time delay activity vs lag - tepco - primavera training ...managing lag utilizing a time delay...
TRANSCRIPT
Managing Lag Utilizing a Time Delay Activity in Primavera P6
1 | P a g e
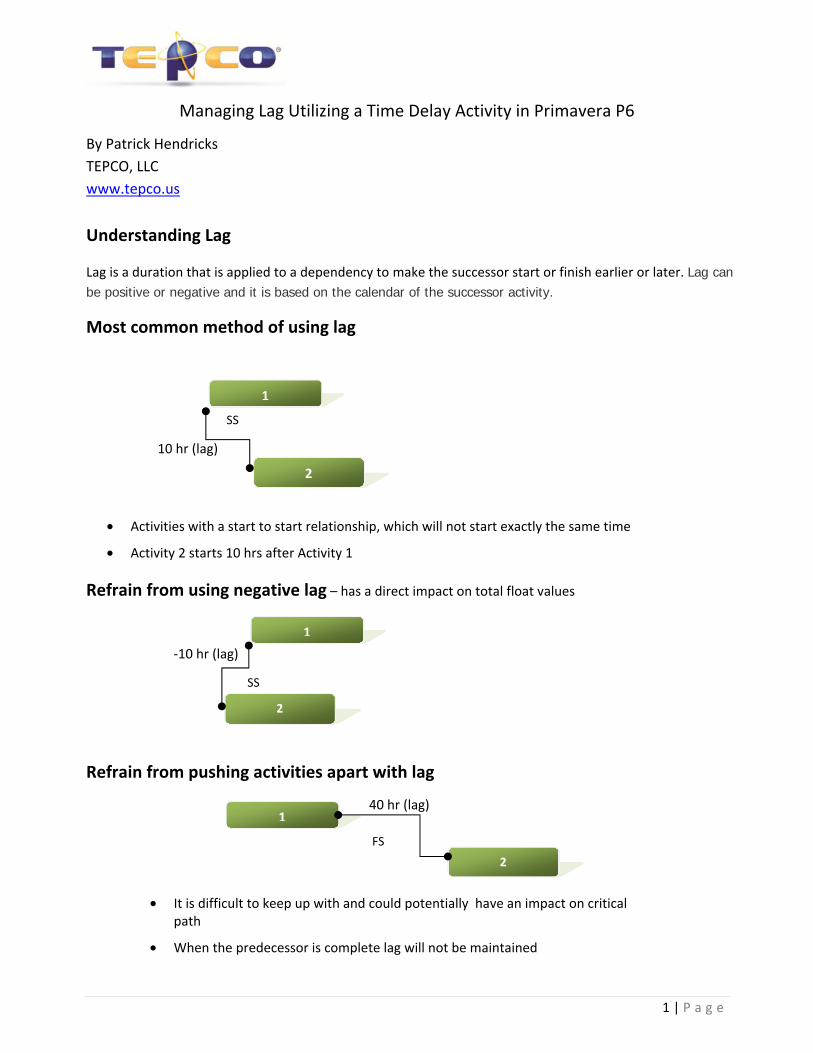
By Patrick Hendricks TEPCO, LLC www.tepco.us Understanding Lag
Lag is a duration that is applied to a dependency to make the successor start or finish earlier or later. Lag can be positive or negative and it is based on the calendar of the successor activity.
Most common method of using lag
Refrain from using negative lag – has a direct impact on total float values
Refrain from pushing activities apart with lag
1
2
• Activities with a start to start relationship, which will not start exactly the same time
• Activity 2 starts 10 hrs after Activity 1
10 hr (lag)
1
2
-10 hr (lag)
SS
SS
1
2FS
40 hr (lag)
• It is difficult to keep up with and could potentially have an impact on critical path
• When the predecessor is complete lag will not be maintained
Managing Lag Utilizing a Time Delay Activity in Primavera P6
2 | P a g e
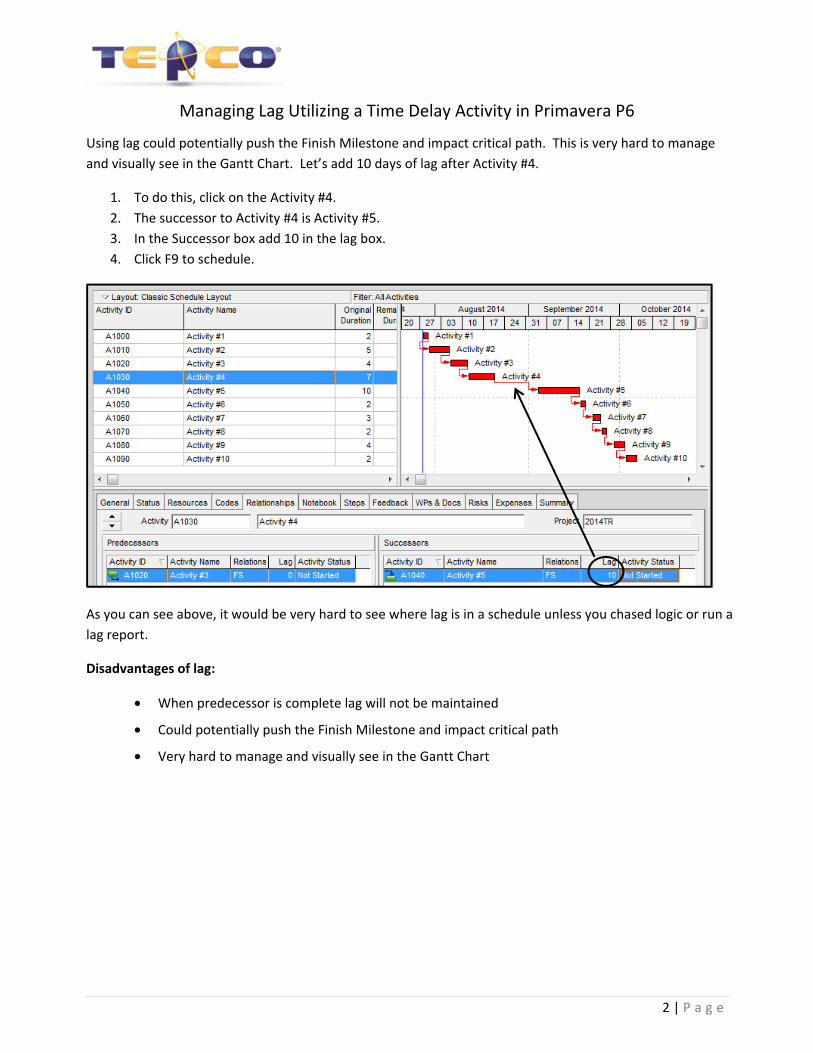
Using lag could potentially push the Finish Milestone and impact critical path. This is very hard to manage and visually see in the Gantt Chart. Let’s add 10 days of lag after Activity #4.
1. To do this, click on the Activity #4. 2. The successor to Activity #4 is Activity #5. 3. In the Successor box add 10 in the lag box. 4. Click F9 to schedule.
As you can see above, it would be very hard to see where lag is in a schedule unless you chased logic or run a lag report.
Disadvantages of lag:
• When predecessor is complete lag will not be maintained
• Could potentially push the Finish Milestone and impact critical path
• Very hard to manage and visually see in the Gantt Chart
Managing Lag Utilizing a Time Delay Activity in Primavera P6
3 | P a g e
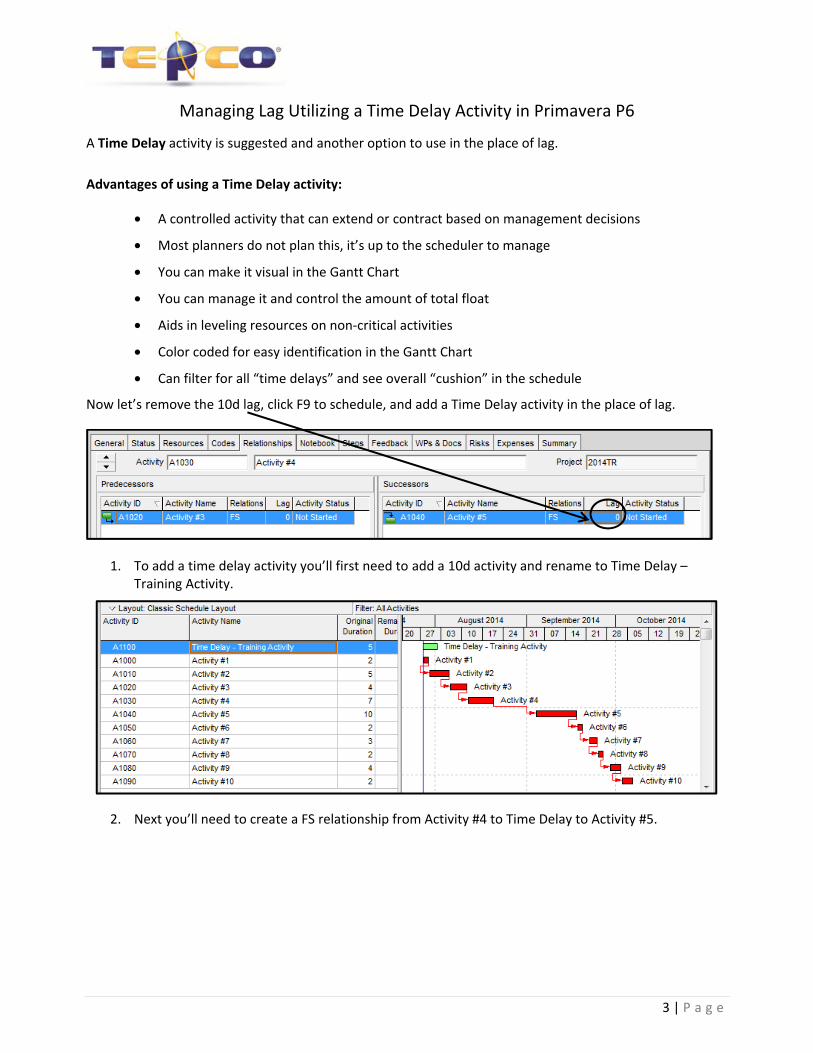
A Time Delay activity is suggested and another option to use in the place of lag. Advantages of using a Time Delay activity:
• A controlled activity that can extend or contract based on management decisions
• Most planners do not plan this, it’s up to the scheduler to manage
• You can make it visual in the Gantt Chart
• You can manage it and control the amount of total float
• Aids in leveling resources on non-critical activities
• Color coded for easy identification in the Gantt Chart
• Can filter for all “time delays” and see overall “cushion” in the schedule
Now let’s remove the 10d lag, click F9 to schedule, and add a Time Delay activity in the place of lag.
1. To add a time delay activity you’ll first need to add a 10d activity and rename to Time Delay – Training Activity.
2. Next you’ll need to create a FS relationship from Activity #4 to Time Delay to Activity #5.
Managing Lag Utilizing a Time Delay Activity in Primavera P6
4 | P a g e
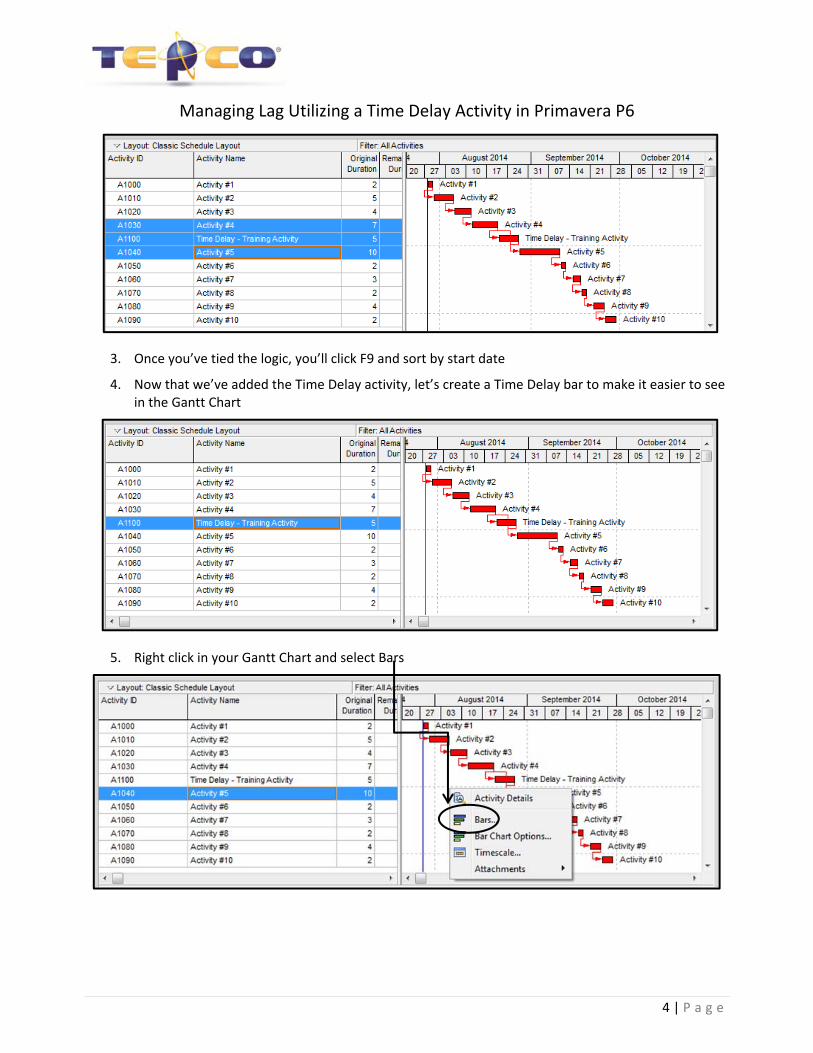
3. Once you’ve tied the logic, you’ll click F9 and sort by start date
4. Now that we’ve added the Time Delay activity, let’s create a Time Delay bar to make it easier to see in the Gantt Chart
5. Right click in your Gantt Chart and select Bars
Managing Lag Utilizing a Time Delay Activity in Primavera P6
5 | P a g e
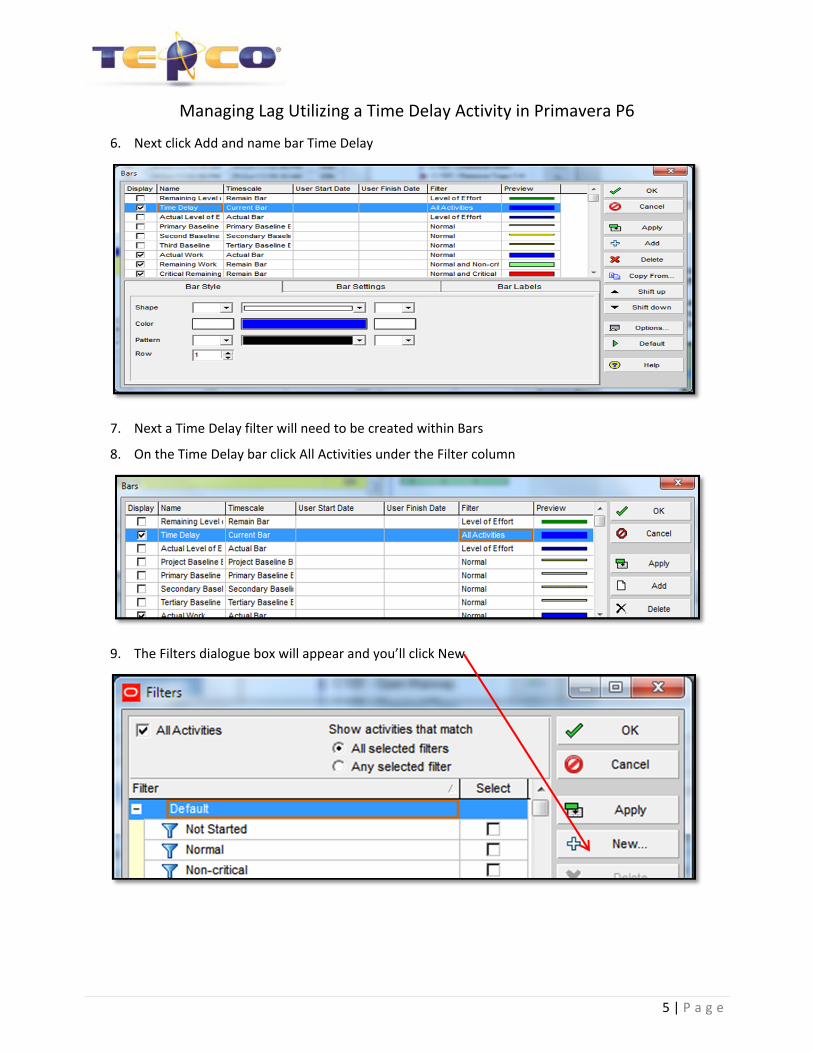
6. Next click Add and name bar Time Delay
7. Next a Time Delay filter will need to be created within Bars
8. On the Time Delay bar click All Activities under the Filter column
9. The Filters dialogue box will appear and you’ll click New
Managing Lag Utilizing a Time Delay Activity in Primavera P6
6 | P a g e
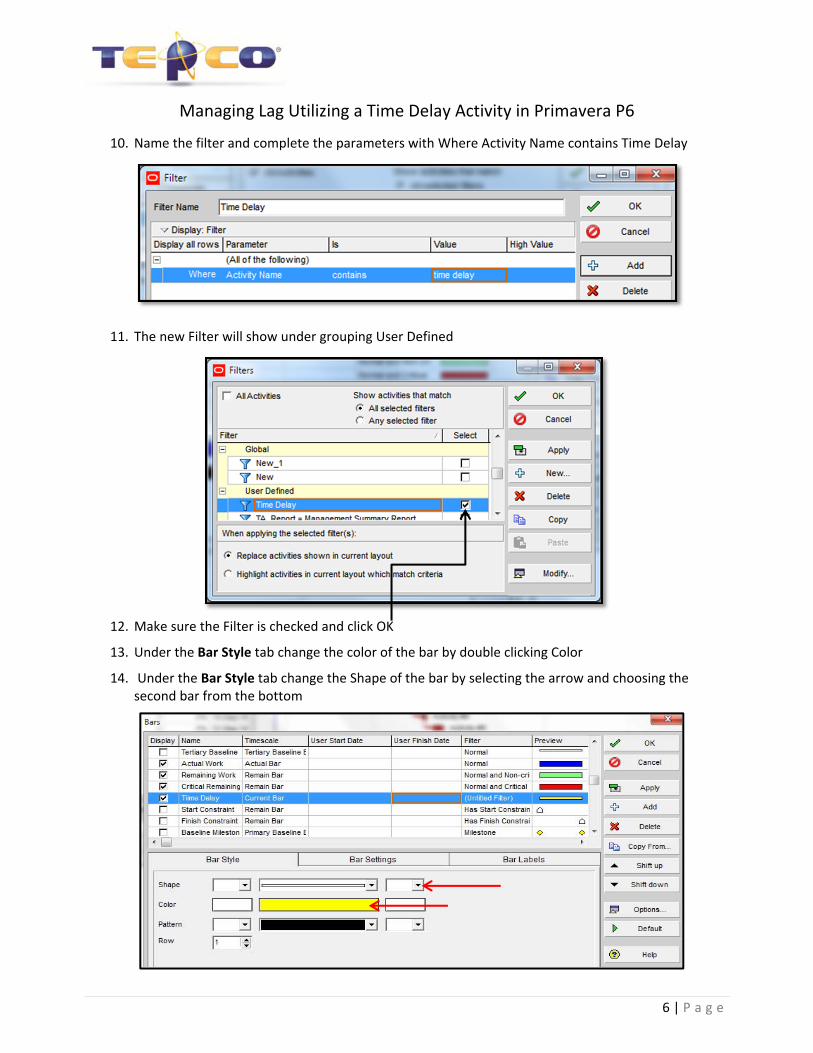
10. Name the filter and complete the parameters with Where Activity Name contains Time Delay
11. The new Filter will show under grouping User Defined
12. Make sure the Filter is checked and click OK
13. Under the Bar Style tab change the color of the bar by double clicking Color
14. Under the Bar Style tab change the Shape of the bar by selecting the arrow and choosing the second bar from the bottom
Managing Lag Utilizing a Time Delay Activity in Primavera P6
7 | P a g e
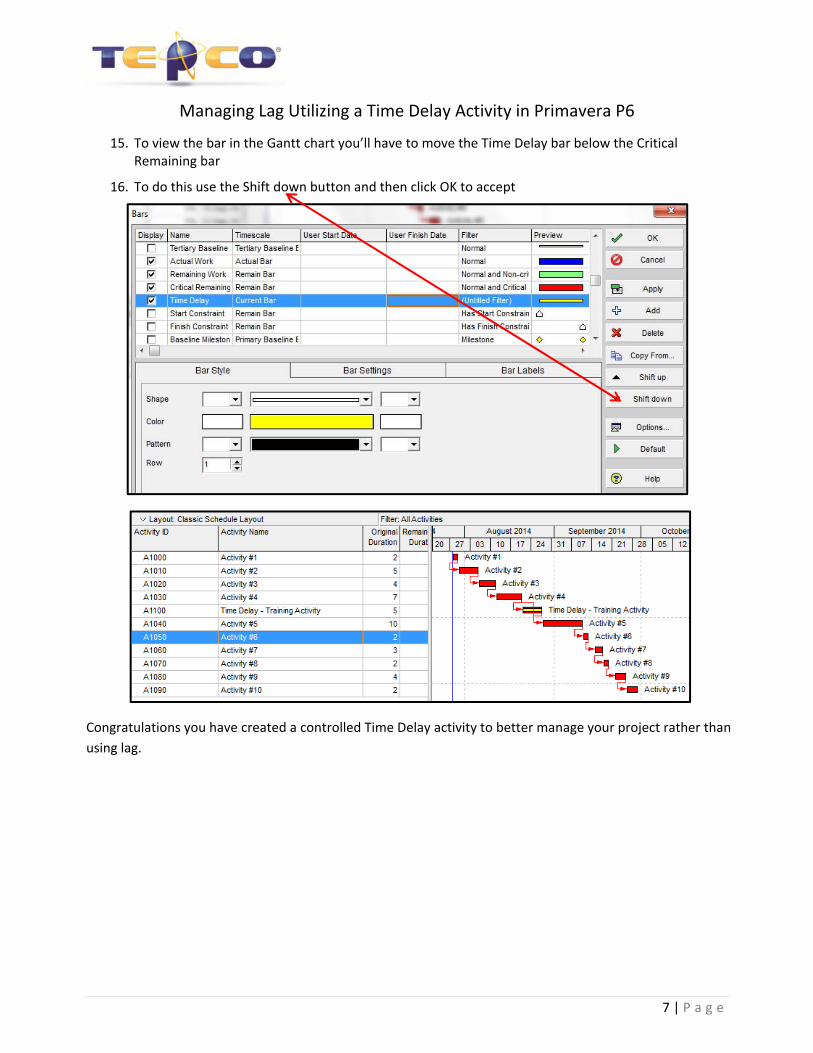
15. To view the bar in the Gantt chart you’ll have to move the Time Delay bar below the Critical Remaining bar
16. To do this use the Shift down button and then click OK to accept
Congratulations you have created a controlled Time Delay activity to better manage your project rather than using lag.