tips, techniques and tools for getting the most out of …...... tips, techniques & tools for...
TRANSCRIPT

www.ceramicartsdaily.org | Copyright © 2011, Ceramic Publications Company | Tips, Techniques & Tools for Getting the Most Out of Your Pottery Wheel | i
ceramic artsdaily.org
tips, techniques and tools for
getting the most out of your pottery wheel
from buying to trimming, tips for the pottery wheel
This special report is brought to you with the support of Skutt Ceramic Products
| Second Edition |
www.ceramicartsdaily.org | Copyright © 2011, Ceramic Publications Company | Tips, Techniques & Tools for Getting the Most Out of Your Pottery Wheel | 1
Pottery Wheels: The What and Why Before You Buy by Bill JonesWhen you decide to buy a pottery wheel, you’ll be pleasantly surprised at all the options. We’ve gathered together some of the advice from seasoned experts Jonathan Kaplan and Steven Branfman to shed a little light on which pottery wheel may be best for you.
Gauges for Wheel Throwing by Bill JonesSooner or later every potter wants to make multiples of a form—a set of bowls, plates, mugs, whatever. Two basic measuring devices for throwing sets on the wheel are the Western pot gauge that measures pots from the outside and the Eastern tombo that measures pots from the inside.
The Basics of Pottery Throwing Ribs by Bill JonesThe best throwing tools around are our fingers but there are just some things they can’t do, and so we have throwing ribs—an essential tool for every potter. Pottery tools like throwing ribs provide an efficient and effective way for potters to remove moisture, control contours, and smooth surfaces. Here’s a look at these tools and where you can find them.
How to Make Custom Pottery Throwing Ribs by Robert BalabanThere are times when you may need a special tool when throwing on the pottery wheel. Robert Balaban solves this problem by making his own tools and here he details how you can do the same.
Throwing on the Pottery Wheel with Templates by William SchranWhile throwing gauges can help you make pots that are the same height and width, templates will help you get the same profile. This technique involves using templates to repeatedly create an even, symmetrical form. These easy to make templates can be used to scrape the clay as it rotates on the wheel to create a smooth, uniform surface.
Faceting on the Pottery Wheel by Hank MurrowFaceting something you’ve thrown on the potter’s wheel is a little tricky, but here’s a technique that’s even trickier. Once you’ve faceted a freshly thrown pot, you can continue throwing the pot from the inside and create a whole new effect with your wheel-thrown work.
Trimming Accessories for the Pottery Wheel by Frank James FisherTrimming the bases of pots on the pottery wheel is another opportunity to bring unity and beauty to your artwork. But different shapes and sizes of work create challenges, and if you throw a lot of large bowls and platters, pots with delicate necks, lids, etc., then you should evaluate these trimming accessories for the potter’s wheel.
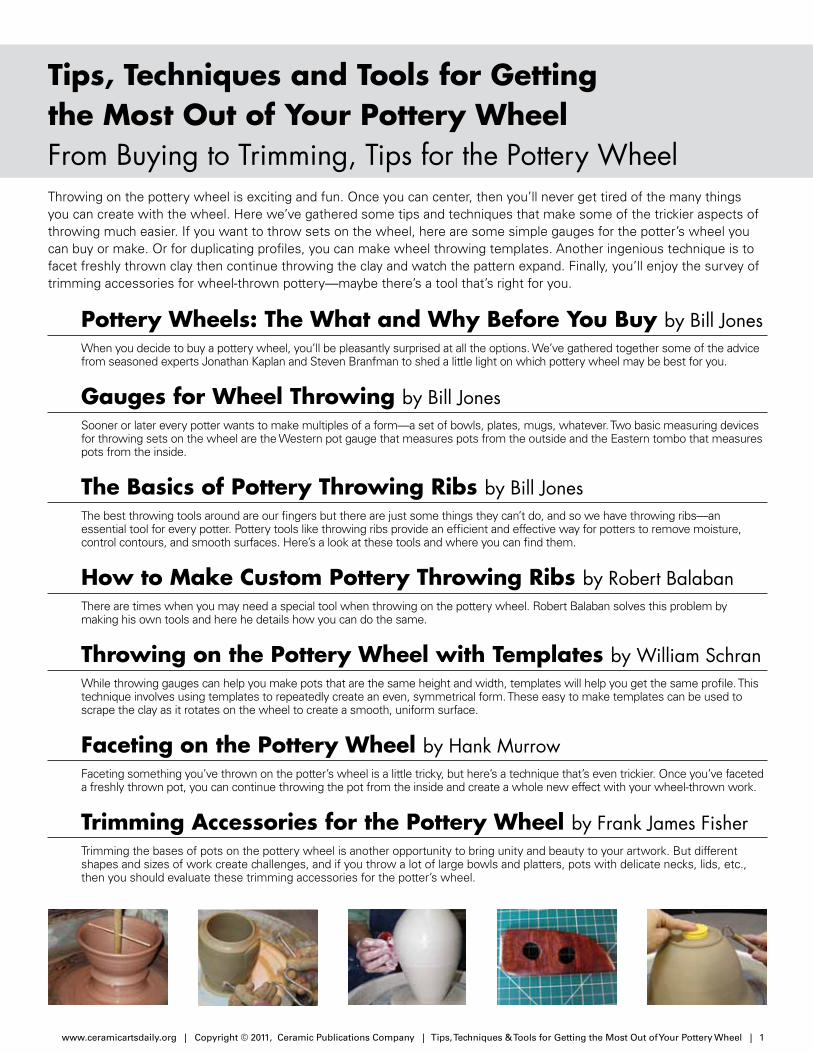
Tips, Techniques and Tools for Getting the Most Out of Your Pottery WheelFrom Buying to Trimming, Tips for the Pottery WheelThrowing on the pottery wheel is exciting and fun. Once you can center, then you’ll never get tired of the many things you can create with the wheel. Here we’ve gathered some tips and techniques that make some of the trickier aspects of throwing much easier. If you want to throw sets on the wheel, here are some simple gauges for the potter’s wheel you can buy or make. Or for duplicating profiles, you can make wheel throwing templates. Another ingenious technique is to facet freshly thrown clay then continue throwing the clay and watch the pattern expand. Finally, you’ll enjoy the survey of trimming accessories for wheel-thrown pottery —maybe there’s a tool that’s right for you.
www.ceramicartsdaily.org | Copyright © 2011, Ceramic Publications Company | Tips, Techniques & Tools for Getting the Most Out of Your Pottery Wheel | 2
•Therearemanytypesofmotorsavailableforpotter’swheelsandtheyareeither
setupforstandardhouseholdalternatingcurrent(AC)orasdirectcurrent(DC).
WhileACmodelsarerelativelyinexpensive,themotorspeedisdifficulttocontrol
becausetheyhavenopermanentmagnets.Althoughitisn’tpossibletosuccessfully
varythespeedofanACmotorelectronically,amechanicalspeedcontrol,suchas
aring-coneorcone-and-disk,canbeusedtovarytheconstantspeed(1725rpm)
ofthistypeofmotor.
•ThehorsepoweronDCelectricmotorscanberatedas“peak”or“continuous
duty.”Lessexpensivepeak-ratedmotorsprovidehorsepoweronlyforshortinter-
vals–notaproblemfortheoccasionalthrower.Continuous-dutymotors,onthe
otherhand,whiletypicallymoreexpensive,canrunfullyloaded24hoursaday
withoutoverheating.Temperatureisthebiggestcauseofserviceproblemsand
motorfailure.Excessiverunningtemperatureseverelydegradesanelectricmotor.
Becauseinsulatedwireisusedtocreatetheelectricalmagneticfieldsthatcause
theshafttospin,moreheatbuildsupinthesewindingsatslowspeeds,andthe
insulationweakensovertime.Oncetheinsulationdegrades,windingfaultsoccur
andthemotoriscompromised.Further,asmotorsoverheat,thebrusheswear
Pottery Wheels: The What and Why
Before You Buyby Bill Jones
If you plan on using the wheel a lot, such as in a pro-duction situation, then you’ll want to look at sturdier professional models. Additionally, if you plan on cen-tering large amounts of clay, then you’ll need to look at wheels with at least ½ hp (horsepower) motors.
In addition to level of use and capacity, you may also want to consider how much space you have, whether you need a portable wheel, if you just need a “starter” wheel, and, of course, what you can afford.
Assess the WheelsSteven Branfman, in his book The Potter’s Profes-sional Handbook, describes the features you need to consider when looking at wheels.
l Power: A wheel’s power in practical terms is a func-tion of hp and torque. What you really want to know is whether you can apply the necessary force to the largest amount of clay you will work with and not have the wheel slow down or stop.
When it comes to buying a wheel there’s no shortage of choices. Ranging in price from a few hundred dollars to nearly $2000, potters wheels are separated
by degrees of capacity, construction, and accessories. While there’s nothing wrong with purchasing the wheel you used as a student, or happen to be using in a com-munity studio, you may be missing out on an oppor-tunity to find the ideal wheel for your needs. If you’ve limited yourself to one or two wheels, you may not know if a different brand or model would be even bet-ter, or whether those models are still in production. To find out which wheel is best for you, you must assess your needs and understand what wheels can offer.
Assess Your NeedsThe two most important things to consider when purchasing a wheel are how often you’ll use it and how much clay you realistically expect to throw at one time.
quickerandthiswearsoutthecommutator.Thelargerthemotor,thegreaterthe
numberofwindingsandthebetter the insulationbetweenthem.Larger-sized
brushesalsoruncooler,whichallowsforincreasedheatdissipationandcooler
operatingmotorsandhencelongermotorlife.Further,high-qualitycontinuous-
ratedmotorshaveabuilt-incoolingfanontheendoftheshafttofurtherextend
thelifeofthemotor.
•Electronic speed controlsusedirectcurrent(DC)motors,andamotorcontroller
changesthehouseholdACtoDC.Onpotterswheels,theytypicallyoperateat90
volts.Whencoupledwithafootpedalusingalinearpotentiometer,thecontroller
allowsarangeofspeedswithpropertorque.
Motor controllersaresolid-stateelectronicdevicesprotectedbyafuseorsmall
pushbuttonre-settablecircuitbreaker.
Therearetwotypesofelectronicmotorspeedcontrollers—SCR(siliconcontrolled
rectification)andPWM(pulsewavemodulation).Whiletherearesubtlediffer-
encesbetweenthesetypes,theyperformthesamefunctionsandareruggedly
constructedtoprovidemanyyearsoftrouble-freeservice.
Horsepower, Motors, and Electronic Controllers
www.ceramicartsdaily.org | Copyright © 2011, Ceramic Publications Company | Tips, Techniques & Tools for Getting the Most Out of Your Pottery Wheel | 3
l Speed: Speed is related to power but is really a different performance issue. Your style of working dictates the speed or RPMs (revolutions per min-ute) of the wheel head you require.
l Control Sensitivity: Your sensitivity to extremely slow speeds and the de-gree of gradual increase as you apply it will dictate any concerns you have in this area.
l Smoothness and Vibration: Again, personal style and expectations will make this more or less of an issue.
l Weight: If you use 30 or more pounds of clay, the weight and sta-bility of the wheel could be an issue. You don’t want the wheel crawling along the floor as you apply pressure to the clay.
l Wheel Head Diameter: Although you can use bats of almost any size, the diameter of the wheel head may be a concern. The smallest head is 12 inches, with heads going as large as 16 inches.
l Miscellaneous Features: Splash pan, integrated seat, attached worktable, adjustable height, choice of rotation (reversing switch), construction ma-terials and finishes, are all options you need to be aware of and assess as to their importance.
Back Problems?For potters prone to back problems, standing at the wheel to throw may be the answer. Most wheels can be purchased with optional leg extend-ers. Durable, stable, and easily adjust-able leg extensions allow you to throw
standing up, perhaps, the best thing many potters can do for their health.
RecommendationsIf there is a pottery supplier nearby with a selection of equipment, they‘re your best bet for answering your ques-tions and trying out wheels. If there’s not a nearby supplier, visit local pot-ters, schools, and studios to see the equipment they have. Ask questions about the operation, maintenance, and repair records of the equipment that interests you. Ask to try the wheel and be sure to bring your own clay! Why? It’s both courteous to the studio and sensible to test the wheel under as close to realistic conditions as possible.
The Internet makes it possible to shop around and find bargins on some wheels. Your local supplier not only service the wheels they sell, but they may also match an online price or order a particular model if they don’t have it in stock. Remember also that if you purchase a wheel that requires shipping, make sure you nail down all the costs for getting the wheel to its final destination.
A new potter’s wheel that fits your needs is a long-term investment you’ll certainly enjoy for many years to come.
This article was excerpted from Steven Bran-fman’s The Potter’s Professional Handbook and from Jonathan Kaplan’s “As the Wheel Turns” reprinted from Pottery Making Illustrated.Speed: Speed is related to power but is really a different performance issue. Your style of work-ing dictates the speed or RPMs (revolutions per minute) of the wheel head you require.
www.ceramicartsdaily.org | Copyright © 2011, Ceramic Publications Company | Tips, Techniques & Tools for Getting the Most Out of Your Pottery Wheel | 4
More than likely you’ll get to the point where you’d like to throw multiples of an object. Getting work to look the same when mak-ing more than one of an item takes a bit of
practice because it’s not as easy as it looks! To help assure you’ll get some sort of consistency on your next set of mugs or bowls, you need a throwing gauge—a way of keeping track of the measurements from the first piece to the last. There are several options for throwing gauges based on designs from both eastern and western cultures, as well as ad hoc solutions that use items around your studio.
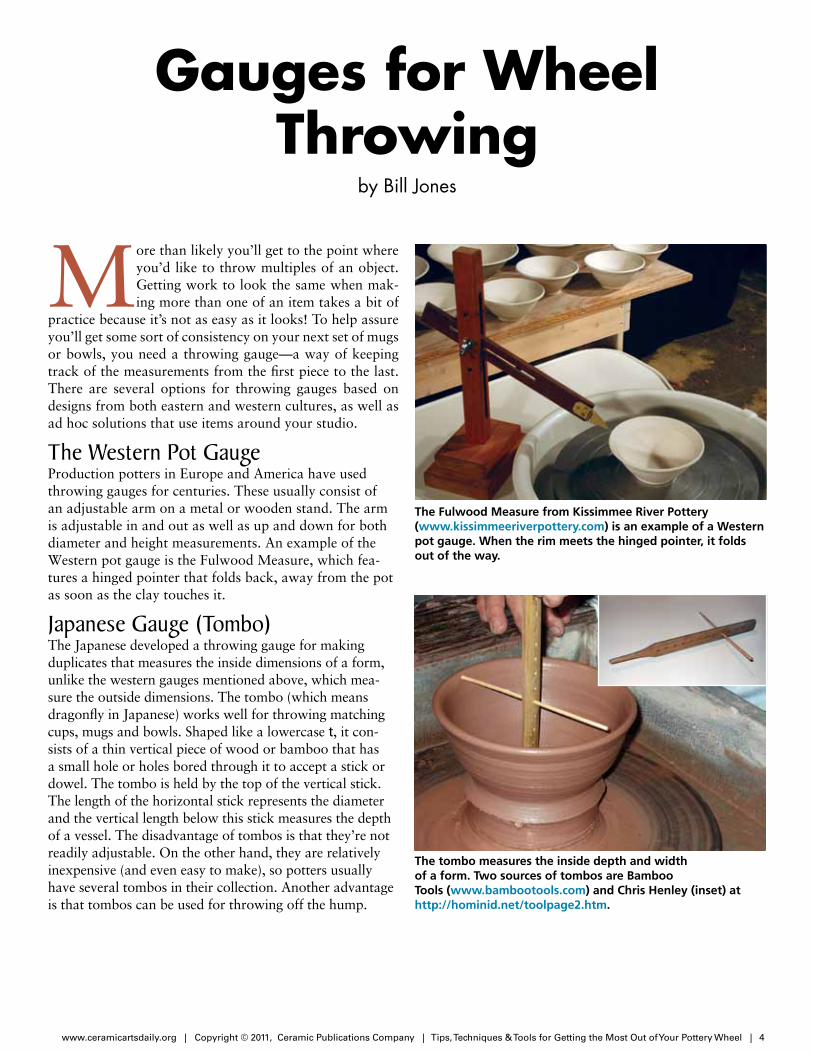
The Western Pot GaugeProduction potters in Europe and America have used throwing gauges for centuries. These usually consist of an adjustable arm on a metal or wooden stand. The arm is adjustable in and out as well as up and down for both diameter and height measurements. An example of the Western pot gauge is the Fulwood Measure, which fea-tures a hinged pointer that folds back, away from the pot as soon as the clay touches it.
Japanese Gauge (Tombo)The Japanese developed a throwing gauge for making duplicates that measures the inside dimensions of a form, unlike the western gauges mentioned above, which mea-sure the outside dimensions. The tombo (which means dragonfly in Japanese) works well for throwing matching cups, mugs and bowls. Shaped like a lowercase t, it con-sists of a thin vertical piece of wood or bamboo that has a small hole or holes bored through it to accept a stick or dowel. The tombo is held by the top of the vertical stick. The length of the horizontal stick represents the diameter and the vertical length below this stick measures the depth of a vessel. The disadvantage of tombos is that they’re not readily adjustable. On the other hand, they are relatively inexpensive (and even easy to make), so potters usually have several tombos in their collection. Another advantage is that tombos can be used for throwing off the hump.
Gauges for Wheel Throwing
by Bill Jones
The Fulwood Measure from Kissimmee River Pottery (www.kissimmeeriverpottery.com) is an example of a Western pot gauge. When the rim meets the hinged pointer, it folds out of the way.
The tombo measures the inside depth and width of a form. Two sources of tombos are Bamboo Tools (www.bambootools.com) and Chris Henley (inset) at http://hominid.net/toolpage2.htm.
www.ceramicartsdaily.org | Copyright © 2011, Ceramic Publications Company | Tips, Techniques & Tools for Getting the Most Out of Your Pottery Wheel | 5
The Basics of Pottery Throwing Ribs
by Bill Jones
Even though our fingers serve as our prima-ry throwing tools, there are times when a throwing rib does a better job. Ribs are a potter’s best friend when it comes to defin-
ing profiles, wringing out water or adding decorative touches. In the beginning, actual animal ribs were used for this purpose—and hence the name—but now contemporary ribs are commonly made from wood, metal, and plastic.
UsesThere are many functions that ribs perform, which is one of the reasons they’re so important. The most common uses for ribs are for manipulating profiles and removing throwing marks while compressing the clay and removing excess water. When throwing porcelain, it’s often best to use a rib on one side of a pot and a sponge on the other, or even to throw with two ribs. The rib provides support, especially when making large voluminous forms.
Because of the variety of shapes available, you can find a rib to suit any profile you wish to make. Using a rib for the inside profile of a bowl can assure a continuous line from the bottom through to the rim. And using the same profile repeatedly helps in mak-ing multiples for sets. Specialized ribs with notched profiles can also be used on the exteriors of pots to add a decorative touch or even shape and refine the foot and rim.
When throwing large forms, too much water in the clay is a problem once you have the preliminary shape completed. How many times have you tried to get that final shape only to have the form col-lapse? To prevent this, remove all the slurry water using a sharp-edged metal rib to ‘wring’ the excess water out. This increases your chances of success and prevents distorting or collapsing the form. It also provides a way to get sweeping curves on bowls and platters.
TipsGetting the most out of using a rib is simple. While you can generally get by without using a rib for small bowls, medium to larger bowls really benefit from this tool. The best way to use the rib is to have the wheel rotating at medium to low speed (the big-
Bamboo Toolswww.bambootools.comBamboo tools have been used in Asia for centuries. Du-rable, flexible, and lightweight, bamboo can be shaped with a sharp knife and will hold an edge that stands up to heavy use. Bamboo Tools offers a variety of curved, straight and profile ribs.
Chinese Clay Art USAwww.chineseclayart.comChinese Clay Art produces a set of five wooden ribs with different profiles and a set of three different sizes of rub-ber ribs. For the budget conscious or those looking to provide supplies in a classroom setting, these provide a perfect solution.
Kemper Tools www.kempertools.comKemper makes eight wooden rib profiles that include the basic shapes required for opening, shaping, curving, smoothing, and trimming. Their flexible metal ribs are made for scraping, and a collection of rigid metal ribs can also be used as squeegees to remove excess water from pottery shapes.
MKM Pottery Toolswww.mkmpotterytools.comMKM makes a variety of ribs out of wood, steel, and coconut. In both the wood and steel series, there are 22 different profiles of varying sizes, each with a specific purpose or combination of uses. Their coconut shell ribs vary in size, shape, and thickness but are durable and comfortable to hold.
Mudtoolswww.mudtools.comDeveloped by Michael Sherrill, Mudtools are made from a silicone plastic material in six shapes and in four differ-ent hardnesses from very soft to very firm. The softest ribs can be used even on rims like a chamois and the firmest are nearly as firm as wood. Mudtools also pro-duces six stainless steel ribs in an assortment of profiles.
Suppliers
www.ceramicartsdaily.org | Copyright © 2011, Ceramic Publications Company | Tips, Techniques & Tools for Getting the Most Out of Your Pottery Wheel | 6
ger the piece, the lower the speed), work the rib up from the bottom of the bowl, curving the clay outward a little with each pass from the bottom to the top. With your right hand, always follow the position of the rib with gentle sponge or finger pressure on the outside of the bowl, supporting the clay. Continue with successive passes until the bowl takes the shape you want.
Remember, when using a rib to shape a form, always hold it at an angle to the surface so it slides smoothly over the clay rather than scraping or cutting into it. After trimming, you can use ribs to eliminate trim tool marks, but you’ll need to be careful to hold the rib at an angle to prevent chatter-ing and grog trails.
Metal ribs, while suitable for throwing, are commonly used in handbuilding for their ability to scrape clay, compress seams, and make sharp lines and cuts.
Getting SpecificAfter the first few weeks in pottery, you’ll want to look at having more ribs on hand than what came in the basic pottery tool kit you started with. If cost is a factor, you can find reasonably priced wood, rubber, and metal ribs that can serve your needs.
As you advance, you’ll find that spe-cialty ribs for bowl interiors (from small to large and wide to steep), for making large or flanged plates and platters, defining corners, creating decorative profiles, and those designed to remove slip or trimming tool marks will make your work easier and expand your repertoire of forms.
A mixture of rigid and flexible ribs as well an assortment of metal, wood, and plastic ribs can also accommodate most any situation in both throwing and hand-building. Luckily, even the most expensive ribs are affordable and will last a lifetime (or until lost or borrowed).
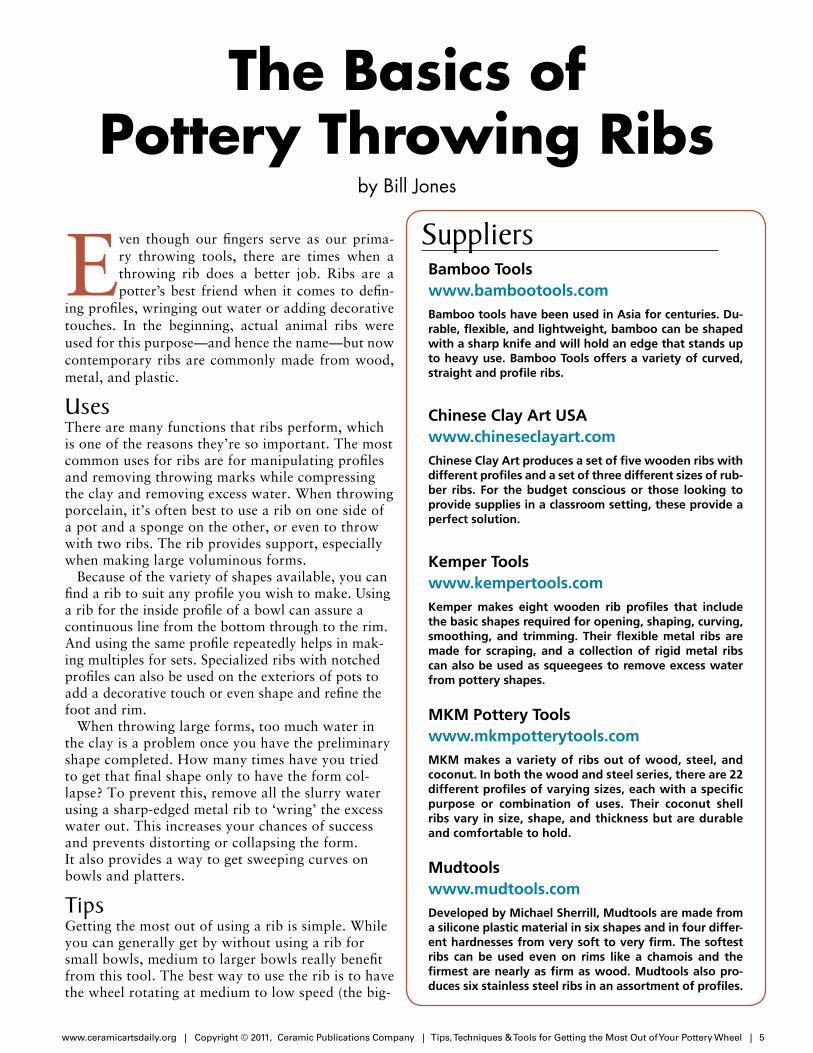
Use two rubber ribs to help in the final thinning, or prior to collaring the neck.
1
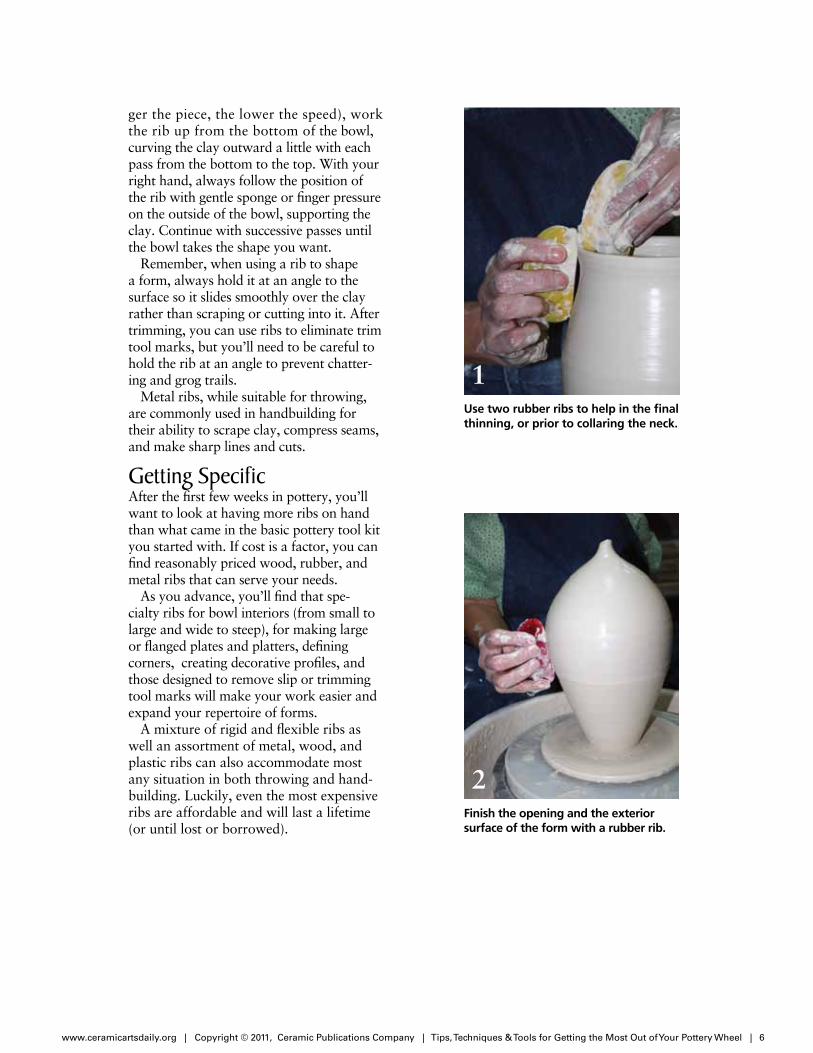
Finish the opening and the exterior surface of the form with a rubber rib.
2
www.ceramicartsdaily.org | Copyright © 2011, Ceramic Publications Company | Tips, Techniques & Tools for Getting the Most Out of Your Pottery Wheel | 7
How to Make Custom Pottery Throwing Ribs
by Robert Balaban
I’ve always looked for ways to improve the quality of my art by fashioning customized hand tools to fa-cilitate the shaping my vessels. In these efforts, I’ve developed a simple system of constructing hardwood
ribs for a variety of throwing purposes. This permits cre-ativity to extend from the clay to the tools. Many studio visitors and students have enjoyed using or creating these tools and often leave the shop with a couple of customized ribs that make a lasting impression on their craft. Custom hardwood ribs are easy to create, and can be constructed in under one hour using skills that any potter can master.
Choosing the Best WoodI’ve experimented with several types of wood, from the most exotic (mpingo, purple heart, bocote, and coco-bolo), to mahogany and cherry, coming my way from a woodworker’s scrap pile or from my own backyard. Maple, osage orange, black locust, and even mountain laurel also work well. Red or white oak and poplar are hard to use because they swell when wet and typi-cally have large growth rings that make a consistent edge difficult to achieve. Usually any dense hardwood with resistance to water damage is appropriate. The best, cheapest, and locally available wood (not from the fragile rain forest) is American black cherry. The 5/16-inch thick stock is a good starting material. Slightly thicker or thinner material can be used depending on taste or task. If you buy wood, a couple of dollars of 5/16-inch wood can generate 10 to 20 ribs.
Generating & Transferring DesignsCreating different ribs for novel shapes or tasks can be done using paper, pencil, and a French curve or other guide or
pattern to help generate that perfect curve or angle. You can also use computer drawing programs, draw free hand or simply copy more familiar rib designs and modify them to your needs or hands. I use a versatile French curve-style rib for working on the inside of vases and other forms. The first step in making this type of rib is to trace the template onto paper and secure it to the piece of wood.
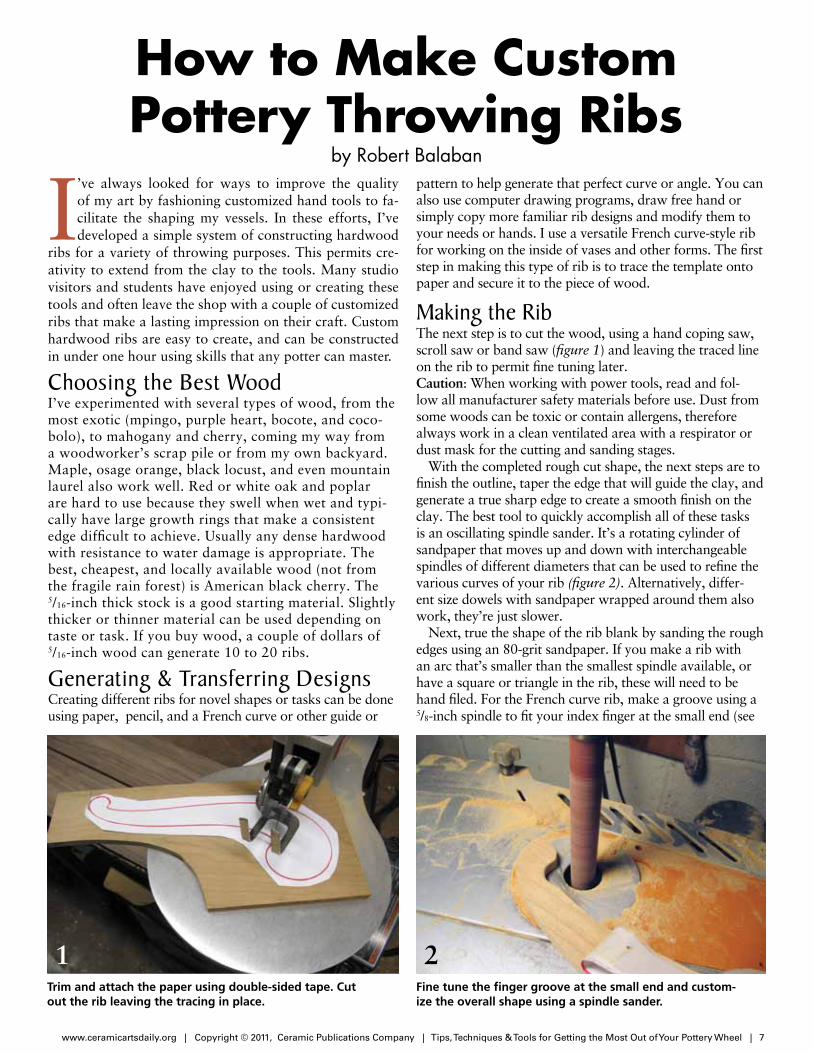
Making the RibThe next step is to cut the wood, using a hand coping saw, scroll saw or band saw (figure 1) and leaving the traced line on the rib to permit fine tuning later. Caution: When working with power tools, read and fol-low all manufacturer safety materials before use. Dust from some woods can be toxic or contain allergens, therefore always work in a clean ventilated area with a respirator or dust mask for the cutting and sanding stages.
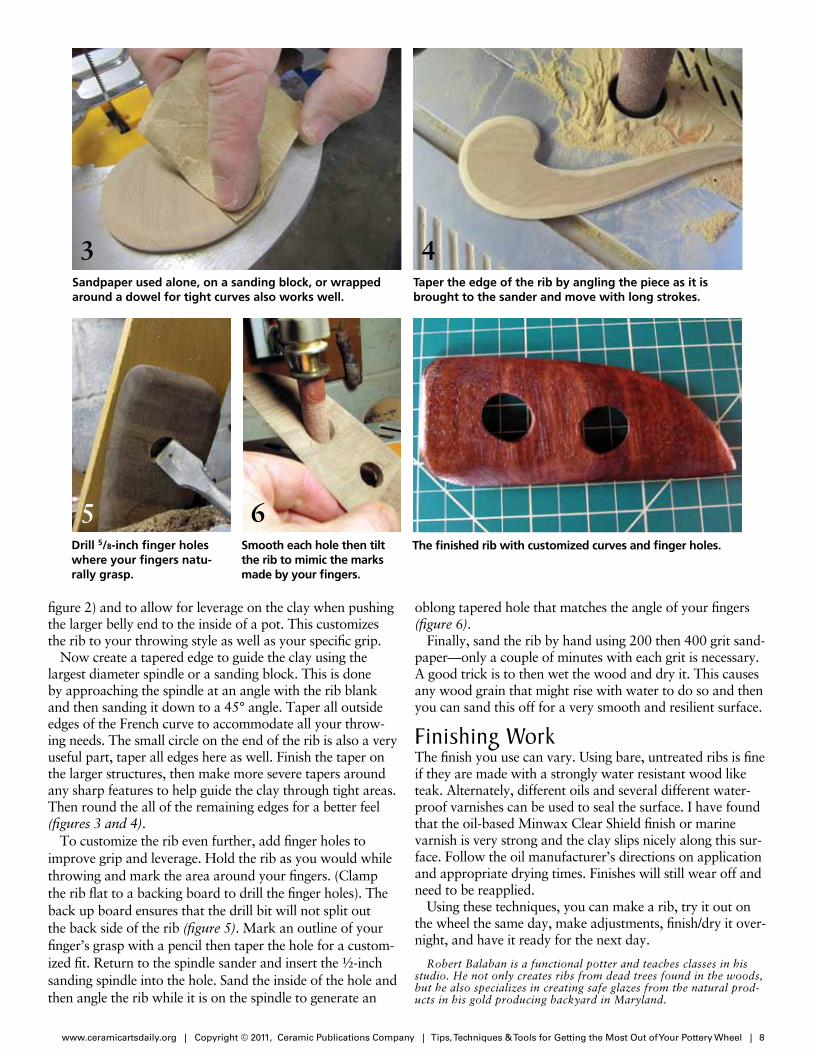
With the completed rough cut shape, the next steps are to finish the outline, taper the edge that will guide the clay, and generate a true sharp edge to create a smooth finish on the clay. The best tool to quickly accomplish all of these tasks is an oscillating spindle sander. It’s a rotating cylinder of sandpaper that moves up and down with interchangeable spindles of different diameters that can be used to refine the various curves of your rib (figure 2). Alternatively, differ-ent size dowels with sandpaper wrapped around them also work, they’re just slower.
Next, true the shape of the rib blank by sanding the rough edges using an 80-grit sandpaper. If you make a rib with an arc that’s smaller than the smallest spindle available, or have a square or triangle in the rib, these will need to be hand filed. For the French curve rib, make a groove using a 5/8-inch spindle to fit your index finger at the small end (see
Trim and attach the paper using double-sided tape. Cut out the rib leaving the tracing in place.
Fine tune the finger groove at the small end and custom-ize the overall shape using a spindle sander.
1 2
www.ceramicartsdaily.org | Copyright © 2011, Ceramic Publications Company | Tips, Techniques & Tools for Getting the Most Out of Your Pottery Wheel | 8
Smooth each hole then tilt the rib to mimic the marks made by your fingers.
Sandpaper used alone, on a sanding block, or wrapped around a dowel for tight curves also works well.
Taper the edge of the rib by angling the piece as it is brought to the sander and move with long strokes.
Drill 5/8-inch finger holes where your fingers natu-rally grasp.
3 4
5 6The finished rib with customized curves and finger holes.
figure 2) and to allow for leverage on the clay when pushing the larger belly end to the inside of a pot. This customizes the rib to your throwing style as well as your specific grip.
Now create a tapered edge to guide the clay using the largest diameter spindle or a sanding block. This is done by approaching the spindle at an angle with the rib blank and then sanding it down to a 45° angle. Taper all outside edges of the French curve to accommodate all your throw-ing needs. The small circle on the end of the rib is also a very useful part, taper all edges here as well. Finish the taper on the larger structures, then make more severe tapers around any sharp features to help guide the clay through tight areas. Then round the all of the remaining edges for a better feel (figures 3 and 4).
To customize the rib even further, add finger holes to improve grip and leverage. Hold the rib as you would while throwing and mark the area around your fingers. (Clamp the rib flat to a backing board to drill the finger holes). The back up board ensures that the drill bit will not split out the back side of the rib (figure 5). Mark an outline of your finger’s grasp with a pencil then taper the hole for a custom-ized fit. Return to the spindle sander and insert the ½-inch sanding spindle into the hole. Sand the inside of the hole and then angle the rib while it is on the spindle to generate an
oblong tapered hole that matches the angle of your fingers (figure 6).
Finally, sand the rib by hand using 200 then 400 grit sand-paper—only a couple of minutes with each grit is necessary. A good trick is to then wet the wood and dry it. This causes any wood grain that might rise with water to do so and then you can sand this off for a very smooth and resilient surface.
Finishing WorkThe finish you use can vary. Using bare, untreated ribs is fine if they are made with a strongly water resistant wood like teak. Alternately, different oils and several different water-proof varnishes can be used to seal the surface. I have found that the oil-based Minwax Clear Shield finish or marine varnish is very strong and the clay slips nicely along this sur-face. Follow the oil manufacturer’s directions on application and appropriate drying times. Finishes will still wear off and need to be reapplied.
Using these techniques, you can make a rib, try it out on the wheel the same day, make adjustments, finish/dry it over-night, and have it ready for the next day.
Robert Balaban is a functional potter and teaches classes in his studio. He not only creates ribs from dead trees found in the woods, but he also specializes in creating safe glazes from the natural prod-ucts in his gold producing backyard in Maryland.
www.ceramicartsdaily.org | Copyright © 2011, Ceramic Publications Company | Tips, Techniques & Tools for Getting the Most Out of Your Pottery Wheel | 9
Throwing on the Pottery Wheel with Templates
by William Schran
This technique involves us-ing templates to repeatedly create an even, symmetri-cal form. In the coil-build-
ing exercise, you position the tem-plate next to the pot as coils are added, making certain the pot con-forms to the profile of the template. The template is then used as a rib to scrape the surface as it’s rotated, cre-ating a smooth, uniform surface.
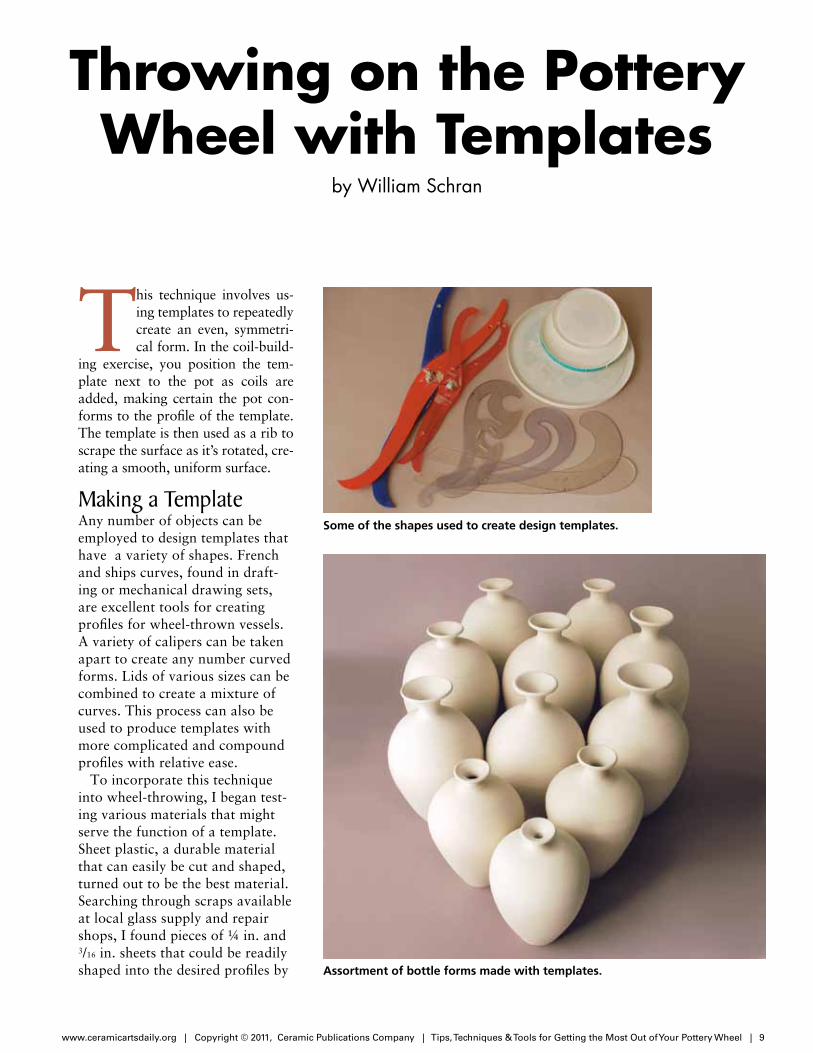
Making a TemplateAny number of objects can be employed to design templates that have a variety of shapes. French and ships curves, found in draft-ing or mechanical drawing sets, are excellent tools for creating profiles for wheel-thrown vessels. A variety of calipers can be taken apart to create any number curved forms. Lids of various sizes can be combined to create a mixture of curves. This process can also be used to produce templates with more complicated and compound profiles with relative ease.
To incorporate this technique into wheel-throwing, I began test-ing various materials that might serve the function of a template. Sheet plastic, a durable material that can easily be cut and shaped, turned out to be the best material. Searching through scraps available at local glass supply and repair shops, I found pieces of ¼ in. and 3/16 in. sheets that could be readily shaped into the desired profiles by Assortment of bottle forms made with templates.
Some of the shapes used to create design templates.

www.ceramicartsdaily.org | Copyright © 2011, Ceramic Publications Company | Tips, Techniques & Tools for Getting the Most Out of Your Pottery Wheel | 10
Template shapes used to throw bottle forms. Templates used to throw cups.
cutting them with a power saw and handsaw. The edges can then be smoothed with fine sandpaper.
Creating the FormTo use a template, as in the wheel-throwing project for the set of cups, prepare several balls of clay weighing between ¾–1 lb. each. Throw a basic wide cylinder. Check the interior diameter, height and width of this basic form with calipers.
Tip: Make a template for the basic cylinder form as well as the finished piece. The first template, showing the right width and shape of the ideal starting cylinder, can help you get the right basic shape.
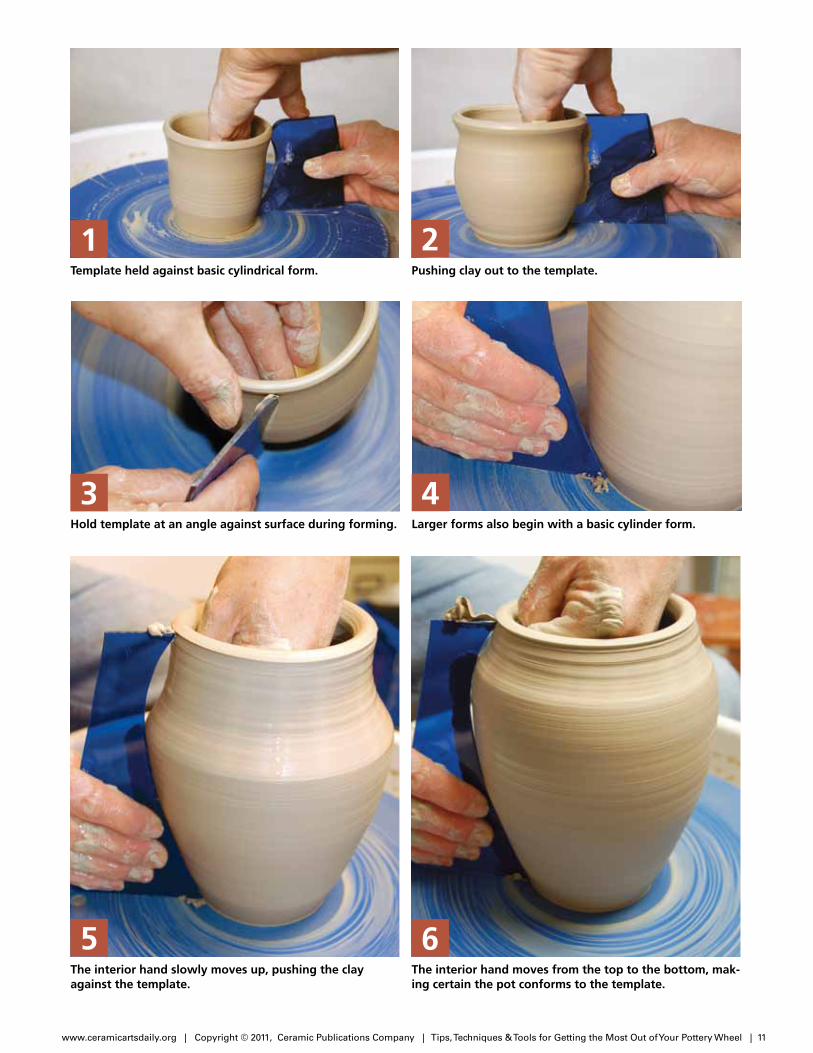
Once you have your cylinder ready, lubricate the interior of the pot, but do not lubricate the outside. Avoiding excess water results in a stronger form that can better withstand manipulation and alteration when us-ing the template. Position the bottom of the template so that it’s just touching the bottom of the pot and rests on the wheel head. The template should contact the wheel but should not be pressed against it. Hold the template at approximately a 45° angle, abutting the rotating clay, such that the clay moves away from the edge of the template. The template should not be held at a 90° angle to the pot as this may lead to inadvertently shifting the template into the movement of the clay.
The fingers of the interior hand slowly move up, push-ing the clay out to the curve of the template. As the pot widens, the hand must move up along the interior of the form more slowly so that it remains symmetrical. After reaching the top, the profile of the pot and template should be compared. If the pot does not match the tem-plate, move the fingers of the interior hand down from the top to the bottom, pushing out where necessary, to conform to the profile of the template. This is often nec-essary for shapes with wider diameters. Refine the rim with a sponge or chamois and the cup is complete.
Large or Complex FormsTemplates are also useful in creating larger pots, par-ticularly bottle shapes. The profile template provides a method to quickly create multiples of the same form, but also the opportunity to explore changes to certain areas, such as the neck and rim. The process of working with larger forms follows the same steps as you would for cups, except the neck and rim are made without the template, after the basic shape has been defined.
To get started, make another cylindrical shaped pot, leaving the top portions of the wall, including the rim, thicker than the rest of the pot. Position the template and push the clay out to conform to the shape, moving fingers on the interior up and down as necessary. After creating the desired curve, pull up the upper portion of the wall to thin it out and narrow it in using a collaring movement. Note: It is very important to continue mov-ing your hands up while collaring in to maintain a curve or arch in the shape of the wall. A wall that becomes too horizontal or flat during the collaring and thinning process may be pulled down by gravity and collapse. In order to collar in the pot, use the middle fingers and thumbs to constrict the neck. As you create the neck, pressing down on the rim with the first finger of the right hand helps to maintain a level top.
Use a flexible rib after each collaring process to refine the shape and maintain the desired curve. Using the rib also removes excess water and compresses the clay. After narrowing the diameter of the pot, the wall has been thickened and can now be pulled up thinner. As the top becomes too narrow to insert a sponge to remove lu-bricating water from the interior, switch to using slurry to lubricate the clay instead. This allows your fingers and tools to continue shaping the clay without building up excess torque that might twist or tear the clay wall. Using slurry on the exterior, instead of water, provides a stronger clay wall.
www.ceramicartsdaily.org | Copyright © 2011, Ceramic Publications Company | Tips, Techniques & Tools for Getting the Most Out of Your Pottery Wheel | 11
Template held against basic cylindrical form. Pushing clay out to the template.
Hold template at an angle against surface during forming. Larger forms also begin with a basic cylinder form.
The interior hand slowly moves up, pushing the clay against the template.
The interior hand moves from the top to the bottom, mak-ing certain the pot conforms to the template.
1 2
5 6
3 4
www.ceramicartsdaily.org | Copyright © 2011, Ceramic Publications Company | Tips, Techniques & Tools for Getting the Most Out of Your Pottery Wheel | 12
Faceting on the Potter’s Wheel
by Hank Murrow
Faceting a pot—slicing clay from the form using a fettling knife, wire tool, or sometimes a Surform tool—is usually done at the leather-hard stage. Several years ago I saw Joe Bennion facet bowls
while they were still wet—just after the initial form was created—then continue to throw to create a stretched facet. Through experimentation, I created my own ver-sion of this process, as well as a wire tool with inter-changeable wires to achieve different surface effects. Here’s the method I use.
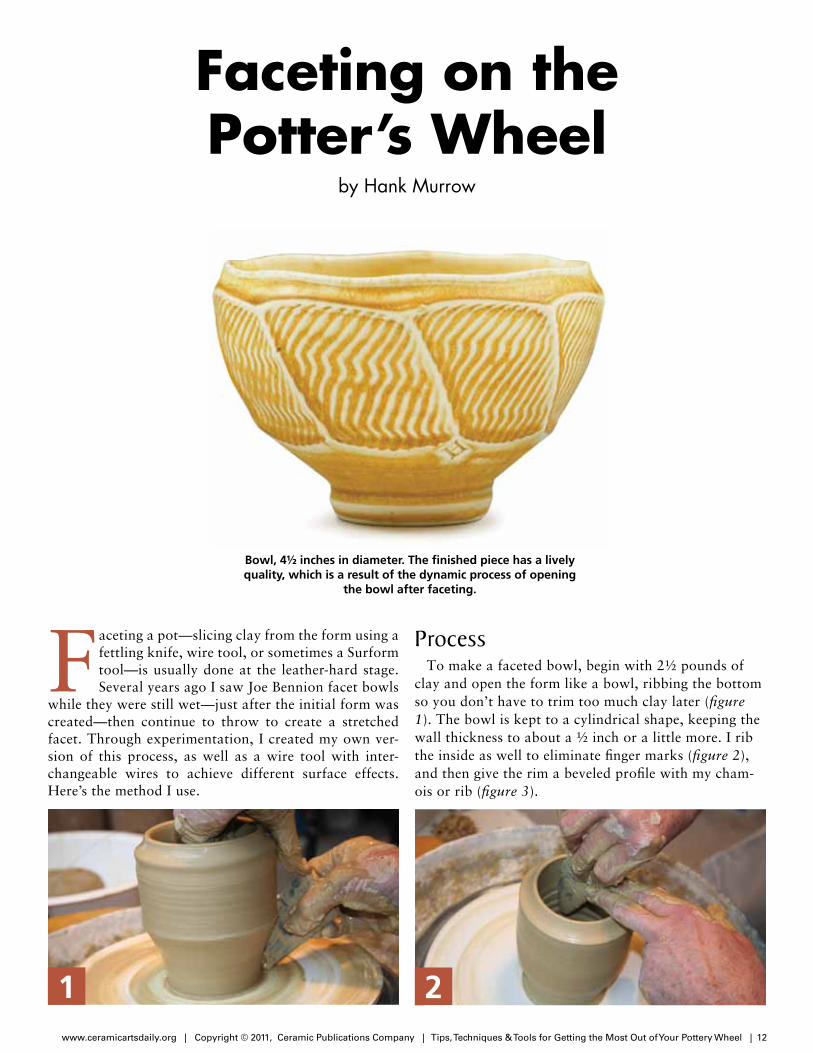
Bowl, 4½ inches in diameter. The finished piece has a lively quality, which is a result of the dynamic process of opening
the bowl after faceting.
1 2
ProcessTo make a faceted bowl, begin with 2½ pounds of
clay and open the form like a bowl, ribbing the bottom so you don’t have to trim too much clay later (figure 1). The bowl is kept to a cylindrical shape, keeping the wall thickness to about a ½ inch or a little more. I rib the inside as well to eliminate finger marks (figure 2), and then give the rim a beveled profile with my cham-ois or rib (figure 3).
www.ceramicartsdaily.org | Copyright © 2011, Ceramic Publications Company | Tips, Techniques & Tools for Getting the Most Out of Your Pottery Wheel | 13
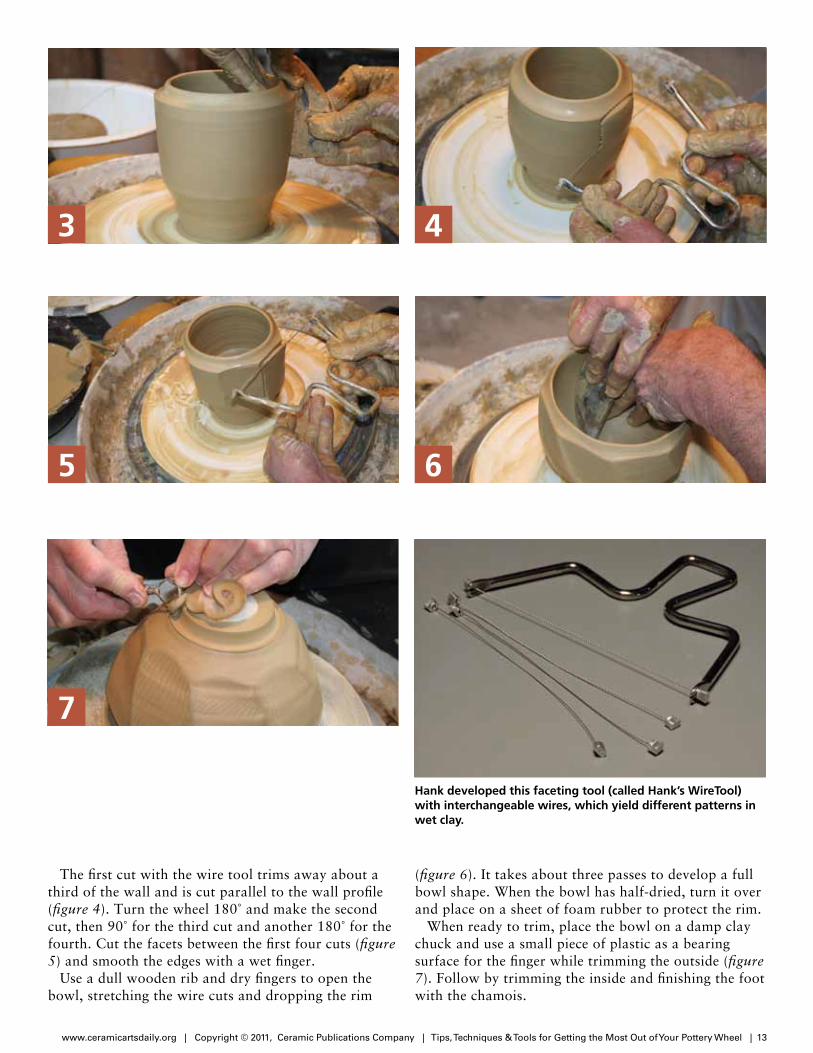
Hank developed this faceting tool (called Hank’s WireTool) with interchangeable wires, which yield different patterns in wet clay.
5 6
7
3 4
The first cut with the wire tool trims away about a third of the wall and is cut parallel to the wall profile (figure 4). Turn the wheel 180˚ and make the second cut, then 90˚ for the third cut and another 180˚ for the fourth. Cut the facets between the first four cuts (figure 5) and smooth the edges with a wet finger.
Use a dull wooden rib and dry fingers to open the bowl, stretching the wire cuts and dropping the rim
(figure 6). It takes about three passes to develop a full bowl shape. When the bowl has half-dried, turn it over and place on a sheet of foam rubber to protect the rim.
When ready to trim, place the bowl on a damp clay chuck and use a small piece of plastic as a bearing surface for the finger while trimming the outside (figure 7). Follow by trimming the inside and finishing the foot with the chamois.
www.ceramicartsdaily.org | Copyright © 2011, Ceramic Publications Company | Tips, Techniques & Tools for Getting the Most Out of Your Pottery Wheel | 14
Trimming Accessories for the Pottery Wheel
by Frank James Fisher
Trimming the bases of pots is another opportunity to bring unity and beauty to your artwork. But different shapes and sizes of work create chal-lenges, and apparently I wasn’t the only potter
who longed for an easier process. Innovations have shown up in the studio, such as the Giffin Grip®, the no-skid Grabber Pad® and the latest arrival, the Trimming Disc. If you throw a lot of large bowls and platters, pots with delicate necks, lids, etc., then you should evaluate the trim-ming accessories described here—a select group of prod-ucts, each with a range of applications.
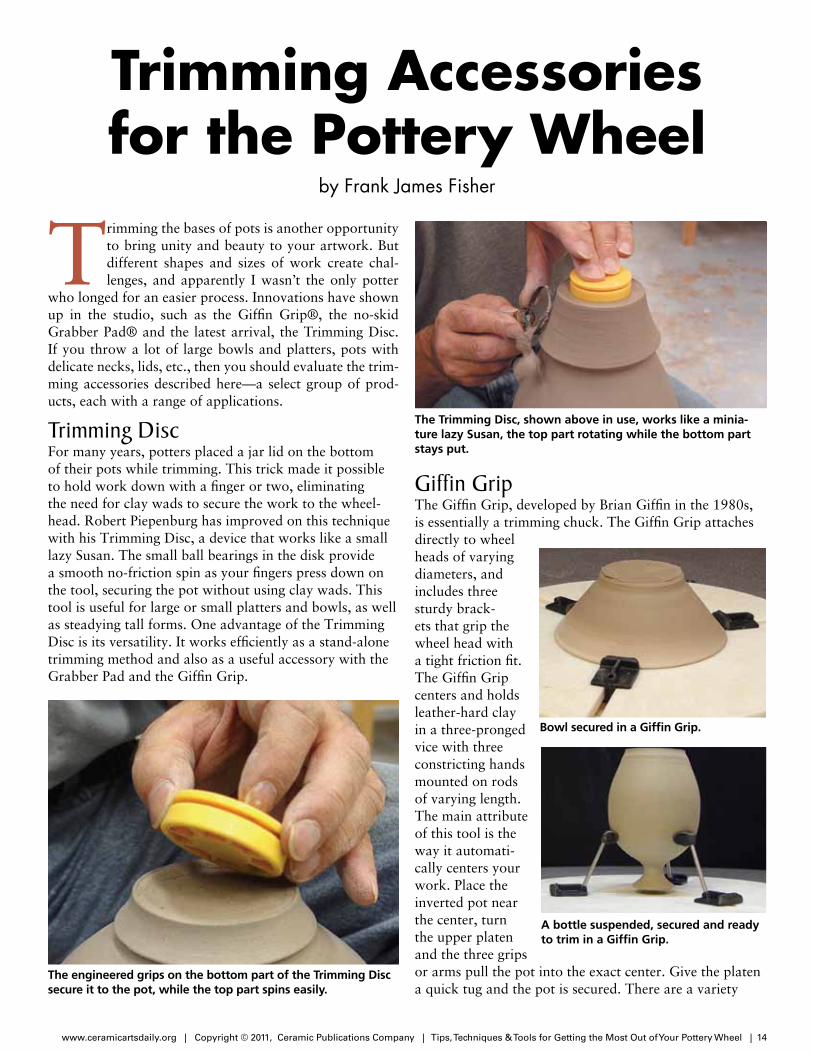
Trimming DiscFor many years, potters placed a jar lid on the bottom of their pots while trimming. This trick made it possible to hold work down with a finger or two, eliminating the need for clay wads to secure the work to the wheel-head. Robert Piepenburg has improved on this technique with his Trimming Disc, a device that works like a small lazy Susan. The small ball bearings in the disk provide a smooth no-friction spin as your fingers press down on the tool, securing the pot without using clay wads. This tool is useful for large or small platters and bowls, as well as steadying tall forms. One advantage of the Trimming Disc is its versatility. It works efficiently as a stand-alone trimming method and also as a useful accessory with the Grabber Pad and the Giffin Grip.
The engineered grips on the bottom part of the Trimming Disc secure it to the pot, while the top part spins easily.
Giffin GripThe Giffin Grip, developed by Brian Giffin in the 1980s, is essentially a trimming chuck. The Giffin Grip attaches directly to wheel heads of varying diameters, and includes three sturdy brack-ets that grip the wheel head with a tight friction fit. The Giffin Grip centers and holds leather-hard clay in a three-pronged vice with three constricting hands mounted on rods of varying length. The main attribute of this tool is the way it automati-cally centers your work. Place the inverted pot near the center, turn the upper platen and the three grips or arms pull the pot into the exact center. Give the platen a quick tug and the pot is secured. There are a variety
The Trimming Disc, shown above in use, works like a minia-ture lazy Susan, the top part rotating while the bottom part stays put.
Bowl secured in a Giffin Grip.
A bottle suspended, secured and ready to trim in a Giffin Grip.
www.ceramicartsdaily.org | Copyright © 2011, Ceramic Publications Company | Tips, Techniques & Tools for Getting the Most Out of Your Pottery Wheel | 15
of fixtures included to secure plates, bowls and even tall vases to the platen. With a Giffin Grip, a narrow-necked bottle can be suspended upside down for trimming the base, something that can otherwise only be done with a clay chuck. When trimming jar lids, I use the Trimming Disc in combination with the Giffin Grip (see above).
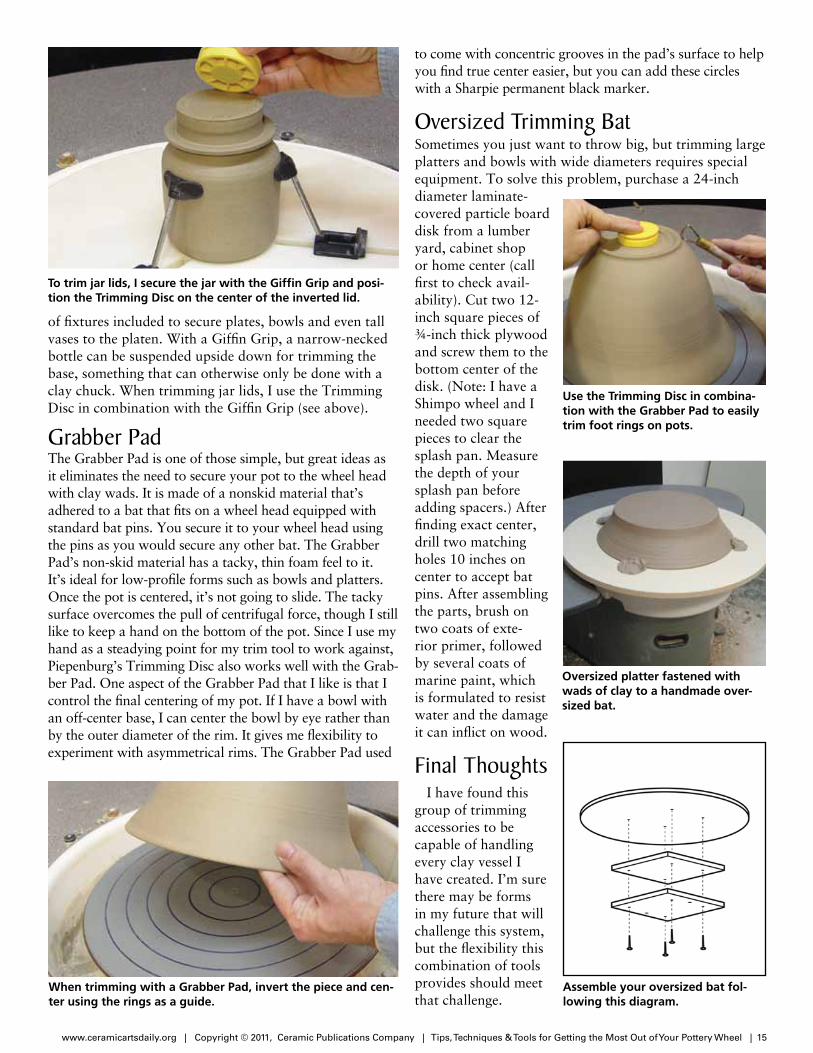
Grabber PadThe Grabber Pad is one of those simple, but great ideas as it eliminates the need to secure your pot to the wheel head with clay wads. It is made of a nonskid material that’s adhered to a bat that fits on a wheel head equipped with standard bat pins. You secure it to your wheel head using the pins as you would secure any other bat. The Grabber Pad’s non-skid material has a tacky, thin foam feel to it. It’s ideal for low-profile forms such as bowls and platters. Once the pot is centered, it’s not going to slide. The tacky surface overcomes the pull of centrifugal force, though I still like to keep a hand on the bottom of the pot. Since I use my hand as a steadying point for my trim tool to work against, Piepenburg’s Trimming Disc also works well with the Grab-ber Pad. One aspect of the Grabber Pad that I like is that I control the final centering of my pot. If I have a bowl with an off-center base, I can center the bowl by eye rather than by the outer diameter of the rim. It gives me flexibility to experiment with asymmetrical rims. The Grabber Pad used
To trim jar lids, I secure the jar with the Giffin Grip and posi-tion the Trimming Disc on the center of the inverted lid.
When trimming with a Grabber Pad, invert the piece and cen-ter using the rings as a guide.
to come with concentric grooves in the pad’s surface to help you find true center easier, but you can add these circles with a Sharpie permanent black marker.
Oversized Trimming BatSometimes you just want to throw big, but trimming large platters and bowls with wide diameters requires special equipment. To solve this problem, purchase a 24-inch diameter laminate-covered particle board disk from a lumber yard, cabinet shop or home center (call first to check avail-ability). Cut two 12-inch square pieces of ¾-inch thick plywood and screw them to the bottom center of the disk. (Note: I have a Shimpo wheel and I needed two square pieces to clear the splash pan. Measure the depth of your splash pan before adding spacers.) After finding exact center, drill two matching holes 10 inches on center to accept bat pins. After assembling the parts, brush on two coats of exte-rior primer, followed by several coats of marine paint, which is formulated to resist water and the damage it can inflict on wood.
Final ThoughtsI have found this
group of trimming accessories to be capable of handling every clay vessel I have created. I’m sure there may be forms in my future that will challenge this system, but the flexibility this combination of tools provides should meet that challenge.
Use the Trimming Disc in combina-tion with the Grabber Pad to easily trim foot rings on pots.
Oversized platter fastened with wads of clay to a handmade over-sized bat.
Assemble your oversized bat fol-lowing this diagram.
www.ceramicartsdaily.org | Copyright © 2011, Ceramic Publications Company | Tips, Techniques & Tools for Getting the Most Out of Your Pottery Wheel | 16
powerfultoughinnovative
smoothvalue
ergonomicergonomicergonomicergonomicergonomicergonomic
value
Visit skutt.com/video/hill to hear Steven talk aboutthe ergonomic benefits of Skutt wheels.
Steven Hill_2-28-11-2.indd 1 4/25/11 9:15:59 AM