tm-j9000 j9100 eng um - ftp.epson.com · ii tm-j9000/j9100 user’s manual ... product name:...
TRANSCRIPT

TM-J9000/J9100User’s Manual
405074700

ii TM-J9000/J9100 User’s Manual
English
All rights reserved. No part of this publication may be reproduced, stored in a retrieval system, or transmitted in any form or by any means, electronic, mechanical, photocopying, recording, or otherwise, without the prior written permission of Seiko Epson Corporation. No patent liability is assumed with respect to the use of the information contained herein. While every precaution has been taken in the preparation of this book, Seiko Epson Corporation assumes no responsibility for errors or omissions. Neither is any liability assumed for damages resulting from the use of the information contained herein.Neither Seiko Epson Corporation nor its affiliates shall be liable to the purchaser of this product or third parties for damages, losses, costs, or expenses incurred by purchaser or third parties as a result of: accident, misuse, or abuse of this product or unauthorized modifications, repairs, or alterations to this product, or (excluding the U.S.) failure to strictly comply with Seiko Epson Corporation’s operating and maintenance instructions.Seiko Epson Corporation shall not be liable against any damages or problems arising from the use of any options or any consumable products other than those designated as Original EPSON Products or EPSON Approved Products by Seiko Epson Corporation.EPSON and ESC/POS are registered trademarks of Seiko Epson Corporation.
NOTICE: The contents of this manual are subject to change without notice.Copyright © 2004 by Seiko Epson Corporation, Nagano, Japan.
DIP Switch TablesDIP switch 1
SW Function On Off
1-1 Internal use — Fixed to Off
1-2 Reserved — Fixed to Off
1-3 Reserved — Fixed to Off
1-4 Reserved — Fixed to Off
Function USB connector side UB series connector side
Interface selection USB available UB series available
DIP switch 2
TM-J9000/J9100 1
EMC and Safety Standards AppliedProduct Name: TM-J9000/9100Model Name M198AThe following standards are applied only to the printers that are so labeled. (EMC is measured using SEIKO EPSON’s AC adapter PS-180.) Europe: CE marking:
Safety: TÜV (EN60950)North America: EMI: FCC/ICES-003 Class A
Safety: UL 60950/CSA C22.2 No. 60950
Oceania: EMC: AS/NZS 3548/CISPR 22 Class A
WARNINGThe connection of a non-shielded printer interface cable to this printer will invalidate the EMC standards of this device.You are cautioned that changes or modifications not expressly approved by Seiko Epson Corporation could void your authority to operate the equipment.
CE MarkingThe printer conforms to the following Directives and Norms:Directive 89/336/EEC EN 55022 Class A
EN 55024 IEC 61000-4-2 IEC 61000-4-3IEC 61000-4-4IEC 61000-4-5IEC 61000-4-6IEC 61000-4-8IEC 61000-4-11
FCC Compliance Statement For American UsersThis equipment has been tested and found to comply with the limits for a Class A digital device, pursuant to Part 15 of the FCC Rules. These limits are designed to provide reasonable protection against harmful interference when the equipment is operated in a commercial environment.This equipment generates, uses, and can radiate radio frequency energy and, if not installed and used in accordance with the instruction manual, may cause harmful interference to radio communications. Operation of this equipment in a residential area is likely to cause harmful interference, in which case the user will be required to correct the interference at his own expense.
FOR CANADIAN USERSThis Class A digital apparatus complies with Canadian ICES-003.
Cet appareil numérique de la classe A est conforme à la norme NMB-003 du Canada.

2 TM-J9000/J9100
Important Safety InformationThis section presents important information intended to ensure safe and effective use of this product. Read this section carefully and store it in an accessible location.
Key to SymbolsThe symbols in this manual are identified by their level of importance, as defined below. Read the following carefully before handling the product.
WARNING:Warnings must be followed carefully to avoid serious bodily injury.
CAUTION:Cautions must be observed to avoid minor injury to yourself or damage to your equipment.
Safety Precautions
WARNING:Shut down your equipment immediately if it produces smoke, a strange odor, or unusual noise. Continued use may lead to fire. Immediately unplug the equipment and contact your dealer or a Seiko Epson service center for advice.Never attempt to repair this product yourself. Improper repair work can be dangerous.Never disassemble or modify this product. Tampering with this product may result in injury or fire.Be sure to use the specified power source. Connection to an improper power source may cause fire.Do not allow foreign matter to fall into the equipment. Penetration by foreign objects may lead to fire.If water or other liquid spills into this equipment, do not continue to use it. Continued use may lead to fire. Unplug the power cord immediately and contact your dealer or a Seiko Epson service center for advice.Seiko Epson recommends using the designated EPSON AC adapter (PS-180) for the printer.
TM-J9000/J9100 3
English
CAUTION:Do not connect cables in ways other than those mentioned in this manual. Different connections may cause equipment damage and burning.Be sure to set this equipment on a firm, stable, horizontal surface. Product may break or cause injury if it falls.Do not use in locations subject to high humidity or dust levels. Excessive humidity and dust may cause equipment damage or fire.Do not place heavy objects on top of this product. Never stand or lean on this product. Equipment may fall or collapse, causing breakage and possible injury.To ensure safety, unplug this product before leaving it unused for an extended period.Before moving the product, unplug it and unplug all cables connected to it.If ink leaks out of the printer, wipe up the ink with a cloth or similar material immediately and contact your dealer or a Seiko Epson service center for advice.
Notes on Usage❏ When using the printer, do not open the covers.❏ Protect the printer from impact. ❏ Do not apply excessive force to the printer case.❏ Do not place food or beverages such as coffee on the printer case.
Notes on Installation❏ Be sure that the printer is installed horizontally.❏ Do not install the printer in a dusty place.❏ Install the printer away from magnetic devices.❏ Cables or other foreign objects must not be caught on the printer. ❏ Because cards are ejected toward the back of the printer, allow at least
60 mm {2.36} behind the printer when installing it.
Notes on Transportation1. Remove the ink cartridge before transporting the printer. After
transportation, install a new ink cartridge.2. Keep the printer upright and horizontal during transportion.3. Be sure not to ship ink cartridges that have been removed from the
packing. Ink may leak.

4 TM-J9000/J9100
English
Purpose of This ManualThis manual describes basic operations for operators of the single color (black ink) TM-J9000 printer, and the two color (black and red/green/blue) TM-J9100 printer to enable safe and correct use of the printer.
Part Names
Note:DIP Switch 2 is intended for switching the interface. Do not change the position of the DIP switch 2 except when changing the interface.
Hooking the USB cable on the locking wire saddle prevents the cable from falling off.
UnpackingThe following items are included for the standard specification printer. If any item is damaged, contact your dealer.
❏ Printer ❏ Roll paper❏ Ink cartridge ❏ User’s Manual (this manual)❏ Power switch cover ❏ Feeder guide❏ Instruction sheet ❏ Ink cartridge manual❏ Pocket (only for the ASF model)
Scanner
Control panel
Power switch
Card entrance
Roll paper section
Feeder
Cartridge cover tabValidation section
Roll paper cover open button
Power supply connector USB connector DIP switch 2
Locking wire saddle

TM-J9000/J9100 5
English
Attaching the Feeder GuideFeeding paper using the included feeder guide allows you to insert a check straight. Also, the auto sheet feeder (ASF) model printers can feed up to 25 checks without manual feeding.
Follow these steps to attach the feeder guide.1. Hold the edge of the feeder guide carefully.2. Insert the dowels of the feeder guide into the holes on the feeder
guide; then move it down until it stops in place.
Attaching the Pocket (only for the ASF model)A pocket is provided with each auto sheet feeder (ASF) model printer. Follow the steps shown below to attach the pocket.1. Push down the pocket cover on the left of the printer, and remove it.
Note:To attach the cover again, insert the cover while pushing it up.
➀
➁
Dowel of the feeder guide

6 TM-J9000/J9100
English
2. Make sure that the ejection lever is open. If it is closed, open it.
Note:Be careful not to hurt your fingers on the lever edge.
3. Position the pocket as shown in the picture below, and push it into the printer until it clicks in place.
4. Unfold the stopper of the pocket as shown in the following picture.
The ejection lever is open. The ejection lever is closed.
Insert the hooks on the four corners of the pocket into the holes indicated with the circles, and move the pocket into place.
➁
➀
Stopper

TM-J9000/J9100 7
English
Note:To remove the pocket, place the printer vertically as shown in the picture below; then while pushing up the lever on the bottom of the pocket, slightly push the pocket backward, and then pull it up.
Control Panel (LEDs and Buttons)
POWER LED❏ Comes on when the printer power is on.❏ Flashes during cleaning and other operations, such as power-on and
power-off.Note:Never open a cover or turn off the printer while the POWER LED is flashing.
ERROR LED❏ Comes on when the printer is off line (and when the roll paper is out,
or the printer cover is open.)❏ Flashes when an error occurs. (See the “Troubleshooting” (on page 19
of this manual) for more information.)
➀
➁
Push up the lever.
POWER LED POWER LED
ERROR LED
INK LED (Black)
PAPER OUT LED
VALIDATION/FEEDER LED
ID LED
(Unused)
ERROR LED
INK LED (Black)
PAPER OUT LED
VALIDATION/FEEDER LED
ID LED
INK LED (Color)
(TM-J9100) Two color model (TM-J9000) Single color model
8 TM-J9000/J9100
English
INK OUT LED❏ Flashes when the ink is almost out. (You can continue printing.)❏ Comes on when no ink cartridge is installed or the ink is out. (The
printer goes off line, and the ERROR LED comes on.)Note:The TM-J9000 has an INK OUT LED for BLACK only, whereas the TM-J9100 has LEDs for both BLACK and COLOR.
PAPER OUT LEDComes on when the roll paper is out or almost out.
VALIDATION/FEEDER LED❏ Comes on when the printer is ready to process checks.❏ Flashes when the printer is waiting for check insertion or removal.
ID CARD LED❏ Comes on when the printer is ready to process ID cards.❏ Flashes when the printer is waiting for card insertion or removal.
CLEANING ButtonWhen printing becomes faint or uneven, press this button for more than three seconds. The printing section inside the printer will be cleaned automatically, and the printing will be back to normal.Note:Press this button for more than three seconds only when the INK OUT LED is not lit or flashing.Pressing the CLEANING button unecessarily leads to a waste of ink.
FEED ButtonPress this button to feed the roll paper.
Power Switch and Power Switch CoverPress the power switch to turn on or off the printer.Note:Never open a cover or turn off the printer while the POWER LED is flashing.
TM-J9000/J9100 9
English
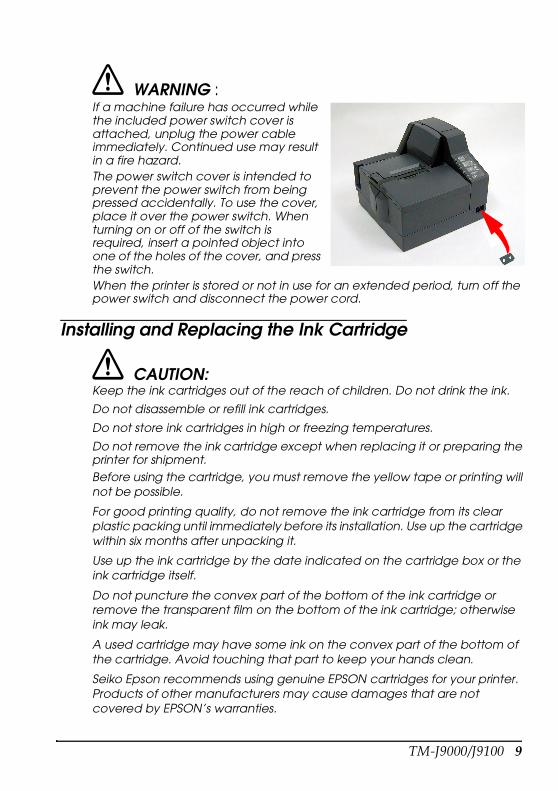
WARNING :If a machine failure has occurred while the included power switch cover is attached, unplug the power cable immediately. Continued use may result in a fire hazard. The power switch cover is intended to prevent the power switch from being pressed accidentally. To use the cover, place it over the power switch. When turning on or off of the switch is required, insert a pointed object into one of the holes of the cover, and press the switch. When the printer is stored or not in use for an extended period, turn off the power switch and disconnect the power cord.
Installing and Replacing the Ink Cartridge
CAUTION:Keep the ink cartridges out of the reach of children. Do not drink the ink.
Do not disassemble or refill ink cartridges.
Do not store ink cartridges in high or freezing temperatures.
Do not remove the ink cartridge except when replacing it or preparing the printer for shipment.Before using the cartridge, you must remove the yellow tape or printing will not be possible.
For good printing quality, do not remove the ink cartridge from its clear plastic packing until immediately before its installation. Use up the cartridge within six months after unpacking it.
Use up the ink cartridge by the date indicated on the cartridge box or the ink cartridge itself.
Do not puncture the convex part of the bottom of the ink cartridge or remove the transparent film on the bottom of the ink cartridge; otherwise ink may leak.
A used cartridge may have some ink on the convex part of the bottom of the cartridge. Avoid touching that part to keep your hands clean.
Seiko Epson recommends using genuine EPSON cartridges for your printer. Products of other manufacturers may cause damages that are not covered by EPSON’s warranties.

10 TM-J9000/J9100
English
When the INK OUT LED flashes, it is almost time to change the ink cartridge. Change the cartridge as soon as it is convenient. When the INK OUT LED comes on, printing stops and you must change the cartridge.
The TM-J9100 has two separate cartridges, one each for black and colored ink (red, green, or blue). Therefore, the TM-J9100 has two INK OUT LEDs, one for BLACK and one for COLOR.
The TM-J9000 has only one INK OUT LED (for BLACK).Follow these steps to install an ink cartridge for the first time or to replace an empty ink cartridge.
1. Make sure the printer power is on. If it is not on, plug in the power supply cable and press the power switch on the front bottom-right of the printer.
2. Make sure the INK OUT LED is lit or flashing. When using both the black ink and colored ink, check which of the ink cartridge INK OUT LEDs is lit or flashing.
3. Hold the tab and open the ink cartridge cover.
4. Hold the knob at the top of the empty ink cartridge and lift the cartridge out of the printer.
(TM-J9100)
TM-J9000/J9100 11
English
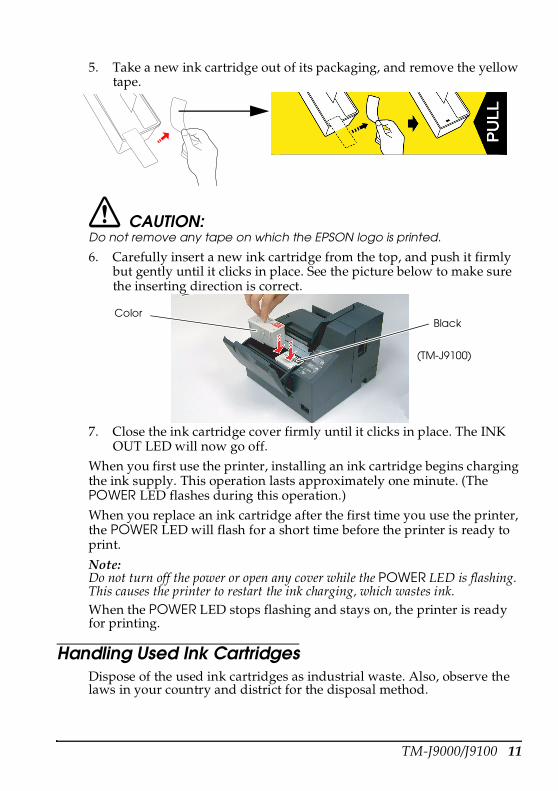
5. Take a new ink cartridge out of its packaging, and remove the yellow tape.
CAUTION:Do not remove any tape on which the EPSON logo is printed.
6. Carefully insert a new ink cartridge from the top, and push it firmly but gently until it clicks in place. See the picture below to make sure the inserting direction is correct.
7. Close the ink cartridge cover firmly until it clicks in place. The INK OUT LED will now go off.
When you first use the printer, installing an ink cartridge begins charging the ink supply. This operation lasts approximately one minute. (The POWER LED flashes during this operation.)When you replace an ink cartridge after the first time you use the printer, the POWER LED will flash for a short time before the printer is ready to print.
Note:Do not turn off the power or open any cover while the POWER LED is flashing. This causes the printer to restart the ink charging, which wastes ink. When the POWER LED stops flashing and stays on, the printer is ready for printing.
Handling Used Ink CartridgesDispose of the used ink cartridges as industrial waste. Also, observe the laws in your country and district for the disposal method.
(TM-J9100)
BlackColor

12 TM-J9000/J9100
English
Cleaning the Print HeadWhen printing becomes faint or uneven although the INK OUT LED is not lit or flashing, press the CLEANING button for more than three seconds to run print head cleaning. During the cleaning process, the POWER LED keeps flashing. When the cleaning process ends, the printer is ready for printing.Note:Press the CLEANING button only when there is a problem with the printing quality. The cleaning process uses some ink, so you do not want to run it unnecessarily.Do not turn off the printer or open any covers while the POWER LED is flashing.
Ink Cartridge LifeTo make your ink cartridges last as long as possible:❏ Do not remove an ink cartridge except when replacing it or
transporting the printer.❏ Do not turn on or off the printer unnecessarily.❏ Do not press the CLEANING button unless printing is faint or uneven.
Inserting and Replacing Roll Paper
CAUTION:Be sure to use roll paper that meets the specifications. (See the specifications on page 22 of this manual for more details.)
To avoid injuries and/or machine failure, make sure not to touch anything other than the roll paper when the roll paper cover is open.Note:Do not use paper rolls that have the paper glued or taped to the core. They may cause paper jams.To prevent paper jams, make sure that nothing obstructs the paper coming out of the paper outlet and do not pull the paper being ejected.Do not open the roll paper cover during printing or paper feeding.1. Turn on the printer power.2. Press the roll paper cover open button, and open the roll paper cover.3. If a roll paper core is inside the printer, remove it.4. Install a new paper roll.
TM-J9000/J9100 13
English
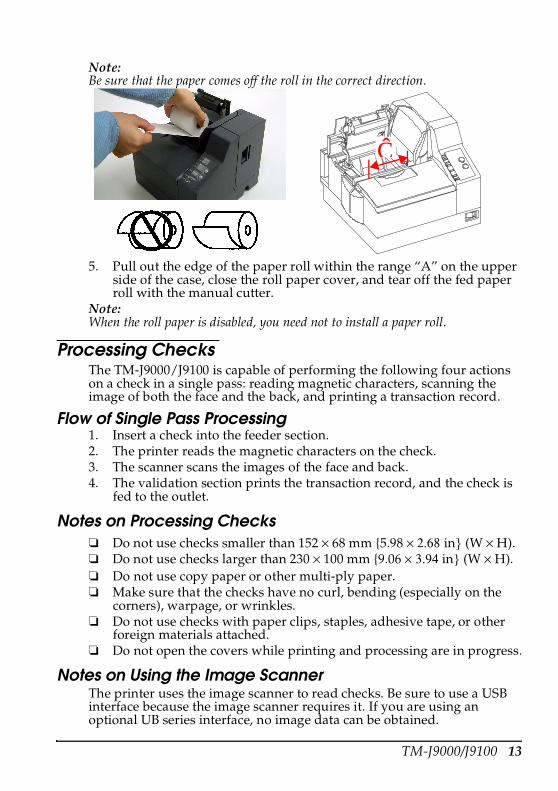
Note:Be sure that the paper comes off the roll in the correct direction.
5. Pull out the edge of the paper roll within the range “A” on the upper side of the case, close the roll paper cover, and tear off the fed paper roll with the manual cutter.
Note:When the roll paper is disabled, you need not to install a paper roll.
Processing Checks The TM-J9000/J9100 is capable of performing the following four actions on a check in a single pass: reading magnetic characters, scanning the image of both the face and the back, and printing a transaction record.
Flow of Single Pass Processing1. Insert a check into the feeder section.2. The printer reads the magnetic characters on the check.3. The scanner scans the images of the face and back.4. The validation section prints the transaction record, and the check is
fed to the outlet.
Notes on Processing Checks❏ Do not use checks smaller than 152 × 68 mm {5.98 × 2.68 in} (W × H).❏ Do not use checks larger than 230 × 100 mm {9.06 × 3.94 in} (W × H).❏ Do not use copy paper or other multi-ply paper.❏ Make sure that the checks have no curl, bending (especially on the
corners), warpage, or wrinkles.❏ Do not use checks with paper clips, staples, adhesive tape, or other
foreign materials attached.❏ Do not open the covers while printing and processing are in progress.
Notes on Using the Image ScannerThe printer uses the image scanner to read checks. Be sure to use a USB interface because the image scanner requires it. If you are using an optional UB series interface, no image data can be obtained.
A
14 TM-J9000/J9100
English
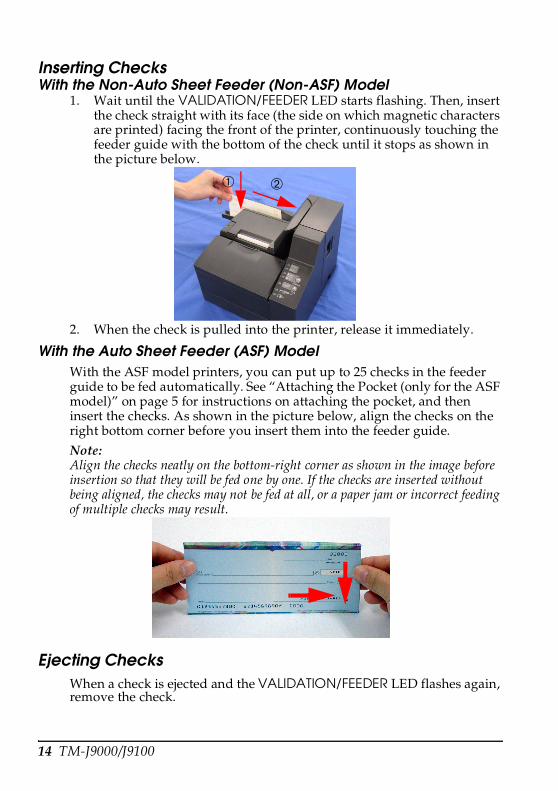
Inserting ChecksWith the Non-Auto Sheet Feeder (Non-ASF) Model
1. Wait until the VALIDATION/FEEDER LED starts flashing. Then, insert the check straight with its face (the side on which magnetic characters are printed) facing the front of the printer, continuously touching the feeder guide with the bottom of the check until it stops as shown in the picture below.
2. When the check is pulled into the printer, release it immediately.
With the Auto Sheet Feeder (ASF) ModelWith the ASF model printers, you can put up to 25 checks in the feeder guide to be fed automatically. See “Attaching the Pocket (only for the ASF model)” on page 5 for instructions on attaching the pocket, and then insert the checks. As shown in the picture below, align the checks on the right bottom corner before you insert them into the feeder guide.Note:Align the checks neatly on the bottom-right corner as shown in the image before insertion so that they will be fed one by one. If the checks are inserted without being aligned, the checks may not be fed at all, or a paper jam or incorrect feeding of multiple checks may result.
Ejecting ChecksWhen a check is ejected and the VALIDATION/FEEDER LED flashes again, remove the check.
➀ ➁
TM-J9000/J9100 15
English
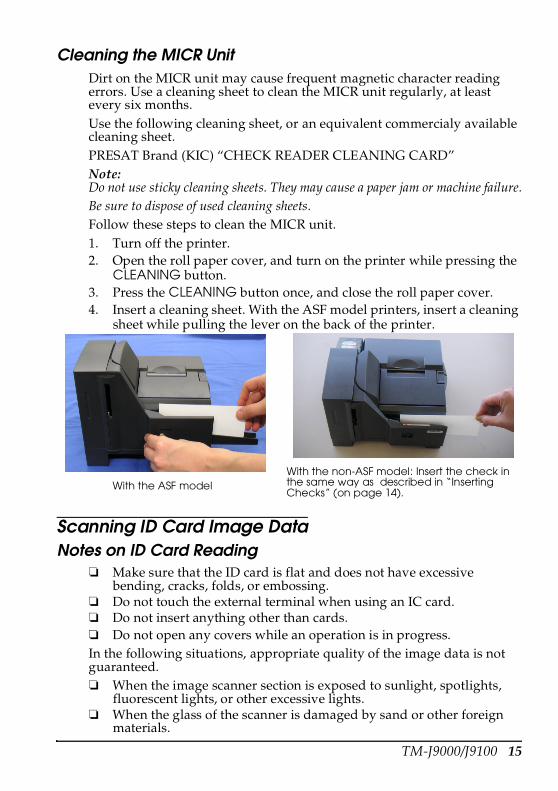
Cleaning the MICR UnitDirt on the MICR unit may cause frequent magnetic character reading errors. Use a cleaning sheet to clean the MICR unit regularly, at least every six months.Use the following cleaning sheet, or an equivalent commercialy available cleaning sheet.PRESAT Brand (KIC) “CHECK READER CLEANING CARD”Note:Do not use sticky cleaning sheets. They may cause a paper jam or machine failure.Be sure to dispose of used cleaning sheets.Follow these steps to clean the MICR unit.1. Turn off the printer.2. Open the roll paper cover, and turn on the printer while pressing the
CLEANING button.3. Press the CLEANING button once, and close the roll paper cover.4. Insert a cleaning sheet. With the ASF model printers, insert a cleaning
sheet while pulling the lever on the back of the printer.
Scanning ID Card Image DataNotes on ID Card Reading
❏ Make sure that the ID card is flat and does not have excessive bending, cracks, folds, or embossing.
❏ Do not touch the external terminal when using an IC card.❏ Do not insert anything other than cards.❏ Do not open any covers while an operation is in progress.In the following situations, appropriate quality of the image data is not guaranteed.❏ When the image scanner section is exposed to sunlight, spotlights,
fluorescent lights, or other excessive lights.❏ When the glass of the scanner is damaged by sand or other foreign
materials.
With the ASF modelWith the non-ASF model: Insert the check in the same way as described in “Inserting Checks” (on page 14).

16 TM-J9000/J9100
English
Note on Using the Image ScannerThe printer uses the image scanner to read cards. Use a USB interface because the image scanner requires it. If you use the optional UB series interface, no image data can be obtained.
Inserting Cards1. Wait until the ID LED starts flashing.2. Insert the card straight with its read side facing the ink cartridge
cover, with the bottom of the card continuously touching the card slot until it stops as shown in the picture below.
3. When the card is pulled into the printer, release it immediately.Note:When the card is pulled into the printer, a part of it comes out of the card carrier slit at the back of the printer. Be sure not to block this slit. Doing so may cause incorrect reading of data.
4. When the card is ejected and ID LED flashes again, pull the card straight out of the slit.
Note:Do not touch the card when it is being ejected. Doing so may cause distortion and other problems with the image data.
Cleaning the Image ScannerIf the glass of the scanner gets soiled from ink or paper dust, the quality of the image data may deteriorate. Follow these steps to clean the glass.
➀
➁
Card carrier slit
TM-J9000/J9100 17
English
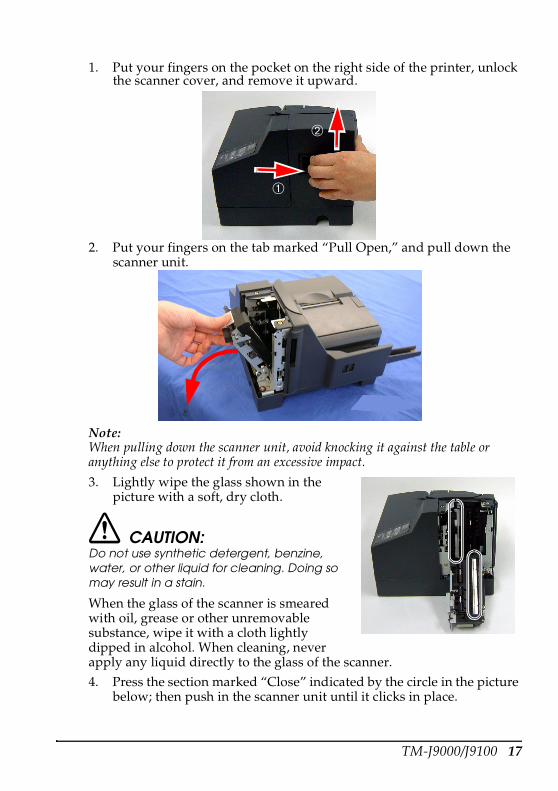
1. Put your fingers on the pocket on the right side of the printer, unlock the scanner cover, and remove it upward.
2. Put your fingers on the tab marked “Pull Open,” and pull down the scanner unit.
Note:When pulling down the scanner unit, avoid knocking it against the table or anything else to protect it from an excessive impact.
3. Lightly wipe the glass shown in the picture with a soft, dry cloth.
CAUTION:Do not use synthetic detergent, benzine, water, or other liquid for cleaning. Doing so may result in a stain.
When the glass of the scanner is smeared with oil, grease or other unremovable substance, wipe it with a cloth lightly dipped in alcohol. When cleaning, never apply any liquid directly to the glass of the scanner.4. Press the section marked “Close” indicated by the circle in the picture
below; then push in the scanner unit until it clicks in place.
➀
➁
18 TM-J9000/J9100
English
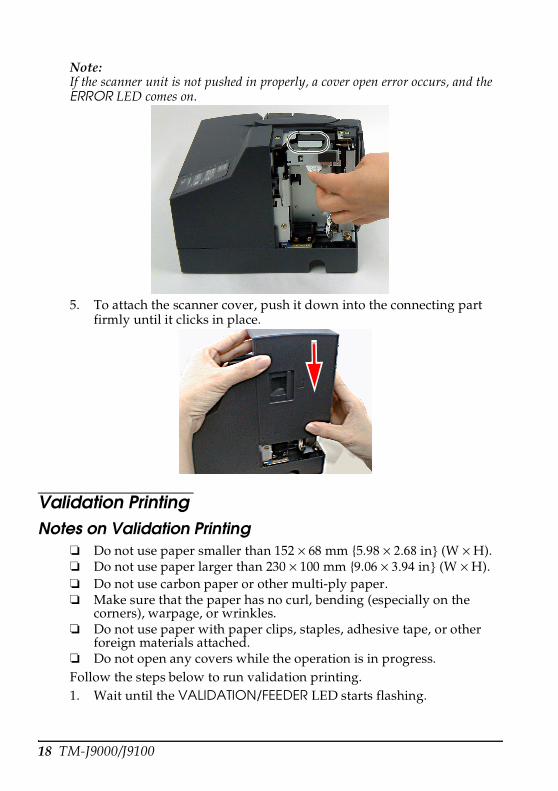
Note:If the scanner unit is not pushed in properly, a cover open error occurs, and the ERROR LED comes on.
5. To attach the scanner cover, push it down into the connecting part firmly until it clicks in place.
Validation Printing Notes on Validation Printing
❏ Do not use paper smaller than 152 × 68 mm {5.98 × 2.68 in} (W × H).❏ Do not use paper larger than 230 × 100 mm {9.06 × 3.94 in} (W × H).❏ Do not use carbon paper or other multi-ply paper.❏ Make sure that the paper has no curl, bending (especially on the
corners), warpage, or wrinkles.❏ Do not use paper with paper clips, staples, adhesive tape, or other
foreign materials attached.❏ Do not open any covers while the operation is in progress.Follow the steps below to run validation printing.1. Wait until the VALIDATION/FEEDER LED starts flashing.
TM-J9000/J9100 19
English
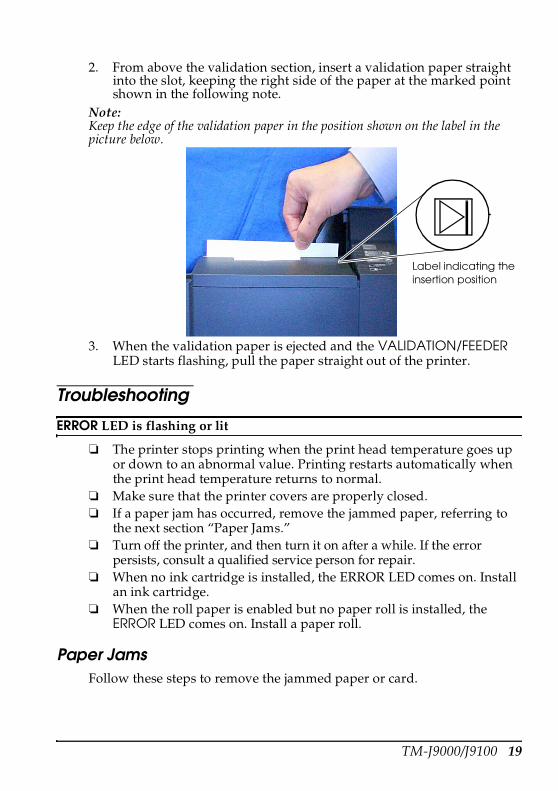
2. From above the validation section, insert a validation paper straight into the slot, keeping the right side of the paper at the marked point shown in the following note.
Note:Keep the edge of the validation paper in the position shown on the label in the picture below.
3. When the validation paper is ejected and the VALIDATION/FEEDER LED starts flashing, pull the paper straight out of the printer.
Troubleshooting
ERROR LED is flashing or lit
❏ The printer stops printing when the print head temperature goes up or down to an abnormal value. Printing restarts automatically when the print head temperature returns to normal.
❏ Make sure that the printer covers are properly closed.❏ If a paper jam has occurred, remove the jammed paper, referring to
the next section “Paper Jams.”❏ Turn off the printer, and then turn it on after a while. If the error
persists, consult a qualified service person for repair.❏ When no ink cartridge is installed, the ERROR LED comes on. Install
an ink cartridge.❏ When the roll paper is enabled but no paper roll is installed, the
ERROR LED comes on. Install a paper roll.
Paper JamsFollow these steps to remove the jammed paper or card.
Label indicating the insertion position
20 TM-J9000/J9100
English
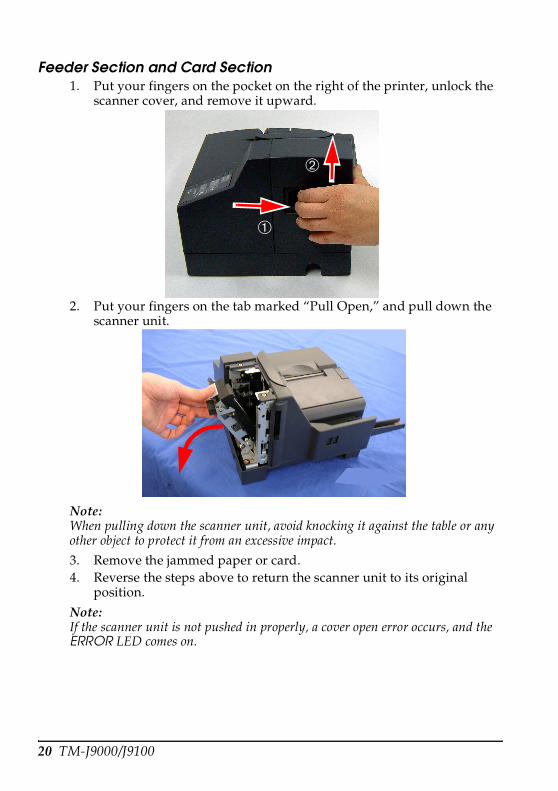
Feeder Section and Card Section1. Put your fingers on the pocket on the right of the printer, unlock the
scanner cover, and remove it upward.
2. Put your fingers on the tab marked “Pull Open,” and pull down the scanner unit.
Note:When pulling down the scanner unit, avoid knocking it against the table or any other object to protect it from an excessive impact.
3. Remove the jammed paper or card.4. Reverse the steps above to return the scanner unit to its original
position.
Note:If the scanner unit is not pushed in properly, a cover open error occurs, and the ERROR LED comes on.
➀
➁

TM-J9000/J9100 21
English
Roll Paper Section1. Press the roll paper
cover open button, and open the roll paper cover.
2. Remove the jammed paper.
3. Reinstall the paper roll and close the roll paper cover.
Validation SectionIf the jammed paper cannot be removed easily, open the ink cartridge cover to remove the paper.
EPSON Ecology LabelThis product is in compliance with the EPSON ecology label requirements. See the following link (http://www.epson.co.jp/e/) for detailed information on label criteria.
Obtaining the Printer Driver and Technical Reference Guide Download the driver from the following web site to control the universal serial bus (USB). The technical reference guide describing related information on TM-J9000/J9100 development can also be downloaded from this web site.
Customers in North Americahttp://pos.epson.com/
Customers in the Other Areashttp://www.epson-pos.com/
Select the product name in the “Select any product” pulldown menu.

22 TM-J9000/J9100
English
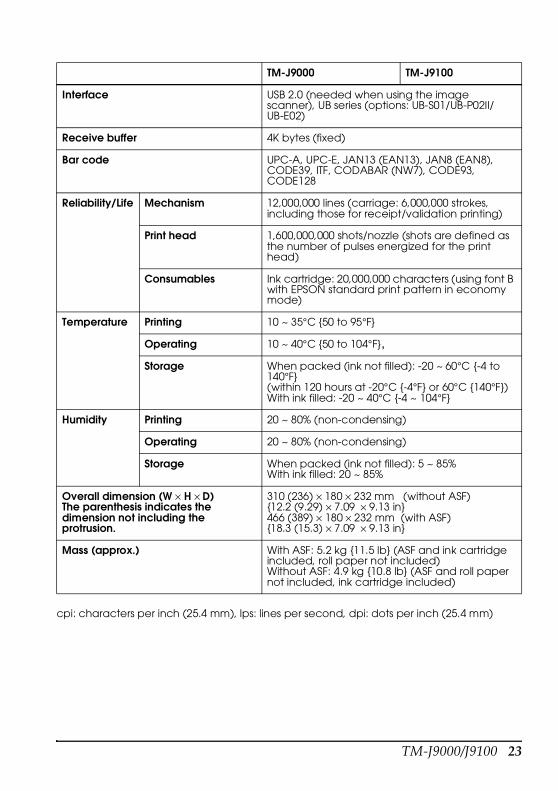
TM-J9000/J9100 Specifications
TM-J9000 TM-J9100
Print method Serial ink-jet dot matrix, 64 nozzles × 1 line
Serial ink-jet dot matrix, 64 nozzles × 2 lines
Print density 180 × 180 dpi
Print font Font Font A/Font B: 12 × 24/9 × 17(Can be changed to 11 × 24/8 × 17 by using memory switches. See the Technical Reference Guide for details.
Columns (standard) Font A/Font B Validation/Transaction: 62/82Roll paper: 40/53
Character size (W × H) (standard)
Font A/Font B: 1.69 × 3.38 mm/1.27 × 2.40 mm
Character type 95 alphanumeric, 48 international characters, 128 × 11 (including a user defined page) graphic
Print speed Validation: Font A: Economy mode: 7.5 lpsValidation: Font B: Economy mode: 11 lpsRoll paper: Font A: Economy mode: 10.1 IpsRoll paper: Font B: Economy mode: 14.3 Ips
Paper Validation/Feeder:Type: NormalDimension (H × W): 68 ~ 100 × 152 ~ 230 mm {2.68 ~ 3.94 × 5.98 ~ 9.06 in} (minimum: 68 mm × 152 mm {2.68 × 5.98 in})Thickness (only single-ply paper can be used):0,09 ~ 0.13 mm {0.0035 to 0.0051 in}
Roll paper:Type: NormalWidth: 76 ± 0.5 mmMaximum outside roll diameter: 60 mmSpool inside diameter: 10 mm or more
ASF unit paper supply (only for the ASF model)
Number of sheets that can be loaded: 25 sheets or fewer
Ink cartridge Exclusive ink cartridge: SJIC8(K)
Exclusive ink cartridge:For color 1: SJIC6(K)For color 2: SJIC7(R), SJIC7(B), SJIC7(G)
Power supply +24 VDC ± 10%
Current consumption
Printing ---
Operating Mean approx. 1.0A, Peak approx. 3.5A
Standby Mean approx. 0.2A
TM-J9000/J9100 23
English
cpi: characters per inch (25.4 mm), lps: lines per second, dpi: dots per inch (25.4 mm)
Interface USB 2.0 (needed when using the image scanner), UB series (options: UB-S01/UB-P02II/UB-E02)
Receive buffer 4K bytes (fixed)
Bar code UPC-A, UPC-E, JAN13 (EAN13), JAN8 (EAN8), CODE39, ITF, CODABAR (NW7), CODE93, CODE128
Reliability/Life Mechanism 12,000,000 lines (carriage: 6,000,000 strokes, including those for receipt/validation printing)
Print head 1,600,000,000 shots/nozzle (shots are defined as the number of pulses energized for the print head)
Consumables Ink cartridge: 20,000,000 characters (using font B with EPSON standard print pattern in economy mode)
Temperature Printing 10 ~ 35°C {50 to 95°F}
Operating 10 ~ 40°C {50 to 104°F},Storage When packed (ink not filled): -20 ~ 60°C {-4 to
140°F}(within 120 hours at -20°C {-4°F} or 60°C {140°F})With ink filled: -20 ~ 40°C {-4 ~ 104°F}
Humidity Printing 20 ~ 80% (non-condensing)
Operating 20 ~ 80% (non-condensing)
Storage When packed (ink not filled): 5 ~ 85%With ink filled: 20 ~ 85%
Overall dimension (W × H × D) The parenthesis indicates the dimension not including the protrusion.
310 (236) × 180 × 232 mm (without ASF){12.2 (9.29) × 7.09 × 9.13 in}466 (389) × 180 × 232 mm (with ASF){18.3 (15.3) × 7.09 × 9.13 in}
Mass (approx.) With ASF: 5.2 kg {11.5 lb} (ASF and ink cartridge included, roll paper not included)Without ASF: 4.9 kg {10.8 lb} (ASF and roll paper not included, ink cartridge included)
TM-J9000 TM-J9100

24 TM-J9000/J9100
English
Image Scanner Specifications
Image scanning specifications
Scanner type CIS (Contact Image Sensor)
Resolution 200 × 200 dpi
Scanning mode 256-level gray scale
Data transmission format
Raw
Scanning area Check (W × L): 100* × max. 230 mm (*100 mm fixed) {3.94* × max. 9.06 in (*3.94 in fixed)}Card (W × L): 56 × 90 mm {2.20 × 3.54 in} (area cannot be set)
Scanning speed Check: 300 mm/s {11.81 in/s}Card: 120 mm/s {4.72 in/s}
Paper Scanned media Check: normal paperCard: ISO/IEC7810 compliant
Size Check (W × L): 68 ~ 100 ×152 ~ 230 mm (min: 68 × 152 mm) {2.64 ~ 3.84 × 5.98 ~ 9.06 in(min: 2.64 × 5.98 in)}Card (W × L): 53.92 ~ 54.18 × 85.47 ~ 85.90 mm{2.123 ~ 2.133 × 3.365 ~ 3.382 in}
Thickness Check (single-ply): 0.09 ~ 0.13 mm {0.00354 ~ 0.00512 in}Card: 0.5 ~ 0.84 mm {0.020 ~ 0.033 in}
Curvature allowance
Card: 2 mm {0.079 in} or less (ISO/IEC7810)
Life 1,000,000 sheets (total of both sides scanning on check and card scanning)


Printed on Recycled Paper
Printed in China
2004.08