tonneau installation guide installation guide warranty, care & maintenance easy as 1-2-3!normal...
TRANSCRIPT
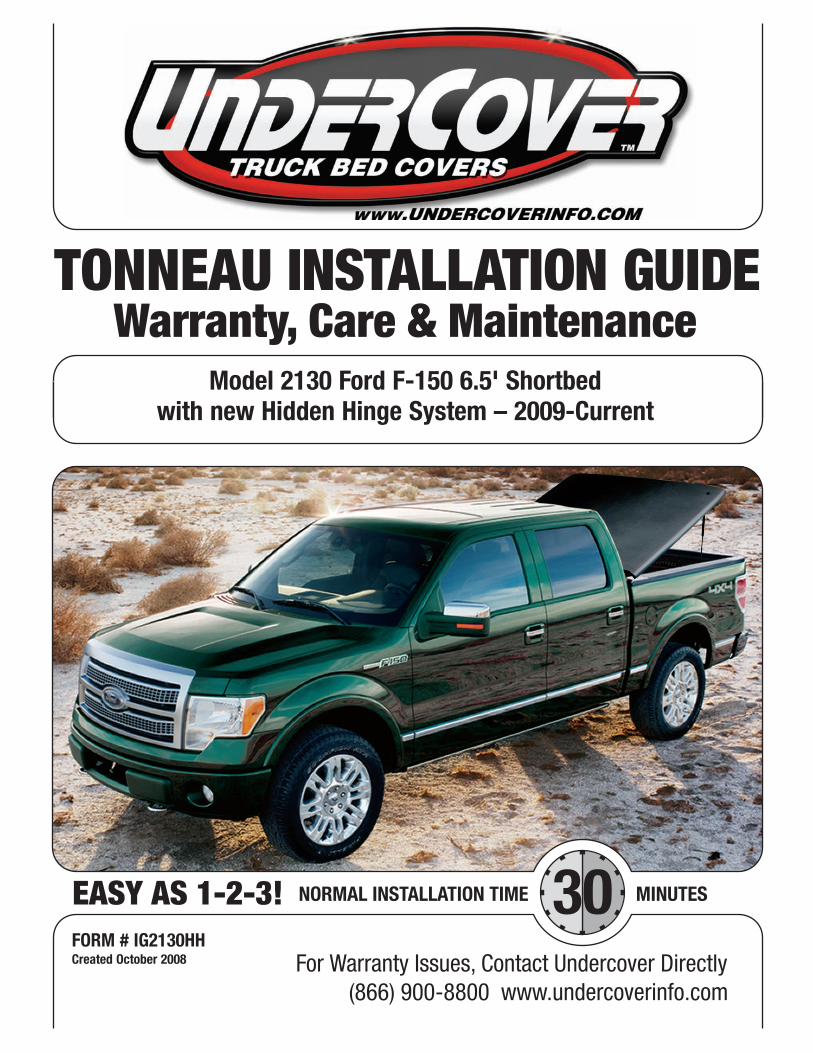
TONNEAU INSTALLATION GUIDEWarranty, Care & Maintenance
EASY AS 1-2-3! 30 MINUTESNORMAL INSTALLATION TIME
For Warranty Issues, Contact Undercover Directly(866) 900-8800 www.undercoverinfo.com
FORM # IG2130HHCreated October 2008
Model 2130 Ford F-150 6.5' Shortbed with new Hidden Hinge System – 2009-Current
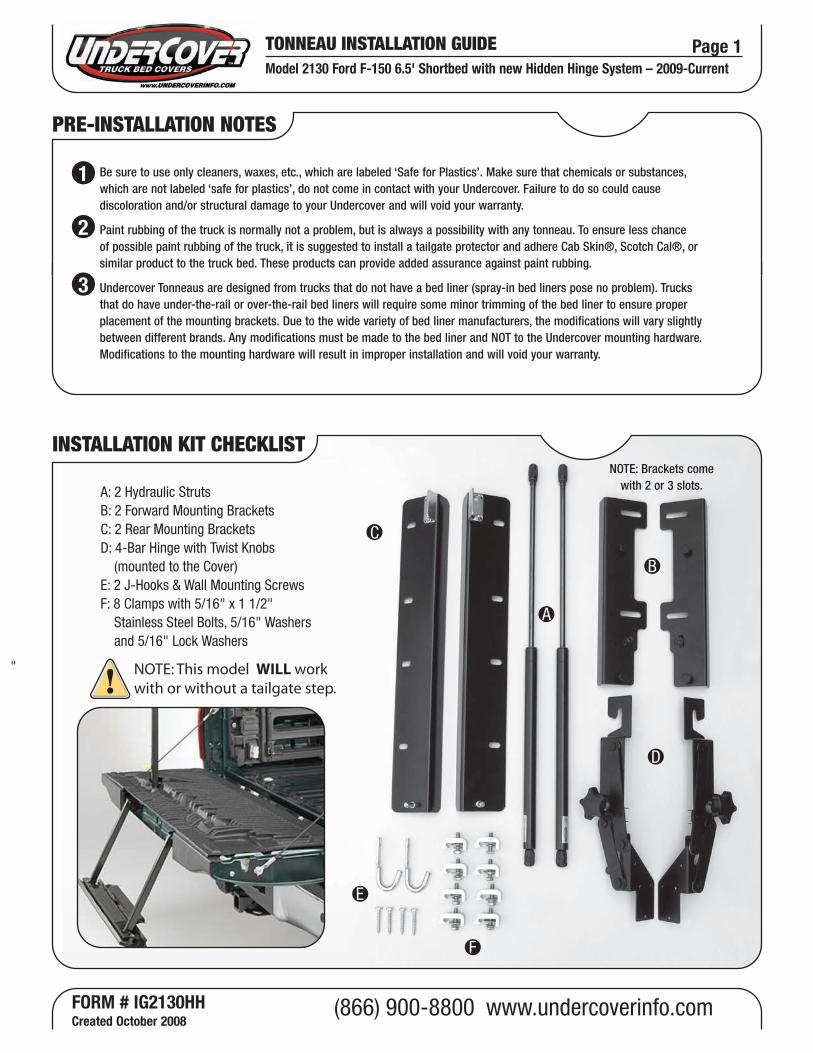
PRE-INSTALLATION NOTES
(866) 900-8800 www.undercoverinfo.com
TONNEAU INSTALLATION GUIDE
INSTALLATION KIT CHECKLIST
A
E
B
D
F
C
A: 2 Hydraulic StrutsB: 2 Forward Mounting BracketsC: 2 Rear Mounting BracketsD: 4-Bar Hinge with Twist Knobs (mounted to the Cover)E: 2 J-Hooks & Wall Mounting ScrewsF: 8 Clamps with 5/16" x 1 1/2" Stainless Steel Bolts, 5/16" Washers and 5/16" Lock Washers
NOTE: This model WILL work with or without a tailgate step.
"
Be sure to use only cleaners, waxes, etc., which are labeled ‘Safe for Plastics’. Make sure that chemicals or substances, which are not labeled ‘safe for plastics’, do not come in contact with your Undercover. Failure to do so could cause discoloration and/or structural damage to your Undercover and will void your warranty.
Paint rubbing of the truck is normally not a problem, but is always a possibility with any tonneau. To ensure less chance of possible paint rubbing of the truck, it is suggested to install a tailgate protector and adhere Cab Skin®, Scotch Cal®, or similar product to the truck bed. These products can provide added assurance against paint rubbing.
Undercover Tonneaus are designed from trucks that do not have a bed liner (spray-in bed liners pose no problem). Trucks that do have under-the-rail or over-the-rail bed liners will require some minor trimming of the bed liner to ensure proper placement of the mounting brackets. Due to the wide variety of bed liner manufacturers, the modifications will vary slightly between different brands. Any modifications must be made to the bed liner and NOT to the Undercover mounting hardware. Modifications to the mounting hardware will result in improper installation and will void your warranty.
1
2
3
NOTE: Brackets come with 2 or 3 slots.
FORM # IG2130HHCreated October 2008
Page 1Model 2130 Ford F-150 6.5' Shortbed with new Hidden Hinge System – 2009-Current

NORMAL INSTALLATION TIME MINUTES30
TONNEAU INSTALLATION GUIDE
(866) 900-8800 www.undercoverinfo.com
UNDERCOVER INSTALLATION TOOLS NEEDED
QUICK REMOVAL & REINSTALL REVIEW
3/8” WRENCH OR SOCKET
1/2” WRENCH OR SOCKET
UnderCover makes tonneaus for most makes and models of trucks.
Note: If your Tonneau has already been installed, skip to Page 9 for removal and reinstall instructions.
Off your truck and on your wall in less than one minute!
FORM # IG2130HHCreated October 2008
Page 2Model 2130 Ford F-150 6.5' Shortbed with new Hidden Hinge System – 2009-Current
TONNEAU INSTALLATION GUIDE
(866) 900-8800 www.undercoverinfo.com
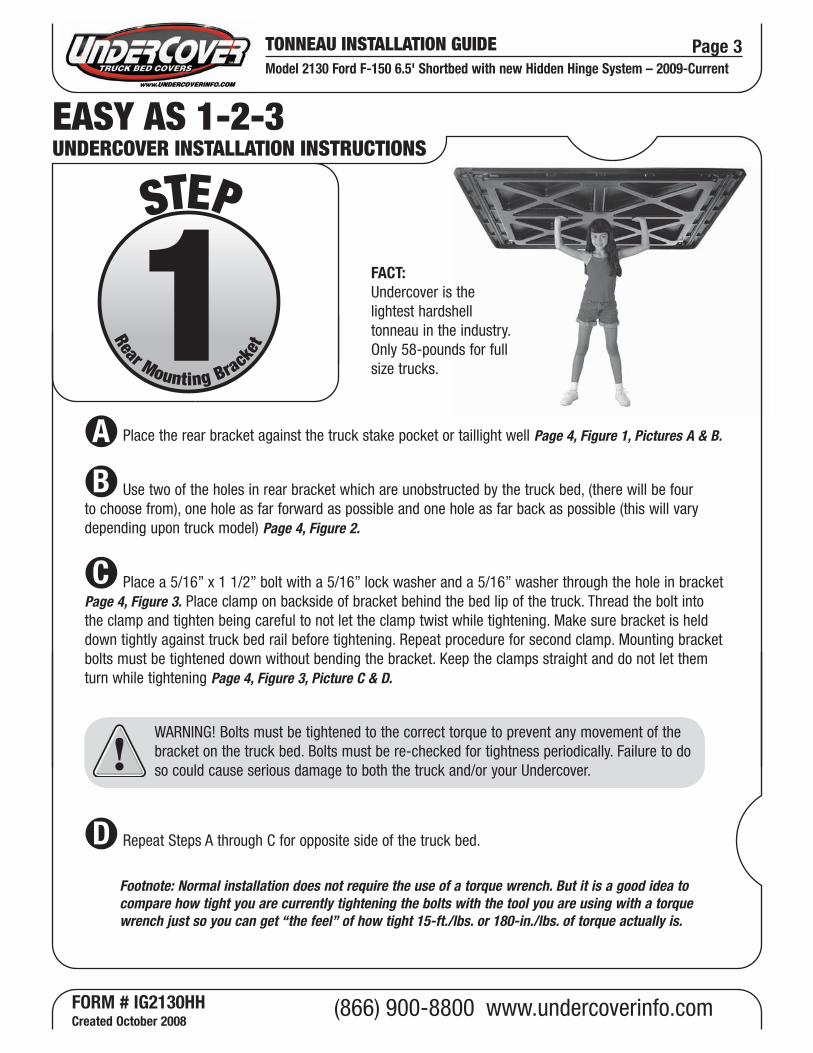
UNDERCOVER INSTALLATION INSTRUCTIONSEASY AS 1-2-3
STEP
1Rear Mounting Bracket
Footnote: Normal installation does not require the use of a torque wrench. But it is a good idea to compare how tight you are currently tightening the bolts with the tool you are using with a torque wrench just so you can get “the feel” of how tight 15-ft./lbs. or 180-in./lbs. of torque actually is.
FACT: Undercover is the lightest hardshell tonneau in the industry. Only 58-pounds for full size trucks.
A
B
C
D
Place the rear bracket against the truck stake pocket or taillight well Page 4, Figure 1, Pictures A & B.
Use two of the holes in rear bracket which are unobstructed by the truck bed, (there will be four to choose from), one hole as far forward as possible and one hole as far back as possible (this will vary depending upon truck model) Page 4, Figure 2.
Place a 5/16” x 1 1/2” bolt with a 5/16” lock washer and a 5/16” washer through the hole in bracket Page 4, Figure 3. Place clamp on backside of bracket behind the bed lip of the truck. Thread the bolt into the clamp and tighten being careful to not let the clamp twist while tightening. Make sure bracket is held down tightly against truck bed rail before tightening. Repeat procedure for second clamp. Mounting bracket bolts must be tightened down without bending the bracket. Keep the clamps straight and do not let them turn while tightening Page 4, Figure 3, Picture C & D.
Repeat Steps A through C for opposite side of the truck bed.
WARNING! Bolts must be tightened to the correct torque to prevent any movement of the bracket on the truck bed. Bolts must be re-checked for tightness periodically. Failure to do so could cause serious damage to both the truck and/or your Undercover.
FORM # IG2130HHCreated October 2008
Page 3Model 2130 Ford F-150 6.5' Shortbed with new Hidden Hinge System – 2009-Current
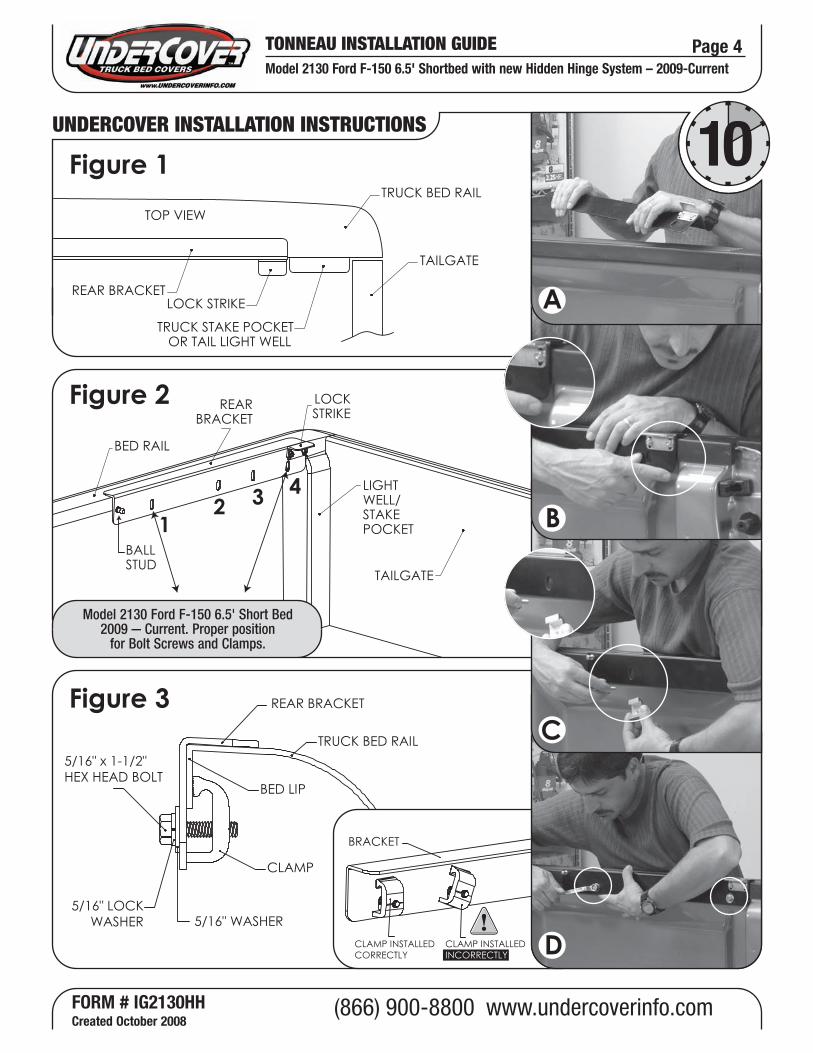
TRUCK BED RAIL
TAILGATE
LOCK STRIKEREAR BRACKET
TOP VIEW
TRUCK STAKE POCKET OR TAIL LIGHT WELL
REARBRACKET
LOCKSTRIKE
TAILGATE
LIGHTWELL/STAKEPOCKET
BALLSTUD
BED RAIL
21
3 4
TONNEAU INSTALLATION GUIDE
UNDERCOVER INSTALLATION INSTRUCTIONS
(866) 900-8800 www.undercoverinfo.com
Figure 1
Figure 3TRUCK BED RAIL
REAR BRACKET
BED LIP
CLAMP
5/16" x 1-1/2"HEX HEAD BOLT
5/16" LOCKWASHER 5/16" WASHER
10
CLAMP INSTALLEDCORRECTLY
BRACKET
CLAMP INSTALLED INCORRECTLY
Figure 2
A
B
C
D
Model 2130 Ford F-150 6.5' Short Bed 2009 — Current. Proper position
for Bolt Screws and Clamps.
FORM # IG2130HHCreated October 2008
Page 4Model 2130 Ford F-150 6.5' Shortbed with new Hidden Hinge System – 2009-Current
TONNEAU INSTALLATION GUIDE
(866) 900-8800 www.undercoverinfo.com
UNDERCOVER INSTALLATION INSTRUCTIONSEASY AS 1-2-3
STEP
2Front Mounting Bracket
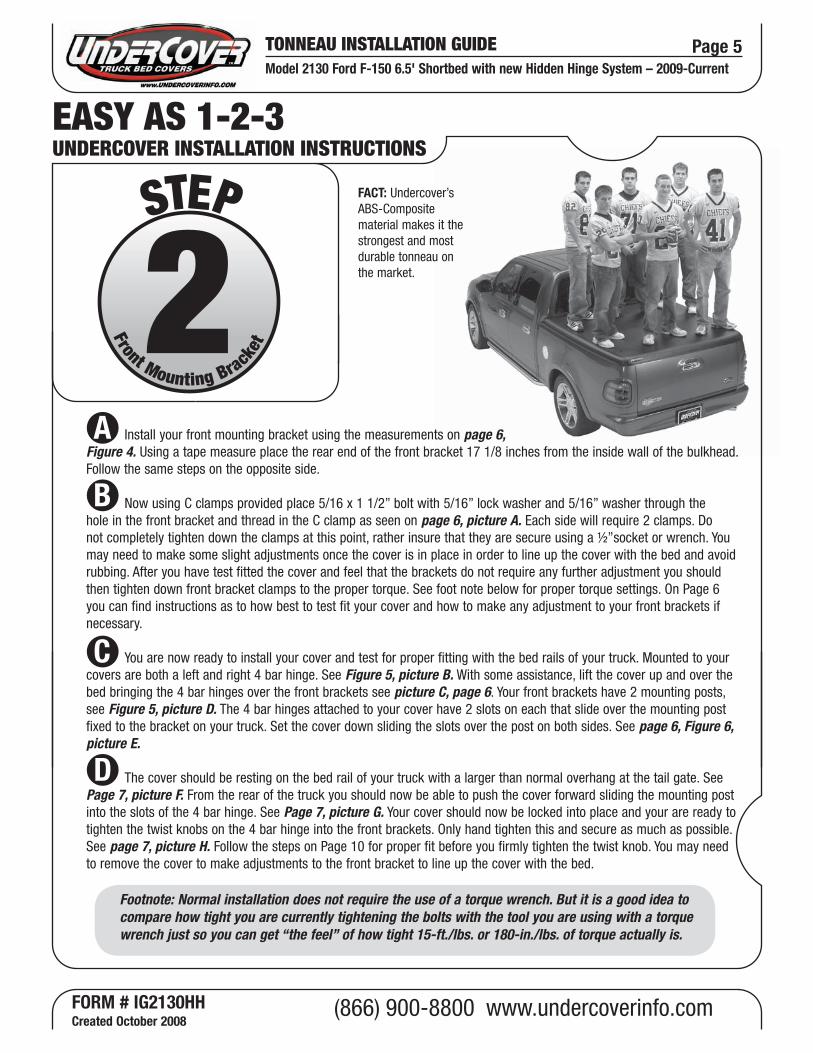
Install your front mounting bracket using the measurements on page 6, Figure 4. Using a tape measure place the rear end of the front bracket 17 1/8 inches from the inside wall of the bulkhead. Follow the same steps on the opposite side.
Now using C clamps provided place 5/16 x 1 1/2” bolt with 5/16” lock washer and 5/16” washer through the hole in the front bracket and thread in the C clamp as seen on page 6, picture A. Each side will require 2 clamps. Do not completely tighten down the clamps at this point, rather insure that they are secure using a ½”socket or wrench. You may need to make some slight adjustments once the cover is in place in order to line up the cover with the bed and avoid rubbing. After you have test fitted the cover and feel that the brackets do not require any further adjustment you should then tighten down front bracket clamps to the proper torque. See foot note below for proper torque settings. On Page 6 you can find instructions as to how best to test fit your cover and how to make any adjustment to your front brackets if necessary.
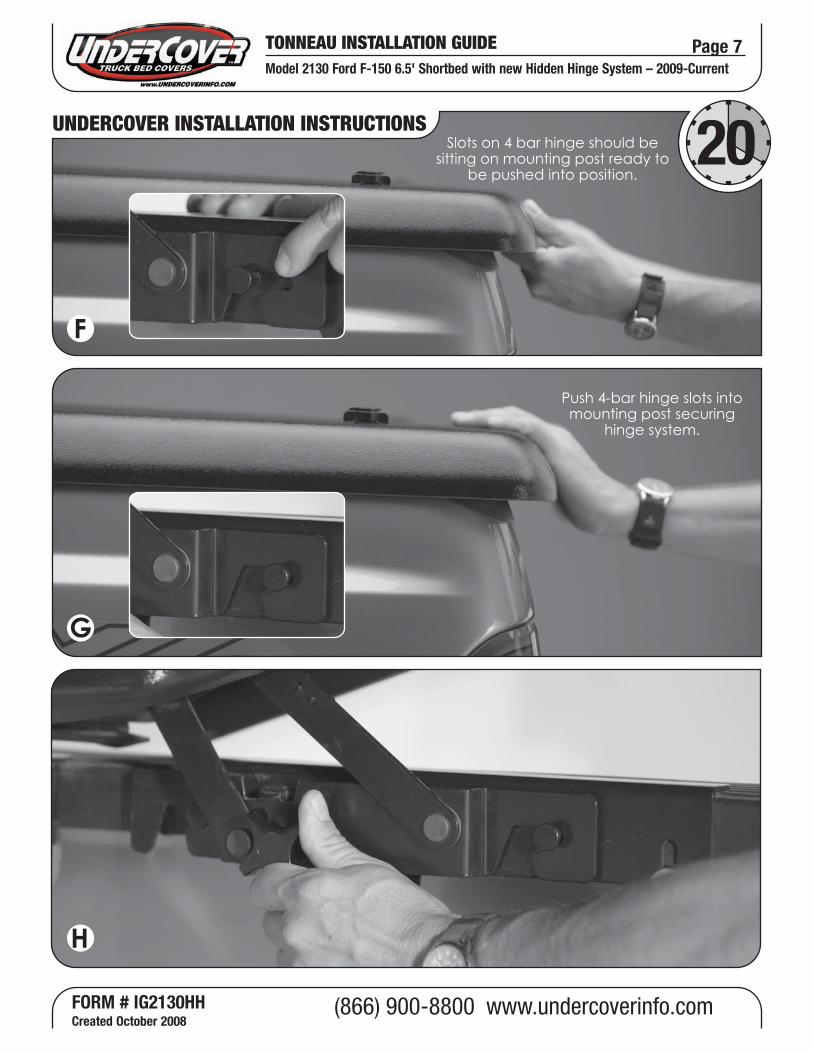
You are now ready to install your cover and test for proper fitting with the bed rails of your truck. Mounted to your covers are both a left and right 4 bar hinge. See Figure 5, picture B. With some assistance, lift the cover up and over the bed bringing the 4 bar hinges over the front brackets see picture C, page 6. Your front brackets have 2 mounting posts, see Figure 5, picture D. The 4 bar hinges attached to your cover have 2 slots on each that slide over the mounting post fixed to the bracket on your truck. Set the cover down sliding the slots over the post on both sides. See page 6, Figure 6, picture E.
The cover should be resting on the bed rail of your truck with a larger than normal overhang at the tail gate. See Page 7, picture F. From the rear of the truck you should now be able to push the cover forward sliding the mounting post into the slots of the 4 bar hinge. See Page 7, picture G. Your cover should now be locked into place and your are ready to tighten the twist knobs on the 4 bar hinge into the front brackets. Only hand tighten this and secure as much as possible. See page 7, picture H. Follow the steps on Page 10 for proper fit before you firmly tighten the twist knob. You may need to remove the cover to make adjustments to the front bracket to line up the cover with the bed.
Footnote: Normal installation does not require the use of a torque wrench. But it is a good idea to compare how tight you are currently tightening the bolts with the tool you are using with a torque wrench just so you can get “the feel” of how tight 15-ft./lbs. or 180-in./lbs. of torque actually is.
A
B
C
D
FACT: Undercover’sABS-Composite material makes it the strongest and most durable tonneau on the market.
FORM # IG2130HHCreated October 2008
Page 5Model 2130 Ford F-150 6.5' Shortbed with new Hidden Hinge System – 2009-Current
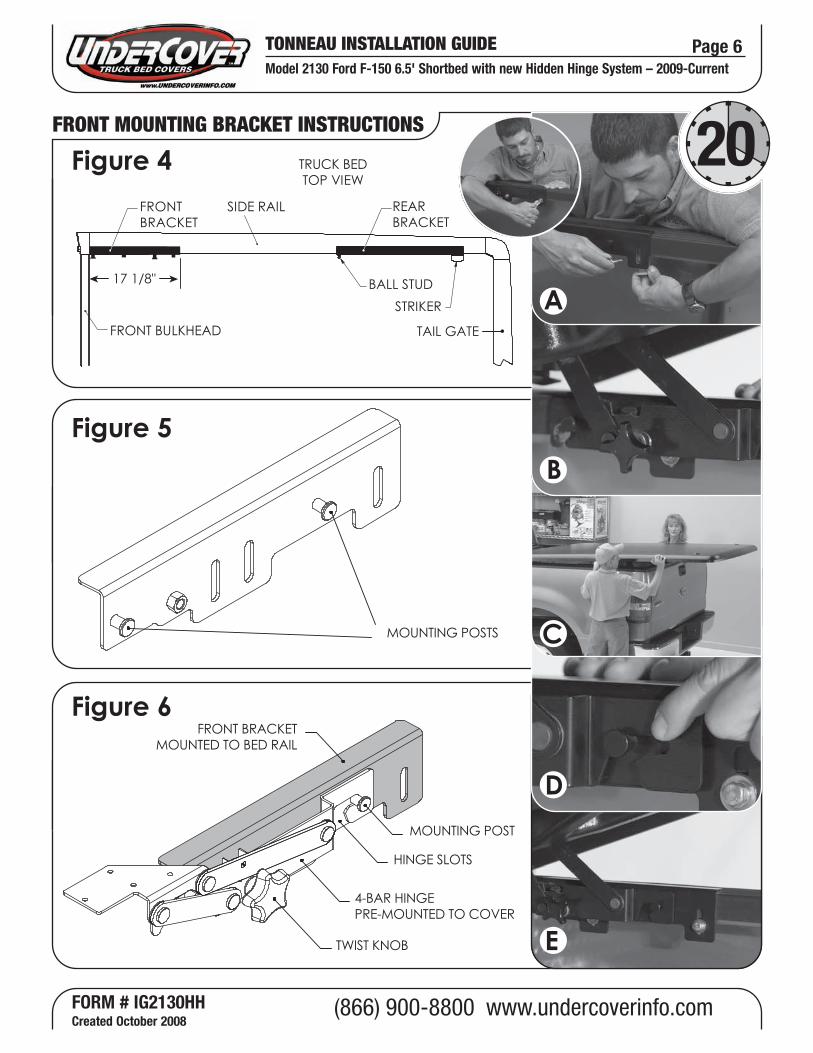
Figure 6
TONNEAU INSTALLATION GUIDE
FRONT MOUNTING BRACKET INSTRUCTIONS
(866) 900-8800 www.undercoverinfo.com
Figure 5
MOUNTING POSTS
MOUNTING POST
HINGE SLOTS
4-BAR HINGEPRE-MOUNTED TO COVER
TWIST KNOB
FRONT BRACKETMOUNTED TO BED RAIL
20
B
C
D
E
ATAIL GATE
Figure 4
56 7/8”
TRUCK BEDTOP VIEW
TRUCK BEDTOP VIEW
FRONT BULKHEAD
REARBRACKET
BALL STUD
STRIKER
FRONT BRACKET
SIDE RAIL
17 1/8"
FORM # IG2130HHCreated October 2008
Page 6Model 2130 Ford F-150 6.5' Shortbed with new Hidden Hinge System – 2009-Current
(866) 900-8800 www.undercoverinfo.com
TONNEAU INSTALLATION GUIDE
TEST FIT COVER PROPERLY BEFORE FINAL SECURING OF KNOBS AND CLAMPS.
TONNEAU INSTALLATION GUIDE
UNDERCOVER INSTALLATION INSTRUCTIONS
(866) 900-8800 www.undercoverinfo.com
G
H
F
20Slots on 4 bar hinge should be sitting on mounting post ready to
be pushed into position.
Push 4-bar hinge slots into mounting post securing
hinge system.
FORM # IG2130HHCreated October 2008
Page 7Model 2130 Ford F-150 6.5' Shortbed with new Hidden Hinge System – 2009-Current
(866) 900-8800 www.undercoverinfo.com
TONNEAU INSTALLATION GUIDE
TEST FIT COVER PROPERLY BEFORE FINAL SECURING OF KNOBS AND CLAMPS.
TONNEAU INSTALLATION GUIDE
UNDERCOVER INSTALLATION INSTRUCTIONS
(866) 900-8800 www.undercoverinfo.com
G
H
F
20Slots on 4 bar hinge should be sitting on mounting post ready to
be pushed into position.
Push 4-bar hinge slots into mounting post securing
hinge system.
Very Important: Periodically check your truck for rubbing. Make slight adjustments when necessary. More information on Step 4.
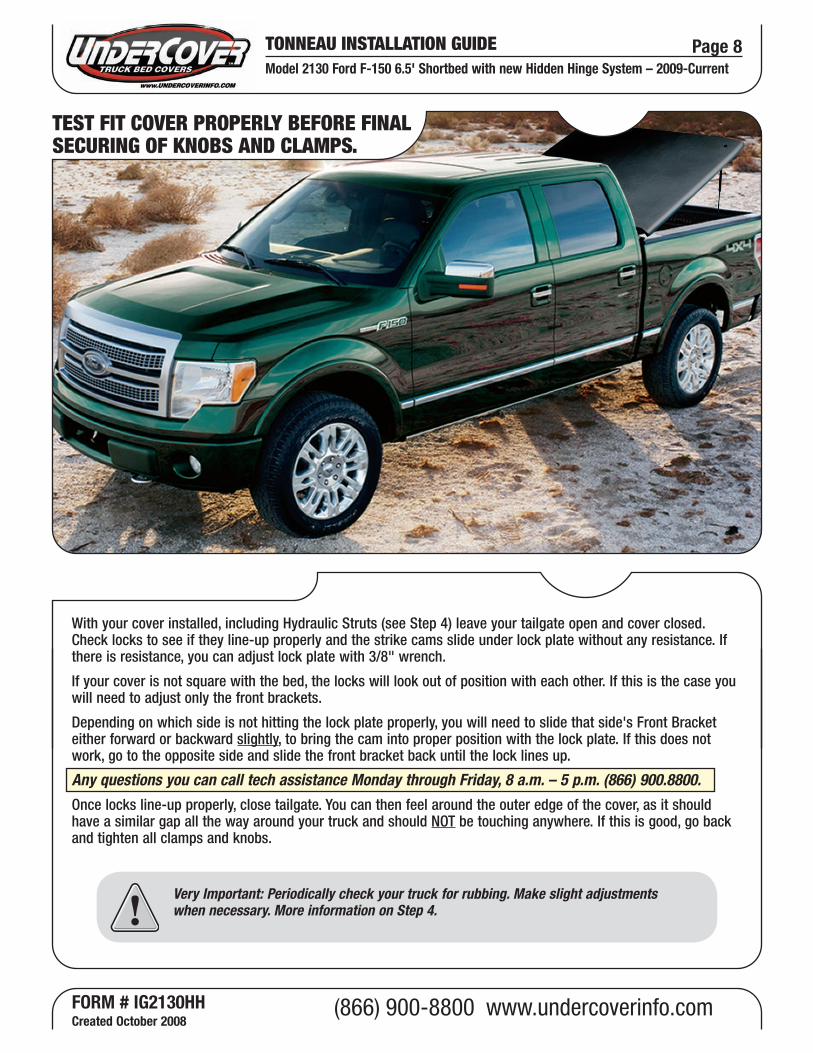
With your cover installed, including Hydraulic Struts (see Step 4) leave your tailgate open and cover closed. Check locks to see if they line-up properly and the strike cams slide under lock plate without any resistance. If there is resistance, you can adjust lock plate with 3/8" wrench.
If your cover is not square with the bed, the locks will look out of position with each other. If this is the case you will need to adjust only the front brackets.
Depending on which side is not hitting the lock plate properly, you will need to slide that side's Front Bracket either forward or backward slightly, to bring the cam into proper position with the lock plate. If this does not work, go to the opposite side and slide the front bracket back until the lock lines up.
Any questions you can call tech assistance Monday through Friday, 8 a.m. – 5 p.m. (866) 900.8800.
Once locks line-up properly, close tailgate. You can then feel around the outer edge of the cover, as it should have a similar gap all the way around your truck and should NOT be touching anywhere. If this is good, go back and tighten all clamps and knobs.
FORM # IG2130HHCreated October 2008
Page 8Model 2130 Ford F-150 6.5' Shortbed with new Hidden Hinge System – 2009-Current
TONNEAU INSTALLATION GUIDE
(866) 900-8800 www.undercoverinfo.com
UNDERCOVER INSTALLATION INSTRUCTIONSEASY AS 1-2-3
STEP
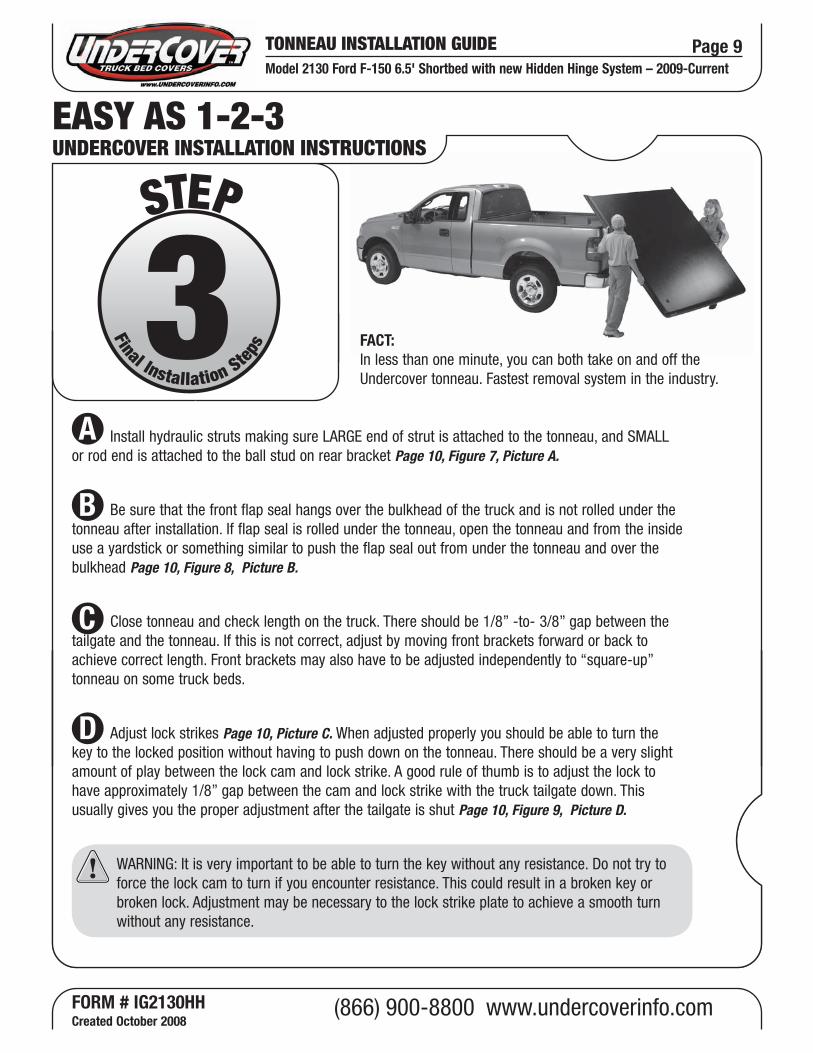
3Final Installation Steps FACT:
In less than one minute, you can both take on and off the Undercover tonneau. Fastest removal system in the industry.
Install hydraulic struts making sure LARGE end of strut is attached to the tonneau, and SMALL or rod end is attached to the ball stud on rear bracket Page 10, Figure 7, Picture A.
Be sure that the front flap seal hangs over the bulkhead of the truck and is not rolled under the tonneau after installation. If flap seal is rolled under the tonneau, open the tonneau and from the inside use a yardstick or something similar to push the flap seal out from under the tonneau and over the bulkhead Page 10, Figure 8, Picture B.
Close tonneau and check length on the truck. There should be 1/8” -to- 3/8” gap between the tailgate and the tonneau. If this is not correct, adjust by moving front brackets forward or back to achieve correct length. Front brackets may also have to be adjusted independently to “square-up” tonneau on some truck beds.
Adjust lock strikes Page 10, Picture C. When adjusted properly you should be able to turn the key to the locked position without having to push down on the tonneau. There should be a very slight amount of play between the lock cam and lock strike. A good rule of thumb is to adjust the lock to have approximately 1/8” gap between the cam and lock strike with the truck tailgate down. This usually gives you the proper adjustment after the tailgate is shut Page 10, Figure 9, Picture D.
WARNING: It is very important to be able to turn the key without any resistance. Do not try to force the lock cam to turn if you encounter resistance. This could result in a broken key or broken lock. Adjustment may be necessary to the lock strike plate to achieve a smooth turn without any resistance.
A
B
C
D
FORM # IG2130HHCreated October 2008
Page 9Model 2130 Ford F-150 6.5' Shortbed with new Hidden Hinge System – 2009-Current

TONNEAU INSTALLATION GUIDE
UNDERCOVER INSTALLATION INSTRUCTIONS
(866) 900-8800 www.undercoverinfo.com
Figure 7
Figure 8
Figure 9
HYDRAULIC STRUT(LARGE END)ATTACHES TO TONNEAU
HYDRAULIC STRUT(ROD END)TRUCK BED RAIL
REAR BRACKET
30
TRUCK BULKHEAD
TONNEAUUNDERCOVER
FRONT FLAP SEAL
CORRECT PLACEMENT OF FRONT FLAP SEAL:FLAP HANGS OVER BULKHEADINCORRECT
PLACEMENT OF FRONT FLAP SEAL
LOCK STRIKELOCK
LOCK CAM#10-24WIZ NUT
TRUCK BED RAIL
REAR BRACKET
BED LIP
CLAMP
5/16"-18 X 1-1/2"HEX HEAD BOLT
5/16" LOCK WASHER
5/16" WASHER
A
B
C
D
FORM # IG2130HHCreated October 2008
Page 10Model 2130 Ford F-150 6.5' Shortbed with new Hidden Hinge System – 2009-Current
TONNEAU INSTALLATION GUIDE
(866) 900-8800 www.undercoverinfo.com
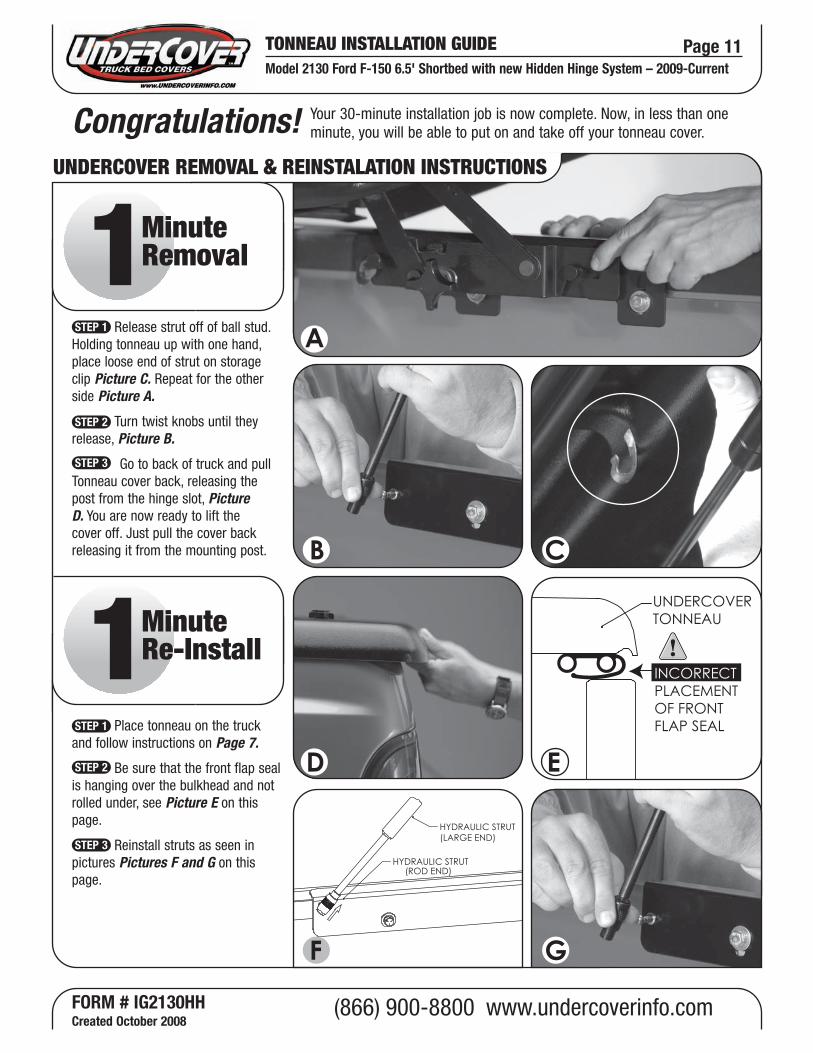
1MinuteRemoval
1MinuteRe-Install
A
CB
F
UNDERCOVER REMOVAL & REINSTALATION INSTRUCTIONS
D
G
HYDRAULIC STRUT(LARGE END)
HYDRAULIC STRUT(ROD END)
E
UNDERCOVERTONNEAU
INCORRECT PLACEMENT OF FRONT FLAP SEAL
Your 30-minute installation job is now complete. Now, in less than one minute, you will be able to put on and take off your tonneau cover.Congratulations!
Release strut off of ball stud. Holding tonneau up with one hand, place loose end of strut on storage clip Picture C. Repeat for the other side Picture A.
Turn twist knobs until they release, Picture B.
Go to back of truck and pull Tonneau cover back, releasing the post from the hinge slot, Picture D. You are now ready to lift the cover off. Just pull the cover back releasing it from the mounting post.
STEP 1
STEP 2
STEP 3
Place tonneau on the truck and follow instructions on Page 7.
Be sure that the front flap seal is hanging over the bulkhead and not rolled under, see Picture E on this page.
Reinstall struts as seen in pictures Pictures F and G on this page.
STEP 1
STEP 2
STEP 3
FORM # IG2130HHCreated October 2008
Page 11Model 2130 Ford F-150 6.5' Shortbed with new Hidden Hinge System – 2009-Current

TONNEAU INSTALLATION GUIDE
(866) 900-8800 www.undercoverinfo.com
UNDERCOVER WALL HANGING INSTRUCTIONS
A
C
D
B
32”
84”
Prior to removing the tonneau, mount the two J-Hooks provided on the garage wall. The hooks must have a minimum height from the floor of 98 inches, and be 32” on center horizontally apart Picture A & B.
Remove your tonneau from the truck bed according to instructions on page 9, 1-Minute Removal.
Hang tonneau vertically on the wall-mounted J-Hooks, with the underside against the wall inserting J-Hooks into the holes provided in Picture C.
STEP 1
STEP 2
STEP 3
FORM # IG2130HHCreated October 2008
Page 12Model 2130 Ford F-150 6.5' Shortbed with new Hidden Hinge System – 2009-Current

TONNEAU INSTALLATION GUIDE
Congratulations! You’ve just installed the fastest-selling, highest-quality tonneau in the industry. Thank you very much for your purchase of UnderCover!
Steve BrallierPresident E.D. Industries/UnderCover
© 2007 E.D. Industries, Inc. All rights reserved.
E.D. Industries/UnderCoverP.O. Box 620Rogersville, MO 65742(417) 753-8000(866) [email protected]
UNDERCOVER SERIAL NUMBER LOCATION
THANK YOU!
For any Warranty issues, contact UnderCover directly.
Page 13Model 2130 Ford F-150 6.5' Shortbed with new Hidden Hinge System – 2009-Current
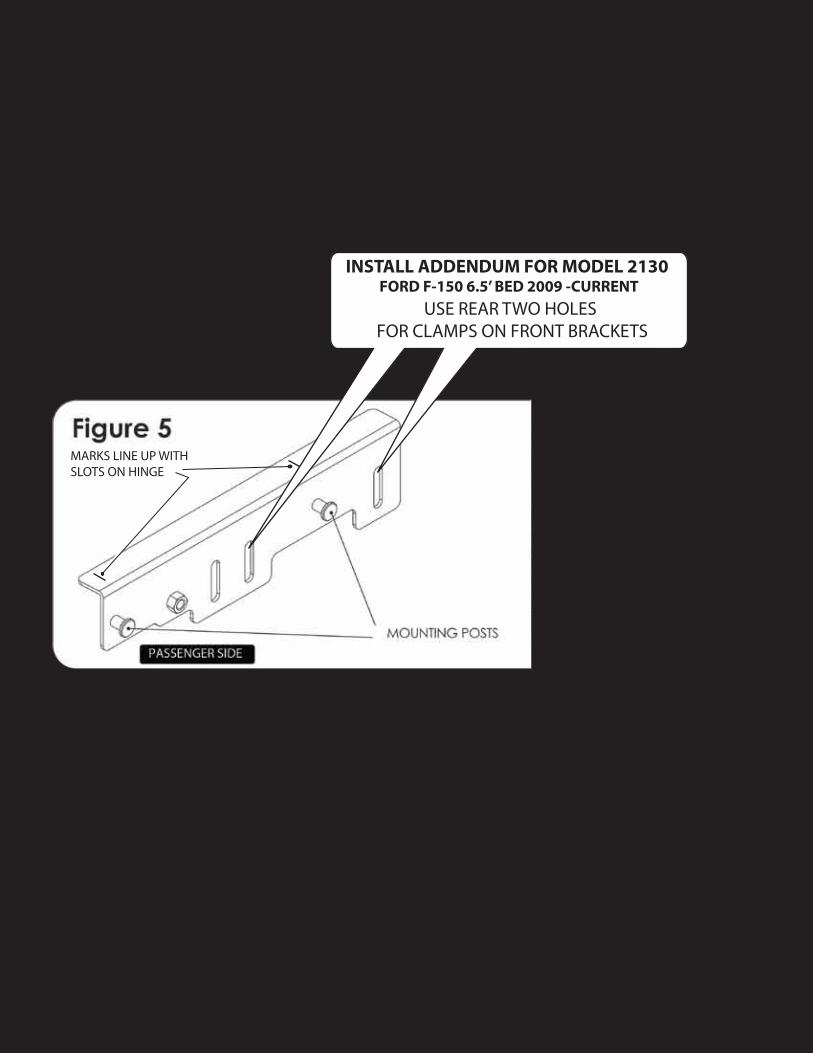
MARKS LINE UP WITHSLOTS ON HINGE
17 1/8”
Page 6Model 2130 Ford F-150 6.5’ Bed 2009-Current
FORM # IG2130HHModi�ed July 2009
INSTALL ADDENDUM FOR MODEL 2130 FORD F-150 6.5’ BED 2009 -CURRENT
USE REAR TWO HOLES FOR CLAMPS ON FRONT BRACKETS