instruction, installation & warranty manual
TRANSCRIPT

INST
RUCT
ION,
INST
ALLA
TIO
N &
WAR
RANT
Y M
ANUA
L
INDEX
A. INSTALLER COMPETENCY 3
B. COMPONENTS
C. UNDERSTANDING THE THERMOSYPHON - CLOSE COUPLED CIRCULATION METHOD 3
D. UNDERSTANDING THE SPLIT PUMPED CIRCULATION METHOD 3
E. SOLAR SYSTEM TYPES 4
F. FEATURES OF KWIKOT SOLAR FLAT PLATE COLLECTOR PANEL 6
G. FEATURES OF THE KWIKOT SOLAR VACUUM TUBES 7
H. ROOF LOCATION OF A SOLAR SYSTEM 7
I. INSTALLATION OF A SOLAR WATER HEATER SYSTEM 9
J. FILLING A SOLAR SYSTEM 17
K. DRAINING AN INDIRECT SOLAR SYSTEM 18
L. GENERAL MAINTENANCE OF THE SOLAR SYSTEM - FOR THE HOMEOWNER 18
M. SAFETY PRECAUTIONS & EMERGENCY SHUTDOWN PROCEDURE - FOR THE HOMEOWNER 19
N. WARRANTIES - FOR THE HOMEOWNER 19
O. PERTINENT INFORMATION - FOR THE HOMEOWNER (TO BE COMPLETED BY THE INSTALLER) 23
P. PERTINENT INFORMATION - FOR KWIKOT (PTY) LTD TO VALIDATE THE WARRANTY 25
Kwiksol Instruction, Installation & Warranty Manual 3
A. INSTALLER COMPETENCYThe installer must be an accredited Eskom solar installer, qualified in plumbing and au fait with the required SANS 10106 Solar Water Heater and SANS 10254 Electric Water Heater Specifications.
B. COMPONENTS
All components must be of an approved type and SABS approved where required to be so.
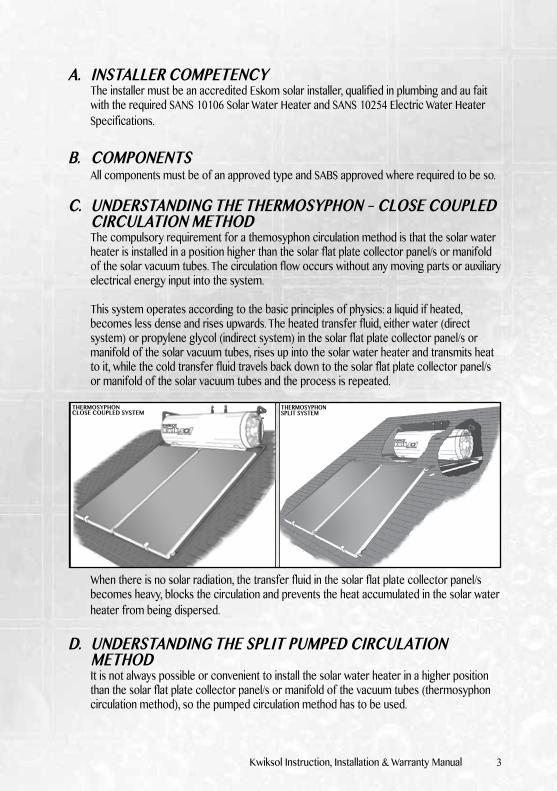
C. UNDERSTANDING THE THERMOSYPHON – CLOSE COUPLED CIRCULATION METHOD
The compulsory requirement for a themosyphon circulation method is that the solar water heater is installed in a position higher than the solar flat plate collector panel/s or manifold of the solar vacuum tubes. The circulation flow occurs without any moving parts or auxiliary electrical energy input into the system.
This system operates according to the basic principles of physics: a liquid if heated, becomes less dense and rises upwards. The heated transfer fluid, either water (direct system) or propylene glycol (indirect system) in the solar flat plate collector panel/s or manifold of the solar vacuum tubes, rises up into the solar water heater and transmits heat to it, while the cold transfer fluid travels back down to the solar flat plate collector panel/s or manifold of the solar vacuum tubes and the process is repeated.
THERMOSYPHONCLOSE COUPLED SYSTEM
THERMOSYPHONSPLIT SYSTEM
When there is no solar radiation, the transfer fluid in the solar flat plate collector panel/s becomes heavy, blocks the circulation and prevents the heat accumulated in the solar water heater from being dispersed.
D. UNDERSTANDING THE SPLIT PUMPED CIRCULATION METHOD
It is not always possible or convenient to install the solar water heater in a higher position than the solar flat plate collector panel/s or manifold of the vacuum tubes (thermosyphon circulation method), so the pumped circulation method has to be used.
4 Kwiksol Instruction, Installation & Warranty Manual
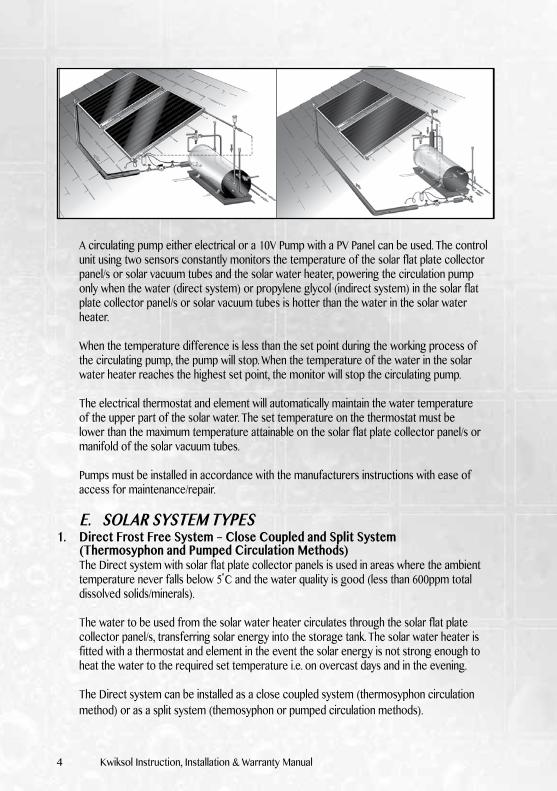
A circulating pump either electrical or a 10V Pump with a PV Panel can be used. The control unit using two sensors constantly monitors the temperature of the solar flat plate collector panel/s or solar vacuum tubes and the solar water heater, powering the circulation pump only when the water (direct system) or propylene glycol (indirect system) in the solar flat plate collector panel/s or solar vacuum tubes is hotter than the water in the solar water heater.
When the temperature difference is less than the set point during the working process of the circulating pump, the pump will stop. When the temperature of the water in the solar water heater reaches the highest set point, the monitor will stop the circulating pump.
The electrical thermostat and element will automatically maintain the water temperature of the upper part of the solar water. The set temperature on the thermostat must be lower than the maximum temperature attainable on the solar flat plate collector panel/s or manifold of the solar vacuum tubes.
Pumps must be installed in accordance with the manufacturers instructions with ease of access for maintenance/repair.
E. SOLAR SYSTEM TYPES1. Direct Frost Free System – Close Coupled and Split System
(Thermosyphon and Pumped Circulation Methods)The Direct system with solar flat plate collector panels is used in areas where the ambient temperature never falls below 5ໍC and the water quality is good (less than 600ppm total dissolved solids/minerals).
The water to be used from the solar water heater circulates through the solar flat plate collector panel/s, transferring solar energy into the storage tank. The solar water heater is fitted with a thermostat and element in the event the solar energy is not strong enough to heat the water to the required set temperature i.e. on overcast days and in the evening.
The Direct system can be installed as a close coupled system (thermosyphon circulation method) or as a split system (themosyphon or pumped circulation methods).
Kwiksol Instruction, Installation & Warranty Manual 5
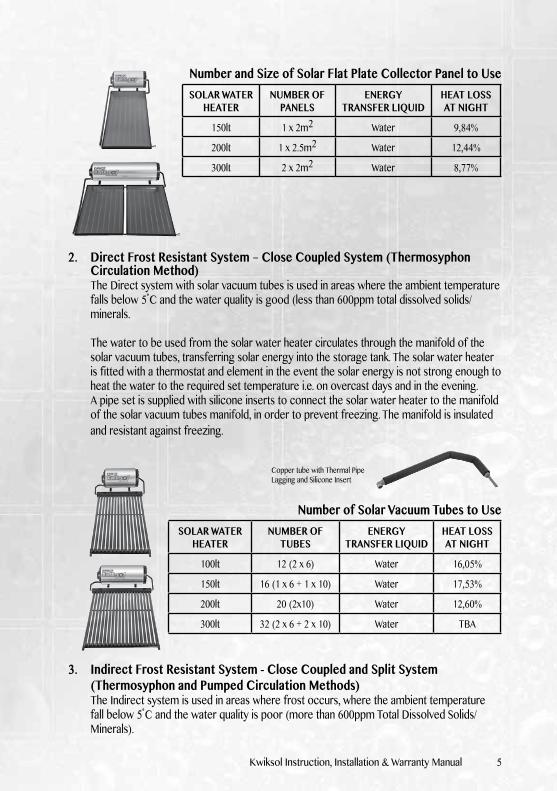
Number and Size of Solar Flat Plate Collector Panel to Use SOLAR WATER
HEATERNUMBER OF
PANELSENERGY
TRANSFER LIQUIDHEAT LOSSAT NIGHT
150lt 1 x 2m2 Water 9,84%
200lt 1 x 2.5m2 Water 12,44%
300lt 2 x 2m2 Water 8,77%
2. Direct Frost Resistant System – Close Coupled System (Thermosyphon Circulation Method)The Direct system with solar vacuum tubes is used in areas where the ambient temperature falls below 5ໍC and the water quality is good (less than 600ppm total dissolved solids/minerals.
The water to be used from the solar water heater circulates through the manifold of the solar vacuum tubes, transferring solar energy into the storage tank. The solar water heater is fitted with a thermostat and element in the event the solar energy is not strong enough to heat the water to the required set temperature i.e. on overcast days and in the evening.A pipe set is supplied with silicone inserts to connect the solar water heater to the manifold of the solar vacuum tubes manifold, in order to prevent freezing. The manifold is insulated and resistant against freezing.
Copper tube with Thermal Pipe Lagging and Silicone Insert
Number of Solar Vacuum Tubes to UseSOLAR WATER
HEATERNUMBER OF
TUBESENERGY
TRANSFER LIQUIDHEAT LOSSAT NIGHT
100lt 12 (2 x 6) Water 16,05%
150lt 16 (1 x 6 + 1 x 10) Water 17,53%
200lt 20 (2x10) Water 12,60%
300lt 32 (2 x 6 + 2 x 10) Water TBA
3. Indirect Frost Resistant System - Close Coupled and Split System (Thermosyphon and Pumped Circulation Methods)The Indirect system is used in areas where frost occurs, where the ambient temperature fall below 5ໍC and the water quality is poor (more than 600ppm Total Dissolved Solids/Minerals).
6 Kwiksol Instruction, Installation & Warranty Manual
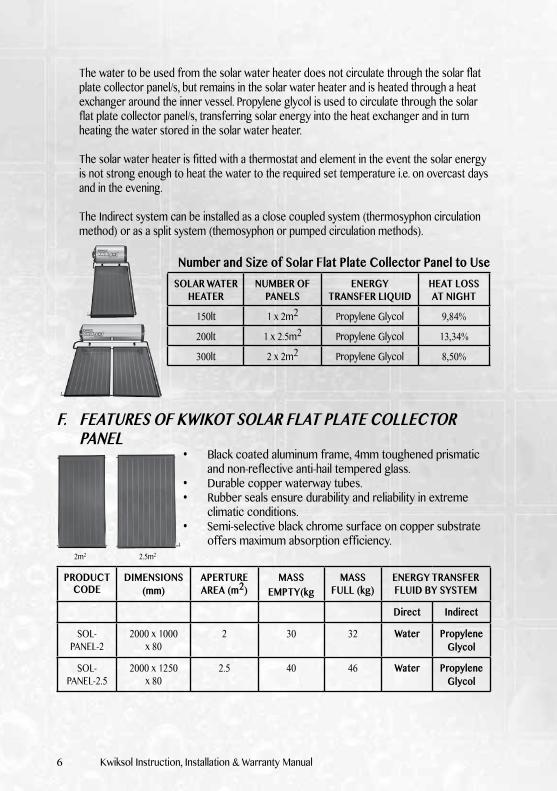
The water to be used from the solar water heater does not circulate through the solar flat plate collector panel/s, but remains in the solar water heater and is heated through a heat exchanger around the inner vessel. Propylene glycol is used to circulate through the solar flat plate collector panel/s, transferring solar energy into the heat exchanger and in turn heating the water stored in the solar water heater.
The solar water heater is fitted with a thermostat and element in the event the solar energy is not strong enough to heat the water to the required set temperature i.e. on overcast days and in the evening.
The Indirect system can be installed as a close coupled system (thermosyphon circulation method) or as a split system (themosyphon or pumped circulation methods).
Number and Size of Solar Flat Plate Collector Panel to Use SOLAR WATER
HEATERNUMBER OF
PANELSENERGY
TRANSFER LIQUIDHEAT LOSSAT NIGHT
150lt 1 x 2m2 Propylene Glycol 9,84%
200lt 1 x 2.5m2 Propylene Glycol 13,34%
300lt 2 x 2m2 Propylene Glycol 8,50%
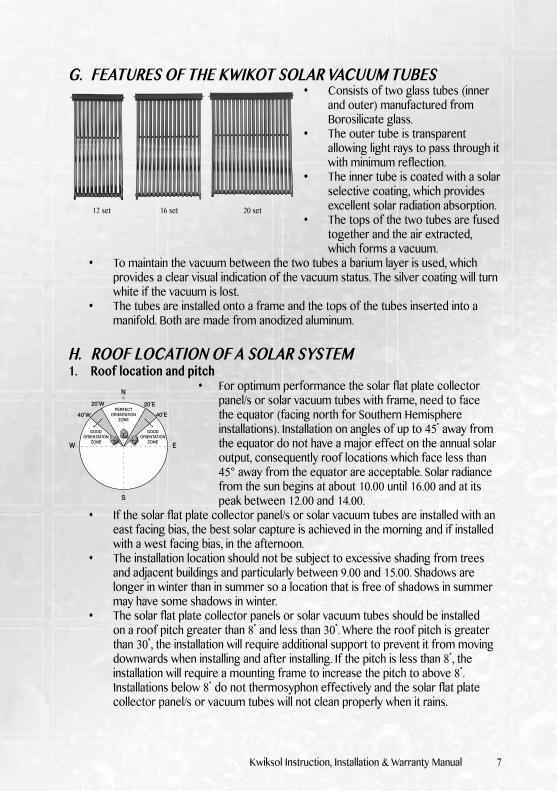
F. FEATURES OF KWIKOT SOLAR FLAT PLATE COLLECTOR PANEL
• Black coated aluminum frame, 4mm toughened prismatic and non-reflective anti-hail tempered glass.
• Durable copper waterway tubes.• Rubber seals ensure durability and reliability in extreme
climatic conditions.• Semi-selective black chrome surface on copper substrate
offers maximum absorption efficiency.
PRODUCT CODE
DIMENSIONS (mm)
APERTURE AREA (m2)
MASS EMPTY(kg
MASS FULL (kg)
ENERGY TRANSFER FLUID BY SYSTEM
Direct Indirect
SOL-PANEL-2
2000 x 1000 x 80
2 30 32 Water Propylene Glycol
SOL-PANEL-2.5
2000 x 1250 x 80
2.5 40 46 Water Propylene Glycol
2m2 2.5m2
Kwiksol Instruction, Installation & Warranty Manual 7
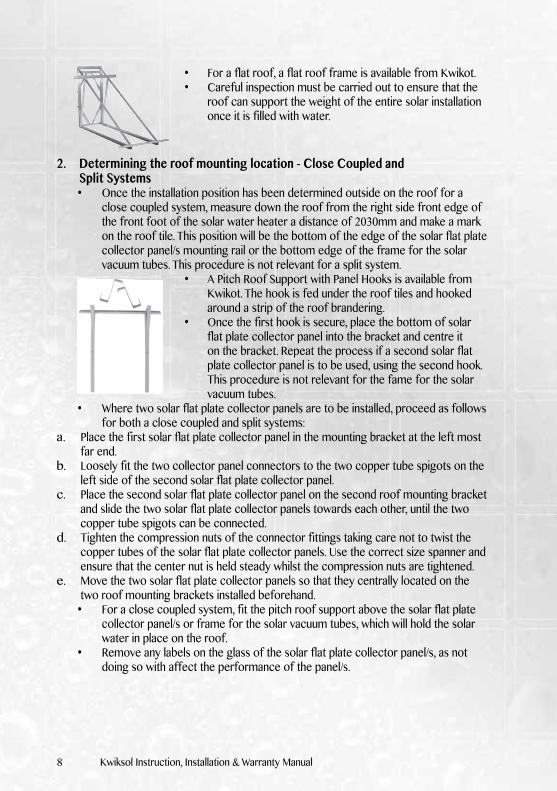
G. FEATURES OF THE KWIKOT SOLAR VACUUM TUBES• Consists of two glass tubes (inner
and outer) manufactured from Borosilicate glass.
• The outer tube is transparent allowing light rays to pass through it with minimum reflection.
• The inner tube is coated with a solar selective coating, which provides excellent solar radiation absorption.
• The tops of the two tubes are fused together and the air extracted, which forms a vacuum.
• To maintain the vacuum between the two tubes a barium layer is used, which provides a clear visual indication of the vacuum status. The silver coating will turn white if the vacuum is lost.
• The tubes are installed onto a frame and the tops of the tubes inserted into a manifold. Both are made from anodized aluminum.
H. ROOF LOCATION OF A SOLAR SYSTEM1. Roof location and pitch
• For optimum performance the solar flat plate collector panel/s or solar vacuum tubes with frame, need to face the equator (facing north for Southern Hemisphere installations). Installation on angles of up to 45ໍ away from the equator do not have a major effect on the annual solar output, consequently roof locations which face less than 45° away from the equator are acceptable. Solar radiance from the sun begins at about 10.00 until 16.00 and at its peak between 12.00 and 14.00.
• If the solar flat plate collector panel/s or solar vacuum tubes are installed with an east facing bias, the best solar capture is achieved in the morning and if installed with a west facing bias, in the afternoon.
• The installation location should not be subject to excessive shading from trees and adjacent buildings and particularly between 9.00 and 15.00. Shadows are longer in winter than in summer so a location that is free of shadows in summer may have some shadows in winter.
• The solar flat plate collector panels or solar vacuum tubes should be installed on a roof pitch greater than 8ໍ and less than 30ໍ. Where the roof pitch is greater than 30ໍ, the installation will require additional support to prevent it from moving downwards when installing and after installing. If the pitch is less than 8ໍ, the installation will require a mounting frame to increase the pitch to above 8ໍ. Installations below 8ໍ do not thermosyphon effectively and the solar flat plate collector panel/s or vacuum tubes will not clean properly when it rains.
12 set 16 set 20 set
PERFECTORIENTATION
ZONE
GOODORIENTATION
ZONE
GOODORIENTATION
ZONE
N20˚E20˚W
40˚W 40˚E
S
EW
8 Kwiksol Instruction, Installation & Warranty Manual
• For a flat roof, a flat roof frame is available from Kwikot.• Careful inspection must be carried out to ensure that the
roof can support the weight of the entire solar installation once it is filled with water.
2. Determining the roof mounting location - Close Coupled and Split Systems
• Once the installation position has been determined outside on the roof for a close coupled system, measure down the roof from the right side front edge of the front foot of the solar water heater a distance of 2030mm and make a mark on the roof tile. This position will be the bottom of the edge of the solar flat plate collector panel/s mounting rail or the bottom edge of the frame for the solar vacuum tubes. This procedure is not relevant for a split system.
• A Pitch Roof Support with Panel Hooks is available from Kwikot. The hook is fed under the roof tiles and hooked around a strip of the roof brandering.
• Once the first hook is secure, place the bottom of solar flat plate collector panel into the bracket and centre it on the bracket. Repeat the process if a second solar flat plate collector panel is to be used, using the second hook. This procedure is not relevant for the fame for the solar vacuum tubes.
• Where two solar flat plate collector panels are to be installed, proceed as follows for both a close coupled and split systems:
a. Place the first solar flat plate collector panel in the mounting bracket at the left most far end.
b. Loosely fit the two collector panel connectors to the two copper tube spigots on the left side of the second solar flat plate collector panel.
c. Place the second solar flat plate collector panel on the second roof mounting bracket and slide the two solar flat plate collector panels towards each other, until the two copper tube spigots can be connected.
d. Tighten the compression nuts of the connector fittings taking care not to twist the copper tubes of the solar flat plate collector panels. Use the correct size spanner and ensure that the center nut is held steady whilst the compression nuts are tightened.
e. Move the two solar flat plate collector panels so that they centrally located on the two roof mounting brackets installed beforehand.• For a close coupled system, fit the pitch roof support above the solar flat plate
collector panel/s or frame for the solar vacuum tubes, which will hold the solar water in place on the roof.
• Remove any labels on the glass of the solar flat plate collector panel/s, as not doing so with affect the performance of the panel/s.

Kwiksol Instruction, Installation & Warranty Manual 9
I. INSTALLATION OF A SOLAR WATER HEATER SYSTEMAll systems must be installed in accordance with SANS 10106 and SANS 10254, which must include a 400kPa Kwikot Pressure Control Valve, Kwikot Vacuum Breakers on both the cold water supply and the hot water draw off, Kwikot Drain Cock and Kwikot 400kPa Safety Valve.
The solar water heater and solar flat plate collector panel/s or manifold for the solar vacuum tubes must be connected by using 22mm copper piping, 22mm female Conex fittings and/or 22mm copper elbows and tee-pieces and thermal pipe lagging.
10 Kwiksol Instruction, Installation & Warranty Manual
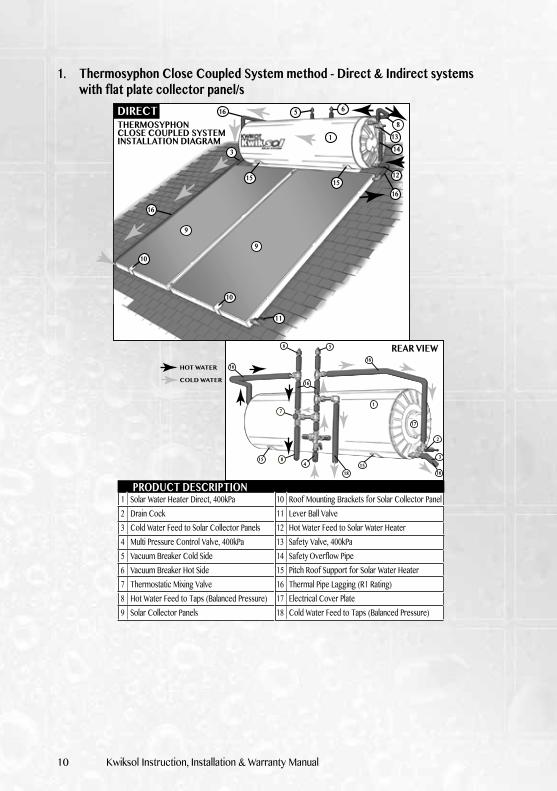
1. Thermosyphon Close Coupled System method - Direct & Indirect systems with flat plate collector panel/s
THEMOSYPHON SPLIT SYSTEM METHOD-DIRECT & INDIRECT SYSTEMS WITH SOLAR FLAT PLATE COLLECTOR PANEL/S
Kwiksol Instruction, Installation & Warranty Manual 11
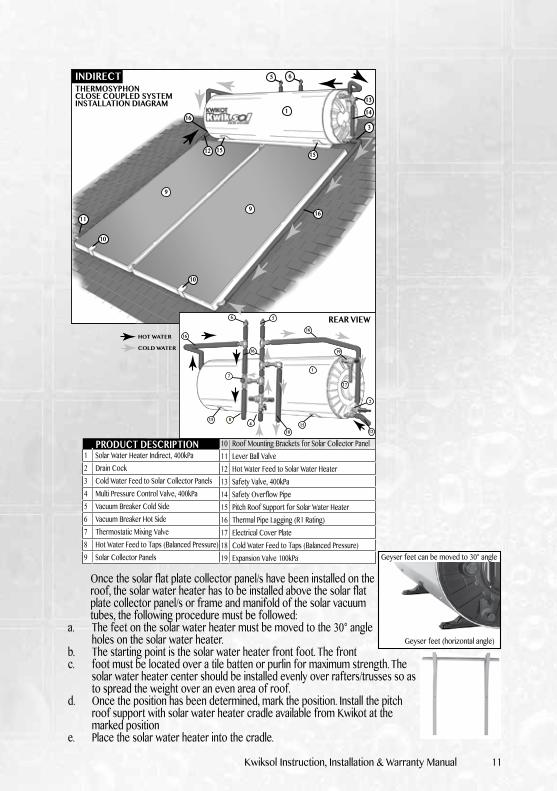
Solar Water Heater Indirect, 400kPaDrain CockCold Water Feed to Solar Collector PanelsMulti Pressure Control Valve, 400kPaVacuum Breaker Cold SideVacuum Breaker Hot SideThermostatic Mixing ValveHot Water Feed to Taps (Balanced Pressure)Solar Collector Panels
123456789
PRODUCT DESCRIPTION Roof Mounting Brackets for Solar Collector PanelLever Ball ValveHot Water Feed to Solar Water HeaterSafety Valve, 400kPaSafety Overflow PipePitch Roof Support for Solar Water HeaterThermal Pipe Lagging (R1 Rating)Electrical Cover PlateCold Water Feed to Taps (Balanced Pressure)Expansion Valve 100kPa
10111213141516171819
13
5 6
14
12 15
10
10
11
15
1
316
169
9
HOT WATER
COLD WATER
INDIRECTTHERMOSYPHONCLOSE COUPLED SYSTEMINSTALLATION DIAGRAM
REAR VIEW
1
16
19
17
12
16
1518
15
2
5
8
6
7
4
16
Once the solar flat plate collector panel/s have been installed on the roof, the solar water heater has to be installed above the solar flat plate collector panel/s or frame and manifold of the solar vacuum tubes, the following procedure must be followed:
a. The feet on the solar water heater must be moved to the 30° angle holes on the solar water heater.
b. The starting point is the solar water heater front foot. The front c. foot must be located over a tile batten or purlin for maximum strength. The
solar water heater center should be installed evenly over rafters/trusses so as to spread the weight over an even area of roof.
d. Once the position has been determined, mark the position. Install the pitch roof support with solar water heater cradle available from Kwikot at the marked position
e. Place the solar water heater into the cradle.
Geyser feet can be moved to 30° angle
Geyser feet (horizontal angle)
12 Kwiksol Instruction, Installation & Warranty Manual
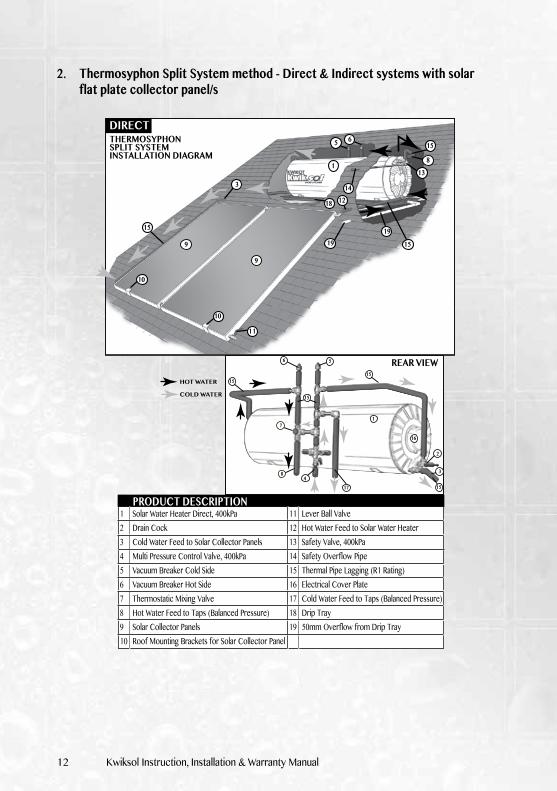
2. Thermosyphon Split System method - Direct & Indirect systems with solar flat plate collector panel/s
1
1515
16
15
15
17
2
3
5
8
6
7
4
HOT WATER
COLD WATER
REAR VIEW
Solar Water Heater Direct, 400kPaDrain CockCold Water Feed to Solar Collector PanelsMulti Pressure Control Valve, 400kPaVacuum Breaker Cold SideVacuum Breaker Hot SideThermostatic Mixing ValveHot Water Feed to Taps (Balanced Pressure)Solar Collector PanelsRoof Mounting Brackets for Solar Collector Panel
12345678910
PRODUCT DESCRIPTIONLever Ball ValveHot Water Feed to Solar Water HeaterSafety Valve, 400kPaSafety Overflow PipeThermal Pipe Lagging (R1 Rating)Electrical Cover PlateCold Water Feed to Taps (Balanced Pressure)Drip Tray50mm Overflow from Drip Tray
111213141516171819
138
1412
1919 15
18
10
10
11
1
3
15
15
9
9
5 6DIRECTTHERMOSYPHONSPLIT SYSTEMINSTALLATION DIAGRAM
Kwiksol Instruction, Installation & Warranty Manual 13
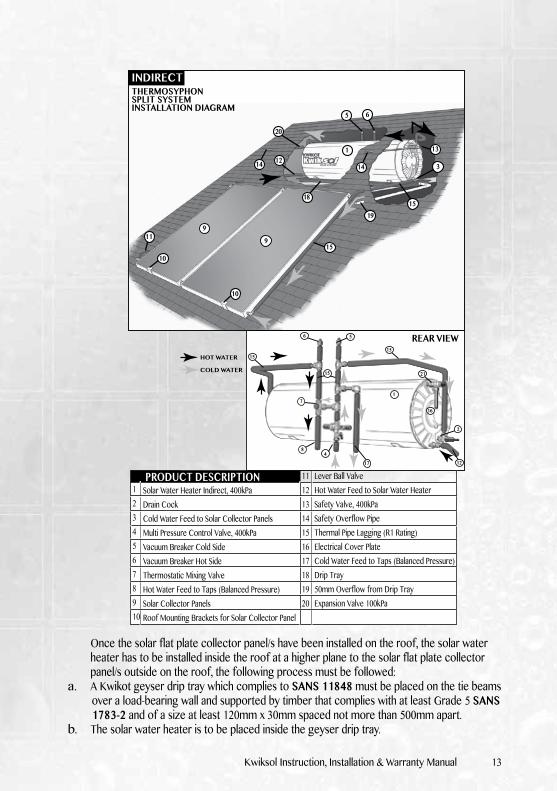
Solar Water Heater Indirect, 400kPaDrain CockCold Water Feed to Solar Collector PanelsMulti Pressure Control Valve, 400kPaVacuum Breaker Cold SideVacuum Breaker Hot SideThermostatic Mixing ValveHot Water Feed to Taps (Balanced Pressure)Solar Collector PanelsRoof Mounting Brackets for Solar Collector Panel
12345678910
PRODUCT DESCRIPTION Lever Ball ValveHot Water Feed to Solar Water HeaterSafety Valve, 400kPaSafety Overflow PipeThermal Pipe Lagging (R1 Rating)Electrical Cover PlateCold Water Feed to Taps (Balanced Pressure)Drip Tray50mm Overflow from Drip TrayExpansion Valve 100kPa
11121314151617181920
HOT WATER
COLD WATER
REAR VIEW
1
15
21
16
12
15
17
2
5
8
6
7
4
15
13
5 6
1414 12
10
10
11
15
1
3
20
15
19
18
99
INDIRECTTHERMOSYPHONSPLIT SYSTEM INSTALLATION DIAGRAM
Once the solar flat plate collector panel/s have been installed on the roof, the solar water heater has to be installed inside the roof at a higher plane to the solar flat plate collector panel/s outside on the roof, the following process must be followed:
a. A Kwikot geyser drip tray which complies to SANS 11848 must be placed on the tie beams over a load-bearing wall and supported by timber that complies with at least Grade 5 SANS 1783-2 and of a size at least 120mm x 30mm spaced not more than 500mm apart.
b. The solar water heater is to be placed inside the geyser drip tray.
14 Kwiksol Instruction, Installation & Warranty Manual
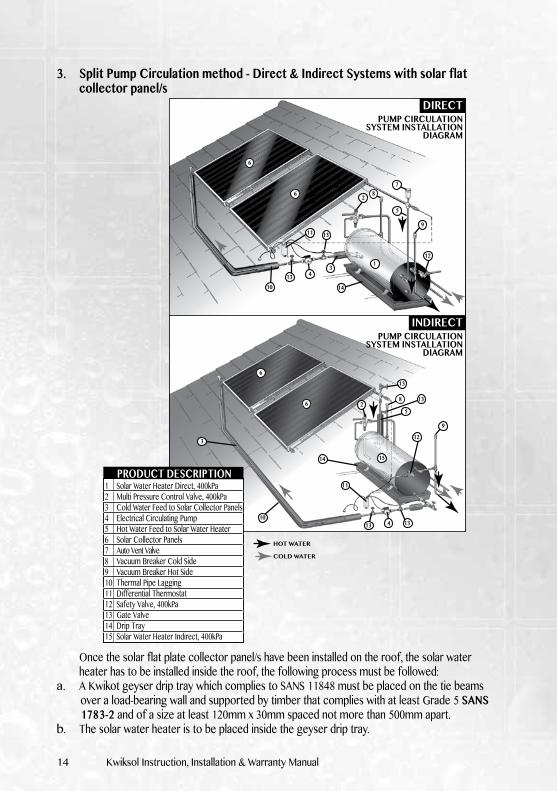
3. Split Pump Circulation method - Direct & Indirect Systems with solar flat collector panel/s
SPLIT PUMP CIRCULATION METHOD-DIRECT & INDIRECT SYSTEMSWITH SOLAR FLAT PLATE COLLECTOR PANEL/S
HOT WATER
COLD WATER
13
13
8
14
12
11
10
34
1
9
6
6
5
2
7
DIRECTPUMP CIRCULATION
SYSTEM INSTALLATIONDIAGRAM
13
13
13 13
8
14
12
11
10
3
4
15
9
6
65
2
INDIRECTPUMP CIRCULATION
SYSTEM INSTALLATIONDIAGRAM
123456789101112131415
Solar Water Heater Direct, 400kPaMulti Pressure Control Valve, 400kPaCold Water Feed to Solar Collector PanelsElectrical Circulating PumpHot Water Feed to Solar Water HeaterSolar Collector PanelsAuto Vent ValveVacuum Breaker Cold SideVacuum Breaker Hot SideThermal Pipe LaggingDifferential ThermostatSafety Valve, 400kPaGate ValveDrip TraySolar Water Heater Indirect, 400kPa
PRODUCT DESCRIPTION
Once the solar flat plate collector panel/s have been installed on the roof, the solar water heater has to be installed inside the roof, the following process must be followed:
a. A Kwikot geyser drip tray which complies to SANS 11848 must be placed on the tie beams over a load-bearing wall and supported by timber that complies with at least Grade 5 SANS 1783-2 and of a size at least 120mm x 30mm spaced not more than 500mm apart.
b. The solar water heater is to be placed inside the geyser drip tray.
Kwiksol Instruction, Installation & Warranty Manual 15
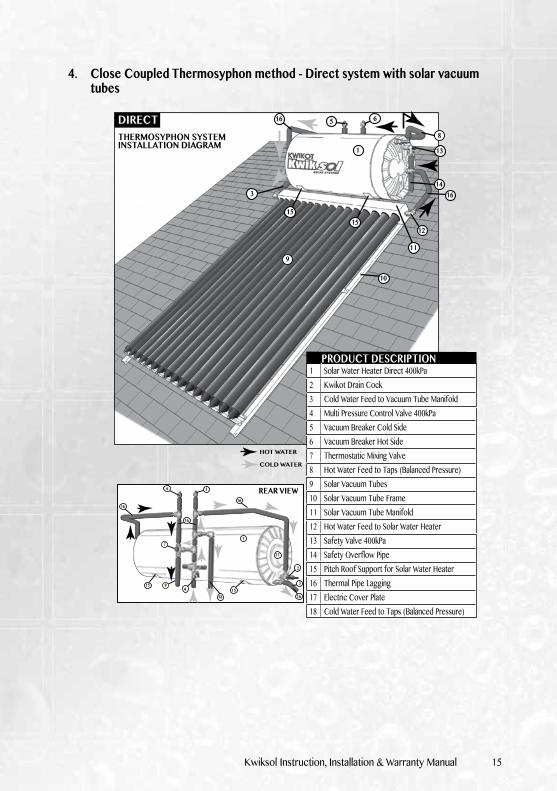
4. Close Coupled Thermosyphon method - Direct system with solar vacuum tubes
CLOSE COUPLED THEMOSYPHON METHOD-DIRECT SYSTEM WITH SOLAR VACUUM TUBES
1
1616
17
16
16
1518
15
2
3
5
8
6
7
4
HOT WATER
COLD WATER
REAR VIEW
PRODUCT DESCRIPTION
1 13
8
14
12
1515
10
11
3 16
16
9
5 6
123456789101112131415161718
Solar Water Heater Direct 400kPaKwikot Drain CockCold Water Feed to Vacuum Tube ManifoldMulti Pressure Control Valve 400kPaVacuum Breaker Cold SideVacuum Breaker Hot SideThermostatic Mixing ValveHot Water Feed to Taps (Balanced Pressure)Solar Vacuum TubesSolar Vacuum Tube FrameSolar Vacuum Tube ManifoldHot Water Feed to Solar Water HeaterSafety Valve 400kPaSafety Overflow PipePitch Roof Support for Solar Water HeaterThermal Pipe LaggingElectric Cover PlateCold Water Feed to Taps (Balanced Pressure)
DIRECTTHERMOSYPHON SYSTEMINSTALLATION DIAGRAM
16 Kwiksol Instruction, Installation & Warranty Manual
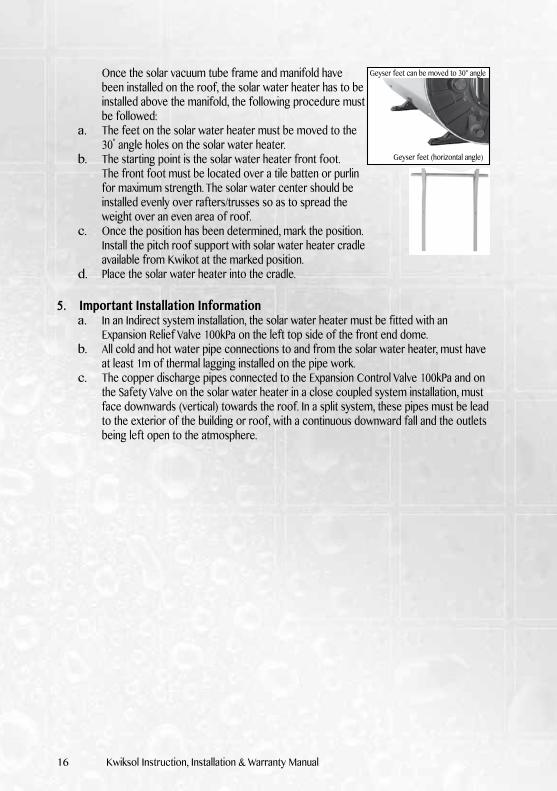
Once the solar vacuum tube frame and manifold have been installed on the roof, the solar water heater has to be installed above the manifold, the following procedure must be followed:
a. The feet on the solar water heater must be moved to the 30ໍ angle holes on the solar water heater.
b. The starting point is the solar water heater front foot. The front foot must be located over a tile batten or purlin for maximum strength. The solar water center should be installed evenly over rafters/trusses so as to spread the weight over an even area of roof.
c. Once the position has been determined, mark the position. Install the pitch roof support with solar water heater cradle available from Kwikot at the marked position.
d. Place the solar water heater into the cradle.
5. Important Installation Informationa. In an Indirect system installation, the solar water heater must be fitted with an
Expansion Relief Valve 100kPa on the left top side of the front end dome. b. All cold and hot water pipe connections to and from the solar water heater, must have
at least 1m of thermal lagging installed on the pipe work.c. The copper discharge pipes connected to the Expansion Control Valve 100kPa and on
the Safety Valve on the solar water heater in a close coupled system installation, must face downwards (vertical) towards the roof. In a split system, these pipes must be lead to the exterior of the building or roof, with a continuous downward fall and the outlets being left open to the atmosphere.
Geyser feet can be moved to 30° angle
Geyser feet (horizontal angle)

Kwiksol Instruction, Installation & Warranty Manual 17
J. FILLING A SOLAR SYSTEMa. Direct System – Thermosyphon Circulation Method
• Do not switch ‘ON’ the electrical supply to the solar water heater until the system has been filled with water.
• Open the cold water supply to the solar water heater and the entire system will self-fill. To ensure that all air is out of the system, open the lever ball valve at the bottom on the solar flat plate collector panel/s and allow the water to flow out for about 15 seconds. Close the lever ball valve.
• Where solar vacuum tubes are used, the manifold at the top of the tubes will fill up. • Check the entire system for water leaks and shut ‘OFF’ the water supply where leaks
need to be repaired.• Once leaks have been repaired, the water supply can be opened to refill the system.
Open a hot tap to allow air to escape until the airbursts have stopped and the water flows freely from the tap. Close the tap.
b. Indirect System – Thermosyphon Circulation Method• A dilution of Propylene Glycol and water has to be used in this system.• The dilution ratio’s as follows:• Ambient temperatures in winter 5ໍC to -8ໍC, one part Propylene Glycol to three
parts water i.e. Propylene Glycol 1lt with 3lts of water.• Ambient temperatures in winter -9ໍ to -16ໍC, one part Propylene glycol to two
parts water i.e. Propylene Glycol 1lt with 2lts of water.• Do not switch ‘ON’ the electrical supply to the solar water heater until the system
has been filled with water.• Cover the solar flat plate collector panel/s to prevent pressure variation due to
thermal activity in the solar flat plate collector panel/s.• Open the cold water supply to the solar water heater and check for any leaks.• Remove the 100kPa Expansion Relief Valve from the socket on the front end of
the solar water heater.• Connect a 15mm (½”) flexible hose to the lever ball valve in the open position, at
the bottom of the solar flat plate collector panel. • With the use of a funnel, pour 1lt bottle of Propylene Glycol into the funnel. Using
the same bottle, add two or three bottles of tap water, dependent on the extreme ambient temperatures in the area during winter. If the poured diluted liquid does not flow from the open socket where the Expansion Relief Valve is installed, repeat the process until the liquid flows from the socket.
18 Kwiksol Instruction, Installation & Warranty Manual
LEVERBALLVALVE
HOSEPIPE
FUNNEL
EXPANSIONRELIEF VALVE
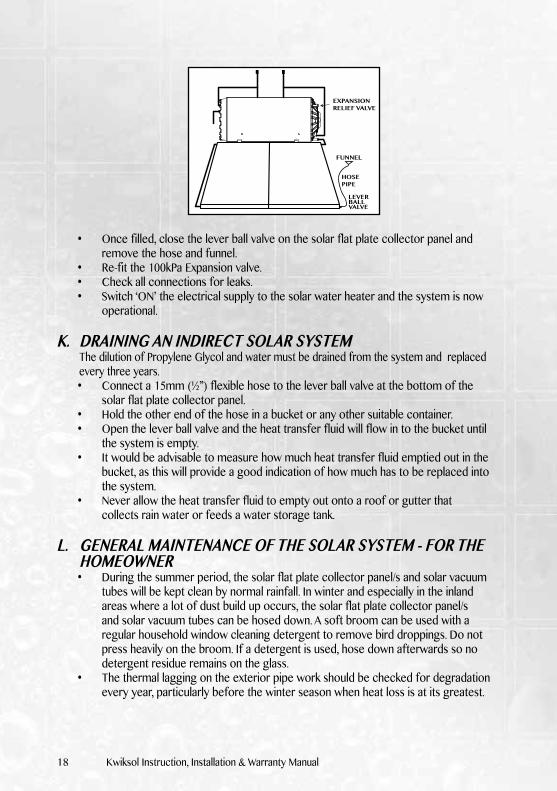
• Once filled, close the lever ball valve on the solar flat plate collector panel and remove the hose and funnel.
• Re-fit the 100kPa Expansion valve. • Check all connections for leaks. • Switch ‘ON’ the electrical supply to the solar water heater and the system is now
operational.
K. DRAINING AN INDIRECT SOLAR SYSTEMThe dilution of Propylene Glycol and water must be drained from the system and replaced every three years.• Connect a 15mm (½”) flexible hose to the lever ball valve at the bottom of the
solar flat plate collector panel.• Hold the other end of the hose in a bucket or any other suitable container.• Open the lever ball valve and the heat transfer fluid will flow in to the bucket until
the system is empty.• It would be advisable to measure how much heat transfer fluid emptied out in the
bucket, as this will provide a good indication of how much has to be replaced into the system.
• Never allow the heat transfer fluid to empty out onto a roof or gutter that collects rain water or feeds a water storage tank.
L. GENERAL MAINTENANCE OF THE SOLAR SYSTEM - FOR THE HOMEOWNER
• During the summer period, the solar flat plate collector panel/s and solar vacuum tubes will be kept clean by normal rainfall. In winter and especially in the inland areas where a lot of dust build up occurs, the solar flat plate collector panel/s and solar vacuum tubes can be hosed down. A soft broom can be used with a regular household window cleaning detergent to remove bird droppings. Do not press heavily on the broom. If a detergent is used, hose down afterwards so no detergent residue remains on the glass.
• The thermal lagging on the exterior pipe work should be checked for degradation every year, particularly before the winter season when heat loss is at its greatest.
Kwiksol Instruction, Installation & Warranty Manual 19
• Always be observant to any leaks that may arise over time in the system and repair these as soon as possible.
• Replace the heat transfer fluid in the Indirect System every three years.
M. SAFETY PRECAUTIONS & EMERGENCY SHUTDOWN PROCEDURE - FOR THE HOMEOWNER1. Safety Precautions
• Do not tamper with any part of the system installation.• Do not touch the hot supply pipe from the solar flat plate collector panel/s or
the manifold for the solar vacuum tubes, as this pipe can get extremely hot, particularly during the summer.
• The draining and replacing of the heat transfer fluid in an Indirect System must only be carried out by someone who has thorough knowledge of solar systems.
• Storage of Glycol Propylene must be placed in a place not accessible to children and pets.
2. Emergency Shutdown ProcedureIn the event of a problem arising with the solar system, carry out the followingprocedure:• Switch ‘OFF’ the Geyser/Solar water Heater Switch at the electrical distribution
board.• Any evidence of a water leak from any part of the system, except occasional
dripping from the overflow pipe on the Safety Valve, shut off the water supply to the solar water heater at either a shut off valve at or before the solar water heater, or at the water supply mains.
• Any evidence of a heat transfer fluid leak in any part of an Indirect System, try and capture or contain the leaking fluid if possible.
• If the solar system installation is still under the installation warranty period offered by the installer, contact the installer.
N. WARRANTIES – FOR THE HOMEOWNERIt is important to note that the warranty on the solar system installation is separate to that of Kwikot’s warranty on certain specified solar system products and components:
1. Installer Warranty• This is the warranty period offered by the installer of the solar system and covers
the installation of the system and the working of the solar system for the period specified.
• Water leaks, heat transfer liquid leaks, system faults and incorrect installation of the system resulting in the system not operating or operating properly, must be brought to the attention of the installer.
2. Product WarrantyKwikot (Pty) Ltd warrants that its solar water heaters, solar flat plate collector panels, solar vacuum tubes and manifold, drain cock and safety valve, Multi or Mono pressure
20 Kwiksol Instruction, Installation & Warranty Manual
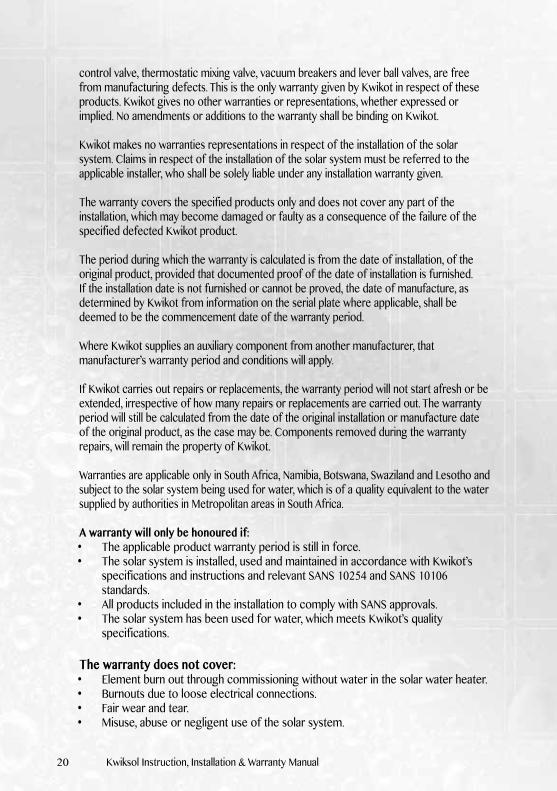
control valve, thermostatic mixing valve, vacuum breakers and lever ball valves, are free from manufacturing defects. This is the only warranty given by Kwikot in respect of these products. Kwikot gives no other warranties or representations, whether expressed or implied. No amendments or additions to the warranty shall be binding on Kwikot.
Kwikot makes no warranties representations in respect of the installation of the solar system. Claims in respect of the installation of the solar system must be referred to the applicable installer, who shall be solely liable under any installation warranty given.
The warranty covers the specified products only and does not cover any part of the installation, which may become damaged or faulty as a consequence of the failure of the specified defected Kwikot product.
The period during which the warranty is calculated is from the date of installation, of the original product, provided that documented proof of the date of installation is furnished. If the installation date is not furnished or cannot be proved, the date of manufacture, as determined by Kwikot from information on the serial plate where applicable, shall be deemed to be the commencement date of the warranty period.
Where Kwikot supplies an auxiliary component from another manufacturer, that manufacturer’s warranty period and conditions will apply.
If Kwikot carries out repairs or replacements, the warranty period will not start afresh or be extended, irrespective of how many repairs or replacements are carried out. The warranty period will still be calculated from the date of the original installation or manufacture date of the original product, as the case may be. Components removed during the warranty repairs, will remain the property of Kwikot.
Warranties are applicable only in South Africa, Namibia, Botswana, Swaziland and Lesotho and subject to the solar system being used for water, which is of a quality equivalent to the water supplied by authorities in Metropolitan areas in South Africa.
A warranty will only be honoured if:• The applicable product warranty period is still in force.• The solar system is installed, used and maintained in accordance with Kwikot’s
specifications and instructions and relevant SANS 10254 and SANS 10106 standards.
• All products included in the installation to comply with SANS approvals.• The solar system has been used for water, which meets Kwikot’s quality
specifications.
The warranty does not cover:• Element burn out through commissioning without water in the solar water heater.• Burnouts due to loose electrical connections.• Fair wear and tear.• Misuse, abuse or negligent use of the solar system.
Kwiksol Instruction, Installation & Warranty Manual 21
Kwikot shall not be liable for any claims, losses, liabilities, damages, costs or expenses whatsoever and howsoever arising out of or in connection with the use, functioning or malfunction of the solar system or any part thereof including defects. Without limiting the generality of the afore-going, Kwikot shall not in any circumstances be liable for any consequential or indirect damages, loss of profits or punitive damages.
Repairs and/or replacements may only be carried out by Kwikot and its authorised agents. This warranty will be completely invalidated if any repairs are effected or work undertaken at anytime by any other party without Kwikot’s authorisation.Specified product warranties are as follows:
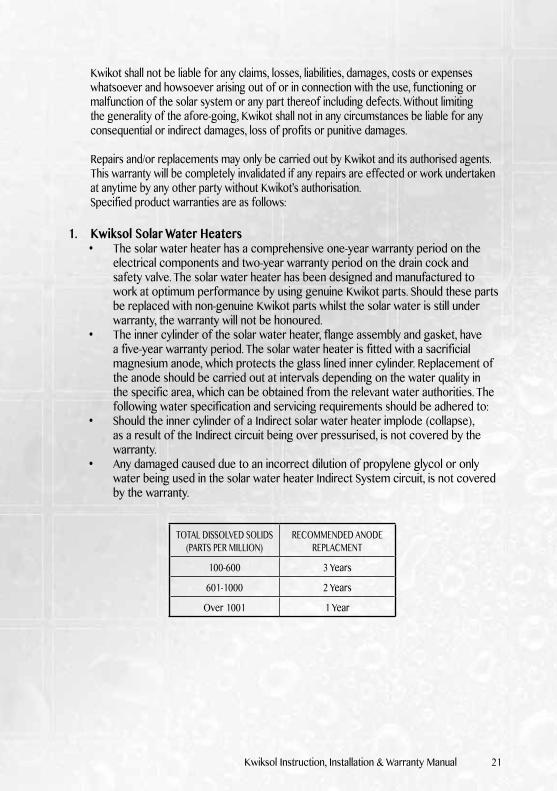
1. Kwiksol Solar Water Heaters• The solar water heater has a comprehensive one-year warranty period on the
electrical components and two-year warranty period on the drain cock and safety valve. The solar water heater has been designed and manufactured to work at optimum performance by using genuine Kwikot parts. Should these parts be replaced with non-genuine Kwikot parts whilst the solar water is still under warranty, the warranty will not be honoured.
• The inner cylinder of the solar water heater, flange assembly and gasket, have a five-year warranty period. The solar water heater is fitted with a sacrificial magnesium anode, which protects the glass lined inner cylinder. Replacement of the anode should be carried out at intervals depending on the water quality in the specific area, which can be obtained from the relevant water authorities. The following water specification and servicing requirements should be adhered to:
• Should the inner cylinder of a Indirect solar water heater implode (collapse), as a result of the Indirect circuit being over pressurised, is not covered by the warranty.
• Any damaged caused due to an incorrect dilution of propylene glycol or only water being used in the solar water heater Indirect System circuit, is not covered by the warranty.
TOTAL DISSOLVED SOLIDS(PARTS PER MILLION)
RECOMMENDED ANODE REPLACMENT
100-600 3 Years
601-1000 2 Years
Over 1001 1 Year

22 Kwiksol Instruction, Installation & Warranty Manual
2. Solar Flat Plate Collector Panels• The panels have a five-year warranty period. The warranty only applies to defects,
which may have arisen solely due to faulty materials and workmanship during the manufacturing process.
• Any freeze damage caused as a result of the panels being installed as a Direct System in frost and freezing areas which record ambient temperatures below 5ໍC, is not covered by the warranty.
• Any damage caused to the solar collector panels due to an incorrect dilution of propylene glycol or water being used in an Indirect System, will not be covered by the warranty.
• The glass collector if cracked or broken from whatever cause, is not covered by the warranty
3. Solar Vacuum Tubes and Manifold• The tubes and manifold have a five-year warranty period. The warranty only
applies to defects, which may have arisen solely due to faulty materials and workmanship during the manufacturing process.
• The tubes if cracked or broken from whatever cause, is not covered by the warranty.
Kwiksol Instruction, Installation & Warranty Manual 23
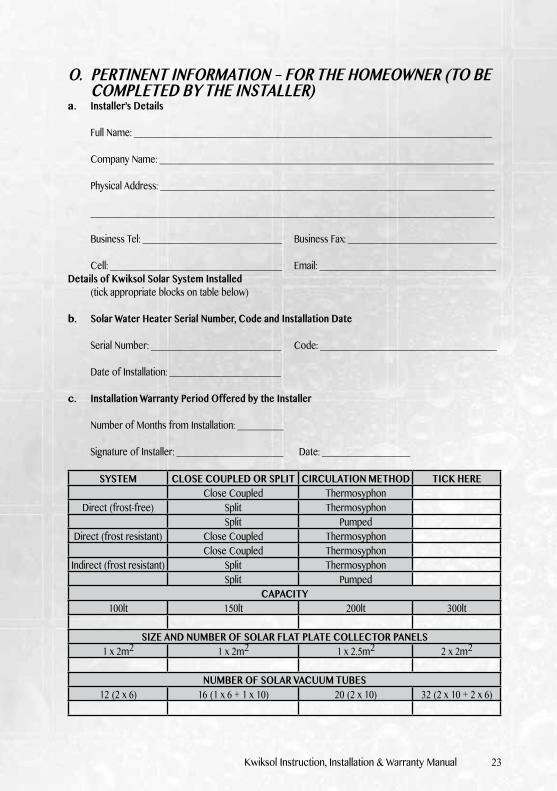
O. PERTINENT INFORMATION – FOR THE HOMEOWNER (TO BE COMPLETED BY THE INSTALLER)a. Installer’s Details
Full Name: _____________________________________________________________________________ Company Name: ________________________________________________________________________
Physical Address: ________________________________________________________________________
_______________________________________________________________________________________
Business Tel: ______________________________ Business Fax: ________________________________
Cell: _____________________________________ Email: ______________________________________Details of Kwiksol Solar System Installed (tick appropriate blocks on table below)
b. Solar Water Heater Serial Number, Code and Installation Date
Serial Number: ____________________________ Code: ______________________________________
Date of Installation: ________________________
c. Installation Warranty Period Offered by the Installer
Number of Months from Installation: __________
Signature of Installer: _______________________ Date: ___________________
SYSTEM CLOSE COUPLED OR SPLIT CIRCULATION METHOD TICK HEREClose Coupled Thermosyphon
Direct (frost-free) Split ThermosyphonSplit Pumped
Direct (frost resistant) Close Coupled ThermosyphonClose Coupled Thermosyphon
Indirect (frost resistant) Split ThermosyphonSplit Pumped
CAPACITY 100lt 150lt 200lt 300lt
SIZE AND NUMBER OF SOLAR FLAT PLATE COLLECTOR PANELS1 x 2m2 1 x 2m2 1 x 2.5m2 2 x 2m2
NUMBER OF SOLAR VACUUM TUBES12 (2 x 6) 16 (1 x 6 + 1 x 10) 20 (2 x 10) 32 (2 x 10 + 2 x 6)

24 Kwiksol Instruction, Installation & Warranty Manual
KWIKOT (PTY) LTDINLAND DIVISIONAL BRANCH OFFICEPO Box 1016Benoni 1500Tel: 011 897 4600Fax: 011 897 4700Email: [email protected]
KWIKOT (PTY) LTDKWAZULU-NATAL DIVISIONAL BRANCH OFFICEPO Box 47366GreyvilleDurban4023Tel: 031 574 8700Fax: 031 574 8750Email: [email protected]
KWIKOT (PTY) LTDEASTERN CAPE DIVISIONAL BRANCH OFFICEPO Box 29142Sunridge ParkPort Elizabeth6008Tel: 041 399 4000Fax: 041 367 1005Email: [email protected]
KWIKOT (PTY) LTDWESTERN CAPE DIVISIONAL BRANCH OFFICEPO Box 443Eppindust7475Tel: 021 690 2700Fax: 021 690 2800Email: [email protected]
Kwiksol Instruction, Installation & Warranty Manual 25
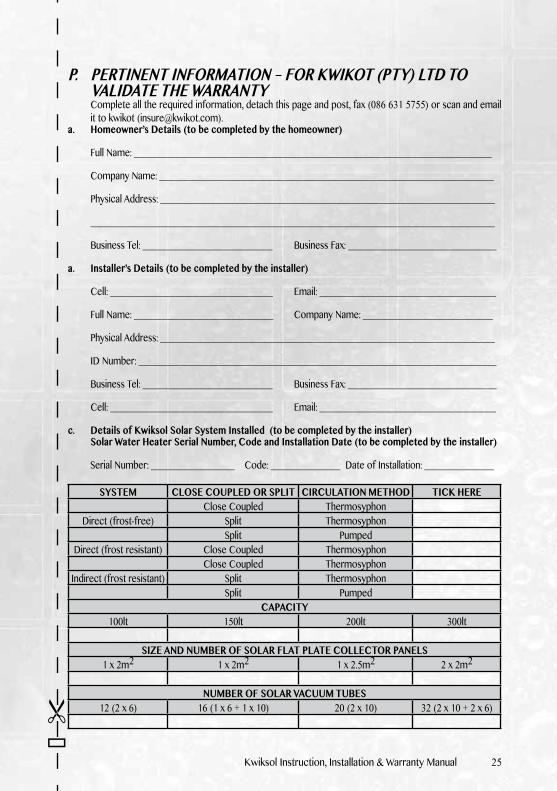
P. PERTINENT INFORMATION – FOR KWIKOT (PTY) LTD TO VALIDATE THE WARRANTY
Complete all the required information, detach this page and post, fax (086 631 5755) or scan and email it to kwikot ([email protected]).
a. Homeowner’s Details (to be completed by the homeowner)
Full Name: _____________________________________________________________________________ Company Name: ________________________________________________________________________
Physical Address: ________________________________________________________________________
_______________________________________________________________________________________
Business Tel: ____________________________ Business Fax: ________________________________
a. Installer’s Details (to be completed by the installer)
Cell: ___________________________________ Email: ______________________________________ Full Name: ______________________________ Company Name: ____________________________
Physical Address: ________________________________________________________________________
ID Number: _____________________________________________________________________________
Business Tel: ____________________________ Business Fax: ________________________________
Cell: ___________________________________ Email: ______________________________________
c. Details of Kwiksol Solar System Installed (to be completed by the installer) Solar Water Heater Serial Number, Code and Installation Date (to be completed by the installer)
Serial Number: __________________ Code: _______________ Date of Installation: _______________
SYSTEM CLOSE COUPLED OR SPLIT CIRCULATION METHOD TICK HEREClose Coupled Thermosyphon
Direct (frost-free) Split ThermosyphonSplit Pumped
Direct (frost resistant) Close Coupled ThermosyphonClose Coupled Thermosyphon
Indirect (frost resistant) Split ThermosyphonSplit Pumped
CAPACITY 100lt 150lt 200lt 300lt
SIZE AND NUMBER OF SOLAR FLAT PLATE COLLECTOR PANELS1 x 2m2 1 x 2m2 1 x 2.5m2 2 x 2m2
NUMBER OF SOLAR VACUUM TUBES12 (2 x 6) 16 (1 x 6 + 1 x 10) 20 (2 x 10) 32 (2 x 10 + 2 x 6)
•
26 Kwiksol Instruction, Installation & Warranty Manual
POST
AGE
STAM
P
•
KWIK
OT (P
TY) L
TDPO
BOX
389
Beno
ni15
00

Kwiksol Instruction, Installation & Warranty Manual 27
28 Kwiksol Instruction, Installation & Warranty Manual
02/2
015