toolkit manual version 800 - university of houston–clear...
TRANSCRIPT


ITEM TOOLKIT Tutorial Version 8.0
ITEM TOOLKIT®
TUTORIAL GETTING STARTED GUIDE
USA Office: UK Office: 34 Executive Park 4 Belfry House Suite 210 4400 Parkway, Whiteley Irvine Fareham, Hampshire CA 92614 PO15 7FJ U.S.A. U.K. Telephone: +1 714 935 2900 Telephone: +44 (0) 1489 885085 Fax: +1 714 935 2911 Fax: +44 (0) 1489 885065 Email: [email protected] Email: [email protected]

Copyright 2011 ITEM Software (USA) Inc., All Rights Reserved The Software Product, any media, printed materials, “online” or electronic documentation, instructional material, or similar materials relating the software are owned by ITEM SOFTWARE and are protected by copyright laws and international copyright treaties as well as other intellectual property laws and treaties. All other matters including use and distribution of the Software Product shall be in accordance with Item Software's SOFTWARE LICENSE AGREEMENT and/or with the prior written permission of Item Software (USA) Inc. The copyright and the foregoing restrictions on the copyright use extend to all media in which this information may be preserved. This guide may not, in whole or in part, be copied, photocopied, translated, or reduced to any electronic medium or machine-readable form without prior consent, in writing, from Item Software. The information in this guide is subject to change without notice and Item Software assumes no responsibility for any errors that may appear in this document. ITEM ToolKit is a trademark of ITEM Software (USA) Inc. All company and product names are the trademarks or registered trademarks of their respective companies.
Printed in U.K.
2011 ITEM Software (USA) Inc.

Contents i
Contents
CONTENTS .......................................................................................................................................................... I
PREFACE ............................................................................................................................................................ 1 1. PURPOSE OF THIS GUIDE.................................................................................................................................. 1 2. STRUCTURE ..................................................................................................................................................... 1 3. CONVENTIONS ................................................................................................................................................. 2
INTRODUCING ITEM TOOLKIT................................................................................................................... 3 1. WHAT IS ITEM TOOLKIT? .............................................................................................................................. 3 2. HARDWARE AND SOFTWARE REQUIREMENTS ................................................................................................. 7 3. GETTING TECHNICAL SUPPORT ....................................................................................................................... 8
INSTALLING ITEM TOOLKIT ....................................................................................................................... 9 1. STANDALONE INSTALLATION .......................................................................................................................... 9 2. NETWORK SERVER INSTALLATION ................................................................................................................ 21 3. LICENSE SERVER INSTALLATION ................................................................................................................... 39 4. NETWORK CLIENT INSTALLATION ................................................................................................................. 57 5. VIEW-ONLY CLIENT INSTALLATION .............................................................................................................. 73
TOOLKIT BASICS ........................................................................................................................................... 83 1. STANDARD FEATURES OF THE TOOLKIT INTERFACE ..................................................................................... 83 2. THE TOOLKIT WORKSPACE .......................................................................................................................... 84 3. THE TOOLKIT MENUS ................................................................................................................................... 91 4. THE TOOLKIT TOOLBARS.............................................................................................................................. 97
PROJECT BASICS ........................................................................................................................................... 99 1. CREATING A NEW PROJECT ......................................................................................................................... 100 2. OPENING A PROJECT .................................................................................................................................... 101 3. CUTTING, COPYING, AND PASTING SYSTEMS .............................................................................................. 102 4. EDITING PROJECT AND SYSTEM PROPERTIES ............................................................................................... 103 5. SAVING A PROJECT ...................................................................................................................................... 104 6. CLOSING A PROJECT .................................................................................................................................... 105 7. EXITING TOOLKIT ....................................................................................................................................... 105
PREDICTIONS ............................................................................................................................................... 107 1. INTRODUCTION ............................................................................................................................................ 107 2. USING TOOLKIT FOR RELIABILITY PREDICTIONS ........................................................................................ 108 3. CREATING A PREDICTION PROJECT ............................................................................................................. 109 4. DERATING COMPONENTS ............................................................................................................................ 119 5. PREDICTIONS EDITOR SCREEN, TOOLBAR AND SHORTCUT KEYS QUICK REFERENCE ................................. 125
FMECA ............................................................................................................................................................ 131

ii ITEM ToolKit Getting Started Guide
1. INTRODUCTION ............................................................................................................................................ 131 2. ITEM TOOLKIT & FMECA ANALYSIS ....................................................................................................... 132 3. CREATING A FMECA PROJECT ................................................................................................................... 133 4. FMECA EDITOR SCREEN, TOOLBAR AND SHORTCUT KEYS QUICK REFERENCE ........................................ 153
RBD ................................................................................................................................................................... 157 1. INTRODUCTION ............................................................................................................................................ 157 2. ITEM TOOLKIT & RELIABILITY BLOCK DIAGRAM ..................................................................................... 158 3. CREATING AN RBD PROJECT ...................................................................................................................... 159 4. RBD EDITOR SCREEN, TOOLBAR AND SHORTCUT KEYS QUICK REFERENCE .............................................. 170
FAULT TREE ANALYSIS ............................................................................................................................. 177 1. INTRODUCTION ............................................................................................................................................ 177 2. ITEM TOOLKIT & FAULT TREE ANALYSIS ................................................................................................. 178 3. CREATING A FAULT TREE PROJECT ............................................................................................................. 179 4. FAULT TREE EDITOR SCREEN, TOOLBAR AND SHORTCUT KEYS QUICK REFERENCE .................................. 195
MARKOV ........................................................................................................................................................ 203 1. INTRODUCTION ............................................................................................................................................ 204 2. ITEM TOOLKIT & MARKOV ANALYSIS ...................................................................................................... 205 3. CREATING A MARKOV PROJECT .................................................................................................................. 206 4. MARKOV EDITOR SCREEN, TOOLBAR AND SHORTCUT KEYS QUICK REFERENCE ....................................... 218
MAINTAIN ...................................................................................................................................................... 225 1. INTRODUCTION ............................................................................................................................................ 225 2. ITEM TOOLKIT & MAINTAIN ..................................................................................................................... 226 3. CREATING A MAINTAIN PROJECT ................................................................................................................ 227 4. MAINTAIN EDITOR SCREEN, TOOLBAR AND SHORTCUT KEYS QUICK REFERENCE ..................................... 235
SPARECOST ................................................................................................................................................... 239 1. INTRODUCTION ............................................................................................................................................ 239 2. ITEM TOOLKIT & SPARECOST ................................................................................................................... 240 3. CREATING A SPARECOST PROJECT .............................................................................................................. 241 4. SPARECOST EDITOR SCREEN, TOOLBAR AND SHORTCUT KEYS QUICK REFERENCE ................................... 250
EVENT TREE ANALYSIS ............................................................................................................................ 255 1. INTRODUCTION ............................................................................................................................................ 255 2. ITEM TOOLKIT & EVENT TREE ANALYSIS ................................................................................................. 256 3. CREATING AN EVENT TREE PROJECT .......................................................................................................... 260 4. EVENT TREE EDITOR SCREEN, TOOLBAR AND SHORTCUT KEYS QUICK REFERENCE .................................. 275
WORKING WITH REPORTS ...................................................................................................................... 281 1. SELECTING AND PREVIEWING REPORTS ...................................................................................................... 281 2. CREATING REPORT TEMPLATES .................................................................................................................. 284 3. CUSTOMIZING REPORTS .............................................................................................................................. 286 4. PROBLEM SOLVING ..................................................................................................................................... 291
IMPORT/EXPORT ......................................................................................................................................... 293

Contents iii
1. CREATING A BILL OF MATERIALS IN EXCEL ................................................................................................ 293 2. IMPORTING THE BILL OF MATERIALS INTO TOOLKIT .................................................................................. 295 3. EXPORTING A SYSTEM FROM TOOLKIT TO EXCEL ....................................................................................... 299
LIBRARY FACILITIES ................................................................................................................................. 303 1. CREATING A NEW LIBRARY PROJECT .......................................................................................................... 303 2. ADDING AND EXTRACTING FROM LIBRARY PROJECT .................................................................................. 305 3. SAVING AND CLOSE A LIBRARY PROJECT ................................................................................................... 307 4. LOADING AND BROWSING A LIBRARY ......................................................................................................... 307
GRID VIEW CUSTOMIZATION ................................................................................................................. 309 1. VIEWING/CREATING GRID TEMPLATES ....................................................................................................... 309 2. ADDITIONAL GRID OPTIONS ........................................................................................................................ 310 3. SWITCHING TO A DIFFERENT GRID TEMPLATE ............................................................................................ 311 4. EXPORTING AND PRINTING THE GRID VIEW ................................................................................................ 311

iv ITEM ToolKit Getting Started Guide

Preface 1
Preface
ITEM ToolKit is a suite of comprehensive Reliability, Availability, Maintainability and Safety modules. It uses globally recognized standards and methodologies to analyze components, systems, and projects.
1. Purpose of this Guide This guide contains information to help you start using ITEM ToolKit. The guide presents information in a tutorial format, and is intended to explain the basic functions of the software. Advanced concepts are included in the online help system, which can be accessed from the Help menu within the ITEM ToolKit software.
2. Structure This guide contains the following chapters:
Chapter 1 Introduces ToolKit.
Chapter 2 Installation of the software.
Chapter 3 Provides an overview of the ToolKit interface.
Chapter 4 Explains basic project operations, such as creating a new project, opening a project, adding libraries, selecting workspace options, importing and exporting project data, saving and closing a project.
Chapter 5 Provides an introduction to the prediction modules and explains their use through a MIL-217 example.
Chapter 6 Provides an introduction to the FMECA module and explains its use through a practical example.
Chapter 7 Provides an introduction to the RBD module and explains its use through a practical example.
Chapter 8 Provides an introduction to the Fault Tree module and explains its use through a practical example.
Chapter 9 Provides an introduction to the Markov module and explains its use through a practical example.
Chapter 10 Provides an introduction to the Maintain module and explains its use through a practical example.
Chapter 11 Provides an introduction to the SpareCost module and explains its use through a practical example.
Chapter 12 Provides an introduction to the Event Tree module and explains its use through a practical example.
Chapter 13 Working with reports, covering their selection, creation and customization of templates.
Chapter 14 Import and export of data, including an example using a bill of materials.
Chapter 15 Library facilities, covering their creation, editing, saving and loading and browsing.
Chapter 16 Grid view customization.

2
3. Conventions Throughout this guide, ITEM ToolKit and ToolKit are used interchangeably.
In examples, an implied carriage return occurs at the end of each line, unless otherwise noted. You must press the ENTER
key at the end of a line of input.
The following table lists the special conventions used in this guide.
Example Description
Edit Words in bold indicate the user enters / clicks that button or menu in the software.
RETURN Words in bold capital letters indicate names of keys and key sequences.
ALT – P A hyphen between key names indicates a key combination. For example, pressing ALT - P means to hold down the ALT key while also pressing the P key.

Chapter 1 Introducing ITEM ToolKit 3
CHAPTER 1 Introducing ITEM ToolKit
Welcome to ITEM ToolKit. This chapter introduces ITEM ToolKit and provides basic requirement and instructions. It contains the following sections:
1. What is ITEM ToolKit?
2. Hardware and Software Requirements.
3. Getting Technical Support.
The remaining chapters of this guide describe ITEM ToolKit and how you can use it to analyze components, systems, and projects.
1. What is ITEM ToolKit? ITEM ToolKit is a suite of comprehensive Reliability, Availability, Maintainability and Safety modules in a single integrated environment. It uses globally recognized standards and methodologies to analyze components, systems, and projects.
ITEM ToolKit allows you to take a total system approach while dealing with individual systems and components. This enables the user to optimize design targets with respect to component selection, increase safety and reduce liability. The user can analyze reliability and availability at the component or system level and view the entire project.
ITEM ToolKit standardizes many critical functions, shortcuts, and other features that operate identically in each module to save time, effort and increase productivity. Whether one starts a new analysis or uses a different module, the essential functions remain the same.
ITEM ToolKit’s graphical user interface uses standard Windows dialogs, menus, toolbars, and controls. The Multiple Document Interface (MDI) architecture allows you to simultaneously display multiple projects, systems and data views in separate viewing areas in the ToolKit workspace. The interface allows you to easily:
Transfer and Link data between different systems and projects Cut, copy and paste data Drag and drop objects both within and between projects Customize the workspace toolbar Access online help
An integrated environment offers flexibility with convenient features that provide a consistent format for all analyses to optimize the learning curve from one module to another.

4 ITEM ToolKit Getting Started Guide
ITEM ToolKit Integrated Modules MIL-217
The MIL-217 module supports two methods of reliability prediction as described in MIL-HDBK-217F: Part Stress Analysis and Parts Count. The Part Stress Analysis requires more detailed information and is usually applicable later in the design phase. The Parts Count generally requires less information, typically part quantities, quality levels and the application environment. It is most applicable early in the design phase and during proposal formulation.
MIL-217 calculates the failure rates and MTBF for electronic components, sub-systems, and systems. It can aid in locating areas for potential reliability improvement.
Telcordia (Bellcore)
The Telcordia module is based on the internationally recognized Telcordia Standard that calculates the reliability of electronic equipment. The latest version of this document is the Reliability Prediction Procedure for Electronic Equipment, SR-332.
Telcordia reliability prediction has only one focus: electronic equipment. It can provide predictions at the component level, system level or project level for COTS (Commercial Off-The- Shelf Parts). Telcordia utilizes three methods for predicting product reliability. These are:
Method I: Parts Count Method II: Combines Method I predictions with laboratory data. Method III: Predictions based on field data
NSWC
The NSWC module uses a series of models for various categories of mechanical components to predict failure rates based on temperature, stresses, flow rates and various other parameters. It provides models for various types of mechanical devices including springs, bearings, seals, motors, brakes and clutches. NSWC is a relatively new standard, and is currently the only one of its kind.
The NSWC Standard is a commonly used model for mechanical components. Standard procedures for predicting the reliability of mechanical components, sub-systems and systems are defined in the Naval Surface Warfare Center Handbook of Reliability Prediction Procedures for Mechanical Equipment, NSWC.
IEC 62380 (RDF 2000)
The IEC 62380 module supports methods of reliability prediction as described in the French standard published by the Union Technique de L’Electricite (UTE, July 2000). IEC 62380 is a universal model for reliability prediction of electronics, printed circuit boards and equipment, which takes directly into account the influence of the environment. Environment factors are no longer used as they are replaced by mission profile undergone by the equipment. The models in the guide can handle permanent working, on/off cycling and dormant applications.
CHINA 299B
The 299B module supports methods of reliability prediction as described in Chinese 299B standard. 299B is a reliability prediction guide for electronic parts in both commercial and military industries. The standard provides the user with the opportunity to take into account the environmental conditions, quality levels and stress conditions. The guide provides procedures to perform Parts Stress Analysis as well as Parts Count Analysis.

Chapter 1 Introducing ITEM ToolKit 5
FMECA
The FMECA module is based on the United States Military, MIL-STD-1629A: Procedures for Performing a Failure Mode, Effects and Criticality Analysis. This procedure was developed to determine the effects of system and equipment failures. The module also now covers, and conforms fully to, the standards IEC 61508 and ISO 26262. This enables ITEM ToolKit to provide a full top-down modeling from Hazard Analysis to FMECA in compliance with these standards.
FMECA addresses reliability and quality problems associated with design, manufacturing, process, safety and environment. The FMECA module provides an intuitive graphical interface with multiple options for constructing and performing an analysis. With an enhanced hierarchy tree and tabular views designed for user-friendly navigation, data entry and modification have never been easier. The FMECA module provides a coherent, comprehensive method for entering data.
During a FMECA procedure, identifying the failure modes and their effects (Failure Mode Effect Analysis) is often only the beginning. Criticality Analysis is where the failure modes are ranked according to a combination of severity and the probability of that failure mode actually occurring. ITEM ToolKit provides total flexibility for applying FMECA to the full analysis.
RBD
The RBD module is a systems analysis tool. As part of the ITEM ToolKit integrated program, the Reliability Block Diagram (RBD) offers a wide range of capabilities. Boolean Algebra expressions are used to determine minimal cut sets or the minimum combination of failures required to cause a system failure. Three types of Importance Analysis are included. Markov analysis models standby systems with respect to maintenance arrangements. RBD calculates system failure, frequency values and unavailability. In addition to component libraries, commonly used failure models can be stored and retrieved for repeated use.
Fault Tree Analysis
Fault Tree Analysis is a systems reliability assessment tool, which focuses on failure path representation. The Fault Tree module provides a wide variety of both qualitative and quantitative information about the system reliability and availability.
Fault Trees are used during Reliability and Safety Risk Assessments to graphically represent the logical interaction and probabilities of occurrence of component failures and other events in a system. The interactions are captured using a tree structure of Boolean operation gates, which decomposes system level failures to combinations of lower-level events. The analysis of such Fault Trees identifies and ranks combinations of events leading to system failure and provides estimates of the system’s failure probability.
Fault Tree Analysis is a well-established methodology that relies on solid theories such as Boolean Logic and Probability Theory. Boolean logic is used to reduce the Fault Tree structure into Minimal Cut Sets, which are the combinations of events leading to failure of the system. Probability Theory is then used to determine probabilities that the system will fail during a particular mission, or is unavailable at a particular point in time, given the probability of the individual events. Additionally, probabilities are computed for individual Minimal Cut Sets, forming the basis for their ranking by importance with respect to their reliability and safety impact.
The module also includes the BDD analysis method as an alternative to the Rare Event and Esary-Proschan quantification options. It uses the Binary Decision Diagram algorithm to obtain cut-sets and quantification results. BDD algorithms distinguish themselves from conventional quantification methods by returning results that do not involve approximations. Instead, BDD algorithms produce results that are in accordance with the basic rules of probability theory.

6 ITEM ToolKit Getting Started Guide
Using Fault Tree’s detailed information, efforts to improve system safety and reliability can be highly focused, and tailored to your individual system. Possible design changes and other risk-mitigating actions can be evaluated for their impact on safety and reliability, allowing for a better-informed decision making process and improved system reliability. This type of analysis is especially useful when analyzing large and complex systems where manual methods of fault isolation and analysis are not viable.
Markov
The Markov module is a powerful modeling and analysis technique with strong applications in time-based reliability and availability analysis. The reliability behavior of a system is represented using a state-transition diagram, which consists of a set of discrete states that the system can be in, and defines the speed at which transitions between those states take place. As such, Markov models consist of comprehensive representations of possible chains of events, i.e., transitions, within systems, which, in the case of reliability and availability analysis, correspond to sequences of failures and repair.
Maintain
The Maintain module provides an integrated environment for predicting the expected number of hours that a system or a device will be inoperative or "down" while it undergoes maintenance. A comprehensive design tool for calculating MTTR, Maintain conforms to maintenance standards established in MIL-HDBK-472, Procedure V, Method A.
SpareCost
The SpareCost module Calculates spares required for equipment supported at Sites (First and Second line maintenance by replacement) and Bases (Third line maintenance to support Sites and the repair of returned defective spares). It optimizes scale of spares at Sites for minimum cost. SpareCost produces full information of spares holding by replaceable item at both Site and Base. Expected number of failures for each component over a defined period is also output. SpareCost generates spares holding required at sites against a stock-out risk at the Site. This scale of spares is optimized against the cost of the spares held.
Event Tree Analysis
Event tree analysis is based on binary logic, in which an event either has or has not happened or a component has or has not failed. It is valuable in analyzing the consequences arising from a failure or undesired event.
Event tree analysis is generally applicable for almost any type of risk assessment application, but used most effectively to model accidents where multiple safeguards are in place as protective features. Event tree analysis is highly effective in determining how various initiating events can result in accidents of interest.
An event tree begins with an initiating event, such as a component failure, increase in temperature/pressure or a release of a hazardous substance. The consequences of the event are followed through a series of possible paths. Each path is assigned a probability of occurrence and the probability of the various possible outcomes can be calculated.
The module also includes the BDD analysis method as an alternative to the Rare Event and Esary-Proschan quantification options. It uses the Binary Decision Diagram algorithm to obtain cut-sets and quantification results. BDD algorithms distinguish themselves from conventional quantification methods by returning results that do not involve approximations. Instead, BDD algorithms produce results that are in accordance with the basic rules of probability theory.

Chapter 1 Introducing ITEM ToolKit 7
2. Hardware and Software Requirements The minimum recommended system configuration for ITEM ToolKit is:
Microsoft Windows 7, Microsoft Windows Vista, Microsoft Windows 2000, Microsoft Windows XP, Microsoft Windows NT 4.0 (SP6 or later) or Microsoft Windows 95/98.
Microsoft Office 2000 or higher.
Intel Pentium II or AMD K6-II 450MHz-based PC or higher.
128MB RAM (256MB or higher is recommended).
200MB free disk space.
A 17-inch or larger monitor with display properties set to a minimum of 1280 X 768 pixels.
Mouse or other pointing device.
CD-ROM drive.
Less capable machines (such as Pentium 133 with Windows 95/98) can run ITEM ToolKit, but the performance may be less than ideal. The use of additional memory, faster processors, bigger monitor or stable operating system such as Microsoft Windows 2000 will directly improve performance and capacity.

8 ITEM ToolKit Getting Started Guide
3. Getting Technical Support The ITEM Software technical support staff is always ready to help you with answers and guidance to solve any problems that you encounter when installing or using ITEM ToolKit.
If you need technical support, contact Item Software using any of the following methods:
North American, South American, and Central American customers:
European, Far East, Middle East, and Australian customers:
+1 (714) 935 2900
Telephone +44 (0) 1489 885085
+1 (714) 935 2911 Facsimile +44 (0) 1489 885065
[email protected] Electronic Mail [email protected]
http://www.itemsoft.com WWW http://www.itemsoft.com
Technical Support ITEM Software USA Inc
34 Executive Park Suite 210
Irvine CA 92614
U.S.A.
Mail Technical Support ITEM Software UK 4 Belfry House 4400 Parkway, Whiteley Fareham, Hampshire PO15 7FJ U.K.
NOTE Please have your product name, version number, and system configuration information available so that the ITEM Software technical support staff can process your support requests as efficiently as possible.

Chapter 2 Installing ITEM ToolKit 9
CHAPTER 2 Installing ITEM ToolKit
ITEM ToolKit is designed to install quickly from the CD included in the software package. The default product directory for ToolKit is C:\Program Files\Item\Toolkit. ToolKit is compatible with the uninstall utility included in 32-bit Windows operating systems.
ToolKit is copy protected using a Software Key Licensing System. A license ID and password are required for activation of the ToolKit modules. The software will run in the Demo Mode as part of the default setting until the activation numbers (license ID, password or software keys) have been entered. After completing the installation process, visit the Customer Area of our website or contact one of our offices to obtain the Activation Keys.
Although the specific steps for installing ToolKit vary depending on the type of Software License purchased and the installation you perform, all installations follow the same general steps. These steps include:
• Installing the software • Activating the software • Verifying the software • Loading the reliability analysis libraries
1. Standalone Installation ITEM ToolKit supports five types of installations: Standalone, Network Server, Network License Server Network Client and View-Only Client. This chapter will provide you the required instruction for installing the software as Standalone. It contains the following sections:
What is Standalone Installation?
Installing the software
Activating the software
Verifying the software

10 ITEM ToolKit Getting Started Guide
What is Standalone Installation? Standalone Installation is one of the options that are available for installing Toolkit. This option will allow you to install ToolKit’s program files to a local or standalone workstation. It is intended for a single user license or when the software license is not shared through a network.
The Software and the license key are installed by default on the C Drive of the desktop or laptop computer under Program Files\Item\Toolkit\Programs
NOTE The following must be noted when performing a Standalone Installation:
STANDALONE INSTALLATION MUST BE PHYSICALLY PERFORMED AT THE DESIGNATED WORSTATION.
STANDALONE INSTALLATION CANNOT BE PERFORMED FROM REMOTE WORKSTATION OR SERVER.
STANDALONE INSTALLATION REQUIRES FULL ADMINISTRATIVE RIGHTS.
STANDALONE USERS MUST HAVE AT LEAST, "POWER USER" ACCESS RIGHTS TO THE WORKSTATION. FULL (ADMINISTRATOR) ACCESS RIGHTS IS RECOMMENDED.
Installing the Standalone Version of the Software The Install Wizard will guide you through simple steps for installing ITEM ToolKit. Please complete the following steps:
• Insert the ToolKit CD into your CD-ROM drive.
• If the Auto Run feature is not activated, choose Run from the Start Menu. The Run dialog box appears.
DESKTOP COMPUTER
Toolkit + License
NETWORK SERVER
Shared ToolKit Project
LAPTOP COMPUTER
Toolkit + License

Chapter 2 Installing ITEM ToolKit 11
• In the Run dialog box, type D:\setup (replace the letter D with the correct letter for your CD-ROM drive).
• Click OK to activate the installation program.
• If the Auto Run feature is activated, the following screen appears.
• Select Install or Upgrade.

12 ITEM ToolKit Getting Started Guide
• Select ITEM ToolKit. The installation wizard begins.
NOTE If the following window appears, click Yes to allow the process to uninstall the existing installation, and then restart the installation process.

Chapter 2 Installing ITEM ToolKit 13
• Click Next and the following Setup Type dialog box appears.
• Choose Standalone and click Next.

14 ITEM ToolKit Getting Started Guide
• The License Agreement dialog box appears. Read the license agreement carefully and click Yes to accept or No to decline. If you click No, the setup program closes.
• The Customer Information dialog box appears. Type the user name and the company name in the appropriate boxes, and then click Next.
• The Choose Destination Location dialog box appears. To choose a destination folder that the program files should be
installed into, click Next to accept the default destination folder or click Browse, select an alternate folder, then click Next.

Chapter 2 Installing ITEM ToolKit 15
• The Select Program Folder dialog box appears. To accept the Item Software folder, click Next. To create a new folder, type the name of the new folder in the Program Folder box, then click Next. To select an existing folder, locate the desired folder in the Existing Folders list, select it, and then click Next.
• Select the optional Components to be installed, and then click Next.

16 ITEM ToolKit Getting Started Guide
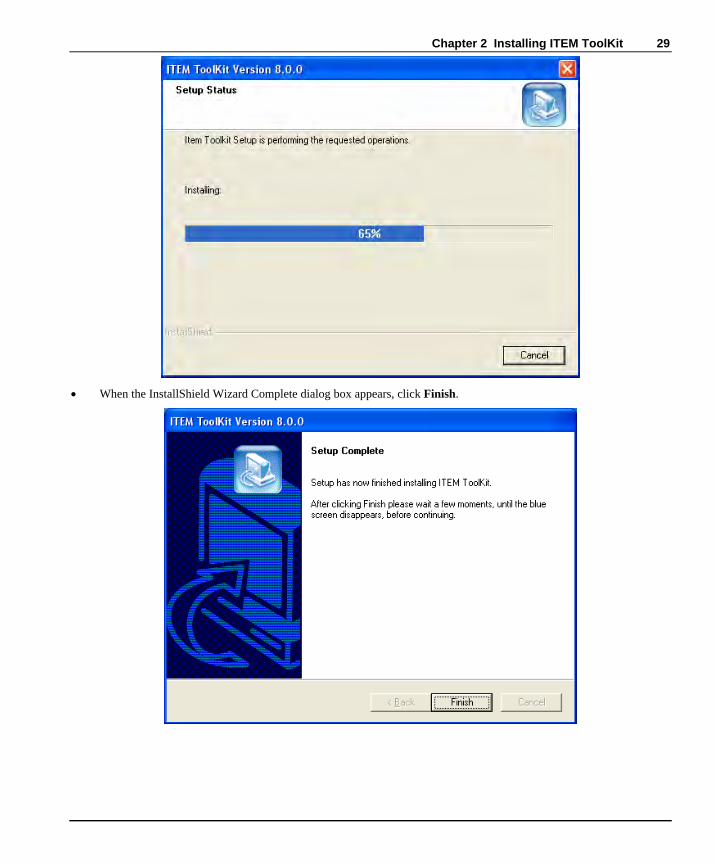
• The Setup Status dialog box appears and displays the progress of the installation.
• When the InstallShield Wizard Complete dialog box appears, click Finish.

Chapter 2 Installing ITEM ToolKit 17
Activating the Software Once the software is installed, it must be activated. If the software is not activated, only the demonstration mode features will be available.
To activate ToolKit:
• From the Start Menu, select Programs -> Item Software -> ITEM ToolKit or click on the ITEM ToolKit icon in your desktop.
• The Success dialog box appears. Click OK.
• The Demo Notification dialog box appears. Select one of the unlock options.
• Selecting Unlock by Email opens the following dialog:

18 ITEM ToolKit Getting Started Guide
• Enter the required information and click Send. An email will be sent to Item Software with your activation request. Once you have received a reply containing your activation codes enter them in the Program Activation Dialog (see Unlock by Phone).
• Selecting Unlock Online opens the following dialog:
• Enter the required information and click OK
• Selecting Unlock by Phone opens the following dialog:
• Your system will generate User Code 1 and User Code 2 numbers.
• The User Codes are required for activation of your program. These numbers must be presented to an Item Software representative by telephone or email. Item Software will then supply the License ID, Password and Registration Keys.
• Enter these details in the boxes, and then click Unlock.
• The About Item ToolKit dialog box appears. Verify that the correct modules are activated:

Chapter 2 Installing ITEM ToolKit 19
After dismissing the above dialog, the "Time Trial Notification Dialog" dialog will be displayed, along with the number of days left in the trial period.
NOTE If you click Continue from the Demo Notification Dialog Box, the software opens in demonstration mode. You can register the software at any time by selecting Edit License Key from the Help Menu.
• Select Help from the Standard Toolbar.
• Select Edit License Key from the Help Menu.
• The Program Activation Dialog box will appear.
• Follow the previous activation procedure.

20 ITEM ToolKit Getting Started Guide
Verifying the Software
To Check Which Modules Are Activated • Select Help From the Standard Toolbar.
• Select About ITEM ToolKit.
• The About ITEM ToolKit Dialog Box appears and you can check the Version of the software and which modules are in full version or Demo Version.
• Click "OK" when finished.

Chapter 2 Installing ITEM ToolKit 21
2. Network Server Installation ITEM ToolKit supports five types of installation: Standalone, Network Server, License Server, Network Client and View-Only Client. This chapter will provide you the required instruction for installing the software as Network Server. It contains the following sections:
What is Network Server Installation?
Installing the software
Activating and verifying the software
Setting up the license manager

22 ITEM ToolKit Getting Started Guide
NETWORK CLIENT # 1 Full ITEM ToolKit
Installation + Path to the Network Licenses
NETWORK SERVER or DESIGNATED NETWORK
CLIENT USED AS SERVER. Full ITEM ToolKit Installation
+ Network Licenses
NETWORK CLIENT # 2 Full ITEM ToolKit
Installation + Path to the Network Licenses
What is Network Server Installation? Network Server Installation is designed to provide access to the License Key through a network. After installing the software on the Network Server or on a designated Network Client used as a server, the Network Client installation must be performed on the client workstation. The software can be launched on the client workstation or on the server. This option is intended for a single user or multiple users that are required to have the software installed on a shared server. The number of users accessing the software will be limited to the number of licenses purchased.
NOTE The following must be noted when installing the software on a network server:
THE INSTALLATION MUST BE PHYSICALLY PERFORMED AT THE DESIGNATED NETWORK SERVER AND CANNOT BE DONE FROM A REMOTE WORKSTATION.
TOOLKIT MUST BE INSTALLED ON THE SERVER BEFORE IT CAN BE INSTALLED ON A NETWORK CLIENT.
SERVER INSTALLATION REQUIRES FULL ADMINISTRATIVE RIGHTS.
THE PROGRAM INSTALLATION FOLDER (FOR EXAMPLE: C:\Program Files \Item\ Toolkit\ Programs) INSTALLED ON THE NETWORK SERVER MUST BE SHARED BETWEEN THE NETWORK SERVER AND CLIENT WORKSTATION.
NETWORK CLIENT MUST HAVE FULL ACCESS RIGHTS TO THE PROGRAMS FOLDER (FOR EXAMPLE: C:\Program Files \Item\ Toolkit\ Programs) INSTALLED ON THE NETWORK SERVER.
Installing the Network Server Version of the Software The Install Wizard will guide you through simple steps for installing ITEM ToolKit. Please complete the following steps:
• Insert the ToolKit CD into your CD-ROM drive.
• If the Auto Run feature is not activated, choose Run from the Start Menu. The Run dialog box appears.

Chapter 2 Installing ITEM ToolKit 23
• In the Run dialog box, type D:\setup (replace the letter D with the correct letter for your CD-ROM drive).
• Click OK to activate the installation program.
• If the Auto Run feature is activated, the following screen appears.
• Select Install or Upgrade.

24 ITEM ToolKit Getting Started Guide
• Select ITEM ToolKit. The installation wizard begins.
NOTE If the following window appears, click Yes to allow the process to uninstall the existing installation, and then restart the installation process.

Chapter 2 Installing ITEM ToolKit 25
• Click Next and the following Setup Type dialog box appears.
• Choose Network Server and click Next.
• The License Agreement dialog box appears. Read the license agreement carefully and click Yes to accept or No to decline. If you click No, the setup program closes.

26 ITEM ToolKit Getting Started Guide
• The Customer Information dialog box appears. Type the user name and the company name in the appropriate boxes, and then click Next.
• The Choose Destination Location dialog box appears. To choose a destination folder that the program files should be
installed into, click Next to accept the default destination folder or click Browse, select an alternate folder, then click Next.
NOTE The destination folder must be shared on the network to provide access to all network clients.
• The Server Installation Connection Type dialog appears. Select the type of connection you wish for the client
machine. The choice is either Network File Share or TCP/IP. With the former option full read/write access to the destination folder is required. With the latter option, you must also enter a port number. If you are unsure which option to select, please consult your Network Administrator. Once your choice has been made click Next.

Chapter 2 Installing ITEM ToolKit 27
• The Select Program Folder dialog box appears. To accept the Item Software folder, click Next. To create a new folder, type the name of the new folder in the Program Folder box, and then click Next. To select an existing folder, locate the desired folder in the Existing Folders list, select it, and click Next.
• Select the optional Components to be installed, and then click Next.

28 ITEM ToolKit Getting Started Guide
• The option to add icons to the desktop is the next window to appear.
• The Setup Status dialog box appears and displays the progress of the installation.
Chapter 2 Installing ITEM ToolKit 29
• When the InstallShield Wizard Complete dialog box appears, click Finish.

30 ITEM ToolKit Getting Started Guide
Activating the Software Once the software is installed, it must be activated. If the software is not activated, only the demonstration mode features will be available.
To activate ToolKit:
• From the Start Menu, select Programs->Item Software->ITEM ToolKit or click on the ITEM ToolKit icon in your desktop.
• The Success dialog box appears. Click OK.
• The Demo Notification dialog box appears. Select one of the unlock options.
• Selecting Unlock Online opens the following dialog:
• Enter the required information and click OK
• Selecting Unlock by Phone opens the Program Activation Dialog:

Chapter 2 Installing ITEM ToolKit 31
• Selecting Unlock opens the following dialog:
• Your system will generate User Code 1 and User Code 2 numbers.
• The User Codes are required for activation of your program. These numbers must be presented to an Item Software representative by telephone or email.
• Item Software will then supply the License ID, Password and Registration Keys.
• Enter these details in the boxes, and then click Unlock.
• Once all the required modules have been activated the About Item ToolKit dialog box appears. Verify that the correct modules are activated.

32 ITEM ToolKit Getting Started Guide
• Clicking the Network Info... button will display the following dialog showing the number of network licenses, available licenses and maintenance expiration date.
NOTE If you click Continue from the Demo Notification Dialog Box, the software opens in demonstration mode. You can register the software at any time by selecting Edit License Key from the Help Menu.
• Select Help from the Standard Toolbar
• Select Edit License Key from the Help Menu

Chapter 2 Installing ITEM ToolKit 33
• The Program Activation Dialog box will appear
• Follow the previous activation procedure.

34 ITEM ToolKit Getting Started Guide
Setting Up the License Manager Once the software is activated, the license manager needs to be set with the correct types of network connections.
ITEM ToolKit has two types of network connections available.
Network File Share Connections: (LAN, WAN Connections) TCP/IP Connections: (Internet Connections) Server path, IP Address and Server Port Number should be obtained from your Network Administrator.
NETWORK CLIENT # 1 Local or installation path: C:\Program Files\Item\Toolkit\Programs Server or License Path: \\Server\ Program Files\Item\Toolkit\ Programs\IT_Local_License
SERVER Local or installation path: C:\Program Files\Item\Toolkit\ Programs The path is shared and accessible to the users (Power user right minimum).
NETWORK CLIENT # 2 Local or installation path: C:\Program Files\Item\Toolkit\Programs Server or License Path: \\Server\ Program Files\Item\Toolkit\ Programs\IT_Local_License
NETWORK CLIENT # 1 Local or installation path: C:\Program Files\Item\Toolkit\Programs Server IP Address: 127 . 0 . 0 . 1 Server Port Number: 10000
SERVER Local or installation path: C:\Program Files\Item\Toolkit\ Programs\IT_Local_License Port Number: 10000
NETWORK CLIENT # 2 Local or installation path: C:\Program Files\Item\Toolkit\Programs Server IP Address: 127 . 0 . 0 . 1 Server Port Number: 10000

Chapter 2 Installing ITEM ToolKit 35
Network File Share Connections Setup • From the Start Menu, select Programs -> Item Software -> ITEM ToolKit License Manager.
• The License Manager Dialog box appears.
• Click on IT License Server from the top menu and select Server configuration.

36 ITEM ToolKit Getting Started Guide
• The license setup window opens.
• Verify that Network Server is selected (A). • Select Network file share (B). • Verify the License path (C). If the path is incorrect, click on Browse (D) and select the folder where the
license keys are located. • Select Service (E) for execution type and click on "Start Server Service" (F).
NOTE Selecting Thread for the Server execution type is for troubleshooting purposes only and will stop the service when exiting the license manager.
• Click "OK" when finished.
A B
C
D E
F

Chapter 2 Installing ITEM ToolKit 37
Network TCP/IP Connections Setup • From the Start Menu, select Programs -> Item Software -> ITEM ToolKit License Manager.
• The License Manager Dialog box appears.
• Click on IT License Server from the top menu and select Server configuration.

38 ITEM ToolKit Getting Started Guide
• The license setup window opens.
Verify that Network Server is selected (A). Select TCP/IP (B). Verify the License path (C). If the path is incorrect, click on Browse (D) and select the folder where the
license keys are located. Enter the Port Number (E). Select Service (F) for execution type and click on "Start Server Service" (G).
NOTE Selecting Thread for the Server execution type is for troubleshooting purposes only and will stop the service when exiting the license manager.
• Click "OK" when finished.
A B
C
D
E F G

Chapter 2 Installing ITEM ToolKit 39
3. License Server Installation ITEM ToolKit supports five types of installation: Standalone, Network Server, License Server, Network Client and View-Only Client. This chapter will provide you the required instruction for installing the License Server Software. It contains the following sections:
What is License Server Installation?
Installing the License Manager Software
Activating and Verifying the Licenses
Setting Up the License Manager

40 ITEM ToolKit Getting Started Guide
What Is License Server Installation? License Server Installation is designed to provide access to the License Key through a network. After installing the License Manager software on the Network Server, the Network Client installation must be performed on the client workstation. Only the License Manager will be installed on the server, ITEM ToolKit will not be installed and cannot be run on the server.
This option is intended for a single user or multiple users that are required to have the Software Licenses installed on a shared license server. The number of users accessing the software will be limited to the number of licenses purchased.
NOTE The following must be noted when installing the software on a network server:
THE INSTALLATION MUST BE PHYSICALLY PERFORMED AT THE DESIGNATED NETWORK SERVER AND CANNOT BE DONE FROM A REMOTE WORKSTATION.
THE LICENSE MANAGER MUST BE INSTALLED ON THE SERVER BEFORE IT CAN BE INSTALLED ON A NETWORK CLIENT.
SERVER INSTALLATION REQUIRES FULL ADMINISTRATIVE RIGHTS.
THE PROGRAM INSTALLATION FOLDER (FOR EXAMPLE: C:\Program Files \Item\ Toolkit\ Programs) INSTALLED ON THE NETWORK SERVER MUST BE SHARED BETWEEN THE NETWORK SERVER AND CLIENT WORKSTATION.
NETWORK CLIENT MUST HAVE FULL ACCESS RIGHTS TO THE PROGRAMS FOLDER (FOR EXAMPLE: C:\Program Files \Item\ Toolkit\ Programs) INSTALLED ON THE NETWORK SERVER.
NETWORK CLIENT # 1 Full ITEM ToolKit
Installation + Path to the Network Licenses
LICENSE SERVER License Manager installation
only +
Network Licenses NETWORK CLIENT # 2 Full ITEM ToolKit
Installation + Path to the Network Licenses

Chapter 2 Installing ITEM ToolKit 41
Installing the License Manager The Install Wizard will guide you through simple steps for installing ITEM ToolKit. Please complete the following steps:
• Insert the ToolKit CD into your CD-ROM drive.
• If the Auto Run feature is not activated, choose Run from the Start Menu. The Run dialog box appears.
• In the Run dialog box, type D:\setup (replace the letter D with the correct letter for your CD-ROM drive).
• Click OK to activate the installation program.
• If the Auto Run feature is activated, the following screen appears.
• Select Install or Upgrade.

42 ITEM ToolKit Getting Started Guide
• Select ITEM ToolKit. The installation wizard begins.
NOTE If the following window appears, click Yes to allow the process to uninstall the existing installation, and then restart the installation process.

Chapter 2 Installing ITEM ToolKit 43
• Click Next and the following Setup Type dialog box appears.
• Choose License Server and click Next.
• The License Agreement dialog box appears. Read the license agreement carefully and click Yes to accept or No to decline. If you click No, the setup program closes.

44 ITEM ToolKit Getting Started Guide
• The Customer Information dialog box appears. Type the user name and the company name in the appropriate boxes, and then click Next.
• The Choose Destination Location dialog box appears. To choose a destination folder that the programs file should be
installed into, click Next to accept the default destination folder or click Browse, select an alternate folder, then click Next.
NOTE The destination folder must be shared on the network to provide access to all network clients.
• The Server Installation Connection Type dialog appears. Select the type of connection you wish for the client
machine. The choice is either Network File Share or TCP/IP. With the former option full read/write access to the destination folder is required. With the latter option, you must also enter a port number. If you are unsure which option to select, please consult your Network Administrator. Once your choice has been made click Next.

Chapter 2 Installing ITEM ToolKit 45
• The Select Program Folder dialog box appears. To accept the Item Software folder, click Next. To create a new folder, type the name of the new folder in the Program Folder box, and then click Next. To select an existing folder, locate the desired folder in the Existing Folders list, select it, and then click Next.
• The option to add icons to the desktop is the next window to appear.

46 ITEM ToolKit Getting Started Guide
• The Setup Status dialog box appears and displays the progress of the installation.

Chapter 2 Installing ITEM ToolKit 47
• When the InstallShield Wizard Complete dialog box appears, click Finish.

48 ITEM ToolKit Getting Started Guide
Activating the Licenses Once the License Manager Software is installed, the license must be activated. If not, only the demonstration mode features will be available at the client workstations.
• From the Start Menu, select Programs\Item Software\ITEM ToolKit License Manager.
• The Demo Notification dialog box appears. Select one of the unlock options.
• Selecting Unlock by Email opens the following dialog:
• Enter the required information and click Send. An email will be sent to Item Software with your activation request. Once you have received a reply containing your activation codes enter them in the Program Activation Dialog (see Unlock by Phone).

Chapter 2 Installing ITEM ToolKit 49
• Selecting Unlock Online opens the following dialog:
• Enter the required information and click OK
• Selecting Unlock by Phone opens the following dialog:
• Your system will generate User Code 1 and User Code 2 numbers.
• The User Codes are required for activation of your program. These numbers must be presented to an Item Software representative by telephone or email. Item Software will then supply the License ID, Password and Registration Keys.
• Enter these details in the boxes, and then click Unlock.
• The Success dialog box appears. Click OK and the License Manager opens. Click Cancel to exit the License Manager.

50 ITEM ToolKit Getting Started Guide
NOTE If you have more than one module to be activated, the following should be applied.
• Click on IT License Server and select License Activation.
• Follow the previous activation procedure.
NOTE If you click Continue from the Demo Notification Dialog Box, the License Manager opens and you can unlock modules from here by selecting IT License Server and then License Activation.

Chapter 2 Installing ITEM ToolKit 51
Verifying the Licenses
• Click on IT License Server and select License Information.
• The Server License Information window appears giving you the number of purchased and available license.

52 ITEM ToolKit Getting Started Guide
Setting Up the License Manager Once the licenses are activated, the license manager needs to be set with the correct types of network connections.
ITEM ToolKit has two types of network connections available.
Network File Share Connections: (LAN, WAN Connections) TCP/IP Connections: (Internet Connections) Server path, IP Address and Server Port Number should be obtained from your Network Administrator.
NETWORK CLIENT # 1 Local or installation path: C:\Program Files\Item\Toolkit\Programs Server or License Path: \\Server\ Program Files\Item\Toolkit\ Programs\IT_Local_License
SERVER Local or installation path: C:\Program Files\Item\Toolkit\ Programs The path is shared and accessible to the users (Power user right minimum).
NETWORK CLIENT # 2 Local or installation path: C:\Program Files\Item\Toolkit\Programs Server or License Path: \\Server\ Program Files\Item\Toolkit\ Programs\IT_Local_License
NETWORK CLIENT # 1 Local or installation path: C:\Program Files\Item\Toolkit\Programs Server IP Address: 127 . 0 . 0 . 1 Server Port Number: 10000
SERVER Local or installation path: C:\Program Files\Item\Toolkit\ Programs\IT_Local_License Port Number: 10000
NETWORK CLIENT # 2 Local or installation path: C:\Program Files\Item\Toolkit\Programs Server IP Address: 127 . 0 . 0 . 1 Server Port Number: 10000

Chapter 2 Installing ITEM ToolKit 53
Network File Share Connections Setup • From the Start Menu, select Programs -> Item Software -> ITEM ToolKit License Manager.
• The License Manager Dialog box appears.
• Click on IT License Server from the top menu and select Server configuration.
• The license setup window opens.
Verify that Network Server is selected (A). Select Network file share (B). Verify the License path (C). If the path is incorrect, click on Browse (D) and select the folder where the
license keys are located.

54 ITEM ToolKit Getting Started Guide
Select Service (E) for execution type and click on "Start Server Service" (F).
NOTE Selecting Thread for the Server execution type is for troubleshooting purposes only and will stop the service when exiting the license manager.
• Click "OK" when finished.
A B
C
D
E F

Chapter 2 Installing ITEM ToolKit 55
Network TCP/IP Connections Setup • From the Start Menu, select Programs -> Item Software -> ITEM ToolKit License Manager.
• The License Manager Dialog box appears.
• Click on IT License Server from the top menu and select Server configuration.

56 ITEM ToolKit Getting Started Guide
• The license setup window opens.
Verify that Network Server is selected (A). Select TCP/IP (B). Verify the License path (C). If the path is incorrect, click on Browse (D) and select the folder where the
license keys are located. Enter the Port Number (E). Select Service (F) for execution type and click on "Start Server Service" (G).
NOTE Selecting Thread for the Server execution type is for troubleshooting purposes only and will stop the service when exiting the license manager.
• Click "OK" when finished.
A B
C
D
E F G

Chapter 2 Installing ITEM ToolKit 57
4. Network Client Installation ITEM ToolKit supports five types of installation: Standalone, Network Server, Network License Server, Network Client and View-Only Client. This chapter will provide you the required instruction for installing the software as a Network Client. It contains the following sections:
What is Network Client Installation?
Installing the Software
Activating the Software
Setting Up Network Client
Verifying the Software

58 ITEM ToolKit Getting Started Guide
What Is Network Client Installation? Network Client Installation is designed to install ITEM ToolKit on the client workstation and to create a path from the client workstation to the network server. Upon completing the installation of the Network Client (client workstation), the license keys that are installed on your network server can be accessed from the client workstation. Network server installation must be present and activated within your network prior to installing the Network Client.
NOTE The following must be noted when installing the software on a Network Client:
NETWORK CLIENT INSTALLATION MUST BE PHYSICALLY PERFORMED AT THE DESIGNATED CLIENT WORKSTATION AND CANNOT BE PERFORMED FROM REMOTE WORKSTATION OR SERVER.
TOOLKIT OR THE LICENSE MANAGER MUST BE INSTALLED ON THE NETWORK SERVER BEFORE DOING A NETWORK CLIENT INSTALLATION.
NETWORK CLIENT INSTALLATION REQUIRES FULL ADMINISTRATIVE RIGHTS.
THE PROGRAMS FOLDER (FOR EXAMPLE: C:\PROGRAM FILES \ITEM\ TOOLKIT\ PROGRAMS) INSTALLED ON THE NETWORK SERVER MUST BE SHARED BETWEEN THE NETWORK SERVER AND CLIENT WORKSTATION.
NETWORK CLIENT MUST HAVE FULL ACCESS RIGHTS TO THE PROGRAMS FOLDER (FOR EXAMPLE: C:\PROGRAM FILES \ITEM\ TOOLKIT\ PROGRAMS) INSTALLED ON THE NETWORK SERVER.
NETWORK CLIENT # 1 Full ITEM ToolKit
Installation + Path to the Network Licenses
NETWORK SERVER or
LICENSE SERVER with installation and activation
completed NETWORK CLIENT # 2
Full ITEM ToolKit Installation +
Path to the Network Licenses

Chapter 2 Installing ITEM ToolKit 59
Installing the Software The Install Wizard will guide you through simple steps for installing ITEM ToolKit. Please complete the following steps:
• Insert the ToolKit CD into your CD-ROM drive.
• If the Auto Run feature is not activated, choose Run from the Start Menu. The Run dialog box appears.
• In the Run dialog box, type D:\setup (replace the letter D with the correct letter for your CD-ROM drive).
• Click OK to activate the installation program.
• If the Auto Run feature is activated, the following screen appears.
• Select Install or Upgrade.

60 ITEM ToolKit Getting Started Guide
• Select ITEM ToolKit. The installation wizard begins.
NOTE If the following window appears, click Yes to allow the process to uninstall the existing installation, and then restart the installation process.

Chapter 2 Installing ITEM ToolKit 61
• Click Next and the following Setup Type dialog box appears.
• Choose Network Client and click Next.
• The License Agreement dialog box appears. Read the license agreement carefully and click Yes to accept or No to decline. If you click No, the setup program closes.

62 ITEM ToolKit Getting Started Guide
• The Customer Information dialog box appears. Type the user name and the company name in the appropriate boxes, and then click Next.
• The Choose Destination Location dialog box appears. To choose a destination folder that the program files should be
installed into, click Next to accept the default destination folder or click Browse, select an alternate folder, then click Next.

Chapter 2 Installing ITEM ToolKit 63
• The Choose Network Destination Path dialog box appears.
• For Network File Share connection type, click Browse to select the path from the client workstation to the directory containing the program on the Network Server.
• The Path dialog box appears.

64 ITEM ToolKit Getting Started Guide
• Select the folder on the Network Server where the ITEM ToolKit program files have been installed, click OK and click Next to continue.
• For TCP/IP connection type, enter the Port Number and Server IP Address. If you are unsure of these settings, please contact your Network Administrator. Click Next to continue.
• The Select Program Folder dialog box appears. To accept the Item Software folder, click Next. To create a new folder, type the name of the new folder in the Program Folder box, and then click Next. To select an existing folder, locate the desired folder in the Existing Folders list, select it, and then click Next.
• Select the optional Components to be installed, and then click Next.

Chapter 2 Installing ITEM ToolKit 65
• The option to add icons to the desktop is the next window to appear.
• The Setup Status dialog box appears and displays the progress of the installation.

66 ITEM ToolKit Getting Started Guide
• When the InstallShield Wizard Complete dialog box appears, click Finish.

Chapter 2 Installing ITEM ToolKit 67
Activating the Software A Network Client cannot be activated and once the software is installed, it should open normally and read the License Key located on the Server.
NOTE ITEM ToolKit will display error messages if: 1. The software cannot read the License Key because the Network Server is down, the connection is lost, the client is logged off or the Network Path is incorrect. 2. You have more users than licenses available.
License problem warning Box
User Limit Exceeded Warning Box

68 ITEM ToolKit Getting Started Guide
Setting Up the Network Client Once the Network Client version of ToolKit is installed, the Client license manager needs to be set with the correct types of network connections.
ITEM ToolKit has two types of network connections available.
Network File Share Connections: (LAN, WAN Connections) TCP/IP Connections: (Internet Connections)
NETWORK CLIENT # 1 Local or installation path: C:\Program Files\Item\Toolkit\Programs Server or License Path: \\Server\ Program Files\Item\Toolkit\ Programs\IT_Local_License
SERVER Local or installation path: C:\Program Files\Item\Toolkit\ Programs The path is shared and accessible to the users (Power user right minimum).
NETWORK CLIENT # 2 Local or installation path: C:\Program Files\Item\Toolkit\Programs Server or License Path: \\Server\ Program Files\Item\Toolkit\ Programs\IT_Local_License
NETWORK CLIENT # 1 Local or installation path: C:\Program Files\Item\Toolkit\Programs Server IP Address: 127 . 0 . 0 . 1 Server Port Number: 10000
SERVER Local or installation path: C:\Program Files\Item\Toolkit\ Programs\IT_Local_License Port Number: 10000
NETWORK CLIENT # 2 Local or installation path: C:\Program Files\Item\Toolkit\Programs Server IP Address: 127 . 0 . 0 . 1 Server Port Number: 10000

Chapter 2 Installing ITEM ToolKit 69
Server path, IP Address and Server Port Number should be obtained from your Network Administrator. Network File Share Connections Setup • Select Help From the Standard Toolbar and Select TCP/IP Client Setup.
• The License setup window opens.
Verify that Network Client is selected (A). Select Network file share (B). Verify the License path (C). If the path is incorrect, click on Browse (D) and select the folder where the
license keys are located.
• Click "OK" when finished.
A
B
C
D

70 ITEM ToolKit Getting Started Guide
Network TCP/IP Connections Setup • Select Help From the Standard Toolbar and Select TCP/IP Client Setup.
• The License setup window opens.
Verify that Network Client is selected (A). Select TCP/IP (B). Enter the Server Port Number (C). Enter the Server IP Address (D).
• Click "OK" when finished.
A B
C
D

Chapter 2 Installing ITEM ToolKit 71
Verifying the Software
To Check Which Modules Are Activated • Select Help From the Standard Toolbar.
• Select About ITEM ToolKit.
• The About ITEM ToolKit Dialog Box appears and you can check the Version of the software and which modules are in full version or Demo Version.
• Click "OK" when finished.

72 ITEM ToolKit Getting Started Guide
To Check How Many Licenses Are Available
• Click on Network Info (A) in the About ITEM ToolKit Dialog Box.
• Check how many Licenses are available. If no licenses are available for the module you want to open, wait until another client closes their application or purchase additional licenses.
• Click "OK" when finished.
A

Chapter 2 Installing ITEM ToolKit 73
5. View-Only Client Installation ITEM ToolKit supports five types of installation: Standalone, Network Server, Network License Server, Network Client and View-Only Client. This chapter will provide you the required instruction for installing the software as a View-Only Client. It contains the following sections:
What is View-Only Client Installation?
Installing the Software

74 ITEM ToolKit Getting Started Guide
What Is View-Only Client Installation? The view-only client mode is an installation type that allows organizations with license servers to install copies of the software that do not allow models to be saved or exported. This client-type can be used by reviewers and managers that have no need to modify models. Network server installation must be present and activated within your network prior to installing the Network Client.
NOTE The following must be noted when installing the software on a View-Only Client:
VIEW-ONLY CLIENT INSTALLATION MUST BE PHYSICALLY PERFORMED AT THE DESIGNATED CLIENT WORKSTATION AND CANNOT BE PERFORMED FROM REMOTE WORKSTATION OR SERVER.
TOOLKIT OR THE LICENSE MANAGER MUST BE INSTALLED ON THE NETWORK SERVER BEFORE DOING A VIEW-ONLY CLIENT INSTALLATION.
VIEW-ONLY CLIENT INSTALLATION REQUIRES FULL ADMINISTRATIVE RIGHTS.
THE PROGRAMS FOLDER (FOR EXAMPLE: C:\PROGRAM FILES \ITEM\ TOOLKIT\ PROGRAMS) INSTALLED ON THE NETWORK SERVER MUST BE SHARED BETWEEN THE NETWORK SERVER AND CLIENT WORKSTATION.
VIEW-ONLY CLIENT MUST HAVE FULL ACCESS RIGHTS TO THE PROGRAMS FOLDER (FOR EXAMPLE: C:\PROGRAM FILES \ITEM\ TOOLKIT\ PROGRAMS) INSTALLED ON THE NETWORK SERVER.
VIEW-ONLY CLIENT # 1 Full ITEM ToolKit
Installation + Path to the Network Licenses
NETWORK SERVER or
LICENSE SERVER with installation and activation
completed VIEW-ONLY CLIENT # 2
Full ITEM ToolKit Installation +
Path to the Network Licenses

Chapter 2 Installing ITEM ToolKit 75
Installing the Software The Install Wizard will guide you through simple steps for installing ITEM ToolKit. Please complete the following steps:
• Insert the ToolKit CD into your CD-ROM drive.
• If the Auto Run feature is not activated, choose Run from the Start Menu. The Run dialog box appears.
• In the Run dialog box, type D:\setup (replace the letter D with the correct letter for your CD-ROM drive).
• Click OK to activate the installation program.
• If the Auto Run feature is activated, the following screen appears.
• Select Install or Upgrade.

76 ITEM ToolKit Getting Started Guide
• Select ITEM ToolKit. The installation wizard begins.
NOTE If the following window appears, click Yes to allow the process to uninstall the existing installation, and then restart the installation process.

Chapter 2 Installing ITEM ToolKit 77
• Click Next and the following Setup Type dialog box appears.
• Choose View-Only Client and click Next.
• The License Agreement dialog box appears. Read the license agreement carefully and click Yes to accept or No to decline. If you click No, the setup program closes.

78 ITEM ToolKit Getting Started Guide
• The Customer Information dialog box appears. Type the user name and the company name in the appropriate boxes, and then click Next.
• The Choose Destination Location dialog box appears. To choose a destination folder that the program files should be
installed into, click Next to accept the default destination folder or click Browse, select an alternate folder, then click Next.

Chapter 2 Installing ITEM ToolKit 79
• The Choose Network Destination Path dialog box appears.
• For Network File Share connection type, click Browse to select the path from the client workstation to the directory containing the program on the Network Server.
• The Path dialog box appears.

80 ITEM ToolKit Getting Started Guide
• Select the folder on the Network Server where the ITEM ToolKit program files have been installed, click OK and click Next to continue.
• For TCP/IP connection type, enter the Port Number and Server IP Address. If you are unsure of these settings, please contact your Network Administrator. Click Next to continue.
• The Select Program Folder dialog box appears. To accept the Item Software folder, click Next. To create a new folder, type the name of the new folder in the Program Folder box, and then click Next. To select an existing folder, locate the desired folder in the Existing Folders list, select it, and then click Next.
• Select the optional Components to be installed, and then click Next.

Chapter 2 Installing ITEM ToolKit 81
• The option to add icons to the desktop is the next window to appear.
• The Setup Status dialog box appears and displays the progress of the installation.
• When the InstallShield Wizard Complete dialog box appears, click Finish.

82 ITEM ToolKit Getting Started Guide

Chapter 3 ToolKit Basics 83
CHAPTER 3 ToolKit Basics
ITEM ToolKit contains powerful features that make it easy to create and analyze projects. This chapter will familiarize you with the ToolKit interface. It includes information about:
1. Standard Features of the ToolKit Interface.
2. The ToolKit Workspace.
3. The ToolKit Menus.
4. The ToolKit Toolbar.
Once you are familiar with ToolKit’s features, see Chapter 4 for information about creating a new project.
1. Standard Features of the ToolKit Interface This section describes the general functionality of the features and command menus within ITEM ToolKit. The standard features described are used throughout all of the applications.
The use of these features and commands might be different and dependent upon the type of analysis performed. However, the functionality of the features and commands will remain the same. For example, the ADD command will:
Allow you to add Systems/Analysis types to your project when creating a Project. Allow you to add Blocks and Components to the systems created within your Project.
For detailed instructions on how to use the standard features specific to each analysis type, please refer to the respective analysis type’s section in this tutorial.
Multiple Document Interface The ToolKit workspace is the area you use to build your projects. It consists of menus, toolbars, and windows. All of the features in the ToolKit workspace follow standard Windows Graphical User Interface (GUI) conventions. The ToolKit workspace features a Multiple Document Interface (MDI), which allows you to:
Choose which windows to display, close, minimize, move and resize. You can drag and drop ToolKit windows and toolbars anywhere within the MDI workspace.
Open multiple project files so you can build several projects at the same time and compare analysis results. Drag and drop components between projects. This feature allows you to create a new project quickly by
reusing components from other projects.

84 ITEM ToolKit Getting Started Guide
2. The ToolKit Workspace
The Project Window Located in the upper left corner (default location); the project window shows the project hierarchy with systems listed by the type of analysis. Cross tabs located on the edge of the project window allow you to select an active project when multiple projects are open. The following items and their icons are shown in the Project window hierarchy tree:
Project File Header: Shown with a filing cabinet icon - Listing includes project information and sum of reliability data for all reliability prediction modules, only.
Analysis Type Header: Shown with a file cabinet drawer icon – Systems are grouped by analysis type; this header identifies the analysis type. System Files: Shown with multiple pockets, file folder icon - Listing includes system information and sum of reliability data for the total system.
Project Window
System Window
Library Window
Chart Window
Dialog Window
Grid Window

Chapter 3 ToolKit Basics 85
The System Window Located in the lower left corner (default location); the system windows shows the hierarchy of the system components included in the system selected in the Project window. Cross tabs located on the edge of this window indicate the type of analysis module that is active in bold (A) along with other recently used analysis modules. The following items and their icons are shown in the System window hierarchy tree when using the prediction and FMECA modules. RBD, Markov, Event Tree and Fault Tree use additional items and icons in the hierarchy tree due to the different nature of the systems.
System Header: Shown with a multiple pockets file folder icon - Listing includes system information and sum of reliability data for the total system. System Block: Shown with a single file folder icon – Listing includes sum of reliability data for all blocks and components attached to this block.
Linked Block: Shown with a single open file folder icon with a green arrow pointing to it – This is a special block that is a mirror image or direct copy of another block and its attached components. The Linked Block automatically updates when data is changed for the block to which it is linked. The Linked Block displays the same data as standard system Block (Used with reliability prediction modules only). Component: Shown with a blue box icon – Listing indicates a single component and its data (lowest level of the hierarchy tree in the prediction systems).
FMECA Component: When using a FMECA system, the component blue box icon becomes a blue file folder icon.
FMECA Failure Mode: Shown with a red box icon - Indicates a failure mode (only used with the FMECA systems).
Library System Window The Library System window is located in the middle of the workspace (default location). This system window stores a library of frequently used systems, blocks and components that helps save time and effort in constructing future systems. The user can create their own custom libraries of components, blocks and even entire systems for later use in future projects. Item Software also has several application specific libraries available that contain thousands of components and their reliability data. The convention for icons and line items listed in the Library System window are the same as the regular System window discussed above.
A

86 ITEM ToolKit Getting Started Guide
The Data View Window The Data View window is located on the right hand side of the workspace (default location). The window allows for the display and entry of component data in the Dialog view, displays a grid or spreadsheet view of system data, creates and displays RBD, Fault Tree, Event Tree and Markov diagrams, generates and displays preformatted and custom graphs and it displays the final calculated results of the reliability model in use. Tabs along the bottom of this window allow for selection and the display of the different types of information.
Options available in the applications window will change in accordance with the analysis performed.
The data window has seven tabs:
The Dialog tab displays information for the item selected in the Project or System Window and is the primary location for viewing and editing data. The tabs and information presented in the Dialog tab vary depending on the selection made in the Project or System Window.

Chapter 3 ToolKit Basics 87
The Grid tab shows the selected element data in tabular format. You can edit data in the Grid window.
If you want to zoom in on a particular section of the grid, select the desired cells and select Grid View Zoom In from the Layout Menu.
If you want to see more of the grid, select Grid View Zoom Out from the Layout Menu. Select Grid View Zoom 100% from the Layout Menu to restore the grid to normal size.
The Diagram tab is used to build, display and edit Reliability Block Diagrams, Fault Tree Diagrams, Markov Diagrams and Event Tree Diagrams. Selecting any of these analyses in the Project or System Window, will display the appropriate Diagram Window.
RBD Diagram

88 ITEM ToolKit Getting Started Guide
Fault Tree Diagram
Markov Diagram
Event Tree Diagram

Chapter 3 ToolKit Basics 89
The Chart tab displays computation results in graphic format. By default, the Chart tab is blank until you specify graph options for the selected system. Once you have generated a chart, you can copy it to the clipboard, save it as a bmp or jpeg file, or print it.
The Result tab is primarily intended for displaying FMECA, Fault Tree, Event Tree, Markov and RBD analysis results. It also displays the failure rates and pi factors for selected Mil-217, Bellcore, RDF 2000, 299B and Mechanical blocks and components.
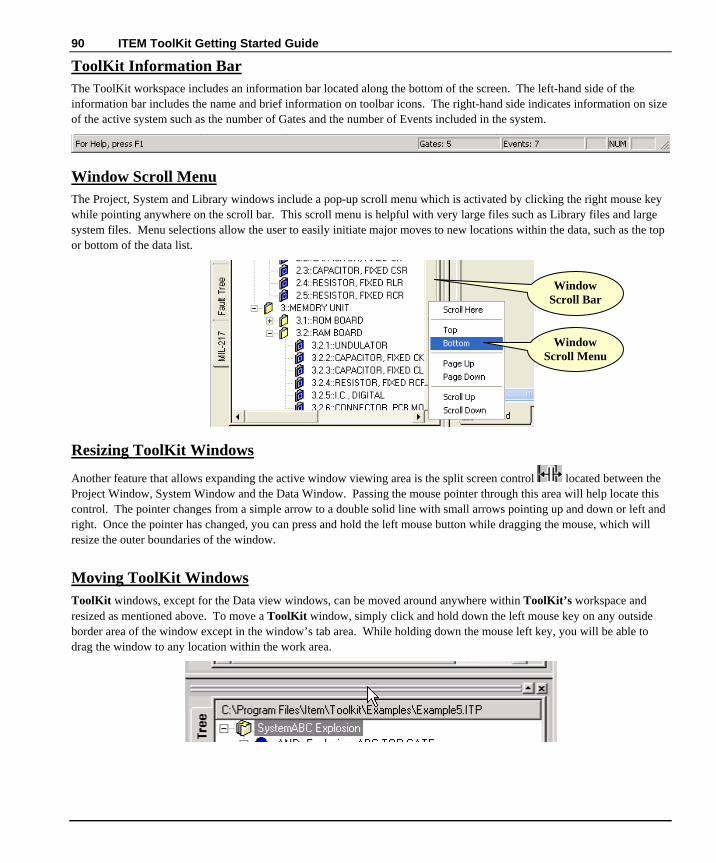
90 ITEM ToolKit Getting Started Guide
ToolKit Information Bar The ToolKit workspace includes an information bar located along the bottom of the screen. The left-hand side of the information bar includes the name and brief information on toolbar icons. The right-hand side indicates information on size of the active system such as the number of Gates and the number of Events included in the system.
Window Scroll Menu The Project, System and Library windows include a pop-up scroll menu which is activated by clicking the right mouse key while pointing anywhere on the scroll bar. This scroll menu is helpful with very large files such as Library files and large system files. Menu selections allow the user to easily initiate major moves to new locations within the data, such as the top or bottom of the data list.
Resizing ToolKit Windows
Another feature that allows expanding the active window viewing area is the split screen control located between the Project Window, System Window and the Data Window. Passing the mouse pointer through this area will help locate this control. The pointer changes from a simple arrow to a double solid line with small arrows pointing up and down or left and right. Once the pointer has changed, you can press and hold the left mouse button while dragging the mouse, which will resize the outer boundaries of the window.
Moving ToolKit Windows ToolKit windows, except for the Data view windows, can be moved around anywhere within ToolKit’s workspace and resized as mentioned above. To move a ToolKit window, simply click and hold down the left mouse key on any outside border area of the window except in the window’s tab area. While holding down the mouse left key, you will be able to drag the window to any location within the work area.
Window Scroll Bar
Window Scroll Menu

Chapter 3 ToolKit Basics 91
3. The ToolKit Menus ITEM ToolKit menus appear along the top of the workspace. Most of the menu functions are also available on a toolbar or in the pop-up menu that appears when you right-click an object.
The principal pull-down menu options for the applications menu are positioned along the top of the program window. Pull-down menus and their options may be selected using the left mouse button. Menu options may alternatively be selected using the keyboard. This is achieved by holding down the Alt key and pressing the underlined character in the required visible menu option. Accelerator keys are also provided for selected menu options.
Selection of many of the menu options will result in standard Windows dialog boxes being displayed (such as those for file or font selection). These dialog boxes contain standard Windows controls such as buttons, combo-boxes (allowing users to choose one option from a selection in a pull-down list), check boxes (allowing users to set a facility on or off) and edit controls (allowing the user to enter text). The controls for each application behave in the same manner to similar controls in other Windows applications.
Files Menu
Add Menu
Edit Menu
Layout Menu
Setting Menu
Analysis Menu
Chart Menu
Window Menu
Help Menu

92 ITEM ToolKit Getting Started Guide
File Menu Project file options may be accessed via the File pull-down menu or the equivalent toolbar options. Project file options allow the users to save and retrieve project data from different projects or create, open and save Library files. The normal Print functions plus the Import / Export functions are also accessed from the File menu. ToolKit also includes a report engine that is available from the File menu. The report engine allows you to create, print and save preformatted and custom reports plus report charts.

Chapter 3 ToolKit Basics 93
Add Menu The Add menu is a multi-functional menu. The Add menu provides options for adding systems to your project and also adding blocks and components to your system.
Add Analysis Menu MIL-217 Add Menu Fault Tree Add Menu
When starting a new project, the Add menu will allow you to add different types of analysis and systems to your project.
After selecting and adding an analysis type to your project, the Add menu will change and will provide a different selection for each type of analysis/system. The type of data that can be accessed with this command is relative to the analysis that is performed. You will have different Add options for each type of analysis. Please refer to the specific analysis section for additional information on using the Add menu.
Edit Menu Where appropriate, choosing the Edit selection from the pull-down menu options accesses the attributes of a selected object. You can access the same Edit functions by placing the cursor over the object, selecting the object and using the Edit menu.

94 ITEM ToolKit Getting Started Guide
Layout Menu The arrangement of how data in the Project and System windows is displayed, and the type of information included, can be customized with the Layout menu. You can specify exactly what type of information is to be displayed. You can view as much, or as little, of the detailed project and system information desired, by selecting the information in the Layout menu. When a data display option is selected, the relevant project or system data will be displayed. You can also select from this menu to sort the data in numerous ways.
Settings Menu The Settings menu provides options for the manner and position in which your project is presented. You can adjust and customize the way numerical values are presented, customize toolbars, customize extended styles, set the workspace to default settings, set diagram measurements and size, customize the automatic backup settings and select the Auto Paginate and Auto Fit to Page Options.

Chapter 3 ToolKit Basics 95
Analysis Menu The analysis menu is not used with the Failure Rate Prediction modules and does not appear when these modules are active. It is only used with the FMECA, RBD, Markov, Event Tree and Fault Tree Modules. The menu selection will be different depending on the analysis module in use. The FMECA, RBD, Markov, Event Tree and Fault Tree Modules do not automatically update their calculation when data is entered or changes are made, as do the prediction modules. The reason for this is that the calculation on these modules can take some time on highly complex projects. The Perform (green GO icon) menu selection is one place in the system to initiate the analysis calculation and update the results. This menu also includes selections for verifying that all data has been entered correctly, which is a major help on complex projects to insure that all required data is entered and it is entered correctly.
Chart Menu The Chart menu provides options for creating and customizing charts using the ToolKit graph engine. The menu is the same for all modules and offers the following commands:
Save Chart As Dib File: This option saves the active chart in dib (bmp) file format. Save Chart As Jpeg File: This option saves the active chart in jpeg file format. Edit Graph: Displays a dialog box that allows you to modify and edit specific areas and each piece of data
displayed within the chart. It should be noted however, that modifications made to the data by using this option do not change the data inside ToolKit.
Wizard: Launches the Chart Wizard that allows you to change the type of graph displayed, title, legend and other standard chart formatting items.
Graph Options: Launches the Graph Options window used to select the data displayed in the graph for the selected system. It then generates the actual graph display.
Set Layout to Default: Returns the graph style and display to the ToolKit default style.

96 ITEM ToolKit Getting Started Guide
Window Menu The Window menu offers the following standard Windows viewing options: Cascade, Tile and Arrange windows. These selections apply only to the Data View window. This menu also allows you to reopen the following ToolKit windows that may have been closed during your analysis, such as Project window, System window, Library System window plus the Dialog, Grid, RBD, Fault Tree, Event Tree, Markov, Chart and Results Data View windows.
Help Menu The Help menu provides access to the online help system and information about the Item software installation.
You access ToolKit’s online Help system the same way that you access Help in a Microsoft document: simply click Help Topics on the Help pull-down menu.

Chapter 3 ToolKit Basics 97
4. The ToolKit Toolbars Toolbars provide quick access to ToolKit functions. Initially, only the Default and Project toolbars are displayed. An analysis module toolbar unique to that analysis type will also appear when an analysis module is opened and/or is made active. Drawing toolbars are also made active by default when analysis modules that include a drawing (RBD, Markov and Fault Tree) are made active.
Default Toolbar Immediately below the pull-down options resides a group of buttons that form a Default (Main) Toolbar allowing the user to directly access some of the more frequently used and standard windows type menu options.
Both the contents of the menus on the menu bar and the toolbar change according to which analysis application is currently in use. The purpose of each button in the toolbar can be displayed in the form of a “tool tip” that appears alongside the button when the cursor is placed over the button.
Project Toolbar The Project Toolbar displays all available systems analysis modules and consists of the following icons:
Mil-217 Prediction Module. Telcordia (Bellcore) Prediction Module. IEC 62380 (RDF 2000) French Prediction Module. 299B Chinese Prediction Module. NSWC Mechanical Prediction Module. Maintain Module. SpareCost Module. Failure Modes, Effect, and Criticality Analysis Module. Reliability Block Diagram (RBD) Analysis Module. Fault Tree Analysis Module. Event Tree Analysis Module. Markov Analysis Module.
This Toolbar is used to create a new analysis system in the Project window.
Create a new project or library
Open an existing project or library file
Save current project or library file
Cut Copy Paste Delete
Undo
About
Help

98 ITEM ToolKit Getting Started Guide
NOTE The selected module will only be fully functional if you have purchased a license for that module and it is activated. If a license has not been purchased, ToolKit will revert to the demo version for that module.
Analysis Toolbar A unique Analysis toolbar will appear in the top right side of the ToolKit application by default when an analysis module and system is opened and/or is made active. This toolbar is different and unique to each type of analysis being used. The Mil-217 analysis toolbar is shown below for example.
The icons shown on the Analysis Toolbar are used for adding various types of Blocks to a System. The drop down dialog box in the Toolbar includes a list of Component types, in addition to the Blocks, that are available to be added to a System.
Drawing Toolbars A series of seven small drawing toolbars are made active by default when the RBD, Markov or Fault Tree window is made active. These toolbars will appear along the bottom of ToolKit’s workspace and consist of Align, Nudge, Rotate, Layout, Canvas, Graph and Zoom. They contain drawing tools to aid in the creation of professional layouts of reliability system drawings and diagrams.
Customizing Toolbars ToolKit allows you to add and delete or customize the workspace toolbars. You can also create your own custom toolbars that contain the functions you use most frequently. Information on custom toolbars is detailed later in this document under the Settings heading.

Chapter 4 Project Basics 99
CHAPTER 4 Project Basics
ITEM ToolKit can be used at the project level to examine the overall reliability of one or more systems. Performing reliability analysis on a project can help lower costs and reduce repairs and maintenance.
A project can be analyzed under any of the methods or standards that are available as part of ToolKit. In addition, any combination of system types can be included in a project. For example; in a project containing six systems, two could be analyzed for failure rates under the MIL-217 prediction standards, the third could be analyzed for failure rates under the Bellcore prediction standards, the fourth could be analyzed for reliability analysis (RBD), and the fifth and sixth could be analyzed for failure modes and effects (FMECA)/Fault Tree analysis.
This chapter includes information about:
1. Creating a New Project
2. Opening a Project
3. Cutting, Copying, and Pasting Systems
4. Editing Project and System Properties
5. Saving a Project
6. Closing a Project
7. Exiting ToolKit

100 ITEM ToolKit Getting Started Guide
1. Creating a New Project Creating a project is the starting point for any system analysis in ToolKit. Once a project is created, you add the systems you want to use to analyze the project.
Creating a New Project and Adding a System 1. Start ToolKit.
2. From the File Menu, select New Project. Or click on the new project icon (A) A blank project opens and the project toolbar is activated.
3. From the Add Menu, or from the project toolbar (B), select the desired system module
4. The selected system will be added into the project (C) and in the system window (D).
5. If you want to add additional systems to the project, repeat step 3.
A
B
C
D

Chapter 4 Project Basics 101
2. Opening a Project
To Open a Project 1. Start ToolKit.
2. From the File Menu (A), select Open Project, or click on the Open project icon (B).
3. From the Open Window, search for the file name of your project (C), select the file (D) and click on Open (E).
4. The selected project opens.
A B
C
DE

102 ITEM ToolKit Getting Started Guide
3. Cutting, Copying, and Pasting Systems To save time and avoid repetitive work, you can reuse previously created systems. You use the cut, copy, and paste functions to move systems within or between any projects displayed in the Project window.
1. Ensure the projects you want to work with appear in the Project window.
2. In the Project window, right click the header of the system you want to cut or copy (A) and select the desired operation from the pop-up menu (A). If you select Cut, a confirmation message appears. Click OK.
3. To paste the cut or copied system, right click the header of the target project (B) and select Paste from the pop-up menu. The system is pasted under the corresponding module header (C).
NOTE The paste function always pastes the system under the corresponding module header. You cannot paste a system under a different module.
A
B
C

Chapter 4 Project Basics 103
4. Editing Project and System Properties When you have created a project and added systems, use the dialog tab to edit the project and system properties. Editing the properties is an important step in creating a well-documented project. In addition, it can help you distinguish systems when you have multiple systems of the same type in a project.
1. Click the desired project (A) or system header (B) in the Project window.
2. Click the Dialog tab (C) in the Data window (if it is not already selected).
3. In the Dialog Window, edit or modify the system data as desired (D).
A
B
C
D

104 ITEM ToolKit Getting Started Guide
5. Saving a Project ToolKit follows standard Windows save functionality. Each saved project is stored in a separate data file with an .ITP extension.
1. If more than one project is open, ensure the correct project is selected. The name of the currently selected project is displayed in bold on the Project window tab.
2. From the File Menu (A), select Save Project (B).
3. If the project is newly created, the Save As dialog box appears. In the Save As dialog box, select the desired folder, enter a file name (C), and then click Save (D).
4. If the project has been previously saved, the existing file is updated with the changes.
NOTE The Save Project and Save Project As commands save the active project only. If more than one project is open, you must save each project individually.
A
B C D

Chapter 4 Project Basics 105
6. Closing a Project To close the active project, select Close Project (A) from the File Menu. ToolKit closes the active project. If the project contains unsaved changes, ToolKit prompts you to save the project before closing it.
7. Exiting ToolKit To exit ToolKit, select Exit (B) from the File Menu. ToolKit closes all open projects. If an open project contains unsaved changes, ToolKit prompts you to save the project before closing it.
NOTE You can also use the X button in the top right corner of the ToolKit workspace to close the application.
A
B

106 ITEM ToolKit Getting Started Guide

Chapter 5 Predictions 107
CHAPTER 5 Predictions
ITEM ToolKit contains five prediction modules for use in creating reliability analyses. This chapter:
1. Introduces reliability predictions
2. Explains the ToolKit prediction modules
3. Outlines the creation of a Prediction Project
4. Describes the Predictions Editor Screen, Toolbars and Shortcut Keys
1. Introduction Reliability predictions are one of the most common forms of reliability analysis. Reliability predictions predict the failure rate of components and overall system reliability. These predictions are used to evaluate design feasibility, compare design alternatives, identify potential failure areas, trade-off system design factors, and track reliability improvement.
Failure Rates Reliability predictions are based on failure rates. A failure rate can be defined as the anticipated number of times an item will fail in a specified time period. It is a calculated value that provides a measure of reliability for a product. This value is normally expressed as failures per million hours (FPMH), but can also be expressed as failures per billion hours (FITS). For example, a component with a failure rate of 2 failures per million hours would be expected to fail 2 times in a million hour time period.
Failure rate calculations are based on component data such as temperature, environment, and stress. In the prediction model, assembly components are structured serially. Thus, calculated failure rates for assemblies are a sum of the failure rates for components within the assembly.
Mean Time Between Failures (MTBF) MTBF is a basic measure of reliability for repairable items. It can be described as the passed time before a component, assembly, or system fails. It is a commonly used variable in reliability and maintainability analyses.
MTBF can be calculated as the inverse of the failure rate for constant failure rate systems. For example, for a component with a failure rate of 2 failures per million hours, the MTBF would be the inverse of that failure rate, or:
MTBF = 1,000,000 hours / 2 failures = 500,000 hours
Although MTBF was designed for use with repairable items, it is commonly used for both repairable and non-repairable items.

108 ITEM ToolKit Getting Started Guide
Mean Time To Failure (MTTF) MTTF is a basic measure of reliability for non-repairable systems. It is the mean time expected to the first failure of a piece of equipment. MTTF is a statistical value and is meant to be the mean over a long period of time and large number of units. For constant failure rate systems, MTTF is the inverse of the failure rate.
If failure rate is in failures/million hours, MTTF = 1,000,000 / Failure Rate for components with exponential distributions.
Mean Time To Repair (MTTR) Mean Time to Repair is defined as the total amount of time spent performing all corrective maintenance repairs divided by the total number of those repairs.
2. Using ToolKit for Reliability Predictions ToolKit allows you to build reliability predictions based on Bellcore, Mil-217, NSWC, RDF 2000 and 299B standards. ToolKit automatically calculates the failure rates and MTBFs associated with components as they are added to the system. In addition, it automatically updates all dependent failure rates in the system as well as the overall project failure rate.
Mil-217 The most widely known and used reliability prediction handbook is Mil-217. It contains failure rate models for electronic system parts such as ICs, transistors, diodes, resistors, capacitors, relays, switches, and connectors.
Telcordia (Bellcore) A product of Bell Communications Research, the Telcordia handbook is derived from the Mil-217 handbook. The Telcordia reliability prediction procedure is applicable to commercial electronic products. Many commercial electronic product companies are now using the Telcordia handbook for their reliability predictions.
NSWC The NSWC Standard is a commonly used model for mechanical components. NSWC uses a series of models for various categories of mechanical components to predict failure rates based on temperatures, stresses, flow rates and various other parameters. It provides models for various types of mechanical devices including springs, bearings, seals, motors, brakes, and clutches. NSWC is a relatively new standard, and is currently the only one of its kind.
IEC 62380 (RDF 2000) The IEC 62380 Module supports methods of reliability prediction as described in the French standard published by the Union Technique de L’Electricite (UTE, July 2000). IEC 62380 is a universal model for reliability prediction of electronics, printed circuit boards and equipment, which takes directly into account the influence of the environment. Environmental factors are no longer used as they are replaced by mission profile undergone by the equipment. The module can handle permanent working, on/off cycling and dormant applications.
CHINA 299B The 299B module supports methods of reliability prediction as described in Chinese 299B standard. 299B is a reliability prediction guide for electronic parts in both commercial and military industries. The standard provides the user with the opportunity to take into account the environmental conditions, quality levels, and stress conditions. The module provides procedures to perform Parts Stress Analysis as well as Parts Count Analysis.

Chapter 5 Predictions 109
3. Creating a Prediction Project To demonstrate ToolKit’s Prediction’s Modules features, we’ll create an example MIL-217 project. Creating a MIL-217 system consists of:
• Constructing the project/system. • Adding Blocks/Components. • Editing their Information. • Performing analysis.
Constructing the Project
1. Click on the New Project icon (A) on the default toolbar, or select New Project from the File menu. 2. Activate your project by clicking on the Project tab or in the Project window (B). 3. Select the Dialog tab from the bottom of the Viewing Option window (C). 4. The Project Dialog Box will be displayed.
5. Enter your project information by placing the cursor or clicking in the appropriate fields (D). 6. The information entered for a project is only for the project level, and its entry is optional. The table below displays
each field that is available for a project and what each field pertains to:
Field Description Title The Project Title
Name A Unique Reference Identifier Part Number Project Part Number
LCN Logistic Control Number
Circuit Ref Circuit Reference
Analyst Person Performing the Analysis
A
C
B
D

110 ITEM ToolKit Getting Started Guide
Compiled By Person who gathered data for analysis
Description What the project is
Function Description What the project/system does Notes Any other pertinent information on the project
Approved By Person required to sign off on the project
Target Rate Acceptable number of failures for the project (FPMH or FITS)
Life Time Project life time given in hours
Redundancy Redundancy Flag
Failure Rate Will display total Project failure rate once analysis is complete
Unavailability This box will display the Project unavailability once the analysis has been run MTBF Mean Time Between Failures for the project
Adding a System A MIL-217 system may represent a single board, a sub assembly or an entire system. The system can then be broken down into sub blocks and components.
1. Select the Add menu from the menu toolbar by clicking on it (A) and click on the MS, MIL-217 System option (B).
2. Another way to add a MIL-217 System is to click on the MS icon on the system toolbar (C). 3. The MIL-217 system in the project window and the applicable system data in the system window will display (D). 4. From the Project window, select the MIL-217 System by clicking on it (E). 5. The System dialog box will be displayed. Enter your system information by placing the cursor or clicking in the
appropriate fields (F).
D
C
B
A
D

Chapter 5 Predictions 111
The table below describes what could be entered and what each field pertains to.
Field Description Title The System Title Name A Unique Reference Identifier
Part Number System Part Number
LCN Logistic Control Number
Circuit Ref Circuit Reference
Analyst Person Performing the Analysis
Quantity Number of system
No On Standby Number of system in Standby if Quantity >1 & Redundancy set to True. Otherwise = 0
MTTR Mean Time To Repair of the System in hours Description What the system is
Function Description What the system does
Notes Any other pertinent information on the system
Compiled By Person who gathered data for analysis
Approved By Person required to sign off on the System Target Rate Acceptable number of failures for the System (FPMH or FITS)
Life Time Project life time given in hours Redundancy Redundancy Flag Failure Rate Will display the System failure rate once analysis is complete
MTBF Mean Time Between Failures for the System
Unavailability This box will display the System unavailability once the analysis has been run
F
E

112 ITEM ToolKit Getting Started Guide
Adding and Editing Blocks A block may be used to represent a system, a sub-system or a device/board. To add blocks into the MIL-217 system hierarchy tree:
1. Click on the system in the system Windows (A), and select the block from the toolbar menu (B). 2. Place the block cursor on the system in the system window and click once (C). The new block appears. 3. Multiple blocks can be added by repeating step 2. To disable the add block mode, select the Release button (D).
4. Select the Dialog tab from the viewing window (E). 5. Select a block from the systems window. 6. The Dialog view will display all parameters for the selected block. Edit the fields into the General Tab.
A
B
C
D
E

Chapter 5 Predictions 113
Field Description Part Number Block Part Number Name A Unique Reference Identifier Circuit Ref Circuit Reference or Reference designator of the Block Analyst Person Performing the Analysis Category Category drop down menu selection
Update Children Check this box to update all sub blocks and components when the selected block parameters are changed
Temperature Control the way temperatures will be changed Parameters Checked Check this box when Block / Component parameters are edited and verified Description Users can add additional information to describe the block Notes Any other pertinent information on the Block LCN (Logistic Control Number) Internal reference number defined by the user
7. Next, edit the Quality fields in the Physical Tab.
Field Description Quality, Microelectronics “Quality” level for “Microelectronics and Integrated Circuit” components
Quality, Discrete Semiconductors “Quality” level for “Discrete Semiconductor” components
Quality, Resistors “Quality” level for “Resistor” components
Quality, Capacitors “Quality” level for “Capacitor” components
Quality, Coils “Quality” level for “Coils and Inductive” components
Quality, Relays, MR “Quality” level for “Mechanical Relay” components
Quality, Relays, SS “Quality” level for “Solid State (SS) and Time Delay (TD) Relay” components
Quality, SAW Devices “Quality” level for “Surface Acoustic Wave (SAW) Devices” or components
Quality, Other “Quality” level for “Other” components
8. Next, edit the fields in the Application Tab.

114 ITEM ToolKit Getting Started Guide
Field Description
Quantity The total number or quantity of Blocks
Repair Mode Flag to switch between the Block “Repairable” or “Non-repairable” Model
Environment Select the Block environment as per the MIL-217 standard
Connection Type Select the type of connections components make to the Block
MTTR Mean Time To Repair at the Block level, in hours
No On Standby Number of Blocks on standby (used for redundant Blocks only)
Ambient Temperature Ambient temperature for the Block and it’s attached Blocks and Components
Voltage Stress Set a voltage stress for the Block reliability calculation
Current Stress Set a current stress for the Block reliability calculation
Power Stress Set a power stress for the Block reliability calculation
Adjustment Factor Optional user adjustment to Block’s reliability calculation
Adding and Editing Components A MIL-217 component represents electronic device components (e.g. resistors, capacitors, diodes). ITEM ToolKit provides data entry fields for part number, description, circuit reference and a number of other identification fields, which may be entered when adding the component, or at a later time. To add components using the toolbar:
1. Activate your system by clicking on the System cross tab or anywhere in the System window. (A).

Chapter 5 Predictions 115
2. From the component drop-down list in the Mil-217 toolbar, select a component (B). 3. Place the block cursor (C) where you would like to add the new Component on the system window and click your
mouse once. The new component should appear. 4. Multiple components can be added by repeating step 2. To disable the add component mode, select the Release button
(D) from the Toolbar or right click the mouse button. 5. To edit a component, select it from the systems window (E). 6. Click on the General Tab (F) to edit the general information of the selected component.
Field Description
Part Number Component Part Number
Name A Unique Reference Identifier
Circuit Ref Circuit Reference or Reference designator of the Component
A
A
B
C
D
E
F

116 ITEM ToolKit Getting Started Guide
Analyst Person Performing the Analysis
Category Category drop down menu selection
Parameters Checked Check this box when Block / Component parameters are edited and verified
Description Users can add additional information to describe the block
Notes Any other pertinent information on the Block
LCN (Logistic Control Number) Internal reference number defined by the user
Detail Model Used to more accurately model VHSIC, VLSI/CMOS components using DMEA
Non-Op Parameters Used to calculate non operational (dormant) failure rate of components
7. Click on the Physical Tab (H) to edit the Physical information of the selected component.
8. Click on the Application Tab (I) to edit the Application information of the selected component.
NOTE New Components added to a Block take on the Ambient Temperature (TA) and parameter settings of that Block if the Update Children box is checked on the Block’s “General” tab view. If the Block Update Children box is not checked, the new Component added to the Block uses default values for Ambient Temperature (TA) and parameter settings.
H
I

Chapter 5 Predictions 117
Viewing Results To view the project results:
1. Click on the system header (A) in the System Window. 2. Click on the Result tab (B) at the bottom of the ITEM ToolKit screen to display the system results.
3. Click on the Block header (C) in the System Window to display the detailed results for the selected block.
A
B
C

118 ITEM ToolKit Getting Started Guide
Understanding Analysis Results The following is a brief description of all the fields:
IT PROJECT (PREDICTIONS ONLY) Failure Rate Total Failure Rate of the Project (FPH, FPMH or FITS) MTBF Total MTBF of the Project (Hours) Unavailability Total Unavailability of the Project
MIL 217 Failure Rate Total Failure Rate of the System (FPH, FPMH or FITS) MTBF Total MTBF of the System (Hours) Unavailability Unavailability of the system Contribution Failure Contribution of the system
FAILURE RATE Name Name of the Block/Component Category Category Name of the Block/Component Part Number Part Number of the Block/Component Description Description of the Block/Component Circuit Reference Circuit Reference or Reference designator of the Block/Component Quantity Quantity of Block/Component Total F/Rate Total Failure Rate of the Block/Component Contribution % Failure Contribution of the Block/Component
PI FACTORS Name Name of the Component Category Category Name of the Component Part Number Part Number of the Component Description Description of the Component Circuit Reference Circuit Reference or Reference designator of the Component Pi Factor Pi Factor details of the Component Quantity Quantity of Component Total F/Rate Total Failure Rate of the Component Contribution % Failure Contribution of the Component
Additional Features All the topics within this manual, as well as the additional features of the ITEM ToolKit prediction modules are fully discussed in the online help, provided within the full program. Some of these features include:
• Creating and customizing charts. • Importing and exporting data. • Derating. • Grid view templates and customization. • Software settings and customization. • Automatic name generation and customization. • Library management. • Linking modules and projects.

Chapter 5 Predictions 119
4. Derating Components Most equipment failures are precipitated by stress. When applied stress exceeds the inherent strength of the part, either a serious degradation or a failure will occur. To assure reliability, equipment must be designed to endure stress over time without failure. Design stress parameters must be identified and controlled. Parts and materials must be selected which can withstand these stresses. Derating is the selection and application of parts and materials so that the applied stress is less than rated for a specific application. For example, derating is the negative slope of a power-versus-temperature graph. It shows that as the operating ambient temperature increases, the output power of a particular component drops to ensure reliable system operation. Derating curves provide a quick way to estimate the maximum output power of a device at a given temperature. Following are several derating standards that are included within ToolKit: NAVSEA TE000-AB-GTP-010 Parts Derating Requirements and Application Manual for Navy Electronic Equipment. MIL-HDBK-1547 Electronic parts, materials, and processes for space and launch vehicles. MIL-STD-975M (NASA) Part selection for electrical, electronic, and electromechanical parts used in the design and construction of space flight hardware in space missions as well as essential ground support equipment (GSE). NAVAIR-AS-4613 Class A/B/C Application and Derating requirements for electronic components, General specification F. For all ToolKit prediction modules, you can choose a derating standard to use for the components in the system. Once a standard has been chosen, each component indicates if its current stress levels are within the derating standard or not. Graphical displays of the situation are available for ease in identifying problem areas. Parametric displays are also available to show the temperature vs. stress situation of the component. User defined derating “standards” can also be created. They are saved as .itd files, and are associated with the project file. When a project is opened, if the components are being derated, the associated derating file is applied. If the derating file is not available, the project will still open normally, but you are presented with a warning window, and can search for the derating file if desired. A derating file manager is also included to help manage the different derating files, whether included with ToolKit or user defined.

120 ITEM ToolKit Getting Started Guide
Configuring a System to be Derated Derating is configured at the System level of your project. It only impacts component categories that are considered in the various derating standards. Optionally you can create your own derating “standard” to accommodate those components not considered in the standards. 1. For a selected system, turn on Derating via the Edit menu

Chapter 5 Predictions 121
2. Select the desired Derating standard from the list.
3. Note that once you have chosen a System to be derated, the icons change in the System window.
4. Select a component, then Edit – Derating to open the Derating window for the component. Each component
category has a specific graph showing the nominal and worse case values vs. temperature. This window can remain open as you select other components. Note that the voltage stress is 0.8 on this component. While not over stressed, it is above the nominal value as per the selected derating standard.
Not a derated component
Meets derating requirements

122 ITEM ToolKit Getting Started Guide
5. Lower the stress value to 0.41 (on the Application tab of the component) and you will see the blue dot relocated to
below the nominal curve as in the next screen shot.
Selected component

Chapter 5 Predictions 123
Creating Your Own Derating Standard ToolKit provides a method for you to create and apply your own derating standard. 1. Use File – Derating Files menu option to open the user defined derating window. On this window you are able to
create derating files that contain the models you wish to create/apply to the components in your systems. These files are stored as .ITD files, and should travel with your ToolKit project files. A project file without a derating file will still open properly, but the derating will not be applied to the project.
2. On the Derating window, choose File – New, then Edit – Add to create a new derating file, and add a model to it.
Select the Model tab to define the component you wish to apply a derating model to.
Check this box to have the derating file applied to the current project.

124 ITEM ToolKit Getting Started Guide
3. Then select the Derating tab to define the curves you wish to have applied.
4. When finished, click OK. When you add a component to your system that has a user defined derating model, the component is derated according to your model. As with the included derating standards, you can see the effects of derating via the icons in the system window, and via the Edit – Derating menu selection for the components.
Adjust/add these values to change the shape of the curves.

Chapter 5 Predictions 125
5. Predictions Editor Screen, Toolbar and Shortcut Keys Quick Reference
The Prediction Editor Screen
The Prediction editor can be made visible by selecting the Dialog Tab (1) or the Grid Tab (2). Its main elements are the following:
• Main Menu (3): Quick access to the main functions. • Prediction Toolbar (4): Quick access to editing functions. • Project Window (5): A hierarchical view of the project and systems. • System Window (6): A hierarchical view of the system, blocks and components. • Library Window (7): A hierarchical view of the components library. • Dialog Window (8): The area in which the Prediction can be edited. • Grid Window (9): In this area, the Prediction can be edited in a tabular style.
3 4
5
6
1
7
2
8
9

126 ITEM ToolKit Getting Started Guide
The Default Toolbar Immediately below the pull-down options resides a group of buttons that form a Default Toolbar allowing the user to access directly some of the more frequently used menu options.
Tool Name Description
New Opens a new project.
Open Open an existing document. The ToolKit displays the Open dialog box, in which you can locate and open the desired file.
Save Save the active document or template with its current name. If you have not named the document, the ToolKit displays the Save As dialog box.
Cut Remove selected data from the document and stores it on the clipboard.
Copy Copy the selection to the clipboard.
Paste Paste the contents of the clipboard at the insertion point.
Delete Item Delete the selection.
Undo Reverse the last editing. Note: You cannot undo some actions.
Print Print the active document.
About Open the About ITEM ToolKit Window.
Help Open the ITEM ToolKit On-line Help.
The Predictions System Dialog Windows Controls All Predictions Dialog Window Contains the following Controls.
Tool Name Description
Undo Changes Cancels the latest operation.
Analyze Run the Analysis of the system.
Set Default Values Set the selected Component to the default values.
Check Spelling Check the Spelling of the selected Text.

Chapter 5 Predictions 127
The Project Toolbar The Project Toolbar displays the available analysis options for the ToolKit application
Tool Name Description
MIL217 Add a MIL-HDBK-217 (Electronic) System.
Telcordia (Bellcore) Add a SR-332 Telcordia (Electronic) System.
IEC 62380 (RDF) Add an IEC 62380 French Telecom Standard (Electronic) System.
299B Add a 299B Chinese Military Standard (Electronic) System.
NSWC (Mechanical) Add a NSWC (Mechanical) System.
Maintain Add a Maintain MIL-HDBK-472 Procedure V System.
SpareCost Add a Spare Cost Spares Scaling and Ranging System.
FMECA Add a Failure Modes Effects and Criticality Analysis (FMECA) System.
RBD Add a Reliability Block Diagram (RBD) System.
Fault Tree Add a Fault Tree Analysis (FTA) System.
Event Tree Add an Event Tree Analysis (ETA) System.
Markov Add a Markov Modeling System.

128 ITEM ToolKit Getting Started Guide
The MIL-217 Toolbar The MIL-217 Toolbar is used to create and control MIL-217 Systems.
Tool Name Description
End Add Mode Cancels add mode.
Block Creates a Block in MIL-217.
Linked Block Creates a Linked Block in MIL-217.
Hybrid Block Creates a Hybrid Block in MIL-217.
Plated Through Block Creates a Plated Through Block in MIL-217.
Surface Mount Block Creates a Surface Mount Block in MIL-217.
Category List Add a Block / Component from the list.
The Telcordia Toolbar The Telcordia (Bellcore) Toolbar is used to create and control Telcordia Systems.
Tool Name Description
End Add Mode Cancels add mode.
Block Creates a Block in the Telcordia System.
Linked Block Creates a Linked Block in the Telcordia System.
Hybrid Block Creates a Hybrid Block in the Telcordia System.
Category List Add a Block / Component from the list.

Chapter 5 Predictions 129
The NSWC Mechanical Toolbar The NSWC Toolbar is used to create and control NSWC Systems.
Tool Name Description
End Add Mode Cancels add mode.
Block Creates a Block in the NSWC System.
Linked Block Creates a Linked Block in the NSWC System.
Category List Add a Block / Component from the list.
The IEC 62380 Toolbar The IEC 62380 (RDF 2000) Toolbar is used to create and control IEC 62380 Systems.
Tool Name Description
End Add Mode Cancels add mode.
Block Creates a Block in the IEC 62380 System.
Linked Block Creates a Linked Block in the IEC 62380 System.
PC Board Creates a PC Board Block in the IEC 62380 System.
Hybrid Block Creates a Hybrid Block in the IEC 62380 System.
Category List Add a Block / Component from the list.

130 ITEM ToolKit Getting Started Guide
The 299B Toolbar The 299B Toolbar is used to create and control 299B Systems.
Tool Name Description
End Add Mode Cancels add mode.
Block Creates a Block in the 299B System.
Linked Block Creates a Linked Block in the 299B System.
PCB Creates a PCB Block in the 299B System.
Hybrid Block Creates a Hybrid Block in the 299B System.
Category List Add a Block / Component from the list.
Shortcut Keys: Key Function Ctrl + N Open a new project.
Ctrl + O Open an existing document. Displays the Open dialog box, in which you can locate and open the desired file.
Ctrl + S Save the active project with its current name. If you have not named the project, the Save As dialog box will open.
Ctrl + P Print the Active View.
Ctrl + X Remove selected data from the document and stores it on the clipboard.
Ctrl + C Copy the selection to the clipboard. Ctrl + V Paste the contents of the clipboard at the insertion point.
Ctrl + W Paste the contents of the clipboard (Gate or Event) at the insertion point as a Repeat Gate or Repeat Event.
Del Delete the selection. F1 Open the ITEM ToolKit On-line Help.

Chapter 6 FMECA 131
CHAPTER 6 FMECA
The FMECA program is documented by the standard originally developed by the United States Military, MIL-STD-1629, Procedures for Performing a Failure Mode, Effects and Criticality Analysis, dated November 9, 1949. This procedure was developed as a reliability technique to determine the effect of system and equipment failures.
The FMECA module also now covers, and conforms fully to, the standards IEC 61508 and ISO 26262. This enables ITEM ToolKit to provide a full top-down modeling from Hazard Analysis to FMECA in compliance with these standards.
This chapter:
1. Introduces FMECA systems
2. Describes ToolKit’s FMECA features
3. Outlines an example FMECA system
4. Describes the FMECA Editor Screen, Toolbars and Shortcut Keys
1. Introduction A Failure Mode, Effects, and Criticality Analysis (FMECA) uses an inductive approach to system design and reliability. It identifies each potential failure within a system or manufacturing process and uses severity classifications to show the potential hazards associated with these failures.
There are two approaches to performing a FMECA:
The functional approach is applied in projects containing hardware components that cannot be uniquely identified. In this scenario, the sub-system functions are weighed in terms of their function within the system.
The hardware approach is applied in projects containing hardware components that can be uniquely identified.
A FMECA is usually applied in two steps:
Identifying failure modes and their effects (FMEA).
Ranking failure modes according to the combination of severity and the probability of that failure mode occurring (Criticality Analysis).

132 ITEM ToolKit Getting Started Guide
FMECA can be performed at any stage of system design. The results from a FMECA are maximized if the analysis is implemented during the early development stages and updated throughout the development. This approach also helps to educate system engineers about the system. Performing FMECA analysis near the end of the design process minimizes the influence on the system design.
FMECAs can take many forms, but at the core, these analyses are used to study a particular system and determine how that system can be modified to improve overall reliability and to avoid failures. For example, consider a simple FMECA that contains a computer monitor which has a capacitor as its only component. By analyzing the design, you determine that if that capacitor was open (one failure mode), the display would appear with wavy lines (the failure effect). If the capacitor was shorted (a second failure mode), the monitor would go blank. The second failure would be ranked as more critical than the first because the monitor becomes completely unusable. Once FMECA has identified failures, you can explore ways to prevent the failure or to lessen their criticality.
2. ITEM ToolKit & FMECA Analysis The ITEM ToolKit FMECA Module provides the full framework for performing a FMECA with the MIL-STD-1629A, IEC 61508, ISO 9000 and ISO 26262 standards. Its interactive graphical facilities allow you to construct a block hierarchy representing the logical connection between the sub-systems and components constituting the overall plant or system. This hierarchy may be extended to represent failure modes at various hierarchical levels.
One of the most powerful features of the FMECA module is its ability to automatically trace failure effects, severity values and failure causes through the system hierarchy. The program automatically calculates failure rates and criticality values. The FMECA module also filters detectable and non-detectable failures in reports and determines the ratio between the frequency of detectable failures and total failures.
Creating a well-documented FMECA system requires a large amount of text entry. The FMECA Module provides a phrase table facility, which contains commonly used descriptions of component parts, failure modes and effects. These phrases can be quickly retrieved and inserted into any text field. This saves considerable data entry and ensures consistency.
ToolKit also provides other features to facilitate the construction of a FMECA project. Data may be easily transferred within the same project or between different projects using the cut, copy and paste facilities. Search and filter facilities allow you to quickly locate data. A wide range of layout options allows different data types to be displayed in the hierarchy view.

Chapter 6 FMECA 133
3. Creating a FMECA Project To demonstrate ToolKit’s FMECA features, we will create an example FMECA project for a redundant computer system.
Creating a FMECA system consists of:
• Constructing the project/system • Adding Blocks/Components • Adding Failure Modes, Causes and Effects and editing their Information • Performing analysis
Constructing the Project To construct a FMECA Project:
1. Click on the New Project icon (A) on the default toolbar, or select New Project from the File menu. 2. Activate your project by clicking on the Project tab (B) or in the Project window. 3. The Project Dialog Box will be displayed.
4. Enter your project information by placing the cursor or clicking in the appropriate fields.
A
B

134 ITEM ToolKit Getting Started Guide
The information entered for a project is only for the project level, and its entry is optional. The table below displays each field that is available for a project and what each field pertains to:
Field Description Title The Project Title Name A Unique Reference Identifier Part Number Project Part Number LCN Logistic Control Number Circuit Ref Circuit Reference Analyst Person Performing the FMECA Analysis Compiled By Person who gathered data for analysis Description What the project is Function Description What the project/system does Notes Any other pertinent information on the project Approved By Person required to sign off on the project Target Rate Acceptable number of failures for the project (Failures Per Million Hours) Life Time Project life time or mission time given in hours Redundancy Redundancy Flag Failure Rate Will display total Project failure rate once analysis is complete Unavailability This box will display the Project unavailability once the analysis has been run MTBF Mean Time Between Failures for the project description
Adding a System A FMECA system may represent a single board, sub assembly or an entire system. The system can then be broken down into sub blocks, components and/or functions.
1. Select the Add menu from the menu toolbar by clicking on it (A).

Chapter 6 FMECA 135
2. Select and click on the FM, FMECA System (B). 3. The project will display as a FMECA in the project window(C) and the applicable system data will display in the
system window. 4. From the Project window, select the FMECA System by clicking on it. The System dialog box will be displayed. 5. The System level has two windows in which data can be entered: Block Info and Mode Info. Enter your system
information by placing the cursor or clicking in the appropriate fields. The table below describes what could be entered and what each field and block of fields pertains to.
B
A
C

136 ITEM ToolKit Getting Started Guide
Field Description
Title System Title Name Unique Reference Identifier for the System Part Number System Part Number Analyst Name of the person performing the FMECA Analysis Life Time Project life time or mission time given in hours Compiled by Name of the person who gathered the data for the FMECA Analysis Approved by Name of the person who signed off the FMECA project Use Weighted Criticality Method Provides an alternative to the MIL-1629A criticality analysis (Optional) Normalize Apportionments Normalize the Apportionments when checked Description Description for this System Function Description Purpose/Description of this System Notes Any other pertinent information about this System Mission Phase Description of the Mission Phase
Standard Select the standard you wish the FMECA to conform to. These include IEC 61508 and ISO 26262 (basic and advanced)
Calc Engine Mode Select the calculation mode you wish to implement. Choose from Basic Mode or Advanced Mode, Split and Hit
The following view is displayed in Dialog View in the Mode tab.

Chapter 6 FMECA 137
Field Description
Mode - Ref. ID Failure mode reference number Beta Probability of current failure mode causing end effect Severity MIL-STD 1629A Severity Category Mode Failure mode description Cause Failure cause description Failure Detection Describes how the failure is detected Compensating Provisions Processes in place to protect against failure Remarks Any other notes or pertinent information
At the System level, the Detectability Panel appears with the Safe or Dangerous radio-buttons for you to choose if the System failure mode creates either situation. Safe is the default. This tab is specific to IEC61508 and can be ignored if you do not wish to us this standard for your FMECA.
The Diagnostic Coverage SFF panel lists the results of the IEC 61508 calculation related to the currently selected System, Block or Component. It is a view only panel and not editable.

138 ITEM ToolKit Getting Started Guide
Adding and Editing Blocks A block may be used to represent a system, sub-system, board or logical group of functions.
Blocks can be added to the FMECA system hierarchy tree by selecting the FMECA system tab. Select the Block options from the Add menu. Blocks can also be created or added using the equivalent toolbar option. To add blocks using the toolbar:
1. Select the block from the toolbar menu (A). The cursor should take the shape of a plus sign.
AB
C
D

Chapter 6 FMECA 139
2. Place the block cursor where you would like to add the new block on the system window and click your mouse once. The new block should appear.
3. Multiple blocks can be added by repeating step 2. To disable the add block mode, select the Release button (B) from the Toolbar or right click the mouse button.
4. Select the Dialog tab from the viewing window (C). 5. Select a block from the systems window (D). 6. The Dialog view will display all parameters for the selected block. Edit the required fields. 7. The following view is displayed in Dialog View in the Block tab.
Field Description
Name/ID Unique Reference Identifier for the Block Part Number Block Part Number Quantity Block Count defined by the user Parent Name/ID Parent Name/ID of the block. Non-editable No. of Modes Modes Count for the Block. Non-editable Circuit Ref. Circuit Reference / Reference Designator of the Block Op. Time Factor Operating time factor of the block. 1 means 100%, 0.5 means 50% LCN (Logistic Control Number) Internal reference number defined by the user Description Additional information to describe the block or function

140 ITEM ToolKit Getting Started Guide
Mission phase Description of the Mission Phase Notes Any other notes or pertinent information
The following view is displayed in Dialog View in the Mode tab:
Field Description Mode - Ref. ID Failure mode reference number Detectable Detectable failure mode selection (Y/N) Beta Probability of current failure mode causing end effect Apportionment Proportion of failure rate attributed to current mode in % Description Failure mode and Cause / Contributors description Cause Failure cause description Immediate Effect Consequence on the current item being analyzed Failure Detection Describes how the failure is detected (via FD, CP, Remarks button) Compensating Provisions Processes in place to mitigate the failure (via FD, CP, Remarks button) Remarks Any other notes or pertinent information (via FD, CP, Remarks button)

Chapter 6 FMECA 141
Adding and Editing Components A FMECA component may represent any mechanical or electronic device. FMECA components differ from FMECA blocks in that you may enter a failure rate for components, which the program then divides between the components failure modes according to their apportionment percentage.
Components can be added to the FMECA system hierarchy tree by selecting the FMECA system tab. Select the Component options from the Add menu. Components can also be created or added using the equivalent toolbar option. To add components using the toolbar:
1. Select the component from the toolbar menu (A). The cursor should take the shape of the component selected.
2. Place the block cursor where you would like to add the new Component on the system window and click your mouse
once. The new component should appear. 3. Multiple components can be added by repeating step 2. To disable the add component mode, select the Release button
(B) from the Toolbar. 4. Select the Dialog tab from the viewing window (C). 5. Select a component from the systems window (D). 6. The Dialog view will display all parameters for the selected component. Edit the required fields. 7. The following view is displayed in Dialog View in the Component tab.
A
B
D
C

142 ITEM ToolKit Getting Started Guide
Field Description
Name/ID Unique Reference Identifier for the Component/Function Part Number Component Part Number Quantity Component Count defined by the user Parent Name/ID Parent Name/ID of the Component. Non-editable No. of Modes Modes Count for the Component. Non-editable Circuit Ref. Circuit Reference / Reference Designator of the Component Failure Rate Failure Rate of the component Op. Time Factor Operating time factor of the component. 1 means 100%, 0.5 means 50% LCN (Logistic Control Number) Internal reference number defined by the user Description Additional information to describe the Component Notes Additional notes added by user Function Description Additional information to describe the Component Mission phase Description of the Mission Phase
The following view is displayed in Dialog View in the Mode tab.

Chapter 6 FMECA 143
Field Description Mode - Ref. ID Failure mode reference number Detect Detectable failure mode Y/N Beta Probability of current failure mode causing end effect Apportionment Proportion of failure rate attributed to current mode in % Severity MIL-STD 1629a severity category Mode Failure mode description Cause Failure cause description Immediate Effect Consequence on the current item being analyzed Failure Detection Describes how the failure is detected Compensating Provisions Processes in place to mitigate the failure Remarks Notes

144 ITEM ToolKit Getting Started Guide
FMECA Example
1. Build a system following the example below.
2. In the Dialog tab, modify the properties of each component. Use the following table as a guide.
Component Description Part Number Circuit Ref LCN Failure Rate
1.1 Processor 1 6 CPU 1 P-1-1 0.3759
1.2 RAM 1 4 RAM 1 M-1-2 0.8426
1.3 Power Supply 15 PS 1 PS-1-3 0.0165
2 RAM 2 8 RAM 2 M-2 0.8426
3 Disk 1 12 HD 1 HD-3 0.5014
4 Disk 2 12 HD 2 HD-4 0.5014
3. The system, block and component descriptions should appear in the system window. If not, select Show Description
from the Layout Menu.

Chapter 6 FMECA 145
Defining FMECA Severity Severity categories are assigned to system failure modes to indicate the severity of the occurrence and the related degree of damage. You must create the severity categories before they can be assigned.
To define severity categories:
1. From the Edit Menu (A), select Severity Categories (B).
2. The Severity Categories dialog box appears.
3. Click Add Sev (C). A new severity category is added to the table on the left side of the dialog box. 4. In the Weighting field, enter 100 (D). 5. In the Description field, enter Catastrophic (E). 6. Click Save. The table is updated with your changes. 7. Following the above steps, create the three other categories that appear in the dialog box above. 8. When all severity categories are entered, click OK to close the dialog box.
A
B
C
D
E

146 ITEM ToolKit Getting Started Guide
Adding Failure Modes, Causes, and Effects A Failure Mode is the way in which a component is expected to fail. Causes are the factors that are proven or deduced to directly or indirectly produce the failure of an item, component, equipment, or system. A Failure Effect is the effect a component Failure Mode has on its “parent” block.
There are three types of Failure Modes
• At the system level, which are End Effects. • At the intermediate or subsystem level, which are Effects. • At the component or lowest level, which are Failure Modes.
A lower level failure mode is the cause of the upper level failure mode, which is the effect of the lower level failure mode. Since FMECA analyses from the lowest level up, the first step is to define the failure modes of Power Supply 1.
To add a failure mode:
1. In the System Window, click the Power Supply component (A). The component information appears in the Dialog tab.
2. In the Dialog tab, click the Mode Info tab (B).
A
D
E
C
H
B
G F

Chapter 6 FMECA 147
3. Click the Mode + button to add a new mode to the list (C). 4. In the new mode box type No Power Output. (D). 5. With this new mode still selected, click the Cause + button to add a new cause. (E). 6. In the new Cause edit box, type Burned Power Supply Fuse (F). 7. Click the Cause + button again to add another cause to the list (E). 8. In the new Cause edit box, type Power Grid Down (F). 9. Click the Immediate - Direct Effects + button to add a new effect to the list. (G) 10. In the Immediate Effect edit box, type No Output from Motherboard 1 (H).
NOTE To remove a failure mode, highlight it in the Mode list and click the - button. Use the same procedure to remove a cause or an effect.
11. Follow the above procedures to the remaining failure modes shown in the Table below. The failure modes should
appear in the System Window (J). If not, select Show Modes from the Layout Menu.
Component Mode Cause Effect
Power Supply No Power Output Burned power supply fuse No output from Motherboard 1
Power grid down No output from Motherboard 1
RAM1
Information not accessible Overheating Unacceptable performance of Motherboard 1
Information not transferred/Stored correctly
Microscopic damage to circuitry Incorrect processing
Processor 1 Intermittent malfunction of logic process Overheating Unacceptable performance of Motherboard 1
J

148 ITEM ToolKit Getting Started Guide
Using the Phrase Library Your system should include accurate descriptions of each object. You can save time by adding long or frequently used descriptions to the phrase library, then retrieving the descriptions when you define object properties.
Each project has a unique phrase library. When you begin a new project, the phrase library is empty. You populate the library by adding phrases or by importing phrases from an external file.
Adding a Phrase There are two ways to add phrases to the phrase library
To enter a phrase and add it to the library:
1. Select a Block/Component in the System Window. 2. Type a description in any field in the Dialog tab. 3. Click Save Phrase. The description is added to the phrase table.
To enter a phrase in the library without adding it to a field:
1. Select a Block/Component in the System Window. 2. From the Edit Menu, select Phrase Library. 3. The Phrase Library dialog box appears.

Chapter 6 FMECA 149
4. In the text box, type the phrase you want to add (D). 5. Click Spell to check the spelling of your phrase (E). 6. Click Add. The phrase is added to the phrase table (F).
7. Click Save to file (H). The Phrase Library will be saved in a text file (I) and can be edited.
D
E
F
G
H
I
J
K L

150 ITEM ToolKit Getting Started Guide
8. Click on Import Phrase (J) and selected the edited and saved Phrase Library (K) in the Open Phrase Library. 9. Click on Open (L) to import the Phrase Library. 10. When you are finished editing phrases, click OK (G) to close the Phrase Library dialog box.
Verifying Data You must verify system data before performing project analysis. Verifying data before performing an analysis can be a great time saving feature.
When verifying FMECA projects, ToolKit checks for:
Component blocks with no failure modes Component failure mode apportionment that does not total 100% System failure modes with no severity category Component blocks with failure rates of zero Failure modes with no assigned effects
To verify FMECA data:
1. In the System Window, click the system header.
2. From the Analysis Menu, select Verify Data.
3. If the system contains errors, the Verification Results dialog box displays all relevant error message numbers and the message text. Use the information in the Verification Results dialog box to make corrections before performing system analysis.
4. Click on save if you want to print and review all error messages. The following window opens. Click OK to save.

Chapter 6 FMECA 151
5. If no errors are present, the Verification Complete – Without Errors message appears. Click OK.
Performing Analysis To analyze a FMECA project:
1. In the System Window, click the system header (A). 2. If you want to turn the weighted criticality method option on or off, click the Use Weighted Criticality Method check
box (B).
3. From the Analysis Menu, select Perform or click the GO button (C). A dialog box displaying the progress of the
analysis appears. 4. When the analysis is complete, the Verification Msg. dialog box appears. Click OK. The objects in the System window
are updated with the analysis results (D). 5. Click on the Result Tab to display the results (E). Clicking on different items in the system window will display results
for this item (F).
A
B
C

152 ITEM ToolKit Getting Started Guide
ISO 9000 Information The ToolKit FMECA Module continues to support the addition of ISO 9000 information. However, now the point of data entry is the ISO 9000 Grid View. Using this view as the data entry and reporting function is much preferred due to the one-to-many relationship of ISO 9000 elements that only the Grid View can display clearly. Right-click the Grid and select ISO 9000. Switch between 1629A and ISO 9000 Grid Views as desired.
D
F
E

Chapter 6 FMECA 153
Use the SEV, OCC, and DET fields to enter the ISO 9000 range of values appropriate for the element you are considering. The RPN number will be automatically calculated.
This view is also intended to be used as the reporting mechanism for ISO 9000 based FMECA. Simply print the Grid View as your report (File – Print Preview – Print Active View or File – Save Grid). You can also construct ISO 9000 based reports via the Report Generator, but they will not be able to represent the ISO 9000 “one-to-many” relationships as the Grid View does.
4. FMECA Editor Screen, Toolbar and Shortcut Keys Quick Reference
The FMECA Editor Screen
1
7
3 4
6
5
2
8
9

154 ITEM ToolKit Getting Started Guide
The FMECA editor can be made visible by selecting the Dialog Tab (1) or the Grid Tab (2). Its main elements are the following:
• Main Menu (3): Quick access to the main functions. • FMECA Toolbar (4): Quick access to editing functions. • Project Window (5): A hierarchical view of the project and systems. • System Window (6): A hierarchical view of the system, blocks, components and modes. • Library Window (7): A hierarchical view of the components and failure modes library. • Dialog Window (8): The area in which the FMECA can be edited. • Grid Window (9): In this area, the FMECA can be edited in a tabular style.
The Default Toolbar Immediately below the pull-down options resides a group of buttons that form a Default Toolbar allowing the user to access directly some of the more frequently used menu options.
Tool Name Description
New Opens a new project.
Open
Open an existing document. The ToolKit displays the Open dialog box, in which you can locate and open the desired file.
Save Save the active document or template with its current name. If you have not named the document, the ToolKit displays the Save As dialog box.
Cut Remove selected data from the document and stores it on the clipboard.
Copy Copy the selection to the clipboard.
Paste Paste the contents of the clipboard at the insertion point.
Delete Item Delete the selection.
Undo Reverse the last editing. Note: You cannot undo some actions.
Print Print the active document.
About Open the About ITEM ToolKit Window.
Help Open the ITEM ToolKit On-line Help.

Chapter 6 FMECA 155
The FMECA Dialog Windows Controls The FMECA Dialog Window Contains the following Controls.
Tool Name Description
Analyse Run the Analysis of the system.
Check Spelling Check the Spelling of the selected Text.
Save Phrase Save the phrase to the phrase library.
Get Phrase Get a phrase from the phrase library.
The Project Toolbar The Project Toolbar displays the available analysis options for the ToolKit application
Tool Name Description
MIL217 Add a MIL-HDBK-217 (Electronic) System.
Telcordia (Bellcore) Add a SR-332 Telcordia (Electronic) System.
IEC 62380 (RDF) Add an IEC 62380 French Telecom Standard (Electronic) System.
299B Add a 299B Chinese Military Standard (Electronic) System.
NSWC (Mechanical) Add a NSWC (Mechanical) System.
Maintain Add a Maintain MIL-HDBK-472 Procedure V System.
SpareCost Add a Spare Cost Spares Scaling and Ranging System.
FMECA Add a Failure Modes Effects and Criticality Analysis (FMECA) System.
RBD Add a Reliability Block Diagram (RBD) System.
Fault Tree Add a Fault Tree Analysis (FTA) System.
Event Tree Add an Event Tree Analysis (ETA) System.
Markov Add a Markov Modeling System.

156 ITEM ToolKit Getting Started Guide
The FMECA Toolbar The FMECA toolbar is used to create and control FMECA Analysis through the commands it contains.
Tool Name Description
Select Cancels add mode.
FMECA Block Add a Block.
Component Add a Component.
Failure Mode Add a Failure mode.
Category List Add an item from the list.
Start FMECA Analysis Allows the user to perform the analysis.
Abort FMECA Analysis Allows the user to stop the analysis.
Shortcut Keys
Key Function Ctrl + N Open a new project.
Ctrl + O Open an existing document. Displays the Open dialog box, in which you can locate and open the desired file.
Ctrl + S Save the active project with its current name. If you have not named the project, the Save As dialog box will open.
Ctrl + P Print the Active View.
Ctrl + X Remove selected data from the document and stores it on the clipboard.
Ctrl + C Copy the selection to the clipboard. Ctrl + V Paste the contents of the clipboard at the insertion point.
Ctrl + W Paste the contents of the clipboard (Gate or Event) at the insertion point as a Repeat Gate or Repeat Event.
Del Delete the selection. F1 Open the ITEM ToolKit On-line Help.

Chapter 7 RBD 157
CHAPTER 7 RBD
A reliability block diagram (RBD) provides a simple way to compare various configurations in an attempt to find the best overall system design.
This chapter:
1. Introduces RBD systems
2. Describes ToolKit’s RBD features
3. Outlines an example RBD system
4. Describes the RBD Screen Editor, Toolbars and Shortcut Keys
1. Introduction A reliability block diagram (RBD) is a drawing and calculation tool used to model complex systems. An RBD is a series of blocks representing portions of a system. Once the blocks are configured properly and data is provided, the failure rate, MTBF, reliability, and availability of the system can be calculated. As the configuration of the diagram changes, the calculation results also change.
The rational course of a RBD stems from an input node located at the left side of the diagram. The input node flows to arrangements of series or parallel blocks that conclude to the output node at the right side of the diagram.
The RBD system is connected by a series or parallel configuration.
A series connection is joined by one continuous link from the Start Node to the End Node.
A parallel connection is used to show redundancy and is joined by multiple links or paths from the Start Node to the End Node.

158 ITEM ToolKit Getting Started Guide
A system can contain a series, parallel, or combination of series and parallel connections to make up the network.
Successful operational systems require at least one maintained path between the system input and the system output. Boolean Algebra expressions are used to describe the minimum combination of failures required to cause a system failure. Minimal cut sets represent the minimal number of failures that can cause the system to fail.
2. ITEM ToolKit & Reliability Block Diagram The RBD analysis is a module of the ITEM ToolKit application. The ToolKit allows for multiple analyses to be performed within a single or between multiple projects. As a result, all analysis modules of the ToolKit can function as a standalone or combined solution set. The ToolKit uses serialization files to store data. This means that all pertinent data from one analysis can be carried over into other analyses.
For example, you may choose to begin your groundwork by performing one of the prediction analyses. The failure rates data obtained can then be directly used to perform a RBD analysis or a FMECA analysis to determine the possible failure modes and their severity. The ToolKit’s flexibility allows you to begin at any level and proceed to what is needed in order to meet requirements.
The RBD Analysis application uses a RBD workspace area where all project, system, and RBD data and graphics are entered. This area is the foundation on which you build your projects. The workspace area consists of menus, toolbars, and project and system windows.
The RBD workspace area features a Multiple Document Interface (MDI), which allows you to:
Choose which windows to display, and move and resize all open windows. Open and create multiple RBD projects at the same time in order to compare analysis results. Drag and drop gate and event components between projects. This feature allows you to quickly create a new
project by reusing components from other projects.

Chapter 7 RBD 159
3. Creating an RBD Project Creating a RBD Project consists of:
• Constructing the Project/System. • Adding Blocks, Nodes and Connections. • Adding and editing Failure Models. • Constructing Sub-System. • Setting the RBD View. • Verifying Data. • Performing analysis.
Constructing the Project/System 1. Click on the New Project icon (A) on the default toolbar, or select New Project from the File menu. 2. Activate your project by clicking on the Project tab (B) or in the Project window. 3. The Project Dialog Box will be displayed.
4. Enter your project information by placing the cursor or clicking in the appropriate fields.
A
B

160 ITEM ToolKit Getting Started Guide
The information entered for a project is only for the project level, and its entry is optional. The table below displays each field that is available for a project and what each field pertains to:
Field Description Title The Project Title Name Project Name Part Number Project Part Number LCN Logistic Control Number Circuit Ref Reference Identification Number (for internal purposes) Analyst The person performing the RBD calculation Compiled By The person who gathered the data for this analysis Description Description of the project Function Description What the project/system does Notes Any other pertinent information on the project Approved By The person required to sign off on the project The following fields will display results only if a prediction system is part of the project Target Rate Acceptable number of failures for the project (Failures Per Million Hours) Life Time Project life time given in hours Redundancy Redundancy Flag Failure Rate Will display total Project failure rate once analysis is complete Unavailability The Project unavailability once the analysis has been run MTBF Mean Time Between Failures for the project

Chapter 7 RBD 161
5. Select the Add menu from the menu toolbar by clicking on it.
6. Select and click on the RBD System option. 7. The project will display as a RBD System in the project window and the applicable system data will display in the
system window. 8. From the Project window, select the RBD System by clicking on it. The RBD System dialog box will be displayed.
9. Enter your system information by placing the cursor or clicking in the appropriate fields. The table below describes
what could be entered and what each field and block of fields pertains to:
Field Description Title System Title Name System Name Part Number System Part Number, if applicable LCN Logistic Control Number Circuit Ref Circuit Reference Number

162 ITEM ToolKit Getting Started Guide
Field Description Analyst The person performing the RBD System Analysis Compiled by The person who gathered the system data for the RBD Analysis Approved by The person required to sign off on this system Unavailability Cut-Off Restricts the extent of the analysis Sort Cut Sets Sort cut sets in required order Order Cut-Off Set the maximum order cut sets that should be considered during analysis Use Max Risk Dormant Model Uses maximum risk values for dormant events Life Time Time over which analysis takes place No of Intermediate Time Points Calculates system parameters at set intervals during lifetime Description Description of the system Function Description What the system does Notes Any comments or pertinent information pertaining to this system Failure Rate Conditional failure intensity Failure Frequency Unconditional failure intensity No. of Expected Failures Number of system failures over system lifetime Mean Time Between Failures Average time between system failures Total Down Time Total time the system will spend unavailable during the system lifetime Mean Time to Repair Average time to repair system Unreliability Probability of system failing one or more times during system lifetime Unavailability Probability of system being unavailable at any specific time Quantification Method Click on the selected Quantification method and select the MTBF Options Modularize Independent Sub-block Group independent sections of the RBD, speeding up the analysis
Adding Blocks, Nodes and Connections
What is a Block? Blocks (A) represent events such as sub-system and component failures. The unique IDs distinguish blocks from other blocks in a diagram. Repeating a block throughout the diagram can represent common cause failures.
B A C

Chapter 7 RBD 163
What is a Node? Nodes (B) connect parallel blocks. Nodes specify voting arrangements where applicable. Nodes also represent the system outputs of a block diagram for which results are required.
What is a connection? Connections (C) indicate the logical flow of a block RBD. They are the lines used to connect figures in a block diagram. Connections enter the figures on the left input node and exit on the right output node.
E
D
F F
G
H
I
J
L
K
M

164 ITEM ToolKit Getting Started Guide
1. Click the RBD tab (D).
2. From the RBD Toolbar, click on the Node icon (E). 3. Move the cursor into the RBD canvas and click the area where you want to add the Input and Output node (F).
4. From the RBD Toolbar, click on the Block icon . (G). 5. Move the cursor into the RBD Canvas and click the area where you want to add the block (H).
6. From the RBD Toolbar, click on the Connection icon . (I). 7. Move the cursor into the RBD Canvas and click on the output (blue) end of the starting node, and then click on the
input (green) end of the Block. The connection C1 appears on the diagram (J). 8. Repeat step 7 to add the connection C2 (K).
9. To exit the Add Node Mode, select the Select icon from the Diagram Toolbar (L).
10. From the RBD Toolbar, click on the Auto Arrange icon (M) to organize and align the components on the canvas.
Editing Block and Node Parameters To edit block parameters:
1. In the RBD Canvas, right click the desired block and select Block Parameters from the pop-up menu. The RBD Block Parameters dialog box appears.
A
B
D
C
E
F
G

Chapter 7 RBD 165
2. Select the failure model from the name drop-down list (A). If the desired model does not appear in the list, click New Model to define the failure model (B).
3. Select the model type from Type combo box (C). Available model types include: Fixed, Rate, MTTF, Dormant, Standby, Weibull, LogNormal, Normal, Gamma, Beta, BiNomial, ChiSquared, Poisson, Uniform and LogUniform.
4. When the type is selected, the mathematical model can be displayed by clicking on the help icon (D). 5. Enter the remaining block information and parameters as necessary (E), and Time Phase tab data (G). 6. When you are finished entering block parameters, click OK to save the changes and close the dialog box (F).
To edit Nodes parameters:
1. In the RBD tab, right click the desired node and select Node Parameters from the pop-up menu. The Node Parameters dialog box appears.
2. Edit the node parameters as necessary. Nodes to the right of a parallel arrangement may be given a vote number (H) to indicate how many success paths must be available through the parallel arrangement (if a vote number is not specified only one path is available).
3. When you are finished entering node parameters, click OK (I) to save the changes and close the dialog box.
Constructing Sub-Systems To construct a sub-system:
1. In the RBD tab, click the block for which you want to create a sub-system. 2. On the RBD toolbar, click the Page Down icon (A). An empty RBD diagram appears. 3. Add the nodes, blocks, and connections for the sub-system (B).
H
I

166 ITEM ToolKit Getting Started Guide
4. When the sub-system is complete, click the Page Up icon on the RBD toolbar (C) to return to the upper level. The block icon changes to indicate the presence of a sub-system (D).
Setting the RBD View ToolKit’s RBD module contains features that make it easy to create and customize an RBD system. In the diagram tab, you can:
• Use Auto Arrange icon to get a better view of the RBD. • Select multiple components by holding the Ctrl or Shift key down while you click the desired components, or by
holding the left mouse button down while you drag a box around the desired components. • Select a component by clicking on it in the system window or in the RBD tab. • Use the mouse to move and resize components. • Zoom in or zoom out by right clicking any empty area in the diagram, selecting Zoom from the pop-up menu,
then selecting the desired zoom factor. • Set the background color by right clicking any empty area in the diagram, selecting Canvas Color from the pop-
up menu, selecting a color, then clicking OK. • Add a text box by selecting Label from the Add Menu, then clicking the diagram in the area you want to place
the text box.
Verifying Data You must verify system data before performing project analysis.
A
B
C
D

Chapter 7 RBD 167
When verifying RBD projects, ToolKit checks for:
• Circular logic • Invalid failure mode parameters • A node termination for each logical path at the system level • A single logical input and output for each sub-system page • Failure models inputs to non-sub-system blocks
To verify RBD data:
1. In the System Window, click the system header (A). 2. From the Analysis Menu, select Verify Data (B).
3. If the system contains errors, the Verification Results dialog box (C) displays all relevant error message number and the message text. Use the information in the Verification Results dialog box to make corrections before performing system analysis.
4. If no errors are present, the Verification Complete – Without Errors message appears. Click OK.
A
B
C

168 ITEM ToolKit Getting Started Guide
Performing Analysis NOTE Before performing analysis, follow the procedure in “Verifying Data” to identify and correct any errors in the
system. You cannot perform analysis until all errors are corrected.
To analyze the system:
1. In the System Window, click the system header. 2. From the Analysis Menu, select Perform (A). A dialog box displaying the progress of the analysis appears. 3. When the analysis is complete, the Verification Msg. dialog box appears. Click OK. The objects in the System
window are updated with the analysis results.
4. When the analysis is complete, select Summary (B) from the Analysis menu to view the results. The RBD Results dialog box appears (C).
5. You can view the results for each item in the hierarchy displayed on the left side of the dialog box (D).
A
B
C D

Chapter 7 RBD 169
Understanding Analysis Results Unavailability Q
Unavailability Q represents the probability that the component or system is unavailable at any given time. “Q” equals the probability that the system is unavailable.
Failure Frequency W
Failure Frequency W, or unconditional failure intensity, is the probability that the system or component fails per unit time, given that it was working correctly at time zero. “W” is equal to the number of expected system failures.
CFI
Conditional Failure Intensity. This is the probability of failure per unit time, given that the component was “working-as-designed” at time zero and is working at time t.
Expected Failure
Expected Failure is the number of times the system is expected to fail over a specified period of time (lifetime). Unreliability
Unreliability represents the probability of one or more system failures over a specified period of time. The number of expected system failures (W) provides a good approximation for system unreliability for cases where W << 1.
Total Down Time (TDT)
This is the total time that the component or system is expected to be unavailable for the specified system lifetime. Total Up Time (TUT)
This is the total time that the component or system is expected to be available for the specified system lifetime. MTBF
Mean Time Before Failure of the component or system. MTTF
Mean Time To Failure of the Non-repairable component or system. MTTR
Mean Time To Repair of the component or system. Availability
Availability represents a measure of the degree to which a system is in an operational state at the start of a mission when the mission is called for at an unknown time.
Reliability
Reliability represents the probability that the system will perform without failure during the specified period of time. No. Of Cut Sets
No. of Cut Sets represents a group of events that will cause system failure if and when they occur together.

170 ITEM ToolKit Getting Started Guide
4. RBD Editor Screen, Toolbar and Shortcut Keys Quick Reference
The RBD Editor Screen
The RBD editor can be made visible by selecting the Dialog Tab (1) or the RBD Tab (2). Its main elements are the following:
• Main Menu (3): Quick access to the main functions. • RBD Toolbars (4): Quick access to editing functions. • Project Window (5): A hierarchical view of the project and systems. • System Window (6): A hierarchical view of the system, blocks, connections and nodes. • RBD Window or canvas (7): The area in which the RBD can be graphically edited.
1 2
3 4
6
5
4
7

Chapter 7 RBD 171
The Default Toolbar Immediately below the pull-down options resides a group of buttons that form a Default Toolbar allowing the user to access directly some of the more frequently used menu options.
Tool Name Description
New Opens a new project.
Open Open an existing document. The ToolKit displays the Open dialog box, in which you can locate and open the desired file.
Save Save the active document or template with its current name. If you have not named the document, the ToolKit displays the Save As dialog box.
Cut Remove selected data from the document and stores it on the clipboard.
Copy Copy the selection to the clipboard.
Paste Paste the contents of the clipboard at the insertion point.
Delete Item Delete the selection.
Undo Reverse the last editing. Note: You cannot undo some actions.
Print Print the active document.
About Open the About ITEM ToolKit Window.
Help Open the ITEM ToolKit On-line Help.
The RBD Dialog Windows Controls The RBD Dialog Window Contains the following Controls.
Tool Name Description
Undo Changes Cancels the latest operation.
Analyse Run the Analysis of the system.
Check Spelling Check the Spelling of the selected Text.

172 ITEM ToolKit Getting Started Guide
The RBD Toolbar The RBD Toolbar is used to create and control RBD Analysis through the commands it contains.
Tool Name Description
Select Cancels add mode.
Block Creates a Block symbol on the RBD diagram.
Node Creates a Node symbol on the RBD diagram.
90 Degree Link Creates a 90 Degree Link on the RBD diagram.
Orthogonal Link Creates an Orthogonal Link on the RBD diagram.
Link Creates a Simple Line Link on the RBD diagram.
Arrow Link Creates an Arrow Link on the RBD diagram.
Text Allows the user to add a text component to the canvas.
Image Allows the user to add an image component to the canvas.
Page Up Allows the user to go one level up in the canvas.
Page Down Allows the user to go one level down in the canvas based on selected Block
Auto Arrange Allows the user to organize the components on the canvas.
Transfer to MS Word Allows the user to transfer the RBD Canvas directly into Microsoft Word.
Start RBD Analysis Allows the user to perform the analysis.
Abort RBD Analysis Allows the user to stop the analysis.
Result Summary Displays a summary of the analysis.
Header Footer Allows the user to create a header and footer for all RBD pages
Fit to Page Allows the user to Fit the RBD diagram in one page automatically.
Reset Fit to Page Allows the user to undo the Fit in one page previously done.

Chapter 7 RBD 173
The Project Toolbar The Project Toolbar displays the available analysis options for the ToolKit application
Tool Name Description
MIL217 Add a MIL-HDBK-217 (Electronic) System.
Telcordia (Bellcore) Add a SR-332 Telcordia (Electronic) System.
IEC 62380 (RDF) Add an IEC 62380 French Telecom Standard (Electronic) System.
299B Add a 299B Chinese Military Standard (Electronic) System.
NSWC (Mechanical) Add a NSWC (Mechanical) System.
Maintain Add a Maintain MIL-HDBK-472 Procedure V System.
SpareCost Add a Spare Cost Spares Scaling and Ranging System.
FMECA Add a Failure Modes Effects and Criticality Analysis (FMECA) System.
RBD Add a Reliability Block Diagram (RBD) System.
Fault Tree Add a Fault Tree Analysis (FTA) System.
Event Tree Add an Event Tree Analysis (ETA) System.
Markov Add a Markov Modeling System.
The Nudge Toolbar The Nudge Toolbar contains commands for moving the selected components by one logical unit in any direction.
Tool Name Description
Nudge Up Move the selected components one logical unit up.
Nudge Down Move the selected components one logical unit down.
Nudge Left Move the selected components one logical unit left.
Nudge Right Move the selected components one logical unit right.

174 ITEM ToolKit Getting Started Guide
The Zoom Toolbar The Zoom Toolbar contains commands for zooming and panning the canvas. Zoom options can also be accessed by right clicking in the white space on the RBD diagram.
Tool Name Description
Ruler Control Turn the ruler of the canvas on or off.
Properties Open the properties window and allows the user to change the selected component properties.
Zoom Changes the cursor to a magnifying glass and allows the user to zoom in by selecting the area to be zoomed in with the left mouse button and zoom out by right clicking.
Zoom to Fit Sets the magnification level of the canvas so that all components on the canvas are visible in the view-port.
Zoom to Selection Sets the magnification level of the canvas so that the selected components are visible in the view-port.
Pan Changes the pointer to a hand and allows the user to grab the canvas with the left mouse button and pan in any direction.

Chapter 7 RBD 175
The Graph Toolbar The Graph Toolbar contains commands that affect the appearance and behavior of the RBD diagram. Each selection highlights the way that Blocks and Nodes are connected through the diagram.
Tool Name Description
Edges Entering Click on the Block/Nodes you wish to select on the RBD Diagram, and then click on this symbol to display the Links to the other figures the selected Block/Nodes is connected to. The Links will flash repeatedly on the screen.
Edges Leaving Click on the Block/Nodes you wish to select on the RBD Diagram, and then click on this symbol to display the Links that is leaving the selected figure and connecting to the next set of connected Block/Nodes. The Links will flash repeatedly on the screen.
All Edges Click on the selected Block/Nodes, and then click on this symbol to display the connection line that the selected Block/Nodes is entering from and going to the Block/Nodes close to it. The Links will flash repeatedly on the screen.
Nodes Connected From
Click on this symbol to display all the Block/Nodes connected to the selected Block/Nodes. The Block/Nodes will flash repeatedly on the screen.
Nodes Connected To Click on this symbol to display all the Block/Nodes connected from the selected Block/Nodes. The Block/Nodes will flash repeatedly on the screen.
Nodes Connected Click on this symbol to display all Block/Nodes that are logically connected within the RBD Diagram. Block/Nodes symbols will flash on the screen in order for you to discern which Block/Nodes are connected.
The Rotate Toolbar The Rotate Toolbar contains commands for rotating the selected components.
Tool Name Description
Rotate Sets the canvas to Rotate mode. Allows grabbing a component and rotating it.
Rotate Left Rotates the selected components by 90 degrees to the left.
Rotate Right Rotates the selected components by 90 degrees to the right.
Flip Vertical Flips the selected components 180 degrees about the Y-axis.
Flip Horizontal Flips the selected components 180 degrees about the X axis

176 ITEM ToolKit Getting Started Guide
The Canvas Toolbar The Canvas Toolbar contains commands that affect the appearance and behavior of the canvas.
Tool Name Description
Undo Undo the last command executed on the canvas.
Redo Redo the last undo that was performed.
Toggle Grid Turn display of the grid on and off.
Snap to Grid Toggle the snap-to-grid feature on and off.
Toggle Page Bounds Turn display of page boundaries on and off.
Shortcut Keys Key Function Ctrl + N Open a new project.
Ctrl + O Open an existing document. Displays the Open dialog box, in which you can locate and open the desired file.
Ctrl + S Save the active project with its current name. If you have not named the project, the Save As dialog box will open.
Ctrl + P Print the Active View. Ctrl + X Removes selected data from the document and stores it on the clipboard. Ctrl + C Copy the selection to the clipboard. Ctrl + V Paste the contents of the clipboard at the insertion point. Del Delete the selection. F1 Open the ITEM ToolKit On-line Help.

Chapter 8 Fault Tree 177
CHAPTER 8 Fault Tree Analysis
Fault Tree Analysis (FTA) is used during Reliability and Safety assessments to graphically represent the logical interaction and probabilities of occurrence of component failures and other events in a system. The interactions are captured using a tree structure of Boolean operator gates, which decomposes system level failures to combinations of lower-level events. The analysis of such Fault Trees, identifies and ranks combinations of events leading to system failure, and provides estimates of the system’s failure probability.
This chapter:
1. Introduces FTA systems
2. Describes Toolkit’s FTA features
3. Outlines an example FTA system
4. Describes the FTA Editor Screen, Toolbars and Shortcut Keys
1. Introduction Item Software’s Fault Tree module provides a wide variety of both qualitative and quantitative information about the system reliability and availability.
Fault Tree Analysis is a well-established methodology that relies on solid theories such as Boolean logic and Probability Theory. Boolean logic is used to reduce the Fault Tree structure into the combinations of events leading to failure of the system, generally referred to as Minimal Cut Sets, many of which are typically found. Probability Theory is then used to determine probabilities that the system will fail during a particular mission, or is unavailable at a particular point in time, given the probability of the individual events. Additionally, probabilities are computed for individual Minimal Cut Sets, forming the basis for their ranking by importance with respect to their reliability and safety impact.
Using this detailed information, efforts to improve system safety and reliability can be highly focused, and tailored to your individual system. Possible design changes and other risk-mitigating actions can be evaluated for their impact on safety and reliability, allowing for a better-informed decision making process and improved system reliability. This type of analysis is especially useful when analyzing large and complex systems where manual methods of fault isolation and analysis are not viable.

178 ITEM ToolKit Getting Started Guide
A Fault Tree is a graphical representation of events in a hierarchical, tree-like structure. It is used to determine various combinations of hardware, software, and human error failures that could result in a specified risk or system failure. System failures are often referred to as top events. A deductive analysis using a Fault Tree begins with a general conclusion or hazard, which is displayed at the top of a hierarchical tree. This deductive analysis is the final event in a sequence of events for which the Fault Tree is used to determine if a failure will occur or, alternatively, can be used to stop the failure from occurring. The remainder of the Fault Tree represents parallel and sequential events that potentially could cause the conclusion or hazard to occur and the probability of this conclusion. This is often described as a "top down" approach.
Fault Trees are composed of events and logical event connectors (OR-gates, AND-gates, etc.). Each event node's sub-events (or children) are the necessary pre-conditions that could cause this event to occur. These conditions can be combined in any number of ways using logical gates. Events in a Fault Tree are continually expanded until basic events are created for which you can assign a probability.
The top level event must be described precisely. Defining the top event too broadly leads to an open-ended tree, showing no specific cause or causes for failure. Similarly, defining the top event too narrowly leads to possible cause omissions. An FTA needs to include all possible weaknesses, faults or failures present in the system that could cause safety hazards or reliability problems. Hardware, software, and human components of the system must be included in the Fault Tree Analysis. All interactions between the system components and elements must be fully described in the FTA.
An FTA provides a method to:
• Calculate unreliability and unavailability • Analyze Uncertainty and Sensitivity • Analysis Common Cause Failure (CCF) • Produce minimal cut sets • Fault Tree Sequencing, Initiator and Enabler, Initiator Only, Enabler Only • Define event failure models • Determine the importance of elements in a system
2. ITEM ToolKit & Fault Tree Analysis Fault Tree Analysis is one of the many modules within the ITEM ToolKit application. Item Software's Fault Tree module can provide useful failure probability and system reliability data concerning the likelihood of a failure and the means by which such a failure could occur.
With the detailed output of each Fault Tree Analysis, efforts to improve system safety and reliability can be highly focused and tailored to your system by using the quantifying results from the data you input. Additionally, a Fault Tree Analysis can help prevent a failure from occurring beforehand, by the analysis of the system data you input.
Binary Decision Diagram (BDD) The ITEM ToolKit Fault Tree Module also incorporates Binary Decision Diagram analysis. The BDD analysis method is an alternative to the Rare Event and Esary-Proschan quantification options. It uses the Binary Decision Diagram algorithm to obtain cut-sets and quantification results. BDD algorithms distinguish themselves from conventional quantification methods by returning results that do not involve approximations. Instead, BDD algorithms produce results that are in accordance with the basic rules of probability theory.

Chapter 8 Fault Tree 179
Furthermore, BDD-based algorithms are generally more efficient than other quantification methods. Depending on the model, these algorithms can identify millions or even billions of cut-sets within seconds. The BDD algorithms embedded in ITEM products identify all cut-sets for a given model, and then filter out the significant cut-sets based on probability and/or order. BDD algorithms do not allow for truncation of probabilistically insignificant elements in the logic. Conventional methods allow models to be solved by considering only the high-probability cut-sets. Studies have shown however that the numerical results produced by conventional methods must be treated with care, due to the truncations and approximations involved in their calculations.
Using the Fault Tree Module The Fault Tree Analysis application uses a Fault Tree workspace area where all project, system, and Fault Tree data and graphics are entered. This area is the foundation on which you build your projects. The workspace area consists of menus, toolbars, and project and system windows.
The Fault Tree workspace area features a Multiple Document Interface (MDI), which allows you to:
• Choose which windows to display, and move and resize all open windows. • Open and create multiple Fault Tree projects at the same time in order to compare analysis results. • Drag and drop gate and event components between projects. This feature allows you to quickly create a new
project by reusing components from other projects.
3. Creating a Fault Tree Project To demonstrate ToolKit’s Fault Tree features, we’ll create an example Fault Tree project based on the following.
Consider two switches in series as shown bellow. The points A and B are points on the wire. Wire failures would be ignored
Creating a Fault tree system consists of:
• Constructing the system • Adding Gates • Adding Events and editing their Failure models • Performing analysis
A B

180 ITEM ToolKit Getting Started Guide
Constructing the system To construct a Fault Tree System:
1. Click on the New Project icon (A) on the default toolbar, or select New Project from the File menu. 2. Activate your project by clicking on the Project tab (B) or in the Project window. 3. Select the Dialog tab from the bottom of the Viewing Option window. 4. The Project Dialog Box will be displayed.
5. Enter your project information by placing the cursor or clicking in the appropriate fields.
6. The information entered for a project is only for the project level, and its entry is optional. The table below displays each field that is available for a project and what each field pertains to:
A
B

Chapter 8 Fault Tree 181
Field Description Title The Project Title Name A Unique Reference Identifier Part Number Project Part Number LCN Logistic Control Number Circuit Ref Circuit Reference Analyst Person Performing FT Analysis Redundancy Redundancy Flag Life Time Project life time given in hours Description What the project is Function Description What the project/system does Notes Any other pertinent information on the project Compiled By Person who gathered data for analysis Approved By Person required to sign off on the project The following fields will display results only if a prediction system is part of the project Failure Rate Will display total Project failure rate once analysis is complete MTBF Mean Time Between Failures for the project description Target Rate Acceptable number of failures for the project (Failures Per Million Hours) Unavailability This box will display the Project unavailability once the analysis has been run
7. Select the Add menu from the menu toolbar by clicking on it.
8. Select and click on the FT, Fault Tree System option. 9. The project will display as a Fault Tree in the project window and the applicable system data will display in the
system window. 10. From the Project window, select the Fault Tree System by clicking on it. 11. The Fault Tree System dialog box will be displayed.

182 ITEM ToolKit Getting Started Guide
12. Enter your system information by placing the cursor or clicking in the appropriate fields. 13. The information entered here is for the system level. The table below describes what could be entered and what each
field and block of fields pertains to:

Chapter 8 Fault Tree 183
Field Description Title System Title. Name Unique Reference Identifier for the System. Part Number System Part Number. LCN Logistic Control Number. Circuit Ref Circuit Reference Number. Analyst Name of the person performing the Fault Tree Analysis. Compiled by Name of the person who gathered the data for the Fault Tree Analysis. Approved by Name of the person who was required to sign off on the Fault Tree project.
Cut-Off
Cut-Off by Probability or by Order can be selected. If you select the Probability box, enter the Unavailability and the Frequency cut-off rate for this project. Click the Order box if you wish to have an Order Cut-Off. If you select this box, you must then enter the Cut-Off value total for this project.
Sort Cut Sets Select whether you wish to Sort Cut Sets by Unavailability, by Frequency, or by Order and enter the maximum amount of sort sets. Click “Off” if you do not wish to use Sort Cut Sets. (Cut Sets are a group of events that, when occurring together, will cause system failure.)
Miscellaneous Click the box to Use Maximum Risk Dormant Model for this analysis, then enter the project lifetime given in hours and the total number of immediate time points for the Dormant Model.
Description Description for this System. Function Description Purpose/Description of this system.
Notes Any other pertinent information about this system.
Failure Rate This is the probability of failure per unit time, given that the component was working as designed at time zero, and has survived to time t.
Failure Frequency Displays the project failure frequency once analysis is complete. The unconditional failure intensity is the probability that the system fails per unit time, given that it was working as designed at time 0.
No. of Expected Failures
Display the number of times the system is expected to fail over the specified lifetime (in hours) of this project once the analysis is complete.
Conditional Failure Intensity
This is the probability of failure per unit time, given that the component was working as designed at time zero and is working at time t.
Total Down Time Displays the total down time for this project if and when a failure occurs during the specified system lifetime (in hours) once the analysis is complete.
Unreliability This is the probability that one or more failures will occur over a specified period of time. Unavailability This is the probability that the component or system is unavailable at any given time. Quantification Method Click on the selected Quantification method.
BDD Click this box to enable the Binary Decision Diagram analysis facilities. Modularize Click this box to modularize independent sub-blocks. CCF Click this box if you wish to perform a Common Cause Failure Analysis.
Uncertainty Click this box if you wish to perform an Uncertainty Analysis. If you select this box, you must then enter the Sample Size and the Percentile.

184 ITEM ToolKit Getting Started Guide
What is a Gate? A gate is used to describe the relationship between the input and output events in a Fault Tree. For example, a specific output can occur if and only if specific input events occur. These specific inputs and outputs define each gate. A Fault Tree can have several different kinds of gates. The gate type defines the appearance of the gate symbol when drawn in the Fault Tree. In addition, the gate type determines how the inputs to the gate are logically connected for the minimal cut set analysis process.
Adding a Gate Fault trees are created by adding gates and events directly into the Fault Tree diagram edit area. As you add gates and events to a fault tree diagram, the system will automatically position the diagram symbols in the diagram edit area.
Once a new Fault Tree System is added into a Project the TOP gate is automatically created. You can enter and add gates to the Fault Tree by using the Select and Click method from the Fault Tree Toolbar or by using the Add pull-down menu and selecting a Gate. You can continue to add gates by simply clicking on any gate.
1. Click on the Fault Tree Tab to open the Fault Tree Canvas (A). 2. Select an OR gate symbol from the Fault Tree Toolbar with the left mouse button (B). 3. Move the mouse cursor to a target gate within the Fault Tree canvas. 4. Once the target gate has been reached, click the left mouse button to add (C). 5. Click on the Select Symbol to stop adding Gates (D).
A
B
C
D
F
E

Chapter 8 Fault Tree 185
6. Right Mouse Click on the new Gate and select Gate Parameter. 7. Enter “No current to point B” as Description (E). 8. Click OK when finished (F).
Types of Gate The following gates are supported in the Fault Tree module:
OR Gate
The OR gate indicates that the output occurs if any one of the input events occurs. AND Gate
The AND gate indicates that the output occurs if all of the input events occur simultaneously.
PRIORITY AND Gate
The PRIORITY AND gate indicates that the output occurs if and only if all of the input events occur in the order from left to right.
VOTE Gate
The VOTE gate indicates how many of the gate inputs need to occur to cause the gate failure to occur. For example, if the gate has four inputs and a vote of three was specified, this indicates that at least three of the gate's four inputs would have to occur to cause the gate failure to occur.
XOR Gate
The XOR gate indicates that an event will occur if one but not both of the input events occur. NOT Gate
The NOT gate indicates that the output event occurs if the input event does not occur. NULL Gate
The NULL gate indicates a single input only. These gates are used to allow additional descriptions to be added to the fault tree for system events. TRANSFER/Subsystem Gate
The TRANSFER/Subsystem gate indicates that this part of the fault tree is developed in a different part of the diagram or on a different page. INHIBIT Gate
The INHIBIT gate indicates that the output event occurs if both input events occur. One of the inputs represents a conditional event.

186 ITEM ToolKit Getting Started Guide
What is an Event? Events appear in both Fault and Event trees, and may represent components unavailability, human errors, system failures, initiating events, etc.
Adding an Event
1. Select a Basic Event symbol from the Fault Tree Toolbar with the left mouse button (A). 2. Move the mouse cursor to the 1.1 OR Gate within the Fault Tree canvas (B). 3. Once the Gate has been reached, click the left mouse button to add. 4. Repeat the same operation until 3 Basic Event are added below the OR Gate. 5. Click on the Select Symbol to stop adding Events (C).
Types of Event The following types of Event are available in the Fault Tree Module:
Basic Event
A Basic event indicates an event for which failure and repair data is available. House Event
A House event indicates whether an event is definitely operating or definitely not operating (dormant). Undeveloped Event
An Undeveloped event indicates a system event, which is yet to be developed.
A
B
C

Chapter 8 Fault Tree 187
Dormant Event
A Dormant event indicates a system event with unrevealed failures until maintenance, or inspection. Conditional Event
A Conditional event is similar to a basic event but represents a conditional probability connected to an inhibit gate.
How to Create and Add a Failure Model into an Event Failure Models contain failure and repair information for a component, or probability of occurrence data for human errors, environmental conditions etc. A failure model is assigned to an event or events, for use in the Quantitative Analysis of the fault tree diagram.
1. Right Click on the first Event. 2. Select Event Parameters. 3. The Event Parameters Window opens.
4. Input the Description of the Event “Switch 1 is open” into the general window (A). 5. Input the Name “Switch 1”(B), select the Type “Rate” (C) and input the Failure Rate “1.5e-006” (D) of the Failure
Model into the Failure Model window. 6. Available model types include: Fixed, Rate, MTTF, Dormant, Standby, Weibull, LogNormal, Normal, Gamma, Beta,
BiNomial, ChiSquared, Poisson, Uniform and LogUniform. 7. When completed, click OK (E). 8. Repeat 1 to 6 for the second Event with “Switch 1 is open” as Description, “Switch 2” as Name, “2e-006” as Failure
Rate and select “Rate” for the Type. 9. Repeat 1 to 6 for the third Event with “No current to point A” as Description, “No Current” as Name, “3e-006” as
Failure Rate and select “Rate” for the Type.
A
B
C
D
E

188 ITEM ToolKit Getting Started Guide
Performing Analysis Fault Tree Module provides a method to:
• Calculate unreliability and unavailability • Analyze Uncertainty and Sensitivity • Analysis Common Cause Failure (CCF) • Produce minimal cut set • Fault Tree Sequencing, Initiator and Enabler, Initiator Only, Enabler Only • Determine the importance of elements in a system
NOTE Before performing analysis, follow the procedure in “Verifying Data” to identify and correct any errors in the system. You cannot perform analysis until all errors are corrected.
To Verify the Data 1. Select Verify Data from the Analysis Option in the menu Toolbar.

Chapter 8 Fault Tree 189
2. If no errors are detected the following windows will be displayed.
3. If the following window appears, correct the detected errors and repeat the step 1.
To Analyze the System 1. In the System Window, click the system header.
2. From the Analysis Menu, select Perform. A dialog box displaying the progress of the analysis appears.
3. When the analysis is complete, the Verification Msg. dialog box appears. Click OK. The objects in the System window are updated with the analysis results.
4. The Fault Tree canvas is also updated with the analysis results.

190 ITEM ToolKit Getting Started Guide
5. Select Summary from the Analysis menu to view the results. The Fault Tree Results dialog box appears.

Chapter 8 Fault Tree 191
Understanding Analysis Results Unavailability Q: Represents the probability that the component or system is unavailable at any given time. “Q” equals the probability that the system is unavailable.
Failure Frequency W: This is the term used by the system to represent the unconditional failure intensity. The unconditional failure intensity is the probability that the system or component fails per unit time, given that it was working correctly at time zero. “W” is equal to the number of expected system failures.
CFI: Signifies the Conditional Failure Intensity. This is the probability of failure per unit time, given that the component was “working-as-designed” at time zero and is working at time t.
Expected Failure: This is the number of times the system is expected to fail over a specified period of time (lifetime).
Unreliability: Represents the probability of one or more system failures over a specified period of time. The number of expected system failures (W) provides a good approximation for system unreliability for cases where W << 1.
TDT: Represents total down time. This is the total time that the component or system is expected to be unavailable for the specified system lifetime.
TUT: Represents total up time. This is the total time that the component or system is expected to be available for the specified system lifetime.
Failure Rate: The Failure rate of the component or system.
MTBF: Mean Time Before Failure of the component or system.
MTTF: Mean Time To Failure of the Non-repairable component or system.
MTTR: Mean Time To Repair of the component or system.
Availability: Represents a measure of the degree to which a system is in an operational state at the start of a mission when the mission is called for at an unknown time.
Reliability: Represents the probability that the system will perform without failure during the specified period of time.
No. of Cut Sets: Represents a group of events that will cause system failure if and when they occur together.
CCF: Signifies Common Cause Failure. This is the occurrence of more than one failure event due to the same cause.
What is a Critical Path? A Critical Path is a group of events that has the highest probability of occurrence among all possible sets of events. Depending on the Importance Method selected, the Critical Paths in a Fault Tree may differ.
ToolKit uses three main levels of Importance Methods to measure the critical path:

192 ITEM ToolKit Getting Started Guide
F-Vesely
The F-Vesely (Fussell-Vesely) importance measure represents an event’s contribution to the system unavailability. Increasing or decreasing the availability of events with a higher importance value will have the most significant effect on system availability.
Birnbaum
The Birnbaum measure for an event represents the sensitivity of system unavailability with respect to changes in the events unavailability.
B-Proschan
The B-Proschan (Barlow-Proschan) event importance measure takes into consideration the sequence of event failures within its calculation. It is the probability that the system fails because a critical cut set containing the event fails, taking into consideration that the event fails last.
How to Display a Critical Path 1. Select the Analysis pull-down menu and click on Critical Path. The Critical Path window displays:
2. From this window you can select the Critical Path importance level you wish to use, add and delete levels, check all levels, uncheck all levels, and use the color palette to assign a color to a specific level.

Chapter 8 Fault Tree 193
3. Select F-Vesely and the 1st Level, choose the path color and click OK. The Fault Tree canvas will be updated with the
Critical Path.
4. Select the Analysis pull-down menu and click on Clear Critical Path. The Fault Tree canvas will return to his original state.
5. Repeat step 1 to 4 to display the Critical Path for Birnbaum or B-Proschan Importance.

194 ITEM ToolKit Getting Started Guide
How to Transfer Fault Tree Data to Microsoft Word A powerful export facility is provided with the Fault Tree module that will allow you to transfer data directly to Microsoft Word.
1. To access the Microsoft Word transfer facility, select the Microsoft Word icon from the Fault Tree Toolbar.
2. The Range window appears. Check all desired option and click OK.
3. The Fault Tree pages you have selected will be transferred directly into Microsoft Word. Microsoft Word does not have to be active on your desktop to perform this transfer; it will open automatically.
Transfer to Microsoft Word

Chapter 8 Fault Tree 195
4. Fault Tree Editor Screen, Toolbar and Shortcut Keys Quick Reference
The Fault Tree Editor Screen
The Fault Tree editor can be made visible by selecting the Dialog Tab (1) or the Fault Tree Tab (2). Its main elements are the following:
• Main Menu (3): Quick access to the main functions. • Fault Tree Toolbars (4): Quick access to editing functions. • Project Window (5): A hierarchical view of the project and systems. • System Window (6): A hierarchical view of the system, blocks, connections and nodes. • Fault Tree Window or canvas (7): The area in which the Fault Tree can be graphically edited.
1 2
3 4
5
6
4
7

196 ITEM ToolKit Getting Started Guide
The Default Toolbar Immediately below the pull-down options resides a group of buttons that form a Default Toolbar allowing the user to access directly some of the more frequently used menu options.
Tool Name Description
New Opens a new project.
Open Open an existing document. The ToolKit displays the Open dialog box, in which you can locate and open the desired file.
Save Save the active document or template with its current name. If you have not named the document, the ToolKit displays the Save As dialog box.
Cut Remove selected data from the document and stores it on the clipboard.
Copy Copy the selection to the clipboard.
Paste Paste the contents of the clipboard at the insertion point.
Delete Item Delete the selection.
Undo Reverse the last editing. Note: You cannot undo some actions.
Print Print the active document.
About Open the About ITEM ToolKit Window.
Help Open the ITEM ToolKit On-line Help.
The Fault Tree Dialog Windows Controls The Fault Tree Dialog Window Contains the following Controls.
Tool Name Description
Undo Changes Cancels the latest operation.
Analyse Run the Analysis of the system.
Check Spelling Check the Spelling of the selected Text.

Chapter 8 Fault Tree 197
The Project Toolbar The Project Toolbar displays the available analysis options for the ToolKit application
Tool Name Description
MIL217 Add a MIL-HDBK-217 (Electronic) System.
Telcordia (Bellcore) Add a SR-332 Telcordia (Electronic) System.
IEC 62380 (RDF) Add an IEC 62380 French Telecom Standard (Electronic) System.
299B Add a 299B Chinese Military Standard (Electronic) System.
NSWC (Mechanical) Add a NSWC (Mechanical) System.
Maintain Add a Maintain MIL-HDBK-472 Procedure V System.
SpareCost Add a Spare Cost Spares Scaling and Ranging System.
FMECA Add a Failure Modes Effects and Criticality Analysis (FMECA) System.
RBD Add a Reliability Block Diagram (RBD) System.
Fault Tree Add a Fault Tree Analysis (FTA) System.
Event Tree Add an Event Tree Analysis (ETA) System.
Markov Add a Markov Modeling System.
The Fault Tree Toolbar The Fault Tree Toolbar is used to create and control Fault Tree Analysis through the commands it contains.
Tool Name Description
Select Cancels add mode.
OR GATE Creates an OR GATE symbol on the Fault Tree diagram.
AND GATE Creates an AND GATE symbol on the Fault Tree diagram.
PRIORITY AND GATE Creates a PRIORITY AND GATE symbol on the Fault Tree diagram.
VOTE GATE Creates a VOTE GATE symbol on the Fault Tree diagram.

198 ITEM ToolKit Getting Started Guide
XOR GATE Creates a XOR GATE symbol on the Fault Tree diagram.
NOT GATE Creates a NOT GATE symbol on the Fault Tree diagram.
NULL GATE Creates a NULL GATE symbol on the Fault Tree diagram.
TRANSFER GATE Creates a TRANSFER GATE symbol on the Fault Tree diagram.
INHIBIT GATE Creates an INHIBIT GATE symbol on the Fault Tree diagram.
BASIC EVENT Creates a BASIC EVENT symbol on the Fault Tree diagram.
HOUSE EVENT Creates a HOUSE EVENT symbol on the Fault Tree diagram.
UNDEVELOPED EVENT Creates an UNDEVELOPED symbol on the Fault Tree diagram.
DORMANT EVENT Creates a DORMANT EVENT symbol on the Fault Tree diagram.
CONDITIONAL EVENT Creates a CONDITIONAL EVENT symbol on the Fault Tree diagram.
Text Allows the user to add a text component to the canvas.
Image Allows the user to add an image component to the canvas.
Page Up Allows the user to go one level up in the canvas.
Page Down Allows the user to go one level down in the canvas based on the selected Block.
Auto Arrange Allows the user to organize the components on the canvas.
Transfer to MS Word Allows the user to transfer any Fault Tree Analysis data directly into MS Word.
Start FTA Analysis Allows the user to perform the necessary calculations of the analysis.
Abort FTA Analysis Allows the user to stop the analysis or calculations currently being performed.
Summary Displays a summary of the analysis.
Header Footer Allows the user to create a header and footer for all Fault Tree pages.
Auto Paginate Allows the user to paginate a Fault Tree automatically.
Undo Auto Paginate Allows the user to undo the Auto paginate previously done.
Fit to Page Allows the user to Fit the Fault Tree diagram in one page automatically.
Reset Fit to Page Allows the user to undo the Fit in one page previously done.

Chapter 8 Fault Tree 199
The Align Toolbar The Align Toolbar contains commands for aligning components with respect to a given anchor component.
Tool Name Description
Align Top Horizontally aligns the selected components with the top of the anchor component.
Align Middle Horizontally aligns the selected components with the center of the anchor component.
Align Bottom Horizontally aligns the selected components with the bottom of the anchor component.
Align Left Vertically aligns the selected components with the left edge of the anchor component.
Align Center Vertically aligns the selected components with the center of the anchor component.
Align Right Vertically aligns the selected components with the right edge of the anchor component.
The Nudge Toolbar The Nudge Toolbar contains commands for moving the selected components by one logical unit in any direction.
Tool Name Description
Nudge Up Move the selected components one logical unit up.
Nudge Down Move the selected components one logical unit down.
Nudge Left Move the selected components one logical unit left.
Nudge Right Move the selected components one logical unit right.

200 ITEM ToolKit Getting Started Guide
The Rotate Toolbar The Rotate Toolbar contains commands for rotating the selected components.
Tool Name Description
Rotate Sets the canvas to Rotate mode. Allows grabbing a component and rotating it.
Rotate Left Rotates the selected components by 90 degrees to the left.
Rotate Right Rotates the selected components by 90 degrees to the right.
Flip Vertical Flips the selected components 180 degrees about the Y-axis.
Flip Horizontal Flips the selected components 180 degrees about the X-axis.
The Layout Toolbar The Layout Toolbar contains commands for arranging components with respect to each other.
Tool Name Description
Space Across Space the components evenly between the left-most and right-most components selected.
Space Down Space the components evenly between the top-most and bottom-most components selected.
Same Width Change the width of the components to match the anchor component.
Same Height Change the height of the components to match the anchor component.
Same Size Change the width and height of the components to match the anchor component.

Chapter 8 Fault Tree 201
The Canvas Toolbar The Canvas Toolbar contains commands that affect the appearance and behavior of the canvas.
Tool Name Description
Undo Undo the last command executed on the canvas.
Redo Redo the last undo that was performed.
Toggle Grid Turn display of the grid on and off.
Snap to Grid Toggle the snap-to-grid feature on and off.
Toggle Page Bounds Turn display of page boundaries on and off.
The Graph Toolbar The Graph Toolbar contains commands that affect the appearance and behavior of the Fault Tree diagram. Each selection highlights the way that gates and events are connected through the Fault Tree.
Tool Name Description
Edges Click on the gate you wish to select on the Fault Tree, and then click on this symbol to display the connection line to the other figures the selected gate is connected to. The connection line will flash repeatedly on the screen.
Edges Leaving Click on the gate you wish to select on the Fault Tree, and then click on this symbol to display the connection line that is leaving the selected figure and connecting to the next set of connected gates and events. The connection line will flash repeatedly on the screen.
Edges Entering
Click on the gate you wish to select on the Fault Tree, and then click on this symbol to display the connection line that the selected gate is entering from the gate above it. The connection line from the gate on the next level up on the Fault Tree will flash repeatedly on the screen.
Nodes Connected From
Click on this symbol to display the connection line from the first node to the second node. The connection line from the first figure to the second figure will flash repeatedly on the screen.
Nodes Connected To
Click on this symbol to display the gate that all nodes are connected to. The gate will flash repeatedly on the screen. This gate is usually the gate directly below the Top Gate in the Fault Tree.
Nodes Connected
Click on this symbol to display all nodes that are logically connected within the Fault Tree. Node gate symbols will flash on the screen in order for you to discern which nodes are connected.

202 ITEM ToolKit Getting Started Guide
The Zoom Toolbar The Zoom Toolbar contains commands for zooming and panning the canvas.
Tool Name Description
Ruler Control Turn the ruler of the canvas on or off.
Properties Opens the properties window and allows the user to change the component properties.
Zoom Allows zoom in by selecting the area with the left mouse button and zoom out by clicking on the right mouse button.
Zoom to Fit Sets the magnification level of the canvas so that all components on the canvas are visible.
Zoom to Selection Sets the magnification level of the canvas so that the selected components are visible.
Pan Changes the pointer to a hand and allows grabbing the canvas with the mouse and panning.
Shortcut Keys
Key Function
Ctrl + N Open a new project.
Ctrl + O Open an existing document. Displays the Open dialog box, in which you can locate and open the desired file.
Ctrl + S Save the active project with its current name. If you have not named the project, the Save As dialog box will open.
Ctrl + P Print the Active View.
Ctrl + X Remove selected data from the document and stores it on the clipboard.
Ctrl + C Copy the selection to the clipboard.
Ctrl + V Paste the contents of the clipboard at the insertion point.
Ctrl + W Paste the contents of the clipboard (Gate or Event) at the insertion point as a Repeat Gate or Repeat Event.
Del Delete the selection.
F1 Open the ITEM ToolKit On-line Help.

Chapter 9 Markov 203
CHAPTER 9 Markov
Markov Analysis is a technique used to obtain numerical measures related to the reliability and availability of a system or part of a system. Markov Analysis is performed when dependencies between the failure of multiple components as well as dependencies between component failures and failure rates cannot be easily represented using a combination of fault trees and standard time-to-failure and time-to-repair distributions. Specific examples of application areas are standby redundancy configurations as well as common cause failures.
This chapter:
1. Introduces Markov system
2. Describes ToolKit’s Markov features
3. Outlines an example Markov System
4. Describes the Markov Editor Screen, Toolbars and Shortcut Keys

204 ITEM ToolKit Getting Started Guide
1. Introduction
Why Use a Markov Analysis? Markov models allow for a detailed representation of failure and repair processes, particularly when dependencies are involved, and therefore result in more realistic assessments of system reliability measures than simple time-to failure and time-to-repair models. Markov Analysis is well suited to handle rare events, unlike simulation-based analyses, and therefore allows such events to be analyzed within a reasonable amount of time.
When is Markov Model Used? Markov Analysis is a technique used to obtain numerical measures related to the reliability and availability of a system or part of a system. Markov Analysis is performed when dependencies between the failure of multiple components as well as dependencies between component failures and failure rates cannot be easily represented using a combination of fault trees and standard time-to-failure and time-to-repair distributions. Specific examples of application areas are standby redundancy configurations as well as common cause failures.
Markov Construction A Markov Analysis consists of three major steps:
1. Specification of the states the system can be in 2. Specification of the rates at which transitions between states take place 3. Computation of the solutions to the model
Steps 1 and 2 take place in the graphical Markov model editor. In this editor, drawing circles and arrows between the circles, respectively, can create states and transitions between them. The construction of larger Markov models is facilitated by the editor's ability to hierarchically construct Markov models, i.e. break down a higher-level state into lower-level states on a separate 'page', similar to the use of transfer gates in Fault Tree modeling.
Both continuous and discrete transitions can be introduced into the model. Continuous transitions are those representing events that can take place at any time within a given time interval, whereas discrete transitions take place at a specified point in time. For this purpose, individual transitions belong to a transition group, consisting of all the transitions applicable to a given time interval, or taking place at a given point in time. Between intervals, the rate at which given transitions take place may be changed, providing a powerful scheme for phased-mission Markov Models.
Another strong feature of ToolKit’s Markov Module is its capability to define state groups. State groups are groups of states within the model for which the user wants to obtain combined statistics, such as total time spent in any of the states, or number of transitions in or our out of the group. One group that is defined by default is the 'Unavailable' group. Any time spent in a state that is marked by the user as belonging to this group is considered to be system downtime, which is taken into account when computing reliability and availability measures.
Once the definition of the model is complete, the user indicates which statistics should be computed, beyond the reliability measures that are computed by default. Available measures include state probabilities, time spent in a given state or state group, as well as transition rate and number of transitions in and out of a given state or state group.
After computation of the solution, Step 3, these results can be observed in the various tabular and graphical formats.

Chapter 9 Markov 205
2. ITEM ToolKit & Markov Analysis Markov Analysis is one of the many modules within the ITEM ToolKit application, which includes ITEM ToolKit’s standard features and integration. Item Software’s Markov Module provides a powerful Markov modeling and analysis technique with strong applications in time-based reliability and availability analysis.
The reliability behavior of a system is represented using a state-transition diagram, which consists of a set of discrete states that the system can be in, and defines the speed at which transitions between those states take place. As such, Markov models consist of comprehensive representations of possible chains of events, i.e., transitions, within systems, which in the case of reliability and availability analysis correspond to sequences of failures and repair.
The Markov model is analyzed in order to determine such measures as the probability of being in a given state at a given point in time, the amount of time a system is expected to spend in a given state, as well as the expected number of transitions between states, for instance representing the number of failures and repairs.
Markov models provide great flexibility in modeling the timing of events. They can be applied when simple parametric time-based models, such as Exponential or Weibull Time-to-Failure models are not sufficient to describe the dynamic aspects of a system’s reliability or availability behavior, as may be the case for systems incorporating standby redundancy.
Computing the solution of a Markov model is equivalent to computing the solution of a large system of ordinary differential equations, which is done by integration. For this purpose, the Markov Analysis module relies on a state-of the- art computational engine that has seen many academic and commercial applications.
The engine is started by a simple click of a button within the ITEM ToolKit.
Highlights of the module’s features are:
• Phased-mission models • Powerful graphical Markov model editor • Discrete and continuous-time transition models • Flexible definition of states and groups of states.
Markov Module provides the following measures and results:
• Expected up and down time • Number of expected failures and repairs • Failure and repair frequencies (at given point in time) • Availability / Reliability (at given point in time, average over mission time interval) • Probability of being in a particular state (at given point in time, average over mission time interval) • Customizable Report Generator • Extensive Import / Export facility from or to Jet Database, Excel or Text.
The Markov workspace area features a Multiple Document Interface (MDI), which allows you to:
• Choose which windows to display, and move and resize all open windows • Open and create multiple Markov projects at the same time in order to compare analysis results • Drag and drop State and Group components between projects. This feature allows you to quickly create a new
project by reusing components from other projects.

206 ITEM ToolKit Getting Started Guide
3. Creating a Markov Project In this example, we will use the ITEM ToolKit Markov module to model and analyze a simple two-component standby system. The system is thought to consist of two identical components that are operated in a warm-standby mode. It is assumed that failures of the standby component are not detected until a demand is made.
1. Click on the New Project icon (A) on the default toolbar, or select New Project from the File menu. 2. Activate your project by clicking on the Project tab (B) or in the Project window. 3. Select the Dialog tab from the bottom of the Viewing Option window. 4. The Project Dialog Box will be displayed.
5. Enter your project information by placing the cursor or clicking in the appropriate fields.
6. The table below displays each field that is available for a project and what each field pertains to:
A
B

Chapter 9 Markov 207
Field Description Title The Project Title Name Project Name Part Number Project Part Number LCN Logistic Control Number Circuit Ref Reference Identification Number (for internal purposes) Analyst The person performing the Markov calculation Compiled By The person who gathered the data for this analysis Description Description of the project Function Description What the project/system does Notes Any other pertinent information on the project Approved By The person required to sign off on the project
The following fields will display results only if a prediction system is part of the project
Target Rate Acceptable number of failures for the project (Failures Per Million Hours) Life Time Project life time given in hours Redundancy Redundancy Flag Failure Rate Total Project failure rate once analysis are completed Unavailability Project unavailability once the analysis has been run MTBF Mean Time Between Failures for the project
7. From the Add Menu, select Markov System. The Markov system and project headers are added.
8. In the System Window, click the Markov header. The system properties appear in the Dialog tab. 9. In the Dialog tab, enter your system information by placing the cursor or clicking in the appropriate fields.

208 ITEM ToolKit Getting Started Guide
10. The table below describes what could be entered and what each field and block of fields pertains to:
Field Description Title The System Title Name A unique Reference Identifier for the System Part Number System Part Number LCN Logistic Control Number Circuit Ref Circuit Reference Number Analyst Name of the person performing the Analysis Compiled by Name of the person who gathered the data for the Analysis Approved by Name of the person who is required to sign off on the project Description Description for this System Function Description Purpose/Description of this system Notes Enter any other pertinent information about this system Mission Time Mission Time of the System in hours No of Intermediate Time Points No of Intermediate Time Points to be computed during the Mission Time Failure Rate Failure rate of the System (Calculated) Failure Frequency Failure Frequency of the System (Calculated) No of Expected Failures No of Expected Failures of the System (Calculated) Conditional Failure Intensity Conditional Failure Intensity of the System (Calculated) Total Down Time Total Down Time of the System (Calculated) Unreliability Unreliability of the System (Calculated) Unavailability Unavailability of the System (Calculated)

Chapter 9 Markov 209
11. The next step is to insert 5 states into the model, corresponding to the following system states: both components available, prime failed, standby failed, both prime and standby failed, and prime repaired.
12. From the Markov toolbar, click the State button (A). This button is used to start the insertion of new states into the model.
13. Move the mouse-pointer into the Markov canvas, and click the left mouse button once. A green circle, representing a
newly created state, appears.
14. Move the mouse-pointer to an empty part of the Markov canvas, and left-click again. A second state appears in the
diagram.
15. Repeat the last step three more times. A total of five states should now be visible in the Markov canvas.
16. We consider that at time 0, both the primary and standby components are available, and that the system therefore is in the first state. In other words, this state is the initial state.
17. Right-click the state S1 corresponding to the ‘both components available’ state. A popup menu appears.
A

210 ITEM ToolKit Getting Started Guide
18. From the popup menu, select the State Parameters… option. A dialog box will appear. 19. In the dialog box, enter “both available” for the Name and check the ‘Initial State’ option, and click OK.
State parameters include the following. • Name: a label used to identify the state. The names of each state must be unique among all the states in a Markov
model. • Initial state probability: a value between 0 and 1, representing the probability that the system is in the specific state at
t = 0. The initial probabilities of all states in a model must add up to 1. • Unavailability state: a flag indicating whether the state represents a system state in which the system is unavailable.
The Markov model diagram indicates states for which this option is selected by a small circle next to the state. • Initial state: a flag indicating whether the state is the sole initial state. Repeat the steps 17 to 19 for the remaining states with the parameters listed below.
Original Name New Name Unavailability State Initial State S 2 Primary Failed X S 3 Both Failed X S 4 Standby Failed X

Chapter 9 Markov 211
S 5 Primary Repaired X Furthermore, we assume that the system as a whole is unavailable when both the primary and standby components are failed. While in principle any number of states can be marked as unavailable, here we will limit it. 20. Right-click the state corresponding to the ‘both components failed’ state. A popup menu appears. 21. In the popup menu, select the State Parameters… option. A dialog box opens. 22. In the dialog box, check the ‘Unavailable State’ option, and click OK. 23. Ensure that in the editor pane, the state is indicated as being an unavailable state of the system by a small circle (A)
appearing next to the state.
24. Next, we introduce into the model the transitions representing the failures as well as repairs of the components. By
inserting a transition originating in one state and leading to another, we model the possibility of an event-taking place that would bring the system from one state to another. In our simple model, we will insert eight transitions, as listed in the following Table.
From To Description Rate
Both Available Primary Failed Failure of primary component 0.001 Both Available Standby Failed Failure of standby component 0.0001 Primary Failed Both Available Repair of primary component 0.5 Primary Failed Both Failed Failure of standby while primary failed 0.001 Standby Failed Both Failed Failure of primary while standby failed 0.001
Both Failed Primary Repaired Repair of primary while standby still failed 0.5 Primary Repaired Both Available Repair of standby 0.5 Primary Repaired Both Failed Repair of primary while standby under repair 0.001
25. In the Markov toolbar, click the Arrow Link Button (B). This button is used to start the creation of new transitions.
26. Left click on the Both Available state. A line originating from the state becomes visible as the mouse is moved around
the Markov canvas. 27. Click on the Primary Failed state. An arrow appears between the two states. The arrow’s label indicates a rate of
occurrence R of 0 (C). 28. Right-click on the label. A popup menu appears.
A
B

212 ITEM ToolKit Getting Started Guide
29. Select the ‘Transition Parameters’ option. A dialog appears. 30. In the field labeled ‘Transition’ (D), enter the value 0.001, corresponding to the rate of occurrence of this transition,
and then click OK. The diagram indicates the updated rate of occurrence for the transition.
31. Repeat the process for the remaining seven transitions listed in the Table.
32. Now that both the states and transitions have been defined, the simple model is complete. 33. Along with states, it is possible to define state groups. You can create state groups in case you want to obtain the
aggregated results, such as the combined state probability, for two or more states combined. A state group can contain
C
D

Chapter 9 Markov 213
any number of states, and can therefore also consist of a single state; a given state can belong to any number of state groups. Groups are created to compute aggregate results, such as the expected time spent in any of the states in a group.
34. The simplest method to create a new group is to click the Add Group toolbar button while in the Markov model editor. The new group, with a default name, is shown in the Markov hierarchy in the lower left corner of the ToolKit window. Once states are added to a group, this will also be made visible there.
35. States are added to a group in the State Parameters dialog. To open this dialog, right-click on the state, and select the State Parameters option in the popup-menu. Then, make the Groups tab in that dialog visible.
36. The left part of the tab lists all the groups that have been created so far. New groups can be added by clicking the Add New Group button. Unnecessary groups can be deleted by selecting them and clicking the Delete Selected Group button. Note that this will only delete the group definition, but not the states contained in the group.
37. When a group is selected, its name and description are made visible in the corresponding fields. The fields can be used to change names and descriptions.

214 ITEM ToolKit Getting Started Guide
38. To add the state to the group, click the Add Selected State to Group button. The list of groups will now show that the state has been attached. The Remove Selected State from Group button can be used to remove states from the group.
39. Close the dialog by clicking the OK button. The updated group information is shown in the Markov hierarchy in the lower left corner of the ToolKit window.
40. We continue the example by analyzing the model, and evaluating its results. First, we specify the mission time interval.
41. Click on the Dialog tab. 42. Set the mission time to 1000 and the number of intermediate points to 100 in the dialog window.
43. Then we start the actual analysis. 44. Switch back to the Markov tab, and start the analysis of the model by clicking the Go button (C) in the toolbar.
45. A progress indicator briefly becomes visible. Once the analysis is complete, a notification message appears, stating
that the analysis has completed without errors. The results of the analysis are now ready for viewing. 46. Click the Result Summary button in the toolbar (D). The result summary dialog opens.
47. The table in the Result Summary dialog lists the key results of the Markov analysis.
C
D

Chapter 9 Markov 215
Understanding Analysis Results The following shows how the various reliability measures are computed. X refers to the state or group of states that have been marked as ‘Unavailable States’. In these definitions, the following notation is used:
x: a state. X: a group of states. Pr( ; )x t : The probability that the system is in state x at time t.
Pr( ; )X t : The probability that the system is any of the states belonging to group X at time t.
x yλ → : The rate at which transition takes place from state x to state y. These transition rates concern continuous-
time transitions. ( )x yP t→ : The probability of a transition from state x to state y at time t. These probabilities concern discrete-
time transitions. Unavailability Q: / Availability A The point unavailability is computed as the probability that the system is in any of the states belonging to group X at time t. The availability is computed as 1 minus this value.
)(1)();Pr()(
tUtAtXtU
−==
TDT (Total Down Time): / Total Up Time (TUT) The Total Down Time and Total Up Time are respectively computed as the expected amount of time spent in any state belonging to group X, and in any state not belonging to group X, between 0 and t.
0
Pr( ; )t
TDT X d
TUT t TDTτ
τ τ=
= ⋅
= −
∫
Mean Unavailability: / Mean Availability The mean unavailability is computed as the expected amount spent in X divided by the total mission time. The mean availability is computed as 1 minus this value.
UA
dXt
Ut
ˆ1ˆ
);Pr(1ˆ0
−=
⋅= ∫=τ
ττ
Expected Failure: / Expected Repair The expected number of repairs r is computed as the expected number of transitions from X to states outside X. The expected number of failures f is computed as the expected number of transitions from states outside X to states inside X.

216 ITEM ToolKit Getting Started Guide
: : 0
: : 0
Pr( ; ) Pr( ; ) ( )
Pr( ; ) Pr( ; ) ( )
i j i j
i j
j i j i
i j
t
i x y i k x y ki x X j y X k
t
j y x j k y x ki x X j y X k
r x d x t P t
f y d y t P t
τ
τ
τ λ τ
τ λ τ
→ →∈ ∉ =
→ →∈ ∉ =
⎡ ⎤= ⋅ ⋅ + ⋅⎢ ⎥
⎣ ⎦⎡ ⎤
= ⋅ ⋅ + ⋅⎢ ⎥⎣ ⎦
∑ ∑ ∑∫
∑ ∑ ∑∫
where tk, k = 1,…,n is the set of times tk < t at which discrete transitions take place. Note that this definition excludes transitions that take place between states that belong to group X, as well as transitions that take place between states that do not belong to group X. Unreliability Unreliability represents the probability of one or more system failures over a specified period of time. The number of expected system failures (W) provides a good approximation for system unreliability for cases where W << 1.
Reliability Reliability represents the probability that the system will perform without failure during the specified period of time.
Failure Frequency W Failure Frequency W is the term used by the system to represent the unconditional failure intensity. The unconditional failure intensity is the probability that the system or component fails per unit time, given that it was working correctly at time zero. “W” is equal to the number of expected system failures.
CFI (Conditional Failure Intensity) This is the probability of failure per unit time, given that the component was “working-as-designed” at time zero and is working at time t.
How to Transfer Markov to Microsoft Word A powerful export facility is provided with the Markov module that will allow you to transfer data directly to Microsoft Word.
1. To access the Microsoft Word transfer facility, select the Microsoft Word icon from the Markov toolbar.
2. The Range window appears. Check all desired option and click OK.
Transfer to Microsoft Word

Chapter 9 Markov 217
3. The Markov pages you have selected will be transferred directly into Microsoft Word. Microsoft Word does not have to be active on your desktop to perform this transfer, it will open automatically.
R:0.001R:0.001
R:1e-4R:1e-4
R:0.5R:0.5
R:0.001R:0.001
R:0.001R:0.001
R:0.5R:0.5
R:0.5R:0.5 R:0.001R:0.001
Pi=0.0 P=0.9374
both available'
Pi=0.0 P=0.9374
both available'
Pi=0.0 P=0.0019
Primary Failed
Pi=0.0 P=0.0019
Primary Failed
Pi=0.0 P=0.0001
Both Failed
Pi=0.0 P=0.0001
Both Failed
Pi=0.0 P=0.0605
Stanby Failed
Pi=0.0 P=0.0605
Stanby Failed
Pi=0.0 P=0.0001
Primary Repaired
Pi=0.0 P=0.0001
Primary Repaired
MS Word Output

218 ITEM ToolKit Getting Started Guide
4. Markov Editor Screen, Toolbar and Shortcut Keys Quick Reference
The Markov Editor Screen
The Markov editor can be made visible by selecting the Dialog Tab (1) or the Markov tab (2). Its main elements are the following:
• Main Menu (3): Quick access to the main functions. • Markov Toolbars (4): Quick access to editing functions. • Project Window (5): A hierarchical view of the project and systems. • System Window (6): A hierarchical view of the states, transitions and groups in the model. • Markov Window or canvas (7): The area in which Markov can be graphically edited.
1
7
5
6
3
2 4
4

Chapter 9 Markov 219
The Default Toolbar Immediately below the pull-down options resides a group of buttons that form a Default Toolbar allowing the user to access directly some of the more frequently used menu options.
Tool Name Description
New Opens a new project.
Open Open an existing document.
Save Save the active document or template with its current name.
Cut Remove selected data from the document and stores it on the clipboard.
Copy Copy the selection to the clipboard.
Paste Paste the contents of the clipboard at the insertion point.
Delete Item Delete the selection.
Undo Reverse the last editing. Note: You cannot undo some actions.
Print Print the active document.
About Open the About ITEM ToolKit Window.
Help Open the ITEM ToolKit On-line Help.
The Markov System Dialog Window Controls The Markov Dialog Window Contains the following Controls.
Tool Name Description
Undo Changes Cancels the latest operation.
Analyse Run the Analysis of the system.
Check Spelling Check the Spelling of the selected Text.

220 ITEM ToolKit Getting Started Guide
The Project Toolbar The Project Toolbar displays the available analysis options for the ToolKit application
Tool Name Description
MIL217 Add a MIL-HDBK-217 (Electronic) System.
Telcordia (Bellcore) Add a SR-332 Telcordia (Electronic) System.
IEC 62380 (RDF) Add an IEC 62380 French Telecom Standard (Electronic) System.
299B Add a 299B Chinese Military Standard (Electronic) System.
NSWC (Mechanical) Add a NSWC (Mechanical) System.
Maintain Add a Maintain MIL-HDBK-472 Procedure V System.
SpareCost Add a Spare Cost Spares Scaling and Ranging System.
FMECA Add a Failure Modes Effects and Criticality Analysis (FMECA) System.
RBD Add a Reliability Block Diagram (RBD) System.
Fault Tree Add a Fault Tree Analysis (FTA) System.
Event Tree Add an Event Tree Analysis (ETA) System.
Markov Add a Markov Modeling System.
The Nudge Toolbar The Nudge Toolbar contains commands for moving the selected components by one logical unit in any direction.
Tool Name Description
Nudge Up Move the selected components one logical unit up.
Nudge Down Move the selected components one logical unit down.
Nudge Left Move the selected components one logical unit left.
Nudge Right Move the selected components one logical unit right.

Chapter 9 Markov 221
The Canvas Toolbar The Canvas Toolbar contains commands that affect the appearance and behavior of the canvas.
Tool Name Description
Undo Undo the last command executed on the canvas.
Redo Redo the last undo that was performed.
Toggle Grid Turn display of the grid on and off.
Snap to Grid Toggle the snap-to-grid feature on and off.
Toggle Page Bounds Turn display of page boundaries on and off.
The Markov Toolbar The Markov Toolbar is used to create and control Markov Analysis through the commands it contains.
Tool Name Description
Select Cancels add mode.
State Creates a State into the Markov System.
Arrow Link Creates a Link into the Markov System.
Group Creates a Group into the Markov System.
Text Allows the user to add a text component to the canvas.
Image Allows the user to add an image component to the canvas.
Transfer to MS Word Allows the user to transfer any Markov data directly into MS Word.
Start Markov Analysis Allows the user to perform the necessary calculations of the analysis.
Abort Markov Analysis Allows the user to stop the analysis currently being performed.
Summary Displays a summary of the analysis.
Header Footer Allows the user to create a header and footer for all Markov pages.
Phase List Phase List Selection Pull Down Menu.

222 ITEM ToolKit Getting Started Guide
Fit to Page Allows the user to fit the Markov diagram in one page automatically.
Reset Fit to Page Allows the user to undo the fit to page previously carried out.
The Zoom Toolbar The Zoom Toolbar contains commands for zooming and panning the canvas. Zoom options can also be accessed by right-clicking in the white space on the Markov diagram.
Tool Name Description
Ruler Control Turn the ruler of the canvas on or off.
Properties Open the properties window and allows the user to change the selected component properties.
Zoom Changes the cursor to a magnifying glass and allows the user to zoom in by selecting the area to be zoomed in with the left mouse button and zoom out by clicking on the right mouse button.
Zoom to Fit Sets the magnification level of the canvas so that all components on the canvas are visible in the view-port.
Zoom to Selection Sets the magnification level of the canvas so that the selected components are visible in the view-port.
Pan Changes the pointer to a hand and allows the user to grab the canvas with the left mouse button and pan in any direction.
The Rotate Toolbar The Rotate Toolbar contains commands for rotating the selected components.
Tool Name Description
Rotate Sets the canvas to Rotate mode. Allows grabbing a component and rotating it.
Rotate Left Rotates the selected components by 90 degrees to the left.
Rotate Right Rotates the selected components by 90 degrees to the right.
Flip Vertical Flips the selected components 180 degrees about the Y-axis.
Flip Horizontal Flips the selected components 180 degrees about the X-axis.

Chapter 9 Markov 223
The Graph Toolbar The Graph Toolbar contains commands that affect the appearance and behavior of the Markov diagram. Each selection highlights the way that States are connected through the Markov System.
Tool Name Description
Edges Entering Click on the state you wish to select on the Markov, and then click on this symbol to display the connection line(s) that the selected state is (are) entering from the state close to it. The connection line(s) will flash repeatedly on the screen.
Edges Leaving Click on the state you wish to select on the Markov, and then click on this symbol to display the connection line(s) that is (are) leaving the selected figure and connecting to the next set of connected states. The connection line will flash repeatedly on the screen.
All Click on the state you wish to select on the Markov, and then click on this symbol to display all the connection line(s) to the other figures the selected state is (are) connected to. The connection line will flash repeatedly on the screen.
Nodes Connected From
Click on this symbol to display the states connected from (leaving) the selected state. The connected states will flash repeatedly on the screen.
Nodes Connected To
Click on this symbol to display the states connected to (entering) the selected state. The connected states will flash repeatedly on the screen.
Nodes Connected
Click on this symbol to display all states that are logically connected within the Markov. Only connected State symbols will flash on the screen.
Shortcut Keys: Key Function Ctrl + N Open a new project.
Ctrl + O Open an existing document. Displays the Open dialog box, in which you can locate and open the desired file.
Ctrl + S Save the active project with its current name. If you have not named the project, the Save As dialog box will open.
Ctrl + P Print the Active View. Ctrl + X Removes selected data from the document and stores it on the clipboard. Ctrl + C Copy the selection to the clipboard. Ctrl + V Paste the contents of the clipboard at the insertion point.
Ctrl + W Paste the contents of the clipboard (Gate or Event) at the insertion point as a Repeat Gate or Repeat Event.
Del Delete the selection. F1 Open the ITEM ToolKit On-line Help.

224 ITEM ToolKit Getting Started Guide

Chapter 10 MainTain 225
CHAPTER 10 Maintain
A comprehensive design tool for calculating MTTR, Maintain conforms to maintenance standards established in MIL-HDBK-472, Procedure V, Method A.
This chapter:
1. Introduces Maintain system
2. Describes Toolkit’s Maintain features
3. Outlines an example Maintain System
4. Describes the Maintain Editor Screen, Toolbars and Shortcut Keys
1. Introduction Maintain is an engineering tool to aid in Maintainability Prediction. It provides an integrated environment for prediction of the expected number of hours that a system or device will be in an inoperative or "down state" while it is undergoing maintenance.
Maintain utilizes techniques specified in MIL-HDBK-472 Procedure V Method A to predict maintainability in quantitative terms.
The recommended application of this technique is to perform the analysis as early as possible during the design phase. This prediction should also be updated continuously as the design progresses to assure a high probability of compliance with specified requirements. Maintain facilitates and eases this analysis and iteration of it by implementing this technique in a 32Bit Windows desktop application.
Using Maintain early in a project design provides a sound basis for development. Use it throughout the project to stay on development schedules and remain in compliance with client requirement. Use it consistently to maximize productivity and ensure ongoing success.
Mission-critical operations depend on the continuing function of systems but all systems are affected by time, use and obsolescence. These factors can seriously affect end-users timelines and productivity.

226 ITEM ToolKit Getting Started Guide
When you design or develop a product, Maintain helps you to:
• Identify areas with potential maintainability problems. • Make repair/replace and design decisions. • Make early assessment of downtime. • Make early assessment of personnel numbers. • Plan for necessary tools and test equipment. • Easily identify Replaceable Items (RIs) • Save and export essential data for use in other RAMS analyses.
2. ITEM ToolKit & MainTain Maintain provides built-in elemental maintenance action, maintenance philosophy and fault isolation. You can save common maintenance tasks to a library for repetitive use.
Maintain Calculates the Following for Component or Group of Components
• Total Mean Time To Repair (Total MTTR) • Mean Time To Repair per Replaceable Items (MTTR) • Mean Man Hour (MMH) • Mean Man Hour per Repair (MMH/R) • Mean Man Hour per Maintenance Action (MMH/MA) • Mean Man Hour per Operating Hours Action (MMH/OH) • Total Failure Rate of all Replaceable Items in a Group (F/Rate) • Average number of Replaceable Items contained in a fault isolation result (S Avg) • Average Preparation Time (Tp) • Average Fault Isolation Time (Tfi) • Average Disassembly Time (Td) • Average Interchange Time (Ti) • Average Reassembly Time (Tr) • Average Alignment Time (Ta) • Average Checkout Time (Tc) • Average Start-up Time (Tst)
ITEM ToolKit’s graphical user interface uses standard Windows dialogs, menus, toolbars, and controls. The Multi Document Interface (MDI) architecture allows you to simultaneously display multiple projects, systems and data views in separate viewing areas in the ToolKit workspace. The interface allows you to easily:
• Transfer data between different systems and projects. • Cut, copy, and paste data. • Drag and drop objects within and between projects. • Customize the workspace toolbar. • Customize Report Generator. • Access online help. • Import / Export from or to Jet Database, Excel or Text. • Plot and graph.

Chapter 10 MainTain 227
3. Creating a Maintain Project To demonstrate ToolKit’s maintainability features, we’ll create an example based on a simple desktop computer system.
1. Click on the New Project icon (A) on the default toolbar, or select New Project from the File menu. 2. Activate your project by clicking on the Project tab (B) or in the Project window. 3. Select the Dialog tab from the bottom of the Viewing Option window. 4. The Project Dialog Box will be displayed.
5. Enter your project information by placing the cursor or clicking in the appropriate fields.
6. The information entered for a project is only for the project level. The table below displays each field that is available
for a project and what each field pertains to:
A
B

228 ITEM ToolKit Getting Started Guide
Field Description Title The Project Title
Name A Unique Reference Identifier
Part Number Project Part Number
LCN Logistic Control Number
Circuit Ref Circuit Reference
Analyst Person Performing the Maintain Analysis
Redundancy Redundancy Flag
Life Time Project life time given in hours
Description What the project is
Function Description What the project/system does
Notes Any other pertinent information on the project
Compiled By Person who gathered data for analysis
Approved By Person required to sign off on the project
The following fields will display results only if a prediction system is part of the project
Failure Rate Will display total Project failure rate once analysis is complete
MTBF Mean Time Between Failures for the project description
Target Rate Acceptable number of failures for the project (Failures Per Million Hours)
Unavailability This box will display the Project unavailability once the analysis has been run 7. From the Add Menu, select Maintain System. The Maintain system and project headers are added.

Chapter 10 MainTain 229
8. In the System Window, click the Maintain header. The system properties appear in the Dialog tab. 9. In the Dialog tab, enter your system information by placing the cursor or clicking in the appropriate fields.
10. The table below describes what could be entered and what each field and block of fields pertains to:
Field Description
Title The System Title
Name A Unique Reference Identifier for the System
Part Number System Part Number
LCN Logistic Control Number
Circuit Ref Circuit Reference Number
Analyst Name of the person performing the Maintain Analysis
Compiled by Name of the person who gathered the data for the Maintain Analysis
Approved by Name of the person who was required to sign off on the Maintain project
Description Description for this System
Function Description Purpose/Description of this system
Notes Any other pertinent information about this system 11. Move the mouse to the System Window in the bottom left of the ToolKit screen and click the left mouse button to
make this the active window. 12. From the Add Menu, select Replaceable Item.

230 ITEM ToolKit Getting Started Guide
13. Move the mouse cursor to the System Window. The mouse cursor changes to add mode. 14. Click the system header. The Replaceable Item is added and its properties appear in the Dialog tab. 15. Click the system header (A) three more times to add three more Replaceable Items. Your System Window should be
similar to the example below: 16. Click on the End Add Mode (B) toolbar icon to return the cursor to the normal mode. 17. Select the first blue replaceable item under the system header (C) and, making sure the Dialog tab (D) is selected, fill
in the data as shown below:
18. Enter data for the remaining Replaceable Items as follows:
Part No. Description Failure Rate
CPU1 CPU Board 8086 Processor + on-board logic. 8.46
MM1 Memory Board 256K RAM + 16K ROM 11.41
DP1 Display Processor Mk2 Monochrome Display board 1.85
B
A
C D

Chapter 10 MainTain 231
Defining the Maintenance Philosophy & Fault Isolation Resolution for Each Ri Set 1. Select the first RI (Replaceable Item) in the system and click the “Fault Isolation to a Group of RI’s in the General
dialog tab. The Maintenance Philosophy & Fault Isolation dialog tab becomes active. 2. Click on the Maintenance Philosophy & Fault Isolation dialog tab. 3. Click on New Group button (A) and the RI Group name will be set as “Group 1” (B) and tick Group Replacement in
the “Isolation to a Group of RI’s” section (C) to set the maintenance philosophy for the group.
4. Click the Add button (D) twice in the Fault Resolution section (still in the Maintenance Philosophy & Fault Isolation
dialog tab). 5. Click in the “Resolution %” for the first line just inserted (E) and change the number to 20%. 6. Leave the “No. of RI’s” set to 1 for the first line and click in the Resolution % for the second line inserted. 7. Leave the “Resolution %” at 100% and change the “No. of RI’s” to 2 (F).
8. You have now said that 20% of the time the operator/maintenance technician will be able to isolate the fault to 1 RI, and for the rest of the time (100%), the operator/maintenance technician will be able to isolate the fault to 2 RI’s.
A
B
C
D
E
F

232 ITEM ToolKit Getting Started Guide
9. Select each of the remaining 3 RI’s in the system; click “Fault Isolation to a group of RI’s” in the General tab and make sure “Group 1” is selected in the “The Maintenance Philosophy & Fault Isolation dialog tab”.
Failure Rate Allocation 1. Select the first RI item in the system, click the “Maintenance Element & Failure Rate Allocation” dialog tab and select
Preparation in the Maintenance combo box (G). The following screen is displayed:
2. In the %Allocation column (H), enter 80% against “Computer P/S” and 20% against “Controller P/S”. The screen
should now look like the example below.
3. You have just allocated how you think the failures will be fixed for the selected RI. Eighty percent of the time the
Power Supply will be fixed by replacing the Computer P/S and 20% of the time by replacing the Controller P/S. 4. To complete the Failure Allocation, you should allocate percentages for each maintenance element, for each RI in the
system.
G
H

Chapter 10 MainTain 233
Viewing Results To view the project results:
1. Click the system header (I) in the System Window.
2. Click on the Result tab (J) at the bottom of the ITEM ToolKit screen to display the results.
I
J

234 ITEM ToolKit Getting Started Guide
Understanding Analysis Results The following is a brief description of all the fields:
SUMMARY VIEW
Total MTTR (Min): Mean Time To Repair, This is a failure sum of all the MTTRs in the project.
MMH (Hour) Mean Man Hour required to repair the Nth RI.
MMH/Repair (Hour) Mean Man Hour per Repair.
MAINTAIN SUMMARY RESULTS
RI Group Name Group Identifier.
Quantity Total RI quantity in the group.
F/Rate (fpmh) Total Failure Rate of all RIs in the Group.
Code Maintenance Philosophy code.
S Avg. Average number of RIs contained in a fault isolation result.
Tp Average Preparation Time.
Tfi Average Fault Isolation Time.
Td Average Disassembly Time.
Ti Average Interchange Time.
Tr Average Reassembly Time.
Ta Average Alignment Time.
Tc Average Checkout Time.
Tst Average Start-up Time.
MTTR (Min): Mean Time To Repair, This is a failure sum of all the MTTRs in the Group.
REPLACEMENT ITEMS
Name RI Identifier.
Failure Rate RI Failure Rate.
Quantity RI Quantity.
RI Replaceable Flag (Yes or No).
MTTR Mean Time To Repair of the RI.
MMH Mean Man Hour required to repair the RI.
MMH/Repair Mean Man Hour per Repair.
Group Name RI’s Group Identifier.
NxFailure Rate RI’s Total Failure Rate (RI’s Failure Rate X Quantity).

Chapter 10 MainTain 235
4. Maintain Editor Screen, Toolbar and Shortcut Keys Quick Reference
The Maintain Editor Screen
The Maintain editor can be made visible by selecting the Dialog tab (1). Its main elements are the following:
• Main Menu (2): Quick access to the main functions. • Maintain Toolbar (3): Quick access to editing functions. • Project Window (4): A hierarchical view of the project and systems. • System Window (5): A hierarchical view of the system, blocks and RIs. • Library Window (6): A hierarchical view of the components library. • Dialog Window (7): The area in which Maintain can be edited.
1
2 3
4
5
7
6

236 ITEM ToolKit Getting Started Guide
The Default Toolbar Immediately below the pull-down options resides a group of buttons that form a Default Toolbar allowing the user to access directly some of the more frequently used menu options.
Tool Name Description
New Opens a new project.
Open Open an existing document. The ToolKit displays the Open dialog box, in which you can locate and open the desired file.
Save Save the active document or template with its current name. If you have not named the document, the ToolKit displays the Save As dialog box.
Cut Remove selected data from the document and stores it on the clipboard.
Copy Copy the selection to the clipboard.
Paste Paste the contents of the clipboard at the insertion point.
Delete Item Delete the selection.
Undo Reverse the last editing. Note: You cannot undo some actions.
Print Print the active document.
About Open the About ITEM ToolKit Window.
Help Open the ITEM ToolKit On-line Help.
The Maintain Dialog Window Controls The Maintain Dialog Window Contains the following Controls:
Tool Name Description
Undo Changes Cancels the latest operation.
Analyse Run the Analysis of the system.
Check Spelling Check the Spelling of the selected Text.

Chapter 10 MainTain 237
The Project Toolbar The Project Toolbar displays the available analysis options for the ToolKit application
Tool Name Description
MIL217 Add a MIL-HDBK-217 (Electronic) System.
Telcordia (Bellcore) Add a SR-332 Telcordia (Electronic) System.
IEC 62380 (RDF) Add an IEC 62380 French Telecom Standard (Electronic) System.
299B Add a 299B Chinese Military Standard (Electronic) System.
NSWC (Mechanical) Add a NSWC (Mechanical) System.
Maintain Add a Maintain MIL-HDBK-472 Procedure V System.
SpareCost Add a Spare Cost Spares Scaling and Ranging System.
FMECA Add a Failure Modes Effects and Criticality Analysis (FMECA) System.
RBD Add a Reliability Block Diagram (RBD) System.
Fault Tree Add a Fault Tree Analysis (FTA) System.
Event Tree Add an Event Tree Analysis (ETA) System.
Markov Add a Markov Modeling System.
The Maintain Toolbar The Maintain Toolbar is used to create and control Maintain Analysis through the commands it contains.
Tool Name Description
Select Cancels add mode.
Block Creates a Block in the Maintain System.
Replaceable Item Creates a Replaceable Item in the Maintain System.
Start Maintain Analysis Allows the user to perform the necessary calculations of the analysis.

238 ITEM ToolKit Getting Started Guide
Shortcut Keys:
Key Function
Ctrl + N Open a new project.
Ctrl + O Open an existing document. Displays the Open dialog box, in which you can locate and open the desired file.
Ctrl + S Save the active project with its current name. If you have not named the project, the Save As dialog box will open.
Ctrl + P Print the Active View.
Ctrl + X Remove selected data from the document and stores it on the clipboard.
Ctrl + C Copy the selection to the clipboard.
Ctrl + V Paste the contents of the clipboard at the insertion point.
Ctrl + W Paste the contents of the clipboard (Gate or Event) at the insertion point as a Repeat Gate or Repeat Event.
Del Delete the selection.
F1 Open the ITEM ToolKit On-line Help.

Chapter 11 SpareCost 239
CHAPTER 11 SpareCost
SpareCost provides methods for calculating the requirements for replacement of spares for operational systems and equipment. It generates spare holdings required at Sites (First and second line maintenance by replacement) and at Base (Third line maintenance to support Sites and repair of returned defective spares). The SpareCost Module supports algorithms and models defined in Repstock and Optcost provided by British Ministry of Defense.
This chapter:
1. Introduces SpareCost
2. Describes ToolKit’s SpareCost features
3. Outlines an example SpareCost System
4. Describes the SpareCost Editor Screen, Toolbars and Shortcut Keys
1. Introduction ITEM ToolKit's SpareCost Module calculates the requirements for replacement spares for operational systems and equipments. It generates spares holding requirements and models the repair of defective items as defined in the Repstock and Optcost algorithms derived for the British Ministry of Defense. The main driving forces behind the calculations are the failure rate and cost of replaceable items in a system, together with an acceptable stock out risk. Spares holdings for Sites (first and second line maintenance by replacement) are calculated using the Optcost method. Base spares requirements (third line maintenance supporting Sites and repair) are handled by Repstock.
The SpareCost Module makes the following assumptions:
• The system is assumed to be "serial" in nature, i.e. if any one item fails then the whole system ceases to function and a spare will be required.
• Detection and replacement of items at site is always possible provided a spare is available. • The time to detect and replace a faulty item is assumed as insignificant.
The SpareCost Module provides:
• Optimization scale of spares at sites for minimum cost. • Base supported period and repair lead-time. • Site and Base Stock-Out-Risk. • Site and Base spare results and cost.

240 ITEM ToolKit Getting Started Guide
2. ITEM ToolKit & SpareCost The SpareCost Analysis Module offers a diverse graphical user interface (GUI) in which all project and system data is entered.
This area is the foundation on which you build your project. The GUI consists of menus, toolbars, project and system windows and multiple viewing options. The following are samples of features offered by the SpareCost Module:
• Quickly create multiple systems within each project. • Quickly create a new project by reusing data from other projects. • Create and open multiple SpareCost projects at the same time and compare analysis results. • Copy and Paste components and block between projects and systems. • Simultaneously display analysis result and view components and blocks information. • Create master libraries of components and blocks. • Drag-and-drop components and blocks between libraries and systems. • Display various system and project information in the hierarchy windows. • Sort and display various information at system and block level. • Display and chart system and block information. • Edit project, system, block and component via Dialog and Grid view.
SpareCost Construction ToolKit offers flexible, powerful and easy ways for constructing SpareCost Analysis. You can simply transfer components, blocks and systems information from other modules within ToolKit or add different types of components and blocks in the System Window to create a hierarchy of your system and enter the appropriate information by using the dialog view.
Multiple Projects and Systems The need to create or review multiple projects at the same time has been made effortless with ToolKit. ToolKit will allow you to create or open multiple projects simultaneously. Projects can consist of many different SpareCost systems that can also be analyzed simultaneously. Merge all or a portion of each system together to create a master SpareCost project. This powerful option will enable you to manage many different projects and systems, create a new system by reusing all or a portion of an existing system that has been analyzed, plus copy/paste blocks and components between projects and /or systems.
User Defined Master Library Analyze your system once and create multiple libraries containing component and block information. ToolKit will allow you to create and open multiple libraries. This time saving feature will shorten the time for constructing a new SpareCost system. The analyzed components can simply be added to a new SpareCost System by using the drag-and drop or copy and paste feature.
Powerful Editing ToolKit offers many different ways for modifying or editing the information pertaining to components, blocks and systems. Edit information via the dialog view and the grid view.

Chapter 11 SpareCost 241
Powerful Customizable Reports ToolKit offers standard and preformatted reports and allows you to create and customize new reports.
Transfer Facility ToolKit’s Transfer Facility allows the entire SpareCost system, or a selected block or component within the system to be transferred to other analysis modules within ToolKit for further analysis.
Link Facility ToolKit offers dynamic link capabilities and allows information to be linked between SpareCost Module and other modules within ToolKit.
3. Creating a SpareCost Project To demonstrate ToolKit’s SpareCost features, we’ll create an example based on the following:
One Army Regiment will be deployed in the Middle East for 6 months. The Command Post shelter is mounted on a HEMTT and is fitted with five computer workstation. We will use SpareCost to determine the Site and Base spare results and cost, the Site and Base Stock-Out-Risk and optimized the number of spare at the site for those five computers:
1. Click on the New Project icon (A) on the default toolbar, or select New Project from the File menu. 2. Activate your project by clicking on the Project tab (B) or in the Project window. 3. Select the Dialog tab from the bottom of the Viewing Option window. 4. The Project Dialog Box will be displayed.
Army Technical Depot (Base)
Battalion Command Post Shelter (Site)
5 Computers including: - One 19” VGA Monitor. MTBF = 3600 hrs. FR = 277.8 FPMH - One Pentium 4 PC. MTBF = 5040 hrs. FR = 198.4 FPMH - One Standard Keyboard. MTBF = 2880 hrs. FR = 347.2 FPMH - One Serial Mouse. MTBF = 2160 hrs. FR = 463 FPMH
Unsupported Period: 6 months. Average Utilization: 100%
Repair Lead Time: 5 Days Replenishment Period: 24 Months Total Number Fitted: 1 Overall Utilization: 100%

242 ITEM ToolKit Getting Started Guide
5. Enter your project information by placing the cursor or clicking in the appropriate fields.
6. The information entered for a project is only for the project level, and its entry is optional. 7. The table below displays each field that is available for a project and what each field pertains to:
Field Description Title The Project Title Name A Unique Reference Identifier Part Number Project Part Number LCN Logistic Control Number Circuit Ref Circuit Reference Analyst Person Performing the SpareCost Analysis Compiled By Person who gathered data for the analysis Description What the project is Function Description What the project/system does Notes Any other pertinent information on the project Approved By Person required to sign off on the project
A
B

Chapter 11 SpareCost 243
The following fields will display results only if a prediction system is part of the project
Target Rate Acceptable number of failures for the project (Failures Per Million Hours) Life Time Project life time given in hours Redundancy Redundancy Flag Failure Rate Will display total Project failure rate once analysis is complete Unavailability This box will display the Project unavailability once the analysis has been run MTBF Mean Time Between Failures for the project description
8. From the Add Menu, select SpareCost System. The SpareCost system and project headers are added.
9. In the System Window, click the SpareCost header. The system properties appear in the Dialog tab. 10. In the Dialog tab, enter your system information by placing the cursor or clicking in the appropriate fields.
11. The table below describes what could be entered and what each field and block of fields pertains to:

244 ITEM ToolKit Getting Started Guide
Field Description Title System Title. Name Unique Reference Identifier for the System. Part Number System Part Number. LCN Logistic Control Number. Circuit Ref Circuit Reference Number. Analyst Name of the person performing the SpareCost Analysis. Approved by Name of the person who was required to sign off on the SpareCost project. Description Description for this System. Function Description Purpose/Description of this system. Notes Any other pertinent information about this system. Compiled by Name of the person who gathered the data for the SpareCost Analysis. Site Spares
Stock-out-Risk (%) Risk a Site bears, that its spares will be insufficient during the unsupported period to meet demands due to equipment failure.
Unsupported Period (days) Operational period for a site during which no replenishment of spares takes place.
No of Equipment per Site Number of equipments being supported at the site. Average utilization (%) Average percentage of time for which the equipments on a site operate. Base Spares Repair Lead Time Average time that it takes to repair or replace line items. Replenishment Period (Month) Early in-service life for which the base stock is to be purchased.
Total Number Fitted Number of line items expected to be in service and supported from base at the end of the replenishment period.
Overall Utilization (%) Overall average utilization for all equipments throughout the period being modeled.
Beyond Economic Repair (%) Average proportion of failed items that will be beyond economic repair.
Stock-out-Risk (%) The value here is used for each item in the range. It is not the same value as the target value used for site spares optimization.
12. Move the mouse to the System Window in the bottom left of the ToolKit screen and click the left mouse button to the
system Header to make this the active window (A).

Chapter 11 SpareCost 245
13. From the Add Menu (B), select Block.
14. Move the mouse cursor to the System Window. The mouse cursor changes to add mode. 15. Click the system header (A). The Block is added (C) and its properties appear in the Dialog tab (D). 16. From the Add Menu (B), select Component.
17. Click the Block four times (C). Four Components are added (E) and their properties appear in the Dialog tab (D). 18. Click on the End Add Mode (F) toolbar icon to return the cursor to the normal mode. 19. Select the Block under the system header (C) and fill in the data as shown below:
20. The following table describes what could be entered and what each field and block of fields pertains to:
A
B
C
D
E
F

246 ITEM ToolKit Getting Started Guide
Field Description Part Number Block Part Number Name A Unique Reference Identifier Circuit Ref Circuit Reference or Reference designator of the Block LCN (Logistic Control Number) Internal reference number defined by the user Failure Rate Block failure rate once analysis is complete (Can be edited only if the block is spareable) Quantity Number of Block (Can be edited only if the block is spareable) Cost Cost of the Block (Can be edited only if the block is spareable) Spareable Item Spareable or Non Spareable selection In Range Select Site, Base or both depending where this item will be used or stocked Description Additional information to describe the block Notes Any other pertinent information on the Block Analyst Person Performing the Analysis
Failure Rate source Select the source of the Failure Rate (Manually entered or coming from a transferred and linked prediction)
21. Select the First Component under the Block and fill in the data as shown below:
22. The following table describes what could be entered and what each field and block of fields pertains to:
Field Description Part Number Component Part Number Name A Unique Reference Identifier Circuit Ref Circuit Reference or Reference designator of the Component LCN (Logistic Control Number) Internal reference number defined by the user Failure Rate Component failure rate (Can be edited only if the block is spareable) Quantity Number of Component (Can be edited only if the Component is spareable) Cost Cost of the Component (Can be edited only if the Component is spareable) Spareable Item Spareable or Non Spareable selection In Range Select Site, Base or both depending where this item will be used or stocked Description Additional information to describe the Component Notes Any other pertinent information on the Component Analyst Person performing the Analysis Failure Rate source
Select the source of the Failure Rate (Manually entered or coming from a transferred and linked prediction)

Chapter 11 SpareCost 247
23. Enter data for the remaining components as follows:
Part No. Description Qty Failure Rate Cost MON-90034 19" VGA Monitor 5 277.8 $355 CPU-00746 Pentium 4 CPU 1.5Ghz 5 198.4 $950 KEY-8021 Standard Keyboard 5 347.2 $25
MOU-73320 Serial Mouse 5 463 $15 24. When all components are edited, go back to the system by clicking on the system header (A). 25. Edit the system parameters as follows:
SITE SPARES (B) BASE SPARES (C) Stock-out-Risk = 5% Repair Lead Time = 5 Days Unsupported period = 182 Days (6 Months) Replenishment Period = 24 Months Number of Equipment (shelter) per site = 1 Total Number Fitted = 1 Average utilization = 100% Overall Utilization = 100%
Beyond Economic Repair = 10% Stock-out-Risk =5%
A B
C

248 ITEM ToolKit Getting Started Guide
Viewing Results To view the project results:
1. Click the system header (A) in the System Window.
2. Click on the Result tab (B) at the bottom of the ITEM ToolKit screen to display the results. 3. Click on the Go Icon (C) and the system results will be displayed. 4. Click on the Components (D) in the System Window to display the following detailed results for the selected
Component.
A
B
C
D

Chapter 11 SpareCost 249
Understanding Analysis Results
The following is a brief description of all the fields:
SUMMARY VIEW
Base Total Equipment: Number of equipments expected to be in service and supported from base.
Base Util %: Overall average utilization for all equipments throughout the period being modeled.
Base Support Period (Months) Operational period for Base during which no replenishment of spares takes place.
Base Repair Lead Time (days) Average time that it takes to repair or replace equipments.
Base Beyond Econ. Repair (%) Percentage of failed equipments that will be beyond economic repair.
Base Target SOR (%) Target Stock-Out-Risk at the Base.
Base Spare Results Total number of Spare and Total Cost (in thousands) at the Base.
Site No of Equip Fitted at Site Number of equipments being supported at the Site.
Site Unsupported Period (Days) Operational period for Site during which no replenishment of spares takes place.
Site Util (%) Average percentage of time for which the equipments on a Site operate.
Site Stock-Out-Risk (%) Target and Actual Stock-Out-Risk at the Site.
Site Spare Results Total number of Spare and Total Cost (in thousands) at the Site.
BASE SPARE RESULTS
Name Name of the equipment.
Description Description of the equipment.
Qty Quantity of equipment.
Cost Cost of the equipment.
F/Rate (fpmh) Failure rate of the equipment in failure per million hours.
Bkup Stock Number of equipments in the Back up Stock.
Repl Stock Replacement Stock.
Total Stock Total number of equipments in Stock.
Actual SOR (%) Actual Stock-Out-Risk at the Base.
SITE SPARE RESULTS
Name Name of the equipment.
Description Description of the equipment.
Qty Quantity of equipment.
Cost Cost of the equipment.
F/Rate (fpmh) Failure rate of the equipment in failure per million hours.
Exp No of Fails Expected number of equipments to fail during the unsupported period of the Site.
No of Spares Number of spare equipments at the Site.
Actual SOR (%) Actual Stock-Out-Risk at the Site.

250 ITEM ToolKit Getting Started Guide
4. SpareCost Editor Screen, Toolbar and Shortcut Keys Quick Reference
The SpareCost Editor Screen
The SpareCost editor can be made visible by selecting the Dialog tab (1). Its main elements are the following:
• Main Menu (2): Quick access to the main functions. • Default Toolbar (3): Quick access to the more frequently used menu options. • SpareCost Toolbar (4): Quick access to SpareCost editing functions. • SpareCost Dialog Window Controls (5): Quick access to Analyze, Spelling and Undo. • Project Window (6): A hierarchical view of the project and systems. • System Window (7): A hierarchical view of the system, blocks and Components. • Library Window (8): A hierarchical view of the components library. • Dialog Window (9): The area in which SpareCost can be edited.
1
2 3
6
7
9
8
4
5

Chapter 11 SpareCost 251
The Default Toolbar Immediately below the pull-down options resides a group of buttons that form a Default Toolbar allowing the user to access directly some of the more frequently used menu options.
Tool Name Description
New Opens a new project.
Open Open an existing document. The ToolKit displays the Open dialog box, in which you can locate and open the desired file.
Save Save the active document or template with its current name. If you have not named the document, the ToolKit displays the Save As dialog box.
Cut Remove selected data from the document and stores it on the clipboard.
Copy Copy the selection to the clipboard.
Paste Paste the contents of the clipboard at the insertion point.
Delete Item Delete the selection.
Undo Reverse the last editing. Note: You cannot undo some actions.
Print Print the active document.
About Open the About ITEM ToolKit Window.
Help Open the ITEM ToolKit On-line Help.
The SpareCost Dialog Window Controls The SpareCost Dialog Window Contains the following Controls:
Tool Name Description
Undo Changes Cancels the latest operation.
Analyse Run the Analysis of the system.
Check Spelling Check the Spelling of the selected Text.

252 ITEM ToolKit Getting Started Guide
The Project Toolbar The Project Toolbar displays the available analysis options for the ToolKit application:
Tool Name Description
MIL217 Add a MIL-HDBK-217 (Electronic) System.
Telcordia (Bellcore) Add a SR-332 Telcordia (Electronic) System.
IEC 62380 (RDF) Add an IEC 62380 French Telecom Standard (Electronic) System.
299B Add a 299B Chinese Military Standard (Electronic) System.
NSWC (Mechanical) Add a NSWC (Mechanical) System.
Maintain Add a Maintain MIL-HDBK-472 Procedure V System.
SpareCost Add a Spare Cost Spares Scaling and Ranging System.
FMECA Add a Failure Modes Effects and Criticality Analysis (FMECA) System.
RBD Add a Reliability Block Diagram (RBD) System.
Fault Tree Add a Fault Tree Analysis (FTA) System.
Event Tree Add an Event Tree Analysis (ETA) System.
Markov Add a Markov Modeling System.
The SpareCost Toolbar The SpareCost Toolbar is used to create and control SpareCost Analysis through the commands it contains:
Tool Name Description
Select Cancels add mode.
Block Creates a Block into the Maintain System.
Replaceable Item Creates a Replaceable Item into the Maintains System.
Start Maintain Analysis Allows the user to perform the necessary calculations of the analysis.

Chapter 11 SpareCost 253
Shortcut Keys:
Key Function
Ctrl + N Open a new project.
Ctrl + O Open an existing document. Displays the Open dialog box, in which you can locate and open the desired file.
Ctrl + S Save the active project with its current name. If you have not named the project, the Save As dialog box will open.
Ctrl + P Print the Active View.
Ctrl + X Remove selected data from the document and stores it on the clipboard.
Ctrl + C Copy the selection to the clipboard.
Ctrl + V Paste the contents of the clipboard at the insertion point.
Ctrl + W Paste the contents of the clipboard (Gate or Event) at the insertion point as a Repeat Gate or Repeat Event.
Del Delete the selection.
F1 Open the ITEM ToolKit On-line Help.

254 ITEM ToolKit Getting Started Guide

Chapter 12 Event Tree 255
CHAPTER 12 Event Tree Analysis
Event Tree Analysis (ETA) is used to determine the consequence of an initiating event and the expected frequency of each consequence. For example, a pipe breaking in a nuclear power station may have many consequences ranging from a very small release of radiation (no significance) up to a very large release of radiation (catastrophic). Event trees model these initiators and consequences, and determine their frequencies.
This chapter:
1. Introduces ETA systems
2. Describes ToolKit’s ETA features
3. Outlines an example ETA system
4. Describes the ETA Editor Screen, Toolbars and Shortcut Keys
1. Introduction Event tree analysis is based on binary logic, in which an event either has or has not happened or a component has or has not failed. It is valuable in analyzing the consequences arising from a failure or undesired event.
Event tree analysis is generally applicable for almost any type of risk assessment application, but used most effectively to model accidents where multiple safeguards are in place as protective features. Event tree analysis is highly effective in determining how various initiating events can result in accidents of interest.
An event tree begins with an initiating event, such as a component failure, increase in temperature/pressure or a release of a hazardous substance. The consequences of the event are followed through a series of possible paths. Each path is assigned a probability of occurrence and the probability of the various possible outcomes can be calculated.
Event Tree Analysis Characteristics
• Models the range of possible accidents resulting from an initiating event or category of initiating events. • A risk assessment technique that effectively accounts for timing, dependence, and domino effects among various
accident contributors that are cumbersome to model in fault trees. • Performed primarily by an individual working with subject matter experts through interviews and field inspections • An analysis technique that generates the following:
Qualitative descriptions of potential problems as combinations of events producing various types of problems (range of outcomes) from initiating events.

256 ITEM ToolKit Getting Started Guide
Quantitative estimates of event frequencies or likelihoods and relative importance of various failure sequences and contributing events.
Lists of recommendations for reducing risks. Quantitative evaluations of recommendation effectiveness.
Event Tree Analysis Process
• Define the system or area of interest. Specify and clearly define the boundaries of the system or area for which event tree analyses will be performed.
• Identify the initiating events of interest. Conduct a screening-level risk assessment to identify the events of interest or categories of events that the analysis will address. Categories include such things as groundings, collisions, fires, explosions, and toxic releases.
• Identify lines of assurance and physical phenomena. Identify the various safeguards (lines of assurance) that will help mitigate the consequences of the initiating event. These lines of assurance include both engineered systems and human actions. Also, identify physical phenomena, such as ignition or meteorological conditions that will affect the outcome of the initiating event.
• Define accident scenarios. For each initiating event, define the various accident scenarios that can occur. • Analyze accident sequence outcomes. For each outcome of the event tree, determine the appropriate frequency and
consequence that characterize the specific outcome. • Summarize results. Event tree analysis can generate numerous accident sequences that must be evaluated in the
overall analysis. Summarizing the results in a separate table or chart will help organize the data for evaluation. • Use the results in decision-making. Evaluate the recommendations from the analysis and the benefits they are
intended to achieve. Benefits can include improved safety and environmental performance, cost savings, or additional output. Determine implementation criteria and plans. The results of the event tree may also provide the basis for decisions about whether to perform additional analysis on a selected subset of accident scenarios.
2. ITEM ToolKit & Event Tree Analysis ITEM ToolKit Event Tree is an inductive or forward logic method to identify various sequences or set of events, started by an initiating event, that can lead to certain end consequences or accident scenarios. The idea is based upon the discretization of the real accident evolution in terms of few macroscopic events. These events are usually characterized in terms of:
• The intervention (or not) of protection systems which are supposed to take action for the mitigation of the accident (system event tree).
• The fulfillment (or not) of safety functions (functional event tree). • The occurrence (or not) of physical phenomena (phenomenological event tree).
An event tree begins with a defined accident-initiating event, which could be a component or an external failure. It follows that there is one event tree for each different accident-initiating event considered. Thereby, all possible responses to the initiating event are listed from left to right across the page. The branch points on the tree structure usually represent the success, failure or partial failure of different systems and subsystems which can respond to the initiating event. These event branches can have their own probability models or can have models derived from attached Fault Trees gates and events. Theoretically, any probabilistic quantification model, defining the failure (or not) of the system and sub-systems, such as Predictions, RBD or Markov models can also be used for the quantification of branch probabilities.
In the following example, fire protection is provided by a sprinkler system. A detector will either detect the rise in temperature or it will not. If the detector succeeds, the control box will either work correctly or it will not - and so on. There is only one branch in the tree that indicates that all the subsystems have succeeded:

Chapter 12 Event Tree 257
Once the system events have been defined, they can be combined to derive the various end states or accident scenarios. In the graphical representation, columns depict the events, and the horizontal lines represent the success, failure or partial failure branches. Each combination of these branches from left to the right depicts a path or a scenario ending in a particular end state or consequence.
Once the Event Tree has been constructed, the next step is the quantification of the event probabilities. Each event, representing a system or a function failure, can be quantified using basic event quantification directly or linked to the top event (or any other gate) of a Fault Tree. Other probabilistic models such as Predictions, RBD or Markov models can also be used. Upon evaluation these fault trees (or basic events) would be linked together to derive the conditional probability of each event (or branch) and the multiplication of these conditional probabilities for each scenario shall give the probability of occurrence of final consequences or the accident scenarios.
For further risk analysis, each of the end state scenarios can be further investigated for respective cut-sets. Also, scenarios ending in same or similar end states can be joined together to get a joint probabilistic result. Weighting of the end scenarios in various categories such as financial, environmental, etc. can help devise a complete category-wise risk analysis.

258 ITEM ToolKit Getting Started Guide
Several Types of Analysis can be Conducted Using Event Trees
Qualitative Analysis: Include:
• The minimal cut sets of the event tree: Combination of failures contributing to a sequence. • Qualitative failure importance: Qualitative rankings of contributions to a failure sequence. • Minimal cut sets susceptible to Common Cause Failures: Cut sets potentially susceptible to a single failure cause.
For the qualitative evaluations, the minimal cut sets are obtained by Boolean reduction of the failure sequence. The minimal cut sets obtained are used not only in the qualitative evaluations but in all the quantitative evaluations as well. After obtaining the minimal cut sets, some idea of failure importance can be obtained by putting the minimal cut sets in order according to their size. The single component minimal cut sets being listed first, then the double order and so on. Since the failure probabilities associated with the minimal cut sets often decrease by orders of magnitude as the cut set increases, the ranking according to size gives a gross indication of the importance of the minimal cut set. Also, the minimal cut sets, even without any quantification, can be used to validate the design criteria.
Quantitative Analysis: Include:
• Absolute probabilities: Probabilities of system and cut set failures. • Quantitative importance of components and minimal cut sets: Rankings of contributions to failure sequence. • Sensitivity and relative probability evaluations: Effects of changes in models and data, error determinations. • Full consequence analysis: Probabilistic risk of each failure consequence ranked and categorized by a consequence.
Once the minimal cut sets are obtained, probability evaluations can be performed if quantitative results are desired. Quantitative analysis can be done for both point estimate as well as uncertainty values. If the failure probabilities are treated as random variables, these can be propagated to the failure sequence to determine the failure probability variations. By "failure" we mean any basic primary event shown on the fault tree/event tree. For a failure we might have a time based probability or a demand based probability. For time based failure models there can be a constant failure rate model (exponential model) or more sophisticated models with repair, standby, or distributions such as Weibull and Gamma. For Demand based failure models there can be either a fixed probability, probability distributions such as Beta and truncated Lognormal, or models such as Poisson and Binomial.
Apart from mean unavailability calculated from the component failure models, other reliability characteristics are unreliability, failure rate (assuming constant failure rate), MTBF, failure frequency, Conditional Failure Intensity (CFI) and Number of failures in the lifetime of the system.

Chapter 12 Event Tree 259
Binary Decision Diagram (BDD): The BDD analysis method is an alternative to the Rare Event and Esary-Proschan quantification options. It uses the Binary Decision Diagram algorithm to obtain cut-sets and quantification results. BDD algorithms distinguish themselves from conventional quantification methods by returning results that do not involve approximations. Instead, BDD algorithms produce results that are in accordance with the basic rules of probability theory. Furthermore, BDD-based algorithms are generally more efficient than other quantification methods. Depending on the model, these algorithms can identify millions or even billions of cut-sets within seconds. The BDD algorithms embedded in ITEM products identify all cut-sets for a given model, and then filter out the significant cut-sets based on probability and/or order. BDD algorithms do not allow for truncation of probabilistically insignificant elements in the logic. Conventional methods allow models to be solved by considering only the high-probability cut-sets. Studies have shown however that the numerical results produced by conventional methods must be treated with care, due to the truncations and approximations involved in their calculations.

260 ITEM ToolKit Getting Started Guide
3. Creating an Event Tree Project Creating an Event Tree system consists of:
• Constructing the system • Adding Branches • Editing their parameters • Performing analysis
To demonstrate ToolKit’s Event Tree features, we’ll create an example Event Tree project based on the following example.
In the event of a fire in the room, the fire protection is provided by a sprinkler system. A detector will either detect the rise in temperature or it will not. If the detector succeeds, the control box will either work correctly or it will not - and so on. There is only one branch in the tree that indicates that all the subsystems have succeeded:
Constructing the System To construct an Event Tree System:
1. Click on the New Project icon (A) on the default toolbar, or select New Project from the File menu. 2. Activate your project by clicking on the Project tab (B) or in the Project window. 3. Select the Dialog tab from the bottom of the Viewing Option window. 4. The Project Dialog Box will be displayed.
A
B

Chapter 12 Event Tree 261
5. Enter your project information by placing the cursor or clicking in the appropriate fields.
The information entered for a project is only for the project level, and its entry is optional. The table below displays each field that is available for a project and what each field pertains to:
Field Description
Title The Project Title Name A Unique Reference Identifier Part Number Project Part Number LCN Logistic Control Number Circuit Ref Circuit Reference Analyst Person Performing FT Analysis Redundancy Redundancy Flag Life Time Project life time given in hours Description What the project is Function Description What the project/system does Notes Any other pertinent information on the project Compiled By Person who gathered data for analysis Approved By Person required to sign off on the project
The following fields will display results only if a prediction system is part of the project
Target Rate: Acceptable number of failures for the project (Failures Per Million Hours) Life Time (Hrs): Project life time given in hours Redundancy: Redundancy Flag Failure Rate: Will display total Project failure rate once analysis is complete Unavailability: This box will display the Project unavailability once the analysis has been run

262 ITEM ToolKit Getting Started Guide
MTBF (Hrs): Mean Time Between Failures for the project description 6. Select the Add menu from the menu toolbar by clicking on it.
7. Select and click on the ET, Event Tree System option. 8. The project will display as an Event Tree in the project window and the applicable system data will display in the
system window. 9. From the Project window, select the Event Tree System by clicking on it. 10. The Event Tree System dialog box will be displayed.

Chapter 12 Event Tree 263
11. Enter your system information by placing the cursor or clicking in the appropriate fields. 12. The information entered here is for the system level. The following table describes what could be entered and what
each field and block of fields pertains to:
Field Description Title System Title Name Unique Reference Identifier for the System Part Number System Part Number LCN Logistic Control Number Circuit Ref Circuit Reference Number Analyst Name of the person performing the Event Tree Analysis Compiled by Name of the person who gathered the data for the Event Tree Analysis Approved by Name of the person who was required to sign off on the project Mission / Life Time Project lifetime given in hours and the total number of immediate time points Quantification Method Select one of the two methods
Cut-Off If you select the Probability box, enter the unavailability and the Frequency cut-off rate for this project. Click the Order box to have an Order Cut-Off, and then enter the cut-off value for this project
Sort Cut Sets Select whether you wish to Sort Cut Sets by unavailability, by frequency, or by order and enter the maximum amount of sort sets. Click “Off” if you do not wish to use Sort Cut Sets
Description Enter the description for this System Function Description Enter the purpose/Description of this system Notes Enter any other pertinent information about this system
Uncertainty Click this box if you wish to perform an Uncertainty Analysis. If you select this box, you must then enter the Sample Size and the Percentile
Miscellaneous Select the option you wish to use
Editing the Event Tree Diagram Creating an Event Tree system automatically generates a default Diagram starting at the left side with an initiating event column (A) followed by 3 events column (B, C, D), the consequence column (E) and the result column (F). Click on the Event Tree Diagram view (G) to see the diagram.

264 ITEM ToolKit Getting Started Guide
Editing Columns
1. Click on the Event Tree Tab to open the Event Tree Canvas (H). 2. Double Click on the Initiator Column Header (I). The Column Parameters window appears. 3. Enter the Column Name, Description, and Notes. 4. Select Event List (J).
A B C D E F
G
H
I
J

Chapter 12 Event Tree 265
5. Click on Event List and the Project Events List window opens. 6. Click on Add Global Event (K).
7. Click on the event (L) and then on Event Parameters (M). 8. The Event Parameters window opens.
9. Add a new Failure Model and edit the parameters. Click OK in the Event Parameters window, in the Project Events
List window and in the Column Parameters window when finished. 10. Edit the rest of the columns according to the following table:
K
L
M

266 ITEM ToolKit Getting Started Guide
Column Name Event Name Failure Model Type Data 1 Data 2
Fire Starts Fire Starts Fixed Unavailability = 0.0015 Failure Frequency = 10 Fire Detected Fire Detected Rate Failure Rate = 0.00012 Repair Rate = 0 Fire Alarm Starts Alarm Starts Rate Failure Rate = 0.00024 Repair Rate = 0 Sprinkler Starts Sprinkler Starts Rate Failure Rate = 0.00048 Repair Rate = 0
11. The column headings should looks like the following:
Editing the Consequences
1. Click on the Event Tree Tab to open the Event Tree Canvas (A).
A
B C
D
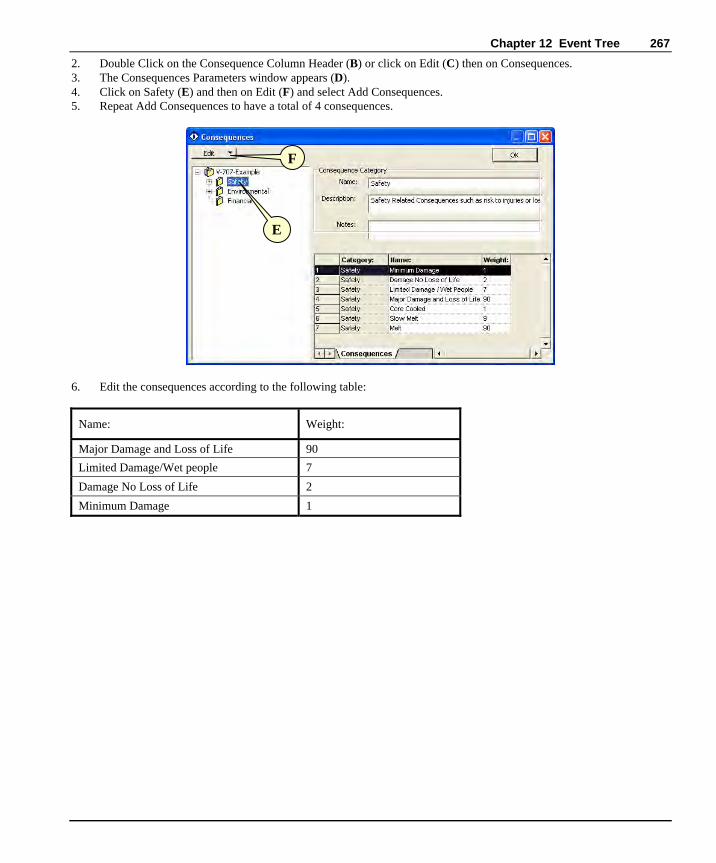
Chapter 12 Event Tree 267
2. Double Click on the Consequence Column Header (B) or click on Edit (C) then on Consequences. 3. The Consequences Parameters window appears (D). 4. Click on Safety (E) and then on Edit (F) and select Add Consequences. 5. Repeat Add Consequences to have a total of 4 consequences.
6. Edit the consequences according to the following table:
Name: Weight:
Major Damage and Loss of Life 90 Limited Damage/Wet people 7 Damage No Loss of Life 2 Minimum Damage 1
E
F

268 ITEM ToolKit Getting Started Guide
7. Click OK when finished.
Editing Branches A branch is a graphical representation of an accident sequence.
The following table lists branch types supported in ITEM ToolKit's Event Tree Module, and how they are symbolized:
Event Type
Symbol on System
Hierarchy
Symbol on Grid view
Symbol on Event Tree Canvas
Symbol on Event Tree Tool Bar Description
Failure Indicates a Failure
Branch
Success
Indicates a Success Branch
Initiator
Indicates a Initiator Branch
Null
Indicates a Null Branch

Chapter 12 Event Tree 269
1. Click on the Event Tree Tab to open the Event Tree Canvas (A).
2. Double Click on the Initiator Branch (B). The Branch Parameters window appears. 3. Enter the Branch Name, Description, and Notes. 4. Click OK when finished (C). 5. Edit the branches according to the following table:
Column Name Type Branch Name Description
Fire Starts Initiator B1 Fire Starts in the Main Building
Fire Detected Success B2 Fire is Detected by the Detection System Failure B3 Fire is NOT Detected by the Detection System
Fire Alarm Starts Success B5 Fire Alarm Starts Successfully Failure B6 Fire Alarm DOES NOT Start Failure B8 Fire Alarm DOES NOT Start
A
B
C

270 ITEM ToolKit Getting Started Guide
Column Name
Type Branch Name
Description Consequence
Sprinkler Starts
Success B9 Sprinkler System is activated Automatically Minimum Damage
Failure B10 Sprinkler System does not Activate Damage No Loss of Life
Success B11 Sprinkler System is activated Automatically Limited Damage / Wet People
Failure B12 Sprinkler System does not Activate Major Damage and Loss of Life
Failure B16 Sprinkler System does not Activate Major Damage and Loss of Life
6. The Diagram should looks like the following:
Performing Analysis Event Tree Module provides a method to:
• Calculate Importance values. • Calculate Event Sequence Unavailability and Frequency.
NOTE Before performing analysis, follow the procedure in “Verifying Data” to identify and correct any errors in the system. You cannot perform the analysis until all errors are corrected.

Chapter 12 Event Tree 271
To Verify the Data
1. Select Verify Data from the Analysis Option in the Menu Toolbar.
2. If no errors are detected the following windows will be displayed.
3. If the following window appears, correct the detected errors and repeat the step 1.
To Analyze the System
1. In the System Window, click the system header. 2. From the Analysis Menu, select Perform. A dialog box displaying the progress of the analysis appears.
3. When the analysis is complete, the Verification Msg. dialog box appears. Click OK.

272 ITEM ToolKit Getting Started Guide
4. The Event Tree canvas is also updated with the analysis results in the Result column.
5. Select Summary from the Analysis menu to view the results. The Event Tree Results dialog box appears.
Understanding Analysis Results Unavailability Q: Represents the probability that the component or system is unavailable at any given time. “Q” equals the probability that the system is unavailable.
Failure Frequency W: This is the term used by the system to represent the unconditional failure intensity. The unconditional failure intensity is the probability that the system or component fails per unit time, given that it was working correctly at time zero. “W” is equal to the number of expected system failures.
No. of Cut Sets: Represents a group of events that will cause system failure if and when they occur together.

Chapter 12 Event Tree 273
Importance F-Vesely
The F-Vesely (Fussell-Vesely) importance measure represents an event contribution to the system unavailability. Increasing or decreasing the availability of events with a higher importance value will have the most significant effect on system availability.
Birnbaum
The Birnbaum measure for an event represents the sensitivity of system unavailability with respect to changes in the event's unavailability.
B-Proschan
The B-Proschan (Barlow-Proschan) event importance measure takes into consideration the sequence of event failures within its calculation. It is the probability that the system fails because a critical cut set containing the event fails, taking into consideration that the event fails last.

274 ITEM ToolKit Getting Started Guide
How to Transfer Event Tree Data to Microsoft Word A powerful export facility is provided with the Event Tree module that will allow you to transfer data directly to Microsoft Word.
1. To access the Microsoft Word transfer facility, select the Microsoft Word icon from the Event Tree Toolbar.
2. The Range window appears. Check all desired options and click OK.
3. The Event Tree pages you have selected will be transferred directly into Microsoft Word. Microsoft Word does not have to be active on your desktop to perform this transfer; it will open automatically.
InitiatorFire Starts in the
Main Building
InitiatorFire Starts in the
Main Building
SuccessFire is Detected by
the Detection System
SuccessFire is Detected by
the Detection System
SuccessFire Alarm Starts
Successfully
SuccessFire Alarm Starts
Successfully
SuccessSprinkler System is
activated
SuccessSprinkler System is
activated
FailureSprinkler System does not Activate
FailureSprinkler System does not Activate
FailureFire Alarm does not
Start
FailureFire Alarm does not
Start
SuccessSprinkler System is
activated
SuccessSprinkler System is
activated
FailureSprinkler System does not Activate
FailureSprinkler System does not Activate
FailureFire is not Detected
by the Detection
FailureFire is not Detected
by the Detection
FailureFire Alarm does not
Start
FailureFire Alarm does not
Start
FailureSprinkler System does not Activate
FailureSprinkler System does not Activate
Major Damage and Loss of Life W=90::
Limited Damage/Wet people W=7::
Major Damage and Loss of Life W=90::
Damage No Loss of Life W=2::
Minimum Damage W=1::
Seq-Q=0.000843::Seq-w=5.624
Seq-Q=0.00000687::Seq-w=5.624
Seq-Q=0.000453::Seq-w=5.624
Seq-Q=0.000063::Seq-w=5.624
Seq-Q=0.00000096::Seq-w=5.624
Transfer to Microsoft word

Chapter 12 Event Tree 275
4. Event Tree Editor Screen, Toolbar and Shortcut Keys Quick Reference
The Event Tree Editor Screen
The Event Tree editor can be made visible by selecting the Dialog Tab (1) or the Event Tree Tab (2). Its main elements are the following:
• Main Menu (3): Quick access to the main functions. • Default Toolbar (4): Quick access to the more frequently used menu options. • Event Tree Toolbars (5): Quick access to Event Tree editing functions. • Diagram Editing Toolbar (6): Quick access to Diagram editing functions. • Project Window (7): A hierarchical view of the project and systems. • System Window (8): A hierarchical view of the system, blocks, connections and nodes. • Event Tree Window or canvas (9): The area in which the Event Tree can be graphically edited.
1 2
3 4
7
8
6
9
5
6

276 ITEM ToolKit Getting Started Guide
The Default Toolbar Immediately below the pull-down options resides a group of buttons that form a Default Toolbar allowing the user to access directly some of the more frequently used menu options.
Tool Name Description
New Opens a new project.
Open Open an existing document. The ToolKit displays the Open dialog box, in which you can locate and open the desired file.
Save Save the active document or template with its current name. If you have not named the document, the ToolKit displays the Save As dialog box.
Cut Removes selected data from the document and stores it on the clipboard.
Copy Copy the selection to the clipboard.
Paste Paste the contents of the clipboard at the insertion point.
Delete Item Delete the selection.
Undo Reverse the last editing. Note: You cannot undo some actions.
Print Print the active document.
About Open the About ITEM ToolKit Window.
Help Open the ITEM ToolKit On-line Help.
The Event Tree Dialog Window Controls The Event Tree Dialog Window Contains the following Controls.
Tool Name Description
Undo Changes Cancels the latest operation.
Analyse Run the Analysis of the system.
Check Spelling Check the Spelling of the selected Text.

Chapter 12 Event Tree 277
The Project Toolbar The Project Toolbar displays the available analysis options for the ToolKit application:
Tool Name Description
MIL217 Add a MIL-HDBK-217 (Electronic) System.
Telcordia (Bellcore) Add a SR-332 Telcordia (Electronic) System.
IEC 62380 (RDF) Add an IEC 62380 French Telecom Standard (Electronic) System.
299B Add a 299B Chinese Military Standard (Electronic) System.
NSWC (Mechanical) Add a NSWC (Mechanical) System.
Maintain Add a Maintain MIL-HDBK-472 Procedure V System.
SpareCost Add a Spare Cost Spares Scaling and Ranging System.
FMECA Add a Failure Modes Effects and Criticality Analysis (FMECA) System.
RBD Add a Reliability Block Diagram (RBD) System.
Fault Tree Add a Fault Tree Analysis (FTA) System.
Event Tree Add an Event Tree Analysis (ETA) System.
Markov Add a Markov Modeling System.
The Canvas Toolbar The Canvas Toolbar contains commands that affect the appearance and behavior of the canvas.
Tool Name Description
Undo Undo the last command executed on the canvas.
Redo Redo the last undo that was performed.
Toggle Grid Turn display of the grid on and off.
Snap to Grid Toggle the snap-to-grid feature on and off.
Toggle Page Bounds Turn display of page boundaries on and off.

278 ITEM ToolKit Getting Started Guide
The Event Tree Toolbar The Event Tree Toolbar is used to create and control Event Tree Analysis through the commands it contains.
Tool Name Description
Select Cancels add mode.
Success Branch Creates a Success Branch symbol on the Event Tree diagram.
Failure Branch Creates a Failure Branch symbol on the Event Tree diagram.
Null Branch Creates a Null Branch symbol on the Event Tree diagram.
Insert Column Insert a New Column on the Event Tree diagram.
Image Allows the user to add an image component to the canvas.
Text Allows the user to add a text component to the canvas.
Auto Arrange Allows the user to organize the components on the canvas.
Transfer to MS Word Allows the user to transfer any Event Tree Diagram directly into MS Word.
Start ETA Analysis Allows the user to perform the necessary calculations of the analysis.
Abort ETA Analysis Allows the user to stop the analysis or calculations currently being performed.
Summary Displays a summary of the analysis.
Header Footer Allows the user to create a header and footer for all Event Tree pages.
Fit to Page Allows the user to Fit the Event Tree diagram onto one page automatically.
Reset Fit to Page Allows the user to undo the Fit to page previously carried out.

Chapter 12 Event Tree 279
The Zoom Toolbar The Zoom Toolbar contains commands for zooming and panning the canvas.
Tool Name Description
Ruler Control Turn the ruler of the canvas on or off.
Properties Opens the properties window and allows the user to change the component properties.
Zoom Allows zoom in by selecting the area with the left mouse button and zoom out by clicking on the right mouse button.
Zoom to Fit Sets the magnification level of the canvas so that all components on the canvas are visible.
Zoom to Selection Sets the magnification level of the canvas so that the selected components are visible.
Pan Changes the pointer to a hand and allows grabbing the canvas with the mouse and panning.
Shortcut Keys:
Key Function
Ctrl + N Open a new project.
Ctrl + O Open an existing document. Displays the Open dialog box, in which you can locate and open the desired file.
Ctrl + S Save the active project with its current name. If you have not named the project, the Save As dialog box will open.
Ctrl + P Print the Active View.
Ctrl + X Removes selected data from the document and stores it on the clipboard.
Ctrl + C Copy the selection to the clipboard.
Ctrl + V Paste the contents of the clipboard at the insertion point.
Del Delete the selection.
F1 Open the ITEM ToolKit On-line Help.

280 ITEM ToolKit Getting Started Guide

Chapter 13 Reports 281
CHAPTER 13 Working with Reports
ITEM ToolKit has a long list of pre-built reports that you can choose from, or use as a foundation for customized reports. Each module within Toolkit (MIL, FMECA, RBD, etc.) contains many reports specific to the type of information you would expect to see in a report from the module. Report templates (pre-built and customized) are stored under the Reports folder within the Toolkit installation on your PC. The template files have a .trt extension and can be sent to other Toolkit users for their use as needed. This chapter covers:
1. Selecting and Previewing Reports
2. Creating Report Templates
3. Customizing Reports
4. Problem solving
1. Selecting and Previewing Reports It is important that the default printer you have associated with ITEM ToolKit be functional and configured to support the printing of Reports. Be sure to check that the printer defined in File – Print Setup is online and is configured to support the page format of the reports you wish. Additionally, it is important that your Analysis results are complete and current. The Report Generator will advise you if the results are out of date, but you will have to determine if the Analysis is complete enough for reporting purposes.
Locating the Reports Reports are located under File – Print – Reports or File – Print Preview - Reports. The window that appears has four main tabs to perform work on. The following sections cover the tasks that you can perform on each of these tabs.
Selection Tab On the Selection tab you can select one or more reports to have the Report Generator create for you. On the left is a list of the currently open Projects/Systems in ToolKit. On the right is a list of the available Reports (pre-built and any custom reports you have made). Choose the Project/System you wish a report for, check the box next to the specific report, and then click the Preview tab. You can always click the Print button if you want to go directly to printing the checked report(s).

282 Item ToolKit Tutorial
The Report you selected will appear in the Preview tab for further actions.
Use the Group checkbox to create a report that is Grouped by the indentures of the System. Each Block in your system will be a different set of report pages which you can browse to quickly.

Chapter 13 Reports 283
Preview Tab After selecting a report, click the Preview tab to see the generated report. From this tab you can browse through the reports(s) page by page, zoom in/out, print, and export/save to other report file formats. To view a different report, return to the Selection tab, select the desired report, then return to the Preview tab.
Choices At this point you can decide if the pre-built reports will suit your needs. If not, continue to the next sections to learn how to modify the existing reports, or build your own.
Click the envelope icon to export the report to another file format, such as PDF, RTF, Excel, HTML, XML, etc.

284 Item ToolKit Tutorial
2. Creating Report Templates
Templates Tab As mentioned earlier, each report (pre-built or custom) is stored as a .trt file under the Reports folder where ToolKit is installed on your PC. You can Load an existing template, edit it and save it on the Templates tab, or you can create a new template from scratch.
Once you have created or edited your template, be sure to save it with a meaningful name. Once it is saved, return to the Selection tab, locate the report, and then Preview.
Choose Load Template to open an existing Report to edit. Choose New Template to create a new template from scratch. Use Save/Save As to save your work.
Pick from the lists of available parameters to appear on the report then use the arrow buttons in the center to place or remove them on the template.

Chapter 13 Reports 285
This is an example of a template being created. A few parameters have been selected from the list on the left, and the arrow buttons have been used to move the parameters over to the right side for inclusion in the template. If you want to move any parameter up or down the list, select it, and then use the blue up/down arrows to change the order of the parameters.
After you have arranged the parameters in the order you wish, click the Save As button to give the template a meaningful name.

286 Item ToolKit Tutorial
3. Customizing Reports
Customize Tab This tab provides you access to the specific elements that make up the report. Column widths, header/footers, graphics, etc. are all controlled on this tab.
Header Tab
When you choose the report template on the left side, the list of fields (parameters) that appear in the header of the report appear in a list on the Header tab. Check those you wish to see in the header of the report. Additionally, you can edit the look/justification of the header with the settings on the Header tab. Be sure to Save your settings before previewing again.
Inserting a graphic in the header is done here.

Chapter 13 Reports 287
Inserting a Graphic One aspect of customizing a report would be to add your company logo or other graphic to the header of the report. This is easily done, but there are positioning and size limitations. Use the Insert/Remove and Justification buttons at the bottom of the Header tab to work with graphics. Use the Insert button to locate the graphic. Typically used file formats are available in the drop-down list. Be sure that the graphic you are intending on using is small enough to fit within the bounds of the Header area on the report. Use the Justification button to move the graphic left, center, or right within the header, and top, center, bottom of the header area. Caution: If you have other information already in the header, it may be covered up by the graphic if they occupy the same space. You can make small adjustments to the graphic position by using the numeric fields provided.
These settings place the graphic in the upper-right corner of the header. Note in this example that the graphic has covered up some information. You will need to remove or move those fields of data in the Header tab to solve the issue.

288 Item ToolKit Tutorial
Fields Tab The Fields tab is where you can adjust how the columns of your report are fitted to the data. You can have the column fit either the heading, the data itself, or you can specify exactly how wide the column is. (1 TWIP = 1/1440 of an inch) Many times, the number or width of the columns will cause them to run off the right side of the paper. Use this tab to make the necessary adjustments to the column widths to fit the report on the paper as you desire.
Choose the column, and then select how it will be fitted to the data.
Choose the data range that the report will include.

Chapter 13 Reports 289
The Field Width setting controls whether the column width follows the Heading of the column, the width of the data, or a specific width set in TWIPs. (1 TWIP is 1/1440 of an inch)
Note how the data wraps in the column. This column is set to follow the width of the Heading.
Note how these two columns of data are compressed to fit on the page. You will need to go into the Fields tab and make adjustments to make these fit nicely.

290 Item ToolKit Tutorial
Footer Tab The Footer tab, similar to the Header tab, controls the information that is displayed in the footer of the report.
Group Header and Footer Tabs If you have checked the Group box, the report will group the results by component categories, parent names, and other aspects of the system. You can control the header/footer for the Groups in the same manner as you do with the report header/footer.
Paper Size Tab The Paper Size tab is used to define the dimensions of the paper you want the report to fit on, as well as the margins. Be sure your printer supports the paper dimensions you wish to use.

Chapter 13 Reports 291
4. Problem Solving Listed below are some common issues you may encounter while working with Reports. When I preview a report it is blank.
Be sure that you have matched the type of System you have selected (MIL, Telcordia, Fault Tree, etc.) to the type of report that you have selected. If you have a MIL System selected, yet select a FMECA report, the resulting report will be blank.
Some of the columns in my report are blank.
There are many opportunities to enter data into ToolKit. If you leave blanks such things as Descriptions, Names, Part Numbers, etc. when you run a report, these columns will appear blank.
Column widths and data wrapping within the column makes the report look messy. What can I do?
Using the Fields tab on the Customize tab, you can adjust how the width for each column is determined. You can choose to either follow the column heading width, the width of the data (which changes), or fix the width in TWIPs. Depending on the nature of the columns and your data, you may have to adjust each column differently.
I make a change to a template, but it does not seem to “stick”.
After you make a change to a template, be sure you Save the template. Additionally, be sure you have the correct template selected for preview.
When I choose columns for a template, some come up blank, but others have data in them on the report. I know those blank columns have data in them.
Certain combinations of columns will result in this effect. For example, if you want to see System level information, and Component level information all in the same row of the report, some combinations of this cannot track with each other.
The columns are cut off on the right side.
Depending on your data and columns selected, you may reach the physical limits of the paper. In this case you will have to either remove columns, use larger paper, or adjust the column widths. Often times it is better to remove columns that to try to fit everything on to one page.
One column seems to take up all the room on the page.
This is common with Description fields. The only real solution is to force the column into a specific width and let the data wrap as needed.
I don’t understand where some of the values in the columns came from?
Some column values are ones you have entered, while others are calculated by ToolKit for you. Find these values in the Results window within ToolKit.

292 Item ToolKit Tutorial

Chapter 14 Import/Export 293
CHAPTER 14 Import/Export
One of the powerful features of ToolKit is the ability to import and export data to/from a variety of formats, Microsoft Excel and Access are just two of the choices. This chapter covers:
1. Creating a bill of materials in Excel
2. Importing the bill of materials into ToolKit
3. Exporting a system from ToolKit to Excel
1. Creating a Bill of Materials in Excel
Importing a Bill of Materials into a Project or Library You have an Excel worksheet BOM that contains component information that you wish to import it into a MIL-217 System within a ToolKit Project. The columns of data in the worksheet have names, but you are not sure if they match the MIL-217 General, Physical, or Application parameter names used in ToolKit.
Preparation The first step is to make sure the columns and values in the worksheet are closely related to the MIL-217 parameters found in ToolKit. This will enable you to use the Auto-Match button during the field mapping process. You may discover that you are not using all of the possible parameters that MIL allows. By looking at the parameters via ToolKit for the components you will be using, you can quickly identify the ones typically used. Add a few of your common components to a MIL-217 System, then view the General, Physical, and Application tab panels on the Dialog window for the system. Here you will see all of the parameters for the components. Following are those commonly used: For Resistors – Category, Description, Rated Power, Applied Power, Power Stress For Capacitors - Category, Description, Rated Voltage, Capacitance, Applied Voltage, Voltage Stress Note: You can also Export any system to an Excel spreadsheet to see the specific column requirements. Build a system with blocks and components, then File – Export. Follow the Wizard to produce an Excel file. Yes, you can then use this generated Excel file as a template for your BOM.

294 Item ToolKit Tutorial
In addition to the MIL-217 parameters, you can have the following columns in your worksheet for ITK to import: ID – a unique, sequential ID number for each block and component row in the sheet System ID – a static number indicating the system that the block/component is a part of (used only if you have more than one System in the Project) Parent ID – a static number that points to the block that the component is part of. (0 for blocks, 1 for components) Name – should be unique, or left blank, ITK will assign a unique numerical name to the block/component Category Keyword – this is a two letter designator for the block/component (BK for block, CR for a cap, RS for a resistor. (See the ToolKit Help text for a listing)
Make the Worksheet
1. Now that you understand the columns required in your worksheet, you can begin constructing an example. We suggest the following:
ID System ID Parent ID Name Category Keyword Description Capacitance
1 1 0 BK Block 1 2 1 1 CR Cap, .22 uf .22 3 1 1 CR Cap, 440 uf 440 4 1 1 RS Res 10K 5 1 1 RS Res 100K
Rated Voltage Rated Power Applied Voltage Applied Power 50 25 25 50 .25 .20 .5 .45
Notice how all Components are assigned to the same System ID, the Block is Parent 0, and each Component is assigned to the first Parent (the Block). Using this pattern, you can see all of the required/optional fields to meet the import and MIL-217 requirements.
2. Name this worksheet “Blocks & Components”. Excel menu: Format – Sheet - Rename
3. Then, add two more worksheets to your Excel file (Excel menu: Insert – Worksheet), one named “Physical”, the other “Application”. Make a copy of the B&C worksheet and paste it into the Physical and Application worksheets. Now you have the same data in three different worksheets within the same Excel file.
4. Save and Close your Excel file.

Chapter 14 Import/Export 295
2. Importing the Bill of Materials into ToolKit
Ready for Import With this properly formed set of worksheets, you are ready to begin the import process. Open/create a new ITK Project file, add a MIL-217 System to the Project and be sure it is selected in the System window. 1. Click File – Import. If the “Save As” dialog appears, save your Project file before continuing.
The Import Wizard dialog now appears.
2. Since we are using an Excel file in this example, select Excel in the Format field, and Browse to locate your Excel
file. Click Next. 3. In this step, you map the individual worksheets to the MIL-217 output tables for the import processing. Start with
the Block, and then match the Physical and Application to the respective Output tables. Only match Input Tables that have a $ at the end of their name.
Be sure to select Excel. If you have saved a successful import template, select it here to avoid remapping.

296 Item ToolKit Tutorial
4. Click Next. 5. This step matches the Tables to the Input/Output fields. For each Table, click the Auto Match button to match the
Input and Output fields. Warning: If your column names do not match the MIL-217 parameter names exactly, the Auto-Match will not work completely. You will have to manually associate the fields together.
6. After using the Auto Match, click each Input field to see the Output field it has been mapped to. Verify that the
mapping is correct. 7. Additionally, for each Table you need to be sure the ID and System ID fields are matched. These fields identify each
component in the list and the System they are a part of.
If the table and fields names match exactly, you can use the Auto Match button.

Chapter 14 Import/Export 297
8. Click Next. 9. The final step is to confirm the settings and click Finish. It will take a moment for the Excel data to be imported into
the MIL system within your Project.
If you have a library open during the import, and the part numbers match, ToolKit will lookup the component parameters in the library and place that information in the system.

298 Item ToolKit Tutorial
10. If you wish to save your settings for future imports of this specific BOM, click Yes. Otherwise, click No on the following dialog box.
Now you can go to your System in your Project and confirm the blocks, components, and the parameter values you just imported.
Errors That Can Happen As with any import type function, errors can be caused for many reasons. Listed below are a few typical errors that could be encountered. An error log in generated and placed in the Toolkit/Programs\IT_DB folder when errors do occur.
• Numeric field overflow – caused by a true number being in a column that has been formatted as a Text column. Place a single quote ‘ in front of the true number.
• Parent ID equals Component ID – this is caused by blank rows between the Column Names and the first row of data. Also, if there are blank rows below the fields of data, they too can be confused as data.
• No ID field defined – You must have a unique ID for each components and block across pages in the Excel file. • Import process seems to complete, but no blocks or components are imported – Be sure you have selected the
proper System you want to import to in Toolkit before starting the import process.
Easy Import If you simply want to import a list of components into ToolKit, with no Category definitions, or if you have a Library open with matching part numbers that has all of the component details included, the following options are available to you:
• Create an Excel spreadsheet with a single column named Part Number. Enter just the part numbers for the components.
• Import the spreadsheet, matching the single column to the Part Number field with ToolKit. • The list of Part Numbers is imported, yet the components are categorized as External for manual editing later. • If however, you have a Library open during the import that has matching part numbers to those in the spreadsheet,
ToolKit will match the part numbers and bring in the information on the parts contained in the Library into the Project file.

Chapter 14 Import/Export 299
3. Exporting a System from ToolKit to Excel The export function enables you to extract all of the information you have entered into ToolKit, and the calculated values/results that ToolKit has made for you. Not only do you get the information in a spreadsheet, database, or text file, but the relationships between the blocks, components, and other elements of your systems are maintained. Any system created using any ToolKit module can be exported. One common use of an export is for review purposes by colleagues who do not have ToolKit. Then, once they have made their changes to the values in the exported spreadsheet, it can be re-imported back into ToolKit.
To export a System from ToolKit: 1. Select the system you wish to export on the System window.
2. Go to File – Export to open the Export Wizard. 3. The first step of the Wizard is indicating the source of the exported data, which is an internally created Access
database containing your data. Click Next to continue.

300 Item ToolKit Tutorial
4. On this window, you select the tables from within ToolKit you wish to have exported. If you wish all tables, click the
triple arrow button. If you want only selected tables, select the table, then click the double arrow button to move it to the right. Click Next when finished.
5. In this step you select the fields from the tables you selected in the previous step that you want to have exported.
Select the table, and then use either the double or triple arrow buttons to select the fields. Click Next when done.
Use this button to select all tables for export.

Chapter 14 Import/Export 301
6. The final step is to confirm the format of the export. Amongst other formats, Excel spreadsheets or Microsoft Access
are the most popular. Click Finish when ready to start the export.
7. The end result of the export, if you chose Excel, is an .xls file with a worksheet for each major table of data within ToolKit.
Select the table first, then use these buttons to select all or specific fields for export.

302 Item ToolKit Tutorial

Chapter 15 Library Facilities 303
CHAPTER 15 Library Facilities
ITEM ToolKit contains several library facilities. The first facility is referred to as "Library Project" and is functionally identical to a regular "Project File", with the addition of another "System Window" labeled "Library System Window". This allows storage, and retrieval of any system, block, or component, including gates, events, or segments (branch) of a fault trees and RBD diagrams. Libraries of this type can be opened as windows on the workspace, or loaded in the background via the Library Lookup Manager. The second facility, "Failure Model Library" handles storage and retrieval of distribution models. The Failure Model Library also has the capability to store and retrieve from a disk file, allowing the content of the library to be shared with other projects. This is discussed further in the separate Fault Tree User Manual. This chapter covers:
1. Creating a new Library Project
2. Adding and Extracting From a Library Project
3. Saving and Closing a Library Project
4. Loading and Browsing a Library
1. Creating a New Library Project Creating a library project is very similar to creating a regular project file. Select New Library from the File menu. Alternatively to open an existing library, select Open Library from the File menu.

304 Item ToolKit Tutorial
Once the command is executed ToolKit will open and display any system in the Library System Window. The layout of the workspace will look like as follows:
Library Project A Library Project is identical to ToolKit Project, with the exception that it has an embedded "Library" label. This labeling allows it to be treated slightly differently, such that it can be created, saved, and viewed in parallel to a regular project file. The disk file extension of library files are *.ITL, which is different from the project files *.ITP. A Library project file and its contents are also displayed and edited using the same facilities as a project file.
Library System Window "Library System Window" is identical in operation and capabilities to the System Window, and it embeds the Library Hierarchy. The Library System Window is identified by its window title if it is in a floating state, and by the hierarchy header which has "Library" appended to the project name. By default this window is docked on the right side of the System Window.
Library Hierarchy The Library Hierarchy is identical in operations and capabilities to the System Hierarchy. This hierarchy is embedded in the Library System Window. The Library Hierarchy is identified by the hierarchy header which has (Library) appended to the project name.
Library Project view and tab
Library system window
Project system window showing open and selected Project system

Chapter 15 Library Facilities 305
2. Adding and Extracting from Library Project Systems, blocks, components, gates and events can be added to a library in the same way as a project. In addition, since the Library Hierarchy is an independent facility from the System Hierarchy Copy/Paste, and Drag/Drop" operations can be carried out between the two hierarchies.
1. Select an element from the System Hierarchy, and use the right mouse menu copy command:
2. Select a target element in the library hierarchy and use the right mouse menu paste command:

306 Item ToolKit Tutorial
Extracting from a Library An element and all its sub-branches can be copied from a library project, into a regular project.
1. With both project, and library open in ToolKit, select an element in the Library Hierarchy and copy it using the right mouse menu Copy command:
2. Select a target element in the System Hierarchy and use the right mouse menu Paste command:

Chapter 15 Library Facilities 307
3. Saving and Close a Library Project Library project files are saved and closed via a set of commands on the File menu that are different from regular project files.
With the Library Project active, note that the File menu Save, Save As, and Close are active. The Save Library command will save the existing library with the file extension of "*.ITL". The Save Library As command will save the existing library allowing an opportunity to rename the library file. The Close Library command will close the active library.
4. Loading and Browsing a Library Using the Library Lookup Manager under the File Menu, any library file can be loaded into memory, eliminating the need to have an extra window open on your workspace. 1. Open an existing or create a new project 2. Click File – Library Lookup Manager
3. Locate the library file(s) you wish to load into memory via the Path field. 4. Click Load Selected Libraries, then OK 5. Now the selected libraries are in memory and available for browsing via the following locations on the workspace:
• Right-click a Component in the System window.
Use this button to browse for library files (.ITL)
Use this button to load the libraries into memory.

308 Item ToolKit Tutorial
• Click the spyglass icon next to the Part Number field on the General tab of a Block or Component.
• Either method opens the Library Browse window.
Search for a component via the search options, select it from the list, then click the Select button to add it to your system.

Chapter 16 Grid View Customization 309
CHAPTER 16 Grid View Customization
ITEM ToolKit contains a feature that allows you to create your own grid layouts. The Grid View is available for all ToolKit modules.
1. Viewing/Creating Grid Templates If you wish to use a Grid View that is different than the default that comes with ToolKit, use the following steps to create your own. 1. Select Settings – Grid Templates menu to open the Grid Templates window.
2. You can edit the default Grid template as you wish, or a better suggestion is to create your own Grid template. Use the
File – Add Template menu option to start creating your own.
Each ToolKit module has a default Grid template.

310 Item ToolKit Tutorial
3. Name the template, then choose from the Available Fields column. Use the arrow buttons to move the fields to the Selected Fields column. You can move the fields up and down the list as desired using the Up and Down arrows.
4. Check the Set selected template as active grid template for selected system box to activate your new template.
Then click OK. 5. When you return to the Grid View, the selected default Grid template for the module is used to display the system
data.
2. Additional Grid options There are several options you can utilize within your Grid templates to make the display of data fit your needs. Filtering – the Grid template can be set to display fields that contain data that meets certain filter criteria. Columns displayed on the Grid that are being used as filters have an * added to the column name. Filtering is case sensitive. Ordering – the rows of data displayed in the Grid can be ordered by key fields in ascending or descending order. User Defined Fields – you can define additional fields to enter/display data on the Grid. Additionally, these fields can be imported/exported from ToolKit along with all other parameter fields for the specific module. Row heights – the display heights of the header and field rows can be adjusted Styles – the style of the column, header, and fields can also be customized.

Chapter 16 Grid View Customization 311
3. Switching to a Different Grid Template 1. While in the Grid View, use the Settings – Grid Templates menu option to select a different Grid template and Set
selected template as active grid template for selected system. Click OK when ready to return to the Grid View. 2. The Grid View is changed to match the Grid template you just selected.
4. Exporting and Printing the Grid View Any Grid View can be exported to several different file formats via the File – Save Grid menu option. Additionally, the Grid View can be printed directly via the File – Print – Print Active View or File – Print Preview – Print Preview Active View menu options.

312 Item ToolKit Tutorial

ITEM TOOLKIT
Version 8
ITE
M T
OO
LK
IT
S o f t w a r e
So
ft
wa
re
S o f t w a r e
World Leaders In Reliability And Safety Analysis Software
ITEM Software (UK)4 Belfry House4400 ParkwayWhiteley, FarehamHampshirePO15 7FJU.K.
Telephone : +44 (0) 1489 885085Facsimile : +44 (0) 1489 885065Email : [email protected] : http://www.itemsoft.com
ITEM Software (USA)34 Executive ParkSuite 210IrvineCalifornia92614U.S.A.
Telephone : +1 714 935 2900Facsimile : +1 714 935 2911Email : [email protected] : http://www.itemsoft.com
Tutorial:Getting Started Guide
Tu
toria
l: Gettin
g S
tarte
d G
uid
e
®
V-8
© ITEM Software