top 20 tips for cabinet installation - ez-level 20 tips2013.pdf · top 20 tips for cabinet...
TRANSCRIPT

TOP 20 Tips for Cabinet Installation by
www.EZ-Level.com
1) Permits & Contractors: Hiring a contractor without checking out his / her references can be disastrous. If you intend to hire a
contractor, go SEE a few of his/her jobs personally. (I usually ask to see 5 but will only go to a couple) If a kitchen remodeler
can’t come up with 5 clients who would LOVE to show off their brand new kitchen… there might be trouble.
If you decide to pull homeowners permit instead, it is pretty easy and the big benefit is that an "official inspector" will come and
look over the work during each phase. Note: If you are planning to skip this step then make sure you know what you are looking
at. Can you tell the difference between good or poor plumbing or electrical? If not… get someone who knows these things to
look over your shoulder. When in doubt… Hire a licensed contractor.
2) Storage: Do not "store" cabinets in extreme conditions: Areas that are too hot or damp (like the garage) can KILL your new
cabinets and void the warrantee. The styles, doors and trim can (and usually will) bow which is a big pain! Plan Ahead... and
store them in the dining room or living room. If you must put them in the garage... make sure the temperature is reasonable.
3) Prepping your work area: Unpack all cabinets... Cut your boxes and use the cardboard to cover your flooring.
4) Sort out your cabinets: Turn all wall cabinets right side up (some cabinets differ from top to bottom). If needed… you can look
at the shelf clips to determine the “up” side. Set all “similar” cabinets together. (i.e.: you might have three W3012’s). This will keep you from accidentally installing the “wrong” cabinet in the wrong place. (things to look for: Hinge positions, finished interiors, finished sides and bottoms)
5) Finding the High Spots: It’s imperative that you determine the high spots FIRST before anything else! Why? EVERY cabinet will be positioned based on that high spot. ESPECIALLY if you have tall cabinets connecting both the wall cabinets as well as the base cabinets!!!! As you can see in this example the high spot causes all the other cabinets to be raised up which in turn causes the wall cabinets to be raised up… including microwave vents etc.! Also check the height of any windows or pass through that could be affected. IF you are too high… you could cut down your toe-kicks a little bit… then mount the leveling system and install as usual. (caution: Cutting your cabinets should be the LAST resort)
How to find the high spots? Make a Story Stick: Take a 1x4 or 2x4… and measure up it 54”. Draw a heavy (easy to see) line across to stick. Mark “OK” just ABOVE that line. Move the story stick to various positions around your kitchen along the walls… moving the story stick in and out (at the wall and approximately 21” out from the wall) If the laser beam falls on or in the OK ZONE… all is well. But if the laser beam falls “below” that line on our story stick… you will need to raise the laser beam UP till the laser once again falls on or above the line. Once you have determined the highest point of your kitchen mark an (easy to read) line on your wall. (for easy reference). Now simply set your laser on that mark and hang your ledgers. (see step #10)
OK
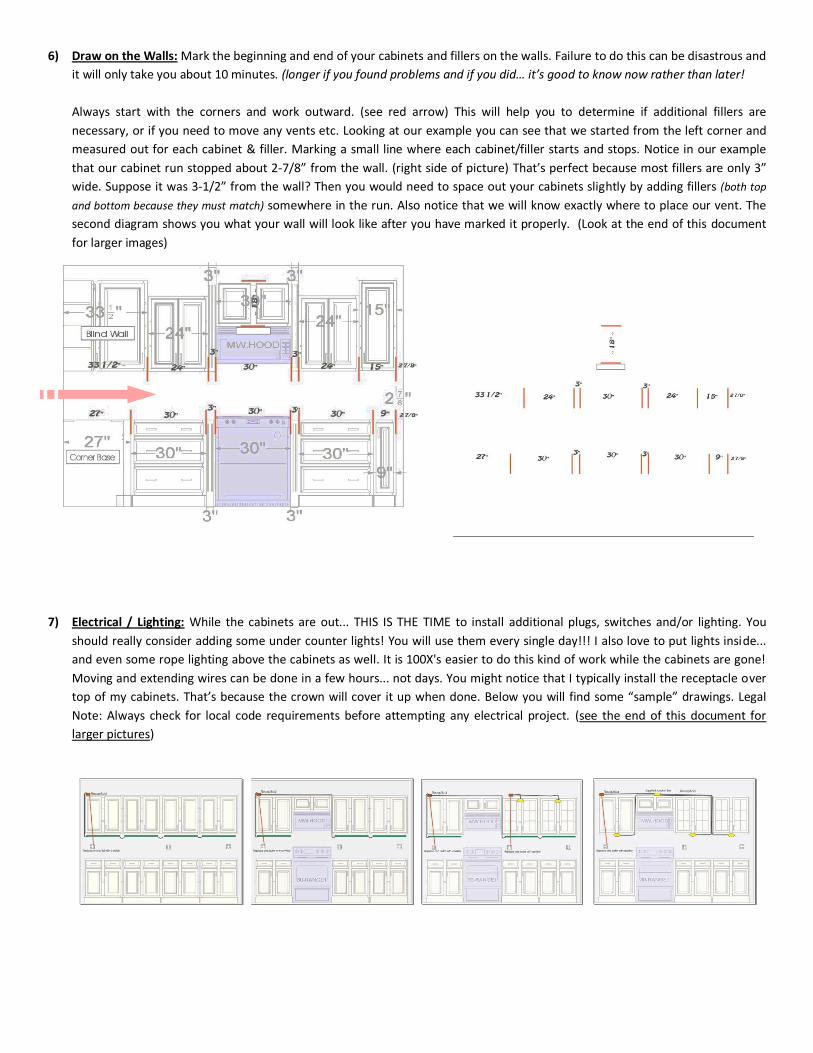
6) Draw on the Walls: Mark the beginning and end of your cabinets and fillers on the walls. Failure to do this can be disastrous and
it will only take you about 10 minutes. (longer if you found problems and if you did… it’s good to know now rather than later!
Always start with the corners and work outward. (see red arrow) This will help you to determine if additional fillers are
necessary, or if you need to move any vents etc. Looking at our example you can see that we started from the left corner and
measured out for each cabinet & filler. Marking a small line where each cabinet/filler starts and stops. Notice in our example
that our cabinet run stopped about 2-7/8” from the wall. (right side of picture) That’s perfect because most fillers are only 3”
wide. Suppose it was 3-1/2” from the wall? Then you would need to space out your cabinets slightly by adding fillers (both top
and bottom because they must match) somewhere in the run. Also notice that we will know exactly where to place our vent. The
second diagram shows you what your wall will look like after you have marked it properly. (Look at the end of this document
for larger images)
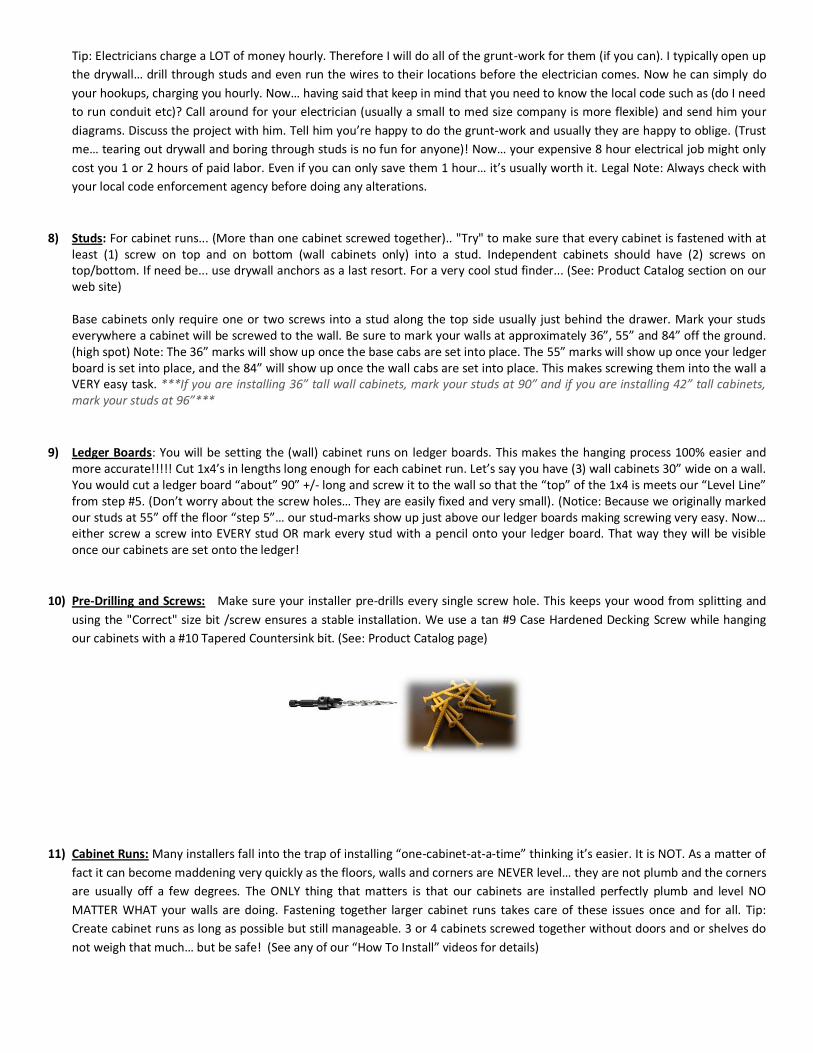
7) Electrical / Lighting: While the cabinets are out... THIS IS THE TIME to install additional plugs, switches and/or lighting. You
should really consider adding some under counter lights! You will use them every single day!!! I also love to put lights inside...
and even some rope lighting above the cabinets as well. It is 100X's easier to do this kind of work while the cabinets are gone!
Moving and extending wires can be done in a few hours... not days. You might notice that I typically install the receptacle over
top of my cabinets. That’s because the crown will cover it up when done. Below you will find some “sample” drawings. Legal
Note: Always check for local code requirements before attempting any electrical project. (see the end of this document for
larger pictures)
Tip: Electricians charge a LOT of money hourly. Therefore I will do all of the grunt-work for them (if you can). I typically open up
the drywall… drill through studs and even run the wires to their locations before the electrician comes. Now he can simply do
your hookups, charging you hourly. Now… having said that keep in mind that you need to know the local code such as (do I need
to run conduit etc)? Call around for your electrician (usually a small to med size company is more flexible) and send him your
diagrams. Discuss the project with him. Tell him you’re happy to do the grunt-work and usually they are happy to oblige. (Trust
me… tearing out drywall and boring through studs is no fun for anyone)! Now… your expensive 8 hour electrical job might only
cost you 1 or 2 hours of paid labor. Even if you can only save them 1 hour… it’s usually worth it. Legal Note: Always check with
your local code enforcement agency before doing any alterations.
8) Studs: For cabinet runs... (More than one cabinet screwed together).. "Try" to make sure that every cabinet is fastened with at least (1) screw on top and on bottom (wall cabinets only) into a stud. Independent cabinets should have (2) screws on top/bottom. If need be... use drywall anchors as a last resort. For a very cool stud finder... (See: Product Catalog section on our web site) Base cabinets only require one or two screws into a stud along the top side usually just behind the drawer. Mark your studs everywhere a cabinet will be screwed to the wall. Be sure to mark your walls at approximately 36”, 55” and 84” off the ground. (high spot) Note: The 36” marks will show up once the base cabs are set into place. The 55” marks will show up once your ledger board is set into place, and the 84” will show up once the wall cabs are set into place. This makes screwing them into the wall a VERY easy task. ***If you are installing 36” tall wall cabinets, mark your studs at 90” and if you are installing 42” tall cabinets, mark your studs at 96”***
9) Ledger Boards: You will be setting the (wall) cabinet runs on ledger boards. This makes the hanging process 100% easier and more accurate!!!!! Cut 1x4’s in lengths long enough for each cabinet run. Let’s say you have (3) wall cabinets 30” wide on a wall. You would cut a ledger board “about” 90” +/- long and screw it to the wall so that the “top” of the 1x4 is meets our “Level Line” from step #5. (Don’t worry about the screw holes… They are easily fixed and very small). (Notice: Because we originally marked our studs at 55” off the floor “step 5”… our stud-marks show up just above our ledger boards making screwing very easy. Now… either screw a screw into EVERY stud OR mark every stud with a pencil onto your ledger board. That way they will be visible once our cabinets are set onto the ledger!
10) Pre-Drilling and Screws: Make sure your installer pre-drills every single screw hole. This keeps your wood from splitting and
using the "Correct" size bit /screw ensures a stable installation. We use a tan #9 Case Hardened Decking Screw while hanging
our cabinets with a #10 Tapered Countersink bit. (See: Product Catalog page)
11) Cabinet Runs: Many installers fall into the trap of installing “one-cabinet-at-a-time” thinking it’s easier. It is NOT. As a matter of
fact it can become maddening very quickly as the floors, walls and corners are NEVER level… they are not plumb and the corners
are usually off a few degrees. The ONLY thing that matters is that our cabinets are installed perfectly plumb and level NO
MATTER WHAT your walls are doing. Fastening together larger cabinet runs takes care of these issues once and for all. Tip:
Create cabinet runs as long as possible but still manageable. 3 or 4 cabinets screwed together without doors and or shelves do
not weigh that much… but be safe! (See any of our “How To Install” videos for details)

Corner cabinets: Corner cabinets should always be screwed together to at least one cabinet on either side as well. Actually… this is the MOST IMPORTANT to screw together.
A. Starting from any corner cabinet… decide which
cabinets will be screwed together prior to hanging. B. Place those cabinets on their BACKS… side by side.
With the doors removed… clamp the front styles (frames) together. Make sure the styles are aligned as best as possible. PRE-DRILL (using a #10 countersink bit) “also available at “tools needed”. Pre-drill about 1/8” from the holes where the HINGES were screwed into the cabinet frame. That way the new screw will be hidden once the hinges go back on. Once you have pre-drilled your first hole, screw the style together using a 2 ½” long #10 cabinet screw. Now pre-drill and screw the next screw. 2 screws per style is fine (tall cabinets usually get 3-5). NOTE: If using Frameless cabinets… you will use much shorter screws!
C. Carefully set your cabinet run upright. Now screw the “backsides” together with one or two cabinet screws. I usually do this on the TOP of the cabinets inside the recess (framed cabinets). If you are installing frameless cabinets… you may need to screw them together “inside” the cabinets.
12) Hanging Wall Cabinets: Start with any of the “Corner cabinets” and set them on the ledger boards in the corner. While one man holds them upright “resting the cabinet(s) on the ledger” screw (1) screw on the TOP of the cabinet into the wall/stud. This will hold that “run” of cabinets temporarily. Continue for each cabinet and/or cabinet run. Set each one on the ledger… slide together… clamp and screw. Note: You may need some shims behind the cabinets to fill any gaps created by uneven walls! NEVER try to “pull” the cabinet to the wall to fill the gap!!! Remember: The WALL is the problem… not your cabinet. Fill any voids with shims… THEN screw tight! If any gaps are visible simply trim and/or caulk depending on the gap.
Finish screwing: Once ALL your wall cabinets and fillers are in place (and you’re SURE that everything lines up perfectly with the base cabinets)… install the remaining screws both top and bottom. As far as the “bottom” screws are concerned… BE SURE to Pre-drill them first. (Just use the tip of the pre-drill for this). This will make for a VERY CLEAN hole/screw which will be visible.
A note about Refrigerator Cabinets: If the cabinet above your fridge is 24” deep… install this cabinet separately! Get the
others in place, and THEN setting a long level across the tops and overhanging our new cabinet location… measure down however high the fridge cabinet is. (12” or 15’ etc). Level this line and screw in a short ledge board just as before. THEN l ift and set this cabinet on the ledger. Align the tops perfectly and screw through the top into the wall just as before. NOW… Carefully screw through the side of the fridge cabinet into the next cabinet frame (or side if frameless)
You should use a laser (vertical beam) to locate studs when you are fastening your cabinets to the wall. Simply set the laser
on the stud… open the cabinet and whala… there’s the stud location! (CAUTION: Keep in mind that the laser line will appear to “move” as the plain thickness changes. To understand this… shoot your laser “at an angle” onto the wall. Now... put a 2x4 on the wall so the laser beam hits it too. NOTICE the laser line tends to move because the plain (surface of the 2x4 is different than the wall). It’s easy to see the difference on a 2x4 but imagine the inside of a cabinet. (the back wall of a cabinet is usually ¾” thick which causes the laser line to be off slightly. THE FIX for this is simple. 1) ALWAYS set your tripod/laser at a reasonable angle. This causes any issues to be exaggerated… which is a good thing to keep you from making a mistake. Now shoot your laser on the stud… set your cabinet in place and look at the top or bottom and notice where the laser line is hits the surface of the cabinet. Now adjust your laser so that the line on the cabinet actually lines up with the stud. Once you get this… it’s a piece of cake.
Choose a way that is simple and
manageable.

BASE CABINETS (Level, Plumb and Steady)
13) The absolute MOST IMPORTANT issue during installation is to make sure your wall and base cabinets are Level, Plumb and
Steady! While this "seems" somewhat obvious it is the No. 1 reason for fractured granite, sticking doors, drawers and troubles
down the road. Always use a “self-leveling cross line” laser to install kitchen cabinets. They are very inexpensive and will save
you hours of frustration. We offer them on our site for your convenience at the above link. TIP: If your budget is tight you might
try renting a unit from any tool rental store.
When your cabinets are installed correctly the laser beam will show up on all four rails of each and every cabinet. If the laser does
not show up on all four rails than those cabinet(s) are simply not level with the others and are not installed correctly! KEEP IN MIND:
Granite is brittle. Therefore it must rest safely on all four rails of every cabinet. If it does not, the slightest weight can cause it to
fracture. High end cabinet installers know this and go to great lengths to make sure this is accomplished. Using the tools that we
recommend anyone (including homeowners) can achieve this in less than an hour.
Never use “shims” in an attempt to level cabinets! All building materials expand and contract through “thermal expansion”.
Cabinets, shims and flooring all “breathe” throughout the seasons. Problem is… As they breathe… shims will MOVE. That is why your
cabinets MUST rest securely on a foundation that “fastens” to the cabinets. You should always use a cabinet leveling & stabilization
system (CLS system) to make sure that all four corners of every single cabinet are firmly set on the ground for ever. Sadly… some
installers don't take the time to do this and you pay the price in the end. (See: EZ-Level video): www.ez-level.com
Examples of cracked countertops due to a failed foundation.

14) Cabinet Runs (for bases): Just like wall cabinets… Many installers fall into the trap of installing base cabinets “one-cabinet-at-a-
time” thinking there is no other way. (That’s because many are used to using shims to level their cabinets and since it would be
impossible to reach the rear shims they are forced to set (and level) each cabinet one at a time). This is the worst possible
method and it takes forever to do it. If you are using the EZ-Level system you simply do exactly as we did with the wall cabinets;
Create your “cabinet runs”… Set them into place… level them up and you’re done!
15) Solid Wood & Particle board: We all know that particle board "explodes" when wet... but did you know that some solid wood
cabinets (which are really plywood) can "soak up water" like a sponge! This leads to rotting and even worse... mildew and mold
spores! A few paragraphs ago... I mentioned that you should use a cabinet leveling system instead of using shims. Here is
another BIG REASON why. You really want to install every single base cabinet about an 1/8" off the ground. You won't see the
gap… but if you ever have a small leak (which happens a lot)... the water simply runs underneath your new cabinets! If you have
a "deep flood" and they do get wet... they will dry out VERY QUICKLY... slowing down mold formation. IF you use a quality
cabinet leveling system... you can install particle board cabinets and sleep soundly knowing that your kitchen is protected from
leaks! (See: EZ-Level video) www.ez-level.com
Install & Level Base Cabinets: As mentioned in earlier paragraphs we highly recommend that base cabinets be installed in larger
“cabinet runs” using a top quality leveling system and a laser. Here’s how:
1) Identify your “cabinet Runs”… (notice the red circles below)

2) Flip those cabinets on their backsides… Clamp and screw together. (Example: Cabinets 12, 8, 9).
3) Mount the leveling system. If you use the EZ-Level system you will install a “Set” of levelers (a “set” is a front & rear) where the
arrows indicate. (a single cabinet would require 2 sets. Cabinet runs require one set at each end and one set at each “seam” where two
cabinets are joined together as shown by the arrows).
4) Set the cabinet runs into place.
5) Turn on the laser and set the laser beam about 1/8” higher than the highest cabinet.
6) Starting on the left side of any cabinet run… simply adjust the EZ-levels till both the front and rear of the cabinet hit the
laser line. Then level up the right side in the same fashion… then… adjust the “center” levelers till they touch the ground
and the laser line has been perfectly split so that it shows up on all four rails of every cabinet.
Notes:
Installation of the EZ-level system usually takes about 10-12 minutes. (first time users… 20-30 minutes)
Leveling usually takes about 5 – 10 minutes. (first time… 15 – 30 minutes)
Each set of levelers has a front and rear. The front leveler has a short adjusting rod and the rear has a long adjusting rod which
conveniently passes through the front leveler so that both are “EZ” to reach from the front of the cabinet. When the toe kicks are put into
place you’ll never see the leveling system again.
Tip: If you would like us to layout your EZ-Levels like the above we are happy to do it at no cost. Simply fax or email us your plans and in
about 1 hour we will email them back to you. Fax: 866-284-3321 (or) Email: [email protected]
16) Plumbing: Everyone (including some plumbers) started using those super thin… easy to install plumbing pipes that simply screw
together in an effort to save time… and they do. However I will NEVER, NEVER, NEVER use those pipes under my sink. One bump
from someone putting a large soap box or something under your sink and guess what… LEAK! The absolutely WORST thing that
can ever happen to a new kitchen or floor is a plumbing leak! Take the time to glue actual PVC pipes into place!!!! Tip: Unless
you are very capable… hire a LARGE plumbing company with strong insurance who will give you a “certificate of insurance” prior
to commencement with your name on it which will cover your home if something goes wrong. A plumber will cost you about
$250-$350 to hookup all your appliances / sink. Which is NOTHING compared to the damage that a small leak can cause.
Independent Cabinet
Cabinet Run

Laying out cabinets on your walls Close-Ups
Note: This is what the wall would look like when completed. Also notice the square box for the vent location.

Electrical Close-ups: (Always consult with your local code enforcement agency before planning or engaging in any alterations)
Showing typical under-cabinet lighting which usually connects… one-to-another and having one common plug which will plug in above the cabinets.
Because of the microwave you will plug in these two sides separately.
Note: Run the plug wire
(smallest end first) through the
cabinet. If using framed cabinets
run the wire “just behind” the
frame (toward the front of the
cabinet). Mount the “thin-line”
fluorescents underneath… and
toward the front of your
cabinets. This gives you much
better lighting than mounting
them toward the rear.
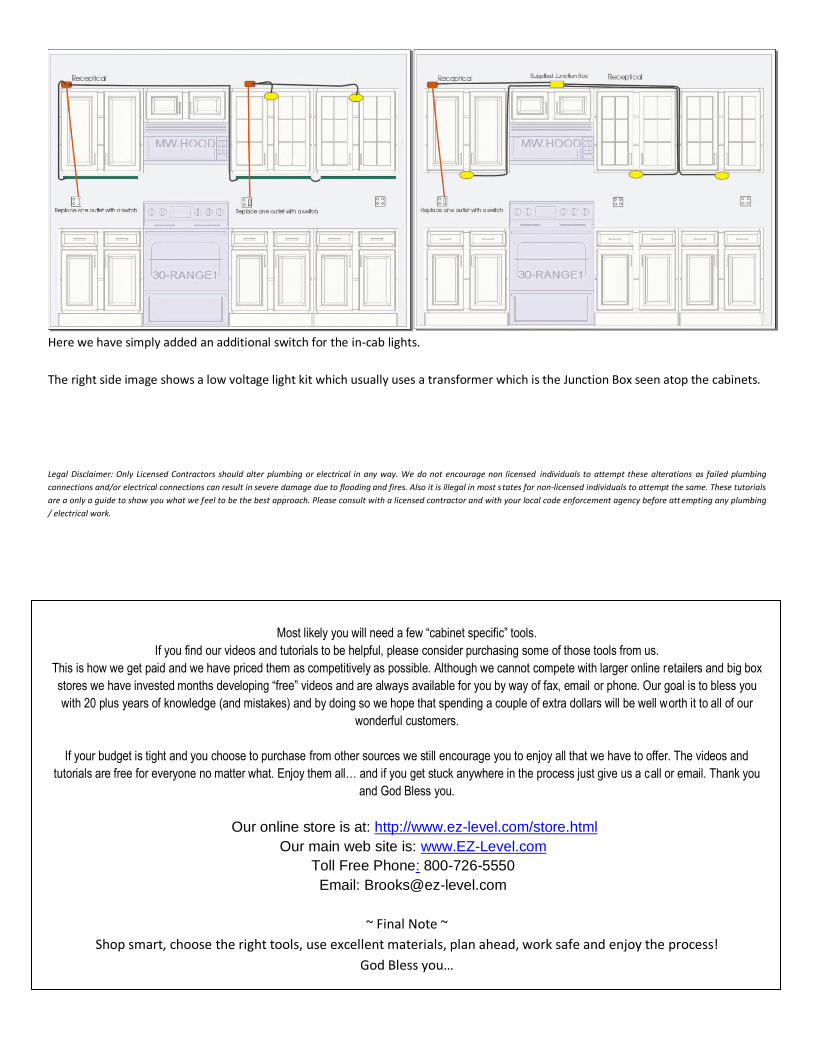
Here we have simply added an additional switch for the in-cab lights.
The right side image shows a low voltage light kit which usually uses a transformer which is the Junction Box seen atop the cabinets.
Legal Disclaimer: Only Licensed Contractors should alter plumbing or electrical in any way. We do not encourage non licensed individuals to attempt these alterations as failed plumbing
connections and/or electrical connections can result in severe damage due to flooding and fires. Also it is illegal in most s tates for non-licensed individuals to attempt the same. These tutorials
are a only a guide to show you what we feel to be the best approach. Please consult with a licensed contractor and with your local code enforcement agency before att empting any plumbing
/ electrical work.
Most likely you will need a few “cabinet specific” tools.
If you find our videos and tutorials to be helpful, please consider purchasing some of those tools from us.
This is how we get paid and we have priced them as competitively as possible. Although we cannot compete with larger online retailers and big box
stores we have invested months developing “free” videos and are always available for you by way of fax, email or phone. Our goal is to bless you
with 20 plus years of knowledge (and mistakes) and by doing so we hope that spending a couple of extra dollars will be well worth it to all of our
wonderful customers.
If your budget is tight and you choose to purchase from other sources we still encourage you to enjoy all that we have to offer. The videos and
tutorials are free for everyone no matter what. Enjoy them all… and if you get stuck anywhere in the process just give us a call or email. Thank you
and God Bless you.
Our online store is at: http://www.ez-level.com/store.html
Our main web site is: www.EZ-Level.com
Toll Free Phone: 800-726-5550
Email: [email protected]
~ Final Note ~
Shop smart, choose the right tools, use excellent materials, plan ahead, work safe and enjoy the process!
God Bless you…