touchscreen keypad · touchscreen keypad en introduction introduction risco group's...
TRANSCRIPT
Touchscreen Keypad
(Models: ProSYS KP, ProSYS KPP)(Models: ProSYS KP, ProSYS KPP)(Models: ProSYS KP, ProSYS KPP)(Models: ProSYS KP, ProSYS KPP)

2
Installing the TouchInstalling the TouchInstalling the TouchInstalling the Touchsssscreen Keypadcreen Keypadcreen Keypadcreen Keypad 1111 2222 3333
4 4 4 4 5555
7777
8888
6666

3
Touchscreen KeypadTouchscreen KeypadTouchscreen KeypadTouchscreen Keypad EN
IntroductionIntroductionIntroductionIntroduction
RISCO Group's Touchscreen Keypad is a slim and contemporary designed 7" touchscreen keypad for RISCO Security Systems. The Touchscreen Keypad is compatible with any RISCO hybrid system and is available with or without a proximity reader. The Touchscreen Keypad enables to control your security system as well as program its features.
For detailed information on programming the system refer to the system Installer and User manuals.
InstallationInstallationInstallationInstallation
For the Touchscreen installation procedure, refer to page 2.
IndicatorsIndicatorsIndicatorsIndicators
Power
On System is operating properly from AC power and backup battery is in good condition
Off No power
Slow Flash System is programming
Rapid Flash System trouble (fault)
Arm (Set)
On System is armed (set) in Full Arm or Stay Arm mode Off System is disarmed (unset) Slow Flash System is in Exit Delay Rapid Flash Alarm condition
Stay/ Bypass (Part Set/ Omit)
On
System is in Stay Arm (Part Set) or Zone Bypass (omit) mode Note:
The icon is equivalent to the icon on other ProSYS keypads.
Off No bypass zones in system
Ready
On System is ready to be armed (set) Off System is not ready to be armed (set)
Slow Flash System is ready to be armed (set) while exit/entry zone remains open
Fire
On Fire alarm in progress Off Normal operation Flashing Fire circuit problem
Tamper On Zone/keypad/external module has been tampered
Off All zones are operating normally
Proximity Flashing Indicates that the keypad has a proximity reader

4
KeysKeysKeysKeys
The keys on the keypad can be used for a variety of functions as explained below.
Control Keys
In Normal Operation mode: Used for Away (Full set) arming (setting) In User Functions menu: Used to change data
In Normal Operation mode: Used for Stay arming (Partial setting) In User Functions menu: Used to change data
Used to disarm (unset) the system after a user code is entered
Used to scroll up a list or to move the cursor to the left
Used to scroll down a list or to move the cursor to the right
Provides the system status (press for 2 seconds)
In Normal Operation mode: Used to enter the User Functions menu In User Functions menu: Used to move back one step in the menu Note:
The key is equivalent to the key on other ProSYS keypads.
Used to terminate commands and confirm data to be stored
Note:
The key is equivalent to the key on other ProSYS keypads.
Emergency Keys
Pressing both keys simultaneously for at least two seconds activates a Fire alarm
Pressing both keys simultaneously for at least two seconds activates an Emergency alarm
Pressing both keys simultaneously for at least two seconds activates a Police (Panic) alarm
Function Keys
Used to arm (set) groups of zones (by default) or to activate a prerecorded series of commands (macros)
Note:
For ProSYS UK version: Keys and are inactive.
Numerical Keys
Used to input numeric numbers when required

5
Keypad SettingsKeypad SettingsKeypad SettingsKeypad Settings
To define keypad settings follow this procedure:
1. Press for two seconds until the Keypad Settings menu appears
2. Select the relevant icon using the keys:
Brightness
Contrast
Volume
Language
Note: Set the keypad language according to the language in the ProSYS panel.
3. Press
4. Press to adjust the level settings
5. Press to save the adjustment
6. Press to exit the Keypad settings menu
Note: Each keypad's settings must be defined separately.
Keypad LockKeypad LockKeypad LockKeypad Lock
To lock the keypad:
Press and simultaneously for 2 seconds.
The keypad will beep and the�icon will appear on the LCD screen to notify that the keypad has been locked. To release the keypad lock:
Press and simultaneously for 2 seconds.

6
Present the Proximity Tag as shown belowPresent the Proximity Tag as shown belowPresent the Proximity Tag as shown belowPresent the Proximity Tag as shown below::::
Technical SpecificationsTechnical SpecificationsTechnical SpecificationsTechnical Specifications
Current Consumption ProSYS KP ProSYS KPP
13.8V +/-10%, 30 mA typical/180 mA max. 13.8V +/-10%, 30 mA typical/280 mA max.
Main Panel Connection 4-wire BUS, up to 300 m (1000 ft) from Main Panel
Dimensions 210 mm x 152 mm x 20 mm (8.2" x 5.9" x 0.7")
Operating temperature 0°C to 49°C (32°F to 120°F)
Storage temperature -20°C to 60°C (-4°F to 140°F)
Prox. RF Frequency 13.56MHz
Maintenance Maintenance Maintenance Maintenance
• To clean the LCD Screen: To clean the LCD Screen: To clean the LCD Screen: To clean the LCD Screen: Lock the keypad (see page 5). Use a non-abrasive
damp cloth. Do not expose the screen directly to liquid.
• Change the user codes regularly.
Ordering InformationOrdering InformationOrdering InformationOrdering Information
Model Description
ProSYS KP Touchscreen Keypad ProSYS KPP Touchscreen Keypad with Proximity 13.56MHz
RP200KT 10 prox keytags for Touchscreen & Agility (13.56MHz)

7
Tastiera TouchscreenTastiera TouchscreenTastiera TouchscreenTastiera Touchscreen IT
Introduzione Introduzione Introduzione Introduzione La Tastiera Touchscreen di RISCO Group è una tastiera con display touchscreen a 7" compatta e moderna realizzata per il sistema ProSYS. La Tastiera Touchscreen è compatibile con qualsiasi versione di ProSYS ed è disponibile con o senza lettore di prossimità integrato. La tastiera Touchscreen permette di controllare il proprio sistema di sicurezza così come programmare le sue funzioni.
Per informazioni dettagliate sulla programmazione del sistema fare riferimento ai manuali Tecnico e Utente della ProSYS.
InstallazioneInstallazioneInstallazioneInstallazione Per la procedura di installazione della Tastiera ProSYS Touchscreen, fare riferimento a pagina 2.
IndicatoriIndicatoriIndicatoriIndicatori
Alimentazione
Acceso Indica che il sistema è in funzione con la normale rete elettrica e che la batteria di riserva è in buone condizioni
Spento Indica che il sistema non è in funzione a causa di una mancanza di alimentazione (sia elettrica che della batteria di riserva) ed è quindi necessario un controllo
Lampeggio Lento Indica che il sistema è in modo Funzioni Utente
Lampeggio Rapido Indica la presenza di un guasto
Inserimento
Acceso Indica che i sensori del sistema sono inseriti; eventuali intrusioni verranno segnalate con un allarme
Spento Indica che i sensori del sistema sono disinseriti Lampeggio Lento Indica che il sistema è in modo Tempo di Ritardo in Uscita
Lampeggio Rapido Indica un allarme
Inserimento Parziale / Esclusione Zona
Acceso
Indica che risulta esclusa almeno una zona, o che è stato selezionato il modo Inserimento Parziale
Nota:
L’icona è equivalente all’icona sulle altre tastiere ProSYS.
Spento Indica che tutte le zone funzionano normalmente e il sistema è in modo Inserimento Totale.
Pronto all’Inserimento
Acceso Indica che il sistema è pronto all’inserimento Spento Indica che il sistema non è pronto all’inserimento
Lampeggio Lento
Indica che il sistema è pronto all’inserimento mentre c’è una o più zone temporizzate rimaste aperte o zone programmate come inserimento forzato aperte. Le zone programmate come inserimento forzato verranno automaticamente escluse dall’inserimento
Incendio
Acceso Indica che si sono verificati un allarme o un’emergenza incendio
Spento Indica che tutte le zone incendio funzionano correttamente
Lampeggiante Indica che è stato rilevato un problema nel circuito incendio ed è necessario un controllo
Manomissione Acceso Indica che un dispositivo collegato al sistema è stato
manomesso Spento Indica che tutte le zone funzionano normalmente

8
Prossimità Lampeggiante Indica che la tastiera ha il lettore di prossimità integrato
TastiTastiTastiTasti
I tasti della tastiera possono essere utilizzati per compiere numerose funzioni come spiegato sotto.
Tasti di Comando
In Modo di Funzionamento Normale: Attiva l’Inserimento Totale Nel Menù Funzioni Utente: Modifica i dati
In Modo di Funzionamento Normale: Attiva l’Inserimento Parziale Nel Menù Funzioni Utente: Modifica i dati
Disinserisce il sistema dopo l’inserimento del codice utente
Scorre un elenco verso l’alto/Sposta il cursore verso sinistra
Scorre un elenco verso il basso/Sposta il cursore verso destra
Informa sullo stato del sistema (premere per 2 secondi)
In Modo di Funzionamento Normale: Attiva il modo Funzioni Utente Nel Menù Funzioni Utente: Viene utilizzato per uscire dal menù corrente Nota:
Il tasto è equivalente al tasto sulle altre tastiere ProSYS.
Termina i comandi e conferma i dati da memorizzare
Nota:
Il tasto è equivalente al tasto sulle altre tastiere ProSYS.
Tasti Emergenza
Premendo simultaneamente e per almeno due secondi i tasti, si attiverà un allarme incendio
Premendo simultaneamente e per almeno due secondi i tasti, si invierà un allarme di soccorso medico
Premendo simultaneamente e per almeno due secondi i tasti, si attiverà un allarme panico
Tasti Funzione
I tasti funzione vengono usati di default per inserire gruppi di zone definiti dal tecnico oppure i tasti funzione possono anche essere usati per attivare una serie di comandi memorizzati (Funzioni Macro)
Tasti Numerici
I tasti numerici vengono usati per digitare i codici numerici necessari per inserire e disinserire il sistema, attivare gli allarmi di emergenza e per molte altre funzioni

9
Impostazioni TastieraImpostazioni TastieraImpostazioni TastieraImpostazioni Tastiera
Per programmare le impostazioni della tastiera segu ire la procedura seguente:
1. Premere per due secondi finché non appare il menù delle impostazioni della tastiera
2. Selezionare l’icona relativa l’impostazione desiderata utilizzando i tasti :
Luminosità
Contrasto
Volume
Lingua
Nota: Impostare la lingua della tastiera conformemente a quella in uso sulla centrale.
3. Premere
4. Premere per regolare il livello dell’impostazione
5. Premere per salvare la regolazione effettuata
6. Premere per uscire dal menù delle impostazioni della Tastiera
Nota: Ogni impostazione della tastiera deve essere programmata separatamente.
Blocco della Tastiera Blocco della Tastiera Blocco della Tastiera Blocco della Tastiera
Per bloccare la tastiera:
Premere simultaneamente i tasti e per 2 secondi.
La tastiera emetterà un tono e l’icona�apparirà sullo schermo LCD per notificare che la tastiera è stata bloccata. Per disattivare il blocco tastiera:
Premere simultaneamente i tasti e per 2 secondi.

10
Avvicinare il Tag di Prossimità nella posizione tratteggiata riportata sotto:Avvicinare il Tag di Prossimità nella posizione tratteggiata riportata sotto:Avvicinare il Tag di Prossimità nella posizione tratteggiata riportata sotto:Avvicinare il Tag di Prossimità nella posizione tratteggiata riportata sotto:
Specifiche TecnicheSpecifiche TecnicheSpecifiche TecnicheSpecifiche Tecniche
Assorbimento di Corrente
Modello: ProSYS KP Modello: ProSYS KPP
13.8V +/-10%, 30mA nom./180 mA max. 13.8V +/-10%, 30mA nom./280 mA max.
Collegamento con la Centrale 4 fili BUS, fino a 300 metri dalla Centrale
Dimensioni 210 mm x 152 mm x 20 mm
Temperatura di funzionamento Da 0°C a 49°C (Da 32°F a 120°F)
Temperatura di stoccaggio Da -20°C a 60°C (Da -4°F a 140°F)
Frequenza RF Prossimità 13.56MHz
Come OrdinareCome OrdinareCome OrdinareCome Ordinare
Modello Descrizione ProSYS KP Tastiera ProSYS Touchscreen
ProSYS KPP Tastiera ProSYS Touchscreen con Lettore di Prossimità integrato (13.56MHz)
RP200KT 10 chiavi tag di prossimità per Touchscreen e Agility (13.56MHz)

11
Teclado TáctilTeclado TáctilTeclado TáctilTeclado Táctil ES
IntroducciónIntroducciónIntroducciónIntroducción
El Teclado Táctil de RISCO Group es un delgado teclado táctil de 7’’, con un diseño moderno, para los sistemas de seguridad ProSYS. El Teclado Táctil es compatible con cualquier versión de ProSYS, y está disponible con o sin lector de proximidad. El Teclado Táctil le permite controlar su sistema de seguridad, así como programar sus funciones.
Para una información más detallada de la programación del sistema, consulte los manuales de Instalación y Usuario de la central ProSYS.
Instalación Instalación Instalación Instalación
Para el proceso de instalación del Teclado Táctil ProSYS, consulte la página 2.
IndicadoresIndicadoresIndicadoresIndicadores
Alimentación
Encendido El sistema está funcionando correctamente con la alimentación de CA, y la batería de respaldo está en perfectas condiciones
Apagado Sin alimentación
Parpadeo Lento El sistema está en modo programación
Parpadeo Rápido
Problema en el sistema
Armado
Encendido El sistema está armado en modo Total o Parcial Apagado El sistema está desarmado Parpadeo Lento
El sistema está en el Tiempo de Salida
Parpadeo Rápido Alarma
Parcial / Anulación
Encendido
El sistema está en Armado Parcial o hay Zonas Anuladas Nota:
El icono es equivalente al icono en otros teclados ProSYS.
Apagado No hay zonas anuladas en el sistema
Listo
Encendido El sistema está listo para ser armado Apagado El sistema no está listo para ser armado Parpadeo Lento
El sistema está listo para ser armado mientras una zona de entrada/salida permanece abierta
Incendio
Encendido Alarma de incendio Apagado Funcionamiento normal Parpadeo Problema en el circuito de incendio
Tamper Encendido Una zona, teclado o módulo externo ha sido saboteado
Apagado Todas las zonas están funcionando normalmente
Proximidad Parpadeo Indica que el teclado tiene un lector de proximidad

12
TeclasTeclasTeclasTeclas
Las teclas del teclado pueden usarse para diferentes funciones, como se explica a continuación.
Teclas de Control
En el modo Normal de funcionamiento: Se utiliza para hacer un Armado Total En el menú de Usuario: Se utiliza para cambiar los datos
En el modo Normal de funcionamiento: Se utiliza para hacer un Armado Parcial En el menú de Usuario: Se utiliza para cambiar los datos
Se utiliza para desarmar el sistema después de introducir un código de usuario
Se utiliza para desplazar hacia arriba una lista o mover el cursor a la izquierda
Se utiliza para desplazar hacia abajo una lista o mover el cursor a la derecha
Proporciona el estado del sistema (mantener pulsado durante 2 segundos)
En el modo Normal: Se utiliza para entrar en el menú de Usuario
En el menú de Usuario: Se utiliza para retroceder un nivel en el menú Nota:
La tecla es equivalente a la tecla en otros teclados ProSYS.
Termina comandos y confirma los datos a ser almacenados
Nota:
La tecla es equivalente a la tecla en otros teclados ProSYS.
Teclas de Emergencia
Presionando ambas teclas simultáneamente durante al menos dos segundos activa una alarma de Incendio.
Presionando ambas teclas simultáneamente durante al menos dos segundos activa una alarma de Emergencia.
Presionando ambas teclas simultáneamente durante al menos dos segundos activa una alarma de Pánico (Policía).
Teclas de Función
Se utilizan para armar grupos de zonas (por defecto) o para activar una serie de comandos pregrabados (macros)
Teclas Numéricas
Se utilizan cuando es necesario introducir números.

13
Configuración del TecladoConfiguración del TecladoConfiguración del TecladoConfiguración del Teclado
Para definir la configuración del teclado siga esto s pasos:
1. Presione durante dos segundos hasta que aparezca el menú de Configuración del Teclado
2. Seleccione un icono usando las teclas :
Brillo
Contraste
Volumen
Idioma
Nota: Configure el idioma del teclado según el idioma de la central.
3. Presione
4. Presione para ajustar el nivel
5. Presione para guardar el ajuste
6. Presione para salir del menú de configuración
Nota: La configuración de cada teclado debe definirse por separado.
Bloqueo del TecladoBloqueo del TecladoBloqueo del TecladoBloqueo del Teclado
Para bloquear las teclas:
Pulsar simultáneamente las teclas y durante 2 segundos.
El teclado pitará y en la pantalla LCD aparecerá el icono�para indicar que el teclado ha sido bloqueado.
Para desbloquear el teclado:
Pulsar simultáneamente las teclas y durante 2 segundos.

14
Acercar la Llave de Proximidad como se indica:Acercar la Llave de Proximidad como se indica:Acercar la Llave de Proximidad como se indica:Acercar la Llave de Proximidad como se indica:
Especificaciones TécnicasEspecificaciones TécnicasEspecificaciones TécnicasEspecificaciones Técnicas
Consumo de Corriente Modelo: ProSYS KP
Modelo: ProSYS KPP
13,8V +/-10%, 30 mA norm./180 mA máx.
13,8V +/-10%, 30 mA norm./280 mA máx.
Conexión a la central BUS de 4 hilos, hasta 300m de la central
Dimensiones 210 mm x 152 mm x 20 mm
Temperatura funcionamiento 0°C a 49°C (32°F a 120°F)
Temperatura almacenaje -20°C a 60°C (-4°F a 140°F)
Frecuencia RF Proximidad 13,56MHz
Información para pedidosInformación para pedidosInformación para pedidosInformación para pedidos
Modelo Descripción ProSYS KP Teclado Táctil ProSYS
ProSYS KPP Teclado Táctil ProSYS con Proximidad (13,56MHz)
RP200KT 10 llaves de prox. para Tecl.Táctil & Agility (13,56MHz)

15
Clavier à Ecran TactileClavier à Ecran TactileClavier à Ecran TactileClavier à Ecran Tactile FR
IntroductionIntroductionIntroductionIntroduction
Le Clavier à Ecran Tactile de RISCO Group est un clavier au design fin et moderne muni d’un écran tactile 7”, conçu pour four fonctionner avec le système de sécurité ProSYS. Le Clavier à Ecran Tactile est compatible avec toutes les versions de ProSYS, et disponible avec ou sans lecteur de proximité intégré. Le Clavier à Ecran Tactile permet de contrôler votre système de sécurité, mais aussi de programmer ses fonctionnalités.
Pour des informations détaillées sur le paramétrage du système, reportez-vous aux manuels Utilisateur et Installateur de la ProSYS.
InstallationInstallationInstallationInstallation
Pour la procédure d’installation du Clavier à Ecran Tactile ProSYS, se référer à la page 2.
IndicateursIndicateursIndicateursIndicateurs
Alimentation
Allumée Le système fonctionne correctement sur tension réseau (230V); la batterie de réserve est en bon état
Eteinte Aucune alimentation Clignote Lentement Indique que le système est en programmation
Clignot e Rapidement Indique une condition de défaut
Armé
Allumée Le système ou la partition est armé(e) Eteinte Le système ou la partition est désarmé(e) Clignote Lentement
Indique que le système se trouve en état de temporisation de sortie
Clignote Rapidement Indique un état d’alarme
Armé partiellement /Exclusion
Allumée
Au moins une zone est exclue ou le système est armé partiellement Remarque :
L’icône équivaut à l’icône des autres claviers ProSYS.
Eteinte Aucune zone exclue dans le système
Prêt
Allumée Le système est prêt à être armé Eteinte Le système n’est pas prêt à être armé
Clignote Lentement
Indique que le système est prêt à être armé tandis qu’une porte d’entrée / de sortie (zone type E/S ouverte) est ouverte
Incendie
Al lumée Une alarme incendie s’est produite ou est en cours Eteinte Toutes les zones incendies fonctionnent normalement Clignote Il y a un défaut dans une boucle de détection incendie
Autoprotection
Allumée Une zone, un clavier ou un module externe utilisé par le système présente une condition d’autoprotection
Eteinte Toutes les zones fonctionnent normalement
Proximité Clignote Indique que le clavier intègre un lecteur de proximité
16
TouchesTouchesTouchesTouches
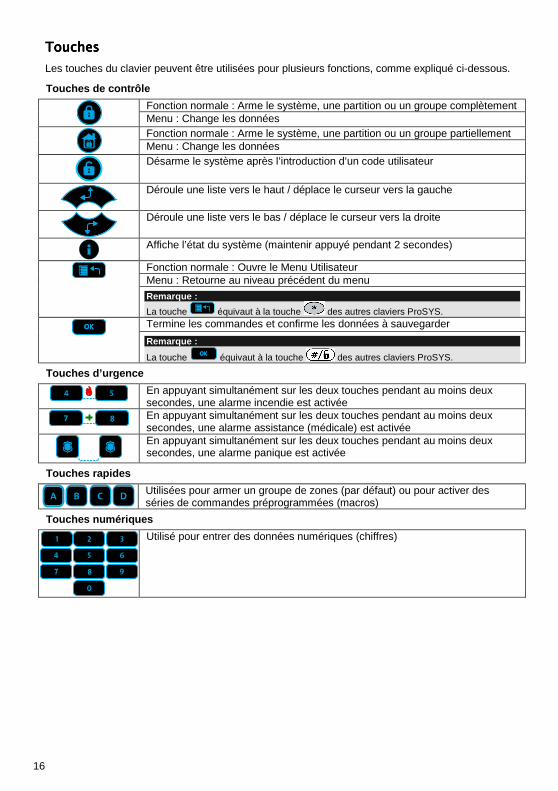
Les touches du clavier peuvent être utilisées pour plusieurs fonctions, comme expliqué ci-dessous.
Touches de contrôle
Fonction normale : Arme le système, une partition ou un groupe complètement Menu : Change les données
Fonction normale : Arme le système, une partition ou un groupe partiellement Menu : Change les données
Désarme le système après l’introduction d’un code utilisateur
Déroule une liste vers le haut / déplace le curseur vers la gauche
Déroule une liste vers le bas / déplace le curseur vers la droite
Affiche l’état du système (maintenir appuyé pendant 2 secondes)
Fonction normale : Ouvre le Menu Utilisateur Menu : Retourne au niveau précédent du menu
Remarque :
La touche équivaut à la touche des autres claviers ProSYS.
Termine les commandes et confirme les données à sauvegarder
Remarque :
La touche équivaut à la touche des autres claviers ProSYS.
Touches d’urgence
En appuyant simultanément sur les deux touches pendant au moins deux secondes, une alarme incendie est activée
En appuyant simultanément sur les deux touches pendant au moins deux secondes, une alarme assistance (médicale) est activée
En appuyant simultanément sur les deux touches pendant au moins deux secondes, une alarme panique est activée
Touches rapides
Utilisées pour armer un groupe de zones (par défaut) ou pour activer des séries de commandes préprogrammées (macros)
Touches numériques
Utilisé pour entrer des données numériques (chiffres)

17
Paramètres du clavierParamètres du clavierParamètres du clavierParamètres du clavier
Pour définir les paramètres du clavier, il faut :
1. Appuyer sur pendant 2 secondes, jusqu’à ce que le menu des Paramètres du Clavier apparaisse
2. Sélectionner l’icône souhaitée avec :
Luminosité
Contraste
Volume
Langue
Remarque : Paramétrer la langue du clavier selon la langue de la centrale.
3. Appuyer sur
4. Appuyer sur pour ajuster le niveau
5. Appuyer pour enregistrer le réglage
6. Appuyer sur pour quitter le menu des Paramètres du Clavier
Remarque : Les paramètres de chaque clavier doivent être définis séparément.
Verrouillage du clavierVerrouillage du clavierVerrouillage du clavierVerrouillage du clavier
Pour verrouiller le clavier :
Appuyer simultanément sur les touches et pendant 2 secondes.
Le clavier émettra un bip et l’icône�apparaîtra sur l’écran LCD pour notifier que le clavier est verrouillé. Pour déverrouiller le clavier :
Appuyer simultanément sur les touches et pendant 2 secondes.

18
Présenter le Tag de Proximité comme montré ciPrésenter le Tag de Proximité comme montré ciPrésenter le Tag de Proximité comme montré ciPrésenter le Tag de Proximité comme montré ci----dessousdessousdessousdessous::::
Spécifications TechniquesSpécifications TechniquesSpécifications TechniquesSpécifications Techniques
Consommation Modèle : ProSYS KP Modèle : ProSYS KPP
13.8V +/-10%, 30 mA nom./180 mA max. 13.8V +/-10%, 30 mA nom./280 mA max.
Connexion à la centrale BUS 4 fils, jusqu’à 300m de la centrale
Dimensions 210 mm x 152 mm x 20 mm
Température d’exploitation 0°C à 49°C (32°F à 120°F)
Température de stockage -20°C à 60°C (-4°F à 140°F)
Fréquence RF de Prox. 13.56MHz
MaintenanceMaintenanceMaintenanceMaintenance
• Pour nettoyer l’écran LCD : Verrouiller le clavier (voir page 17). Utiliser un tissue humide. Ne pas exposer l’écran directement à du liquide.
• Changer les codes utilisateur régulièrement.
Information de CommandeInformation de CommandeInformation de CommandeInformation de Commande
Modèle Description ProSYS KP Clavier à Ecran Tactile ProSYS
ProSYS KPP Clavier à Ecran Tactile ProSYS avec lecteur de Proximité 13.56MHz
RP200KT 10 Tags de Proximité pour Claviers à Ecran Tactile & Agility (13.56MHz)

19
Touchscreen KeypadTouchscreen KeypadTouchscreen KeypadTouchscreen Keypad NL
InleidingInleidingInleidingInleiding
Het RISCO Group's Touchscreen Keypad is een dun en modern design keypad van 7" (17,8cm) voor het ProSYS beveiliging systeem. Het is compatible met alle ProSYS versie en beschikbaar met en zonder proximitylezer. Het Touchscreen Keypad maakt het bestuur van uw beveiliging systeem mogelijk als ook de programmering van zijn onderleden.
Voor meer informatie over de programmering van het systeem zie ProSYS Installateur en Gebruikershandleiding.
InstallatieInstallatieInstallatieInstallatie
Raadpleeg pagina 2 voor de ProSYS Touchscreen installatie procedure.
IndicatorsIndicatorsIndicatorsIndicators
Voeding
Aan Het systeem werkt correct op stroom via het net; de stand-by batterij is in een goede toestand
Uit Geen voeding Knippert Langzaam
Geeft aan dat het systeem in het Gebruikersmenu staat
Knippert Snel Geeft een storingstoestand aan
Ingeschakeld
Aan Het systeem of partitie is ingeschakeld Uit Het systeem of partitie is uitgeschakeld Knippert Langzaam
Geeft aan dat het systeem zich in de uitloopvertraging bevindt
Knippert Snel
Alarm toestand
Deels/ Overbruggen
Aan
Het systeem werkt in Deels inschakeling of Zone Overbruggen modus Opmerking:
De icoon is gelijkwaardig aan de icoon op andere ProSYS keypads.
Uit Alle zones functioneren normaal en het systeem is ingeschakeld
Gereed
Aan Het systeem is gereed om te worden ingeschakeld Uit Het systeem is niet gereed om te worden ingeschakeld
Knippert Langzaam
Duidt aan dat het systeem gereed is om te worden ingeschakeld terwijl een speciaal aangegeven ingang/uitgangsdeur open staat
Brand
Aan Een brandalarm is opgetreden of is recentelijk opgetreden
Uit Alle brandzones werken normaal Knippert Er is een storing waargenomen op een brandcircuit
Sabotage Aan
Een zone, keypad of een externe module die door het systeem gebruikt wordt is fysiek vernield of gesaboteerd
Uit Alle zones functioneren normaal
Proximity Knippert Duidt aan dat het keypad heeft een proximitylezer

20
ToetsenToetsenToetsenToetsen
De keypad toetsen kan gebruiken voor verschillende functies hieronder vermelden.
Sturing toetsen
Normale functie: Schakelt het systeem, een partitie of een groep geheel in. Gebruikermenu: Verandert data.
Normale functie: Schakelt het systeem, een partitie of een groep gedeeltelijk in. Gebruikermenu: Verandert data.
Schakelt het systeem uit nadat de gebruikercode ingevoerd is.
Scrolt omhoog door een lijst/beweegt de cursor naar links.
Scrolt omlaag in een lijst/beweegt de cursor naar rechts.
Toont de systeemstatus (toets 2 seconden induwend).
Normale functie: Activeert het Gebruikermenu. Gebruikermenu: Te gebruiken om een step terug in het menu. Opmerking:
De toets is gelijkwaardig aan de toets op andere ProSYS keypads.
Sluit de commando's af en bevestigt data die dienen te worden opgeslagen.
Opmerking:
De toets is gelijkwaardig aan de toets op andere ProSYS keypads.
Noodtoetsen
Door tegelijkertijd op die toetsen te drukken ten minste gedurende twee seconden, wordt er een Brandalarm geactiveerd.
Door tegelijkertijd op die toetsen te drukken gedurende twee seconden wordt er een Hulpalarm geactiveerd.
Door tegelijkertijd op die toetsen te drukken gedurende ten minste twee seconden wordt er een Paniekalarm geactiveerd.
Sneltoetsen
Standaard worden de sneltoetsen gebruikt om groepen zones in te schakelen of de toetsen kunnen ook worden gebruikt om een vooraf opgenomen reeks commando's te activeren.
Numerieke toetsen
Te gebruiken om numeriek waarden in te tijpen als nodig.

21
Keypad instellingenKeypad instellingenKeypad instellingenKeypad instellingen
Om de keypad in te stellen volg de instructies hier onder:
1. Druk op gedurende 2 seconden tot het keypad instelling menu doorschijnt
2. Kies de juist icoon met de toetsen:
Helderheid
Contrast
Volume
Taal
Opmerking: Stel de taal van het keypad in volgens de taal van de centrale.
3.Druk op
4. Druk op om de juist instelling te kiezen
5. Druk op om de instelling te bewaren
6. Druk op om uit te gaan van het Keypad instelling menu
Opmerking: Elke keypad moet afzonderlijk ingesteld worden.
Keypad blokkeringKeypad blokkeringKeypad blokkeringKeypad blokkering
Om het keypad te blokkeren:
Druk gelijktijdig op de toetsen en voor 2 seconden.
De keypad zou piepen en de icoon�zou op het scherm voorschijnen om te vermelden dat het keypad is geblokkeerd. Om het keypad te deblokkeren:
Druk gelijktijdig op de toetsen en voor 2 seconden.

22
Biedt de Proximity Tag zoals hieronder getoondBiedt de Proximity Tag zoals hieronder getoondBiedt de Proximity Tag zoals hieronder getoondBiedt de Proximity Tag zoals hieronder getoond::::
TechnisTechnisTechnisTechnische Specificatiesche Specificatiesche Specificatiesche Specificaties
Stroomverbruik Model: ProSYS KP Model: ProSYS KPP
13.8V +/-10%, 30 mA typ./180 mA max. 13.8V +/-10%, 30 mA typ./280 mA max.
Hoofd paneel aansluiting 4-wire BUS, tot 300 m van het paneel
Afmeting 210 mm x 152 mm x 20 mm
Bedrijfstemperatuur 0°C tot 49°C (32°F tot 120°F)
Opslagtemperatuur -20°C tot 60°C (-4°F tot 140°F)
Prox. RF Frequentie 13.56MHz
Bestelling informatieBestelling informatieBestelling informatieBestelling informatie
Model Beschrijving ProSYS KP ProSYS Touchscreen Keypad
ProSYS KPP ProSYS Touchscreen Keypad met Proximity 13.56MHz
RP200KT 10 prox keytags voor Touchscreen & Agility (13.56MHz)

23
Teclado Touchscreen Teclado Touchscreen Teclado Touchscreen Teclado Touchscreen (com tela sensível ao toque)(com tela sensível ao toque)(com tela sensível ao toque)(com tela sensível ao toque)
Introdução Introdução Introdução Introdução
O teclado touchscreen do RISCO Group é um teclado de 7 polegadas fino e moderno, com tela sensível ao toque para o sistema de segurança ProSYS. O teclado touchscreen é compatível com qualquer versão da ProSYS, e está disponível com ou sem leitor de proximidade. O teclado toucscreen permite controlar seu sistema de segurança bem como programar suas funções.
Para informações mais detalhadas sobre como programar o sistema, consulte os manuais do instalador e do usuário da ProSYS.
InstalaçãoInstalaçãoInstalaçãoInstalação
Para o procedimento de instalação da tela sensível ao toque da ProSYS, consulte a página 2.
IndicadoresIndicadoresIndicadoresIndicadores
Funcionamento
Ativado O sistema está funcionando adequadamente. A energia elétrica e a bateria de reserva estão em boas condições
Desativado Não há energia Piscando lentamente O sistema está em modo de programação
Piscando rapidamente Problema no sistema
Armado
Ativado O sistema está armado no modo Total ou Parcial Desativado O sistema está desarmado Piscando lentamente O sistema está contando o tempo de saída
Piscando rapidamente Condição de alarme
Stay/ Bypass
Ativado
O sistema está no modo de armado Parcial ou existem zonas Inibidas. (Bypass) Nota:
O ícone é equivalente ao ícone nos outros teclados numéricos da ProSYS.
Desativado Nenhuma zona inibida no sistema
Pronto
Ativado O sistema está pronto para ser armado Desativado O sistema não está pronto para ser armado
Piscando lentamente
O sistema está pronto para ser armado, porém, a quando a zona de entrada/saída permanecer aberta
Incêndio
Ativado Alarme de incêndio em funcionamento Desativado Operação normal Piscando Problema no circuito de incêndio
Tamper Ativado Um módulo, zona e/ou teclado está(ão)
violado(a/os/as) Desativado Todas as zonas estão operando normalmente
Proximidade Piscando
Indica que o teclado possui um leitor de proximidade
24
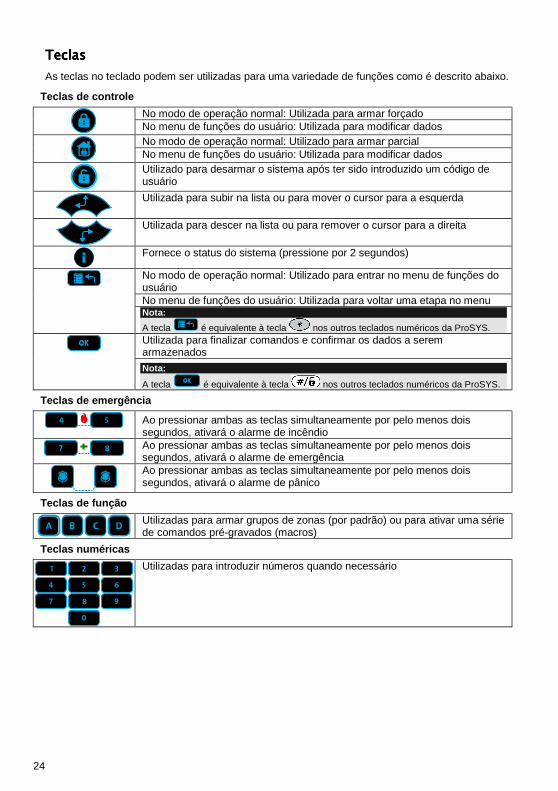
TeclasTeclasTeclasTeclas
As teclas no teclado podem ser utilizadas para uma variedade de funções como é descrito abaixo.
Teclas de controle
No modo de operação normal: Utilizada para armar forçado No menu de funções do usuário: Utilizada para modificar dados
No modo de operação normal: Utilizado para armar parcial No menu de funções do usuário: Utilizada para modificar dados
Utilizado para desarmar o sistema após ter sido introduzido um código de usuário
Utilizada para subir na lista ou para mover o cursor para a esquerda
Utilizada para descer na lista ou para remover o cursor para a direita
Fornece o status do sistema (pressione por 2 segundos)
No modo de operação normal: Utilizado para entrar no menu de funções do usuário No menu de funções do usuário: Utilizada para voltar uma etapa no menu Nota:
A tecla é equivalente à tecla nos outros teclados numéricos da ProSYS.
Utilizada para finalizar comandos e confirmar os dados a serem armazenados
Nota:
A tecla é equivalente à tecla nos outros teclados numéricos da ProSYS.
Teclas de emergência
Ao pressionar ambas as teclas simultaneamente por pelo menos dois segundos, ativará o alarme de incêndio
Ao pressionar ambas as teclas simultaneamente por pelo menos dois segundos, ativará o alarme de emergência
Ao pressionar ambas as teclas simultaneamente por pelo menos dois segundos, ativará o alarme de pânico
Teclas de função
Utilizadas para armar grupos de zonas (por padrão) ou para ativar uma série de comandos pré-gravados (macros)
Teclas numéricas
Utilizadas para introduzir números quando necessário

25
Configurações do teclado numéricoConfigurações do teclado numéricoConfigurações do teclado numéricoConfigurações do teclado numérico
Para definir as configurações do teclado numérico, siga o procedimento a seguir:
1. Pressione por dois segundos até aparecer o menu de configurações do teclado numérico
2. Selecione o ícone relevante utilizando as teclas :
Brilho
Contraste
Volume
Idioma
Nota: Configure o idioma do teclado numérico de acordo com o idioma no painel do ProSYS.
3. Pressione
4. Pressione para ajustar as configurações do nível
5. Pressione para salvar o ajuste
6. Pressione para sair do menu de configurações do teclado numérico
Nota: Cada configuração do teclado numérico deve ser definida separadamente.
Teclado numérico bloqueadoTeclado numérico bloqueadoTeclado numérico bloqueadoTeclado numérico bloqueado
Para bloquear o teclado numérico:
Pressione e simultaneamente por 2 segundos.
Soará um bip no painel numérico e o ícone�aparecerá na tela LCD para avisar que o teclado está bloqueado. Para liberar o teclado numérico:
Pressione e simultaneamente por 2 segundos.

26
Aproxime o cartão de proximidade conforme indicado abaixo:Aproxime o cartão de proximidade conforme indicado abaixo:Aproxime o cartão de proximidade conforme indicado abaixo:Aproxime o cartão de proximidade conforme indicado abaixo:
Especificações técnicasEspecificações técnicasEspecificações técnicasEspecificações técnicas
Corrente de consumo ProSYS KP ProSYS KPP
13,8V +/-10%, 30 mA típica/180 mA máx. 13,8V +/-10%, 30 mA típica/280 mA máx.
Conexão do painel principal Barramento 4-fios, até 300 m do painel principal
Dimensões 210 mm x 152 mm x 20 mm
Temperatura de operação 0°C a 49°C
Temperatura de armazenamento -20°C a 60°C Freqüência de rádio do leitor de proximidade 13,56MHz
Informações para encomendaInformações para encomendaInformações para encomendaInformações para encomenda
Model oooo Descrição
ProSYS KP Teclado Touchscreen da ProSYS ProSYS KPP Teclado Touchscreen da ProSYS com proximidade de 13,56MHz
RP200KT 10 Tags (identificadores) de proximidade para o teclado Touchscreen da ProSYS ou para o teclado da Agility (13,56MHz)

27
Klawiatura Klawiatura Klawiatura Klawiatura DotykowaDotykowaDotykowaDotykowa PL
Wstęp
Klawiatura dotykowa RISCO Group to nowoczesne urządzenie, z siedmiocalowym wyświetlaczem, przeznaczone do współpracy z rodziną central alarmowych ProSYS. Jest ono kompatybilne z dowolną wersją centrali. Klawiatura dotykowa występuje w dwóch wersjach, z których jedna zawiera dodatkowo czytnik zbliżeniowy. Umożliwia zarówno sterowanie systemem jak też programowanie jego parametrów.
Szczegółowe informacje dotyczące programowania systemu znajdują się w Instrukcji Instalacji oraz Poradniku Użytkownika systemu ProSYS.
Instalacja
Instalowanie klawiatury dotykowej ProSYS należy przeprowadzić zgodnie z informacjami umieszczonymi na stronie 2.
Wskaźniki
Zasilanie
Świeci się Prawidłowe zasilanie sieciowe AC oraz właściwy stan naładowania akumulatora.
Wygaszony Brak zasilania
Wolne miganie System w trybie programowania Szybkie miganie
Awaria w systemie
Arm
Świeci się System jest uzbrojony całkowicie lub częściowo Wygaszony System jest rozbrojony Wolne miganie System w trakcie opóźnienia na wyjście Szybkie miganie
System w stanie alarmu
Uzbrojenie częściowe lub stan blokady
Świeci się
System jest uzbrojony częściowo lub znajduje się w trybie blokady linii Uwaga:
Ikona jest odpowiednikiem ikony w innych klawiaturach systemu ProSYS.
Wygaszony Brak zablokowanych linii w systemie
Gotowo ść
Świeci się System jest gotowy do uzbrojenia Wygaszony System nie jest gotowy do uzbrojenia
Wolne miganie System jest gotowy do uzbrojenia kiedy linia opóźniona pozostaje naruszona (otwarta)
Pożar
Świeci się W trakcie alarmu pożarowego Wygaszony Tryb normalny Miganie Problem w obwodzie p.poż.
Sabota ż
Świeci się Sabotaż linii/klawiatury/innych modułów Wygaszony Tryb normalny
Czytnik zbli żeniowy Miganie Wskazuje na wyposażenie klawiatury w czytnik
zbliżeniowy

28
Klawisze
Klawisze klawiatury mogą być użyte do różnych funkcji, zgodnie z poniższym opisem:
Klawisze Steruj ące
W trybie normalnym: do uzbrajanie całkowitego W trybie funkcji użytkownika: do zmiany danych
W trybie normalnym: do uzbrajanie częściowego W trybie funkcji użytkownika: do zmiany danych
Do rozbrojenia systemu po wprowadzeniu kodu użytkownika
Do przewijania do góry listy parametrów (opcji) lub przesuwania kursora w lewo
Do przewijania do dołu listy parametrów (opcji) lub przesuwania kursora w prawo
Prezentacja stanu systemu (nacisnąć na 2 sekundy)
W trybie normalnym: wejście do trybu funkcji użytkownika W trybie funkcji użytkownika: powrót o jeden poziom menu Uwaga:
Ikona jest odpowiednikiem ikony w innych klawiaturach systemu ProSYS.
Zakończenie polecenia lub potwierdzenie danych do zapisu
Uwaga:
Ikona jest odpowiednikiem ikony w innych klawiaturach systemu ProSYS.
Klawisze Alarmowe
Naciśnięcie obydwu klawiszy jednocześnie na co najmniej 2 sekundy uruchamia alarm pożarowy
Naciśnięcie obydwu klawiszy jednocześnie na co najmniej 2 sekundy uruchamia alarm medyczny
Naciśnięcie obydwu klawiszy jednocześnie na co najmniej 2 sekundy uruchamia sygnalizację napadu
Klawisze Funkcyjne
Używane do uzbrajania grupy linii (ustawienie fabryczne) lub aktywacji wcześniej wpisanej listy poleceń (makro)
Klawisze Numeryczne
Używane do wprowadzania danych liczbowych, jeżeli zachodzi taka potrzeba.

29
Ustawienie klawiatury
Do zdefiniowania ustawie ń klawiatury słu ży poni ższa procedura:
1. Nacisnąć na dwie sekundy aż pojawi się menu ustawień klawiatury
2. Wybrać odpowiednią ikonę, używając klawiszy :
Jasność
Kontrast
Poziom głośności
Język
Uwaga: Wybierz wersję językową zgodną z wersją centrali ProSYS.
3. Nacisnąć
4. Naciskać aby uzyskać właściwe ustawienie parametru
5. Nacisnąć aby zapisać wybrane ustawienie
6. Nacisnąć aby wyjść z menu ustawień klawiatury
Uwaga: Ustawień dla każdej klawiatury należy dokonywać oddzielnie.
Blokada KlawiaturyBlokada KlawiaturyBlokada KlawiaturyBlokada Klawiatury
Aby zablokowa ć klawiatur ę:
Nacisnąć jednocześnie i przytrzymać przez 2 sekundy klawisze oraz .
Klawiatura wygeneruje sygnał akustyczny a na wyświetlaczu pojawi się ikona�wskazując, że klawiatura jest zablokowana.
Aby odblokowa ć klawiatur ę:
Nacisnąć jednocześnie i przytrzymać przez 2 sekundy klawisze oraz .
30
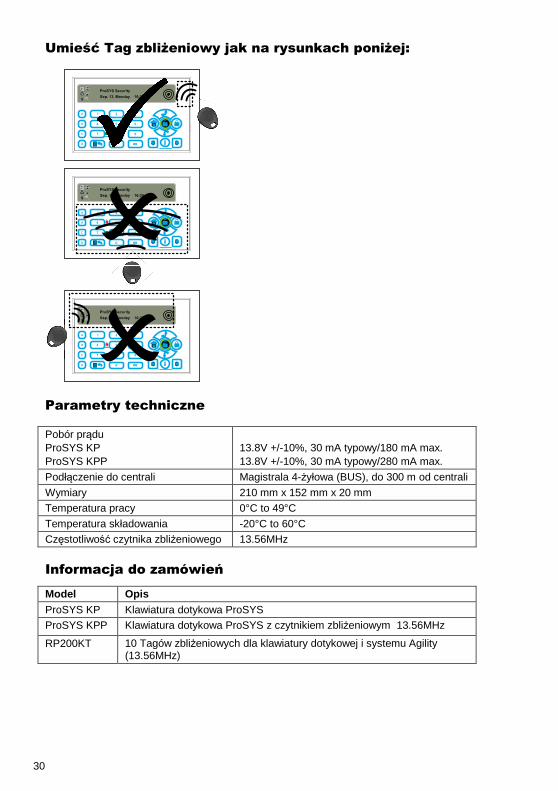
Umieść Tag zbliżeniowy jak na rysunkach poniżej:
Parametry techniczne
Pobór prądu ProSYS KP ProSYS KPP
13.8V +/-10%, 30 mA typowy/180 mA max. 13.8V +/-10%, 30 mA typowy/280 mA max.
Podłączenie do centrali Magistrala 4-żyłowa (BUS), do 300 m od centrali
Wymiary 210 mm x 152 mm x 20 mm
Temperatura pracy 0°C to 49°C
Temperatura składowania -20°C to 60°C
Częstotliwość czytnika zbliżeniowego 13.56MHz
Informacja do zamówień
Model Opis
ProSYS KP Klawiatura dotykowa ProSYS ProSYS KPP Klawiatura dotykowa ProSYS z czytnikiem zbliżeniowym 13.56MHz
RP200KT 10 Tagów zbliżeniowych dla klawiatury dotykowej i systemu Agility (13.56MHz)

31
Dotyková klávesniceDotyková klávesniceDotyková klávesniceDotyková klávesnice CZ
ÚvodÚvodÚvodÚvod
Dotyková klávesnice od RISCO Group je štíhlá 7" obrazovka s tlačítky určená pro bezpečnostní systém ProSYS. Klávesnice je kompatibilní se všemi verzemi ProSYS a je k dispozici ve verzi s nebo bez proximity čtečky.Tlačítka na obrazovce umožňují ovládat a programovat všechny rysy vašeho bezpečnostního systému. Detailní informace o programování systému ProSYS najdete v Instalačním a Uživatelském manuálu.
InstalInstalInstalInstalaceaceaceace
Postup instalace k panelu ProSYS je na straně 2.
IndiIndiIndiIndikacekacekacekace
Power
Svítí Napájení je zapnuté (AC i baterie)
Nesvítí Bez napájení Pomalu bliká
Systém v programování
Rychle bliká Porucha systému
Arm
Svítí Systém je plně nebo částečně aktivován Nesvítí Systém je deaktivován Pomalu bliká Systém je v odchodovém zpoždění
Rychle bliká Poplach
Stay/ Bypass
Svítí
Systém je v částečné aktivaci nebo je nějaká zóna přemostěna Poznámka:
Ikona je ekvivalent klávesy na ostatních klávesnicích ProSYS.
Nesvítí Žádná zóna v systému není přemostěna
Ready
Svítí Systém je připraven k aktivaci Nesvítí Systém není připraven k aktivaci Pomalu bliká
Systém je připraven k aktivaci, zatímco vstupní/odchodová zóna zůstává otevřená
Fire
Svítí Požární poplach Nesvítí Normální režim Bliká Porucha požárního okruhu
Tamper
Svítí Zóna/klávesnice/externí modul má otevřený tamper Nesvítí Všechny zóny jsou v normálním režimu
Proximity Bliká Indikuje, že klávesnice má proximity čtečku

32
IkonyIkonyIkonyIkony
Ikony na klávesnici můžou být použity pro různé funkce uvedené níže.
Ovládací klávesy
V normálním pracovním režimu: Použita na plnou aktivaci V uživatelském menu: Použita na změnu dat
V normálním pracovním režimu: Použita na částečnou aktivaci V uživatelském menu: Použita na změnu dat
Použito na deaktivaci systému po zadání uživatelského kódu
Použito na listování v menu nahoru nebo posunu kurzoru doleva
Použito na listování v menu dolu nebo posunu kurzoru doprava
Poskytne informace o stavu systému (stiskněte na 2 vteřiny)
V normálním pracovním režimu: Použito na vstup do Uživatelského menu V uživatelské menu: Použito na jeden krok zpět v menu Poznámka:
Ikona je ekvivalent klávesy na ostatních klávesnicích ProSYS.
Použito na ukončení příkazu a potvrzení uložení provedených změn.
Poznámka:
Ikona je ekvivalent klávesy na ostatních klávesnicích ProSYS.
Nouzové klávesy
Stisknutím obou ikon současně na nejméně 2 vteřiny aktivujete požární poplach.
Stisknutím obou ikon současně na nejméně 2 vteřiny aktivujete zdravotní poplach.
Stisknutím obou ikon současně na nejméně 2 vteřiny aktivujete policejní (Panik) poplach.
Funkční klávesy
Tyto klávesy se používají na aktivaci skupin zón (standartně) nebo na aktivaci předdefinovaných sérií příkazů (maker).
Numerické klávesy
Tyto ikony se používají na zadávání číslic, když je to požadováno.

33
Nastavení klávesniceNastavení klávesniceNastavení klávesniceNastavení klávesnice
Postup definice nastavení klávesnice:
1. Stiskněte na 2 vteřiny ikonu dokud se neobjeví menu nastavení klávesnice.
2. Vyberte příslušnou ikonu použitím kláves :
Jas
Kontrast
Hlasitost
Jazyk
Poznámka: Nastavte shodný jazyk klávesnice s panelem ProSYS.
3. Stiskněte ikonu .
4. Stiskněte ikony pro přizpůsobení úrovně nastavení.
5. Stiskněte ikonu pro uložení úprav.
6. Stiskněte ikonu pro odchod z menu nastavení klávesnice.
Poznámka: Každá klávesnice musí být definována samostatně.
Zámek klávesniceZámek klávesniceZámek klávesniceZámek klávesnice
Postup pro uzam čení klávesnice:
Stiskněte současně klávesnici a na 2 vteřiny.
Klávesnice pípne a na LCD displeji se zobrazí ikona�, která signalizuje, že klávesnice je uzamčená. Postup pro odemknutí klávesnice:
Stiskněte současně klávesnici a na 2 vteřiny.

34
Ukázka použití proximity pUkázka použití proximity pUkázka použití proximity pUkázka použití proximity přívívívívěškuškuškušku::::
TechTechTechTechnická specifikacenická specifikacenická specifikacenická specifikace
Proudový odběr ProSYS KP ProSYS KPP
13.8V +/-10%, 30 mA typicky/180 mA max. 13.8V +/-10%, 30 mA typicky/280 mA max.
Připojení k hlavnímu panelu 4-drátová sběrnice, až 300 m od hlavního panelu
Rozměry 210 mm x 152 mm x 20 mm
Pracovní teplota 0°C až 49°C
Skladovací teplota -20°C až 60°C
Prox. RF Frekvence 13.56MHz
Informace pro objednávkyInformace pro objednávkyInformace pro objednávkyInformace pro objednávky
Model Popis
ProSYS KP ProSYS klávesnice s dotykovou obrazovkou ProSYS KPP ProSYS klávesnice s dotykovou obrazovkou s proximity 13.56MHz
RP200KT 10 prox. přívěšků pro dotykovou obrazovku & Agility (13.56MHz)

35
Πληκτρολόγιο µε Οθόνη Αφής GR
Εισαγωγή
Το Πληκτρολόγιο µε Οθόνη Αφής της RISCO Group είναι ένα λεπτό και σύγχρονα σχεδιασµένο πληκτρολόγιο µε οθόνη αφής 7" για το Σύστηµα Ασφαλείας ProSYS. Το Πληκτρολόγιο Αφής είναι συµβατό µε οποιαδήποτε έκδοση ProSYS και διατίθεται µε ή χωρίς αναγνώστη προσέγγισης. Το Πληκτρολόγιο Αφής σας επιτρέπει να ελέγχετε το σύστηµα ασφαλείας σας, καθώς και να προγραµµατίζετε τα χαρακτηριστικά του.
Για αναλυτικές πληροφορίες σχετικά µε τον προγραµµατισµό του συστήµατος ανατρέξτε στα εγχειρίδια Εγκατάστασης και Χρήσης της ProSYS.
Εγκατάσταση
Για την εγκατάσταση της Οθόνης Αφής ProSYS, ανατρέξτε στη σελίδα 2.
Ενδείξεις
Τροφοδοσία
Αναµµένη
Το σύστηµα λειτουργεί κανονικά από το δίκτυο ηλεκτροδότησης (AC) και η εφεδρική µπαταρία είναι σε καλή κατάσταση
Σβηστή Χωρίς τροφοδοσία
Αργό Αναβόσβηµα Το σύστηµα είναι σε προγραµµατισµό
Γρήγορο Αναβόσβηµα
Πρόβληµα συστήµατος
Οπλισµός
Αναµµένη Το σύστηµα είναι οπλισµένο Ολικά ή Μερικά
Σβηστή Το σύστηµα είναι αφοπλισµένο Αργό Αναβόσβηµα
Το σύστηµα είναι σε Χρονοκαθυστέρηση Εξόδου
Γρήγορο Αναβόσβηµα Κατάσταση συναγερµού
Παραµονή/Παράκαµψη
Αναµµένη
Το σύστηµα είναι Μερικά Οπλισµένο ή σε λειτουργία Παράκαµψης Ζώνης Σηµείωση:
Το εικονίδιο είναι ισοδύναµο µε το εικονίδιο των υπολοίπων πληκτρολογίων ProSYS.
Σβηστή ∆εν υπάρχουν ζώνες σε παράκαµψη στο σύστηµα
Ready
Αναµµένη Το σύστηµα είναι έτοιµο να οπλιστεί Σβηστή Το σύστηµα δεν είναι έτοιµο να οπλιστεί Αργό Αναβόσβηµα
Το σύστηµα είναι έτοιµο να οπλιστεί ενώ η ζώνη εξόδου/εισόδου παραµένει ανοικτή
Πυρκαγιά
Αναµµένη Συναγερµός πυρκαγιάς σε εξέλιξη Σβηστή Κανονική λειτουργία Αναβόσβηµα Πρόβληµα στο κύκλωµα πυρκαγιάς
Παραβίαση Αναµµένη
Έχει γίνει παραβίαση ζώνης/πληκτρολογίου/εξωτερικής διάταξης
Σβηστή Όλες οι ζώνες λειτουργούν κανονικά
Προσέγγιση Αναβόσβηµα ∆ηλώνει ότι το πληκτρολόγιο διαθέτει
αναγνώστη προσέγγισης

36
Πλήκτρα
Τα πλήκτρα του πληκτρολογίου µπορούν να χρησιµοποιηθούν για µια ποικιλία λειτουργιών, όπως αναλύεται ακολούθως.
Πλήκτρα Ελέγχου
Σε Συνήθη Λειτουργία: Χρησιµοποιείται για Ολικό οπλισµό Στο µενού Λειτουργίες Χρήστη: Χρησιµοποιείται για αλλαγή δεδοµένων
Σε Συνήθη Λειτουργία: Χρησιµοποιείται για οπλισµό Παραµονής (Μερικό) Στο µενού Λειτουργίες Χρήστη: Χρησιµοποιείται για αλλαγή δεδοµένων
Χρησιµοποιείται για αφοπλισµό του συστήµατος µετά την εισαγωγή κωδικού χρήστη.
Χρησιµοποιείται για µετακίνηση προς τα πάνω σε µια λίστα ή µετακίνηση του κέρσορα προς τα αριστερά
Χρησιµοποιείται για µετακίνηση προς τα κάτω σε µια λίστα ή µετακίνηση του κέρσορα προς τα δεξιά
Εµφανίζει την κατάσταση του συστήµατος (πιέστε για 2 δευτερόλεπτα)
Σε Συνήθη Λειτουργία: Χρησιµοποιείται για εισαγωγή στο µενού Λειτουργίες Χρήστη Στο µενού Λειτουργίες Χρήστη: Χρησιµοποιείται για να µετακινηθείτε ένα βήµα προς τα πίσω στο µενού Σηµείωση:
Το πλήκτρο είναι ισοδύναµο µε το πλήκτρο των υπολοίπων πληκτρολογίων ProSYS.
Χρησιµοποιείται για ολοκλήρωση εντολών και επιβεβαίωση δεδοµένων προς αποθήκευση
Σηµείωση:
Το πλήκτρο είναι ισοδύναµο µε το πλήκτρο των υπολοίπων πληκτρολογίων ProSYS.
Πλήκτρα Ανάγκης
Η ταυτόχρονη πίεση και των δύο πλήκτρων \U 2.15\D 2.15για τουλάχιστον
δύο δευτερόλεπτα ενεργοποιεί συναγερµό Πυρκαγιάς
Η ταυτόχρονη πίεση και των δύο πλήκτρων για τουλάχιστον δύο δευτερόλεπτα ενεργοποιεί συναγερµό Ανάγκης
Η ταυτόχρονη πίεση και των δύο πλήκτρων για τουλάχιστον δύο δευτερόλεπτα ενεργοποιεί συναγερµό Αστυνοµίας (Πανικού)
Πλήκτρα Λειτουργίας
Χρησιµοποιούνται για την όπλιση οµάδων ζωνών (αρχική ρύθµιση) ή για την ενεργοποίηση µιας προγραµµατισµένης σειράς εντολών (µακροεντολές)
Αριθµητικά Πλήκτρα
Χρησιµοποιούνται για την εισαγωγή αριθµών όταν απαιτείται

37
Ρυθµίσεις Πληκτρολογίου
Για να ορίσετε τις ρυθµίσεις του πληκτρολογίου ακολουθήστε την εξής διαδικασία:
1. Πιέστε για δύο δευτερόλεπτα µέχρι να εµφανιστεί το µενού Ρυθµίσεις Πληκτρολογίου
2. Επιλέξτε το επιθυµητό εικονίδιο χρησιµοποιώντας τα πλήκτρα :
Φωτεινότητα
Αντίθεση
Ένταση
Γλώσσα
Σηµείωση: Ρυθµίστε τη γλώσσα πληκτρολογίου σύµφωνα µε τη γλώσσα στον πίνακα ProSYS.
3. Πιέστε
4. Πιέστε για να προσαρµόσετε το επίπεδο των ρυθµίσεων
5. Πιέστε για να αποθηκεύσετε τη ρύθµιση
6. Πιέστε για να βγείτε από το µενού ρυθµίσεων Πληκτρολογίου
Σηµείωση: Οι ρυθµίσεις για κάθε πληκτρολόγιο πρέπει να οριστούν ξεχωριστά.
Κλείδωµα πληκτρολογίου
Για να κλειδώσετε το πληκτρολόγιο:
Πιέστε και ταυτόχρονα για 2 δευτερόλεπτα.
Το πληκτρολόγιο θα κάνει έναν σύντοµο ήχο και θα εµφανιστεί το εικονίδιο �στην οθόνη για να ενηµερώσει ότι το πληκτρολόγιο έχει κλειδωθεί.
Για να ξεκλειδώσετε το πληκτρολόγιο:
Πιέστε και ταυτόχρονα για 2 δευτερόλεπτα.

38
Πλησιάστε την Κάρτα Προσέγγισης ως εξής:
Τεχνικά Χαρακτηριστικά
Κατανάλωση Ρεύµατος ProSYS KP ProSYS KPP
13.8V +/-10%, 30 mA τυπική/180 mA µέγιστη 13.8V +/-10%, 30 mA τυπική/280 mA µέγιστη
Σύνδεση Κεντρικού Πίνακα BUS 4-καλωδίων, µέχρι 300 m από τον Κεντρικό Πίνακα
∆ιαστάσεις 210 mm x 152 mm x 20 mm (8.2" x 5.9" x 0.7")
Θερµοκρασία λειτουργίας 0°C έως 49°C (32°F έως 120°F)
Θερµοκρασία αποθήκευσης -20°C έως 60°C (-4°F έως 140°F)
Ραδιοσυχνότητα Προσέγγισης 13.56MHz
Πληροφορίες Παραγγελίας
Μοντέλο Περιγραφή
ProSYS KP Πληκτρολόγιο µε Οθόνη Αφής ProSYS ProSYS KPP Πληκτρολόγιο µε Οθόνη Αφής ProSYS και σύστηµα Προσέγγισης
13.56MHz RP200KT 10 κάρτες προσέγγισης για το Πληκτρολόγιο Αφής & Agility
(13.56MHz)

39
FCC NoteFCC NoteFCC NoteFCC Note
This device complies with Part 15 of the FCC Rules. Operation is subject to the following two conditions: 1. This device may not cause harmful interference and 2. This device must accept any interference received, including interference that may cause undesired
operation. FCC ID: JE4PROSYSKPP This equipment has been tested and found to comply with the limits for a Class B digital device, pursuant to Part 15 of the FCC rules. These limits are designed to provide reasonable protection against harmful interference in a residential installation. This equipment generates, uses and can radiate radio frequency energy and, if not installed and used in accordance with the instructions, may cause harmful interference to radio communications. However, there is no guarantee that interference will not occur in a particular installation. If this equipment does cause harmful interference to radio or television reception, which can be determined by turning the equipment off and on, the user is encouraged to try to correct the interference by one or more of the following measures:
a) Reorient or relocate the receiving antenna. b) Increase the separation between the equipment and receiver. c) Connect the equipment to an outlet on a circuit different from that to which the receiver is connected. d) Consult the dealer or an experienced radio/TV technician.
FCC Warning
The manufacturer is not responsible for any radio or TV interference caused by unauthorized modifications to this equipment. Such modifications could void the user's authority to operate the equipment.
RTTE Compliance StatementRTTE Compliance StatementRTTE Compliance StatementRTTE Compliance Statement
Hereby, RISCO Group declares that this equipment is in compliance with the essential requirements and other relevant provisions of Directive 1999/5/EC. For the CE Declaration of Conformity please refer to our website: www.riscogroup.com.
RISCO Group Limited WarrantyRISCO Group Limited WarrantyRISCO Group Limited WarrantyRISCO Group Limited Warranty RISCO Group and its subsidiaries and affiliates ("Seller") warrants its products to be free from defects in materials and workmanship under normal use for 24 months from the date of production. Because Seller does not install or connect the product and because the product may be used in conjunction with products not manufactured by the Seller, Seller cannot guarantee the performance of the security system which uses this product. Seller's obligation and liability under this warranty is expressly limited to repairing and replacing, at Seller's option, within a reasonable time after the date of delivery, any product not meeting the specifications. Seller makes no other warranty, expressed or implied, and makes no warranty of merchantability or of fitness for any particular purpose. In no case shall seller be liable for any consequential or incidental damages for breach of this or any other warranty, expressed or implied, or upon any other basis of liability whatsoever. Seller's obligation under this warranty shall not include any transportation charges or costs of installation or any liability for direct, indirect, or consequential damages or delay. Seller does not represent that its product may not be compromised or circumvented; that the product will prevent any personal injury or property loss by burglary, robbery, fire or otherwise; or that the product will in all cases provide adequate warning or protection. Seller, in no event shall be liable for any direct or indirect damages or any other losses occurred due to any type of tampering, whether intentional or unintentional such as masking, painting or spraying on the lenses, mirrors or any other part of the detector. Buyer understands that a properly installed and maintained alarm may only reduce the risk of burglary, robbery or fire without warning, but is not insurance or a guaranty that such event will not occur or that there will be no personal injury or property loss as a result thereof. Consequently seller shall have no liability for any personal injury, property damage or loss based on a claim that the product fails to give warning. However, if seller is held liable, whether directly or indirectly, for any loss or damage arising under this limited warranty or otherwise, regardless of cause or origin, seller's maximum liability shall not exceed the purchase price of the product, which shall be complete and exclusive remedy against seller. No employee or representative of Seller is authorized to change this warranty in any way or grant any other warranty.
WARNING: This product should be tested at least once a week.

40
Contacting RISCO GroupContacting RISCO GroupContacting RISCO GroupContacting RISCO Group
RISCO Group is committed to customer service and product support. You can contact us through
our website www.riscogroup.com or as follows:
United Kingdom Tel: +44-(0)-161-655-5500
E-mail: [email protected]
Brazil
Tel: +55-11-3661-8767
E-mail: [email protected]
Italy Tel: +39-02-66590054
E-mail: [email protected]
China (Shanghai) Tel: +86-21-52-39-0066
E-mail: [email protected]
Spain
Tel: +34-91-490-2133
E-mail: [email protected]
China (Shenzhen)
Tel: +86-755-82789285
E-mail: [email protected]
France
Tel: +33-164-73-28-50
E-mail: [email protected]
Poland
Tel: +48-22-500-28-40
E-mail: [email protected]
Belgium (Benelux) Tel: +32-2522-7622
E-mail: [email protected]
Israel Tel: +972-3-963-7777
E-mail: [email protected]
USA
Tel: +1-631-719-4400
E-mail: [email protected]
Australia
Tel: + 1-800-991-542
E-mail: [email protected]
All rights reserved.
No part of this document may be reproduced in any form without prior written permission from the
publisher.
© RISCO Group 11/2014 5IN1222 J