toughsat flyaway user manual - ground control · 2016-01-15 · toughsat flyaway user manual....
TRANSCRIPT

ToughsaT Flyaway User Manual
TOUGHSAT FLYAWAY USERS MANUAL Ground Control
V.2.0 January 2016

Toughsat Flyaway Users Manual Ground Control
Important warning regarding your Ground Control TOUGHSAT System
All power to the system (controller, modem, external network devices) MUST be disconnected when connecting the satellite mount (dish) to the internal electronics (controller and modem). Permanent damage will occur to the unit causing it to cease functionality until the unit is returned to Ground Control’s facility for repairs. This damage is NOT covered under the unit’s warranty. If you have any questions regarding connecting or operating your Ground Control Toughsat System, stop and please contact our Technical Support Team immediately for assistance to prevent damaging your equipment. You can contact our 24/7 Support Team at the following:
GROUND CONTROL SUPPORT USA Toll Free: 1-800-931-5559
International: 00-1-805-783-4633 Email: [email protected]
- 2 -

Toughsat Flyaway Users Manual Ground Control
TOUGHSAT System Information Please fill out the information on this page with the account information supplied to you from Ground Control and keep the manual in the Toughsat Flyaway case. It will be helpful both for on-site setup as well as required information if you need to contact Ground Control for support.
Ground Control Account Number: GC____________________ iDirect or CPE Serial Number: _______________________ Modem Static IP Address: _______________________ System Type (Flyaway, Vehicle Mounted) _______________________ Other Information With some companies, the configuration of the rest of their network equipment requires them to change some of the default system IP address information. If your company has changed any of the following IP address values from their default, please have an IT technician write down the current values in the spaces provided below.
Mobile System IP Address: _______________________ Router IP Address: _______________________
Contacting Ground Control Technical Support Ground Control technical support representatives are available 24 hours per day for your convenience. Please note that our standard hours of operation are Monday – Friday, 8AM to 5PM Pacific Standard Time. If you call outside of these hours, support response may be delayed and certain resources may not be available to the support agent. For Technical Support, please call 1-800-931-5559 from the U.S. or 805-783-4633 from abroad. You may also email [email protected] from a computer connected to working Internet connection.
- 3 -

Toughsat Flyaway Users Manual Ground Control
Table of Contents System Information Page…………………………………………………………… Page 3 Toughsat Flyaway Features………………………………………………………… Page 5 Included Equipment………………………………………………………………….. Page 5 Setup & Operation – Ground Mounting……………………………………………. Page 6 Connecting To The Internet………………………………………………………… Page 14 Accessing The Wireless Router……………………………………………………. Page 15 Access The Toughsat Control Pages……………………………………………… Page 15 Stowing The Dish……………………………………………………………………. Page 17 Setup of Fly-And-Drive Bracketing…………………………………………………. Page 19 Optional Flyaway Accessories……………………………………………………… Page 23 Contacting Ground Control…………………………………………………………. Page 26
- 4 -

Toughsat Flyaway Users Manual Ground Control
The Toughsat Flyaway is easily transported in most SUV’s.
Toughsat FLYAWAY FEATURES
One Person Setup – Requires little or no training to use, no certification required.
Establishes a self-contained local area wireless "G" network (100' radius) automatically.
Download speeds of up to 5Mbps, Upload of 2Mbps with iDirect from Ground Control.
Operates in extreme environments (rain, hail, hot, cold). The case lid is unaffected by weather.
Operates with any wired or wireless SIP phone. Or consider our VOIP phone service.
Ideal for quick back-up network connection for business / organizational continuity.
Fly-And-Drive bracketing is universal, even for most rental vehicle roof racks.
Unaffected by wind speeds up to 20 MPH (32kph) without added weight on ground mounting.
All system bags/cases are under UPS-FedEx-DHL shipping weight limits.
Included Equipment
● The Toughsat .98Meter or 1.2 XP or SP Mobile system inside a lightweight high-strength composite paneling case. Color - Black (shipping compliant). Includes quick-release dolly wheels.
- 5 -

Toughsat Flyaway Users Manual Ground Control
● A .98 or 1.2 meter dish in a durable all weather bag (shipping compliant).
● The rolling rackmount case (6 RU) for system electronics (shipping compliant). (Contents of the rackmount case are below)
● The Toughsat TS2 dish controller (1 RU) with integrated 4-port wireless router. ● iDirect Evolution X5 or X7 satellite router. ● Power Conditioner (1 RU) for 8 AC plugs. ● 50' (14 meters) cable-run so electronics case may be located in a structure or tent.
● Fly-And-Drive & Ground Mount bracketing in heavy-duty shipping complaint bag. ● Includes Dolly and assembly hardware Tote Bag
- 6 -

Toughsat Flyaway Users Manual Ground Control
Setup & Operation – On Ground A new Toughsat Flyaway system ships pre-configured so first-time setup and use of a Toughsat requires no special instructions other than the steps described below. Please contact Ground Control support if you have any issues setting up a system.
STEP 1 Unpack the bracketing bag which includes: 1. Four aluminum rails 2. A three-piece dolly (two wheels & axle) 3. Hardware pouch (bolts & nuts)
- 7 -
Toughsat Flyaway Users Manual Ground Control
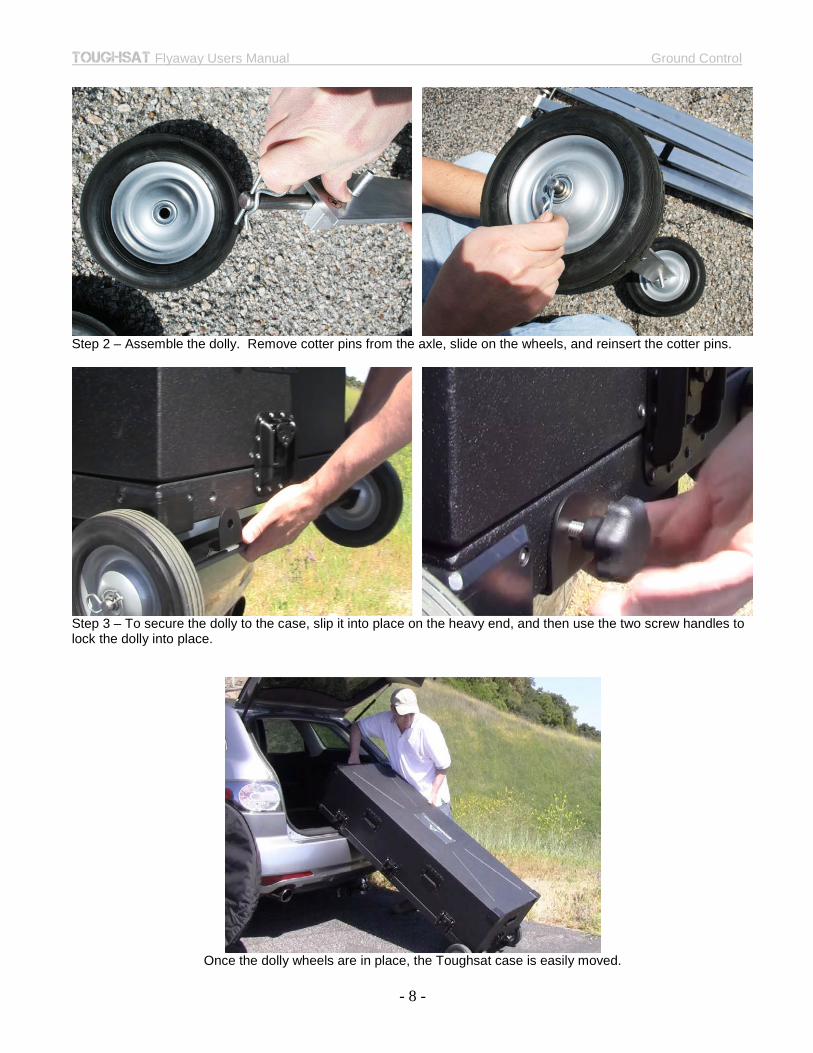
Step 2 – Assemble the dolly. Remove cotter pins from the axle, slide on the wheels, and reinsert the cotter pins.
Step 3 – To secure the dolly to the case, slip it into place on the heavy end, and then use the two screw handles to lock the dolly into place.
Once the dolly wheels are in place, the Toughsat case is easily moved.
- 8 -

Toughsat Flyaway Users Manual Ground Control Stabilization Bracketing – The stabilization bracketing is used to keep the Flyaway stable in a windy environments, but it is not necessary to use it for all applications. Below are instructions for setup.
Step 4 – Place one of the rails on the ground and slide the two T-nuts into place on the two black marks.
Step 5 – Place the other rails together as shown. Line up the top rails so that ends are above the T-nuts.
Step 6 - From the hardware pouch, find four 9/16 bolts (with washers) that will secure the rails to each other.
- 9 -

Toughsat Flyaway Users Manual Ground Control
Step 7 - A ratchet wrench and a 9/16 socket is used to secure the four bolts on the rails.
Step 8 – There are four T-nuts on the top rails. Slide them to the ends of the top rails. Note the positions above.
Step 9 – You may now move the bracket to a location where the flyaway will stay. To place the dish on the ground bracket, simply roll it into place.
- 10 -

Toughsat Flyaway Users Manual Ground Control
Step 10 – Remove the dolly wheels when the mobile system is placed on the brackets. You will need to adjust the case to align the four holes over the T-Nuts at the ends of the rails.
Lining up the holes takes some practice. Try finding one hole and placing a bolt in before lining up other holes.
Secure all the bolts with a ratchet wrench. Use the leveling posts to level the system on uneven ground. The Flyaway Ground Bracketing is now installed. Next Up… connecting the electronics.
- 11 -

Toughsat Flyaway Users Manual Ground Control
Step 11 – Open the rolling rackmount case and pull out the 50’ of cabling. Inside of the mobile case, unscrew the three waterproof caps and then connect the three cable ends. WARNING – DO NOT PLUG IN CONTROL CABLE IF CONTROLLER IS POWERED ON. Doing so will damage electronics, which is not covered by the warranty.
The coax cables and connectors are color coded red Step 12 – Remove the power bar power cord. and blue (red is transmit, blue is receive).
Step 13 – Connect the power cord to ANY power source (The Honda 1000EUi generator in this picture). Once the generator is running, you may turn on the power bar that supplies power to all electronics.
- 12 -

Toughsat Flyaway Users Manual Ground Control
Step 14 – The dish arms need to be raised in order to install the .98 meter satellite dish. To do this, turn on the TS2 Toughsat controller, and press on the “Deploy” button. The arms will raise and stop automatically when vertical.
The dish should stop when it is vertical, but if not, simply press on the stop button to stop the dish from moving.
Step 15 – Unzip and remove the .98 Meter dish from its sleeve. The quick-connect dish simply slides into the slots on the dish arms. No tools are required for this step.
- 13 -

Toughsat Flyaway Users Manual Ground Control
Step 16 – Once the dish is secure, simply press on the “Deploy” button again. The dish will spin and lock on satellite in about 3.5 minutes. If there is a problem, confirm that all equipment is connected and turned on.
Connecting to the Internet The Flyaway system was pre-configured, so connecting to the Internet is as easy as connecting to a wireless access point. The default SSID for the wireless access point is “Toughsat <serial number>”. You can also connect to the system using an Ethernet cable connected to the back of the MSS control unit in one of the 4 LAN ports. The default configuration uses DHCP to manage the IP addresses, so be sure your computer is set for DHCP. Below are the Toughsat TS2 Controller display and the iDirect X5 Evolution satellite modem/router.
The TS2 Controller display will show the progress of the satellite dish. You can also look at the LED lights on the iDirect X5 router. When all four lights are green and steady as shown in this picture, you should be able to access the Internet (the status light is only lit when booting, or if there is an issue). If the power light is solid green and the TX light is blinking green, the system is still acquiring the satellite.
- 14 -

Toughsat Flyaway Users Manual Ground Control
System Safety When deploying and online, make sure there is a 10 foot zone around the dish secured with cones or some type of barricade to prevent people from getting close to the dish when it is operating. If a person is too close to the dish while transmitting, serious injury may occur from the radio transmissions.
Access the Toughsat Built-In Wireless Router You can reconfigure the wireless settings, add encryption or security, or even disable the wireless completely from the router interface at http://192.168.1.1 Leave the username blank and the password is “admin”. Do not change the static IP settings inside the router unless instructed by Ground Control.
Access the Toughsat Control Pages You can view the Toughsat control page by typing in http://192.168.1.2 on a connected browser.
There are no logins or passwords for this page, and it contains a large amount of information about your system. Some menus will even allow you to change configuration settings for your dish. Leave these alone unless instructed or you know what you are doing. Many of these settings will prevent your dish from working correctly if changed. Contact Ground Control Technical Support if you have questions about the items on these pages.
- 15 -

Toughsat Flyaway Users Manual Ground Control
First, look to the lower left quadrant of the screen, to the “Input Data” Section: Confirm that it displays “GPS Signal OK” and has GPS coordinates. Without this information, or if the MSS does not display “GPS Signal OK”, the MSS will not deploy. Once you have confirmed this, look for “Reference Satellite” and make sure it is the same thing as “Target Satellite”. When all of these things are true, click on “Find Satellite”. This dish should lock on satellite and create an Internet connection automatically.
Now look at the “Signal Quality” section, here: and you will see what the MSS is doing at this moment, in the “Status” line. The MSS will search for signal, and when it’s ready, it will display “Passed Test, System Online”. You are online. Confirm it by connecting to any web page on the Internet with your browser.
- 16 -

Toughsat Flyaway Users Manual Ground Control
Stowing the Dish
Stowing the dish on the Flyaway can either be done by pressing “Stow Dish” on the Toughsat Control panel, or by accessing the controller’s web page at http://192.168.1.2 and pressing on the “Stow Dish” button.
During the stow process, the dish will begin to lower in elevation, but it will STOP when the arms are vertical. This is so that you may remove the dish. To completely stow the dish, simply press the stow button again. Press the STOP button anytime there is any problem! Pressing Stop simply stops all movement or action of the dish. Press any button to continue.
- 17 -

Toughsat Flyaway Users Manual Ground Control
Once the Flyaway is stowed with the orange padding in place, the system may be safely turned off using the toggle switch on the back. Once the cables are disconnected, and everything is boxed up, you are ready to move the system again.
- 18 -

Toughsat Flyaway Users Manual Ground Control
FLYAWAY SETUP - Fly-And-Drive Bracketing
The ground mount bracketing used for the Toughsat flyaway can double as a fly-and-drive system. Below are the steps required to place the system on most vehicle roof racks.
Step 1 – Measure the top of the roof rack (from front to back in this case) to find the distance the rails may sit on the rack. Adjustments are easily made by moving one of the bottom rails.
- 19 -

Toughsat Flyaway Users Manual Ground Control
Step 2 – Make sure all bolts are secure. Slide the system into place over the bracketing. Note the heavy side of the case must be positioned over the aluminum rail at a far end, as shown in the right image above.
Step 3 – Line up the four holes on the top rails over the T-nuts. Secure the case to the rails with the four bolts.
Step 4 – Move the complete system on top of the vehicle. This normally takes about four people, but it can be done with two stronger individuals. Note that the heavy end of the mobile system is mounted on the front of the vehicle. You have the choice of putting the .98 meter dish reflector on or not. With the dish on, the system is ready to be used any time. If the dish is off, the case lid top can be secured, but it’s not ready to use.
- 20 -

Toughsat Flyaway Users Manual Ground Control
Step 5 – There are four U-clamps in the hardware pouch used to secure the flyaway rails to any roof rack. Slip the oval nuts into the oval rail holes (red arrow).
Step 6 – The oval nuts are inserted only halfway into the oval hole (as shown) and twisted 90 degrees. Tighten both bolts with a crescent wrench or 9/16” open end wrench. Repeat these steps with the 3 other U-clamps to secure the flyaway to the roof rack.
Step 7 – The leveling posts at the end of the rails should be raised up and tightened so they do not lower. You have the option of removing the leveling posts entirely by loosening a tightening nut (right image arrow) below the handle. Once the handle is removed, you may screw the long bolt down and out of the T-Nut.
- 21 -

Toughsat Flyaway Users Manual Ground Control
When required, the wire run from the dish to the electronics can be threaded through a slightly open window. The electronics case and the larger mobile system case lid can be stored in the SUV. NOTE – When stowing the system, you will need to press the Stow button twice. This is because the dish will stop at vertical so that you have the option of removing the dish reflector. If you do not wish to remove the reflector, press the Stow button again so the dish will stow completely, allowing you to drive.
The Fly-And-Drive system is installed and ready to use.
- 22 -
Toughsat Flyaway Users Manual Ground Control
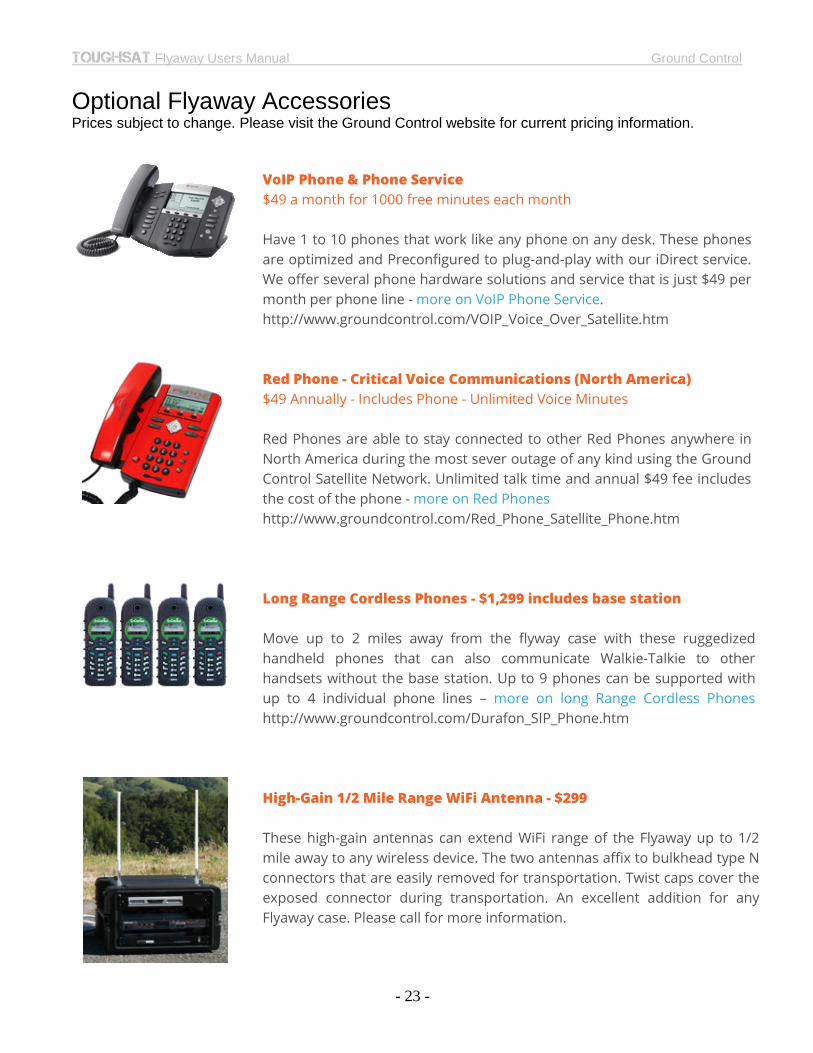
Optional Flyaway Accessories Prices subject to change. Please visit the Ground Control website for current pricing information.
VoIP Phone & Phone Service $49 a month for 1000 free minutes each month
Have 1 to 10 phones that work like any phone on any desk. These phones are optimized and Preconfigured to plug-and-play with our iDirect service. We offer several phone hardware solutions and service that is just $49 per month per phone line - more on VoIP Phone Service. http://www.groundcontrol.com/VOIP_Voice_Over_Satellite.htm
Red Phone - Critical Voice Communications (North America) $49 Annually - Includes Phone - Unlimited Voice Minutes
Red Phones are able to stay connected to other Red Phones anywhere in North America during the most sever outage of any kind using the Ground Control Satellite Network. Unlimited talk time and annual $49 fee includes the cost of the phone - more on Red Phones http://www.groundcontrol.com/Red_Phone_Satellite_Phone.htm
Long Range Cordless Phones - $1,299 includes base station
Move up to 2 miles away from the flyway case with these ruggedized handheld phones that can also communicate Walkie-Talkie to other handsets without the base station. Up to 9 phones can be supported with up to 4 individual phone lines – more on long Range Cordless Phones http://www.groundcontrol.com/Durafon_SIP_Phone.htm
High-Gain 1/2 Mile Range WiFi Antenna - $299
These high-gain antennas can extend WiFi range of the Flyaway up to 1/2 mile away to any wireless device. The two antennas affix to bulkhead type N connectors that are easily removed for transportation. Twist caps cover the exposed connector during transportation. An excellent addition for any Flyaway case. Please call for more information.
- 23 -

Toughsat Flyaway Users Manual Ground Control
1000 Watt Honda EU1000i Generator - $999 2000 Watt Honda EU2000i Generator - $1,200
Select the portable ultra-quite generator that is housed inside of the generator cabinet on the T-100 trailer. More Information http://www.groundcontrol.com/Portable_Generators.htm#Gen
3-Piece Dish - $2,299
This 3-Piece 1.2 meter dish reduces the shippable size of a bulky 1-piece dish. Includes a reinforced nylon carry case with three sections for protecting the dish during transit.
Quick Release Dish - Now Standard Equipment
All Flyaway dishes now ship with the no-tools, Quick-Release dish mounting system.
Long Range Cordless Phones In Case - Up to 90 phone supported $4,595 includes 4 handset phones in 1RU shelf and base station
This rackmount solution places 4 long-range 2-mile cordless phones inside of the Flyaway Case. This system includes the Durafon Pro base station and 4 handset phones and charge cradles - All pre-configured and ready to use with our Flyaway system. May support up to 4 individual phone lines. Long Range Phone Information http://www.groundcontrol.com/Long_Range_Cordless_Phones.htm
- 24 -
Toughsat Flyaway Users Manual Ground Control
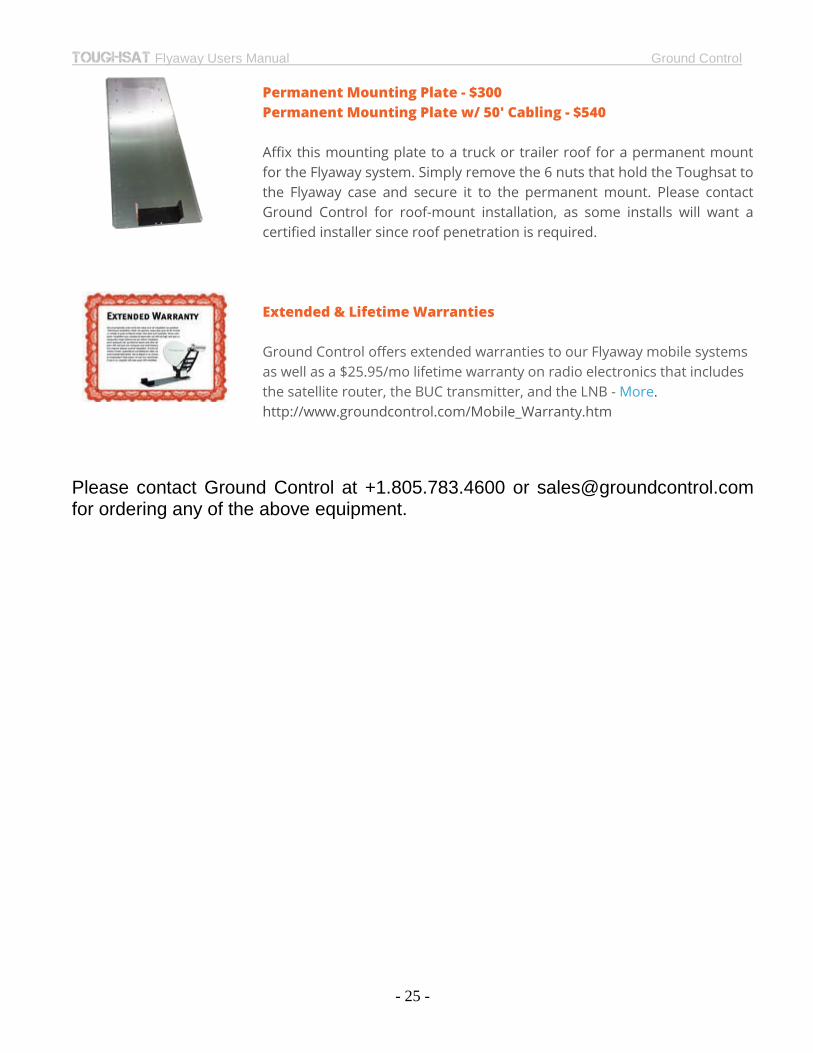
Permanent Mounting Plate - $300 Permanent Mounting Plate w/ 50' Cabling - $540
Affix this mounting plate to a truck or trailer roof for a permanent mount for the Flyaway system. Simply remove the 6 nuts that hold the Toughsat to the Flyaway case and secure it to the permanent mount. Please contact Ground Control for roof-mount installation, as some installs will want a certified installer since roof penetration is required.
Extended & Lifetime Warranties
Ground Control offers extended warranties to our Flyaway mobile systems as well as a $25.95/mo lifetime warranty on radio electronics that includes the satellite router, the BUC transmitter, and the LNB - More. http://www.groundcontrol.com/Mobile_Warranty.htm
Please contact Ground Control at +1.805.783.4600 or [email protected] for ordering any of the above equipment.
- 25 -

Toughsat Flyaway Users Manual Ground Control
Contacting Ground Control Technical Support Ground Control technical support representatives are available 24 hours per day for your convenience. Please note that our standard hours of operation are Monday – Friday, 8AM to 5PM Pacific Standard Time. If you call outside of these hours, support response may be delayed and certain resources may not be available to the support agent. For Technical Support, please call 1-800-931-5559 from the U.S. or 805-783-4633 from abroad. You may also email [email protected] from a computer connected to working Internet connection.
www.groundcontrol.com
- 26 -