trainer’s guide - ra-training-library.s3.amazonaws.com trainer's guide.pdf · this project...
TRANSCRIPT

Trainer’s Guide for Tea small grower training

Table of content
Module 1 Soil management
Activity 1
Activity 2
Activity 3
Activity 4
Introduction ..........................................................................................
Group observation and discussion .......................................................
Photo presentation ..............................................................................
Weed identification exercise ...............................................................
Activity 5 Shade trees discussion .......................................................................
Activity 6 Poster distribution ................................................................................
2
2
5
6
10
11
Activity 7 Feedback from the participants ............................................................ 11
Page no.
Preparation prior to the training ...........................................................................
Program of the day ................................................................................................
Materials to bring ..................................................................................................
1
1
1
Module 2 Pest management
Activity 1
Activity 2
Activity 3
Activity 4
Introduction ..........................................................................................
Pest identification exercise ...................................................................
Story-telling .........................................................................................
Predator identification exercise ...........................................................
Activity 5 Group discussion ................................................................................
Activity 6 Poster distribution ................................................................................
13
13
15
17
19
20
Activity 7 Feedback from the participants ............................................................ 20
Page no.
Preparation prior to the training ...........................................................................
Program of the day ................................................................................................
Materials to bring ..................................................................................................
12
12
13

Module 1 Soil management
1
Preparation prior to the trainingVisit several farms in advance to select one where you will conduct the training. Select a farm based on the
following criteria.
Choose a farm where you can observe various evidences of soil erosion, as they serve as the starting point
of the discussion of the day.
The farm should have enough open space somewhere on the premise whereby the trainer and the
participants can gather and discuss.
The farm should be located at a place where the participants can easily reach, and should not be too away
from the participants’ homes.
Talk with the farm owner in advance so that he/she agrees to receive the participants on the day of training at
his/her farm, and inform the farm owner in advance that the trainer and the participants will be discussing about
the problems of soil erosion that can be observed in the farm.
Program of the day
Activity 1
Activity 2
Activity 3
Activity 4
Introduction of the trainer and the objectives of the training
Observation of the soil condition of the farm and discussion of the findings
Presentation with the photos on the good practices of soil management
Weed identification exercise
Activity 5 Observation of shade trees and discussion of their benefits
Activity 6 Distribution of the poster and recap of the day using the poster
15 minutes
45 minutes
30 minutes
45 minutes
15 minutes
15 minutes
Activity 7 Feedback from the participants 15 minutes
DurationTopics
Materials to bringPhoto package for the soil management module
Poster “Soil Life Transformation”, enough quantity to give one to each participant

2
Activity 1 IntroductionIntroduce yourself as a trainer for the Global Environment Facility (GEF) funded project, entitled “Mainstreaming
Sustainable Management of Tea Production Landscapes.” This project aims to train tea small growers in India
(Assam and Darjeeling), Sri Lanka and China (and later on in Vietnam) on the topics of sustainable land
management.
Bring across the point that this is not a small village-level initiative, but is an international initiative across the
four Asian countries to promote sustainable management in tea production landscapes.
Explain that today’s topic is soil management. It is a crucial element of the sustainable land management, as
healthy and fertile soil is the fundamental basis of tea production. Sustainable soil management contributes to
tea productivity, and helps conserve the environment, water sources and biodiversity on the farm. Let the
participants know that the following topics are all related to soil, and will be discussed in today’s training
session.
Soil erosion
Soil compaction
Organic matter in the soil
Drainage
Weed management
Activity 2 Group observation and discussionTell the participants that the whole group is now going to walk around the farm together. Ask the participants to
look for any spot whereby the can observe an evidence of soil erosion. As the group walk around together, if
any participant find an evidence of soil erosion, he/she should call the attention of the rest of the group so that
the trainer and all the participants will come and look at it together.
Start going around the farm. Anytime when a participant says that he/she found an evidence of soil erosion, call
the rest of the group around the spot and look at it together. As the group looks at the spot, ask the following
questions.
What is happening to the soil at this spot?
What do you observe? (e.g. drain sides
collapsing due to soil erosion)
What has caused this problem? (e.g. excessive
herbicide spraying on drain sides)
What would be the consequence of leaving
the soil under this condition? (e.g. the tea
bushes will eventually collapse into the drain)
1
2
3
What should be done to prevent it from
happening? (e.g. the drain sides need to be
protected with vegetative cover)
Mulching
Cover crops
Shade trees
Climate change resilience
4
Make sure that you ask these
questions first, so that the participants
have a chance to think by themselves
and come up with their own answers.
DO NOT explain the answers without
asking questions and letting the
participants respond first.
Key point of training

3 2
The participants may notice the following types of soil erosion on the farm. At each spot, gather the group to
hold a discussion. Make sure to stop at all the spots that you have previously found in your preparatory visit.
Drain sides are collapsing
into the drains.
Excessive herbicide spraying
has caused the soil to be
exposed to rains, winds and
workers that pass by.
If you leave the soil under this condition, the soil keep on eroding into the drains and you will keep on
losing the precious soil on your farm.
Every time when it rains, the runoff water will take away the soil further.
Due to the loss of soil, the productivity of tea will be affected.
Some tea bushes will eventually collapse into the drains.
The drain will be filled up with eroded soil and will lose its function.
1
3
2
4 Drain sides need to be protected with vegetative cover. The roots of certain weeds can hold the soil and
prevent it from eroding. Drain sides do not need to be so “clean”, completely free of weeds. We should
keep the weeds on drain sides at lower height through manual weeding.
Mulching materials, such as leaves
and small branches, are washed
into the drains.
1 Eroded soil is accumulated
in the drain and filling it up.
Fallen leaves from shade trees
and tea plants, pruned tea
branches, certain weeds after
sicklying, all serve as mulching
materials that can cover the soil
and protect the soil surface from
erosion.
They should be kept on the soil
surface as mulch, and should
not be washed away into the
drains.
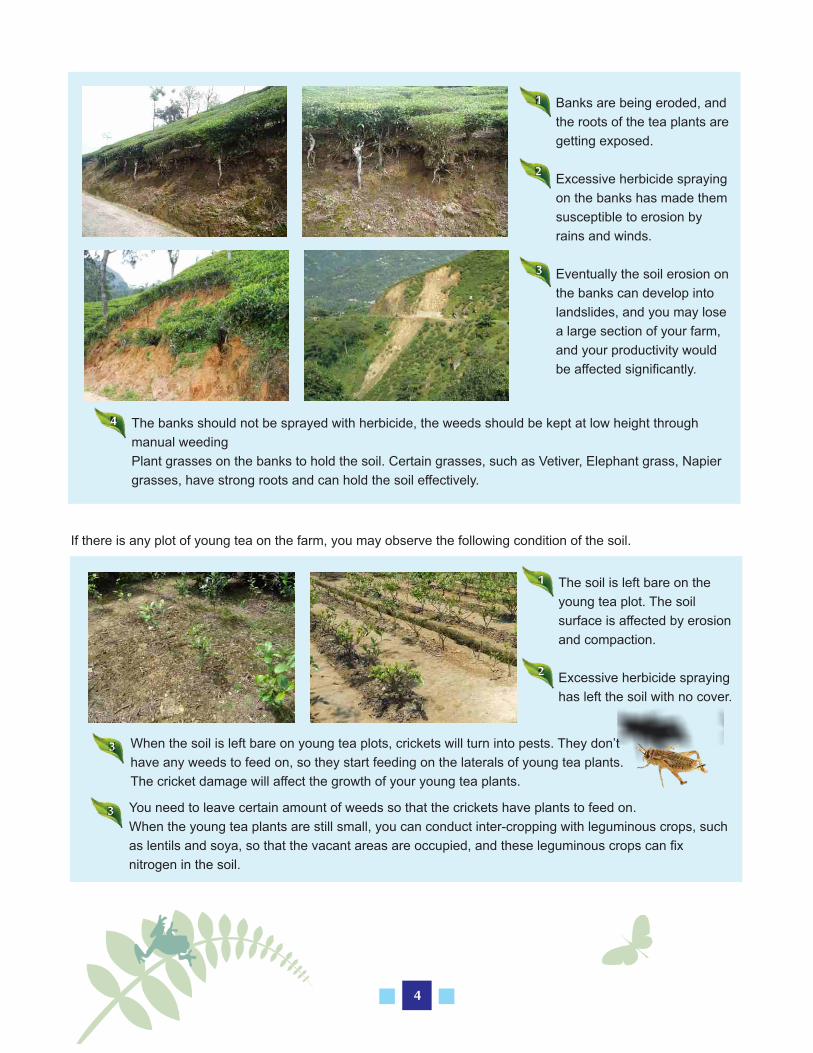
Banks are being eroded, and
the roots of the tea plants are
getting exposed.
Excessive herbicide spraying
on the banks has made them
susceptible to erosion by
rains and winds.
Eventually the soil erosion on
the banks can develop into
landslides, and you may lose
a large section of your farm,
and your productivity would
be affected significantly.
1
2
3
The banks should not be sprayed with herbicide, the weeds should be kept at low height through
manual weeding
Plant grasses on the banks to hold the soil. Certain grasses, such as Vetiver, Elephant grass, Napier
grasses, have strong roots and can hold the soil effectively.
4
If there is any plot of young tea on the farm, you may observe the following condition of the soil.
The soil is left bare on the
young tea plot. The soil
surface is affected by erosion
and compaction.
Excessive herbicide spraying
has left the soil with no cover.
1
2
3 When the soil is left bare on young tea plots, crickets will turn into pests. They don’t
have any weeds to feed on, so they start feeding on the laterals of young tea plants.
The cricket damage will affect the growth of your young tea plants.
3 You need to leave certain amount of weeds so that the crickets have plants to feed on.
When the young tea plants are still small, you can conduct inter-cropping with leguminous crops, such
as lentils and soya, so that the vacant areas are occupied, and these leguminous crops can fix
nitrogen in the soil.
4

Activity 3 Photo presentationGather the participants at one open space, and have them stand in a circle so that everyone can look at you
well. Bring out the photo package for the soil management module, and show them to the participants one by
one.
These photos are examples of good practices of soil conservation. Have the participants reflect back on the soil
erosion problems they saw on the farm and the discussions they had. These photos should be used to confirm
the importance of good practices that have been discussed in the previous activity, and help the participants’
understanding with visual images.
Photo package on soil management
Drain sides protected with vegetative cover
Young tea plants inter-cropped with leguminous crop
5
Soil covered with weeds after sickling
Counter planting
Bank protected with vegetative cover
Bank protected with planted grasses
6
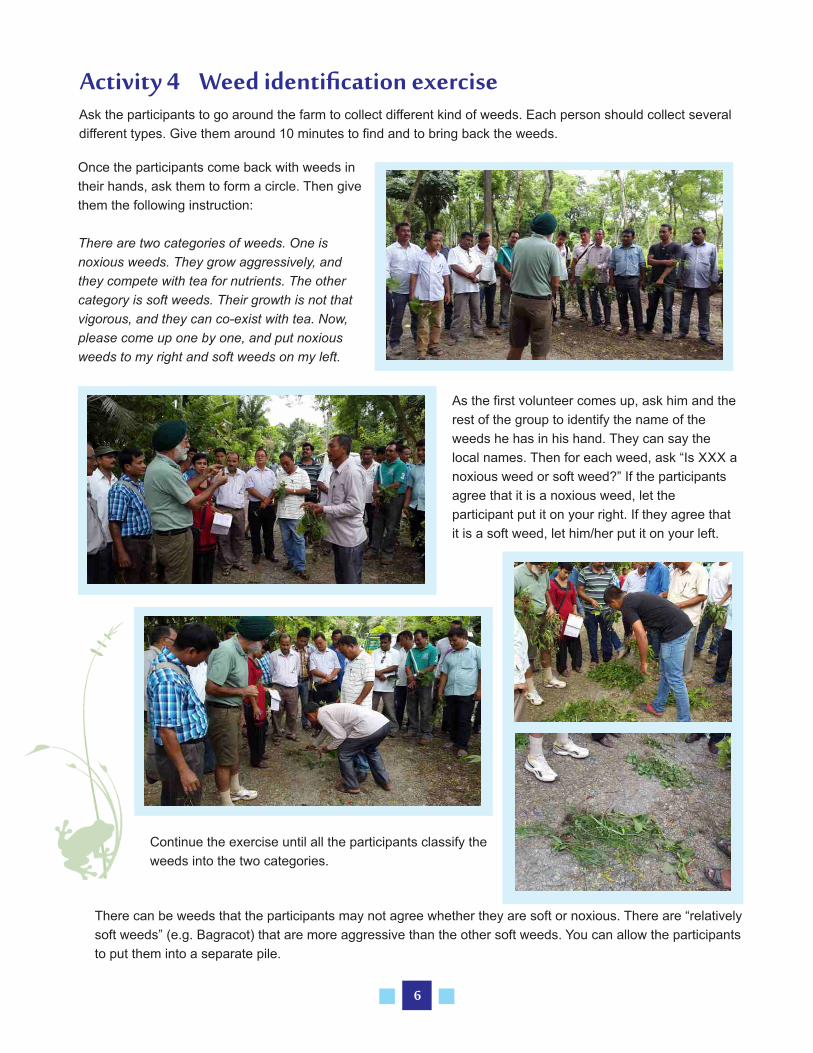
Activity 4 Weed identification exercise Ask the participants to go around the farm to collect different kind of weeds. Each person should collect several
different types. Give them around 10 minutes to find and to bring back the weeds.
Once the participants come back with weeds in
their hands, ask them to form a circle. Then give
them the following instruction:
There are two categories of weeds. One is
noxious weeds. They grow aggressively, and
they compete with tea for nutrients. The other
category is soft weeds. Their growth is not that
vigorous, and they can co-exist with tea. Now,
please come up one by one, and put noxious
weeds to my right and soft weeds on my left.
As the first volunteer comes up, ask him and the
rest of the group to identify the name of the
weeds he has in his hand. They can say the
local names. Then for each weed, ask “Is XXX a
noxious weed or soft weed?” If the participants
agree that it is a noxious weed, let the
participant put it on your right. If they agree that
it is a soft weed, let him/her put it on your left.
Continue the exercise until all the participants classify the
weeds into the two categories.
There can be weeds that the participants may not agree whether they are soft or noxious. There are “relatively
soft weeds” (e.g. Bagracot) that are more aggressive than the other soft weeds. You can allow the participants
to put them into a separate pile.

7
Cyperus pilosus
Setaria palmifolia
Digitaria sanguinalis
Imperata cylindrica (Thatch)
Cynodon dactylon(Murwa grass)
Eupotarium odoratum(Siam weed)
Polygonum chinensis
Mikania
Mimosa pudica
Ferns
Folloing are common noxious weeds that can be found on tea farms. If the participants did not categorize any of
them correctly, guide them so that they understand that these are noxious weeds.
Folloing are common soft weeds that can be found on tea farms. If the participants did not categorize any of
them correctly, guide them so that they understand that these are soft weeds.
Ageratum
Borreria hispida (Bagracot)
Axonopus compressus (Flat grass)
Glechoma hederacea (Ground Ivy, Creeping Charlie)
OxalisParthenium hysterophorus
(Parthenium weed, Carrot grass)

8
Once all the weeds are categorized into noxious weeds and soft weeds, discuss the participants about the
differences in characteristics between the two by asking the following questions.
When you spray herbicide, have you noticed that some
weeds come back more quickly than the others?
Which category do such weeds belong to?
Have you ever noticed that some weeds develop
resistance again herbicide? Which category do such
weeds belong to?
If you keep on spraying the same herbicide repeatedly,
then what will happen?
1
2
3
Key point of trainingHere again, make sure you DO NOT
say the answers, until the participants share
their opinions and experiences.
After the participants share their opinions and experiences, explain the following points. If any of them had
already been mentioned by the participants, recognize their contributions and reinforce their statement through
your explanation.
After spraying, noxious weeds come back more quickly than soft weeds. In the absence of soft weeds,
noxious weeds find more space to grow and proliferate. Therefore, each time you spray, you end up having
more and more noxious weeds on your farm.
Noxious weeds tend to develop resistence against herbicide, when one chemical is repeatedly used. Once
residence is developed, the chemical does not work on such noxious weeds any longer, and they continue
to proliferate more in the absence of other weeds. Such situation has been reported in reality with Murwa
grass (Cynodon dactylon) in tea farms in Assam.
Murwa grass infestation on a farm where Glyphosate was repeatedly used

9
Once the participants have understood the consequence of repeated herbicide spraying, ask the next
questions.
What can be done to reduce noxious weeds on a farm? 4
Let the participants come up with their ideas and express them first. Then explain the following points. For each
point, keep on asking further questions in the following manner.
Noxious weeds should be uprooted so that they can be
eliminated with roots. As long as the roots stay in the soil,
they can revive easily. Therefore, it is best to control them by
uprooting and taking them out of the farm.
What are the other advantages and benefits of soft weeds?
When you leave the soil to be bare, noxious weeds find space to grow and proliferate. By covering the
soil surface with soft weeds, the spread of noxious weeds can be contained.
Soft weeds tend to grow slowly and laterally, covering the soil
surface. As long as you keep them at low height with regular
weeding, they do not compete with tea for nutrients.
Soft weeds, when
sickled, they die easily
and take time to come
back. The sickled soft
weeds can be laid over
the soil surface and used
as mulch. They get
decomposed and add
organic matter to the soil.
Soft weeds host predators. By
having more soft weeds, you will
have more predators on the farm
that can control pests.
At what timing should the noxious weeds be uprooted? 5
It is important to uproot them before they flower and seed.
Once they flower and seed, even if you uproot the current
ones, their seeds will germinate and grow back.
What should be done with the uprooted noxious weeds? 6
The uprooted noxious weeds should not be kept on the
ground of the farm, as they can revive. They should be made
into compost. Composting generates heat, so their seeds will
killed in the process. Through composting, these weeds can
be converted into an organic fertilizer that benefit your farm.
(As you explain this point, you can show them the composting
photo in the photo package.)
Can soft weeds play a role in reducing noxious weeds? 7
8
9

At what timing should sicklying of soft weeds be conducted?9
Wait until they flower and seed before you conduct sicklying.
By letting them seed, they will slowly proliferate and occupy
more areas of your farm. By repeating these practices, you
can gradually replace noxious weeds with soft weeds.
10
Activity 5 Shade tree discussionAsk the participants to look around the farm and observe its shade trees.
Then ask the following questions.
What are the benefits of these shade trees to the soil? 1
After they share their opinions, explain the following points.
Fallen leaves from shade trees add organic matter to the soil.
Fallen leaves from shade trees help cover the soil surface as mulch, and protect it from erosion.
Shade trees help to retain moisture in the soil, and this moisture help tea plants in cases of drought.
What are the other benefits of these shade trees? 2
Shade trees protect tea from strong sunlight and help you sustain its productivity.
When you plant fruit trees as shade trees, their harvest brings you extra income.
Certain trees attract birds, which are predators to many pests. By having more
birds on the farm, your pest problem reduces.

Activity 6 Poster distribution Give one “Soil Life Transformation” poster to each participant.
Using the poster, conduct a recap of the day’s content.
Activity 7 Feedback from the participantsThank the participants for their participation, and ask them for feedback.
What did you like about the training?
What new did you learn today?
Do you plan on changing any practice on your farm?
Any recommendation for improvement for the next training?
As much as possible, note down their feedback so that these can be used to understand some results of the
training and areas of improvement for the future training.
11

Module 2 Pest management
12
Preparation prior to the trainingVisit several farms in advance to select one where you will conduct the training. Select a farm based on the
following criteria.
Choose a farm where you can observe various predators. Do not choose a farm which has been repeatedly
sprayed with insecticides and where the predators have been wiped out. Choose a farm that has been less
sprayed.
The farm should have enough open space somewhere on the premise whereby the trainer and the
participants can gather and discuss.
The farm should be located at a place where the participants can easily reach, and should not be too away
from the participants’ homes.
Talk with the farm owner in advance so that he/she agrees to receive the participants on the day of training at
his/her farm.
Program of the day
Activity 1
Activity 2
Activity 3
Activity 4
Introduction of the trainer and the objectives of the training
Pest damage identification exercise
Story-telling and group discussion on the impacts of spraying
Photo presentation and predator identification exercise
Activity 5 Group discussion on how to increase predator population
Activity 6 Distribution of the poster and recap of the day using the poster
15 minutes
60 minutes
30 minutes
45 minutes
15 minutes
15 minutes
Activity 7 Feedback from the participants 15 minutes
DurationTopics
Note: The Activity 4 “Predator identification exercise” needs to be conducted early morning or after 3pm in the
afternoon. If it is close to mid-day, the predators are hiding and cannot be easily found. Therefore, you may
need to adjust the order of these activities to ensure that this exercise is conducted at an appropriate timing.
On the day of the training, spend some time at a farm before the training to collect tea leaves with pest
damages. (See the next page for the leaves to look for.) It is important to collect as many leaf samples as
possible in order to have an enriching exercise, so allocate sufficient time to collect damaged leaves.

Activity 1 IntroductionExplain that today’s topic is pest management, and tell the participants that the training will not just look at the
pests, but will put pests in the context of the whole ecosystem on a tea farm. When one understands the issue
of pests in the perspective of landscape, the way to address the pest problem becomes different.
Communicate the objectives of the training. By the end of the training, the participants should be able to:
Activity 2 Pest identification exercise Take out the leaves that have been damaged by pests, which you have collected in advance. Take them out one
by one, and ask:
Materials to bringPhoto package for the pest management module
Poster “The World of Predators”, enough quantity to give one to each participant
Identify pests and understand how each of them affect tea leaves
Identify predators for the pests and understand how each of them control pests
Understand the ecosystem of pests, predators and their habitats on the farm
Learn different ways to increase predator population on a farm
Learn sustainable management of pests through maintaining the natural predator-pest balance
Which pest has attacked this leaf? How did that pest make this damage? 1
The following types of damaged leaves should be presented for discussion:
13
1. Looper damage
After the participants express their opinions, explain to them that these small holes on succulent leaves
have been made by small young loopers. As they grow, they start to eat maintenance foliage and are
capable of eating the whole leaf. By looking at the leaves, you can tell whether there are more small
loopers or more grown-up loopers on the farm.
After any participant says that these leaves have been attacked by loopers, ask them the next question:
What made the difference between these small holes and these big bites of the leaf edges? 2

2. Helopeltis damage
Explain that helopeltis is a sucking insect like a mosquito. When it sucks a leaf, it leaves these black
spots. When a leaf is recently attacked, the spots look rather transparent. These semi-transparent spots
can be observed in early morning. As the day progresses, they turn black.
Helopeltis is an insect that moves very fast. If you only observe black spots, they mean that helpeltis was
there before, but it does not mean that they are still around. They may have moved to another location of
your farm. If you decide to spray based on the level of black spots you observe, you may be spraying
where helopeltis is no longer around and are spraying in vain.
That is why it is very important to look for semi-transparnt spots, which is a signal of fresh attack, and it
means that helopeltis is still around the area. Your decision of pest control should be based on the level
of fresh helopeltis attack you can observe on the particular spot of the farm.
After any participant says that these leaves have been attacked by helopeltis, ask them the next question:
What made the difference between these black spots and these semi-transparent spots? 3
14
3. Thrips damage After any participant says that these leaves have been attacked by thrips, ask them the next question:
How did thrips make this kind of damage? 4
Explain to them that thrips are also sucking insects. They suck leaves when they are still buds. Therefore,
when attacked buds open and grow, they grow malformed with vertical lines. These leaves cannot
conduct photosynthesis properly, and will affect the productivity of your farm.

15
4. Empoasca (green fly) damage
After any participant says that these leaves have been attacked by
green flies, ask them the next question:
How did green flies make this kind of damage? 5
Explain that green flies are also sucking insects, and they suck the
edges of young leaves. When the attacked leaves grow, the edges do
not grow properly, so the leaves start to curl.
5. Red spider mite damageExplain that red spider mite make colonies under the
bushes. They are not hoping on the surface of tea bushes,
as the predators are.
Therefore, it is not easy to conduct effective spraying on red
spider mites, as they can hide in their colonies under the
bush where spraying does not reach.
In order to confirm the participants’ understanding of this topic, ask them to go around the farm and bring back
several leaves that have been affected by any of these pests. Give them around 10 minutes to collect the leaves.
Once they come back, form a circle and ask each participant to show the leaves they collected and identify
which pest has attacked them. If any of them did not identify a damage correctly, ask the other participants to
identify it. By doing this exercise, you can reinforce their understanding.
Activity 3 Story-tellingGather in a circle in the middle of the field, where all the participants can observe tea bush in front of him/her.
Then what happens when you spray? 1
Then tell them the following, as if it is a story-telling.
Predators are usually hopping around on the surface of the tea
bushes, because they are looking for their food. On the other
hand, pests tend to be hiding in tea bushes, because they do not
want to be caught by the predators. For example, red spider
mites make their colonies and hide underneath.
Ask the participants:

16
After the participants express their opinions, continue the story-
telling.
When you spray pesticide, the predators which are hoping around
on top of the tea bushes, are the first ones to be killed. The spray
does not easily reach to the red spider mites, which are hiding
underneath their web. The spray can only kill the weak mites and
small mites.
Ask the participants:
Then what happens next? 2
After the participants express their opinions, continue the story-
telling.
And the big strong mites survive, and they come out of their
colonies and start to hop around. They realize that there is no
predator around.
The strong mites start to mate among them. As there are no
predators, they do not worry about protecting themselves with the
web. They start to use all their energy to produce offspring. They
can produce up to 3 times as many eggs as when there were
predators.
In the absence of predators, the pest multiples extremely quickly. As a result, you have more mites than even
before you sprayed.
Ask the participants:
Then what should we do instead of spraying? 3
After they express their opinions, explain them the following.
When a pest population grows, its predator population may also be growing. If there are enough predators, they
will start to eat the pests and bring them under control. The nature is keeping the delicate balance between the
pests and predators. When we disturb that balance and eliminate the predators, it often results in pest outbreak.
When you observe pest-damaged field in the field, you should also observe the presence of predators in the field.
If you notice that the predator population is also growing, then you can predict that the predators will bring the
pest under control, and it is better that you do not spray.
In order for you to take such decision, you need to be able to identify predators. Let us proceed to the next
exercise of predator identification.

17
Activity 4 Predator identification exerciseBring out the photo package for the pest management module. Take them out one by one and ask:
Do you recognize this insect? Do you know its name? What does it do on your farm? 1
After the participants share what they know, tell them the name of the predator and explain its function.
They help you reduce the
number of aphids, mites,
thrips and other pests.
They eat soft-bodied insects,
such as caterpillars and many
other soil borne insects.
They kill your pests
by drilling them with
their spine. They eat thrips, mealybugs, aphids,
mites and other insects.
They eat thrips,
mites, aphids and
small caterpillars.
They eat all stages of
mealybugs.
They eat aphids, small caterpillars and
sometimes even thrips.
Ladybug beetle
Ground beetle
Spined soldier bug
Green lacewing
Minute pirate bugs
Mealybug destroyer
Hover fly

18
After the explanation with the photos, ask them to go to the field to look for
insects and bring them back. Tell them to look for predators rather than
pests. However, if they are not sure whether an insect is a predator or not,
they can always bring it back so that the group can verify it together. Give
them around 15 minutes to collect insects.
Once the participants come back with a pest or a predator in their hand, ask
them to form a circle and ask each person to show the insect one by one.
As they show the insect, ask whether it is a predator or a pest, in order to
reinforce their ability to identify predators.
There are so many kinds of them, and they eat a lot and do a great job
in controlling all sorts of pests on your farm, including aphids, mites
helopeltis, caterpillars, etc.
Spiders
They eat helopeltis,
caterpillars, moths, green
fly, and other insects.
Praying mantis
They lay eggs into a
caterpillar, which will
later hatch inside the
caterpillar and the larvae
will feed on it.
Wasps
They eat helopeltis, greenflies,
thrips, and many flying insects.
Dragonflies and damselflies
Ground beetle = pest
Spider = predator
Moth = pest
Ladybug beetle = predator

19
Activity 5 Group discussionTell the participants that now we are going to talk about way to increase the predator population on the farm so
that you can have an effective natural control of pests. In order to increase their population, it is critical to
increase their habitats. When they have more place to live, their population naturally grows. Ask the following
question:
1 Where are the natural habitat of predators? Where do they live? 1
After the participants express their opinions, explain the following.
The predators need a place to hide from their own predators, and
lay eggs in a place hidden from their predators. Therefore, natural
vegetation provides a place for them to hide safely and lay eggs.
Many of them also need a daily dose of pollen and nectar from
flowers for their energy and reproduction. Natural vegetation
growing in and around your tea is an important source of these
much required flowers.
1 How can we increase their natural habitats? Where on the farm can they live? 2
If you want their population to grow, you need to keep patches of
natural vegetation in various parts of the farm. For example, you
can keep some vegetation along drain sides, pathways and in any
areas that are not suitable for tea farming.
You should grow
natural vegetation
along water sources,
which also helps
conserve your water
sources.
13
Ask the participants:
1 How can we increase the bird population on a farm? 4
We have talked a lot about insects so far, but are there any other kind of predators?
If any participants says “Birds”, then give him/her an applause. Explain that birds are also
important predators of the pests. They eat caterpillars, helopeltis and some other insects.
Then ask the next question:

20
Birds also need a place to hide from their predators and make their
nests. Trees provide a safe place for them to hide, make their
nests and raise their babies. When you cut down trees, the birds
lose their habitats and their population will go down, or they will go
away from your farm.
If you want to increase the population of the birds on your farm,
you need to plant diverse indigenous trees at different places on
your farm. Most indigenous trees create a better habitat for local
birds than exotic species. You can plant multiple species as shade
trees in the farm.
You can plant bird attracting trees in many places on your farm, like vacant areas, areas unsuitable for tea
cultivation, boundaries, roads, and near water sources, also as a protection for the water sources.
By increasing the habitats for the predators, their number will increase and your pest control improves. Let us
increase patches of natural vegetation on the farm, and let us plant trees. These actions will help keep a healthy
balance between the pests and the predators and keep your pests under natural control.
Activity 6 Poster distribution Give one “The World of Predators” poster to each
participant.
Using the poster, conduct a recap of the day’s content.
Activity 7 Feedback from the participantsThank the participants for their participation, and ask them for feedback.
What did you like about the training?
What new did you learn today?
Do you plan on changing any practice on your farm?
Any recommendation for improvement for the next training?
As much as possible, note down their feedback so that these can be used to understand some results of the
training and areas of improvement for the future training.