training guide what’s new in arcgis desktop for 7.5 and 7
TRANSCRIPT

TRAINING GUIDE
What’s New in ArcGIS Desktop for 7.5 and 7.6

What’s New in ArcGIS Desktop for 7.5 and 7.6
1
What’s New in ArcGIS Desktop for 7.5 and 7.6
In this session, we’ll introduce you to new Lucity GIS tools available since ACT 2012
Table of Contents
ArcMap Changes ................................................................................................. 2
Highlights for 7.5 ............................................................................................. 4
Highlights for 7.6 ............................................................................................. 4
Add Assets from Map ........................................................................................ 5
Lucity GIS Settings ........................................................................................... 6
Show in Map Option for Work Modules ................................................................ 6
Symbology Defaults ....................................................................................... 7
Subsets ......................................................................................................... 9
Create an Inventory Subset (Ordered) ................................................................ 9
View Routine/PM Locations .............................................................................. 10
Direct Spatial Updates .................................................................................... 12
ArcCatalog Changes ........................................................................................... 14
Highlights for 7.5 ........................................................................................... 14
Highlights for 7.6 ........................................................................................... 15
Geodatabase Configuration .............................................................................. 15
Import Feature Classes from Schema ................................................................... 16
Domain Configuration ..................................................................................... 17
Resolve Domain Discrepancies ........................................................................... 19
Update GIS Domains to match Lucity picklists ........................................................ 20
Update Lucity picklists to match GIS Domains ........................................................ 21
Update Parent Linking Domains ......................................................................... 22
Feature Class Fields Grid ................................................................................. 23
Color Coding ............................................................................................. 24
Lucity Code/Type fields ............................................................................... 24
Lucity Composite Address fields ..................................................................... 25

What’s New in ArcGIS Desktop for 7.5 and 7.6
2
ArcMap Changes
Tools added or modified for 7.5 Button Name Description
Add asset from map (Show in Map)
User now receives prompt if they want to clear the map selection with any of the Add Assets from Map options (i.e. right-click option in work order asset grid).
User Specific Settings New user specific settings for Requests, Work Orders, Routine
modules to show Assets Only, Locations Only or Both (default) when using the show in map tool with these modules.
Lucity Views Now require the feature class be loaded in the map and
visible. The Hydrant Flow Tests have been broken out into two different modules requiring the Hydrant Flow Test view to be recreated before it will display data properly.
View Work Locations Results are no longer provided in a shapefile and instead are
provided in a temp file geodatabase feature class which supports field aliases.
View Work Frequency
Results are no longer provided in a shapefile and instead are provided in a temp file geodatabase feature class which supports field aliases.
View TV Observations Results are no longer provided in a shapefile and instead are
provided in a temp file geodatabase feature class which supports field aliases.
Lucity Help A shortcut to the online Lucity GIS help manual was added. All tools also have an F1 shortcut to the related help menu topic.
Sewer Split Allows users to specify the rim elevation and depth for the newly inserted structure and with this information updates the pipes’ elevation and slope data
Lucity Delete Will now work with whatever is currently selected in the map.
Users can now select features in the map display and/or feature attribute table and then click the Lucity delete button.
Alias Import This tool now checks for missing shape, OID, LucityID, and
Lucity CommonID (FacilityID) fields. These fields are required for the web map, GIS Viewer, and the Lucity SOE Updater.

What’s New in ArcGIS Desktop for 7.5 and 7.6
3
Tools added or modified for 7.6 Button Name Description
View Routine Locations
New tool that works similar to the other View Work Location tools and displays PM work locations based upon search criteria and the associated asset and/or location records for the resulting pm/work template records.
Subset Manager Users can control the order of subsets they create in the map.
Ordered subset functionality can then be used within other Lucity web products.
User Specific Settings New user specific settings for custom symbology templates.
Users can now specify the default templates they want to use as the output from the following tools: Lucity Views, Work Frequency, Work Locations, and TV Observations.
Lucity Views Results will use default symbology template if one has been
defined.
View Work Locations Results will use default symbology template if one has been
defined.
View Work Frequency
Results will use default symbology template if one has been defined.
View TV Observations Results will use default symbology template if one has been
defined.
Street Feature Renumber
Street Feature Renumber tool can now be used on Street Pole and Street Light features.
Update Spatial Relationships
The relationship between Street Mainlines and Street Conduits are now automatically calculated. This is updated every time one is created, moved, or selected using the Update Spatial Relationships tool
Force Synch The us/from and ds/to node information for sewer pipes and
storm conduits are now automatically calculated. This is updated every time a pipe/conduit is synched such as when they are created, modified, or selected using the Force Synch tool.
Sewer Renumber
Sewer Split
Sewer Merge
These tools have been modified to account for the various node types that can now be used for the sewer conduit endpoints: structures, pump stations, nodes, control valves and system valves.
Storm Renumber
Storm Split
Storm Merge
These tools have been modified to account for the various node types that can now be used for the storm conduit endpoints: structures, pump stations, nodes, control valves and system valves.
Direct Spatial Updates
This is a new tool that directly updates Lucity from GIS based on spatial relationships found in the map. This is performed outside an edit session and without updating any GIS fields.

What’s New in ArcGIS Desktop for 7.5 and 7.6
4
Highlights for 7.5 • ArcGIS 9x is no longer supported. Version 7.5 supports ArcGIS 10.0 and 10.1. 7.5 SP2 will
support ArcGIS 10.2.
• New GIS enabled modules:
o Sewer: Nodes, Control Valves, System Valves, Service Connections
o Storm: Nodes, Control Valves, System Valves, Discharge Points
o Facility: Floor Sections
o General: Survey Sites
o Right-of-way: Furniture, Landscape Areas, Parking Stalls, Trials
• New tools added:
o Lucity Online Help links
• Lucity GIS tools no longer provide results in shapefile format. Results are now added as a feature class to LucityGISTools.gdb.
o The Lucity extension will check for a LucityGISTools.gdb in the user’s TEMP directory (the location specified in the TEMP environmental variable) and if it doesn’t exist one will be created.
• Lucity Views now require the feature class to be loaded in the map and visible. The view will now be created using the feature class’s connection info instead of the default connection string info listed in GIS Connection Strings.
• Synch Process will now skip over features that have a FacilityID value of 0. This allows features to be added into a feature class without them being imported immediately into Lucity.
• Synch Process will honor user defined x/y coordinates instead of Esri’s calculated values if defined in the Geodatabase Configuration Tool.
Highlights for 7.6 • ArcGIS 10x is supported (10.0, 10.1, and 10.2).
• New GIS enabled modules:
o Sewer: IPT Monitoring Points
o Storm: BMP Sites, BMP Assets
o Traffic: Street Signals
o Water: Recycled Water Main Breaks
• New tools added:
o View Routine Locations
o Direct Spatial Updates
• Endpoints for Sewer Pipes and Storm Conduits can now be associated to multiple asset types
o US/DS relationships are now automatically managed by Lucity extension
o 7.6 upgrade will delete any existing us/ds spatial relationships

What’s New in ArcGIS Desktop for 7.5 and 7.6
5
• User defined symbology is now supported with the following tools: Lucity views, Work Frequency, Work Location, TV Observations
• Mainline and Conduit relationships are now many to many
o These relationships are automatically managed by Lucity extension
o All updates from Lucity Desktop to an SDE or File Geodatabase must be made through an ArcServer Map Service using the Lucity SOE.
Add Assets from Map The work order module and pm/work template module asset grids provide the user the ability to add asset records via ArcMap. For example, in the work order module’s asset grid, there is a right-click option to “Add Assets from Map”. Selecting the option will open the .mxd configured with the work order module and prompt the user to select the desired assets to add to the work order.
With 7.5, there is a new prompt asking if the currently selected features should be cleared. This allows users the ability to first select the desired assets in the .mxd, then from the Lucity application select the Add Assets from Map option to add the already selected features.
1. Select the Add Assets from Map option from either the work order or pm/work template asset grid.
2. The .mxd that is configured with Lucity will become the active window. The following prompt
will appear indicating if the selection should be clear.
3. The following prompt will appear indicating that you can continue to select additional features
and once done press F2 to add the assets to the work order or pm/work template.

What’s New in ArcGIS Desktop for 7.5 and 7.6
6
Lucity GIS Settings There are a couple new user specific settings with the Lucity GIS extension. One controls how the show in map should display request, work order and pm/work template records. The other setting controls the default symbology templates that should be used with various Lucity GIS tools.
• To access these settings click on the Settings button located on the Lucity GIS Editor toolbar in ArcMap. The Lucity GIS Settings dialog will be displayed.
Show in Map Option for Work Modules The Lucity GIS Settings dialog will allow the user to specify how the Show In Map tool should display the location of Requests, Work Orders and PM/Work Templates. There are three options available:
o Assets- This option will only show the assets. Any address or x/y locations associated with the record will not be displayed. This option helps eliminate duplication of locational representation that can occur if you have the option set to automatically add the asset address to location grid.
o Locations- This option will only show address and x/y locations associated with the record. Assets will not be displayed in the results.
o Assets and Locations- This is the default option. This option will show the location of all assets, addresses and x/y locations associated to the record.
1. To alter the default setting, from the Lucity GIS Settings dialog select the desired setting from the drop down for each of the three modules.
2. Click Save. This setting will take effect the next time ArcMap is reopened.

What’s New in ArcGIS Desktop for 7.5 and 7.6
7
Symbology Defaults The Lucity GIS Settings dialog will allow the user to select layer files (.lyr) that will be used as symbology templates for various Lucity GIS tools.
1. In ArcMap, run the Lucity GIS tool (Lucity Views, Work Frequency, Work Location, or TV Observations) you wish to set default symbology for. The tool will produce a resulting feature class and it will be added to the .mxd.
2. Make any desired change to the properties of the feature class. Changes can include:
o Symbology (size, shape, color, symbol levels, etc)
o Labeling
o Scale Dependency
o Fields Displayed
o Etc…
Note: The Lucity GIS tools include a set of default fields in the result; however, some tools allow you to alter the results to include additional fields. If you make modifications where a non-default field is used for display (label, symbol, etc.) each time you run that tool in the future you must include that field in the results or your default template will not apply correctly or may fail all together.
3. In the table of contents right-click on the feature class and select “Save as Layer File…”
4. A save dialog will appear. Name the file and save it to a location where it can be stored long-
term.
Note: If the tool generated more than one layer (points, lines, polygons) steps 3 and 4 must be repeated for each layer.
Note:____________________________________________________________________________________
_________________________________________________________________________________________
_________________________________________________________________________________________
_________________________________________________________________________________________
_________________________________________________________________________________________
_________________________________________________________________________________________

What’s New in ArcGIS Desktop for 7.5 and 7.6
8
5. From the Lucity GIS Settings dialog, click the Symbology Defaults button. The following dialog will appear:
6. Find the related tool and layer, click the … button and navigate to the location of the saved
.lyr file. Repeat for each layer.
7. When complete click Apply Changes.
8. The next time ArcMap is reopened and the Lucity GIS tool is used, the results will use the saved .lyr file as a template.
Note:____________________________________________________________________________________
_________________________________________________________________________________________
_________________________________________________________________________________________
_________________________________________________________________________________________
_________________________________________________________________________________________
_________________________________________________________________________________________
What’s New in ArcGIS Desktop for 7.5 and 7.6
9
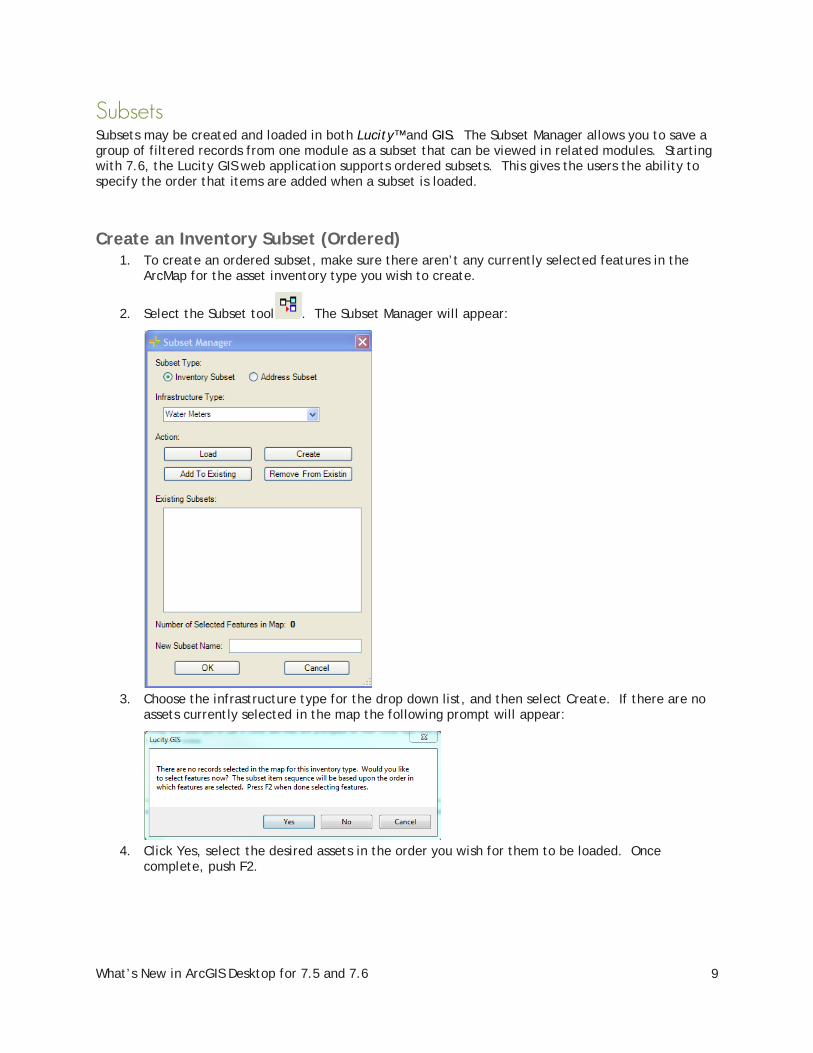
Subsets Subsets may be created and loaded in both Lucity™ and GIS. The Subset Manager allows you to save a group of filtered records from one module as a subset that can be viewed in related modules. Starting with 7.6, the Lucity GIS web application supports ordered subsets. This gives the users the ability to specify the order that items are added when a subset is loaded.
Create an Inventory Subset (Ordered) 1. To create an ordered subset, make sure there aren’t any currently selected features in the
ArcMap for the asset inventory type you wish to create.
2. Select the Subset tool . The Subset Manager will appear:
3. Choose the infrastructure type for the drop down list, and then select Create. If there are no
assets currently selected in the map the following prompt will appear:
4. Click Yes, select the desired assets in the order you wish for them to be loaded. Once
complete, push F2.

What’s New in ArcGIS Desktop for 7.5 and 7.6
10
View Routine/PM Locations With 7.6 a new tool has been added to the View Work Locations suite. Similar to the other tools the View Routine/PM Locations tool will map the locations of routine/pm records based upon user specified search criteria.
1. To use the View Routine/PM locations tool, click . The following dialog will appear:
2. Choose a search option:
o Date and Category(ies) - This option will search for all PM records where the PM category is in the list specified and the next work order creation date is between the dates specified.
o PM/Work Template Filter- This option will search for all PM records that meet the filter criteria specified.
o PM/Work Template Filter and Dates- This option will search for all PM records that meet the criteria specified in the filter AND have a PM start date between the dates specified.
Note: Regardless of your option the results will always end up being filtered on either the next start date or next end date as shown above.
3. Depending on the option that is chosen the form will expand and display either a list of categories or a list of filters. Select the desired category or filter.

What’s New in ArcGIS Desktop for 7.5 and 7.6
11
4. Spatial Filter Option- This option allows users to specify a specific area to view PM records in.
o None- All PM records specified by the search criteria will be displayed.
o User the Current Map Extent- Only PM records within the location of the current extent will be displayed.
o Select Polygon Feature(s) - Allows users to select a polygon feature in the map. Only PM records that are found within that polygon feature will be displayed.
5. Modify default fields in the results option
o By default there are certain fields that will be included in the results. This option will allow users to include additional fields in the results.
6. When ready to process click the Display button.
7. Once the processing is finished a grouped layer will be added to ArcMap containing three layers (point, line, polygon).
o The search criteria used for the PM records is listed in the description for the group layer. To access this information, right-click on the grouped layer and select Properties.
8. The tool would have attempted to map all locations for each PM record in the search criteria.
Features that weren’t able to be spatially represented will still be added to the layer, but will have a value of 0 in the FoundInMap field in the attribute table for the feature class.
9. After the locations have been added to the map the cursor will change to crosshairs and you
can then right-click on the features to view the PM records in the desktop application.
What’s New in ArcGIS Desktop for 7.5 and 7.6
12
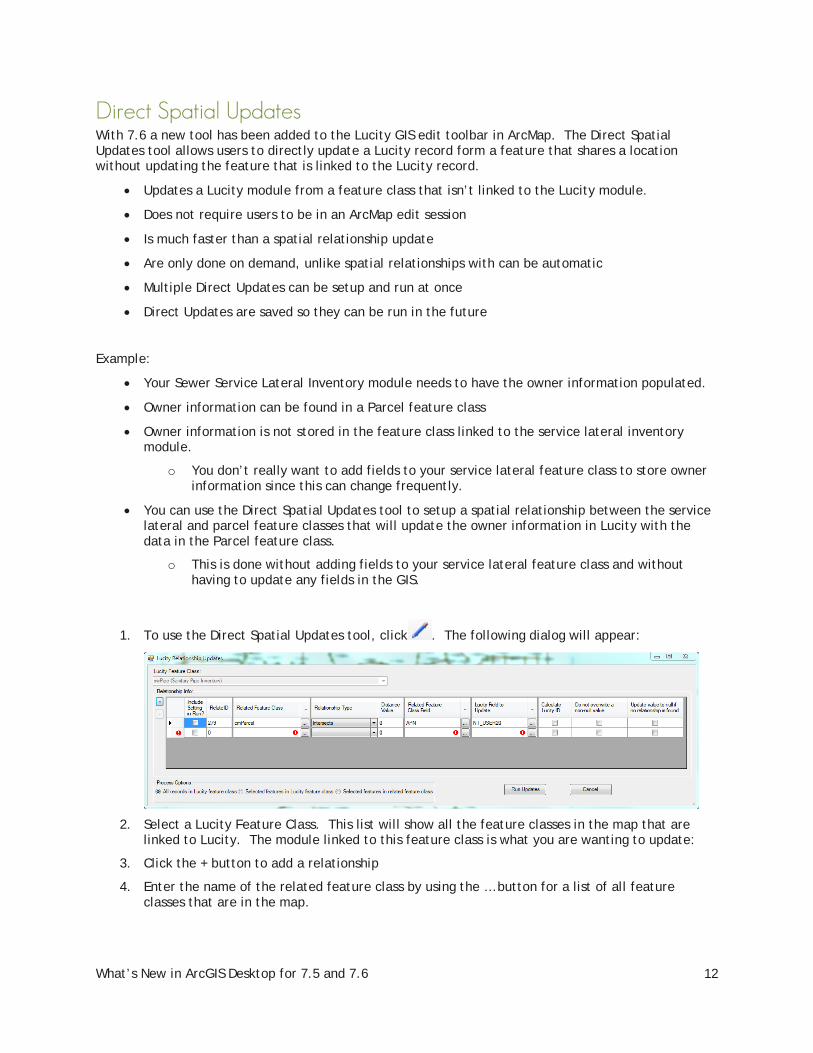
Direct Spatial Updates With 7.6 a new tool has been added to the Lucity GIS edit toolbar in ArcMap. The Direct Spatial Updates tool allows users to directly update a Lucity record form a feature that shares a location without updating the feature that is linked to the Lucity record.
• Updates a Lucity module from a feature class that isn’t linked to the Lucity module.
• Does not require users to be in an ArcMap edit session
• Is much faster than a spatial relationship update
• Are only done on demand, unlike spatial relationships with can be automatic
• Multiple Direct Updates can be setup and run at once
• Direct Updates are saved so they can be run in the future
Example:
• Your Sewer Service Lateral Inventory module needs to have the owner information populated.
• Owner information can be found in a Parcel feature class
• Owner information is not stored in the feature class linked to the service lateral inventory module.
o You don’t really want to add fields to your service lateral feature class to store owner information since this can change frequently.
• You can use the Direct Spatial Updates tool to setup a spatial relationship between the service lateral and parcel feature classes that will update the owner information in Lucity with the data in the Parcel feature class.
o This is done without adding fields to your service lateral feature class and without having to update any fields in the GIS.
1. To use the Direct Spatial Updates tool, click . The following dialog will appear:
2. Select a Lucity Feature Class. This list will show all the feature classes in the map that are
linked to Lucity. The module linked to this feature class is what you are wanting to update:
3. Click the + button to add a relationship
4. Enter the name of the related feature class by using the … button for a list of all feature classes that are in the map.

What’s New in ArcGIS Desktop for 7.5 and 7.6
13
5. Using the pre-defined list select a relationship type by clicking the drop down button
o If you selected within distance, then you will also need to populate the Distance Value field
6. Select the related feature class field. Click the … button for a list of fields in the related feature class.
7. Select the Lucity field to update. Click the … button for a list of fields that can be updated in the Lucity module.
8. Check any additional field options:
o Calculate Lucity ID- Use this option if your destination field is a Lucity code/type and the source field is providing the Lucity type/description.
o Do not overwrite a non-null value- Use this option to not overwrite any pre-existing data in the destination field
o Update value to null if no relationship is found- If no relationship is found between the Lucity feature and a feature in the related feature class the destination field will be set to null
9. Repeat steps 3-9 to add additional relationships for this feature class.
10. Select the desired Process Option:
o All record in Lucity feature class- Runs the tool against all records in the Lucity feature class
o Selected features in Lucity feature class- Runs the tool against all records from the Lucity feature class that are selected
o Selected features in related feature class- Runs the tool against the selected records from the related feature class.
11. Check the Include Setting in Run? check box for each relationship you wish to have performed at this time.
12. Click the Run Updates, a process log will appear and provide additional information about the process.

What’s New in ArcGIS Desktop for 7.5 and 7.6
14
ArcCatalog Changes The table below contains a description of the tools added or modified for version 7.5
Name Description
Import Feature Classes from Schema
New tool allows admins to quickly configure new feature classes with Lucity if they are based on the Lucity or Esri Local Government Information Model schemas.
Domain Configuration New tool providing a greater ability to control domains between Lucity and the geodatabase.
Update Lucity Picklists to match GIS Domains
New tool providing the ability to recreate the Lucity picklists to match the corresponding GIS domain
Update Parent Linking Domains
New tool to create domains for GIS fields that are mapped to parent linking fields.
Field Configuration Color coded some additional field types.
Added back ability to map a GIS field to the Lucity X/Y coordinate fields. If mapped, Lucity will be populated with that field’s value instead of Esri’s calculated x/y coordinate.
The table below contains a description of the tools added or modified for version 7.6
Name Description
Field Configuration Composite field support. Users can now map a single GIS field that stores street name components to Lucity. Users can now map a single GIS field that stores building number components to Lucity.
Highlights for 7.5 • New tools added:
o Import Feature Classes from Schema
o Domain Configuration
o Compare Domain Discrepancies
o Update Parent Linking Domains
• Ability to specify user defined x/y coordinates.
• Ability to recreate Lucity picklists to match GIS domains
• Mapping to Lucity type fields are no longer allowed. GIS fields can only be mapped to Lucity code fields. However, the new Domain Configuration tool will now support mapping text domains to numeric picklists and vice versa.
• The 7.5 conversion will reconfigure existing Lucity type/description (*_TY) field mappings to the corresponding Lucity code field.

What’s New in ArcGIS Desktop for 7.5 and 7.6
15
Highlights for 7.6 o All updates from Lucity Desktop to an SDE or File Geodatabase must be made through
an ArcServer Map Service using the Lucity SOE.
• Composite field support- You can now map a single address field in GIS to Lucity
• Spatial relationships configured to the following fields will be deleted during the 7.6 conversion:
o SWNET.NT_USMAN or SWNET.NT_DSMAN
o SMVCONDT.CN_US_STR or SMVCONDT.CN_DS_STR
o STCONDUIT.CT_ML_ID
Geodatabase Configuration Once you have created the geodatabase connections with the Lucity Administration tool you can use the Lucity Geodatabase Configuration tool in ArcCatalog to perform all other configurations.
In ArcCatalog, Click on Lucity GIS Tools>>Geodatabase Configuration.
The following dialog will appear:

What’s New in ArcGIS Desktop for 7.5 and 7.6
16
Import Feature Classes from Schema The Import Feature Classes from Schema tool provides a quick way to configure Lucity to work with specific pre-configured geodatabases. This tool has stored configurations based on linking Lucity to the Esri Local Government Information Model and Lucity geodatabase schemas.
• This tool does not create the feature classes in the geodatabase. It simply creates configuration records in the Lucity geodatabase configuration to recognize feature classes and fields based on one of these standardized schemas.
• This tool does not create or update any Domains. This must be done after the import using the Domain Configuration tool.
To import feature class configurations from a default schema:
1. Right-click on the geodatabase connection node that contains the feature classes you wish to load the mappings for and click “Import Feature Classes from Schema”.
2. The following form will appear:

What’s New in ArcGIS Desktop for 7.5 and 7.6
17
3. Select a schema.
o You can either select a Lucity geodatabase schema or an Esri’s Local Government Information Model schema.
4. Select the schema version/release.
o For Lucity, this will be the Lucity version number (7.4, 7.5, 7.6, etc.)
o For Esri, this will be the version followed by the release date. For example, there have been two releases of the 10.1 Local Government Information Model, one on 7/12/12 and 11/5/12, these will be listed as 10.1_071212 and 10.1_110512.
5. Select the feature class(es) you would like to load the schema mappings for.
6. Preview by selecting a specific feature class on the left side.
o The Field Mappings grid will show which fields in the feature class will be mapped to which fields in Lucity
o The Spatial Relationships grid will show the default spatial relationships for the feature class
Note: You are unable to modify the defaults at this time. Once you import the schema, you can then modify the feature class configuration just like any other feature class.
7. Click the Import Schema Mappings button once you are ready to import the settings
8. The Validation results window will appear and provide feedback on the import process.
After importing feature class schema it is recommended that you perform the following:
1. Configure domains for the new feature class by using the Domain Configuration tool
2. Update the feature class aliases by running the Import Feature Class Alias tool in the Geodatabase Configuration tool or in ArcMap
3. Validate the feature class configuration using the validation tool
Domain Configuration Fields in the geodatabase that are linked to a Lucity Code/Type field (pick list) should contain a geodatabase domain. A domain provides the same functions in ArcMap that a picklist provides inside of Lucity. Domains ensure data integrity and help with data population during an edit session. To ensure data integrity between Lucity and the Geodatabase the picklist values should match up to the domain values. The Domain Configuration Tool in the Geodatabase configuration allows users to quickly compare domains to picklists and fix and differences between the two.
1. To access the Domain Configuration screen, right-click on either a geodatabase or feature class node in the tree located on the left-hand side of the Geodatabase Configuration browser.

What’s New in ArcGIS Desktop for 7.5 and 7.6
18
2. If you are integrated with an enterprise geodatabase you will be prompted with the following:
3. This screen is asking the user to login as the Domain Owner. Domains within a geodatabase can
only be edited by the original creator (domain owner). Often, not even system admin accounts can edit a domain if they weren't used to create it. Make an authentication choice and enter if username and password if needed. Click OK.
4. When this tool is run it validates the Lucity picklists and GIS domains for all fields mapped between the two systems. The validation process is tracked and displayed in the resulting dialog:
5. The top section shows the validation progress and can be reviewed by using the scroll on the
right. The bottom section provides the results in a tabular format allowing you to easily review and resolve any conflicts.
o No Issues- There are no problems, the Lucity picklist and GIS Domain are identical
o Missing Domain- There is no domain in the geodatabase for this Lucity picklist
o Invalid Type- The domain for this GIS field is not a coded value domain. Lucity only supports linking to Esri’s coded value domains
o No Domain Values- The domain exists but does not have any values for users to pick from
o No Lucity Values- The Lucity picklist does not have any values for users to pick from

What’s New in ArcGIS Desktop for 7.5 and 7.6
19
o Domain Missing Value- There is a value in the Lucity picklist that does not exist in the domain
o Lucity Missing Value- There is a value in the GIS Domain that does not exist in the Lucity picklist
o Desc Don’t Match- The GIS Domain description and Lucity Description does not match
6. Click the Manage button to assist with the resolution of any conflicts.
Resolve Domain Discrepancies When configuring Lucity picklists and GIS domains users can choose to manage each individual picklist/domain grouping. Once they click the Manage button in the Validation results grid the Resolve Domain Discrepancies dialog appears. Users can manually edit the picklist and/or domain, synch values from the domain to the picklist, synch values from the picklist to the domain and match up values in a picklist that have mismatched codes.
1. After clicking the Manage button on the Domain Configuration grid results the following form will appear:
o The grid on the left shows the GIS domain values. The grid on the right shows the
Lucity picklist values. Discrepancies are shown in red.
o Within this window you can: add/edit/delete GIS domain values, add/edit/delete Lucity picklist values, repopulate the GIS domain values to match Lucity, and repopulate the Lucity picklist values to match the GIS domain.
o The GIS Code field is used to link a Lucity Value to a Domain value with a different code. This is used when neither the picklist nor domain values can be changed. It can also be used to link together number picklists/domains to alpha-numeric ones.
2. After making changes you must click “Apply Changes” button at the bottom of the grid for the changes to save.
3. Click Close when you are finished. You will be returned to the Domain Configuration results form.
Note: The domain you just modified will still be listed as having a discrepancy. You must click the Revalidate button on the top menu if you wish to have the form refreshed.

What’s New in ArcGIS Desktop for 7.5 and 7.6
20
Update GIS Domains to match Lucity picklists You can perform a mass update that will overwrite all the GIS domains with values from the related Lucity picklists.
o If a domain doesn’t exist for a field, it is created in the geodatabase and linked to the feature class field. By default the domain name is given the Lucity table name and Lucity field name. For example, if a GIS field is mapped to sewer pipe’s material field the assigned domain name will be SWNET_NT_MAT_CD.
o If multiple feature classes are mapped to the same field and there isn’t already a GIS domain assigned to these fields this tool will only create one domain and assign it to all GIS fields linked to the Lucity field.
o If the GIS field type doesn’t match the Lucity field type (GIS field is text, Lucity is numeric or vice versa), the Lucity GIS Code is required before the GIS domain can be updated.
1. From the Domain Configuration Results form, click Sync Domains>>Update GIS domains to match Lucity picklists.
2. The tool will start processing the GIS domains, results are shown in the upper section of the Domain Configuration window. Please refer to the results for any issues.
Note:____________________________________________________________________________________
_________________________________________________________________________________________
_________________________________________________________________________________________
_________________________________________________________________________________________
_________________________________________________________________________________________
_________________________________________________________________________________________
What’s New in ArcGIS Desktop for 7.5 and 7.6
21
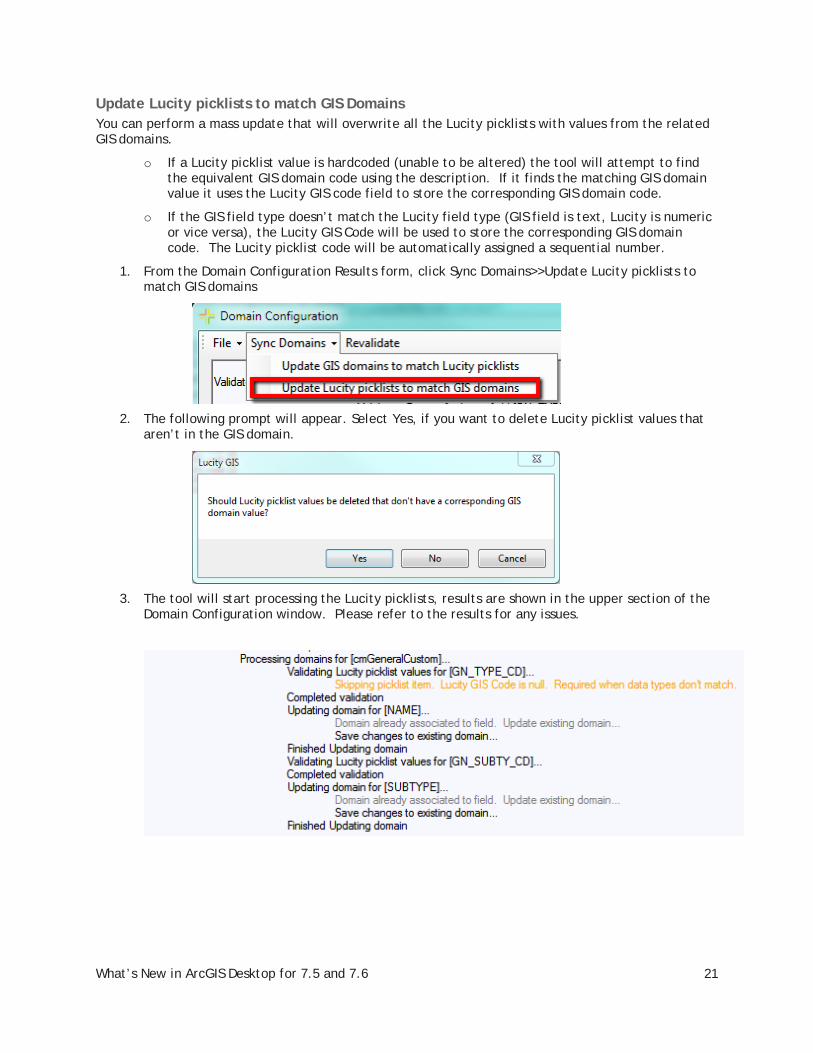
Update Lucity picklists to match GIS Domains You can perform a mass update that will overwrite all the Lucity picklists with values from the related GIS domains.
o If a Lucity picklist value is hardcoded (unable to be altered) the tool will attempt to find the equivalent GIS domain code using the description. If it finds the matching GIS domain value it uses the Lucity GIS code field to store the corresponding GIS domain code.
o If the GIS field type doesn’t match the Lucity field type (GIS field is text, Lucity is numeric or vice versa), the Lucity GIS Code will be used to store the corresponding GIS domain code. The Lucity picklist code will be automatically assigned a sequential number.
1. From the Domain Configuration Results form, click Sync Domains>>Update Lucity picklists to match GIS domains
2. The following prompt will appear. Select Yes, if you want to delete Lucity picklist values that
aren’t in the GIS domain.
3. The tool will start processing the Lucity picklists, results are shown in the upper section of the
Domain Configuration window. Please refer to the results for any issues.

What’s New in ArcGIS Desktop for 7.5 and 7.6
22
Update Parent Linking Domains In many feature classes there will be fields that link a feature to a related feature in another feature class. It does this by storing the related feature's LucityID. For example, a park bench might store the ID of the Park that it is in. This provides important connection information for Lucity, but is less useful to users because it just displays a number. The Update Parent Linking Domains tool creates user-friendly domains for these fields. While the field will still store the linking ID, the domain could display parent records: Facility ID number, Name/Description, Facility ID and Name/Description, or Name/Description and Facility ID.
1. To update parent linking domains, right-click on either a geodatabase or feature class node in the tree located on the left-hand side of the Geodatabase Configuration browser and select “Update Parent Linking Domains”
2. A prompt following prompt will appear.
3. Select the description option and click OK.
Note: When the “Do not show this prompt again…” option is checked any additional parent linking domains needing proceed will use the same option.

What’s New in ArcGIS Desktop for 7.5 and 7.6
23
4. If there currently is not a domain assigned to the GIS field the following prompt will appear. Click Yes.
5. The domain will be created and/or updated. The process will be updated in the Validation
Results window.
Feature Class Fields Grid The feature class fields grid allows you to manage the feature class to Lucity field mappings. A mapping enables the Lucity application to update the feature class when the data is updated in the Lucity desktop or web application. A mapping also enables the Lucity extension in ArcMap to update the Lucity database when the data is updated in the feature class during an ArcMap edit session.
• FieldName- The field name in the Lucity table.
• DisplayName- The field caption in Lucity.
• Field Type- The type of data stored in the field
• MaxMask- The data format. A numeric value followed by an “x” indicates the number of characters allowed.
• Feature Class Field Name- This is the name of the field in the feature class. This is NOT the alias field name. If you are unsure of the field name use the Field Lookup button.
• Field Lookup- This button column displays a list of the feature class fields. Note: If a connection to the geodatabase was unsuccessful then no fields will be listed.

What’s New in ArcGIS Desktop for 7.5 and 7.6
24
Color Coding • Red- Required Field. This is the Common ID (FacilityID) field for the asset inventory module.
• Orange- Required Field. Stores the required ID number of related features (the parent record number)
• Yellow- These are considered parent linking fields. They typically store the ID of the related feature.
• Green- Building and Address composite field.
Lucity Code/Type fields Starting with 7.5, only the Lucity code fields are displayed in the Feature Class Fields grid. The Domain Configuration tool can be used to further define the mapping between a GIS field to a Lucity picklist field. We support mapping a text GIS domain to Lucity numeric picklist and vice versa.
Note:____________________________________________________________________________________
_________________________________________________________________________________________
_________________________________________________________________________________________
_________________________________________________________________________________________
_________________________________________________________________________________________
_________________________________________________________________________________________
_________________________________________________________________________________________
_________________________________________________________________________________________

What’s New in ArcGIS Desktop for 7.5 and 7.6
25
Lucity Composite Address fields Lucity breaks out street address information into the following fields: Building number, building suffix, street direction, street prefix, street name, street type, and street suffix. You can use the composite address fields in the feature class fields grid to map a field in your feature class that contains the entire building number or the entire street name. Note: If you map to a composite field you should NOT map to the individual building or street component fields.
• Multiple field configuration:
• Single field configuration: