transformgenerator v6.4 users guide - aavso.org · plots of the instrument magnitudes used to...
TRANSCRIPT

1
Transform Generator User’s Guide
(TG – Version 6.4)
1. Introduction
The Transform Generator (TG) program provides an easy way to calculate photometry
transformation coefficients. The program reads text file(s) containing machine magnitude
measurements of standard star reference fields (currently M67, NGC 7790, M11, NGC 1252, NGC
3532 , Mellotte 111 and the Landolt Fields) and calculates the standard transformation coefficients.
Plots of the instrument magnitudes used to compute each transform are displayed allowing users to
deactivate bad data points whereupon the transforms are immediately recalculated. Deselected
data points can be reactivated. Transform sets can be saved for future use. Results from multiple
transform sets can be compared and averaged together to obtain a final set of coefficients. An
export file can be created containing the transform coefficients in a format compatible with the
AAVSO TransformApplier tool.
The program works with standard export files from AIP4WIN and MaxIm. It will also process
photometry report download files from VPHOT.
(Transform Generator was previously known a Photometry Transformation Generation Program
(PTGP). The name was changed to Transform Generator with release 5.5)
Screen captures in this user’s guide sometimes show previous version numbers. Other than the
version number, those screens have not changed in the updated version.
2. System Requirements and Installation TG requires the use of Python along with several additional libraries. It runs on Windows, Apple, and LINUX computers. The simplest installation uses an integrated set of Python software libraries known as Anaconda (https://store.continuum.io/cshop/anaconda/). Detailed installation instructions can be found at http://www.aavso.org/tg. Following these procedures will ensure all of the necessary software is installed on your computer.
3. Program Overview TG allows users to compute and maintain transformation coefficients for multiple telescopes.
Using TG, users proceed through the following steps to generate coefficients:
1. Identify telescope (enter telescope name the first time used) 2. Select standard star field used (M67, NGC 7790, M11, NGC 1252, NGC 3532, Melotte
111 or Landolt Fields.) 3. Load user provided file(s) containing instrument magnitudes of standard field stars
(formats defined below.) 4. Compute transforms using TG

2
5. Review plots of individual transforms, deactivating any invalid observations 6. Save transform set 7. Repeat the above steps if multiple sets of observations available 8. Compare different sets of transforms 9. Select sets to be averaged 10. Average selected observation sets to create a final “master” transform set 11. Export a file containing the final transform values for printing and for input into
Transform Applier (TA)
4. Program Operation 4.1. Start program using the start-up icon. (See installation instructions at www.aavso.org/tg)
4.2. Select telescope name – or “Add Scope” if it’s the first time you enter data from that scope. (To
use the demonstration file, enter T17 as a scope name).
4.3. Select the standards field used. Currently M67, NGC 7790, M11, NGC 1252, NGC 3532, Melotte 111 and the Landolt Fields are available. (Select M67 to use the demonstration file.)
4.4. Load the Instrument Magnitudes - to load the telescope instrument magnitude file, identify the file format and click the “Select file(s)”. For both TG/AIP4WIN and MaxIm formats, only one file is loaded. For VPHOT photometry download files, one file exists for each image/filter combination. The user selects ALL the files at one time for processing.
(Users of AIP4WIN should refer to Appendix C for specific details using

3
AIP4WIN generated output files. Also, use of VPHOT to identify stars and generate instrument magnitude files is recommended. It can save a lot of time. Skip to section 4.4.3. You won’t need to understand the details of the instrument magnitude file format)
4.4.1. TG and AIP4WIN Instrument Magnitude File Format: The format for this file is a standard CSV file – the delimiter may be either a semicolon or comma. Three types of lines in the file are processed - all other lines in the file are ignored.
4.4.1.1. Filter identification line - A filter identification line identifies what filters were used and which fields of subsequent star measurement lines contain which filter measurements. The first key word of this line must be “Filt” – case sensitive. Subsequent fields contain u,b,v,r, and/or i (upper or lower case). Fields may be skipped (e.g. many programs output error data in between machine magnitudes) by entering successive delimiters. Two examples: Filt,b,v,i Filt;;u;;b;;I;;v;;r (note, this is a standard AIP4WIN output format)
4.4.1.2. Date of observation line - This is optional, but is included in the program output to help identification. The first key word is “Julian_Day”, and the second field contains the date Example: Julian_Day; 2456628.19110; (again, this is part of a standard AIP4WIN format)
4.4.1.3. Star instrument magnitude measurement lines- These lines contain the filtered instrument magnitudes for each star. The filter sequence and spacing are defined by the earlier Filter identification line.
The first field of a star instrument magnitude measurement line contains the star id.
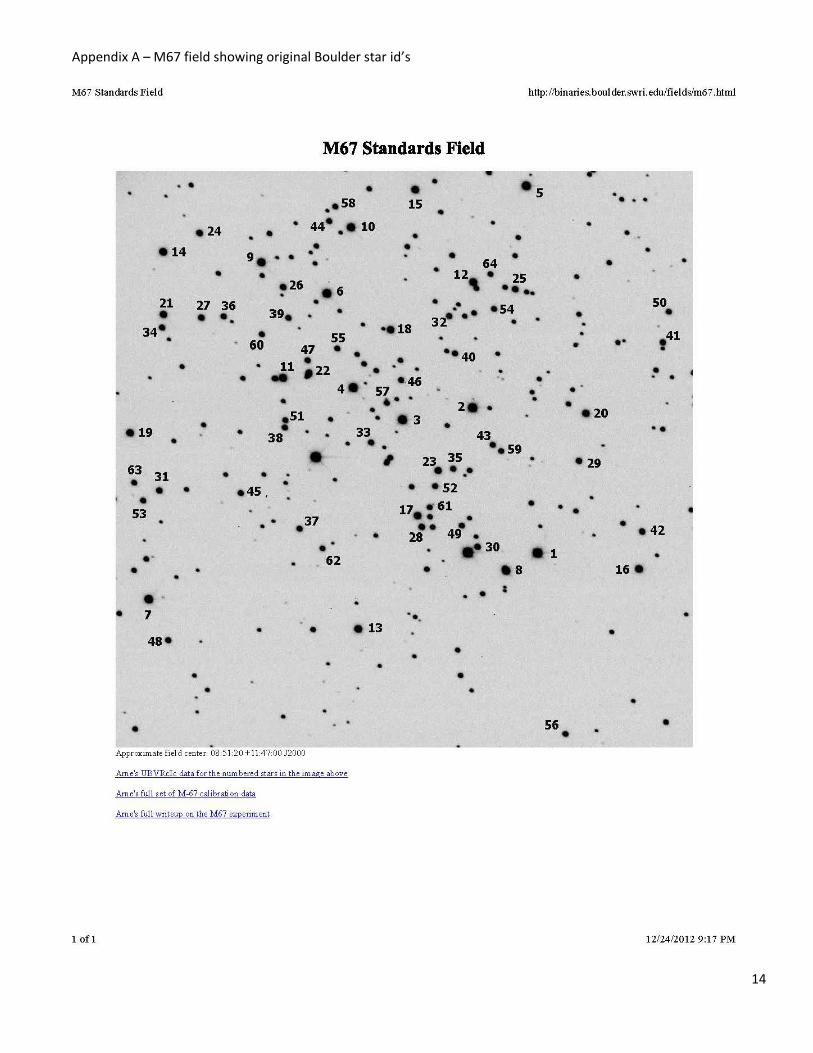
M67 ids may be either those in Appendix A (with “Boulder” star ids 1-63) or the current AUID.
NOTE: The most recent standard reference magnitudes are retrieved from the AAVSO VSP tool

4
independent of whether one uses the original Boulder ID’s or current AUID’s. (Users of the
original “Boulder” numbers should know some of those stars are no longer reference stars. A
message will be displayed by TG indicating which stars were not used in the calculation.)
NGC 7790 ids may be either those in Appendix B (with “Boulder” star ids 1-31) or current
AUID’s.
The second and subsequent fields in the star instrument magnitude measurement line have the
magnitudes defined in the earlier Filt line.
Examples 1:
Filt; B;; V;; R;; I;; 1; 9.063; 0.001; 9.047; 0.001; 8.784; 0.001; 9.375; 0.001; 2; 10.711; 0.002; 9.325; 0.001; 8.408; 0.001; 8.369; 0.001; Example 2: Filt,b,snr,v,snr,r,snr 112,-7.747,258,-9.436,411,-9.475,415 117,-7.9,282,-9.002,332,-8.7,235
4.4.1.4. To use the demonstration file, click “Select File” and pick:
“M67_T17_20140330_Photometry_Demo_instrument_mags.txt” from the default directory.)
4.4.1.5. Users of AIP4WIN can generate this file using the MMT (Magnitude Measurement Tool) and
selecting the Instrumental Magnitudes report format with the “One Star” per line of report option
AIP4WIN MMT Window:
5
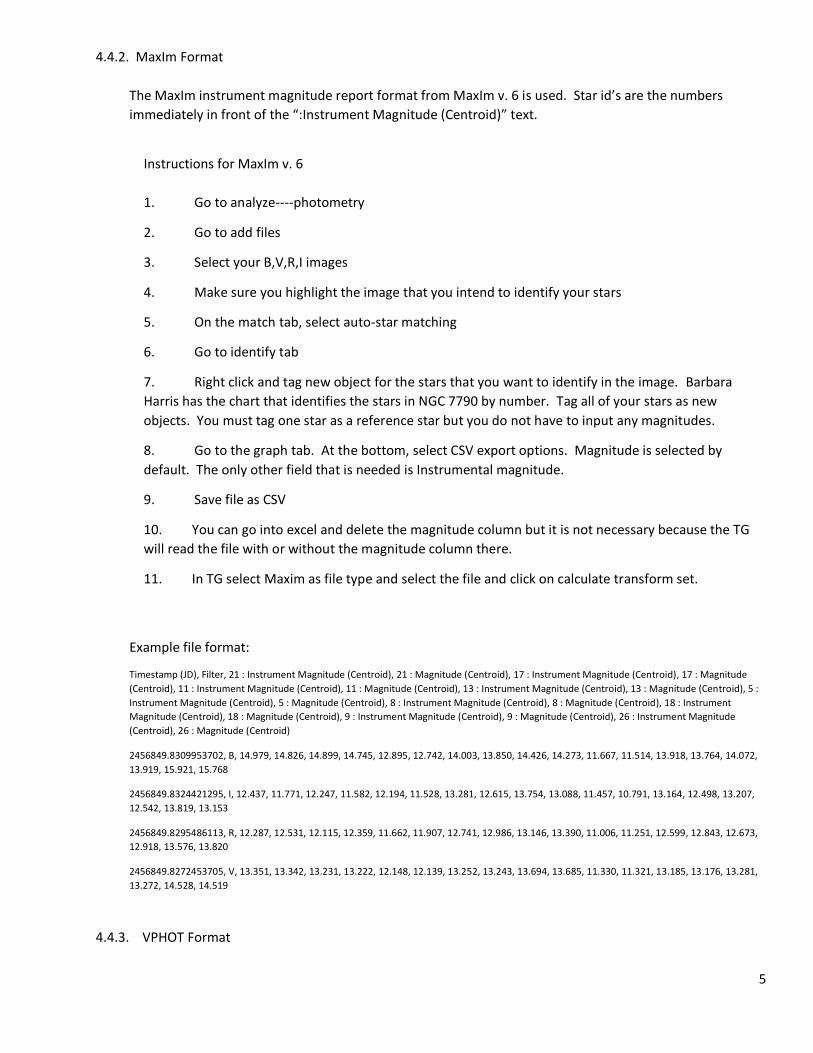
4.4.2. MaxIm Format
The MaxIm instrument magnitude report format from MaxIm v. 6 is used. Star id’s are the numbers
immediately in front of the “:Instrument Magnitude (Centroid)” text.
Instructions for MaxIm v. 6
1. Go to analyze----photometry
2. Go to add files
3. Select your B,V,R,I images
4. Make sure you highlight the image that you intend to identify your stars
5. On the match tab, select auto-star matching
6. Go to identify tab
7. Right click and tag new object for the stars that you want to identify in the image. Barbara
Harris has the chart that identifies the stars in NGC 7790 by number. Tag all of your stars as new
objects. You must tag one star as a reference star but you do not have to input any magnitudes.
8. Go to the graph tab. At the bottom, select CSV export options. Magnitude is selected by
default. The only other field that is needed is Instrumental magnitude.
9. Save file as CSV
10. You can go into excel and delete the magnitude column but it is not necessary because the TG
will read the file with or without the magnitude column there.
11. In TG select Maxim as file type and select the file and click on calculate transform set.
Example file format:
Timestamp (JD), Filter, 21 : Instrument Magnitude (Centroid), 21 : Magnitude (Centroid), 17 : Instrument Magnitude (Centroid), 17 : Magnitude
(Centroid), 11 : Instrument Magnitude (Centroid), 11 : Magnitude (Centroid), 13 : Instrument Magnitude (Centroid), 13 : Magnitude (Centroid), 5 :
Instrument Magnitude (Centroid), 5 : Magnitude (Centroid), 8 : Instrument Magnitude (Centroid), 8 : Magnitude (Centroid), 18 : Instrument
Magnitude (Centroid), 18 : Magnitude (Centroid), 9 : Instrument Magnitude (Centroid), 9 : Magnitude (Centroid), 26 : Instrument Magnitude
(Centroid), 26 : Magnitude (Centroid)
2456849.8309953702, B, 14.979, 14.826, 14.899, 14.745, 12.895, 12.742, 14.003, 13.850, 14.426, 14.273, 11.667, 11.514, 13.918, 13.764, 14.072,
13.919, 15.921, 15.768
2456849.8324421295, I, 12.437, 11.771, 12.247, 11.582, 12.194, 11.528, 13.281, 12.615, 13.754, 13.088, 11.457, 10.791, 13.164, 12.498, 13.207,
12.542, 13.819, 13.153
2456849.8295486113, R, 12.287, 12.531, 12.115, 12.359, 11.662, 11.907, 12.741, 12.986, 13.146, 13.390, 11.006, 11.251, 12.599, 12.843, 12.673,
12.918, 13.576, 13.820
2456849.8272453705, V, 13.351, 13.342, 13.231, 13.222, 12.148, 12.139, 13.252, 13.243, 13.694, 13.685, 11.330, 11.321, 13.185, 13.176, 13.281,
13.272, 14.528, 14.519
4.4.3. VPHOT Format
6
To use VPHOT, do the following:
Upload one (or more) of your images for each filter. In VPHOT, view one image at a time. Select “Catalogs”
“Load AAVSO Standard Stars”. Then select “View Photometry Report”. Select the “Download” option
towards the top of the screen, and save the file on your computer. Repeat this for each image. For
example, if you have a full UBVRI set of images, you will have 5 separate files. (You can also have multiple
images for any filter(s) creating multiple files for the same filter. TG will average the measurements from
all the files.)
Start TG. Select the VPHOT format, and also enter a minimum SNR setting for the VPHOT data. (You can
make it 0 to use all the data VPHOT marks as “True”.)
Click “Select File(s)” and select ALL THE DOWNLOADED VPHOT FILES at one time.
Click “Calculate Transforms” – and the data appears in 10 – 15 seconds.
(FYI, the program sorts out the problem associated with VPHOT using inconsistent star_ids. It uses other
data in the VPHOT download file (the standard magnitude and B-V values) to match to the AUID. TG reads
through all the files creating a master array containing the AUID and all the instrument magnitude
values. It also keeps track of “False” data – and knows when a particular AUID only contains data for a
subset of the filters.)
The number of stars used for each transform varies – based on the minimum SNR entered and which stars
VPHOT downloaded.
4.5. Calculation of transforms - Select “Calculate Transform Set” to generate the transforms. If any of the stars
contained in the instrument measurements file are not found in VSP, an error message appears listing those
id’s. Transforms are calculated using the other stars measured.
Note the display shows the current file name, the JD of observations (if it was provided), transform values, one
sigma error estimate, and “r squared” measure indicating the “goodness” of the linear fit to the measured data.

7
4.6. Plotting transforms - The user may point at any individual transformation – the field will turn red. (On a Mac,
the field will turn red only if one clicks once somewhere on the window to make it active.) On selecting the
field, a plot is generated –

8
4.7. Analyzing transforms - The red line shows the plot resulting from the calculated transform. Two sigma error
lines calculated using all observations are shown in purple. These two sigma lines remain static during
subsequent analysis and deletion/addition of data points.
The user may select any individual observation measurement to deactivate from the calculation. Deactivated
observations switch from green to red in color, and the transform value is immediately recalculated, an
updated fit line redrawn in red, and new “Current 2 sigma” lines are drawn in dotted blue. The deactivated
star id and the number of active reference stars used in the current calculation are shown. Users can deactivate
additional stars and also, by reselecting a deactivated star, re-activate it for use in the calculation.
9
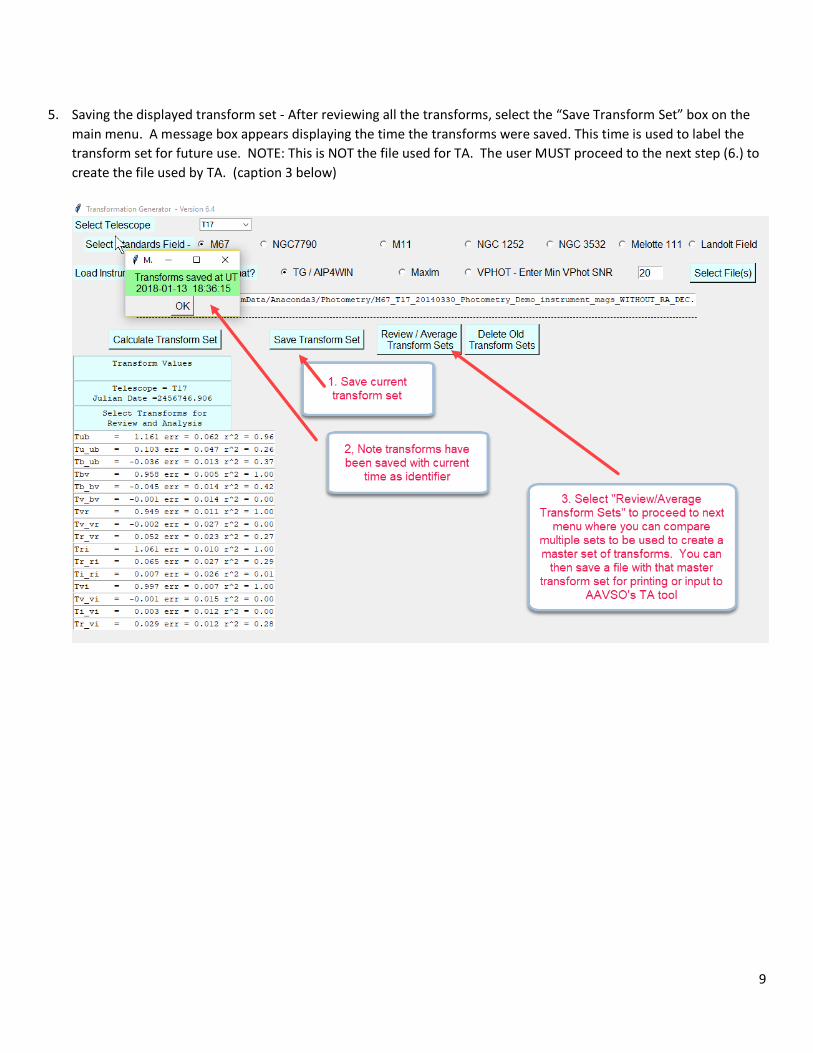
5. Saving the displayed transform set - After reviewing all the transforms, select the “Save Transform Set” box on the
main menu. A message box appears displaying the time the transforms were saved. This time is used to label the
transform set for future use. NOTE: This is NOT the file used for TA. The user MUST proceed to the next step (6.) to
create the file used by TA. (caption 3 below)
10
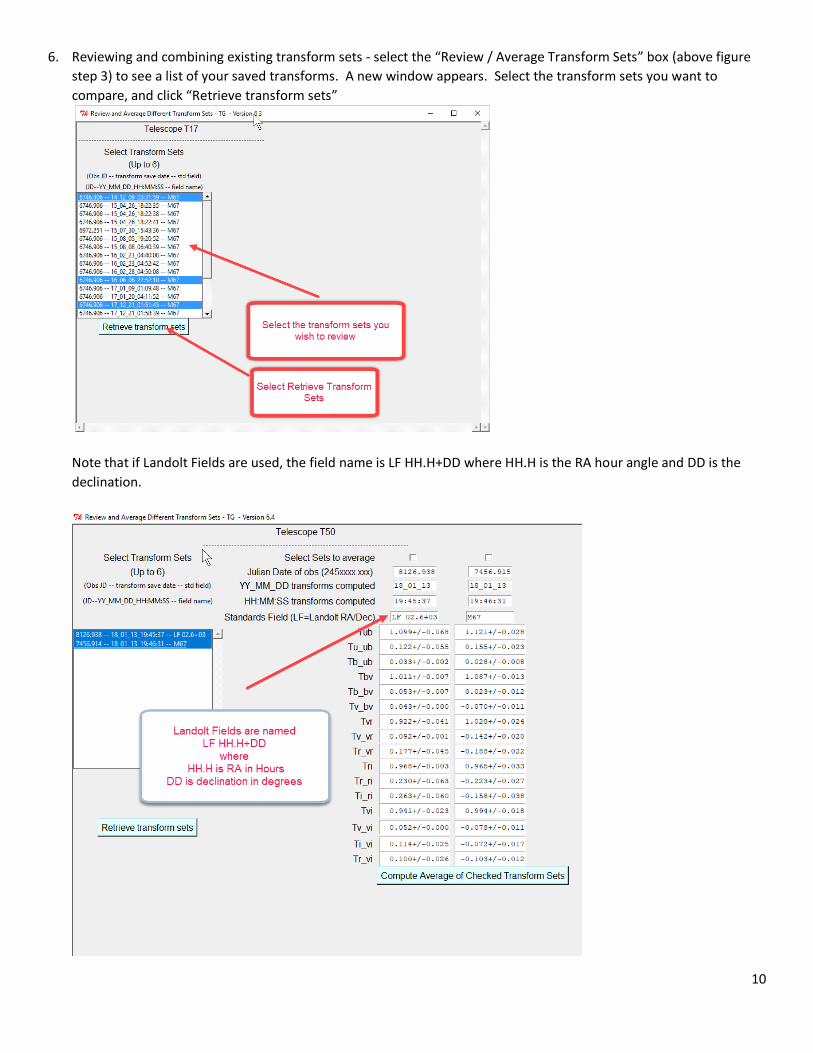
6. Reviewing and combining existing transform sets - select the “Review / Average Transform Sets” box (above figure
step 3) to see a list of your saved transforms. A new window appears. Select the transform sets you want to
compare, and click “Retrieve transform sets”
Note that if Landolt Fields are used, the field name is LF HH.H+DD where HH.H is the RA hour angle and DD is the
declination.

11
7. After reviewing the data, select the sets you want averaged together by clicking on the check boxes at the top of
each column. Then select “Compute Average of Checked Observation Sets” –
12
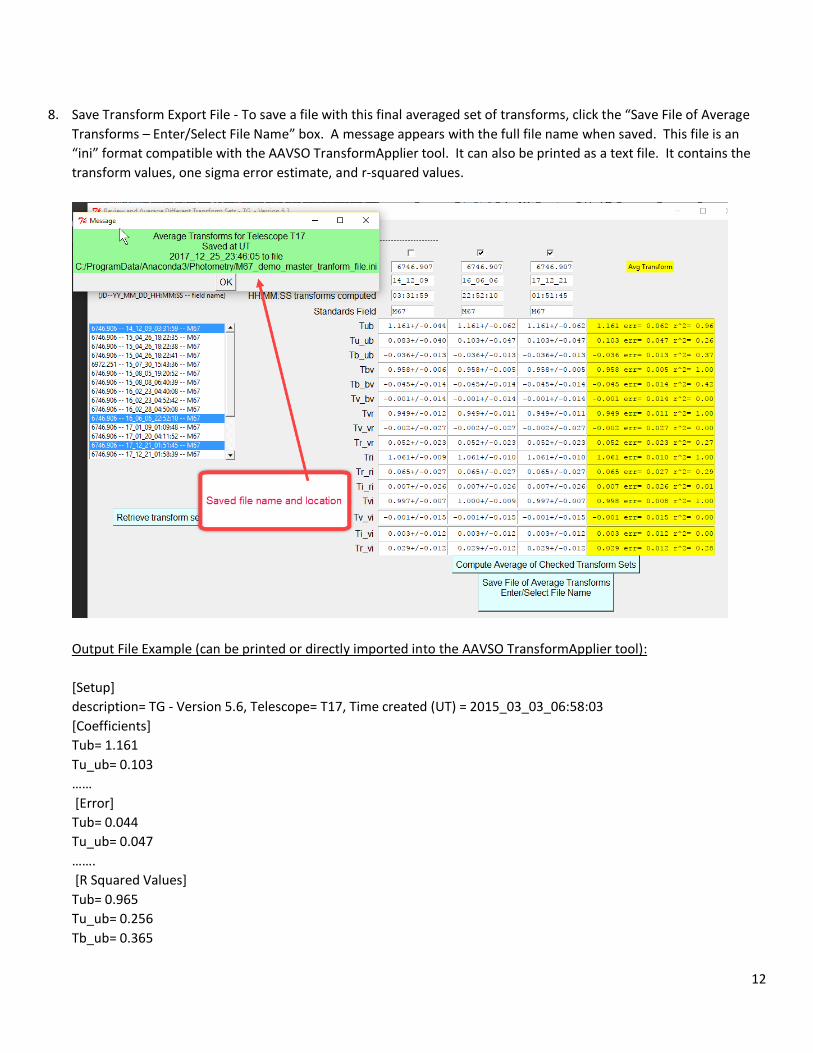
8. Save Transform Export File - To save a file with this final averaged set of transforms, click the “Save File of Average
Transforms – Enter/Select File Name” box. A message appears with the full file name when saved. This file is an
“ini” format compatible with the AAVSO TransformApplier tool. It can also be printed as a text file. It contains the
transform values, one sigma error estimate, and r-squared values.
Output File Example (can be printed or directly imported into the AAVSO TransformApplier tool):
[Setup]
description= TG - Version 5.6, Telescope= T17, Time created (UT) = 2015_03_03_06:58:03
[Coefficients]
Tub= 1.161
Tu_ub= 0.103
……
[Error]
Tub= 0.044
Tu_ub= 0.047
…….
[R Squared Values]
Tub= 0.965
Tu_ub= 0.256
Tb_ub= 0.365

13
9. Transform Set Deletion:
To delete existing transform sets, select “Delete Old Transform Sets” button. A new window appears –
Select the set(s) to delete, click on the Delete transform sets button. A success message will appear –
10. TransformGenerator Support
Questions and suggestions can be emailed to: [email protected]
14
Appendix A – M67 field showing original Boulder star id’s

15
Appendix B – NGC7790 Standards Field Showing original Boulder id’s

16
Appendix C: Details for using AIP4WIN data with TG
This note was posted on the AAVSO web site in response to a member’s question:
Using AIP4WIN with TG
mgw
Online
Joined: 2010-08-01
Posted: March 10, 2015 - 3:19pm
Keith,
You don't need all the magnitude information on the M67 stars. TG automatically retrieves it from the AAVSO web site's
VSP tool.
What you do need is a comp list with the 64 ids (1-64) so you can select those stars in AIP4WIN and get the right
Boulder identifier. (The TG Users guide V 5.6 has a new appendix A that shows an image of the M67 field with the 1-
64 star ids).
To help get the right comp star ids I created an AIP4WIN "STAR" file that contains all 64 M67 standard stars. It
is attached to this post. (NOTE: When you download it, remove the _.txt at the end of the file name. I had to add _.txt
to be able to post the file on this blog. AIP4WIN is looking for the file to end in .STAR".) Copy this
M67_Henden_Field_Comps.STAR file into the AIP4WIN/Data directory (usually C:\Program Files (x86)\AIP4Win\Data).
Now start MMT. On the MMT Images tab load all your M67 images for all the filters. Select one image to locate the
comps (I ususally select one of the V filter images). Go to the MMT Stars tab and click "Recall..." to load that M67 file
containig all the comps.
Select any star as the M67 target (i.e. AIP4WIN's "V" star - which again, is not used). Now select the comp stars - you'll
see the comp number matches the boulder id. Once all the comps are selected, go to the AIP4WIN Report tab and
select the options shown in the TG Users Guide section 4.4.1.5. Then go to the AIP4WIN Execute tab, pick a good
guide star and "Run Photometry". Because you have different filter images, AIP4WIN will usually ask you reconfirm the
guide star between images.

17
AIP4WIN will find all the stars in each image. Sometimes stars in one band won't have adequate SNR for AIP4WIN, but
that's OK. AIP4WIN indicates the error in the output report file and TG handles it.
The AIP Instrument Magnitudes file created this wasy can be directly loaded into TG.
FYI, TG goes to the AAVSO web site to retrieve the current standard star magnitudes from VSP, so don't worry about
the magnitudes in the STAR file.
One other suggestion - if you want to ease the star selection burden and only identify the first 30 standard stars, edit the
STAR file (in Notepad) by deleting all stars above 30.) Pragmatically I find the results are very good.
Another point - when you run TG you will get an error message that some of the Boulder id do not have an AUID
counterpart. That's true - some of the original stars are no longer in the standards field. Don't worry, TG will generate
the transforms based on the other stars.
Again, think about using VPHOT to identify the stars - it saves a lot of work