tri-meweb ry 2015 release uat 2 december 7, 2015 · •what is the purpose of test scripts? – to...
TRANSCRIPT

TRI-MEweb RY 2015 Release UAT 2
December 7, 2015
© CGI Group Inc. CONFIDENTIAL

2
Agenda
• Welcome and Introduction
• Schedule
• Activities
• Test Materials
• TRI UAT Website
• TRI-MEweb Overview
• CGI Testing Tracker

Welcome and Introduction
• Welcome to the TRI-MEweb RY 2015 User
Acceptance Testing
• CGI Testing Support:
– Veena Peddineni / [email protected]
– Kyle Pahowka / [email protected]
– UAT Help Desk: (703) 227 – 6862 / (703) 227 – 4978
• EPA Testing Support
– Shane Knipschild / [email protected] /
(202) 566-2712
– Juan Parra / [email protected] / (202) 566-0499
3

4
UAT Schedule
Track 2 (12/07/15 – 12/11/15)
Monday 12/07/15
• 11:00 am – Kickoff Presentation
• 12:30 pm to 5:00 pm – Testing
Tuesday 12/08/15 – Thursday 12/10/15
• 8:00 am – 5:00 pm – Testing
Friday 12/11/15
• Conclude Testing
• Review TRI-MEweb UAT results
• UAT Debrief

Activities
• UAT Testers execute test cases and logs
identified issues in the CGI Testing Tracker.
• CGI and EPA UAT Testing Support assists in
classifying and prioritizing logged issues.
5
CGI helps categorize
and log issue
EPA and CGI prioritize
unresolved issues for fixesTRI Testers
Issue encountered
Log Issue
CGI tracks and
resolves logged issues

Test Material
• TRI UAT Website:
http://www2.epa.gov/toxics-release-inventory-tri-program/tri-
meweb-user-acceptance-testing-ry-2015
– UAT Kick-Off Presentation
– RY 2015 Enhancements Presentation
– Testing Tracker Presentation
– Test Scripts
– Participant Roster and Test Script Assignment
– Sample XML
– Known Application Issues
– TRI-MEweb Tutorials/Guidance Materials
6

TRI UAT Website https://wcms.epa.gov/toxics-release-inventory-tri-program/tri-meweb-user-acceptance-testing-ry-2015
7

Log in to CDX
8

9
Below is the CDX Log In page.
CDX -> test.epacdx.net

10
Log In Enter your CDX user ID and password in Test environment and click Log In

11
Welcome to TRI-Meweb! page is displayed.
TRI-MEweb Welcome Page

Add a Facility
12

13
On the TRI-MEweb Welcome page, click “Manage My Facilities.”
Search and create a new facility

14
My List of Facilities Page
Click “Map Facilities” to add a new facility.

15
Click on “Add Facilities” to load the Add Facility tab.
Mange Facilities Page

Enter in at least two search criteria and click “Search Facilities.”
Search for facilities
16

17
Create new facility There are options to select an existing facility or create new facility.” Click “Create New
Facility.”

18
Enter in facility details and click “Map Facility.”
Map new address

19
Click “OK” to standardized address and close pop-up.
Standardize facility address

20
Click “Submit” to add facility to Unsaved Facility table.
Submit

21
Click “Save Selected Facility” to prompt the Explanation of New Facility pop-up.
Save newly created facility

22
Click “Ok” to close pop-up.
Explanation of New Facility

23
New facility is saved and associated with the user.
Access Granted

24
Click on My Facilities tab then click “+Access/Add Facility”
Adding an existing facility using TRI-MEweb

25
Select Option 2, enter in TRI Facility ID and Access Key, then click “Next.”
Enter Facility’s Access Information

26
Verify that the “Yes” option is selected and click “Next.”
Confirm Facility

27
Verify Access Granted page, exiting facility is successfully associated with this user.
Access Granted

28
TRI-MEweb Overview

29
The TRI-MEweb application is launched, displaying the Welcome page for a user with access to facilities.
Welcome page displayed below is for a experience user that already has added TRI facility accounts.
TRI-MEweb for existing users

Open/Close TRI-MEweb Help Area
30
The TRI-MEweb Help Area is open by default; click the red arrow to close the TRI-MEweb
Help Area side bar.

31
The TRI-MEweb Help Area side bar is closed. Click the left-facing arrow to open the help area.
Open/Close TRI-MEweb Help Area, continued

TRI-MEweb Form Preparation
32

33
Click the “Prepare” tab.
TRI-MEweb Form Preparation

34
Select a reporting year from the “Reporting Year” drop-down menu and click the “Next” button.
TRI-MEweb Form Preparation, continued

35
Select a facility by selecting the associated radio button. Click the “Forms” sub-tab.
TRI-MEweb Form Preparation, continued

36
Click the “+ Add Form” button on the “Select a Form” page.
TRI-MEweb Form Preparation, continued

37
Select a chemical on the “Add New Chemical Forms” page and click the “+ Add Selected” button. Click the “Next” button.
TRI-MEweb Form Preparation, continued

38
Select a chemical form via a radio button on the “Select a Form” page; click the “Next” button.
TRI-MEweb Form Preparation, continued

39
TRI-MEweb Form Preparation, continued
Select the form type of the form via radio button. Click the “Next” button.

40
Click the “Go To Form Mode” button.
TRI-MEweb Form Navigation

41
Form R Part II, Sections 1, 2, 3 and 4 page displays in form mode; click the section links displayed in the header bar to navigate within form mode. Click the “Go To Questionnaire Mode” button to navigate back to questionnaire mode.
TRI-MEweb Form Navigation, continued

42
Click the “View Form” button to view the style sheet.
TRI-MEweb Form Navigation, continued

43
TRI-MEweb Form Navigation, continued
The Form R style sheet displays in a separate pop up window.

Validate and Transmit
44

45
Validate Click the “Validate” tab to begin the process of validating a form.

46
Validate Overview A progress bar is displayed with description of Facility Validation and Form Validation. Click “Next” to start the validation process.

47
Facility Validation page loads, it’s arrow is blue with text “(You are here)”. Click “Next.”
Validation Step 1 of 2: Facility Information

48
Form Validation page loads, it’s arrow is blue with text “(You are here)”. Select radio button then click “Validate.”
Validation Step 2 of 2: Chemical Information on Forms

49
Validation Step 2 of 2: Chemical Information on Forms
“TRI-MEweb has validated all forms for this facility” message is prompted. Click “Next.”

50
Data Quality Reports
Data Quality page loads, it’s arrow is blue with text “(You are here).” Click “Validate.”

51
Review Draft Package page loads, it’s arrow is blue with text “(You are here).” Click “Next.”
Prepare Review Package for Draft Forms

52
“Transmit” tab is selected. Overview of Submission and Certification Steps are displayed.
Note: “Transmit to State or Tribe” is only visible for non-TDX States
Overview of Submission and Certification Steps

53
Select a chemical form on the “Select Chemical Forms to Prepare for Certification” page by checking the checkbox, and clicking the “Next” button.
Select Form(s) for Certification

54
Notify Certifying Official(s) of Pending Submission
Select Certifying Official(s) arrow is highlighted. Click the radio button for the Certifying
Official, then click “Next.”

55
“Final Review arrow is highlighted. Click “Next.”
Final Review

56
Ready for Certification arrow is highlighted, this is the last Transmit step. An email will be sent to your certifying and alternate certifying official (if nominated), notifying of the pending submission certification.
Ready for Certification

57
Signing TRIFID Signature Agreement

58
Click the “Certify” tab, then the Manage TRIFIDs for Certification page will appear.
Signing TRIFID Signature Agreement

59
Below is the “Manage TRIFIDs for Certifications” page with the three main components highlighted.
Signing TRIFID Signature Agreement, continued

60
Scroll down to the “Pending Signature” section, click the checkbox, then click the “Sign Agreement” button.
Select a TRIFID to sign Agreement

61
Review then click the “I Agree” button on the “TRIFID Agreement” page.
Signing TRIFID Signature Agreement, continued

62
Sign the submission by entering your CDX credentials in the pop-up window. Click the
“Sign” button.
Signing TRIFID Signature Agreement, continued

63
Acknowledge the TRIFID Signature Agreement confirmation pop-up window by clicking the
“OK” button.
Signing TRIFID Signature Agreement, continued

64
Reset CDX password

65
If you forgot your CDX password, click the ‘Forgot your password?’ link.
Resetting your CDX password
66
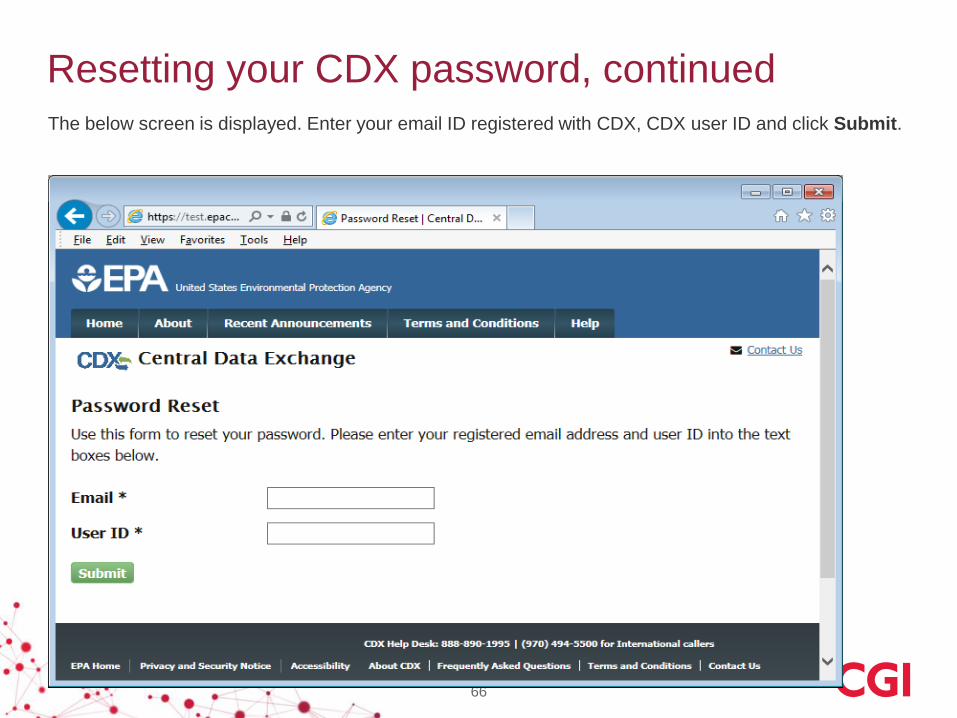
The below screen is displayed. Enter your email ID registered with CDX, CDX user ID and click Submit.
Resetting your CDX password, continued
67
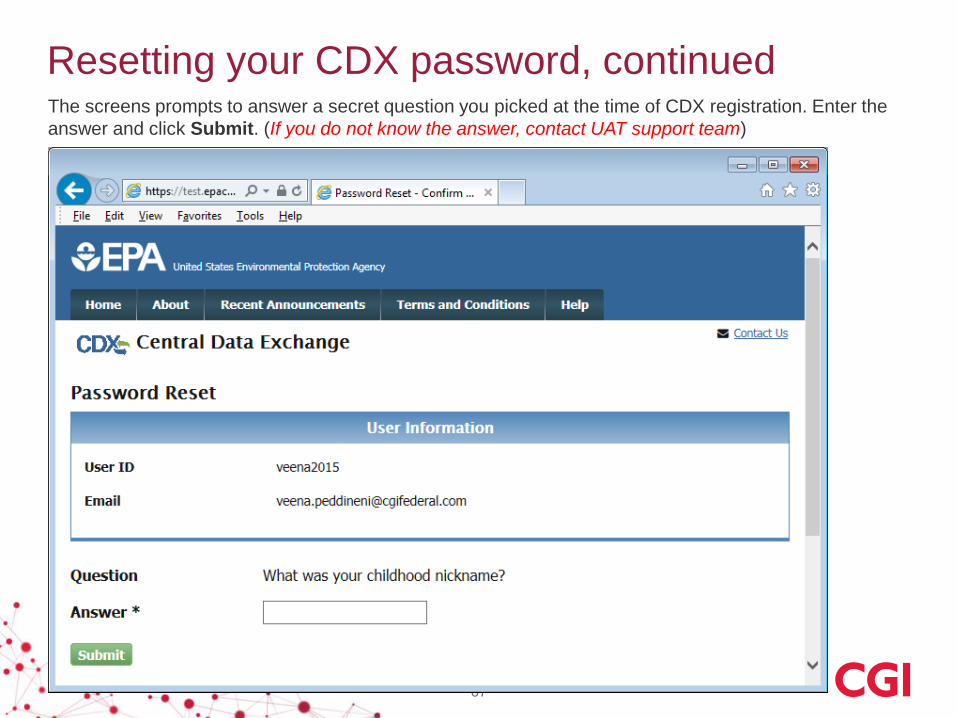
The screens prompts to answer a secret question you picked at the time of CDX registration. Enter the
answer and click Submit. (If you do not know the answer, contact UAT support team)
Resetting your CDX password, continued

68
The below screen appears confirming that an email was sent to the email address you provided.
Resetting your CDX password, continued

69
Follow the link from the email to reset your password.
Resetting your CDX password, continued

70
Read the instructions on the page for password instructions and enter your new password in the screen
below and click Submit.
Resetting your CDX password, continued

71
You should now be able to access TRI-MEweb by clicking on the link on the MyCDX page.
Resetting your CDX password, continued

72
Testing Tracker

73
Test Script FAQs
• What is the purpose of test scripts?
– To provide a step-by-step walk through of each enhancement.
• Do I need to follow the test script?
– It is recommended that the scripts be followed when testing a certain scenario.
Testers are encouraged to perform additional unscripted testing independent of the
test scripts after the assigned scripts are successfully complete.
• Will my test scripts be collected at the end of UAT?
– No. The test script is for the testers use only. Any information you include on the
script will not be seen by UAT facilitators unless it has also been entered in Testing
Tracker.
• Should I enter all discrepancies between “expected” and “actual”
results into Testing Tracker?
– Yes; however, if you are unsure if something is a valid issue and would like
guidance on how to proceed, call the UAT Help Desk at (703) 227-6862 or
(703) 227 – 4978 or email [email protected]

74
Test Script FAQs (Continued)
• Should I take a screenshot of the TRI-MEweb page when I come
across an issue?
– Yes. Screenshots are a valuable element in resolving an issue. However, the ticket
(including the “Detailed Description” field) must be fully completed and saved before
a screenshot can be attached. Take a screenshot of the TRI-MEweb page that is
being affected and save it as a .jpg file with no spaces in the name. Note that
screenshots of the test scripts in the Word documents can also be used as
supporting documentation.
• When will Testing Tracker prompt me to attach screenshot(s)?
– You must first complete each of the fields on the New Issue page in Testing Tracker.
You will be given the opportunity to attach multiple screenshots and corresponding
comments after you have populated the “Detailed Description” field and clicked the
“Save” button. However, the Testing Tracker does not display an automatic prompt.

Questions?
75