ts1000 version 5.0 installation guide sql nxpowerlite control... · ts1000 installation 2 1 system...
TRANSCRIPT

TS1000 INSTALLATION 1
TS1000 INSTALLATION

TS1000 INSTALLATION 2
1 System Overview
A TS1000 5.00 software platform is composed by a Data Server and one or many clients accessing data from the server. All system data is stored in the Data Server and client access it through a server process listening at a TCP Port (by default TCP port 3050).
Unlike previous TS1000 systems, there is no file sharing involved in a TS1000 system for data access and clients don’t have access to the internal physical database files that are stored in the server.
Image 1 System Overview
In case of having an installation based on only one PC, server and client are installed in the same machine. In an installation with many PCs, one PC must be selected to act as a server and the rest access it as clients.

TS1000 INSTALLATION 3
2 Installation
There is only one TS1000 installer to install both Data Server and clients. The installer asks the user to select server or client installation modes through the setup process. In case of having a single PC installation, server and client are installed in the same machine. In a multi-user installation, one full installation and several client-only installations must be run in different machines.
Full Install Client-only Install
System with 1 PC YES. Once
Run full install in the PC
NO
System with N PCs YES. Once
Run full install in the PC selected to be used as a Data Server
YES. N-1 times
Run client-only install in the rest of N-1 PCs
Installation Options
2.1 System Requirements
These are the recommended system requirements for a TS1000 system:
• PC with Pentium 4 or higher processor
• 512 MB RAM
• 1GB of free disk space
• Windows XP Operating System or higher
2.2 Preparing the installation
Before proceeding with the installation some decisions must be made. The most important one is to decide which machine to use to install the TS1000 Data Server. Please take into account that:
• The machine used as the Data Server must be always switched on in order to allow clients to access data.
• Selecting the most powerful machine available as the Data Server will enhance all clients’ performance.
2.3 Uninstalling previous TS1000 versions
The installer checks whether there is a previous TS1000 installation in the machine before proceeding. TS1000 5.00 software cannot be installed without uninstalling previous versions.
Choose language

TS1000 INSTALLATION 4
Click on Si to continue the installation
Click on Si to continue the installation

TS1000 INSTALLATION 5
Installation procedure
Administrator rights are needed to install TS1000 5.0 software. Please contact your system administrator for more information on this.
1. A welcome screen and a license agreement text are shown when the installer is run. Click on Next and agree the license agreement to continue.
Welcome Screen
License Agreement Screen
Click on I Agree

TS1000 INSTALLATION 6
2. Select the Destination Folder to copy files to and click on Next. By default c:\Program Files\TS1000 5.0
Install Destination Folder Selection Screen
3. Select Installation type: Full (Data Server+Client) or Client Only (Client Only) and click on Next
Installation Type Selection Screen
TS1000 INSTALLATION 7
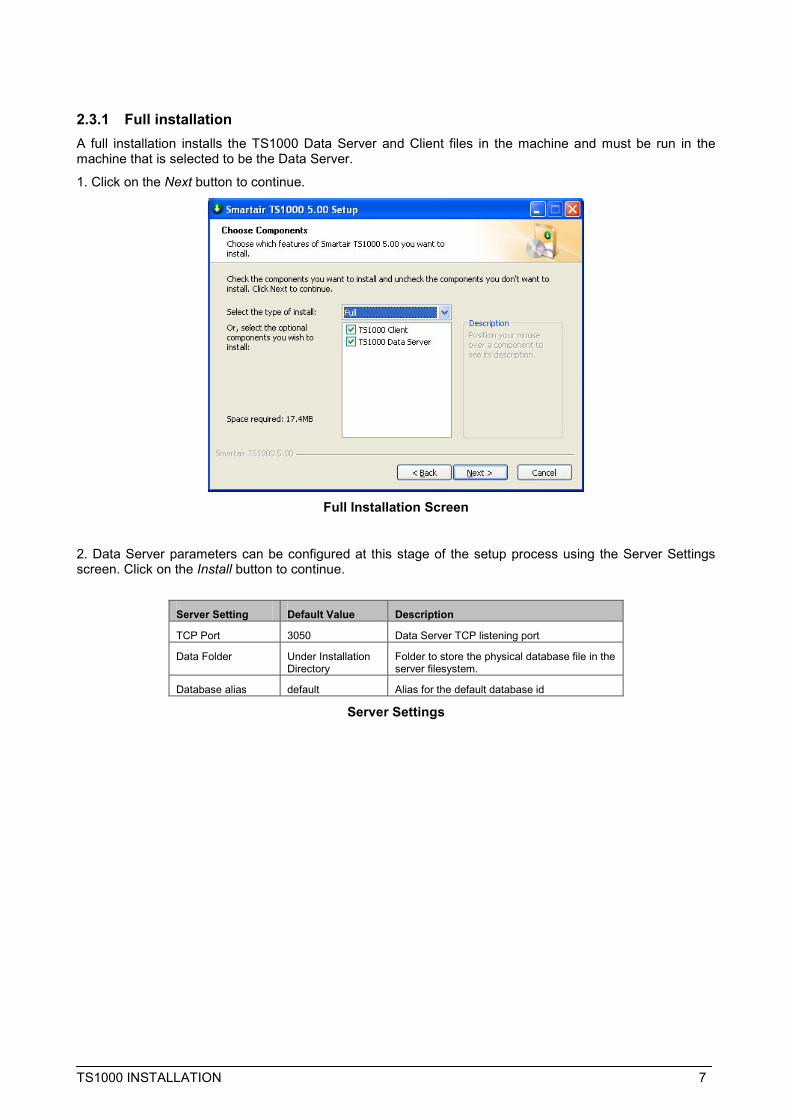
2.3.1 Full installation
A full installation installs the TS1000 Data Server and Client files in the machine and must be run in the machine that is selected to be the Data Server.
1. Click on the Next button to continue.
Full Installation Screen
2. Data Server parameters can be configured at this stage of the setup process using the Server Settings screen. Click on the Install button to continue.
Server Setting Default Value Description
TCP Port 3050 Data Server TCP listening port
Data Folder Under Installation Directory
Folder to store the physical database file in the server filesystem.
Database alias default Alias for the default database id
Server Settings

TS1000 INSTALLATION 8
Server Settings Screen
3. Files will be copied and the system will be configured at this stage. Click on Show details to show the installation log.
Setup Progress Screen
This message is shown in order to remind if the installed TCP/IP port is open

TS1000 INSTALLATION 9
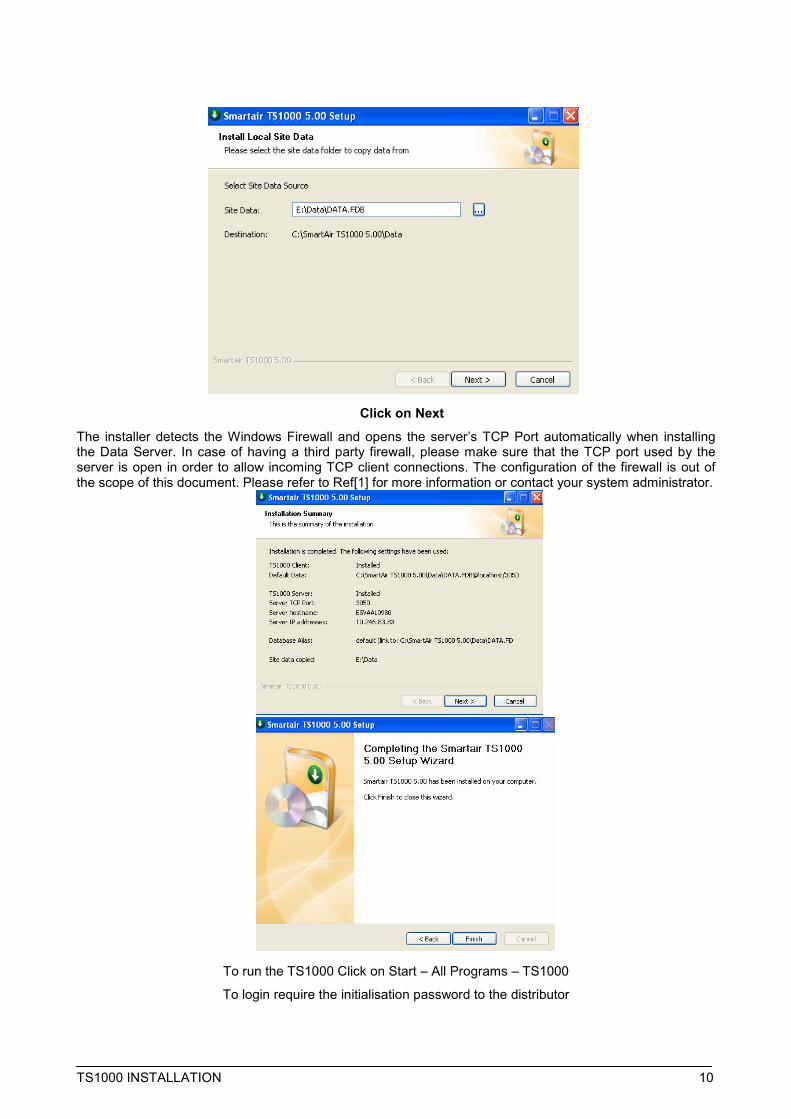
4. Install Site Data (optional). Select Yes when prompted to install Site Data. Select the Site Data Source and click on the Next button. Site data will be copied to the Data Server’s internal database file folder.
Install Site Data Screen
Select the DATA.fdb file to copy
Click on Si to continue the installation
Search the data fólder of the USB and click on Aceptar
TS1000 INSTALLATION 10
Click on Next
The installer detects the Windows Firewall and opens the server’s TCP Port automatically when installing the Data Server. In case of having a third party firewall, please make sure that the TCP port used by the server is open in order to allow incoming TCP client connections. The configuration of the firewall is out of the scope of this document. Please refer to Ref[1] for more information or contact your system administrator.
To run the TS1000 Click on Start – All Programs – TS1000
To login require the initialisation password to the distributor
TS1000 INSTALLATION 11
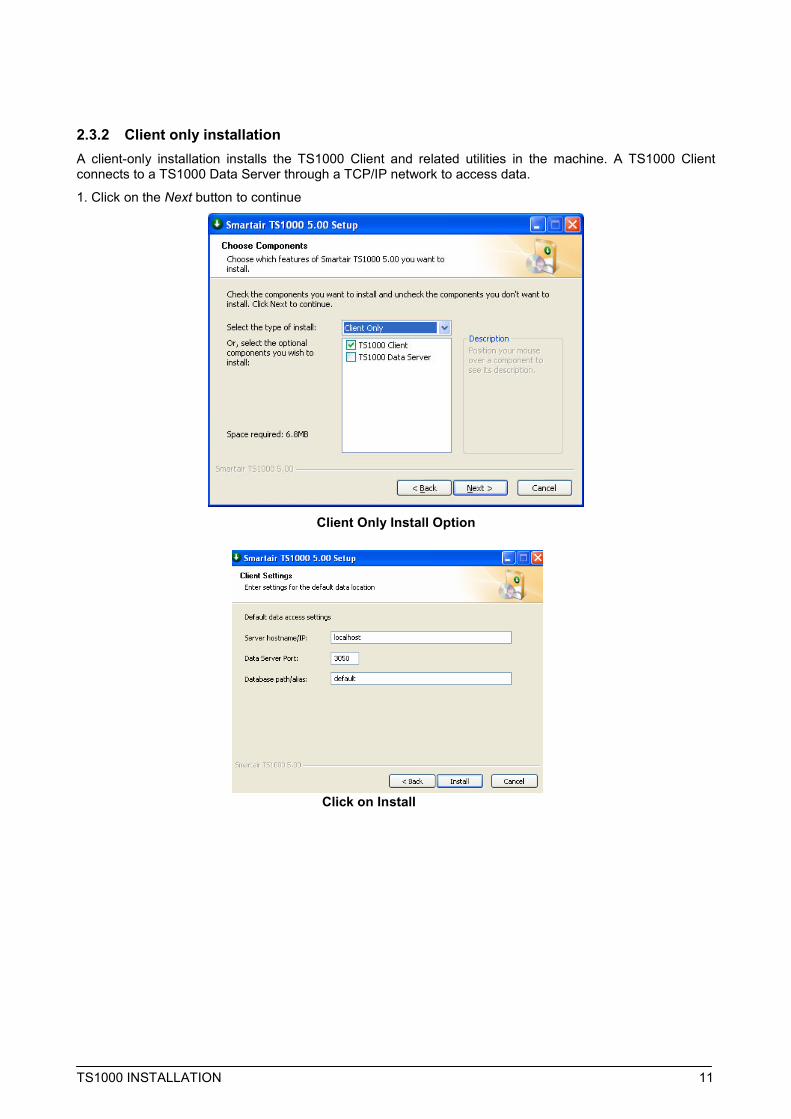
2.3.2 Client only installation
A client-only installation installs the TS1000 Client and related utilities in the machine. A TS1000 Client connects to a TS1000 Data Server through a TCP/IP network to access data.
1. Click on the Next button to continue
Client Only Install Option
Click on Install

TS1000 INSTALLATION 12
Setup Progress Screen
Summary Installation
2. Installation is finished at this stage. Click on the Finish button to close the installer.
Installation End Screen
To run the TS1000 Click on Start – All Programs – TS1000.
To login require the initialisation password to the distributor

TS1000 INSTALLATION 13
2.3.3 Create Demo Data Folder
Always is possible to create unlimited demo data folders in order to be used for a presentation or an exhibition.
Demo data folder offers the possibility to create unlimited number of doors with any technology (off line, UOC, Wireless…). The unique restriction is that users after been encoded have 15 days to use the card using expiration days. After these 15 days to use the card is necessary to encode again the card.
To create the demo data folder is necessary to create a shortcut of TS1000 and add the /s parameter

TS1000 INSTALLATION 14
Remark:
If it is not copied the data folder in the installation process or it is not created a demo data folder, TS1000 is not able to be open and this message is showed.

TS1000 INSTALLATION 15
3 Configuring Clients
In a multi-client system, clients must be configured to connect to a specific data server. This can be accomplished using the DATA and SERVER parameters in the Start menu shortcuts.
SERVER: parameter identifies the server using its IP address or hostname while the
DATA: identifies a database inside a server. One server can manage multiple databases and that’s why the DATA parameter is needed. A database inside the server can be identified using the alias (defined at the server’s setup process) or using a full database file path.
No configuration is needed in an installation based on only one PC where server and client run on the same machine.
3.1 Specifying a remote Data Server
TS1000 5.00 Program Group
1. Click on the Start menu and find the SmartAir TS1000 5.00 program group.
2. Right-click on TS1000 and select Properties from the drop-down menu.
3. Add the /SERVER: and /DATA: parameters using correct format and click on the Apply button.
This is also possible to be done creating shortcut files in order to have different files for each location of the data folder
Mouse 2nd button

TS1000 INSTALLATION 16
Client Configuration Parameters
Parameter Format Description
/SERVER:IP[/Port] • IP IP or hostname of the remote server
• [/Port] Optional. Port number if it is different from 3050
/DATA:DatabaseID • DatabaseID Database Identifier inside the server. Can be either:
o Database alias defined at server’s setup
o Database file path: Existing server’s folder path+/FileName.fdb
Client Configuration Parameters Format

TS1000 INSTALLATION 17
Examples:
• Server located at 192.168.10.5 listening at default port 3050. Using the alias defined on server’s setup as a database id.
/SERVER:192.168.10.5 /DATA:default
• Server located at 192.168.10.5 listening at default port 3050. Using a full database file path as a database id. A valid database file path is any path to a *.fdb file inside an existing server folder.
/SERVER:192.168.10.5 /DATA:C:\Data\Data.fdb
• Server located at 192.168.10.5 listening at port 3052. Using the alias defined on server’s setup as a database id.
/SERVER:192.168.10.5/3052 /DATA:default
• Server located at 192.168.10.5.listening at port 3052. Using a full database file path as a database id. A valid database file path is an *.fdb file inside an existing server folder.
/SERVER:192.168.10.5/3052 /DATA:C:\Data\DataFile_123.fdb
4. Repeat steps 1 to 3 with Tools and Wireless Tools applications.
TS1000 INSTALLATION 18
4 Configuring the Data Server
4.1 Backup management
Backing up Data Server database files is highly recommended to avoid data loss in case of disk crash or Operating System failures. This can be easily automated using the Backup Manager.
4.1.1 Scheduling automatic backups
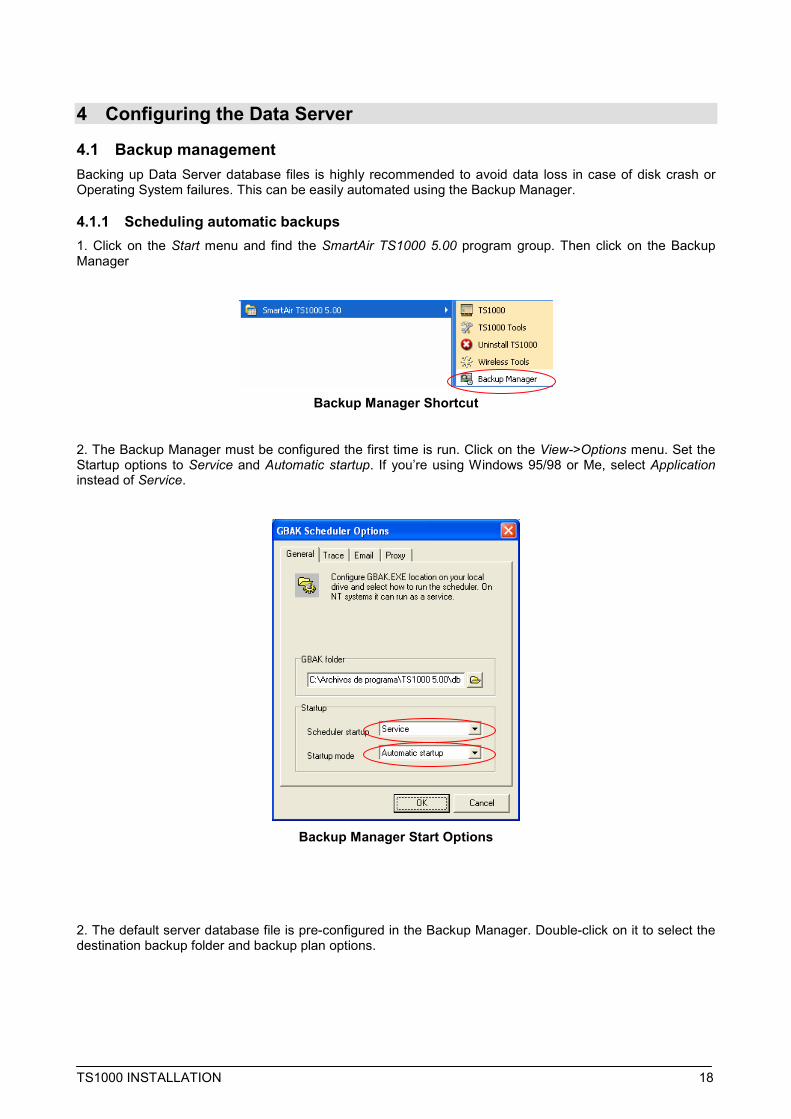
1. Click on the Start menu and find the SmartAir TS1000 5.00 program group. Then click on the Backup Manager
Backup Manager Shortcut
2. The Backup Manager must be configured the first time is run. Click on the View->Options menu. Set the Startup options to Service and Automatic startup. If you’re using Windows 95/98 or Me, select Application instead of Service.
Backup Manager Start Options
2. The default server database file is pre-configured in the Backup Manager. Double-click on it to select the destination backup folder and backup plan options.

TS1000 INSTALLATION 19
Backup Manager Main Window
3. Select the destination backup folder using the Target tab. Click on OK to finish.
Backup Manager Backup Target Tab
4. Define a backup plan using the Backup plan tab. Click on OK to finish.

TS1000 INSTALLATION 20
Backup Manager Backup Plan Tab
5. To configure several database files use the Copy button from the main window toolbar and repeat steps 2 to 4.
6. Click on the Backup->Start menu option. The Gbak Scheduler service will be running in the background since this moment.
Backup Manager Service Startup

TS1000 INSTALLATION 21
4.1.2 Restoring backups
The Backup Manager generates backup files in the target directory according to the Backup plan. These Backups are restored using the TS1000 Tools program in the Data Server PC.
TS1000 Tools shortcut
1. Click on the Restore Database Button button.
Tools Main Window

TS1000 INSTALLATION 22
2. Go to the backup folder and select the backup file to restore. Click on the Open button to begin the restore process.
Backup Restore File Selection
3. When restore completes, an information message is shown on screen.
Backup Restore Completion

TS1000 INSTALLATION 23
4.2 Importing data from a previous TS1000 system (version 4.x or lower)
Data from a previous 4.x or lower TS1000 version can be imported to a TS1000 5.0 using the TS1000
Data Migration Tool in the data server PC.
This is an application (located in the installation folder) that automatically is created installing the TS1000 ( by default c:\Program Files \ \TS1000 5.00 )
1. Select the Source TS1000 4.x Data directory
Data Migration Tool. Source Selection.
2. Select the Destination Database file (Data.fdb) in the server or type a new database file name to create a new one.
Data Migration Tool. Destination Selection

TS1000 INSTALLATION 24
3. Click on the Start Button
4. Wait until the process is finished
Data Migration Tool. Migration Process
5. An information message is shown on screen when the process finishes.
Data Migration Tool. Migration Completion
Once the process is finished the new database is working under SQL database.