3dteacheronline.com3dteacheronline.com/animate/cloud tunnel.docx · web viewin 3ds max, create a...
TRANSCRIPT

CREATING 3DS MAX CLOUDS
IntroductionIn this tutorial you will learn to create a fly-through of a realistic cloud tunnel, using 3D Studio Max
with no plugins or 3rd party renderers.
The problem of ray-marching and volumetricsThe basic physics of light moving through a gaseous cloud has nothing to do with traditional polygon
lighting, and therein lies the main challenge when rendering clouds.

Cloud particles are translucent, and will be visible from all sides when illuminated.
However, light decays in strength as it passes through.
This will make the backside of a cloud illuminated only by how far through the cloud the sunlight has
travelled.

Note that the angle of a cloud particle's surface is completely irrelevant, contrary to "normal" polygon
lighting.
We will now move on, knowing that the photorealistic look of a cloud is dependent on decaying, non-
polygon lighting.
The cotton teapotBefore moving onto a larger cloud formation, we'll take the theory from above and apply it to a
simple shape.
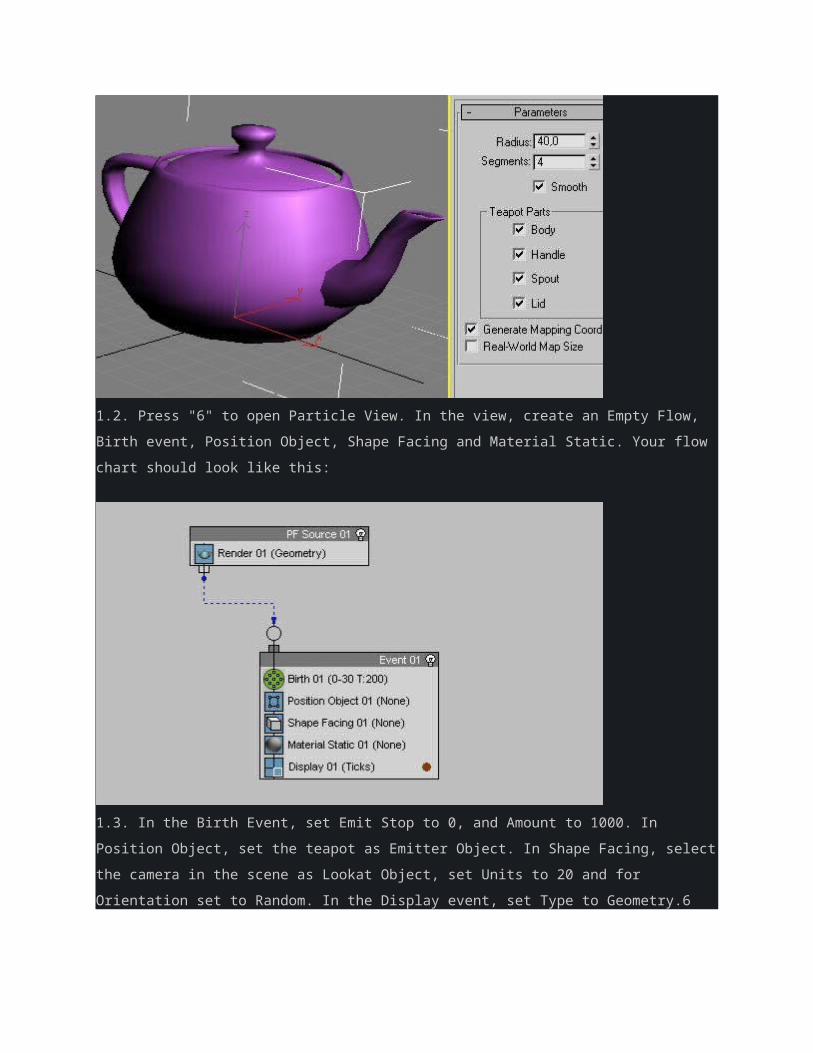
1.1. First, set the Unit Scale to Millimeters by going to Customize>Units Setup. Create a teapot with
a radius of 40 in the Perspective viewport. Right-click, choose Properties, and de-select
"Renderable". Press CTRL+C to create a camera in the viewport.

1.2. Press "6" to open Particle View. In the view, create an Empty Flow, Birth event, Position Object,
Shape Facing and Material Static. Your flow chart should look like this:
1.3. In the Birth Event, set Emit Stop to 0, and Amount to 1000. In Position Object, set the teapot as
Emitter Object. In Shape Facing, select the camera in the scene as Lookat Object, set Units to 20
and for Orientation set to Random. In the Display event, set Type to Geometry.6
1.4. Now, in Photoshop, use a soft brush to make a popcorn shaped blob that looks something like
this. Make sure it's white on black background. You can also just use the photo below.
1.5. In 3ds Max, create a material with a solid white color, that uses your popcorn image as Opacity
Map. Drag this to the Material Static event in the Particle View.

1.6. In the Material Editor, make sure the popcorn map is open. Click on "Bitmap", and select Mask
from the Map Browser. Choose "Keep old map as sub-map" in the "Replace Map" dialog. In the new
Mask material, your popcorn map is set as Map, so drag that do the Mask slot, and choose "Swap".
1.7. Click the Map slot, and choose Gradient Ramp from the Map Browser. Set Gradient Type to
Radial. Right-click the left flag, choose "Edit properties" and change the color from black to white,

right-click the center flag and choose "Delete", and right-click the right flag and choose "Edit
properties".
1.8. Press the None slot to open the Map Browser and choose Smoke. In the Smoke Map settings,
enter Size 5, and Exponent 1.
1.9. Create a Target Direct light in the top viewport, so it lights the teapot from behind, and place the
target in the center of the teapot. On the light's "Intensity..." rollout, activate Use Far Attenuation, and
adjust the Near and Far values so the range covers the whole teapot and the particles. Under

Directional Parameters, adjust the Hotspot/Beam so all the particles are covered. Now for the magic:
in the light's Advanced Settings rollout, click "Ambient Only". This will make the light ignore the
polygons' angles, which is exactly what we want.
1.10. Render that out to see the fluffiest teapot!
(hint: switch to Mental Ray to double render speed)
What we've done here is fake ray-marching. The fake part is that we ignore how far the light has
travelled inside the cloud, and instead concentrate only on how far the light travels in space. For our
purposes, it's close enough.m

Flight pathFirst, we'll create a camera that chases an airplane through a tunnel. Later, we'll turn that tunnel into
clouds.
2.1. Delete the teapot and the light from before, but keep the camera, particle system and the
material.
2.2. Create an s-shaped spline like this, using four bezier points. Note the shape in the Top and Left
viewports. Be careful with the bezier handles - no sharp corners! And since we don't want any
jittering in the camera, increase the interpolation to 20, and un-check Optimize. (actually, we do want
jittering, but not this kind... more on this later!)

2.3. The first point in my curve is at 0,0,0, and the last is at 50,400,-100. This is important because
the closer your scale is to this, the easier it will be to match the sizes of particles and procedural
maps later in the tutorial.
2.4. Select the camera, and add a Path Constraint by going to the Motion tab, expand the Assign
Controller rollout, click Position, click Assign controller and double-click Path Constraint.

2.5. In the Path Parameters rollout, click Add Path and click the spline in a viewport. Now the
camera follows the length of the path during the whole length of the animation, but we want it to
have a distance to the camera target, so go to the final frame, activate Auto Key, set the Default
Tangent to linear, and type in 90% in the %Along Path field.
2.6. Turn off Auto Key. Go to Helpers tab and create a dummy, and add a Path Constraint to make it
follow the same spline, but now (with Auto Key on) go to frame 0 and type in 10% in the %Along
Path field. Turn off Auto Key.
2.7. Use the Align tool to align the camera target to the dummy, and then link the camera target to
the dummy. Play the animation, and double check that you now have a nice animation of a camera
following the camera target at a constant distance.

2.8. Why use the dummy and not apply the Path Constraint directly to the camera target?
Remember that jittering we were talking about? Select the camera target, and assign the Noise
Position controller to it, instead of the Path Constraint. In the Noise Controller dialog, un-check
Fractal Noise, enter 0,2 as Frequency, and 2,0 as X, Y and Z Strength. This gives a nice turbulent
bounce to the camera.
2.9. Create a cylinder with Radius 45, Height 440, Height Segments 40, Sides 15, and align it to the
path (position and rotation) using the Align tool. Right-click the cylinder, go to Properties and de-
select Renderable. Also, make sure the cylinder's Backface Cull is turned off.

2.10. In the Modify panel, open the Modifier rollout, and select PathDeform (WSM). It's very imortant
that you choose the World-Space Modifier version (WSM), and not just the normal PathDeform.
Select the path.
2.11. Now you can see the cylinder stretching along the path. If your path coordinates deviated
radically from the ones I described earlier, you will need to adjust your cylinder's Length, Radius etc.
Play the animation in the camera viewport, and it should look something like a tunnel effect from an
Amiga demo, but without the plasma!
2.12. Add a banking effect to the camera: set Default Tangents to auto, activate Auto Key, select the
camera, and press F12. Go to frame 25, and set Roll to -25. Go to frame 75 and set Roll to 25. Go to
frame 100 and set Roll to 0.
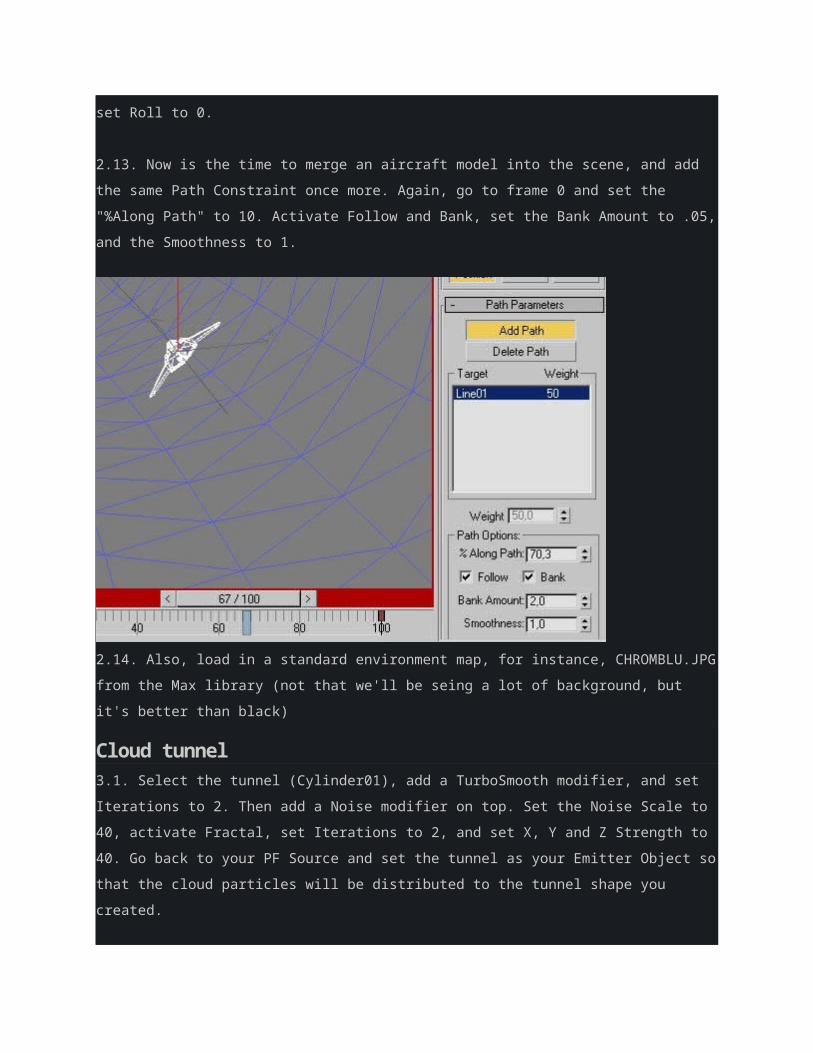
2.13. Now is the time to merge an aircraft model into the scene, and add the same Path Constraint

once more. Again, go to frame 0 and set the "%Along Path" to 10. Activate Follow and Bank, set the
Bank Amount to .05, and the Smoothness to 1.
2.14. Also, load in a standard environment map, for instance, CHROMBLU.JPG from the Max library
(not that we'll be seing a lot of background, but it's better than black)
Cloud tunnel3.1. Select the tunnel (Cylinder01), add a TurboSmooth modifier, and set Iterations to 2. Then add a
Noise modifier on top. Set the Noise Scale to 40, activate Fractal, set Iterations to 2, and set X, Y
and Z Strength to 40. Go back to your PF Source and set the tunnel as your Emitter Object so that
the cloud particles will be distributed to the tunnel shape you created.
3.7. Create a directional target light again in your scene. Right-click Top -> Views -> Direct001 to
see the scene from the light source's point of view. Under Directional Parameters, adjust the
Hotspot/Beam and Falloff/Field until the particles are totally visible from your light source view.
3.8. Render the scene from the light's point of view. Save the image, and load it into Photoshop.
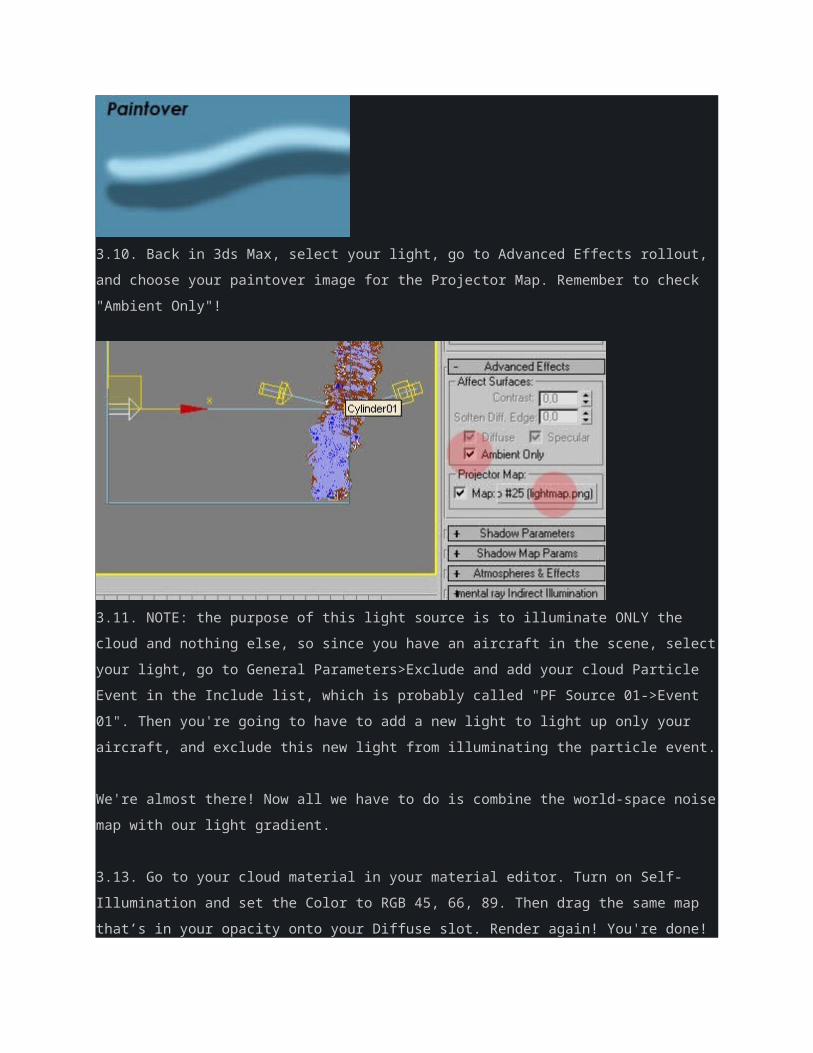
3.9. In Photoshop, paint over the particles so they get covered with a gradient, and save the image.
The idea is that anywhere in the cylinder, the cloud particles will have a gradient from top to bottom.
We're faking ray-marching of light coming from the top. Your paintover should look something like
this:
3.10. Back in 3ds Max, select your light, go to Advanced Effects rollout, and choose your paintover
image for the Projector Map. Remember to check "Ambient Only"!�

3.11. NOTE: the purpose of this light source is to illuminate ONLY the cloud and nothing else, so
since you have an aircraft in the scene, select your light, go to General Parameters>Exclude and
add your cloud Particle Event in the Include list, which is probably called "PF Source 01->Event 01".
Then you're going to have to add a new light to light up only your aircraft, and exclude this new light
from illuminating the particle event.
We're almost there! Now all we have to do is combine the world-space noise map with our light
gradient.
3.13. Go to your cloud material in your material editor. Turn on Self-Illumination and set the Color to
RGB 45, 66, 89. Then drag the same map that’s in your opacity onto your Diffuse slot. Render again!
You're done!
If you will, adjust the Self-illumination and the Diffuse Map's Amount slider to blend between the
Noise Map and the gradient light source.
Highlights on the sunny sideRemember that rimlight/halo look that clouds get when they're backlit? So far we've seen nothing
like that in this tutorial, but there is a cheap and dirty way to fake it. Stay with me.
4.1. Copy the emitter (Cylinder01), and move the copy up slightly.
4.2. Press "6" to open Particle View, and create a copy of Event 01.

4.3. In Event 02, change the Position Object to Cylinder02. You should see the double particles in
the Top viewport like this. This should also warn you that the particle count has doubled, so prepare
for slower renders.
4.4. Press "M" to open the Material Editor, and create a copy of the cloud material. Name this
"cloud_highlight".
Set the Self Illumination to a brighter color. This will make the highlight material brighter and more
self-illuminated than the rest of the clouds, which is exactly what we want.
You can further enhance the effect by lowering the original cloud material's Self-illumination.
4.5. Drag the "cloud_highlight" material to Event 02's Material Static slot.
4.6. Render again to see the new look. At first glance, it may seem much better, but remember the
disadvantages about textures and intersecting billboards? They'll start showing, once you render the
whole animation.

3.2. Add a Push modifier and set it to -10 to make the walls bulge out in round shapes (if you think
the polys are moving in the wrong direction when you use the Push modifier, keep in mind that we
are watching the inside of a cylinder, and all the polys are backfacing).

The cylinder is now a representation of where the clouds will be.
3.3. Press "6" to open the Particle View. In the Birth, change the Amount to 2000. Your tunnel should
now be populated with particles. Make a test render of that, to see how you're doing.
Not bad, but we're still using traditional lighting, based on polygon angles - that's the only reason for
the grey shades you can see in the render. This isn't a liable solution, because when the billboards
turn to follow the camera, their angle relative to the light source will change, and so will their
brightness.
3.4. But before we begin lighting the cloud tunnel, let's work on the color. We are going to replace
the map we currently have in the Diffuse slot for something else. We can't apply any polygon-
mapped texture, but we can make large chunks of color variation. In the cloud material, click the
Diffuse Color slot, and select Noise from the Map Browser..

3.5. Choose Fractal, High=0,8 Low=0,2 Levels=10 and Size=100. Instead of black, use 60, 90, 115.
Turn the cloud material's Self-illumination up to 100, and render.
What we have created is a large world-space texture variation. The reason we can't use polygon-
mapped bitmap textures with billboard particles is that when they turn to follow the camera, they will
intersect in and out of each other, and the textures will "pop" in and out. But with a world-space
texture, two intersecting polygons are guaranteed to have the exact same color information at the
intersection point, so the intersection is invisible.
(Technically, world-space textures aren't perfect either, because when the billboards turn, their
surface will move through the world-space texture information, and the texture will appear to "crawl"
over the surface. But with a pattern this large, it's not a problem).
3.6. In the top viewport, you can create a Target Direct light that lights the cloud tunnel from the side

3.7. Go to Render set up and do a Range render from frame 50 to 100. Make an AVI render of your
work and upload to Blackboard. If it takes too long to render, set the output size to 320X240.