twistedwave manual
TRANSCRIPT


CONTENTS 1
Contents
1 Introduction 4
2 Getting running 42.1 Creating a new document . . . . . . . . . . . . . . . . . . . . . . . . . . . 42.2 Loading a file . . . . . . . . . . . . . . . . . . . . . . . . . . . . . . . . . . 52.3 Large files . . . . . . . . . . . . . . . . . . . . . . . . . . . . . . . . . . . . 5
3 Manipulating the Waveform 53.1 Zooming . . . . . . . . . . . . . . . . . . . . . . . . . . . . . . . . . . . . . 5
3.1.1 From the toolbar . . . . . . . . . . . . . . . . . . . . . . . . . . . . 53.1.2 With the scroll wheel . . . . . . . . . . . . . . . . . . . . . . . . . . 53.1.3 By dragging . . . . . . . . . . . . . . . . . . . . . . . . . . . . . . . 6
3.2 Vertical Zoom . . . . . . . . . . . . . . . . . . . . . . . . . . . . . . . . . . 63.3 Scrolling . . . . . . . . . . . . . . . . . . . . . . . . . . . . . . . . . . . . . 6
3.3.1 With the scroll wheel . . . . . . . . . . . . . . . . . . . . . . . . . . 63.3.2 By dragging . . . . . . . . . . . . . . . . . . . . . . . . . . . . . . . 6
3.4 The temporary zoom . . . . . . . . . . . . . . . . . . . . . . . . . . . . . . 63.4.1 Zooming out . . . . . . . . . . . . . . . . . . . . . . . . . . . . . . . 63.4.2 Zooming in . . . . . . . . . . . . . . . . . . . . . . . . . . . . . . . 7
3.5 Using the overview . . . . . . . . . . . . . . . . . . . . . . . . . . . . . . . 8
4 The selection 84.1 Selecting . . . . . . . . . . . . . . . . . . . . . . . . . . . . . . . . . . . . . 84.2 Selecting whole channels . . . . . . . . . . . . . . . . . . . . . . . . . . . . 84.3 Selection editor . . . . . . . . . . . . . . . . . . . . . . . . . . . . . . . . . 104.4 Cursor editor . . . . . . . . . . . . . . . . . . . . . . . . . . . . . . . . . . 104.5 Advanced selection . . . . . . . . . . . . . . . . . . . . . . . . . . . . . . . 114.6 Auto extend to crossing . . . . . . . . . . . . . . . . . . . . . . . . . . . . 124.7 Detecting silences . . . . . . . . . . . . . . . . . . . . . . . . . . . . . . . 13
4.7.1 Expert silence detector . . . . . . . . . . . . . . . . . . . . . . . . . 144.7.2 Splitting a file . . . . . . . . . . . . . . . . . . . . . . . . . . . . . . 15
4.8 Detecting transients . . . . . . . . . . . . . . . . . . . . . . . . . . . . . . 164.9 Copy / pasting . . . . . . . . . . . . . . . . . . . . . . . . . . . . . . . . . 174.10 Special pasting . . . . . . . . . . . . . . . . . . . . . . . . . . . . . . . . . 174.11 Crossfading . . . . . . . . . . . . . . . . . . . . . . . . . . . . . . . . . . . 184.12 The clip list . . . . . . . . . . . . . . . . . . . . . . . . . . . . . . . . . . . 19
5 Editing cuts and crossfades 205.1 Editing cuts . . . . . . . . . . . . . . . . . . . . . . . . . . . . . . . . . . . 205.2 Editing crossfades . . . . . . . . . . . . . . . . . . . . . . . . . . . . . . . . 20
Copyright c©2012

CONTENTS 2
6 Playing 236.1 Scrubbing . . . . . . . . . . . . . . . . . . . . . . . . . . . . . . . . . . . . 23
7 Applying effects 237.1 Amplify . . . . . . . . . . . . . . . . . . . . . . . . . . . . . . . . . . . . . 237.2 Normalize . . . . . . . . . . . . . . . . . . . . . . . . . . . . . . . . . . . . 247.3 Fade in, fade out . . . . . . . . . . . . . . . . . . . . . . . . . . . . . . . . 257.4 Custom fade . . . . . . . . . . . . . . . . . . . . . . . . . . . . . . . . . . . 257.5 Loop crossfade . . . . . . . . . . . . . . . . . . . . . . . . . . . . . . . . . 257.6 Manipulating channels . . . . . . . . . . . . . . . . . . . . . . . . . . . . . 257.7 Sampling rate conversion . . . . . . . . . . . . . . . . . . . . . . . . . . . . 267.8 Change pitch and speed . . . . . . . . . . . . . . . . . . . . . . . . . . . . 26
7.8.1 Time/frequency localization and the ‘lambda’ parameter . . . . . . 277.9 Pitch correction . . . . . . . . . . . . . . . . . . . . . . . . . . . . . . . . 28
8 Audio Unit and VST plugins 298.1 Using a single Audio Unit or VST plugin . . . . . . . . . . . . . . . . . . . 298.2 Saving presets . . . . . . . . . . . . . . . . . . . . . . . . . . . . . . . . . . 308.3 Using the effect stack . . . . . . . . . . . . . . . . . . . . . . . . . . . . . . 318.4 Effect plugins and 64 bit . . . . . . . . . . . . . . . . . . . . . . . . . . . . 32
9 Generating Sounds 329.1 Signal Generator . . . . . . . . . . . . . . . . . . . . . . . . . . . . . . . . 329.2 Speech Synthesis . . . . . . . . . . . . . . . . . . . . . . . . . . . . . . . . 33
10 Recording 34
11 Markers 3411.1 Manipulating markers . . . . . . . . . . . . . . . . . . . . . . . . . . . . . 3411.2 Importing/exporting markers . . . . . . . . . . . . . . . . . . . . . . . . . 3611.3 Markers window . . . . . . . . . . . . . . . . . . . . . . . . . . . . . . . . . 3611.4 Splitting by markers . . . . . . . . . . . . . . . . . . . . . . . . . . . . . . 3611.5 Automatic markers . . . . . . . . . . . . . . . . . . . . . . . . . . . . . . . 36
12 Metadata 3712.1 BWAV and Soundminer . . . . . . . . . . . . . . . . . . . . . . . . . . . . 3712.2 FLAC metadata . . . . . . . . . . . . . . . . . . . . . . . . . . . . . . . . . 37
13 Exporting the waveform 39
14 Batch processing 4014.1 Defining the batch script . . . . . . . . . . . . . . . . . . . . . . . . . . . . 4014.2 Saving processed files . . . . . . . . . . . . . . . . . . . . . . . . . . . . . . 4214.3 Running the batch . . . . . . . . . . . . . . . . . . . . . . . . . . . . . . . 43
Copyright c©2012

CONTENTS 3
14.4 Splitting files . . . . . . . . . . . . . . . . . . . . . . . . . . . . . . . . . . 43
15 TwistedWave iOS Remote 43
16 Preferences 4316.1 General settings . . . . . . . . . . . . . . . . . . . . . . . . . . . . . . . . . 43
16.1.1 Time display . . . . . . . . . . . . . . . . . . . . . . . . . . . . . . 4316.1.2 Level Meter . . . . . . . . . . . . . . . . . . . . . . . . . . . . . . . 4616.1.3 Registration . . . . . . . . . . . . . . . . . . . . . . . . . . . . . . . 4616.1.4 TwistedWave iOS Remote . . . . . . . . . . . . . . . . . . . . . . . 46
16.2 Editing preferences . . . . . . . . . . . . . . . . . . . . . . . . . . . . . . . 4616.2.1 Editing preferences . . . . . . . . . . . . . . . . . . . . . . . . . . . 4616.2.2 Playing . . . . . . . . . . . . . . . . . . . . . . . . . . . . . . . . . 4816.2.3 Transient threshold . . . . . . . . . . . . . . . . . . . . . . . . . . . 48
16.3 Selecting audio devices . . . . . . . . . . . . . . . . . . . . . . . . . . . . . 48
17 Keyboard shortcuts 5017.1 Zooming . . . . . . . . . . . . . . . . . . . . . . . . . . . . . . . . . . . . . 5017.2 Manipulating the selection . . . . . . . . . . . . . . . . . . . . . . . . . . . 5017.3 Moving the cursor . . . . . . . . . . . . . . . . . . . . . . . . . . . . . . . . 5017.4 Playing . . . . . . . . . . . . . . . . . . . . . . . . . . . . . . . . . . . . . . 51
18 Feeling at home 5118.1 Changing colors . . . . . . . . . . . . . . . . . . . . . . . . . . . . . . . . . 5118.2 Changing shortcuts . . . . . . . . . . . . . . . . . . . . . . . . . . . . . . . 53
19 Copyright notices 5319.1 DIRAC Time Scaling technology . . . . . . . . . . . . . . . . . . . . . . . 5319.2 LAME . . . . . . . . . . . . . . . . . . . . . . . . . . . . . . . . . . . . . . 5319.3 FFMpeg . . . . . . . . . . . . . . . . . . . . . . . . . . . . . . . . . . . . . 5419.4 Guile . . . . . . . . . . . . . . . . . . . . . . . . . . . . . . . . . . . . . . . 5419.5 id3lib . . . . . . . . . . . . . . . . . . . . . . . . . . . . . . . . . . . . . . . 5419.6 libsndfile . . . . . . . . . . . . . . . . . . . . . . . . . . . . . . . . . . . . . 5419.7 Ogg/Vorbis . . . . . . . . . . . . . . . . . . . . . . . . . . . . . . . . . . . 5419.8 FLAC . . . . . . . . . . . . . . . . . . . . . . . . . . . . . . . . . . . . . . 5519.9 WavPack . . . . . . . . . . . . . . . . . . . . . . . . . . . . . . . . . . . . . 56
Copyright c©2012

2 GETTING RUNNING 4
1 Introduction
The TwistedWave reference manual is available both in a browsable format, from the Help
menu, and as a printable PDF here1.What makes TwistedWave unique is its ability to deal with very large files. You don’t
have to wait until TwistedWave has finished loading a file or applying an effect before youcan start playing the result, or applying another effect. You can read more about this insection 2.3 on page 5.
2 Getting running
The first thing you will do with TwistedWave will be to load an existing audio file, orcreate an empty document. These tasks are described in the two following sections.
2.1 Creating a new document
Create a new document by selecting File / New from the main menu, and you will beasked for the bit depth, sample rate and number of channels for the new document.
New document settings
The bit depth indicates the resolution at which the file will be saved. With a higherbit depth, the sound quality will be better, but the files will be larger. For good results, avalue of at least 16 bits is recommended. Note that you can still change your mind, andselect a different bit depth when you save the file. If you save in a compressed file format,such as aac or mp3, the bit depth will not have any influence on the resulting file.
For the sample rate, however, it is important to select the correct value from thebeginning. It is possible to change the sampling rate afterward, but the conversion is neverperfect, and will result in a slight reduction of the audio quality.
The third parameter is the number of channels. Select 1 for mono files, 2 for stereofiles, or any other number you may need.
1It is the one you are currently reading.
Copyright c©2012

3 MANIPULATING THE WAVEFORM 5
2.2 Loading a file
More commonly, instead of starting with an empty document, you will want to open analready existing file, and start working on it.
TwistedWave can handle many different file formats, and opening an audio file workssimilarly to any other application, by selecting File / Open... in the main menu.
TwistedWave also supports many movie file formats, and selecting one will extract itssound track.
2.3 Large files
When you open a very large file in TwistedWave, it can take a while for it to load completely.However, you can still immediately start playing the file, adding effects, copying and pastingparts of it or do whatever while the file is still being loaded!
It is only when you want to save the resulting file that you will have to wait for all thepending tasks to be completed.
When a task has not finished processing, the part of the waveform that is not up todate appears in a lighter color, and a progress bar at the bottom of the window indicatesthe effect being applied, and the amount done.
3 Manipulating the Waveform
As it is important to be able to quickly navigate in the sound file to find the portionsyou want to listen to, or edit, TwistedWave offers a number of ways to manipulate thewaveform. Both zooming and panning are fast and easy. Here are the different ways toperform these.
3.1 Zooming
3.1.1 From the toolbar
This is the simplest and most obvious way to zoom. Two buttons in the toolbar allow youto easily zoom the waveform in and out.
3.1.2 With the scroll wheel
One easy way to zoom in the waveform is to use the mouse wheel. You can zoom in andout by scrolling up or down.
By default, when zooming in and out, TwistedWave makes sure the cursor remains inthe center of the window. An option in the preferences window (section 16.2.1 on page 48)can make this zoom be centered on the mouse pointer instead.
When this option is enabled, you can move the mouse pointer left or right to adjustthe point where you want to go as you are zooming in.
Copyright c©2012
3 MANIPULATING THE WAVEFORM 6
3.1.3 By dragging
Another easy and very fast way to zoom in the waveform is to press the command key, anddrag the mouse vertically. Move the mouse down do zoom in, and up to zoom out. Youcan also move the mouse horizontally to indicate where you want to zoom in.
This is a very powerful way to navigate in the waveform, because it allows you to zoomand scroll at the same time. In a single drag, you can zoom out, move the mouse overanother location in the file, and zoom back in.
3.2 Vertical Zoom
When the sound file you are working on is very quiet, and the waveform does not showenough detail, you can zoom vertically to work more comfortably. TwistedWave offersthree ways to do this:
• With the Vertical Zoom toolbar icon. By clicking and dragging on this icon, youcan adjust the vertical zoom. A single click will restore the zoom to its original value.
• By click and dragging on the vertical ruler at the left of the waveform. This worksthe same as the toolbar icon. A double click will restore the zoom to its originalvalue.
• By using the scroll wheel with the command modifier key.
3.3 Scrolling
3.3.1 With the scroll wheel
If you have a mighty mouse, or another kind of mouse that offers a horizontal scrollingmechanism, you can use it to scroll the waveform in TwistedWave.
With a regular scroll wheel, you can also scroll horizontally by pressing the shift modifierkey.
3.3.2 By dragging
Another way to scroll the waveform is to drag it with the mouse while pressing the controlkey.
Additionally, when you are selecting, TwistedWave will automatically scroll the wave-form when the mouse reaches the edges of the document window.
3.4 The temporary zoom
3.4.1 Zooming out
As the pattern described above to move in the waveform (zoom out, change position, zoomin) turns out to be quite useful, there is a keyboard shortcut just for it. Press Shift-Z, and
Copyright c©2012

3 MANIPULATING THE WAVEFORM 7
the wave will zoom out. When you release the Z key, it zooms back in at the same levelyou were before. When you keep the Z pressed, a window appears, showing you whereyou will be when you zoom back in. By moving the mouse horizontally, you can move thewindow to the location you want to be.
The zoom window
3.4.2 Zooming in
By pressing the Z key without the shift, you can perform the opposite operation. Whenyou press it, TwistedWave will zoom in, and when you release it, it returns to the originalposition. This can be useful if you want to see more closely a small detail, without loosingyour current position. What makes this feature very interesting is that when you arezoomed in, you can still manipulate the wave with the mouse. If you want to select anarea with great precision you can do the following:
• Press Z to zoom where you want to start the selection
• Click to start selecting
• Without releasing the mouse, release Z to zoom back out
• Press Z again at the location where you want to end the selection
Copyright c©2012

4 THE SELECTION 8
• Release the mouse to end the selection
• Release Z to zoom back out
Note also that when you are zoomed in, you can continue zooming or panning withthe scroll wheel, the scrollbar, or by manipulating the red window in the overview, controldragging or whatever. When you release the Z, the view will always revert to the positionyou were before you started zooming. This can be useful if you want to see or selectsomething at another location with the ability to return back where you were just byreleasing the Z key.
3.5 Using the overview
The overview is the area above the main waveform display that shows the whole file, witha red window indicating the portion visible in the main display. This red window can alsobe manipulated in order to change the visible portion of the sound file. You can drag itto another position, or reshape it by dragging one of its edges in order to see a smaller orlarger area.
If you press the option key while dragging the window, you will be able to make itshrink or grow, effectively zooming in or out of the waveform.
4 The selection
By default, all the effects available will be applied to the whole sound file. Often, you wantan effect to be applied to a small portion of it. You can do this by selecting the area youwant the effect to work on before applying the filter.
4.1 Selecting
In order to select a part of the sound file, just click and drag the mouse over the areayou want to select. In order to get more precision on the area you are selecting you cantemporarily zoom at the places where you want to start and stop selecting. This processis described in more detail in section 3.4 on page 6.
It is possible to adjust the current selection by dragging one of its edges. This is doneby pressing shift when clicking on the waveform.
4.2 Selecting whole channels
It is often necessary to select a whole channel. TwistedWave provides a convenient way todo this by double-clicking on a channel. All the data on that channel will be selected fromthe first to the last frame. After having double clicked, you can keep the mouse buttondown, and drag the mouse pointer over adjacent channels to select them as well.
Copyright c©2012

4 THE SELECTION 9
A document with a selected area
Copyright c©2012

4 THE SELECTION 10
By using the option or shift-option key combinations while double clicking, you can addor remove whole channels from the current selection.
By triple clicking, you can also select all the channels at once. This is equivalent tousing the Select / All menu item.
4.3 Selection editor
A powerful way to edit the selection is with the selection editor. It can be opened fromthe menu Select / Edit Selection..., or simply by clicking on the selection length inthe toolbar 2.
Selection editor
The selection editor allows you to enter numerical values for the begin, end and sizeof the selection. When you enter a time in any of these fields, TwistedWave understandsmany formats. Simply entering a numerical value such as 5 corresponds to a number ofseconds. You can also enter 1m25 to indicate one minute and 25 seconds. 3h means 3hours, 15” is 15 seconds, and 1’23 is one minute and 23 seconds.
On the right hand side of the selection editor, a number of check-boxes are used toindicate which channels have to be selected. This can be used to select only the left orright channel in a stereo file, for instance.
4.4 Cursor editor
Exactly as you can enter the numerical values for the selection, the cursor editor allowsyou to enter the time you want to move the cursor to.
The cursor editor is opened from the menu Select / Edit Cursor..., or by clickingon the cursor position in the toolbar.
2The selection length is not present in the default toolbar. You can add it by right-clicking on thetoolbar, and selecting Customize Toolbar....
Copyright c©2012

4 THE SELECTION 11
Cursor editor
4.5 Advanced selection
Usually, a selection is just an area contained between two samples. With TwistedWave,you can have more complex selections that are composed of several disjoint areas. Suchselections can be useful when you want to apply an effect at different places in the file.Instead of selecting an area, applying the effect, selecting another area, and reapplying theeffect, you can select all the areas at once, and then preview the effect on them all, andapply it.
A complex selection
Two key combinations allow you to create complex selections. The first is by using thealt/option key. When it is pressed, the selections you make by dragging the mouse areadded to the current selection. You can also remove an area from the selection by using
Copyright c©2012

4 THE SELECTION 12
both the shift and alt keys. As with simple selections, it is still possible to adjust the edgesof complex selections with the shift key.
4.6 Auto extend to crossing
When the Auto Extend to Crossing option from the Select menu is enabled, the selec-tion is automatically extended by a few samples to the next zero crossings of the wave atits edges. This is done in order to avoid discontinuities when the sample is cut and pastedsomewhere else. A discontinuity in the sound wave would result in a click when played,and should be avoided. When you move the insertion cursor, it is also automatically movednext to the closest zero crossing. That way, when you paste something at that position,this will not introduce a discontinuity.
The selection was automatically adjusted to start and end at a position where the wavecrosses the zero axis.
It is important to note that if TwistedWave has not finished loading the file you areworking on, or if it is currently applying an effect, the Auto Extend to Crossing functionwill not work. The reason is that because in such a case, TwistedWave cannot accuratelydetermine the position of the zero crossings. It is therefore not possible to adjust theselection accordingly.
Copyright c©2012
4 THE SELECTION 13
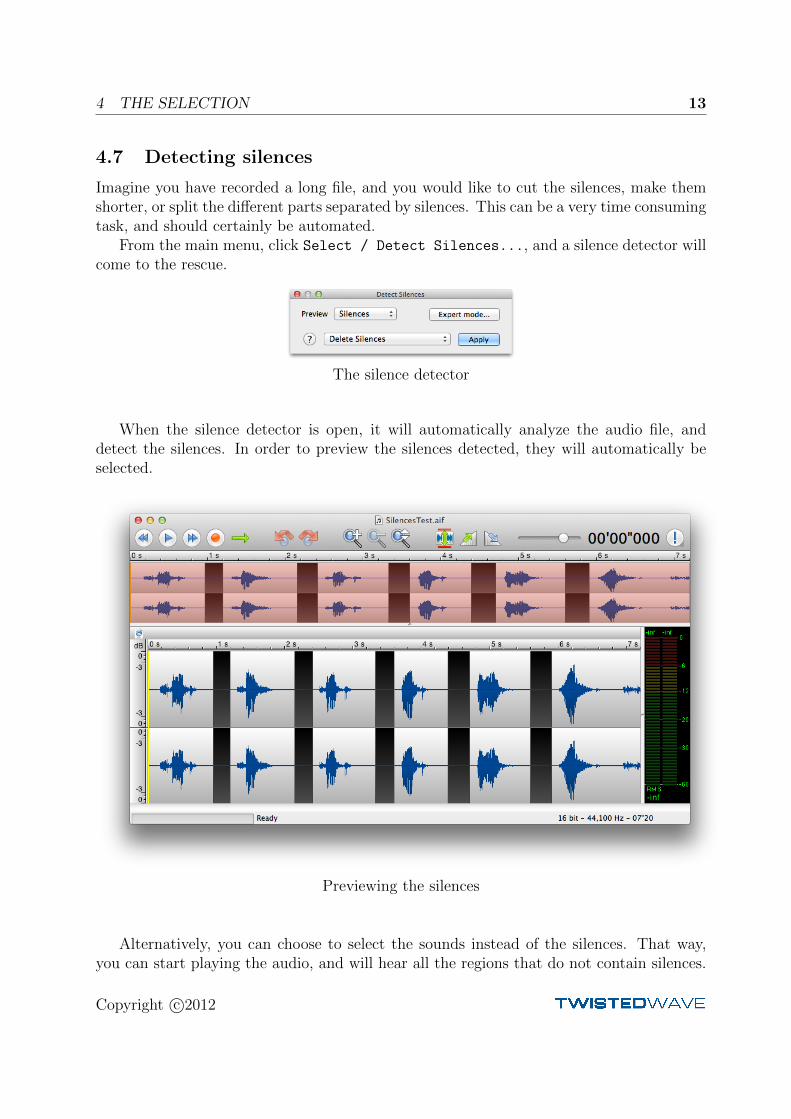
4.7 Detecting silences
Imagine you have recorded a long file, and you would like to cut the silences, make themshorter, or split the different parts separated by silences. This can be a very time consumingtask, and should certainly be automated.
From the main menu, click Select / Detect Silences..., and a silence detector willcome to the rescue.
The silence detector
When the silence detector is open, it will automatically analyze the audio file, anddetect the silences. In order to preview the silences detected, they will automatically beselected.
Previewing the silences
Alternatively, you can choose to select the sounds instead of the silences. That way,you can start playing the audio, and will hear all the regions that do not contain silences.
Copyright c©2012

4 THE SELECTION 14
When the silences have correctly been analyzed and detected, you can perform on themany of the actions available from the pop-up button:
• Select Silences. This option will select the parts of the audio containing silence.
• Select Sounds. This is the opposite of the previous option, and only the areas notcontaining silence will be selected.
• Place Markers. Markers will be automatically placed at the beginning and end ofeach detected silence.
• Delete Silences. All the silences will be deleted.
• Delete Silences and Mark. All the silences will be deleted, and some markers willbe placed where the cuts were made.
The silences were cut, and markers were added
4.7.1 Expert silence detector
If the simple silence detector fails to detect the silences contained in the audio file, youcan switch to the “Expert mode” where a number of parameters allow you to fine-tune thesilence detection.
Copyright c©2012

4 THE SELECTION 15
The expert silence detector, with extra parameters
• Threshold. This parameter specifies the sound level in dB below which a sound isconsidered as silence. Note that when you open the silence detector, the sound fileis analyzed, and this parameter is automatically set to a value that should be fine.You should only have to change this parameter in some cases where the distinctionbetween sound and silence is less obvious.
• Minimum silence duration. This parameter specifies the minimum duration belowwhich a silence is not considered. This can be useful when detecting silences froma file containing spoken text, and a small pause between two words should not beconsidered as silence.
• Minimum sound duration. This parameter specifies the minimum duration belowwhich a sound is not considered as such, and will be treated as a silence. When ashort noise is present during a silence, it can be desirable to still consider the silenceas a whole, and ignore the sounds up to a given length.
• Left and right padding. When you want to cut the silences from a sound file, itmay be necessary to keep around a fraction of a second of audio before and after eachsound. If the sound fades out at the end, for instance, it may be necessary to keep ita bit longer even after it drops below the silence threshold.
4.7.2 Splitting a file
A common use for silence detection is splitting an audio file containing several sounds intoseveral audio files. In order to do this, select the option Delete Silences and Mark when
Copyright c©2012

4 THE SELECTION 16
detecting silences.You should then rename the markers to give them the names you would like to give to
your files. You can easily do that with the markers window (see section 11.3 on page 36).And you can then export all the parts separated by markers from the main menu,
Markers / Split by Markers (see section 11.4 on page 36).
4.8 Detecting transients
One of the most difficult task when editing an audio document is to properly select thearea you want to edit. The capture here shows TwistedWave with a file loaded, containinga percussion loop. The individual shots are clearly visible, but accurately selecting one ofthem requires quite some dexterity.
A selected transient
This is where the transient detection in TwistedWave comes handy. This allows Twist-edWave to automatically detect the individual shots in the file. The operation Select /
Move Cursor to Transient, available with the Tab key by default, moves the cursor tothe next transient in the file, and can be used to easily move to the start of every individualshots in the file. You can then Shift-Tab to select the area between the cursor positionand the next transient. This is how we could easily select a single shot, as shown in thecapture here.
Copyright c©2012

4 THE SELECTION 17
The transients in the example shown here are clearly identifiable. Often, however, theremay be a lot of background noise, and the transients may not be as strong. If TwistedWavefails to detect the transients, you can adjust the detection threshold from the preferenceswindow (see section 16.2.3 on page 48).
4.9 Copy / pasting
Just as in a text editor, once you have selected an area of the sound file, you can copythe selection, and paste it somewhere else with the usual X, C and V shortcuts. Inaddition to the simple paste that inserts the contents of the clipboard at the location ofthe cursor, you can paste over the existing data. When you Shift- V, the contents of theclipboard will be mixed in, without altering the length of the file3.
4.10 Special pasting
In addition to the simple copy and pasting commands described above, TwistedWaveprovides a special pasting command whose behavior can be customized in many ways.This command is available in the menu Edit / Special Paste, or with Y by default,and can be customized with Edit / Special Paste Options....
Special pasting options
The pop-up button at the top of the special pasting options selects the operation thatis performed when the Special Pasting command is invoked.
3Unless you are at the end of the file.
Copyright c©2012

4 THE SELECTION 18
• Insert will just insert the contents of the clipboard at the position of the cursor.This is also what does the default paste, available on V.
• Mix will not make make the document any longer, but will mix the clipboard withthe contents of the document starting from the position of the cursor. This behavioris similar to the paste over, available on Shift- V.
• Replace will replace the selection with the contents of clipboard. This is similarto Mix, except that only the selected area will be affected. The clipboard will betruncated to match the length of the selection. If the selection is longer than theclipboard, the extra sound in the selected area remains unaffected.
What makes the special paste special is its ability to automatically fade in and out thecontents of the clipboard, and the document in which it is pasted.
When copying and pasting, by default, TwistedWave will make sure that the edges ofthe clipboard and the document at the insertion point will fall on a sample value of zero.In most cases, this will prevent a click when pasting.
However, the transition to the clipboard can still seem too brutal, and the automaticfading in and out can help a lot making things smoother. With the options to fade or notthe document and the clipboard, a large number of effects can be achieved. In order toimmediately see how the fades are applied, a preview representing the document and thecontent being pasted is shown at the bottom of this options panel. The blue part representsthe document, the red part is the contents of the clipboard, and the slopes show where thefades take place.
4.11 Crossfading
Deleting a region from the middle of a file will produce a noticeable cut in the resultingfile. This is often not desirable, and a common solution to such a problem is to apply acrossfade.
In order to apply a crossfade in TwistedWave, simply select the region you wantto delete, and select Edit/Delete and Crossfade... from the menu, or use the -Backspace shortcut. A window will pop-up asking you for the duration of the crossfade,and will then proceed to mix the audio before and after the region deleted in order to makethe transition smoother.
In addition to the crossfade duration, a pop-up button allows you to use a fade outfollowed by a fade in instead of the crossfade.
A third option, Crossfade Centered, differs from the Crossfade by the way Twisted-Wave applies the crossfade.
With the first Crossfade option, the selected area is completely removed, and a piece ofsound corresponding to the crossfade duration is taken before the selection, another pieceis taken after the selection, and these two are then mixed together to apply the crossfade.
With the Crossfade Centered option, the two pieces of sound are not entirely outsidethe selection, but centered on the beginning and end of the selection. The benefit is that if
Copyright c©2012

4 THE SELECTION 19
you select 10 seconds of sound, for instance, and apply such a crossfade, the total length ofthe file will be reduced by 10 seconds, and the reduction does not depend on the durationof the fade. This can be very important when editing music, for instance. If you select anarea between two beats, you can apply a crossfade without breaking the rhythm.
After a crossfade is applied, you can still manipulate it, change its duration, in and outpoints. See section 5.2 on page 20.
Applying a crossfade
4.12 The clip list
When working an a long sound file, it is often necessary to take a few bits out of it, anduse them later on to build a new document. This can be done by copying each part of thefile you are interested in, and pasting it in a new document, but this can be tedious, andyou will end with many document windows obscuring your screen.
The clip list
As a solution to this problem, TwistedWave offers a clip list. You open it from themenu View / Show Clip List . Now, when you zip through the audio and have selectedan interesting bit, instead of copying it to the clipboard, create a new clip from it. Simplypress the New Clip... button, use the corresponding menu item, or press its key shortcut,simply N. You are then asked to enter a name for the new clip. Once you have filled the
Copyright c©2012

5 EDITING CUTS AND CROSSFADES 20
clip list, you can play, paste or delete them from the list with the corresponding buttonsthat appear in front of their names.
Two options can affect the way clips are pasted:
• When the Paste over option is checked, the clip is not inserted in the audio file, butmixed with the already existing data, without altering the length of the file.
• When the Multiple paste option is checked, when you press the paste button, youwill be asked how many times the clip should be pasted. This can be useful whenyou want to paste a clip many times without having to repeat clicking on the pastebutton.
5 Editing cuts and crossfades
In order to cut or to apply a crossfade to a part of the sound file, you first have to carefullyadjust the selection, and then cut or crossfade (see section 4.11 on page 18 for applyingcrossfades). If the result doesn’t sound good, you can undo, tweak the selection a bit, andtry again.
TwistedWave offers a better alternative. You can manipulate the cut or crossfades afterit has been applied, and preview it without having to undo or redo anything.
Note that cuts and crossfades can only be edited when they are the last operationperformed on a sound file. If you perform another operation, the changes you would havemade to the cut or crossfade are committed, and you cannot edit them without having toundo and redo them, in the old way.
5.1 Editing cuts
The capture below shows the waveform just after having deleted a part of the audio. Agray vertical bar shows where the cut has taken place, and two arrows are visible on eachside of the cut. (Also note that a marker was automatically added by TwistedWave. Seesection 11.5 on page 36 to know how to do this.)
These two arrows are in fact two handles, and you can grab and drag them to movethe audio in or out of the cut.
5.2 Editing crossfades
The capture below shows the waveform just after having applied a crossfade. Just as whenediting cuts, two arrows appear, which you can grab and drag to adjust the position wherethe crossfade starts and ends.
You can also grab one of the two vertical bars, and drag it to adjust the duration of thecrossfade. Note that depending on the kind of crossfade you have selected, adjusting thecrossfade duration can affect the total length of the file or not. See section 4.11 on page 18for more information.
Copyright c©2012

5 EDITING CUTS AND CROSSFADES 21
Editing a cut
Copyright c©2012

5 EDITING CUTS AND CROSSFADES 22
Editing a crossfade
Copyright c©2012

7 APPLYING EFFECTS 23
6 Playing
When editing an audio file, in order to find out what parts of the file to select, cut, orapply effects to, it is important to know to what parts of the waveform correspond whatsounds. When you play the file once, you get a rough idea of what sound corresponds toa given shape in the waveform.
While TwistedWave is playing, it is possible to click in the waveform to move theplayhead, or select a specific area you are interested in.
You may find that simply playing a selection is no enough to make accurate selections,and this is where scrubbing comes to the rescue.
6.1 Scrubbing
Scrubbing gives you more control on the position of the playhead, and allows you to listento very specific parts of the audio and get a clear idea of where specific sounds are locatedin the waveform.
Scrubbing is performed by clicking and dragging the mouse in the rulers, above themain wave and the overview windows. Depending on your needs, three scrubbing modescan be selected from the preferences window.
• Repeat. In this mode, a small area around the mouse pointer is repeated continu-ously. The audio is played at the nominal speed, and sounds natural.
• Velocity. This mode allows you to control the speed at which the playhead movesin the waveform. This mode allows you to play the audio slower or faster than thenominal speed, but this also affects the pitch of the sound. This mode can be veryeffective when detecting clicks in the audio.
• Position. This mode is similar to the velocity mode, except that you have a directcontrol on the playhead position rather than its velocity. This makes it easier to playa very specific area.
7 Applying effects
This section describes a few effects provided by TwistedWave. The most interesting ef-fects, however, come from plugins in the Audio Unit or VST format. Using plugins inTwistedWave is described in detail in section 8 on page 29.
7.1 Amplify
The simplest effect you may want to apply on a signal is to adjust its volume. The amplifyeffect allows you to choose a gain in decibel to apply to the selected area of the sound file.
Copyright c©2012

7 APPLYING EFFECTS 24
7.2 Normalize
When you record from a microphone, or import a sound sample in another way, it canhappen that the sound level was not properly adjusted, and appears very low when played,compared to other sound files. You can use the amplify effect to increase the volume by thedesired amount. The normalize effect, however, does this automatically. It scans throughthe entire region, and finds the area where the sound level is the highest. It can thenautomatically determine by what amount it is possible to amplify without introducing anyclipping.
The “Normalize to” pop-up button indicates what level is being normalized. It can beset to one of:
• Peak Value. With this setting, TwistedWave look at the sample with the highestpeak value, and the sound volume is then adjusted to have the level of this samplematch the value specified in the normalization level. With this setting, and a nor-malization level of 0 dB, for instance, TwistedWave will amplify the sound as muchas it is possible without generating any clipping.
• True Peak Value. This setting is similar to the above, with the difference that thesignal is oversampled in order to detect peaks that happen between two samples.This can be useful to make sure the level does not exceed a certain value after theaudio has been converted from digital to analog.
• RMS Value. This setting is different from the two previous in that TwistedWave doesnot look for the loudest part in the audio, but computes the average energy contentof the whole audio.
• LUFS (BS-1770, R128). This setting is similar to the previous one. The only dif-ference is in the way the average energy content is measured. TwistedWave usesthe recommendation ITU-R BS.1770 to compute a value more closely related to theperceived loudness, by attenuating the low and high frequencies before measuring theaverage energy content.
The next two settings, the maximum gain and maximum attenuation, indicate themaximum amount by which TwistedWave can amplify or attenuate the sound volume tomatch the given normalization level. If these options are not checked, TwistedWave isallowed to adjust the gain as much as is necessary.
The last setting, maximum peak value is useful when we are normalizing to a targetRMS or LUFS value. In these cases, especially if there is a lot of dynamic range in theaudio, it is possible for the normalized sound to exceed the full scale, and clip. When thisoption is checked, TwistedWave will make sure the maximum peak value does not exceedthe specified value, even if that means the loudness does not reach the target value.
Copyright c©2012

7 APPLYING EFFECTS 25
7.3 Fade in, fade out
These effects will continually adjust the sound volume of the selected area. When applyinga fade in, the sound volume gradually increases to its original level. A fade out does theopposite, and decreases the volume to zero.
To see how you can apply crossfades, see section 4.11 on page 18.
7.4 Custom fade
The custom fade is more customizable than a simple fade in or fade out. Instead ofgradually fading from 0 to 100%, the attenuation can be specified at the beginning and theend of the selection.
7.5 Loop crossfade
The “Loop Crossfade” is a special kind of fading where the end of the sample is crossfadedwith the beginning. The resulting sample can be played seamlessly in loop.
7.6 Manipulating channels
All the channel manipulation functions are grouped in the Edit menu. A few basic functionsallow you to add or remove channels, and convert the document to mono or stereo.
When working on complex documents with more than two channels, it may be hard toget anything useful from these basic functions. For all the complex tasks you will find atool to reorder the channels in the menu Edit / Reorder Channels...
The channel reordering tool
With the channel reordering tool, you can:
• Reorder the channels by drag and dropping them.
Copyright c©2012

7 APPLYING EFFECTS 26
• Remove selected channels by pressing the delete key.
• Add channels by duplicating already existing ones.
7.7 Sampling rate conversion
The sampling rate is the frequency at which the sound is sampled. On a CD, for instance,the sampling rate is 44 100 Hz. It can be necessary to convert the sampling rate if youhave a recording at 48 kHz, and you want to record it on a CD, for example.
With a lower sampling rate, the sound data will take less space on the disk, but at thecost of loosing the high frequencies. The highest frequency that can be represented at agiven sampling rate is half the value of the sampling rate. On a CD, for example, no soundhigher than 22 050 Hz can be represented.
The sampling rate converter
The window that asks you for a new sampling rate offers the option to resample. Whenit is checked, as it is by default, the wave will be resampled so that it does not sounddifferent4. If you uncheck it, TwistedWave will keep the samples untouched, and merelytag the audio as having the new sampling rate. This will result in the sound to be playedfaster or slower. The file will also sound higher or lower, just as if you were adjusting thespeed of a turntable. If you want to change the speed of a file without modifying the pitch,you should use the Change pitch and speed function, described in the next section.
7.8 Change pitch and speed
This function allows you to change the pitch and speed of a sound file. It can be used tochange the speed without affecting the pitch, changing the pitch and keeping the originalspeed, or any combination of pitch shifting and time stretching.
By checking the Lock speed and pitch option, you will get the effect you would havewhen playing a tape or record at a different speed, where both the speed and pitch areaffected at the same time.
4Unless you are converting to a lower sampling rate, in which case you will lose the higher frequencies.
Copyright c©2012

7 APPLYING EFFECTS 27
The pitch and speed adjustment interface
When the Use DIRAC processing engine option is checked, instead of using Apple’stime stretching implementation, TwistedWave uses the DIRAC Time Stretch/Pitch Shifttechnology licensed from The DSP Dimension,http://www.dspdimension.com. Developed and c©2005-2012 Stephan M. Bernsee.
DIRAC’s pitch shifting is one of the best pitch shifting implementation, and is anexcellent replacement for Apple’s one.
In addition to shifting the pitch of the audio, the DIRAC processing engine can alsoshift the formants. By shifting them with the opposite value of the pitch shift, they willbe unaffected by the pitch transformation, and the result will sound more natural.
By checking the Natural pitch option, the formant shift will automatically be adjustedto avoid them being pitch shifted.
7.8.1 Time/frequency localization and the ‘lambda’ parameter
DIRAC uses a novel algorithm that can be scaled to provide good time domain localizationor good frequency localization, or both. High time localization means that DIRAC producesresults similar to the time domain pitch-synchronized overlap-add (PSOLA) methods, highfrequency localization produces results that are closer to what you get from an improvedphase vocoder.
This ability is controlled by the“lambda”parameter. As a rule of thumb, a low Lambdavalue provides good time localization (good for voice and single instrument recordings),
Copyright c©2012

7 APPLYING EFFECTS 28
while a high lambda value is good for entire mixes. High lambda values take slightly moretime to process but are not considerably slower.
The following lambda settings are available:
• Preview. This automatically selects the best time/frequency trade-off for real-time/preview performance. It is the fastest setting but might not provide the bestresults in all cases.
• Voice. Selects full time localization. Good setting for single instruments and voice.
• Duet. Time/frequency localization with emphasis on time localization. If a settingof Voice produces echoes this might be a better choice.
• Standard. This sets the time/frequency localization halfway between time and fre-quency domains. It is the best setting for all general purpose signals and should beset as default for non-realtime (non-preview) processing.
• Smooth. Higher frequency localization and less time localization. Might be a betterchoice for classical music than the lower-lambda settings
• Classics. Highest frequency localization. This might not be an ideal choice if you’redealing with signals that have very sharp attack transients but it might be useful forsensitive material such as classics
7.9 Pitch correction
The pitch correction uses the DIRAC Time Stretch/Pitch Shift technology to automaticallyadjust the pitch of the selected audio. It works by detecting the pitch of each note, andadjusting them to the closest note.
The pitch correction can be altered with the following parameters:
• Basic tuning. This value defines the reference tuning for the pitch correction.
• Slur speed. Defines the time it takes for the correction to reach the full correctionamount. Typically, notes are a bit unstable at the beginning, because the attack phaseof a sound has a higher amount of noise, and because singers gradually adjust theirtuning after the onset of the note. The slur time makes the pitch correction soundnatural because it models this effect. Higher values will yield a slower adaptationtime and it will take longer for the correction to produce the corrected pitch.However,longer slur times will also preserve vibrato better.
• Quality. This setting allows you to choose a compromise between the sound qualityand the processing speed.
Copyright c©2012

8 AUDIO UNIT AND VST PLUGINS 29
The pitch correction interface
8 Audio Unit and VST plugins
Audio Units is Apple’s audio plugin technology. These plugins produce sound effects thatcan be applied to the selected parts of your documents. A few Audio Units are providedby Apple and are available on every Macintosh, such as a few filters, equalizer, pitchshifter, reverb and more. Many Audio Units provided by third parties are also available.A comprehensive list is available on macmusic.org5.
VST (Virtual Studio Technology) is another plugin technology, created by Steinberg.Similarly to Audio Units, VST plugins can provide many effects, and a comprehensive listis also available on macmusic.org6.
8.1 Using a single Audio Unit or VST plugin
Loading a plugin is as simple as choosing it from the Effects / Audio Units & VST
menu. TwistedWave will open a window showing the plugin interface.When you opened an Audio Unit or a VST plugin, it remains active on the current
document. That means that when you start the playback, the plugin will be applied tothe file in real time. You can even have more than one open at the same time, and theywill all process the sound when the document is being played.
In some cases, you want an Audio Unit or VST plugin to be applied not just to onedocument, but to all the documents open in TwistedWave. This can be done with theGlobal option. When it is checked, the plugin window will remain visible, and the effectwill be applied when playing back any document. This can be useful in particular with
5http://www.macmusic.org/software/cat.php?lang=en&id=7037&view=AU6http://www.macmusic.org/software/cat.php?lang=en&id=7037&view=VST
Copyright c©2012

8 AUDIO UNIT AND VST PLUGINS 30
An Audio Unit window
visualization plugins. A VU meter, for instance, could be useful for all the documents youcould be working on.
If you want to permanently alter the sound file by processing it with the the Audio Unitor VST plugin, you can press the Apply button, and the plugin will process the selectedarea of the document, or the whole document if nothing was selected.
Note that when the file is saved, the active plugins will not be saved, and won’t affectthe file being saved. If you want to save the result of processing the document with aplugin, you should apply it first.
In the top right hand corner of the plugin window, a pop-up button offers you to choosewhat to do with the tail of the effect. The tail of the effect is the sound produced by theAudio Unit or the VST plugin after it has finished processing the selection. If you use adelay to add an echo, for instance, it might take a few seconds for the echo to repeat untilit has completely disappeared. There are three ways in which TwistedWave can deal withthis tail:
• Truncate tail. With this option, the plugin will stop processing once it has reachedthe end of the selection, and the tail will be discarded.
• Insert tail. The tail will be inserted in the document, at the end of the selection.
• Merge tail. The tail will be mixed with the contents of the document after theselection. Note that this option will alter a part of the sound that is not selected bymixing the tail of the effect to it.
8.2 Saving presets
You can press the Save button at the top of the plugin window to save the current preset.You will then be asked to name the new preset. You can access saved presets from theLoad Preset pop-up button.
Copyright c©2012

8 AUDIO UNIT AND VST PLUGINS 31
Presets are saved as files in a folder corresponding to the current plugin. SelectingManage Presets... from the menu will open this folder in the Finder. This allows youto rename or delete presets. You can also put them in sub-folders, and they will appear insub-menus when you open the presets menu.
8.3 Using the effect stack
With the effect stacks, TwistedWave provides a convenient way to group plugin together.This makes it easy to save their presets as a whole, reorder the plugins, or apply all ofthem at once.
Select New Effect Stack... from the Effects menu, and TwistedWave will open aninitially empty window. The Add Effect menu allows you to choose the Audio Unit orVST plugins you want to add to the stack. When you have added a few effects, you canstart previewing them by pressing the Play button, and all the effects in the stack will beapplied in real time on the selected area of the document. That means that you can changethe parameters of all the Audio Unit and VST plugins before committing the changes tothe document.
The Effect Stack with two effects being edited
The effect stack works as a single plugin window (see section 8.1 on page 29) in theway that an effect stack window is always active on the current document. The effects itcontains are always applied when playing back the document.
Copyright c©2012

9 GENERATING SOUNDS 32
In the same way that you can save Presets for individual Audio Unit or VST plugins,you can save a whole effect stack. In addition to the Load Stack pop-up button, you canload an effect stack directly from the main Effects menu. A Load Stack menu appearsbelow the New Effect Stack... when some saved stacks are available.
8.4 Effect plugins and 64 bit
TwistedWave can run in 32-bit or in 64-bit mode. When it is running in 64-bit mode, itcan only load Audio Unit or VST plugins that were built for 64-bit.
Because many plugins are still available in 32-bit only, they will not show up in theplugin list if TwistedWave is running in 64-bit mode. If you still want to use 32-bit plugins,you should run TwistedWave in 32-bit mode. Here is how to do this:
• Locate the TwistedWave application. It is usually placed in the /Applications folder,
• Right-click the application, and select “Get Info”,
• Check the option “Open in 32-bit mode”,
• Reopen TwistedWave, and it will be running in 32-bit mode.
9 Generating Sounds
9.1 Signal Generator
The signal generator is a tool that allows you to generate simple signal patterns. Theoptions allow you to select the shape of the wave (sine, rectangle, triangle or sawtooth),its frequency and amplitude.
In addition to periodic signals, the signal generator can produce white7 or pink noise8.These are two kinds of noises where the energy is distributed across all frequencies in thespectrum.
When you have adjusted the signal parameters, clicking Apply will add the generatedsignal to the current document in one of three ways, as chosen from the Action pop-upbutton.
• Insert will insert the generated signal at the position of the cursor.
• Replace Selection will replace the contents of the selection with the generatedsignal.
• Mix with Selection will keep the contents of the selection, and mix it with thegenerated signal.
7http://en.wikipedia.org/wiki/White noise8http://en.wikipedia.org/wiki/Pink noise
Copyright c©2012

9 GENERATING SOUNDS 33
Signal Generator
9.2 Speech Synthesis
The speech synthesis effect uses Apple’s built-in speech synthesis to convert a text tospeech.
Enter some text, and press OK to insert the spoken text in the current document atthe position of the cursor.
Speech Synthesis
A number of different voices are available to synthesize the speech. They can also befurther refined by adjusting the speech speed and the pitch of the voice.
Copyright c©2012

11 MARKERS 34
10 Recording
In addition to being able to import samples in many different formats, TwistedWave allowsyou to create new samples by recording from any of the audio devices connected to yourMacintosh, such as a microphone.
You can start recording by pressing the Record button, from the toolbar. Note that thisfunction is available only when TwistedWave is ready, and is not currently busy reading afile, applying a filter, or performing any other background task.
When the recording session has started, the audio is inserted in the current documentat the position of the insertion point, and the level meters show the peak levels of the audiobeing recorded. This is intended to help you adjust the input level to a good value, andmaking sure no clipping takes place.
11 Markers
Markers are a kind of index that can be used to identify a specific place in the audio file.They can be given a name, which makes it obvious what they point to.
Another use for markers is to indicate the beginning of each track which might composea sound file. When preparing a CD, the application responsible for burning the CD mightexpect a list of markers to indicate the beginning of each track.
11.1 Manipulating markers
The capture here shows a document with a few markers. The markers are represented asa vertical line in the waveform. Additionally, an arrow and a label are shown in the areaabove the time ruler. Within this area, you can:
• Add a marker by clicking anywhere in the ruler.
• Move a marker by dragging it within the ruler.
• Remove a marker by drag and dropping it out of the ruler.
• Manually enter its position and label by double clicking on a marker.
A convenient way to create markers is to click Markers / Add Marker from the menu,or press the shortcut key M. This command will automatically add a marker at the currentcursor position.
Because this also works when TwistedWave is playing or recording, you can play awhole file, and mark places you want to inspect and edit at a later time.
TwistedWave can also automatically add markers when certain operations are per-formed. See section 11.5 on page 36.
Copyright c©2012

11 MARKERS 35
Markers
Copyright c©2012

11 MARKERS 36
11.2 Importing/exporting markers
When an audio file is burnt to a CD, markers are often used to mark the beginning ofeach track. Although TwistedWave can save markers in WAV or AIFF files, some softwareprefer having the markers saved in a separate file. From the Markers menu, the optionsImport Markers... and Export Markers... allow you to manage CUE files containingmarkers. The CUE files are commonly recognized by CD burning applications, and containthe necessary information to split the audio file in several tracks.
11.3 Markers window
From the menu, the option Markers / Markers Window opens a window showing a list ofall the markers present in the current document.
By double clicking on the items in this list, you can easily rename the markers, and settheir positions to a precise time.
The markers window
11.4 Splitting by markers
Because markers are often used to indicate the beginning of individual track in an audiofile, an area between a pair of markers corresponds to a track, and in order to work onindividual tracks, it can be useful to split the tracks, and save them in individual files.This can be done by selecting Markers / Split by Markers from the menu.
By default, the names of the files generated correspond to the names of the markers,prepended by the number of the track. You can also manually edit these names, or uncheckthem if you don’t want to save a specific track.
11.5 Automatic markers
Some operations, such as cutting, or applying a crossfade can have a dramatic effect onthe sound file. Therefore, it can be important to always know where such operations wereapplied. A convenient way to always remember a place is to insert a marker.
When the option Markers / Auto Mark Cuts is enabled, TwistedWave will automat-ically add a marker whenever you cut a part of the file, or apply a crossfade (Delete orDelete Crossfade... from the Edit menu).
Copyright c©2012

12 METADATA 37
Splitting by markers
12 Metadata
Many audio file formats can store metadata in addition to the sound data itself. Metadatacan consist in several pieces of information you would like to record with your document.In the case of a song for instance, you may want to record the title of the song, the nameof the album and artist, and so on.
You can edit this metadata with the metadata edit panel, which can be open from themenu File / Show Info..., or by clicking the Info button from the toolbar.
TwistedWave can read and save music metadata from files in the aiff, wav, mp3, mp4,flac and ogg/vobis format.
12.1 BWAV and Soundminer
In addition to music metadata, the edit panel can show up to two additional tabs forediting BWAV and Soundminer metadata. These metadata are not specific to music, andcan be used to store more general information, such as a description of the sound, whatkind of microphone was used for the recording, where the sound was recorded. . .
Note that BWAV metadata can only be saved in .wav files, and this tab will only bepresent when editing a file in this format. Soundminer metadata can be present in .wavand .aiff files.
12.2 FLAC metadata
Although FLAC does not have native support for BWAV and Soundminer metadata, Twist-edWave still allows you to edit and save FLAC files with this kind of metadata.
Copyright c©2012

12 METADATA 38
3 tabs of the metadata edit panel
Copyright c©2012

13 EXPORTING THE WAVEFORM 39
Since version 1.2.1, the FLAC encoder has support for metadata found in the WAVand AIFF files. When used with the option -keep-foreign-metadata9, the encoder willkeep the metadata from the original file in the FLAC file. TwistedWave takes advantageof this possibility, and will save the BWAV and Soundminer metadata chunks in the FLACfiles. When the FLAC files generated by TwistedWave are decoded with the commandline FLAC decoder, and if the –keep-foreign-metadata option is used, the BWAV andSoundminer metadata chunks will be restored in the generated WAV file.
13 Exporting the waveform
In addition to exporting a sound file in a different audio format, TwistedWave offers theability to export its waveform as a PNG image. Exporting the waveform image withTwistedWave is not very different than taking a screenshot. Where this can be very useful,however, is when this is done in conjunction with the batch processing. This is a very easyway to generate a small waveform image for many files in a single step.
section 14 on page 40
Exporting the waveform
The waveform export window allows you to customize the color scheme for the exported
9http://flac.sourceforge.net/documentation tools flac.html#flac options keep foreign metadata
Copyright c©2012

14 BATCH PROCESSING 40
waveform, or to select an existing one from the same presets that are used to customizethe appearance of the waveform in the document windows.
The rendered waveform looks the same as it does in the regular editing windows, unlessyou add some anti aliasing. The image here shows the effect of the anti aliasing on thewaveform rendering.
The effect of antialiasing on the exported waveform
14 Batch processing
TwistedWave’s batch processing abilities make it very easy to apply a number of effects orother transformations to a large number of files.
The batch processing window, shown in the capture here, is composed of two parts.The batch script is built in the upper half, and the set of files on which to apply the scriptis selected in the lower half.
14.1 Defining the batch script
The upper part of the batch processing window shows mainly a list of all the actions thathave to be performed on the selected files. When the batch process is run, the actions arerun one by one, from the top of the list to the end on each of the selected files.
This list is initially empty, and a new action is added by selecting it from the Add
Action pop-up button in the lower left hand corner. Most of them are the same effectsthat can be found in the main menu when working on individual files.
Copyright c©2012

14 BATCH PROCESSING 41
Batch processing window
Copyright c©2012

14 BATCH PROCESSING 42
In order for the batch script to do anything useful with the files, it has to do at leastone of Save or Export Waveform Image. You can even have more than one Save, if youwant to convert a bunch of files to different file formats at the same time, for instance.
The behavior of most of the actions that can compose a batch script can be furthercustomized by clicking the Edit button sitting next to their name. Than allows you toindicate the amount by which to change the pitch or speed of a file, for instance.
In the lower right hand corner, another pop-up button allows you to save batch scripts,or load a previously saved one.
14.2 Saving processed files
In order to save the files resulting from the batch process, you have to add at least oneSave action at the end of the process. As shown in the capture, the Save action offers anumber of options to select the file format, destination and name.
Saving options
It offers the possibility to add a prefix or a suffix in order to alter the file name.The location of the saved file, by default, is the same as the original file. It is possible,
however, to select another folder.The format of the saved file can be either the original file format, or another format
which you can select from the file format pop-up button.Note that if you select both the original location and format, the processed files will
replace the original files, and such an action should be performed only after the batchprocess was tested, and verified to work as expected. If you select a different locationor file format, any already existing file will only be overwritten if the Allow overwrites
option was enabled.
Copyright c©2012

16 PREFERENCES 43
14.3 Running the batch
When a batch process has been defined, you can add a few files to the list by clicking theAdd Files... button, or more simply by drag and dropping them directly to the list.
You can add single files as well as folders to the list. When you add a folder, all thesound files it contains are looked for, and the number of file it contains is indicated in thelist.
Also note that when a folder has been added to the list, when a Save operation isbeing applied, if the destination is not the original location, the original directory tree isreconstructed in the destination folder, with the processed versions of the selected files.
You can then start the batch by clicking the Start Processing button. If you want totest the batch, and run it on a single file without saving anything, you can click the Test
button in front of a file name, and the processed file will open in an unsaved TwistedWavedocument window.
14.4 Splitting files
The result of applying the batch script on a file will result in a processed file which willusually be saved by one or more Save operation at the end of the script.
Two batch processing actions (namely Split by Markers and Split Channels) havethe special ability to split an audio file into several parts. When processing a file results inmore than one part, the Save operations will not save a single file, but the different partswill be saved in different files.
15 TwistedWave iOS Remote
The TwistedWave remote is an application for iPhone or iPod that can be downloadedfrom the App Store. It will connect to a TwistedWave application running on a mac, andallow you to remotely control it and perform a few simple tasks, such as playing, recordingor placing markers.
16 Preferences
The Preferences window enables you to customize the behavior of TwistedWave. Thedifferent options available are described in the sections below.
16.1 General settings
16.1.1 Time display
• Some WAV or AIFF files can contain a time code information specifying the timereference of the file. When this information is available, TwistedWave uses it, andthe timeline and cursor position displays will use it as the time origin. Even if
Copyright c©2012

16 PREFERENCES 44
The TwistedWave Remote
Copyright c©2012

16 PREFERENCES 45
The Preferences Window (general settings)
Copyright c©2012

16 PREFERENCES 46
this information is available, it may be desirable to work with times relative to thebeginning of the file, which can be done by unchecking the option Use time origin
from audio file.
• By default, the values displayed in the timelines and for the cursor position in thetoolbar are in minutes, seconds, and fractions of a second. With the “Time format”option, you can also select to see the time information in sample count, or display aSMPTE time code value.
16.1.2 Level Meter
Two settings allow you to customize the loudness indication visible below the level meter.By default, this value shows the RMS level in decibels.
The value displayed corresponds to the energy integrated on a window whose lengthcan be specified with the “integration window” setting. With the default of 10 seconds, thevalue displayed represents the loudness of the 10 previous seconds of audio.
The “Loudness indication” setting allows you to select between the RMS and LUFSmeasurement for the loudness indications.
When you select the LUFS, before integrating the energy contained in the audio, afilter is applied to the sound in order to discard the frequencies that are not perceived bythe human ear, and don’t contribute to the loudness.
16.1.3 Registration
When you register TwistedWave, either by entering a serial number, or by purchasingdirectly from within the application, TwistedWave becomes registered only for the userthat is currently logged in on your computer.
In the preferences window, an option allows you to make the registration available toall the users.
16.1.4 TwistedWave iOS Remote
When you have enabled the TwistedWave Remote, you can connected to your runningTwistedWave instance with the iOS application, available on the app store.
You can see how to use the remote in section 15 on page 43.
16.2 Editing preferences
16.2.1 Editing preferences
• The “Auto extend to crossing” option allows you to enable or disable the ability ofTwistedWave to automatically extend the selection to the next zero crossing pointsin the sound. This capability is described in more detail in section 4.6 on page 12.
Copyright c©2012

16 PREFERENCES 47
The Preferences Window (editing preferences)
Copyright c©2012

16 PREFERENCES 48
• The“Lock channels together”option can be very useful when working on multichannelfiles. When this option is checked, selecting an area will always select all the channelsat the same time.
• By default, when zooming with the scroll wheel, TwistedWave makes sure the inser-tion point remains in the center of the window so that it is always visible. If youcheck the option “Zooming centered on mouse”, zooming in and out will be centeredon the mouse position instead. This allows you to control the point where you arezooming in by moving the mouse while you are zooming. This can be an efficientway to find a specific location in the waveform.
16.2.2 Playing
• The “Auto scroll when playing” option allows you to enable or disable the automaticscrolling of the waveform when playing. Disabling it can be useful when you areediting the selection, and don’t want to loose the current position just to start theplayback in order to check what you have selected.
• When the option “Move cursor back after playing” is checked, the cursor remembersits position, and comes back to its original place after playing.
• The “Scrubbing mode” option allows you to select the behavior of the playhead whendragging the mouse to perform scrubbing. The different scrubbing options are de-scribed in section 6.1 on page 23.
16.2.3 Transient threshold
This slider allows you to adjust the threshold above which TwistedWave can detect tran-sients. The higher the value, the more pronounced the transients have to be in order forTwistedWave to be able to detect them. The value you use may depend on the kind ofdocument you are working on. If the transients are very marked, you can use a highervalue, in order to avoid detecting unwanted transients. Using the transient detection inTwistedWave is described in more details in section 4.8 on page 16.
16.3 Selecting audio devices
These two pop-up buttons allow you to select which input and output devices are used forrecording and playback.
When recording, you may want to monitor the sound being recorded. By checking theoption to Play through when recording, TwistedWave will automatically play the audiofed to the input device when you start recording.
A pop-up button enables you to adjust the buffer size. This instructs TwistedWaveabout the size of the chunks of audio that should be used when communicating withthe sound card when playing or recording. This setting is useful mainly when the Play
Copyright c©2012

16 PREFERENCES 49
The Preferences Window (device settings)
Copyright c©2012

17 KEYBOARD SHORTCUTS 50
through option is used. When playing through, a small delay may be noticed between thetime the audio is recorded, and when it is played back on the output device. By selectinga smaller buffer size, this delay can be reduced.
When TwistedWave records from a device that has more channels than the file youare currently working on, it uses only as many channels as necessary. If you have a 16channel input device, and record a stereo file, for instance, TwistedWave will record fromthe first two input channels of your input device. However, you may not always want touse the first two channels. In order to solve this, press the button “Select Channels. . . ”,and TwistedWave will open a sheet allowing you to specify the order in which the channelsshould be used for recording.
This works exactly in the same way for playing, where you select the channels to beused for the output.
17 Keyboard shortcuts
Most of the keyboard shortcuts available in TwistedWave are attached to menu items, andcan be found by browsing the main menu. Additionally, some shortcuts are not attachedno any menu item, and are described below.
17.1 Zooming
The + and - keys can be used to zoom the waveform in or out. The same effect can beachieved with the up and down arrows.
The temporary zoom is activated with the Z and Shift-Z shortcuts. The process isexplained in detail in section 3.4 on page 6.
17.2 Manipulating the selection
• Clicking and dragging the mouse over the waveform selects an area of the file.
• Shift+clicking will edit the selection by dragging the edges of the already existingselection.
• Option+clicking will add a region to the already existing selection.
• Option+Shift+clicking will remove a region from the already existing selection.
17.3 Moving the cursor
When a selection is present, the left and right arrows will move the cursor to the edges ofthe selection.
When nothing is selected, the arrows will move the cursor to the beginning or the endof the file.
Copyright c©2012

18 FEELING AT HOME 51
17.4 Playing
Pressing the space bar will start playing the audio at the position of the cursor. If a regionof the file is selected, only that area is played back.
Pressing space again will stop the playback.
18 Feeling at home
When you start working in a new environment, it takes some time getting used to it beforeyou are able to be fully efficient. With a new application, this means getting to know howit works, what it can do for you. If you were used to a similar application, the differencesbetween TwistedWave and what you were used to could complicate the matter. In orderto leverage your knowledge of other application, it is possible to change the keyboardshortcuts to ones you are more familiar with. It is also possible to change the colors of thewaveform, and make it suit your tastes better.
18.1 Changing colors
In order to change the color of the waveform, you have to open the color editor, located inEdit / Edit Colors.... This will open a window with a list of color swatches and shortdescriptions. You can then click to edit the colors, and see how it affects the waveform inreal time.
Here are a few things to note regarding the colors:
• When changing the wave color, you have the option to change both the center andedge color. Having two different colors will fill the wave with a gradient, making itlook better.
• Similarly for the background color, you have to set the top and bottom color in orderto define a gradient.
• In order to change the color of the selection, you have to specify the color of theselected wave, and the selected background.
The color editing window is also the place where you can change the size of the fontused in the timelines (the rulers above the main wave and overview windows). You mayalso like not to have the font antialiased, especially for small sizes.
Similarly to the Audio Unit presets, the Color Schemes pop-up button at the topof the window allows you to save and load color schemes. The color schemes are savedin individual files, and the Manage Color Schemes... option opens a Finder windowshowing the folder containing all the presets you could have saved. You can remove thesefiles, copy them on another computer or exchange them with friends. These changes willautomatically be reflected in the pop-up menu.
Copyright c©2012

18 FEELING AT HOME 52
The Color Editor
Copyright c©2012

19 COPYRIGHT NOTICES 53
18.2 Changing shortcuts
In order to change the shortcuts, select the menu Edit / Edit Keyboard Shortcuts....The main menu will enter in shortcut edit mode, and a window will invite you to select anitem from the menu in order to change its associated keyboard shortcut.
In shortcut edit mode
When you have selected a menu item, a second window shows you the current anddefault associated shortcuts (if any), and waits for the next key strokes to use as a newshortcut. You are also offered the option to remove the current shortcut, or use the default.
Editing a shortcut
19 Copyright notices
19.1 DIRAC Time Scaling technology
DIRAC Time Stretch/Pitch Shift technology licensed from The DSP Dimension,http://www.dspdimension.com. Developed and c©2005-2012 Stephan M. Bernsee.
19.2 LAME
TwistedWave uses LAME for encoding mp3 files. LAME is licensed under the LGPL (GNULibrary General Public License). A copy of the LGPL can be found at gnu.org10.
10http://www.gnu.org/licenses/lgpl.html
Copyright c©2012

19 COPYRIGHT NOTICES 54
The LAME source code can be obtained at lame.sourceforge.net11
19.3 FFMpeg
TwistedWave uses FFMpeg for decoding files in various formats. FFMpeg is licensed underthe LGPL (GNU Library General Public License). A copy of the LGPL can be found atgnu.org12.
The FFMpeg source code can be obtained at ffmpeg.mplayerhq.hu13
19.4 Guile
Guile is licensed under the LGPL (GNU Library General Public License). A copy of theLGPL can be found at gnu.org14.
The Guile source code can be obtained at gnu.org15
19.5 id3lib
Id3lib is licensed under the LGPL (GNU Library General Public License). A copy of theLGPL can be found at gnu.org16.
The id3lib source code can be obtained at id3lib.sourceforge.net17
19.6 libsndfile
Libsndfile is licensed under the LGPL (GNU Library General Public License). A copy ofthe LGPL can be found at gnu.org18.
The libsndfile source code can be obtained at www.mega-nerd.com19
19.7 Ogg/Vorbis
TwistedWave uses libvorbis and libogg. They are used for reading and writing Ogg/Vorbisfiles.
Copyright (c) 1994-2004 Xiph.org Foundation
Redistribution and use in source and binary forms, with or without
11http://lame.sourceforge.net/index.php12http://www.gnu.org/licenses/lgpl.html13http://ffmpeg.mplayerhq.hu/index.html14http://www.gnu.org/licenses/lgpl.html15http://www.gnu.org/software/guile/16http://www.gnu.org/licenses/lgpl.html17http://id3lib.sourceforge.net/18http://www.gnu.org/licenses/lgpl.html19http://www.mega-nerd.com/libsndfile/
Copyright c©2012
19 COPYRIGHT NOTICES 55
modification, are permitted provided that the following conditions
are met:
- Redistributions of source code must retain the above copyright
notice, this list of conditions and the following disclaimer.
- Redistributions in binary form must reproduce the above copyright
notice, this list of conditions and the following disclaimer in the
documentation and/or other materials provided with the distribution.
- Neither the name of the Xiph.org Foundation nor the names of its
contributors may be used to endorse or promote products derived from
this software without specific prior written permission.
THIS SOFTWARE IS PROVIDED BY THE COPYRIGHT HOLDERS AND CONTRIBUTORS
"AS IS" AND ANY EXPRESS OR IMPLIED WARRANTIES, INCLUDING, BUT NOT
LIMITED TO, THE IMPLIED WARRANTIES OF MERCHANTABILITY AND FITNESS FOR
A PARTICULAR PURPOSE ARE DISCLAIMED. IN NO EVENT SHALL THE REGENTS OR
CONTRIBUTORS BE LIABLE FOR ANY DIRECT, INDIRECT, INCIDENTAL, SPECIAL,
EXEMPLARY, OR CONSEQUENTIAL DAMAGES (INCLUDING, BUT NOT LIMITED TO,
PROCUREMENT OF SUBSTITUTE GOODS OR SERVICES; LOSS OF USE, DATA, OR
PROFITS; OR BUSINESS INTERRUPTION) HOWEVER CAUSED AND ON ANY THEORY OF
LIABILITY, WHETHER IN CONTRACT, STRICT LIABILITY, OR TORT (INCLUDING
NEGLIGENCE OR OTHERWISE) ARISING IN ANY WAY OUT OF THE USE OF THIS
SOFTWARE, EVEN IF ADVISED OF THE POSSIBILITY OF SUCH DAMAGE.
19.8 FLAC
TwistedWave uses libFLAC and libFLAC++. They are used for reading and writing FLACfiles.
Copyright (C) 2000,2001,2002,2003,2004 Josh Coalson
Redistribution and use in source and binary forms, with or without
modification, are permitted provided that the following conditions
are met:
- Redistributions of source code must retain the above copyright
notice, this list of conditions and the following disclaimer.
- Redistributions in binary form must reproduce the above copyright
notice, this list of conditions and the following disclaimer in the
documentation and/or other materials provided with the distribution.
Copyright c©2012

19 COPYRIGHT NOTICES 56
- Neither the name of the Xiph.org Foundation nor the names of its
contributors may be used to endorse or promote products derived from
this software without specific prior written permission.
THIS SOFTWARE IS PROVIDED BY THE COPYRIGHT HOLDERS AND CONTRIBUTORS
"AS IS" AND ANY EXPRESS OR IMPLIED WARRANTIES, INCLUDING, BUT NOT
LIMITED TO, THE IMPLIED WARRANTIES OF MERCHANTABILITY AND FITNESS FOR
A PARTICULAR PURPOSE ARE DISCLAIMED. IN NO EVENT SHALL THE REGENTS OR
CONTRIBUTORS BE LIABLE FOR ANY DIRECT, INDIRECT, INCIDENTAL, SPECIAL,
EXEMPLARY, OR CONSEQUENTIAL DAMAGES (INCLUDING, BUT NOT LIMITED TO,
PROCUREMENT OF SUBSTITUTE GOODS OR SERVICES; LOSS OF USE, DATA, OR
PROFITS; OR BUSINESS INTERRUPTION) HOWEVER CAUSED AND ON ANY THEORY OF
LIABILITY, WHETHER IN CONTRACT, STRICT LIABILITY, OR TORT (INCLUDING
NEGLIGENCE OR OTHERWISE) ARISING IN ANY WAY OUT OF THE USE OF THIS
SOFTWARE, EVEN IF ADVISED OF THE POSSIBILITY OF SUCH DAMAGE.
19.9 WavPack
TwistedWave uses WavPack. They are used for reading and writing WavPack files.
Copyright (c) 1998 - 2008 Conifer Software
All rights reserved.
Redistribution and use in source and binary forms, with or without
modification, are permitted provided that the following conditions
are met:
- Redistributions of source code must retain the above copyright
notice, this list of conditions and the following disclaimer.
- Redistributions in binary form must reproduce the above copyright
notice, this list of conditions and the following disclaimer in the
documentation and/or other materials provided with the distribution.
- Neither the name of the Xiph.org Foundation nor the names of its
contributors may be used to endorse or promote products derived from
this software without specific prior written permission.
THIS SOFTWARE IS PROVIDED BY THE COPYRIGHT HOLDERS AND CONTRIBUTORS
"AS IS" AND ANY EXPRESS OR IMPLIED WARRANTIES, INCLUDING, BUT NOT
LIMITED TO, THE IMPLIED WARRANTIES OF MERCHANTABILITY AND FITNESS FOR
A PARTICULAR PURPOSE ARE DISCLAIMED. IN NO EVENT SHALL THE REGENTS OR
Copyright c©2012

19 COPYRIGHT NOTICES 57
CONTRIBUTORS BE LIABLE FOR ANY DIRECT, INDIRECT, INCIDENTAL, SPECIAL,
EXEMPLARY, OR CONSEQUENTIAL DAMAGES (INCLUDING, BUT NOT LIMITED TO,
PROCUREMENT OF SUBSTITUTE GOODS OR SERVICES; LOSS OF USE, DATA, OR
PROFITS; OR BUSINESS INTERRUPTION) HOWEVER CAUSED AND ON ANY THEORY OF
LIABILITY, WHETHER IN CONTRACT, STRICT LIABILITY, OR TORT (INCLUDING
NEGLIGENCE OR OTHERWISE) ARISING IN ANY WAY OUT OF THE USE OF THIS
SOFTWARE, EVEN IF ADVISED OF THE POSSIBILITY OF SUCH DAMAGE.
Copyright c©2012

INDEX 58
Index
Amplify, 23Audio devices, 48Audio Units, 29Auto extend to crossing, 12Auto scroll, 48
Batch processing, 40Buffer size, 48BWAV, 37
Change pitch, 26Change speed, 26Channels, 25Clip list, 19Color schemes, 51Colors, 51Complex selection, 11Convert sampling rate, 26Copy, 17Crossfade, 18Custom fade, 25Cut, 17
Detecting silences, 13
Effect stack, 31Effects, 23
Fade in, 25Fade out, 25
Keyboard shortcuts, 53
Large files, 5Level meter, 46Load Stack, 32Loading files, 5Loop crossfade, 25
Manage Presets, 31Markers, 34Menu shortcuts, 53Metadata, 37
New Clip, 19New document, 4New Effect Stack, 31Normalize, 24
Overview, 8
Panning, 6Paste, 17Paste over, 17Pink noise, 32Pitch, 26, 28Pitch correction, 28Play through, 48Playing, 51Preferences, 43Presets, 30
Recording, 34Rectangle, 32Remote, 43Replacing, 17
Sampling rate, 26Sawtooth, 32Scrolling, 6Scrubbing, 23Selection, 8Shortcuts, 53Show Clip List, 19Signal generator, 32Silences, 13Sine, 32Soundminer, 37Special pasting, 17Speech Synthesis, 33Speed, 26
Temporary zoom, 6Transient threshold, 48Transients, 16
Copyright c©2012

INDEX 59
Triangle, 32
VST plugins, 29
Waveform, 5White noise, 32
Zooming, 5Zooming vertically, 6
Copyright c©2012