u12 learn to curl final - curling québec · curling canada’s u12 learn to curl program is...
TRANSCRIPT
Page1
U12 LEARN TO CURL Program This is an 8-week 1-hour program
Page2
INTRODUCTION
Curling Canada’s U12 Learn to Curl program is designed to introduce children to the sport of curling. The objective is to have fun, increase physical literacy with key fundamental movement skills (FMS), follow Curling Canada’s Long Term Athlete Development (LTAD) framework and begin sport specific techniques. Program Instructors
It is recommended that instructors be trained in Curling Canada’s NCCP Club Coach Youth program for consistency in the program delivery. Check with local Provincial/Territorial organizations to determine police screening requirements for your employees and volunteers working with minors. Recommended Coach Qualifications for U12 Learn to Curl Instructors: Club Coach Youth “Trained” Recommended Coach to Athlete Ratio for U12 Programs: 1:8 Each club should have a Screening and Risk Management Policy in place since instructors, employees or contractors will be working with minors.
Program Framework
Program Length: 8 weeks (+/- 1 week if required) Session Length: 1 hour total Throughout the course of this 8-week program, the recommendation is to have groups in continuous motion alternating among circuits or stations. The lesson plans outline various stations for different skills using FMS as a building block for each. As you work through the lesson plans you may need to vary activities based on the number of participants as well as on and off ice space available. For example, you may decide to have the stations set up as an obstacle course rather than 2 minutes per station or in the case of having 8 participants and playing the Triples game, participants may need to rotate through some one-on-one instructor time while 6 kids play the game. If numbers are uneven, the instructors may be expected to participate on a team/group. The lesson plans outline clear goals and objectives, equipment required, key teaching points, games and activities to support the goals and objectives, as well as a list of drills or suggested activities. Each Session is 1 hour long, and should be treated as a fun learning environment for beginners. Each session will also incorporate the desired skill development through fun games, drills and activities. In order to enhance the learning environment, the equipment used has been chosen to be playful, colourful and overall FUN! Use music to keep children engaged and moving. Music is also a great way to keep things on schedule, as most songs are 3 to 4 minutes in length. When considering the equipment, try to find various items that focus on inclusion for all. Bright coloured balls with bells and various textures for limited visibility and delivery sticks for wheelchair participants are only a few suggestions. You will notice that each session has ON and OFF ICE components. The lesson plans have various drills and games for the week based on the theme. It is recommended that participants are divided into groups and move through these drills in a circuit pattern. For example, during the main instructional component, a third of the group would be doing drill A while another third does drill B and similarly for drill C. In the case of Warm up and Cool Down drills, 4-6 actives have been listed covering various Fundamental Movement Skills target areas. It is recommended you select 3 of these activities to do in a station circuit format as well. Your program should follow the safety guidelines in Curling Canada’s helmet policy – each participant will need to bring a helmet for on ice sports to participate in the program.
Page3
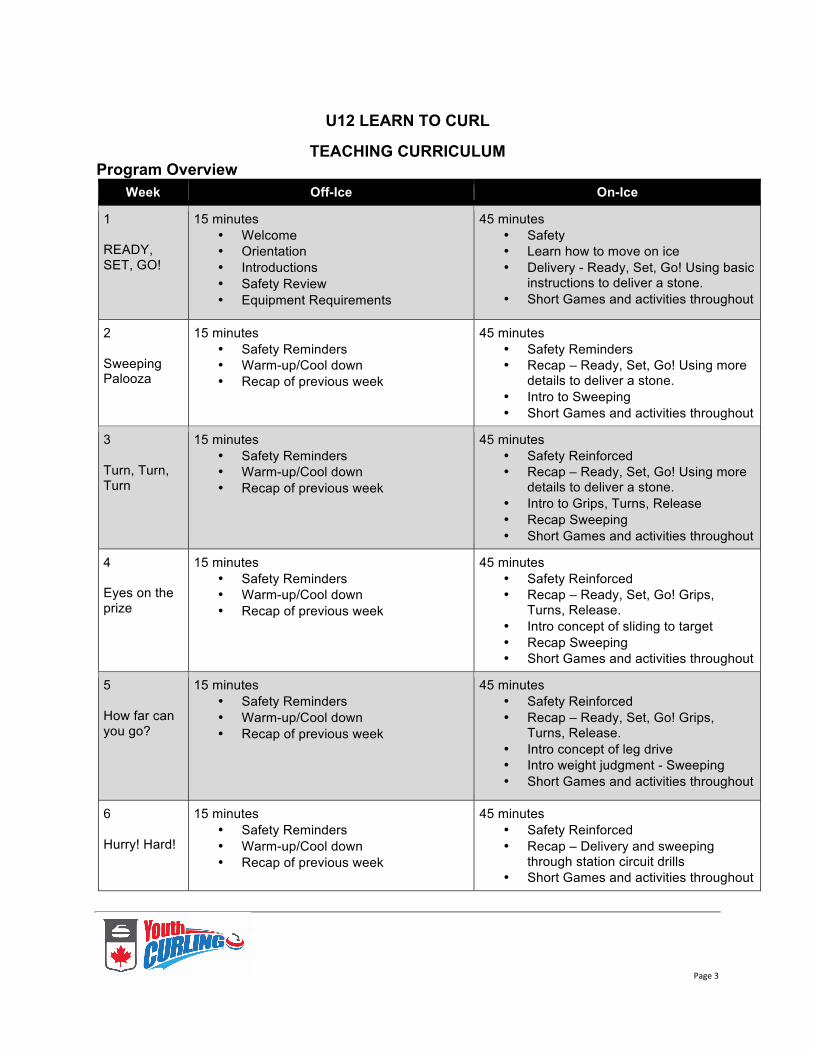
U12 LEARN TO CURL
TEACHING CURRICULUM
Program Overview Week Off-Ice On-Ice
1 READY, SET, GO!
15 minutes • Welcome • Orientation • Introductions • Safety Review • Equipment Requirements
45 minutes• Safety • Learn how to move on ice • Delivery - Ready, Set, Go! Using basic
instructions to deliver a stone. • Short Games and activities throughout
2 Sweeping Palooza
15 minutes• Safety Reminders • Warm-up/Cool down • Recap of previous week
45 minutes• Safety Reminders • Recap – Ready, Set, Go! Using more
details to deliver a stone. • Intro to Sweeping • Short Games and activities throughout
3 Turn, Turn, Turn
15 minutes• Safety Reminders • Warm-up/Cool down • Recap of previous week
45 minutes• Safety Reinforced • Recap – Ready, Set, Go! Using more
details to deliver a stone. • Intro to Grips, Turns, Release • Recap Sweeping • Short Games and activities throughout
4 Eyes on the prize
15 minutes• Safety Reminders • Warm-up/Cool down • Recap of previous week
45 minutes• Safety Reinforced • Recap – Ready, Set, Go! Grips,
Turns, Release. • Intro concept of sliding to target • Recap Sweeping • Short Games and activities throughout
5 How far can you go?
15 minutes• Safety Reminders • Warm-up/Cool down • Recap of previous week
45 minutes• Safety Reinforced • Recap – Ready, Set, Go! Grips,
Turns, Release. • Intro concept of leg drive • Intro weight judgment - Sweeping • Short Games and activities throughout
6 Hurry! Hard!
15 minutes• Safety Reminders • Warm-up/Cool down • Recap of previous week
45 minutes• Safety Reinforced • Recap – Delivery and sweeping
through station circuit drills • Short Games and activities throughout
Page4
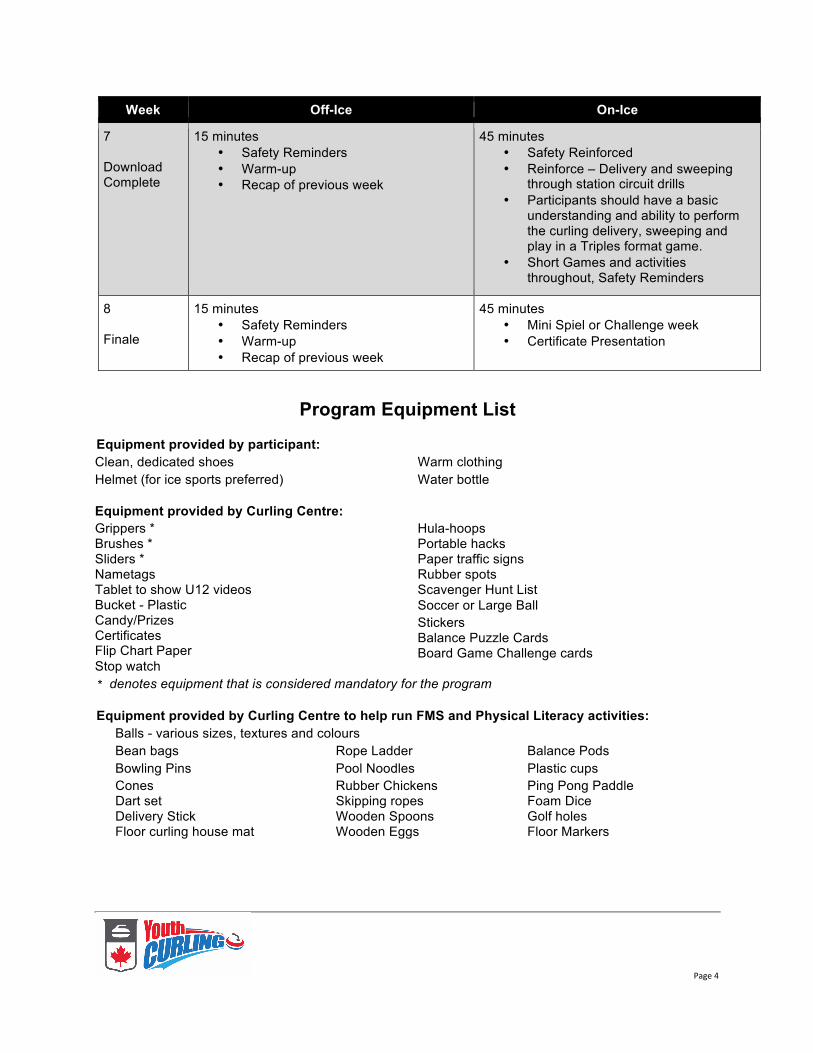
Week Off-Ice On-Ice
7 Download Complete
15 minutes• Safety Reminders • Warm-up • Recap of previous week
45 minutes• Safety Reinforced • Reinforce – Delivery and sweeping
through station circuit drills • Participants should have a basic
understanding and ability to perform the curling delivery, sweeping and play in a Triples format game.
• Short Games and activities throughout, Safety Reminders
8 Finale
15 minutes• Safety Reminders • Warm-up • Recap of previous week
45 minutes• Mini Spiel or Challenge week • Certificate Presentation
Program Equipment List
Equipment provided by participant: Clean, dedicated shoes Helmet (for ice sports preferred)
Warm clothing Water bottle
Equipment provided by Curling Centre: Grippers * Brushes * Sliders * Nametags Tablet to show U12 videos Bucket - Plastic Candy/Prizes Certificates Flip Chart Paper Stop watch
Hula-hoops Portable hacks Paper traffic signs Rubber spots Scavenger Hunt List Soccer or Large Ball Stickers Balance Puzzle Cards Board Game Challenge cards
* denotes equipment that is considered mandatory for the program Equipment provided by Curling Centre to help run FMS and Physical Literacy activities:
Balls - various sizes, textures and colours Bean bags Rope Ladder Balance Pods Bowling Pins Pool Noodles Plastic cups Cones Rubber Chickens Ping Pong Paddle Dart set Skipping ropes Foam Dice Delivery Stick Wooden Spoons Golf holes Floor curling house mat Wooden Eggs Floor Markers
Page5
Curling Canada created 8 videos that you can access online to help with this U12 Learn to Curl program. The videos are shown throughout the program. You can access all of them on our youthcurling.ca website under the Gallery link or on the following YouTube links: 1. Safety - https://youtu.be/UXEorOy-z9k
2. Warm up - https://youtu.be/P3NX-vSRnd4
3. Set up - https://youtu.be/p4gHqQ7stVs
4. Pull Back - https://youtu.be/SmluVvxj0a8
5. Moving Forward - https://youtu.be/G-FhwAzFRbg
6. Release - https://youtu.be/VTzQeZdx0S4
7. Sweeping - https://youtu.be/NtCvpwHyJ2A
8. Putting it All Together - https://youtu.be/Gttg16OJG44
U12 Learn to Curl - Program Curriculum Week 1: READY, SET, GO!
Date: ________________ Time: ______________ # of Participants: _______ # of Sheets: _______
Head Coach/Leader: _________________
Instructors: __________________ _____________________
__________________ _____________________
__________________ _____________________
Goals/Objectives: Welcome, orientation, safety, deliver a stone Equipment Needed:
Note: ensure equipment that comes in contact with the ice surface has been cooled down and/or placed in an out of play area to adjust so as not to damage the playing surface.
Nametags Sliders Grippers Brushes Soccer or Large Ball Cones
Rope ladder Skip rope Balance Puzzle Cards Bowling pins Various size balls
Helmets (participant) see Helmet Policy for more info Tablet to show short video Potential Risk Factors: Injury due to fall
Page6
Pre Activity
Lead Instructor: ___________ Complete Emergency Action Plan (EAP) & Facility Safety Checklist Review Lesson Plan: Ensure Equipment needed is available Prepare Name tags for each participant and have laid out for them when they arrive Select/prepare music playlist (after week 1, have participants give some of their favourite songs) Select warm up and cool down activities Ensure instructors are knowledgeable of responsibilities of each station
Time Allotted
Activities Reference Key Factors
10 minutes Introduction 2 minutes Safety 2 minutes Warm-up 3 x 2 minute stations
1) Orientation and Introduction: Ice Breaker: Call Ball (Group children in a circle and spread out slightly with one person in the middle holding a ball. The middle person tosses the ball high in the air and calls out the name of another person. This child must catch the ball after one bounce and then becomes the middle person.) 2) Safety: I Spy SAFETY (Using traditional I-SPY game, identify different safety items by description. i.e.: I SPY a red cylinder…answer: fire extinguisher) Show Safety video https://youtu.be/UXEorOy-z9k
3) Warm-Up Activities: A - Hopscotch: Using the ladder as the Hopscotch pattern, have the child toss a bean bag into the first square, hop to the square, pick up the bean bag then hop back. Repeat for each child and then move to the next square for another round. B - Hop to the Beat: Listening to a beat (i.e.: music, tambourine or other shaker), children move to the beat. Vary tempo and change movement (i.e.: hop, jump, skip, leap, jog). Freeze when the beat stops. C - Seals in the Sea (Log Roll): Ask children to pretend they are seals rolling in the sea by keeping their arms and shoulders off the mat (floor) as they roll. When they are performing the seal roll, children should try to keep their back straight. D - Dribble Tag: Have children dribble a large ball (soccer) between their feet while playing tag. Variation: If large balls are not available, have children squeeze a ball or balloon between their knees. E - Animal Walks: Ask the children: “Who can show me how a (insert animal) walks? Then have all the children follow. Show the animal walking and then running. Some ideas: Kangaroo, crab, monkey, bear, pony, squirrel.
Ensure curlers feel welcome Ensure everyone has a helmet and is properly attired for cold environment Use a FUN icebreaker to have curlers get to know each other! The warm up is structured into the NCCP Club Coach (Youth); Step, Stretch, and Slide while incorporating the fundamental movement skills to perform the activities. Ensure when selecting the warm activities that the above is covered.
Page7
F - Conga Line: Ask an instructor to be the leader. Have all the children line up and place their hands on the shoulders of the person in front of them. Have the instructor lead them around the ice surface in a fun pattern in a conga line (or large snake). Music playing would up the fun level!
Time Allotted Activities
Reference Key Factors
25 minutes On-ice activities A - 8 minutes then move to next station B - 8 minutes then move to next station C - 8 minutes
A - Curling Delivery Final Slide: Using the Club Coach Youth reference material, introduce the curling delivery Final Slide position and “on your mark” section Activity: Button Bowling - Using a plastic bowling set, set up 10 pins in traditional triangular pattern with the #1 pin on the button. Children will then roll a ball, while keeping their foot in the hack, at the pins. Variations: Widen space between pins and use a curling stone, or perform the curling delivery from a portable hack. B - Introduce the “Get Set” phase of the delivery Activity: Zig Zag Relay - Set up a course using cones or bowling pins and have children zig zag around them. The first person runs the course and returns to tag the next in line. This can be done in pairs or groups. C - Introduce the “GO!” phase of the delivery Activity: Ball Into Bucket Drop - Have children perform the curling delivery to a bucket (bowl or upside down marker cone) placed within the slide path at a distance that you would like to challenge the child (i.e.: back line, 8 foot, t-line, etc.) while holding a ball in their throwing hand. Once the slide is complete they should have their hand above the bucket and can drop the ball straight into the bucket.
Ready Set Go Delivery from NCCP Club Coach Youth
Double Grippers should be used during all activities except during their slide and delivery. During the first week only, the stations will need to be performed in order as the delivery is introduced. You can break up the kids on to different sheets.
15 Minutes On-ice Game
Ice Bowling: Using the traditional curling delivery and have the children play a short game using the bowling pins as targets instead of rock. Place portable hack so that all children are challenged, but will also be successful.
The goal of week one is to have every child deliver a stone.
Page8
Time Allotted Activities
Reference Key Factors
10 minutes Off or On Ice Cool down 3 x 2.5 minute stations Wrap-Up 2 minutes
A – Pathfinder - The children each place a marker (bean bag, cone or bowling pin) around the surface. When directed, the children move (if safe; walk, skip, crab walk) to 5 other markers and return to their marker. Instructor note: change the method of movement each round. B - High Low and to the Side - One partner is designated the catcher and the other the tosser, The tosser throws the ball to various places around the catcher. The catcher must track the ball and adjust the catching position to catch the ball. C - Ball’s Eye - Children stand behind a line (skip rope) that is about 10-15 meters (or suitable to challenge the child’s skill) from the cone with a ball resting on top. Children throw a small ball at the larger ball on the cone to knock it off. Alternate arms. Variation: children can use balls, beanbags or chickens as the small ball. D - Monkey Progression - Divide children into two groups: passers (larger group), and monkeys (about a third of your group). Using the traditional game of Monkey in the Middle, passers will pass the ball to each other while trying to keep the monkeys from catching them. Using cones or markers mark the playing area. Variations: can have a playing area marked that players cannot cross and also for the monkeys. E - Stork Stand - A one-foot balance with the ankle or heel of the non-supporting leg placed against the knee of the support leg. Note: Ensure both legs have been done in equal segments of time, noting that one leg (more dominate) will be easier them than the other. F - Balance Puzzle - Children take a sheet with a series of balance puzzles (not included in tool kit) and see how many they can do. Examples of puzzles are: two feet and two elbows, head, two hands and two feet, bottom, two hands, one knee and one foot, etc. Note: Activity can be done in pairs or groups. Wrap Up
The cool down and wrap up should be a time to lower heart rates and begin to slow the body down. While using activities that promote Fundamental Movement Skills, this can be achieved. Select 3 activities to perform.
Notes for Next Practice:
Page9
U12 Learn to Curl - Program Curriculum
Week 2: SWEEPING PALOOZA
Date: ________________ Time: ______________ # of Participants: _______ # of Sheets: _______
Head Coach/Leader: _________________
Instructors: __________________ _____________________
__________________ _____________________
__________________ _____________________
Goals/Objectives: Safety reminders, Delivery Review, Intro to Sweeping, Equipment Needed:
Note: ensure equipment that comes in contact with the ice surface has been cooled down and/or placed in an out of play area to adjust so as not to damage the playing surface.
Nametags Sliders Grippers Brushes Helmets (participant) see Helmet Policy for more information
Various size balls Rope Ladder Pool Noodle
Bowling Pins Cones/markers Flip Chart Paper Stickers Wooden Spoons Wooden Eggs Rubber Chickens Balance Puzzle Cards
Tablet to show short video
Potential Risk Factors: Injury due to fall
Pre Activity
Lead Instructor: ___________ Complete Emergency Action Plan (EAP) & Facility Safety Checklist Review Lesson Plan: Ensure Equipment needed is available Prepare Name tags for each participant and have laid out for them when they arrive Select/prepare music playlist (after week one have participants give some of their favourite songs) Select warm up and cool down activities Ensure instructors are knowledgeable of responsibilities of each station
Page10
Time Allotted
Activities Reference Key Factors
10 minutes Introduction 2 minutes Warm-up 3 x 2.5 minute stations
1) Introduction - Review Safety: I - Spy 2) Warm-Up Activities: Show the Warm Up video
https://youtu.be/P3NX-vSRnd4
A - Call-Ball: Group children in a circle and spread out slightly with one person in the middle holding a ball. The middle person tosses the ball high in the air and calls out the name of another person. This child must catch the ball after one bounce and then becomes the middle person. Variation: instead of having a middle person, toss the ball to someone after you have called out his or her name. Add 2-3 more balls/chickens to make it fun and entertaining. B - Noodle Duel: Each child will need a partner for this activity. Each partner will have their own noodle piece and stand facing their partner touching their noodle pieces end to end. When the game begins, one partner will count to 3 then say, “go”. Each partner will attempt to touch the other partner’s shoe first. When a shoe has been touched, the partners will get into start position again (end of noodle to end of noodle) and start another round. The game will continue until the instructor stops the activity. C - Animal Walks: Ask the children: “Who can show me how a (insert animal) walks? Then have all the children follow. Show the animal walking and then running. Some ideas: Kangaroo, crab, monkey, bear, pony, squirrel. D - Chicken Tag: Using traditional tag, have the child who is “it” carry a rubber chicken. They must tag the others with the Chicken in order to send them to the chicken coop. Variation: have a person with a Noodle or egg who can free the chickens from the coop. E - Simon Says: Using the traditional SIMON SAYS… have the children from the group take turn (i.e.: three items each) and have them stretch or balance or do any other warm-up or cool down. Example: Simon Says… Touch your toes, reach for the sky, roll over, stomp the ground, etc. F - Wave Runner: Children are in pairs or groups, standing one behind the other at the starting line (first hog line). On a signal, the first person accelerates to the first marker. Once there, the second child can advance. Repeat until all of group has advanced to the marker then move to next marker or return.
Ensure curlers feel welcome. Ensure everyone has a helmet and properly attired for cold environment. The warm up is structured into the NCCP Club Coach (Youth); Step, Stretch, and Slide while incorporating the Fundamental Movement Skills to perform the activities. Ensure when selecting the warm-up activities that the above is covered. The warm-up time has been extended to include transition between activities and on to ice surface.
Page11
Time Allotted
Activities Reference Key Factors
25 minutes On-ice activities 3 x 8 minute stations
A) Ready Set Go Delivery from reference material, review the curling delivery Final Slide position and “on your mark”, “Get Set” and the “GO!” phases of the delivery. CHALLENGE: How far can you Go? Using pins or cones set up measuring points approximately every 2 meters along the side lines. Have the children slide as far as they can. Note: starting point for measuring point can vary pending on the skill level of the children. B) Introduce Sweeping - Stance, Grip and Motion (see NCCP Club Coach Youth, Chapter 4) Activity: Red light - Green Light (while sweeping) While sweeping, use the ping pong paddle as your Red Light (red side) and Green Light (Black side) have the children sweep from hog line to hog line while using the stop and sweep when indicated. C) Introduce Triples format - using the rules from the game outline listed below. Explain to the children the positions and their roles, a brief outline of the rules and scoring. Activity: Short Game: using the hack as base and the nearest house, play a game using the skip to call shots and the thrower delivering a stone without leaving the hack (foot must remain in the hack). No takeouts allowed.
NCCP Club Coach Youth
Keep practicing how to travel on ice. Continually reinforce balance skills. Groups will move through the stations every 8 minutes. Time is built into the session to allow for transition.
Page12
Time Allotted
Activities Reference Key Factors
15 minutes On-ice Game
First End - Triples (remember your colour or #) Modified Triples Rules: 1) The U12 Learn to Curl Triples game will consist of 3 ends using the 5 rock Free Guard Zone rules. 2) Each player will throw two rocks for a total of six rocks per end, per team 3) Lead, Middle and Skip positions will rotate from end to end. All three players will play each position once over the next three weeks. 4) The person who is the designated sweeper for that shot is the only player allowed sweeping the running stone for the duration of the shot. This is to encourage the sweeper to judge on his/her own, have the thrower concentrate on his/her delivery and the person in the house to focus on line calling. All three players will need to learn how to communicate with each other. 5) End 1: Hammer is determined by a coin toss. End 2: Hammer in second end reverses from End 1. End 3: The team with the least amount of points chooses whether they want hammer in End 3. If it is tied, then flip a coin for hammer in End 3. 6) There is no advantage to blanking an end since the hammer switches from end to end:
• Ends 1 and 2 are worth 1 point each • End 3 is worth 2 points. This ensures either
team can win the game entering End 3, which helps create a more meaningful game for both teams.
• If teams are tied in points at the end of End 3, then all three players on both teams will draw to the button to break the tie and scores are added up. The designated sweeper is allowed to sweep. Scoring system for the draw to the button is: 5 (rock is touching the button), 4 (rock is touching the four foot), 3 (rock is touching the eight foot), 2 (rock is touching the twelve foot), 1 (rock is in play but not touching the house), 0 (rock is not in play). Order for throwing: Leads, Middles, Skips (from End 3).
• 7) Coaches are encouraged to be on the ice with their team and can rotate their position around the playing surface.
The Triples game will be carried over a few weeks. Have each child remember their number/colour so that they can rotate through each position. Children will need to be assigned a colour, number or even an animal for their triples position. For example: Skip: Red Group Middle: Blue Group Lead: Yellow Group Record these groups by placing a coloured sticker on child’s nametag or record on flip chart paper. In the following weeks the colour group will play in a different position.
Page13
Time Allotted
Activities Reference Key Factors
10 minutes Off or On Ice Cool down 3 x 2.5 minute stations Wrap-Up 2 minutes
A - Noodle Soup: 2 teams. The students may line up behind the cones facing the center of the game area. Two players will be picked to be the “crazy chefs”. The “crazy chefs” will attempt to protect their noodle soup (cones, bowling pins and other items) from the hungry students by tagging them with their spoons (longer noodle pieces). Each team will have two players at a time attempt to collect the food in the middle (they may only take one piece at a time). If the “crazy chef” hits a hungry student, the student must go back to their team without some food and let another player go. After a few minutes, pick two new “crazy chefs” and continue the game. See how many pieces of soup each team can collect. Option, if the chef tags you, you switch places. B - Hop Scotch: Using the ladder as the Hopscotch pattern have the child toss a beanbag back into the first square, hop to the square, pick up the beanbag then hop back. Repeat for each child and then move to the next square for another round. C - Musical Islands: Using the same rules as Musical Chairs; create Islands by using cones, pods or markers. Have children move around (vary dance, skip, walk, crawl) and stand with a marker when music stops. D - Ball (Egg) and Spoon Relay: In pairs or groups have the children balance a small ball or toy egg on a wooden spoon. Set up distance markers and have the children travel to the marker and return, tagging the next in line. If the ball falls on the ground, the participant will go back to the start line and do the relay again. E - Plank: Have the children lay on their stomach while on the floor with hands flat on the floor at shoulder level and toes on the floor. On the count of 3, have each child push up on their hands to straighten their arms and lift the whole body all the way to the toes off of the floor. Hold for 10 - 30 seconds. F - Balance Puzzle: Children take a sheet with a series of balance puzzles (not included in tool kit) and sees how many they can do. Examples of puzzles are: two feet and two elbows, head, two hands and two feet, bottom, two hands, one knee and one foot, etc. Note: Activity can be done in pairs or groups Wrap Up
The cool down and wrap up should be a time to lower heart rates and begin to slow the body down. While using activities that promote Fundamental Movement Skills this can be achieved. Select 3 activities to perform. Note: During the Plank activity, always make sure that the children are breathing while completing exercises. Holding their breath allows a child to avoid using the crucial core muscles, and lessens oxygen flow throughout the body. A child who continues to hold their breath during exercises may be attempting to perform exercises that are too difficult.
Notes for Next Practice:
Page14
U12 Learn to Curl - Program Curriculum
Week 3: TURN, TURN, TURN
Date: ________________ Time: ______________ # of Participants: _______ # of Sheets: _______
Head Coach/Leader: _________________
Instructors: __________________ _____________________
__________________ _____________________
__________________ _____________________
Goals/Objectives: Safety reminders, Delivery, Sweeping - Detailed Instruction on grips and turns, Equipment Needed:
Note: ensure equipment that comes in contact with the ice surface has been cooled down and/or placed in an out of play area to adjust so as not to damage the playing surface.
Nametags Sliders Grippers Brushes Helmets (participant) see Helmet Policy for more information
Various size balls Plastic cups Pool Noodle
Bowling Pins Cones/markers Skip ropes Golf holes Rubber Chickens Bean bags Pods Paper targets
Tablet to show short video Potential Risk Factors: Injury due to fall
Pre Activity
Lead Instructor: ___________ Complete Emergency Action Plan (EAP) & Facility Safety Checklist Review Lesson Plan: Ensure Equipment needed is available Prepare Name tags for each participant and have laid out for them when they arrive Select/prepare music playlist (have participants give some of their favourite songs) Select warm up and cool down activities Ensure instructors are knowledgeable of responsibilities of each station
Page15
Time Allotted Activities
Reference Key Factors
10 minutes Introduction 2 minutes Warm up 3 x 2.5 minute stations
1) Introduction: Welcome everyone and introduce today’s session. Check attendance and make sure that everyone is ready to start. Play a name game so the kids can get to know each other.
2) Warm-Up Activities: A - Pod Crawl: Use balance pods to create a trail for the children to walk or crawl on. B - Noodle Duel: Each child will need a partner for this activity. Each partner will have their own noodle piece and stand facing their partner touching their noodle pieces end to end. When the game begins, one partner will count to 3 then say, “go”. Each partner will attempt to touch the other partner’s shoe first. When a shoe has been touched, the partners will get into start position again (end of noodle to end of noodle) and start another round. The game will continue until the instructor stops the activity. C - Balance Touch: Have children do the stork stand position with a beanbag, ball or chicken on the floor in front of them. Then, have them reach their elevated foot out to touch the beanbag before resuming the stork position. The aim is to perform the movement without losing balance and without putting weight on the beanbag. D - Shadow Tag: In pairs, one partner is a leader with their “shadow” standing behind them. The leader accelerates and decelerates and the shadow tries to keep constant distance behind the leader. E - Jump the Creek: Stretch out two skipping ropes in a parallel line about 1 metre apart. The distance between the ropes represents the creek. Traveling in single file, each child jumps over the creek. Gradually increase the width of creek. Ask, ”How wide can the creek be before you fall in?” F - Relay Race (on-ice): In pairs or groups have the children walk fast (from hog line to hog line or 12 foot to centre line). After the child has completed the distance they will tag, or using a chicken as a baton and pass it to the next child. Repeat until all children have run the path. Make sure they have grippers on their feet, no sliders.
Ensure curlers feel welcome. Ensure everyone has a helmet and properly attired for cold environment. The warm-up is structured into the NCCP Club Coach (Youth); Step, Stretch, and Slide while incorporating the Fundamental Movement Skills to perform the activities. Ensure when selecting the warm activities that the above is covered. The warm-up time has been extended to include transition between actives and onto ice surface.

Page16
Time Allotted Activities
Reference Key Factors
25 minutes On-ice activities 3 x 8 minute stations
A) Review curling delivery: Show the Set Up video - https://youtu.be/p4gHqQ7stVs
Using the reference material, review the Final Slide position and “on your mark”, “Get Set” and the “GO!” phases of the delivery. CHALLENGE: How many cups can you stack? Line up plastic cups upside down along slide path. Have the child stack the cups while sliding. B) Review Sweeping - Stance, Grip and Motion Activity: Follow the leader: while sweeping, set up obstacles to weave around. C) Introduce Grip and Turns (see NCCP Club Coach Youth Chapter 4)
Ready Set Go Delivery from NCCP Club Coach Youth
Children will rotate through all 3 stations. During drills, reinforce technique needed. Have child work on one thing at a time.
Page17
Time Allotted Activities
Reference Key Factors
15 minutes On-ice Game
Second End - Triples (remember your colour or #) Modified Triples Rules: 1) The U12 Learn to Curl Triples game will consist of 3 ends using the 5 rock Free Guard Zone rules. 2) Each player will throw two rocks for a total of six rocks per end, per team 3) Lead, Middle and Skip positions will rotate from end to end. All three players will play each position once over the next three weeks. 4) The person who is the designated sweeper for that shot is the only player allowed sweeping the running stone for the duration of the shot. This is to encourage the sweeper to judge on his/her own, have the thrower concentrate on his/her delivery and the person in the house to focus on line calling. All three players will need to learn how to communicate with each other. 5) End 1: Hammer is determined by a coin toss. End 2: Hammer in second end reverses from End 1. End 3: The team with the least amount of points chooses whether they want hammer in End 3. If it is tied, then flip a coin for hammer in End 3. 6) There is no advantage to blanking an end since the hammer switches from end to end:
• Ends 1 and 2 are worth 1 point each • End 3 is worth 2 points. This ensures either
team can win the game entering End 3, which helps create a more meaningful game for both teams.
• If teams are tied in points at the end of End 3, then all three players on both teams will draw to the button to break the tie and scores are added up. The designated sweeper is allowed to sweep. Scoring system for the draw to the button is: 5 (rock is touching the button), 4 (rock is touching the four foot), 3 (rock is touching the eight foot), 2 (rock is touching the twelve foot), 1 (rock is in play but not touching the house), 0 (rock is not in play). Order for throwing: Leads, Middles, Skips (from End 3).
7) Coaches are encouraged to be on the ice with their team and can rotate their position around the surface.
The Triples game will be carried over three weeks. Have each child remember their number or colour so that they can rotate through each position. Children should remember which group they were the previous week (red for skip, blue for middle and yellow for lead) and they will now play a different position. Example: Blue goes to skip Yellow goes to middle Red goes to lead
Page18
Time Allotted Activities
Reference Key Factors
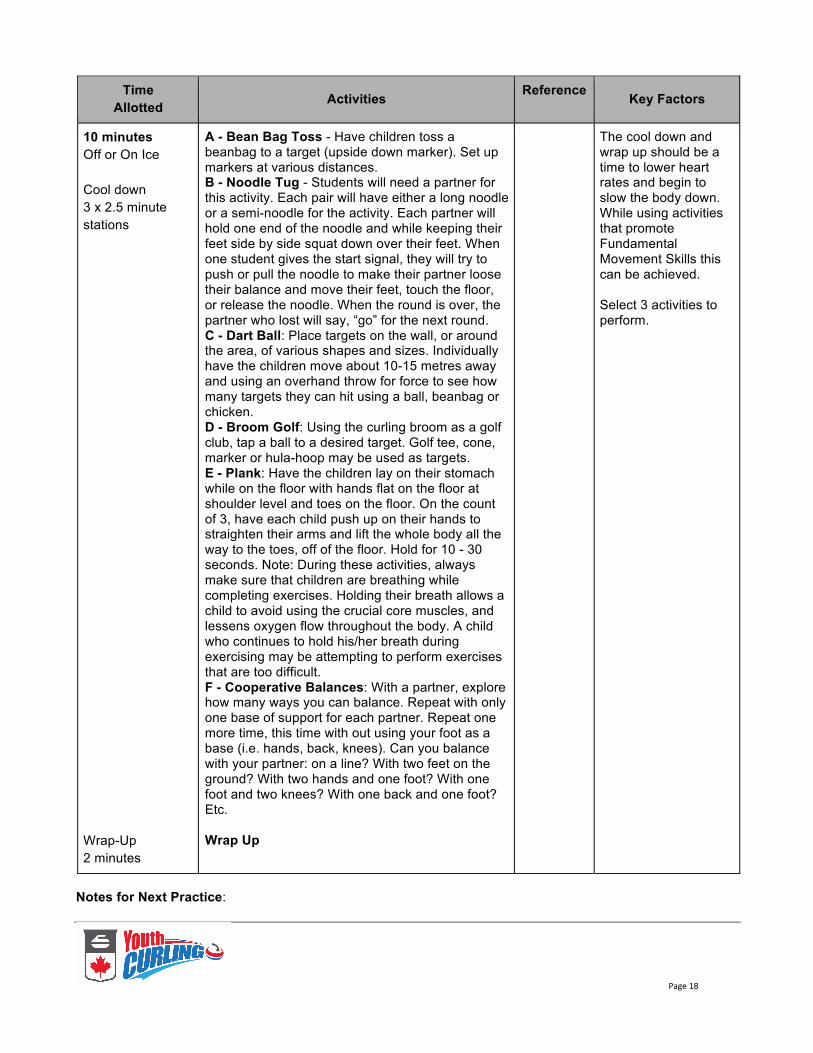
10 minutes Off or On Ice Cool down 3 x 2.5 minute stations Wrap-Up 2 minutes
A - Bean Bag Toss - Have children toss a beanbag to a target (upside down marker). Set up markers at various distances. B - Noodle Tug - Students will need a partner for this activity. Each pair will have either a long noodle or a semi-noodle for the activity. Each partner will hold one end of the noodle and while keeping their feet side by side squat down over their feet. When one student gives the start signal, they will try to push or pull the noodle to make their partner loose their balance and move their feet, touch the floor, or release the noodle. When the round is over, the partner who lost will say, “go” for the next round. C - Dart Ball: Place targets on the wall, or around the area, of various shapes and sizes. Individually have the children move about 10-15 metres away and using an overhand throw for force to see how many targets they can hit using a ball, beanbag or chicken. D - Broom Golf: Using the curling broom as a golf club, tap a ball to a desired target. Golf tee, cone, marker or hula-hoop may be used as targets. E - Plank: Have the children lay on their stomach while on the floor with hands flat on the floor at shoulder level and toes on the floor. On the count of 3, have each child push up on their hands to straighten their arms and lift the whole body all the way to the toes, off of the floor. Hold for 10 - 30 seconds. Note: During these activities, always make sure that children are breathing while completing exercises. Holding their breath allows a child to avoid using the crucial core muscles, and lessens oxygen flow throughout the body. A child who continues to hold his/her breath during exercising may be attempting to perform exercises that are too difficult. F - Cooperative Balances: With a partner, explore how many ways you can balance. Repeat with only one base of support for each partner. Repeat one more time, this time with out using your foot as a base (i.e. hands, back, knees). Can you balance with your partner: on a line? With two feet on the ground? With two hands and one foot? With one foot and two knees? With one back and one foot? Etc. Wrap Up
The cool down and wrap up should be a time to lower heart rates and begin to slow the body down. While using activities that promote Fundamental Movement Skills this can be achieved. Select 3 activities to perform.
Notes for Next Practice:
Page19
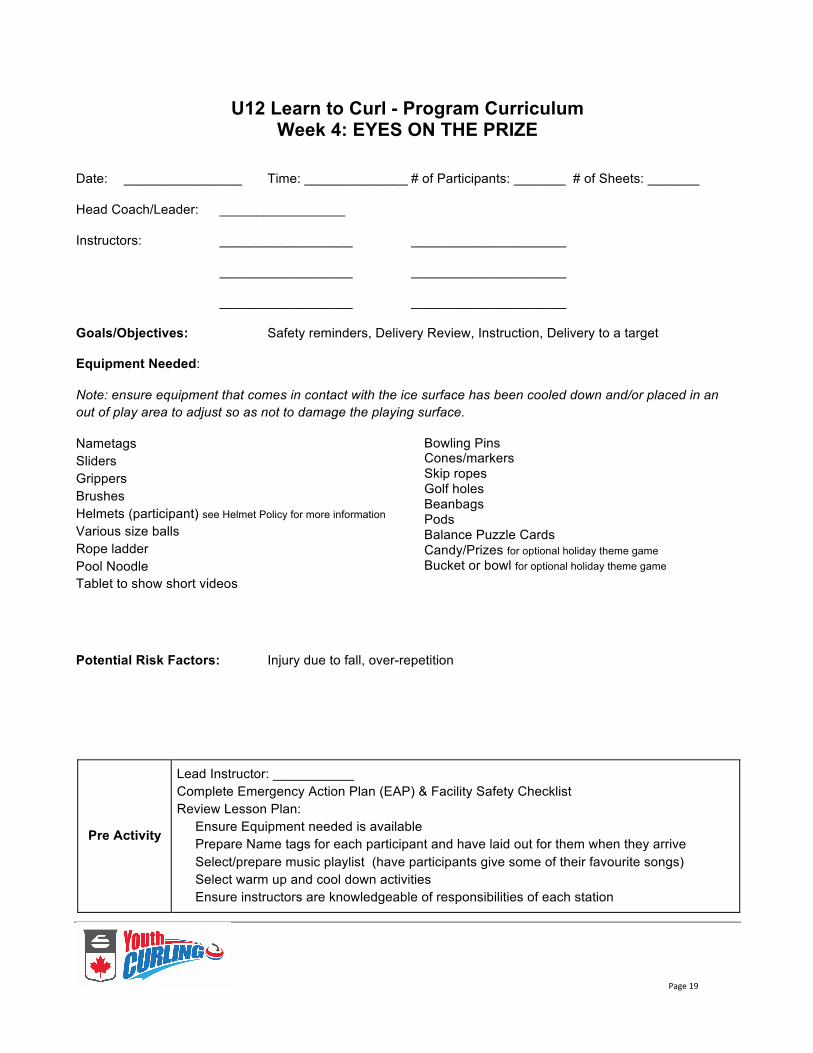
U12 Learn to Curl - Program Curriculum
Week 4: EYES ON THE PRIZE
Date: ________________ Time: ______________ # of Participants: _______ # of Sheets: _______
Head Coach/Leader: _________________
Instructors: __________________ _____________________
__________________ _____________________
__________________ _____________________
Goals/Objectives: Safety reminders, Delivery Review, Instruction, Delivery to a target Equipment Needed:
Note: ensure equipment that comes in contact with the ice surface has been cooled down and/or placed in an out of play area to adjust so as not to damage the playing surface.
Nametags Sliders Grippers Brushes Helmets (participant) see Helmet Policy for more information
Various size balls Rope ladder Pool Noodle Tablet to show short videos
Bowling Pins Cones/markers Skip ropes Golf holes Beanbags Pods Balance Puzzle Cards Candy/Prizes for optional holiday theme game Bucket or bowl for optional holiday theme game
Potential Risk Factors: Injury due to fall, over-repetition
Pre Activity
Lead Instructor: ___________ Complete Emergency Action Plan (EAP) & Facility Safety Checklist Review Lesson Plan: Ensure Equipment needed is available Prepare Name tags for each participant and have laid out for them when they arrive Select/prepare music playlist (have participants give some of their favourite songs) Select warm up and cool down activities Ensure instructors are knowledgeable of responsibilities of each station
Page20
Time Allotted Activities
Reference Key Factors
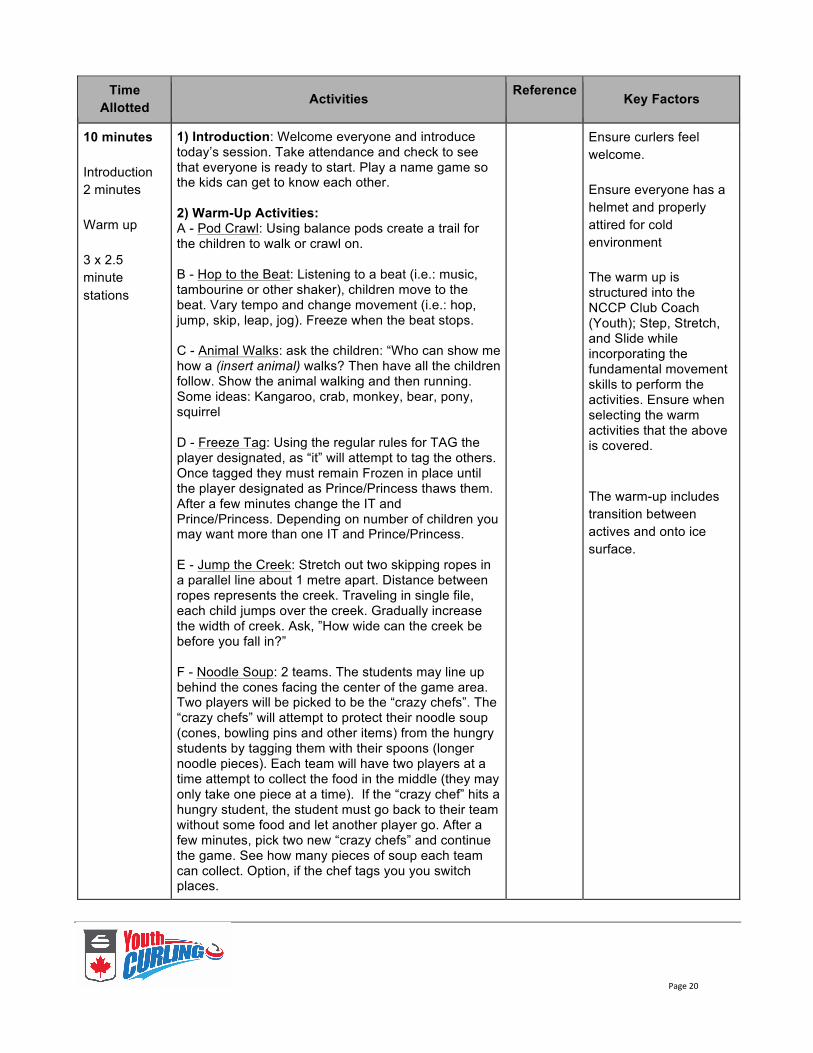
10 minutes Introduction 2 minutes Warm up 3 x 2.5 minute stations
1) Introduction: Welcome everyone and introduce today’s session. Take attendance and check to see that everyone is ready to start. Play a name game so the kids can get to know each other. 2) Warm-Up Activities: A - Pod Crawl: Using balance pods create a trail for the children to walk or crawl on. B - Hop to the Beat: Listening to a beat (i.e.: music, tambourine or other shaker), children move to the beat. Vary tempo and change movement (i.e.: hop, jump, skip, leap, jog). Freeze when the beat stops. C - Animal Walks: ask the children: “Who can show me how a (insert animal) walks? Then have all the children follow. Show the animal walking and then running. Some ideas: Kangaroo, crab, monkey, bear, pony, squirrel D - Freeze Tag: Using the regular rules for TAG the player designated, as “it” will attempt to tag the others. Once tagged they must remain Frozen in place until the player designated as Prince/Princess thaws them. After a few minutes change the IT and Prince/Princess. Depending on number of children you may want more than one IT and Prince/Princess. E - Jump the Creek: Stretch out two skipping ropes in a parallel line about 1 metre apart. Distance between ropes represents the creek. Traveling in single file, each child jumps over the creek. Gradually increase the width of creek. Ask, ”How wide can the creek be before you fall in?” F - Noodle Soup: 2 teams. The students may line up behind the cones facing the center of the game area. Two players will be picked to be the “crazy chefs”. The “crazy chefs” will attempt to protect their noodle soup (cones, bowling pins and other items) from the hungry students by tagging them with their spoons (longer noodle pieces). Each team will have two players at a time attempt to collect the food in the middle (they may only take one piece at a time). If the “crazy chef” hits a hungry student, the student must go back to their team without some food and let another player go. After a few minutes, pick two new “crazy chefs” and continue the game. See how many pieces of soup each team can collect. Option, if the chef tags you you switch places.
Ensure curlers feel welcome. Ensure everyone has a helmet and properly attired for cold environment The warm up is structured into the NCCP Club Coach (Youth); Step, Stretch, and Slide while incorporating the fundamental movement skills to perform the activities. Ensure when selecting the warm activities that the above is covered. The warm-up includes transition between actives and onto ice surface.

Page21
Time Allotted Activities
Reference Key Factors
25 minutes On-ice activities 3 x 8 minute stations
A) Review the curling delivery Show the videos for Pull Back https://youtu.be/SmluVvxj0a8
and Moving Forward https://youtu.be/G-FhwAzFRbg
Use the reference Club Coach Youth Final Slide position and “on your mark”, “Get Set” and the “GO!” phases of the delivery. CHALLENGE: Can you slide through the tunnel? Set up cones or bowling pins along each side of the slide path and have each child slide through the centre trying not to knock any down. B) Review Grip and Turns (see NCCP Club Coach Youth, Chapter 4) Activity: Rock Toss - Have partners practice their rotation by pushing rocks back and forth across the width of the sheet to their partner. Have the partner indicate the rotation as a skip would with one hand elevated to indicate the turn. C) Draw to the Button competition: during the draw to the button, use the time to instruct the children on direction of curl and weight judgment during sweeping. Use the Triples team format so that they can challenge each other. Optional Activity: Slide to a bowl with a prize (this is the midway portion of the session and it may coincide with Halloween or Valentine’s Day themed games and prizes).
Ready Set Go Delivery from NCCP Club Coach Youth
Have children rotate through the main portion of 3 stations. During drills, reinforce technique where needed. Have children work on one thing at a time.
Page22
Time Allotted Activities
Reference Key Factors
15 Minutes On-ice Game
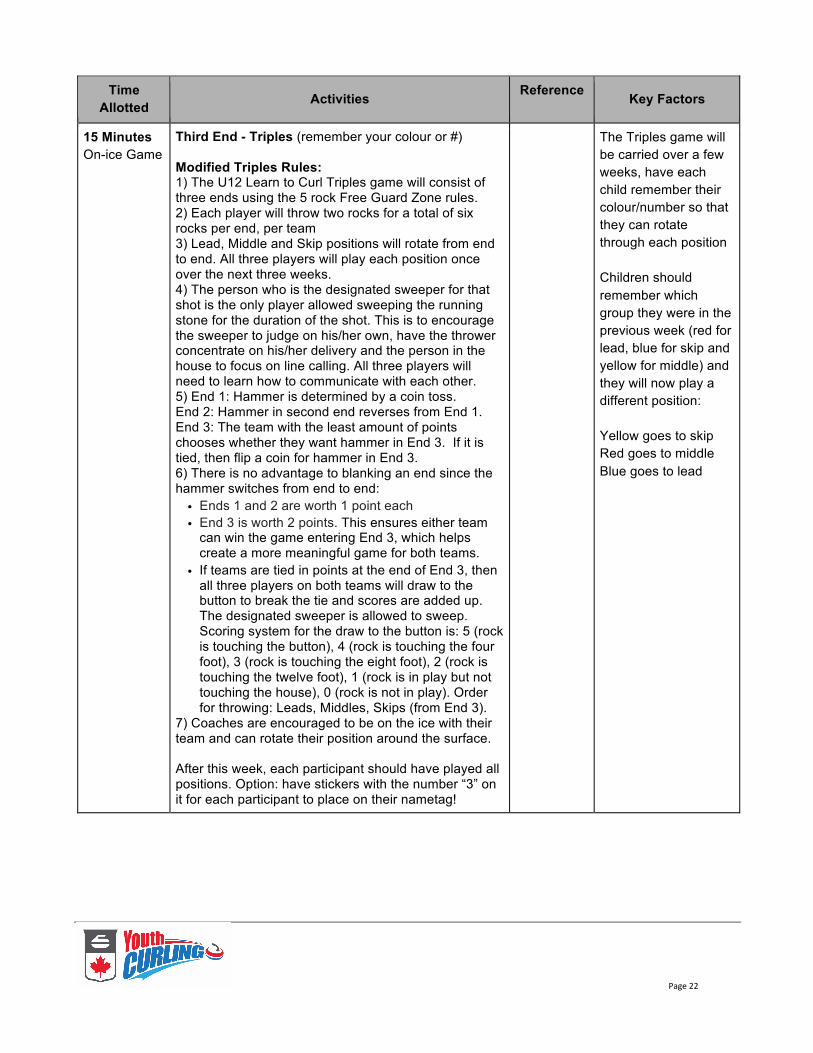
Third End - Triples (remember your colour or #) Modified Triples Rules: 1) The U12 Learn to Curl Triples game will consist of three ends using the 5 rock Free Guard Zone rules. 2) Each player will throw two rocks for a total of six rocks per end, per team 3) Lead, Middle and Skip positions will rotate from end to end. All three players will play each position once over the next three weeks. 4) The person who is the designated sweeper for that shot is the only player allowed sweeping the running stone for the duration of the shot. This is to encourage the sweeper to judge on his/her own, have the thrower concentrate on his/her delivery and the person in the house to focus on line calling. All three players will need to learn how to communicate with each other. 5) End 1: Hammer is determined by a coin toss. End 2: Hammer in second end reverses from End 1. End 3: The team with the least amount of points chooses whether they want hammer in End 3. If it is tied, then flip a coin for hammer in End 3. 6) There is no advantage to blanking an end since the hammer switches from end to end:
• Ends 1 and 2 are worth 1 point each • End 3 is worth 2 points. This ensures either team
can win the game entering End 3, which helps create a more meaningful game for both teams.
• If teams are tied in points at the end of End 3, then all three players on both teams will draw to the button to break the tie and scores are added up. The designated sweeper is allowed to sweep. Scoring system for the draw to the button is: 5 (rock is touching the button), 4 (rock is touching the four foot), 3 (rock is touching the eight foot), 2 (rock is touching the twelve foot), 1 (rock is in play but not touching the house), 0 (rock is not in play). Order for throwing: Leads, Middles, Skips (from End 3).
7) Coaches are encouraged to be on the ice with their team and can rotate their position around the surface. After this week, each participant should have played all positions. Option: have stickers with the number “3” on it for each participant to place on their nametag!
The Triples game will be carried over a few weeks, have each child remember their colour/number so that they can rotate through each position Children should remember which group they were in the previous week (red for lead, blue for skip and yellow for middle) and they will now play a different position: Yellow goes to skip Red goes to middle Blue goes to lead
Page23
Time Allotted Activities
Reference Key Factors
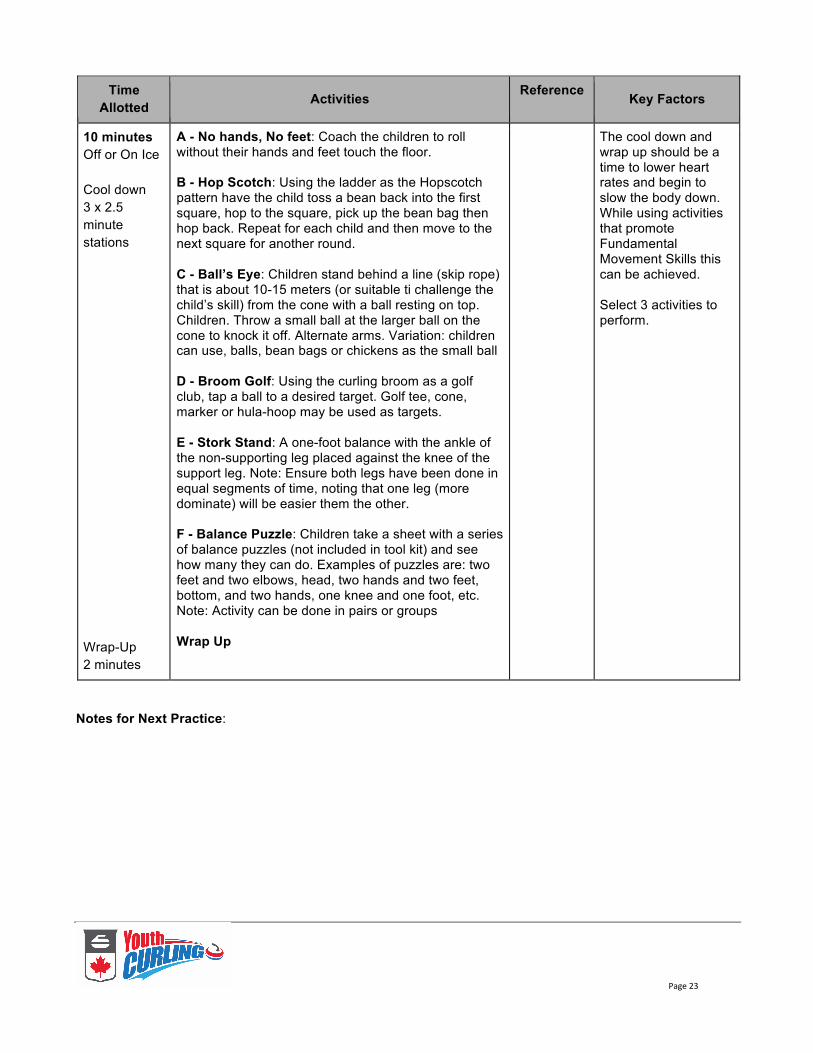
10 minutes Off or On Ice Cool down 3 x 2.5 minute stations Wrap-Up 2 minutes
A - No hands, No feet: Coach the children to roll without their hands and feet touch the floor. B - Hop Scotch: Using the ladder as the Hopscotch pattern have the child toss a bean back into the first square, hop to the square, pick up the bean bag then hop back. Repeat for each child and then move to the next square for another round. C - Ball’s Eye: Children stand behind a line (skip rope) that is about 10-15 meters (or suitable ti challenge the child’s skill) from the cone with a ball resting on top. Children. Throw a small ball at the larger ball on the cone to knock it off. Alternate arms. Variation: children can use, balls, bean bags or chickens as the small ball D - Broom Golf: Using the curling broom as a golf club, tap a ball to a desired target. Golf tee, cone, marker or hula-hoop may be used as targets. E - Stork Stand: A one-foot balance with the ankle of the non-supporting leg placed against the knee of the support leg. Note: Ensure both legs have been done in equal segments of time, noting that one leg (more dominate) will be easier them the other. F - Balance Puzzle: Children take a sheet with a series of balance puzzles (not included in tool kit) and see how many they can do. Examples of puzzles are: two feet and two elbows, head, two hands and two feet, bottom, and two hands, one knee and one foot, etc. Note: Activity can be done in pairs or groups Wrap Up
The cool down and wrap up should be a time to lower heart rates and begin to slow the body down. While using activities that promote Fundamental Movement Skills this can be achieved. Select 3 activities to perform.
Notes for Next Practice:
Page24
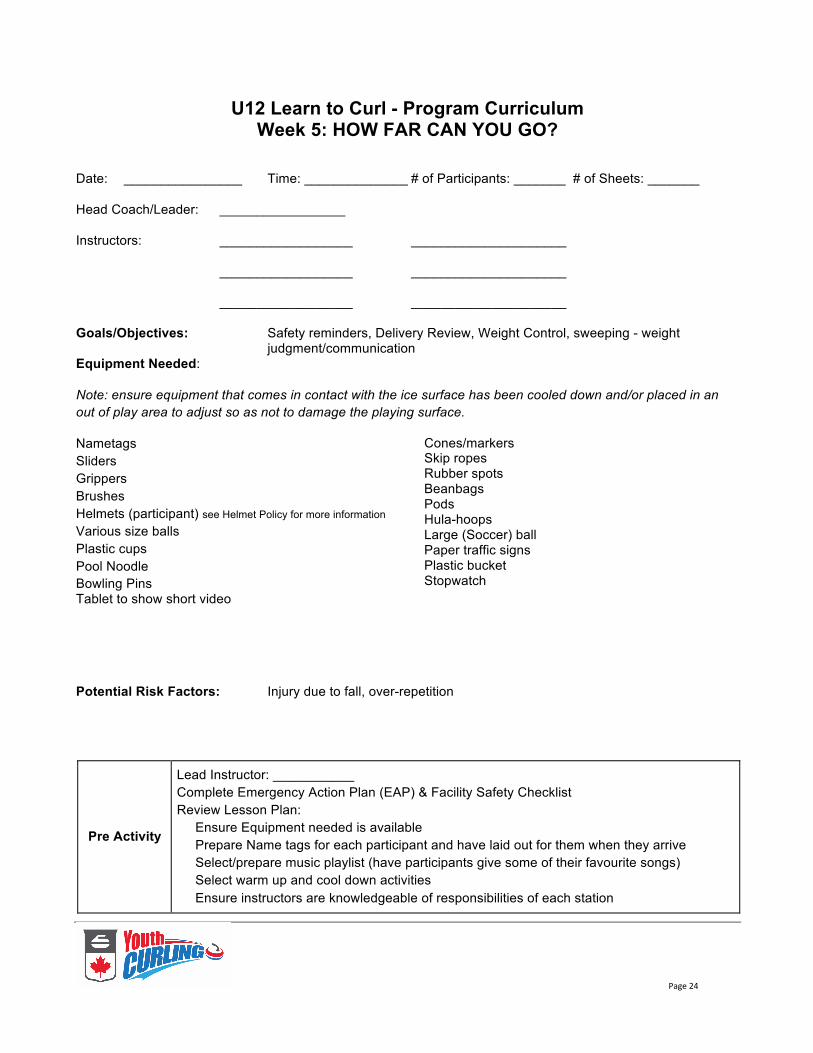
U12 Learn to Curl - Program Curriculum
Week 5: HOW FAR CAN YOU GO?
Date: ________________ Time: ______________ # of Participants: _______ # of Sheets: _______
Head Coach/Leader: _________________
Instructors: __________________ _____________________
__________________ _____________________
__________________ _____________________
Goals/Objectives: Safety reminders, Delivery Review, Weight Control, sweeping - weight judgment/communication Equipment Needed:
Note: ensure equipment that comes in contact with the ice surface has been cooled down and/or placed in an out of play area to adjust so as not to damage the playing surface.
Nametags Sliders Grippers Brushes Helmets (participant) see Helmet Policy for more information
Various size balls Plastic cups Pool Noodle Bowling Pins Tablet to show short video
Cones/markers Skip ropes Rubber spots Beanbags Pods Hula-hoops Large (Soccer) ball Paper traffic signs Plastic bucket Stopwatch
Potential Risk Factors: Injury due to fall, over-repetition
Pre Activity
Lead Instructor: ___________ Complete Emergency Action Plan (EAP) & Facility Safety Checklist Review Lesson Plan: Ensure Equipment needed is available Prepare Name tags for each participant and have laid out for them when they arrive Select/prepare music playlist (have participants give some of their favourite songs) Select warm up and cool down activities Ensure instructors are knowledgeable of responsibilities of each station
Page25
Time Allotted Activities
Reference Key Factors
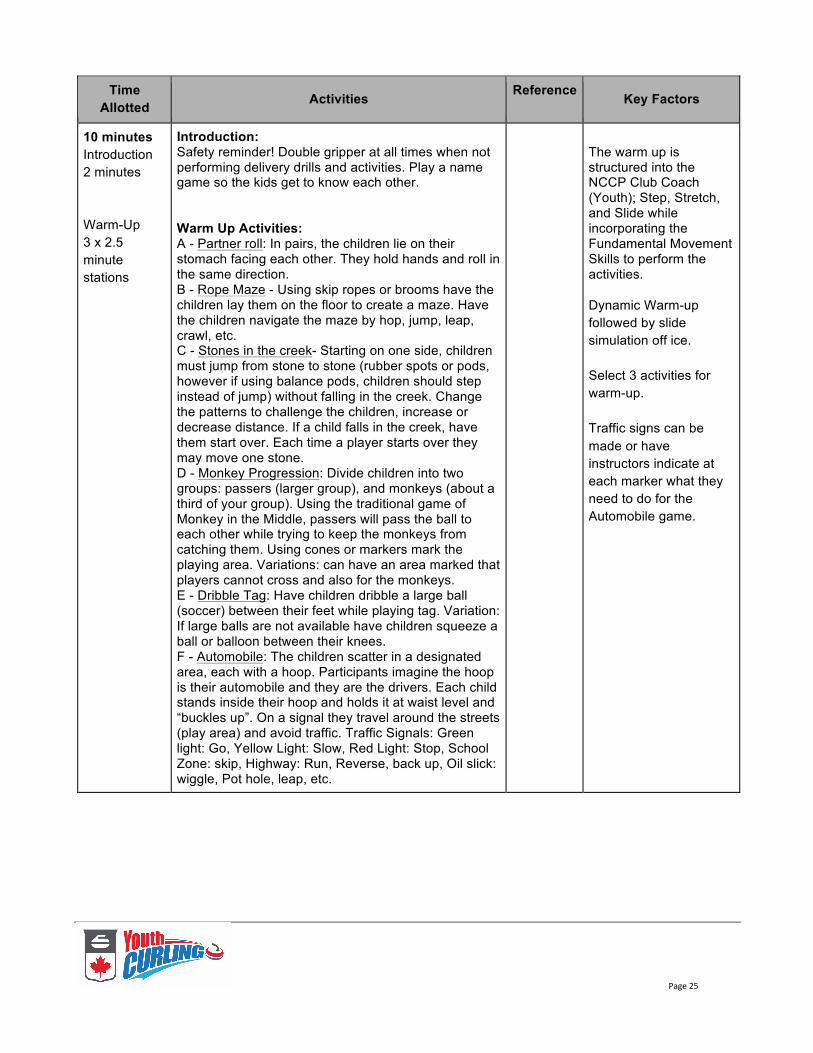
10 minutes Introduction 2 minutes Warm-Up 3 x 2.5 minute stations
Introduction: Safety reminder! Double gripper at all times when not performing delivery drills and activities. Play a name game so the kids get to know each other. Warm Up Activities: A - Partner roll: In pairs, the children lie on their stomach facing each other. They hold hands and roll in the same direction. B - Rope Maze - Using skip ropes or brooms have the children lay them on the floor to create a maze. Have the children navigate the maze by hop, jump, leap, crawl, etc. C - Stones in the creek- Starting on one side, children must jump from stone to stone (rubber spots or pods, however if using balance pods, children should step instead of jump) without falling in the creek. Change the patterns to challenge the children, increase or decrease distance. If a child falls in the creek, have them start over. Each time a player starts over they may move one stone. D - Monkey Progression: Divide children into two groups: passers (larger group), and monkeys (about a third of your group). Using the traditional game of Monkey in the Middle, passers will pass the ball to each other while trying to keep the monkeys from catching them. Using cones or markers mark the playing area. Variations: can have an area marked that players cannot cross and also for the monkeys. E - Dribble Tag: Have children dribble a large ball (soccer) between their feet while playing tag. Variation: If large balls are not available have children squeeze a ball or balloon between their knees. F - Automobile: The children scatter in a designated area, each with a hoop. Participants imagine the hoop is their automobile and they are the drivers. Each child stands inside their hoop and holds it at waist level and “buckles up”. On a signal they travel around the streets (play area) and avoid traffic. Traffic Signals: Green light: Go, Yellow Light: Slow, Red Light: Stop, School Zone: skip, Highway: Run, Reverse, back up, Oil slick: wiggle, Pot hole, leap, etc.
The warm up is structured into the NCCP Club Coach (Youth); Step, Stretch, and Slide while incorporating the Fundamental Movement Skills to perform the activities. Dynamic Warm-up followed by slide simulation off ice. Select 3 activities for warm-up. Traffic signs can be made or have instructors indicate at each marker what they need to do for the Automobile game.
Page26
Time Allotted Activities
Reference Key Factors
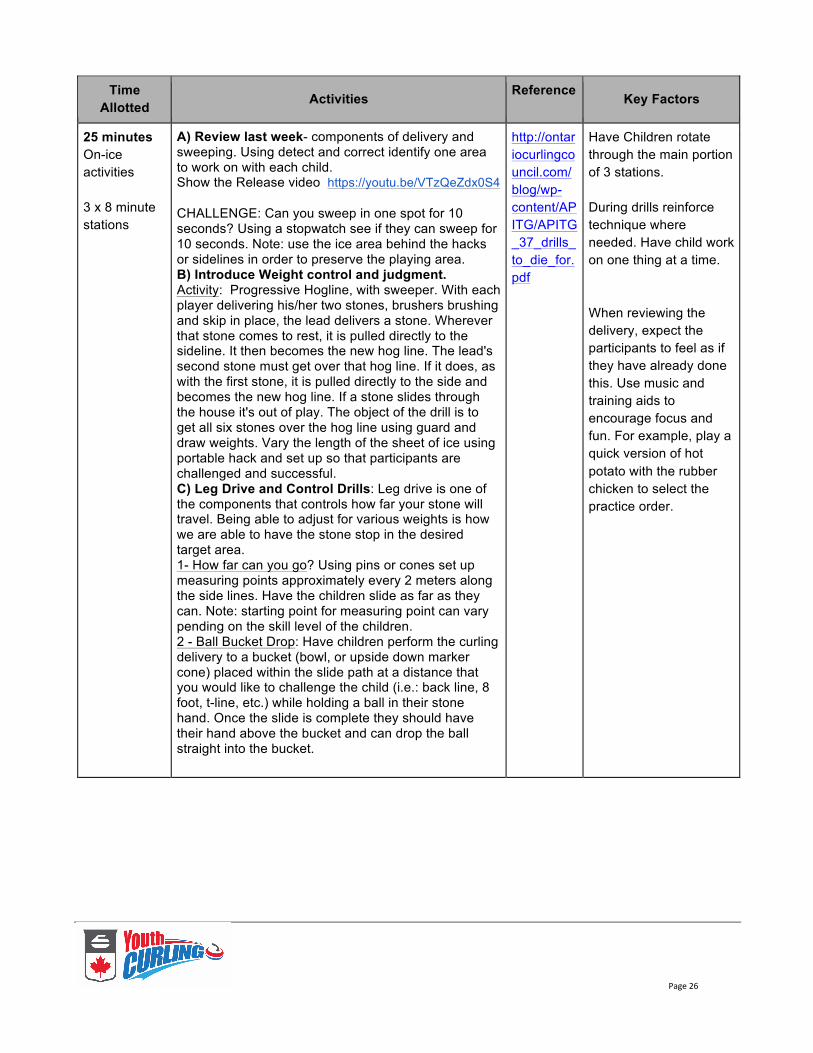
25 minutes On-ice activities 3 x 8 minute stations
A) Review last week- components of delivery and sweeping. Using detect and correct identify one area to work on with each child. Show the Release video https://youtu.be/VTzQeZdx0S4
CHALLENGE: Can you sweep in one spot for 10 seconds? Using a stopwatch see if they can sweep for 10 seconds. Note: use the ice area behind the hacks or sidelines in order to preserve the playing area. B) Introduce Weight control and judgment. Activity: Progressive Hogline, with sweeper. With each player delivering his/her two stones, brushers brushing and skip in place, the lead delivers a stone. Wherever that stone comes to rest, it is pulled directly to the sideline. It then becomes the new hog line. The lead's second stone must get over that hog line. If it does, as with the first stone, it is pulled directly to the side and becomes the new hog line. If a stone slides through the house it's out of play. The object of the drill is to get all six stones over the hog line using guard and draw weights. Vary the length of the sheet of ice using portable hack and set up so that participants are challenged and successful. C) Leg Drive and Control Drills: Leg drive is one of the components that controls how far your stone will travel. Being able to adjust for various weights is how we are able to have the stone stop in the desired target area. 1- How far can you go? Using pins or cones set up measuring points approximately every 2 meters along the side lines. Have the children slide as far as they can. Note: starting point for measuring point can vary pending on the skill level of the children. 2 - Ball Bucket Drop: Have children perform the curling delivery to a bucket (bowl, or upside down marker cone) placed within the slide path at a distance that you would like to challenge the child (i.e.: back line, 8 foot, t-line, etc.) while holding a ball in their stone hand. Once the slide is complete they should have their hand above the bucket and can drop the ball straight into the bucket.
http://ontariocurlingcouncil.com/blog/wp-content/APITG/APITG_37_drills_to_die_for.pdf
Have Children rotate through the main portion of 3 stations. During drills reinforce technique where needed. Have child work on one thing at a time. When reviewing the delivery, expect the participants to feel as if they have already done this. Use music and training aids to encourage focus and fun. For example, play a quick version of hot potato with the rubber chicken to select the practice order.
Page27
Time Allotted Activities
Reference Key Factors
15 minutes On-ice Game
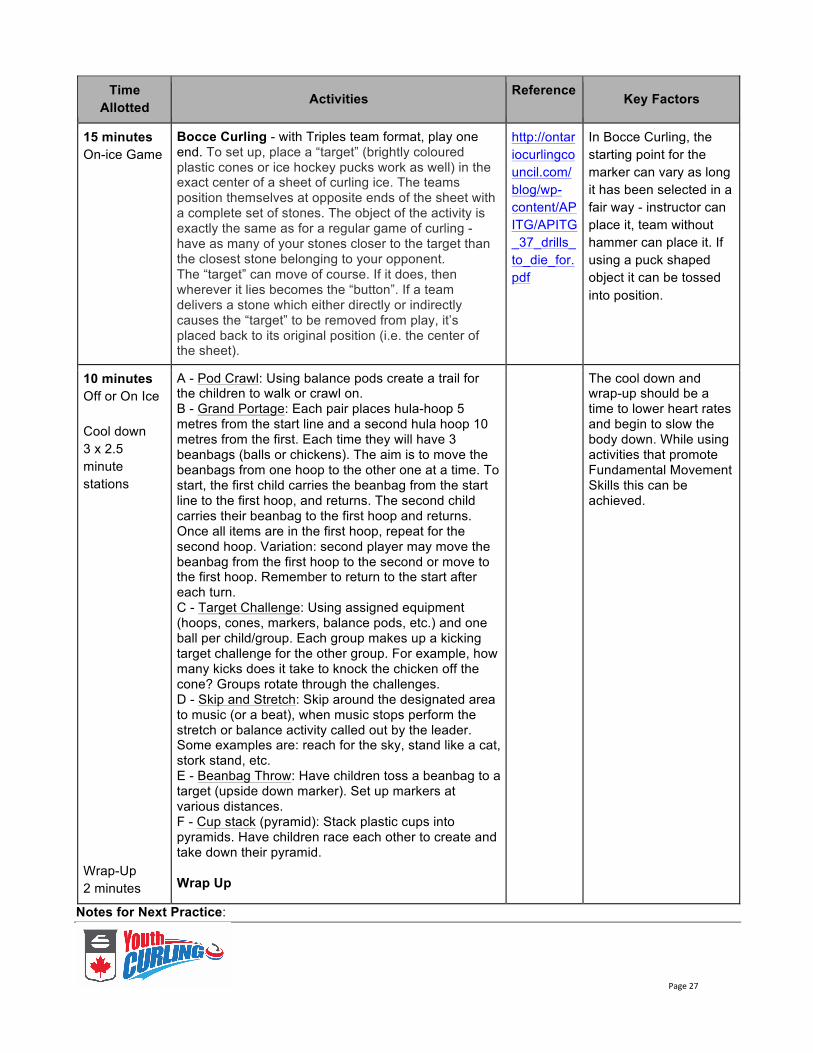
Bocce Curling - with Triples team format, play one end. To set up, place a “target” (brightly coloured plastic cones or ice hockey pucks work as well) in the exact center of a sheet of curling ice. The teams position themselves at opposite ends of the sheet with a complete set of stones. The object of the activity is exactly the same as for a regular game of curling - have as many of your stones closer to the target than the closest stone belonging to your opponent. The “target” can move of course. If it does, then wherever it lies becomes the “button”. If a team delivers a stone which either directly or indirectly causes the “target” to be removed from play, it’s placed back to its original position (i.e. the center of the sheet).
http://ontariocurlingcouncil.com/blog/wp-content/APITG/APITG_37_drills_to_die_for.pdf
In Bocce Curling, the starting point for the marker can vary as long it has been selected in a fair way - instructor can place it, team without hammer can place it. If using a puck shaped object it can be tossed into position.
10 minutes Off or On Ice Cool down 3 x 2.5 minute stations Wrap-Up 2 minutes
A - Pod Crawl: Using balance pods create a trail for the children to walk or crawl on. B - Grand Portage: Each pair places hula-hoop 5 metres from the start line and a second hula hoop 10 metres from the first. Each time they will have 3 beanbags (balls or chickens). The aim is to move the beanbags from one hoop to the other one at a time. To start, the first child carries the beanbag from the start line to the first hoop, and returns. The second child carries their beanbag to the first hoop and returns. Once all items are in the first hoop, repeat for the second hoop. Variation: second player may move the beanbag from the first hoop to the second or move to the first hoop. Remember to return to the start after each turn. C - Target Challenge: Using assigned equipment (hoops, cones, markers, balance pods, etc.) and one ball per child/group. Each group makes up a kicking target challenge for the other group. For example, how many kicks does it take to knock the chicken off the cone? Groups rotate through the challenges. D - Skip and Stretch: Skip around the designated area to music (or a beat), when music stops perform the stretch or balance activity called out by the leader. Some examples are: reach for the sky, stand like a cat, stork stand, etc. E - Beanbag Throw: Have children toss a beanbag to a target (upside down marker). Set up markers at various distances. F - Cup stack (pyramid): Stack plastic cups into pyramids. Have children race each other to create and take down their pyramid. Wrap Up
The cool down and wrap-up should be a time to lower heart rates and begin to slow the body down. While using activities that promote Fundamental Movement Skills this can be achieved.
Notes for Next Practice:
Page28
U12 Learn to Curl - Program Curriculum
Week 6: HURRY HARD
Date: ________________ Time: ______________ # of Participants: _______ # of Sheets: _______
Head Coach/Leader: _________________
Instructors: __________________ _____________________
__________________ _____________________
__________________ _____________________
Goals/Objectives: Safety reminders, Delivery Practice, Introduce leg drive and weight control Equipment Needed:
Note: ensure equipment that comes in contact with the ice surface has been cooled down and/or placed in an out of play area to adjust so as not to damage the playing surface.
Nametags Sliders Grippers Brushes Helmets (participant) see Helmet Policy for more information
Various size balls Wooden Spoon Tablet to show short video
Wooden Egg Bowling Pins Cones/markers Skip ropes Beanbags Foam Dice Hula-hoops Balance Puzzle cards
Potential Risk Factors: Injury due to fall, over-repetition
Pre Activity
Lead Instructor: ___________ Complete Emergency Action Plan (EAP) & Facility Safety Checklist Review Lesson Plan: Ensure Equipment needed is available Prepare Nametags for each participant and have laid out for them when they arrive Select/prepare music playlist (have participants give some of their favourite songs) Select warm up and cool down activities Ensure instructors are knowledgeable of responsibilities of each station
Page29
Time Allotted Activities
Reference Key Factors
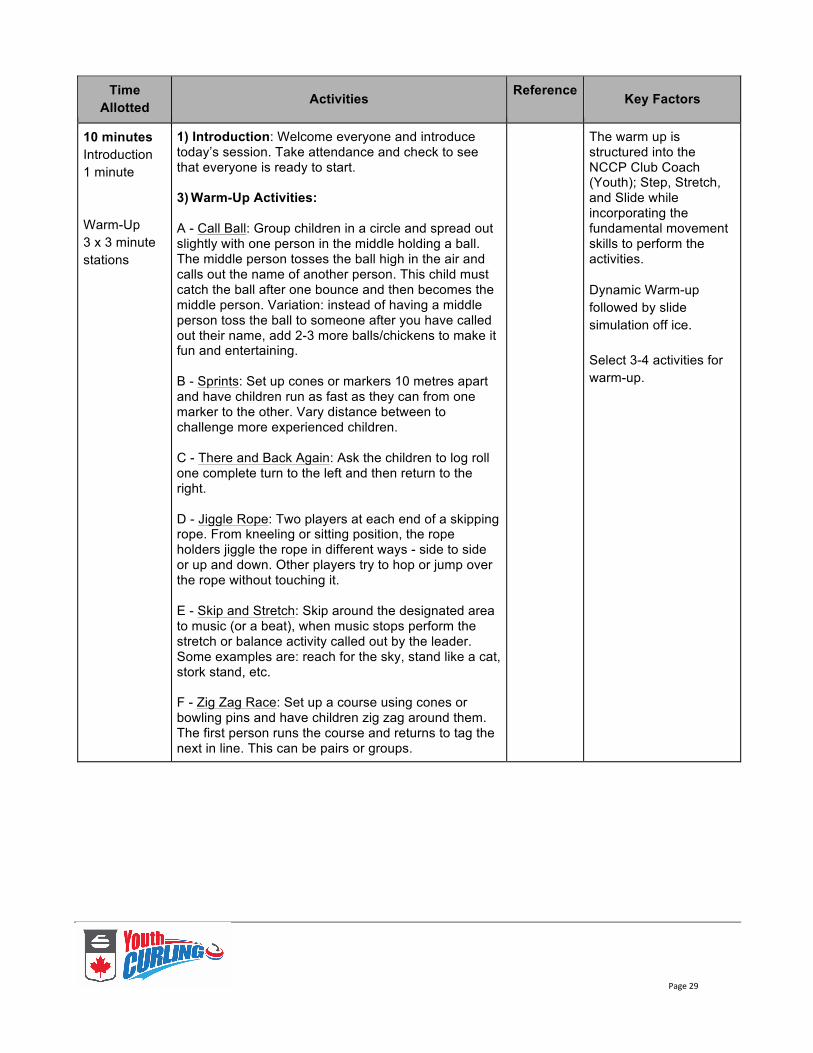
10 minutes Introduction 1 minute Warm-Up 3 x 3 minute stations
1) Introduction: Welcome everyone and introduce today’s session. Take attendance and check to see that everyone is ready to start. 3) Warm-Up Activities:
A - Call Ball: Group children in a circle and spread out slightly with one person in the middle holding a ball. The middle person tosses the ball high in the air and calls out the name of another person. This child must catch the ball after one bounce and then becomes the middle person. Variation: instead of having a middle person toss the ball to someone after you have called out their name, add 2-3 more balls/chickens to make it fun and entertaining. B - Sprints: Set up cones or markers 10 metres apart and have children run as fast as they can from one marker to the other. Vary distance between to challenge more experienced children. C - There and Back Again: Ask the children to log roll one complete turn to the left and then return to the right. D - Jiggle Rope: Two players at each end of a skipping rope. From kneeling or sitting position, the rope holders jiggle the rope in different ways - side to side or up and down. Other players try to hop or jump over the rope without touching it. E - Skip and Stretch: Skip around the designated area to music (or a beat), when music stops perform the stretch or balance activity called out by the leader. Some examples are: reach for the sky, stand like a cat, stork stand, etc. F - Zig Zag Race: Set up a course using cones or bowling pins and have children zig zag around them. The first person runs the course and returns to tag the next in line. This can be pairs or groups.
The warm up is structured into the NCCP Club Coach (Youth); Step, Stretch, and Slide while incorporating the fundamental movement skills to perform the activities. Dynamic Warm-up followed by slide simulation off ice. Select 3-4 activities for warm-up.
Page30
Time Allotted Activities
Reference Key Factors
25 minutes On-ice activities Section A: 5 minutes Section B: station games 3.5 minutes per station with 30 seconds to reset included
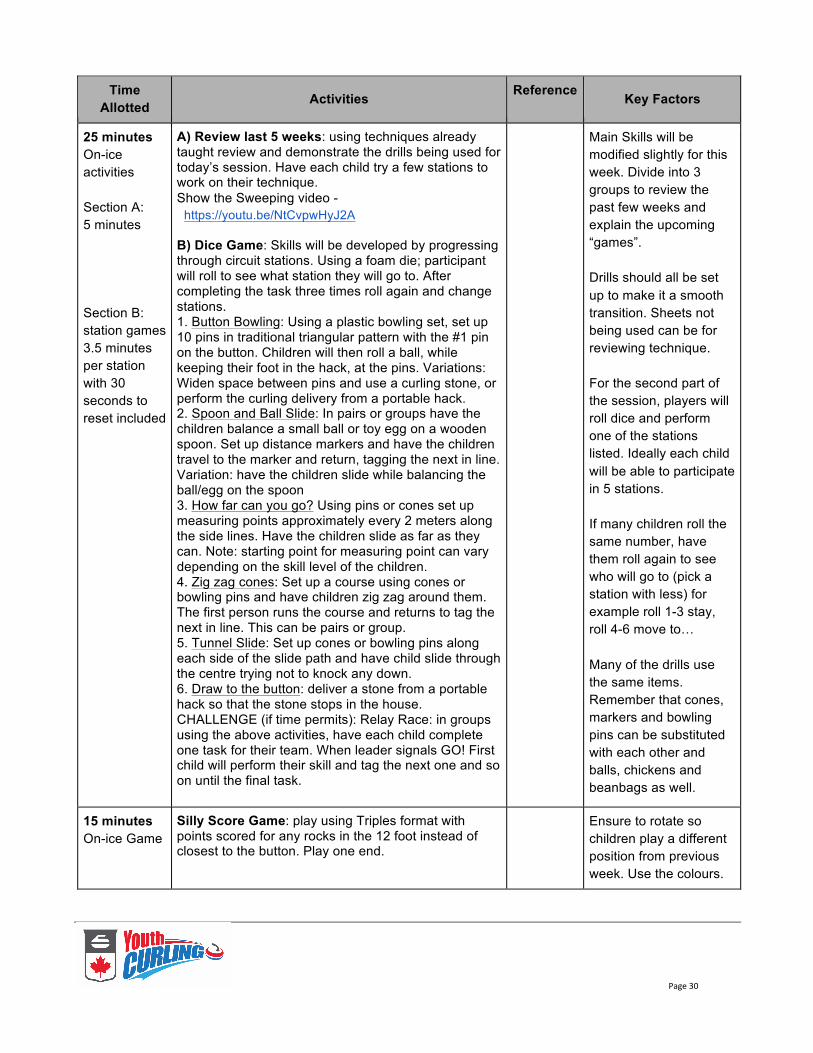
A) Review last 5 weeks: using techniques already taught review and demonstrate the drills being used for today’s session. Have each child try a few stations to work on their technique. Show the Sweeping video - https://youtu.be/NtCvpwHyJ2A
B) Dice Game: Skills will be developed by progressing through circuit stations. Using a foam die; participant will roll to see what station they will go to. After completing the task three times roll again and change stations. 1. Button Bowling: Using a plastic bowling set, set up 10 pins in traditional triangular pattern with the #1 pin on the button. Children will then roll a ball, while keeping their foot in the hack, at the pins. Variations: Widen space between pins and use a curling stone, or perform the curling delivery from a portable hack. 2. Spoon and Ball Slide: In pairs or groups have the children balance a small ball or toy egg on a wooden spoon. Set up distance markers and have the children travel to the marker and return, tagging the next in line. Variation: have the children slide while balancing the ball/egg on the spoon 3. How far can you go? Using pins or cones set up measuring points approximately every 2 meters along the side lines. Have the children slide as far as they can. Note: starting point for measuring point can vary depending on the skill level of the children. 4. Zig zag cones: Set up a course using cones or bowling pins and have children zig zag around them. The first person runs the course and returns to tag the next in line. This can be pairs or group. 5. Tunnel Slide: Set up cones or bowling pins along each side of the slide path and have child slide through the centre trying not to knock any down. 6. Draw to the button: deliver a stone from a portable hack so that the stone stops in the house. CHALLENGE (if time permits): Relay Race: in groups using the above activities, have each child complete one task for their team. When leader signals GO! First child will perform their skill and tag the next one and so on until the final task.
Main Skills will be modified slightly for this week. Divide into 3 groups to review the past few weeks and explain the upcoming “games”. Drills should all be set up to make it a smooth transition. Sheets not being used can be for reviewing technique. For the second part of the session, players will roll dice and perform one of the stations listed. Ideally each child will be able to participate in 5 stations. If many children roll the same number, have them roll again to see who will go to (pick a station with less) for example roll 1-3 stay, roll 4-6 move to… Many of the drills use the same items. Remember that cones, markers and bowling pins can be substituted with each other and balls, chickens and beanbags as well.
15 minutes On-ice Game
Silly Score Game: play using Triples format with points scored for any rocks in the 12 foot instead of closest to the button. Play one end.
Ensure to rotate so children play a different position from previous week. Use the colours.
Page31
Time Allotted Activities
Reference Key Factors
10 minutes Off or On Ice Cool down 3 x 2.5 minute stations Wrap-Up 2 minutes
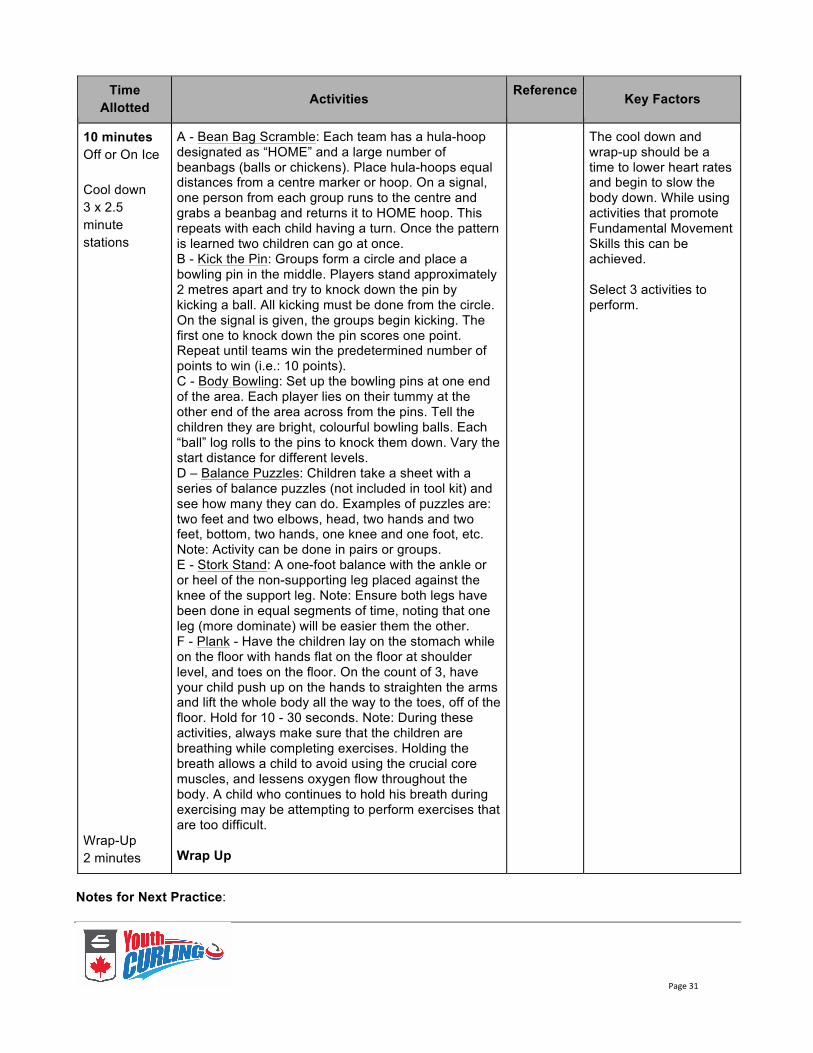
A - Bean Bag Scramble: Each team has a hula-hoop designated as “HOME” and a large number of beanbags (balls or chickens). Place hula-hoops equal distances from a centre marker or hoop. On a signal, one person from each group runs to the centre and grabs a beanbag and returns it to HOME hoop. This repeats with each child having a turn. Once the pattern is learned two children can go at once. B - Kick the Pin: Groups form a circle and place a bowling pin in the middle. Players stand approximately 2 metres apart and try to knock down the pin by kicking a ball. All kicking must be done from the circle. On the signal is given, the groups begin kicking. The first one to knock down the pin scores one point. Repeat until teams win the predetermined number of points to win (i.e.: 10 points). C - Body Bowling: Set up the bowling pins at one end of the area. Each player lies on their tummy at the other end of the area across from the pins. Tell the children they are bright, colourful bowling balls. Each “ball” log rolls to the pins to knock them down. Vary the start distance for different levels. D – Balance Puzzles: Children take a sheet with a series of balance puzzles (not included in tool kit) and see how many they can do. Examples of puzzles are: two feet and two elbows, head, two hands and two feet, bottom, two hands, one knee and one foot, etc. Note: Activity can be done in pairs or groups. E - Stork Stand: A one-foot balance with the ankle or or heel of the non-supporting leg placed against the knee of the support leg. Note: Ensure both legs have been done in equal segments of time, noting that one leg (more dominate) will be easier them the other. F - Plank - Have the children lay on the stomach while on the floor with hands flat on the floor at shoulder level, and toes on the floor. On the count of 3, have your child push up on the hands to straighten the arms and lift the whole body all the way to the toes, off of the floor. Hold for 10 - 30 seconds. Note: During these activities, always make sure that the children are breathing while completing exercises. Holding the breath allows a child to avoid using the crucial core muscles, and lessens oxygen flow throughout the body. A child who continues to hold his breath during exercising may be attempting to perform exercises that are too difficult. Wrap Up
The cool down and wrap-up should be a time to lower heart rates and begin to slow the body down. While using activities that promote Fundamental Movement Skills this can be achieved. Select 3 activities to perform.
Notes for Next Practice:
Page32
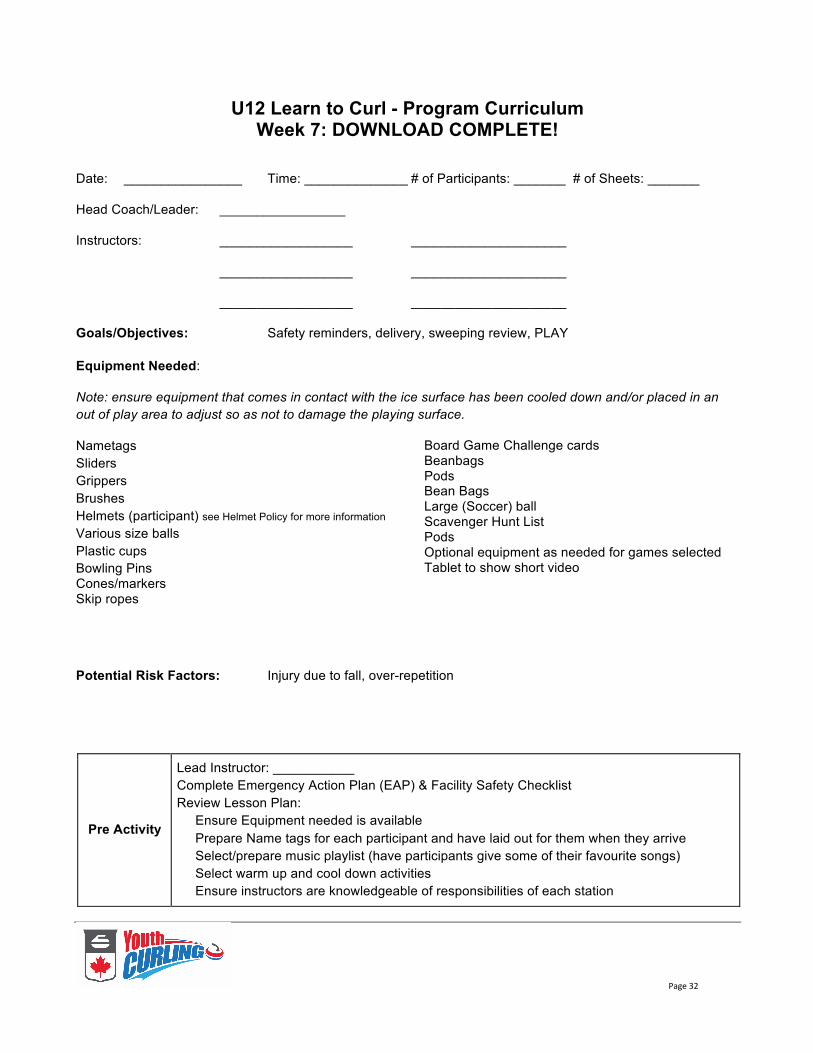
U12 Learn to Curl - Program Curriculum
Week 7: DOWNLOAD COMPLETE!
Date: ________________ Time: ______________ # of Participants: _______ # of Sheets: _______
Head Coach/Leader: _________________
Instructors: __________________ _____________________
__________________ _____________________
__________________ _____________________
Goals/Objectives: Safety reminders, delivery, sweeping review, PLAY Equipment Needed:
Note: ensure equipment that comes in contact with the ice surface has been cooled down and/or placed in an out of play area to adjust so as not to damage the playing surface.
Nametags Sliders Grippers Brushes Helmets (participant) see Helmet Policy for more information
Various size balls Plastic cups Bowling Pins Cones/markers Skip ropes
Board Game Challenge cards Beanbags Pods Bean Bags Large (Soccer) ball Scavenger Hunt List Pods Optional equipment as needed for games selected Tablet to show short video
Potential Risk Factors: Injury due to fall, over-repetition
Pre Activity
Lead Instructor: ___________ Complete Emergency Action Plan (EAP) & Facility Safety Checklist Review Lesson Plan: Ensure Equipment needed is available Prepare Name tags for each participant and have laid out for them when they arrive Select/prepare music playlist (have participants give some of their favourite songs) Select warm up and cool down activities Ensure instructors are knowledgeable of responsibilities of each station
Page33
Time Allotted Activities
Reference Key Factors
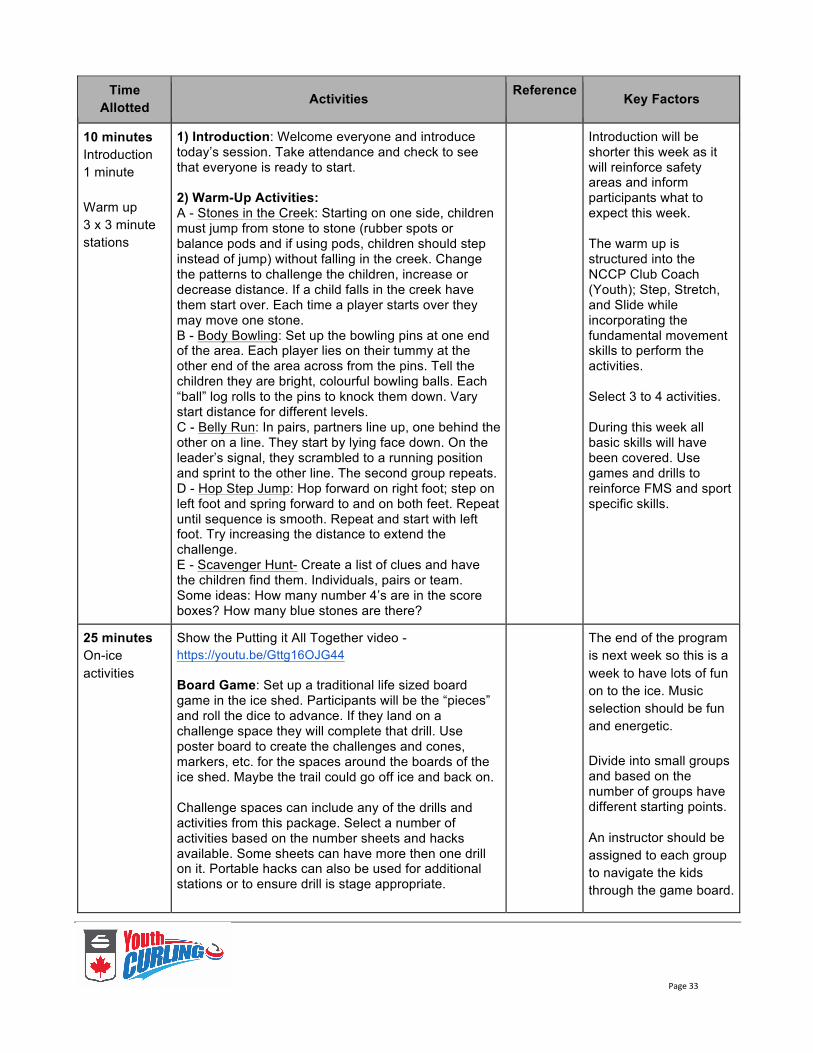
10 minutes Introduction 1 minute Warm up 3 x 3 minute stations
1) Introduction: Welcome everyone and introduce today’s session. Take attendance and check to see that everyone is ready to start. 2) Warm-Up Activities: A - Stones in the Creek: Starting on one side, children must jump from stone to stone (rubber spots or balance pods and if using pods, children should step instead of jump) without falling in the creek. Change the patterns to challenge the children, increase or decrease distance. If a child falls in the creek have them start over. Each time a player starts over they may move one stone. B - Body Bowling: Set up the bowling pins at one end of the area. Each player lies on their tummy at the other end of the area across from the pins. Tell the children they are bright, colourful bowling balls. Each “ball” log rolls to the pins to knock them down. Vary start distance for different levels. C - Belly Run: In pairs, partners line up, one behind the other on a line. They start by lying face down. On the leader’s signal, they scrambled to a running position and sprint to the other line. The second group repeats. D - Hop Step Jump: Hop forward on right foot; step on left foot and spring forward to and on both feet. Repeat until sequence is smooth. Repeat and start with left foot. Try increasing the distance to extend the challenge. E - Scavenger Hunt- Create a list of clues and have the children find them. Individuals, pairs or team. Some ideas: How many number 4’s are in the score boxes? How many blue stones are there?
Introduction will be shorter this week as it will reinforce safety areas and inform participants what to expect this week. The warm up is structured into the NCCP Club Coach (Youth); Step, Stretch, and Slide while incorporating the fundamental movement skills to perform the activities. Select 3 to 4 activities. During this week all basic skills will have been covered. Use games and drills to reinforce FMS and sport specific skills.
25 minutes On-ice activities
Show the Putting it All Together video - https://youtu.be/Gttg16OJG44
Board Game: Set up a traditional life sized board game in the ice shed. Participants will be the “pieces” and roll the dice to advance. If they land on a challenge space they will complete that drill. Use poster board to create the challenges and cones, markers, etc. for the spaces around the boards of the ice shed. Maybe the trail could go off ice and back on. Challenge spaces can include any of the drills and activities from this package. Select a number of activities based on the number sheets and hacks available. Some sheets can have more then one drill on it. Portable hacks can also be used for additional stations or to ensure drill is stage appropriate.
The end of the program is next week so this is a week to have lots of fun on to the ice. Music selection should be fun and energetic. Divide into small groups and based on the number of groups have different starting points. An instructor should be assigned to each group to navigate the kids through the game board.
Page34
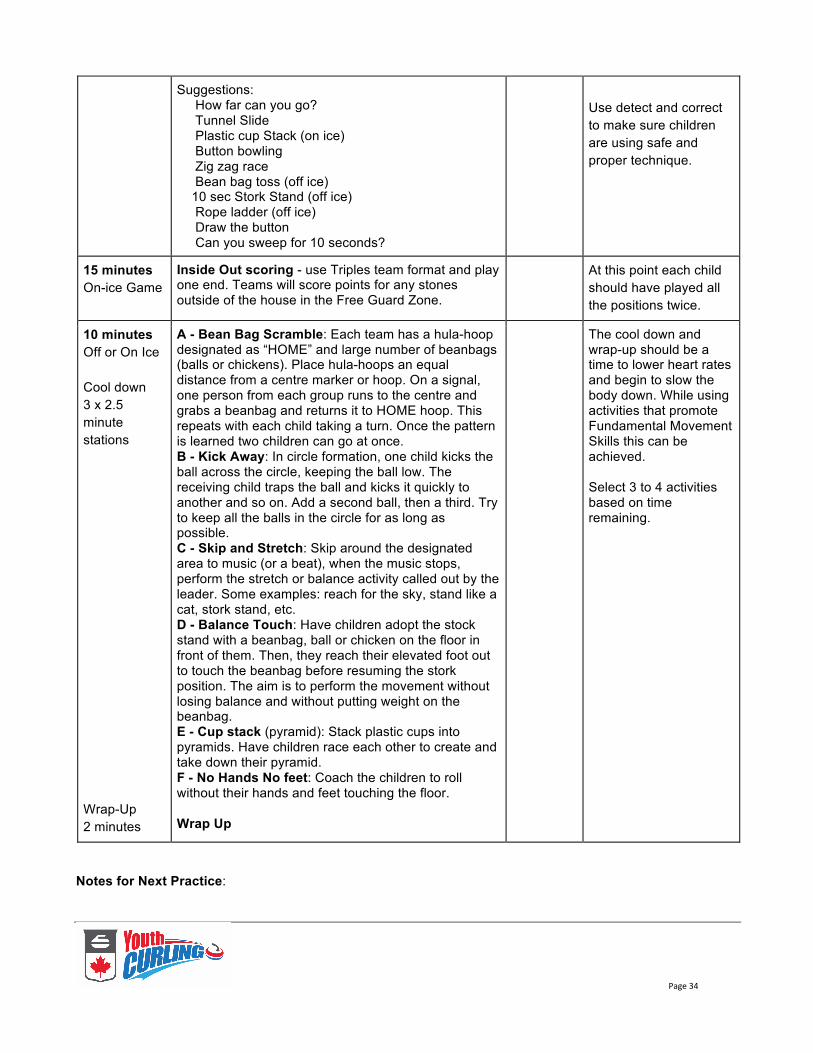
Suggestions: How far can you go? Tunnel Slide Plastic cup Stack (on ice) Button bowling Zig zag race Bean bag toss (off ice) 10 sec Stork Stand (off ice) Rope ladder (off ice) Draw the button Can you sweep for 10 seconds?
Use detect and correct to make sure children are using safe and proper technique.
15 minutes On-ice Game
Inside Out scoring - use Triples team format and play one end. Teams will score points for any stones outside of the house in the Free Guard Zone.
At this point each child should have played all the positions twice.
10 minutes Off or On Ice Cool down 3 x 2.5 minute stations Wrap-Up 2 minutes
A - Bean Bag Scramble: Each team has a hula-hoop designated as “HOME” and large number of beanbags (balls or chickens). Place hula-hoops an equal distance from a centre marker or hoop. On a signal, one person from each group runs to the centre and grabs a beanbag and returns it to HOME hoop. This repeats with each child taking a turn. Once the pattern is learned two children can go at once. B - Kick Away: In circle formation, one child kicks the ball across the circle, keeping the ball low. The receiving child traps the ball and kicks it quickly to another and so on. Add a second ball, then a third. Try to keep all the balls in the circle for as long as possible. C - Skip and Stretch: Skip around the designated area to music (or a beat), when the music stops, perform the stretch or balance activity called out by the leader. Some examples: reach for the sky, stand like a cat, stork stand, etc. D - Balance Touch: Have children adopt the stock stand with a beanbag, ball or chicken on the floor in front of them. Then, they reach their elevated foot out to touch the beanbag before resuming the stork position. The aim is to perform the movement without losing balance and without putting weight on the beanbag. E - Cup stack (pyramid): Stack plastic cups into pyramids. Have children race each other to create and take down their pyramid. F - No Hands No feet: Coach the children to roll without their hands and feet touching the floor. Wrap Up
The cool down and wrap-up should be a time to lower heart rates and begin to slow the body down. While using activities that promote Fundamental Movement Skills this can be achieved. Select 3 to 4 activities based on time remaining.
Notes for Next Practice:
Page35
U12 Learn to Curl - Program Curriculum
Week 8: FINALE
Date: ________________ Time: ______________ # of Participants: _______ # of Sheets: _______
Head Coach/Leader: _________________
Instructors: __________________ _____________________
__________________ _____________________
__________________ _____________________
Goals/Objectives: PLAY Mini Spiel or Circuit Relay Equipment Needed:
Note: ensure equipment that comes in contact with the ice surface has been cooled down and/or placed in an out of play area to adjust so as not to damage the playing surface.
Name tags Sliders Grippers Brushes Helmets (participant) see Helmet Policy for more information
Various size balls Rope Ladder
Bowling Pins Cones/markers Skip ropes Large (Soccer) ball Certificates Prizes and items for prizing as needed
Potential Risk Factors: Injury due to fall, over-repetition
Pre Activity
Lead Instructor: ___________ Complete Emergency Action Plan (EAP) & Facility Safety Checklist Review Lesson Plan: Ensure Equipment needed is available Prepare Name tags for each participant and have laid out for them when they arrive Select/prepare music playlist (have participants give some of their favourite songs) Select warm up and cool down activities Ensure instructors are knowledgeable of responsibilities of each station Prepare completion certificate
Page36
Time Allotted Activities
Reference Key Factors
10 minutes Introduction 1 minute Warm-Up 3 x 3 minute stations
1) Introduction: Welcome everyone and introduce today’s session. Take attendance and check to see that everyone is ready to start. 4) Warm-Up Activities:
A - Animal Walks: Ask the children: “Who can show me how a (insert animal) walks? Then have all the children follow. Show the animal walking and then running. Some ideas: Kangaroo, crab, monkey, bear, pony, squirrel. B - Belly Run: In pairs, partners line up, one behind the other on a line. They start by lying face down; at the leader’s signal, they scramble to a running position and sprint to the other line. The second group repeats. C - Jiggle Rope: Two players are at each end of a skipping rope. From a kneeling or sitting position, the rope holders jiggle the rope in different ways - side to side or up and down. Other players try to hop or jump over the rope without touching it. D - Instructor’s Choice - Instructor selects one of the favourite activities from the curriculum. E - Hopscotch: Using the ladder as the Hopscotch pattern have the child toss a beanbag into the first square. Hop to the square, pick up the beanbag and then hop back. Repeat for each child and then move to the next square for another round. F - Chicken Tag: Using traditional tag; have the child who is “IT” carry a rubber chicken. They must tag the others with the Chicken in order to send them to the chicken coop. Variation: Also have a person with a Noodle or egg who can free the chickens from the coop.
Introduction should include an outline of the mini spiel to follow. The warm-up is structured into the NCCP Club Coach (Youth); Step, Stretch, and Slide while incorporating the Fundamental Movement Skills to perform the activities. Select 3 activities.
Page37
Time Allotted Activities
Reference Key Factors
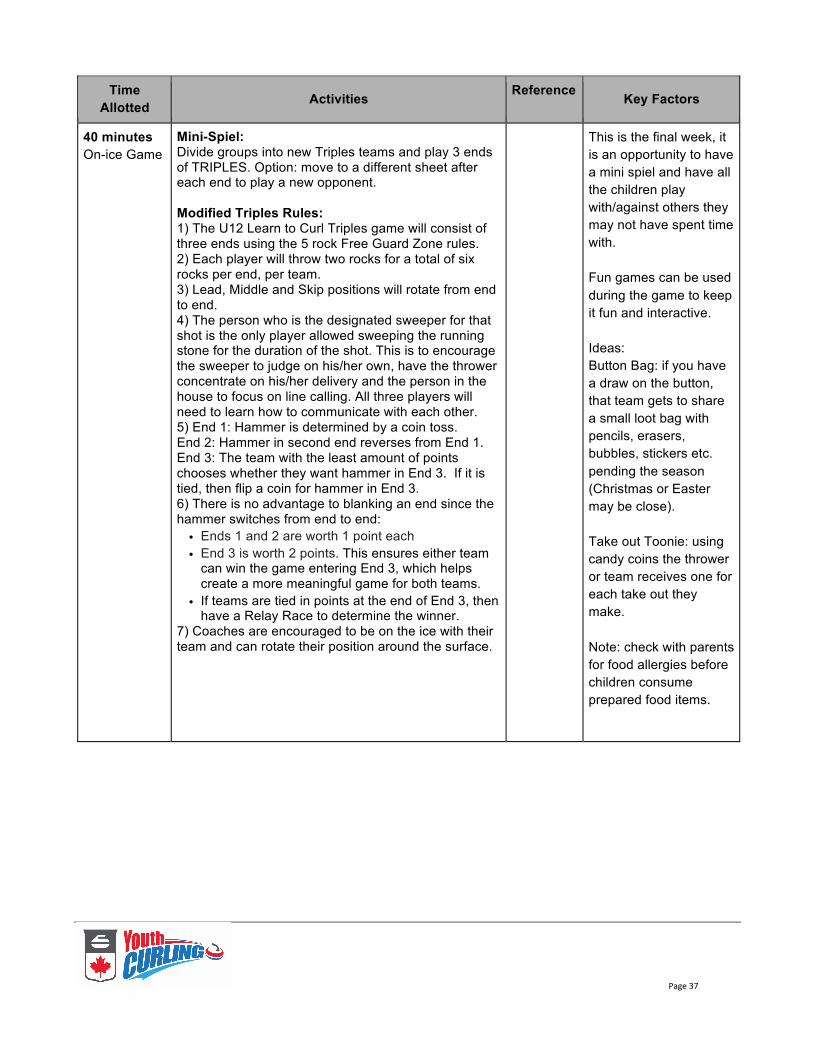
40 minutes On-ice Game
Mini-Spiel: Divide groups into new Triples teams and play 3 ends of TRIPLES. Option: move to a different sheet after each end to play a new opponent. Modified Triples Rules: 1) The U12 Learn to Curl Triples game will consist of three ends using the 5 rock Free Guard Zone rules. 2) Each player will throw two rocks for a total of six rocks per end, per team. 3) Lead, Middle and Skip positions will rotate from end to end. 4) The person who is the designated sweeper for that shot is the only player allowed sweeping the running stone for the duration of the shot. This is to encourage the sweeper to judge on his/her own, have the thrower concentrate on his/her delivery and the person in the house to focus on line calling. All three players will need to learn how to communicate with each other. 5) End 1: Hammer is determined by a coin toss. End 2: Hammer in second end reverses from End 1. End 3: The team with the least amount of points chooses whether they want hammer in End 3. If it is tied, then flip a coin for hammer in End 3. 6) There is no advantage to blanking an end since the hammer switches from end to end:
• Ends 1 and 2 are worth 1 point each • End 3 is worth 2 points. This ensures either team
can win the game entering End 3, which helps create a more meaningful game for both teams.
• If teams are tied in points at the end of End 3, then have a Relay Race to determine the winner.
7) Coaches are encouraged to be on the ice with their team and can rotate their position around the surface.
This is the final week, it is an opportunity to have a mini spiel and have all the children play with/against others they may not have spent time with. Fun games can be used during the game to keep it fun and interactive. Ideas: Button Bag: if you have a draw on the button, that team gets to share a small loot bag with pencils, erasers, bubbles, stickers etc. pending the season (Christmas or Easter may be close). Take out Toonie: using candy coins the thrower or team receives one for each take out they make. Note: check with parents for food allergies before children consume prepared food items.
Page38
Time Allotted Activities
Reference Key Factors
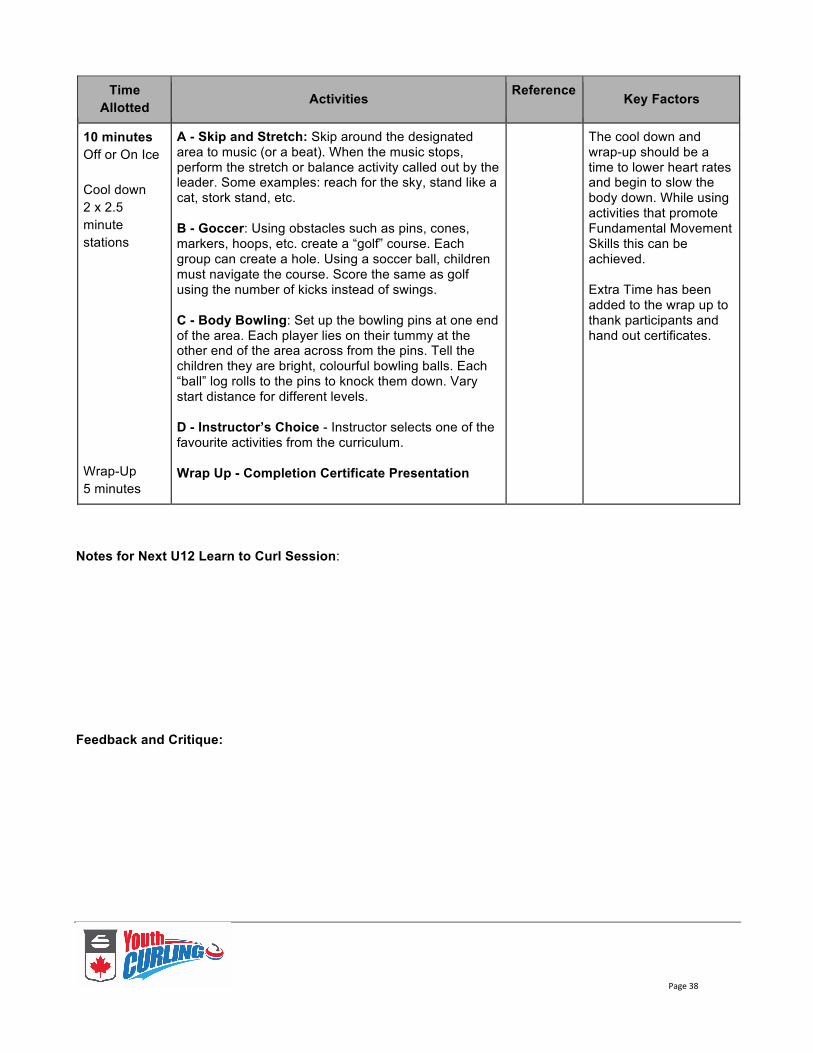
10 minutes Off or On Ice Cool down 2 x 2.5 minute stations Wrap-Up 5 minutes
A - Skip and Stretch: Skip around the designated area to music (or a beat). When the music stops, perform the stretch or balance activity called out by the leader. Some examples: reach for the sky, stand like a cat, stork stand, etc. B - Goccer: Using obstacles such as pins, cones, markers, hoops, etc. create a “golf” course. Each group can create a hole. Using a soccer ball, children must navigate the course. Score the same as golf using the number of kicks instead of swings. C - Body Bowling: Set up the bowling pins at one end of the area. Each player lies on their tummy at the other end of the area across from the pins. Tell the children they are bright, colourful bowling balls. Each “ball” log rolls to the pins to knock them down. Vary start distance for different levels. D - Instructor’s Choice - Instructor selects one of the favourite activities from the curriculum. Wrap Up - Completion Certificate Presentation
The cool down and wrap-up should be a time to lower heart rates and begin to slow the body down. While using activities that promote Fundamental Movement Skills this can be achieved. Extra Time has been added to the wrap up to thank participants and hand out certificates.
Notes for Next U12 Learn to Curl Session: Feedback and Critique: