ucm6102/6104/6108/6116 configuration - intermedia ucm61xx... · grandstream ucm6102/6104/6108/6116....
TRANSCRIPT

1
UCM6102/6104/6108/6116 Configuration
This document introduces manual configuration steps performed for interoperability testing between AccessLine and
Grandstream UCM6102/6104/6108/6116. Configuration parameters not explained in this document were kept at
factory default settings.
1. Connect UCM6102/6104/6108/6116 to the network and power it up.
2. From the LCD and navigation keys, press "OK" button and "DOWN" button to view the IP address on the
UCM6102/6104/6108/6116.
3. From a PC connected in the same LAN, log into the device’s Web UI by typing the IP address of the
UCM6102/6104/6108/6116 on the PC’s web browser.
4. Default login name and password for the administrator is admin/admin for Grandstream devices.
5. Select tab "PBX"->"Basic/Call Routes"->"VoIP Trunks" in the web UI and click on "Create New SIP Trunk". In
the following dialog, configure Type, Provider Name, Host Name, Username, Password, AuthID and Outbound
Proxy.
Click on "Save" to save the configuration.
2
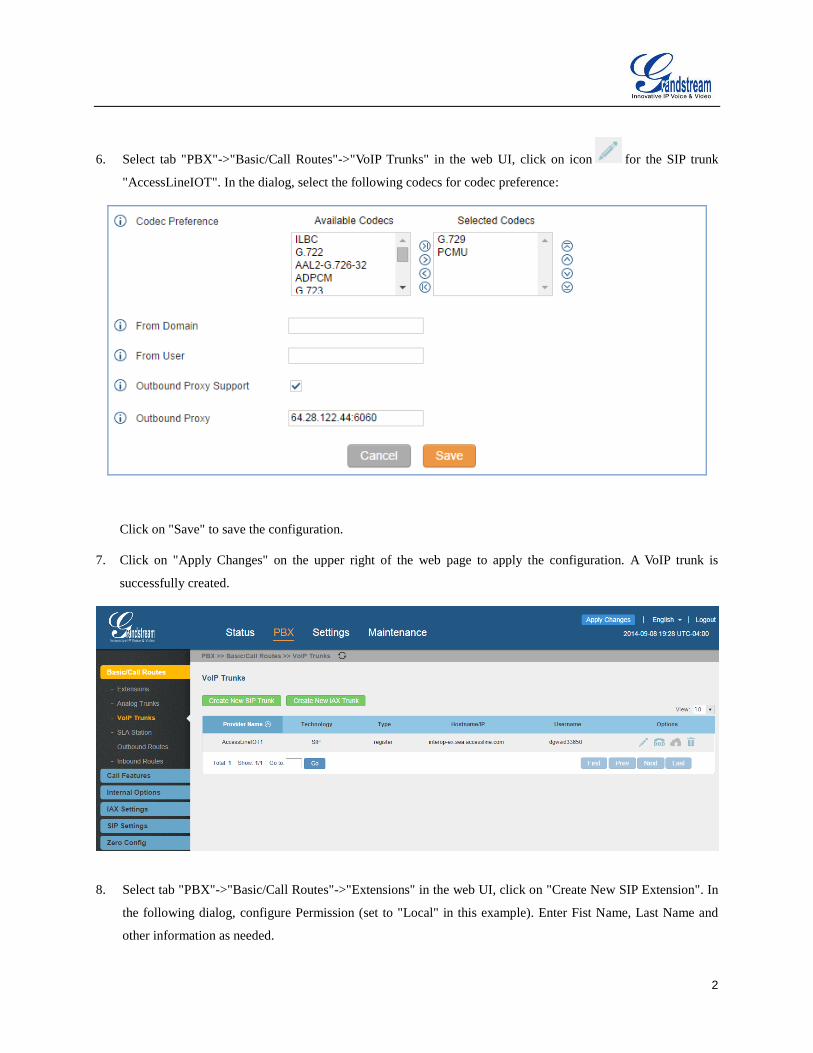
6. Select tab "PBX"->"Basic/Call Routes"->"VoIP Trunks" in the web UI, click on icon for the SIP trunk
"AccessLineIOT". In the dialog, select the following codecs for codec preference:
Click on "Save" to save the configuration.
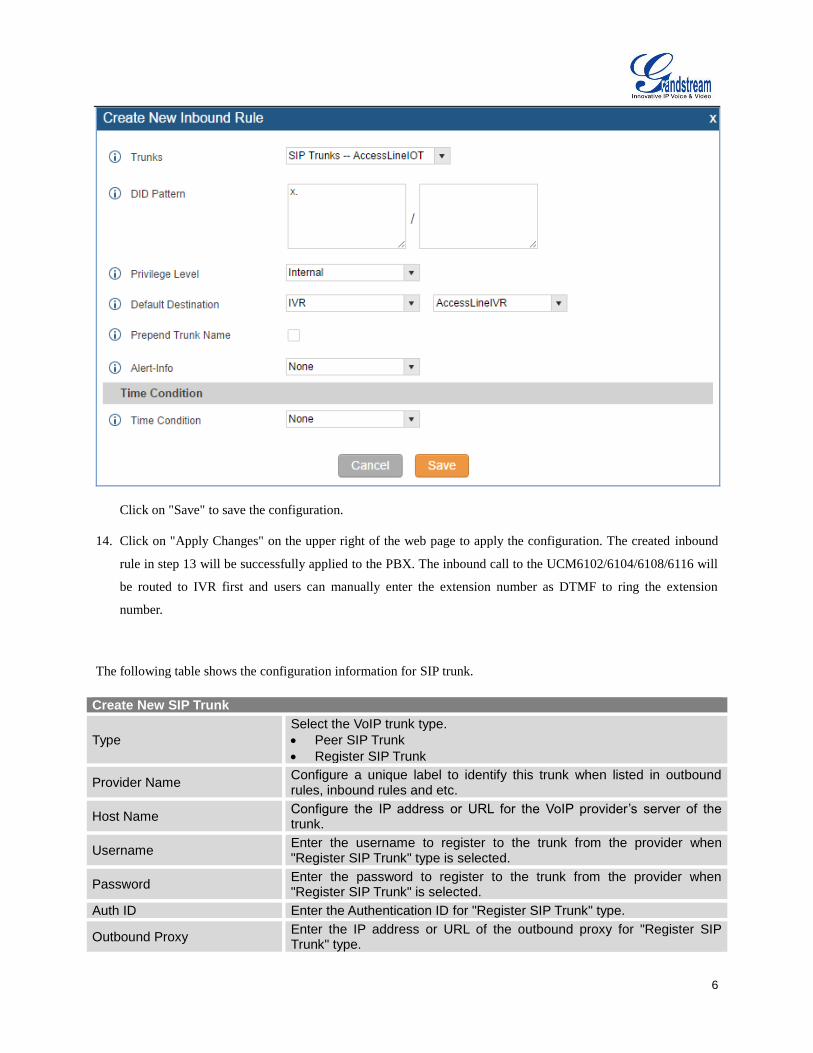
7. Click on "Apply Changes" on the upper right of the web page to apply the configuration. A VoIP trunk is
successfully created.
8. Select tab "PBX"->"Basic/Call Routes"->"Extensions" in the web UI, click on "Create New SIP Extension". In
the following dialog, configure Permission (set to "Local" in this example). Enter Fist Name, Last Name and
other information as needed.

3
Click on "Save" to save the configuration.
9. Repeat this step to create more extensions as needed. These extensions can be used to make outbound calls or
answer inbound calls. Once done, click on "Apply Changes" on the upper right of the web page to apply the
configuration. The created extensions in step 8 will be successfully applied on the PBX.
10. Select tab "PBX"->"Basic/Call Routes"->"Outbound Routes" in the web UI, click on "Create New Outbound
Rule". In the following dialog, configure Caller Rule Name, Pattern, select Privilege Level and Use Trunk.

4
Click on "Save" to save the configuration.
Please note:
If "Privilege Level" is set to "Local" in outbound rule, the extension that is used to make outbound call needs to
have "Permission Level" set to "Local" or higher. The extension settings is under web UI->"PBX"->"Basic/Call
Routes"->"Extension" page, as described in step 8.
11. Select tab "PBX"->"Call Features"->"IVR" in the web UI, click on "Create New IVR". In the following dialog,
configure Name, Extension, Dial Other Extensions and Key Pressing Events.

5
Click on "Save" to save the configuration.
12. Click on "Apply Changes" on the upper right of the web page to apply the configuration. The created IVR in
step 11 will be successfully applied to the PBX.
13. Select tab "PBX"->"Basic/Call Routes"->"Inbound Routes" in the web UI, click on "Create New Inbound
Rule". In the following dialog, configure Trunks, DID Pattern and Default Destination.
6
Click on "Save" to save the configuration.
14. Click on "Apply Changes" on the upper right of the web page to apply the configuration. The created inbound
rule in step 13 will be successfully applied to the PBX. The inbound call to the UCM6102/6104/6108/6116 will
be routed to IVR first and users can manually enter the extension number as DTMF to ring the extension
number.
The following table shows the configuration information for SIP trunk.
Create New SIP Trunk
Type
Select the VoIP trunk type.
Peer SIP Trunk
Register SIP Trunk
Provider Name Configure a unique label to identify this trunk when listed in outbound rules, inbound rules and etc.
Host Name Configure the IP address or URL for the VoIP provider’s server of the trunk.
Username Enter the username to register to the trunk from the provider when "Register SIP Trunk" type is selected.
Password Enter the password to register to the trunk from the provider when "Register SIP Trunk" is selected.
Auth ID Enter the Authentication ID for "Register SIP Trunk" type.
Outbound Proxy Enter the IP address or URL of the outbound proxy for "Register SIP Trunk" type.

7
Codec Preference Select audio and video codec for the VoIP trunk. The available codecs are: PCMU, PCMA, GSM, AAL2-G.726-32, G.726, G.722, G.729, G.723, ILBC, ADPCM, H.264, H.263, H.263p.
The following table shows the configuration information for extensions.
General
Extension The extension number associated with the user.
CallerID Number
Configure the CallerID Number that would be applied for outbound calls from this user. Note: The ability to manipulate your outbound Caller ID may be limited by your VoIP provider.
Permission
Assign permission level to the user. The available permissions are "Internal", "Local", "National" and "International" from the lowest level to the highest level. The default setting is "Internal". Note: Users need to have the same level as or higher level than an outbound rule's privilege in order to make outbound calls using this rule.
SIP/IAX Password Configure the password for the user. A random secure password will be automatically generated. It is recommended to use this password for security purpose.
Enable Voicemail Enable voicemail for the user. The default setting is "Yes".
Voicemail Password
Configure voicemail password (digits only) for the user to access the voicemail box. A random numeric password is automatically generated. It is recommended to use the random generated password for security purpose.
Call Forward Unconditional Configure the Call Forward Unconditional target number. If not configured, the Call Forward Unconditional feature is deactivated. The default setting is deactivated.
CFU Time Condition
Select time condition for Call Forward Unconditional. CFU takes effect only during the selected time condition. The available time condition are “Office Time”, “Out of Office Time”, “Holiday”, “Out of Holiday”, “Out of Office Time or Holiday” and “Specific”. Note:
“Specific” has higher priority to “Office Times” if there is a conflict in terms of time period.
Specific time can be configured on the bottom of the extension configuration dialog. Scroll down the add Time Condition for specific time.
Office Time and Holiday could be configured on page Settings->Time Settings->Office Time/Holiday page.
Call Forward No Answer Configure the Call Forward No Answer target number. If not configured, the Call Forward No Answer feature is deactivated. The default setting is deactivated.
CFN Time Condition Select time condition for Call Forward No Answer. The available time condition are “Office Time”, “Out of Office Time”, “Holiday”, “Out of Holiday”, “Out of Office Time or Holiday” and “Specific”.

8
Note:
“Specific” has higher priority to “Office Times” if there is a conflict in terms of time period.
Specific time can be configured on the bottom of the extension configuration dialog. Scroll down the add Time Condition for specific time.
Office Time and Holiday could be configured on page Settings->Time Settings->Office Time/Holiday page.
Call Forward Busy Configure the Call Forward Busy target number. If not configured, the Call Forward Busy feature is deactivated. The default setting is deactivated.
CFB Time Condition
Select time condition for Call Forward Busy. The available time condition are “Office Time”, “Out of Office Time”, “Holiday”, “Out of Holiday”, “Out of Office Time or Holiday” and “Specific”. Note:
“Specific” has higher priority to “Office Times” if there is a conflict in terms of time period.
Specific time can be configured on the bottom of the extension configuration dialog. Scroll down the add Time Condition for specific time.
Office Time and Holiday could be configured on page Settings->Time Settings->Office Time/Holiday page.
Ring Timeout
Configure the number of seconds to ring the user before the call is forwarded to voicemail (voicemail is enabled) or hang up (voicemail is disabled). If not specified, the default ring timeout is 60 seconds on the UCM6100, which can be configured in the global ring timeout setting under web GUI->Internal Options->IVR Prompt: General Preference. The valid range is between 5 seconds and 600 seconds. Note: If the end point also has a ring timeout configured, the actual ring timeout used is the shortest time set by either device.
Auto Record Enable automatic recording for the calls using this extension. The default setting is disabled. The recording files can be accessed under web GUI->CDR->Recording Files.
Skip Voicemail Password Verification
When user dials voicemail code, the password verification IVR is skipped. If enabled, this would allow one-button voicemail access. By default this option is disabled.
Support Hot-Desking Mode If enabled, SIP Password will accept only alphabet characters and digits; AuthID will be changed to the same as Extension.
Disable This Extension
If selected, this extension will be disabled on the UCM6100. Note: The disabled extension still exists on the PBX but can’t be used on the end device.
Music On Hold Select which Music On Hold class to suggest to extension when putting it on hold.
User Settings
First Name Configure the first name of the user. The first name can contain characters, letters, digits and _.
9
Last Name Configure the last name of the user. The last name can contain characters, letters, digits and _.
Email Address Fill in the Email address for the user. Voicemail will be sent to this Email address.
Language
Select the voice prompt language to be used for this extension. The default setting is "Default" which is the selected voice prompt language under web GUI->PBX->Internal Options->Language. The dropdown list shows all the current available voice prompt languages on the UCM6100. To add more languages in the list, please download voice prompt package by selecting "Check Prompt List" under web GUI->PBX->Internal Options->Language.
SIP Settings
NAT
Use NAT when the UCM6100 is on a public IP communicating with devices hidden behind NAT (e.g., broadband router). If there is one-way audio issue, usually it's related to NAT configuration or Firewall's support of SIP and RTP ports. The default setting is enabled.
Can Reinvite
By default, the UCM6100 will route the media steams from SIP endpoints through itself. If enabled, the PBX will attempt to negotiate with the endpoints to route the media stream directly. It is not always possible for the UCM6100 to negotiate endpoint-to-endpoint media routing. The default setting is "No".
DTMF Mode
Select DTMF mode for the user to send DTMF. The default setting is "RFC2833". If "Info" is selected, SIP INFO message will be used. If "Inband" is selected, 64-kbit PCMU and PCMA are required. When "Auto" is selected, RFC2833 will be used if offered, otherwise "Inband" will be used.
Insecure
Port: Allow peers matching by IP address without matching port number.
Very: Allow peers matching by IP address without matching port number. Also, authentication of incoming INVITE messages is not required.
No: Normal IP-based peers matching and authentication of incoming INVITE.
The default setting is "Port".
Enable Keep-alive If enabled, empty SDP packet will be sent to the SIP server periodically to keep the NAT port open. The default setting is "Yes".
Keep-alive Frequency Configure the Keep-alive interval (in seconds) to check if the host is up. The default setting is 60 seconds.
Auth ID Configure the authentication ID for the user. If not configured, the extension number will be used for authentication.
TEL URI
If the end device/phone has an assigned PSTN telephone number, this field should be set to "User=Phone". Then a "User=Phone" parameter will be attached to the Request-Line and TO header in the SIP request to indicate the E.164 number. If set to "Enable", "Tel:" will be used instead of "SIP:" in the SIP request. The default setting is disabled.
Other Settings
SRTP Enable SRTP for the call. The default setting is disabled.
Fax Detection Enable to detect Fax signal from the user/trunk during the call and send the received Fax to the Email address configured for this extension. If no Email address can be found for the user, send the received Fax to the

10
default Email address in Fax setting page under web GUI->PBX->Internal Options->Fax/T.38. Note: If enabled, Fax Pass-through cannot be used.
Skip Trunk Auth If enabled, users will not need enter the "PIN Set" required by the outbound rule to make outbound calls. The default setting is "No".
Dial Trunk Password Configure personal password when making outbound calls via trunk.
Strategy
This option controls how the extension can be used on devices within different types of network.
Allow All Device in any network can register this extension.
Local Subnet Only Only the user in specific subnet can register this extension. Up to three subnet addresses can be specified.
A Specific IP Address Only the device on the specific IP address can register this extension.
The default setting is "Allow All".
Codec Preference Select audio and video codec for the extension. The available codecs are: PCMU, PCMA, GSM, AAL2-G.726-32, G,726, G.722, G.729, G.723, ILBC, ADPCM, H.264, H.263 and H.263p.
Specific Time
Time Condition Click on add Time Condition to configure specific time for this extension.
The following table shows the configuration information for IVR.
Name Configure the name of the IVR. Letters, digits, _ and - are allowed.
Extension Enter the extension number for users to access the IVR.
Dial Other Extensions If enabled, all callers to the IVR can dial other extensions. The default setting is "No".
Dial Trunk If enabled, all callers to the IVR is allowed to use trunk. The permission must be configured for the users to use the trunk first. The default setting is "No".
Permission
Assign permission level for outbound calls if "Dial Trunk" is enabled. The available permissions are "Internal", "Local", "National" and "International" from the lowest level to the highest level. The default setting is "Internal". If the user tries to dial outbound calls after dialing into the IVR, the UCM6100 will compared the IVR's permission level with the outbound route's privilege level. If the IVR's permission level is higher than (or equal to) the outbound route's privilege level, the call will be allowed to go through.
Welcome Prompt Select an audio file to play as the welcome prompt for the IVR. Click on "Prompt" to add additional audio file under web GUI->Internal Options->IVR Prompt.
Digit Timeout
Configure the timeout between digit entries. After the user enters a digit, the user needs to enter the next digit within the timeout. If no digit is detected within the timeout, the UCM6100 will consider the entries complete. The default timeout is 3 seconds.

11
Response Timeout
After playing the prompts in the IVR, the UCM6100 will wait for the DTMF entry within the timeout (in seconds). If no DTMF entry is detected within the timeout, a timeout prompt will be played. The default setting is 10 seconds.
Response Timeout Prompt Select the prompt message to be played when timeout occurs.
Invalid Prompt Select the prompt message to be played when an invalid extension is pressed.
Response Timeout Repeat Loops
Configure the number of times to repeat the prompt if no DTMF input is detected. When the loop ends, it will go to the timeout destination if configured, or hang up. The default setting is 3.
Invalid Repeat Loops Configure the number of times to repeat the prompt if the DTMF input is invalid. When the loop ends, it will go to the invalid destination if configured, or hang up. The default setting is 3.
Language
Select the voice prompt language to be used for this IVR. The default setting is "Default" which is the selected voice prompt language under web GUI->PBX->Internal Options->Language. The dropdown list shows all the current available voice prompt languages on the UCM6100. To add more languages in the list, please download voice prompt package by selecting "Check Prompt List" under web GUI->PBX->Internal Options->Language.
Key Press Event
Select the event for each key pressing for 0-9, *, Timeout and Invalid. The event options are:
Extension
Voicemail
Conference Rooms
Voicemail Group
IVR
Ring Group
Queues
Page Group
Fax
Custom Prompt
Hangup
DISA
Dial By Name
External Number
The following table shows the configuration information for outbound route.
Calling Rule Name Configure the name of the calling rule (e.g., local, long_distance, and etc). Letters, digits, _ and - are allowed.
Pattern
All patterns are prefixed with the "_".
Special characters: X: Any Digit from 0-9. Z: Any Digit from 1-9. N: Any Digit from 2-9. ".": Wildcard. Match one or more characters. "!": Wildcard. Match zero or more characters immediately. Example: [12345-9] - Any digit from 1 to 9.
Password Configure the password for users to use this rule when making outbound calls.

12
Call Duration Limit Enable to configure the maximum duration for the call using this outbound route.
Maximum Call Duration Configure the maximum duration of the call (in seconds). The default setting is 0, which means no limite.
Warning Time Configure the warning time for the call using this outbound route. If set to x seconds, the warning tone will be played to the caller when x seconds are left to end the call.
Warning Repeat Interval Configure the warning repeat interval for the call using this outbound route. If set to x seconds, the warning tone will be played every x seconds after the first warning.
Privilege Level
Select privilege level for the outbound rule.
Internal: The lowest level required. All users can use this rule.
Local: Users with Local, National, or International level are allowed to use this rule.
National: Users with National or International level are allowed to use this rule.
International: The highest level required. Only users with international level can use this rule.
The default setting is "Disable". Please be aware of the potential security risks when using "Internal" level, which means all users can use this outbound rule to dial out from the trunk.
Enable Filter on Source Caller ID
When enabled, users could specify extensions allowed to use this outbound route. "Privilege Level" is automatically disabled if using "Enable Filter on Source Caller ID". The following two methods can be used at the same time to define the extensions as the source caller ID.
Select available extensions/extension groups from the left to the right. This allows users to specify arbitrary single extensions available in the PBX.
Custom Dynamic Route: define the pattern for the source caller ID. This allows users to define extension range instead of selecting them one by one.
All patterns are prefixed with the "_".
Special characters: X: Any Digit from 0-9. Z: Any Digit from 1-9. N: Any Digit from 2-9. ".": Wildcard. Match one or more characters. "!": Wildcard. Match zero or more characters immediately. Example: [12345-9] - Any digit from 1 to 9.
Send This Call Through Trunk
Use Trunk Select the trunk for this outbound rule.
Strip
Allows the user to specify the number of digits that will be stripped from the beginning of the dialed string before the call is placed via the selected trunk. Example: The users will dial 9 as the first digit of a long distance calls. However, 9 should not be sent out via analog lines and the PSTN line. In this case, 1

13
digit should be stripped before the call is placed.
Prepend Specify the digits to be prepended before the call is placed via the trunk. Those digits will be prepended after the dialing number is stripped.
The following table shows the configuration information for inbound route.
Trunks Select the trunk to configure the inbound rule.
DID Pattern
All patterns are prefixed with the "_".
Special characters: X: Any Digit from 0-9. Z: Any Digit from 1-9. N: Any Digit from 2-9. ".": Wildcard. Match one or more characters. "!": Wildcard. Match zero or more characters immediately. Example: [12345-9] - Any digit from 1 to 9.
The pattern can be composed of two parts, divided by a ‘/’ character. The first part is used to specify the dialed number the second part is used to specify the caller ID and it is optional, if set it means only the extension with the specific caller ID is allowed to call in or call out. For example, patter '_2XXX/1234' means the only extension with the caller ID '1234' is allowed to use this rule.
Privilege Level Configure the privilege level for this inbound route.
Default Destination
Select the default destination for the inbound call.
Extension
Voicemail
Conference Room
Queue
Ring Group
Paging/Intercom
Voicemail Group
Fax
DISA
IVR
Dial By Name
External Number
By DID When "By DID" is used, the UCM6100 will look for the destination based on the number dialed, which could be local extensions, conference, call queue, ring group, paging/intercom group, IVR, voicemail groups and Fax extension as configured in "DID destination". If the dialed number matches the DID pattern, the call will be allowed to go through.
Strip Configure the number of digits to be stripped from the beginning of the DID. This option shows up only when "By DID" is selected.
Prepend Trunk Name This option shows up only when “By DID” is selected. If enabled, the trunk name will be prepended to the display name.
Dial Trunk This option shows up only when "By DID" is selected. If enabled, the external users dialing in to the trunk via this inbound route can dial outbound call using the UCM6100’s trunk.
DID Destination This option shows up only when "By DID" is selected. This controls the
14
destination that can be reached by the external caller via the inbound route. The DID destination are:
Extension
Conference
Call Queue
Ring Group
Paging/Intercom Groups
IVR
Voicemail Groups
Fax Extension
Dial By Name
Alert-Info When present in an INVITE request, the Alert-Info header field specifies an alternative ring tone to the UAS.
Note:
For more configuration information, please refer to UCM6100 user manual on our web site:
http://www.grandstream.com/products/ucm_series/ucm61xx/documents/ucm61xx_usermanual_english.pdf