ukulele crazy! · “ukulele crazy: get your uke on,” is a video/e-book set that brings mahalo...
TRANSCRIPT

Entire contents copyright 2012 Bartt Warburton. No reproduction without express prior written consent.
Ukulele Crazy!Get your uke on!
Play your Mahalo with the modern-Day Master of ukulele,
Bartt Warburton

2
Entire contents copyright 2012 Bartt Warburton. No reproduction without express prior written consent.
You’re headed towards ukulele glory!
I’m Bartt Warburton, and I’m going to teach you how to play ukulele. This e-book is the companion to the Mahalo DVD that’s called “Ukulele Crazy: Get Your Uke On!” Both the e-book and the DVD are for beginners, so if you just got your first ukulele, you’re in the right place. You can get the DVD from mahalo-ukulele.com, or you can download a digital version at Bartt.net. I’ll be teaching you how to play basic chords, do basic strumming, and how to read those funny-looking chord diagrams. I’ll also teach you some of the basic vocabulary of music, and we’ll do a little bit of blues and some practice exercises. With the help of “Ukulele Crazy,” you’ll be able to play lots of easy songs. When you’ve mastered everything in this book, go to Bartt.net and get more advanced lessons. And when you’re ready to shop for an ukulele, go to Mahalo!
Get your uke out, and get
your uke on!
2
www.mahalo-ukulele.com

Entire contents copyright 2012 Bartt Warburton. No reproduction without express prior written consent.
3
Before we start, a quick word about Mahalo & Bartt
Mahalo is most popular ukulele in the world. Mahalo is known for their wonderfully crazy designs, like the Smiley Face and Alien ukes. Budding musicians across the globe make Mahalo their first instrument, because of the affordability and durability of Mahalo starter ukes. And they come in lots of fun colors.
Mahalo also makes higher-quality instruments for more advanced players. For example, Bartt can be seen playing his adorable LTD3, a concert-sized uke built from spalted flame maple and solid red cedar, with abalone inlays. Each Mahalo ukulele is given strict inspection at every step of the building process. Mahalo listens to their customers, and creates new designs and modifications based on their suggestions. They are proud to say that even the lowest-priced ukulele gets all the care and passion needed for serious fun. To discover their wild designs, go to http://www.mahalo-ukulele.com and check things out!
Bartt Warburton is recognized around the world for his dazzling musical performances and “Fancy Fingers” workshops. Known as “Ukulele Bartt,” the Los Angeles Times calls him a “modern-day master.” In addition to his eclectic and fearless playing virtuosity, he is equally acclaimed for being as much fun as you can have with four strings.
Honored as “Teacher of the Year” in the 40,000-teacher Los Angeles Unified School District, America’s second-largest district, Bartt has also been awarded a commendation from the mayor of Los Angeles. He has produced many instructional videos, e-books, and music CDs, including his first DVD and companion e-book, “Ukulele Bartt’s Ultimate Ukulele.” All of them can be found across North America, Europe, Australia, New Zealand, and Asia. Bartt is the creator of the popular website, Bartt.net, a bountiful resource center for players of all skill levels. Millions of viewers have enjoyed his Internet videos. In addition to his vigorous performing schedule, Bartt also keeps himself busy as a recording engineer in his Los Angeles studio.
“Ukulele Crazy: Get Your Uke On,” is a video/e-book set that brings Mahalo and Bartt together in a beginner-level instructional course for players across the globe. The “Ukulele Crazy” video is available in English, Japanese, Chinese, Spanish, and French!
3

Entire contents copyright 2012 Bartt Warburton. No reproduction without express prior written consent.
4
Chapter 1Know Your Parts:
The Anatomy of an Ukulele
HEADSTOCK
MACHINE HEADS
FINGERBOARD
NUT
FRETS
POSTS
BINDING
ROSETTE
BRIDGE
SOUND HOLE
SADDLE
4

Entire contents copyright 2012 Bartt Warburton. No reproduction without express prior written consent.
5
The “frets” are the thin metal strips that run across the fingerboard every inch or so. They mark the places where you put your fingers. The word “fret” also refers to the spaces between these metal strips. Your finger goes on the wooden fingerboard, not the metal fret.
The “posts” are the metal things that stick up from the headstock. You wrap the strings around the posts, which are attached to the tuning pegs. When you turn the knob on the tuning peg, the post rotates, tightening or loosening the strings.
“Binding” is the decorative stuff that goes around the body. It is sometimes called “purfling.” Not all ukes have binding. The “rosette” is decorative, too. It goes around the “sound hole” on some ukes.
The “saddle” and the “nut” are small pieces of wood, bone, or other material. They are virtually the only parts of the uke that actually touch the strings, and therefore have a lot to do with how your uke sounds. They have tiny grooves in them, where the strings rest. This helps to keep the strings stable and in tune.
The “machine heads”, also known as “tuning pegs”, are the knobs at the top of your uke. They’re also called “tuners.” You turn them, to tighten or loosen the strings. That’s how you keep your uke in tune. There are “friction” tuners and “geared” tuners. “Geared” tuners have little gears inside of them, which keep the peg from getting loose. So when you tune up, the strings stay in tune. “Friction” pegs do not have gears. They are simply pegs that turn. They generally work fine, but when they’re old, they have a tendency to loosen a little, making it a bit harder to keep your uke in tune. But the good part is, they cost less.
Tuners come in various ratios, such as 12:1 or 6:1. The bigger number refers to the number of times you have to turn the peg during tuning, before you get to the next note. The bigger the number, the higher the ratio, and the more accurately you can tune your uke. But a higher ratio also means that it takes longer to unwind your strings when you change them. The higher the ratio, the more expensive they can get.
Want a little more info? Keep reading:
5

Entire contents copyright 2012 Bartt Warburton. No reproduction without express prior written consent.
6
Here are the important things to know
The “sound hole” should face your audience. Don’t point the sound hole at yourself, the sky, or the floor. The sound comes out of this hole, so turn the ukulele towards your audience if you want them to hear you.
Basic Finger Position: If you are right-handed, you will form chords with your left hand, and strum with your right hand. If you are left-handed, of course you will form chords with your right hand and strum with your left hand. In either case, the hand that you use to form chords is called your “fingering hand.” The other hand is called the “strumming hand.”
Keep the fingers of your fingering hand perpendicular to the neck. Push down on the string you want to use, but do not let that finger touch the other strings. One string per finger! If your finger accidentally dips down and gently touches the string below, you will get a muffled note, sometimes called a “dead” note. That’s bad. Play each note cleanly!
Basic Thumb Position: The thumb of your fingering hand should rest on the back of the neck. Don’t let it peek up above the neck. By resting your thumb on the back of the neck, you are allowing your fingers to reach further. This will help you to press down on the strings more easily and cleanly.
Strumming-Hand Position: Your strumming hand should be relaxed. Don’t tense your muscles! Rotate your wrist as you strum across all four strings. You should usually strum at the place where the ukulele’s body joins the neck. You can also strum directly over the sound hole, but it is usually more natural to strum a little bit higher up the neck.
Chapter 2 Holding the Ukulele

Entire contents copyright 2012 Bartt Warburton. No reproduction without express prior written consent.
7
Whether you tune with an electronic tuner, a pitch-pipe, or by ear, you must know about “top” and “bottom” strings before you begin tuning.
The “top” string is the string furthest from your nose, when you’re in playing position. It is called “top,” because it is the highest-sounding string. Its location, however, is actually at the bottom the fingerboard. This string is commonly called the “first” string.
Conversely, the “bottom” string is the one closest to your nose when you’re in playing position. It is physically located at the top of the fingerboard, but it is the lowest-sounding string. This string is commonly called the “fourth” string.
NOTE: Ukuleles can be strung with a “High-G,” or a “Low-G” string. In other words, the G-string can be in a high octave, or in a low octave. That’s why some ukes sound deeper than others. There is no particular reason to string either way, other than personal preference. You play both of them the same way. The High-G sounds a little more gentle, and the Low-G is slightly more reminiscent of a deeper guitar sound. You can experiment and try both styles. But in both cases, the G-string is known as the “bottom” string. So when you are tuning your “top” string, you are tuning your A-string. When you tune your “bottom” string, you are tuning your G-string.
There are other tunings, but we will stick to G-C-E-A in this book. Most countries use GCEA tuning. In Canada and some other countries, however, ukulele players frequently tune to DGBE. But we’ll get to that some other day, in some other book.
Tuning with an Electronic Tuner
Get an electronic tuner. It is also known as a “clip-on” tuner, because it clips on to your instrument. Clip it onto the headstock of your uke, and turn it on. The face of the tuner will light up, and a needle or other indictor will begin to move. Turn the tuning peg of the G-string until the tuner indicates that you have hit a G-note. Presto, your G-string is in tune! Now repeat this for the C, E and A strings. I told you it was easy!
Chapter 3 Tuning the Ukulele

8
Entire contents copyright 2012 Bartt Warburton. No reproduction without express prior written consent.
NOTE: If you turn a tuning peg too far, your tuner will scroll through the other notes as you raise the pitch. You may accidentally tune beyond the note you’re aiming for. For example, if you’re aiming for a G-note, and you tighten the peg too high, you will move beyond the G-note. If you continue to tighten the peg, eventually you will reach the G-note that is in a higher octave. You will also probably break the string! The strings should not be too tight, nor should they be too loose. Pay attention to the tension of your strings when they are correctly in tune, and you will learn to recognize when you’ve tuned beyond your intended note.
Tuning with a Pitch-Pipe
A pitch-pipe is a little pipe that you blow into. It’s like a tiny four-piped flute that plays four different notes. You blow into the G, listen to the sound, and turn your tuning peg until your string matches the sound. Then repeat this for the other three strings. You need a good ear for this tool, but after you’ve been playing for a few months, your ear will begin to recognize the tones.
Tuning By Ear
I don’t mean to let you down, but I’m not going to explain ear-tuning. It’s difficult for beginners, it takes a long time to master, and virtually every player uses an electronic tuner anyway. It is absolutely an extremely important part of being a musician, but this is a beginner book. You should be having fun, instead of getting frustrated. Tuning by ear can frustrate a beginner, and make you want to put the instrument down and do something else. But if you get an electronic tuner, you can tune in about one minute. Learn ear-tuning after you get more familiar with your instrument. Traditionalists will jeer at my approach, but I’m not afraid to use technology. Are you?
Stretching and changing the strings
New ukuleles go out of tune every few minutes. But after a few weeks of playing, they will stay in tune. And whenever you change your strings, they will go out of tune for a couple of weeks. That’s because the strings have been wound up in a little bag at the factory, and they need to stretch out.
It’s easy to stretch your strings. Just grab them and yank on them. Then tune them back up, and repeat. Do this about a dozen times, then repeat it every half-hour or so. Eventually your strings will be stretched out, and they will stay in tune.
How often should you change your strings? It depends on how frequently you play. If you are a professional player, you might change them every month or two. But if you were a professional player, you wouldn’t be reading this book. Casual players might change their strings once per year. Some ukuleles hanging on my wall have had the same strings for two years. Maybe you’ll change them every few months. Strings are inexpensive, so try different brands. Your instrument can have many different sounds and feels, depending on what brand of strings you use. It makes a big difference, so experiment with a variety of strings.
Stretch your strings! They’re pretty hard to break, so go for it!

Chapter 4 What is a “Chord,” and what is a “Note?”
A “note” is a single tone. Pluck one string, and you’re playing a “note.”
A “chord” is any combination of two or more “notes.”
So if you pluck two strings simultaneously, you are playing a “chord.” A chord, therefore, is made up of a combination of notes. Any combination will make a chord. Of course, some chords sound better than others. But even if you pluck two discordant notes simultaneously, and make an awful, annoying sound, you are still playing a “chord.” It’s just an ugly chord. Maybe it’s better to stick with the beautiful chords, unless you’re writing a song about fingernails screeching across a blackboard.
Entire contents copyright 2012 Bartt Warburton. No reproduction without express prior written consent.
9
MAHALO INVASION! Bartt autographs a whole bunch of Mahalo’s in New Zealand

Chapter 5 How to Read Chord Diagrams
Entire contents copyright 2012 Bartt Warburton. No reproduction without express prior written consent.
10
Here’s an explanation of what those lines and dots mean.
Look for three things:
1. Which string?
2. Which fret?
3. Which finger?
The diagram on the top right is for a C-chord. The dot tells you where to put your finger: fret number three, on the A-string.
The red “3” tells you which finger to use. Your fingers are numbered 1 through 4, beginning with your index finger. So finger number three is your ring finger.
Therefore, here’s how you play a C-chord:
1. Which string? The A-string.
2. Which fret? The third fret.
3. Which finger? Your ring finger.
4. Strum all four strings.
3
C

Entire contents copyright 2012 Bartt Warburton. No reproduction without express prior written consent.
11
Play an F-chord like this:
1. Which strings? The G-string and the E-string.
2. Which frets? The first and second frets.
3. Which fingers? Your index and middle fingers.
Put your index finger on the first fret of the E-string. Put your middle finger on the second fret of the G-string. Strum all four strings.
Some books and charts do not include the number to indicate which finger you use. In that case, go to Bartt.net and watch some free videos that will show you the correct fingering positions.
Here’s another example:
21
F

There are seven basic chords: A, B, C, D, E, F, and G.
In addition to those seven chords, there are plenty more chords. Each of those seven chords has an associated minor, seventh, diminished, augmented, ninth, and lots of other variations. That’s why it’s important to begin with these seven, which are known as the “major” chords.
Here’s a chart that will help you learn your chords:
Entire contents copyright 2012 Bartt Warburton. No reproduction without express prior written consent.
12
Chapter 6 The Concepts of Majors, Minors, and Sevenths
Entire contents copyright 2012 Bartt Warburton. No reproduction without express prior written consent.
13
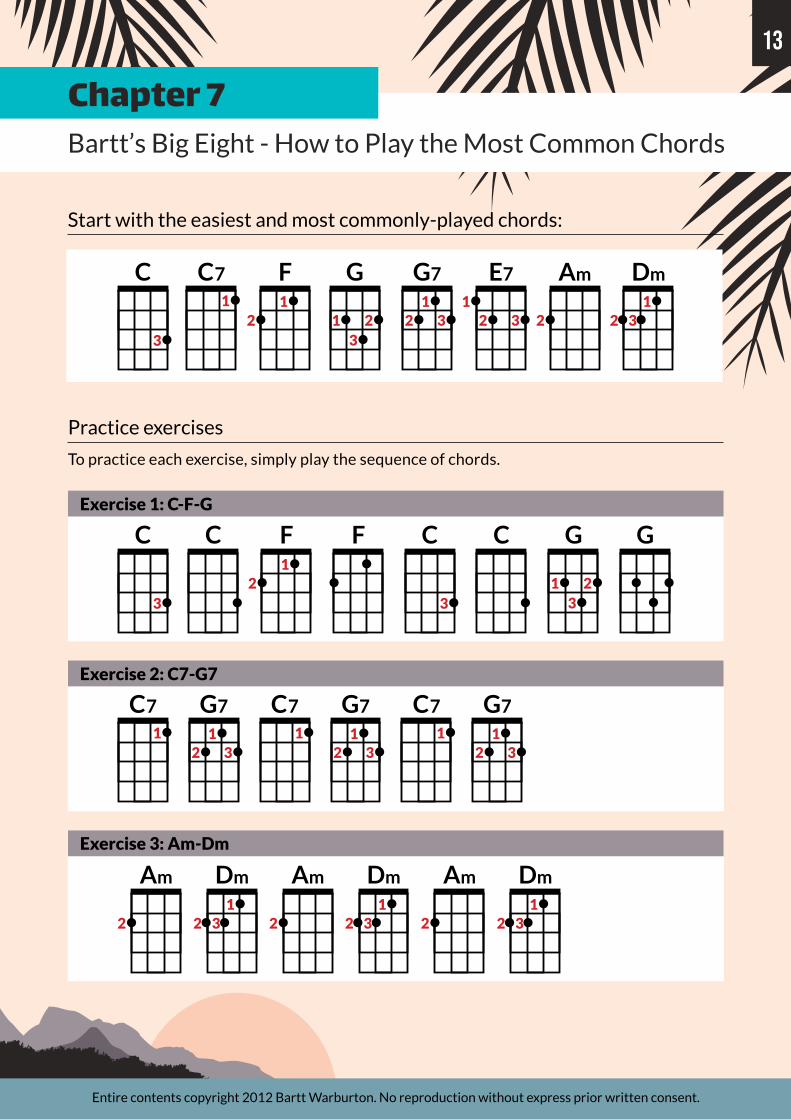
Start with the easiest and most commonly-played chords:
Chapter 7 Bartt’s Big Eight - How to Play the Most Common Chords
Practice exercises
To practice each exercise, simply play the sequence of chords.
Exercise 1: C-F-G
Exercise 2: C7-G7
Exercise 3: Am-Dm
21
F
21
F F
2
Am
2
Am
2
Am
2
Am
3
C
3
C
3
CC C
1
C7
1
C71
C71
C7
21
G7
3
21
G7
3 21
G7
3 21
G7
3
1
G
23
1
G
23
G
2
E7
31
2
Dm
31
2
Dm
31
2
Dm
31
2
Dm
31

3
C
3
C
Entire contents copyright 2012 Bartt Warburton. No reproduction without express prior written consent.
14
Strums are written with arrows. If the arrow points up, strum upward.
If the arrow points down, strum downward.
You can strum with any finger, but the simplest way to begin is by using your index finger. When you strum downward, use the fingernail of your index finger. When you strum upwards, use the pad of your finger.
Here’s a strumming exercise.
Strum once per arrow. You should be strumming like this:
Down-down-down-up, Down-up-up-up
Down-down-down-up, Down-up-up-up
Chapter 8 Basic Strumming Techniques
When I strum my ukulele
I get better, almost daily!

9a: C to Am
Ring finger and middle finger. Use the correct finger for the job.
9b: C to C7
Use your ring and index fingers.
9c: F to Dm
Add your ring finger to make a new chord.
9b: F to Am
Remove your index finger to make a new chord.
3
C
Entire contents copyright 2012 Bartt Warburton. No reproduction without express prior written consent.
15
These exercises will help you learn some common chord changes. Practice by switching back and forth between the chords.
Each pair of chords is a commonly-used chord change. You can make your own exercises by pairing any two chords, and strumming them back and forth. Then try grouping three or four chords into a pattern.
Chapter 9 Exercises for Switching Chords
21
F
21
F
2
Am
2
Am
2
Dm
31
1
C7
3
C

Entire contents copyright 2012 Bartt Warburton. No reproduction without express prior written consent.
16
A “sharp” is a note or chord that is one fret closer to the sound hole.
A “flat” is a note or chord that is one fret further from the sound hole.
A “sharp” is symbolized by the pound sign: #
A “flat” is symbolized by a lower-case letter “b”: b
Chapter 10 What is a “Sharp,” and what is a “Flat?”
Here’s an example: Here’s another example:
The first chord is a B-chord, played on frets 2, 3, and 4.
The second chord is a B-flat chord, played on frets 1, 2, and 3.
The first chord is a G-flat, played on frets 1, 2, and 3.
The second chord is a G, played on frets 2 and 3.
The third chord is a G-sharp, played on frets 3, 4, and 5.
The blue “3” indicates that those notes are played on fret number 3.
When you’re reading a chord chart, keep an eye out for these symbols:
# (flat)
b (sharp)
1
G
23
1
Gb2
34
2
Bb11
32
B
11
3
1
G#2
34
3

Entire contents copyright 2012 Bartt Warburton. No reproduction without express prior written consent.
17
The term “12-bar blues” refers to the most common blues pattern. It contains twelve “bars,” or “measures.” In the example above, each “bar,” or “measure,” is indicated by a chord diagram. That’s why there are twelve chord diagrams. In this exercise, you will play a 12-Bar Blues in 4/4 time.
The term “4/4” time is pronounced “four-four” time. It means that for each measure, you will count to four. For example, every time you play a C-chord, you will count like this: “C-two-three-four.”
To practice this blues exercise, simply play the twelve chords. Play each chord for one “measure,” or “bar.” In other words, each time you play a chord, you will play for the count of “1-2-3-4.”
The final chord in this particular progression, a G-chord, is called a “turnaround” chord. It ends the pattern, while simultaneously leading us back to the beginning of the pattern. The sound of the turnaround chord is a signal to tell us to repeat the pattern. When you play this blues pattern a bunch of times, and you feel like finishing the song, simply replace the final G-chord with a C-chord. You will recognize that the pattern now sounds “finished.” It’s more satisfying to “finish” the pattern, instead of just fizzling out on a random chord.
Chapter 11 Simple Practice Song: 12-Bar Blues
BAR 1 2 3 4 5 6 7 8 9 10 11 12
CHORD C C C C F F C C G F C G
Entire contents copyright 2012 Bartt Warburton. No reproduction without express prior written consent.
18
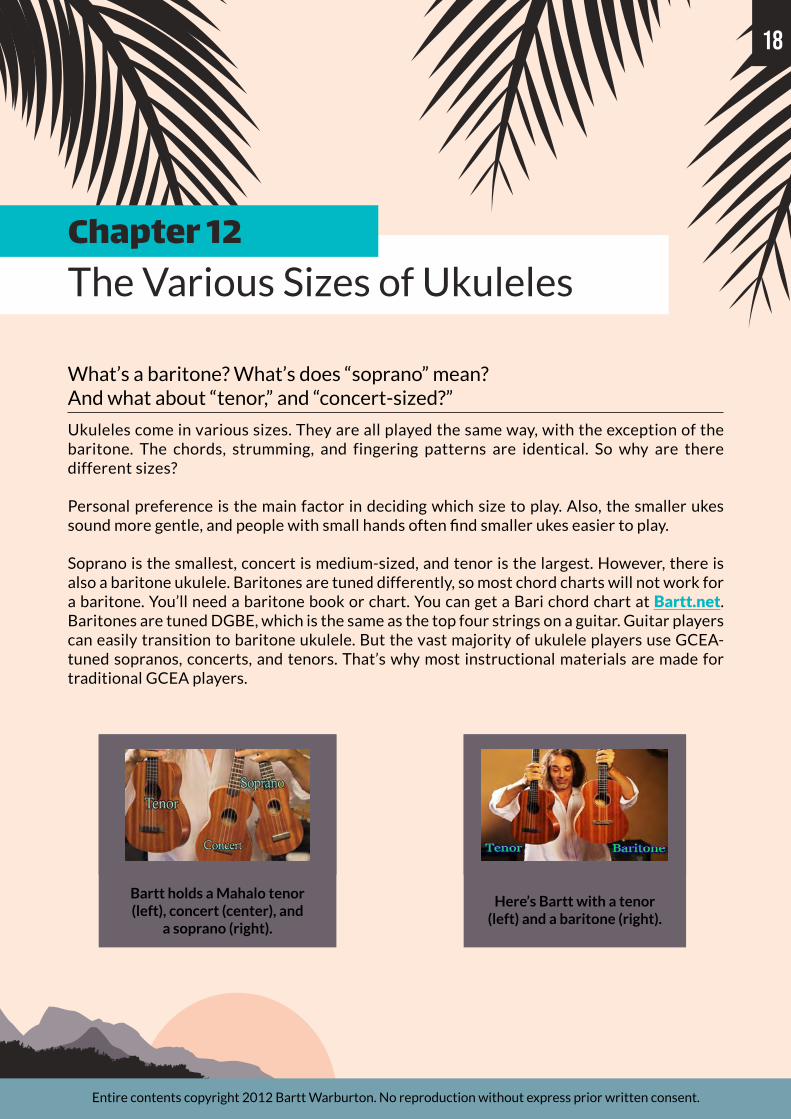
What’s a baritone? What’s does “soprano” mean? And what about “tenor,” and “concert-sized?”
Ukuleles come in various sizes. They are all played the same way, with the exception of the baritone. The chords, strumming, and fingering patterns are identical. So why are there different sizes?
Personal preference is the main factor in deciding which size to play. Also, the smaller ukes sound more gentle, and people with small hands often find smaller ukes easier to play.
Soprano is the smallest, concert is medium-sized, and tenor is the largest. However, there is also a baritone ukulele. Baritones are tuned differently, so most chord charts will not work for a baritone. You’ll need a baritone book or chart. You can get a Bari chord chart at Bartt.net. Baritones are tuned DGBE, which is the same as the top four strings on a guitar. Guitar players can easily transition to baritone ukulele. But the vast majority of ukulele players use GCEA-tuned sopranos, concerts, and tenors. That’s why most instructional materials are made for traditional GCEA players.
Chapter 12 The Various Sizes of Ukuleles
Bartt holds a Mahalo tenor (left), concert (center), and
a soprano (right).
Here’s Bartt with a tenor (left) and a baritone (right).

Entire contents copyright 2012 Bartt Warburton. No reproduction without express prior written consent.
19
Why are there two different types of G-strings?
It’s a personal preference. Many players use both types of G-strings. The main difference, besides the sound, is that most low-G strings are “wound” strings.
What is a “wound” string?
Most ukulele strings are made of a single strand of nylon, acrylic, or similar material. This single-strand type of string is called a “monofilament” string. This material is flexible, and it sounds good. But in order to vibrate and resonate, it needs to be fairly thin. A low-G string, on the other hand, needs to be fairly thick.
Rather than making thick monofilament low-G strings, some string manufacturers construct their low-G strings by wrapping steel or nickel around a thinner monofilament string. This gives the string a deeper sound, and turns a “monofilament” string into a “wound” string.
Wound strings can break much more easily than monofilament strings. Also, the metal might wear down the fingernails on your strumming hand. That’s why some players prefer high-G strings. Like I said, it’s a personal preference.
Chapter 13 Strings: Low-G or High-G?
Wound
Monofilament

20
Entire contents copyright 2012 Bartt Warburton. No reproduction without express prior written consent.
Here’s a 7-Step overview of what to do, and how to do it:
Get an electronic tuner:
Tuning by ear is difficult for beginners, because you won’t recognize when a string is out of tune. You can learn ear-tuning later, after the notes become familiar. Treat yourself to a clip-on tuner with a built-in backlight that changes color when you’re in tune.
Learn these three chords:
C, F and G. They’re relatively easy. There may be a few other chords that are easier, but the C-F-G combination will allow you to play hundreds of songs. Isn’t that what you really want to do?
Learn how to count to four:
If you can’t keep time, you sound terrible! Learn this vocabulary: “Measure” is the count of “1-2-3-4.” “Beat” is each individual note. So when you’re counting “1-2-3-4,” you’re counting one “measure” of four “beats.” When you can do this in a steady rhythm, you’re keeping time! Test yourself with a metronome.
Learn these two simple strums:
Strum #1: Down-Down-Down-Down. Strum #2: Down-Up-Down-Up.
These are simple, and they’ll get you to the next step. Add fancy strums after you learn the easy ones.
Practice switching chords:
You won’t be able to play songs very well, until you can switch chords. Build your muscle memory by doing the practice exercises I gave you earlier. Do them a million times, until muscle memory kicks in!
Practice switching chords, while keeping time with a metronome:
Keeping in time is mandatory when playing with other people. If you constantly go out of time, you’ll annoy everyone. You may think your timing is perfect, but a metronome will be the true judge.
Find some ukulele friends and go to Meet-ups:
It’s fun! You can friend me on Facebook to get free updates, lessons, videos and more. Be Bartt’s Friend!
Chapter 14 How Do I Start?
1
3
6
2
5
4
7
20

Entire contents copyright 2012 Bartt Warburton. No reproduction without express prior written consent.
21
Now that you’re an accomplished beginner, it’s time to start exploring the fancy stuff!
Finger-picking
Chord solos
Fancy strums
Fancy chords
Scales
Flashy solos
Online videos
Performances
Fun
Thrills
Chocolate (Why not? Chocolate is good!)
All of these things await you. Aren’t you glad you got your uke on? Music is infinite! For more advanced lessons, you can get Bartt’s “Ultimate Ukulele” video, or try his other books, e-books, and downloadable lessons.
Check it out right now: Preview Bartt’s Fancy Stuff.
Chapter 15 What Next?

22
Entire contents copyright 2012 Bartt Warburton. No reproduction without express prior written consent.
“Mahalo” means “Thank You.” “Mahalo” is the Hawai’ian word for “Thank You.”
On behalf of myself and Mahalo ukuleles, I would love to say “Mahalo” for discovering the fun and beauty of playing ukulele. I’m happy that you’ve discovered this book, and the accompanying video. I hope that these lessons bring you joy as they welcome you into the world of ukulele.
May all of your strums be happy ones, and I hope we cross paths on a beach some time soon!
22
www.mahalo-ukulele.com