understanding remedyforce sandboxes - bmc software · with the winter 15 release, we now have a...
TRANSCRIPT
White Paper
Understanding Remedyforce
Sandboxes
Getting Started with Remedyforce Series
Eric J Cobb
25 March 2015
PAGE 1 OF 19 Copyright BMC Software, Inc. 2015
Understanding Remedyforce Sandboxes
Getting Started with Remedyforce Serie s
Welcome to the “Getting Started with BMC Remedyforce” Series
Today’s IT departments must drive business growth and innovation, while coping with less resources and increasing complexity. To do this,
they require an IT Service Management solution that provides best practices while minimizing costs. BMC Remedyforce is built on
Salesforce—the world's most widely used cloud platform—to deliver complete IT service management functionality with the secure social,
mobile, and collaborative capabilities users expect.
With the “Getting Started with Remedyforce” white paper series, our aim is to help you leverage BMC Remedyforce to improve the
effectiveness and efficiency of your ITSM operations. Each paper addresses a specific area of interest and provides you with conceptual,
functional and technical best practices to make configuration decisions and take action to gain value from your BMC Remedyforce
investment.
Understanding Remedyforce Sandboxes BMC provides you with various options for sandbox environments to ensure you are able to adequately test changes, versions, etc. before
moving them into production use. While we’ve seen customers try to shortcut the process of getting a change implemented quickly by editing
the production environment directly, creating changes in your production Remedyforce environment has never been and never will be a best
practice. When changes are made to your environment without the proper testing, there is a higher chance for things to go wrong. This is
why the Remedyforce Services Team always recommends to make any changes in your sandbox environment first. This white paper will
discuss the differences between the various types of sandboxes, what can be moved between sandboxes, and how to leverage a new
feature in Winter ’15 that makes life a lot easier: the new Pentaho Migration Package.
Understanding Remedyforce Sandboxes – Types of Sandboxes There are different types of sandboxes that you can use with Remedyforce and Salesforce. Each type of sandbox provides you with different
specifications and functionalities for Remedyforce. We will explain the different types of sandboxes here and discuss the features of each.
Full Sandbox Full Sandboxes are intended to be an exact replica of your production implementation and are to be used as a testing
environment. Full sandboxes can be added to your license agreement for an additional charge, and your Remedyforce sales
representative can tell you more about pricing and options. You can refresh your full sandbox from production only once every 29
days, so it’s a good idea to plan refreshes carefully.
Developer Sandbox Developer Sandboxes are intended to be used as a safe place to do coding and testing in an isolated environment. Developer
sandboxes contain a copy of your organizations metadata or configurations. This does not include any data that was configured in
your production environment. There are also set storage limits. For example, with a developer sandbox, you are limited to 200 MB
of files and 200 MB of data. The developer sandbox is provided free of charge with Remedyforce. This sandbox can be refreshed
every 24 hours.
Developer Pro Sandbox Developer Pro Sandboxes are the same as developer sandboxes, but provide you with higher storage limits. The storage limits
for Developer Pro sandboxes are 1 GB of files and 1 GB of data. There is a charge associated with this sandbox, which can be
discussed with your Remedyforce sales representative. This sandbox can also be refreshed every 24 hours.
PAGE 2 OF 19 Copyright BMC Software, Inc. 2015
Understanding Remedyforce Sandboxes
Getting Started with Remedyforce Serie s
Partial Copy Sandbox Partial Copy Sandboxes are intended to be utilized for testing purposes. The purpose of this environment is quality assurance
tasks, such as user acceptance testing, regression testing, and training. The limits for this sandbox are 5 GB of files and 5 GB of
data. There is also a cost associated with this sandbox, which can be discussed with your Remedyforce sales representative. This
sandbox can be refreshed every 5 days.
Understanding Remedyforce Sandboxes – Types of “Data” and How to Move between Orgs Within Remedyforce, there are different types of data. In order to keep your sandbox environment and production environment in sync, you’ll
be faced with the task of moving this data between orgs. Based on what it is you want to move, we classify it differently and have different
functions on how to move/migrate this “data.” Understanding the different data types will help later on with how you move/migrate within your
orgs.
Metadata What is metadata? Metadata lies at the heart of the Force.com platform. The Force.com IDE, Force.com Migration Tool, and the
browser-based user interface that you use to add records in your Force.com applications (BMC Remedyforce) are all powered by
metadata. There are two different forms of metadata within the Remedyforce environment: 1) metadata that is part of the
Remedyforce Managed Package and 2) metadata that is not (custom metadata). Some of the items which are part of the
Remedyforce Managed Package, if manipulated or changed, will not necessarily move from your sandbox environment to your
production environment because it is part of the Remedyforce Managed Package. This Metadata is restricted from being
manipulated by BMC. For example, if you make a change to a field set within your sandbox environment and try to promote it to
production, it will not be available because it is restricted by BMC as part of the Managed Package. The other form of metadata is
custom metadata. This includes all the custom fields, custom workflows, custom field sets, etc. that could be promoted to your
production environment.
We will discuss later in this white paper the process to move metadata via change sets.
Data In BMC Remedyforce, many of the configurations that are performed within Remedyforce are considered data. This includes
Categories, Templates, Service Requests, Impact, Urgency, Priority, Quickviews and others. Sometimes it is not clear to
administrators that this data can be moved easily from the sandbox environment to the production environment. Before the Winter
15 release of Remedyforce, administrators would have to either use data loader to export/import this data or recreate it manually.
With the Winter 15 release, we now have a Pentaho Migration package that can do this for you.
We will discuss later in this white paper the process to move data via the new Pentaho Package.
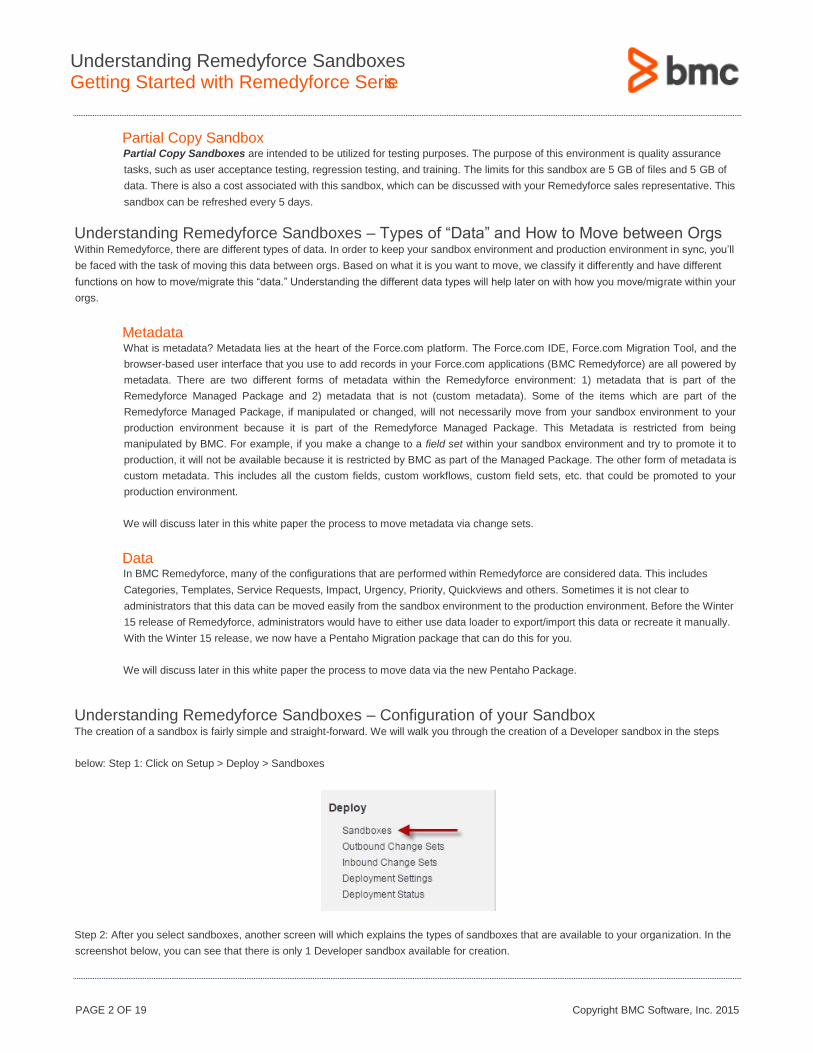
Understanding Remedyforce Sandboxes – Configuration of your Sandbox The creation of a sandbox is fairly simple and straight-forward. We will walk you through the creation of a Developer sandbox in the steps
below: Step 1: Click on Setup > Deploy > Sandboxes
Step 2: After you select sandboxes, another screen will which explains the types of sandboxes that are available to your organization. In the
screenshot below, you can see that there is only 1 Developer sandbox available for creation.
PAGE 3 OF 19 Copyright BMC Software, Inc. 2015
Understanding Remedyforce Sandboxes
Getting Started with Remedyforce Serie s
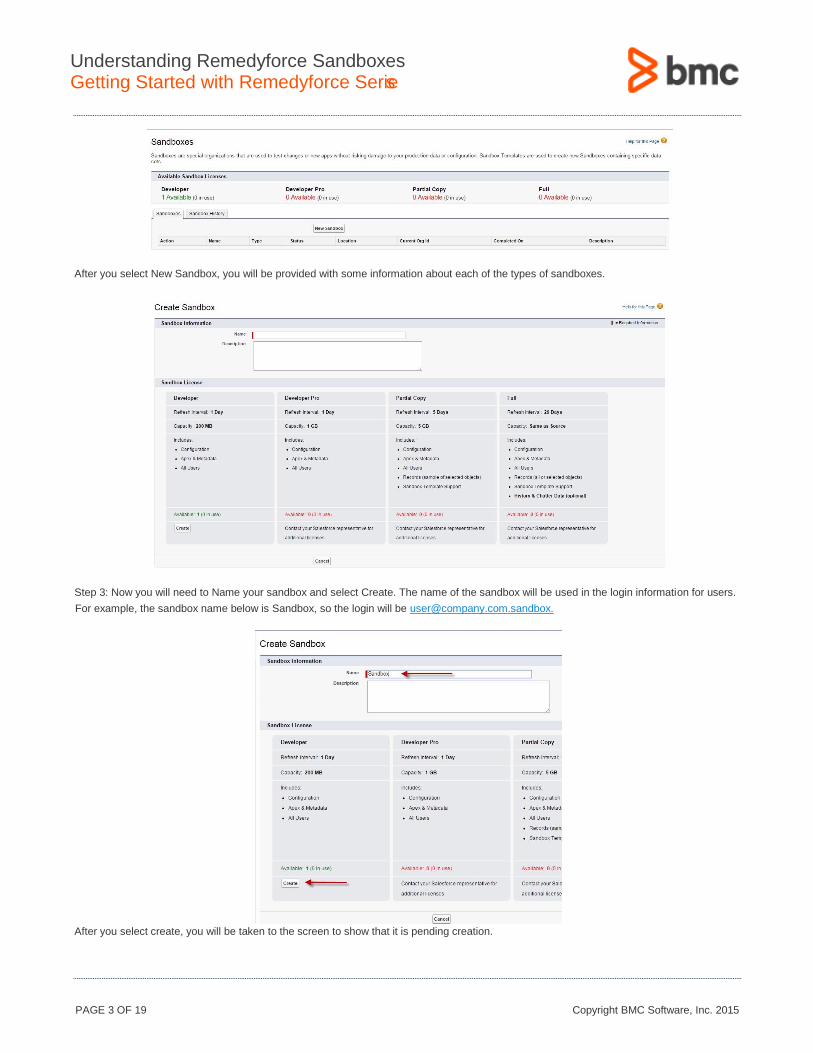
After you select New Sandbox, you will be provided with some information about each of the types of sandboxes.
Step 3: Now you will need to Name your sandbox and select Create. The name of the sandbox will be used in the login information for users.
For example, the sandbox name below is Sandbox, so the login will be [email protected].
After you select create, you will be taken to the screen to show that it is pending creation.
PAGE 4 OF 19 Copyright BMC Software, Inc. 2015
Understanding Remedyforce Sandboxes
Getting Started with Remedyforce Serie s
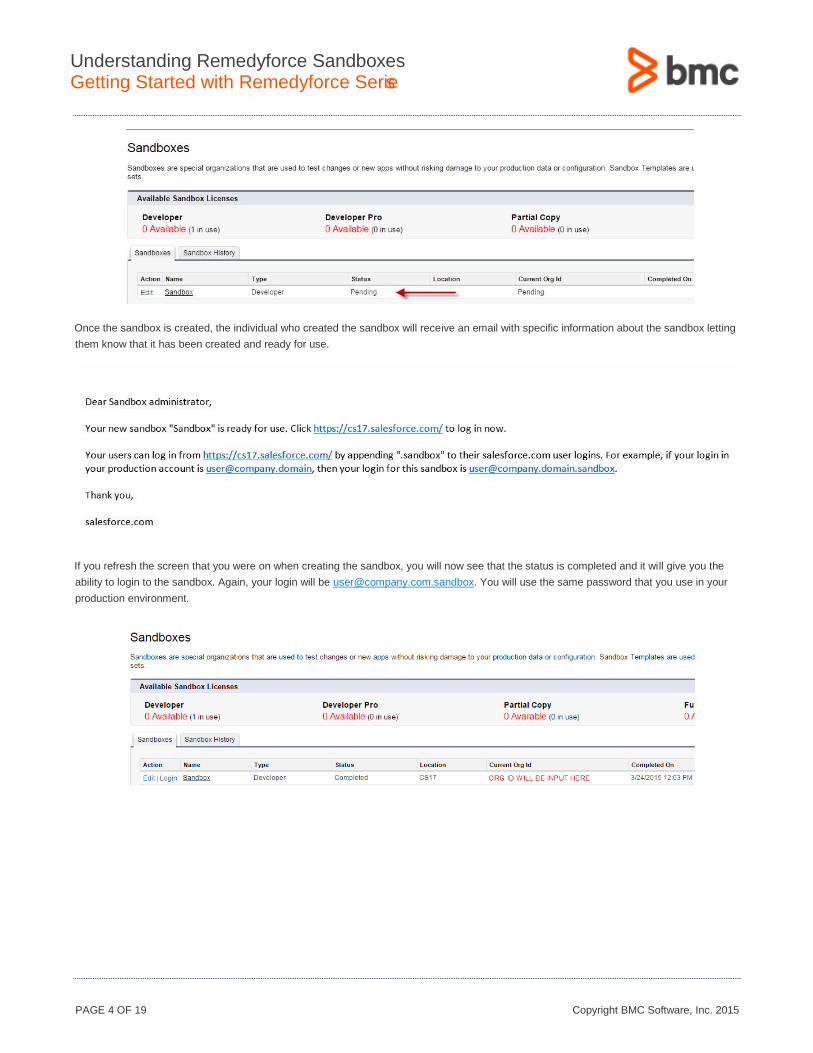
Once the sandbox is created, the individual who created the sandbox will receive an email with specific information about the sandbox letting
them know that it has been created and ready for use.
If you refresh the screen that you were on when creating the sandbox, you will now see that the status is completed and it will give you the
ability to login to the sandbox. Again, your login will be [email protected]. You will use the same password that you use in your
production environment.
PAGE 5 OF 19 Copyright BMC Software, Inc. 2015
Understanding Remedyforce Sandboxes
Getting Started with Remedyforce Serie s
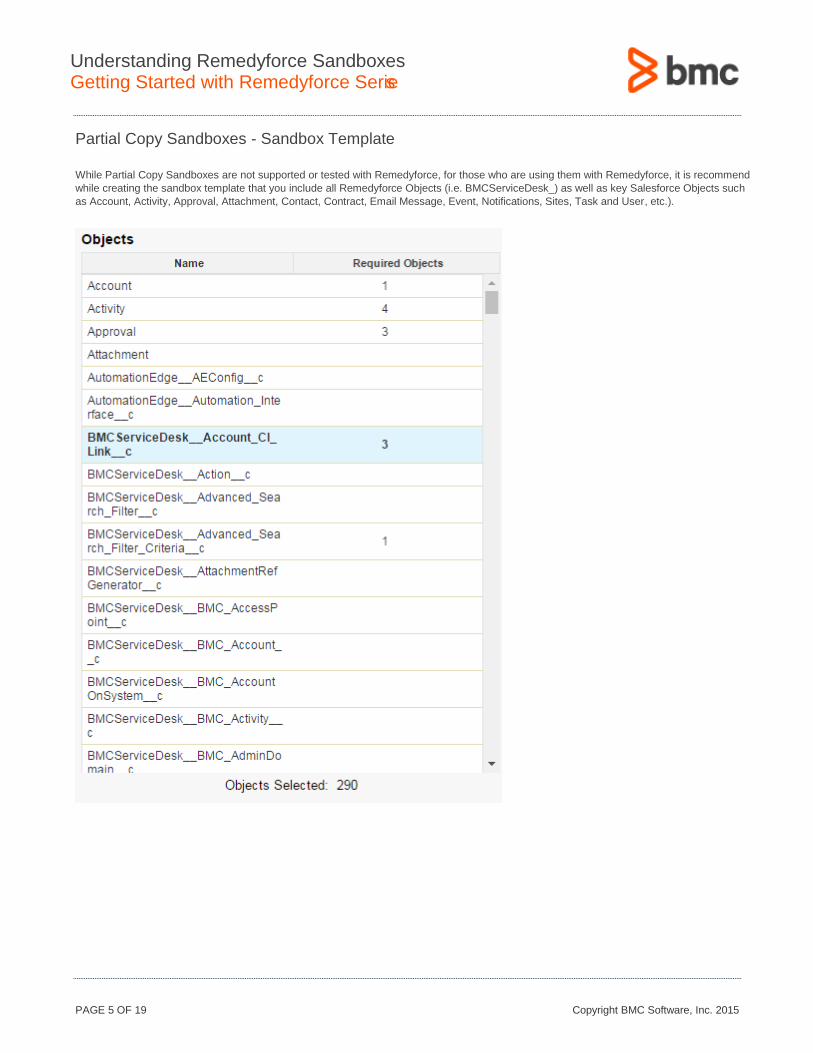
Partial Copy Sandboxes - Sandbox Template
While Partial Copy Sandboxes are not supported or tested with Remedyforce, for those who are using them with Remedyforce, it is recommend
while creating the sandbox template that you include all Remedyforce Objects (i.e. BMCServiceDesk_) as well as key Salesforce Objects such
as Account, Activity, Approval, Attachment, Contact, Contract, Email Message, Event, Notifications, Sites, Task and User, etc.).
PAGE 6 OF 19 Copyright BMC Software, Inc. 2015
Understanding Remedyforce Sandboxes
Getting Started with Remedyforce Serie s
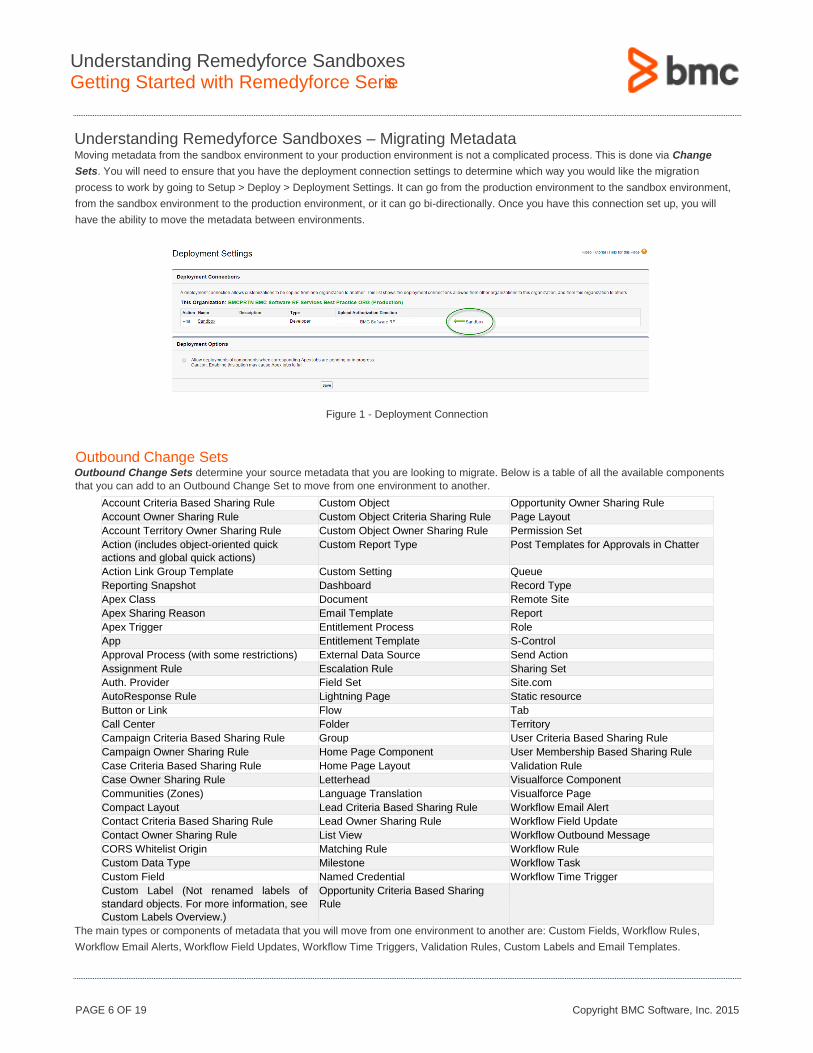
Understanding Remedyforce Sandboxes – Migrating Metadata Moving metadata from the sandbox environment to your production environment is not a complicated process. This is done via Change
Sets. You will need to ensure that you have the deployment connection settings to determine which way you would like the migration
process to work by going to Setup > Deploy > Deployment Settings. It can go from the production environment to the sandbox environment,
from the sandbox environment to the production environment, or it can go bi-directionally. Once you have this connection set up, you will
have the ability to move the metadata between environments.
Figure 1 - Deployment Connection
Outbound Change Sets Outbound Change Sets determine your source metadata that you are looking to migrate. Below is a table of all the available components
that you can add to an Outbound Change Set to move from one environment to another.
Account Criteria Based Sharing Rule Custom Object Opportunity Owner Sharing Rule
Account Owner Sharing Rule Custom Object Criteria Sharing Rule Page Layout
Account Territory Owner Sharing Rule Custom Object Owner Sharing Rule Permission Set
Action (includes object-oriented quick
actions and global quick actions)
Custom Report Type Post Templates for Approvals in Chatter
Action Link Group Template Custom Setting Queue
Reporting Snapshot Dashboard Record Type
Apex Class Document Remote Site
Apex Sharing Reason Email Template Report
Apex Trigger Entitlement Process Role
App Entitlement Template S-Control
Approval Process (with some restrictions) External Data Source Send Action
Assignment Rule Escalation Rule Sharing Set
Auth. Provider Field Set Site.com
AutoResponse Rule Lightning Page Static resource
Button or Link Flow Tab
Call Center Folder Territory
Campaign Criteria Based Sharing Rule Group User Criteria Based Sharing Rule
Campaign Owner Sharing Rule Home Page Component User Membership Based Sharing Rule
Case Criteria Based Sharing Rule Home Page Layout Validation Rule
Case Owner Sharing Rule Letterhead Visualforce Component
Communities (Zones) Language Translation Visualforce Page
Compact Layout Lead Criteria Based Sharing Rule Workflow Email Alert
Contact Criteria Based Sharing Rule Lead Owner Sharing Rule Workflow Field Update
Contact Owner Sharing Rule List View Workflow Outbound Message
CORS Whitelist Origin Matching Rule Workflow Rule
Custom Data Type Milestone Workflow Task
Custom Field Named Credential Workflow Time Trigger
Custom Label (Not renamed labels of
standard objects. For more information, see
Custom Labels Overview.)
Opportunity Criteria Based Sharing
Rule
The main types or components of metadata that you will move from one environment to another are: Custom Fields, Workflow Rules,
Workflow Email Alerts, Workflow Field Updates, Workflow Time Triggers, Validation Rules, Custom Labels and Email Templates.
PAGE 7 OF 19 Copyright BMC Software, Inc. 2015
Understanding Remedyforce Sandboxes
Getting Started with Remedyforce Serie s
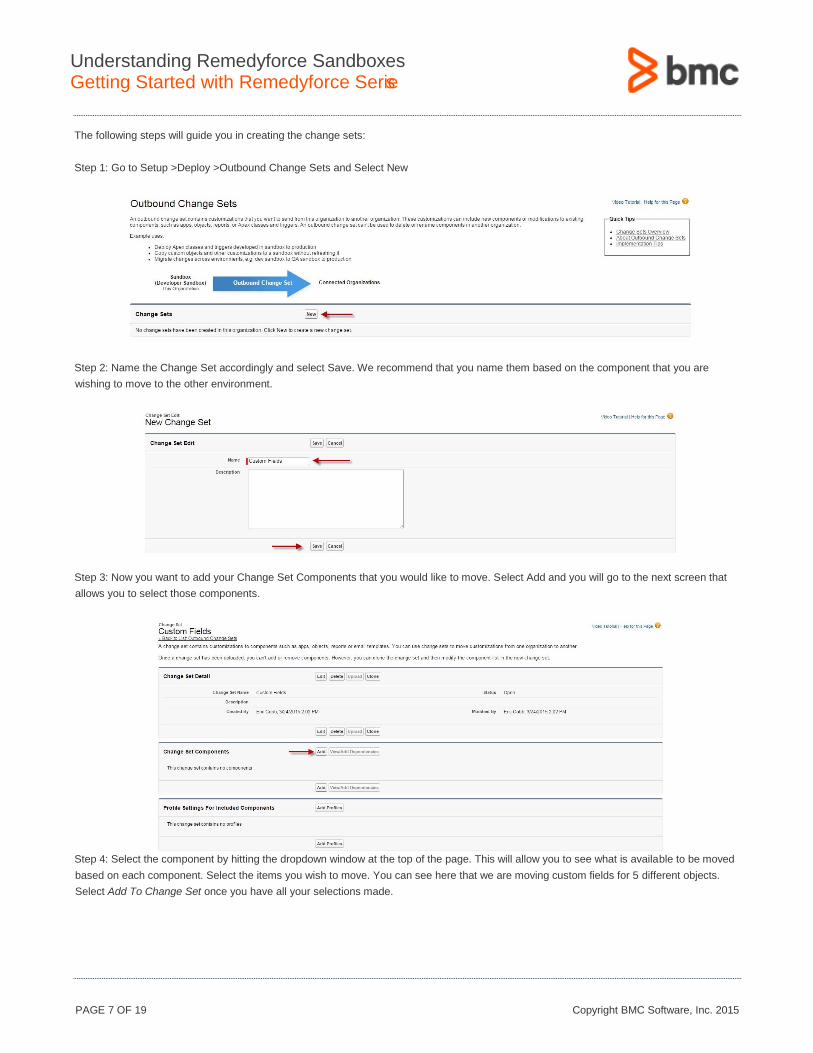
The following steps will guide you in creating the change sets:
Step 1: Go to Setup >Deploy >Outbound Change Sets and Select New
Step 2: Name the Change Set accordingly and select Save. We recommend that you name them based on the component that you are
wishing to move to the other environment.
Step 3: Now you want to add your Change Set Components that you would like to move. Select Add and you will go to the next screen that
allows you to select those components.
Step 4: Select the component by hitting the dropdown window at the top of the page. This will allow you to see what is available to be moved
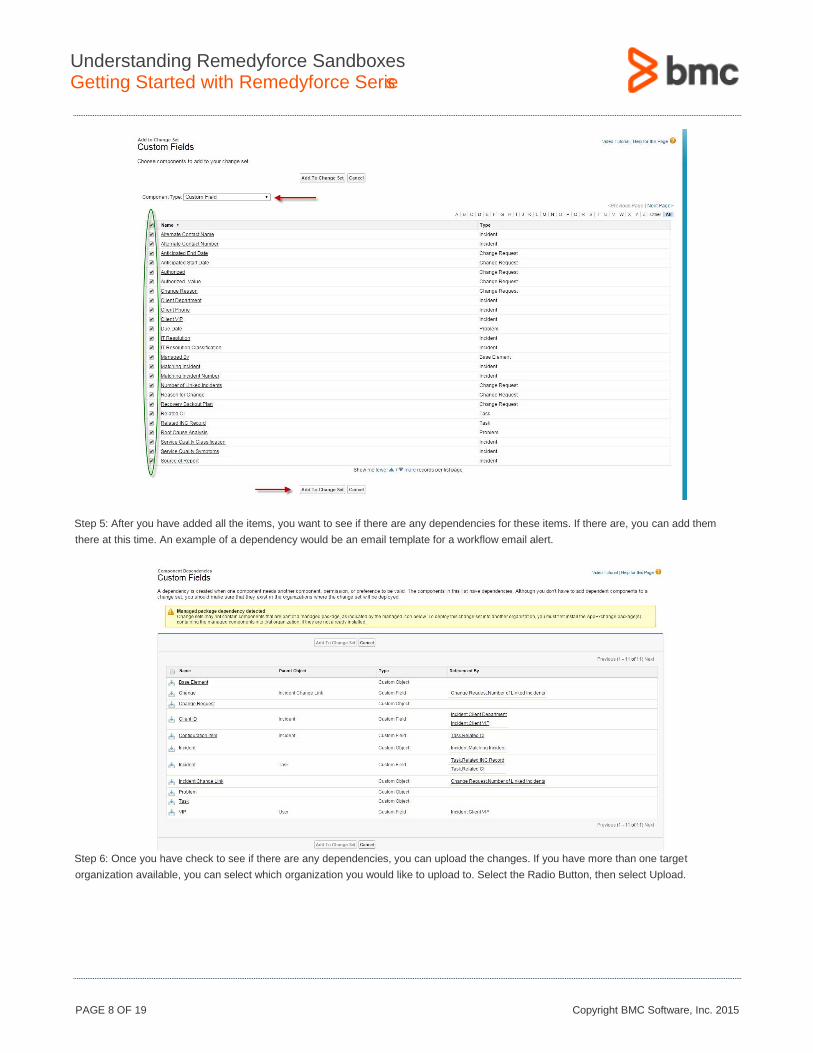
based on each component. Select the items you wish to move. You can see here that we are moving custom fields for 5 different objects.
Select Add To Change Set once you have all your selections made.
PAGE 8 OF 19 Copyright BMC Software, Inc. 2015
Understanding Remedyforce Sandboxes
Getting Started with Remedyforce Serie s
Step 5: After you have added all the items, you want to see if there are any dependencies for these items. If there are, you can add them
there at this time. An example of a dependency would be an email template for a workflow email alert.
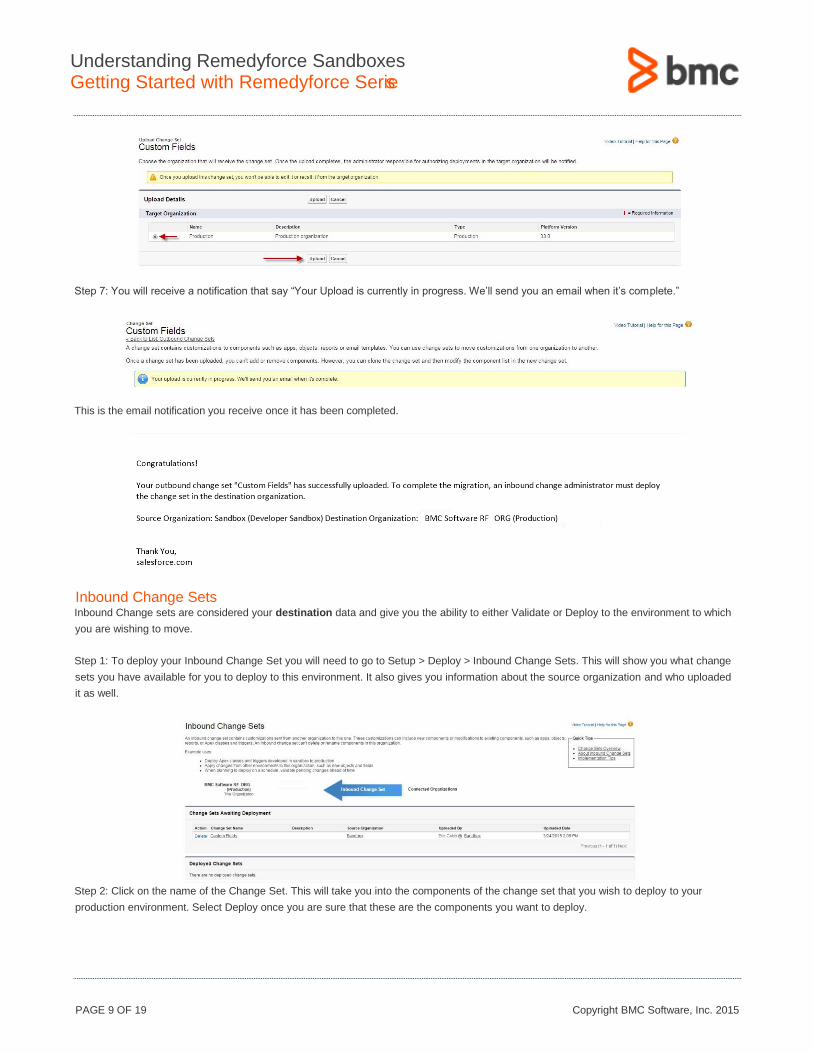
Step 6: Once you have check to see if there are any dependencies, you can upload the changes. If you have more than one target
organization available, you can select which organization you would like to upload to. Select the Radio Button, then select Upload.
PAGE 9 OF 19 Copyright BMC Software, Inc. 2015
Understanding Remedyforce Sandboxes
Getting Started with Remedyforce Serie s
Step 7: You will receive a notification that say “Your Upload is currently in progress. We’ll send you an email when it’s complete.”
This is the email notification you receive once it has been completed.
Inbound Change Sets Inbound Change sets are considered your destination data and give you the ability to either Validate or Deploy to the environment to which
you are wishing to move.
Step 1: To deploy your Inbound Change Set you will need to go to Setup > Deploy > Inbound Change Sets. This will show you what change
sets you have available for you to deploy to this environment. It also gives you information about the source organization and who uploaded
it as well.
Step 2: Click on the name of the Change Set. This will take you into the components of the change set that you wish to deploy to your
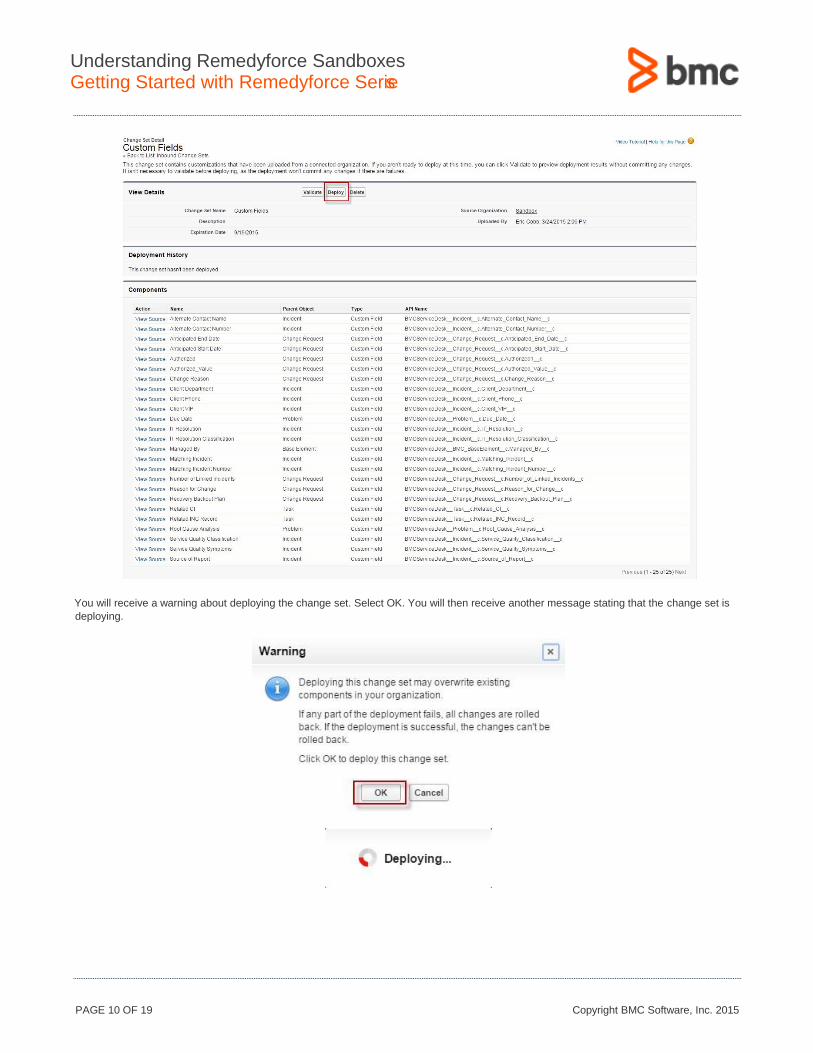
production environment. Select Deploy once you are sure that these are the components you want to deploy.
PAGE 10 OF 19 Copyright BMC Software, Inc. 2015
Understanding Remedyforce Sandboxes
Getting Started with Remedyforce Serie s
You will receive a warning about deploying the change set. Select OK. You will then receive another message stating that the change set is
deploying.
PAGE 11 OF 19 Copyright BMC Software, Inc. 2015
Understanding Remedyforce Sandboxes
Getting Started with Remedyforce Serie s
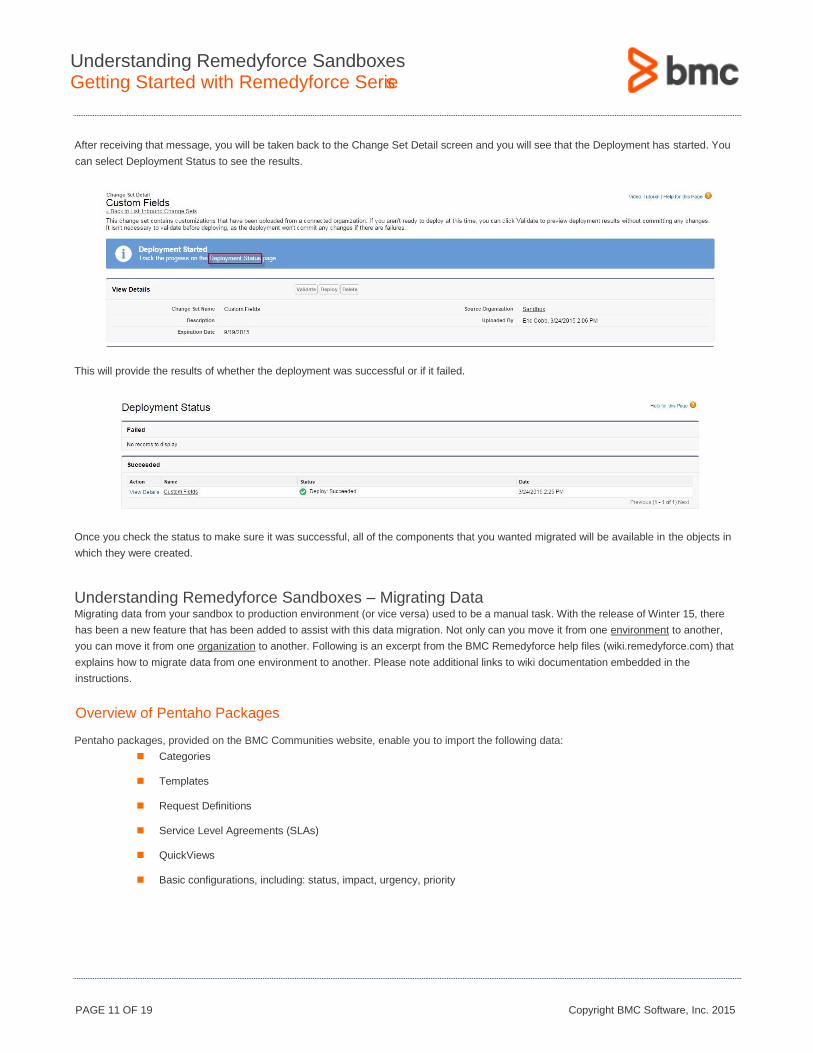
After receiving that message, you will be taken back to the Change Set Detail screen and you will see that the Deployment has started. You
can select Deployment Status to see the results.
This will provide the results of whether the deployment was successful or if it failed.
Once you check the status to make sure it was successful, all of the components that you wanted migrated will be available in the objects in
which they were created.
Understanding Remedyforce Sandboxes – Migrating Data Migrating data from your sandbox to production environment (or vice versa) used to be a manual task. With the release of Winter 15, there
has been a new feature that has been added to assist with this data migration. Not only can you move it from one environment to another,
you can move it from one organization to another. Following is an excerpt from the BMC Remedyforce help files (wiki.remedyforce.com) that
explains how to migrate data from one environment to another. Please note additional links to wiki documentation embedded in the
instructions.
Overview of Pentaho Packages
Pentaho packages, provided on the BMC Communities website, enable you to import the following data:
Categories
Templates
Request Definitions
Service Level Agreements (SLAs)
QuickViews
Basic configurations, including: status, impact, urgency, priority
PAGE 12 OF 19 Copyright BMC Software, Inc. 2015
Understanding Remedyforce Sandboxes
Getting Started with Remedyforce Serie s
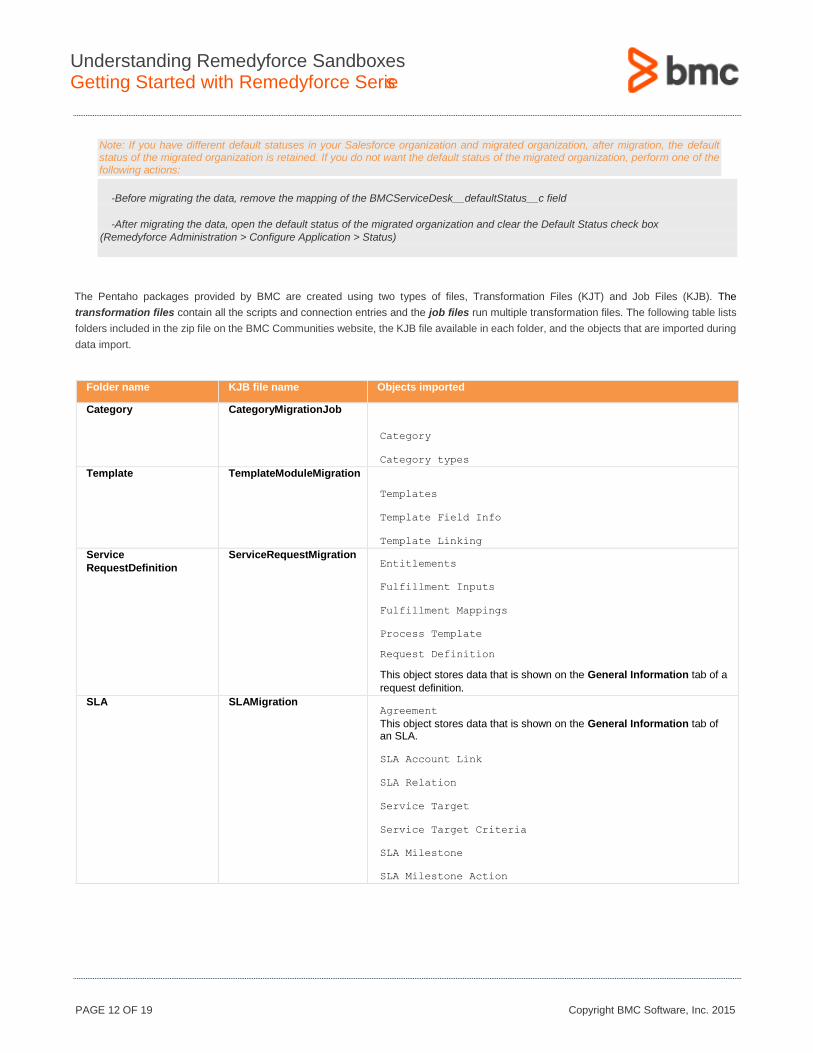
Note: If you have different default statuses in your Salesforce organization and migrated organization, after migration, the default status of the migrated organization is retained. If you do not want the default status of the migrated organization, perform one of the following actions:
-Before migrating the data, remove the mapping of the BMCServiceDesk__defaultStatus__c field
-After migrating the data, open the default status of the migrated organization and clear the Default Status check box
(Remedyforce Administration > Configure Application > Status)
The Pentaho packages provided by BMC are created using two types of files, Transformation Files (KJT) and Job Files (KJB). The
transformation files contain all the scripts and connection entries and the job files run multiple transformation files. The following table lists
folders included in the zip file on the BMC Communities website, the KJB file available in each folder, and the objects that are imported during
data import.
Folder name KJB file name Objects imported
Category CategoryMigrationJob
Category
Category types
Template TemplateModuleMigration
Templates
Template Field Info
Template Linking
Service
RequestDefinition
ServiceRequestMigration Entitlements
Fulfillment Inputs
Fulfillment Mappings
Process Template
Request Definition
This object stores data that is shown on the General Information tab of a
request definition.
SLA SLAMigration Agreement
This object stores data that is shown on the General Information tab of an SLA.
SLA Account Link
SLA Relation
Service Target
Service Target Criteria
SLA Milestone
SLA Milestone Action
PAGE 13 OF 19 Copyright BMC Software, Inc. 2015
Understanding Remedyforce Sandboxes
Getting Started with Remedyforce Serie s
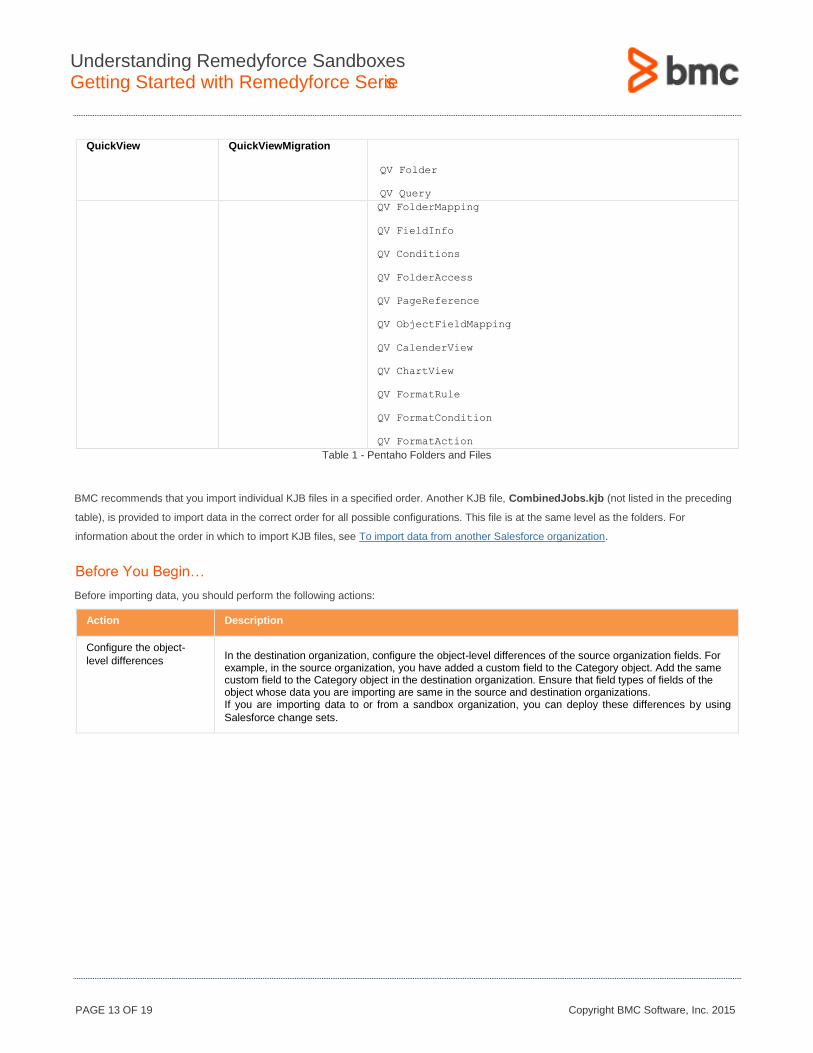
QuickView QuickViewMigration
QV Folder
QV Query
QV FolderMapping
QV FieldInfo
QV Conditions
QV FolderAccess
QV PageReference
QV ObjectFieldMapping
QV CalenderView
QV ChartView
QV FormatRule
QV FormatCondition
QV FormatAction
Table 1 - Pentaho Folders and Files
BMC recommends that you import individual KJB files in a specified order. Another KJB file, CombinedJobs.kjb (not listed in the preceding
table), is provided to import data in the correct order for all possible configurations. This file is at the same level as the folders. For
information about the order in which to import KJB files, see To import data from another Salesforce organization.
Before You Begin…
Before importing data, you should perform the following actions:
Action Description
Configure the object-
level differences In the destination organization, configure the object-level differences of the source organization fields. For example, in the source organization, you have added a custom field to the Category object. Add the same custom field to the Category object in the destination organization. Ensure that field types of fields of the object whose data you are importing are same in the source and destination organizations. If you are importing data to or from a sandbox organization, you can deploy these differences by using
Salesforce change sets.
PAGE 14 OF 19 Copyright BMC Software, Inc. 2015
Understanding Remedyforce Sandboxes
Getting Started with Remedyforce Serie s
Tag the records of the
objects that you want to
import
You must select the Tag for Export check box. If this check box is not available on the UI, add the it to one of the field sets of the object. For example, say that you created 20 new categories in your sandbox (the source organization). To import these categories to your production organization (the destination organization), tag them to be imported by using the Tag for Export check box.
If you tag records of an object for importing, data of the related objects is also imported. For example, if you have marked Service Level Agreements (SLAs) for importing, data of the related objects, such as Service Target, SLA Milestone, and so on, is also imported.
You can tag a record for export in one of the following ways:
Open the record, and select the Tag for Export check box.
Create a tab for the object whose data you are importing, such as Category. Create a new view, or edit the
existing view to include the Tag for Export check box. Edit multiple records, and select this field for all the
required records simultaneously.
Add or import linked
data that is required in
the destination
organization
Before you import data, ensure that all the required linked data is present in the destination organization.
For example, before importing request definitions, ensure that the services and service offerings are
present in the destination organization.
Mark related records for
importing To import related records, ensure that you mark the related records for importing; otherwise, they are not
imported. For example, if you have marked an agreement for importing, but did not similarly mark related
agreements, the related agreements are not imported.
Import data of the
custom objects
If you have used a custom object field in templates, import the data of the custom object by using Data
Loader.
Import data of the Base
Elements and Base
Relationships objects
Use the Data Loader to import the data of these objects. This data ensures that you have all the services
and service offerings required to create request definitions.
Register at the BMC
Communities website
For more information, see the wiki article: Prerequisites for importing data to BMC Remedyforce.
Installing the JRE For more information, see the wiki article: Prerequisites for importing data to BMC Remedyforce.
Download the Pentaho
Data Integration tool.
For more information, see the wiki article: Prerequisites for importing data to BMC Remedyforce.
To Import Data from another Salesforce Organization
Before importing data from another Salesforce organization, perform all of the actions in the document entitled: Before you begin.
Best Practices • For best results, import data in the following order:
1. Any custom status, urgency, priority, or impact, objects.
2. Category
3. Templates
4. Request Definitions
5. Service Level Agreements
6. QuickViews
• If you need to reimport data, delete the imported data, and then import it again. If you do not delete the imported data
before reimporting it, the next import job will fail.
PAGE 15 OF 19 Copyright BMC Software, Inc. 2015
Understanding Remedyforce Sandboxes
Getting Started with Remedyforce Serie s
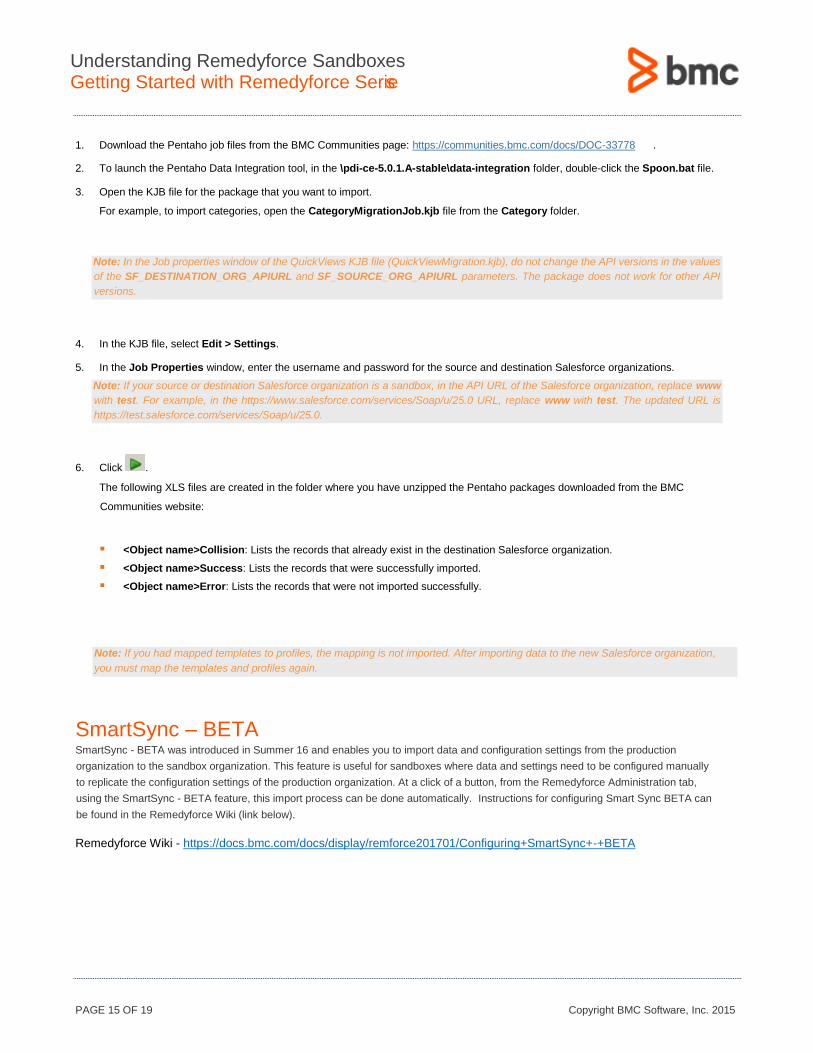
1. Download the Pentaho job files from the BMC Communities page: https://communities.bmc.com/docs/DOC-33778 .
2. To launch the Pentaho Data Integration tool, in the \pdi-ce-5.0.1.A-stable\data-integration folder, double-click the Spoon.bat file.
3. Open the KJB file for the package that you want to import.
For example, to import categories, open the CategoryMigrationJob.kjb file from the Category folder.
Note: In the Job properties window of the QuickViews KJB file (QuickViewMigration.kjb), do not change the API versions in the values
of the SF_DESTINATION_ORG_APIURL and SF_SOURCE_ORG_APIURL parameters. The package does not work for other API
versions.
4. In the KJB file, select Edit > Settings.
5. In the Job Properties window, enter the username and password for the source and destination Salesforce organizations.
Note: If your source or destination Salesforce organization is a sandbox, in the API URL of the Salesforce organization, replace www
with test. For example, in the https://www.salesforce.com/services/Soap/u/25.0 URL, replace www with test. The updated URL is
https://test.salesforce.com/services/Soap/u/25.0.
6. Click .
The following XLS files are created in the folder where you have unzipped the Pentaho packages downloaded from the BMC
Communities website:
<Object name>Collision: Lists the records that already exist in the destination Salesforce organization.
<Object name>Success: Lists the records that were successfully imported.
<Object name>Error: Lists the records that were not imported successfully.
Note: If you had mapped templates to profiles, the mapping is not imported. After importing data to the new Salesforce organization,
you must map the templates and profiles again.
SmartSync – BETA SmartSync - BETA was introduced in Summer 16 and enables you to import data and configuration settings from the production
organization to the sandbox organization. This feature is useful for sandboxes where data and settings need to be configured manually
to replicate the configuration settings of the production organization. At a click of a button, from the Remedyforce Administration tab,
using the SmartSync - BETA feature, this import process can be done automatically. Instructions for configuring Smart Sync BETA can
be found in the Remedyforce Wiki (link below).
Remedyforce Wiki - https://docs.bmc.com/docs/display/remforce201701/Configuring+SmartSync+-+BETA
PAGE 16 OF 19 Copyright BMC Software, Inc. 2015
Understanding Remedyforce Sandboxes
Getting Started with Remedyforce Serie s
In Summary Making sure that you have an environment that you can configure and test new features or functionality is pivotal to ensuring your
Remedyforce environment is stable at all times. With the use of sandboxes, you can do all your testing in a separate environment without
negatively impacting your production environment and causing issues with your end users.
For more information on Remedyforce sandboxes, read the blog post by Joshua Green on Using Remedyforce with Salesforce
Sandboxes.
BMC Remedyforce has an extremely active user community where you can get answers to additional questions on this topic. We encourage
you to take a look at bmc.com/communities.
BMC delivers software solutions that help IT transform digital enterprises for the ultimate competitive business advantage. We have
worked with thousands of leading companies to create and deliver powerful IT management services. From mainframe to cloud to
mobile, we pair high-speed digital innovation with robust IT industrialization—allowing our customers to provide amazing user
experiences with optimized IT performance, cost, compliance, and productivity. We believe that technology is the heart of every
business, and that IT drives business to the digital age.
BMC – Bring IT to Life.