unicenter tcpaccess telnet server getting started started.k022062e.pdf · data warehousing, and...
TRANSCRIPT
Unicenter®
TCPaccess™
Telnet Server
Getting Started 6.1 SP1
MAN05112521EK02206-2E
This documentation and related computer software program (hereinafter referred to as the “Documentation”) is for the end user’s informational purposes only and is subject to change or withdrawal by Computer Associates International, Inc. (“CA”) at any time.
This documentation may not be copied, transferred, reproduced, disclosed or duplicated, in whole or in part, without the prior written consent of CA. This documentation is proprietary information of CA and protected by the copyright laws of the United States and international treaties.
Notwithstanding the foregoing, licensed users may print a reasonable number of copies of this documentation for their own internal use, provided that all CA copyright notices and legends are affixed to each reproduced copy. Only authorized employees, consultants, or agents of the user who are bound by the confidentiality provisions of the license for the software are permitted to have access to such copies.
This right to print copies is limited to the period during which the license for the product remains in full force and effect. Should the license terminate for any reason, it shall be the user’s responsibility to return to CA the reproduced copies or to certify to CA that same have been destroyed.
To the extent permitted by applicable law, CA provides this documentation “as is” without warranty of any kind, including without limitation, any implied warranties of merchantability, fitness for a particular purpose or noninfringement. In no event will CA be liable to the end user or any third party for any loss or damage, direct or indirect, from the use of this documentation, including without limitation, lost profits, business interruption, goodwill, or lost data, even if CA is expressly advised of such loss or damage.
The use of any product referenced in this documentation and this documentation is governed by the end user’s applicable license agreement.
The manufacturer of this documentation is Computer Associates International, Inc.
Provided with “Restricted Rights” as set forth in 48 C.F.R. Section 12.212, 48 C.F.R. Sections 52.227-19(c)(1) and (2) or DFARS Section 252.227-7013(c)(1)(ii) or applicable successor provisions.
© 2004 Computer Associates International, Inc.
All trademarks, trade names, service marks, and logos referenced herein belong to their respective companies.
01telgstc.doc, printed on 8/19/2004, at 2:39 PM
Contents
Chapter 1: Introduction CA Technology Services: Enabling Solutions Through Experience .................................1–1
CA Education Services .....................................................................................................1–2 Computer Associates: The Software That Manages eBusiness ..................................1–2 For More Information.......................................................................................................1–3
Welcome to Telnet! ..................................................................................................................1–3 Unicenter TCPaccess Telnet Server Features .......................................................................1–4
Chapter 2: CA Common Services for z/OS and OS/390 CAIRIM .....................................................................................................................................2–1 CA LMP.....................................................................................................................................2–2
Requirements.....................................................................................................................2–2 Using CA LMP ..................................................................................................................2–3
Chapter 3: System Requirements Installation Materials...............................................................................................................3–1 Installation Prerequisites ........................................................................................................3–2
z/OS and OS/390 / ESA Release Level ........................................................................3–2 PDSE/SMS Requirements ...............................................................................................3–2 APF Authorizations..........................................................................................................3–3 Callable System Services Library and Language Environment .................................3–3
Contents iii
01telgstc.doc, printed on 8/19/2004, at 2:39 PM
Chapter 4: Installation Installation Notes..................................................................................................................... 4–1 Before Running the Installation Jobs..................................................................................... 4–3
Unloading the Installation Library................................................................................. 4–4 Reading Installation-Specific Information .................................................................... 4–5 Using the TCPNAMES CLIST ........................................................................................ 4–5
Setting Up the TCPNAMES CLIST ......................................................................... 4–5 Using the TCPNAMES CLIST to Customize Installation Jobs............................ 4–7
Download the Most Recent PTFs from SupportConnect............................................ 4–9 Running the Installation Jobs............................................................................................... 4–10
Determining Your Installation Type............................................................................ 4–10 Running the Required Jobs ........................................................................................... 4–11 Job Descriptions .............................................................................................................. 4–11
Job SRVPAC1 ........................................................................................................... 4–12 Job SRVPACP1......................................................................................................... 4–12 Job SRVPAC2 ........................................................................................................... 4–13 Job DELFMID........................................................................................................... 4–14 Job T00ALLOC......................................................................................................... 4–14 Job T04ALLOC......................................................................................................... 4–15 Job T04INST1 ........................................................................................................... 4–15 Job T04INST2 ........................................................................................................... 4–16
Getting PTFs Online ....................................................................................................... 4–16 Enrolling for SupportConnect ............................................................................... 4–17 Getting Hold Data ................................................................................................... 4–18
After Running the Installation Jobs..................................................................................... 4–19 Applying Downloaded Maintenance .......................................................................... 4–19 Receive PTFs.................................................................................................................... 4–19 Apply Check PTFs.......................................................................................................... 4–20 Apply PTFs...................................................................................................................... 4–21 Starting Unicenter TCPaccess Telnet Server............................................................... 4–22 Task 1: Edit the RUNTLN Member.............................................................................. 4–22 Task 2: Submit RUNTLN............................................................................................... 4–23
iv Getting Started
Contents v
01telgstc.doc, printed on 8/19/2004, at 2:39 PM
Chapter 5: Customization Configuring the TN3270E Server...........................................................................................5–1
Chapter 6: Diagnosis and Problem Reporting Diagnostic Procedures.............................................................................................................6–2
Collecting Diagnostic Data ..............................................................................................6–3 Interpreting Diagnostic Data...........................................................................................6–4
Accessing the Online Client Support System.......................................................................6–5 Requirements for Using SupportConnect .....................................................................6–6 Accessing the Technical Support Phone Services Directory.......................................6–6
CA-TLC: Total License Care...................................................................................................6–7 Calling Computer Associates Technical Support................................................................6–7 Product Versions and Maintenance ......................................................................................6–8 Requesting Enhancements......................................................................................................6–8
Index

02telgs1.doc, printed on 8/24/2004, at 9:36 AM
Chapter
1 Introduction
This book introduces Unicenter® TCPaccess™ Telnet Server to you in an efficient and visual manner. By the time you have finished reading this guide, you will have an overview of the wide scope of the product and its usability will be familiar to you. It is important to us that you feel comfortable with Unicenter TCPaccess Telnet Server before you begin to use it.
CA Technology Services: Enabling Solutions Through Experience
When it comes to getting on the information fast track, CA Technology Services can recommend and install a full suite of CA solutions to keep your business moving. And our associates offer the proprietary know-how on custom-fitting your enterprise for solutions ranging from life cycle management, data warehousing, and next-level business intelligence. Our experts will leave you with the technology and knowledge tools to fully collect, exploit, and leverage your data resources and applications.
Introduction 1–1
CA Technology Services: Enabling Solutions Through Experience
02telgs1.doc, printed on 8/24/2004, at 9:36 AM
CA Education Services
Computer Associates Global Education Services (CA Education) offerings include instructor-led and computer-based training, product certification programs, third-party education programs, distance learning, and software simulation. These services help to expand the knowledge base so you are better able to use our products more efficiently, contributing to your greater success. CA Education has been developed to assist today’s technologists in everything from understanding product capabilities to implementation and quality performance.
Because the vast community of education seekers is varied, so too are our methods of instruction. CA Education is committed to provide a variety of alternatives to traditional instructor-led training, including synchronous and asynchronous distance learning, as well as Unicenter simulation.
For training that must be extended to a wider audience—for a fraction of the cost and logistical hassle of sending everybody away to a class—CA Education offers excellent distance learning options.
Computer Associates: The Software That Manages eBusiness
The next generation of business promises unlimited opportunities by leveraging existing business infrastructures and adopting new technologies. At the same time, extremely complicated management presents challenges—from managing the computing devices to integrating and managing the applications, data, and business processes within and across organizational boundaries. Look to CA for the answers.
CA has the solutions available to help businesses address these important issues. Through industry-leading Process Management, Information Management, and Infrastructure Management offerings, CA delivers the only comprehensive, state-of-the-art solutions, serving all stakeholders in this extended global economy.
1–2 Getting Started
Welcome to Telnet!
02telgs1.doc, printed on 8/24/2004, at 9:36 AM
For More Information
After walking through this Getting Started, you can refer to the numerous resources available to you for additional information. Your product CD contains useful instructional documents that showcase your software and provide detailed explanations about the product’s comprehensive, feature-rich components. In addition, the online help system at esupport.ca.com offers procedural information and answers to any questions you may encounter.
Welcome to Telnet! This release of Unicenter TCPaccess Telnet Server provides you with a performance product that runs regardless of which IP protocol stack you have chosen—CA Unicenter TCPaccess Communications Server or IBM’s Communication Server IP.
Computer Associates values the unique qualities of Unicenter TCPaccess Telnet Server and its uncoupling from its traditional Unicenter® TCPaccess™ Communications Server base means that Computer Associates can accelerate its development with frequent new releases, in response to your requirements, independent of transport layer enhancements.
Unicenter TCPaccess Telnet Server provides support for TN3270E sessions including printers, enabling installations to attach a printer directly to a Telnet session or application, with minimal virtual storage overheads. This new release offers SSL support to secure your sessions across the Internet. When integrated with Computer Associates Unicenter® NetSpy™ Network Performance, a true measurement of response time is also possible. Unicenter TCPaccess Telnet Server is a natural choice for your telnet requirements when performance is a key differentiator.
Introduction 1–3
Unicenter TCPaccess Telnet Server Features
02telgs1.doc, printed on 8/24/2004, at 9:36 AM
Unicenter TCPaccess Telnet Server Features Features include:
■ SSL support.
■ Use of UNIX System Services sockets.
■ Provides verified RTM statistics to the Unicenter NetSpy Network Performance and also to Unicenter® NetMaster™ Network Management for TCP/IP for true response time measurement.
■ Supports the full TN3270E protocol (as defined in RFC2355 and its extensions), including TN3270E printer support.
■ Response time metrics are captured to a data space. Computer Associates Unicenter TCPaccess Communications Server via a NETSTAT TELNET command can be used to query the response time data on a session level.
For information on using the NETSTAT commands, see the Unicenter TCPaccess Communications Server Systems Management Guide.
■ TNSTAT command enables you to display statistics similar to the NESTAT TELNET command. It alleviates the need to know which stack controls the connection and querying that particular stack.
■ SMF record subtype 23 is expanded for the TN3270E server to include more information, including response time figures. For details see the System Management Guide.
■ An SMF exit point is defined to allow a user exit program to be called when an SMF record is about to be written by Unicenter TCPaccess Telnet Server.
■ An SMF user exit point is available with the TN3270E.
For details, read the Planning Guide. See the Unicenter TCPaccess Telnet Server Customization Guide for information on configuring user exit programs.
1–4 Getting Started
Unicenter TCPaccess Telnet Server Features
Introduction 1–5
02telgs1.doc, printed on 8/24/2004, at 9:36 AM
■ Direct Native IP interface to CA-TPX. This bypasses the usual LU-LU VTAM connection. Thereby lowering the number of LUs.
■ TNTERM command for terminating sessions.

03telgs2.doc, printed on 8/24/2004, at 9:40 AM
Chapter
2 CA Common Services for z/OS and OS/390
To help you quickly understand all that CA Common Services for z/OS and OS/390 offers this section provides a brief description of the common services that can be used by the Unicenter TCPaccess Telnet Server.
CAIRIM CAIRIM, CAI Resource Initialization Manager, is the common driver for a collection of dynamic initialization routines that eliminate the need for user SVCs, SMF exits, subsystems, and other installation requirements commonly encountered when installing systems software. These routines are grouped under the Computer Associates z/OS and OS/390 dynamic service code, S910. Some of the features of CAIRIM include:
■ Obtaining SMF data
■ Verification of proper software installation
■ Installation of z/OS and OS/390 interfaces
■ Automatic startup of CA and other vendor products
■ Proper timing and order of initialization
No other services are required to operate properly.
Note: CAIRIM is mandatory for Unicenter TCPaccess Telnet Server. It must be installed and started with Unicenter TCPaccess Telnet Server within 30 minutes of IPL time. CAIRIM is part of the CA Common Services for z/OS and OS/390.
CA Common Services for z/OS and OS/390 2–1
CA LMP
03telgs2.doc, printed on 8/24/2004, at 9:40 AM
CA LMP The CA License Management Program (LMP) provides a standardized and automated approach to the tracking of licensed software. It uses common realtime enforcement software to validate the user’s configuration. CA LMP reports on license, usage, and financial activities of Unicenter TCPaccess Telnet Server. The routines that accomplish this are integrated into the Computer Associates z/OS and OS/390 dynamic service code, S910 (the CAIRIM service).
Some of the features of CA LMP include:
■ Common key data set can be shared among many CPUs
■ Check digits are used to detect errors in transcribing key information
■ Execution keys can be entered without affecting any CA software solution already running
■ No special maintenance requirements
Requirements
Unicenter TCPaccess Telnet Server requires CA Common Services for z/OS and OS/390 at genlevel 9901 or above, and OS2.10
2–2 Getting Started
CA LMP
03telgs2.doc, printed on 8/24/2004, at 9:40 AM
Using CA LMP
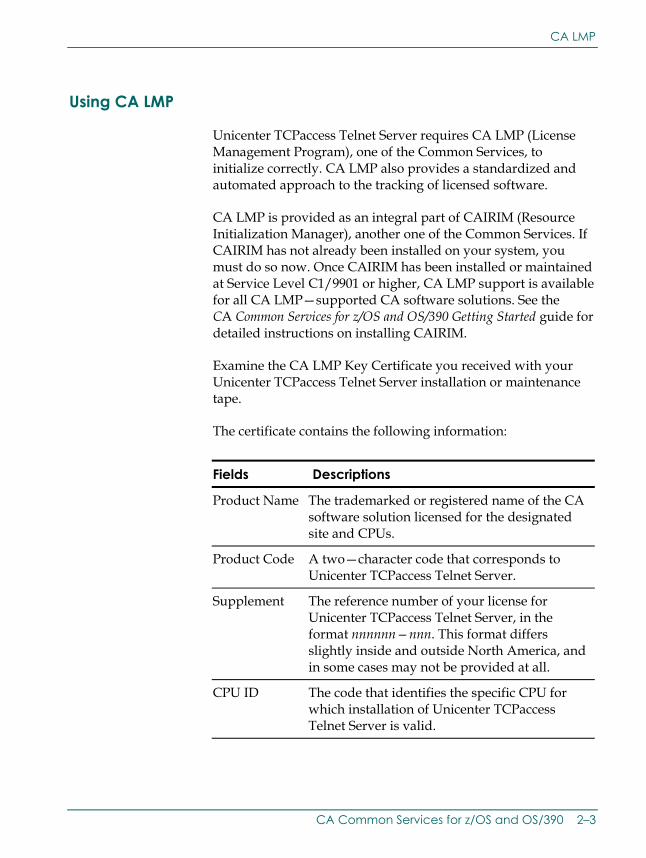
Unicenter TCPaccess Telnet Server requires CA LMP (License Management Program), one of the Common Services, to initialize correctly. CA LMP also provides a standardized and automated approach to the tracking of licensed software.
CA LMP is provided as an integral part of CAIRIM (Resource Initialization Manager), another one of the Common Services. If CAIRIM has not already been installed on your system, you must do so now. Once CAIRIM has been installed or maintained at Service Level C1/9901 or higher, CA LMP support is available for all CA LMP—supported CA software solutions. See the CA Common Services for z/OS and OS/390 Getting Started guide for detailed instructions on installing CAIRIM.
Examine the CA LMP Key Certificate you received with your Unicenter TCPaccess Telnet Server installation or maintenance tape.
The certificate contains the following information:
Fields Descriptions
Product Name The trademarked or registered name of the CA software solution licensed for the designated site and CPUs.
Product Code A two—character code that corresponds to Unicenter TCPaccess Telnet Server.
Supplement The reference number of your license for Unicenter TCPaccess Telnet Server, in the format nnnnnn—nnn. This format differs slightly inside and outside North America, and in some cases may not be provided at all.
CPU ID The code that identifies the specific CPU for which installation of Unicenter TCPaccess Telnet Server is valid.
CA Common Services for z/OS and OS/390 2–3
CA LMP
03telgs2.doc, printed on 8/24/2004, at 9:40 AM
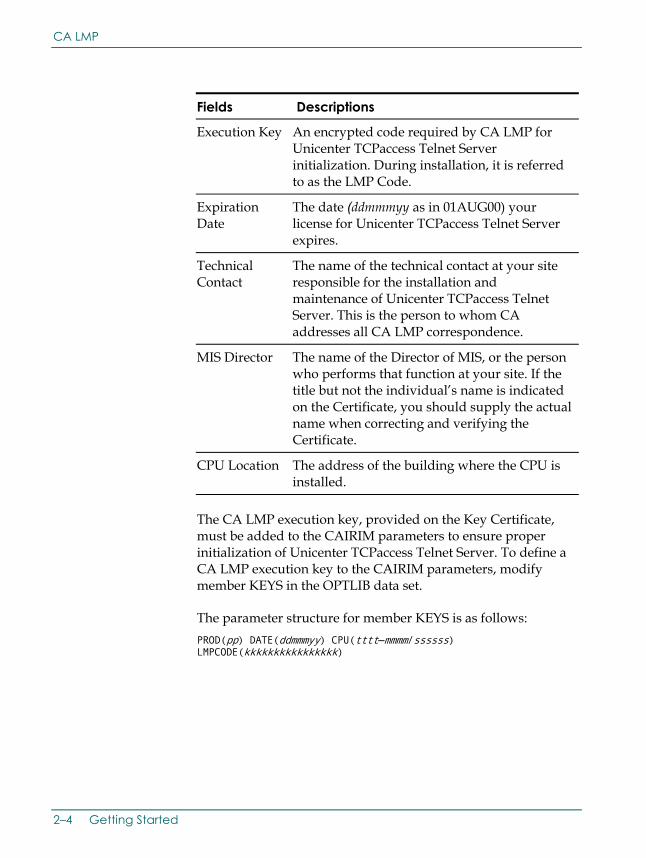
Fields Descriptions
Execution Key An encrypted code required by CA LMP for Unicenter TCPaccess Telnet Server initialization. During installation, it is referred to as the LMP Code.
Expiration Date
The date (ddmmmyy as in 01AUG00) your license for Unicenter TCPaccess Telnet Server expires.
Technical Contact
The name of the technical contact at your site responsible for the installation and maintenance of Unicenter TCPaccess Telnet Server. This is the person to whom CA addresses all CA LMP correspondence.
MIS Director The name of the Director of MIS, or the person who performs that function at your site. If the title but not the individual’s name is indicated on the Certificate, you should supply the actual name when correcting and verifying the Certificate.
CPU Location The address of the building where the CPU is installed.
The CA LMP execution key, provided on the Key Certificate, must be added to the CAIRIM parameters to ensure proper initialization of Unicenter TCPaccess Telnet Server. To define a CA LMP execution key to the CAIRIM parameters, modify member KEYS in the OPTLIB data set.
The parameter structure for member KEYS is as follows: PROD(pp) DATE(ddmmmyy) CPU(tttt—mmmm/ssssss) LMPCODE(kkkkkkkkkkkkkkkk)
2–4 Getting Started
CA LMP
CA Common Services for z/OS and OS/390 2–5
03telgs2.doc, printed on 8/24/2004, at 9:40 AM
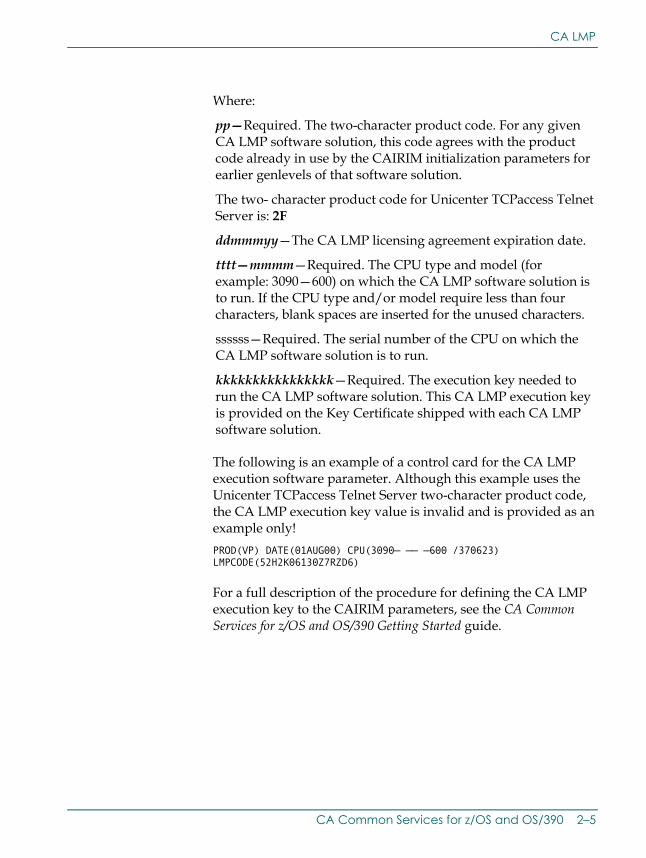
Where:
pp—Required. The two-character product code. For any given CA LMP software solution, this code agrees with the product code already in use by the CAIRIM initialization parameters for earlier genlevels of that software solution.
The two- character product code for Unicenter TCPaccess Telnet Server is: 2F
ddmmmyy—The CA LMP licensing agreement expiration date.
tttt—mmmm—Required. The CPU type and model (for example: 3090—600) on which the CA LMP software solution is to run. If the CPU type and/or model require less than four characters, blank spaces are inserted for the unused characters.
ssssss—Required. The serial number of the CPU on which the CA LMP software solution is to run.
kkkkkkkkkkkkkkkk—Required. The execution key needed to run the CA LMP software solution. This CA LMP execution key is provided on the Key Certificate shipped with each CA LMP software solution.
The following is an example of a control card for the CA LMP execution software parameter. Although this example uses the Unicenter TCPaccess Telnet Server two-character product code, the CA LMP execution key value is invalid and is provided as an example only! PROD(VP) DATE(01AUG00) CPU(3090— —— —600 /370623) LMPCODE(52H2K06130Z7RZD6)
For a full description of the procedure for defining the CA LMP execution key to the CAIRIM parameters, see the CA Common Services for z/OS and OS/390 Getting Started guide.

04telgs3.doc, printed on 8/24/2004, at 10:03 AM
Chapter
3 System Requirements
This section provides a brief overview of the requirements necessary for installing Unicenter TCPaccess Telnet Server using SMP/E. This information is provided for planning
It contains the following sections:
■ Installation Materials
■ Installation Prerequisites
Detailed information about security modifications is outlined in the Planning Guide.
Installation Materials Before beginning the installation procedure, make sure that you have the following Unicenter TCPaccess installation materials:
■ The installation tape—the volume serial number is specified on the PML (product maintenance letter) received with the installation package
■ The CA Common Services for z/OS and OS/390 tape and documentation
■ The documentation list described in the chapter “Introduction”
System Requirements 3–1
Installation Prerequisites
04telgs3.doc, printed on 8/24/2004, at 10:03 AM
Installation Prerequisites
z/OS and OS/390 / ESA Release Level
Unicenter TCPaccess Telnet Server requires an IBM supported release of OS/390 or z/OS. Contact Customer Support to verify that your system is at the correct supported level.
MVS/SP and MVS/ESA releases are not supported.
PDSE/SMS Requirements
The Unicenter TCPaccess Telnet Server requires PDSE libraries. The Unicenter TCPaccess installation jobs, T00ALLOC and T04ALLOC include a symbolic of SMSCLAS. This symbolic represents the SMS storage class and is used to allocate the PDSE libraries.
The following data sets are defined as PDSEs:
T04ALLOC—TLNLOAD and ATLNLOAD
—TLNPARM and ATLNPARM
—TLNSAMP and ATLNSAMP
—TLNLINK
T00ALLOC—SMPLTS
Note: ■ Support for non-SMS PDSEs is provided in DFSMS/MVS 1.4
and 1.5 with the appropriate maintenance applied. It is in the base of DFSMS 2.10. If you want to use non-SMS PDSEs replace STORCLAS with the UNIT= and VOL=SER= parameters.
■ Some maintenance levels of data set utilities such as PDSMAN do not support PDSEs. If you are using such a product, be sure that it supports PDSEs or use the standard IBM IEBCOPY utility.
3–2 Getting Started
Installation Prerequisites
System Requirements 3–3
04telgs3.doc, printed on 8/24/2004, at 10:03 AM
APF Authorizations
The following libraries must be APF authorized:
hlq.LOAD TCPaccess program library
hlq.LINK TCPaccess client commands
hlq.TLNLOAD Telnet Server program library*
Other APF authorized libraries that must be available either through linked list or STEPLIBs for the Telnet SSL Server are: CEE.SCEERUN, GSK.SGSKLOAD and CBC.SCLBDLL.
Callable System Services Library and Language Environment
You must have the Callable System Services library, SYS1.CSSLIB, available for the installation. Modules from this library are linked with Unicenter TCPaccess Telnet Server for USS support.
IBM’s Language Environment link-time libraries, CEE.SCEELKED, CEE.SCEELKEX, CEE.SCEELPP and CBC.SCLBSID are now also required SMP/E data sets used by the CALLLIB facility.
Important! Unicenter TCPaccess Telnet Server will not install properly without these libraries.

05telgs4.doc, printed on 10/15/2004, at 10:24:01 AM
Chapter
4 Installation
This chapter provides information for system administrators and installation managers who are responsible for installing and supporting the Unicenter TCPaccess Telnet Server.
This chapter discusses the following topics:
■ Installation Notes
■ Before Running the Installation Jobs
■ After Running the Installation Jobs
For additional information about these installation procedures, see:
■ The pre-installation procedures outlined in the Planning Guide
■ The security modifications outlined in the Planning Guide
Installation Notes With release 6.0, Unicenter TCPaccess Communications Server Suite now consists of three components:
■ Unicenter ® TCPaccess™ Communications Server. The latest release is 6.0, SP3, and is delivered on Tape CS60S3. This release is installed on FMID C2E6000. Also included on this tape, are cumulative PTF updates for Telnet Server, release 6.0, and cumulative PTF updates for FTP Server, release 6.0.
Installation 4–1
Installation Notes
05telgs4.doc, printed on 10/15/2004, at 10:24:01 AM
■ Unicenter ® TCPaccess™ Telnet Server. The latest release is 6.1, SP1, and is delivered on Tape TL61S1. This release is installed on FMID C2C6100. Also included on this tape, are cumulative PTF updates for Communications Server, release 6.0, and cumulative PTF updates for Telnet Server, release 6.0. This older release was installed on FMID C2C6000.
■ Unicenter ® TCPaccess™ FTP Server. The latest release is 6.1, SP1, and is delivered on Tape FT61S1. This release is installed on FMID C196100. Also included on this tape, are cumulative PTF updates for Communications Server, release 6.0, and cumulative PTF updates for FTP Server, release 6.0. This older release was installed on FMID C196000.
This guide provides installation instructions for the Unicenter TCPaccess Telnet Server product 6.1 Release tape. The tape’s serial number can help you identify the install tape as either a new product release tape, or a service pack tape for a supported release.
New release tapes use the product code followed by the two-digit release, for example: TL61. Some time after the initial release of the product, service pack tapes containing the latest maintenance for this release will be distributed. Service pack serial numbers have the same first four characters as a release tape, followed by Sx. The x identifies the service pack number for this particular product release, for example: TL61S1.
Using either a New Release Tape or a Service Pack Tape, you can apply the latest maintenance to the Unicenter TCPaccess release 6.0 common FMIDs. If you received a New Release Tape with your Service Pack, you should use the New Release Tape to install the Unicenter TCPaccess Telnet Server product with the latest maintenance at the latest level.
4–2 Getting Started
Before Running the Installation Jobs
05telgs4.doc, printed on 10/15/2004, at 10:24:01 AM
Before Running the Installation Jobs ■ Before you run the installation jobs, do the following:
■ Back up all SMP/E CSIs and libraries.
■ Compress all libraries.
■ Before you apply a service pack, issue a P CLEAR to any systems that use the target libraries, to ensure that all Unicenter TCPaccess control blocks are refreshed.
Important! SOC4 or SOC6 ABENDs may occur if you apply maintenance to active libraries. Use the P CLEAR command to correct them.
Also, carefully note the following:
■ A complete installation of the Unicenter TCPaccess Telnet Server requires 190 cylinders of DASD space. You should choose your target volumes accordingly.
■ If you are planning to install Unicenter TCPaccess Communications Server release 6.0 for the first time, you should complete that installation before you start this one. Refer to the Unicenter TCPaccess Communications Server Getting Started guide for instructions on installing TCPaccess Communications Server 6.0.
■ Unicenter TCPaccess Telnet Server 6.1 must be installed in a separate CSI from TCPaccess 5.2 or 5.3 installations.
Installation 4–3
Before Running the Installation Jobs
05telgs4.doc, printed on 10/15/2004, at 10:24:01 AM
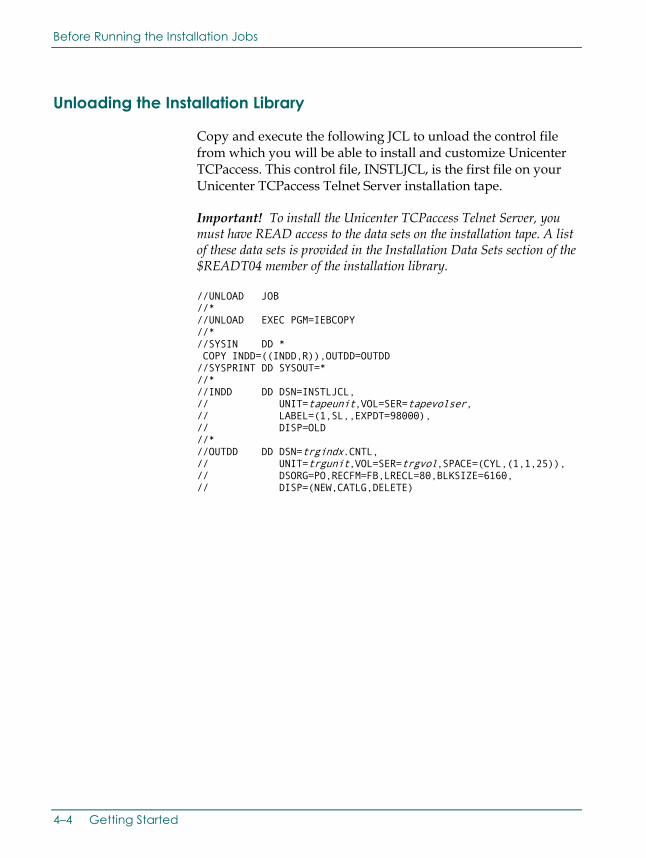
Unloading the Installation Library
Copy and execute the following JCL to unload the control file from which you will be able to install and customize Unicenter TCPaccess. This control file, INSTLJCL, is the first file on your Unicenter TCPaccess Telnet Server installation tape.
Important! To install the Unicenter TCPaccess Telnet Server, you must have READ access to the data sets on the installation tape. A list of these data sets is provided in the Installation Data Sets section of the $READT04 member of the installation library.
//UNLOAD JOB //* //UNLOAD EXEC PGM=IEBCOPY //* //SYSIN DD * COPY INDD=((INDD,R)),OUTDD=OUTDD //SYSPRINT DD SYSOUT=* //* //INDD DD DSN=INSTLJCL, // UNIT=tapeunit,VOL=SER=tapevolser, // LABEL=(1,SL,,EXPDT=98000), // DISP=OLD //* //OUTDD DD DSN=trgindx.CNTL, // UNIT=trgunit,VOL=SER=trgvol,SPACE=(CYL,(1,1,25)), // DSORG=PO,RECFM=FB,LRECL=80,BLKSIZE=6160, // DISP=(NEW,CATLG,DELETE)
4–4 Getting Started
Before Running the Installation Jobs
05telgs4.doc, printed on 10/15/2004, at 10:24:01 AM
Reading Installation-Specific Information
The $READT04 member of the installation library contains information about the contents of the tape, and may contain important last-minute information about how to complete the install. You should review it carefully before you proceed.
Using the TCPNAMES CLIST
The TCPNAMES ISPF edit macro is a member of the INSTLJCL control file that lets you do fast and reliable customization of the installation jobs. It does the following:
■ Inserts a copy of the locally customized JOB statement
■ Updates all data set high-level qualifiers to your local standards
■ Updates all DASD unit names and volume serials to your local standards
■ Updates all tape unit names and volume serials to your local standards
Setting Up the TCPNAMES CLIST
To use the TCPNAMES edit macro, you need to prepare your TSO environment to recognize it. To do so, follow these steps:
1. Copy the TCPNAMES member of the installation library to a command library listed in the SYSPROC concatenation of your TSO logon procedure. You can find the proper command library by following these steps:
a. Determine the name of your logon procedure. It is a field on your TSO logon screen.
b. Determine the data set that your logon procedure resides in. It is probably in SYS1.PROCLIB; if not, execute command LISTA from your TSO command line. This will list all data sets allocated to your TSO session, and your TSO logon procedure is probably located in a data set with final qualifier of PROCLIB.
Installation 4–5
Before Running the Installation Jobs
05telgs4.doc, printed on 10/15/2004, at 10:24:01 AM
c. Determine the CMDLIB you will use.
i. Select the member containing your logon procedure.
ii. Find the SYSPROC DD.
iii. Select a CMDLIB into which to copy TCPNAMES. (Note: in many locations, a userid.CLIST data set is available for this purpose.)
d. If you are copying the TCPNAMES EXEC into a library with a variable-length record format, enter unnum at the command line before you copy the member. This will delete the sequence numbers at the far right side of the member, allowing the CLIST to run with variable-length records.
e. If after following these suggestions you are still not able to tell which CLIST library to use, contact your TSO administrator.
2. Update the JOBCARD member in the installation library for use by the CLIST. This JOB statement will be inserted as the first line in every job that you run TCPNAMES on.
3. If you are using JES3, replace the JOBPARM statement with the following: //*MAIN LINES=(999,W)
4. If you would like all data sets to be SMS controlled, make the following global changes:
a. For T00ALLOC: ‘C ALL VOLUME( STORCLAS(‘
b. For T04ALLOC: ‘C ALL VOL=SER STORCLAS’
c. Substitute the SMS storage class for all occurrences of SMPVOL, TRGVOL, and DSTVOL.
4–6 Getting Started
Before Running the Installation Jobs
05telgs4.doc, printed on 10/15/2004, at 10:24:01 AM
Using the TCPNAMES CLIST to Customize Installation Jobs
The TCPNAMES CLIST is an ISPF edit macro. To use it, you must edit an installation job and type the TCPNAMES command on the primary command line.
As distributed, the TCPNAMES CLIST assumes that you want to use the same tape unit, disk unit, disk volume, and SMS storage class for all of the disk data sets in a particular installation job. Two high-level qualifiers, hlq.smp and hlq.dsn, are provided so you can include newer releases of products in a common CSI. If this does not suit your purposes, you can update the CLIST directly.
Note: If you do so, make sure that you save a copy for reference before you modify the CLIST.
If it is acceptable to use the same high-level qualifiers, disk unit, and disk volume for all of the disk data sets, you do not need to edit the TCPNAMES CLIST. Instead, you can enter the command with parameters as follows:
TCPNAMES hlq.smp hlq.dsn diskvolser diskunit tapevolser tapeunit smsclass
The parameters are as follows:
hlq.smp High-level qualifier for SMP index.
hlq.dsn High-level qualifier for other data set names.
diskvolser Volume serial name of a disk drive in your environment.
diskunit A valid unit name for a disk drive in your environment.
tapevolser The volume serial name of the install tape.
tapeunit A valid unit name for a tape drive in your environment.
smsclass The storage class for SMS-managed data sets.
Installation 4–7
Before Running the Installation Jobs
05telgs4.doc, printed on 10/15/2004, at 10:24:01 AM
The following is an example of this usage:
TCPNAMES TCP.V600SMS TLN610 MVS001 3390 TL61S1 TAPE NMDCLAS
This command reflects the following environment:
TCP.V600SMS Use TCP.V600SMS as the high-level qualifier for SMP data sets.
TLN610 Use TLN610 as the high-level qualifier for all created data sets.
MVS001 Put all created data sets on disk volume MVS001.
3390 Indicate that volume MVS001 is a 3390.
TL61S1 The tape’s volume serial number isTL61S1.
TAPE The tape is to be mounted on a TAPE unit.
NMDCLAS SMS-managed data sets are to use storage class NMDCLASS.
4–8 Getting Started
Before Running the Installation Jobs
05telgs4.doc, printed on 10/15/2004, at 10:24:01 AM
Download the Most Recent PTFs from SupportConnect
The Unicenter TCPaccess family of products contain many Co-requisite PTFs which cross product components. For instance, there are many PTFs written for Unicenter TCPaccess Telnet Server that require co-requisite PTFs in the Unicenter® TCPaccess™ Communications Server common FMIDs. If these latest co-reqs are not available when you initially install your product, or even when you apply maintenance, the procedure may fail.
Therefore, we highly recommend that you download the latest PTFs for your product group. For this TL61S1installation, the product group would be Unicenter® TCPaccess™ Telnet Server, which also includes fixes for the Unicenter® TCPaccess™ Communications Server common FMIDs. Please see the section on Getting PTFs Online and Getting Hold Data for instructions on doing this.
Once you have downloaded the fixes, put them in a data set that can be referenced by the SMPPTFIN DD in the routines SRVPAC1, SRVPACP1 or T04INST1. These routines are described in the section Job Descriptions.
Installation 4–9
Running the Installation Jobs
05telgs4.doc, printed on 10/15/2004, at 10:24:01 AM
Running the Installation Jobs The following sections describe the installation jobs.
Determining Your Installation Type Before you run any installation jobs, you need to determine which type of installation is appropriate for your current configuration. Use the following criteria to determine what your installation type is:
Installation Type A You have not previously installed Unicenter® TCPaccess™ Telnet Server (any release), or any of the products listed below:
Unicenter® TCPaccess™ Communications Server 6.0
Unicenter® TCPaccess™ FTP Server 6.0 / 6.1
Unicenter® SOLVE:CPT™ 6.1
Unicenter® NetMaster™ Socket Management for CICS 1.0 / 1.1
Installation Type B You have not previously installed Unicenter® TCPaccess™ Telnet Server 6.0, but you have installed one or more of the products listed in Installation Type A above.
Installation Type C You have previously installed Unicenter® TCPaccess™ Telnet Server 6.0, but wish to replace it with the latest release, 6.1.
Installation Type D You have previously installed Unicenter® TCPaccess™ Telnet Server 6.0, and simply want to upgrade it with the latest maintenance.
Installation Type E You have previously installed Unicenter® TCPaccess™ Telnet Server 6.1, and simply want to upgrade it with the latest maintenance.
4–10 Getting Started
Running the Installation Jobs
05telgs4.doc, printed on 10/15/2004, at 10:24:01 AM
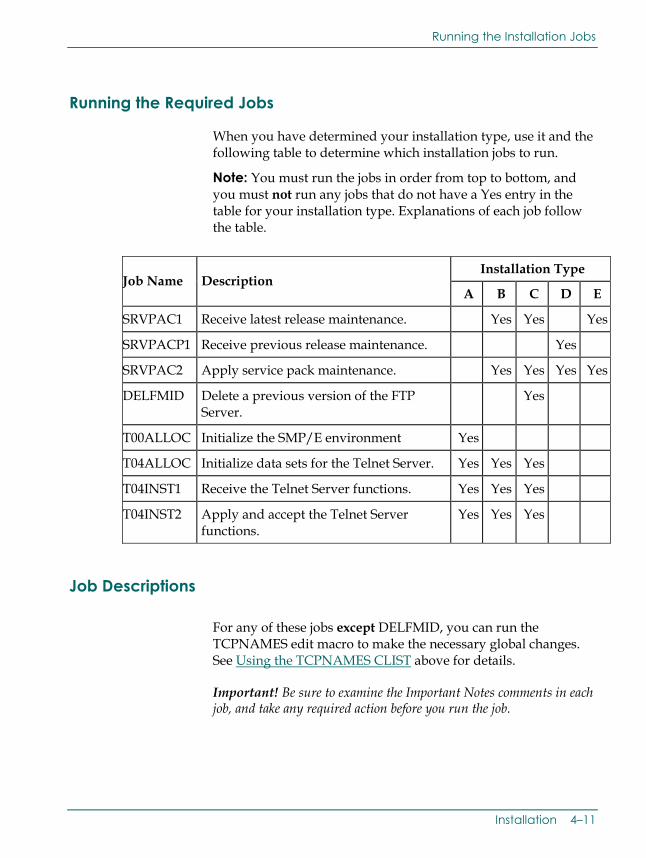
Running the Required Jobs
When you have determined your installation type, use it and the following table to determine which installation jobs to run.
Note: You must run the jobs in order from top to bottom, and you must not run any jobs that do not have a Yes entry in the table for your installation type. Explanations of each job follow the table.
Installation Type Job Name Description
A B C D E
SRVPAC1 Receive latest release maintenance. Yes Yes Yes
SRVPACP1 Receive previous release maintenance. Yes
SRVPAC2 Apply service pack maintenance. Yes Yes Yes Yes
DELFMID Delete a previous version of the FTP Server.
Yes
T00ALLOC Initialize the SMP/E environment Yes
T04ALLOC Initialize data sets for the Telnet Server. Yes Yes Yes
T04INST1 Receive the Telnet Server functions. Yes Yes Yes
T04INST2 Apply and accept the Telnet Server functions.
Yes Yes Yes
Job Descriptions
For any of these jobs except DELFMID, you can run the TCPNAMES edit macro to make the necessary global changes. See Using the TCPNAMES CLIST above for details.
Important! Be sure to examine the Important Notes comments in each job, and take any required action before you run the job.
Installation 4–11
Running the Installation Jobs
05telgs4.doc, printed on 10/15/2004, at 10:24:01 AM
Job SRVPAC1
Maximum acceptable return code: 4.
The SRVPAC1 job receives service pack maintenance for the Unicenter® TCPaccess™ Telnet Server, release 6.1, and the common FMIDs. . Before running this job, make sure you have downloaded the latest PTFs, as described in the section Download the Most Recent PTFs from SupportConnect and replaced the field L_MAINT in SRVPAC1 to point to the data set containing them. The HOLDDATA file identifies any fixes that may have been PEd since the installation tape was distributed.
The highest PTFs included on the tape are identified in the $READT04 file in the INSTLJCL members. Reference the section Getting PTFs Online for instructions on how to download PTFs from SupportConnect. Review the hold data, especially that of type ACTION, and take appropriate action.
Important! If you have run the SRVPAC1 and SRVPAC2 jobs, or SRVPACP1 and SRVPAC2 jobs previously, you may receive a GIM24801W warning "NO SYSMODS STATISFIED THE OPERANDS SPECIFIED". This indicates that there were no new PTFs received and you do not need to run the SRVPAC2 job--it will fail. One reason this might occur is that you recently completed another installation and applied this Service Pack maintenance to the same CSI. In this case, simply skip job SRVPAC2 and proceed to the following job.
Job SRVPACP1
Maximum acceptable return code: 4.
The SRVPACP1 job receives service pack maintenance for the Unicenter® TCPaccess™ Telnet Server, release 6.0, and the common FMIDs. Before running this job, make sure you have downloaded the latest PTFs, as described in the section Download the Most Recent PTFs from SupportConnect and replaced the field L_MAINT in SRVPACP1 to point to the data set containing them. The HOLDDATA file identifies any fixes that may have been PE’d since the installation tape was distributed.
4–12 Getting Started
Running the Installation Jobs
05telgs4.doc, printed on 10/15/2004, at 10:24:01 AM
The highest PTFs included on the tape are identified in the $READT04 file in the INSTLJCL members. Review the hold data, especially that of type ACTION, and take appropriate action.
Important! If you have run the SRVPAC1 and SRVPAC2 jobs, or SRVPACP1 and SRVPAC2 jobs previously, you may receive a GIM24801W warning "NO SYSMODS STATISFIED THE OPERANDS SPECIFIED". This indicates that there were no new PTFs received and you do not need to run the SRVPAC2 job--it will fail. One reason this might occur is that you recently completed another installation and applied this Service Pack maintenance to the same CSI. In this case, simply skip job SRVPAC2 and proceed to the following job.
Job SRVPAC2
Maximum acceptable return code: 4.
The SRVPAC2 job applies service pack maintenance for the Unicenter TCPaccess Telnet Server, and the common FMIDs. Before you remove the comment markers from the BYPASS option, make sure that you have taken any necessary actions noted in the hold data.
We recommend that you run SRVPAC2 with the CHECK and BYPASS options specified, to see if any errors are picked up. Assuming that you have all the required PTFs and no errors are identified, comment out the CHECK and BYPASS statements and run SRVPAC2 again.
Note: The GSKSSL DD statement is required for maintenance of the Unicenter TCPaccess Telnet Server (FMID C2C6100). The path name is case-sensitive and may be installation-dependent. See the Unicenter TCPaccess Telnet Server Getting Started guide for details. If you do not have TCPaccess Telnet Server installed, comment out the GSKSSL DD statement, because it will cause a JCL error if the path does not exist.
Installation 4–13
Running the Installation Jobs
05telgs4.doc, printed on 10/15/2004, at 10:24:01 AM
Job DELFMID
Maximum acceptable return code: 4.
Any previous version of the Unicenter TCPaccess Telnet Server must be removed before you can install a new version. The DELFMID job deletes the old product’s FMID, C2C6000, to prepare for the installation of the new release, 6.1, on FMID C2C6100.
Important! This job does an irreversible delete of the entire old FMID. Back up your SMP/E environment before you run it, and follow the instructions in the job itself very carefully.
Job T00ALLOC
Maximum acceptable return code: 0.
The T00ALLOC job allocates the data sets needed for the SMP/E environment and for shared components. The shared components includes features used by all the products like:
■ Tracing Components
■ Translate Tables
■ SAS/C Runtime
Job T00ALLOC initializes the CSI and adds all the required SMP/E definitions.
After you run the TCPNAMES CLIST, if you want all data sets to be SMS controlled, make the following global changes:
■ ‘C ALL VOLUME( STORCLAS(‘
■ The SMS storage class for all occurrences of SMPVOL, TRGVOL, and DSTVOL
4–14 Getting Started

Running the Installation Jobs
05telgs4.doc, printed on 10/15/2004, at 10:24:01 AM
Note: ■ The Language Environment link-time library SCEELKED is
required for SMP/E apply processing.
■ The SMPLTS library is allocated as a PDSE. If your site does not support PDSEs, replace the STORCLAS and DSNTYPE parameters with UNIT and VOL=SER parameters.
Job T04ALLOC
Maximum acceptable return code: 4.
The T04ALLOC job allocates the data sets needed for the Unicenter TCPaccess Telnet Server, and adds all required SMP/E definitions for them.
If you have previously installed Unicenter TCPaccess Telnet Server, (this is installation Type C) make sure that this job is allocating different data sets than were allocated for the old Unicenter TCPaccess Telnet Server. If you do not, the job will fail. In the TCPNAMES CLIST, you can use hlq.dsn to point to the new Unicenter TCPaccess Telnet Server data sets and hlq.smp to point to your current SMP environment.
Job T04INST1
Maximum acceptable return code: 4.
The T04INST1 job receives the functions necessary to run the Unicenter TCPaccess Telnet Server, associated hold data, and any last-minute maintenance. Before running this job, make sure you have downloaded the latest PTFs, as described in the section Download the Most Recent PTFs from SupportConnect replaced the field L_MAINT in T04INST1 to point to the data set containing them. The HOLDDATA file identifies any fixes that may have been PEd since the installation tape was distributed.
Note: If you are using a tape management system such as CA1, you must modify the label parameter on your DD statements to include EXPDT=98000.
Installation 4–15
Running the Installation Jobs
05telgs4.doc, printed on 10/15/2004, at 10:24:01 AM
LABEL=(2,SL,,EXPDT=98000)
Job T04INST2
Maximum acceptable return code: 4.
The T04INST2 job applies and accepts the functions necessary to run the Unicenter TCPaccess Telnet Server, and applies any last-minute maintenance. Before you run it, make sure that you have taken any necessary actions noted in the hold data.
Getting PTFs Online
You can check for the most recent PTFs available by visiting the SupportConnect home page at http://www.ca.com/supportconnect.
Note: If you have not yet registered for SupportConnect, please do so as described in the Enrolling for SupportConnect section which follows.
After you have registered for SupportConnect, you can enter the site by clicking on LOGIN at the top right of the home page. A login dialog box is presented. Enter the proper login information.
Once the security prompts are satisfied, you are taken back to the home page. At this point, you will notice that there are additional links on the page. Click Published Solutions in the left frame.
Select the product Unicenter TCPaccess Telnet Server – MVS, from the Product box, then check the SELECT ALL box. This selects the Telnet Server product group, which includes the FMIDs required to support the Unicenter TCPaccess Telnet Server. When you do this, you automatically get fixes for the support components and for the Unicenter TCPaccess Telnet Server application. However, note that all of the PTFs for one component are shown before starting with those of another component.
4–16 Getting Started
Running the Installation Jobs
05telgs4.doc, printed on 10/15/2004, at 10:24:01 AM
Select the release you are installing / updating in the Release box.
To find the PTFs that have been built and published since the install tape was produced, consult the Last Published Date included in the $READT04 member of the installation library, then enter the following day in the Confirmed Since box.
Click Search for your results. You can then check each of the Add to Cart boxes for each PTF you want to download. Then click Go To Solution Cart and follow the directions to download your PTFs.
Important! If you have problems with the SupportConnect download process, contact Customer Support or your Customer Relationship Manager.
Enrolling for SupportConnect
Existing users of CA’s Support.ca.com, Webtrack.ca.com and eSupport.ca.com do not need to re-enroll to get access to SupportConnect. These users should follow the procedures in Existing CA Support Users, provided below, to migrate their customer information to the SupportConnect web site.
New users should use the procedure outlined in the next section to enroll in SupportConnect.
New User Enrollment You can get enrollment forms by visiting the SupportConnect home page at http://www.ca.com/supportconnect and clicking Enroll Now. Once you have submitted your enrollment, CA will send you a confirmation email. When your enrollment is processed, you will get an email that includes instructions on logging in. You can then log in with the email address and password that you specified in your enrollment form, or you can install the digital certificate.
Installation 4–17
Running the Installation Jobs
05telgs4.doc, printed on 10/15/2004, at 10:24:01 AM
Existing CA Support Users
For a limited time, CA will provide a seamless way to migrate your information from Support.ca.com, Webtrack.ca.com and eSupport.ca.com to SupportConnect. During this period, existing accounts can be converted to SupportConnect by visiting http://www.ca.com/supportconnect and clicking Convert Existing Account on the home page. After this period, you will be required to use the procedure described previously.
Once the account has been converted, customers can either install a digital certificate or use an existing email address and password to log in.
Getting Hold Data
To get hold data that may be more current than that on your New Install or service pack tape, use one of the methods below.
■ Call Customer Support and ask for the latest hold data
■ Recommended: Get the latest hold data through the web by following these steps:
— Go to http://www.ca.com/supportconnect and log in. (You must be enrolled as described in the section above.)
— Click Published Solutions in the left frame.
— In the Enter a fix number box, enter QO20643, QO50174 for Unicenter ® TCPaccess™ Telnet Server release 6.0 or QO45760 for 6.1, and submit.
— Click Add To Cart, and then on Go To Solution Cart.
— Left click $$HOLD.VIEW, this enables you to view the entire text of the hold data. Right clicking $$HOLD.BIN, enables you to download the hold data file in binary.
4–18 Getting Started
After Running the Installation Jobs
05telgs4.doc, printed on 10/15/2004, at 10:24:01 AM
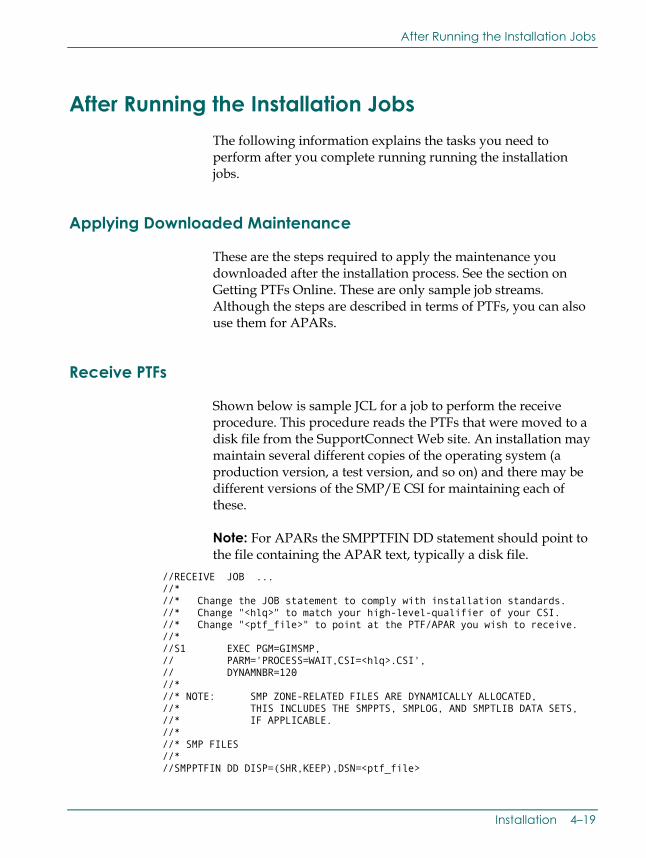
After Running the Installation Jobs The following information explains the tasks you need to perform after you complete running running the installation jobs.
Applying Downloaded Maintenance
These are the steps required to apply the maintenance you downloaded after the installation process. See the section on Getting PTFs Online. These are only sample job streams. Although the steps are described in terms of PTFs, you can also use them for APARs.
Receive PTFs
Shown below is sample JCL for a job to perform the receive procedure. This procedure reads the PTFs that were moved to a disk file from the SupportConnect Web site. An installation may maintain several different copies of the operating system (a production version, a test version, and so on) and there may be different versions of the SMP/E CSI for maintaining each of these.
Note: For APARs the SMPPTFIN DD statement should point to the file containing the APAR text, typically a disk file.
//RECEIVE JOB ... //* //* Change the JOB statement to comply with installation standards. //* Change "<hlq>" to match your high-level-qualifier of your CSI. //* Change "<ptf_file>" to point at the PTF/APAR you wish to receive. //* //S1 EXEC PGM=GIMSMP, // PARM='PROCESS=WAIT,CSI=<hlq>.CSI', // DYNAMNBR=120 //* //* NOTE: SMP ZONE-RELATED FILES ARE DYNAMICALLY ALLOCATED, //* THIS INCLUDES THE SMPPTS, SMPLOG, AND SMPTLIB DATA SETS, //* IF APPLICABLE. //* //* SMP FILES //* //SMPPTFIN DD DISP=(SHR,KEEP),DSN=<ptf_file>
Installation 4–19
After Running the Installation Jobs
05telgs4.doc, printed on 10/15/2004, at 10:24:01 AM
//SMPCNTL DD * SET BOUNDARY (GLOBAL) . RECEIVE SYSMODS . //*
Apply Check PTFs
This procedure goes through the PTFs and validates each without modifying the actual system files. You should carefully review the log file from this procedure before continuing:
//APPLYCHK JOB ... //* //* Change the JOB statement to comply with installation standards. //* Change "<hlq>" to match your high-level-qualifier of your CSI. //* Change "<tpxxxxx>" to match the PTF/APAR you wish to apply. //* //* If your target zone is not TCPTZN then change: //* SET BOUNDARY(TCPTZN) . //* statement (below) to match your target zone. //* //* If the you receive a return code of 4 from this job then check //* the output for any HOLD information that was bypassed. The HOLD //* information will show any documentation or action that may be //* required after the PTF/APAR is applied. //* //S1 EXEC PGM=GIMSMP, // PARM='PROCESS=WAIT,CSI=<hlq>.CSI', // DYNAMNBR=120 //* //* NOTE: SMP ZONE-RELATED FILES ARE DYNAMICALLY ALLOCATED, //* THIS INCLUDES THE SMPPTS, SMPLOG, AND SMPTLIB DATA SETS, //* IF APPLICABLE. //* //* SMP FILES //* //SMPCNTL DD * SET BOUNDARY(TCPTZN) . APPLY BYPASS(HOLDSYSTEM) GROUP JCLINREPORT CHECK SELECT(<tpxxxxx>) RETRY(YES) .
4–20 Getting Started
After Running the Installation Jobs
05telgs4.doc, printed on 10/15/2004, at 10:24:01 AM
Apply PTFs
This step performs the actual modification. Check for SMP holds on the PTFs. You may need to issue a BYPASS(HOLDSYSTEM) on the apply:
//APPLY JOB ... //* //* Note: Run the APPLYCHK first to see if any HOLDDATA exists and //* to insure you have all the PRE-REQ's. //* //* Change the JOB statement to comply with installation standards. //* Change "<hlq>" to match your high-level-qualifier of your CSI. //* Change "<tpxxxxx>" to match the PTF/APAR you wish to apply. //* //* If your target zone is not TCPTZN then change: //* SET BOUNDARY(TCPTZN) . //* statement (below) to match your target zone. //* //S1 EXEC PGM=GIMSMP, // PARM='PROCESS=WAIT,CSI=<hlq>.CSI', // DYNAMNBR=120 //* //* NOTE: SMP ZONE-RELATED FILES ARE DYNAMICALLY ALLOCATED, //* THIS INCLUDES THE SMPPTS, SMPLOG, AND SMPTLIB DATA SETS, //* IF APPLICABLE. //* //* SMP FILES //* //SMPCNTL DD * SET BOUNDARY(TCPTZN) . APPLY BYPASS(HOLDSYSTEM) GROUP JCLINREPORT SELECT(<tpxxxxx>) RETRY(YES) .
Installation 4–21
After Running the Installation Jobs
05telgs4.doc, printed on 10/15/2004, at 10:24:01 AM
Starting Unicenter TCPaccess Telnet Server
The startup member, RUNTLN, is located in the TLNSAMP library. This member invokes Unicenter TCPaccess Telnet Server. You have a choice to submit RUNTLN as a started task or as a batch job. This is only an installation verification procedure to make sure that the installation was done properly. For a more detailed explanation of configuring the RUNTLN sample, see the "Operations" chapter, JCL Requirements section in the System Management Guide.
Task 1: Edit the RUNTLN Member
Note: Do not execute TCPNAMES.
1. Change the symbolic HLQ to the value you specified in hlq.dsn for CLIST member TCPNAMES.
2. Verify that the symbolic U=ACTN is available for use. The MVS command D SSI displays subsystem names that were invoked during the life of the current IPL. You can use ACTN if it does not display or if it shows as inactive.
Note: If ACTN is active, you must choose a different name for your subsystem.
3. Verify that the character used for the symbolic SRC is not in use. If a character is to be used, modify the parameter to include that character; for example, SRC='%'.
4. If you have a line limit, add one of the following lines immediately after the JOBCARD to support diagnostics:
■ If you are using JES2 add: /*JOBPARM LINES=9999
■ If you are using JES3, add: //*MAIN LINES=(999,W)
5. Update the JOB statement for RUNTLN.
4–22 Getting Started
After Running the Installation Jobs
05telgs4.doc, printed on 10/15/2004, at 10:24:01 AM
6. To prepare RUNTLN as a started task:
a. Delete the RUNTLN JOBCARD and comments that appear prior to the PROC statement.
b. Delete the following two JCL statements from RUNTLN: // PEND //TLN EXEC TLN
c. Copy member RUNTLN into a system PROCLIB.
Task 2: Submit RUNTLN ■ To submit RUNTLN as a batch job, submit member
RUNTLN.
■ To submit RUNTLN as a started task, issue the MVS command S RUNTLN.
■ To stop RUNTLN, issue the MVS command:
F RUNTLN,P CLEAR
Answer YES to the reply. This reply is generated if you have the PROMPT parameter specified in your IJTCFGTN member of the TLNPARM library.
Installation 4–23

06telgs5.doc, printed on 8/24/2004, at 10:11 AM
Chapter
5 Customization
You will need to customize the configuration files for Unicenter TCPaccess Telnet Server for your network. Refer to the Customization Guide for complete information.
Configuring the TN3270E Server The APPCFGTN member supplied in the PARM library is configured for TN3270E on port 23 and SSL on ports 1023 and 1123, which AUTOLOG to TSO.
You need to consider updating the following:
■ Update one or both of sample KEYRING statements supplied for a keyring created via SAF or a pair of HFS-defined pathnames.
■ If you do not intend for Unicenter TCPaccess Telnet Server to communicate over all active CINET IP stacks, you need to code the PROVIDER(name) keyword on the TNGLOBAL statement. See the Customization Guide for details.
■ A parameter is available on the TERMPROF statement to allow specification of logmodenames for TN3270E device types. The LUPOOL statement allows association of TN3270E printer LUs with their terminal LU counterparts. See the Customization Guide for details.
■ You can add the TPX keyword to the TELNET statement to use the Native IP Interface to CA-TPX. See the Customization Guide for details.
Customization 5–1


07telgs6.doc, printed on 8/24/2004, at 9:47 AM
Chapter
6 Diagnosis and Problem Reporting
This chapter contains information about:
■ Identifying and resolving problems
■ Contacting Computer Associates Technical Support
■ Receiving new versions of a product and ongoing maintenance
■ Requesting product enhancements
Diagnosis and Problem Reporting 6–1
Diagnostic Procedures
07telgs6.doc, printed on 8/24/2004, at 9:47 AM
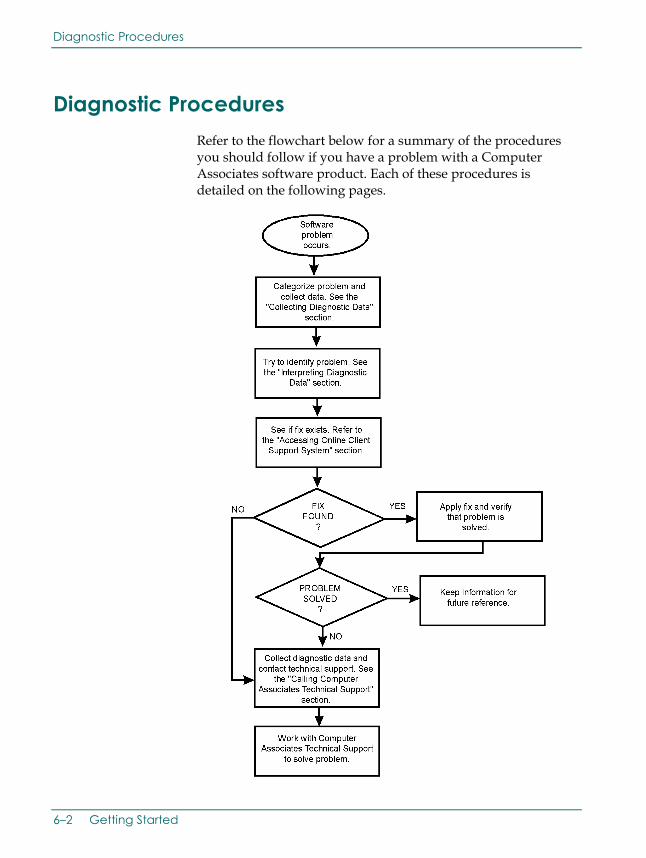
Diagnostic Procedures Refer to the flowchart below for a summary of the procedures you should follow if you have a problem with a Computer Associates software product. Each of these procedures is detailed on the following pages.
6–2 Getting Started
Diagnostic Procedures
07telgs6.doc, printed on 8/24/2004, at 9:47 AM
Collecting Diagnostic Data
The following information is helpful in diagnosing problems that might occur:
■ Control statements used to activate your product
■ JCL used to install or activate your product
■ Relevant system log or console listings
■ Relevant system dumps or product dumps
■ List of other IBM or third-party products that might be involved
■ Manufacturer, model number, and capacity of your hardware
■ Numbers and text of IBM or Computer Associates error messages associated with the problem
■ Names of panels where the problem occurs
■ Listings of all fixes applied to all relevant software, including:
The dates fixes were applied
Fix numbers
Names of components to which fixes were applied
■ Short description of problems
Diagnosis and Problem Reporting 6–3
Diagnostic Procedures
07telgs6.doc, printed on 8/24/2004, at 9:47 AM
Interpreting Diagnostic Data
When you have collected the specified diagnostic data, write down your answers to the following questions:
1. What was the sequence of events prior to the error condition?
2. What circumstances existed when the problem occurred and what action did you take?
3. Has this situation occurred before? What was different then?
4. Did the problem occur after a particular PTF was applied or after a new version of the software was installed?
5. Have you recently installed a new version of the operating system?
6. Has the hardware configuration (tape drives, disk drives, and so forth) changed?
From your response to these questions and the diagnostic data, try to identify the cause and resolve the problem.
6–4 Getting Started
Accessing the Online Client Support System
07telgs6.doc, printed on 8/24/2004, at 9:47 AM
Accessing the Online Client Support System SupportConnect.ca.com is an online product support and service system available on the Internet from Computer Associates. It contains an extensive Knowledge Base that allows you to retrieve many types of product-related information with a single search. SupportConnect also provides full product downloads and an easy-to-use Suggestion Box for you to submit enhancement ideas for your licensed products.
The best features of CA's prior online support systems are fully integrated into SupportConnect. These include:
■ Solution downloads
■ Technical Support issue management
■ License key downloads
■ Virus signature downloads
■ Product-specific FAQs
■ Product documentation downloads
■ Newsgroup open forums
■ E-News newsletters
SupportConnect offers everything that the previous online sites (eSupport.ca.com, support.ca.com, and webtrack.ca.com) offered, and much more. For the differences between SupportConnect and Webtrak and eSupport, see the comparison documents that are accessible from the SupportConnect home page.
Diagnosis and Problem Reporting 6–5
Accessing the Online Client Support System
07telgs6.doc, printed on 8/24/2004, at 9:47 AM
Requirements for Using SupportConnect
With a current version of a browser and without logging in, you have access to a considerable amount of information on the website. This includes access to FAQs, published solutions (for channel products only), compatibilities, virus signatures, news, CA user group information, and support services, and to perform general Knowledge Base searches.
For full access to all the services related to your licensed products, including published solutions, license keys, newsgroups, Hyper Subscriptions, product and documentation downloads, issue management, and Suggestion Box, you must log in. These areas require that you are a registered SupportConnect user. You can convert your Webtrack or eSupport login and password to a SupportConnect account; just click on Convert Existing Account when you first access SupportConnect.
If you enrolled at AccountConnect.ca.com, you can log into SupportConnect using your AccountConnect digital certificate rather than entering a login name and password. However, this works only on the PC where the digital certificate resides, and only if you are using Microsoft Internet Explorer 5.5 or later. If you need to access SupportConnect from another PC, or if you are using Netscape Navigator, you must provide a login name and password.
Accessing the Technical Support Phone Services Directory
The Computer Associates Technical Support Phone Services Directory lists each Computer Associates product and the telephone number to call for primary support for that product. To access the Support Phone Services Directory, click on the Support Services link on the SupportConnect.ca.com webpage.
6–6 Getting Started
CA-TLC: Total License Care
07telgs6.doc, printed on 8/24/2004, at 9:47 AM
CA-TLC: Total License Care Many Computer Associates software solutions use license keys or authorization codes to validate your hardware configuration. If you need assistance obtaining a license key or authorization code, contact the CA-TLC: Total License Care group through SupportConnect.ca.com.
Calling Computer Associates Technical Support For further technical assistance with this product, Technical Support is available 24 hours a day, seven days a week. You can obtain a complete list of Computer Associates locations and phone numbers by product at SupportConnect.ca.com at the Support Services link.
If you are unable to resolve the problem, please have the following information ready before contacting Computer Associates Technical Support:
■ All the diagnostic information described in Collecting Diagnostic Data.
■ Product name, version number, operating system, and genlevel.
■ Product name and version number of any other software you suspect is involved.
■ Version level and PUTLEVEL of the operating system.
■ Your name, telephone number and extension (if any).
■ Your company name.
■ Your site ID.
Diagnosis and Problem Reporting 6–7
Product Versions and Maintenance
07telgs6.doc, printed on 8/24/2004, at 9:47 AM
■ A severity code. This is a number (from 1 to 4) that you assign to the problem. Use the following to determine the severity of the problem:
1 a "system down" or inoperative condition
2 a suspected high-impact condition associated with the product
3 a question concerning product performance or an intermittent low-impact condition associated with the product
4 a question concerning general product utilization or implementation
Product Versions and Maintenance Customers are requested to operate only under currently supported versions of the product.
Customers with current maintenance agreements also receive ongoing product maintenance. When a new version of the system is available, a notice is sent to all current customers.
Requesting Enhancements Computer Associates welcomes your suggestions for product enhancements. All suggestions are considered and acknowledged. You can use either of two methods to request enhancements:
■ Enter your request through the Suggestion Box at SupportConnect.ca.com, the Computer Associates web-based, interactive support system.
■ Contact your Account Manager who will initiate the request for you.
6–8 Getting Started
09telgsix.doc, printed on 8/24/2004, at 9:53 AM
Index
CA-TLC (CA Total License Care), 6-7
check, 4-20 $
$READT04 member, 4-5 D
DELFMID job, 4-14 A
AccountConnect, 6-6 E
APF authorizations, 3-3
enrolling for SupportConnect applying enrolling, 4-17 check PTFs, 4-20 existing CA support users, 4-18 PTFs, 4-21 new user, 4-17 applying downloaded maintenance, 4-19 overview, 4-17
authorization codes, obtaining, 6-7
G C
getting hold data, 4-18 CA Common Services for z/OS and OS/390 getting PTFs online, 4-16
CA LMP, 2-3
CA Common Services for z/OS and OS/390
H CA LMP, 2-2
hold data, getting, 4-18 CAIRIM, 2-1
CA LMP, 2-2
CAIRIM, 2-1
callable system services library, 3-3
Index–1
09telgsix.doc, printed on 8/24/2004, at 9:53 AM
I P
installation Phone Services Directory, 6-6 materials, 3-1 PTFs setting up TCPNAMES CLIST, 4-5 applying, 4-20, 4-21 using the TCPNAMES CLIST, 4-5, 4-9 receiving, 4-19 customizing the install job, 4-7
INSTLJCL control file, 4-4
R Internet, Computer Associates site, 6-5
receiving PTFs, 4-19 J RUNTLN member
editing, 4-22 JCL to unload the tape, 4-4 submitting, 4-23
job descriptions DELFMID, 4-14
S overvview, 4-11 SRVPACA, 4-13 SRVPACR, 4-12 SMS requirements, 3-2 T00ALLOC, 4-14
software prerequisites, 3-2 T04INSTA, 4-16 T04INSTR, 4-15 SRVPACA job, 4-13 T05ALLOC, 4-15
SRVPACR job, 4-12
starting Unicenter TCPaccess FTP Server, 4-22 L Support Phone Services Directory, 6-6
SupportConnect, 6-5 license keys, obtaining, 6-7
license management program, 2-3
T
M T00ALLOC job, 4-14
T04INSTA job, 4-16 maintenance applying, 4-19 T04INSTR job, 4-15
T05ALLOC job, 4-15
Index–2 Getting Started
09telgsix.doc, printed on 8/24/2004, at 9:53 AM
TCPNAMES CLIST command format, 4-7 customizing the install job, 4-7 setting up, 4-5 using, 4-5
Technical Support Phone Services Directory, 6-6
Total License Care (CA-TLC), 6-7
Troubleshooting, 6-1
U
unloading the product tape, JCL, 4-4
Index–3

gsgprt-blank.doc, printed on 9/22/2003, at 11:19 AM