unit commitment 1
TRANSCRIPT

7/28/2019 Unit Commitment 1
http://slidepdf.com/reader/full/unit-commitment-1 1/59
1
CHAPTER-1
UNIT COMMITMENT PROBLEM
1.1 INTRODUCTION
Electricity generating companies and power systems have the problem of deciding how
best to meet the varying demand for electricity, which has a daily and weekly cycle. The short-
term optimization problem is how to schedule generation to minimize the total fuel cost or to
maximize the total profit over a study period of typically a day, subject to a large number of
constraints that must be satisfied. If the electricity company has responsibility for satisfying the
demand for electricity, then the most important constraint is that the total generation must equal
the half-hourly forecast demands.
There are two related short-term optimization problems, ‘unit commitment’ and
‘economic dispatch’. Unit commitment is the process of deciding when and which generating
units at each power station to start-up and shut-down. Economic dispatch is the process of
deciding what the individual power outputs should be of the scheduled generating units at each
time-point. Unit commitment is a very challenging optimization problem, because of the
astronomical number of possible combinations of the on and off states of all the generating units
in the power system over all the time-points in the study period.
Power Optimization is an independent consultancy, which develops unit commitment
software for electricity companies. The software considers both unit commitment and economic
dispatch simultaneously, which improves the quality of the calculated schedules. The software is
customized to the unique features of the electricity company being modelled and to the precise
requirements of the user, and it can be integrated with the user’s own computer systems.

7/28/2019 Unit Commitment 1
http://slidepdf.com/reader/full/unit-commitment-1 2/59
2
1.2 UNIT COMMITMENT
To ‘commit’ a generating unit is to ‘turn it on’, that is, to bring the unit up to speed,
synchronize it to the system, and connect it so, it can deliver power to the network.
The economic dispatch problem assumes that all the N units are already connected to the system.
The unit commitment problem is more difficult to solve. To commit a generating unit is to turn it
on i.e. synchronize it and connect it to the system so that it can deliver power to the load in the
system. If the number of sets N with their capacities are given and the daily or weekly load
forecast is known including the details of load curve.
The problem in unit commitment is that as to which of the units should be kept on
(or) off for a certain given time during the day or the week in order to obtain the
minimum operating cost. A great deal of money can be saved by turning off the units when
they are not need for the time. If the operation of the system is to be optimized, the units
should be shut down when the load falls and the capacity of units is not required. The
problem in which of the units should be dropped or shut down and which should be left
on the line. Also the load rises again which of the unit should be recommitted.
We have a few generators (units)
Also we have some forecasted load
Besides the cost of running the units we have additional costs and constraints
It turns out that we cannot just flip the switch of certain units on and use them.
We need to think ahead, and based on the forecasted load and unit constraints, determine
which units to turn on (commit) and which ones to keep down
Minimize cost, cheap units play first
Expensive ones run only when demand is high.

7/28/2019 Unit Commitment 1
http://slidepdf.com/reader/full/unit-commitment-1 3/59
3
1.3 CONSTRAINTS IN THE UNIT COMMITMENT PROBLEM
The thermal unit can only undergo gradual temperature changes, and this translates into a
time period of some hours required to bring the unit on-line. As a result of such restrictions in the
operation of a thermal plant, have various constraints. The constraints, which must be satisfied
during the optimization process; are of two types.
System or Coupling Constraints
Local Constraints.
1.3.1 SYSTEM OR COUPLING CONSTRAINTS ARE THE FOLLOWING
i) System power balance (Demand + Losses +Export)
ii) System reserve requirements
1.3.2 LOCAL CONSTRAINTS
i) Unit high MW limits (Pmax)
ii) Unit low MW limits (Pmin)
iii) Unit minimum up time
iv) Unit minimum down time
v) Hot cost and Cold cost
vi) Hot start and Cold start
vii) Unit Initial Conditions
1.3.3 SYSTEM POWER BALANCE
Enough units will be committed to supply the load (Demand +Losses +Export) at each
hour of the scheduling period. Unit High & Low MW Limits: Each unit has a range over which it
runs efficiently. It is desired for economic reasons to run the unit in this range. The higher and
lower limits are thus fixed.

7/28/2019 Unit Commitment 1
http://slidepdf.com/reader/full/unit-commitment-1 4/59
4
i.Minimum Uptime: Once the unit is running it should not be turned off immediately.
ii.Minimum Down time: Once the unit is de-committed, there is a minimum time before it can
be recommitted.
iii.Hot Start cost & Cold Start cost: The amount of fuel required to bring the boiler in
operating temperature in time for a schedules turn on form cold state is called” cold startup cost”
up to certain number of hours (Cold Start hours) the cos4 of banking will bå lecs than the cost of
coolang. Up to cold start hours the star up cost is called “hot start cost”Hot Start: Ib t`e boiler is
not cooled for sufficient time (minimum time of cooling) it is0called as ‘Hot Start’ its c/st is less
as compared to cold start.
iv.Cold Start: If the boiler is cooled for suffi#ient time (greates than minimum time of cooling
the boiler) and then heated back to operating temperature then the procedure is called ‘Cold
Svart’
v.Unit Initial Conditions: The previous state of the units (whether it has been ON or OFF
previously and for how long) is necessary to start t(e unit commitment schedule.The basic UC
methods reported in the létez!ture can be #lassifhed and the most widely used methods to the unit
commitment problem by the power )ndustry are classified as follows:
(i) Priority List
(ii) Dynamic Programming
1.4 PRIORITY LISTING METHODOLOGY
The simplest unit commitment solution methods consist of creating a priority list of units.
A simple shutdown rule (or) priority list schemes could be obtained after an exhaustive
enumeration of all unit combinations at each load level. All plants merely need to be ranked in aheuristic with increasing operation costs. The units are committed in ascending order of the
average full load cost so that the most economic base load units are committed first and the peak
units last in order to meet the load demand. This unique ranking order is then used to commit
units to satisfy demand and reserve requirements every hour. There are no further economic
optimizations. The calculation time for this method is small, even for large systems. This makes

7/28/2019 Unit Commitment 1
http://slidepdf.com/reader/full/unit-commitment-1 5/59
5
the method eligible for our purposes. An important disadvantage of the method is that it is not
considered accurate. Also state transition costs are not taken into account. Priority List methods
are very fast but they are highly heuristic and give schedules with relatively high production cost.
The top priority list schemes would have steps for shutting down a unit as follows which may be
put in form of an algorithm and worked out as necessary.
(1) At each hour when the load is dropping. Find out whether taking off the next unit on
the priority list will have sufficient capacity to supply the load as well as provide the
spinning reserve required. If yes, go to next step; if not, do not drop the unit but
continue the operation with the unit as it is.(2) Determine the number of hours after which the unit will need to be as committed
again.
(3) If the number of hours is less than the minimum shut down time for the unit then keep
the unit on as it is .If not then go to next step.
(4) Calculate the hourly cost of production for the number of hours with units in
operation. Compare this with cost for situation with unit down plus starting up costs.
(may be completely cooling or banking).
(5) Repeat the procedure for the next unit on the priority list continue for each next unit.
The priority list should be made considering the grouping of units to satisfy the
various constraints.
1.5 DYNAMIC PROGRAMMING METHOD
Dynamic programming has the advantage of reduction in the dimensionality of the
problem. The procedure is set for determining the optimal schedule and the minimum total fuel
cost. This is done either by “Backward dynamic approach” or by “forward dynamic approach”
method.
Dynamic Programming methods decompose the unit commitment problem in time
starting at the first hour of the scheduling horizon, commitment of units progresses one hour at a
time and combination of units are stored for each hour This is the forward path of the dynamic

7/28/2019 Unit Commitment 1
http://slidepdf.com/reader/full/unit-commitment-1 6/59
programming method. At the end of the execution of the forward path for each hour state pair (a
state is defined are combination of the ON/OFF status of all units) The main limitation of the
6
dynamic programming methods is the curse of dimensionality. Strong all possible unit
combinations (2N- 1, N number of units) at every hour is impossible even for moderate size
systems. Thus heuristic techniques are used to restrict the number of combinations to be searched
and the number of strategies to be saved at every hour. These heuristic produce sub optimal
solutions and in certain cases may require the relaxation of some of the constraints in order to
produce a solution. Another major difficulty in dynamic programming is in treating time
dependent constraints such as unit minimum up and down times dependent start up cost etc.
The total number of units, their individuals cost characteristics and the load cycle on the
station are assumed to be known a prior. Further, it shall be assumed that the load on each unit or
combination of units changes in suitably small but uniform steps of size (e.g. 1Mw).
Starting arbitrarily with any two units, the most economical combination is determined for all the
discrete load levels of the combined output of the two units. At each load level the most
economic answer may be to run either unit or both units with a certain load sharing between the
two. The most economical cost curve in discrete form the two units thus obtained can be viewed
as the cost curve of a single equivalent unit. The third unit is now added and the procedure
repeated to find the cost curve of three combined units. It may be noted that in this procedure the
operating combination of third and first, also third and second are not required to be worked out
resulting in considerable saving in computational effort. The process is repeated, till all available
units are exhausted the advantage of this approach is that having obtained the optimal way of
loading K units. It is quite easy to determine the optimal manner of loading (K+1) units.
Let cost function FN(x) be defined as follows.
FN(x) =the minimum cost in Rs/hr of generating x Mw by N units
fN(y) =cost of generating y Mw by the Nth unit.
FN-1(x-y) = the minimum cost of generating (x-y) Mw by the remaining (N-1) units.
Now the application of dynamic programming results in the following recursive relation.

7/28/2019 Unit Commitment 1
http://slidepdf.com/reader/full/unit-commitment-1 7/59

7/28/2019 Unit Commitment 1
http://slidepdf.com/reader/full/unit-commitment-1 8/59
8
CHAPTER-2
2.1 MICROCONTROLLER
Basically, a microcontroller is a device which integrates a number of the components of a
microprocessor system onto a single microchip and optimised to interact with the outside world
through on-board interfaces; i.e. it is a little gadget that houses a microprocessor, ROM (Read
Only Memory), RAM (Random Access Memory), I/O (Input Output functions), and various
other specialized circuits all in one package.
On the other hand, a microprocessor is normally optimised to co-ordinate the flow
of information between separate memory and peripheral devices which are located outside
itself. Connections to a microprocessor include address, control and data busses that
allow it to select one of its peripherals and send to or retrieve data from it. Because a
microcontrollers processor and peripherals are built on the same silicon, the devices are
self-contained and rarely have any bus structures extending outside their packages.
So a microcontroller incorporates onto the same microchip the following:
• The CPU core
• Memory (both ROM and RAM)
• Some parallel digital I/O

7/28/2019 Unit Commitment 1
http://slidepdf.com/reader/full/unit-commitment-1 9/59
Fig.2.1 Microcontroller's fundamental components
9
MICROCONTROLLERS WILL ALSO COMBINE OTHER DEVICES SUCH AS
Fig.2.2 Basic microcontroller architecture

7/28/2019 Unit Commitment 1
http://slidepdf.com/reader/full/unit-commitment-1 10/59
• A Timer module to allow the microcontroller to perform tasks for certain time periods.
• A serial I/O port to allow data to flow between the microcontroller and other devices such
as a PC or another microcontroller.
• An ADC to allow the microcontroller to accept analogue input data for processing.
2.2 THE MICROCONTROLLER'S BUILDING BLOCKS
To illustrate the functions and interconnectivity of the building blocks of the
microcontroller, we shall construct the microcontroller block by block
i MEMORY UNIT
Memory is part of the microcontroller whose function is to store data.
The easiest way to explain it is to describe it as one big closet with lots of drawers. If we suppose
that we marked the drawers in such a way that they cannot be confused, any of their contents
10
will then be easily accessible. It is enough to know the designation of the drawer and so its
contents will be known to us for sure.

7/28/2019 Unit Commitment 1
http://slidepdf.com/reader/full/unit-commitment-1 11/59
Memory components are exactly like that. For a certain input we get the contents of a certain
addressed memory location and that's all. Two new concepts are brought to us: addressing and
memory location. Memory consists of all memory locations, and addressing is nothing but
selecting one of them. This means that we need to select the desired memory location on one
hand, and on the other hand we need to wait for the contents of that location. Beside reading
from a memory location, memory must also provide for writing onto it. This is done by
supplying an additional line called control line. We will designate this line as R/W (read/write).
Control line is used in the following way: if r/w=1, reading is done, and if opposite is true then
writing is done on the memory location. Memory is the first element, and we need a few
operation of our microcontroller.
ii CENTRAL PROCESSING UNIT
The block that will have a built in capability to multiply, divide, subtract,
and move its contents from one memory location onto another is called "central
processing unit" (CPU). Its memory locations are called registers.
Registers are therefore memory locations whose role is to help with performing various
mathematical operations or any other operations with data wherever data can be found. Look at
the current situation. We have two independent entities (memory and CPU) which are
interconnected, and thus any exchange of data is hindered, as well as its functionality. If, for
example, we wish to add the contents of two memory locations and return the result again back
to memory, we would need a connection between memory and CPU. Simply stated, we must
have some "way" through data goes from one block to another.
11
iii BUS

7/28/2019 Unit Commitment 1
http://slidepdf.com/reader/full/unit-commitment-1 12/59
That "way" is called "bus". Physically, it represents a group of 8, 16, or more
wires. There are two types of buses address and data bus. The first one consists of as
many lines as the amount of memory we wish to address, and the other one is as wide
as data, in our case 8 bits or the connection line. First one serves to transmit address
from CPU memory, and the second to connect all blocks inside the microcontroller.
As far as functionality, the situation has improved, but a new problem has
also appeared we have a unit that's capable of working by itself, but which does
not have any contact with the outside world, or with us! In order to remove this
deficiency, let's add a block which contains several memory locations whose one
end is connected to the data bus, and the other has connection with the output
lines on the microcontroller which can be seen as pins on the electronic component.
iv INPUT-OUTPUT UNIT
Those locations we've just added are called "ports". There are several types of ports :
input, output or bidirectional ports. When working with ports, first of all it is necessary to choose
which port we need to work with, and then to send data to, or take it from the port.
When working with it the port acts like a memory location. Something is simply being written
into or read from it, and it could be noticed on the pins of the microcontroller.
v SERIAL COMMUNICATION
Beside stated above we've added to the already existing unit the possibility of
communication with an outside world. However, this way of communicating has its drawbacks.
One of the basic drawbacks is the number of lines which need to be used in order to transfer data.
What if it is being transferred to a distance of several kilometres? The number of lines times
number of kilometres doesn't promise the economy of the project. It leaves us having to reducethe number
12

7/28/2019 Unit Commitment 1
http://slidepdf.com/reader/full/unit-commitment-1 13/59
Of lines in such a way that we don't lessen its functionality. Suppose we are working
with three lines only, and that one line is used for sending data, other for receiving, and
the third one is used as a reference line for both the input and the output side. In order
for this to work, we need to set the rules of exchange of data. These rules are called
protocol. Protocol is therefore defined in advance so there wouldn't be any
misunderstanding between the sides that are communicating with each other. For example,
if one man is speaking in French, and the other in English, it is highly unlikely that
they will quickly and effectively understand each other. Let's suppose we have the
following protocol. The logical unit "1" is set up on the transmitting line until transfer
begins. Once the transfer starts, we lower the transmission line to logical "0" for a
period of time (which we will designate as T), so the receiving side will know that it is
receiving data, and so it will activate its mechanism for reception. Let's go back now to the
transmission side and start putting logic zeros and ones onto the transmitter line in the
order from a bit of the lowest value to a bit of the highest value. Let each bit stay on line
for a time period which is equal to T, and in the end, or after the 8th bit, let us bring the
logical unit "1" back on the line which will mark the end of the transmission of one data. The
protocol we've just described is called in professional literature NRZ (Non-Return to Zero).
As we have separate lines for receiving and sending, it is possible to receive and send
data (info.) at the same time. So called full-duplex mode block which enables this way of
communication is called a serial communication block. Unlike the parallel transmission, data
moves here bit by bit, or in a series of bits what defines the term serial communication comes
from. After the reception of data we need to read it from the receiving location and store it
in memory as opposed to sending where the process is reversed. Data goes from memory
through the bus to the sending location, and then to the receiving unit according to the protocol.
13
7/28/2019 Unit Commitment 1
http://slidepdf.com/reader/full/unit-commitment-1 14/59
vi TIMER UNIT
Since we have the serial communication explained, we can receive, send and process
data.However, in order to utilize it in industry we need a few additionally blocks. One of those is
the timer block which is significant to us because it can give us information about time, duration,
protocol etc. The basic unit of the timer is a free-run counter which is in fact a register whose
numeric value increments by one in even intervals, so that by taking its value during periods T1
and T2 and on the basis of their difference we can determine how much time has elapsed. This is
a very important part of the microcontroller whose understanding requires most of our time.
vii WATCHDOG
One more thing is requiring our attention is a flawless functioning of the microcontroller
during its run-time. Suppose that as a result of some interference (which often does occur in
industry) our microcontroller stops executing the program, or worse, it starts working
incorrectly.
Of course, when this happens with a computer, we simply reset it and it will keep working.
However, there is no reset button we can push on the microcontroller and thus solve our
problem. To overcome this obstacle, we need to introduce one more block called watchdog.
This block is in fact another free-run counter where our program needs to write a zero in
every time it executes correctly. In case that program gets "stuck", zero will not be written in,
and counter alone will reset the microcontroller upon achieving its maximum value. This will
result in executing the program again, and correctly this time around. That is an
important element of every program to be reliable without man's supervision.
viii Analog to Digital Converter (ADC)
As the peripheral signals usually are substantially different from the ones that
microcontroller can understand (zero and one), they have to be converted into a pattern which
can be comprehended by a microcontroller. This task is performed by a block for analog to
14

7/28/2019 Unit Commitment 1
http://slidepdf.com/reader/full/unit-commitment-1 15/59
digital conversion or by an ADC. This block is responsible for converting an information
about some analog value to a binary number and for follow it through to a CPU block so that
CPU block can further process it. Finally, the microcontroller is now completed, and all we need
to do now is to assemble it into an electronic component where it will access inner blocks
through the outside pins. The picture below shows what a microcontroller looks like inside.

7/28/2019 Unit Commitment 1
http://slidepdf.com/reader/full/unit-commitment-1 16/59

7/28/2019 Unit Commitment 1
http://slidepdf.com/reader/full/unit-commitment-1 17/59
Fig.2.3 Architecture of Microcontroller
15
Thin lines which lead from the center towards the sides of the microcontroller
represent wires connecting inner blocks with the pins on the housing of the
microcontroller so called bonding lines. Chart on the following page represents the center
section of a microcontroller. For a real application, a microcontroller alone is not enough.
Beside a microcontroller, we need a program that would be executed, and a few more

7/28/2019 Unit Commitment 1
http://slidepdf.com/reader/full/unit-commitment-1 18/59
elements which make up a interface logic towards the elements of regulation .
2.3 PROGRAM
Program writing is a special field of work with microcontrollers and is called
"programming". Try to write a small program in a language that we will make up
ourselves first and then would be understood by anyone.
START
REGISTER1=MEMORY LOCATION_A
REGISTER2=MEMORY LOCATION_B
PORTA=REGISTER1 + REGISTER2
END
The program adds the contents of two memory locations, and views their sum on
port A. The first line of the program stands for moving the contents of memory location
"A" into one of the registers of central processing unit. As we need the other data as
well, we will also move it into the other register of the central processing unit. The next
instruction instructs the central processing unit to add the contents of those two registers
and send a result to port A, so that sum of that addition would be visible to the outside
world. For a more complex problem, program that works on its solution will be bigger.
Programming can be done in several languages such as Assembler, C and Basic which
are most commonly used languages. Assembler belongs to lower level languages that are
16
programmed slowly, but take up the least amount of space in memory and gives the best results
where the speed of program execution is concerned. As it is the most commonly used language
in programming microcontrollers it will be discussed in a later chapter. Programs in C language
are easier to be written, easier to be understood, but are slower in executing from assembler
programs. Basic is the easiest one to learn, and its instructions are nearest a man's way of

7/28/2019 Unit Commitment 1
http://slidepdf.com/reader/full/unit-commitment-1 19/59
reasoning, but like C programming language it is also slower than assembler. In any case, before
you make up your mind about one of these languages you need to consider carefully the demands
for execution speed, for the size of memory and for the amount of time available for its
assembly.
After the program is written, we would install the microcontroller into a device and run
it. In order to do this we need to add a few more external components necessary for its work.
First we must give life to a microcontroller by connecting it to a power supply (power needed for
operation of all electronic instruments) and oscillator whose role is similar to the role that heart
plays in a human body. Based on its clocks microcontroller executes instructions of a program.
As it receives supply microcontroller will perform a small check up on itself, look up the
beginning of the program and start executing it. How the device will work depends on many
parameters, the most important of which is the skilfulness of the developer of hardware, and on
programmer's expertise in getting the maximum out of the device with his program.
2.4 Microcontrollers vs. Microprocessors
Microcontroller differs from a microprocessor in many ways. First and the most
important is its functionality. In order for a microprocessor to be used, other components such as
memory, or components for receiving and sending data must be added to it. In short that means
that microprocessor is the very heart of the computer. On the other hand, microcontroller is
designed to be all of that in one. No other external components are needed for its application
because all necessary peripherals are already built into it.
17
2.5 MICROCONTROLLER 89C51
The AT89C51 is a low power, high performance CMOS 8-bit microcontroller with
4Kbytes of Flash programmable and erasable read only memory (PEROM). This device is
compatible with the industry standard 8051 instruction set and pin out. The on-chip Flash allows

7/28/2019 Unit Commitment 1
http://slidepdf.com/reader/full/unit-commitment-1 20/59
the program memory to be quickly reprogrammed using a nonvolatile memory programmer such
as the PG302 (with the ADT87 adapter). By combining an industry standard 8-bit CPU with
Flash on a monolithic chip, the 89C51 is a powerful microcomputer which provides a highly
flexible and cost effective solution to many embedded control applications. The 8951 provides
the following features:
(1) Compatible with MCS-51 ™ Products
(2) 4K Bytes of In-System Reprogrammable Flash Memory
– Endurance: 1,000 Write/Erase Cycles
(3) Fully Static Operation: 0 Hz to 24 MHz
(4) Three-level Program Memory Lock
(5) 128 x 8-bit Internal RAM(6) 32 Programmable I/O Lines
(7) Two 16-bit Timer/Counters
(8) Six Interrupt Sources
(9)Programmable Serial Channel
(10)Low-power, Idle and Power-down Modes
In addition, the 89C51 is designed with static logic for operation down to zero frequency
and supports two software selectable power saving modes. The Idle Mode stops the CPU while
allowing the RAM, timer/counters, serial port and interrupt system to continue functioning. The
Power Down Mode saves the RAM contents but freezes the oscillator disabling all other chip
functions until the next hardware reset.
18
2.5.1 PIN DIAGRAM OF 89C51

7/28/2019 Unit Commitment 1
http://slidepdf.com/reader/full/unit-commitment-1 21/59
Fig. 2.4 Pin diagram of 89c51 Microcontroller
In the above block diagram the four I/O ports are:
Port 0 with 8 pins from (0.0-0.7)
Port 1 with 8 pins from (1.0-1.7)
Port 2 with 8 pins from (2.0-2.7)
Port 3 with 8 pins from (3.0-3.7)
Port 0: Port 0 is an 8-bit open-drain bi-directional I/O port. As an output port, each pin can
sink eight TTL inputs. When 1s are written to port 0 pins, the pins can be used as high
impedance inputs.
19

7/28/2019 Unit Commitment 1
http://slidepdf.com/reader/full/unit-commitment-1 22/59
Port 0 may also be configured to be the multiplexed low order address/data bus during accesses
to external program and data memory. In this mode P0 has internal pull-ups.
Port 0 also receives the code bytes during Flash programming, and outputs the code bytes during
program verification. External pullups are required during program verification.
BLOCK DIAGRAM OF 89C51 MICROCONTROLLER
fig. 2.5 block diagram of 89c51 microcontroller
Port 1: Port 1 is an 8-bit bi-directional I/O port with internal pullups. The Port 1 output buffers
can sink/source four TTL inputs. When 1s are written to Port 1 pins they are pulled high by the
internal pullups and can be used as inputs. As inputs,
Port 1 pins that are externally being pulled low will source current (IIL) because of the internal
pullups. Port 1 also receives the low-order address bytes during Flash programming and
verification.
20

7/28/2019 Unit Commitment 1
http://slidepdf.com/reader/full/unit-commitment-1 23/59
Port 2: Port 2 is an 8-bit bi-directional I/O port with internal pullups. The Port 2 output buffers
can sink/source four TTL inputs. When 1s are written to Port 2 pins they are pulled high by the
internal pullups and can be used as inputs. As inputs, Port 2 pins that are externally being pulled
low will source current (IIL) because of the internal pullups. Port 2 emits the high-order address
byte during fetches from external program memory and during accesses to external data memory
that uses 16-bit addresses (MOVX @ DPTR). In this application, it uses strong internal pullups
when emitting 1s. During accesses to external data memory that uses 8-bit addresses (MOVX @
RI); Port 2 emits the contents of the P2 Special Function Register.
Port 2 also receives the high-order address bits and some control signals during Flash
programming and verification.
Port 3: Port 3 is an 8-bit bi-directional I/O port with internal pullups. The Port 3 output buffers
can sink/source four TTL inputs. When 1s are written to Port 3 pins they are pulled high by the
internal pullups and can be used as inputs. As inputs,
Port 3 pins that are externally being pulled low will source current (IIL) because of the pullups.
Port 3 also serves the functions of various special features
of the AT89C51 as listed below:
In the pin diagram
Pin 9: It is RST pin which is used to reset the microcontroller.
Pins 18 & 19: These are XTAL1 and XTAL2 across which a crystal oscillator is connected with
frequency of oscillation =11.0592hz.We can also connect general oscillator but during the
asynchronous transmission, decimal parts may arise. So a crystal oscillator is connected because
of its accuracy.
2.5.2 CRYSTAL OSCILLATOR
Crystal oscillators are oscillators where the primary frequency determining element is aquartz crystal. Because of the inherent characteristics of the quartz crystal the crystal oscillator
may be held to extreme accuracy of frequency stability. Temperature compensation may be
applied to crystal oscillators to improve thermal stability of the crystal oscillator.
21

7/28/2019 Unit Commitment 1
http://slidepdf.com/reader/full/unit-commitment-1 24/59
Crystal oscillators are usually, fixed frequency oscillators where stability and accuracy
are the primary considerations. For example it is almost impossible to design a stable and
accurate LC oscillator for the upper HF and higher frequencies without resorting to some sort of
crystal control. Hence the reason for crystal oscillators.
The frequency of older FT-243 crystals can be moved upward by crystal grinding.
XTAL1
Input to the inverting oscillator amplifier and input to the internal clock operating circuit.
XTAL2
Output from the inverting oscillator amplifier.
2.6 Oscillator Characteristics
XTAL1 and XTAL2 are the input and output, respectively, of an inverting amplifier
which can be configured for use as an on-chip oscillator, as shown in Figure 1. Either a quartz
crystal or ceramic resonator may be used. To drive the device from an external clock source,
XTAL2 should be left unconnected while XTAL1 is driven as shown in Figure 2. There are no
requirements on the duty cycle of the external clock signal, since the input to the internal
clocking circuitry is through a divide-by-two flip-flop, but minimum and maximum voltage high
and low time specifications must be observed.
2.6.1 Idle Mode
In idle mode, the CPU puts itself to sleep while all the onchip peripherals remain active.
The mode is invoked by software. The content of the on-chip RAM and all the special functionsregisters remain unchanged during this
mode. The idle mode can be terminated by any enabled interrupt or by a hardware reset. Itshould be noted that when idle is terminated by a hardware reset, the device normally resumes
22

7/28/2019 Unit Commitment 1
http://slidepdf.com/reader/full/unit-commitment-1 25/59
program execution, from where it left off, up to two machine cycles before the internal resetalgorithm takes control. On-chip hardware
Fig 2.6 crystal oscillator
23

7/28/2019 Unit Commitment 1
http://slidepdf.com/reader/full/unit-commitment-1 26/59
ware inhibits access to internal RAM in this event, but access to the port pins is not inhibited. Toeliminate the possibility of an unexpected write to a port pin when Idle is terminated by reset, theinstruction following the one that
invokes Idle should not be one that writes to a port pin or to external memory.
2.6.2 TIMING & CONTROL
This block takes input from the oscillator and generates the following signals.
i ALE: Address latch enable signaling the presence of address on the AD0 to AD7 lines (port 0).
It is present all the time even if EA is at logic 0 or 1.It occurs in the middle of S1P2 and S4P2
states. It is helpful in checking if 89c51 is operating or not.
ii PSEN: Program store enable. When the device is executing code from the external memory
PSEN is activated. Twice during each machine cycle. Not emitted when external data memory
accessed.
iii EA: External Access. When low 89c51 emits AD0-AD7 on port 0 and A8-A15 on port 2.
iv RESET: High on this port resets 89c51. It should be high for two machine cycles while clock
is running
2.6.3 PROGRAMMING THE 89C51
Assembly language programming consists of writing programs using instruction
mnemonics that are specified by the manufacturer of the chip.An instruction set consists of a
label, an instruction mnemonic, operands,and operational comments. the instruction mnemonic
specifies the action to be taken by the CPU, and the operands specify the address of the data used
in the action. Labels are the names given to address numbers in program code memory.
24

7/28/2019 Unit Commitment 1
http://slidepdf.com/reader/full/unit-commitment-1 27/59
2.7ADDRESSING MODES:
Moving data from one location to another is an important concept to be dealt with while
programming in 89c51. Data is stored at a source address and moved to a destination address.
The ways in which these addresses are specified are called the addressing modes. The
mnemonics are written with the destination address named first followed by the source address.
i IMMEDIATE ADDRESSING
The simplest way to get data to a destination is to make the source of the data part of the
opcode. The data source is the immediately available as part of the instruction itself. When the
89c51 executes an immediate data move, the program counter is automatically incremented to
point to the bytes following the opcode byte in the program memory. Whatever data is found
there is copied to the destination address. The mnemonic for immediate data is the pound sign
(#). It is impossible to have immediate data as a destination.
ii REGISTER ADDRESSING
Certain register names may be a part of the opcode mnemonic as sources or destination of
data. Registers A, DPTR and R0 toR7 may be named as part of the opcode mnemonic. Other
registers in the 89c51 may be addressed using the direct addressing mode. The registers used inthe opcode as R0 to R7 are chosen by the bank select bits RS0 and RS1 in the program status
word. Register to register moves using the register addressing mode occur between register A
and R0 to R7.
iii DIRECT ADDRESSING
All 128 bytes of internal RAM and the special function registers (SFR) may be addressed
directly using single byte address assigned to each RAM location and each SFR. Internal RAM
uses addresses from 00H to 7FH to address each byte. The SFR addresses exist from 80H to FFH
only at selected locations. The programmer may select to use the absolute numeric address
number for an SFR or may use a symbol for the SFR.
25

7/28/2019 Unit Commitment 1
http://slidepdf.com/reader/full/unit-commitment-1 28/59
iv INDIRECT ADDRESSING
The indirect addressing mode uses a register to add the actual address that will finally be
used in the data often, the register itself is not the address, but rather the number in the register.
Indirect addressing uses register R0 & R1, to hold the address of one of the data location inRAM from address 00H to 7FH. The mnemonic symbol used for indirect addressing is the ‘at
sign (@)’. Only registers R0 or R1 maybe used for indirect addressing.
v EXTERNAL DATA MOVES
Registers R0, R1 and DPTR can be used to hold the address of the data byte in external
RAM. R0 and R1 are limited to hold the address of the data byte in external RAM address range
of 00H to 0FFFFH. Opcode that access external memory always use indirect addressing to
specify the external memory. All data moves must involve the A register.
2.8 BIT-LEVEL LOGICAL OPERATIONS
The efficiency of a microcontroller lies in its ability to provide the programmer with bit
level data manipulation. Bit operations yield compact program code that enhances program
execution speed. Certain internal RAM and SFRs can be addressed by the address
of each bit within a byte. Bit addressing is very convenient when we wish to alter a single bit
of a byte, in a control register for instance, crucial bit of the same byte. The assembler can alsoequate bit addresses to labels that make the program more readable.
2.9 JUMP AND CALL INSTRUCTIONS
Jumps operate by testing for conditions that are specified in the jump mnemonic. If the
condition is true, the jump is taken to the specified address. Otherwise it executes the next
instruction.A call whether hardware or software initiated, causes a jump to the address where the
call subroutine is located without testing for any condition.A microcontroller program uses jump
to alter program flow as external conditions require. This sort of program can determine external
conditions by moving data from the port pins to location and jumping on the conditions of the
port pin data .This technique is called polling and requires that the program does not have to
respond to external conditions quickly.
26

7/28/2019 Unit Commitment 1
http://slidepdf.com/reader/full/unit-commitment-1 29/59
CHAPTER-3
3.HARDWARE IMPLEMENTATION
3.1555 TIMER
The 555 timer is one of the most remarkable integrated circuits ever developed. It comes in
a single or dual package and even low power CMOS versions exist - ICM7555. Common part
numbers are LM555, NE555, LM556, and NE556. The 555 timer consists of two voltage
comparators, a bi-stable flip flop, a discharge transistor, and a resistor divider network.
555 timer applications:
Precision timing.
Pulse generation.
Sequential timing.
Time delay generation.
Pulse width modulation (PWM).
3.1.1 PIN CONFIGURATION OF 555 TIMER
Here are the pin configurations of 555 timer given in figure 1 below
Fig.3.1 - 555 timer pin configurations

7/28/2019 Unit Commitment 1
http://slidepdf.com/reader/full/unit-commitment-1 30/59
27
i Pin 1 (Ground): The ground (or common) pin is the most-negative supply potential of the
device, which is normally connected to circuit common (ground) when operated from positive
supply voltages.
ii Pin 2 (Trigger): This pin is the input to the lower comparator and is used to set the latch,
which in turn causes the output to go high. This is the beginning of the timing sequence in
monostable operation. Triggering is accomplished by taking the pin from above to below a
voltage level of 1/3 V+ (or, in general, one-half the voltage appearing at pin 5). The action of the
trigger input is level-sensitive, allowing slow rate-of-change waveforms, as well as pulses, to be
used as trigger sources. The trigger pulse must be of shorter duration than the time interval
determined by the external R and C. If this pin is held low longer than that, the output will
remain high until the trigger input is driven high again. One precaution that should be observed
with the trigger input signal is that it must not remain lower than 1/3 V+ for a period of time
longer than the timing cycle. If this is allowed to happen, the timer will re-trigger itself upon
termination of the first output pulse. Thus, when the timer is driven in the monostable mode with
input pulses longer than the desired output pulse width, the input trigger should effectively be
shortened by differentiation. The minimum-allowable pulse width for triggering is somewhat
dependent upon pulse level, but in general if it is greater than the 1uS (micro-Second), triggering
will be reliable. A second precaution with respect to the trigger input concerns storage time in
the lower comparator. This portion of the circuit can exhibit normal turn-off delays of several
microseconds after triggering; that is, the latch can still have a trigger input for this period of
time after the trigger pulse. In practice, this means the minimum monostable output pulse width
should be in the order of 10uS to prevent possible double triggering due to this effect. Thevoltage range that can safely be applied to the trigger pin is between V+ and ground. A dc
current, termed the trigger current, must also flow from this terminal into the external circuit.
This current is typically 500nA (nano-amp) and will define the upper limit of resistance
allowable from pin 2 to ground. For an astable configuration operating at V+ = 5 volts, this
resistance is 3 Mega-ohm; it can be greater for higher V+ levels.

7/28/2019 Unit Commitment 1
http://slidepdf.com/reader/full/unit-commitment-1 31/59
28
iii Pin 3 (Output): The output of the 555 comes from a high-current totem-pole stage made up
of transistors Q20 - Q24. Transistors Q21 and Q22 provide drive for source-type loads, and their
Darlington connection provides a high-state output voltage about 1.7 volts less than the V+
supply level used. Transistor Q24 provides current-sinking capability for low-state loads referred
to V+ (such as typical TTL inputs). Transistor Q24 has a low saturation voltage, which allows it
to interface directly, with good noise margin, when driving current-sinking logic. Exact output
saturation levels vary markedly with supply voltage, however, for both high and low states. At a
V+ of 5 volts, for instance, the low state Vce(sat) is typically 0.25 volts at 5 mA. Operating at 15
volts, however, it can sink 200mA if an output-low voltage level of 2 volts is allowable (power
dissipation should be considered in such a case, of course). High-state level is typically 3.3 volts
at V+ = 5 volts; 13.3 volts at V+ = 15 volts. Both the rise and fall times of the output waveform
are quite fast, typical switching times being 100nS. The state of the output pin will always reflect
the inverse of the logic state of the latch. Since the latch itself is not directly accessible, this
relationship may be best explained in terms of latch-input trigger conditions. To trigger the
output to a high condition, the trigger input is momentarily taken from a higher to a lower level.
[see “Pin 2 - Trigger”]. This causes the latch to be set and the output to go high. Actuation of the
lower comparator is the only manner in which the output can be placed in the high state. The
output can be returned to a low state by causing the threshold to go from a lower to a higher level
[see “Pin 6 - Threshold”], which resets the latch. The output can also be made to go low by
taking the reset to a low state near ground [see “Pin 4 - Reset”]. The output voltage available at
this pin is approximately equal to the Vcc applied to pin 8 minus 1.7V.
iv Pin 4 (Reset): This pin is also used to reset the latch and return the output to a low state. The
reset voltage threshold level is 0.7 volt, and a sink current of 0.1mA from this pin is required to
reset the device. These levels are relatively independent of operating V+ level; thus the reset
input is TTL compatible for any supply voltage. The reset input is an overriding function; that is,
it will force the output to a low state regardless of the state of either of the other inputs. It may
thus be used to terminate an output pulse prematurely, to gate oscillations from “on” to “off”,

7/28/2019 Unit Commitment 1
http://slidepdf.com/reader/full/unit-commitment-1 32/59
29
etc. Delay time from reset to output is typically on the order of 0.5 µS, and the minimum reset
pulse width is 0.5 µS. Neither of these figures is guaranteed, however, and may vary from one
manufacturer to another. In short, the reset pin is used to reset the flip-flop that controls the state
of output pin 3. The pin is activated when a voltage level anywhere between 0 and 0.4 volt is
applied to the pin. The reset pin will force the output to go low no matter what state the other
inputs to the flip-flop are in. When not used, it is recommended that the reset input be tied to V+
to avoid any possibility of false resetting.
v Pin 5 (Control Voltage): This pin allows direct access to the 2/3 V+ voltage-divider point, the
reference level for the upper comparator. It also allows indirect access to the lower comparator,
as there is a 2:1 divider (R8 - R9) from this point to the lower-comparator reference input, Q13.
Use of this terminal is the option of the user, but it does allow extreme flexibility by permitting
modification of the timing period, resetting of the comparator, etc. When the 555 timer is used in
a voltage-controlled mode, its voltage-controlled operation ranges from about 1 volt less than V+
down to within 2 volts of ground (although this is not guaranteed). Voltages can be safely
applied outside these limits, but they should be confined within the limits of V+ and ground for
reliability. By applying a voltage to this pin, it is possible to vary the timing of the device
independently of the RC network. The control voltage may be varied from 45 to 90% of the Vcc
in the monostable mode, making it possible to control the width of the output pulse
independently of RC. When it is used in the astable mode, the control voltage can be varied from
1.7V to the full Vcc. Varying the voltage in the astable mode will produce a frequency
modulated (FM) output. In the event the control-voltage pin is not used, it is recommended that it
be bypassed, to ground, with a capacitor of about 0.01uF (10nF) for immunity to noise, since it is
a comparator input. This fact is not obvious in many 555 circuits since I have seen many circuits
with ‘no-pin-5’ connected to anything, but this is the proper procedure. The small ceramic cap
may eliminate false triggering.

7/28/2019 Unit Commitment 1
http://slidepdf.com/reader/full/unit-commitment-1 33/59
30
vi Pin 6 (Threshold): Pin 6 is one input to the upper comparator (the other being pin 5) and is
used to reset the latch, which causes the output to go low. Resetting via this terminal is
accomplished by taking the terminal from below to above a voltage level of 2/3 V+ (the normal
voltage on pin 5). The action of the threshold pin is level sensitive, allowing slow rate-of-change
waveforms. The voltage range that can safely be applied to the threshold pin is between V+ and
ground. A dc current, termed the threshold current, must also flow into this terminal from the
external circuit. This current is typically 0.1µA, and will define the upper limit of total resistance
allowable from pin 6 to V+. For either timing configuration operating at V+ = 5 volts, this
resistance is 16 Mega-ohm. For 15 volt operation, the maximum value of resistance is 20
MegaOhms.
vii Pin 7 (Discharge): This pin is connected to the open collector of a npn transistor (Q14), the
emitter of which goes to ground, so that when the transistor is turned “on”, pin 7 is effectively
shorted to ground. Usually the timing capacitor is connected between pin 7 and ground and is
discharged when the transistor turns “on”. The conduction state of this transistor is identical in
timing to that of the output stage. It is “on” (low resistance to ground) when the output is low and
“off” (high resistance to ground) when the output is high. In both the monostable and astable
time modes, this transistor switch is used to clamp the appropriate nodes of the timing network to
ground. Saturation voltage is typically below 100mV (milli-Volt) for currents of 5 mA or less,
and off-state leakage is about 20nA (these parameters are not specified by all manufacturers,
however). Maximum collector current is internally limited by design, thereby removing
restrictions on capacitor size due to peak pulse-current discharge. In certain applications, this
open collector output can be used as an auxiliary output terminal, with current-sinking capability
similar to the output (pin 3).
Pin 8 (V +): The V+ pin (also referred to as Vcc) is the positive supply voltage terminal of the
555 timer IC. Supply-voltage operating range for the 555 is +4.5 volts (minimum) to +16 volts
(maximum), and it is specified for operation between +5 volts and +15 volts. The device will
operate essentially the same over this range of voltages without change in timing period.

7/28/2019 Unit Commitment 1
http://slidepdf.com/reader/full/unit-commitment-1 34/59
31
Actually, the most significant operational difference is the output drive capability, which
increases for both current and voltage range as the supply voltage is increased. Sensitivity of
time interval to supply voltage change is low, typically 0.1% per volt. There are special and
military devices available that operate at voltages as high as 18 volts.
Fig.3.2 555 TIMER BLOCK DIAGRAM
7/28/2019 Unit Commitment 1
http://slidepdf.com/reader/full/unit-commitment-1 35/59
32
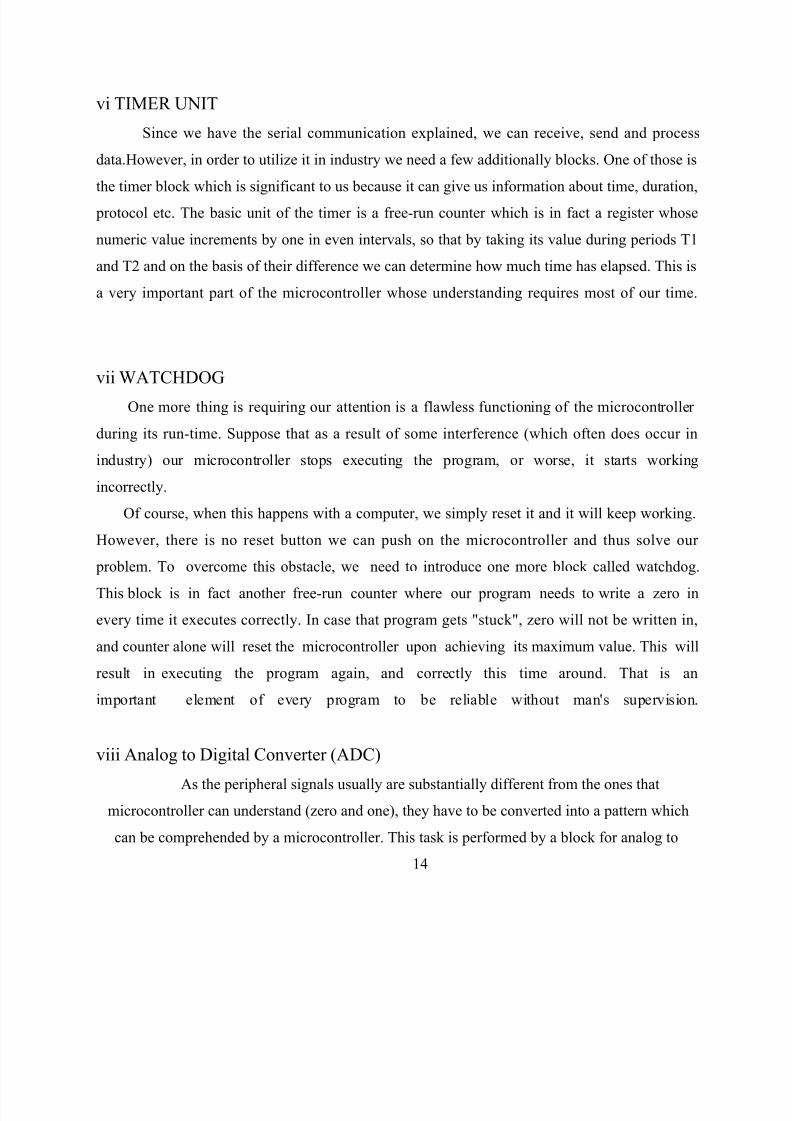
Fig 3.3 555 timing circuit
3.2 ASTABLE OPERATION
Figure above shows the 555 connected as an astable multivibrator. Both the trigger and
threshold inputs (pins 2 and 6) to the two comparators are connected together and to the external
capacitor. The capacitor charges toward the supply voltage through the two resistors, R1 and R2.
The discharge pin (7) connected to the internal transistor is connected to the junction of those
two resistors.
33

7/28/2019 Unit Commitment 1
http://slidepdf.com/reader/full/unit-commitment-1 36/59
When power is first applied to the circuit, the capacitor will be uncharged; therefore, both
the trigger and threshold inputs will be near zero volts. The lower comparator sets the control
flip-flop causing the output to switch high. That also turns off transistor T1. That allows the
capacitor to begin charging through R1 and R2. As soon as the charge on the capacitor reaches
2/3 of the supply voltage, the upper comparator will trigger causing the flip-flop to reset. That
causes the output to switch low. Transistor T1 also conducts. The effect of T1 conducting causes
resistor R2 to be connected across the external capacitor. Resistor R2 is effectively connected to
ground through internal transistor T1. The result of that is that the capacitor now begins to
discharge through R2.
The only difference between the single 555, dual 556, and quad 558 (both 14-pin types),
is the common power rail. For the rest everything remains the same as the single version, 8-pin
555.
As soon as the voltage across the capacitor reaches 1/3 of the supply voltage, the lower
comparator is triggered. That again causes the control flip-flop to set and the output to go high.
Transistor T1 cuts off and again the capacitor begins to charge. That cycle continues to repeat
with the capacitor alternately charging and discharging, as the comparators cause the flip-flop to
be repeatedly set and reset. The resulting output is a continuous stream of rectangular pulses.
The frequency of operation of the astable circuit is dependent upon the values of R1, R2,
and C. The frequency can be calculated with the formula
f = 1/ (.693 x C x (R1 + 2 x R2))
The Frequency f is in Hz, R1 and R2 are in ohms, and C is in farads. The time duration
between pulses is known as the ‘period’, and usually designated with a ‘t’. The pulse is on for
t1 seconds, then off for t2 seconds. The total period (t) is t1 + t2 (see fig. 10). That time interval
is related to the frequency by the familiar relationship:
f = 1/t or t = 1/f
34

7/28/2019 Unit Commitment 1
http://slidepdf.com/reader/full/unit-commitment-1 37/59
The time intervals for the on and off portions of the output depend upon the values of R1
and R2. The ratio of the time duration when the output pulse is high to the total period is known
as the duty-cycle. The duty-cycle can be calculated with the formula
D = t1/t = (R1 + R2) / (R1 + 2R2)
You can calculate t1 and t2 times with the formulas below
t1 = .693(R1+R2) C
t2 = .693 x R2 x C
The 555, when connected as shown in Fig. 9b, can produce duty-cycles in the range of
approximately 55 to 95%. A duty-cycle of 80% means that the output pulse is on or high for 80%
of the total period. The duty-cycle can be adjusted by varying the values of R1 and R2.
3.3 GENERAL CONSIDERATIONS WITH USING A 555 TIMER
Most devices will operate down to as low as 3V DC supply voltage.
However correct supply filtering and bypassing is critical, a capacitor between .01 mF to 10 mF
(depending upon the application) should be placed as close as possible to the 555 timer supply
pin. Owing to internal design considerations the 555 timer can generate large current spikes onthe supply line. considerations limit maximum timing periods to no more than 30 minutes.
3.4 APPLICATIONS
There are literally thousands of different ways that the 555 can be used in electronic
circuits. In almost every case, however, the basic circuit is either a one-shot or an astable. The
application usually requires a specific pulse time duration, operation frequency, and duty-cycle.
Additional components may have to be connected to the 555 to interface the device to external
circuits or devices.
35

7/28/2019 Unit Commitment 1
http://slidepdf.com/reader/full/unit-commitment-1 38/59
3.4.1 ANALOG TO DIGITAL CONVERTER (ADC 0808)
ADC : A device that converts continuously varying analog signals from instruments that
monitor such conditions as movement, temperature, sound, etc., into binary code for the
computer. It may be contained on a single chip or can be one circuit within a chip.
Fig.3.4 timer to ADC connection
36
7/28/2019 Unit Commitment 1
http://slidepdf.com/reader/full/unit-commitment-1 39/59
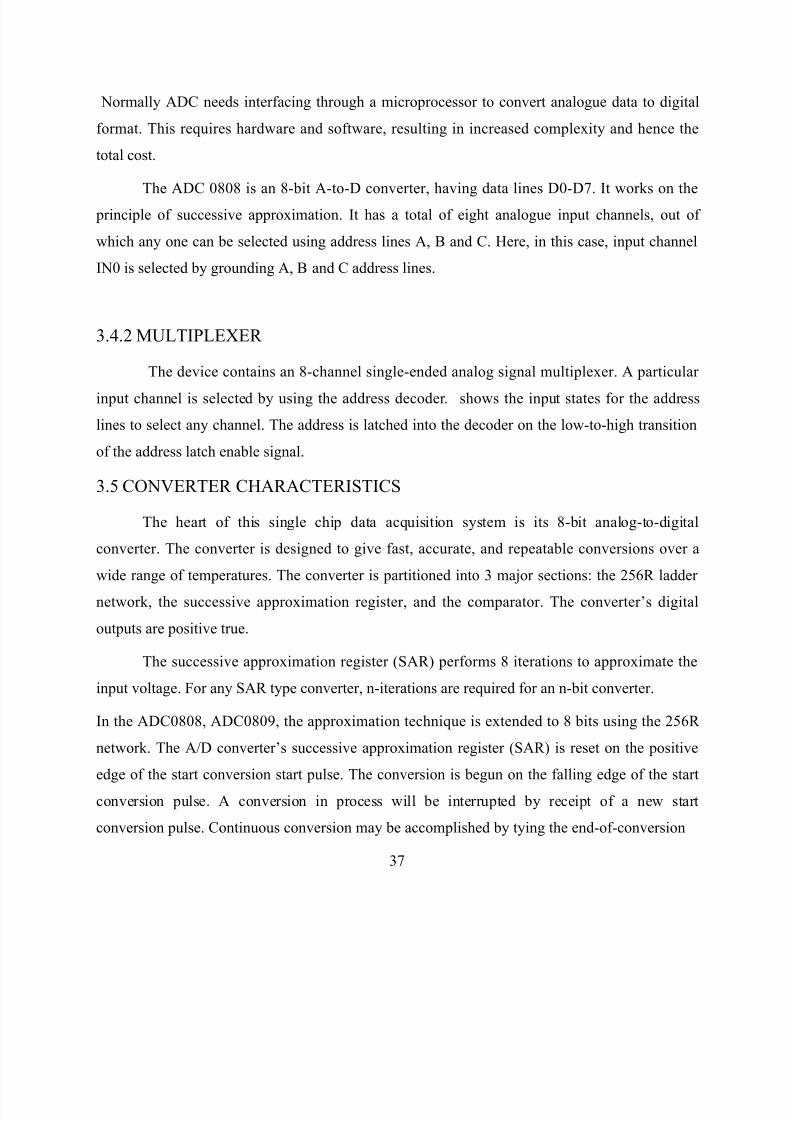
Normally ADC needs interfacing through a microprocessor to convert analogue data to digital
format. This requires hardware and software, resulting in increased complexity and hence the
total cost.
The ADC 0808 is an 8-bit A-to-D converter, having data lines D0-D7. It works on the principle of successive approximation. It has a total of eight analogue input channels, out of
which any one can be selected using address lines A, B and C. Here, in this case, input channel
IN0 is selected by grounding A, B and C address lines.
3.4.2 MULTIPLEXER
The device contains an 8-channel single-ended analog signal multiplexer. A particular
input channel is selected by using the address decoder. shows the input states for the address
lines to select any channel. The address is latched into the decoder on the low-to-high transition
of the address latch enable signal.
3.5 CONVERTER CHARACTERISTICS
The heart of this single chip data acquisition system is its 8-bit analog-to-digital
converter. The converter is designed to give fast, accurate, and repeatable conversions over a
wide range of temperatures. The converter is partitioned into 3 major sections: the 256R ladder
network, the successive approximation register, and the comparator. The converter’s digital
outputs are positive true.
The successive approximation register (SAR) performs 8 iterations to approximate the
input voltage. For any SAR type converter, n-iterations are required for an n-bit converter.
In the ADC0808, ADC0809, the approximation technique is extended to 8 bits using the 256R
network. The A/D converter’s successive approximation register (SAR) is reset on the positive
edge of the start conversion start pulse. The conversion is begun on the falling edge of the start
conversion pulse. A conversion in process will be interrupted by receipt of a new start
conversion pulse. Continuous conversion may be accomplished by tying the end-of-conversion
37

7/28/2019 Unit Commitment 1
http://slidepdf.com/reader/full/unit-commitment-1 40/59
(EOC) output to the SC input. If used in this mode, an external start conversion pulse should be
applied after power up. End-of-conversion will go low between 0 and 8 clock pulses after the
rising edge of start conversion. The most important section of the A/D converter is the
comparator. It is this section which is responsible for the ultimate accuracy of the entireconverter. It is also the comparator drift which has the greatest influence on the repeatability
Usually the control signals EOC (end of conversion), SC (start conversion), ALE (address latch
enable) and OE (output enable) are interfaced by means of a microprocessor. However, the
circuit shown here is built to operate in its continuous mode without using any microprocessor.
Therefore the input control signals ALE and OE, being active-high, are tied to Vcc (+5 volts).
The input control signal SC, being active-low, initiates start of conversion at falling edge of the
pulse, whereas the output signal EOC becomes high after completion of digitization. This EOC
output is coupled to SC input, where falling edge of EOC output acts as SC input to direct the
ADC to start the conversion requires hardware and necessary software, resulting in increased
complexity and hence the total cost.
As the conversion starts, EOC signal goes high. At next clock pulse EOC output again goes low,
and hence SC is enabled to start the next conversion. Thus, it provides continuous 8-bit digital
output corresponding to instantaneous value of analogue input. The maximum level of analogueinput voltage should be appropriately scaled down below positive reference (+5V) level.
The ADC 0808 IC requires clock signal of typically 550 kHz, which can be easily derived from
an astable multivibrator, constructed using 7404 inverter gates. Since ADC works in the
continuous mode, it displays digital output as soon as analogue input is applied. The decimal
equivalent digital output value D for a given analogue input voltage Vin can be calculated from
the relationship
38

7/28/2019 Unit Commitment 1
http://slidepdf.com/reader/full/unit-commitment-1 41/59
3.6THE ELECTROMAGNETIC RELAY
The electromagnetic relay consists of a multi-turn coil, wound on an iron core, to form an
electromagnet. When the coil is energised, by passing current through it, the core becomes
temporarily magnetised. The magnetised core attracts the iron armature. The armature is pivotedwhich causes it to operate one or more sets of contacts. When the coil is de-energised the
armature and contacts are released.
Fig.3.5 Electromagnetic relay
The coil can be energised from a low power source such as a transistor while the contacts
can switch high powers such as the mains supply. The relay can also be situated remotely from
the control source. Relays can generate a very high voltage across the coil when switched off.
This can damage other components in the circuit. To prevent this a diode is connected across the
coil. The cathode of the diode is connected to the most positive end of the coil.
The springsets (contacts) can be a mixture of n.o n.c and c.o. Various coil operating
voltages (ac and dc) are available. The actual contact points on the springsets are available for
high current and low current operation.
39

7/28/2019 Unit Commitment 1
http://slidepdf.com/reader/full/unit-commitment-1 42/59
CURRENT TRANSFORMER
Current transformers can perform circuit control, measure current for power
measurement and control, and perform roles for safety protection and current limiting. They can
also cause circuit events to occur when the monitored current reaches a specified level. Currentmonitoring is necessary at frequencies from the 50 Hz/60 Hz power line to the higher
frequencies of switch mode transformers that range into the hundreds of kilohertz.voltage can be
calibrated to produce the desired results when the voltage reaches a specified level.
Fir.3.6 current transformer
A burden resistor connected across the secondary produces an output voltage
proportional to the resistor value, based on the amount of current flowing through it. With our
1:10 turns ratio transformer that produces a 10:1 current ratio, a burden resistor can be selected
to produce the voltage we want. If 1A on the primary produces 0.1A on the secondary, then by
Ohm’s law, 0.1 times the burden resistor will result in an output voltage per amp.
40

7/28/2019 Unit Commitment 1
http://slidepdf.com/reader/full/unit-commitment-1 43/59
Many voltage transformers have adjusted ratios that produce the desired output voltage
and compensate for losses. The turns-ratios or actual turns aren’t the primary concern of the end-
user. Only the voltage output and possibly regulation and other loss parameters may be of
concern. With current transformers, the user must know the current ratio to use the transformer.
The knowledge of amps in per amps out is the basis for use of the current transformer. Quite
often, the end users provide the primary with a wire through the center of the transformer. They
must know what secondary turns are to determine what their output current will be. Generally, in
catalogues, the turns of the transformers are provided as a specification for use.
With this knowledge, the user can choose the burden resistor to produce their desired
output voltage. The output current of 0.1A for a 1A primary on the 1:10 turns ratio transformer
will produce 0.1 V/A across a 1&! burden resistor, 1V per amp across a 10&! burden and 10V
per amp across a 100&! burden resistor.
In this analysis, the secondary dc resistance (R DCR
) doesn’t become part of the calculation.
When considering the secondary current, only the actual current affects V. How well that current
can be determined controls the accuracy of the prediction of V. The secondary dc resistance is
best analyzed by reflecting it to the primary by R DCR
/N2.
When choosing the burden resistor, the engineer can create any output voltage per amp,
as long as it doesn’t saturate the core. Core saturation level is an important consideration whenspecifying current transformers. The maximum volt-microsecond product specifies what the core
can handle without saturating. The burden resistor is one of the factors controlling the output
voltage. There’s a limit to the amount of voltage that can be achieved at a given frequency. Since
frequency = 1/cycle period, if the frequency is too low (cycle period too long) so that voltage-
time product exceeds the core’s flux capacity, saturation will occur. The flux that exists in a core
is proportional to the voltage times cycle period. Most specifications provide a maximum volt-
microsecond product that the current transformer can provide across the burden resistor.
Exceeding this voltage with too large a burden resistor will saturate the transformer and limit the
voltage.
41

7/28/2019 Unit Commitment 1
http://slidepdf.com/reader/full/unit-commitment-1 44/59
The output voltage will rise trying to develop current until it reaches the saturation
voltage of the coil at that frequency. At that point, the voltage will cease to rise and the
transformer will add no additional impedance to the driving current. Therefore, without a burden
resistor, the output voltage of a current transformer will be its saturation voltage at the operating
frequency.
There are factors in the current transformer that affect efficiency. For complete accuracy,
the output current must be the input current divided by the turns ratio. Unfortunately, not all the
current is transferred. Some of the current isn’t transformed to the secondary, but is instead
shunted by the inductance of the transformer and the core loss resistance. Generally, it’s the
inductance of the transformer that contributes the majority of the current shunting that detracts
from the output current. This is why it’s important to use a high-permeability core to achieve the
maximum inductance and minimize the inductance current. Accurate turns ratio must be
maintained to produce the expected secondary current and the expected accuracy .
ITRANSFORMED
=IINPUT
-ICORE
-jIMAG
(1)
Any measuring device alters the circuit in which it measures. For instance, connecting a
voltmeter to a circuit causes the voltage to change from what it was before the meter was
attached. However minuscule this effect may or may not be, the voltage you read isn’t the
voltage that existed before attaching the meter. This is also true with a current transformer. The
burden resistor on the secondary is reflected to the primary by (1/N2), which provides a
resistance in series with the current on the primary. This usually has minimal effect and is
usually only important when you are concerned about the current that would exist when the
transformer isn’t in the circuit, such as when it’s used as a temporary measuring device.
The resistance of the primary loop (PRIDCR ), the core loss resistance (R CORE), the secondary DCR
(R DCR
) is reduced by 1/N2, and the secondary burden resistor R BURDEN
is also reduced by a factor of
N2. These are losses that affect current source (I). The resistances have an indirect effect on the
42

7/28/2019 Unit Commitment 1
http://slidepdf.com/reader/full/unit-commitment-1 45/59
current transformer accuracy. It’s their effect on the circuit that they are monitoring that alters its
current. The primary dc resistance (PRIdcr
) and the secondary DCR/N2 (R DCR
/N2) don’t detract
from the Iinput
that is read or is affecting the accuracy of the actual current reading. Rather, they
alter the current from what it would be if the current transformer weren’t in the circuit. With theexception of the burden resistor, these loss resistors are the components that contribute to the loss
in the transformer and heating.
This wasted energy is usually small compared with the power in the circuit it’s
monitoring. Usually, the design of the transformer and choice of the burden resistor will be
within the maximum energy loss the end user can allow. As battery-operated devices come into
wider use and power consumption contributes to the energy crisis — even this power may be of
concern. Under these circumstances, it may require special design attention to power consumption.
Current transformers are an efficient way to measure current. Since the burden resistor is
reflected to the primary by 1/N2, the resistance seen in the circuit being monitored can be very
small. This allows a larger voltage to be created on the output with minimal effect on the circuit
being measured. A simpler and lower-cost method to measure current is to use a sense resistor
connected in series with the current. However, this method can only be used when power
consumption is of secondary concern. With the more frequent use of battery-powered devices
and the prevailing need to reduce power consumption, the extra expense of a current transformer
can soon be recovered with use. Also, with high current or when a voltage of any magnitude is
required, a sense resistor would be impractical.
3.8 BUZZER
A buzzer is used to give a signal to the persons or vehicles that the train is coming, so that not to
enter on the track. Buzzer is switched on when first magnetic sensor senses the train, and it is
switched off when the gate is closed.
43

7/28/2019 Unit Commitment 1
http://slidepdf.com/reader/full/unit-commitment-1 46/59
V C C
Q ?
B C 5 4 7
D ?
4 0 0 7
+
1 2 V
-
B u z
Fig.3.7 buzzer diagram
The buzzer subsystem produces a 2Khz audible tone when powered. The buzzer will
sound coming into the driver is high. It must be connected to a Darlington transistor or a
transducer driver subsystem. The buzzer is connected between the supply rail (+12v) and the
input signal. This acts as load on the driver. When the input signal is coming into the buzzer of
the subsystem is low, a potential difference across the buzzer causes current to flow. It is this
flow of current that causes buzzer to sound.
3.9 LIGHT EMITTING DIODE (LED)
LED’S are manufactured using Gallium Arsenic (GaAs) material. LED’S are used to
provide signals to the train. Due to recombination of electrons and holes the energy release in the
form of light. These are used in our project to indicate the relay which is in operating mode.
3.10 BASIC PRINCIPLE
In this project load scheduling is done automatically depending on the changes in load
using the 89c51 microcontroller. The load is sensed by using a sensor, which is a current
transformer in this case. The sensed a.c load voltage is converted to d.c through a diode bridge
rectifier .the rectified a.c voltage is adjusted to within a range of (0-5v) using a potentiometer.
This adjusted voltage is fed to the ADC 0808 analog to digital converter which obtains the
square wave input from a 555 timer to a clock input pin of ADC pin. The ADC converts the
analog value of the
44
µC PORT

7/28/2019 Unit Commitment 1
http://slidepdf.com/reader/full/unit-commitment-1 47/59
voltage sensed from the load into digital value, which is given as the input to the
microcontroller.
The microcontroller reads the input signal; the program in RAM computes the output and
sends the signal to the output port of the microcontroller.V C C + 5 vV C C + 1 2 v
V C C + 1 2 v
V C C + 5 v
1
4
5
8
P o w e r 1234
+
1 0 / 1 6
35
412
B C 5 4 7
A T 8 9 C 5 2 / F P
9
1
9
1
8
2 0
2 93 03 1
4 012345678
2 12 22 32 42 52 62 72 8
1 0
1 11 21 31 41 51 61 7
3 83 9
3 73 63 53 43 33 2
R S T
X
T
A
L
2
X
T
A
L
1
G N D
P S E NA L E / P R O G
E A / V P P
V C CP 1 . 0P 1 . 1P 1 . 2P 1 . 3P 1 . 4P 1 . 5P 1 . 6P 1 . 7
P 2 . 0 / A 8P 2 . 1 / A 9
P 2 . 2 / A 1 0P 2 . 3 / A 1 1P 2 . 4 / A 1 2P 2 . 5 / A 1 3P 2 . 6 / A 1 4P 2 . 7 / A 1 5
P 3 . 0 / R X DP 3 . 1 / T X DP 3 . 2 / I N T 0P 3 . 3 / I N T 1P 3 . 4 / T 0P 3 . 5 / T 1P 3 . 6 / W RP 3 . 7 / R D
P 0 . 0 / A D 0P 0 . 1 / A D 1
P 0 . 2 / A D 2P 0 . 3 / A D 3P 0 . 4 / A D 4P 0 . 5 / A D 5P 0 . 6 / A D 6P 0 . 7 / A D 7
3 3 p f
B C 5 4 7
1 0 3 S I P1
2 3 4 5 6 7 8 9
B C 5 4 7
8 . 2 K
1 0 3
35
412
4 0 0 7
L 7 8 0 51
3
2V I N
G
N
DV O U T
+
4 7 0 / 1 6
4 0 0 7
R E S I S T O R
R E S I S T O R
R E S I S T O R
4 0 0 7
4 0 0 7+
1 0 / 5 0
4 0 0 7
4 0 0 7
1 0 3
35
412
4 0 0 7
1 0 K
1 0 K
4 0 0 7
1 1 . 0 5 9 2L M 5 5 5 3
4 8
5
26
7
1
+
1 0 / 5 0
+
2 2 0 0 / 2 5
1 0 4 p
A D C 0 8 0 9
1 0
9
7
1 71 41 581 81 92 02 1
62 2
1
1
1 3
1
2
1 6
2 62 72 8
12345
2 52 42 3
C L K
O
E
E O C
D 0D 1D 2D 3D 4D 5D 6D 7
S T A R TA L E
V
C
C
G N D
R
E
F
+
R E F -
I N 0I N 1I N 2I N 3I N 4I N 5I N 6I N 7
A 0A 1A 2
1 0 3 S I P
1
2 3 4 5 6 7 8 9
3 3 p f
1
4
5
8
1 0 4 p
1 0 4 p1 0 4 p
S W 1
S W 1
S O U R C E
L O A D
Fig.3.8 diagram for unit commitment problem solving using microcontroller
3.11 LOAD SENSING
The load applied can be measured by measuring the current absorbed by the load using a current
transformer. Current transformers are an efficient way to measure current. The current
transformer is a step up transformer and hence it steps down current. A current transformer has a
large number of turns on its secondary winding but, very few turns on its primary winding. The
primary winding of current transformer is connected the in series with the load so that it carries
the full load current to the system and is determined by the load connected on the secondary
45

7/28/2019 Unit Commitment 1
http://slidepdf.com/reader/full/unit-commitment-1 48/59
winding of the current transformer. According to the current in the primary winding
corresponding voltage is developed in the secondary winding of the current transformer. Thus
the voltage corresponding to the load current is obtained.
3.12 A-D CONVERSION
The ADC 0808 is an 8-bit A-to-D converter, having data lines D0-D7. It works on the
principle of successive approximation. It has a total of eight analogue input channels, out of
which any one can be selected using address lines A, B and C. Here, in this case, input channel
IN0 is selected by grounding A, B and C address lines.
Fig.3.9 Analog to digital converter
The ADC0808, ADC0809 offers high speed, high accuracy, minimal temperature
dependence,excellent long-term accuracy and repeatability, and consumes minimal power. These
features make this device ideally suited to applications from process and machine control to
consumer and automotive applications.
46

7/28/2019 Unit Commitment 1
http://slidepdf.com/reader/full/unit-commitment-1 49/59
The sensed load is tracked with help of current transformer; it is fed to the ADC-0808 IC
through a potential divider .The analog load voltage is the input to the ADC, is converted to
digital value and sent to the input port of the microcontroller through the eight digital inputs.
47

7/28/2019 Unit Commitment 1
http://slidepdf.com/reader/full/unit-commitment-1 50/59
CHAPTER-4
MICROCONTROLLER INTERFACING
4.1 89C51 MICROCONTROLLER PROGRAMMING
The AT89C51 is a low-power, high-performance CMOS 8-bit microcomputer with 4K
bytes of Flash programmable and erasable read only memory (PEROM). The device
is manufactured using Atmel’s high-density nonvolatile memory technology and is
compatible with the industry-standard MCS-51 instruction set and pinout. The on-chip
Flash allows the program memory to be reprogrammed in-system or by a conventional
nonvolatile memory programmer. By combining a versatile 8-bit CPU with Flash
on a monolithic chip, the Atmel AT89C51 is a powerful microcomputer which provides
a highly-flexible and cost-effective solution to many embedded control applications.
The ADC sends the digital signal continuously to the microcontroller. The microcontroller takes
the input from ADC and basing on the program that is according to the priority list method the
respective relay which obtains the input from the output port of the microcontroller is energized.
4.1.1 PROGRAM
P2.0=RLY1
P2.1=BUZ
P2.2=RLY2
P2.3=RLY3
P2.4=RLY4
P1=ADC DATA
P3.5=B
P3.4=A
48

7/28/2019 Unit Commitment 1
http://slidepdf.com/reader/full/unit-commitment-1 51/59
P3.3=START
P3.2=ALE
70H=READ CURRENT VAULE
0RG 0
JMP START
ORG 0050H
START:
CLR P2.0
CLR P2.1
CLR P2.2
CLR P2.3
CLR P2.4
LCALL SSEC
SETB P2.0
SETB P2.1
SETB P2.2
SETB P2.3
49

7/28/2019 Unit Commitment 1
http://slidepdf.com/reader/full/unit-commitment-1 52/59
SETB P2.4
LCALL SSEC
CLR P2.0
CLR P2.1
CLR P2.2
CLR P2.3
CLR P2.4
LCALL SSEC
SETB P2.0
SETB P2.1
SETB P2.2
SETB P2.3
SETB P2.4
LCALL SSEC
SETB P2.0
CLR P2.1CLR P2.2
CLR P2.3
CLR P2.4
50

7/28/2019 Unit Commitment 1
http://slidepdf.com/reader/full/unit-commitment-1 53/59
XX1: LCALL ISEN
MOV A, 51H
MOV 70H, A
LCALL ICOM1
LJMP XX1
ICOM1: CLR C
CLR A
MOV A, # 43H
CJNE A, 70H, GTLS1
LJMP ICOM2
GTLS1: JC GT1
SETB P2.0
CLR P2.2
CLR P2.3
CLR P2.4
CLR P2.1
RET
51

7/28/2019 Unit Commitment 1
http://slidepdf.com/reader/full/unit-commitment-1 54/59
GT1: LJMP ICOM2
ICOM2: CLR C
CLR A
MOV A, # 76H
CJNE A, 70H, GTLS2
LJMP ICOM3
GTLS2: JC GT2
SETB P2.0
SETB P2.2
CLR P2.3
CLR P2.4
CLR P2.1
RET
GT2: LJMP ICOM3
ICOM3: CLR C
CLR A
MOV A, #A9H
CJNE A, 70H, GTLS3
LJMP ICOM4
GTLS3: JC GT3
SETB P2.0
52

7/28/2019 Unit Commitment 1
http://slidepdf.com/reader/full/unit-commitment-1 55/59
SETB P2.2
SETB P2.3
CLR P2.4
CLR P2.1
RET
GT3: LJMP ICOM4
ICOM4: CLR C
CLR A
MOV A, #E1H
CJNE A, 70H, GTLS4
LJMP ICOMP5
GTLS4: JC GT4
SETB P2.0
SETB P2.2
SETB P2.3
SETB P2.4
CLR P2.1
RET
GT4: LJMP ICOM5
53

7/28/2019 Unit Commitment 1
http://slidepdf.com/reader/full/unit-commitment-1 56/59
ICOM5: SETB P2.1
LCALL SSEC
CLR P2.0
CLR P2.2
CLR P2.3
CLR P2.4
RET
ISEN: MOV P1, #FFH
MOV P3, #FFH
CLR P3.2
CLR P3.3
LCALL DEL
CLR P3.4
CLR P3.5
LCALL DEL
SETB P3.2
LCALL DEL
SETB P3.3
LCALL DEL
CLR P3.2
LCALL DEL
CLR P3.3
LCALL SEC
54

7/28/2019 Unit Commitment 1
http://slidepdf.com/reader/full/unit-commitment-1 57/59
MOV R6, P1
MOV 51H, R6
RET
DEL: MOV R7, #FFH
DJNZ R7, $
SEC: MOV R5, #0AH
M1: MOV R6, #FFH
M2: MOV R7, #FFH
M3: DJNZ R7, M3
DJNZ R6, M2
DJNZ R5, M1
RET
SSEC: MOV R5, #0AH
SM1: MOV R6, #FFH
SM2: MOV R7, #FFH
SM3: DJNZ R7, SM3
DJNZ R6, SM2
DJNZ R5, SM1
RET
55

7/28/2019 Unit Commitment 1
http://slidepdf.com/reader/full/unit-commitment-1 58/59
CHAPTER-5
CONCLUSIONThe economical significance of power generation scheduling becomes more apparent since this
procedure may lead to large savings in fuel expenditure. Also, the lives of older units in a power
plant can be extended if a reasonable schedule is followed. The schedules produced are better
than those that could be found manually. The unit cost can be rapidly reduced. It can be very
useful to small industries
FUTURE SCOPE
This project has been implemented for single phase, further it can be extended to 3 phase
with 1 relay for each phase for the same circuitry.
The blind search which is a part of the conventional dynamic programming is eliminated,
and available information regarding the unit commitment scheduling in a specific power system
is used extensively. Computer software simulations of neural networks and various expert
systems shells have provided powerful tools for developing new systems.
The neural network computing enhances by expert systems open a new route to the
optimization of generation scheduling. With proper and sufficient offline training, the
information regarding the optimal operation of a system can be stored in the network, and the
output is obtained in a much shorter time. A short term unit commitment algorithm requires fast
and iterative decisions for the generation scheduling which underline the value of the proposed
approach. .
56

7/28/2019 Unit Commitment 1
http://slidepdf.com/reader/full/unit-commitment-1 59/59
BIBLIOGRAPHY
1. POWER GENERATION OPERATION AND CONTROL
Allen J.Wood, Bruce F.Wollenberg.
2.POWER SYSTEM OPERATION AND CONTROL
G.R.Chandrasekhar Reddy.
3. MODERN POWER SYSTEM ANALYSIS
I.J.Nagrath & D.P. Kothari
4. Wikipedia.net