upgrade scom 1807 to scom 2019 step by step
TRANSCRIPT
Upgrade SCOM 1807 to SCOM 2019 Step by Step
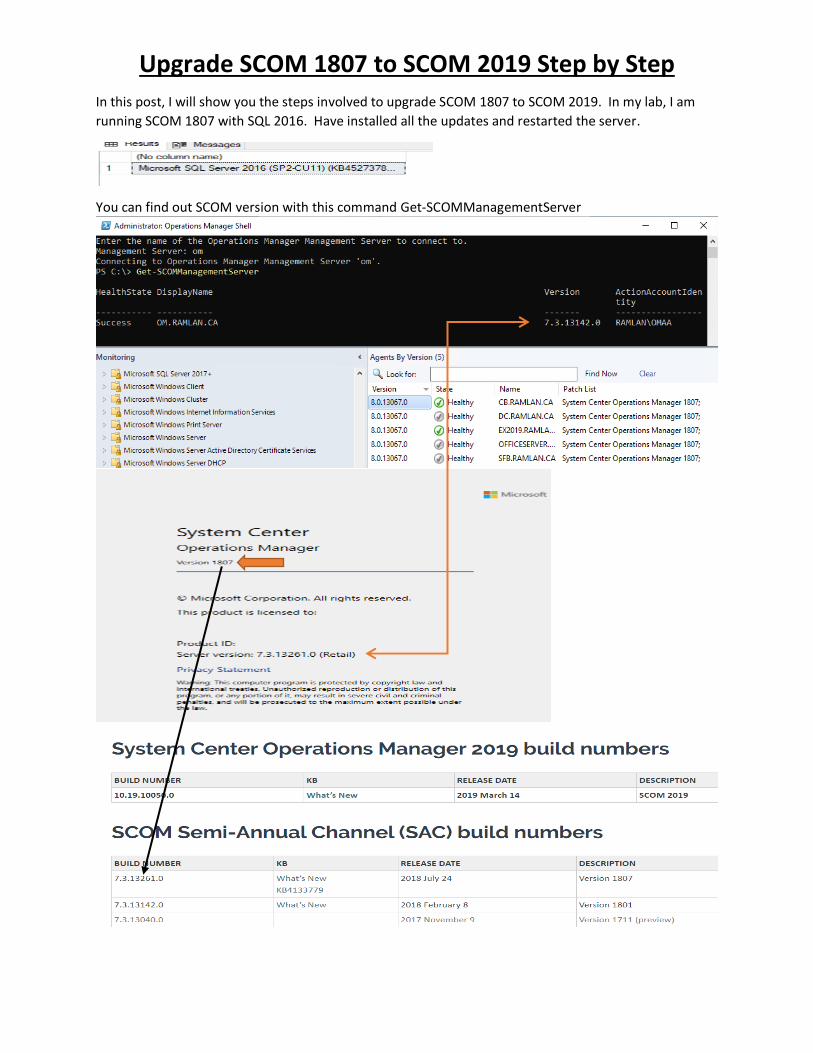
In this post, I will show you the steps involved to upgrade SCOM 1807 to SCOM 2019. In my lab, I am
running SCOM 1807 with SQL 2016. Have installed all the updates and restarted the server.
You can find out SCOM version with this command Get-SCOMManagementServer
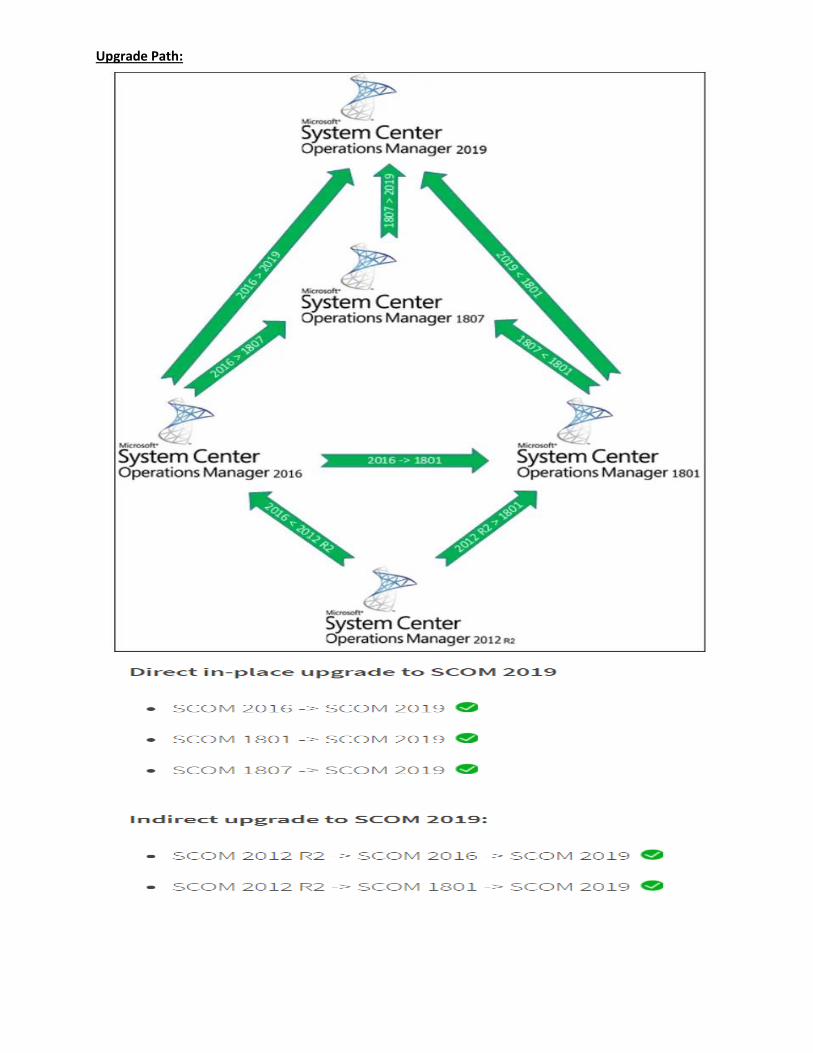
Upgrade Path:
Pre-upgrade tasks Before upgrading there are some tasks that need to be done, we will go through them one by one before performing the upgrade.
High-level overview of the pre-upgrade tasks 1. Review the Operations Manager event logs. 2. Clean up the Database (ETL Table). 3. Configure agents to failover between multiple gateway servers so all agents reporting to a gateway
have a failover gateway assigned. 4. Remove Agents from Pending Management. 5. Disable Notification Subscriptions. 6. Disable any connectors. 7. Stop the Microsoft Monitoring Agent, System Center Data Access Service, System Center
Configuration Management, and Microsoft Monitoring Agent services on all management servers except the one being upgraded.
8. Verify that the Operational Database Has More Than 50 Percent Free Space. 9. Back up the Operations Manager Databases. 10. Update the agent’s health service cache size temporarily to prevent loss of data while Management,
and Gateway servers are upgraded. 11. Stop the application pool of Operations Manager and MonitoringViews in IIS server.
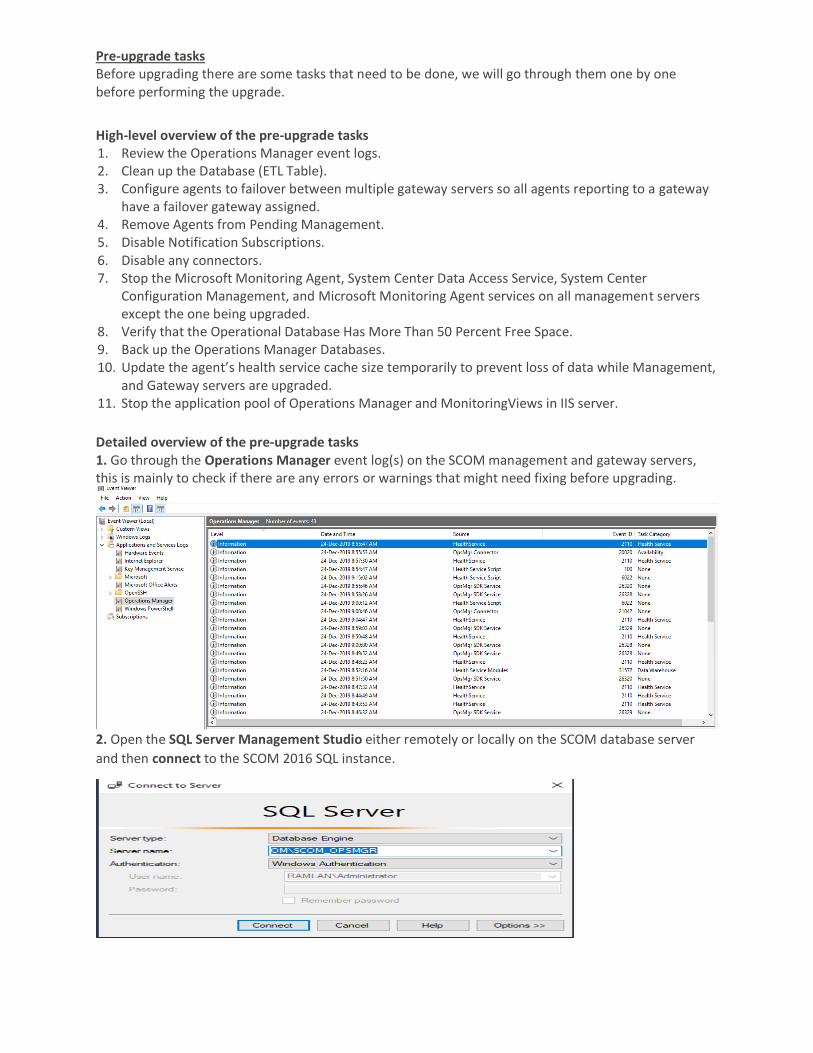
Detailed overview of the pre-upgrade tasks 1. Go through the Operations Manager event log(s) on the SCOM management and gateway servers, this is mainly to check if there are any errors or warnings that might need fixing before upgrading.
2. Open the SQL Server Management Studio either remotely or locally on the SCOM database server
and then connect to the SCOM 2016 SQL instance.
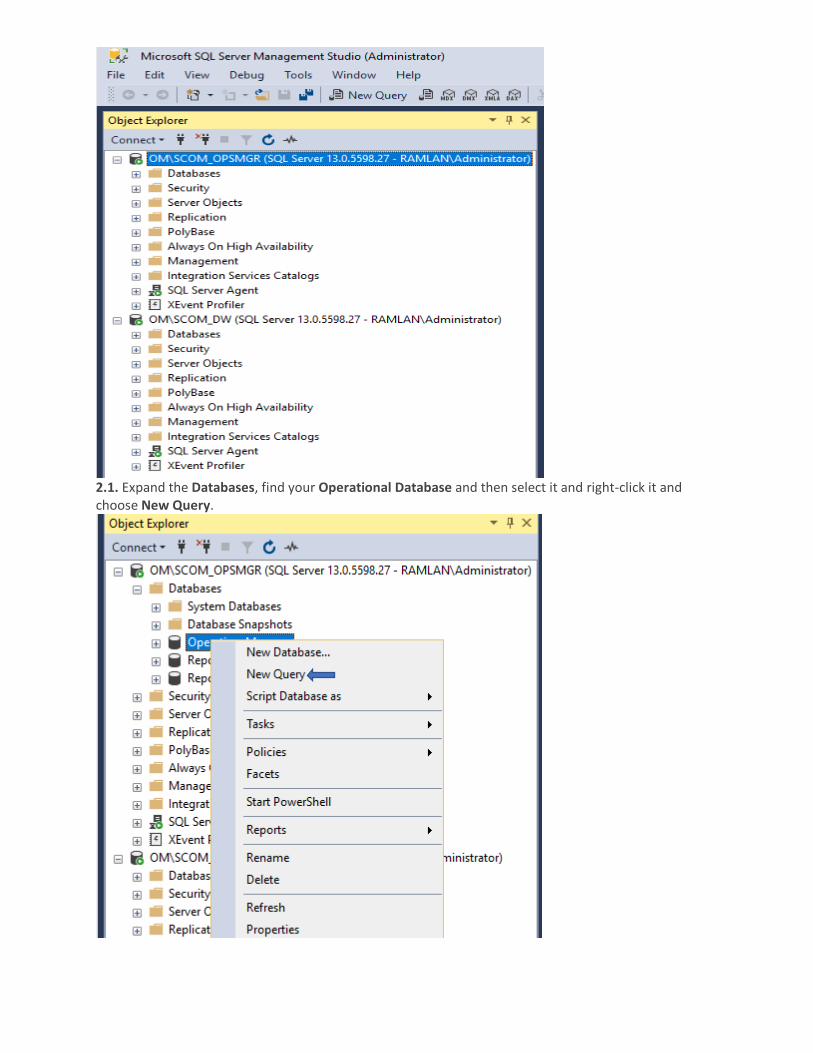
2.1. Expand the Databases, find your Operational Database and then select it and right-click it and choose New Query.
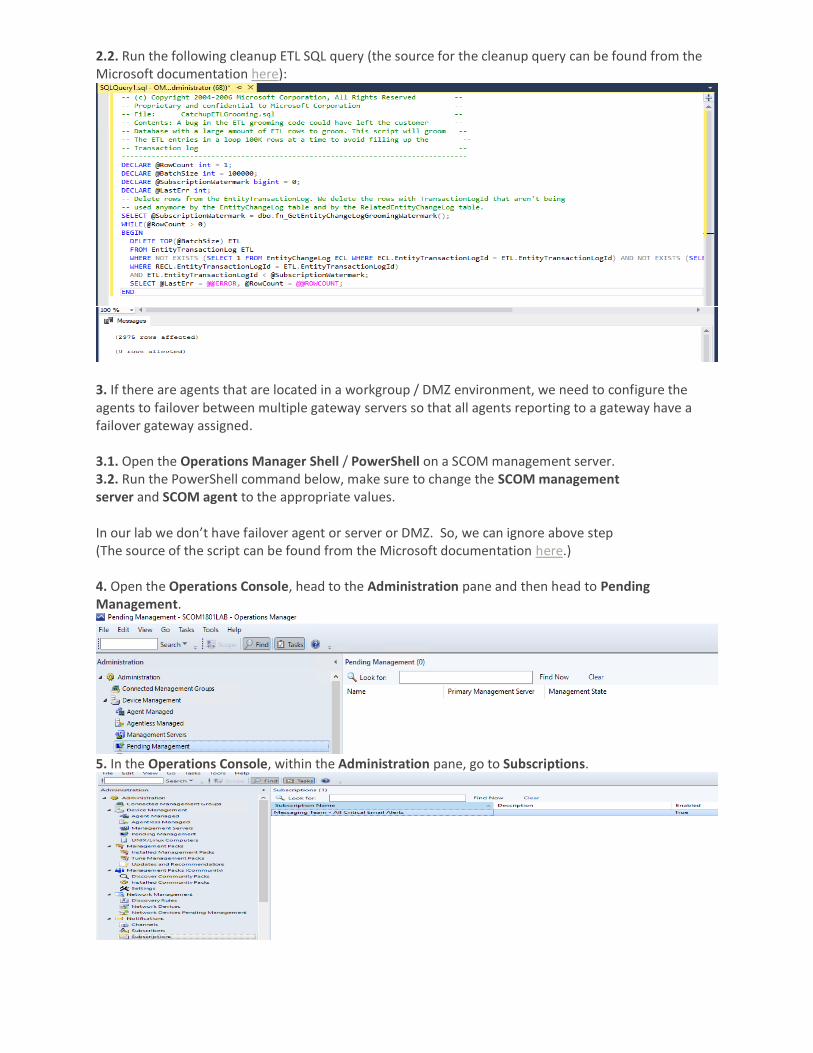
2.2. Run the following cleanup ETL SQL query (the source for the cleanup query can be found from the Microsoft documentation here):
3. If there are agents that are located in a workgroup / DMZ environment, we need to configure the agents to failover between multiple gateway servers so that all agents reporting to a gateway have a failover gateway assigned. 3.1. Open the Operations Manager Shell / PowerShell on a SCOM management server. 3.2. Run the PowerShell command below, make sure to change the SCOM management server and SCOM agent to the appropriate values. In our lab we don’t have failover agent or server or DMZ. So, we can ignore above step (The source of the script can be found from the Microsoft documentation here.) 4. Open the Operations Console, head to the Administration pane and then head to Pending Management.
5. In the Operations Console, within the Administration pane, go to Subscriptions.
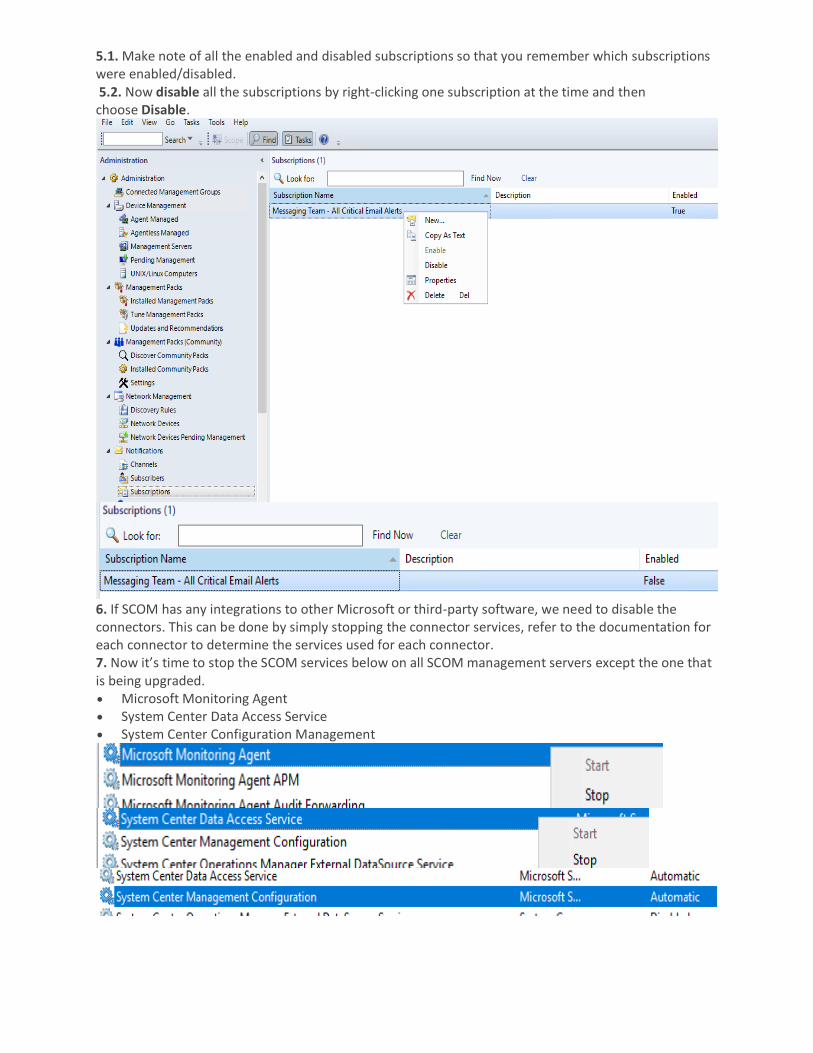
5.1. Make note of all the enabled and disabled subscriptions so that you remember which subscriptions were enabled/disabled. 5.2. Now disable all the subscriptions by right-clicking one subscription at the time and then choose Disable.
6. If SCOM has any integrations to other Microsoft or third-party software, we need to disable the connectors. This can be done by simply stopping the connector services, refer to the documentation for each connector to determine the services used for each connector. 7. Now it’s time to stop the SCOM services below on all SCOM management servers except the one that is being upgraded. • Microsoft Monitoring Agent • System Center Data Access Service • System Center Configuration Management
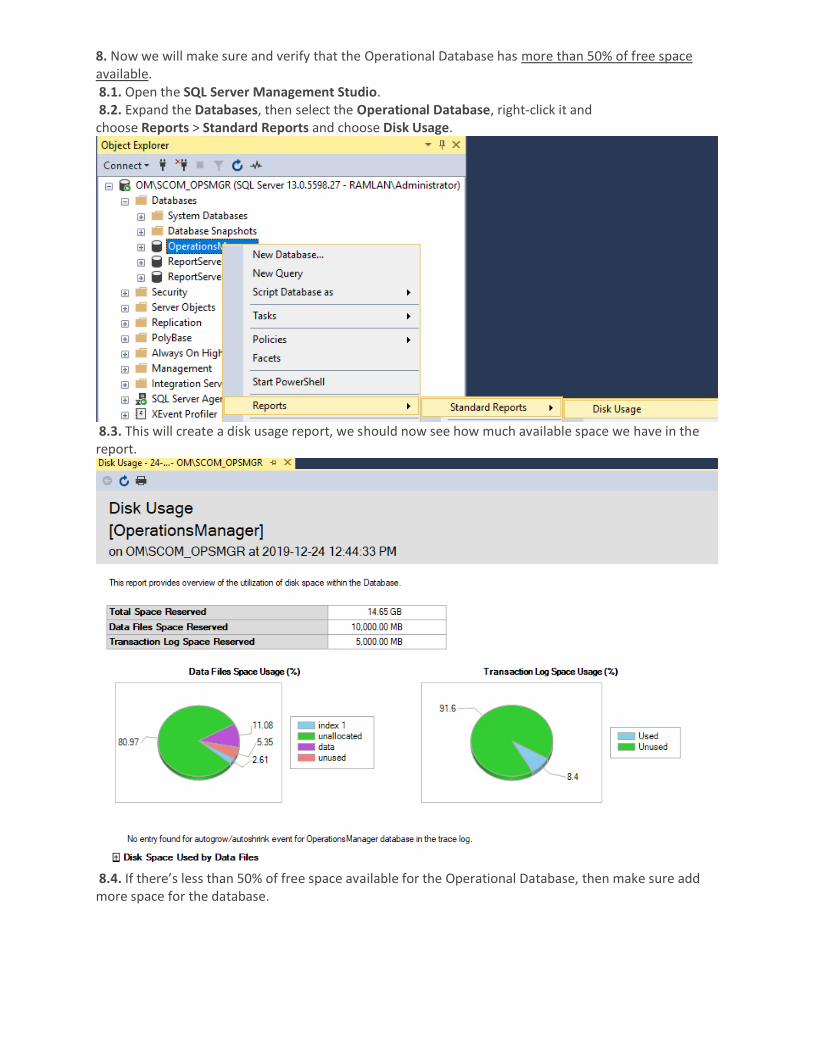
8. Now we will make sure and verify that the Operational Database has more than 50% of free space available. 8.1. Open the SQL Server Management Studio. 8.2. Expand the Databases, then select the Operational Database, right-click it and choose Reports > Standard Reports and choose Disk Usage.
8.3. This will create a disk usage report, we should now see how much available space we have in the report.
8.4. If there’s less than 50% of free space available for the Operational Database, then make sure add more space for the database.
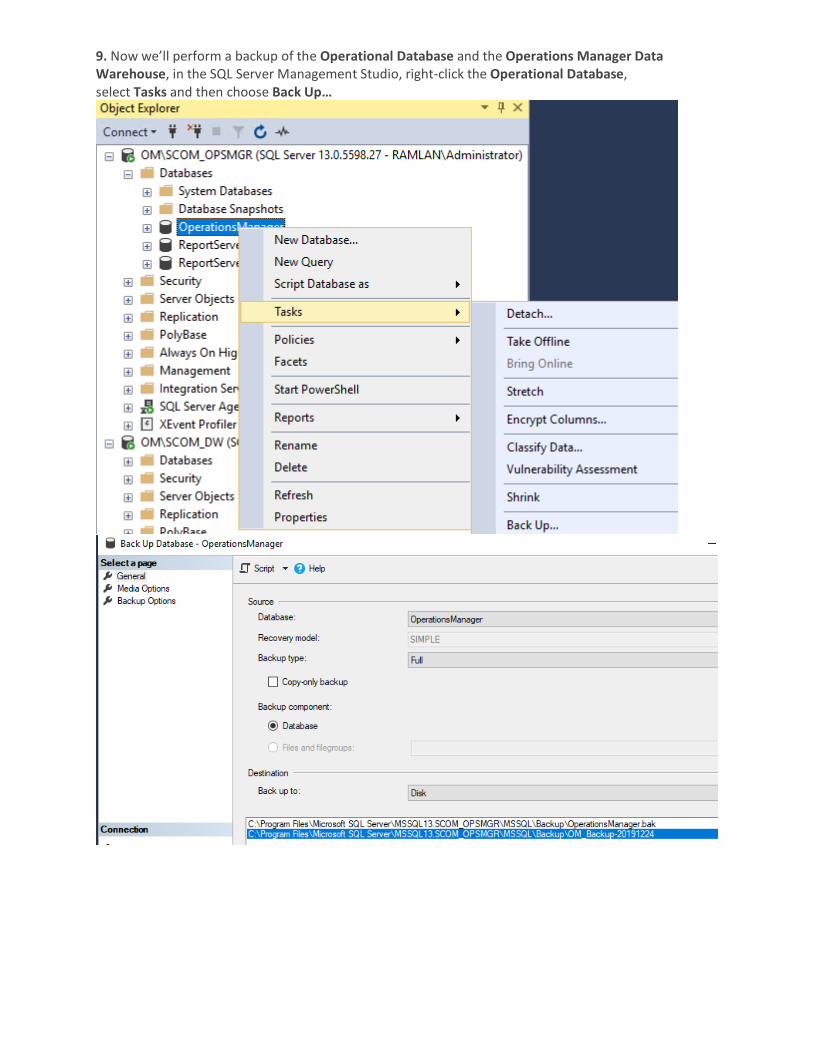
9. Now we’ll perform a backup of the Operational Database and the Operations Manager Data Warehouse, in the SQL Server Management Studio, right-click the Operational Database, select Tasks and then choose Back Up…
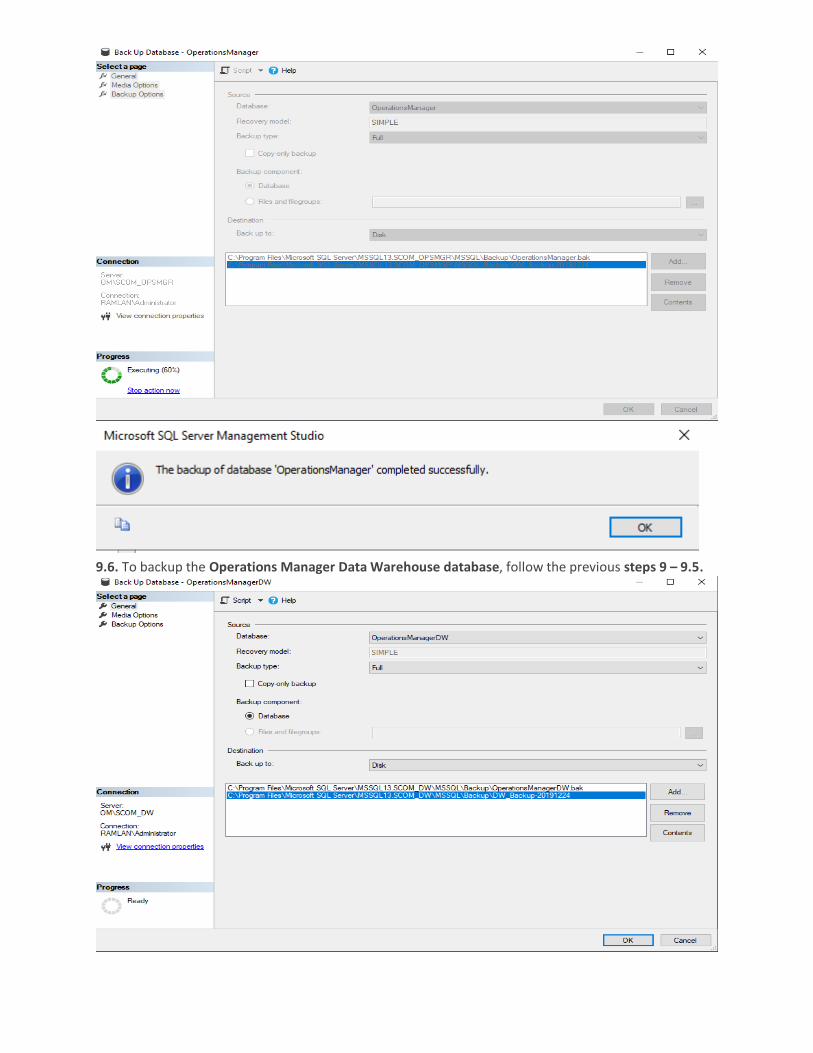
9.6. To backup the Operations Manager Data Warehouse database, follow the previous steps 9 – 9.5.
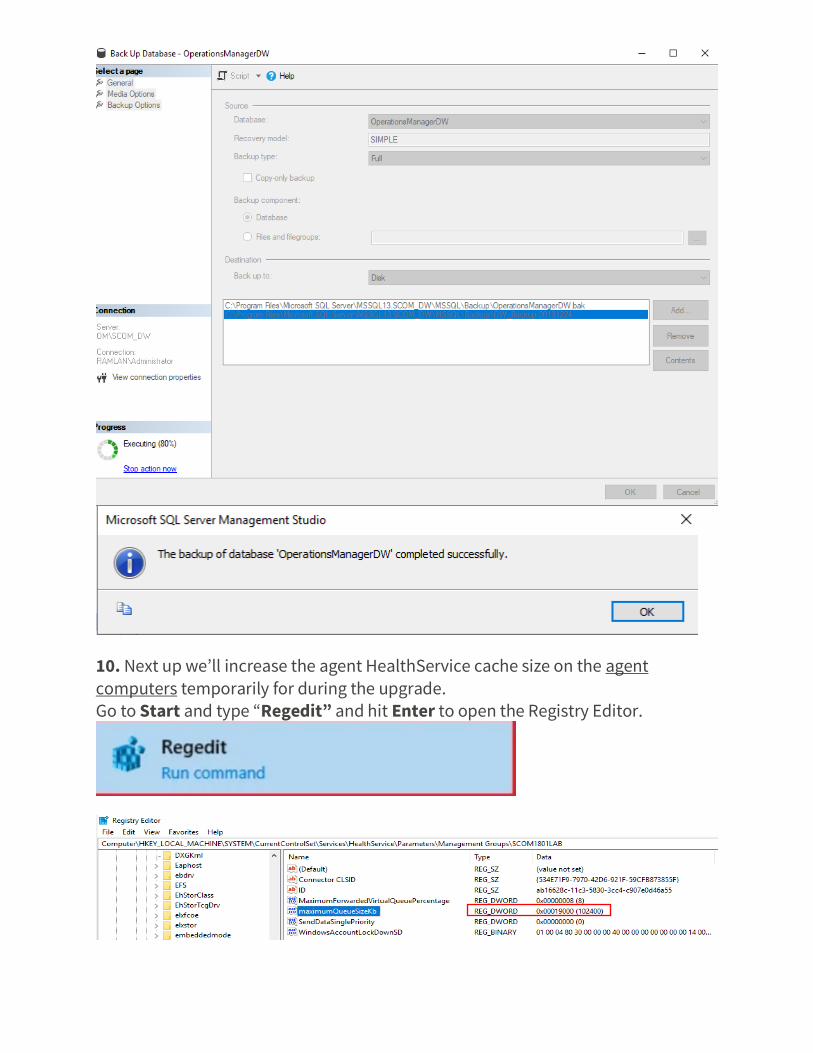
10. Next up we’ll increase the agent HealthService cache size on the agent
computers temporarily for during the upgrade. Go to Start and type “Regedit” and hit Enter to open the Registry Editor.
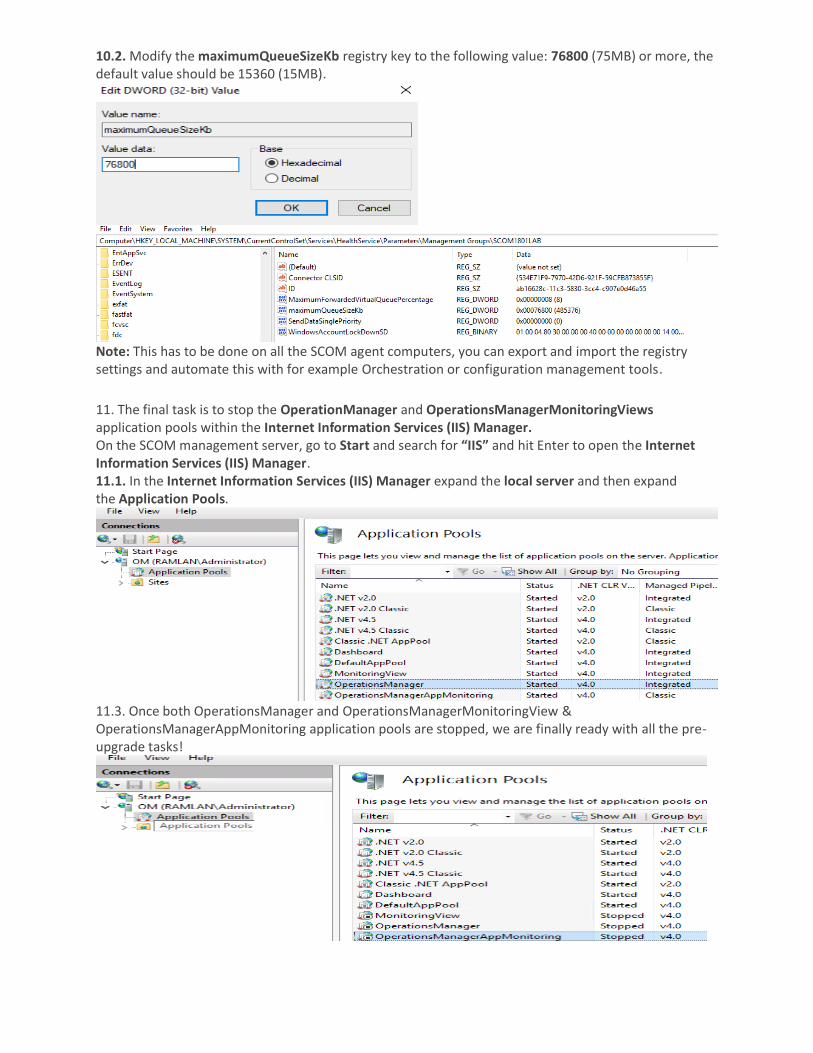
10.2. Modify the maximumQueueSizeKb registry key to the following value: 76800 (75MB) or more, the default value should be 15360 (15MB).
Note: This has to be done on all the SCOM agent computers, you can export and import the registry settings and automate this with for example Orchestration or configuration management tools.
11. The final task is to stop the OperationManager and OperationsManagerMonitoringViews application pools within the Internet Information Services (IIS) Manager. On the SCOM management server, go to Start and search for “IIS” and hit Enter to open the Internet Information Services (IIS) Manager. 11.1. In the Internet Information Services (IIS) Manager expand the local server and then expand the Application Pools.
11.3. Once both OperationsManager and OperationsManagerMonitoringView & OperationsManagerAppMonitoring application pools are stopped, we are finally ready with all the pre-upgrade tasks!
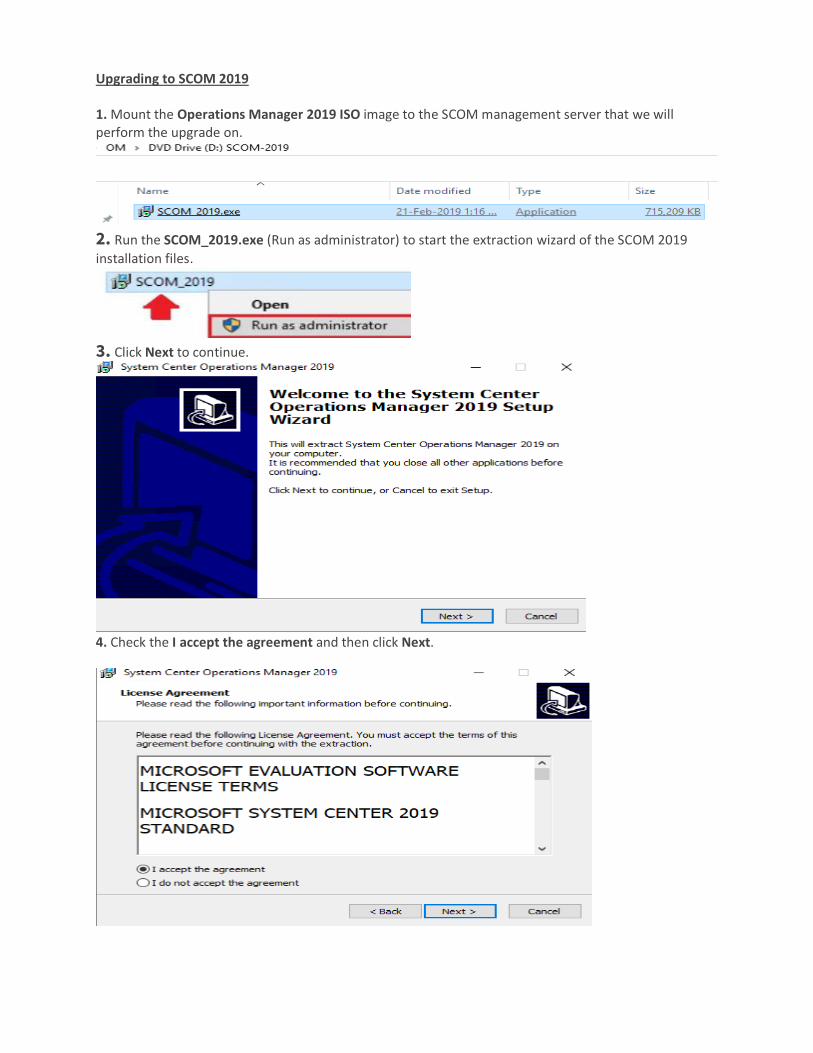
Upgrading to SCOM 2019 1. Mount the Operations Manager 2019 ISO image to the SCOM management server that we will perform the upgrade on.
2. Run the SCOM_2019.exe (Run as administrator) to start the extraction wizard of the SCOM 2019
installation files.
3. Click Next to continue.
4. Check the I accept the agreement and then click Next.
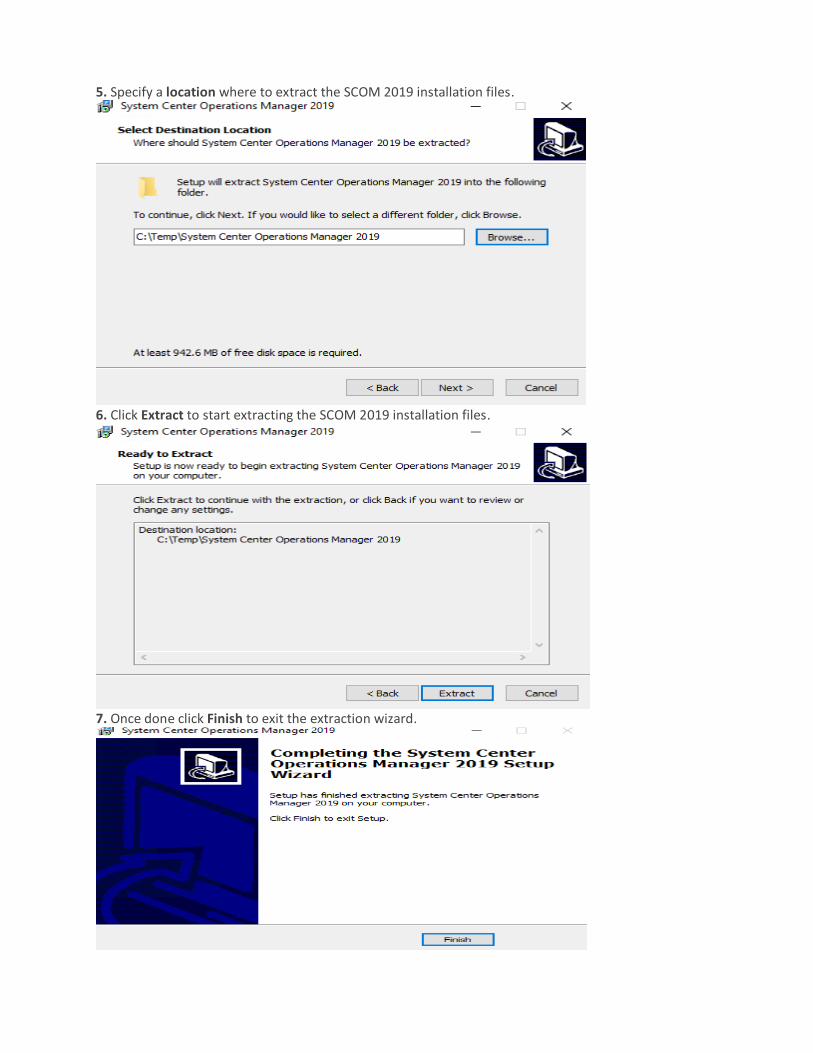
5. Specify a location where to extract the SCOM 2019 installation files.
6. Click Extract to start extracting the SCOM 2019 installation files.
7. Once done click Finish to exit the extraction wizard.
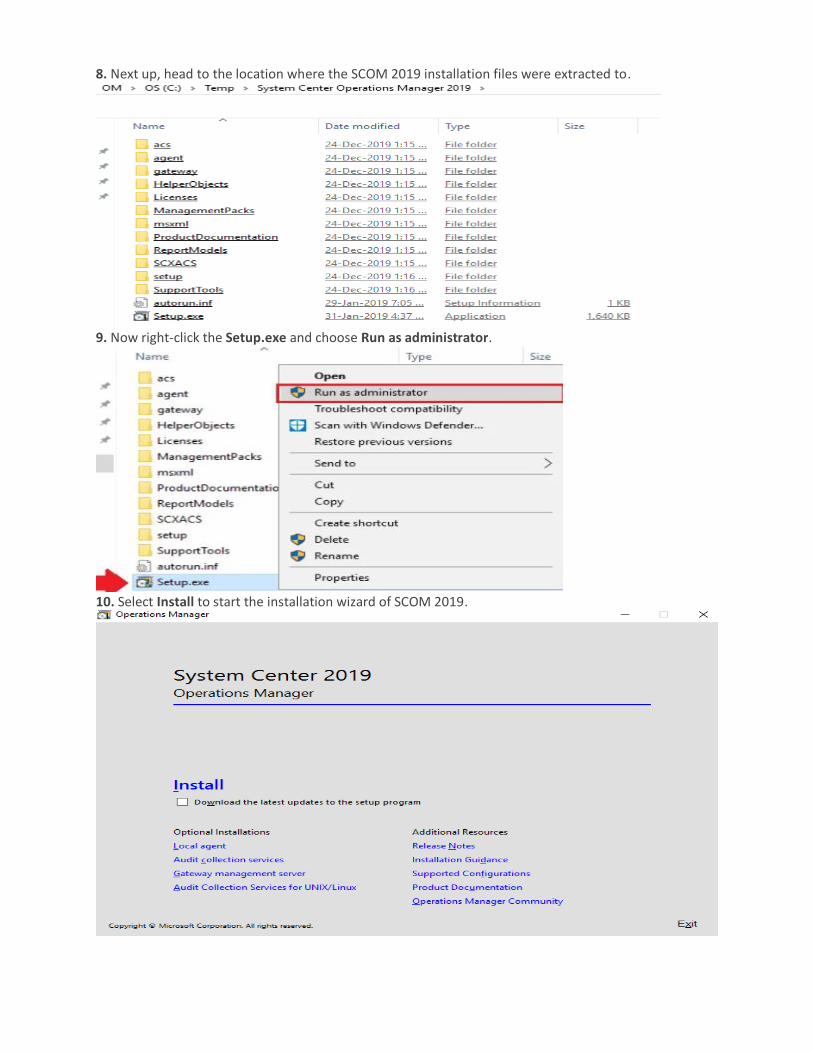
8. Next up, head to the location where the SCOM 2019 installation files were extracted to.
9. Now right-click the Setup.exe and choose Run as administrator.
10. Select Install to start the installation wizard of SCOM 2019.
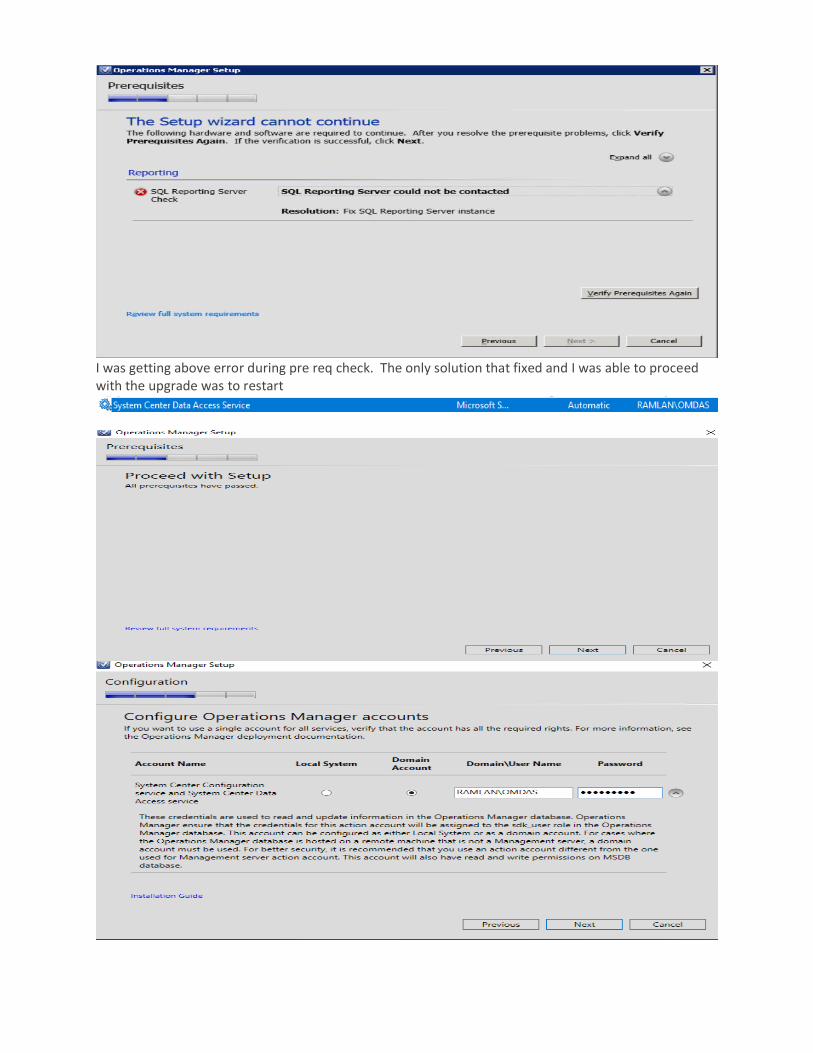
I was getting above error during pre req check. The only solution that fixed and I was able to proceed with the upgrade was to restart
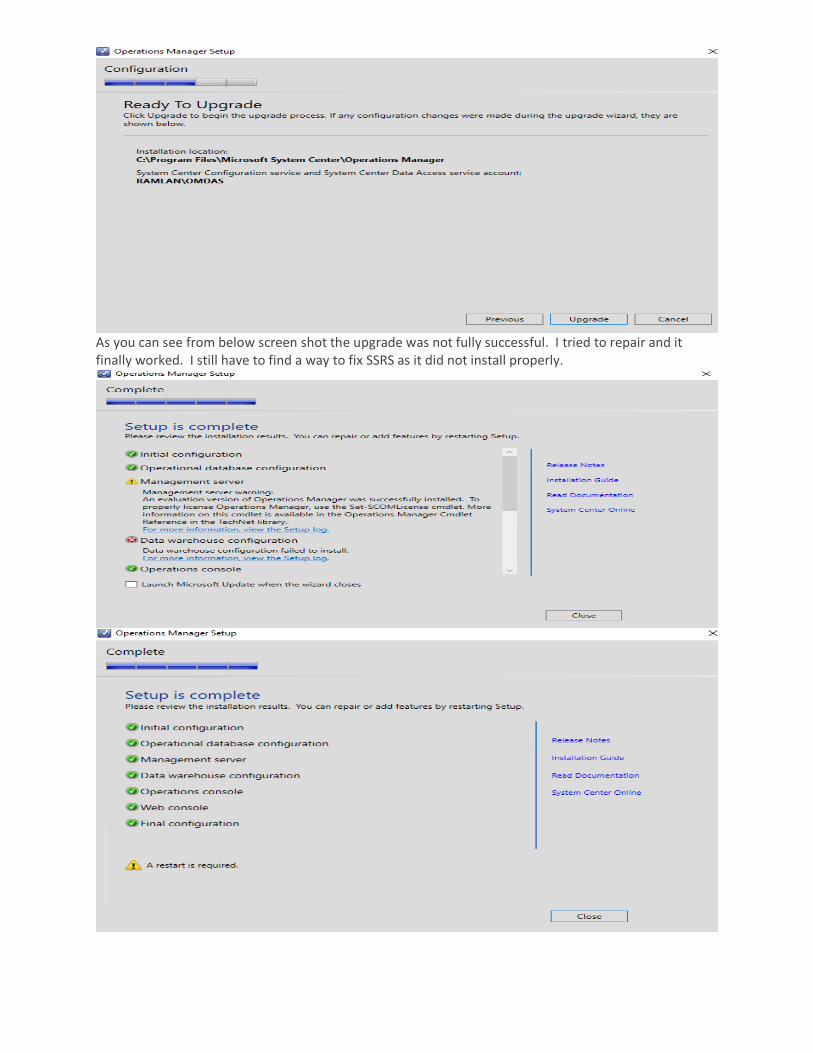
As you can see from below screen shot the upgrade was not fully successful. I tried to repair and it finally worked. I still have to find a way to fix SSRS as it did not install properly.
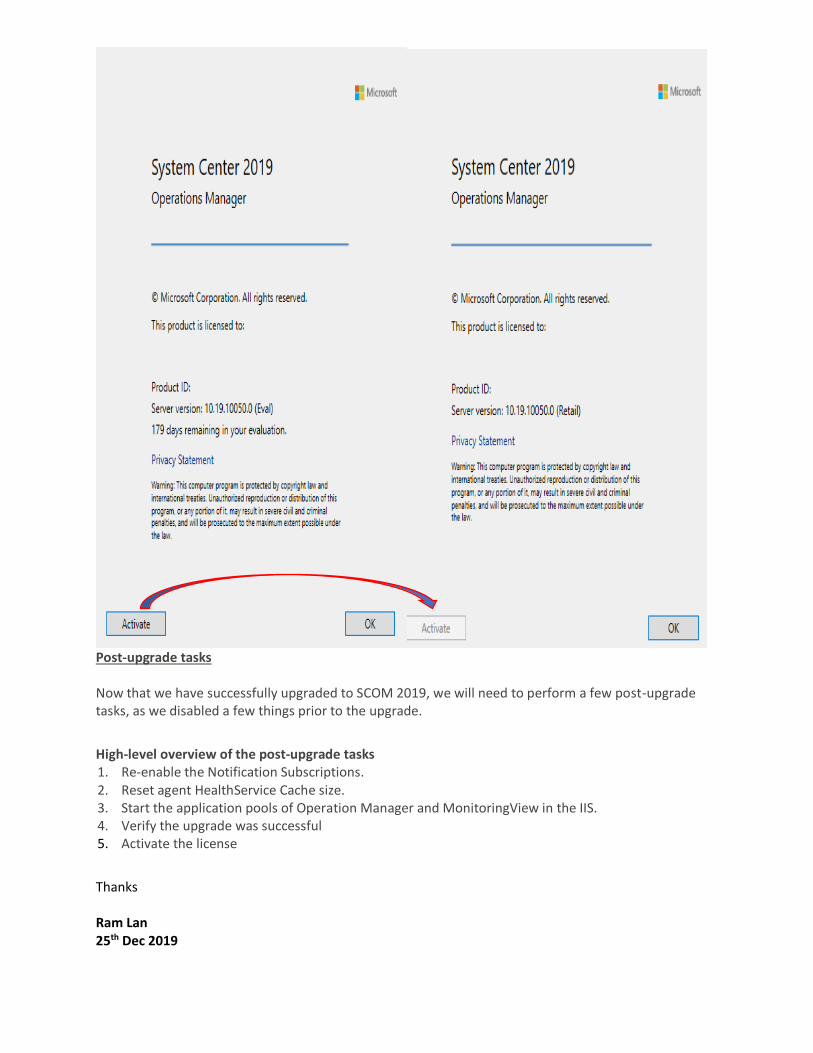
Post-upgrade tasks Now that we have successfully upgraded to SCOM 2019, we will need to perform a few post-upgrade tasks, as we disabled a few things prior to the upgrade.
High-level overview of the post-upgrade tasks 1. Re-enable the Notification Subscriptions. 2. Reset agent HealthService Cache size. 3. Start the application pools of Operation Manager and MonitoringView in the IIS. 4. Verify the upgrade was successful 5. Activate the license
Thanks Ram Lan 25th Dec 2019