u.s. 2013 year-end update
TRANSCRIPT

Microsoft Dynamics® GPU.S. 2013 Year-End Update
Microsoft Dynamics GP 2013Microsoft Dynamics GP 2010

Copyright Copyright © 2013 Microsoft Corporation. All rights reserved.
Complying with all applicable copyright laws is the responsibility of the user. Without limiting the rights under copyright, no part of this document may be reproduced, stored in or introduced into a retrieval system, or transmitted in any form or by any means (electronic, mechanical, photocopying, recording, or otherwise), or for any purpose, without the express written permission of Microsoft Corporation. Notwithstanding the foregoing, the licensee of the software with which this document was provided may make a reasonable number of copies of this document solely for internal use.
Trademarks Microsoft, Microsoft Dynamics, Windows, Windows Server, and Windows Vista are either registered trademarks or trademarks of Microsoft Corporation or its affiliates in the United States and/or other countries.
The names of actual companies and products mentioned herein may be trademarks or registered marks - in the United States and/or other countries - of their respective owners.
Unless otherwise noted, the example companies, organizations, products, domain names, e-mail addresses, logos, people, places, and events depicted herein are fictitious. No association with any real company, organization, product, domain name, e-mail address, logo, person, place, or event is intended or should be inferred.
Intellectual property Microsoft may have patents, patent applications, trademarks, copyrights, or other intellectual property rights covering subject matter in this document. Except as expressly provided in any written license agreement from Microsoft, the furnishing of this document does not give you any license to these patents, trademarks, copyrights, or other intellectual property.
Warranty disclaimer Microsoft Corporation disclaims any warranty regarding the sample code contained in this documentation, including the warranties of merchantability and fitness for a particular purpose.
Limitation of liability The content of this document is furnished for informational use only, is subject to change without notice, and should not be construed as a commitment by Microsoft Corporation. Microsoft Corporation assumes no responsibility or liability for any errors or inaccuracies that may appear in this manual. Neither Microsoft Corporation nor anyone else who has been involved in the creation, production or delivery of this documentation shall be liable for any indirect, incidental, special, exemplary or consequential damages, including but not limited to any loss of anticipated profit or benefits, resulting from the use of this documentation or sample code.
License agreement Use of this product is covered by a license agreement provided with the software product. If you have any questions, please call the Microsoft Dynamics GP Customer Assistance Department at 800-456-0025 (in the U.S. or Canada) or +1-701-281-6500.
Publication date November 2013

U . S . 2 0 1 3 Y E A R - E N D U P D A T E i
Contents
Introduction .................................................................................................................................................1What’s in this manual...................................................................................................................................1
Symbols and conventions ............................................................................................................................2
Year-end resources ........................................................................................................................................2
Send us your documentation comments ...................................................................................................3
Chapter 1: Changes in the year-end update................................................................. 5Fixed Assets luxury automobile maximum depreciation amounts ......................................................5
W-2 electronic filing changes.......................................................................................................................6
Payables form and application changes ....................................................................................................6
Chapter 2: Payroll year-end checklists.............................................................................. 7Printing 2013 statements before processing 2014 pay runs ....................................................................7
Processing 2014 pay runs before printing 2013 statements ....................................................................8
Chapter 3: Preparation and FAQs .......................................................................................... 9Supported releases........................................................................................................................................9
Obtaining the year-end update...................................................................................................................9
Obtaining a User Identification Number to submit EFW2 files electronically ....................................9
Non-supported electronic filing .................................................................................................................9
Frequently asked questions .......................................................................................................................10
Chapter 4: Payroll year-end procedures........................................................................ 15Payroll year-end closing.............................................................................................................................15
Installing the year-end update ..................................................................................................................17
Creating the Year-End Wage file ...............................................................................................................21
Editing W-2 records ....................................................................................................................................22
Editing 1099-R statement information.....................................................................................................23
Archiving Human Resources information for inactive employees .....................................................24
Setting up fiscal periods.............................................................................................................................25
Setting up attendance.................................................................................................................................26
Deleting information for inactive employees .........................................................................................28
Chapter 5: Submitting W-2 reports electronically .............................................. 31Creating EFW2 files ....................................................................................................................................31
Submitting EFW2 files................................................................................................................................33
Chapter 6: Report procedures................................................................................................ 35Printing the Year-End Wage Report .........................................................................................................35
Printing W-2 forms and reports ................................................................................................................36
Printing 1099-R forms and reports ...........................................................................................................38
Index ...................................................................................................................................................................41

ii U . S . 2 0 1 3 Y E A R - E N D U P D A T E

U . S . 2 0 1 3 Y E A R - E N D U P D A T E 1
IntroductionThis document contains instructions for updating the U.S. Payroll module for Microsoft Dynamics GP 2013 and Microsoft Dynamics GP 2010 so that your system is compliant with 2013 filing requirements.
Also included in this document are instructions for completing payroll year-end procedures.
These instructions assume that you are already familiar with U.S. Payroll for Microsoft Dynamics GP.
You can find information about year-end payroll procedures in the “Payroll Company Routines” and “Government Form and Report Routines” chapters in the U.S. Payroll manual, or the sections of help with the same names.
Note, however, that the instructions in this document expand on the instructions in your Payroll documentation, and in some cases supersede them.
This introduction is divided into the following sections:
• What’s in this manual• Symbols and conventions• Year-end resources• Send us your documentation comments
What’s in this manual
This manual is designed to give you an understanding of new 2013 tax year filing requirements and to provide instructions for installing the updates necessary to make Microsoft Dynamics GP compliant for 2013 filing. Additionally, you will find instructions for completing year-end payroll procedures using your Payroll system.
To make best use of the year-end update, you should be familiar with systemwide features described in the System User’s Guide, the System Setup Guide, and the System Administrator’s Guide.
To view information about the release of Microsoft Dynamics GP that you’re using and which modules or features you are registered to use, go to the Help menu. Choose Help >> About Microsoft Dynamics GP.
The manual is divided into the following chapters:
• Chapter 1, “Changes in the year-end update,” contains an description of application changes in the year-end update.
• Chapter 2, “Payroll year-end checklists,” contains checklists that you can use for year-end payroll tasks.
• Chapter 3, “Preparation and FAQs,” contains information to help you prepare for the year-end update, as well as answers to frequently asked questions.
• Chapter 4, “Payroll year-end procedures,” explains each payroll year-end process, such as installing the year-end update, creating the Year-End Wage file, editing forms and statements, and clearing inactive employee data.

I N T R O D U C T I O N
2 U . S . 2 0 1 3 Y E A R - E N D U P D A T E
• Chapter 5, “Submitting W-2 reports electronically,” explains how to prepare and submit federal W-2 files to the Social Security Administration.
• Chapter 6, “Report procedures,” provides descriptions of each year-end report and procedures for printing them.
Symbols and conventions
For definitions of unfamiliar terms, see your Payroll glossary in the manual or refer to the glossary in Help.
This manual uses the following conventions to refer to sections, navigation, and other information.
Year-end resources
If you have questions about Payroll year-end closing procedures and your Microsoft® Partner isn’t available, there are several resources, in addition to this document, to assist in answering your year-end questions.
Year-end information on CustomerSource(https://mbs.microsoft.com/customersource/support/downloads/taxupdates/)
Look here to find year-end updates, instructions, and tax updates. Instructions for downloading and installing the updates are also provided here.
Knowledge Base(https://mbs.microsoft.com/knowledgebase/search.aspx)
Provides you with instant access to the same database our support engineers use. You can find answers to common questions, along with technical tips and performance recommendations.
Symbol Description
The light bulb symbol indicates helpful tips, shortcuts and suggestions.
The warning symbol indicates situations you should be especially aware of when completing tasks.
Convention Description
Creating a batch Italicized type indicates the name of a section or procedure.
File >> Print The (>>) symbol indicates a sequence of actions, such as selecting items from a menu or toolbar, or pressing buttons in a window. This example directs you to go to the File menu and choose Print.
TAB or ENTER All capital letters indicate a key or a key sequence.

U . S . 2 0 1 3 Y E A R - E N D U P D A T E 3
I N T R O D U C T I O N
eSupport(https://mbs.microsoft.com/support/newstart.aspx)
For support requests that can be handled with e-mail. On average, the response time is nearly twice as fast as telephone support. That’s a big benefit during the critical year-end season.
Community(https://mbs.microsoft.com/customersource/communities/)
Start a year-end discussion with other members of the Microsoft customer community. This database provides you with the opportunity to exchange information with other customers, which is perfect for providing tips and answers to year-end questions.
Microsoft Dynamics GP support teamWe have specialized support teams focused on providing service and support to our Human Resources/Payroll customers. If you have Human Resources/Payroll questions, dial toll free 888-GPS-SUPP (888-477-7877). Enter your 10-digit authorization code.
Send us your documentation comments
We welcome comments regarding the usefulness of the documentation. If you have specific suggestions or find any errors in this manual, send your comments by email to the following address: [email protected].
Note: By offering any suggestions to Microsoft, you give Microsoft full permission to use them freely.

4 U . S . 2 0 1 3 Y E A R - E N D U P D A T E
U . S . 2 0 1 3 Y E A R - E N D U P D A T E 5
Chapter 1: Changes in the year-end updateThe U.S. 2013 Year-End Update contains software changes to allow you to comply with 2013 filing requirements as well as the most recent fixes for Microsoft Dynamics GP and other quality report fixes related to the payroll year-end. You should install this update if you have employees with wages over $200,000. There are no W-2 and W-3 form changes.
The following topics are included:
• Fixed Assets luxury automobile maximum depreciation amounts• W-2 electronic filing changes• Payables form and application changes
Fixed Assets luxury automobile maximum depreciation amounts
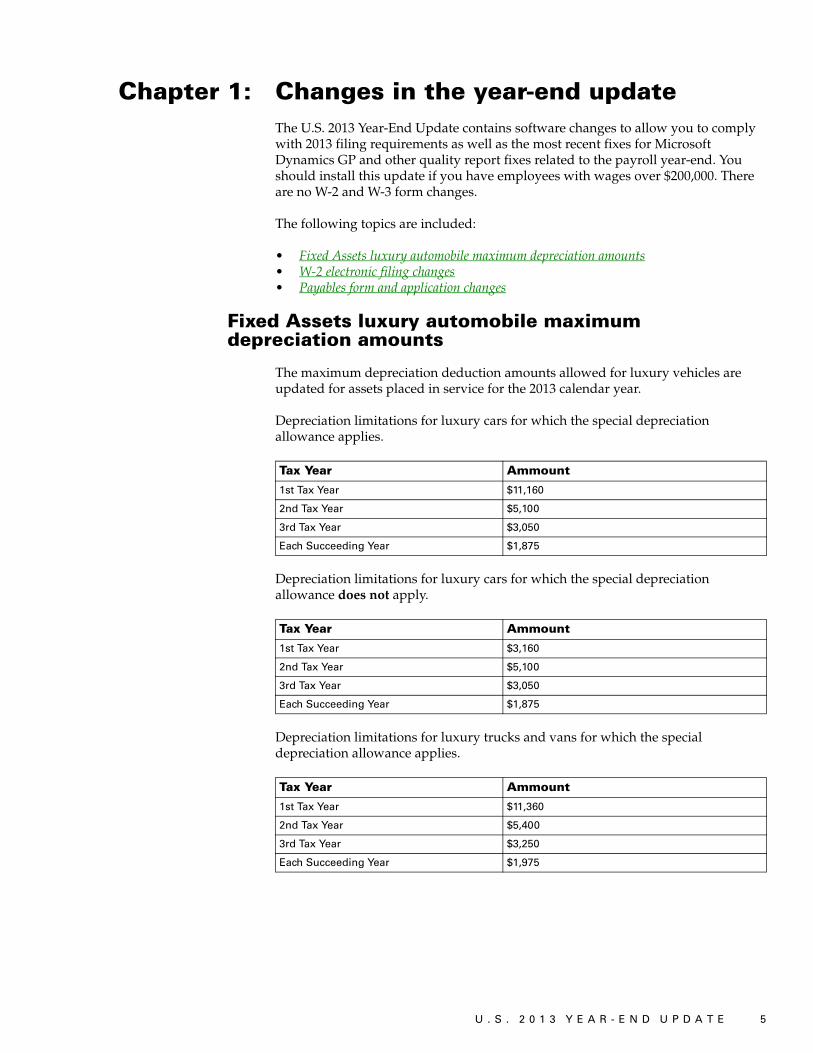
The maximum depreciation deduction amounts allowed for luxury vehicles are updated for assets placed in service for the 2013 calendar year.
Depreciation limitations for luxury cars for which the special depreciation allowance applies.
Depreciation limitations for luxury cars for which the special depreciation allowance does not apply.
Depreciation limitations for luxury trucks and vans for which the special depreciation allowance applies.
Tax Year Ammount
1st Tax Year $11,160
2nd Tax Year $5,100
3rd Tax Year $3,050
Each Succeeding Year $1,875
Tax Year Ammount
1st Tax Year $3,160
2nd Tax Year $5,100
3rd Tax Year $3,050
Each Succeeding Year $1,875
Tax Year Ammount
1st Tax Year $11,360
2nd Tax Year $5,400
3rd Tax Year $3,250
Each Succeeding Year $1,975

6 U . S . 2 0 1 3 Y E A R - E N D U P D A T E
Depreciation limitations for luxury trucks and vans for which the special depreciation allowance does not apply.
W-2 electronic filing changes
Changes in the 2013 EFW2 file generated by Microsoft Dynamics GP include the following:
• A new Employer Contact Name field (positions 222-248) has been added to the RE Employer Record.
• A new Employer Contact Phone Number field (positions 249-263) has been added to the RE Employer Record. This field requires numeric values only. No special characters.
• A new Employer Contact Phone Extension field (positions 264-268) has been added to the RE Employer Record. This field requires numeric values only. No special characters.
• A new Employer Contact Fax Number field (positions 269-278) has been added to the RE Employer Record. This field requires numeric values only. No special characters. This field applies only to the U.S. and U.S. territories.
• A new Employer Contact E-Mail/Internet field (positions 279-318) has been added to the RE Employer Record. This field may be upper and lower case.
• The Other EIN field (positions 31-39) is now applicable to all tax jurisdictions codes.
Payables form and application changes
On the 1099-DIV form, the Street address box and the City or town, province or state, country, and ZIP or postal code box have been moved up one line. The size of the Receipient’s box has been reduced to match the size of the Recipient’s box. The size of the City or town, province or state, country, and ZIP or postal code box has been increased to match the size of the Recipient’s box. The Account number box and 2nd TIN box have been switched with the blank box on the bottom of the form.
On the 1099-MISC form, the Street address box and the City or town, province or state, country, and ZIP or postal code box have been moved up one line. The size of the Receipient’s box has been reduced to match the size of the Recipient’s box. The size of the City or town, province or state, country, and ZIP or postal code box has been increased to match the size of the Recipient’s box.
The 1099-INT form has changed from a three per page format to a two per page format.
On the 1096 form, the boxes on the bottom of the form have been realigned. The same boxes exist, but are smaller now.
Tax Year Ammount
1st Tax Year $3,360
2nd Tax Year $5,400
3rd Tax Year $3,250
Each Succeeding Year $1,975

U . S . 2 0 1 3 Y E A R - E N D U P D A T E 7
Chapter 2: Payroll year-end checklistsThis chapter contains checklists that you can use for year-end. Use the checklist that most suits the way your company handles Payroll year-end activities. The following checklists are provided:
• Printing 2013 statements before processing 2014 pay runs• Processing 2014 pay runs before printing 2013 statements
Printing 2013 statements before processing 2014 pay runs
Use this checklist to install the year-end maintenance and update, to close the 2013 payroll year, to update your Payroll system with the 2013 Payroll tax changes, and to print 2013 wage statements before performing 2014 pay runs.
Detailed instructions for completing each step are found in the chapters and sections indicated.
Step Description
1 Verify that you have installed the latest 2013 Payroll tax updates. The last tax update was on 01/15/2013 or later.
2 Complete all 2013 pay runs.
3 Complete all payroll month-end, period-end, or quarter-end procedures.Note: You can install the year-end update (step 5) before this step, as long as you create a backup before installing.
4 Make a backup of your 2013 company database(s). Label the backup “Pre Year-End Wage file”.
5 Install the U.S. 2013 Year-End Update. See Installing the year-end update on page 17. Note: Do not restart Microsoft Dynamics GP on any workstation until the update has been installed on all workstations that run the application.
6 Create the Year-End Wage file. See Creating the Year-End Wage file on page 21.Note: 2014 Payroll tax updates can be installed any time after the Year-End Wage file has been created.
7 Make a backup of your 2013 company database(s). Label the backup “Post Year-End Wage file”.
8 Verify W-2 and 1099-R statement information. Note: If you make changes to the statement information, we recommend that you make another backup.
9 Print the W-2 Validation Report, W-2 statements, and W-3 Transmittal form. See Chapter 6, “Report procedures.”
10 Print the 1099-R Validation Report, 1099-R forms, and 1096 Transmittal Form. See Chapter 6, “Report procedures.”
11 Prepare and submit W-2 information in the federal EFW2 format, if required. See Chapter 5, “Submitting W-2 reports electronically.”
12 Archive Human Resources information for inactive employees (optional).
13 Set up fiscal periods for 2014.
14 Delete Human Resources information for inactive employees (optional).
15 Close the fiscal periods for the Payroll series for the 2013 year (optional).
16 Install the 2014 Payroll tax update.

C H A P T E R 2 P A Y R O L L Y E A R - E N D C H E C K L I S T S
8 U . S . 2 0 1 3 Y E A R - E N D U P D A T E
Processing 2014 pay runs before printing 2013 statements
Use this checklist if you need to process 2014 pay runs before printing 2013 wage statements.
Detailed instructions for completing each step are found in the chapters and sections indicated.
Step Description
1 Verify that you have installed the latest 2013 Payroll tax updates. The last tax update was on 01/15/2013 or later.
2 Complete all 2013 pay runs.
3 Complete all payroll month-end, period-end, or quarter-end procedures.Note: You can install the year-end update (step 5) before this step, as long as you create a backup before installing.
4 Make a backup of your 2013 company database(s). Label the backup “Pre Year-End Wage file”.
5 Install the U.S. 2013 Year-End Update. See Installing the year-end update on page 17. Note: Do not restart Microsoft Dynamics GP on any workstation until the update has been installed on all workstations that run Microsoft Dynamics GP.
6 Create the Year-End Wage file. See Creating the Year-End Wage file on page 21.Note: 2014 Payroll tax updates can be installed any time after the Year-End Wage file has been created.
7 Make a backup of your 2013 company database(s). Label the backup “Post Year-End Wage file”.
8 Verify W-2 and 1099-R statement information. Note: If you make changes to the information, we recommend that you make another backup.
9 Archive Human Resources information for inactive employees (optional).
10 Set up fiscal periods for 2014.
11 Clear Human Resources information for inactive employees (optional).
12 Close the fiscal periods for the Payroll series of the 2014 year (optional).
13 Install the 2014 Payroll tax update.
14 Process 2014 pay runs.
15 Print the W-2 Validation Report, W-2 statements, and W-3 Transmittal forms. See Chapter 6, “Report procedures.”
16 Print the 1099-R Validation Report, 1099-R forms, and 1096 Transmittal Form. See Chapter 6, “Report procedures.”
17 Prepare and submit W-2 information in the federal EFW2 format, if required. See Chapter 5, “Submitting W-2 reports electronically.”

U . S . 2 0 1 3 Y E A R - E N D U P D A T E 9
Chapter 3: Preparation and FAQsUse the instructions in this chapter to prepare for the U.S. 2013 Year-End Update. Information is divided into the following sections:
• Supported releases• Obtaining the year-end update• Obtaining a User Identification Number to submit EFW2 files electronically• Non-supported electronic filing• Frequently asked questions
Supported releases
The U.S. 2013 Year-End Update supports Microsoft Dynamics GP 2010 and Microsoft Dynamics GP 2013.
To identify the release you’re using, start Microsoft Dynamics GP. Choose Help >> About Microsoft Dynamics GP.
If you’re not using one of the supported releases, upgrade to a supported version before installing this update.
For more information about product discontinuation dates, refer to the discontinuation chart on CustomerSource (https://mbs.microsoft.com/customersource/support) >> Support Information. Select “Effectively predict support availability with the Microsoft Support Lifecycle Policy.”
Obtaining the year-end update
Download update files and documentation from CustomerSource (https://mbs.microsoft.com/customersource/support/downloads/taxupdates), or obtain them from your Microsoft Partner.
Obtaining a User Identification Number to submit EFW2 files electronically
If you plan to submit W-2 statements electronically using the EFW2 format, you must first register for a User Identification Number (User ID) with the Social Security Administration.
Use one of the following options to obtain a User Identification Number:
• Internet: www.socialsecurity.gov/bso/bsowelcome.htm
• Telephone: 1-800-772-6270 Monday through Friday, 7 a.m. to 7 p.m. (EST)
Non-supported electronic filing
Microsoft Dynamics GP currently supports electronic filing of W-2 information in the federal EFW2 format. Some states also accept this format.
Microsoft Dynamics GP does not support electronic filing of 1099-R forms, State Unemployment Tax (SUTA) forms, or state W-2 forms in formats other than EFW2. You will need to use separate software or services for filing these items. Contact a Microsoft Developer that offers compatible electronic filing products.

C H A P T E R 3 P R E P A R A T I O N A N D F A Q S
10 U . S . 2 0 1 3 Y E A R - E N D U P D A T E
This is the contact information for the Microsoft Developers:
Greenshades Software, Inc.7020 AC Skinner ParkwaySuite 100Jacksonville FL 32256 Telephone: (888) 255-3815E-mail: [email protected] site: www.greenshades.com
MasterTax, LLC7150 East Camelback Road, Suite 160Scottsdale, AZ 85251Telephone: (480) 778-8723E-mail: [email protected] site: www.mastertax.net
Frequently asked questions
As you complete year-end tasks, refer to the answers in this section.
Q: What will happen if I’ve already closed the 2013 Payroll tax year and don’t install the 2014 tax update right away?
A: Until you install the 2014 tax update containing FICA, federal, and state tax changes, the tax calculations for your 2014 pay runs may be incorrect.
Q: If I use multiple companies with my accounting system, do I have to install the year-end tax update for each company?
A: No. The update will be reflected in all companies. However, you do need to install the update on each workstation using Microsoft Dynamics GP.
Q: I need to print my 2014 checks before I can print W-2s. What should I do?
A: After you create the Year-End Wage file, close the year. Install the 2014 tax update, and you can print checks. Follow the checklist for Processing 2014 pay runs before printing 2013 statements on page 8.
Q: How do I print multiple W-2 statements for each employee?
A: There are two ways:
Using Laser form “sets” To print all the required forms for each employee at a time (you’re using laser form “sets”), simply enter the number of copies you need to print in the “number of copies” field in the Print dialog box that appears after you choose Print in the Print W-2 Forms window.
For example, to print four copies of the W-2 statement for each employee, enter “4” in the Print dialog box. Information for two employees will be printed per page: Copy A for two employees, Copy B for two employees, Copy C for two employees, Copy D for two employees, etc. until the required number of copies has been printed for all employees.

U . S . 2 0 1 3 Y E A R - E N D U P D A T E 11
C H A P T E R 3 P R E P A R A T I O N A N D F A Q S
Using Laser form “sheets” To print all forms for all employees, repeat the Printing W-2 Statements procedure as many times as necessary to print the required number of copies. For example, to print copies of the W-2 statements, put the Copy A sheets into the printer and follow the procedure. Copy A W-2 statements will be printed for each employee. Then, put the Copy B sheets into the printer and repeat the procedure, and so on, until all required forms are printed for all employees.
Q: I can’t make W-2 forms align correctly. What can I do?
A: Try the following method to correct alignment issues:
1. Print the W-2s to the screen.
2. Choose the printer icon button on the top left.
3. A print dialog box with horizontal and vertical alignments will appear on the right. Adjust according to the situations below:
Q: I have closed the year and I want to print the 941 for the prior year, but it is blank. Why?
A: The 941 report is date sensitive, so you need to be sure the Microsoft Dynamics GP user date and the year you’re printing the 941 for are the same.
Q: How do I verify federal withholding taxes?
A: If an employee’s federal withholding taxes seem incorrect or you want to verify the amounts, follow these steps to help pinpoint the error source.
1. Verify your employee’s records in the Payroll Employee Tax Maintenance window (Cards >> Payroll >> Tax). Check to see if any additional amounts have been entered in the Additional Withholding and Estimated Withholding fields.
2. Open the Deduction Setup window. (Microsoft Dynamics GP menu >> Tools >> Setup >> Payroll >> Deduction. Verify that all deductions are marked as TSA are marked correctly.
3. Be sure that the pay frequency of the employee’s pay codes matches the pay period of your company. For example, if you pay your employees semimonthly, the pay frequency for the employee’s pay code, deduction, and benefit should also be semimonthly.
For additional information, search the Microsoft Dynamics Knowledge Base (https://mbs.microsoft.com/knowledgebase/search.aspx) and view article number 855655. See the Dynamics GP Support and Service blog “How to Verfy Microsoft Dynamics GP is Calculating Payroll Taxes Correctly.”
Problem Adjustment
Form prints too high Enter a positive vertical adjustment (.25 is one line).
Form prints too low Enter a negative vertical adjustment (-.25 is one line).
Form prints too far right Enter a negative horizontal adjustment.
Form prints too far left Enter a positive horizontal adjustment.

C H A P T E R 3 P R E P A R A T I O N A N D F A Q S
12 U . S . 2 0 1 3 Y E A R - E N D U P D A T E
Q: What will happen if I have deductions and/or benefits set to print in the same box on the W-2 statement with the same label?
A: The amounts will be combined and print as one.
Q: How do I print W-2 statements for Medicare Qualified Government employees?
A: In the Print W-2 Forms window (Microsoft Dynamics GP menu >> Tools >> Routines >> Payroll >> Print W-2s), select the Medicare Qualified Government Employee option in the Employee Type box. The W-2 statements for Medicare Qualified Government Employees are printed separately.
Q: What is the source of the Employer Identification Number that appears as a default in the Print W-2 Forms window?
A: The number is the federal or state ID entered in the Unemployment Tax Setup window (Microsoft Dynamics GP menu >> Setup >> Payroll >>Unemployment Tax) in the Unemployment Tax ID field.
Q: In both the Edit W-2 Information and the Print W-2 Forms windows, there is a list used to select the year. Is there a limit to the number of years available? Also, is each year added to the year-end wage file, or does each year have separate year-end wage files created during the year-end closing process?
A: During the Payroll year-end closing process, the Year-End Wage File is created. Multiple years of history can be saved. If you choose the same year twice when performing the process, the previous file will be replaced by the new file. As long as the correct year is entered each time, the new year’s information will be added to the file. This information can be cleared using the Remove Payroll Year-End Information window.
Q: If I add information in the Edit W-2 Special Information window (Special button in the Edit W-2 Information window) without entering information in the Edit W-2 Information window, where will that information appear?
A: It will print this information on the additional W-2.

U . S . 2 0 1 3 Y E A R - E N D U P D A T E 13
C H A P T E R 3 P R E P A R A T I O N A N D F A Q S
Q: The correct Last Year-End Update date doesn’t appear in the Payroll Setup window, even though I installed the 2013 year-end update and see the changes included in the update. Is there something I need to do?
A: The Last Year-End Update date is read from the LastYearEndUpdate= line in the Dex.ini file. When you install a year-end update on a particular computer, the Dex.ini file on that computer is updated. However, in some Windows Terminal Server deployments, there is only a single installation of Microsoft Dynamics GP, which many users access. Each user typically has a Dex.ini file in their home Windows folder. Installing the year-end update on the server doesn’t update each user’s Dex.ini file. In these situations, you should manually update each user’s Dex.ini file so that the appropriate line reads LastYearEndUpdate=11/15/2013.
For more information about how the Year-End Update date is changed, search the Microsoft Dynamics Knowledge Base (https://mbs.microsoft.com/knowledgebase/search.aspx) and view article number 981312.

14 U . S . 2 0 1 3 Y E A R - E N D U P D A T E

U . S . 2 0 1 3 Y E A R - E N D U P D A T E 15
Chapter 4: Payroll year-end proceduresUse the instructions in this chapter to start your Payroll year-end closing tasks. The first section provides an overview of the tasks involved. The remaining sections provide additional detail for specific steps.
Information is divided into the following sections:
• Payroll year-end closing• Installing the year-end update• Creating the Year-End Wage file• Editing W-2 records• Editing 1099-R statement information• Archiving Human Resources information for inactive employees• Setting up fiscal periods• Setting up attendance• Deleting information for inactive employees
Payroll year-end closing
Use this procedure to close the 2013 Payroll year. After closing the year, you need to install the 2014 Payroll tax update before processing 2014 pay runs. There are two year-end checklists you can use to close the year for payroll. The steps in this section correspond most closely to Printing 2013 statements before processing 2014 pay runs on page 7. For more information, see the checklists in Chapter 2, “Payroll year-end checklists.”
To complete payroll year-end closing:1. You already should have completed the tasks in Chapter 3, “Preparation and
FAQs.”
2. Complete all 2013 pay runs. The information created during the pay runs is used for month-end or period-end, quarter-end, and any additional year-end reports that you print. You can reprint period-end, quarter-end, or additional reports and re-create the Year-End Wage file at any time.
It’s important that you complete all pay runs for 2013 before you install a 2014 Payroll tax update. If you install a 2014 Payroll tax update before completing your pay runs, taxes will be calculated at 2014 rates for the remainder of the 2013 pay runs.
3. Complete your company’s standard payroll month-end or period-end, and quarter-end procedures (optional). These procedures might include printing several month-end or period-end and quarter-end reports. You can reprint these reports at any time.
4. Back up your 2013 Microsoft Dynamics GP data. Label the backup “2013 Pre Year-End Wage file.” If you encounter a problem while creating the Year-End Wage file, you can restore information from this backup. The Internal Revenue Service requires you to keep these records for at least four years.

C H A P T E R 4 P A Y R O L L Y E A R - E N D P R O C E D U R E S
16 U . S . 2 0 1 3 Y E A R - E N D U P D A T E
5. To install the latest 2013 tax update changes, log in to Microsoft Dynamics GP as the system administrator, and open the Payroll Tax Update window. (Microsoft Dynamics GP menu >> Maintenance >> U.S. Payroll Updates >> Check for Tax Updates) You last tax update should be 01/15/2013 or later.
6. Install the U.S. 2013 Year-End Update on each client workstation that will use Microsoft Dynamics GP. Before installing the update, ask all Microsoft Dynamics GP users to exit the application until the update is complete on every workstation. For more information, see Installing the year-end update on page 17.
This step can be done at any time, even if you have not completed all of your 2013 pay runs. This step must be done before you create the Year-End Wage file.
7. Create the Year-End Wage file. For information, see Creating the Year-End Wage file on page 21.
2014 Payroll tax updates can be installed any time after the Year-End Wage file has been created. However, if you create the Year-End Wage file, then install 2014 updates and re-create the 2013 year-end file, your FICA limits may be incorrect.
8. Back up your 2013 Microsoft Dynamics GP. This backup must be separate from the “2013 Pre Year-End Wage file” backup. Label the backup “2013 Post Year-End Wage file.” You can use this backup if you encounter problems while printing W-2 statements. The Internal Revenue Service requires you to keep these records for at least four years.
9. Verify W-2 and 1099-R statement information. If you’re printing W-2 statements before closing the year 2013 or after processing a 2014 pay run, we suggest that you verify that the W-2 and 1099-R statement information is correct before you close the payroll year. For information, see Printing the Year-End Wage Report on page 35. You also might want to make changes to your W-2 records. For information, see Editing W-2 records on page 22.
To verify 1099-R statement information, you can print 1099-R statements using the Print 1099-R Forms window. If you make changes to your 1099-R records, we recommend that you make another backup. For information, see Editing 1099-R statement information on page 23.
10. Print the W-2 Validation Report to verify that the information to be printed on W-2 statements is correct. The report displays warnings if there are employee record errors, except for employees with no wages, tips, or withholding information entered on their W-2 forms. W-2 forms will not be printed for employees with no earnings or withholding information. For instructions, see Printing W-2 forms and reports on page 36.
For more information about validation report warnings, search the Microsoft Dynamics Knowledge Base (https://mbs.microsoft.com/knowledgebase/search.aspx) and view article number 872100.
Next, print the W-2 statements and W-3 Transmittal form. You should print aW-2 statement for each employee who has worked for the company during the year. For information, see Printing W-2 forms and reports on page 36.

U . S . 2 0 1 3 Y E A R - E N D U P D A T E 17
C H A P T E R 4 P A Y R O L L Y E A R - E N D P R O C E D U R E S
11. Print the 1099-R Validation Report, 1099-R forms and 1096 Transmittal Form. The 1096 statement is a report showing the distribution of pension payments for use in preparing federal, state, and local tax returns. A 1099-R statement shows an employee’s distribution from a retirement plan. For more information, see Printing 1099-R forms and reports on page 38.
12. Create an EFW2 transmission file, if required. If your company has more than 250 employees, the Social Security Administration requires you to create and submit federal W-2 wage reports electronically. For information, see Chapter 5, “Submitting W-2 reports electronically.”
13. Archive inactive employee Human Resources information (optional). If you’re using Human Resources with Payroll and you want to save inactive employee information while removing Payroll history records, you can archive the information. Archiving information is beneficial if you need to provide information for references, re-hiring, or other reporting purposes. For information, see Archiving Human Resources information for inactive employees on page 24.
14. Set up fiscal periods for 2014. Enter the number and length of each company’s open fiscal periods for 2014 in the Fiscal Periods Setup window. For information, see Setting up fiscal periods on page 25.
15. Delete inactive employee Human Resources information (optional). Deleting Human Resources information saves hard disk space and ensures that unused data is not available in lookup lists. For information, see Deleting information for inactive employees on page 28.
To accrue time using the Human Resources attendance system, see Setting up attendance on page 26.
16. Close the fiscal periods for the year 2013 (optional). Closing any Payroll periods that are still open for the year 2013 keeps transactions from being accidentally posted to the wrong period. For information, see Setting up fiscal periods on page 25.
If you need to post Payroll transactions to a fiscal period you’ve already closed, use the Fiscal Periods Setup window to reopen the period before posting the transaction.
17. Install the 2014 Payroll tax update. For additional information and step-by-step instructions to follow, download the latest 2014 U.S. Payroll Tax Update documentation from CustomerSource (https://mbs.microsoft.com/customersource/support/downloads/taxupdates). Choose the link for the Microsoft Dynamics GP version you are using.
You also can print W-2 statements and 1099-R forms and create an EFW2 transmission file after you’ve installed the 2014 Tax Update and performed pay runs for the year 2014. To view the checklist, see Processing 2014 pay runs before printing 2013 statements on page 8.
Installing the year-end update
Use these instructions to install the U.S. 2013 Year-End Update for Payroll.

C H A P T E R 4 P A Y R O L L Y E A R - E N D P R O C E D U R E S
18 U . S . 2 0 1 3 Y E A R - E N D U P D A T E
If the files Reports.dic, Forms.dic, and Dynamics.vba are present in your application, make backup copies before installing the U.S. 2013 Year-End Update.
You will need to install the year-end update on every workstation that runs Microsoft Dynamics GP. Before you begin, ask all Microsoft Dynamics GP users to exit the application until the update is complete.
To install the year-end update:1. Download the update from CustomerSource (https://mbs.microsoft.com/
customersource/support/downloads/taxupdates). The filenames are as follows:
Save the appropriate file to a folder on the local disk drive of the server workstation that runs Microsoft Dynamics GP.
The year-end update file also includes all prior Microsoft Dynamics GP 2010 R2 or Microsoft Dynamics GP 2010 with Service Pack 3 or Microsoft Dynamics GP 2013 with Service Pack 2. Documents describing the service packs are available from CustomerSource.
2. Double-click the file that you just downloaded. Progress windows appear as space requirements are verified and files are installed.
3. A message may appear, asking if you want to restart now or later. Click Yes to restart now, you will need to run the update file again after restarting.
4. Start Microsoft Dynamics GP Utilities.
5. In the Welcome to Microsoft Dynamics GP Utilities window, verify your server name, enter the system administrator user ID and password, and click OK.
6. In the second welcome window, click Next.
7. In the Upgrade Microsoft Dynamics GP window, click Next.
The Server Installation Progress window describes the process as it progresses.
8. In the Confirmation window, click Finish.
Microsoft Dynamics GP Utilities updates your company databases. This process may take several minutes to complete. The Server Installation Progress window describes the process as it progresses.
9. After the update process is finished and is successful, the Additional Tasks window opens.
Language Microsoft Dynamics GP 2010 Microsoft Dynamics GP 2013
English (U.S) MicrosoftDynamicsGP11-KB2897368-ENU.msp MicrosoftDynamicsGP12-KB2911836-ENU.msp
Spanish (Latin America) MicrosoftDynamicsGP11-KB287369-ESLA.msp MicrosoftDynamicsGP12-KB2897367-ESLA.msp
Microsoft Dynamics GP 2010
Start >> Programs >> Microsoft Dynamics >> GP 2010 >> GP Utilities
Microsoft Dynamics GP 2013
Start >> Programs >> Microsoft Dynamics >> GP 2013 >> GP Utilities

U . S . 2 0 1 3 Y E A R - E N D U P D A T E 19
C H A P T E R 4 P A Y R O L L Y E A R - E N D P R O C E D U R E S
If the update process wasn’t successful, the Update Company Tables window opens and a red x appears next to the name of the company. You must contact Microsoft Dynamics GP Technical Support. See Year-end resources on page 2 for more information.
10. In the Additional Tasks window, choose Update modified forms and reports and click Process. The Locate Launch File window appears.
11. Select the location of the launch file (Dynamics.set). In most cases you can accept the default location. Click Next. The Update Modified Forms and Reports window appears.
12. Mark the check box next to Microsoft Dynamics GP and any additional components listed.
13. When you mark a component’s check box, a Product Details window may appear, allowing you to select the location of the component’s original code dictionary. You also can open the Product Details window by selecting a component and clicking Details.
When you apply an update (.msp file), any dictionaries whose compatibility ID has changed are backed up to a folder named “Version<Version Number>Backup”. This folder is located in the same folder as Dynamics.exe. The <Version Number> value is the version you were using before applying the update.
If the original dictionary exists in the backup folder, Microsoft Dynamics GP Utilities will automatically display its location in the Product Details window, and you can click OK to accept the location. If the location is missing or incorrect, click the file folder icon and browse to the appropriate location.
14. When you have finished selecting components, click Update. A Report Upgrade Progress window displays the status of the update. When the process finishes, click Close.
Log files containing detailed information about the update are saved in the \Data folder. For each component, a report named “Update<Version_Name> .log” is generated. An update summary named “Update<Version>.txt” is also generated.
15. In the Modified Forms and Reports window, click Next. The Additional Tasks window opens, where you can start Microsoft Dynamics GP, or exit Microsoft Dynamics GP Utilities.
16. We recommend that you start Microsoft Dynamics GP and print all of your modified reports, and access all your modified forms to verify whether the reports and forms were updated correctly.
17. After installing the U.S. 2013 Year-End Update on a server for Microsoft Dynamics GP, install the U.S. 2013 Year-End Update on all remaining client computers or Terminal Services.
You can set up Automated Client Update to update all client workstations. For information about setting up the automatic updates, refer to your System Administrator manual.

C H A P T E R 4 P A Y R O L L Y E A R - E N D P R O C E D U R E S
20 U . S . 2 0 1 3 Y E A R - E N D U P D A T E
To install the update on an operating system with User Account Control (UAC) activated, a user must be running Microsoft Dynamics GP with administrative privileges. (From the Start menu, select and right-click the Microsoft Dynamics GP shortcut, and then select Run as Administrator.) For other ways to install the update on Windows Vista clients with UAC activated, see Installing with UAC activated.
18. To confirm that the update is installed, open the Payroll Setup window. (Microsoft Dynamics GP menu >> Tools >> Setup >> Payroll >> Payroll)
Check the Last Year-End Update date. It should be 11/15/2013.
If the date does not appear changed to 11/15/2013, search the Microsoft Dynamics Knowledge Base (https://mbs.microsoft.com/knowledgebase/search.aspx) and view article number 981312.
Installing with UAC activatedUser Account Control (UAC) is an enhanced security feature in Windows® 7, Windows Vista®, and Windows Server® 2008 or later. UAC is activated by default. Before performing actions that could affect your computer’s operation, such as installing software updates, UAC asks for permission. To install the update on a client computer when UAC is active, copy the .msp file to each client workstation, then use one of the following methods:
• Start Microsoft Dynamics GP as a user that has administrative privileges on the local computer. (To do this, right-click on the Microsoft Dynamics GP shortcut and choose Run as administrator.) Double-click the .msp file to install it.
• Start the Command Prompt (located in the Accessories group) as a user that has administrative privileges on the local computer. (To do this, right-click on the Command Prompt shortcut and select Run as administrator.) Set the current directory to the location where you copied the .msp file.
For Microsoft Dynamics GP 2013, enter the following command for U.S. English installs:
Msiexec /p MicrosoftDynamicsGP12-KB2911836-ENU.msp /1*v C:\MSPErrorlog.txt
For Microsoft Dynamics GP 2010, enter the following command for U.S. English installs:
Msiexec /p MicrosoftDynamicsGP11-KB2897368-ENU.msp /1*v C:\MSPErrorlog.txt
• If you want the user to install updates and service packs without having administrative privileges on the local computer, you can change permissions for the folder where Microsoft Dynamics GP is installed. Be aware that doing this makes your computer less secure.
View properties for the folder, and display the Security tab. Grant Modify permissions to an appropriate group, such as Users or Authenticated Users. Once the folder permissions are changed, any user in the group can install the .msp file by double-clicking it.

U . S . 2 0 1 3 Y E A R - E N D U P D A T E 21
C H A P T E R 4 P A Y R O L L Y E A R - E N D P R O C E D U R E S
Creating the Year-End Wage file
To ensure that information in the Year-End Wage file is correct, verify that you’ve set up W-2 box and W-2 label settings within both the Employee Benefit Maintenance window (Cards >> Payroll >> Benefit) and the Employee Deduction Maintenance window (Cards >> Payroll >> Deduction) for each benefit and deduction.
Be sure that the W-2 options are marked correctly in the Employee Tax Maintenance window (Cards >> Payroll >> Tax).
Verify your Employer State ID number in the Payroll Tax Identification Setup window (Microsoft Dynamics GP menu >> Tools >> Setup >> Payroll >> Tax ID).
This is the number that will be printed on the W-2 statements. You can maintain an Unemployment ID number and State Tax ID number in Microsoft Dynamics GP.
Be sure that you’ve installed the U.S. 2013 Year-End Update and updated your Payroll information before creating the Year-End Wage file. Also, be sure that you’ve made a full backup of all your company data and stored it in a safe place.
Use the Payroll Year-End Closing window to create a table of annual wage information. The data from this table will be used to create W-2 statements and 1099-R statements.
To create the Year-End Wage file:1. Open the Payroll Year-End Closing window.
(Microsoft Dynamics GP menu >> Tools >> Routines >> Payroll >> Year-End Closing)
2. Enter 2013 for the reporting year.
3. Choose Process to create the Year-End Wage file that will be used for printing W-2 statements and 1099-R forms. You can store multiple years of year-end wage information in Microsoft Dynamics GP. To clear previous year-end wage information, use the Remove Payroll Year-End Information window (Microsoft Dynamics GP menu >> Tools >> Utilities >> Payroll >> Remove Year-End Information).

C H A P T E R 4 P A Y R O L L Y E A R - E N D P R O C E D U R E S
22 U . S . 2 0 1 3 Y E A R - E N D U P D A T E
You can install 2013 tax tables any time after you’ve created the Year-End Wage file. You also may need to process 2014 pay runs before printing 2013 wage statements. For more information, see the checklist Processing 2014 pay runs before printing 2013 statements on page 8.
Editing W-2 records
You can verify and update information for an employee’s W-2 statement in the Edit W-2 Information window.
However, when you make changes in this window, only the information in the Year-End Wage file changes. The employee record doesn’t change, so it might be necessary to make permanent changes to the record (if the employee’s address changes, for example).
To edit W-2 records:1. Open the Edit W-2 Information window.
(Microsoft Dynamics GP menu >> Tools >> Routines >> Payroll >> Edit W-2s)
2. Select 2013 and select an employee. The employee’s Social Security number and address are displayed in editable fields.
Social Security numbers that aren’t valid are listed in the W-2 Validation Report. For more information, see Printing W-2 forms and reports on page 36.
If the employee has a foreign address, mark the Foreign Address option. Fields specific to a foreign address will be displayed.
3. You can edit Special and Other box information by choosing Special or Other to open the Edit Additional Special Information and Edit Additional Other Information windows. If two deductions or benefits are defined to be printed in the same W-2 box with the same label, the amounts will be combined.
4. Edit wage and withholding information. Additional W-2 statements will be printed only for employees with multiple state tax records, multiple local tax records, multiple special records, and multiple other records.
The Advanced EIC Payment field is no longer used on the W-2. If you have an amount in that field other than zero, you will see a warning on the W-2 Validation Report.

U . S . 2 0 1 3 Y E A R - E N D U P D A T E 23
C H A P T E R 4 P A Y R O L L Y E A R - E N D P R O C E D U R E S
5. Specify the type of employee for whom you’re editing W-2 information. Information from the Employee Tax Maintenance window will appear as default entries. Settings include:
Statutory Employee Mark this box if the employee is subject to FICA withholding but not federal withholding.
Retirement Plan Mark this box if the employee is an active participant in a retirement plan.
6. Edit optional information, as needed. Choose State or Local to open the Edit State Tax Information or the Edit Local Tax Information windows. Use these windows to view state and local tax information that will be printed on the main W-2 statement and supporting W-2 statements for the employee.
When you’ve finished editing information, choose OK to close the window and return to the Edit W-2 Information window.
7. Choose Save to store the information and close the window.
Editing 1099-R statement information
Use the Edit 1099-R window to update a retired employee’s 1099-R information. The 1099-R statement shows an employee’s distribution to a retirement plan.
When you make changes in the Edit 1099-R window, only the information in the Year-End Wage file is changed, not the employee record itself. If the change is permanent, such as an address change, you also will need to change the employee record.
To edit 1099-R records:1. Open the Edit 1099-R window.
(Microsoft Dynamics GP menu >> Tools >> Routines >> Payroll >> Edit 1099-Rs)
2. Select 2013 for the calendar year and select an employee. The employee’s Social Security number and address are displayed in editable fields.

C H A P T E R 4 P A Y R O L L Y E A R - E N D P R O C E D U R E S
24 U . S . 2 0 1 3 Y E A R - E N D U P D A T E
3. Edit miscellaneous information. If necessary, you can change the gross distribution amount or the current-year total amount of the pension that the employee received. If you know the amount of the distribution that is taxable, enter that amount. Otherwise, leave the Taxable Amount Not Determined field marked and the taxable amount at 0.
If the employee has an excess in deferrals or earnings, be sure to enter the amount in excess in the appropriate amount field.
4. Edit state and local tax information. If necessary, you can change the amounts of the federal and state income tax withheld. You also can change the state and payer’s state ID, the local tax withheld, and the name of the locality to which the tax was paid. If an employee is receiving a W-2 statement as well as a 1099-R statement, the withholding amounts will be pro-rated.
5. Choose Save to store the information and close the window.
Archiving Human Resources information for inactive employees
Use the Employee Archive window to store inactive employee Human Resources information, such as discipline records, reviews, and position history.
It’s important to archive inactive employee Human Resources information before deleting inactive employees if you would like to keep this information in the system.
To archive Human Resources information for an inactive employee:1. Open the Employee Archive window.
(Microsoft Dynamics GP menu >> Tools >> Utilities >> Human Resources >> Archive Employee)
2. Select the inactive employee whose information you want to archive.
3. Mark the information to archive.

U . S . 2 0 1 3 Y E A R - E N D U P D A T E 25
C H A P T E R 4 P A Y R O L L Y E A R - E N D P R O C E D U R E S
4. Choose Save to apply the changes. For more information about archiving employee records or accessing archived employee records, see the Human Resources documentation included with Microsoft Dynamics GP.
Setting up fiscal periods
Setting up periods for the future fiscal year allows you to enter transactions into the 2014 fiscal year before closing the 2013 fiscal year. Enter the number and length of each company’s open fiscal periods for 2014 in the Fiscal Periods Setup window.
After clearing financial information, you also can use the Fiscal Periods Setup window to:
• Close any Payroll periods that are still open for the year, which helps to keep transactions from being posted to the wrong period or year.
• Reopen a fiscal period that you’ve already closed.
To set up fiscal periods:1. Open the Fiscal Periods Setup window.
(Microsoft Dynamics GP menu >> Tools >> Setup >> Company >> Fiscal Periods)
2. Enter the year. Also enter the first and last days of the fiscal year. The fiscal year isn’t limited to a calendar year; it can be any length.
3. If you’re entering information for an historical year, mark the Historical Year option.
4. Enter the number of fiscal periods in the fiscal year. For example, enter 4 for quarterly periods, or 12 for monthly periods.
5. Choose Calculate to calculate first and last days for each period. The beginning date of each period appears in the scrolling window.
You can reenter information and recalculate periods as many times as necessary.
6. Review the beginning dates of each period in the Date column. Make changes, as needed.

C H A P T E R 4 P A Y R O L L Y E A R - E N D P R O C E D U R E S
26 U . S . 2 0 1 3 Y E A R - E N D U P D A T E
7. In the Period Name column, review and rename the periods, as needed. For example, enter Quarter 1 for Period 1.
8. Use the Series Closed columns to prevent posting to a series after a period has been closed. This step is part of your period-end procedures.
9. Choose OK to save the information and close the window.
Setting up attendance
Use the Attendance Setup window to specify if your company accrues time using Payroll or the Human Resources attendance system. If you’re using Human Resources, you also can set up vacation and sick time accrual methods in this window.
To set up attendance:1. Open the Attendance Setup window.
(Microsoft Dynamics GP menu >> Tools >> Setup >> Human Resources >> Attendance >> Setup)
2. Specify how your company accrues benefit time.
Human Resources Mark Human Resources to use the Human Resources attendance system.
Payroll Mark Payroll to use your accounting system to track attendance. Proceed to step 7.
3. Mark the Print Available Time on Payroll Checks option in the Employee Attendance Maintenance window (Cards >> Human Resources >> Employee - Attendance >> Maintenance) to print available vacation and/or sick time on payroll checks.
4. Mark the Allow entry of attendance type and reason in Payroll option to link attendance type and reason codes to payroll transactions in the Payroll Transaction Entry window. This option is available only when the accrue type is Human Resources and U.S. Payroll is registered.
5. Enter the current payroll, or accrual, year and the last day that you accrued attendance.

U . S . 2 0 1 3 Y E A R - E N D U P D A T E 27
C H A P T E R 4 P A Y R O L L Y E A R - E N D P R O C E D U R E S
These fields are available with Human Resources when U.S. Payroll is not registered. They also are available when the accrue type is Human Resources and U.S. Payroll is registered.
6. Select whether seniority is based on Months or Days.
7. You can choose to update the Vacation Calendar with attendance transactions.
Mark the Update Vacation Calendar option.
8. Reset benefit time available.
For instance, an employee has 12.75 vacation hours available and you want the balance to be zero; you’d create an adjusting transaction for -12.75 hours for the vacation time code.
If you don’t reset vacation and sick time available, the hours that were available at the end of the year are carried over to the next year.
Accruing with Human Resources If you marked Human Resources as your accrual type in step 2, you can reset benefit time available by creating an Hours Available Adjustment in the Attendance Transaction Entry window (Transactions >> Human Resources >> Transaction Entry).
For more information, see the Human Resources documentation included in Microsoft Dynamics GP.
Accruing with Payroll If you marked Payroll as your accrual type in step 2, (Microsoft Dynamics GP menu >> Tools >> Utilities >> Payroll >> Mass Update) and reset benefit time available. In the Update list, choose Vacation Time Available or Sick Time Available.
9. In the Attendance Setup window, enter the number of days that equal a week and the number of hours that equal a day to define your organization’s work schedule. For example, a standard 40 hour work week might be Number of days in a week = 5 and Number of hours in a day = 8.

C H A P T E R 4 P A Y R O L L Y E A R - E N D P R O C E D U R E S
28 U . S . 2 0 1 3 Y E A R - E N D U P D A T E
10. Choose Options to open the Attendance Setup Options window.
11. Enter an attendance reason for absence—such as Jury Duty—and add it to the Reason list by choosing the insert button. Then, enter an attendance type for the reason—such as Miscellaneous—and add it to the Type list.
The reasons and types that you enter will be displayed in the Attendance Transaction Entry window. If you marked the Allow entry of attendance type and reason in Payroll option in the Attendance Setup window, then the reasons and types will be displayed in the Payroll Transaction Entry window.
To remove an attendance reason or type from a list, select it and choose Remove. Predefined reasons and types cannot be removed.
12. Choose OK to save your changes and return to the Attendance Setup window. Choose OK again to save the settings in the Attendance Setup window.
Deleting information for inactive employees
The Remove Inactive Records window deletes inactive records in both Payroll and in Human Resources. Deleting information for employees that you’ve inactivated ensures that unused data is not being stored in the system and is not available in lookup lists.
Don’t delete inactive records until after you’ve created the Year-End Wage file and have printed all government statements and reports for the year. Once inactive employee records are removed, you won’t be able to reprint statements and reports. You should also make sure to archive all employee information that you want to keep.

U . S . 2 0 1 3 Y E A R - E N D U P D A T E 29
C H A P T E R 4 P A Y R O L L Y E A R - E N D P R O C E D U R E S
To delete information for inactive employees:1. Open the Remove Inactive Records window.
(Microsoft Dynamics GP menu >> Tools >> Utilities >> Payroll >> Remove Inactive Records)
2. Choose the type of information to delete. If you mark Remove Inactive Employee Records and do not mark Remove History for Inactive Employees, information for Payroll history reports will be retained.
3. Choose Process. When processing is complete, the Remove Inactive Employee Records Utility Log will be printed.

30 U . S . 2 0 1 3 Y E A R - E N D U P D A T E

U . S . 2 0 1 3 Y E A R - E N D U P D A T E 31
Chapter 5: Submitting W-2 reports electronicallyIf your company has more than 250 employees, the Social Security Administration (SSA) requires you to create and submit federal W-2 wage reports electronically. If your company has fewer than 250 employees, you can submit W-2 wage reports either manually or electronically.
Microsoft Dynamics GP currently supports electronic filing of W-2 information in the federal EFW2 format. Some states also accept this format for state W-2 electronic filing. For states that require other electronic formats for W-2 filing, see Non-supported electronic filing on page 9.
To create EFW2 files using Microsoft Dynamics GP 2010, the U.S. W-2 Magnetic Media feature must be registered for Microsoft Dynamics GP. To verify this, choose Help >> About Microsoft Dynamics GP and choose Options. Scroll through the list of registered modules to find U.S. W-2 Magnetic Media. A checkmark indicates it is registered. If you are using Microsoft Dynamics GP 2013, you are not required to register the U.S. W-2 Magnetic Media feature.
For more information about the electronics submission formats and free accuracy-checking tools, visit the SSA website at www.socialsecurity.gov.
Information is divided into the following sections:
• Creating EFW2 files• Submitting EFW2 files
Creating EFW2 files
Use the W-2 Electronic Filing window to create the EFW2 transmission file and to select which companies to include in the file. In order to view this window, you must be registered to use the U.S. W-2 Magnetic Media feature with Microsoft Dynamics GP.
You must register with the SSA to submit the file. For information on how to register and obtain a User Identification Number with the SSA, see Obtaining a User Identification Number to submit EFW2 files electronically on page 9.
Before you begin, be sure you have completed these procedures:
• Completed all pay runs for the year.
• Created the Year-End Wage file. For more information, see Creating the Year-End Wage file on page 21.
• Verified W-2 amounts on the Year-End Employee Wage report. For more information, see Printing the Year-End Wage Report on page 35.
Be sure no one edits W-2 information while you’re working in the W-2 Electronic Filing window.

C H A P T E R 5 S U B M I T T I N G W - 2 R E P O R T S E L E C T R O N I C A L L Y
32 U . S . 2 0 1 3 Y E A R - E N D U P D A T E
To create the EFW2 file:1. Open the W-2 Electronic Filing window.
(Microsoft Dynamics GP menu >> Tools >> Routines >> Payroll >> W-2 Electronic Filing)
When you first open the window, a message prompts you to register with the SSA to submit W-2 information electronically.
2. Enter the reporting year.
3. Mark the Include option for the first company to include in the EFW2 file.
4. If information for a selected company is incomplete, a yellow alert icon will appear in the scrolling window heading. Click the icon to open the Electronic Filing Employer Information window. Enter the missing employer information and verify the Kind of Employer selection. Choose OK to close the window.
5. Repeat steps 3 and 4 for each company to include in the EFW2 file.

U . S . 2 0 1 3 Y E A R - E N D U P D A T E 33
C H A P T E R 5 S U B M I T T I N G W - 2 R E P O R T S E L E C T R O N I C A L L Y
6. Enter the destination and file name for the EFW2 file. The default file name is W2Report, without an extension. If you add an extension, the SSA requires that it be a valid extension, such as “.txt”.
7. Enter the User Identification Number assigned to you by the SSA when you registered to submit EFW2 files electronically. You must enter your User Identification Number before you can choose Create File. For information, see Obtaining a User Identification Number to submit EFW2 files electronically on page 9.
8. Choose Submitter to enter submitter information in the Electronic Filer Submitter Information window. To ensure that your file is valid, you must enter an e-mail address.
Address information should be no more than 22 characters per line. Excess characters will be cut off in the file.
Choose OK to save the changes and return to the W-2 Electronic Filing window.
9. Choose Create File to create the EFW2 file now, or choose Save to store the information for creating the file later. Choosing Save will also save changes in the Electronic Filer Submitter Information window.
10. If a message is displayed stating that not all fields have been entered, choose Submitter and verify that the information is complete.
The W-2 Electronic Filing Summary Report is printed after the EFW2 file is created. This report is for informational purposes only.
We recommend using AccuWage to check all EFW2 files before sending. This is a free tool available from the SSA website (www.socialsecurity.gov/employer/accuwage).
Submitting EFW2 files
The following guidelines summarize the filing instructions provided by the SSA. Read the SSA’s instructions carefully before submitting your EFW2 file.

C H A P T E R 5 S U B M I T T I N G W - 2 R E P O R T S E L E C T R O N I C A L L Y
34 U . S . 2 0 1 3 Y E A R - E N D U P D A T E
For information on Microsoft developers that provide electronic filing services for state taxes, see Non-supported electronic filing on page 9.
BSO filingYou can use the SSA’s Business Services Online website to upload wage information in EFW2 format to the SSA over the Internet. To use BSO, go to www.socialsecurity.gov/bso/bsowelcome.htm. You’ll need to register for a User Identification Number to use BSO services.
EDT filingYou can use the Electronic Data Transfer (EDT) system to file wage information using the EFW2 format. The system connects SSA’s national computer with various states, federal offices, and SSA sites. For details, refer to the Electronic Data Transfer (EDT) Guide at www.socialsecurity.gov/employer/pub.htm.

U . S . 2 0 1 3 Y E A R - E N D U P D A T E 35
Chapter 6: Report proceduresYou can generate either detailed reports or summary reports in your year-end procedures, as needed. You also can customize your reports.
Information is divided into the following sections:
• Printing the Year-End Wage Report• Printing W-2 forms and reports• Printing 1099-R forms and reports
Printing the Year-End Wage Report
Print the Year-End Wage Report from the Year-End Wage Report window to verify W-2 amounts before printing W-2 statements. This report contains the same information that appears on the W-2 statement with headings for each field. It won’t include Form 1099-R statement information. The Year-End Wage file must be created before you can print the Year-End Employee Wage report.
To print the Year-End Wage Report:1. Open the Year-End Wage Report window.
(Microsoft Dynamics GP menu >> Tools >> Routines >> Payroll >> Year-End Wage Report)
2. Enter 2013 as the year.
3. Select a sorting option for displaying information: Employee ID, Employee Name, Department/Employee, or Social Security Number.
4. Mark All to include every employee in the report, or enter a starting and ending employee ID to include a select group of employees.
5. Choose Print.

C H A P T E R 6 R E P O R T P R O C E D U R E S
36 U . S . 2 0 1 3 Y E A R - E N D U P D A T E
Printing W-2 forms and reports
Use the Print W-2 Forms window to print the following forms and reports.
You must print a W-2 statement for each employee who worked for you during the year. In the Print W-2 Forms window you can specify which information should be printed on the W-2 statement, and then print the statement. In addition, be sure that the employee information for Box 13 of the W-2 form is accurately entered in the Edit W-2 Information window before printing a validation report.
Print the W-2 Validation report before printing W-2 statements to verify that the information to be printed on W-2 statements is correct. If the W-2 Validation Report shows any errors that need to be corrected, use the Print W-2 Forms window or the Edit W-2 Information window to make changes to the appropriate W-2 forms. For more information, see Editing W-2 records on page 22.
If you’re submitting W-2 wage reports electronically, you can also use AccuWage from www.socialsecurity.gov to verify if the information in your file is correct.
To print W-2 forms and reports:1. Open the Print W-2 Forms window.
(Microsoft Dynamics GP menu >> Tools >> Routines >> Payroll >> Print W-2s)
2. Enter 2013 as the reporting year.
Report Description
W-2 Validation Report Shows W-2 information before printing W-2 statements, usually for verification purposes. Information is validated according to the Software Edit Criteria specified by the Social Security Administration.
W-2 Alignment Form Shows if the forms are aligned correctly in the printer before printing statements. Print this before printing W-2 statements.
W-2 Statement Shows income earned and taxes deducted, and is distributed to your employees for use in preparing federal, state, and local tax returns.
W-3 Transmittal Form Contains a summary of the W-2 statements after they are printed out. The Social Security Administration requires you to submit this form along with the W-2 statements.

U . S . 2 0 1 3 Y E A R - E N D U P D A T E 37
C H A P T E R 6 R E P O R T P R O C E D U R E S
3. Select a printing option. Mark Normal Year-End to print W-2 statements for all employees at the end of the year, including inactive employees and employees who’ve already had W-2 statements printed.
4. Select an employment type.
• If you’re printing W-2 statements for employees who are required to pay both FICA/Social Security and FICA/Medicare tax, mark Regular.
• If you’re printing W-2 statements for employees who are exempt from FICA/Social Security tax but subject to FICA/Medicare tax, mark Medicare Qualified Government Employee; also mark Medicare Qualified Government Employee in the Employee Tax Maintenance window.
5. Mark All to print W-2 statements for every employee, or enter a starting and ending employee ID to print statements for a select group of employees.
6. Select a sorting order for the W-2 statements: Employee ID, Employee Name, Department/Employee Name, or Social Security Number.
7. Enter the company name, and select the company address ID. Also verify the federal government employer identification number (EIN) and selection for Kind of Employer.
8. Select a form type to print.
1 Wide-Continuous Select this option to print your form or report in a continuous form, with one copy of the form or report for each page printed.
2 Wide-Continuous Select this option, also called Alternate Format, to print your form or report in a continuous form, with two copies of the form or report for each page printed.
1-Wide Single Feed Select this option to print your form or report on a single sheet of paper. To print all forms for all employees using this format, repeat the procedure for each form. For example, to print the A, B, and C copies of the W-2 statements, first put the Copy A sheets in the printer and complete this procedure; next put the Copy B sheets into the printer and complete this procedure; finally, put the Copy C sheets into the printer and complete this procedure.
4-Up Laser Forms Select this option to print your form or report in a sheet of paper, but with four forms or reports for each page. The page contains Copy B, Copy C, and two Copy 2 forms. Copy A and Copy D must be printed separately. Copy A will be included in EFW2 files, if you are submitting federal W-2 files electronically.
9. Select the form or report to print.
10. Verify that you’ve loaded the correct form in the printer.
11. Choose Print.

C H A P T E R 6 R E P O R T P R O C E D U R E S
38 U . S . 2 0 1 3 Y E A R - E N D U P D A T E
You can print as many copies of W-2 statements as needed. To print all the required forms for each employee (using laser form sets), enter the number of copies you need in the Print dialog box. Information for two employees will be printed per page, on each form, Copy A through Copy D, until the required number of copies have been printed. For more information, refer to the “How do I print multiple W-2 statements for each employee?” question in Frequently asked questions on page 10.
If you need to reprint W-2s for any reason, you can reprint them as a group or individually. Use the Employee ID field to restrict the range of W-2 statements printed.
Printing 1099-R forms and reports
Use the Print 1099-R Forms window to print the following forms and reports:
You can print 1099-R statements and related reports any time.
If the 1099-R Validation Report shows errors, update the statements that have errors in the Print 1099-R Forms window and the Edit 1099-R Information window. For more information, see Editing 1099-R statement information on page 23.
To print 1099-R forms and reports:1. Open the Print 1099-R Forms window.
(Microsoft Dynamics GP menu >> Tools >> Routines >> Payroll >> Print 1099-Rs)
2. Enter 2013 for the calendar year. The default year is the current system year.
Report Description
1099-R Validation Report Shows 1099-R information before printing 1099-R statements, usually to ensure the information printed on the 1099-R statements is correct.
1099-R Alignment Form Shows if the forms are aligned correctly in the printer before printing statements. Print this before printing 1099-R statements.
1099-R Statements Shows the distribution of pension payments for use in preparing federal, state, and local tax returns. It also shows an employee’s distribution from a retirement plan.
1096 Transmittal Form Contains a summary of the 1099-R statements.

U . S . 2 0 1 3 Y E A R - E N D U P D A T E 39
C H A P T E R 6 R E P O R T P R O C E D U R E S
3. Mark All to print 1099-R statements for every employee, or enter a starting and ending employee ID to print statements for a select group of employees.
4. Select the sorting order for the 1099-R statements: Employee ID, Employee Name, Department/Name, or Social Security Number.
5. Enter the company name, and select the appropriate company address ID. Also verify the federal government employer identification number (EIN).
6. Select a form type to print: Continuous or Single Feed.
7. Select the form or report to print.
8. Verify that you’ve loaded the correct form in the printer.
9. Choose Print.

40 U . S . 2 0 1 3 Y E A R - E N D U P D A T E

U . S . 2 0 1 3 Y E A R - E N D U P D A T E 41
IndexNumerics1099-R records
changing gross distribution amount 23
controlling access to 23editing 23verifying 15
AAttendance Setup Options window
displaying 28setting up attendance 26
Attendance Setup window, setting up attendance 26
Attendance Transaction Entry windowaccruing with attendance 26displaying 27
Cchanges for Payables Management, in
2012 year-end filing 6changes for Payroll, in 2012 year-end
filing 5checklists
printing 2012 statements before processing 2013 pay runs 7
processing 2013 pay runs before printing 2012 statements 8
compliance update for 2012, Payroll 5
Ddata backup
minimum retention period 15printing W-2 statements 15, 21verifying after changing statement
information 15documentation, symbols and conventions
2
EEdit 1099-R Information window, editing
1099-R records 23Edit W-2 Information window
displaying 22editing W-2 records 22
EFW2 filescreating 31registering for a User Identification
Number 9submitting 33
Electronic Filer Submitter Information window, displaying 33
electronic filingform W-2 reports 31non-supported formats 9
Electronic Filing Employer Information window, displaying 32
Employee Archive windowarchiving Human Resources
information 24displaying 24
employees, deleting inactive employee information 28
Employer State ID Number, verifying 21
Ffiscal periods
closing and reopening 25reopening 15setting up 15, 25
Fiscal Periods Setup windowdisplaying 25setting up fiscal periods 25
frequently asked questions 10
HHuman Resources information, archiving
15, 24
Iicons, used in manual 2inactive employees
archiving Human Resources information 15, 24
deleting Human Resources information 15
deleting information 28
Mmagnetic media, see electronic filing
Nnavigation, symbols used for 2
Oonline tax resources 2
Ppay runs, knowing when to complete 15payroll year-end closing 15Payroll Year-End Closing window
creating a Year-End Wage file 21displaying 21
Print 1099-R Forms windowdisplaying 38printing 1099-R forms and reports 38
Print W-2 Forms windowdisplaying 36printing W-2 forms and reports 36
product support, online tax resources 2
Rreleases, supported 9Remove Inactive Records window,
displaying 29reports
1099-R 15, 38choosing W-2 form types 36month-end 15period-end 15
reports (continued)printing multiple copies of W-2s 36quarter-end 15W-2 15, 36W-2 Electronic Filing Summary 31W-2 Validation report 15year-end wage report 35
Ssick time, resetting 26state electronic filing, solution developer
support 9supported releases 9symbols, used in manual 2
Ttax updates, installing for Payroll 15
UUser Identification Number registration,
for W-2 electronic submissions 9
Vvacation time, resetting 26versions, supported 9
WW-2
alignment correction 11backing up data 15choosing form types 36creating EFW2 files 31entering foreign addresses 22filing electronically 31printing multiple copies 10, 36registering for an electronic
submission User Identification Number 9
specifying additional printouts 22submitting files electronically 33verifying before year-end 15verifying the Employer State ID
Number 21verifying wage file information 21
W-2 Electronic Filing windowdisplaying 32submitting W-2s electronically 31
W-2 recordscontrolling access to 22editing 22
Windows Server 2008, installing client updates 20
Windows Vista, installing client updates 20
YYear End Wage Report window
displaying 35printing the year-end wage report 35
year-end installation 18

I N D E X
42 U . S . 2 0 1 3 Y E A R - E N D U P D A T E
year-end installation (continued)installing on Windows Vista and
Windows Server 2008 clients 20year-end update
installing 17obtaining for manual updates 9
Year-End Wage filecreating 21creating after data backup 15creating before data backup 15keeping multiple year wage
information 21verifying entries 21