usa. · pdf fileusing ipod™ 2 en this unit has the dock terminal on the rear panel that...
TRANSCRIPT
YSP-3000Digital Sound ProjectorTM
Reference Guide for iPodTM/XM Radio
This is the Reference Guide for Yamaha YSP-3000 Digital Sound Projector. This guide explains the connections and operations of iPod and XM Satellite Radio (U.S.A. and Canada models only). Operations in this guide use keys on the supplied remote control unless otherwise specified. For general information including the controls and functions of this unit, refer to the owner’s manual.
yThe illustrations used in this Reference Guide are for U.S.A. and Canada models only.
“iPod” is a trademark of Apple Inc., registered in the U.S. and other countries.
The XM name and related logos are registered trademarks of XM Satellite Radio Inc.
Neural Surround™ name and related logos are trademarks owned by Neural Audio Corporation.
Using iPod™........................................................................................................................................ 2Connection................................................................................................................................................. 2Controlling iPod™ ....................................................................................................................................2
XM™ Satellite Radio tuning (U.S.A. and Canada models only).................................................... 5Connecting XM™ Mini-Tuner Home Dock ............................................................................................. 5Activating XM™ Satellite Radio .............................................................................................................. 6Basic XM™ Satellite Radio operations .................................................................................................... 6Presetting the XM™ Satellite Radio channels .......................................................................................... 9Displaying the XM™ Satellite Radio information.................................................................................. 10
Troubleshooting ................................................................................................................................ 11
Overview
Contents
iPodTM
UA

USING IPOD™
Using iPod™
2 En
This unit has the DOCK terminal on the rear panel that allows you to connect the Yamaha iPod universal dock (such as YDS-10, sold separately). Station your iPod in the Yamaha iPod universal dock, and use the supplied remote control to operate your iPod.
• Only iPod (Click and Wheel), iPod nano, and iPod mini are supported.• Some features may not be compatible depending on the model or the software version of your iPod.• The photos and video clips stored on your iPod are not displayed on your TV monitor.
Connect the Yamaha iPod universal dock to the DOCK terminal of this unit using a dedicated cable.
Do not connect this unit or other components to the main power until all connections between components are complete.
yWhen your iPod and external component using the AUX 3 input jack are connected to this unit at the same time, and when the DOCK indicator is lit in the front panel display, iPod output takes priority.
1 Navigate through the iPod menu ( / / / ) and starts playback (ENTER).
2 Displays the OSD (on-screen menu) menu.
3 Selects AUX3/DOCK (U.S.A. and Canada models) or AUX3 (Australia model) as the input source.
4 Use to return to the previous iPod menu.
5 Sets the operation mode of this unit.
6 Use to return to the previous iPod menu.
7 Stops playback.
8 Pauses playback.
9 Searches forward/backward.
0 Starts playback.
A Skips to the beginning of the current/previous/next track.y8 and 9 toggle between play and pause operations in the Simple Remote mode.
Notes
Connection
CAUTION
OUT
SUBWOOFERTV/STBAUX 1
VIDEO
DOCK
AUDIO INPUTANTENNA
Yamaha iPod universal dock (such as YDS-10, sold separately)
Rear panel of this unit
Controlling iPod™
ENHANCER
TV VOLVOLUME
MUTE
CH LEVEL TEST
TV INPUT TV MUTE
ENTER
SUR. DECODEOFF
CODE SET
CH
+100
YSP
TV/AV
ENTRY
CAT/A-E
MENU
RETURNDISPLAY
MACROTV
INPUT1
AUX1 AUX2
STB TV
DVD AUX3
TV
POWERPOWERSTANDBY/ON
AV
DOCK
1
2
3
6
5
7
4
8
90
A
(U.S.A. and Canada models)
Using iPod™E
ng
lish
y• For a complete list of status messages that appear in the front panel display and in the OSD, see the “iPod” section in
3 En
“Troubleshooting” on page 11.• While your iPod is stationed in the Yamaha iPod universal dock connected to the DOCK terminal of this unit, your iPod battery is
automatically charged as long as this unit is turned on.
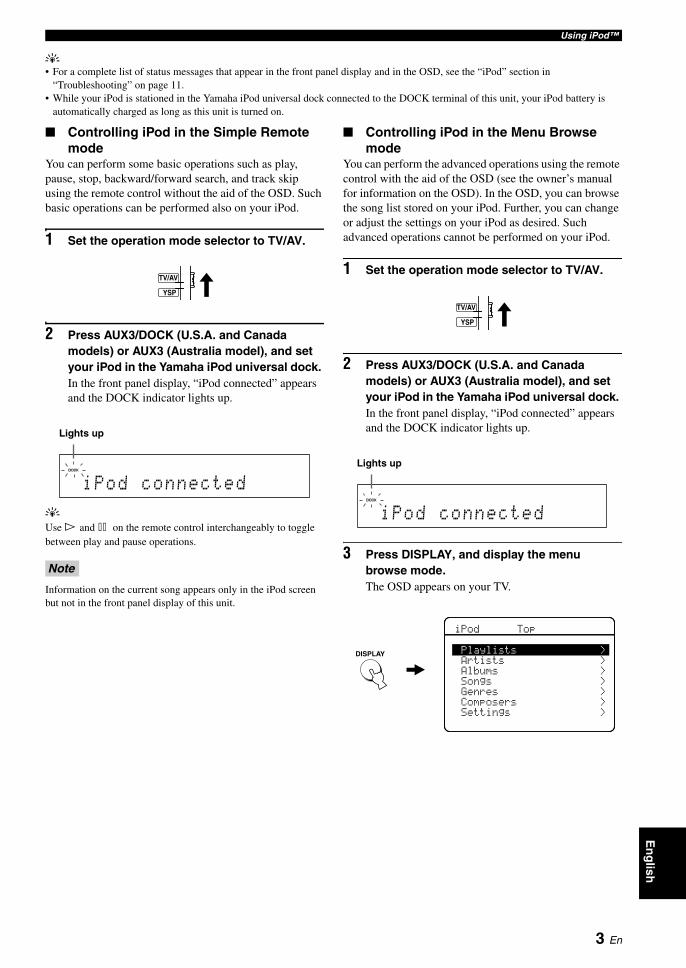
■ Controlling iPod in the Simple Remote mode
You can perform some basic operations such as play, pause, stop, backward/forward search, and track skip using the remote control without the aid of the OSD. Such basic operations can be performed also on your iPod.
1 Set the operation mode selector to TV/AV.
2 Press AUX3/DOCK (U.S.A. and Canada models) or AUX3 (Australia model), and set your iPod in the Yamaha iPod universal dock. In the front panel display, “iPod connected” appears and the DOCK indicator lights up.
yUse # and * on the remote control interchangeably to toggle between play and pause operations.
Information on the current song appears only in the iPod screen but not in the front panel display of this unit.
■ Controlling iPod in the Menu Browse mode
You can perform the advanced operations using the remote control with the aid of the OSD (see the owner’s manual for information on the OSD). In the OSD, you can browse the song list stored on your iPod. Further, you can change or adjust the settings on your iPod as desired. Such advanced operations cannot be performed on your iPod.
1 Set the operation mode selector to TV/AV.
2 Press AUX3/DOCK (U.S.A. and Canada models) or AUX3 (Australia model), and set your iPod in the Yamaha iPod universal dock. In the front panel display, “iPod connected” appears and the DOCK indicator lights up.
3 Press DISPLAY, and display the menu browse mode.The OSD appears on your TV.
Note
YSP
TV/AV
iPod connected
Lights up
YSP
TV/AV
iPod connected
Lights up
DISPLAY >
>
>
>
>
>
>
Playlists
Artists
Albums
Songs
Genres
Composers
Settings
iPod Top
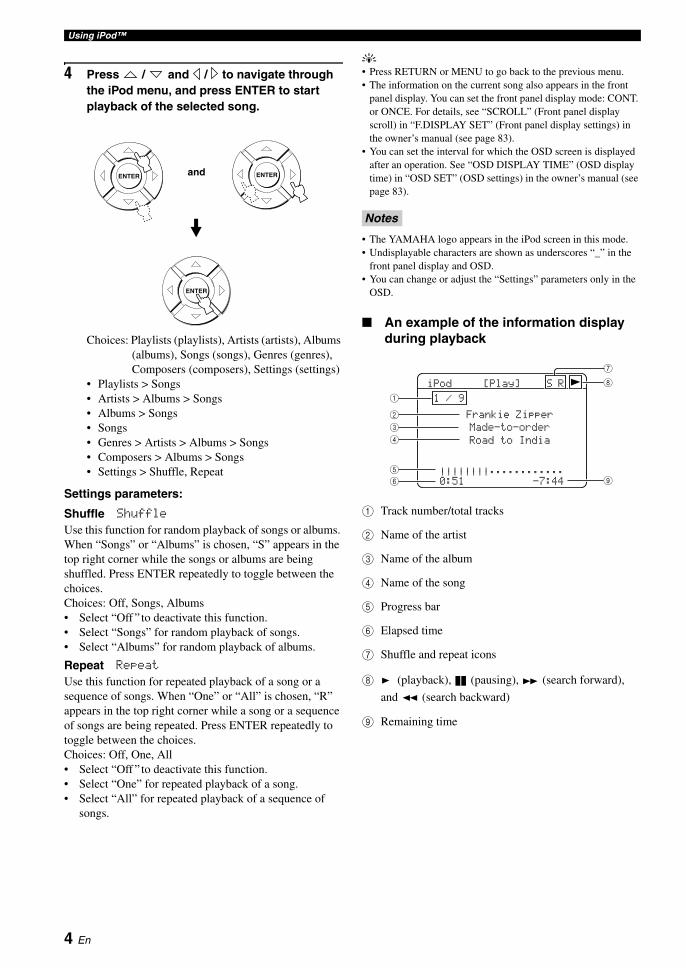
Using iPod™
4 Press / and / to navigate through y• Press RETURN or MENU to go back to the previous menu.
4 En
the iPod menu, and press ENTER to start playback of the selected song.
Choices: Playlists (playlists), Artists (artists), Albums (albums), Songs (songs), Genres (genres), Composers (composers), Settings (settings)
• Playlists > Songs• Artists > Albums > Songs• Albums > Songs• Songs• Genres > Artists > Albums > Songs• Composers > Albums > Songs• Settings > Shuffle, Repeat
Settings parameters:
Shuffle ShuffleUse this function for random playback of songs or albums. When “Songs” or “Albums” is chosen, “S” appears in the top right corner while the songs or albums are being shuffled. Press ENTER repeatedly to toggle between the choices.Choices: Off, Songs, Albums• Select “Off ” to deactivate this function.• Select “Songs” for random playback of songs.• Select “Albums” for random playback of albums.
Repeat RepeatUse this function for repeated playback of a song or a sequence of songs. When “One” or “All” is chosen, “R” appears in the top right corner while a song or a sequence of songs are being repeated. Press ENTER repeatedly to toggle between the choices.Choices: Off, One, All• Select “Off ” to deactivate this function.• Select “One” for repeated playback of a song.• Select “All” for repeated playback of a sequence of
songs.
• The information on the current song also appears in the front panel display. You can set the front panel display mode: CONT. or ONCE. For details, see “SCROLL” (Front panel display scroll) in “F.DISPLAY SET” (Front panel display settings) in the owner’s manual (see page 83).
• You can set the interval for which the OSD screen is displayed after an operation. See “OSD DISPLAY TIME” (OSD display time) in “OSD SET” (OSD settings) in the owner’s manual (see page 83).
• The YAMAHA logo appears in the iPod screen in this mode.• Undisplayable characters are shown as underscores “_” in the
front panel display and OSD.• You can change or adjust the “Settings” parameters only in the
OSD.
■ An example of the information display during playback
1 Track number/total tracks
2 Name of the artist
3 Name of the album
4 Name of the song
5 Progress bar
6 Elapsed time
7 Shuffle and repeat icons
8 (playback), (pausing), (search forward), and (search backward)
9 Remaining time
ENTER
ENTER
ENTERand
Notes
iPod�����[Play] S R����
�1�/�9������������������
��������������������������||||||||;;;;;;;;;;;;����0:51�����������-7:44��
Frankie�Zipper
Made-to-order
Road�to�India
8
9
7
1
2
3
4
5
6
XM™ SATELLITE RADIO TUNING (U.S.A. AND CANADA MODELS ONLY)E
ng
lish
XM™ Satellite Radio tuning
5 En
■ About XM Satellite Radio
XM Satellite Radio offers an extraordinary variety of commercial-free music, plus the best in sports, news, talk, and entertainment. XM is broadcast in superior digital audio from coast to coast. From rock to reggae, from classical to hip hop, XM has something for every music fan. XM’s dedication to playing the richest selection of music is matched by its passion for live sporting events, talk radio, up-to-the-minute news, stand-up comedy, children’s programming, and much more.
yThis unit is equipped with the Neural Surround decoder that plays back the XM HD surround sound content of the XM Satellite Radio broadcasts in multi-channels, resulting in a full surround sound experience. See “Surround modes and recommended sources” in the owner’s manual (see page 56).
The XM Satellite Radio service is unavailable in Alaska and Hawaii.
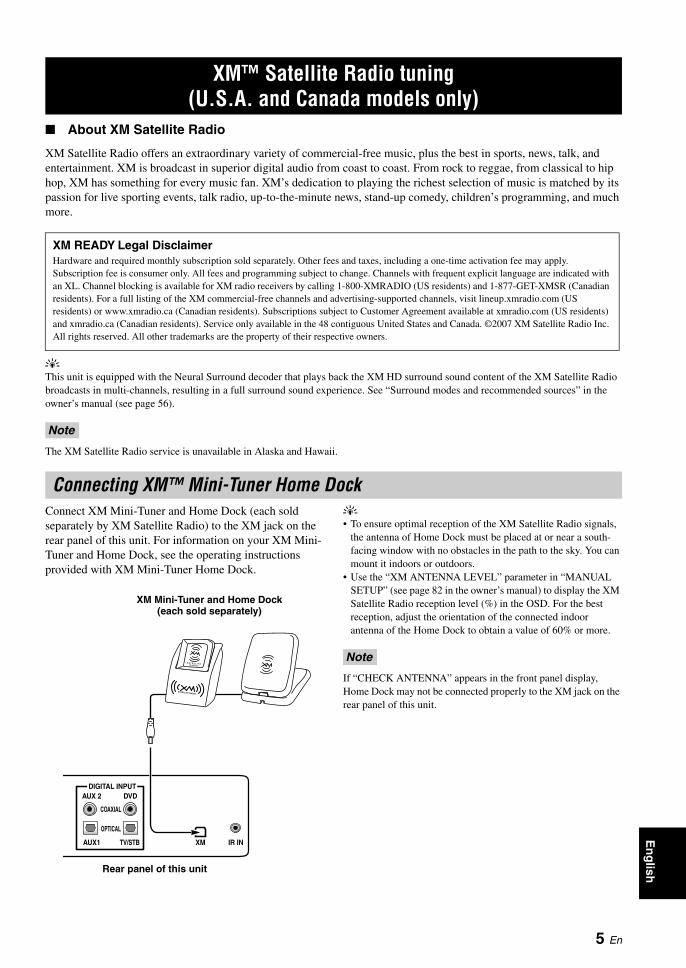
Connect XM Mini-Tuner and Home Dock (each sold separately by XM Satellite Radio) to the XM jack on the rear panel of this unit. For information on your XM Mini-Tuner and Home Dock, see the operating instructions provided with XM Mini-Tuner Home Dock.
y• To ensure optimal reception of the XM Satellite Radio signals,
the antenna of Home Dock must be placed at or near a south-facing window with no obstacles in the path to the sky. You can mount it indoors or outdoors.
• Use the “XM ANTENNA LEVEL” parameter in “MANUAL SETUP” (see page 82 in the owner’s manual) to display the XM Satellite Radio reception level (%) in the OSD. For the best reception, adjust the orientation of the connected indoor antenna of the Home Dock to obtain a value of 60% or more.
If “CHECK ANTENNA” appears in the front panel display, Home Dock may not be connected properly to the XM jack on the rear panel of this unit.
(U.S.A. and Canada models only)
XM READY Legal DisclaimerHardware and required monthly subscription sold separately. Other fees and taxes, including a one-time activation fee may apply. Subscription fee is consumer only. All fees and programming subject to change. Channels with frequent explicit language are indicated with an XL. Channel blocking is available for XM radio receivers by calling 1-800-XMRADIO (US residents) and 1-877-GET-XMSR (Canadian residents). For a full listing of the XM commercial-free channels and advertising-supported channels, visit lineup.xmradio.com (US residents) or www.xmradio.ca (Canadian residents). Subscriptions subject to Customer Agreement available at xmradio.com (US residents) and xmradio.ca (Canadian residents). Service only available in the 48 contiguous United States and Canada. ©2007 XM Satellite Radio Inc. All rights reserved. All other trademarks are the property of their respective owners.
Note
Connecting XM™ Mini-Tuner Home Dock
DIGITAL INPUT
TV/STB
DVD
IR INXMAUX1
AUX 2
COAXIAL
OPTICAL
XM Mini-Tuner and Home Dock(each sold separately)
Rear panel of this unit
Note
XM™ Satellite Radio tuning (U.S.A. and Canada models only)
Activating XM™ Satellite Radio Basic XM™ Satellite Radio
6 En
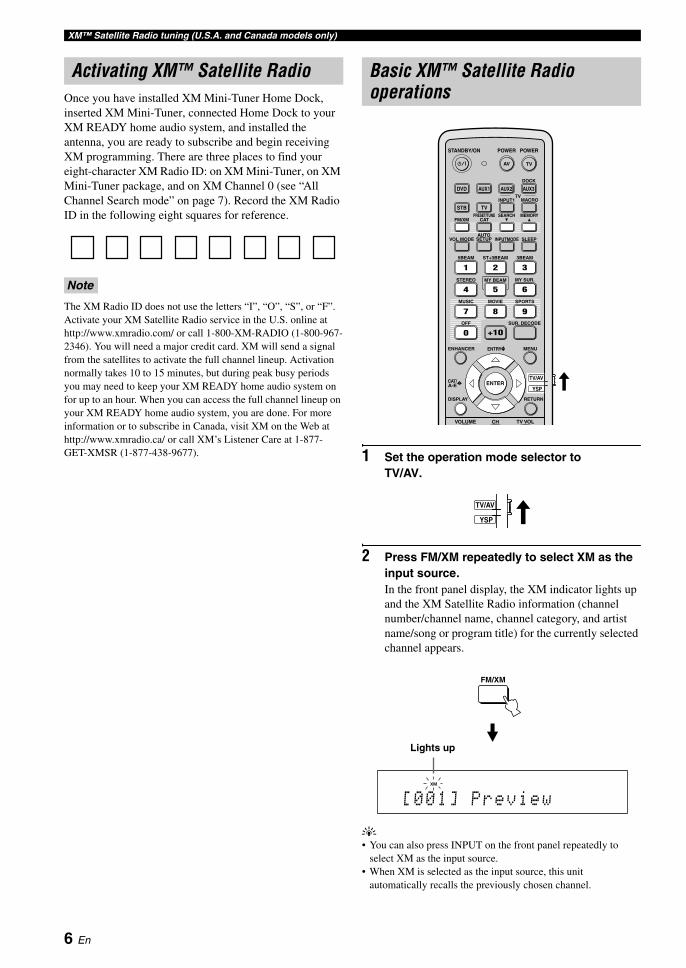
Once you have installed XM Mini-Tuner Home Dock, inserted XM Mini-Tuner, connected Home Dock to your XM READY home audio system, and installed the antenna, you are ready to subscribe and begin receiving XM programming. There are three places to find your eight-character XM Radio ID: on XM Mini-Tuner, on XM Mini-Tuner package, and on XM Channel 0 (see “All Channel Search mode” on page 7). Record the XM Radio ID in the following eight squares for reference.
The XM Radio ID does not use the letters “I”, “O”, “S”, or “F”. Activate your XM Satellite Radio service in the U.S. online at http://www.xmradio.com/ or call 1-800-XM-RADIO (1-800-967-2346). You will need a major credit card. XM will send a signal from the satellites to activate the full channel lineup. Activation normally takes 10 to 15 minutes, but during peak busy periods you may need to keep your XM READY home audio system on for up to an hour. When you can access the full channel lineup on your XM READY home audio system, you are done. For more information or to subscribe in Canada, visit XM on the Web at http://www.xmradio.ca/ or call XM’s Listener Care at 1-877-GET-XMSR (1-877-438-9677). 1 Set the operation mode selector to
TV/AV.
2 Press FM/XM repeatedly to select XM as the input source.In the front panel display, the XM indicator lights up and the XM Satellite Radio information (channel number/channel name, channel category, and artist name/song or program title) for the currently selected channel appears.
y• You can also press INPUT on the front panel repeatedly to
select XM as the input source.• When XM is selected as the input source, this unit
automatically recalls the previously chosen channel.
Note
operations
STEREO MY BEAM
PRESET/TUNE MEMORYSEARCH
SLEEPINPUTMODE
ENHANCER MENU
RETURNDISPLAY
TV VOLVOLUME
ENTER
SUR. DECODEOFF
SPORTS
5BEAM ST+3BEAM 3BEAM
MY SUR.
MUSIC MOVIE
VOL MODEAUTO
SETUP
CATFM/XM
MACROTV
INPUT1
CH
ENTRY
CAT/A-E
4 6
321
AUX1 AUX2
STB TV
DVD AUX3
TV
POWERPOWERSTANDBY/ON
DOCK
+100
7 8 9
5
AV
TV/AV
YSP
YSP
TV/AV
[001] Preview
Lights up
FM/XM

XM™ Satellite Radio tuning (U.S.A. and Canada models only)E
ng
lish
3 Search for a desired channel by using one of ■ Category Search mode
7 En
the four XM Satellite Radio search modes:• To select a channel from all channels, see “All
Channel Search mode” on this page.• To select a channel by channel category, see
“Category Search mode” on this page.• To select a channel from the preset channels, see
“Preset Search mode” on page 8.• To select a channel by directly entering the channel
number, see “Direct Number Access mode” on page 8.
y• You can preset the XM Satellite Radio channels (see page 9).• You can display the XM Satellite Radio information in the front
panel display and/or in the OSD (see page 10).
■ All Channel Search mode
1 Press SEARCH repeatedly to select “ALL CH SEARCH”.
2 Press ENTRY ( / ) repeatedly to search for an XM channel within all channels.
y• Hold down ENTRY ( / ) for quick search.
• To change the channel category, press CAT/A-E ( / ).• Select channel “0” to display your XM Radio ID number.
1 Press SEARCH repeatedly to select “CAT SEARCH”.
2 Press CAT/A-E ( / ) repeatedly to change the XM channel category.
3 Press ENTRY ( / ) repeatedly to search for an XM channel within the selected channel category.
yHold down ENTRY ( / ) for quick search.
SEARCH
ALL CH SEARCH
ENTER
ENTRY
SEARCH
CAT SEARCH
ENTERCAT/A-E
ENTER
ENTRY

XM™ Satellite Radio tuning (U.S.A. and Canada models only)
■ Preset Search modePrior to selecting a preset channel in the Preset Search
■ Direct Number Access mode
8 En
mode, you must preset the XM channels. For details, see “Presetting the XM™ Satellite Radio channels” on page 9.
1 Press SEARCH repeatedly to select “PRESET SEARCH”.
2 Press CAT/A-E ( / ) repeatedly to change the preset channel group (A to E).
3 Press ENTRY ( / ) repeatedly to change the preset channel number (1 to 8).
yYou can also use the numeric buttons to directly input the preset channel number.
1 Press SEARCH repeatedly to select either “ALL CH SEARCH” or “CAT SEARCH”.
2 Press the numeric buttons (0 to 9) to enter the desired three-digit XM channel number.For example, to enter the number 123, press the numeric buttons 1, 2, and 3.
The front panel display changes as follows:
• To enter a one- or two-digit number, press the corresponding number button(s), and press ENTER to confirm the number. If you do not press ENTER, this unit automatically confirms the entered number after a few seconds.
• If you press a button other than the numeric buttons and ENTER during this operation, the Direct Number Access mode is canceled.
SEARCH
PRESET SEARCH
ENTERCAT/A-E
ENTER
ENTRY
Notes
SEARCH
ALL CH SEARCH
or
CAT SEARCH
15BEAM
2ST+3BEAM
33BEAM
<XM> --1
<XM> -12
<XM> 123

XM™ Satellite Radio tuning (U.S.A. and Canada models only)E
ng
lish
4 Press ENTRY ( / ) repeatedly to select Presetting the XM™ Satellite
9 En
You can use this feature to store up to 40 XM Satellite Radio channels (A1 to E8: 5 preset channel groups with 8 preset channel numbers each). You can then recall the preset channels easily by selecting the preset group and number as described in “Preset Search mode” on page 8.
1 Search for an XM channel that you want to preset.See “Basic XM™ Satellite Radio operations” on page 6 for details.
yThe initial factory setting for all preset channels is “[001] Preview”.
2 Press MEMORY.The MEMORY indicator flashes in the front panel display for about 10 seconds.
Operate steps 3 to 5 while the MEMORY indicator is flashing.
3 Press CAT/A-E ( / ) repeatedly to select a preset group while the MEMORY indicator is flashing. The selected preset group appears in the front panel display.
a preset number while the MEMORY indicator is flashing.The selected preset number appears in the front panel display.
5 Press MEMORY or ENTER to assign the preset group and number to the selected XM channel while the MEMORY indicator is flashing.A colon (:) appears, and the MEMORY indicator turns off in the front panel display.
When you overwrite an existing preset channel, the previously stored XM channel information is cleared and updated.
Radio channels
Note
[043] XMU
Currently selected channel number
Flashes
MEMORY
Currently selected preset group
Flashing
ENTERCAT/A-E
C [043] XMU
Note
C8 [043] XMU
Currently selected preset number
Flashing
ENTER
ENTRY
Colon (:)
MEMORY
ENTERor
C8: [043] XMU
Colon (:)

XM™ Satellite Radio tuning (U.S.A. and Canada models only)
y• You can set the front panel display mode: CONT. or ONCE. Displaying the XM™ Satellite
10 En
You can display the XM Satellite Radio information (channel number/channel name, channel category, and artist name/song or program title) for the currently selected channel in the front panel display or in the OSD.
If a status or error message appears in the front panel display or in the OSD, see the “XM Satellite Radio (U.S.A. and Canada models only)” in “Troubleshooting” on page 11.
■ Displaying the XM channel information in the front panel display
Press DISPLAY repeatedly to toggle between the following information displays.
When the channel number / channel name is displayed:
When the channel category is displayed:
When the artist name / song title is displayed:
When ONCE is selected, the front panel display scrolls characters to the end once, after which the first 15 characters appear and stay. See “SCROLL” (Front panel display scroll) in “F.DISPLAY SET” (Front panel display settings) in the owner’s manual (page 83).
• Undisplayable characters are displayed as spaces.
■ Displaying the XM channel information in the OSD
Press DISPLAY.The following screen is displayed in the OSD.
y• To turn off the OSD, press DISPLAY again.• You can set the interval for which the OSD screen is displayed
after an operation. See “OSD DISPLAY TIME” (OSD display time) in “OSD SET” (OSD settings) in the owner’s manual (page 83).
• To hold the XM Satellite Radio OSD information, press ENTER. To unhold, press ENTER again.
• This unit can save up to two XM Satellite Radio OSD information screens for future reference. To view the previous OSD screens, press RETURN repeatedly while the current XM Satellite Radio OSD information screen is on hold.
Radio information
Note
Channel number / Channel name
Artist name / Song or program title
DISPLAY
Channel category
[043] XMU
<CAT>ROCK
Coldplay / Spee
XM INFORMATION
ALL CH SEARCHXM :043CHAN :XMUCAT :RockNAME :ColdplayTITLE�:Speed of sound
.(Coldplay/Spe)[ ]/[ ]:CHANNEL[ ]/[ ]:CATEGORY
DISPLAY
TROUBLESHOOTINGE
ng
lish
Troubleshooting
11 En
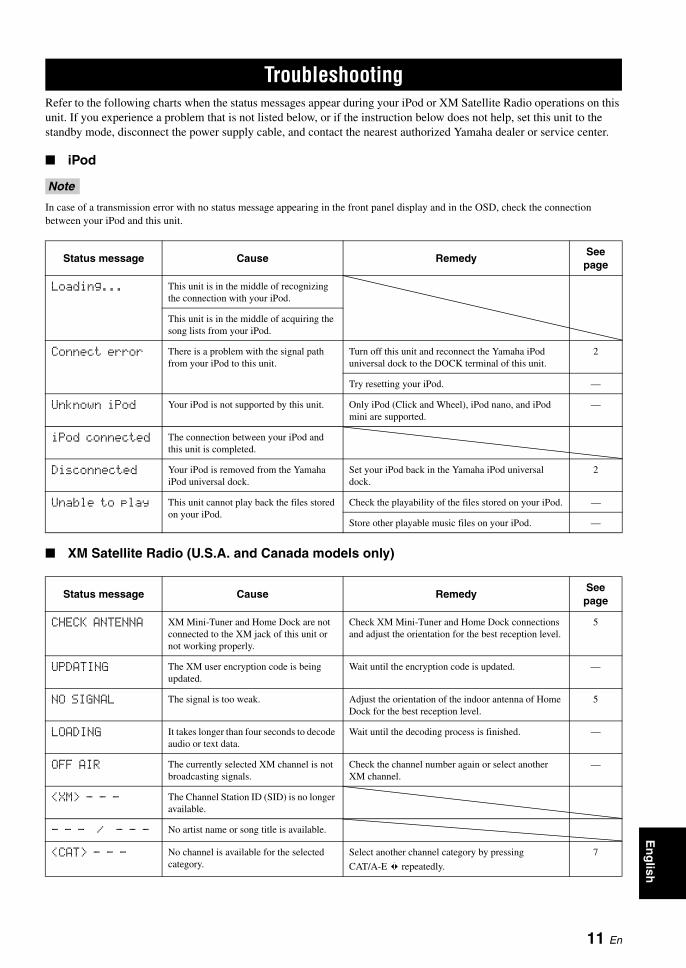
Refer to the following charts when the status messages appear during your iPod or XM Satellite Radio operations on this unit. If you experience a problem that is not listed below, or if the instruction below does not help, set this unit to the standby mode, disconnect the power supply cable, and contact the nearest authorized Yamaha dealer or service center.
■ iPod
In case of a transmission error with no status message appearing in the front panel display and in the OSD, check the connection between your iPod and this unit.
■ XM Satellite Radio (U.S.A. and Canada models only)
Note
Status message Cause RemedySee
page
Loading... This unit is in the middle of recognizing the connection with your iPod.
This unit is in the middle of acquiring the song lists from your iPod.
Connect error There is a problem with the signal path from your iPod to this unit.
Turn off this unit and reconnect the Yamaha iPod universal dock to the DOCK terminal of this unit.
2
Try resetting your iPod. —
Unknown iPod Your iPod is not supported by this unit. Only iPod (Click and Wheel), iPod nano, and iPod mini are supported.
—
iPod connected The connection between your iPod and this unit is completed.
Disconnected Your iPod is removed from the Yamaha iPod universal dock.
Set your iPod back in the Yamaha iPod universal dock.
2
Unable to play This unit cannot play back the files stored on your iPod.
Check the playability of the files stored on your iPod. —
Store other playable music files on your iPod. —
Status message Cause RemedySee
page
CHECK ANTENNA XM Mini-Tuner and Home Dock are not connected to the XM jack of this unit or not working properly.
Check XM Mini-Tuner and Home Dock connections and adjust the orientation for the best reception level.
5
UPDATING The XM user encryption code is being updated.
Wait until the encryption code is updated. —
NO SIGNAL The signal is too weak. Adjust the orientation of the indoor antenna of Home Dock for the best reception level.
5
LOADING It takes longer than four seconds to decode audio or text data.
Wait until the decoding process is finished. —
OFF AIR The currently selected XM channel is not broadcasting signals.
Check the channel number again or select another XM channel.
—
<XM> - - - The Channel Station ID (SID) is no longer available.
- - - / - - - No artist name or song title is available.
<CAT> - - - No channel is available for the selected category.
Select another channel category by pressing
CAT/A-E repeatedly.
7

YAMAHA ELECTRONICS CORPORATION, USA 6660 ORANGETHORPE AVE., BUENA PARK, CALIF. 90620, U.S.A.YAMAHA CANADA MUSIC LTD. 135 MILNER AVE., SCARBOROUGH, ONTARIO M1S 3R1, CANADAYAMAHA ELECTRONIK EUROPA G.m.b.H. SIEMENSSTR. 22-34, 25462 RELLINGEN BEI HAMBURG, GERMANYYAMAHA ELECTRONIQUE FRANCE S.A. RUE AMBROISE CROIZAT BP70 CROISSY-BEAUBOURG 77312 MARNE-LA-VALLEE CEDEX02, FRANCEYAMAHA ELECTRONICS (UK) LTD. YAMAHA HOUSE, 200 RICKMANSWORTH ROAD WATFORD, HERTS WD18 7GQ, ENGLANDYAMAHA SCANDINAVIA A.B. J A WETTERGRENS GATA 1, BOX 30053, 400 43 VÄSTRA FRÖLUNDA, SWEDENYAMAHA MUSIC AUSTRALIA PTY, LTD. 17-33 MARKET ST., SOUTH MELBOURNE, 3205 VIC., AUSTRALIA
© 2007 All rights reserved.
Printed in Malaysia WK75460-1