usb a manual.1 - us-buildings-support.comus-buildings-support.com/webdocs/amanual.pdfcongratulations...
TRANSCRIPT

Welcome to Our Family
Congratulations on your investment in an arch-type steelbuilding from U.S. Buildings. Thousands of owners, just likeyou, have chosen our buildings because they understand theimportance of quality, undeniable strength, and ease of con-struction. Your building has been designed and engineeredwith these features in mind.
Before you start construction of your building please readthrough your manual and note any questions you may have,then if you have any questions call our customer servicedepartment immediately so we can assist you.
1-800-463-6062Once you are ready to start, follow the instructions and youwill be surprised at how easy it was. Once again thank youfor your business.

2
Supporting the building when raising the arches is recommended for the following reasons:
1. Helps maintain the true peak height.
2. Helps prevent sagging caused by downward force.
3. Helps with the lining of the bolt holes.
Support ridge & roof (2 X 4). Measure as to height needed.
Inside Support is Recommended When ErectingYour Building.
Scaffolding with supports for all models A, S, Q, T, & R

3
Cautions, Notes and Tips
You’ll find this information throughyour manual:
Cautions must be observed to avoid possible damage to your building.
Notes contain importantinformation about your building.
Tips contain additional hintsfor a great building.
Table of Contents
Your Building Model . . . . . . . . . . . . . . . . . . . . . . . . . . .4
Storage Recommendations . . . . . . . . . . . . . . . . . . . . . . . .4
Tools and Equipment . . . . . . . . . . . . . . . . . . . . . . . . . . .5
Foundation Recommendations . . . . . . . . . . . . . . . . . . . . .6(Your foundation Drawings, Clearance Profiles andAccessories Installation Instructions will be inserted betweenpages 4 and 5.)
Assembling The Arches . . . . . . . . . . . . . . . . . . . . . . . . .7
Preparing To Raise The Arches . . . . . . . . . . . . . . . . . . .8-9
Constructing The Arches . . . . . . . . . . . . . . . . . . . . . . . .10
Strapping The Arches . . . . . . . . . . . . . . . . . . . . . . . . . .11
Completing The Arches . . . . . . . . . . . . . . . . . . . . . . . . .12
Assembling Curved Angels . . . . . . . . . . . . . . . . . . . . . .13
Installing Endwalls . . . . . . . . . . . . . . . . . . . . . . . . . .14-15
Grouting Your Building . . . . . . . . . . . . . . . . . . . . . . . . .16

4
U.S. Buildings highly recommendsyou purchase construction insurancebefore you assemble your building.Your building does not reach itsfull capacity until it is fullyassembled and grouted into thefooting. If you are using our chan-nels, the building must be fullyattached to the channel and theC Channel must be grouted.Sudden changes in weather cancause damage during construction,therefore construction insurance canhelp protect you from damage at areasonable cost. U.S. Buildings is notliable for any damage to buildingproperty or persons during the construction process.
A special passive oil has beenapplied to the steel for added protec-tion during storage. The oil will pro-tect your steel for up to 30 days.Inside storage is preferred over out-side storage.
Your Building Model
Your building model is a U.S. Buildings Model ____.
Your order #
_____________________________.
Storage Recommendations
Your building and its components were inspected thoroughlywhen it left the factory. If you must store your buildingbefore you begin construction, the following guidelines fromthe steel manufacturer should be followed:
InsideA. Store in a dry vented area.B. Cut the strapping and separate panels to allow air to
move around each piece.C. Never allow moisture on, or in between, any steel
parts before construction.
OutsideA. Cut the strapping and separate panels with dry
pieces of wood.B. Separate endwall bundles.C. Keep all parts off the ground.
IMPORTANT

5
Tools
The tools listed below include everything you’ll need for theproper construction of your U.S. Building. These materialsare not supplied with your building.
TOOLS:• Hard Hats and Work Gloves (working gloves protect
against sharp edges)• 2 Tape Measures (50 ft./100 ft., and 10 ft.)• Level• 1/2” and 9/16” Wrenches• Cutting Shears (manual or electric), Handsaw, Hacksaw• Rope (100 ft. Length)• 2 “S” hooks• Electric Impact Gun• 1/2” (6) Point Socket• Pliers• Power (circular) saw, Keyhole saw, saber saw• Electric drill, 3/8” minimum, variable speed• Drill bits, 3/8” for sheet metal• Extension Ladder• Scaffolding and Stepladders & Jacks
You may not need all the tools listed. However, it your building is specially customized, you mayrequire additional tools.
Your Building Profile and FoundationDrawings should be inserted betweenpages 4 & 5, if not contact customer ser-vice immediately.
6
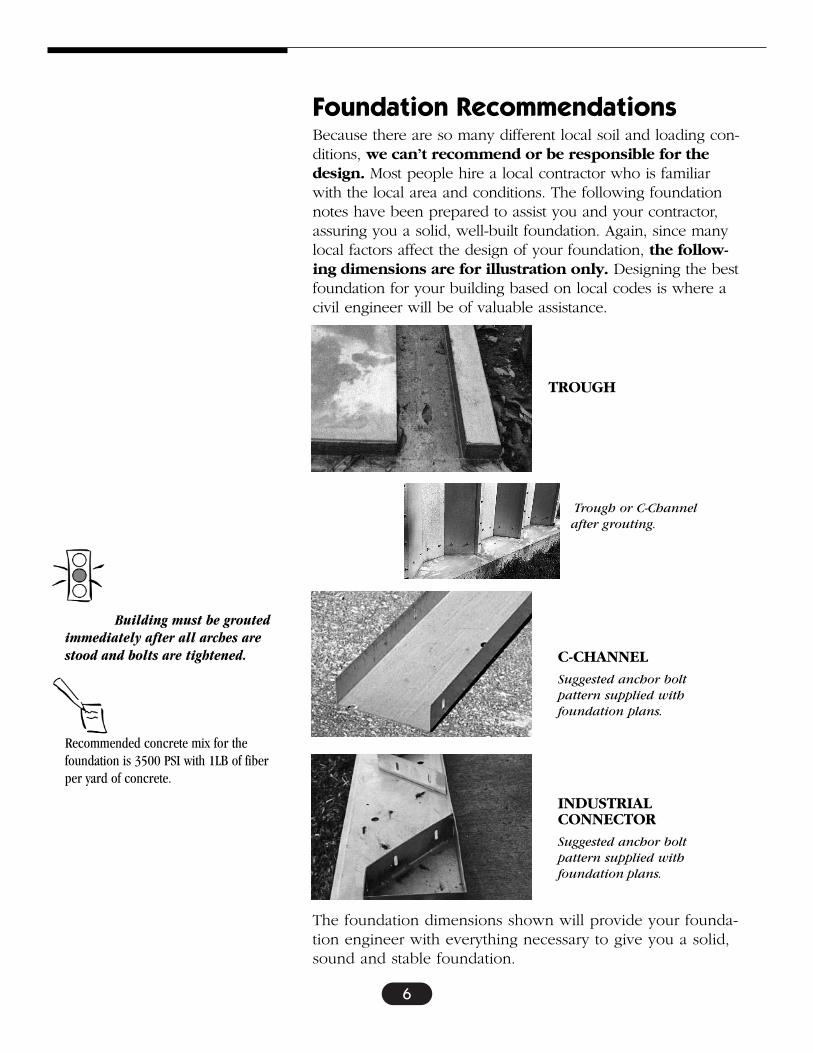
Building must be groutedimmediately after all arches arestood and bolts are tightened.
Recommended concrete mix for thefoundation is 3500 PSI with 1LB of fiberper yard of concrete.
Foundation RecommendationsBecause there are so many different local soil and loading con-ditions, we can’t recommend or be responsible for thedesign. Most people hire a local contractor who is familiarwith the local area and conditions. The following foundationnotes have been prepared to assist you and your contractor,assuring you a solid, well-built foundation. Again, since manylocal factors affect the design of your foundation, the follow-ing dimensions are for illustration only. Designing the bestfoundation for your building based on local codes is where acivil engineer will be of valuable assistance.
The foundation dimensions shown will provide your founda-tion engineer with everything necessary to give you a solid,sound and stable foundation.
TROUGH
C-CHANNELSuggested anchor boltpattern supplied withfoundation plans.
INDUSTRIALCONNECTORSuggested anchor bolt pattern supplied with foundation plans.
Trough or C-Channelafter grouting.

7
Assembling The Arches
Simply build the arches on ground, 80% of the work will bedone on the ground.
Bolts in arches - finger tight only.
It is recommended that you putanchor bolts every 24” at the out-side peak of each arch, on the 5”portion of your foundation (seeillustration). 1/2” x 5” wedge typeanchors are recommended.
Anchor bolts or tie down brackets arenot supplied with your building, butare strongly recommended. In theevent of high winds during constructionthey will help to hold your building downand prevent your building from lifting outof the foundation. Anchor bolts and tiedown brackets are to be used as tempo-rary support only as arches are stood.TIE DOWN BRACKETS ARE NOT A SUBSTITUTE GROUTING for permanentsupport. You must grout your building toto reach its full wind and snow load capacity. These are available at most localhardware retailers or can be purchasedfrom your U.S. Buildings sales representa-tive. Again, we highly recommend construction insurance.

8
Preparing To Raise The Arches
Place arches on the ground ready to stand away from prevailing winds.
Scaffolding
Wind Direction
Set up scaffolding platform in a wayto provide you a raised standingarea to easily pull up your arches. (scaffolding usually can be rentedlocally)

9
Preparing To Raise Arches (continued)
Adjustable Scaffolding Jacks. After 1st, 2nd and 3rd archesare stood, move your scaffolding forward 1 arch at a timeuntil building is completed.
Raising Arches. Place S-Hooks approximately 6-8 bolt holesto the right and left of center of arch to attach rope.(Support arches as shown above, to correct height as notedin your Profile Insert. The hole location changes dependingon the height of your scaffold, and the number of men youhave.) With the ropes and hooks in place, and one or twomen on each corner to guide the arch into the trough the first arch is pulled to an upright position.
It is a essential to place supportjacks (some rental stores refer tothese as house levelers) upsidedown into the 4 corners of scaffold-ing to help in supporting and main-taining the proper building heightduring the construction process.
Raising the arches is the only time inthe construction of your buildingthat may require additional assis-tance.

10
Constructing The Arches
Raising Arches.
Half Arch Method. For buildings 40’ wide and larger theHalf Arch Method of construction is recommended.

11
Strapping The Arches
Strapping arches is essential in keeping your building theproper length and height. Place strapping centered on 1stcurved panel as shown above and in Illustration A, number1 below.
You are supplied with 6 to 8 pieces of strapping you mustmove it forward during construction to keep building on 2foot centers. After construction place 3 pieces of strappingon each end of the building as shown in Illustration A.
If you live in a heavy snow areawe recommend that you leave thestrapping on your building.
Strapping is supplied with yourbuilding and must be used tomaintain a 24” center to center.Three of these straps should be boltedinto the arches, one on each side andone at the peak as the constructionproceeds. (shown here)
Illustration A

12
Completing The Arches
Arches Stood.
It is important to keep your drift pins in place 2 bolt holesahead while inserting bolts.
After standing your arches with allbolts finger tight and strapping on,square and plumb your building.At this time tighten all bolts starting with the bottom straightpanel working upwards.

13
Assembling Curved Angles
The Curved Angles are put on the outside of the 1st and lastarch to accept the endwalls. (A Models overlap 1 bolthole, S and Q Models overlap 2 bolt holes.)
The outer curved angle is now installed on top of the archand the inner curved angle, bolts to the underside of thearch.
OUTERCURVED ANGLE
FOAM
INNERCURVED ANGLE

14
Installing Endwalls
Solid endwall in progress.
Strapping is punched on 18” centers to accommodate thebolts in the endwalls. It is essential to use this strapping sothe endwall lines up and the corner flat panels fit properly.
Solid endwall completed.
It is important to begin assembling yoursolid endwall from the center and worktoward the outside walls. A mark shouldbe placed on the concrete at your centerpoint and the center bolt of your firstpanel should be lined up here. Panelsshould be centered 18” out to the leftand right.
It is recommended that you layyour endwall panels out near yourbuilding in order to assure thatthey go into the proper location.

15
Installing Endwalls With Opening
It is important to begin assembling your endwall with panelsmarked F1 and work toward the outside walls. Openingshould be squared and center marked on concrete. Beginwith Panels marked F1, once panels are installed left andright of opening install the shorter panels over door begin-ning with panel marked OD1.
Endwall with opening completed.

16
Grouting Your Building
Your building and endwalls MUSTbe grouted immediately after yourarches are raised and tightened.Failure to do so WILL cause thebuilding to collapse.
Recommended mix for the grouting is5000 PSI cement and sand(Portlandnon-acidic) mix only (no stone).Grouting of the building should be insideas well as the outside. Mix 1 part cement2 1/2 parts sand. Some areas mayrequire variable mixtures.
When grouting your buildingmake sure to use a 1” slope toallow water to run away fromthe building.
The steel panels are protectedby a coat of special oil. Thisoil may affect the bondbetween the steel and thegrout, so you must clean thepanels by wiping with a suit-able solvent such as varsol.Steel is also sensitive to thechemical reaction of concreteduring the curing period,therefore, the steel mill willnot cover their warranty unlessa thin coating of lacquer orvarnish is applied to the panelbefore grouting.
Grouting completed.
Important: Grout mixture must not contain any corrosive substances, such as calcium chloride. This will result in steelcorrosion. Grout is typically one part portland cement and 2 1/2 parts sand.
Arch
Endwall
Grout both inside and outside of arches and endwalls. This willproperly secure your building to its foundation. Also, youshould place a caulk seam where grout meets steel to producea water resistant seam.