use and care manual - heartland owners half...half time oven, inc. p.o. box 6066 west palm beach, fl...
TRANSCRIPT

High Speed Convection Microwave Ovens
Easy to Use:
1. Set Temperature 2. Set Time 3. Press Start
Cooks and browns like a gas or electric oven, but in a fraction of the time. Use the regular cooking time from any cookbook or directions on any food package. The electronic control will automatically calculate the high speed cooking time.
2X Models - Cooks two times faster than a gas or electric oven. Reduces cooking time 50%.
4X Models - Cooks four times faster than a gas or electric oven. Reduces cooking times 75%.
Complete Meal - Cook meat, poultry or fish, potatoes or rice and vegetables or casseroles all at the same time. No need to cook items separately.
Convection - Cooks with Turbo powered Convection Heat, plus some Microwave Energy for speed.
Microwave - Cooks and Reheats with Microwave Energy plus Speed Defrost and Defrost by Weight.
Four Cooking Modes
Cooks Delicious Food Like a Gas or Electric OvenSame Taste, Appearance and BrowningBut in a Fraction of the Time
Use and Care Manual
HIGH SPEED2X/4X
MICROWAVE
CONVECTION
COMPLETEMEAL
Downloaded from www.Manualslib.com manuals search engine


CONTENTS
DATE PURCHASED
MODEL NUMBER
SERIAL NUMBER
Half Time Oven, Inc.P.O. Box 6066West Palm Beach, FL 33405
TO:
A Warranty registration card is packed inside the oven. Please fill in the card and mail it to us for proper warranty registration. If you move register your new address by writing to us at the address below. The model number and serial number are found on the rating plate which is located on the front door frame. Write this information below for a handy reference when inquiring about warranty service for your oven.
Half Time Oven, Inc. Warranty Registration
213
2-3
4
5
6
7
7
8
8
9
10
10
11
11
12
12
13
14
15
15-16
17-19
20
21-22
23-25
27-28
29-31
32-33
On Back Cover
26
Precautions to Avoid Possible exposure to Excessive Microwave Energy
Safety Instructions
Installation-Oven START-UP
Oven Features-Specifications
Control Panel
Setting The Clock
Using the Add Time Pad
Setting High Speed Mode
Automatic Pre-Heat Set Time and Temperature Using Special Trays
Arranging Tray for Complete Meal
Complete Meal Mode
Setting Convection Mode
Setting Microwave Time and Power
Two Stage Cooking
Setting Speed Defrost
Instant Action Pads Baked Potato Setting Popcorn Setting Beverage / Soup Setting
Setting Defrost by Weight
Care & Maintenance Cleaning Outside Surfaces Interior Surfaces Replacing Oven Light Bulb
Service Before Calling Service Chart How To Obtain Service
Cooking Charts
High Speed Cooking Chart
Complete Meal Type A
Complete Meal Type B
Convection
Grill Rack Cooking
Microwave
Reheating
Defrosting
Warranty
1
Downloaded from www.Manualslib.com manuals search engine
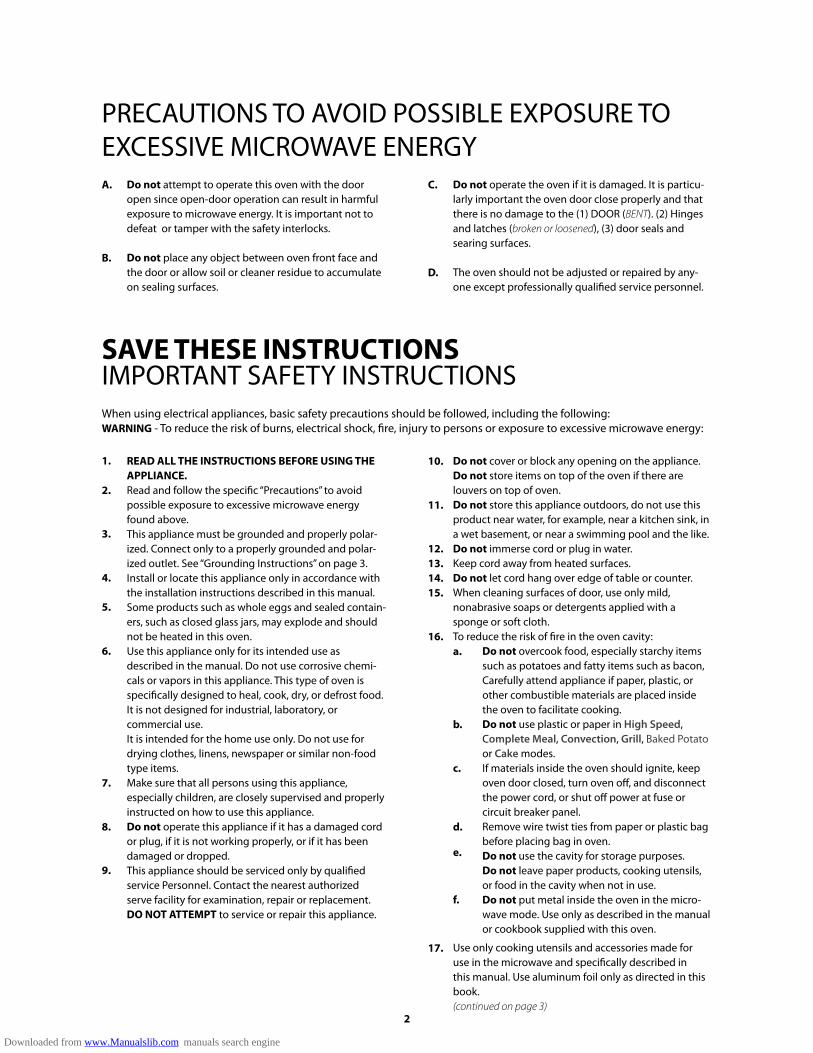
PRECAUTIONS TO AVOID POSSIBLE EXPOSURE TO EXCESSIVE MICROWAVE ENERGY
When using electrical appliances, basic safety precautions should be followed, including the following:WARNING - To reduce the risk of burns, electrical shock, fire, injury to persons or exposure to excessive microwave energy:
A. C.
B.D.
Do not attempt to operate this oven with the door open since open-door operation can result in harmful exposure to microwave energy. It is important not to defeat or tamper with the safety interlocks.
Do not place any object between oven front face and the door or allow soil or cleaner residue to accumulate on sealing surfaces.
Do not operate the oven if it is damaged. It is particu-larly important the oven door close properly and that there is no damage to the (1) DOOR (BENT). (2) Hinges and latches (broken or loosened), (3) door seals and searing surfaces.
The oven should not be adjusted or repaired by any-one except professionally qualified service personnel.
IMPORTANT SAFETY INSTRUCTIONSSAVE THESE INSTRUCTIONS
1. 10.
11.
12.13.14.15.
16.
17.
a.
b.
c.
d.
e.
f.
2.
3.
4.
5.
6.
7.
8.
9.
READ ALL THE INSTRUCTIONS BEFORE USING THE APPLIANCE.Read and follow the specific “Precautions” to avoid possible exposure to excessive microwave energy found above.This appliance must be grounded and properly polar-ized. Connect only to a properly grounded and polar-ized outlet. See “Grounding Instructions” on page 3.Install or locate this appliance only in accordance with the installation instructions described in this manual.Some products such as whole eggs and sealed contain-ers, such as closed glass jars, may explode and should not be heated in this oven.Use this appliance only for its intended use as described in the manual. Do not use corrosive chemi-cals or vapors in this appliance. This type of oven is specifically designed to heal, cook, dry, or defrost food. It is not designed for industrial, laboratory, or commercial use.It is intended for the home use only. Do not use for drying clothes, linens, newspaper or similar non-food type items.Make sure that all persons using this appliance, especially children, are closely supervised and properly instructed on how to use this appliance. Do not operate this appliance if it has a damaged cord or plug, if it is not working properly, or if it has been damaged or dropped.This appliance should be serviced only by qualified service Personnel. Contact the nearest authorized serve facility for examination, repair or replacement. DO NOT ATTEMPT to service or repair this appliance.
Do not cover or block any opening on the appliance. Do not store items on top of the oven if there are louvers on top of oven.Do not store this appliance outdoors, do not use this product near water, for example, near a kitchen sink, in a wet basement, or near a swimming pool and the like.Do not immerse cord or plug in water.Keep cord away from heated surfaces.Do not let cord hang over edge of table or counter.When cleaning surfaces of door, use only mild, nonabrasive soaps or detergents applied with a sponge or soft cloth.To reduce the risk of fire in the oven cavity:
Use only cooking utensils and accessories made for use in the microwave and specifically described in this manual. Use aluminum foil only as directed in this book.(continued on page 3)
Do not overcook food, especially starchy items such as potatoes and fatty items such as bacon, Carefully attend appliance if paper, plastic, or other combustible materials are placed inside the oven to facilitate cooking.Do not use plastic or paper in High Speed, Complete Meal, Convection, Grill, Baked Potato or Cake modes.If materials inside the oven should ignite, keep oven door closed, turn oven off, and disconnect the power cord, or shut off power at fuse or circuit breaker panel.Remove wire twist ties from paper or plastic bag before placing bag in oven.Do not use the cavity for storage purposes. Do not leave paper products, cooking utensils, or food in the cavity when not in use.Do not put metal inside the oven in the micro-wave mode. Use only as described in the manual or cookbook supplied with this oven.
2
Downloaded from www.Manualslib.com manuals search engine

IMPORTANT SAFETY INSTRUCTIONS18. 23.
19.
20.
24.
21.
25.
22.
26.
27.
28.
29.
In the ½ Time, Complete Meal and Convection modes use glass, metal or ceramic utensils which are “Oven Safe”. In the microwave mode use only cooking utensils and accessories made for use in the microwave oven. Use aluminum foil only as directed in this book.Do not use outdoors.Do not pop popcorn in anything other than a microwave oven popper unless it is a specially treated bag labeled: “Microwave popcorn intended for use in the microwave”.Never use brown paper bags, glass or plastic bowls, or other unsuitable containers to pop popcorn. To avoid scorching and burning, remove popcorn after popping has slowed to two or three seconds between pops. Prolonged popping can cause smoking from overheated oil, breakage of dishes, damage to oven and eventually a fire.Do not remove the outer case or any shields inside the oven cavity.Briskly stir liquids or pureed baby food before heating and reheating to incorporate air. This prevents abrupt boil overs that sometimes occur after air-depleted liquids are heated, especially in tall, narrow containers.
Liquids, such as water, coffee, or tea are able to be overheated beyond the boiling point without appear-ing to be boiling. Visible bubbling or boiling when the container is removed from the microwave oven is not always present. This could result in very hot liquids Suddenly Boiling Over when the container is disturbed or a utensil is inserted into the liquid.Do not fry or deep fat fry in the microwave oven. Hot oil can splatter and result in skin burns.PLASTIC WRAP: Use only in the microwave mode. Use only those types designed for microwave oven use and avoid forming an air-tight seal. Fold back a small corner or cut a slit to allow steam to escape. Use pot holders with plastic wrap-covered utensils. ALWAYS use pot-holders when handling dishes or food in the ½ Time, Complete Meal and Convection mode.Stay near the appliance while it is in use and check cooking progress frequently. Leaving the appliance unattended may result in overcooked food and a possible fire in you oven.When heating a liquid, like soup or beverages, up to a boiling point, do not take it out of the oven immediate-ly. Wait 30 seconds before removing to avoid spilling a hot or scalding liquid. After heating up baby feeding bottles the content should be shaken and the liquid temperature should be checked before feeding, in order to avoid feeding hot or scalding liquid.
MICROWAVE TIPS TO AVOID OVEN DAMAGESAVE THESE INSTRUCTIONS
Do not operate microwave oven when empty or with empty utensils.
Never use sharp-edged utensils in or near the oven.
Use ALUMINUM FOIL only as directed in this book or other special microwave cookbooks. Small strips of foil on meats are helpful in shielding microwaves to prevent overcooked areas. Low-sided aluminum foil pans, such as TV dinner trays, may be used. Use care to keep aluminum foil at least 1 inch away from oven walls, door or top. Metal placed closer than 1-inch from interior surfaces can cause arcing (electrical sparks). If arching occurs, stop microwave and remove foil.
PREVENT BURSTING OR EXPLOSION FROM FOOD AND CONTAINERSPierce microwavable plastic bags and pouches for frozen foods before heating. Pierce foods with heavy skins such as potatoes, whole squash, apples and chestnuts before cook-ing. Piercing allows steam to escape and eliminates pressure build-up.
CONTAINERS WITH RESTRICTED OPENINGS such as narrow-necked pop bottles or salad dressing bottles should never be placed in the microwave for either defrosting or heating. These can explode, even if the top has been removed, when heat has built up in the lower portion of the container.
RAW EGGS IN THE SHELL OR HARD COOKED EGGS should never be microwaved. Eggs heat so quickly that pressure build-up might not be avoided, and an explosion could occur.
DO NOT USE RECYCLED PAPER PRODUCTS when Microwaving. They may contain small metal fragments which could ignite,
3
Downloaded from www.Manualslib.com manuals search engine
4
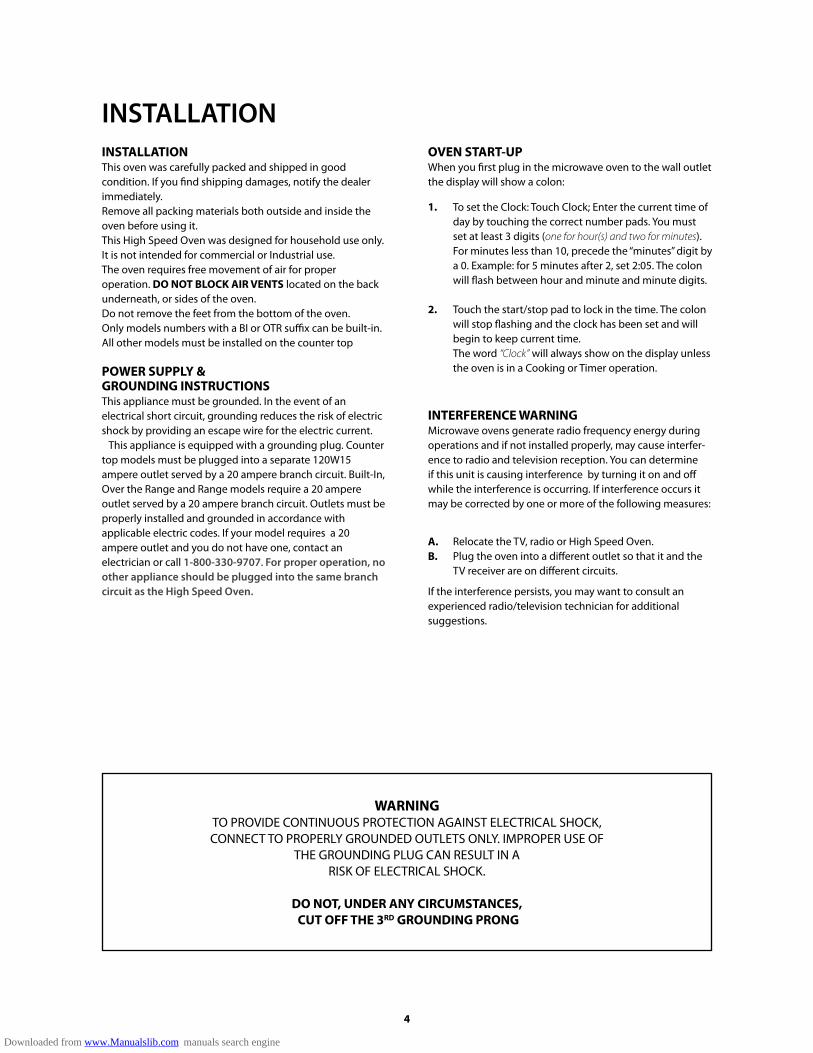
OVEN START-UPWhen you first plug in the microwave oven to the wall outlet the display will show a colon:
INTERFERENCE WARNINGMicrowave ovens generate radio frequency energy during operations and if not installed properly, may cause interfer-ence to radio and television reception. You can determine if this unit is causing interference by turning it on and off while the interference is occurring. If interference occurs it may be corrected by one or more of the following measures:
If the interference persists, you may want to consult an experienced radio/television technician for additional suggestions.
INSTALLATIONThis oven was carefully packed and shipped in good condition. If you find shipping damages, notify the dealer immediately.Remove all packing materials both outside and inside the oven before using it.This High Speed Oven was designed for household use only. It is not intended for commercial or Industrial use.The oven requires free movement of air for proper operation. DO NOT BLOCK AIR VENTS located on the back underneath, or sides of the oven.Do not remove the feet from the bottom of the oven.Only models numbers with a BI or OTR suffix can be built-in. All other models must be installed on the counter top
POWER SUPPLY & GROUNDING INSTRUCTIONSThis appliance must be grounded. In the event of an electrical short circuit, grounding reduces the risk of electric shock by providing an escape wire for the electric current. This appliance is equipped with a grounding plug. Counter top models must be plugged into a separate 120W15 ampere outlet served by a 20 ampere branch circuit. Built-In, Over the Range and Range models require a 20 ampere outlet served by a 20 ampere branch circuit. Outlets must be properly installed and grounded in accordance with applicable electric codes. If your model requires a 20 ampere outlet and you do not have one, contact an electrician or call 1-800-330-9707. For proper operation, no other appliance should be plugged into the same branch circuit as the High Speed Oven.
1.
2.
To set the Clock: Touch Clock; Enter the current time of day by touching the correct number pads. You must set at least 3 digits (one for hour(s) and two for minutes). For minutes less than 10, precede the “minutes” digit by a 0. Example: for 5 minutes after 2, set 2:05. The colon will flash between hour and minute and minute digits.
Touch the start/stop pad to lock in the time. The colon will stop flashing and the clock has been set and will begin to keep current time.The word “Clock” will always show on the display unless the oven is in a Cooking or Timer operation.
A.B.
Relocate the TV, radio or High Speed Oven.Plug the oven into a different outlet so that it and the TV receiver are on different circuits.
INSTALLATION
WARNINGTO PROVIDE CONTINUOUS PROTECTION AGAINST ELECTRICAL SHOCK, CONNECT TO PROPERLY GROUNDED OUTLETS ONLY. IMPROPER USE OF
THE GROUNDING PLUG CAN RESULT IN A RISK OF ELECTRICAL SHOCK.
DO NOT, UNDER ANY CIRCUMSTANCES, CUT OFF THE 3RD GROUNDING PRONG
Downloaded from www.Manualslib.com manuals search engine

6.1.7.2.
8.3.
9.4.
10.
5.
11.12.
Turntable Guide Ring and WheelsTurntable Driver - Must mate properly with bottom of glass turntable for proper operation.Stainless steel cavityLight bulb - Must be replaced by Authorized Service Agent.Safety Interlock SystemDoor HandleRating plate - Serial # and model # label on the front frame of the oven.
Window DoorElectronic Control PanelMetal tray - Must be used for high speed, Complete Meal, Convection, Baked Potato and Cake modes.Place the metal tray on top of the glass turntable.Grill Rack - Some models come equipped with a Grill Rack. Cooking instructions are included in this manual. When using this Grill Rack, place it on top of the glass turntable. Do not use the metal tray.Rotating Glass Turntable
TURNTABLE INSTALLATION
3.
4.
5.
1.
2.
Place the glass turntable on top of the ring and make sure the turntable properly mates with the Turntable Coupler/Driver describer in Step 1. The turntable will onto turn and the oven will not cook properly unless the coupler/driver and glass tray are properly mated.
The glass turntable is used for all cooking modes.
When you use the High Speed, Complete Meal, Convection, Baked Potato or Cake modes, place the metal tray on top of the glass turntable.
Remove the styrofoam packing from inside the oven. Inside the plastic with “Use and Care Manual” is a hard plastic “coupler” or driver with 3 arms. (#7) Place it on the metal shaft which is located in the center of the oven floor.
Inside the plastic bag with the “Use and Care Manual” is a plastic ring with wheels. (#6) Place the ring in the recessed area of the oven floor.
5
OVEN FEATURES
Downloaded from www.Manualslib.com manuals search engine
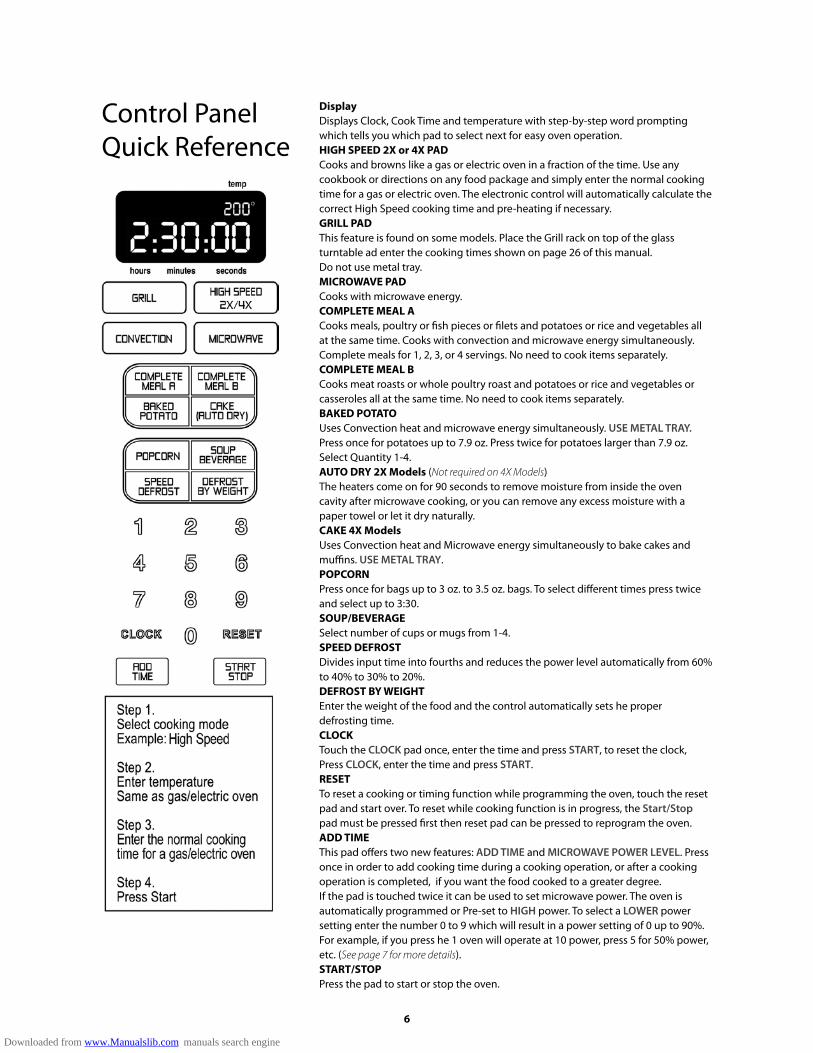
DisplayDisplays Clock, Cook Time and temperature with step-by-step word prompting which tells you which pad to select next for easy oven operation.HIGH SPEED 2X or 4X PADCooks and browns like a gas or electric oven in a fraction of the time. Use any cookbook or directions on any food package and simply enter the normal cooking time for a gas or electric oven. The electronic control will automatically calculate the correct High Speed cooking time and pre-heating if necessary.GRILL PADThis feature is found on some models. Place the Grill rack on top of the glass turntable ad enter the cooking times shown on page 26 of this manual. Do not use metal tray.MICROWAVE PADCooks with microwave energy.COMPLETE MEAL ACooks meals, poultry or fish pieces or filets and potatoes or rice and vegetables all at the same time. Cooks with convection and microwave energy simultaneously. Complete meals for 1, 2, 3, or 4 servings. No need to cook items separately.COMPLETE MEAL BCooks meat roasts or whole poultry roast and potatoes or rice and vegetables or casseroles all at the same time. No need to cook items separately.BAKED POTATOUses Convection heat and microwave energy simultaneously. USE METAL TRAY. Press once for potatoes up to 7.9 oz. Press twice for potatoes larger than 7.9 oz. Select Quantity 1-4.AUTO DRY 2X Models (Not required on 4X Models)The heaters come on for 90 seconds to remove moisture from inside the oven cavity after microwave cooking, or you can remove any excess moisture with a paper towel or let it dry naturally.CAKE 4X ModelsUses Convection heat and Microwave energy simultaneously to bake cakes and muffins. USE METAL TRAY.POPCORNPress once for bags up to 3 oz. to 3.5 oz. bags. To select different times press twice and select up to 3:30.SOUP/BEVERAGESelect number of cups or mugs from 1-4.SPEED DEFROSTDivides input time into fourths and reduces the power level automatically from 60% to 40% to 30% to 20%.DEFROST BY WEIGHTEnter the weight of the food and the control automatically sets he proper defrosting time.CLOCKTouch the CLOCK pad once, enter the time and press START, to reset the clock, Press CLOCK, enter the time and press START.RESETTo reset a cooking or timing function while programming the oven, touch the reset pad and start over. To reset while cooking function is in progress, the Start/Stop pad must be pressed first then reset pad can be pressed to reprogram the oven.ADD TIMEThis pad offers two new features: ADD TIME and MICROWAVE POWER LEVEL. Press once in order to add cooking time during a cooking operation, or after a cooking operation is completed, if you want the food cooked to a greater degree.If the pad is touched twice it can be used to set microwave power. The oven is automatically programmed or Pre-set to HIGH power. To select a LOWER power setting enter the number 0 to 9 which will result in a power setting of 0 up to 90%. For example, if you press he 1 oven will operate at 10 power, press 5 for 50% power, etc. (See page 7 for more details).START/STOPPress the pad to start or stop the oven.
Control PanelQuick Reference
6
Downloaded from www.Manualslib.com manuals search engine

7
The metal tray must be used for High Speed, Complete Meal, Convection, Baked Potato and Cake cooking modes. NEVER use the metal tray during a microwave only function. The metal tray has a special easy to clean coating. Sharp knives and forks should never be used directly on the surface of the tray, as they could scratch the finish. To clean the tray, wash with any dish washing soap and dry with a towel.
Place Grill Rack on the Glass Turntable.
Place food or regular oven safe cookware directly on the Metal Tray.
High Speed, Complete Meal, Complete Meal, Convection, Backed Potato or Cake Cooking Modes
HIGH SPEED2X/4X
BAKEDPOTATO
COMPLETEMEAL B
COMPLETEMEAL A
CONVECTION
CAKE
The Glass Tray included with the oven should remain in place during every cooking function. NEVER USE THE METAL TRAY DURING A MICROWAVE ONLY FUNCTION.
Place food or microwave safe cookware directly on the Glass Turntable.
Additional Glass, Metal Trays, Grill Racks or Glass Cookware for Complete Meal cooking can be ordered for $29.95 each including shipping and handling. Send check to: Half Time Oven, Inc., 7570 South Federal Highway, Suite 6, Hypoluo, Florida 33462 or call 1-800-330-9707
Microwave Cooking
MICROWAVE
If your oven comes with a Grill Rack, or if you purchase a Grill rack from Half Time Oven, place the Grill Rack on the Glass Turntable and DO NOT use the Metal Tray.
Place Grill Rack on the Glass Turntable.
Grill Cooking GRILL
Downloaded from www.Manualslib.com manuals search engine

8
1. 3.
2.4.
When the oven is first plugged into a wall outlet touch the CLOCK pad once, the display will show “ENTER TIME”
Enter he current time of day by touching the correct number ads. You must set at least 3 digits. (one for hour(s) and two for minutes after 2, set 2:05) After the correct time of day has been set press START to activate. The colon will become steady, the word CLOCK will remain in the display the updated clock time will be kept.
To recall the time of day while cooking, Press CLOCK and the current time of day will be displayed for 3 sec.
To reset the clockPress CLOCK, enter time, press START.
Setting The ClockCLOCK
This pad also offers two features: ADD TIME or MICROWAVE POWER LEVEL.
Press once in order to ADD TIME
Press twice to change the MICROWAVE POWER LEVEL.
You can ADD TIME to any cooking operation: HIgh Speed Convection, Microwave Grill, Complete Meal, Baked Potato, Cake. If you ADD TIME during a cooking operation without opening the door, the time will be added and the oven will continue to run. If you open the door to check the food during the operation or after cooking operation has been completed, you can still ADD TIME. Press the ADD TIME pad, enter the amount of time you want to add, then press the START pad. You do not have to reset the cooking mode or temperature, the electronic control will automatically remember it.
If the ADD TIME pad is touched twice it can be used to set MICROWAVE power. The oven is automatically programmed or p re-set to HIGH power. To select a LOWER power setting, enter the number 0 to 9, which will result in a power setting of 0 up to 90%.For example, if you press 1 the oven will operate at 10%, press 5 for 50%, etc.
Using the ADD TIME PadADDTIME
Touch START as the final step in setting he oven. If you touch the POPCORN, SOUP/BEVERAGE, BAKED POTATO or AUTO DRY pads, the oven will restart automatically. If you open the door during a cooking operation, the START pad must be pressed to re-start the oven after you close the door.
To stop the oven open the door press the START/STOP pad.
Using the START/STOP PadSTARTSTOP
1. 2.to reset the cooking or timing function while program-ming the oven, touch the RESET pad and start over. the RESET will clear the oven back to the current time of the day.
To reset while a cooking function is in progress, the START/STOP pad must be pressed first. Then the RESET pad can be pressed to reset the function.
Using the Reset PadRESET
Downloaded from www.Manualslib.com manuals search engine

Like convectional ovens, this oven should be preheated if the cooking time is short and the oven is cold. You enter the normal cooking time for a gas or electric oven. When the START pad is pressed, the electronic control will automatically add the preheat time if required
If the oven from a previous cooking operation, the electronic control will add a preheat time, but after 10 seconds a sensor inside the oven will determine the oven is already hot and the preheating will automatically be removed.
Automatic Preheat
Foods can be placed directly on the metal cooking tray provided with the oven or they can be placed in oven safe glass, ceramic or metal pans and placed on the metal tray for cooking.The legs on the metal tray position the food to allow hot air to circulate all around the food (top, bottom and sides) for optimum cooking results
this tray can be placed on top of the glass tray when cooking in the High Speed, Complete Meal, Convection, Baked Potato or Cake Modes.
DO NOT USE this tray in the grill, Microwave, Speed Defrost, Defrost by weight, Popcorn or Beverage pad modes.
Using the Special Metal Tray
THE ELECTRONIC CONTROL WILL AUTOMATICALLY ADD PREHEATING IF THE OVEN IS COLD
PREHEATING TABLE 150˚-250˚ F255˚-300˚ F305˚-350˚ F
355˚-375˚ F380˚-450˚ F
no preheat3:00 minutes3:30 minutes
4:00 minutes5:00 minutes
9
To Set High Speed Cooking1. 4.
2.
3.
5.
Place food directly on the special metal tray or in a metal, glass or ceramic cooking utensil and then place the utensil on the top of the metal tray. Press the HIGH SPEED PAD. The word HIGH SPEED, ENTER TEMP will be lit in the Display. Enter desired temperature from 150˚ F to 450˚ F. If the inputted temperature is not in 5 degree increment, the oven will round the closest 5 degree increment. If an incorrect temp is entered an error beep will sound. When the 3 temp digits have been selected ENTER TIME will be lit in the display.
Enter the same cooking time as a gas or electric oven. The electronic control will automatically calculate the High Speed cooking time.
Press the START PAD and the oven will begin to cook. As the cooking time progresses you may hear the oven cycling. This is when the oven “thermostats” to maintain the set temperature. This function is just like your convectional gas or electric oven.
Up to four hours can be entered. For example, to set one hour and 30 minutes you must press 1 for hours, 30 for minutes, and 00 for seconds. 1:30:00 will appear in the display.
Up to 99:00 minutes can be entered. For example, if you want to set 45 minutes, you can enter 45 for min-utes, 00 for seconds. 45 : 00 will appear in the display
Up to 99 seconds can be entered. For example, if you want to enter 30 seconds enter 30 : 30 will appear in the display
If you decide to add cooking tie it can be done during or after the cooking operation is completed by pressing the ADD TIME PAD. If you open the door and decide to ADD TIME, the START PAD must be pressed to restart the oven after the door is closed.
HIGH SPEED4X
High Speed Cooking combines Convection heat for flavor and browning and simultaneously uses microwave energy for speed. This combination cooks like a conventional Gas or Electric Oven but in a fraction of the time.
Use any cookbook or the direction from any food package.Step 1: Enter the same temperature as a gas or electric oven. Step 2: Enter the normal cooking time for a gas or electric oven, ten press START. The electronic control will automati-cally calculate the proper High Speed cooking time and add preheating if necessary.
High Speed Cooking HIGH SPEED2X
1:30:00
45:00
:30
Downloaded from www.Manualslib.com manuals search engine

Complete Meal CookingType A Type B
Use for meat, poultry or fish pieces/slices.
Chicken BreastSliced Potatoes
RiceVegetables
Pork Chops
Vegetable CasseroleScalloped Potatoes
Beef Roast
Chicken
Baked Potatoes
Mixed Vegetables
Use for meat roasts or whole poultry.
10
COMPLETEMEAL B
COMPLETEMEAL A
Dishes for Rice, Vegetables or Casseroles can be stacked to make room for a Roast and Baked Potatoes.
Downloaded from www.Manualslib.com manuals search engine
11
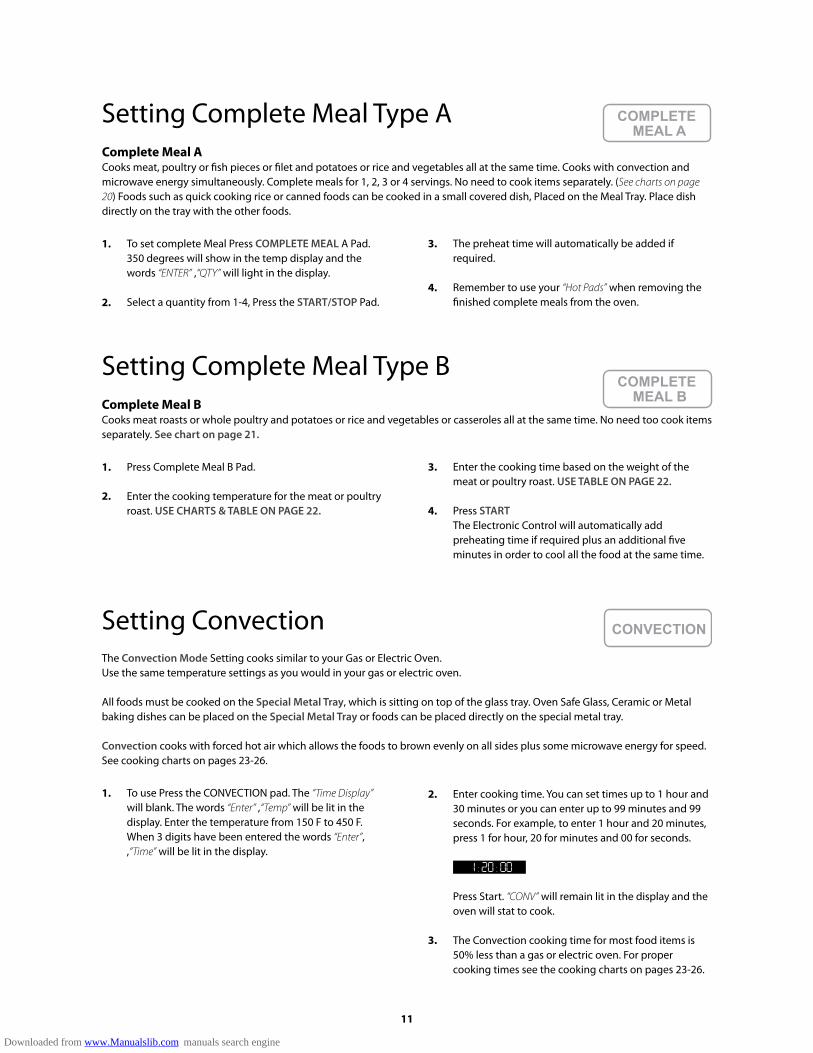
Complete Meal BCooks meat roasts or whole poultry and potatoes or rice and vegetables or casseroles all at the same time. No need too cook items separately. See chart on page 21.
Setting Complete Meal Type B
1. 3.
2.4.
Press Complete Meal B Pad.
Enter the cooking temperature for the meat or poultry roast. USE CHARTS & TABLE ON PAGE 22.
Enter the cooking time based on the weight of the meat or poultry roast. USE TABLE ON PAGE 22.
Press STARTThe Electronic Control will automatically add preheating time if required plus an additional five minutes in order to cool all the food at the same time.
Complete Meal ACooks meat, poultry or fish pieces or filet and potatoes or rice and vegetables all at the same time. Cooks with convection and microwave energy simultaneously. Complete meals for 1, 2, 3 or 4 servings. No need to cook items separately. (See charts on page 20) Foods such as quick cooking rice or canned foods can be cooked in a small covered dish, Placed on the Meal Tray. Place dish directly on the tray with the other foods.
Setting Complete Meal Type A
1. 3.
2.4.
To set complete Meal Press COMPLETE MEAL A Pad. 350 degrees will show in the temp display and the words “ENTER” ,“QTY” will light in the display.
Select a quantity from 1-4, Press the START/STOP Pad.
The preheat time will automatically be added if required.
Remember to use your “Hot Pads” when removing the finished complete meals from the oven.
COMPLETEMEAL B
COMPLETEMEAL A
The Convection Mode Setting cooks similar to your Gas or Electric Oven. Use the same temperature settings as you would in your gas or electric oven.
All foods must be cooked on the Special Metal Tray, which is sitting on top of the glass tray. Oven Safe Glass, Ceramic or Metal baking dishes can be placed on the Special Metal Tray or foods can be placed directly on the special metal tray.
Convection cooks with forced hot air which allows the foods to brown evenly on all sides plus some microwave energy for speed. See cooking charts on pages 23-26.
Setting Convection
1. 2.
3.
To use Press the CONVECTION pad. The “Time Display” will blank. The words “Enter” ,“Temp” will be lit in the display. Enter the temperature from 150 F to 450 F. When 3 digits have been entered the words “Enter”, ,“Time” will be lit in the display.
Enter cooking time. You can set times up to 1 hour and 30 minutes or you can enter up to 99 minutes and 99 seconds. For example, to enter 1 hour and 20 minutes, press 1 for hour, 20 for minutes and 00 for seconds.
Press Start. “CONV” will remain lit in the display and the oven will stat to cook.
The Convection cooking time for most food items is 50% less than a gas or electric oven. For proper cooking times see the cooking charts on pages 23-26.
CONVECTION
1:20:00
Downloaded from www.Manualslib.com manuals search engine

12
Two-Stage Cooking
SET STAGE 1Assuming “HI” Power, just touch number pads for easy set time. (Most 2-stage recipes start with “HI”, but you can also switch power levels after setting cook time)
DO NOT TOUCH START until you have completed Stage 2 setting.
SET STAGE 2Touch MICROWAVE pad then enter proper cooking time. Press ADD TIME pad twice ad enter the lower power level designed for second stage. MEM will show in the display. Touch START. As cooking is complete in the first stage the control will sound a single beep. the word MEM will disappear from the display and the second stage Microwave time will appear in the display.
Two-stage MICROWAVE function lets you cook a food at two different power levels with one-time settings. Some recipes and package directions use two cooking steps.
For example, rice should be cooked in two stages. Stage 1 starts rice at HIGH for 5 min. Stage 2 completes cooking 10-12 minutes at “5”.
If you are cooking at a lower power level and wish to return to HI power press the ADD TIME pad three times.
Stage Cooking
1. 3.
2.
Press the SPEED DEFROST pad. The words “DEF MICRO” will show in the display with the words “ENTER TIME”. Select the desired time for defrosting.
Next press the HIGH SPEED pad. The words “HIGH SPEED” and “MEM” (memory) will show in the display with the words “ENTER TIME” will appear in the display. Enter the time.
Press START. The time will begin counting down, first in the SPEED DEFROST mode and then in the HIGH SPEED mode. At the completion of the SPEED DEFROST mode the words “MEM” and “DEF MICRO” will disappear from the display. The words “HIGH SPEED” will appear and the oven will start in cooking in the HIGH SPEED mode.
As you become more familiar with your new oven you may want to experiment by combining cooking functions. For example, to defrost an item and then cook it at high speed, follow these steps
Setting Microwave Cook and Power
% of Power908070605040302010
Med Hi
Med
Lo
Warm
1. 1.
2.
To cook at “HI” Power simply set cook time by touching number pads. For example to set 3 minutes, touch 3-0-0 and START. You do not have to touch MICROWAVE pad before setting time.
Enter the cooking time. You can set times up to 99 minutes and 99 seconds. For example, if you want to set 20 minutes, enter 20 for minutes and 00 for seconds. 20:00 will appear in the display.
USE THESE SINGLE DIGITS TO SET POWER LEVELSDigit987654321
After setting Microwave time, press the ADD TIME pad twice, then enter a single digit representing the power level desired, touch START.
MICROWAVE
20:00
Downloaded from www.Manualslib.com manuals search engine
13
To Set SPEED DEFROST
3.1.
2.
Touch START, DEF shows in the display and time begins counting down. After time has elapsed the control will sound multiple beeps and END will appear in the display.
Touch SPEED DEFROST. Display will prompt to enter “Time”.
Enter desired Speed Defrost time by touching correct number pads.
“How do I know whether to set Speed Defrost or Defrost by Weight?”
This is determined by the type of food being defrosted and the amount of attention that must be paid to the food. The automatically-coded Defrost by Weight program is specifi-cally designed for large, dense meat roasts which must thaw slowly for even defrosting. Defrost by Weight requires only one turn-over of the meat.
Speed Defrost automatically sets microwave power for quick thawing of small to medium size foods. Use the defrost chart in this manual to enter the defrost time.Some foods benefit from being turned over, rearranged or broken apart if separate pieces are frozen together.For larger frozen items use Defrost By Weight.
Setting Speed Defrost SPEEDDEFROST
Baked PotatoThe METAL TRAY MUST BE USED place on top of glass tray. Uses microwave energy and convection heat simultaneously.To set:
BEVERAGE or SOUPThis pad uses: Microwave energy only. Up to 4 large cups or mugs or beverage (coffee, tea, cocoa, cider, etc.) can be heated at once.Press BEVERAGE and the words “ENTER” ,“QTY” will be lit in the display. Select 1-4 using the number pads. If no quantity has been selected after 3 seconds the control will assume a quantity of one and start counting down.
PopcornThis pad uses microwave energy only.Popcorn is a favorite snack. POPCORN control automatically sets the correct time for a 3-3.5 oz. bag of Microwave popcorn. Place popcorn on glass turn tray and press POPCORN pad.
YOU CAN CHANGE THE POPCORN SETTING TO “REMEM-BER” A DIFFERENT COOK TIME for your favorite brand or size of POPCORN. Press POPCORN twice. “ENTER” ,“TIME” appears in the display. Enter your desired time up to 3:30. When you press START the control will start counting down the new time and remember it. Next time, just press POPCORN twice to get the new setting. If you want to reset it again repeat the above steps.
NOTE: On oven models mounted under a cook top, after you touch one of the instant action pads, the START pad must be pressed to start the oven.
Instant Action Pads
1.
2.
Press BAKED POTATO pad once for potatoes weighing less than 7.9oz. The display will show a red “1”. Press the BAKED POTATO pad twice for potatoes weighing more than 7.9oz. The display will show a red “2”The words “ENTER” ,“QTY” will appear in the time display. Select a quantity from 1 to 4. These numbers will appear in the time display. Once the quantity is selected the control will start the oven after 3 seconds. If no quantity is selected the control will assume a quantity of 1 and start counting down after 3 sec. The control will sound multiple beeps at the end of the cycle and the word “END” will appear in the display.
SOUP/BEVERAGE
POPCORNBAKEDPOTATO
Downloaded from www.Manualslib.com manuals search engine

Set DEFROST BY WEIGHT for any weight up to 6 pounds. Because it is more gentle defrost setting the “SPEED DEFROST”, it is especially good for meats which are dense in the center but vulnerable to overcooking of the edges.
Defrost By Weight
Allow enough time for defrosting because it is slower than SPEED DEFROSTING. With DEFROST by WEIGHT, low power microwaving is intersperses with “resting” or “standing” periods. Where no microwaves enter the oven. These no-microwave periods allow meat to equalize in tempera-ture before the next period of defrosting automatically comes on.
With DEFROST BY WEIGHT there’s no need to guess how long to defrost. DEFROST BY WEIGHT automatically sets the correct thawing time, but you must enter the food weight accurately.
Automatic DEFROST BY WEIGHT times are based on meat that is solidly frozen at 0 degrees F. If meat has been partially defrosted remove from oven before the total time has elapsed.
Place meat on microwave-safe rack or in microwave roasting dish on the rotating glass tray for best results. Place meats fat-side down and poultry breast-side-down.
Special Tips for Defrost by Weight
14
1.
2.
3.
4.
Check weight of meat. If the weight is more than 6 pounds, use the SPEED DEFROST feature on page 13
Unwrap meat before defrosting.Touch DEFROST BY WEIGHT pad. ENTER lbs (pounds) or oz. (ounces). For example, to defrost and item that weighs 1lb 6oz, enter “106”. Numbers to the left of the colon represent pounds, numbers to the right of the colon represent ounces.
You must enter three digits. For example, you must enter “300” for an item that weighs 3 pounds.Press START. The timer will starting counting down and lbs and oz. will disappear from the display. The word DEF will remain lit.
Part way through the defrosting the oven will sound two long beeps and pause. At this point you must open the door and turn over or rearrange the food to insure complete defrosting. After closing the door press START again the program and countdown will resume.At the end of the cycle the control will sound 4 long beeps and the word END will appear in the display. When the door is open the display will go back to the current time of day.
DEFROSTBY WEIGHT
Downloaded from www.Manualslib.com manuals search engine

CLEANINGIMPORTANT: ALWAYS UNPLUG OVEN AND BE SURE OVEN IS COOL BEFORE CLEANING.To maintain the appearance of your oven, never use abrasive cleaning agents (such as cleansing powders, scouring pads or steel wool pads) Also, never use commercial oven cleaners on any part of your High Speed Oven. Easy Off Oven Cleaner CAN BE USED.
Some liquid cleaners can remove the shiny surface on plastic or vinyl. Therefore, never spray or pour liquid cleaners onto a surface. Spray or pour cleaner onto a cloth or sponge and then clean.
Clean up splatters or spills in your stainless steel cavity as quickly as possible. Once the spills have baked on they are harder to get off. Use any goof dish detergent with a soft cloth or sponge. For hard to clean soiled areas, oven cleaners such as “Easy Off” can be used. Be careful not to spray these cleaners into any of the holes punched in the cavity back or side walls. Do not spray on or in the light bulb area, The spray can cause the light bulb to fail. All the oven cavity holes can be covered with masking tape before using the oven cleaner spray.
OUTSIDE SURFACESWRAPPER Clean the outside of the oven with a glass or all surface cleaner. Be careful when cleaning around louvers. Rinse and Dry.
To clean the viewing window use a liquid or glass cleaning agent and a sponge or soft cloth. To prevent scratching the plastic surface do not use paper toweling.
POWER CORDBe sure oven is unplugged. Wipe cord with a damp sudsy cloth, rinse and dry thoroughly before plugging cord back into outlet.
LIGHT BULBThis bulb is to be replaced by properly qualified service personnel.
Care and Maintenance
15
ServiceBEFORE CALLING SERVICE, CHECK THE FOLLOWING
1. 3.
4.
5.
2.
Oven does not operate. Food is overcooked.
Oven light does not turn on.
House fuse or circuit breaker tripes when the oven is turned on.
Food is under cooked.
_ _
_
_
_
__
__
_
_
_
__
_
_
_
_
____
_
_
Is power cord plugged into wall outlet?Is house fuse blown or circuit breaker tripped?Is oven correctly programmed?Is oven door closed?Was START-STOP pad pressed once to turn oven on?
Was thew amount of food less than called for in the recipe?Was the cooking time too long for the amount of food? Was the oven temperature or microwave power level too high?Was the food placed in a dish that was too large for the amount of food being cooked?Was the initial temperature of the food higher than normal?
Is power cord plugged into wall outlet?Is house fuse blown or circuit breaker tripped?
Counter top models must be plugged into a separate 120V, 15 ampere outlet served by a 20 ampere branch circuit. Built-In, Over the Range and Range models require a 20 ampere outlet served by a 20 ampere branch circuit.For proper operation, no other appliances should be plugged into the same branch circuit as the High Speed Oven.
Was the metal tray used in the high speed?Complete Meal, Convection, Baked Potato and Cake setting and placed on top of the glass turntable?If the grill rack was used, was it placed on top of the glass turntable?Was the amount of food more than called for in the recipe?Was the cooking time too short for the amount of food?Was the set oven temperature too low, or if in Microwave was the power level too low?Was the household voltage too low?Is there another appliance on the same circuit as the food being cooked?Was the food placed in a dish that was too small for the amount of food being cooked?Was the food completely defrosted before cooking?
Downloaded from www.Manualslib.com manuals search engine
Do not attempt to service the appliance yourself unless directed to do so in this book. Call 1-800-330-9707 to get the name and phone no, or your nearest service agent.
HOW TO OBTAIN SERVICEIf you are not satisfied with the response to your service request, write to: Half Time Oven, P.O. Box 6006, West Palm beach, FL 33405.
Include the complete model and serial number of appliance, the name and address of the dealer from which you purchases the appliance, the date of purchase and details concerning the problem.
16
6.
11.
14.
12.
13.
7.
8.
9.
10.Oven comes without pressing START?
My light bulb is out, how can I replace it?
How do I clean my oven?
Looks like the upper left hand corner or my door is chipped or broken.
Do I have to save the box and the packing material that came with the oven?
Oven feels hot to touch.
I can see light through the cracks in the oven.
Accumulation of moisture on the inside of the door.
High Speed Cooking is too long/short._
_
_
_
_
_
_
_
_
_
_
Did you press one of the INSTANT START Keys? Baked Potato, Soup/Beverage, or Popcorn? If one of these keys has been pressed the oven will Automatically start cooking in 3 seconds without pressing START.
The light bulb can be replaced ONLY by a qualified service agent.
Please see the Care and Maintenance section on page 15 of this manual. Glass or all surface cleaners may be used. “Easy Off” oven cleaner may be used to clean heavily soiled areas. Do not use abrasive cleaning agents, scouring pads or steel wool pads.
The upper left hand corner of the door has been notched out for clearance of the door hinge. This is normal.
if you ever have to return the oven for any reason it is important to package it properly including the glass and metal tray. If you do not want to save the carton and packaging material and you need to return the oven, take it to a packing service, such as UPS to be properly repackaged.
This is High Speed Oven gets hot on the outside just like your gas or electric range. The door and outer cabinet will feel hot when you have been cooking in the High Speed, Complete Meal, Convection, Grill, Baked Potato, Cake Mode.Be sure to use HOT PADS while handling foods and dishes in the oven.
The light is located outside of the oven cavity. There may be places you can see the light, but all microwave energy is contained in the cooking cavity.
This oven is designed to cook efficiently with heat and therefore is extremely well insulated and sealed. This causes moisture to form inside the cavity. In the High Speed and Convection modes, the moisture is evaporated by the heaters. In the microwave mode, the heaters are not on so, moisture may accumulate. Simply wipe it off at the end of cooking cycle with a soft rag or paper towel or press the AUTO DRY pad.
The High Speed, Complete Meal and Convection cooking modes operate like a gas or electric oven. Check the food and adjust the cooking time to suit your taste as you do when cooking in a regular oven.Press the ADD TIME pad and enter added cooking time if you want to cook the food longer.
Downloaded from www.Manualslib.com manuals search engine

HIGH SPEED COOKING GUIDE
17
1.2.3.4.
5.6.7.8.
ALL FOOD MUST BE COOKED ON THE METAL TRAY PACKED INSIDE THE OVENPlace the metal tray on the glass turntable.Metal tray acts like an oven rack and allows hot air to circulate under the food.Food can be cooked directly on the metal tray or place the food in a metal, glass or ceramic cooking utensil and then place the utensil on the top of the metal tray.USE HOT PADS WHEN HANDLING METAL TRAY OR UTENSILS AFTER COOKINGIf desired, an oven safe meat thermometer can be used for poultry and meats.Adjust the cooking time for personal tastes by using the ADD TIME pad.Enter the cooking time for a regular gas or electric oven shown in any cookbook or on any food package, or you can use the cooking times shown in this manual. After you enter the cooking time for a gas or electric oven, the electronic control will automatically calculate the proper High Speed cooking time and add preheating time if required.
Food
BakingBreads
Cakes
Cookies
Biscuits Corn Bread
Muffins
Popovers
Nut Bread or Fruit Bread
Yeast Bread
Plain or Sweet Rolls
Angel Food
Cheese Cake
Cup Cakes
Fruit Cake (Loaf)
Gingerbread
Yellow Cakes, Cake Mixes
Bunt Cake
Pound Cake
Bar
Drop or Sliced
Dish
Metal pan
8 x 8 pan
Muffin pan
Custard cups
Loaf pan
Loaf pan
Metal pan
Tube pan
8” pan
Metal pan
Loaf pan
8 x 8
Metal tray
Oven Temp.
450˚
400˚
400˚
450˚ then 350˚
350˚
375˚
350˚
350˚
350˚
350˚
350˚
350˚
350˚
350˚
350˚
350˚
350˚
Comments
Pierce each Popower with a tooth pick after removing
from oven to allow steam to escape
Interiors will be moist and tender
Lightly grease baking sheet
Invert and cool in pan
After cooking turn oven off and let cheesecake stand
in oven 30 min. with door ajar
Interior will be moist and tender
Grease and flour pan
Cool in pan 10 min. before inverting on wire rack
Use same time for bar cookies from a mix
Use same time for solid cookies from a mix
Downloaded from www.Manualslib.com manuals search engine

18
HIGH SPEED COOKING GUIDEFood
ConvenienceFoods
Fruits& otherDesserts
Pies &Pastries
Casseroles
Main Dishes
Frozen Bread Dough
Pizza Self Rising CrustPizza
Slice & Bake Cookies
Baked Apples or Pears
Bread Pudding
Cream Puffs
Custard (individual)
Meringue shells
Frozen
Meringue-Topped
Two Crust
Quiche
Pastry Shell
Meal, Chicken, SeafoodCombinations
Pasta
Potatoes, Scalloped
Vegetable
Meat Loaf
Beef & Bean Casserole
Stuffed Peppers
Dish
Loaf Pen
Metal Tray
Metal Tray
Pie Plate
Loaf Pan
Oven Temp.
350˚
400˚425˚
375˚
350˚
300˚
400˚
350˚
350˚
375˚
325˚
400˚
350˚
400˚
350˚
350˚
350˚
350˚
350˚
375˚
350˚
Comments
Follow package directions, place on metal tray
Follow package directions, place on metal tray
Let stand a few minutes before removing from tray
Bake in utensil with shallow sides
Pudding is done when knife inserted near center
comes cut clean
Puncture puffs twice with toothpicks to release steam
after 15 min. of baking time
Set cups in baking dish. Pour boiling water around
cups to a depth of 1 in.
When done, turn oven off and let shells stand in oven
1 hour to dry
Follow procedures on package.
Let stand 5 min. before serving
Pierce pastry with fork to prevent shrinkage
Cook times vary with casserole sizes and ingredients
Cook times vary with casserole sizes and ingredients
Let stand 5 min. before serving
Cook times vary with casserole size and ingredients
Use green, red or yellow peppers
Downloaded from www.Manualslib.com manuals search engine
19
Pierce skin in several places, Add 1/4 C water
Turn squash cut side up after 30 min. and cover.
Pierce skins with fork before baking
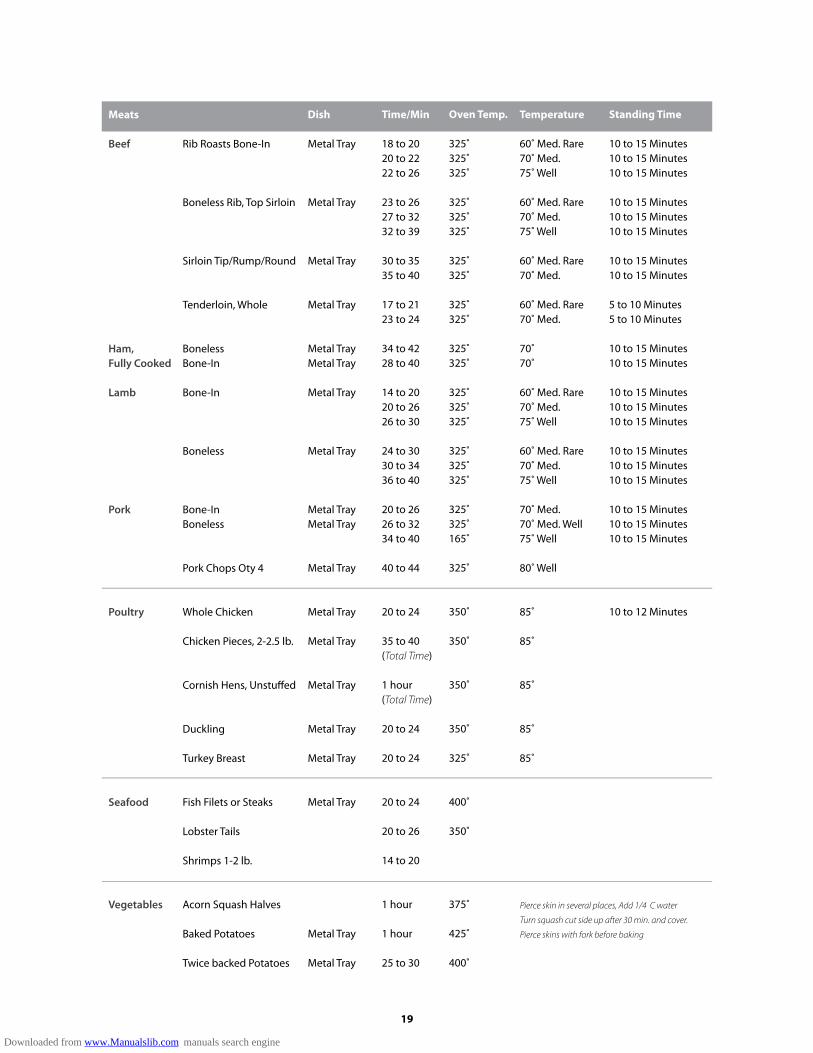
Meats
Beef
Ham, Fully Cooked
Lamb
Pork
Poultry
Seafood
Vegetables
Rib Roasts Bone-In
Boneless Rib, Top Sirloin
Sirloin Tip/Rump/Round
Tenderloin, Whole
BonelessBone-In
Bone-In
Boneless
Bone-InBoneless
Pork Chops Oty 4
Whole Chicken
Chicken Pieces, 2-2.5 lb.
Cornish Hens, Unstuffed
Duckling
Turkey Breast
Fish Filets or Steaks
Lobster Tails
Shrimps 1-2 lb.
Acorn Squash Halves
Baked Potatoes
Twice backed Potatoes
Dish
Metal Tray
Metal Tray
Metal Tray
Metal Tray
Metal TrayMetal Tray
Metal Tray
Metal Tray
Metal TrayMetal Tray
Metal Tray
Metal Tray
Metal Tray
Metal Tray
Metal Tray
Metal Tray
Metal Tray
Metal Tray
Metal Tray
Time/Min
18 to 2020 to 2222 to 26
23 to 2627 to 3232 to 39
30 to 3535 to 40
17 to 2123 to 24
34 to 4228 to 40
14 to 2020 to 2626 to 30
24 to 3030 to 3436 to 40
20 to 2626 to 3234 to 40
40 to 44
20 to 24
35 to 40(Total Time)
1 hour(Total Time)
20 to 24
20 to 24
20 to 24
20 to 26
14 to 20
1 hour
1 hour
25 to 30
Oven Temp.
325˚325˚325˚
325˚325˚325˚
325˚325˚
325˚325˚
325˚325˚
325˚325˚325˚
325˚325˚325˚
325˚325˚165˚
325˚
350˚
350˚
350˚
350˚
325˚
400˚
350˚
375˚
425˚
400˚
Temperature
60˚ Med. Rare70˚ Med.75˚ Well
60˚ Med. Rare70˚ Med.75˚ Well
60˚ Med. Rare70˚ Med.
60˚ Med. Rare70˚ Med.
70˚70˚
60˚ Med. Rare70˚ Med.75˚ Well
60˚ Med. Rare70˚ Med.75˚ Well
70˚ Med.70˚ Med. Well75˚ Well
80˚ Well
85˚
85˚
85˚
85˚
85˚
Standing Time
10 to 15 Minutes10 to 15 Minutes10 to 15 Minutes
10 to 15 Minutes10 to 15 Minutes10 to 15 Minutes
10 to 15 Minutes10 to 15 Minutes
5 to 10 Minutes5 to 10 Minutes
10 to 15 Minutes10 to 15 Minutes
10 to 15 Minutes10 to 15 Minutes10 to 15 Minutes
10 to 15 Minutes10 to 15 Minutes10 to 15 Minutes
10 to 15 Minutes10 to 15 Minutes10 to 15 Minutes
10 to 12 Minutes
Downloaded from www.Manualslib.com manuals search engine
20
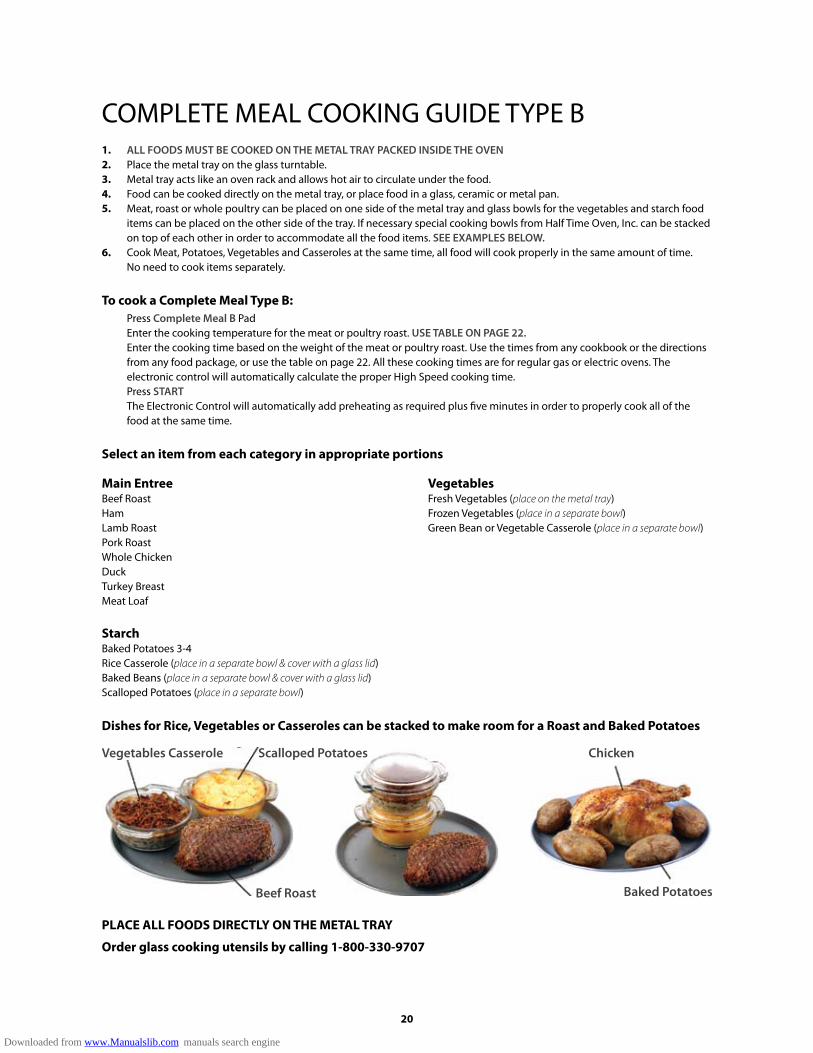
Dishes for Rice, Vegetables or Casseroles can be stacked to make room for a Roast and Baked Potatoes
COMPLETE MEAL COOKING GUIDE TYPE B1.2.3.4.5.
6.
ALL FOODS MUST BE COOKED ON THE METAL TRAY PACKED INSIDE THE OVENPlace the metal tray on the glass turntable.Metal tray acts like an oven rack and allows hot air to circulate under the food.Food can be cooked directly on the metal tray, or place food in a glass, ceramic or metal pan.Meat, roast or whole poultry can be placed on one side of the metal tray and glass bowls for the vegetables and starch food items can be placed on the other side of the tray. If necessary special cooking bowls from Half Time Oven, Inc. can be stacked on top of each other in order to accommodate all the food items. SEE EXAMPLES BELOW.Cook Meat, Potatoes, Vegetables and Casseroles at the same time, all food will cook properly in the same amount of time. No need to cook items separately.
To cook a Complete Meal Type B:Press Complete Meal B Pad Enter the cooking temperature for the meat or poultry roast. USE TABLE ON PAGE 22.Enter the cooking time based on the weight of the meat or poultry roast. Use the times from any cookbook or the directions from any food package, or use the table on page 22. All these cooking times are for regular gas or electric ovens. The electronic control will automatically calculate the proper High Speed cooking time.Press STARTThe Electronic Control will automatically add preheating as required plus five minutes in order to properly cook all of the food at the same time.
Select an item from each category in appropriate portions
Main EntreeBeef RoastHamLamb RoastPork RoastWhole ChickenDuckTurkey Breast Meat Loaf
VegetablesFresh Vegetables (place on the metal tray)Frozen Vegetables (place in a separate bowl)Green Bean or Vegetable Casserole (place in a separate bowl)
StarchBaked Potatoes 3-4Rice Casserole (place in a separate bowl & cover with a glass lid)Baked Beans (place in a separate bowl & cover with a glass lid)Scalloped Potatoes (place in a separate bowl)
PLACE ALL FOODS DIRECTLY ON THE METAL TRAY
Order glass cooking utensils by calling 1-800-330-9707
Vegetables Casserole Scalloped Potatoes Chicken
Baked PotatoesBeef Roast
Downloaded from www.Manualslib.com manuals search engine

21
Complete Meal Type B Main EntreeMeats
Beef
Ham, Fully Cooked
Lamb
Pork
Poultry
Meatloaf
Rib Roasts Bone-In
Boneless Rib, Top Sirloin
Sirloin Tip/Rump/Round
Tenderloin, Whole
BonelessBone-In
Bone-In
Boneless
Bone-InBoneless
Whole Chicken
Cornish Hens, Unstuffed
Duckling
Turkey Breast
Beef
Dish
Metal Tray
Metal Tray
Metal Tray
Metal Tray
Metal TrayMetal Tray
Metal Tray
Metal Tray
Metal Tray
Metal Tray
Metal Tray
Metal Tray
Metal Tray
Loaf Pan
Time/Min
18 to 2020 to 2222 to 26
23 to 2627 to 3232 to 39
30 to 3535 to 40
17 to 2123 to 24
34 to 4228 to 40
14 to 2020 to 2626 to 30
24 to 3030 to 3436 to 40
20 to 2626 to 3234 to 40
20 to 24
1 hour(Total Time)20 to 24
20 to 24
1 hour
Oven Temp.
325˚325˚325˚
325˚325˚325˚
325˚325˚
325˚325˚
325˚325˚
325˚325˚325˚
325˚325˚325˚
325˚325˚325˚
350˚
350˚
350˚
325˚
350˚
Temperature
140˚ Med. Rare155˚ Med.160˚ Well
140˚ Med. Rare155˚ Med.160˚ Well
140˚ Med. Rare155˚ Med.
140˚ Med. Rare155˚ Med.
155˚155˚
140˚ Med. Rare155˚ Med.160˚ Well
140˚ Med. Rare155˚ Med.160˚ Well
155˚ Med.155˚ Med. Well160˚ Well
180˚
180˚
180˚
180˚
Standing Time
10 to 15 Minutes10 to 15 Minutes10 to 15 Minutes
10 to 15 Minutes10 to 15 Minutes10 to 15 Minutes
10 to 15 Minutes10 to 15 Minutes
5 to 10 Minutes5 to 10 Minutes
10 to 15 Minutes10 to 15 Minutes
10 to 15 Minutes10 to 15 Minutes10 to 15 Minutes
10 to 15 Minutes10 to 15 Minutes10 to 15 Minutes
10 to 15 Minutes10 to 15 Minutes10 to 15 Minutes
Downloaded from www.Manualslib.com manuals search engine
22
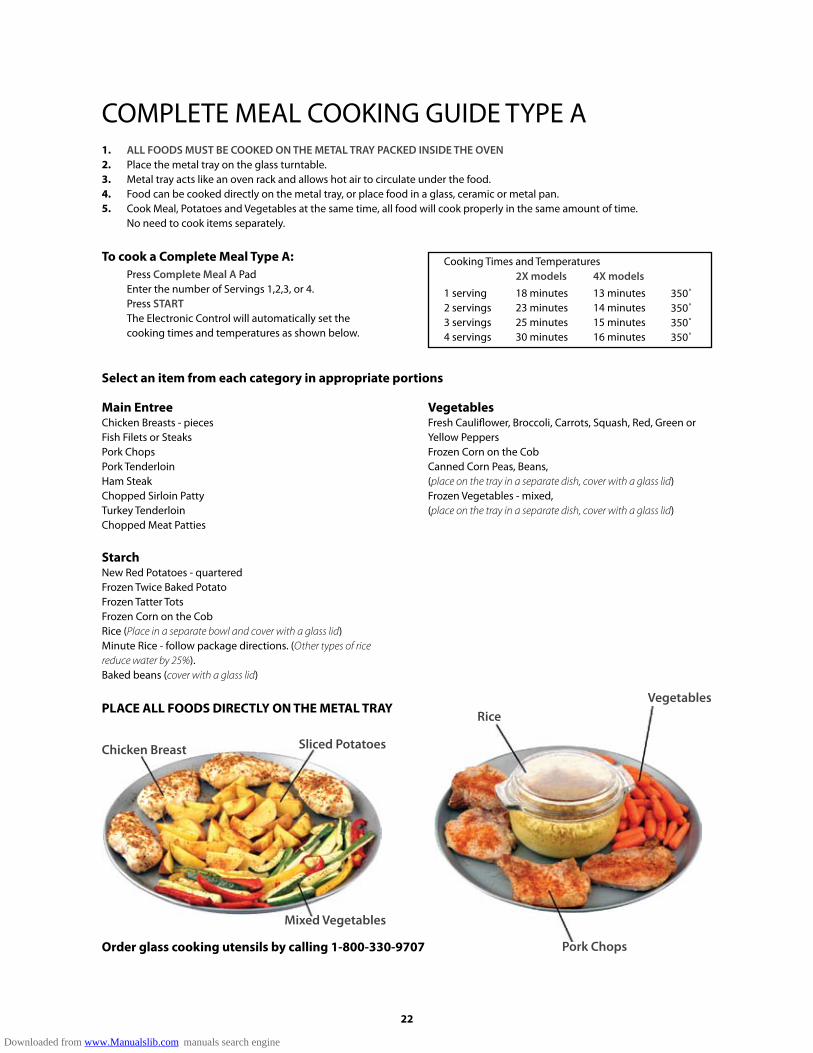
COMPLETE MEAL COOKING GUIDE TYPE A
PLACE ALL FOODS DIRECTLY ON THE METAL TRAY
Order glass cooking utensils by calling 1-800-330-9707
Select an item from each category in appropriate portions
Main EntreeChicken Breasts - piecesFish Filets or SteaksPork ChopsPork TenderloinHam SteakChopped Sirloin PattyTurkey TenderloinChopped Meat Patties
VegetablesFresh Cauliflower, Broccoli, Carrots, Squash, Red, Green or Yellow PeppersFrozen Corn on the CobCanned Corn Peas, Beans, (place on the tray in a separate dish, cover with a glass lid)Frozen Vegetables - mixed, (place on the tray in a separate dish, cover with a glass lid)
StarchNew Red Potatoes - quarteredFrozen Twice Baked PotatoFrozen Tatter TotsFrozen Corn on the CobRice (Place in a separate bowl and cover with a glass lid)Minute Rice - follow package directions. (Other types of rice reduce water by 25%).Baked beans (cover with a glass lid)
1.2.3.4.5.
ALL FOODS MUST BE COOKED ON THE METAL TRAY PACKED INSIDE THE OVENPlace the metal tray on the glass turntable.Metal tray acts like an oven rack and allows hot air to circulate under the food.Food can be cooked directly on the metal tray, or place food in a glass, ceramic or metal pan.Cook Meal, Potatoes and Vegetables at the same time, all food will cook properly in the same amount of time.No need to cook items separately.
To cook a Complete Meal Type A:Press Complete Meal A PadEnter the number of Servings 1,2,3, or 4.Press STARTThe Electronic Control will automatically set the cooking times and temperatures as shown below.
Cooking Times and Temperatures
1 serving2 servings3 servings4 servings
18 minutes23 minutes25 minutes30 minutes
13 minutes14 minutes15 minutes16 minutes
350˚350˚350˚350˚
2X models 4X models
Rice
Chicken Breast
Vegetables
Sliced Potatoes
Pork Chops
Mixed Vegetables
Downloaded from www.Manualslib.com manuals search engine
23
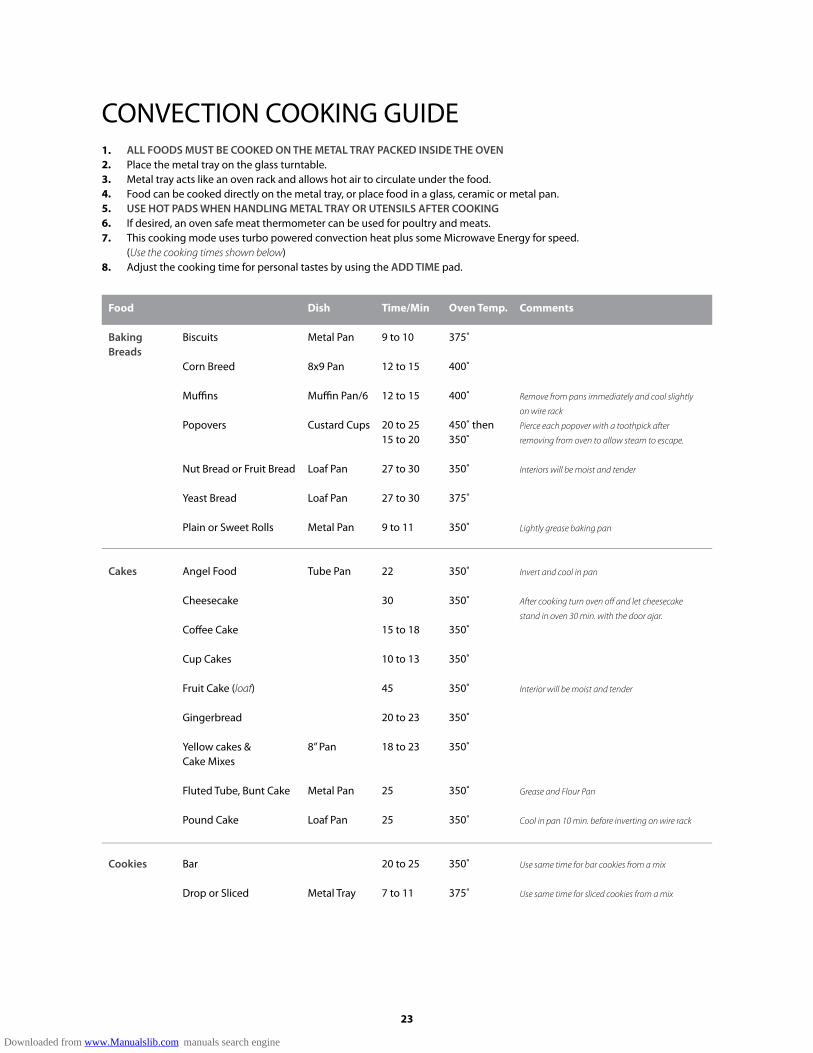
CONVECTION COOKING GUIDE1.2.3.4.5.6.7.
8.
ALL FOODS MUST BE COOKED ON THE METAL TRAY PACKED INSIDE THE OVENPlace the metal tray on the glass turntable.Metal tray acts like an oven rack and allows hot air to circulate under the food.Food can be cooked directly on the metal tray, or place food in a glass, ceramic or metal pan.USE HOT PADS WHEN HANDLING METAL TRAY OR UTENSILS AFTER COOKINGIf desired, an oven safe meat thermometer can be used for poultry and meats.This cooking mode uses turbo powered convection heat plus some Microwave Energy for speed.(Use the cooking times shown below)Adjust the cooking time for personal tastes by using the ADD TIME pad.
Food
Baking Breads
Cakes
Cookies
Biscuits Corn Breed
Muffins
Popovers
Nut Bread or Fruit Bread
Yeast Bread
Plain or Sweet Rolls
Angel Food
Cheesecake
Coffee Cake Cup Cakes
Fruit Cake (loaf)
Gingerbread
Yellow cakes & Cake Mixes
Fluted Tube, Bunt Cake
Pound Cake
Bar
Drop or Sliced
Dish
Metal Pan
8x9 Pan
Muffin Pan/6
Custard Cups
Loaf Pan
Loaf Pan
Metal Pan
Tube Pan
8” Pan
Metal Pan
Loaf Pan
Metal Tray
Time/Min
9 to 10
12 to 15
12 to 15
20 to 2515 to 20
27 to 30
27 to 30
9 to 11
22
30
15 to 18
10 to 13
45
20 to 23
18 to 23
25
25
20 to 25
7 to 11
Oven Temp.
375˚
400˚
400˚
450˚ then 350˚
350˚
375˚
350˚
350˚
350˚
350˚
350˚
350˚
350˚
350˚
350˚
350˚
350˚
375˚
Comments
Remove from pans immediately and cool slightly
on wire rack
Pierce each popover with a toothpick after
removing from oven to allow steam to escape.
Interiors will be moist and tender
Lightly grease baking pan
Invert and cool in pan
After cooking turn oven off and let cheesecake
stand in oven 30 min. with the door ajar.
Interior will be moist and tender
Grease and Flour Pan
Cool in pan 10 min. before inverting on wire rack
Use same time for bar cookies from a mix
Use same time for sliced cookies from a mix
Downloaded from www.Manualslib.com manuals search engine

24
Food
Fruits & other Desserts
Pies and Pastries
Casseroles
Main Dishes
Convenience Foods
Vegetables
Baked Apples or Pears
Bread Pudding
Cream Puffs
Custard (Individual)
Meringue Shells
Frozen
Meringue-Topped
Two-Crust
Quiche
Pastry Shell
Meat, Chicken, Seafood combinations
Pasta
Potatoes - scalloped
Vegetable
Meat Loaf
Beef & Bean Casserole
Stuffed Peppers
Frozen Bread Dough
Pizza, Self Rising Crust, Pizza
Sliced & Baked Cookies
Atom Squash Halves
Baked Potatoes
Twice-Baked Potatoes
Dish
Loaf Pan
Loaf Pan
Metal TrayMetal Tray
Time/Min
18 to 23
20
20 to 25
25
18 to 20
30
9 to 11
30
18
10 to 13
13 to 23
15 to 25
30
15 to 20
30
25
15 to 18
16 to 20
17 to 2013 to 19
10 to 12
30
30
18 to 20
Oven Temp.
350˚
300˚
400˚
350˚
300˚
375˚
325˚
400˚
350˚
400˚
350˚
350˚
350˚
350˚
350˚
350˚
350˚
350˚
400˚425˚
375˚
350˚
425˚
400˚
Comments
Bake in utensil with shallow sides
Pudding is done when knife inserted near center
comes out clean
Puncture puffs twice with toothpicks to release steam
after 15 min. of baking time
Set cups in baking dish. Pour boiling water around
cups to a depth of 1 in.
When done turn oven off and let shells stand in oven
1 hour to dry
Follow procedures on package
Let stand 5 min. before serving
Pierce pastry with fork to prevent shrinkage
Cook times vary with casserole size ingredients
Cook times vary with casserole size ingredients
Let stand 5 minutes before serving
Cook times vary with casserole size ingredients
Use green, red or yellow peppers
Follow package-directions
Follow package-directions
Let stand a few minutes before removing from pan
to cool
Pierce skin in several places. Add 1/4 C water
Turn squash halves cut side up after 30 min., Cover.
Pierce skin with a fork before baking
Downloaded from www.Manualslib.com manuals search engine

25
Meats
Beef
Ham, Fully Cooked
Lamb
Pork
Poultry
Seafood
Rib Roasts Bone-in
Boneless Rib, Top Sirloin
Sirloin Tip
Tenderloin, Whole
Boneless Bone-in
Bone-in
Boneless
Boneless Bone-in
Pork Chops - 4 Pieces
Whole Chicken
Chicken Pieces 2 ½ lbs
Cornish Hens, Unstuffed
Duckling
Turkey Breast
Fish Fillets or Steaks
Lobster Tails
Shrimp
Dish
Metal Tray
Metal Tray
Metal Tray
Metal Tray
Metal TrayMetal Tray
Metal Tray
Metal Tray
Metal TrayMetal Tray
Metal Tray
Metal Tray
Metal Tray
Time/Min
101113
131618
1720
1012
2220
101315
151720
131620
22(Total Time)
10
20(Total Time)
35(Total Time)
10
10
12
13
10
Oven Temp.
325˚325˚325˚
325˚325˚325˚
325˚325˚
325˚325˚
325˚325˚
325˚ 325˚325˚
325˚325˚325˚
325˚325˚325˚
325˚
350˚
375˚
375˚
375˚
325˚
400˚
350˚
350˚
Temperature
140˚ Med. Rare155˚ Med.160˚ Well
140˚ Med. Rare155˚ Med.160˚ Well
140˚ Med. Rare155˚ Med.
155˚155˚
155˚155˚
140˚ Med. Rare 155˚ Med.160˚ Well
140˚ Med. Rare155˚ Med.160˚ Well
155˚ Med.155˚ Med. Well160˚ Well
170˚ Well
180˚
180˚
180˚
180˚
180˚
Standing Time
10 to 15 Minutes10 to 15 Minutes10 to 15 Minutes
10 to 15 Minutes10 to 15 Minutes10 to 15 Minutes
10 to 15 Minutes10 to 15 Minutes
5 to 10 Minutes5 to 10 Minutes
10 to 15 Minutes10 to 15 Minutes
10 to 15 Minutes10 to 15 Minutes10 to 15 Minutes
10 to 15 Minutes10 to 15 Minutes10 to 15 Minutes
10 to 15 Minutes10 to 15 Minutes10 to 15 Minutes
10 to 12 Minutes
10 to 12 Minutes
10 to 12 Minutes
10 to 12 Minutes
10 to 12 Minutes
Downloaded from www.Manualslib.com manuals search engine
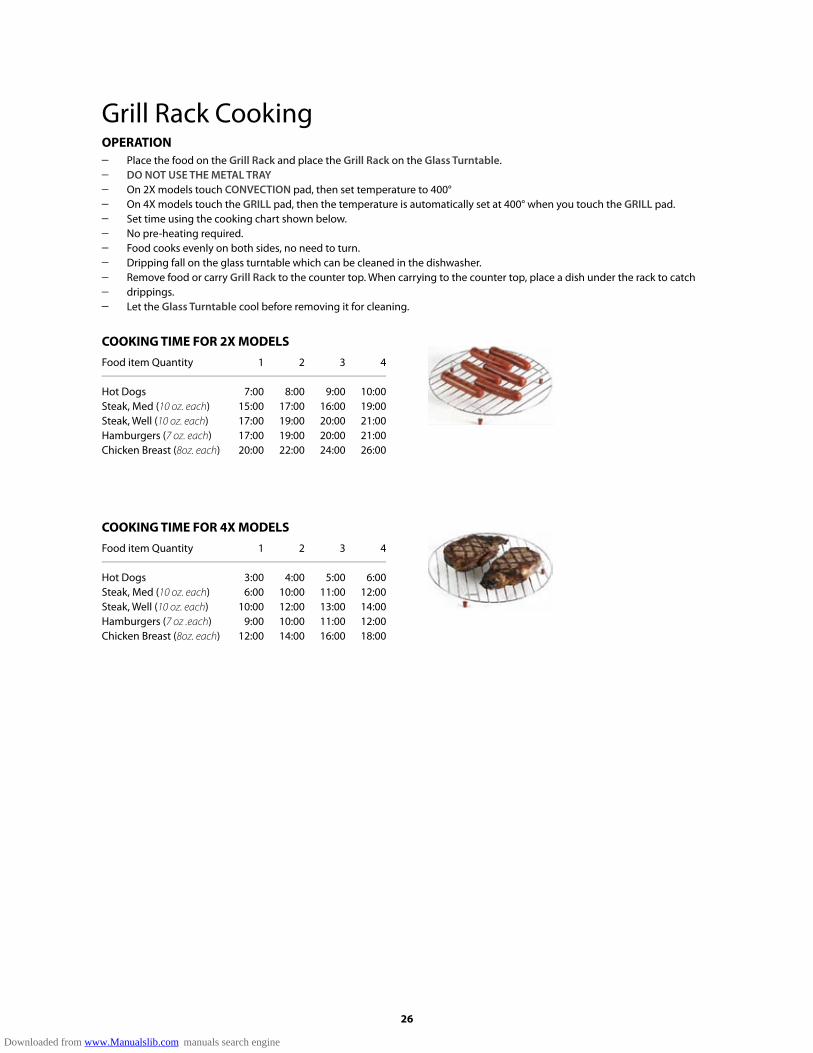
Grill Rack Cooking___________
OPERATIONPlace the food on the Grill Rack and place the Grill Rack on the Glass Turntable.DO NOT USE THE METAL TRAYOn 2X models touch CONVECTION pad, then set temperature to 400°On 4X models touch the GRILL pad, then the temperature is automatically set at 400° when you touch the GRILL pad.Set time using the cooking chart shown below.No pre-heating required.Food cooks evenly on both sides, no need to turn.Dripping fall on the glass turntable which can be cleaned in the dishwasher.Remove food or carry Grill Rack to the counter top. When carrying to the counter top, place a dish under the rack to catch drippings.Let the Glass Turntable cool before removing it for cleaning.
26
Food item Quantity
Hot DogsSteak, Med (10 oz. each)Steak, Well (10 oz. each)Hamburgers (7 oz. each)Chicken Breast (8oz. each)
1
7:0015:0017:0017:0020:00
2
8:0017:0019:0019:0022:00
3
9:0016:0020:0020:0024:00
4
10:0019:0021:0021:0026:00
COOKING TIME FOR 2X MODELS
Food item Quantity
Hot DogsSteak, Med (10 oz. each)Steak, Well (10 oz. each)Hamburgers (7 oz .each)Chicken Breast (8oz. each)
1
3:006:00
10:009:00
12:00
2
4:0010:0012:0010:0014:00
3
5:0011:0013:0011:0016:00
4
6:0012:0014:0012:0018:00
COOKING TIME FOR 4X MODELS
Downloaded from www.Manualslib.com manuals search engine

27
MICROWAVE COOKING GUIDE1.2.3.4.
5.6.
Use cooking chart below. In microwaving the greater the quantity, the longer the cook time.Microwaving does not brown food, used High Speed mode to brown, bake and roast.Use a microwave safe plastic, glass or oven safe plastic containers. DO NOT USE METAL.When using microwave plastic containers be sure the oven is cool. If the oven is still hot from convection High Speed cook-ing use a glass or oven safe plastic container.Covered utensils must have venting. Be careful when uncovering.Oven automatically cooks at the HIGH power (10). To set power levels 9-1 press the ADD TIME pad twice and enter a single digit 9-1.
Food
Appetizers
Cakes
EggsCheese Dairy
Fish &Shellfish
Fruits
Party mix 2 ½ Qts.
Meatball, small meat or hot dog chunks (24)
Stuffed Vegetables (12)
Toasted nuts or seeds (½ to 1 cup)
Rectangular, square or round
Cheesecake(9 inch cake or pie plate)
Scrambled eggs
Quiche
Thickened sauces & gravies (1 cup)
Scald Milk (½ cup)
Melt Butter (½ cup)
Soften cream cheese (8 oz.)
Filets or steaks (1 lb.)
Whole Shrimp
Shrimp Peeled (1 lb.)
Baked apples or pears
Baked dried fruits
Cover
No
Wax paper or plastic wrap
No
No
No
No
No
No
No
No
No
No
Wax paper
Yes
Yes
Yes
Power
High (10)
High (10)
High (10)
High (10)
Med. High (7)
Med. High (7)
High (10)
Med. High (7)Med. (5)
Med. (5)
High 1 to 2
Low (3)
High (10)
High (10)
High (10)
High (10)
High (10)
Time/Min
6 to 7
5 to 6
3 to 4
8 to 10
5 to 7
12 to 14
1 min. / egg
16 to 21
3 to 5
5
1/2 to 1
5 to 7
10 to 12
6 to 7
2 to 4 / piece
7 to 8 / lb.
Comments
Stir every 2 min.
Spread in a single layer in 2 quart glass dish
Space evenly on tray or on plate lined with
paper towels
Combine nuts with small amount of butter
Stir every 2 min.
Microwave cheese cake mixture in 2 quart
casserole until thick and smooth
Stir every 2 min. with wire whisk
Pour into crumb crust - Chill until firm
Stir 2 to 3 times during microwaving
Pour filling into pre baked shell
Melt fat, stir in flour and salt, microwave 1-2
min. Stir to blend, add additional liquid - Stir
every min.
Cover with water
Brush with garlic butter before cooking
Pierce fruit or peel to prevent bursting
Add ½ Cup water, wine or juice per lb.
Downloaded from www.Manualslib.com manuals search engine

28
MICROWAVE COOKING GUIDEFood
Meat
Rice & Pasta
Vegetables
Brown Ground Beef (1lb)
Bacon
Sausage Patties, Iinks
Sandwiches
Meat Casseroles / raw meat and vegetables
1 cup raw Rice
Instant Rice
Long pieces Spaghetti½ lb. (2-3 quart dish)
Asparagus 1 lb.
Green Beans 1 lb. snapped
Broccoli, 1 lb. (pieces)
Cabbage, 1 small (chopped)
Carrots, 2 cup, sliced or baby carrots Cauliflower
Corn on the Cob
Sugar Snap Peas ½ lb.
Potatoes Boiled
Spinach (fresh) 4 cups
Squash, Acorn, Butternut
Sweet Potatoes, whole
Zucchini, ¼ in. slices
Cover
Yes
Paper Towel
Paper Towel
Paper Towel
Yes
Yes
Yes
Yes
Yes
Yes
Yes
Yes
Yes
Yes
Yes
Yes
Yes
Yes
No
No
Yes
Power
High (10)
High (10)
High (10)
High (10)
High (10)
High (10)
High (10)
High (10)
High (10)
High (10)
High (10)
High (10)
High (10)
High (10)
High (10)
High (10)
High (10)
High (10)
High (10)
High (10)
High (10)
Time/Min
5 to 7
1- 1 ½ /slice
1-2 each
1 to 2
13 to 18
10 to 12
2 to 4
12 to 15
8 to 10
6 to 8
5 to 7
8 to 10
5 to 7
5 to 7
2-2 ½ / ear
3 to 5
10 to 12 / lb.
3 to 4
5 to 7
4-6 / Potato
3-4 / cup
Comments
Break up and stir every 2 min.
Place on paper towel lined plate.
Place on paper towel lined plate or glass dish, Turn.
Turn over after ½ cooking time.
Wrap sandwich in paper towel or napkin.
Rearrange or stir after ½ cooking time.
Ad water to package directions. Stir at ½ cooking time.
Let stand covered 5 min. - Fluff with fork
Let stand cover 3 to 5 min. - Fluff with fork.
Start with very hot water, Stir ½ way through
Place in dish with tender tips toward center
Add ¼ cup water
Add ¼ cup water
Cover with water in casserole dish.
Place in covered dish or wrap in Saran Wrap.
Add ½ cup water, ½ t. salt
Wash, cook with water sill on leaves
Cut in half, cook cut side down
Wash and pierce before cooking. Let stand for 5 min.
Downloaded from www.Manualslib.com manuals search engine

29
1.2.
HEATING & REHEATING GUIDE:Cover foods with paper towel or wax paper to prevent “popping or splattering.When reheating a plate of food place larger pieces on the outside of the plate and smaller pieces in the center of the plate
Food
Appetizers
Plate of Leftovers
Meats &Main Dishes
Saucy such as meatballs, riblets, cocktail franks, etc. ½ cup serving
Dips: cream orprocess cheese
Pastry bites, small pizzas, egg rolls etc.
Meat plus 2 vegetables
Saucy Main DishesChop suey, spaghetti,
cream chicken
Chili, stew, macaroni &cheese
Thin sliced roast meatRare, Minimum Time
Medium Rare Maximum Time
Well done beef, pork, ham, poultry, etc.
Steaks, chops, ribs, other meal pieces:Rare beef steak
Well done beef, chops, ribs, etc.
Hamburgers or Meat loaf
Chicken Pieces
Hot dogs & sausages
Amount
1-2 Servings3-4 Servings
½ cup1 cup
2-4 Servings
1 plate
1-2 servings
3-4 servings
1-2 servings3-4 servings
1-2 servings3-4 servings
1-2 servings3-4 servings
1-2 servings3-4 servings
1-2 servings3-4 servings
1-2 servings4-4 servings
1-2 servings3-4 servings
Power
High (10)High (10)
Med. (5)Med. (5)
High (10)
High (10)
High (10)
High (10)
Med. H (7)Med. H (7)
Med. H (7)Med. H (7)
Med. H (7)Med. H (7)
Med. H (7)Med. H (7)
High (10)High (10)
High (10)High (10)
High (10)High (10)
Time/Min
2 to 35 to 6
2 ½ to 33 to 4
2 to 3
2 to 4
3 to 6
9 to 12
1 to 32 to 4
1 to 32 to 5
1 to 32 to 5
2 to 35 to 7
1 to 22 to 4
½ to 1
1 ½ to 2 ½
Comments
Cover sauce appetizers with wax paper
Do not cover pastry
Cover plate with plastic wrap or wax paper
¾ - 1 cup per serving
3-4 oz. per serving
3-4 oz. per serving
3-4 oz. per serving
4 oz. servings
Downloaded from www.Manualslib.com manuals search engine

30
HEATING & REHEATING GUIDE:
Food
Pasta & Rice
Sandwiches
Soup
Vegetables
Sauces
Plain or buttered
Topped or mixed - sauce
Moist filling:Sloppy Joe, Barbecue, ham
salad in bun.
Thick meat-cheese filling /
bread.
Water based
Milk based
Small piecespeas, beans, corn, etc.
Large places or wholeAsparagus spears,
corn on the cob, etc.
Mashed potatoes, squash,
pumpkin, etc.
Dessert chocolate butterscotch
Meat or main dish, chunky type Giblet-gravy,
Spaghetti sauce, etc.
Creamy Type
Amount
1-2 Servings3-4 Servings
1-2 Servings3-4 Servings
1-2 Servings3-4 Servings
1-2 Servings3-4 Servings
1-2 Servings3-4 Servings
1 10 oz. can
1-2 Servings3-4 Servings
1 10 oz. can
1-2 Servings3-4 Servings1 16 oz. can
1-2 Servings3-4 Servings1 16 oz. can
1-2 Servings3-4 Servings
½ cup1 cup
½ cup1 cup1 16 oz. can
½ cup1 cup
Power
High (10)High (10)
High (10)High (10)
Med. H (7)Med. H (7)
Med. H (7)Med. H (7)
High (10)High (10)
High (10)
Med. H (7)Med. H (7)
Med. H (7)
High (10)High (10)High (10)
High (10)High (10)High (10)
High (10)High (10)
High (10)High (10)
High (10)High (10)High (10)
High (10)High (10)
Time/Min
1 to 33 to 5
1 to 33 to 5
1 to 23 to 4
1 to 33 to 5
1 to 33 to 6
3 to 5
1 to 26 to 10
6 to 8
1 to 32 to 32 to 4
2 to 33 to 44
1 to 34 to 5
1 to 22 to 3
1 to 22 to 33 to 4
1 to 1 ½2 to 2 ½
Comments
½ to 1 cup serving
Tip: Cover saucy main dishes / plastic wrap
Cover other main dishes & meats / wax paper
Do not cover rare or medium rare meats.
1/3 cup servings
Tip: Use paper towel to cover sandwiches
1 cup servings
1 cup servings
Tip: cover soups / wax paper or wrap
Tip: Cover vegetables for most even heating
Tip: cover food to prevent splatter, stir often
Downloaded from www.Manualslib.com manuals search engine
31
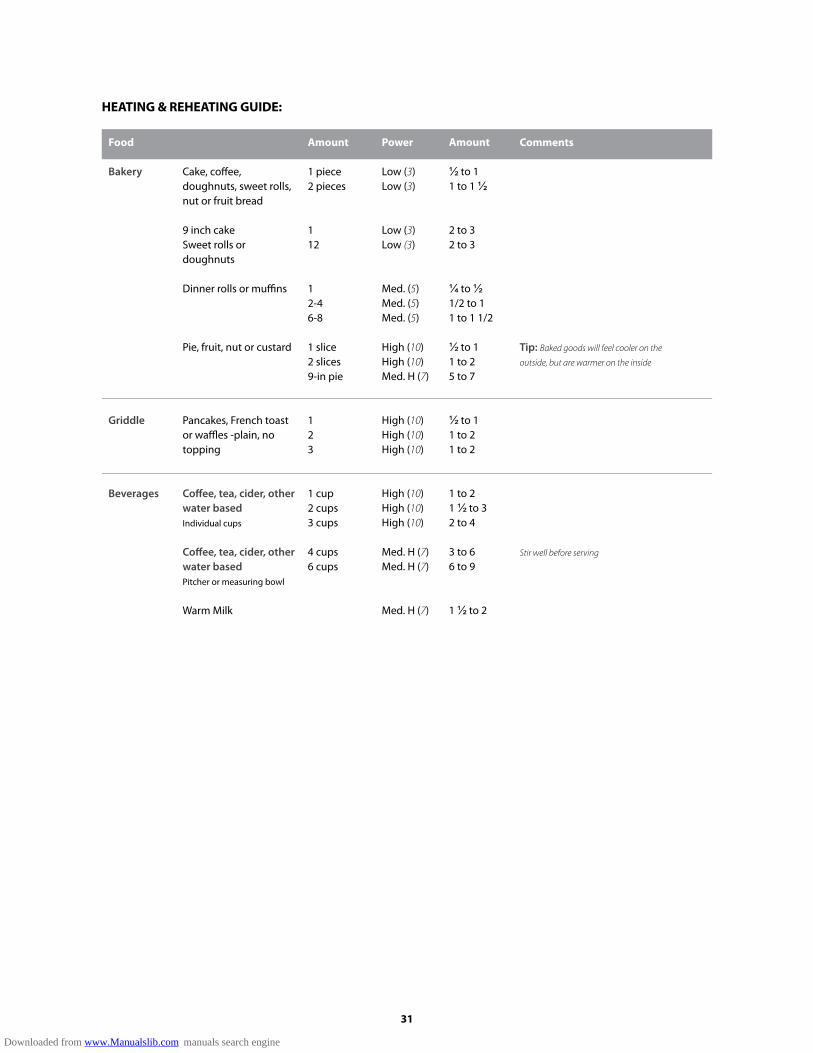
HEATING & REHEATING GUIDE:
Food
Bakery
Griddle
Beverages
Cake, coffee, doughnuts, sweet rolls, nut or fruit bread
9 inch cakeSweet rolls or doughnuts
Dinner rolls or muffins
Pie, fruit, nut or custard
Pancakes, French toast or waffles -plain, no topping
Coffee, tea, cider, other water based Individual cups
Coffee, tea, cider, other water basedPitcher or measuring bowl
Warm Milk
Amount
1 piece2 pieces
112
12-46-8
1 slice2 slices9-in pie
123
1 cup2 cups3 cups
4 cups6 cups
Power
Low (3)Low (3)
Low (3)Low (3)
Med. (5)Med. (5)Med. (5)
High (10)High (10)Med. H (7)
High (10)High (10)High (10)
High (10)High (10)High (10)
Med. H (7)Med. H (7)
Med. H (7)
Amount
½ to 11 to 1 ½
2 to 32 to 3
¼ to ½1/2 to 11 to 1 1/2
½ to 11 to 25 to 7
½ to 1 1 to 21 to 2
1 to 21 ½ to 32 to 4
3 to 66 to 9
1 ½ to 2
Comments
Tip: Baked goods will feel cooler on the
outside, but are warmer on the inside
Stir well before serving
Downloaded from www.Manualslib.com manuals search engine

32
1.2.
DEFROSTING GUIDEUse Speed Defrost for most items. For large cuts of meat use DEFROST BY WEIGHT.Medium to large food items should b turned over after ½ the Defrosting time.When defrosting several food items frozen together, for example chicken pieces, chops or steaks, separate items after ½ the defrosting time.
Food
BreadsCakes
Pies
Fish &Seafood
Bread or Buns (1 lb. pkg)
Coffee cake (11 to 13 oz.)
Sweet rolls (12 oz. pkg)
Doughnuts (1-3)
Doughnuts - glazed (box of 12)
French Toast (2 slices)
Cake, frosted 2 to 3 layer (17-22 oz.)
Cake, filled or topped 1 layer (12 ½ - 16 oz.)
Pound cake (11 ¼ oz.)
Cheesecake, plain or fruit top (17-19 oz.)
Cupcakes (1 to 2)
Fruit or nut pie (8 in.)
Cream or custard pie (14-24 oz.)
Filets (1 lb.)
Steaks (6 oz.)
Whole fish (8 to 10 oz.)
Shellfish, small pieces (1 lb.)
Shellfish, blocks, crab meat - (6 oz. pkg.)
Oysters (12 oz. can)
Scallops (1 lb. pkg.)
Time/Min
5
5 to 6
3 to 4
2/4 to 1 ½
3 to 4
1 to 2
3-3 ½
2 to 3
3
3 to 4
½ to 1
9 to 12
2 to 5
9 to 11
3
2 to 7
6 to 10
2 to 5
12 to 14
12 to 14
Comments
Turn over after ½ the defrosting time
Turn over after ½ the defrosting time.
Let stand 10 min. before serving
Let stand 10 min. before serving
Let stand 10 min. before serving
Let stand 10 min. defrost 2-3 min. more if needed
Let stand 5 minutes before serving
Let stand 5 minutes before serving
Place unopened package in oven - If fish is frozen in water, place in cooking dish
Turn over after first half of time - Let stand 5 minutes on counter to complete defrosting
Place unopened steak in oven - Turn over after first half of time
Place fish in cooking dish. Turn over after first half of time - After second half time, rinse cavity
with cold water to complete defrosting
Spread shell fish in single layer in baking dish - Rearrange after ½ of the time
Place blocks in casserole. Turn over and break up with fork after first half of time
Place block in casserole - Turn over and break up with fork after first half of time
Let stand 10 minutes after defrosting
Place block in casserole - Turn over and break up with fork after first half of time
Let stand 10 minutes after defrosting
Downloaded from www.Manualslib.com manuals search engine
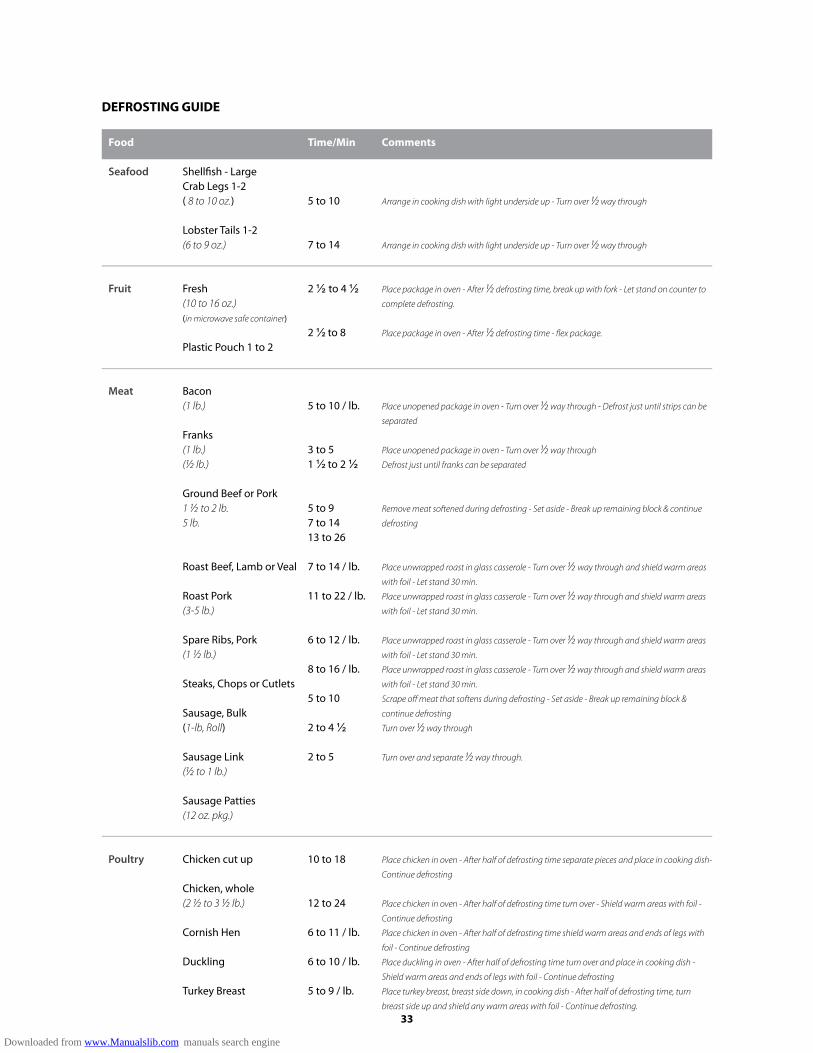
33
DEFROSTING GUIDE
Food
Seafood
Fruit
Meat
Poultry
Shellfish - LargeCrab Legs 1-2 ( 8 to 10 oz.)
Lobster Tails 1-2 (6 to 9 oz.)
Fresh (10 to 16 oz.)(in microwave safe container)
Plastic Pouch 1 to 2
Bacon (1 lb.)
Franks (1 lb.)(½ lb.)
Ground Beef or Pork1 ½ to 2 lb.5 lb.
Roast Beef, Lamb or Veal
Roast Pork (3-5 lb.)
Spare Ribs, Pork (1 ½ lb.)
Steaks, Chops or Cutlets
Sausage, Bulk (1-lb, Roll)
Sausage Link (½ to 1 lb.)
Sausage Patties (12 oz. pkg.)
Chicken cut up
Chicken, whole(2 ½ to 3 ½ lb.)
Cornish Hen
Duckling
Turkey Breast
Time/Min
5 to 10
7 to 14
2 ½ to 4 ½
2 ½ to 8
5 to 10 / lb.
3 to 51 ½ to 2 ½
5 to 97 to 1413 to 26
7 to 14 / lb.
11 to 22 / lb.
6 to 12 / lb.
8 to 16 / lb.
5 to 10
2 to 4 ½
2 to 5
10 to 18
12 to 24
6 to 11 / lb.
6 to 10 / lb.
5 to 9 / lb.
Comments
Arrange in cooking dish with light underside up - Turn over ½ way through
Arrange in cooking dish with light underside up - Turn over ½ way through
Place package in oven - After ½ defrosting time, break up with fork - Let stand on counter to
complete defrosting.
Place package in oven - After ½ defrosting time - flex package.
Place unopened package in oven - Turn over ½ way through - Defrost just until strips can be
separated
Place unopened package in oven - Turn over ½ way through
Defrost just until franks can be separated
Remove meat softened during defrosting - Set aside - Break up remaining block & continue
defrosting
Place unwrapped roast in glass casserole - Turn over ½ way through and shield warm areas
with foil - Let stand 30 min.
Place unwrapped roast in glass casserole - Turn over ½ way through and shield warm areas
with foil - Let stand 30 min.
Place unwrapped roast in glass casserole - Turn over ½ way through and shield warm areas
with foil - Let stand 30 min.
Place unwrapped roast in glass casserole - Turn over ½ way through and shield warm areas
with foil - Let stand 30 min.
Scrape off meat that softens during defrosting - Set aside - Break up remaining block &
continue defrosting
Turn over ½ way through
Turn over and separate ½ way through.
Place chicken in oven - After half of defrosting time separate pieces and place in cooking dish-
Continue defrosting
Place chicken in oven - After half of defrosting time turn over - Shield warm areas with foil -
Continue defrosting
Place chicken in oven - After half of defrosting time shield warm areas and ends of legs with
foil - Continue defrosting
Place duckling in oven - After half of defrosting time turn over and place in cooking dish -
Shield warm areas and ends of legs with foil - Continue defrosting
Place turkey breast, breast side down, in cooking dish - After half of defrosting time, turn
breast side up and shield any warm areas with foil - Continue defrosting.
Downloaded from www.Manualslib.com manuals search engine

You may purchase OUT OF WARRANTY PARTS or ACCESSORIES by calling 1-800-330-9707.
Half Time Oven, Inc. warrants this oven against defects in material or workmanship for a period of one year from the date of it’s original purchase by a consumer for home use. No other company involved in the sale or promotion of this product is a co-warrantor of this manufacturer’s warranty
Manufacturer’s Limited Warranty
The Oven cannot be returned to the Seller for repair. It must be repaired by an authorized Service Agent. You can get the name and phone number of your nearest service agent by calling 1-800-330-9707. You must take Counter-top Models to the nearest Service Agent to obtain service. Only Built-in ovens or Over the Range Models will be serviced in-home.
HOW TO OBTAIN SERVICE
In no event shall the manufacturer be liable for any incidental or consequential damages (including, but not limited to food loss) or for any special damages or any further loss as a result of any breach of these warranties. Some states do not allow the exclusion or limitations of consequential damages; so the above limitations or exclusion may not apply to you.
LIMITATION OF LIABILITY
Before requesting service, be sure that you have read and followed all procedures in the Use and Care Book. Should service be required call 1-800-330-9707 for the name and number of your nearest service agent. If your oven is installed in a Recreational Vehicle you can call 1-800-772-7262. Evidence of purchase date must be provided to obtain warranty service.
If you are not satisfied with the response to your service requirements, write Service Department, P.O. Box 6066, West Palm Beach, FL 33405 The letter should include the date of purchase and details concerning your problem.
TO SECURE WARRANTY SERVICE
HOW TO OBTAIN OUT OF WARRANTY PARTS
These warranties are the only written or expressed warranties given by the manufacturer. No one is authorized to increase, alter, or enlarge the manufacture’s responsibilities or obligations under these warranties. These warranties give you specific legal rights, which may vary, from state to state.
ADDITIONAL RIGHTS
THIS WARRANTY COVERS PRODUCTS IN THE UNITED STATES AND CANADA ONLY
MANUFACTURER’S OBLIGATION UNDER THESE WARRANTIES SHALL NOT EXTEND TO ANY MALFUNCTION OR OTHER PROBLEM CAUSED BY:
EXCLUSIONS
1. 1.
2.
3.
2.
Damage unless attributable to a defect in material or workmanship.Unreasonable use or misuse, such as, but not limited to, improper setting of controls, improper electrical supply and improper installation.Damages resulting from or problems caused by any installation, repair, alteration, modification, or adjustment of the appliance not performed by an Authorized Service Agent.
THESE WARRANTIES DO NOT COVER:The replacement of light bulbs or metal trays.
Ovens purchased or used for commercial purposes.
Downloaded from www.Manualslib.com manuals search engine