user guide - hampton city schools
TRANSCRIPT
July 8, 2019 Page 1 of 15
Hampton City Schools MUNIS Employee Self Service (ESS)
User Guide
To access the Hampton City Schools MUNIS ESS site visit: https://selfservice.hampton.k12.va.us/mss/
Or
From the Hampton City Schools home page (http://www.hampton.k12.va.us/) click Staff,
and click the link Employee Self Service-MUNIS ESS.
(Be advised, ESS is only accessible while on the HCS network)
Table of Contents

July 8, 2019 Page 2 of 15
MUNIS Employee Self Service Overview
MUNIS Employee Self Service (ESS) is a web based application that allows
Hampton City Schools (HCS) employees to privately access selected personal and payroll information.
The following are some features and information available through ESS:
PERSONAL INFORMATION
o View and update contact information (address and telephone numbers) o View and update secondary email contact information o View and update emergency contact information
o View employee profile information (general employment and demographic information)
PAY AND TAX INFORMATION o View and print pay check information (beginning July 15) o View and print year-to-date gross earnings (beginning July 15)
o View and print W-2 information (available beginning January 2020 for 2019 tax year)
o View current W-4 & VA-4 withholding information o Paycheck Simulator utility
RESOURCE LINKS
o View and print any additional documents or links that have been provided for your reference.
Before You Get Started, General Guidelines
Internet access is necessary in order to access MUNIS Employee Self Service
(ESS). You must be on the HCS network for the link listed in this document to work.
Login credentials are your current email single sign-on credentials. Username and password are the same for ESS that are currently in place for all other
systems. To reset your password, please follow the “Forgot Your Password?” link on the HCS staff page:
Module specific screens are listed at the left side of the Employee Self Service page which provides information to which you have access.
Please make sure you log off when finished and close your browser to ensure complete log out from the system.

July 8, 2019 Page 3 of 15
Accessing MUNIS Employee Self Service
1. From the Internet, type https://selfservice.hampton.k12.va.us/mss/
2. The HCS Munis Self Service page will appear.
Logging In to MUNIS Self Service
1. Click the Log In link located teal bar on the top right‐hand side of the
screen, next to the question mark.

July 8, 2019 Page 4 of 15
2. Enter your username and password (current HCS credentials)
3. Click Log In.
MUNIS Self Service Main Page
1. Once you log in, MUNIS Self Service Main Page appears displaying your name
in the upper right‐hand side and the Employee Self Service link on the left‐hand side.
2. The Employee Self Service Welcome screen appears.
Identifying parts of the Employee Self Service Main Page:
1. Announcements – District‐wide messages for all HCS ESS users to view which are set by the ESS administrator.
2. Module specific list – Various modules listed in the left side menu
3. Workflow forwarding – This appears only in supervisor ESS accounts. Allows the supervisor to forward time-off workflow to specified alternate
supervisor for a set time frame. 4. Personal Information – Lists employee specific personal information
(name, phone number, address, email address).

July 8, 2019 Page 5 of 15
5. Time off – Lists all leave earned and available for use by employee 6. Paychecks – Takes you straight into your last payroll advices. You can
select to see the physical image of your stub or see a list of all details (pay/deduction data) of your pay advice. Your physical image will also be
delivered to you via email prior to the pay date. This email will contain a PDF of the pay advice, which is password protected with the last four digits of your social security number.
7. Employee time off – (supervisor access only) – Lists all employee time off information for each supervisor
Certifications/Credentials Modules
The Certifications and Credentials Modules allow you to view currently held certifications and credentials that are position specific. Supervisors (if applicable) will see their information populated first, with employees in a
drop down menu in order to view current certifications and credentials held by members of your team. NOTE: More detailed information regarding
information contained within these modules will be released at a later date.
Personal Information Module
1. Select Personal Information from the Module‐Specific list on the left.
2. Personal information includes home address, e‐mail (can add an alternate
email), telephone, and emergency contact information. 3. The employee has the ability to update most Personal Information by clicking
the “edit” link in each section. An “edit” link will appear in each section an editable field exists. Once selected, the editable fields become visible with a
text box, drop down list, or selection box. Be sure to select save once changes are made. Keep in mind changes made here are reflected in your Human Resources record with HCS.
Job Information Subsection
Under Personal Information, click the Job Information to view general information specific to your current position. Data includes name, employee
ID, job name, location, jurisdiction, and position title. NOTE: This is informational only, some of which is coded for internal use, and cannot be
edited. If you have recently had a job/position change and see previous data, the updates may have not been finalized yet. Please reach out to Human Resources if any errors exist in this information.

July 8, 2019 Page 6 of 15
Pay/Tax Information Module
The Pay/Tax Information Module allows you to view and print pay check
information, view and print year‐to‐date gross earnings, view and print W‐2
information, view and print current W‐4 withholding information and offers a
Paycheck Simulator utility. NOTE: The Total Compensation and Payroll Calendars utilities are currently inactive. More detailed information regarding their functionality will be released at a later date.
View and Print Pay/Tax Information
1. Click Pay/Tax Information from the Module‐Specific list on the left to view pay history: (No previous pay/tax information is being brought over into ESS from the K12 ERC. Should you need access to historical K12 data, please
access the Employee Resource Center or contact the Payroll Department for assistance.)
Data will be populated here as payroll is processed, and will be listed in order from newest to oldest. A “details” link will be on the right side of the pay
information for each specific payroll. Select this link to be taken to a detailed listing of all pays and deductions. Also, a picture of a camera will also be
July 8, 2019 Page 7 of 15
seen next to the details link. Selecting the camera will populate a pay advice. NOTE: This information cannot be modified by the user. Please
contact the Payroll Department for questions or issues regarding your pay check information.
YTD Information Subsection
Click the YTD Information subsection of Pay/Tax Information for a
cumulative view of payroll information for a given year.
W‐2 Information Subsection
1. Click the W‐2 Information subsection of Pay/Tax Information.
2. W‐2 Information displays Federal and State taxes and withholding for a given year.
W‐4 Information Subsection
Click the W‐4 Information subsection of Pay/Tax Information to view
information regarding current tax withholding status for both Federal & State taxes. No edits can be made in ESS; please complete a paper W-4 or VA-4 and submit to Payroll Department for any desired changes. NOTE: Please
have all W-4 & VA-4 changes to the payroll office no later than 10 days prior to pay day to ensure changes are made for the next payroll process.
Paycheck Simulator Subsection
1. Click the Paycheck Simulator subsection of Pay/Tax Information to enter
pay, tax, and deductions to see what your paycheck might look like if you change tax withholdings. Keep in mind, this is merely a simulator
based on editable information. Any number of reasons could cause the results here to vary from actual processed payroll. Changing tax status/exemptions here does not reflect in the actual employee
record without a paper form submission.

July 8, 2019 Page 8 of 15
2. Click Submit to see the results of your entered values. 3. A listing of current values and simulated values will appear:
Remember, results here may not reflect an actual pay processed, and are merely for simulation purposes only.

July 8, 2019 Page 9 of 15
Time Off Module
The Time Off Module houses two employee specific subsections, in addition to two
supervisor level subsections where appropriate. All employees will have access to My Requests and Request Time Off; while the Employee Requests and Employee History are supervisor specific. NOTE: The supervisor access is granted internally
and all current supervisors should have access to all indicated supervisor subsections. Should a supervisor not see sections as indicated, please contact the
Payroll Department for assistance.
From the main screen in the Time Off module, all current leave records with
earnings and use information, are visible. Each leave type (comp-if applicable, personal, sick, vacation) are linked, as well as the figures in the taken column.
Clicking one of the leave types will bring you to an earned/used history screen:
The current year populates and lists all leave taken up to that point in time. There
are links that take you back to the previous screen as well as a calendar view. The drop down year list at the top of the calendar goes back to 2011 (this is a default that cannot be changed) and will have future years added as time passes. All leave
history will show on the calendar with a yellow box on the date leave was used. This history record will exist for all leave utilized beginning with July 1, 2019.
Leave entries are indicated on the calendar as soon as a request is made, even if not yet approved or taken.

July 8, 2019 Page 10 of 15
Clicking on a highlighted date will provide more detailed information:
July 8, 2019 Page 11 of 15
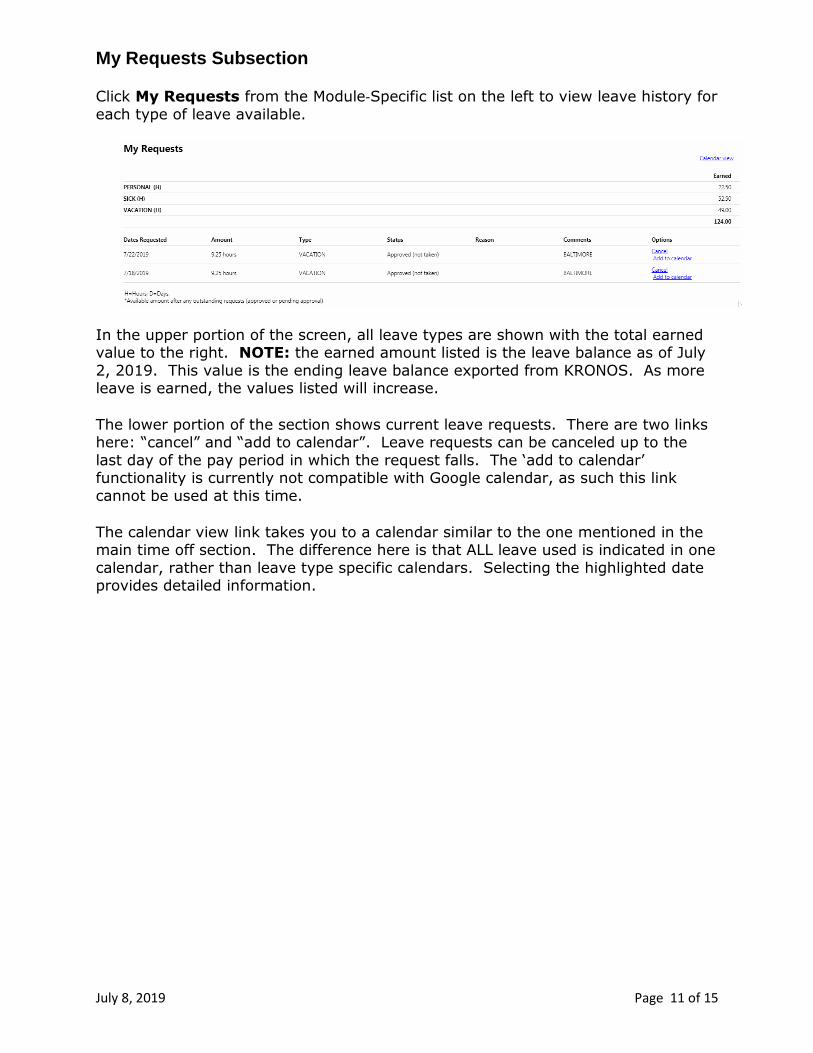
My Requests Subsection
Click My Requests from the Module‐Specific list on the left to view leave history for
each type of leave available.
In the upper portion of the screen, all leave types are shown with the total earned value to the right. NOTE: the earned amount listed is the leave balance as of July
2, 2019. This value is the ending leave balance exported from KRONOS. As more leave is earned, the values listed will increase.
The lower portion of the section shows current leave requests. There are two links here: “cancel” and “add to calendar”. Leave requests can be canceled up to the
last day of the pay period in which the request falls. The ‘add to calendar’ functionality is currently not compatible with Google calendar, as such this link
cannot be used at this time.
The calendar view link takes you to a calendar similar to the one mentioned in the main time off section. The difference here is that ALL leave used is indicated in one
calendar, rather than leave type specific calendars. Selecting the highlighted date provides detailed information.

July 8, 2019 Page 12 of 15
Request Time Off Subsection
Click Request Time Off from the Module‐Specific list on the left to enter a new
leave request:
To request time off, follow these 4 steps:
1. Select dates: the default calendar view is the current month and the next two months, as seen above. If the desired request is beyond 3
months, select ‘next month’. ESS has functionality to take retroactive (in the past) requests. Select the date from the current month or click ‘previous month’ to move back one month. Shown here is a request
for July 29, 2019: Once the desired date is selected, it becomes
highlighted. A range of dates (7/29-7/31) or multiple dates (7/29 & 7/31) can be selected as well. Select
‘CONTINUE’

July 8, 2019 Page 13 of 15
2. Select type of leave: in this step, select the radio button for the leave type desired for the date(s) indicated in step 1.
In this example, SICK is the desired leave type. To the right, the current leave balance available is listed to assist with your selection.
NOTE: All comp time (where applicable) should be used prior to any other leave type. The system has this rule built in (if comp time is
available, and sick is selected, the system will automatically charge comp time first.) Select ‘CONTINUE’
3. Partial day requests: in this step, you will identify how many hours of leave are requested for each day in this leave request.
The scheduled hours per day populate automatically for each day in process of being requested. It is important to pay special attention to
this and make any necessary adjustments prior to moving to the final step. NOTE: during extended summer hours, please be sure to enter adjusted hours as appropriate for full days off. If only taking a partial
day off, enter hours as necessary. 4. Additional Information: in this final step, the data entered in the
previous 3 steps will be reviewed. An optional comment can also be entered in this step (while not required to enter a leave request in ESS, this step may be required by your immediate supervisor.)

July 8, 2019 Page 14 of 15
The “REASON” and drop down that appears is a system default. Please do not make a selection here. This field will be utilized for various special leave requests, and information will be provided to
those it immediately affects. Select “MAKE REQUEST” to finalize request. Once the request is made, you will be directed to the ‘My
Requests’ section. The request will appear in the list with a status of ‘In Progress’. At this point, your supervisor will receive an email notification. Once approved, you will receive a system generated
email from hcs-munisadmin indicating the decision.
Resources Menu
To access various Payroll and Human Resources documents, click Resources Menu icon in the upper right hand corner of the teal ribbon:
This menu houses various documents for use by employees pertaining to both the Payroll and Human Resources departments. Examples of documents housed here
include W-4, VA-4, Electronic Payment Election Form, and ESS Employee Guide. This menu may be updated periodically, with the goal to utilize the Resources Menu as a primary source for needed information and forms.

July 8, 2019 Page 15 of 15
Frequently Asked Questions
What if I forget my password?
Follow the ‘Forgot Your Password’ link on the HCS staff page.
How secure is my personal information?
Your information is encrypted for privacy and will remain secure as long as you
protect your password. For added security, and given the active directory link for ESS, please do not allow other employees to attempt to log in to ESS from a
computer you are currently logged into.
Who do I call if I have questions about my information?
Payroll Related Questions
Contact your timekeeper for assistance. In the event your timekeeper is unavailable contact the
Payroll Department at:
757-727-2330 or [email protected]
Human Resources Related Questions
Contact the Human Resources department at:
757-727-2300 or [email protected]