user guide indu soft
TRANSCRIPT

8/22/2019 User Guide Indu Soft
http://slidepdf.com/reader/full/user-guide-indu-soft 1/1279
IntroductionThis User Guide and Technical Reference was designed to help you get the best results from yourInduSoft Web Studio™ software. This document provides technical information and step-by-stepinstructions for all the tasks you need to create Web-enabled HMI/SCADA programs.
Who should read this
This User Guide and Technical Reference is a comprehensive document designed to provide usefulinformation for both novice and advanced users of IWS.
New Users: This publication uses a step-by-step, hands-on approach to the projectdevelopment process. Be sure to read the introductory chapters describing the product'sfeatures and development environment.
Experienced Users: This publication offers advanced instructions, tips, and troubleshootinginformation to help you get the most out of your projects.
Note: We assume you are familiar with working in a Windows environment, and we do notattempt to explain Windows navigation, file management, and so forth. If you are unfamiliar withany of these procedures, we recommend using the Windows Help feature (Start > Help) orconsulting your Microsoft Windows documentation.
Contents
The information in this document is organized into the following chapters:
This chapter: Describes the purpose, content, and organization of the User Guide and Technical
Reference. In addition, this chapter contains the following information:
Explains the formatting, mouse, and Windows conventions used
Lists other publications providing information about IWS
Explains how to contact a technical support representative
About This Software: Provides a high-level overview of the product's uses, features, andfunctions.
Installing and Uninstalling: Provides step-by-step instructions for installing, licensing,starting, and uninstalling InduSoft Web Studio and CEView.
Navigating the Development Environment: Describes the IWS interface (or development
environment ), and explains some basic skills and techniques you must understand beforecreating a new project.
How the Software Works: Describes the internal structure of IWS, including how data flowsthrough the runtime modules and how these modules are executed.
Creating and Configuring a New Project: Provides step-by-step instructions for creatingand configuring a new project.

8/22/2019 User Guide Indu Soft
http://slidepdf.com/reader/full/user-guide-indu-soft 2/1279
Working with Tags: Explains basic concepts about the product database, tag types (arrays,classes, and pointers), tag values and parameters. Following the concepts discussion, thischapter provides instructions for creating and editing tags for your projects.
Creating Screens and Graphics: Explains how to use the different IWS development tools tocreate your project screens and graphics.
Configuring Background Tasks: Explains how to create and configure the different IWS task
worksheets for your projects.
Event Settings: Describes the logging and event-retrieval features.
Communicating with Other Devices: Describes how to configure your project to read fromand write to a device's registers. The information includes instructions for configuring drivers
and OPC, TCP/IP, and DDE communication.
Configuring a Security System: Explains how to set-up and manage a security system foryour projects.
Testing and Debugging Your Project: Discusses how to test and debug projects using toolssuch as the Database Spy and Output windows. This chapter includes a list of possible errormessages and methods for correcting those errors.
Configuring a Web Solution: Explains how configure and run your projects on the Web.
Downloading to a Remote Device: Explains how to download, monitor, and debug projectsfrom a remote runtime workstation.
Using the Translation Tool: Explains how to use the Translation Tool to translate the text inyour projects from one language to another.
Database Interface: Explains how to connect IWS to compatible databases.
Scripting Languages: Describes IWS's built-in scripting language, as well as the support forVBScript in IWS.
Troubleshooting and FAQs: Provides instructions for verifying projects, describes somecommon development errors, and explains what to do if you need to contact a supportrepresentative.
Related documentation
You may want to review the following manuals in addition to this Technical Reference:
Getting Started Manual : Provides basic information about InduSoft Web Studio, including asystematic tutorial that allows you to develop a single project and become familiar with theproduct in a short time.
Tutorial Manual : Describes how to build an project, step-by-step, with the main productfeatures. You can use this document as a self-training manual.
Drivers User Guides: Explain how to configure individual direct communication drivers,according to their unique protocol characteristics. One customized user guide is included witheach driver.
Note: All manuals are located in the Documentation folder on the IWS installation CD. IWSinstalls the Drivers User Guides in the\Drv folder in the program directory. You also can access
technical information from the Help menu.

8/22/2019 User Guide Indu Soft
http://slidepdf.com/reader/full/user-guide-indu-soft 3/1279
InduSoft Web Studio v7.0 Technical ReferenceCopyright © 2003–2010 Indusoft, Inc.

8/22/2019 User Guide Indu Soft
http://slidepdf.com/reader/full/user-guide-indu-soft 4/1279
Conventions used in thisdocumentation
This documentation uses standardized formatting and terminology to make it easier for all users tounderstand.
Text conventions
This documentation uses special text formatting to help you quickly identify certain items:
Titles, labels, new terms, and messages are indicated using italic text (for example, ObjectProperties).
File names, screen text, and text you must enter are indicated using monospace text (for
example, D:\Setup.exe).
Buttons, menu options, and keyboard keys are indicated using a bold typeface (for example,File menu).
In addition, this documentation segregates some text into Tip, Note, and Caution boxes:
Tips provide useful information to save development time or to improve the projectperformance.
Notes provide extra information that may make it easier to understand the nearby text, usuallythe text just before the note.
Cautions provide information necessary to prevent errors that can cause problems whenrunning the project, and may result in damage.
Mouse and selection conventions
Because most PCs used for project development run a version of Microsoft Windows with a mouse,this documentation assumes you are using a mouse. Generally, a PC mouse is configured for right-handed use, so that the left mouse button is the primary button and the right mouse button is thesecondary button.
This documentation uses the following mouse and selection conventions:
Click and Select both mean to click once on an item with the left mouse button. In general,you click buttons and you select from menus and lists.
Double-click means to quickly click twice on an item with the left mouse button.
Right-click means to click once on an item with the right mouse button.
Select also means you should use your pointing device to highlight or specify an item on thecomputer screen. Selecting an item with a touchscreen is usually the same as selecting with amouse, except that you use your finger to touch (select) a screen object or section. To selectitems with your keyboard, you typically use the Tab key to move around options, the Enter key

8/22/2019 User Guide Indu Soft
http://slidepdf.com/reader/full/user-guide-indu-soft 5/1279
to open menus, and the Alt key with a letter key to select an object that has an underlinedletter.
Drag means to press down the appropriate mouse button and move the mouse before releasingthe button. Usually an outline of the item will move with the mouse cursor.
Windows conventions
This documentation uses the following Windows conventions:
dialoges (or dialogs) are windows that allow you to configure settings and enter information.
Text boxes are areas in dialogs where you can type text.
Radio buttons are white circles in which a black dot appears or disappears when you click onthe button. Typically, the dot indicates the option or function is enabled (selected). No dotindicates the option or function is disabled (not selected).
Check boxes are white squares in which a check ( ) appears or disappears when youclick on it with the cursor. Typically, a check indicates the option or function is enabled
(selected). No check indicates the option or function is disabled (not selected).
Buttons are icons in boxes appear "pressed" when you click on them.
Lists are panes (white boxes) in windows or dialogs containing two or more selectable options.
Combo boxes have arrows that, when clicked, show part or all of an otherwise concealedlist.
Dockable windows are windows that you can drag to an edge of the interface and merge withthat edge.
InduSoft Web Studio v7.0 Technical ReferenceCopyright © 2003–2010 Indusoft, Inc.

8/22/2019 User Guide Indu Soft
http://slidepdf.com/reader/full/user-guide-indu-soft 6/1279
About This Application
InduSoft Web Studio (or simply IWS or Studio) is a powerful, fully integrated software program thatenables you to design and build feature-rich HMI (Human-Machine Interface) or SCADA (SupervisoryControl and Data Acquisition) projects for:
Data acquisition
Local supervisory stations
Remote supervisory stations
Data concentrators on distributed processes
Data communications with corporate systems
Product Overview
Product Features
InduSoft Web Studio v7.0 Technical Reference
Copyright © 2003–2010 Indusoft, Inc.

8/22/2019 User Guide Indu Soft
http://slidepdf.com/reader/full/user-guide-indu-soft 7/1279
About This Application >
Product OverviewInduSoft Web Studio projects run on microcomputers connected in real-time to machines orprocessors through programmable controllers, remote I/O devices, and other data-acquisitionequipment.
These projects consist of animated operator-interface screens, configurable PLC (programmable logiccontroller) drivers and other controllable I/O devices, a project tags database, and optional modulessuch as alarm monitors, logic, trend charts, recipes, schedulers, and a security system. IWS projectsinterface with industrial I/O systems and other Windows applications in the runtime environmentusing the following protocols:
ODBC (Open Database Connectivity )
DDE (Dynamic Data Exchange)
NetDDE (Network Dynamic Data Exchange)
OPC (Open Connectivity )TCP/IP (Transmission Control Protocol/Internet Protocol )
After developing a project, you can run it on your development workstation or download the projectto a runtime workstation (using a serial or TCP/IP connection) and run it using InduSoft Web Studioor CEView runtime software. The workstation processes scan data from connected devices accordingto parameters defined in the project and then react to, display, store and upload the data.
The product consists of two parts:
The development system software runs on a desktop, laptop, or industrial PC running acurrently supported Microsoft Windows desktop or server operating system.
The runtime system software runs on an operator interface workstation running a currentlysupported Microsoft Windows desktop operating system or Windows Embedded.
Note: The runtime client for Windows Embedded operating systems (CEView) is often pre-loaded on the HMI. If necessary, you can update the CEView version of the developmentsystem software by downloading the current version to the HMI.
Parent topic: About This ApplicationInduSoft Web Studio v7.0 Technical ReferenceCopyright © 2003–2010 Indusoft, Inc.

8/22/2019 User Guide Indu Soft
http://slidepdf.com/reader/full/user-guide-indu-soft 8/1279
About This Application >
Product Features
The InduSoft Web Studio product provides the following features:
Integrated Windows development environment with toolbars, dialogs, and menus:
Drop-down (pop-up) menus, which you activate by right-clicking on any area of thedevelopment environment (Options vary according to context.)
Customizable fly-over toolbars
Tasks, objects, and controls organized in a tree-view explorer
Full-featured objects and animations (the ability to modify object properties, executecommands, or inset values to tags used to build screens on the fly at runtime):
Configurable objects such as buttons, rectangles, ellipse, polygons, lines, and text
Object animations such as bar graphs, color, resizing, position, hide/unhide, rotation,
command, hyperlink, and text input/outputOn-line and historical alarm list displays
On-line and historical trending
Alignment and distribution tools
Background bitmap layer creation and editing
Graphics importation
ActiveX object containers
On-line remote management and configuration
Microsoft DNA architecture compliance, with full OPC and XML support
Web interface enabled, which exports project screens to a "thin" client through theInternet/intranet and by exchanging data on-line through the TCP/IP protocol
Symbols library with more than 100 pre-made objects, such as pushbuttons, meters, sliders,switches, text and numeric displays, LED-style indicators, pipes, bumps, icons, vehicles, valves,frames, motors, gauges, and common controls
Debugging tools:
Database Spy window to monitor/force tag values and execute functions
LogWin module to record OPC, DDE, and TCP/IP transactions, modules activation, tracetags, and so forth
Cross-referencing to locate tags throughout the project
On-line system and network diagnosticsPowerful and flexible tag database (Boolean, Integer, Real, and String tags), array tags,classes, and indirect tag-pointers
Open architecture with API exchanges and tag values with external software
Translation editor, which enables you to translate a project into several different languages, andswitch between them while the runtime system is online

8/22/2019 User Guide Indu Soft
http://slidepdf.com/reader/full/user-guide-indu-soft 9/1279
TCP/IP client and server modules to exchange tag values and configure redundancy systems
More than 200 direct communication drivers for different devices (such as PLC) from severalmanufacturers; such as Allen-Bradley, Siemens, GE-Fanuc, as well as standard protocols suchas MODBUS RTU/ASCII, DeviceNet, Profibus, Interbus, and so forth
Full integration with PC-based control packages (imports tags database) such as ISaGRAF,SteepleChase, Think&Do, OpenControl, FP Control and ASAP.
OPC Server and OPC Client with integrated OPC Browser
Screen and object password-protected runtime security (256 levels)
Logical expressions and a scripting language with more than 200 functions
Recipe and Report (ASCII, UNICODE, and RTF formats) builders integrated into theproduct
Event scheduler based on date, time, or data condition (100ms resolution)
Multi-layer project, which means modular worksheets and screens can be merged easily toother projects
Dial-Up functions to trigger, monitor, and hang-up a dial-up connection with the RAS Server of remote stations
Functions to send e-mail from IWS (or CEView)
Real-time project documentationScreen resolution converter
Note: IWS provides different product types for each level of project responsibility. However, IWS
does not support some features in certain product types (such as CEView). You can review theTargetVersions.pdf document on the IWS installation CD for detailed information about these
the limitations of each product-type limitations.
Parent topic: About This ApplicationInduSoft Web Studio v7.0 Technical ReferenceCopyright © 2003–2010 Indusoft, Inc.
8/22/2019 User Guide Indu Soft
http://slidepdf.com/reader/full/user-guide-indu-soft 10/1279
About This Application >
Understanding the InternalStructure and Data Flow
IWS runtime environment runs on an operator interface workstation (running Windows2K/XP/Vista/CE) and consists of the following modules or threads (program elements that canexecute independently of other program elements):
Background Task (a supervisory task): Executes other internal tasks (IWS worksheets). Forexample, the Background task executes scripts configured in the Math and Schedulerworksheets and manages parameters configured in the Alarm, Recipe, Report, and Trendworksheets.
Database Spy (debugging tool):
Executes functions and/or expressions for testing purposes
Reads data (such as tag values) from the Tags database
Writes data (such as tag values) to the Tagsdatabase
DDE Client: Manages DDE communication with a DDE Server (local or remote), according toparameters configured in the DDE Client worksheets.
DDE Server: Manages DDE communication with a DDE Client (local or remote).
LogWin (debugging tool): Traces messages generated from other modules/tasks.
Driver Runtime: Manages the read/write commands configured in the Driver worksheets.
OPC Client: Manages OPC communication with an OPC Server (local or remote), according toparameters configured in the OPC Client worksheets.
OPC Server: Manages OPC communication with an OPC Client (local or remote).
ODBC Runtime: Manages ODBC data communication with any SQL relational database,according to parameters configured in the ODBC worksheets.
TCP/IP Client: Manages TCP/IP communication with a remote TCP/IP Server module (from
IWS), according to parameters configured in the TCP/IP Client worksheets.
TCP/IP Server: Manages TCP/IP communication messages with a remote TCP/IP Clientmodule (from IWS).
Viewer: Executes all scripts (On Open, On While, On Close, Command, Hyperlink, and so forth)configured for project screens and updates the screen objects.
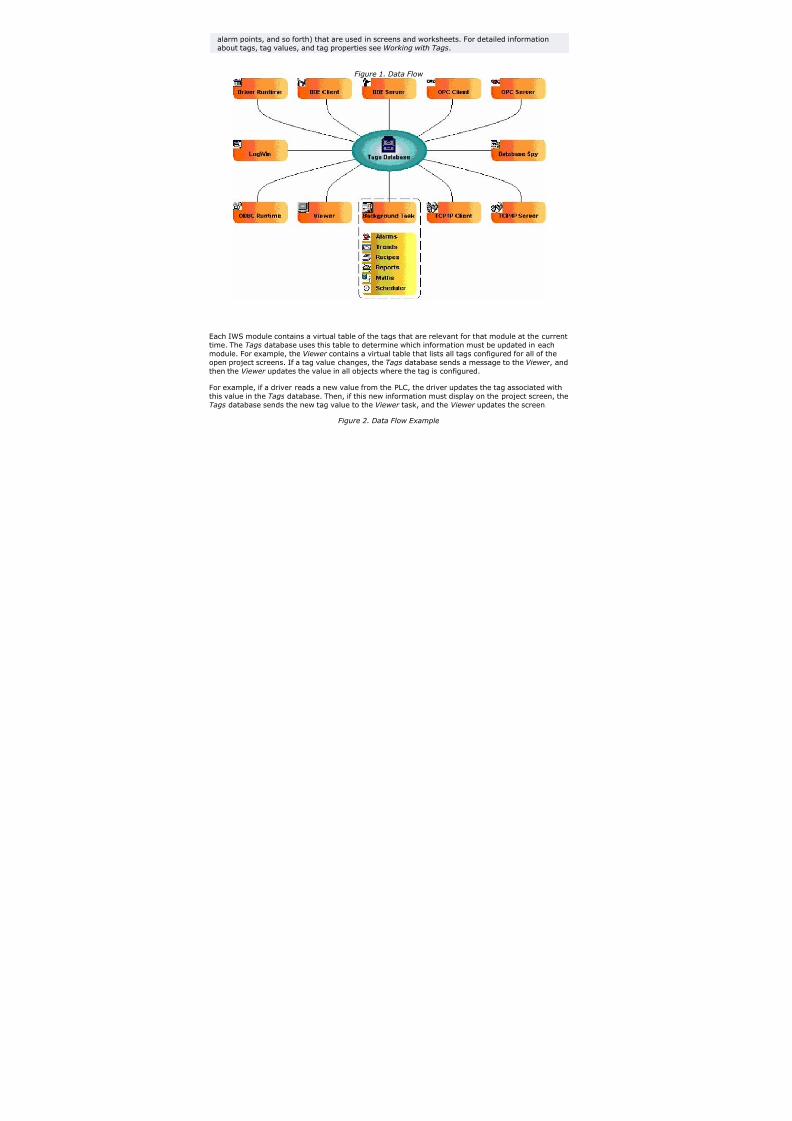
None of the preceding runtime modules exchange data directly with another module or task. Instead,runtime modules send data to and receive data from the Tags database, which is the "heart" of IWS.
The Tags database manages the flow of data between modules. In addition, the Tags database storesall tag values and the status of all properties associated with each tag (such as alarm conditioning,timestamp, quality, and so forth).
Note: Tags are variables (such as communication points in field equipment, calculation results,

8/22/2019 User Guide Indu Soft
http://slidepdf.com/reader/full/user-guide-indu-soft 11/1279
alarm points, and so forth) that are used in screens and worksheets. For detailed informationabout tags, tag values, and tag properties see Working with Tags.
Figure 1. Data Flow
Each IWS module contains a virtual table of the tags that are relevant for that module at the currenttime. The Tags database uses this table to determine which information must be updated in eachmodule. For example, the Viewer contains a virtual table that lists all tags configured for all of theopen project screens. If a tag value changes, the Tags database sends a message to the Viewer , andthen the Viewer updates the value in all objects where the tag is configured.
For example, if a driver reads a new value from the PLC, the driver updates the tag associated withthis value in the Tags database. Then, if this new information must display on the project screen, theTags database sends the new tag value to the Viewer task, and the Viewer updates the screen.
Figure 2. Data Flow Example
8/22/2019 User Guide Indu Soft
http://slidepdf.com/reader/full/user-guide-indu-soft 12/1279
Note that the driver does not send new tag values directly to the Viewer . In addition, there is nopooling between tasks — the Tags database receives the updated information and immediatelyforwards it to all runtime tasks requiring that information.
Important: The Viewer module will update an object only when (at least) one of the object'stag values change.
If you configure an object animation (such as Text Data Link) with a function that does notrequire a tag (for example, NoInputTime()), the Viewer will not update the object because there isare no tags associated with that object.
The architecture of IWS significantly improves the internal data flow performance and makes it easyfor you to add new internal tasks. Even though each task works independently, it can accessinformation from any other task through the Tags database.
Parent topic: About This ApplicationInduSoft Web Studio v7.0 Technical ReferenceCopyright © 2003–2010 Indusoft, Inc.

8/22/2019 User Guide Indu Soft
http://slidepdf.com/reader/full/user-guide-indu-soft 13/1279
About This Application >
Executing/Switching Modules
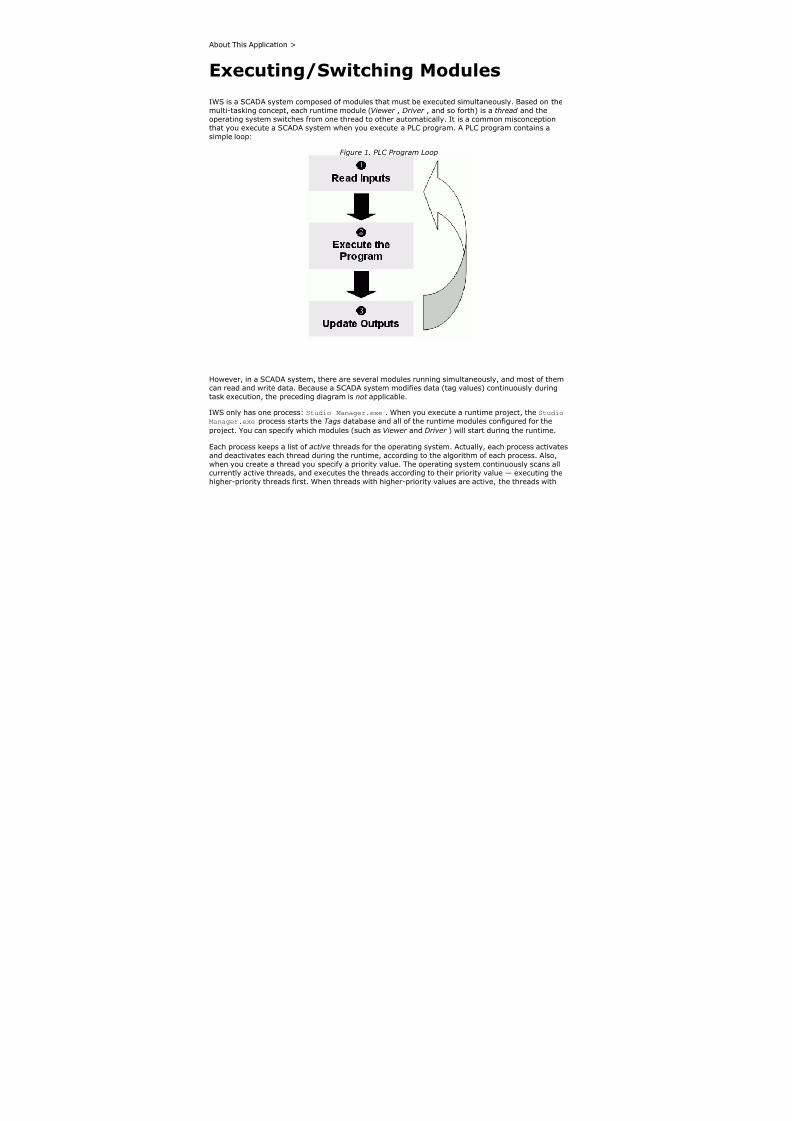
IWS is a SCADA system composed of modules that must be executed simultaneously. Based on themulti-tasking concept, each runtime module (Viewer , Driver , and so forth) is a thread and theoperating system switches from one thread to other automatically. It is a common misconceptionthat you execute a SCADA system when you execute a PLC program. A PLC program contains asimple loop:
Figure 1. PLC Program Loop
However, in a SCADA system, there are several modules running simultaneously, and most of themcan read and write data. Because a SCADA system modifies data (tag values) continuously duringtask execution, the preceding diagram is not applicable.
IWS only has one process: Studio Manager.exe . When you execute a runtime project, the Studio
Manager.exe process starts the Tags database and all of the runtime modules configured for the
project. You can specify which modules (such as Viewer and Driver ) will start during the runtime.
Each process keeps a list of active threads for the operating system. Actually, each process activatesand deactivates each thread during the runtime, according to the algorithm of each process. Also,when you create a thread you specify a priority value. The operating system continuously scans allcurrently active threads, and executes the threads according to their priority value — executing thehigher-priority threads first. When threads with higher-priority values are active, the threads with

8/22/2019 User Guide Indu Soft
http://slidepdf.com/reader/full/user-guide-indu-soft 14/1279
lower-priority values are not executed at all. If there is more than one thread with the same priorityvalue, and there are no other threads with higher-priority values, the operating system keepsswitching between the threads with the same priority.
Note: All IWS threads are set to priority 7 , which is THREAD_PRIORITY_NORMAL . (Most programscontain this priority value.)
Real-time program (such as SoftPLCs and Device Drivers) threads are assigned a higher-priority
value (THREAD_PRIORITY_HIGHEST ); however, these programs must provide a mechanism to keepthem inactive for some period of time or the threads with normal priority would never beexecuted.
IWS uses the UNICOMM.DLL library for serial drivers. This library creates a THREAD_PRIORITY_HIGHEST
thread that "sleeps" (remains inactive) until data arrives in the serial channel. When IWS detectsnew data in the serial channel, the THREAD_PRIORITY_HIGHEST thread "wakes up" (becomes active)and transfers the data from the operating system buffer to the thread buffer, where it can beread by the Driver. This thread is the only highest-priority thread created by IWS .
If you allowed threads to remain active all the time, the CPU usage would be 100% all the time,which must be avoided for performance reasons. Every program provides a mechanism to prevent
threads from staying active all the time.
IWS uses the following parameters to prevent threads from staying active continuously:
TimeSlice (from operating system): Causes the operating system to switch automaticallybetween active threads with the same priority value.
By default, the operating system executes each active thread for approximately 20ms and thenswitches to the next active thread. In other words, if there are multiple active threads with thesame priority value waiting to be executed, the operating system will not execute any oneactive thread for more than 20ms.
TimeSlice (from IWS ): Specifies how long each IWS thread can remain continuously active.
You use this parameter in addition to the operating system's TimeSlice parameter. Youconfigure a TimeSlice value for each IWS thread (except the Background Task) and specify how
long each thread can remain continuously active. As long as a thread is active, the operatingsystem can switch to that thread.
Period (from IWS ): Specifies the maximum amount of time each IWS thread (except theBackground Task) can remain inactive.
CAUTION:
We st r on g ly recommend that you do not modify these default values unless it is
absolutely necessary. Configuring these parameters incorrectly can cause the entire
system to malfunction (for example, CPU usage will go to 100%) and/or cause some
tasks to perform poorly.
If you must change the parameter defaults, note the values before making your
changes so if a malfunction occurs you can return to the original settings.
To change the IWS TimeSlice and Period parameter default values:
From the IWS installation directory (for example, C:\Program Files\installation folder \Bin ),1.

8/22/2019 User Guide Indu Soft
http://slidepdf.com/reader/full/user-guide-indu-soft 15/1279
double-click \BIN to open the folder.
Double-click the Program Settings.INI file to open the file in Microsoft® Notepad.
The following is a list of all parameters contained in this .ini file and their default values (inmilliseconds).
[Period]
DBSpy=1000UniDDEClient=200
UniDDE=200
Driver=20
LogWin=100
UniODBCRT=100
OPCClient=20
OPCServer=20
TCPClient=100
TCPServer=100
Viewer=50
[TimeSlice]
UniDDEClient=100
Driver=10
OPCClient=10
OPCServer=10
TCPClient=200
TCPServer=200
Viewer=200
Note: You may not see all of these parameters listed when you open your Program
Settings.INI file. However, even if a parameter is not visible in your list, IWS still uses thatparameter and its default value.
To change the default value of a displayed parameter: In Notepad, delete the default valueand type the new value in its place.
To change the default value of a parameter that is not displayed in your list: In Notepad,type the parameter name exactly as shown in the following list, the equal sign, and thenthe new value.
2.
Save the file (File > Save ) and close Notepad (File > Exit ).3.
The following figure illustrates how IWS executes a generic thread (such as the Viewer ).
Figure 2. Executing a Generic Thread

8/22/2019 User Guide Indu Soft
http://slidepdf.com/reader/full/user-guide-indu-soft 16/1279
Where:
Signal 1 is the Period time period (set to 50ms for this example).
Signal 2 shows when the thread is active for the operating system.
Signal 3 is the TimeSlice time period (set to 30ms for this example).
Signal 4 shows the execution of the thread itself.
In this example, IWS generates a Period message every 50ms (signal 1 ). When IWS generates thismessage, its thread becomes active and remains active until the specified TimeSlice time period(from IWS ) expires. The thread then remains inactive until IWS generates the next Period message(signal 1 ).
While the thread is active, the operating system is responsible for executing that thread. However, just because a thread is active does not mean the operating system will execute it immediately — theoperating system may be executing other threads, for example.
When the operating system executes the thread, the TimeSlice timer starts counting and the thread
is executed for 20ms (TimeSlice from the operating system). After the 20ms period, the operatingsystem automatically switches to the next active thread (such as the Driver), and so on.
In the above example, the TimeSlice time was set to 30ms, which means the operating system is notsupposed to execute the thread more than once in each TimeSlice of IWS . However, if you specifyhigher values for the IWS TimeSlice time period, it is likely that the operating system will execute thesame thread more than once in the same TimeSlice time period.
In the next example, the Period and the TimeSlice values were changed as follows, but the defaultoperating system TimeSlice period (20 ms) was not changed.
Figure 3. Setting a Higher TimeSlice

8/22/2019 User Guide Indu Soft
http://slidepdf.com/reader/full/user-guide-indu-soft 17/1279
Where:
Signal 1 is the Period time period (set to 100ms).
Signal 2 shows when the thread is active for the operating system.
Signal 3 is the IWS TimeSlice time period (set to 80ms).
Signal 4 shows the execution of the thread itself.
Notice that the thread can be executed more than once in the same TimeSlice time period. When theIWS TimeSlice time period expires, the operating system interrupts the thread execution; however,even though the IWS Period and TimeSlice parameters are set to 100ms and 80ms respectively, theoperating system will not execute this thread continuously for more than 20ms, because theoperating system TimeSlice time period is set to 20ms.
When the operating system is not executing the Viewer thread, the CPU can execute any otherthread or remain idle (if there are no other active threads to execute). Remember, the IWS Periodand TimeSlice parameters were created to prevent all threads from being active at the same time toprevent 100% CPU usage.
During thread execution, the thread must handle its pending messages. For example, the Viewermodule must update any related screen objects. If there are no messages pending, the threaddeactivates itself and gives control back to the operating system. The operating system immediatelyswitches to the next active thread. In other words, a thread can interrupt its own execution — even if the operating system TimeSlice time period has not yet expired (which occurs frequently in real-worldapplications).
Note: The Database Spy , DDE Server , LogWin , and ODBC Runtime modules do not have aTimeSlice parameter. Consequently, after each thread handles all of its pending messages, thethreads become inactive until the next Period message for each one of the threads occurs.
The Background Task is the exception to the execution/switching process just discussed. Themechanism for executing/switching the Background Task is described in the next section.
Parent topic: About This ApplicationInduSoft Web Studio v7.0 Technical ReferenceCopyright © 2003–2010 Indusoft, Inc.

8/22/2019 User Guide Indu Soft
http://slidepdf.com/reader/full/user-guide-indu-soft 18/1279
About This Application >
Executing/Switching theBackground TaskThe Background Task executes scripts from the Math and Scheduler worksheets (for example,messages from Alarm and Trend worksheets). In addition, the Background Task executes all Recipeand Report commands when the Recipe() or Report() functions are executed during the runtime.
Although the Alarm, Math, Scheduler , and Trend tasks are not threads, you can specify or changetheir Period time in the Program Settings.ini file located in the IWS program directory.
The Period default values (in milliseconds) are as follows:
[Period]
Math=100
Sched=50Alarm=100
Trend=1000
These values mean that every 100ms, IWS generates a Period message to the Math task. Every50ms, IWS generates a Period message to the Scheduler task, and so on.
CAUTION:
We strongly recommend that you do not modify the Background Task default values
unless it is absolutely necessary. Configuring any of these parameters incorrectly can
cause your entire system to malfunction (for example, CPU usage will go to 100%)and/or cause some tasks to perform poorly.
If you must change the parameter defaults, note the values before making your
changes so if a malfunction occurs you can return to the original settings.
Keep in mind that the Background Task thread has the same priority as other threads in IWS(Drivers, Viewer , and so forth), which means that the operating system will not execute this taskcontinuously for more than 20ms.
The Background Task executes the Recipe and Report worksheets when the Recipe() and Report()
functions are called, respectively. Because the Recipe() and Report() functions are synchronous, oncethe Background Task starts executing the functions, it will not switch to another task ( Alarm, Math,Scheduler , or Trend ) until it completely executes the functions. Executing a Recipe() or Report()
function usually takes a few milliseconds.
The Background Task must switch between the Alarm, Math, Scheduler , and Trend tasks. WhenBackground Task switches to the Scheduler task, it will not switch to another task ( Alarm, Math, orTrend ) until all Scheduler worksheets are executed. After executing all Scheduler worksheets, theBackground Task will not execute the Scheduler again until it receives the next Period message for

8/22/2019 User Guide Indu Soft
http://slidepdf.com/reader/full/user-guide-indu-soft 19/1279
the Scheduler task.
The Background Task applies the same behavior when executing the Alarm and Trend tasks — whenthe Background Task switches to the Alarm or Trend task, it will not switch to another task until ithandles all pending messages. So, the Background Task will not execute the Alarm or Trend taskagain, until IWS generates the next Period message for each of these tasks.
The Background Task typically executes the Alarm, Scheduler , and Trend tasks in a few milliseconds.
However, it can take longer to execute the Math task because it usually contains loops and complexscripts. Consequently, the mechanism used to execute the Alarm, Scheduler , and Trend tasks cannotbe applied to the Math task.
The Background Task executes the Math task for no more than 10ms continuously before switchingto other task (such as the Scheduler ). The Background Task cannot execute the Math task again forthe next 50ms; however, the Background Task can execute other tasks ( Alarm, Recipe, Report ,Scheduler , or Trend ) during this 50ms period. After the Background Task executes all of the Math
worksheets, it will not begin a new scan of the Math worksheets until IWS generates a new Periodmessage for the Math task.
It is important to re-emphasize that this process was created to prevent 100% CPU usage all thetime.
CAUTION:
We recommend caution when using the Math() function in a Sch ed u le r worksheet or for
a screen object (such as the Command animation).
When the Sch ed u le r task executes a Math() function, no other task can be executed by
the Background Task until the Sch ed u le r executes the entire M at h worksheet called
by the Math() function. This process can take several milliseconds or even seconds,
depending on how you configured the script in the M at h worksheet (especially for
loops).
If you configure a Math() function for a screen object, the V ie w er stops updating the
screen until the V ie w er executes the entire M at h worksheet called by the Math()function.
If you must use the Math() function for the Sch ed u le r task or a screen object, we
recommend using the following procedure to prevent process delays:
Specify one auxiliary tag with the value 1 and the Sch ed u le r or V ie w er task will
send a message to the Ta g s database to update this tag value.
1.
Configure the tag in the Execution field of the M at h worksheet to be executed.
When the Background Task scans the M at h worksheet, IWS will execute the
worksheet.
2.
Reset the tag in the last line of the M at h worksheet (write the value 0 to the
auxiliary tag).
3.
As a result, the Background Task will not execute the M at h worksheet in the next scan
unless the auxiliary tag is set to the value 1 again.
Parent topic: About This ApplicationInduSoft Web Studio v7.0 Technical Reference

8/22/2019 User Guide Indu Soft
http://slidepdf.com/reader/full/user-guide-indu-soft 20/1279
Copyright © 2003–2010 Indusoft, Inc.

8/22/2019 User Guide Indu Soft
http://slidepdf.com/reader/full/user-guide-indu-soft 21/1279
Installation
System requirementsThese are the minimum system requirements to install and run the InduSoft Web Studiosoftware.
Installing the Software
Starting the Software
Uninstalling the Software
InduSoft Web Studio v7.0 Technical Reference
Copyright © 2003–2010 Indusoft, Inc.

8/22/2019 User Guide Indu Soft
http://slidepdf.com/reader/full/user-guide-indu-soft 22/1279
Installation >
System requirementsThese are the minimum system requirements to install and run the InduSoft Web Studio software.
Note: The requirements described below are based on typical projects. Depending on yourspecific project, the requirements may vary:
"Windows Embedded and Windows Mobile-compatible devices" includes a wide variety of processors and feature sets, from smartphones to industrial displays. Consult your vendorfor the specific hardware requirements to run your project on these devices.
Some of the items listed as optional may be mandatory depending on your project. Forinstance, if you need to exchange data with a PLC via a serial interface, then the computermust have a serial COM port.
Development
To install and run the development application, you must have:
A Windows-compatible computer with a standard keyboard, mouse, and SVGA display
A Windows desktop or server operating system that is currently supported by Microsoft, whichat this time includes:
Microsoft Windows XP Service Pack 3 or later
Microsoft Windows Vista Service Pack 1 or later
Microsoft Windows 7, all versions
Microsoft Windows Server 2003 Service Pack 2 or later
Microsoft Windows Server 2008, all versions
Microsoft Internet Explorer6.0 or later
Minimum of 500MB free hard drive space
Ethernet adapter or wireless networking
CD-ROM drive (optional, to install the application; it can also be downloaded from our website)
USB port (optional, to be used with hard key licensing)
Serial COM ports and adapters (optional, to be used for direct communication with devices)
Tip: Any station that has the development application installed can also run as a project server
and/or a project client.
Project Server
To run as a project server, you must have:

8/22/2019 User Guide Indu Soft
http://slidepdf.com/reader/full/user-guide-indu-soft 23/1279
A Windows or Windows Embedded-compatible computer
A Windows desktop, server, or embedded operating system that is currently supported byMicrosoft, which at this time includes:
Microsoft Windows XP Service Pack 3 or later
Microsoft Windows Vista Service Pack 1 or later
Microsoft Windows 7, all versions
Microsoft Windows Server 2003 Service Pack 2 or later
Microsoft Windows Server 2008, all versions
Microsoft Windows XP Embedded Service Pack 3
Microsoft Windows Embedded Standard 7 (2009)
Microsoft Windows Embedded Compact (previously known as Windows CE), version 5.0 orlater
Tip: We recommend "Professional" and "Ultimate" editions over "Home" and "MediaCenter" editions, because they include Internet Information Services (IIS) that can be usedas your project's Web server.
Minimum of 500MB free hard drive space
Ethernet adapter or wireless networking
USB port (optional, to be used with hard key licensing)
Serial COM ports and adapters (optional, to be used for direct communication with devices)
Project Client – Embedded
To run as a project client using CEView, you must have:
A Windows Embedded or Windows Mobile-compatible device with a mouse or touchscreen input
A Windows embedded or mobile operating system that is currently supported by Microsoft,which at this time includes:
Microsoft Windows XP Embedded Service Pack 3
Microsoft Windows Embedded Standard 7 (2009)
Microsoft Windows Embedded Compact (previously known as Windows CE) or WindowsMobile, version 5.0 or later
Ethernet adapter or wireless networking
Project Client – Thin
To run as a project client using the Secure Viewer program or the browser-based Thin Client, youmust have:
A Windows or Windows Embedded-compatible computer with a mouse or touchscreen input
A Windows desktop, server, or embedded operating system that is currently supported by

8/22/2019 User Guide Indu Soft
http://slidepdf.com/reader/full/user-guide-indu-soft 24/1279
Microsoft, which at this time includes:
Microsoft Windows XP Service Pack 3 or later
Microsoft Windows Vista Service Pack 1 or later
Microsoft Windows 7, all versions
Microsoft Windows Server 2003 Service Pack 2 or later
Microsoft Windows Server 2008, all versions
Microsoft Windows XP Embedded Service Pack 3
Microsoft Windows Embedded Standard 7 (2009)
Microsoft Windows Embedded Compact (previously known as Windows CE) or WindowsMobile, version 5.0 or later
Microsoft Internet Explorer6.0 or later
Ethernet adapter or wireless networking
Parent topic: InstallationInduSoft Web Studio v7.0 Technical ReferenceCopyright © 2003–2010 Indusoft, Inc.

8/22/2019 User Guide Indu Soft
http://slidepdf.com/reader/full/user-guide-indu-soft 25/1279
Installation >
Installing the SoftwareInduSoft Web Studio provides development tools for all IWS projects, and it can be installed on a PCrunning Microsoft Windows XP, Windows Vista, or Windows 7 operating system. For moreinformation, see System Requirements.
You can install the development application either from the web download or from the InduSoft WebStudio installation CD. For projects running on Windows Embedded target systems, you can use thedevelopment application to download CEView (the runtime engine) to the target system via serial orTCP/IP link.
The IWS installation program creates directories as needed, copies files to your hard drive, andcreates the InduSoft Web Studio icon on your Windows desktop.
Note:
You must have Administrator privileges on your PC in order to install or uninstall thedevelopment application.
You must uninstall an older version of the development application (or move it to adifferent directory) before installing a new version. Also, you cannot install the sameversion of the development application in two different paths on the same PC.
The instructions for installing InduSoft Web Studio and CEView are provided inthe following twosections.
Installing the Development Application on Your Windows PC
To install the IWS development application from the installation CD:
Turn on your PC and be sure that no other programs are running.1.
Insert the installation CD into your PC's CD-ROM drive.
Internet Explorer should run automatically and show the CD's welcome screen. If it does not —for example, if you have the Autorun feature turned off in your Windows settings — then youcan manually show the screen by using Windows Explorer to locate and open the fileD:\InduSoft.htm.
2.
In the welcome screen, select the product that you want to install.
Internet Explorer will ask if you want to run or save the installer.
3.
Click Run.The product's installation wizard will begin.
4.
Follow the wizard's instructions to proceed with the installation.5.
When the installation is finished, select Yes, I want to restart my computer now and thenclick OK.
6.

8/22/2019 User Guide Indu Soft
http://slidepdf.com/reader/full/user-guide-indu-soft 26/1279
After your PC has restarted, you can run the development application. See Starting the Software forinstructions.
Note: When you install the development application, Microsoft .NET Framework 2.0 and some
other utilities are also installed to support the features of IWS. Your PC may have later versionsof the .NET Framework already installed, but there is no reason for concern because multipleversions of the .NET Framework should not conflict with each other. You can see which versionsare installed on your PC by opening the Add or Remove Programs control panel (Start >Control Panel > Add or Remove Programs).
For more information about Microsoft .NET Framework, see Database Appendix A: Using ODBCDatabases.
Installing CEView on Your Windows Embedded Device
CEView is the runtime engine for IWS projects on Windows Embedded devices. CEView must beinstalled on your device before you send your project to it.
Where the Files Are Located
Given the nature of Windows Embedded devices, each combination of OS version and deviceprocessor has its own build of CEView. All of these builds are located in the following directory:
[…]\InduSoft Web Studio v7.0\Redist\
The build for your specific device is located in the following directory:
[…]\InduSoft Web Studio v7.0\Redist\version\ processor \
…where:
version is the version of the operating system on the device where CEView will be installed:
The\WinCE 5.0 folder contains the files for Windows CE and Windows Mobile 5.0 or later;
and
The\WinEmbedded folder contains the files for Windows XP Embedded and Windows
Embedded 7.
processor is the processor used by your Windows CE device. We provide a CEView runtime for
every processor that is currently supported by the Windows CE operating system (e.g.,Pocket2003-ArmV4, ArmV4i, x86). For more information, consult the manufacturer'sdocumentation for the device.
To install the files on your device, use the Remote Management tool in the development application.
Installing via TCP/IP (Ethernet)
Tip: We recommend using TCP/IP whenever possible.

8/22/2019 User Guide Indu Soft
http://slidepdf.com/reader/full/user-guide-indu-soft 27/1279
To install CEView on a Windows Embedded device via a TCP/IP (Ethernet) connection:
Make sure your Windows Embedded device is connected to your network.1.
Turn on the device.
The Remote Agent dialog should open automatically. If it does not, then you must manuallyinstall the file CEServer.exe on the device. The file is located here:
[…]\InduSoft Web Studio v7.0\Redist\version\ processor \CEServer.exe
There are different ways to install the file — for example, you can use Microsoft ActiveSync (forWindows 2000 and Windows XP) or Windows Mobile Device Center (for Windows Vista) tocommunicate directly with the device or you can map the device as a shared folder on your PC.For more information about copying and executing files, consult the manufacturer'sdocumentation for the device.
2.
In the Remote Agent dialog, click Setup and then configure the communication settings for thedevice's network connection. In particular, note the IP address of the device.
3.
Start the development application on your PC.4.
On the Home tab of the ribbon, in the Remote Management group, click Connect. TheRemote Management dialog is displayed:
Figure 1. Remote Management dialog
5.
In the Target System group-box, select Network IP and then type the IP address of thedevice.
6.
Click Connect to establish a connection between the development application and the device.
If the conncection is successful, then the device's specifications will be displayed in thePlatform text-box.
7.

8/22/2019 User Guide Indu Soft
http://slidepdf.com/reader/full/user-guide-indu-soft 28/1279
Click Install System Files to download the CEView files to the device.8.
When the installation is completed, click Disconnect.9.
For more information about downloading and running finished projects on the Windows Embedded
device, please see Remote Management.
Installing via Microsoft ActiveSync
To install CEView on a Windows Embedded device via Microsoft ActiveSync:
Make sure that Microsoft ActiveSync (for Windows 2000 and Windows XP) or Windows MobileDevice Center (for Windows Vista) is installed on your PC.
1.
Turn on the Windows Embedded device and connect it to your PC. Most devices should be ableto connect via USB.
2.
Start the development application on your PC.3.
On the Home tab of the ribbon, in the Remote Management group, click Connect. TheRemote Management dialog is displayed.
4.
In the Target System group-box, select Microsoft ActiveSync.5.
Click Connect to establish a connection between the development application and the device.
If the conncection is successful, then the device's specifications will be displayed in thePlatform text-box.
6.
Click Install System Files to download the CEView files to the device.7.
When the installation is completed, click Disconnect.8.
Note: In some cases, the Remote Management tool may not be able to connect via MicrosoftActiveSync to a device running Windows CE 6.0 or later. This is because of a problem in thedefault configuration of Windows CE 6.0. You can fix the problem by using a small utility that isincluded with IWS. The utility is located at:
[…]\InduSoft Web Studio v7.0\Redist\ActiveSyncUnlock.exe
Copy this file to the device using the stand-alone version of Microsoft ActiveSync and thenexecute the file on the device. It doesn't matter where on the device the file is located. (Formore information about copying and executing files, consult the manufacturer's documentationfor the device.) When this is done, try again to use the Remote Management tool to connect tothe device.
For more information about downloading and running finished projects on the WindowsEmbedded device, please see Remote Management.
Parent topic: InstallationInduSoft Web Studio v7.0 Technical ReferenceCopyright © 2003–2010 Indusoft, Inc.

8/22/2019 User Guide Indu Soft
http://slidepdf.com/reader/full/user-guide-indu-soft 29/1279
Installation >
Starting the Software
To run InduSoft Web Studio:
Double-click the InduSoft Web Studio v7.0 icon on the desktop; or
Choose Start > All Programs > InduSoft Web Studio v7.0 > InduSoft Web Studio v7.0.
Tip: You can run the IWS development environment under any video setting. However, werecommend that you configure the video settings to a resolution of 800x600 (or higher) and usemore than 256 colors for a more pleasing environment. The project resolution (screen size) isindependent of the operating system resolution.
Parent topic: InstallationInduSoft Web Studio v7.0 Technical ReferenceCopyright © 2003–2010 Indusoft, Inc.

8/22/2019 User Guide Indu Soft
http://slidepdf.com/reader/full/user-guide-indu-soft 30/1279
Installation >
Uninstalling the Software
CAUTION:
Before starting the uninstall procedure, be sure to back-up any program files you mayfind useful later. Also, be certain that you have a current (or newer) version of the
IWS installation CD or diskettes so you can re-install the software later if necessary.
If you find it necessary to remove IWS from your system, follow these instructions:
From the Windows task bar, select Start > Settings > Control Panel to open the ControlPanel.
1.
Double-click on the Add/Remove Programs icon in the Control Panel window.2.
When the Add/Remove Programs Properties dialog displays, select InduSoft Web Studio fromthe list and click Add/Remove.
3.
When the Confirm File Deletion dialog displays, click Yes.The Uninstall Shield Wizard and the Remove Programs from Your Computer dialogs display.
4.
When the Uninstall successfully completed message displays and the OK button becomesactive, click OK.
Verify that InduSoft Web Studio is no longer listed in the Add/Remove Programs Propertiesdialog.
5.
Click the Cancel button or the close button ( ), to close the Add/Remove ProgramsProperties dialog, then close the Control Panel window.
6.
Open the Windows Explorer and browse to IWS program directory.7.
Verify that all of the IWS files and folders were deleted. (You must manually delete any that
remain.)
8.
Note: The uninstall tool cannot delete files you created or modified in your IWS projects folder.
You must have administrator privileges to uninstall (and install) InduSoft Web Studio.
Parent topic: InstallationInduSoft Web Studio v7.0 Technical ReferenceCopyright © 2003–2010 Indusoft, Inc.

8/22/2019 User Guide Indu Soft
http://slidepdf.com/reader/full/user-guide-indu-soft 31/1279
Licensing
Protection Types
License Settings
Execution Modes
Product Versions
Installing a New Hardkey License
Upgrading the Current Hardkey License
Installing a New Softkey License
Invalid Licenses
Installing or Upgrading a CEView License (Locally)
Installing or Upgrading a CEView License (Remotely)
InduSoft Web Studio v7.0 Technical Reference
Copyright © 2003–2010 Indusoft, Inc.

8/22/2019 User Guide Indu Soft
http://slidepdf.com/reader/full/user-guide-indu-soft 32/1279
Licensing >
Protection Types
InduSoft Web Studio and CEView support the following protection types:
Hardkey
An encapsulated chip that must be physically connected to the computer's parallel port (LPT1)or USB interface.
The software license resides in the hardkey, and you cannot share this license simultaneouslywith more than one other copy of software in the network. If you connect the hardkey toanother computer, then you effectively transfer the license to that computer.
Using the parallel port hardkey does not prevent you from connecting another device — suchas a printer — to the port. The hardkey should be electronically transparent to other devicesconnected to the parallel port. You simply connect the hardkey to the computer and then
connect the printer cable to the hardkey. However, you may encounter problems if you installmore than one hardkey (for different products) on the same parallel port.
On the other hand, while using the USB hardkey, the USB port cannot be shared with any otherdevice.
CAUTION:
Be careful when installing or removing a hardkey from the computer's parallel
port. We strongly recommend that you turn off the computer and disconnect it
from the power supply before installing or removing a hardkey.
Softkey
When you install InduSoft Web Studio or CEView, the program generates a unique code calleda Site Code. You can send this site code to your software vendor, who will then generate alicense code called a Site Key to match your site code. The site key installs the InduSoft WebStudio or CEView license on your computer or Windows Embedded device.
Note: When you use a softkey, IWS records the license in the computer's (or WindowsEmbedded device's) non-volatile memory. If this device is damaged, you will lose thelicense.
Parent topic: Licensing
InduSoft Web Studio v7.0 Technical ReferenceCopyright © 2003–2010 Indusoft, Inc.

8/22/2019 User Guide Indu Soft
http://slidepdf.com/reader/full/user-guide-indu-soft 33/1279
Licensing >
License Settings
Both hardkey and softkey licenses set the following parameters:
Version
The overall version of the IWS software, e.g., 6.1. (This does not include the service pack, if any.)
Drivers
The number of direct communication drivers that can be simultaneously enabled.
Product Type
Specifies which features and restrictions are enabled for the application (e.g., the maximum
number of tags supported). Consult your software vendor about which product types are
available and which features are enabled for each type.
Execution Mode
Specifies one of the following options:
Engineering Only: Can develop a IWS project and then run it for short-term testingonly. You cannot use this license as a long-term runtime license.
Runtime Only: Can run a IWS project for an unlimited period. You cannot use thislicense to develop or modify the project.
Engineering + Runtime: Can develop a IWS project and then run it for an unlimitedperiod.
For more information, see Execution Modes.
Importers
The list of third-party applications that can be handled by the Import Wizard.
Thin Clients
The number of Thin Clients that can connect simultaneously to the server. One connection isincluded with every license. Contact your vendor to purchase additional connections.
Secure Viewers
The number of Secure Viewer clients that can connect simultaneously to the server. Oneconnection is included with every license. Contact your vendor to purchase additional
connections.
SMA Clients
The number of Studio Mobile Access (SMA) clients that can connect simultaneously to theserver. One connection is included with every license. Contact your vendor to purchaseadditional connections.
Parent topic: Licensing

8/22/2019 User Guide Indu Soft
http://slidepdf.com/reader/full/user-guide-indu-soft 34/1279
InduSoft Web Studio v7.0 Technical ReferenceCopyright © 2003–2010 Indusoft, Inc.

8/22/2019 User Guide Indu Soft
http://slidepdf.com/reader/full/user-guide-indu-soft 35/1279
Licensing >
Execution ModesInduSoft Web Studio and CEView support the following execution modes:
Execution Mode IWS CEView
Evaluation Mode Y N
Demo Mode Y Y
Licensed for Engineering Only Y N
Licensed for Runtime Only Y Y
Licensed for Engineering +Runtime
Y N
Evaluation Mode
Enables all of the product's engineering and runtime features.
The first time you install InduSoft Web Studio on a computer, the product runs for forty (40)hours in Evaluation Mode. This evaluation period includes any time you run a product module(engineering or runtime). You can use this evaluation period continuously or not (for example:10 hours a day for 4 days, 5 hours a day for 8 days, 10 hours a day for 3 days plus 5 hours aday for 2 days, and so on).
After running for 40 hours in the Evaluation Mode the evaluation period terminates and IWSautomatically converts to and runs in Demo Mode (see following description) until you install a
valid license (Hardkey or Softkey ). You cannot reactivate Evaluation Mode, even if you uninstalland then reinstall the product on your computer.
Note: Every version of IWS has an evaluation period that is independent of every other
version. For example, if your IWS version 6.1 evaluation period expires and you arerunning in Demo Mode because you have not installed a license, when you install IWSversion 6.1 on the same computer, the newer version will begin its own 40-hour evaluationperiod and the 6.1 version will continue running in Demo Mode only.
Demo Mode
Allows you to download projects to remote stations and to run projects for testing or
demonstration purposes. You can execute runtime tasks and use the debugging tools (LogWinand Database Spy), but they shut down automatically after running for two hours continuously.You can restart the Demo Mode again and run for another two hours, and so on.
You cannot create or modify screens, worksheets, or project settings in Demo Mode.
Licensed for Engineering Only

8/22/2019 User Guide Indu Soft
http://slidepdf.com/reader/full/user-guide-indu-soft 36/1279
Enables all workbench options for an unlimited time.
This mode also allows you to execute the runtime tasks and debugging tools (Database Spy,Output window, and LogWin module) for 24 hours continuously. After the 24-hour period thesetasks shut down, but you can restart them again and run for another 24 hours, and so on. Youcan use this license for development and testing only.
Licensed for Runtime Only
Enables you to run all runtime and debugging tools (Database Spy, Output window, andLogWin module) for unlimited time, but you cannot create or modify screens and/orworksheets.
The menu options available in Runtime Only mode are the same as the options listed for DemoMode (see previous table).
Licensed for Engineering + Runtime
Enables all engineering tools, runtime tasks, and debugging tools (Database Spy, Outputwindow, and LogWin module) for an unlimited period of time.
Note: The Remote Management tool (Connect on the Home tab of the ribbon) is alwaysavailable, regardless of execution mode, so that you can upload files from or download files to
remote stations.
To see which execution mode you are currently running, click About on the Help tab of the ribbon;the About dialog shows the execution mode, including the time remaining if you are in EvaluationMode.
Parent topic: LicensingInduSoft Web Studio v7.0 Technical ReferenceCopyright © 2003–2010 Indusoft, Inc.

8/22/2019 User Guide Indu Soft
http://slidepdf.com/reader/full/user-guide-indu-soft 37/1279
Licensing >
Product Versions
InduSoft Web Studio and CEView should both have the same version number, which uses the syntaxX.Y+SPWW (for example, InduSoft Web Studio v7.0 and CEView v7.0), where:
X represents the Family version. The Family version changes only when major enhancementsare added to the product technologies and concepts.
Y represents the Sub-version: The Sub-version changes when minor enhancements and/ornew features are added to the product.
WW represents the Service Pack. The Service Pack version changes when you must install add-on packages to accomplish the following:
Upgrade files for the version previously installed
Fix bugs in the product (showstoppers and no-workarounds)
Provide minor enhancements before releasing the next version of the productEach Service Pack release supersedes the previous Service Pack release. For example, SP2includes all the contents of SP1 and all newly upgraded files, bug fixes, and enhancements. SP3includes all the contents of SP2 and all new upgraded files, bug fixes, enhancements and so on.
Both InduSoft Web Studio and CEView can execute projects built in previous versions of the product.However, older versions of IWS and CEView cannot execute projects built or modified in newerversions of the product.
For example, you cannot execute version 6.1 projects using IWS version 6.0 but you can executeversion 6.0 projects with IWS version 6.1.
Important: We issue each license for a specific Family version and Sub-version (X.Y), and thelicense is valid for that version (including Service Packs) only. The license is not valid for a newerFamily version or Sub-version of the product. Therefore, if you install a new version of IWS orCEView, then you must upgrade your license to the new version being installed. If you install aService Pack only, then you do not need to upgrade your license.
Parent topic: LicensingInduSoft Web Studio v7.0 Technical ReferenceCopyright © 2003–2010 Indusoft, Inc.

8/22/2019 User Guide Indu Soft
http://slidepdf.com/reader/full/user-guide-indu-soft 38/1279
Licensing >
Installing a New Hardkey License
To install a new hardkey license for InduSoft Web Studio or CEView:
Install IWS or CEView according to the instructions provided earlier in this chapter.1.
On the computer where you've installed the software, connect the hardkey to the parallel port(LPT1) or USB interface.
CAUTION:
Be careful when you connect or remove a hardkey on a parallel port. We strongly
recommend that you turn off the computer and disconnect it from the power
supply before connecting or removing the hardkey.
2.
Run the software.3.
If the software recognizes the hardkey, then it will run normally without any alert messages.However, if it does not, then try the following:
For IWS, use the Protection Manager utility to make sure the software is set to check for ahardkey. (See Upgrading the Current Hardkey License.)
For CEView, if the software does not recognize the hardkey, then it will automatically check fora softkey. If it does not find a softkey either, then use the Remote Agent utility on the WindowsEmbedded device to diagnose the problem. (See Installing or Upgrading a CEView License(Locally).)
Please note that not all Windows Embedded devices can recognize the USB hardkey technologyused by InduSoft; our internal testing has shown only Windows Embedded devices that fully
support USB flash memory (a.k.a. "thumb drives" or "memory sticks") will recognize our USBhardkey. Check with the manufacturer of your Windows Embedded device.
Parent topic: LicensingInduSoft Web Studio v7.0 Technical ReferenceCopyright © 2003–2010 Indusoft, Inc.

8/22/2019 User Guide Indu Soft
http://slidepdf.com/reader/full/user-guide-indu-soft 39/1279
Licensing >
Upgrading the Current HardkeyLicense
Note: These instructions only apply to upgrading a hardkey license for InduSoft Web Studio. Toupgrade a license for CEView, see Installing or Upgrading a CEView License (Locally) or Installingor Upgrading a CEView License (Remotely).
To upgrade your current hardkey license for InduSoft Web Studio:
Close all IWS development and runtime modules and then exit the application.1.
Make sure the hardkey is connected to the parallel port (LPT1) or USB interface on thecomputer where you installed InduSoft Web Studio.
2.
Choose Start > All Programs > InduSoft Web Studio v7.0 > Register to launch theProtection Manager.
3.
When the Protection Manager dialog displays, select Hardkey in the Protection Type sectionand then click Check.
Figure 1. Protection Manager: Select Hardkey
If you do not have a valid hardkey connected to the computer's parallel port (LPT1) orUSB interface, the following error message displays:
Figure 2. No Hardkey
If you do have a valid hardkey connected to the computer's parallel port (LPT1) or USB
4.

8/22/2019 User Guide Indu Soft
http://slidepdf.com/reader/full/user-guide-indu-soft 40/1279
interface, the Hardkey Settings dialog displays, which contains the current license settingsrecorded on the hardkey.
Figure 3. Checking the Hardkey Settings
Click the Change License button to open the Change License – Hardkey dialog:
Figure 4. Change License Dialog
5.
Copy the code from the Site Code text box and send it to your software vendor.6.
Your software vendor should send back a Site Key to match the Site Code. Type this site keyinto the Site Key field of the Change License – Hardkey dialog and then click the Authorize
button.
You will be prompted to confirm the operation. If the program accepts (validates) your site key,the following message displays:
Figure 5. Register: Successful Completion
Note: If your new Site Key is not valid, an error message displays. If this happens, double-check that you entered the Site Key correctly. If you entered the key correctly and still
7.

8/22/2019 User Guide Indu Soft
http://slidepdf.com/reader/full/user-guide-indu-soft 41/1279
receive an error message, contact your software vendor for assistance.
You can upgrade any license setting (ProductType, Execution Mode, or Number of Thin Clients)simultaneously supported by the server, or upgrade the software version that is being supportedcurrently. The upgrade cost will depend on your current license settings and the settings of theupgrade license.
Parent topic: LicensingInduSoft Web Studio v7.0 Technical ReferenceCopyright © 2003–2010 Indusoft, Inc.
8/22/2019 User Guide Indu Soft
http://slidepdf.com/reader/full/user-guide-indu-soft 42/1279
Licensing >
Installing a New Softkey License
Note: These instructions only apply to installing a softkey license for InduSoft Web Studio. Toinstall a license for CEView, see Installing or Upgrading a CEView License (Locally) or Installing orUpgrading a CEView License (Remotely).
Also, you must have Administrator privileges on the computer on which you are installing ormodifying a softkey license.
To install a new softkey license for InduSoft Web Studio:
Install InduSoft Web Studio according to the instructions provided earlier in this chapter.1.
Launch the Protection Manager by choosing Start > All Programs > InduSoft Web Studio
v7.0 > Register.2.
Select Softkey in the Protection Type group, and then click Check.
Figure 1. Protection Manager: Softkey
Note: If you already have a hardkey license installed on your computer, then you will beasked to confirm the change of protection type.
The Softkey Settings dialog displays:
If you already have a valid InduSoft Web Studio softkey license installed, then the currentlicense settings display.
If you have not previously installed a license on your computer, then the Status text boxdisplays a "License not found" message.
Figure 2. Checking the Softkey Settings
3.

8/22/2019 User Guide Indu Soft
http://slidepdf.com/reader/full/user-guide-indu-soft 43/1279
Click the Change License button on the Softkey Settings dialog.4.
When the Change License – Softkey dialog displays, copy the code information from the Site
Code text box and send it to your software vendor.
Figure 3. Change License: Softkey
Your software vendor will send back a Site Key that matches this Site Code. Type the Site Keyinto the Site Key field of the Change License – Softkey dialog and then click the Authorize
button.
You will be prompted to confirm the operation. If the program accepts (validates) your Site Key,the following message displays:
Figure 4. Successful Site Key Installation
Note: If your new Site Key is not valid, an error message displays. If this happens, double-check that you entered the site key correctly. If you entered the key correctly and stillreceive an error message, contact your software vendor for assistance.
5.
Close the Protection Manager and run IWS.6.

8/22/2019 User Guide Indu Soft
http://slidepdf.com/reader/full/user-guide-indu-soft 44/1279
Parent topic: LicensingInduSoft Web Studio v7.0 Technical ReferenceCopyright © 2003–2010 Indusoft, Inc.

8/22/2019 User Guide Indu Soft
http://slidepdf.com/reader/full/user-guide-indu-soft 45/1279
Licensing >
Invalid LicensesWhen you try to run InduSoft Web Studio with an invalid license, you will receive a specific warningmessage that gives you the information you need to resolve the issue. Examples:
Figure 1. Version of software higher than license version
Figure 2. Selected Target System is not supported by the license
Parent topic: LicensingInduSoft Web Studio v7.0 Technical ReferenceCopyright © 2003–2010 Indusoft, Inc.

8/22/2019 User Guide Indu Soft
http://slidepdf.com/reader/full/user-guide-indu-soft 46/1279
Licensing >
Installing or Upgrading a CEViewLicense (Locally)
Tip: You can purchase some Windows Embedded devices with a CEView softkey license alreadyinstalled. Ask your software vendor about this possibility.
You can register a CEView license on your Windows Embedded device by using the Remote Agentutility on the device itself. This works for both hardkey and softkey licenses.
To install a new (or upgrade an existing) CEView softkey license (locally):
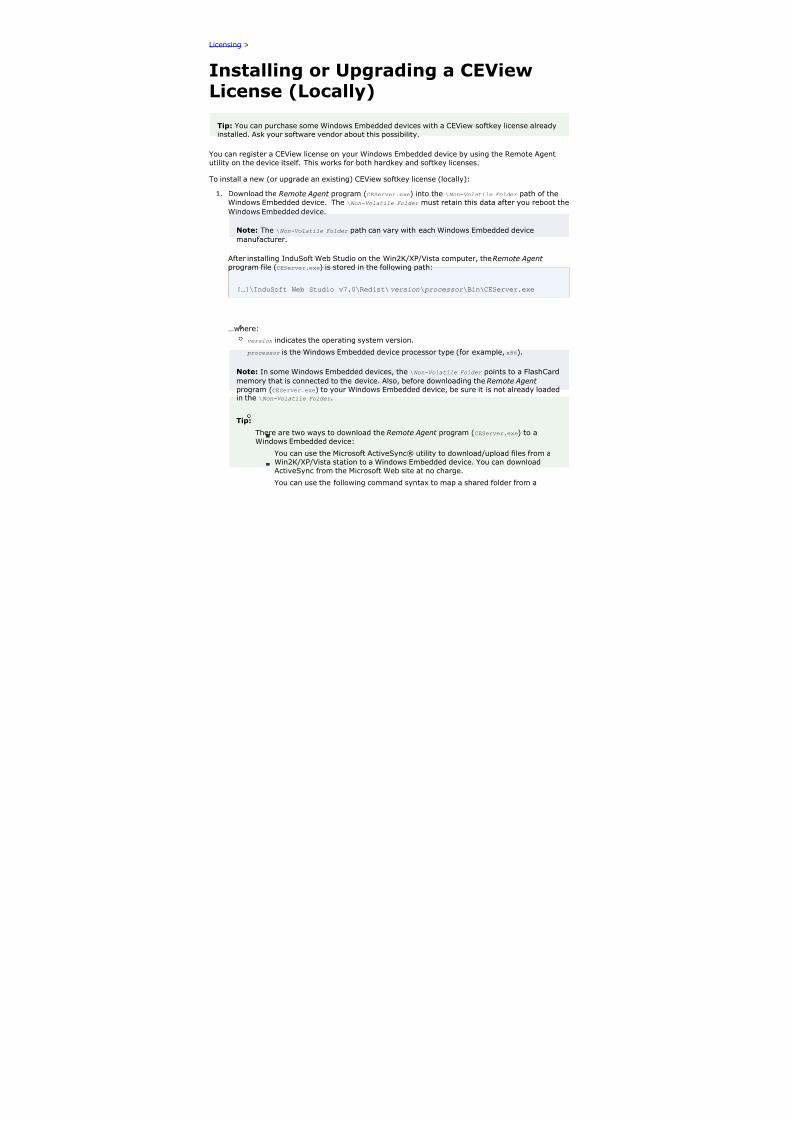
Download the Remote Agent program (CEServer.exe) into the \Non-Volatile Folder path of theWindows Embedded device. The \Non-Volatile Folder must retain this data after you reboot the
Windows Embedded device.
Note: The \Non-Volatile Folder path can vary with each Windows Embedded device
manufacturer.
After installing InduSoft Web Studio on the Win2K/XP/Vista computer, the Remote Agent
program file (CEServer.exe) is stored in the following path:
[…]\InduSoft Web Studio v7.0\Redist\version\ processor \Bin\CEServer.exe
…where:
version indicates the operating system version.
processor is the Windows Embedded device processor type (for example, x86).
Note: In some Windows Embedded devices, the \Non-Volatile Folder points to a FlashCard
memory that is connected to the device. Also, before downloading the Remote Agent
program (CEServer.exe) to your Windows Embedded device, be sure it is not already loadedin the \Non-Volatile Folder .
Tip:
There are two ways to download the Remote Agent program (CEServer.exe) to aWindows Embedded device:
You can use the Microsoft ActiveSync® utility to download/upload files from aWin2K/XP/Vista station to a Windows Embedded device. You can downloadActiveSyncfrom the Microsoft Web site at no charge.
You can use the following command syntax to map a shared folder from a
1.

8/22/2019 User Guide Indu Soft
http://slidepdf.com/reader/full/user-guide-indu-soft 47/1279
Win2K/XP/Vista computer to most Windows Embedded devices:
net use [LocalName] [RemoteName] [/user:UserName]
After executing this command successfully, open a Command Prompt windowand use a COPY command to copy files to the Windows Embedded device.
We strongly recommend that you configure the Windows Embedded device to executethe Remote Agent program automatically when you power on the Windows Embedded
device. See the Windows Embedded device manufacturer's documentation forinformation about how to configure the Startup program on the device.
If the Remote Agent program (CEServer.exe) does not start automatically when you power on
the Windows Embedded device, you can run it manually from the \Non-Volatile Folder .
Figure 1. Remote Agent Dialog
2.
If you are upgrading a hardkey license, make sure the hardkey is connected to the device.3.From the Remote Agent dialog, click the Setup button to open the Setup dialog:
Figure 2. Setup Dialog
4.
Click the License button to open the License dialog:
Figure 3. License Dialog
5.

8/22/2019 User Guide Indu Soft
http://slidepdf.com/reader/full/user-guide-indu-soft 48/1279
Click the Change License button to open the Change License dialog:
Figure 4. Change License Dialog
Copy the site code information (provided in the Site Code field) and send it to yoursoftware vendor.
Your software vendor will send back a Site Key that matches this site code. Type the SiteKey into the Site Key field on the Change License dialog, and click the Authorize button.
If the Site Key is accepted (validated), the following message displays:
Figure 5. Successful Site Key Installation
Note: If the new site key is not validated, an error message displays. If this happens,double-check that you entered the site key correctly. If you typed the key correctly and getan error message, contact your software vendor for further assistance.
6.
Parent topic: LicensingInduSoft Web Studio v7.0 Technical ReferenceCopyright © 2003–2010 Indusoft, Inc.

8/22/2019 User Guide Indu Soft
http://slidepdf.com/reader/full/user-guide-indu-soft 49/1279
Licensing >
Installing or Upgrading a CEViewLicense (Remotely)
Tip: You can purchase some Windows Embedded devices with a CEView softkey license alreadyinstalled. Ask your software vendor about this possibility.
You can register a CEView license on your Windows Embedded device by using IWS to send thelicense to the device. This works for both hardkey and softkey licenses.
To install a new (or upgrade an existing) CEView license (remotely):
Perform the four first steps described in the previous section.1.
In the Setup dialog, specify the Device Connection type by clicking (enabling) the Serial Port
or TCP/IP radio button. (If you enable Serial Port, you also must select a port from thecombo-box list). Click OK to close the dialog.
2.
Connect your development workstation to the Windows Embedded device using either a serial orTCP/IP link.
3.
Run the IWS development application.4.
On the Home tab of the ribbon, in the Remote Management group, click Connect. The RemoteManagement dialog is displayed:
Figure 1. Remote Management dialog
5.
Specify a target system by clicking one of the following radio buttons in the Target System:6.

8/22/2019 User Guide Indu Soft
http://slidepdf.com/reader/full/user-guide-indu-soft 50/1279
Network IP, and then type the IP address into the field provided
Serial Port, and then select a port from the combo-box list provided
Microsoft ActiveSync
Note: You cannot upgrade a CEView hardkey license via Microsoft ActiveSync.
When the Connect button becomes active, click the button to connect to the WindowsEmbedded device on which the Remote Agent is running. (If you select Network IP, then youmust also enter the IP address in the text box provided.)
Tip: TCP/IP links provide better communication performance than serial links.
The Status field must display the following message: Connected to CEView version
7.
Select the Embedded License tab to see which license settings are currently installed on yourWindows Embedded device.
8.
From the License Codes section, copy the information from the Site Code field and send it toyour software vendor.
Your software vendor will send you a Site Key that corresponds to this Site Code. Type thissite key into the Site Key field.
Click the Send button to send the code to the Remote Agent running on the WindowsEmbedded device.
The Remote Agent program will attempt to install the new license using the site key sent fromthe Remote Management tool. If the site key is accepted (validated), then a confirmationmessage is displayed.
Note: If the new site key is not valid, an error message will display. If this happens,double-check that you typed the Site Key correctly. If you entered the Site Key correctlyand still receive an error message, contact your software vendor for further assistance.
CAUTION:
After sending the license to the Windows Embedded device, be sure to save its
registry settings. If you do not save these settings, you will lose the license after
rebooting the device.
9.
Parent topic: LicensingInduSoft Web Studio v7.0 Technical ReferenceCopyright © 2003–2010 Indusoft, Inc.

8/22/2019 User Guide Indu Soft
http://slidepdf.com/reader/full/user-guide-indu-soft 51/1279
The Development EnvironmentInduSoft Web Studio incorporates a modern, Ribbon-based Windows interface to provide anintegrated and user-friendly development environment.
Figure 1. The IWS Development Environment
Application button
The Application button opens a menu of standard Windows application commands like New,Open, Save, Print, and Close.

8/22/2019 User Guide Indu Soft
http://slidepdf.com/reader/full/user-guide-indu-soft 52/1279
Quick Access Toolbar
The Quick Access Toolbar is a customizable toolbar that contains a set of commands that areindependent of the ribbon tab that is currently displayed.
Ribbon
The new ribbon combines the numerous menus and toolbars from the previous version of IWSinto a single, user-friendly interface. Almost all application commands are now on the ribbon,organized into tabs and groups according to general usage.
Project Explorer
The Project Explorer organizes all of the screens, worksheets, and other components that makeup your project and presents them in an expandable tree-view.
Screen/Worksheet Editor
Use the powerful, object-oriented screen editor to create and edit a variety of screens andworksheets for your projects. You can input information using your mouse and keyboard, outputcontrol data to your processes, and automatically update screens based on data input from yourprocesses.
Database Spy
The Database Spy window is a debugging tool that allows you to: monitor and force values toproject tags; execute and test functions; and execute and test math expressions.
Output (LogWin)
You can use the Output window to view debugging messages generated during project runtime.The window displays OPC, DDE, and TCP/IP transactions, module activation, trace tags, and soon.
Title Bar
The Title Bar located along the top of the development environment displays the applicationname (e.g., InduSoft Web Studio) followed by the name of the active screen or worksheet (if any).
Status Bar
The Status Bar located along the bottom of the development environment provides informationabout the active screen (if any) and the state of the application.
InduSoft Web Studio v7.0 Technical ReferenceCopyright © 2003–2010 Indusoft, Inc.

8/22/2019 User Guide Indu Soft
http://slidepdf.com/reader/full/user-guide-indu-soft 53/1279
The Development Environment >
Application buttonThe Application button opens a menu of standard Windows application commands like New, Open,Save, Print, and Close.
Figure 1. Application button opens menu of commands
Recent Projects
The Recent Projects area of the Application menu lists the most recently opened projects.
New
The New command on the Application menu is used to create a new worksheet file or project.
Open Project
The Open Project command on the Application menu is used to open a saved project.
Open
The Open command on the Application menu is used to open a saved worksheet file.
Save
The Save command on the Application menu is used to save the active screen or worksheet.

8/22/2019 User Guide Indu Soft
http://slidepdf.com/reader/full/user-guide-indu-soft 54/1279
Save As
The Save As command on the Application menu is used to open a save the active screen or
worksheet at another location.
Save All
The Save All command on the Application menu is used to save all open worksheet files.
Save All as HTMLThe Save All as HTML command on the Application menu is used to save all of your project'sscreens and screen groups in HTML format.
Save as HTML
The Save as HTML command on the Application menu is used to save the active screen inHTML format.
Save Screen Group as HMTL
The Save Screen Group as HTML command on the Application menu is used to save aselected screen group in HTML format.
PrintThe Print command on the Application menu is used to print the active screen or worksheet.
Print Preview
The Print Preview command on the Application menu is used to see what the active worksheetwould look like when it is printed.
Print Setup
The Print Setup command on the Application menu is used to configure the options (e.g.,paper size, print orientation) for a selected printer.
Close
The Close command on the Application menu is used to close the active screen or worksheet.
Close All
The Close All command on the Application menu is used to close all open screens andworksheets.
Exit
The Exit command on the Application menu is used to close all open screens and worksheets,save the project database, and then exit the application.
Parent topic: The Development Environment
InduSoft Web Studio v7.0 Technical ReferenceCopyright © 2003–2010 Indusoft, Inc.

8/22/2019 User Guide Indu Soft
http://slidepdf.com/reader/full/user-guide-indu-soft 55/1279
The Development Environment > Application button >
Recent ProjectsThe Recent Projects area of the Application menu lists the most recently opened projects.
To open one of the listed projects, simply click it.
Parent topic: Application buttonInduSoft Web Studio v7.0 Technical ReferenceCopyright © 2003–2010 Indusoft, Inc.

8/22/2019 User Guide Indu Soft
http://slidepdf.com/reader/full/user-guide-indu-soft 56/1279
The Development Environment > Application button >
NewThe New command on the Application menu is used to create a new worksheet file or project.
The New dialog (see the following figures) contains two tabs:
File tab: Select this tab to create new worksheets or screens for an open project.
Project tab: Select this tab to create a new project.
Instructions for creating new files and projects follow.
Creating a New File
To create a new worksheet or screen:
Click the File tab.
Figure 1. New File tab
1.
Select Display or a Worksheet type from the list.2.
Click OK.3.

8/22/2019 User Guide Indu Soft
http://slidepdf.com/reader/full/user-guide-indu-soft 57/1279
The New dialog is closed and your selection is opened in the worksheet editor.
Note: When you add an I/O driver to the project, an associated option allows you to open a newdriver worksheet. You also can create new screens or worksheets by right-clicking on the folder
in the Project Explorer and selecting the Insert option from the shortcut menu.
Note: Worksheets for DDE Client and ODBC are not available for WindowsCE projects, because
they are not supported by the Windows® CE operating system.
Creating a New Project
To create a new project:
Click the Project tab.
Figure 2. New Project tab
1.
In the Project name box, type a name for your project.2.
By default, IWS stores all projects in the location specified by the Default Project Pathpreference (Preferences on the Project tab of the ribbon), so that path will be automaticallydisplayed in the Location box. To save your project in another location, click Browse and thenselect a folder.
3.
Select a Target platform.4.
Click OK to continue to the Project Wizard dialog.5.

8/22/2019 User Guide Indu Soft
http://slidepdf.com/reader/full/user-guide-indu-soft 58/1279
Figure 3. Project Wizard
In the Resolution box, select a screen resolution. If you select Custom, then also type thewidth and height in pixels.
6.
To share tags with another PC-based control application, select the application type from the listand click the Configure button. (Each type has its own configuration options; please consultthe application vendor.) Otherwise, leave it set to <None>.
7.
Click OK when you're done.8.
For a more detailed walkthrough, see Creating a New Project.
Parent topic: Application buttonInduSoft Web Studio v7.0 Technical ReferenceCopyright © 2003–2010 Indusoft, Inc.

8/22/2019 User Guide Indu Soft
http://slidepdf.com/reader/full/user-guide-indu-soft 59/1279
The Development Environment > Application button >
Open ProjectThe Open Project command on the Application menu is used to open a saved project.
Selecting the command opens a standard Windows Open dialog, which you can use to locate andopen the project file (*.app).
Figure 1. Open dialog
Parent topic: Application buttonInduSoft Web Studio v7.0 Technical ReferenceCopyright © 2003–2010 Indusoft, Inc.

8/22/2019 User Guide Indu Soft
http://slidepdf.com/reader/full/user-guide-indu-soft 60/1279
The Development Environment > Application button >
OpenThe Open command on the Application menu is used to open a saved worksheet file.
Selecting the command opens a standard Windows Open dialog, which you can use to locate andopen the worksheet file. The application can open many different file types, so use the File type
combo-box to filter the files.
Figure 1. Available worksheet file types in the Open dialog
Parent topic: Application buttonInduSoft Web Studio v7.0 Technical ReferenceCopyright © 2003–2010 Indusoft, Inc.

8/22/2019 User Guide Indu Soft
http://slidepdf.com/reader/full/user-guide-indu-soft 61/1279
The Development Environment > Application button >
SaveThe Save command on the Application menu is used to save the active screen or worksheet.
The command becomes available only after you modify the worksheet in some way.
Parent topic: Application buttonInduSoft Web Studio v7.0 Technical ReferenceCopyright © 2003–2010 Indusoft, Inc.

8/22/2019 User Guide Indu Soft
http://slidepdf.com/reader/full/user-guide-indu-soft 62/1279
The Development Environment > Application button >
Save AsThe Save As command on the Application menu is used to open a save the active screen orworksheet at another location.
Parent topic: Application buttonInduSoft Web Studio v7.0 Technical ReferenceCopyright © 2003–2010 Indusoft, Inc.

8/22/2019 User Guide Indu Soft
http://slidepdf.com/reader/full/user-guide-indu-soft 63/1279
The Development Environment > Application button >
Save AllThe Save All command on the Application menu is used to save all open worksheet files.
The command becomes available only after you modify the a worksheet in some way.
Parent topic: Application buttonInduSoft Web Studio v7.0 Technical ReferenceCopyright © 2003–2010 Indusoft, Inc.

8/22/2019 User Guide Indu Soft
http://slidepdf.com/reader/full/user-guide-indu-soft 64/1279
The Development Environment > Application button >
Save All as HTMLThe Save All as HTML command on the Application menu is used to save all of your project'sscreens and screen groups in HTML format.
After saving, the files can be found in the Web folder in the Project Explorer. For more information,see Deploying your project as a Web application.
Note: You must close all worksheets before you execute this command.
Parent topic: Application buttonInduSoft Web Studio v7.0 Technical ReferenceCopyright © 2003–2010 Indusoft, Inc.

8/22/2019 User Guide Indu Soft
http://slidepdf.com/reader/full/user-guide-indu-soft 65/1279
The Development Environment > Application button >
Save as HTMLThe Save as HTML command on the Application menu is used to save the active screen in HTMLformat.
After saving, the file can be found in the Web folder in the Project Explorer. For more information, seeDeploying your project as a Web application.
Parent topic: Application buttonInduSoft Web Studio v7.0 Technical ReferenceCopyright © 2003–2010 Indusoft, Inc.

8/22/2019 User Guide Indu Soft
http://slidepdf.com/reader/full/user-guide-indu-soft 66/1279
The Development Environment > Application button >
Save Screen Group as HMTLThe Save Screen Group as HTML command on the Application menu is used to save a selectedscreen group in HTML format.
After saving, the files can be found in the Web folder in the Project Explorer. For more information,see Deploying your project as a Web application.
Parent topic: Application buttonInduSoft Web Studio v7.0 Technical ReferenceCopyright © 2003–2010 Indusoft, Inc.

8/22/2019 User Guide Indu Soft
http://slidepdf.com/reader/full/user-guide-indu-soft 67/1279
The Development Environment > Application button >
PrintThe Print command on the Application menu is used to print the active screen or worksheet.
Selecting the command opens a standard Windows Print dialog, which you can use to adjust the printrange and the number of copies.
Parent topic: Application buttonInduSoft Web Studio v7.0 Technical ReferenceCopyright © 2003–2010 Indusoft, Inc.

8/22/2019 User Guide Indu Soft
http://slidepdf.com/reader/full/user-guide-indu-soft 68/1279
The Development Environment > Application button >
Print PreviewThe Print Preview command on the Application menu is used to see what the active worksheetwould look like when it is printed.
Use the buttons located along the top of the Print Preview window as follows:
Click Print to open the Print dialog and print the screen or worksheet.
Click Next Page to view the next page in a series of pages.
Click Prev Page to view the previous in a series of pages.
Click Two Page to view two pages at a time.
Note: The Next Page, Prev Page, and Two Page buttons become active only when youare printing more than one page.
Click Zoom In to check details.
Click Zoom Out to change back to the default size.
Note: The Zoom Out button becomes active after you Zoom In.
Click Close to close the Print Preview window.
Parent topic: Application buttonInduSoft Web Studio v7.0 Technical ReferenceCopyright © 2003–2010 Indusoft, Inc.

8/22/2019 User Guide Indu Soft
http://slidepdf.com/reader/full/user-guide-indu-soft 69/1279
The Development Environment > Application button >
Print SetupThe Print Setup command on the Application menu is used to configure the options (e.g., papersize, print orientation) for a selected printer.
Selecting the command opens a standard Windows Print Setup dialog:
Figure 1. Print Setup dialog
Note: To specify a default printer :
Go to your Windows Start menu and select Start > Settings > Printers.1.
When the Printers dialog displays, right-click on a printer name.2.
When the shortcut menu displays, select Set As Default.3.
A check displays next to Set As Default indicating the selected printer is the default.4.
Parent topic: Application buttonInduSoft Web Studio v7.0 Technical ReferenceCopyright © 2003–2010 Indusoft, Inc.

8/22/2019 User Guide Indu Soft
http://slidepdf.com/reader/full/user-guide-indu-soft 70/1279
The Development Environment > Application button >
CloseThe Close command on the Application menu is used to close the active screen or worksheet.
When you select this command, you will be prompted to save your changes before closing.
Parent topic: Application buttonInduSoft Web Studio v7.0 Technical ReferenceCopyright © 2003–2010 Indusoft, Inc.

8/22/2019 User Guide Indu Soft
http://slidepdf.com/reader/full/user-guide-indu-soft 71/1279
The Development Environment > Application button >
Close AllThe Close All command on the Application menu is used to close all open screens and worksheets.
When you select this command, you will be prompted to save your changes before closing.
Parent topic: Application buttonInduSoft Web Studio v7.0 Technical ReferenceCopyright © 2003–2010 Indusoft, Inc.

8/22/2019 User Guide Indu Soft
http://slidepdf.com/reader/full/user-guide-indu-soft 72/1279
The Development Environment > Application button >
ExitThe Exit command on the Application menu is used to close all open screens and worksheets, savethe project database, and then exit the application.
When you select this command, you will be prompted to save your changes before closing.
Note: Selecting this command is the same as clicking the Close button on the title bar.
Parent topic: Application buttonInduSoft Web Studio v7.0 Technical ReferenceCopyright © 2003–2010 Indusoft, Inc.

8/22/2019 User Guide Indu Soft
http://slidepdf.com/reader/full/user-guide-indu-soft 73/1279
The Development Environment >
Quick Access ToolbarThe Quick Access Toolbar is a customizable toolbar that contains a set of commands that areindependent of the ribbon tab that is currently displayed.
Move the Quick Access Toolbar
The Quick Access Toolbar can be located in one of two places:
Upper-left corner next to the Application button (default location); or
Below the ribbon, where it can run the full length of the application window.
If you don't want the Quick Access Toolbar to be displayed in its current location, you can move it tothe other location:
Click Customize Quick Access Toolbar .1.
In the list, click Show Below Ribbon or Show Above Ribbon.2.
Add a command to the Quick Access Toolbar
You can add a command to the Quick Access Toolbar directly from commands that are displayed onthe ribbon:
On the ribbon, click the appropriate tab or group to display the command that you want to addto the Quick Access Toolbar.
1.
Right-click the command, and then click Add to Quick Access Toolbar on the shortcut menu.2.
You can also add and remove commands — as well as reset the toolbar to its default — using theCustomize dialog:
Click Customize Quick Access Toolbar .1.
In the list, click More Commands. The Customize dialog is displayed.
Figure 1. Customize Quick Access Toolbar dialog
2.

8/22/2019 User Guide Indu Soft
http://slidepdf.com/reader/full/user-guide-indu-soft 74/1279
In the Choose commands from menu, select the appropriate Ribbon tab. The commandsfrom that tab are displayed in the Commands list.
3.
In the Commands list, select the command that you want to add to the Quick Access Toolbar.4.Click Add.5.
Only commands can be added to the Quick Access Toolbar. The contents of most lists, such as indentand spacing values and individual styles, which also appear on the ribbon, cannot be added to theQuick Access Toolbar.
Parent topic: The Development EnvironmentInduSoft Web Studio v7.0 Technical ReferenceCopyright © 2003–2010 Indusoft, Inc.

8/22/2019 User Guide Indu Soft
http://slidepdf.com/reader/full/user-guide-indu-soft 75/1279
The Development Environment >
RibbonThe new ribbon combines the numerous menus and toolbars from the previous version of IWS into asingle, user-friendly interface. Almost all application commands are now on the ribbon, organized intotabs and groups according to general usage.
Figure 1. The Ribbon interface
Home tabThe Home tab of the ribbon is used to manage your project within the developmentenvironment.
View tab
The View tab of the ribbon is used to customize the look of the development environment itself.
Insert tab
The Insert tab of the ribbon is used to insert new tags, screens, worksheets, and othercomponents into your project.
Project tab
The Project tab of the ribbon is used to configure your project settings.
Graphics tab
The Graphics tab of the ribbon is used to draw project screens.
Format tab
The Format tab of the ribbon is used to format and arrange objects in a project screen.
Help tab
The Help tab of the ribbon provides additional help with using the software.
Parent topic: The Development EnvironmentInduSoft Web Studio v7.0 Technical ReferenceCopyright © 2003–2010 Indusoft, Inc.
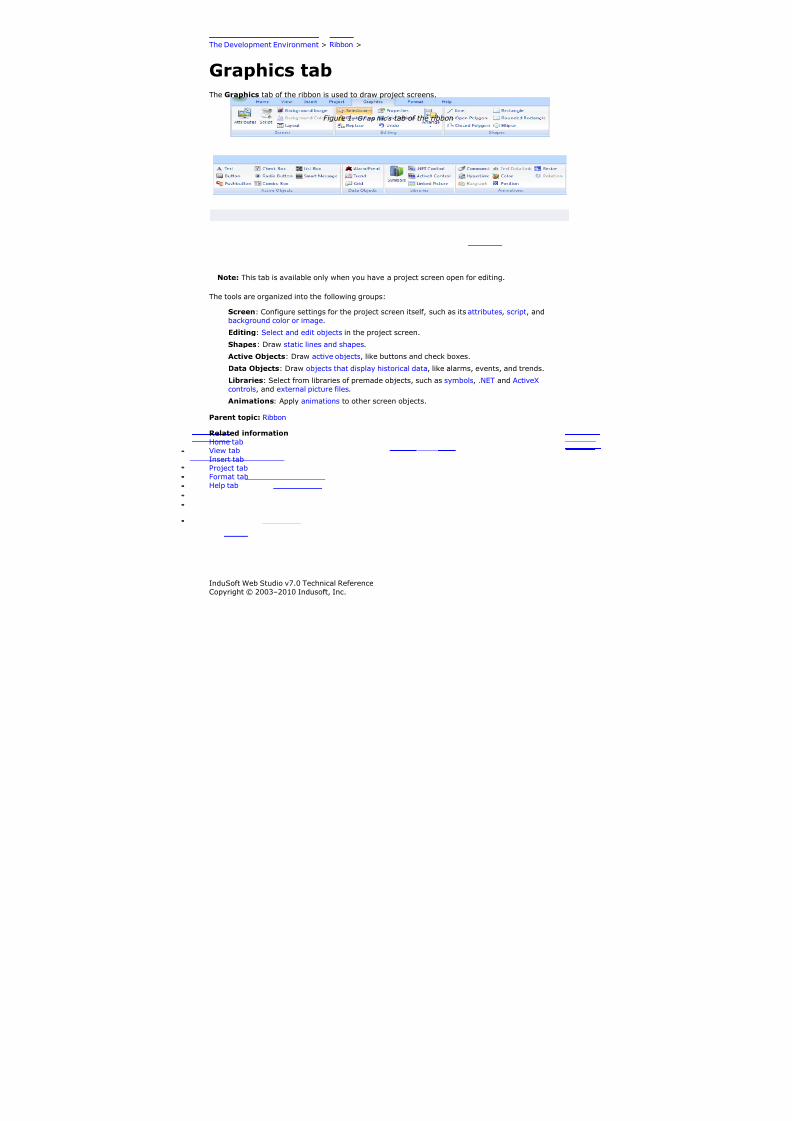
8/22/2019 User Guide Indu Soft
http://slidepdf.com/reader/full/user-guide-indu-soft 76/1279
The Development Environment > Ribbon >
Home tabThe Home tab of the ribbon is used to manage your project within the development environment.
Figure 1. Ho m e tab of the ribbon
The tools are organized into the following groups:
Clipboard : Cut , copy , paste , and find items in project screens and task worksheets.
Local Management : Run and stop the project on the local station (i.e., where thedevelopment application is installed), as well as manage the execution tasks .
Remote Management : Connect to a remote station (e.g., a Windows Embedded device) sothat you can download the project to it, and then run , stop , and trouble shoot the project onthat station.
Tools : Miscellaneous tools to verify the project , import tags from other projects, convertscreen resolutions , and register ActiveX and .NET controls .
Tags : Manipulate tags and tag properties in the project database.
Parent topic: Ribbon
Related informationView tabInsert tabProject tabGraphics tabFormat tabHelp tab
InduSoft Web Studio v7.0 Technical ReferenceCopyright © 2003–2010 Indusoft, Inc.

8/22/2019 User Guide Indu Soft
http://slidepdf.com/reader/full/user-guide-indu-soft 77/1279
The Development Environment > Ribbon >
View tabThe View tab of the ribbon is used to customize the look of the development environment itself.
Figure 1. V i ew tab of the ribbon
The tools are organized into the following groups:
Show/Hide: Show and hide the different parts of the development environment, as well asrestore the default layout.
Zoom: Zoom in and out of the screen editor.
Options: Change the language and font used in the development environment.
Window: Arrange the windows in the development environment.
Parent topic: Ribbon
Related information
Home tabInsert tabProject tabGraphics tab
Format tabHelp tab
InduSoft Web Studio v7.0 Technical ReferenceCopyright © 2003–2010 Indusoft, Inc.
8/22/2019 User Guide Indu Soft
http://slidepdf.com/reader/full/user-guide-indu-soft 78/1279
The Development Environment > Ribbon >
Insert tabThe Insert tab of the ribbon is used to insert new tags, screens, worksheets, and other componentsinto your project.
Figure 1. I n se r t tab of the ribbon
The tools are organized into the following groups:
Global: Insert tags, classes, translations, and procedures into the Global tab of the ProjectExplorer.
Graphics: Insert screens and screen groups into the Graphics tab of the Project Explorer.
Task Worksheets: Insert task worksheets into the Tasks tab of the Project Explorer.
Communication: Insert server configurations and communication worksheets into the Commtab of the Project Explorer.
Parent topic: Ribbon
Related information
Home tabView tab
Project tabGraphics tabFormat tabHelp tab
InduSoft Web Studio v7.0 Technical ReferenceCopyright © 2003–2010 Indusoft, Inc.

8/22/2019 User Guide Indu Soft
http://slidepdf.com/reader/full/user-guide-indu-soft 79/1279
The Development Environment > Ribbon >
Project tabThe Project tab of the ribbon is used to configure your project settings.
Figure 1. Project tab of the ribbon
The tools are organized into the following groups:
Settings: Configure the general project settings, and also set the project to run as a Windowsservice.
Security System: Enable and configure the project security system.
Web: Configure the project to accept connections from thin clients and mobile devices, and alsoconfigure outgoing email and FTP.
Parent topic: Ribbon
Related information
Home tabView tabInsert tab
Graphics tabFormat tabHelp tab
InduSoft Web Studio v7.0 Technical ReferenceCopyright © 2003–2010 Indusoft, Inc.

8/22/2019 User Guide Indu Soft
http://slidepdf.com/reader/full/user-guide-indu-soft 80/1279
The Development Environment > Ribbon >
Graphics tabThe Graphics tab of the ribbon is used to draw project screens.
Figure 1. Gr ap h ic s tab of the ribbon
Note: This tab is available only when you have a project screen open for editing.
The tools are organized into the following groups:
Screen: Configure settings for the project screen itself, such as its attributes, script, and
background color or image.Editing: Select and edit objects in the project screen.
Shapes: Draw static lines and shapes.
Active Objects: Draw active objects, like buttons and check boxes.
Data Objects: Draw objects that display historical data, like alarms, events, and trends.
Libraries: Select from libraries of premade objects, such as symbols, .NET and ActiveXcontrols, and external picture files.
Animations: Apply animations to other screen objects.
Parent topic: Ribbon
Related informationHome tabView tabInsert tabProject tabFormat tabHelp tab

8/22/2019 User Guide Indu Soft
http://slidepdf.com/reader/full/user-guide-indu-soft 81/1279
InduSoft Web Studio v7.0 Technical ReferenceCopyright © 2003–2010 Indusoft, Inc.

8/22/2019 User Guide Indu Soft
http://slidepdf.com/reader/full/user-guide-indu-soft 82/1279
The Development Environment > Ribbon >Screens and Graphics > Editing >Screens and Graphics >
Format tabThe Format tab of the ribbon is used to format and arrange objects in a project screen.
Figure 1. Fo r m at tab of the ribbon
Note: This tab is available only when you've selected one or more objects in a project screen.
The tools are organized into the following groups:
Arrange: Arrange objects in a project screen, including bring to front and send to back, group,align, and rotate.
Position: Precisely adjust the position of a screen object in a project screen.
Size: Precisely adjust the size of a screen object.
Style: Change the fill and line color of a screen object.
Fonts: Change the caption font of a screen object.
Move to Front and Move to Back
Move Backward and Move Forward
Group and Ungroup Tools
Align, Center and Distribute Tools
Rotate Tool
Adjusting the position of a screen object
Moving a screen object by selecting and dragging it can be imprecise — especially if you have"snap to grid" enabled — so you can use the Position tools to precisely adjust the position of anobject.
Resize Tools

8/22/2019 User Guide Indu Soft
http://slidepdf.com/reader/full/user-guide-indu-soft 83/1279
Fill Color Tool
Line Color Tool
Fonts Tool
Parent topic: RibbonParent topic: EditingParent topic: Screens and Graphics
Related information
Home tabView tabInsert tabProject tabGraphics tabHelp tab
InduSoft Web Studio v7.0 Technical Reference
Copyright © 2003–2010 Indusoft, Inc.

8/22/2019 User Guide Indu Soft
http://slidepdf.com/reader/full/user-guide-indu-soft 84/1279
The Development Environment > Ribbon >
Help tabThe Help tab of the ribbon provides additional help with using the software.
Figure 1. He l p tab of the ribbon
The tools are organized into the following groups:
Documentation: Access the documentation for the development application, including this helpfile / technical reference and notes for the individual communication drivers.
Information: Access other information about InduSoft Web Studio, including the licenseagreement, product website, and release notes, as well as system and support details thatmake it easier for Customer Support to assist you.
Parent topic: Ribbon
Related information
Home tabView tabInsert tab
Project tabGraphics tabFormat tab
InduSoft Web Studio v7.0 Technical ReferenceCopyright © 2003–2010 Indusoft, Inc.

8/22/2019 User Guide Indu Soft
http://slidepdf.com/reader/full/user-guide-indu-soft 85/1279
The Development Environment >
Project ExplorerThe Project Explorer organizes all of the screens, worksheets, and other components that make upyour project and presents them in an expandable tree-view.
Figure 1. The Project Explorer
Click the Expand icon or double-click the folder to view the contents of the folder. Click the Collapseicon to close the folder.
If you right-click on any component in the Project Explorer , a shortcut menu is displayed with optionsfor that component.
Global tab
The Global tab of the Project Explorer contains the project tags database, as well as otherfeatures that apply to the entire project such security and UI translation.
Graphics tab
The Graphics tab of the Project Explorer contains all of the screens, screen groups, andsymbols in your project.
Tasks tab
The Tasks tab of the Project Explorer organizes the worksheets that are processed asbackground tasks during project runtime.
Comm tab
The Comm tab of the Project Explorer organizes the worksheets that establish communicationwith another device or software using available protocols.
Parent topic: The Development Environment

8/22/2019 User Guide Indu Soft
http://slidepdf.com/reader/full/user-guide-indu-soft 86/1279
InduSoft Web Studio v7.0 Technical ReferenceCopyright © 2003–2010 Indusoft, Inc.

8/22/2019 User Guide Indu Soft
http://slidepdf.com/reader/full/user-guide-indu-soft 87/1279
The Development Environment > Project Explorer >
Global tabThe Global tab of the Project Explorer contains the project tags database, as well as other featuresthat apply to the entire project such security and UI translation.
Figure 1. Glob a l tab of the Project Explorer
The folders on the Global tab are described on the following pages:
Project Tags contains tags you create during project development (such as screen tags or tagsthat read from/write to field equipment).
Classes contains compound tags, called class tags, created to associate a set of values (ratherthan a single value) with an object.
Shared Database contains tags that were created in a PC-based control program and thenimported into the project tags database.
For example you can import SteepleChase tags into your project so that it can read/write datafrom a SteepleChase PC-based control product.
System Tags contains predefined tags with predetermined functions that are used by theproject for specific, supervisory tasks (for example, Date tags hold the current date in stringformat).
All system tags are read-only , which means you cannot add, edit, or remove these tags fromthe database.
Security contains all of the group and individual user security accounts configured for thecurrent project.
Procedures contains VBScript functions and sub-routines that can be called by any other scriptin the project.
Event Logger contains logging and event-retrieval features.
Translation contains the translation worksheet that defines how your project's user interfaceshould be translated into another language.

8/22/2019 User Guide Indu Soft
http://slidepdf.com/reader/full/user-guide-indu-soft 88/1279
Parent topic: Project Explorer
Related information
Graphics tabTasks tabComm tab
InduSoft Web Studio v7.0 Technical Reference
Copyright © 2003–2010 Indusoft, Inc.

8/22/2019 User Guide Indu Soft
http://slidepdf.com/reader/full/user-guide-indu-soft 89/1279
The Development Environment > Project Explorer >Screens and Graphics >
Graphics tabThe Graphics tab of the Project Explorer contains all of the screens, screen groups, and symbols inyour project.
Figure 1. Graphics tab of the Project Explorer
The folders on the Graphics tab are described on the following pages:
Screens contains all of the screens created for the current project.
Screen Group contains the entire screen groups (individual screens combined into manageablegroups) created for the current project.
Web Pages contains all of the Web pages (i.e., screens saved in HTML format) created for theproject.
Mobile Access allows configuration of the mini-site that is targeted to cell phones, PDAs,and other mobile devices.
Project Symbols contains all of the user-defined symbols, which can be groups of imagesand/or text. You can create custom symbols for the project and save them into this folder.
Graphics Script contains predefined functions that are executed when certain screen actionsoccur, such as when the Thin Client is launched on a remote station.
Symbols contains the library of common symbols and graphics provided with the project.Double-click the Library icon to open the Symbol Library.
Layout displays all screens currently open in the Screen Editor and allows you to visualize how
the screens fit together during runtime.
Screens folder
Screen Group Folder

8/22/2019 User Guide Indu Soft
http://slidepdf.com/reader/full/user-guide-indu-soft 90/1279
Web Pages Folder
Mobile Access
Layout Tool
Parent topic: Project ExplorerParent topic: Screens and Graphics
Related information
Global tabTasks tabComm tab
InduSoft Web Studio v7.0 Technical ReferenceCopyright © 2003–2010 Indusoft, Inc.

8/22/2019 User Guide Indu Soft
http://slidepdf.com/reader/full/user-guide-indu-soft 91/1279
The Development Environment > Project Explorer >
Tasks tabThe Tasks tab of the Project Explorer organizes the worksheets that are processed as backgroundtasks during project runtime.
Figure 1. Tasks tab of the Project Explorer
The folders on the Tasks tab are described on the following pages:
Alarms contains the Alarm worksheets used to configure alarm groups and the tags related toeach alarm group in the project. You also use the Alarm task to define the alarm messagesgenerated during project runtime.
Trend contains the Trend worksheets used to configure history groups that store trend curvesfor the project. You can use the Trend task to declare which tags must have their values stored
on disk, and to create history files for trend graphs. Your project stores the samples in a binaryhistory file (*.hst), and displays both history and on-line samples in a trend graph screen.
Recipes contains the Recipe worksheets used to configure how data is exchanged between theproject database and disk files in ASCII or DBF format, and how values are transferred betweenfiles and real-time memory.
Reports contains the Report worksheets used to configure reports (text type) that are sent to aprinter or a disk. Reports tasks allow you to configure text reports with system data, whichmakes report creation easier and more efficient.
ODBC contains the ODBC worksheets used to configure how the ODBC interface runs in anetwork environment and uses standard Windows ODBC configuration. You configure ODBCtasks to exchange data between your project and any database supporting the ODBC interface.
Math contains the Math worksheets used to configure and implement additional routines towork with different tasks. Your project executes Math worksheets as Background Tasks duringruntime. You can configure Math worksheets to provide free environments for logical routinesand mathematical calculations required by the project.
Script contains the Startup Script and other Script Groups.
Scheduler contains the Scheduler worksheets used to configure events using defined

8/22/2019 User Guide Indu Soft
http://slidepdf.com/reader/full/user-guide-indu-soft 92/1279
mathematical expressions, which are executed according to time, date, or other monitoredevent.
Database/ERP contains the Database worksheets that communicate with external databasesusing the standard ADO.NET interface (as an alternative to ODBC).
Parent topic: Project Explorer
Related information
Global tabGraphics tabComm tab
InduSoft Web Studio v7.0 Technical ReferenceCopyright © 2003–2010 Indusoft, Inc.

8/22/2019 User Guide Indu Soft
http://slidepdf.com/reader/full/user-guide-indu-soft 93/1279
The Development Environment > Project Explorer >
Comm tabThe Comm tab of the Project Explorer organizes the worksheets that establish communication withanother device or software using available protocols.
Figure 1. Comm tab of the Project Explorer
The folders on the Comm tab are described on the following pages.
Drivers contains the Driver worksheets used to configure a communication interface (orinterfaces) between the project and remote equipment (such as a PLC or transmitters).
A communication driver is a .DLL file that contains specific information about the remoteequipment and implements the communication protocol.
OPC contains the OPC worksheets used to configure OPC interfaces between your project andan OPC Server. An OPC Client module enables your project to communicate with any devicethat acts as an OPC Server by implementing the OPC standard described in theOLE for Process
Control Data Access Standard Version 2.0 document published by the OPC Foundation.
OPC UA contains the OPC UA worksheets that are used to connect to OPC Servers via the newOPC Unified Architecture protocol.
OPC Xi contains the OPC Xi worksheets that are used to connect to OPC Servers via the newOPC Express Interface protocol.
TCP/IP contains the TCP/IP worksheets used to configure TCP/IP Client interfaces for otherIWS stations.
IWS TCP/IP Client and Server modules enable two or more projects to keep their databases
synchronized using the TCP/IP protocol.DDE contains the DDE worksheets used to configure a DDE Client for a DDE Server application(such as Microsoft Excel or any other Windows program that supports this interface).
DDE (Dynamic Data Exchange) is a protocol that enables dynamic data exchange betweenWindows applications. A DDE conversation is an interaction between server and client programs.IWS provides interfaces that run as clients or as servers.

8/22/2019 User Guide Indu Soft
http://slidepdf.com/reader/full/user-guide-indu-soft 94/1279
Parent topic: Project Explorer
Related information
Global tabGraphics tabTasks tab
InduSoft Web Studio v7.0 Technical Reference
Copyright © 2003–2010 Indusoft, Inc.

8/22/2019 User Guide Indu Soft
http://slidepdf.com/reader/full/user-guide-indu-soft 95/1279
The Development Environment >
Screen/Worksheet EditorUse the powerful, object-oriented screen editor to create and edit a variety of screens andworksheets for your projects. You can input information using your mouse and keyboard, outputcontrol data to your processes, and automatically update screens based on data input from yourprocesses.
Figure 1. Screen/Worksheet Editor
Other screen editor features include:
Simple point-and-click, drag-and-drop interface
Grouping objects to preserve the construction steps of individual objects
Editing objects without having to ungroup internal object components or groups
Handling bitmap objects and background bitmaps
Status line support in project windows and dialogs
Parent topic: The Development EnvironmentInduSoft Web Studio v7.0 Technical Reference

8/22/2019 User Guide Indu Soft
http://slidepdf.com/reader/full/user-guide-indu-soft 96/1279
Copyright © 2003–2010 Indusoft, Inc.

8/22/2019 User Guide Indu Soft
http://slidepdf.com/reader/full/user-guide-indu-soft 97/1279
The Development Environment >
Database SpyThe Database Spy window is a debugging tool that allows you to: monitor and force values to projecttags; execute and test functions; and execute and test math expressions.
Figure 1. Sample Database Spy window
The window contains the following elements:
For each item that you want to monitor during runtime:
Tag/Expression: Specify a project tag, system tag, or expression that you want tomonitor.
Value: Displays the value returned by the tag/expression.
Quality: Displays the quality (GOOD or BAD) of the value returned by the tag/expression.
Continuous: Select this option to have the project continuously evaluate thetag/expression.
DB tabs: The windows is divided into multiple sheets, so that you can keep your itemsorganized.
Scroll bars: Use to view areas of the Database Spy that are obscured from view because of thewindow size or the size of the current sheet.
Tip: The Database Spy is dockable, which means you can move it to another location in thedevelopment environment. Click on the titlebar and drag it to a new location. Release the mousebutton to attach or dock the window to its new location.
Parent topic: The Development EnvironmentInduSoft Web Studio v7.0 Technical Reference
Copyright © 2003–2010 Indusoft, Inc.

8/22/2019 User Guide Indu Soft
http://slidepdf.com/reader/full/user-guide-indu-soft 98/1279
The Development Environment >
Output (LogWin)You can use the Output window to view debugging messages generated during project runtime. Thewindow displays OPC, DDE, and TCP/IP transactions, module activation, trace tags, and so on.
Figure 1. Sample Output Window
The window contains the following elements:
XRef tab: Use the Cross Reference tool to get a tag, and to find every place in the projectwhere the tag is being used. Results appear on this tab, providing path and filename, column,row in the spreadsheet. So, if something changes in the tag, and produces unexpected orunsuccessful results, you can locate all instances of the tag for debugging purposes.
Note: The XRef tab does not work for functions, only tags, but it does allow you to look forarray indices.
Hide Docked Window button ( ): Click to open or close the window.
Alternatively, to hide the window, you can deselect (uncheck) the Output Window option onthe View tab of the ribbon.
Contract/Expand button ( ): Click to contract and expand the Output window.
Scroll Bars: Click and drag to view areas of the Output window that are obscured from viewbecause of the window size or the length of your data.
The Output window is dockable, which means you can move it to another location in the developmentenvironment. Click on the title bar and drag the window to a new location. Release the mouse buttonto attach or dock the window to its new location.
Configuring the Log to Show Additional Information
By default, the log shows only debugging and error messages — that is, messages indicating thatyour project is not running properly. If the log showed all messages generated by IWS, it wouldquickly overflow with information, making it unusable.

8/22/2019 User Guide Indu Soft
http://slidepdf.com/reader/full/user-guide-indu-soft 99/1279
To configure the log to show specific additional information:
Right-click anywhere in the Output window, and then click Settings on the shortcut menu. TheLog Settings dialog is displayed.
1.
In the Log Options tab of the dialog, select the specific types of messages that you want the logto show.
Figure 2. Log Settings — Options Tab
Option Description
Field Read Commands andField Write Commands
Show any read and/or write commands that are sent toconnected devices.
Protocol Analyzer Show messages generated by configured device drivers.
OPC Messages Show messages generated by OPC communications.
TCP/IP Messages Show messages generated by TCP/IP communications.
Recipe/Report Show messages generated by the Recipe and Report tasks.
Display Open/Close Display a message whenever a screen is opened or closed.
Logon/Logout Display a message whenever a user logs on or logs out. (Formore information, see Security.)
Trace Messages Show messages generated by the Trace() function. Thisfunction is used to generate customized messages fromwithin your project.
Database Messages Show messages generated by the ODBC and ADO.NETdatabase interfaces.
DDE Messages Show messages generated by DDE communications.
Insert date/time Timestamp each message.
2.
In the Log Tags tab of the dialog, click Add to browse for project tags.
Figure 3. Log Settings — Tags Tab
3.

8/22/2019 User Guide Indu Soft
http://slidepdf.com/reader/full/user-guide-indu-soft 100/1279
The Output window will display a message whenever the value of a selected tag changes.
Click OK to save your settings and close the Log Settings dialog.4.
Parent topic: The Development EnvironmentInduSoft Web Studio v7.0 Technical ReferenceCopyright © 2003–2010 Indusoft, Inc.

8/22/2019 User Guide Indu Soft
http://slidepdf.com/reader/full/user-guide-indu-soft 101/1279
The Development Environment >
Title BarThe Title Bar located along the top of the development environment displays the application name (e.g.,InduSoft Web Studio ) followed by the name of the active screen or worksheet (if any).
Figure 1. Example of Title Bar
The Title Bar also provides the following buttons (from left to right):
Minimize button : Click to minimize the development environment window to the Taskbar.
Restore Down / Maximize : Click to toggle the development environment window between two
sizes:
Restore Down button reduces the window to its original (default) size.
Maximize button enlarges the window to fill your computer screen.
Close button : Click to save the database and then close the development environment. If youmodified any screens or worksheets, the application prompts you to save your work. This button'sfunction is similar to clicking Exit Application on the Application menu.
Note: Closing the development environment does not close either the project viewer or theruntime system, if they are running.
Parent topic: The Development EnvironmentInduSoft Web Studio v7.0 Technical ReferenceCopyright © 2003–2010 Indusoft, Inc.

8/22/2019 User Guide Indu Soft
http://slidepdf.com/reader/full/user-guide-indu-soft 102/1279
The Development Environment >
Status BarThe Status Bar located along the bottom of the development environment provides information aboutthe active screen (if any) and the state of the application.
Figure 1. Example of Status Bar
The Status Bar fields (from left to right) are described in the following table:Execution ModeThe current execution mode of the application.CAPIndicates whether the keyboard Caps Lock is on (black) or off (grey).
NUMIndicates whether the keyboard Num Lock is on (black) or off (grey).SCRLIndicates whether the keyboard Scroll Lock is on (black) or off (grey).Object IDThe ID number of a selected screen object.Cursor PositionThe location of the cursor on the active screen or worksheet. If it's a screen, then the position of themouse cursor is given as X,Y coordinates, where X is the number of pixels from the left edge of thescreen and Y is the number of pixels from the top edge of the screen. If it's a worksheet, then theposition of the text cursor is given as Line and Column.Object SizeThe size (in pixels) of a selected screen object, where W is the width and H is the height.
No DRAGIndicates whether dragging is disabled (No DRAG ) or enabled (empty) in the active screen.Tag CountThe total number of tags used so far in the project.
Field Description
Parent topic: The Development EnvironmentInduSoft Web Studio v7.0 Technical ReferenceCopyright © 2003–2010 Indusoft, Inc.

8/22/2019 User Guide Indu Soft
http://slidepdf.com/reader/full/user-guide-indu-soft 103/1279
Creating a New Project
Use the following steps to create a new project:
Click the Application button, and then click New on the the Application menu. The New dialog isdisplayed.
1.
Click the Project tab.
Figure 1. New Project dialog
2.
In the Project name box, type the name of your project, keeping the following guidelines inmind:
You must follow the usual Windows naming conventions; and
Do not use spaces in the name if you want to access your project from the Web. (URLs donot recognize spaces.)
3.
By default, IWS stores all projects in the directory C:\Users\username\My
Documents\InduSoft Web Studio v7.0 Projects\, so this file path will be automatically
displayed in the Location box. To save your project to another location, click Browse and thenselect the desired folder.
Tip: If you want to permanently change the default location where projects will be saved,then edit the file Program Settings.ini to include the following entry:
4.

8/22/2019 User Guide Indu Soft
http://slidepdf.com/reader/full/user-guide-indu-soft 104/1279
[Application]
DefaultDirectory=filepath
Select a license level from the Target platform list, to indicate the platform on which you willbe running this project.
Tip: To check the license level on your workstation, exit from the development applicationand then open the Protection Manager (Start > All Programs > InduSoft Web Studio
v7.0 > Register).
Important: If you try to open or develop an project that was originally developed using ahigher license level than exists on your current workstation, the development applicationwill prevent you from opening the project and put you into Demo mode.
To correct this situation, click Target System on the Project tab of the ribbon. (The menudisplays only those target systems that you are licensed to use.) Select one of these toaccomodate your current license level.
Although you can change your license level later, we recommend that you verify and selectthe correct license level now, so you will not waste time developing projects requiring alicense level you are not authorized to use on the runtime device.
Also, we recommend developing for the lowest license level if you will be running yourproject on multiple computers with different licenses.
5.
When you are finished configuring the Project tab, click OK to continue to the Project Wizarddialog.
Figure 2. Project Wizard Dialog
6.

8/22/2019 User Guide Indu Soft
http://slidepdf.com/reader/full/user-guide-indu-soft 105/1279
Use this dialog to select a template, set the default screen resolution, and to indicate that youwant to share tags with another software product database such as Steeplechase or ISaGRAF.
Instructions for using these features are provided in the following sections.
7.
Click OK when you're done. Your new project is opened and ready for editing.8.
Specifying a Default Screen Resolution
Use the Resolution list box to select a default resolution (display size) for your project's screens.
Figure 3. Selecting a default resolution
If you select Custom, then also enter the screen Width and Height (in pixels).
Note: You can adjust the resolution of your screens after you've created them by clickingConvert Resolution on the Home tab of the ribbon.
InduSoft Web Studio v7.0 Technical ReferenceCopyright © 2003–2010 Indusoft, Inc.

8/22/2019 User Guide Indu Soft
http://slidepdf.com/reader/full/user-guide-indu-soft 106/1279
Configuring additional projectsettings
Select Project Settings to open the Project Settings dialog, which controls settings that affect theoverall project.
Figure 1. Project Settings dialog
Information tab
Options tab
Viewer tab
Communication tab
Web tab

8/22/2019 User Guide Indu Soft
http://slidepdf.com/reader/full/user-guide-indu-soft 107/1279
Preferences tab
InduSoft Web Studio v7.0 Technical ReferenceCopyright © 2003–2010 Indusoft, Inc.

8/22/2019 User Guide Indu Soft
http://slidepdf.com/reader/full/user-guide-indu-soft 108/1279
Configuring additional project settings >
Information tab
Figure 1. Project Settings: Identification tab
Use the following parameters to identify the project (for documentation purposes only).
Description
Revision
Company
Author
Field Equipment
Notes
Parent topic: Configuring additional project settings
Related information
Options tab

8/22/2019 User Guide Indu Soft
http://slidepdf.com/reader/full/user-guide-indu-soft 109/1279
Viewer tabCommunication tabWeb tabPreferences tab
InduSoft Web Studio v7.0 Technical ReferenceCopyright © 2003–2010 Indusoft, Inc.

8/22/2019 User Guide Indu Soft
http://slidepdf.com/reader/full/user-guide-indu-soft 110/1279
Configuring additional project settings >
Options tabUse this tab to specify parameters relating to your project in general.
Figure 1. Project Settings: Options tab
A description of these parameters follows:
Target system: Use the combo box to specify the target system for the current project. Thetarget system sets the project restrictions (such as number of tags supported) and must matchyour license. The description of the main license restrictions for each target system is displayedbelow the combo-box where you chose it.
CAUTION:
If you specify a Target System level that does not match the actual license level
on the target system, then your project may not run properly.
Resolution: Displays your project's screen resolution.

8/22/2019 User Guide Indu Soft
http://slidepdf.com/reader/full/user-guide-indu-soft 111/1279
Alarm History and Events: Type a value into the History Life Time (days) field to specify howlong to keep alarm and event history files. After the specified number of days, the projectautomatically deletes existing alarm/event history files that are older than the period specified.If you type zero in this field, the project does not delete any history files automatically. In sucha case, you should create an external procedure to clean the old history files; otherwise, thefree memory in the computer will eventually be depleted.
History Format: Select the format of the Alarm/History event, as follows:
Format Description
Proprietary Saves the history data in the Alarm sub-folder of your project folder (by
default) in text files using the proprietary format.
Database Saves the history data in the SQL Relational Database specified by theuser, using the built-in ADO interface.
Binary Saves the history data in the Alarm sub-folder of your project folder (by
default) in binary files using the proprietary format.
For more information, see Alarm History Database.
Default Database: Allows you to configure a Default Database, which can be shared bydifferent tasks and objects. See Configuring a Default Database for All Task History for moreinformation.
Shared Tags pane: Select a third-party software from the combo-box. Click the Configurebutton to configure the settings for importing tags from one of the following data sources intothe Shared Database folder:
<None>: Does not share tags with any external software
First ISaGRAF: Import tags from a First ISaGRAF project into the Shared Tags folder of the current project, and, if enabled, configure the communication interface with the ISAGRdriver automatically.
ISaGRAF: Import tags from a ISaGRAF project into the Shared Tags folder of the current
project, and, if enabled, configure the communication interface with the ISAGR driverautomatically.
Think & Do: Import tags from a Think & Do project into the Shared Tags folder of thecurrent project, and, if enabled, configure the communication interface with the TND driverautomatically.
SteepleChase: Import tags from a SteepleChase project into the Shared Tags folder of the current project, and configure the communication interface with the VLC driverautomatically.
SixNet: Import tags from a SixNet project into the Shared Tags folder of the currentproject, and configure the communication interface with the SNET driver automatically.
OpenControl: Import tags from an OpenControl project into the Shared Tags folder of
the current project, and configure the communication interface with the OC driverautomatically.
Straton: Import tags from a Straton project into the Shared Tags folder of the currentproject, and configure the communication interface with the STRAT driver automatically.
Note: PC-based control has its own, customized interface that requires you to provide

8/22/2019 User Guide Indu Soft
http://slidepdf.com/reader/full/user-guide-indu-soft 112/1279
information about the PC-based control application in order to share tags with the IWSproject.
Alarm History Database
Configuring a Default Database for All Task History
Database Configuration
Parent topic: Configuring additional project settings
Related information
Information tabViewer tabCommunication tabWeb tabPreferences tab
InduSoft Web Studio v7.0 Technical ReferenceCopyright © 2003–2010 Indusoft, Inc.

8/22/2019 User Guide Indu Soft
http://slidepdf.com/reader/full/user-guide-indu-soft 113/1279
Configuring additional project settings > Options tab >
Alarm History Database
The alarm history can be saved either in the IWS proprietary format or to an external SQL Relationaldatabase by ADO. The alarm history settings can be configured in the project settings (Options onthe Project tab of the ribbon):
Figure 1. Project Settings: Options tab
The Alarm History and Events interface allows you to configure the following settings:
Field Remarks Syntax
History Life Time (days) The history for alarm/event messages older than thenumber of days specified in this field are automaticallydeleted, following a FIFO (First-In, First-Out) behavior.If this field is left in blank, the history of alarms/eventsare not deleted automatically.
Number
History Format Defines the format of the history of alarms/events:
Proprietary: Saves the history in the proprietaryformat. The alarm messages are saved in a text
file with the name ALyymmdd .ALH, where:
yy is the last two digits of the current year.
mm is the month.
dd is the day
There will be one history file for each day. Bydefault, the alarm history files created with theproprietary format are stored in the \Alarm sub-
folder of the project. However, it is possible todirect the alarms to a different directory by usingthe SetAppAlarmPath function from the built-inlanguage.
Database: Saves the history in a third-party SQLRelational Database (e.g., SQL Server).
Combo-box
Alarm Database When selecting Database as the format for the historyof alarms, the specific settings to interface with thethird-party SQL Relational Database can be configured
—

8/22/2019 User Guide Indu Soft
http://slidepdf.com/reader/full/user-guide-indu-soft 114/1279
Field Remarks Syntax by the dialog launched when pressing this button. Forfurther details about support for third-party SQLRelational Databases, see Database Interface.
When saving the alarm history in the proprietary format, each alarm event is saved in a new line,
using the pipe character (|) to delimiter the different fields, as illustrated below:
P1|P2|P3|P4|P5|P6|P7|P8|P9|P10|P11|P12|P13|P14|P15|P16|P17|P18|P19|P20|P21
P1|P2|P3|P4|P5|P6|P7|P8|P9|P10|P11|P12|P13|P14|P15|P16|P17|P18|P19|P20|P21
.
.
P1|P2|P3|P4|P5|P6|P7|P8|P9|P10|P11|P12|P13|P14|P15|P16|P17|P18|P19|P20|P21
The format of the history both in proprietary format and in the SQL Relational Database format isdescribed in the following table:
Proprietary SQL Relational Database Remarks File Vers.
Field No. Field Name Field Type
P1 — — File version (Current =003)
001
P2 Al_Start_Time Date/Time Start Date(DD/MM/YYYY)
001
P3 Start Time (HH:MM:SS) 001
P4 Al_Tag Text Tag Name 001
P5 Al_Message Text Alarm Message 001
P6 Al_Ack Number Ack, where:
0: Alarm wasacknowledged ordoes not requireacknowledgment
1: Alarm was notacknowledged
001
P7 Al_Active Number Active, where:
0: Alarm is notactive
1: Alarm is active
001

8/22/2019 User Guide Indu Soft
http://slidepdf.com/reader/full/user-guide-indu-soft 115/1279
Proprietary SQL Relational Database Remarks File Vers.
Field No. Field Name Field Type
P8 Al_Tag_Value Number Tag Value when theevent occurred
001
P9 Al_Group Number Alarm Group Number 001
P10 Al_Priority Number Priority Number 001P11 Al_Selection Text Selection 001
P12 Al_Type Number Type, where:
1 is HiHi
2 is Hi(On)
4 is Lo(Off)
8 is LoLo
16 is Rate(Change)
32 is Deviation+
64 is Deviation-
001
P13 Al_Ack_Req Number Ack required, where:
0: Alarm requiresacknowledge
1: Alarm does notrequire acknowldge
001
P14 Al_Norm_Time Date/Time Normalization Date(DD/MM/YYYY)
001
P15 Normalization Time
(HH:MM:SS)
001
P16 Al_Ack_Time Date/Time Ack Date (DD/MM/YYYY) 001
P17 Ack Time (HH:MM:SS) 001
P18 Al_User User Name 002
P19 Al_User_Comment Comment 002
P20 Al_User_Full User Full Name 003
P21 Al_Station Station 003
P22 Al_Prev_Tag_Value Number Previous Value 003
P23 Bias Number Time Zone Bias 003
— Al_Start_Time_ms Number Number of millisecondsfor the Start Timetimestamp. This field isused when the databasedoes not support ms in a
003

8/22/2019 User Guide Indu Soft
http://slidepdf.com/reader/full/user-guide-indu-soft 116/1279
Proprietary SQL Relational Database Remarks File Vers.
Field No. Field Name Field Type TimeStamp field.
— Al_Norm_Time_ms Number Number of millisecondsfor the Norm Timetimestamp. This field is
used when the databasedoes not support ms in aTimeStamp field.
003
— Al_Ack_Time_ms Number Number of millisecondsfor the Ack Timetimestamp. This field isused when the databasedoes not support ms in aTimeStamp field.
003
— Al_Deleted Number Deleted, where:
0: Alarm messagewas not deleted bythe user (notvisible).
1: Alarm messagewas deleted by theuser (visible).
003
— Last_Update Date/Time Timestamp of the lastupdate for this event.
003
— Last_Update_ms Number Number of millisecondsfor the Last Eventtimestamp. This field isused when the databasedoes not support ms in aTimeStamp field.
003
See also:
SQL Relational Databases
Studio Database Gateway
Database Appendix A: Using ODBC Databases
Configuring a Default Database for All Task History
Parent topic: Options tabInduSoft Web Studio v7.0 Technical ReferenceCopyright © 2003–2010 Indusoft, Inc.

8/22/2019 User Guide Indu Soft
http://slidepdf.com/reader/full/user-guide-indu-soft 117/1279
Configuring additional project settings > Options tab >Database Interface >
Configuring a Default Database for
All Task HistoryYou can configure a Default Database that will save the historical data from all Tasks in a project.After you do, when you create a new Task worksheet, you can choose either to use the DefaultDatabase or to configure a new database for that specific worksheet.
To configure the connection settings for the Default Database:
On the Project tab of the ribbon, in the Settings group, click Options. The Project Settingsdialog is displayed.
1.
Click Configure. The Default Database Configuration dialog is displayed.
Figure 1. Default Database Configuration dialog
2.
Please refer to Database Configuration dialog for help completing the fields in this window.
Parent topic: Options tabParent topic: Database InterfaceInduSoft Web Studio v7.0 Technical ReferenceCopyright © 2003–2010 Indusoft, Inc.
8/22/2019 User Guide Indu Soft
http://slidepdf.com/reader/full/user-guide-indu-soft 118/1279
Configuring additional project settings > Options tab >Database Interface >
Database ConfigurationThe Database Configuration dialog allows you to configure the necessary settings to link IWS to anexternal database file.
Figure 1. Database Configuration dialog
Database combo-box: Allows you to select either Primary or Secondary. With Primary, allsettings displayed in the Database Configuration window apply to the Primary Databaseinterface. Otherwise, they apply to the Secondary Database interface. You can configure theSecondary database in the following modes:
Disabled: In this mode, IWS saves data in the Primary Database only. If the PrimaryDatabase is unavailable for any reason, the data is not saved anywhere else. This optionmay cause loss of data if the Primary Database is not available.
Redundant: In this mode, IWS saves data in both Primary and Secondary Databases. If one of these databases is unavailable, IWS keeps saving data only in the database that isavailable. When the database that was unavailable becomes available again, IWS
synchronizes both databases automatically.Store and Forward: In this mode, IWS saves data in the Primary Database only. If thePrimary Database becomes unavailable, IWS saves the data in the Secondary Database.When the Primary Database becomes available again, IWS moves the data from theSecondary Database into the Primary Database.
Note: The Primary and Secondary can be different types of databases. However, they

8/22/2019 User Guide Indu Soft
http://slidepdf.com/reader/full/user-guide-indu-soft 119/1279
must have the same fields.
Using the Secondary Database, you can increase the reliability of the system and use theSecondary Database as a backup when the Primary Database is not available. This architectureis particularly useful when the Primary Database is located in the remote station. In this case,you can configure a Secondary Database in the local station to save data temporarily if thePrimary Database is not available (during a network failure, for instance).
Use project default checkbox: When this option is checked, IWS uses the settings configuredin the Default Database for the task that is being configured (Connection string, User name,Password, Retry Interval and Advanced Settings). When this option is not checked, you canconfigure these settings individually to the current task.
Connection string field: This field defines the database where IWS will write and read valuesas well as the main parameters used when connecting to the database. Instead of writing theConnection string manually, you can press the browse button (…) and select the database typefrom the Data Link Properties window.
Figure 2. Data Link Properties dialog
Note: The list of Database Providers shown in the Data Link Properties window depends onthe providers actually installed and available in the computer where you are running IWS.Consult the operating system documentation (or the database documentation) for furtherinformation regarding the settings of the Provider for the database that you are using.
User name field: User name used to connect to the database. The user name configured in thisfield must match the user name configured in the database.

8/22/2019 User Guide Indu Soft
http://slidepdf.com/reader/full/user-guide-indu-soft 120/1279
Password field: Password used to connect to the database. The password configured in thisfield must match the password configured in the database.
Retry Interval field: If IWS is unable to connect to the database for any reason, it retriesautomatically to connect to the database after the number of seconds configured in this fieldhave passed.
Advanced button: After pressing this button, you have access to customize some settings. Formost projects, the default value of these settings do not need to be modified and should be
kept.
Figure 3. Database Configuration: Advanced dialog
Milliseconds combo box: You can configure how the milliseconds will be saved whensaving the date in the database. Each database saves the date in different formats; forexample, some databases do not support milliseconds in a Date field. The followingoptions are available:
Default: Uses the format pre-defined for the current database. The databasespreviously tested by InduSoft are previously configured with the most suitableoption. When selecting Default, IWS uses the setting pre-configured for the current
database type. If you are using a database that has not been previously configured,the Default option attempts to save the milliseconds in a separate field.
Tip: The default option for each database is configured in the StADOSvr.ini file,stored in the \BIN sub-folder of IWS. See Studio Database Gateway forinformation about how to configure the StADOSvr.ini file.
Disable: Does not save the milliseconds at all when saving the date in the database.
Enable: Saves the milliseconds in the same field where the date is saved.
Separate Column: Saves the milliseconds in a separated column. In this case, thedate is saved in one field (without the milliseconds precision) and the number of milliseconds is saved in a different column. This option is indicated where you want tosave timestamps with the precision of milliseconds but the database that you areusing does not support milliseconds for the Date fields.
Save time difference checkbox: When this option is checked (default), IWS saves theTime Zone configured in the computer where the project is running in each register of thedatabase. This option must be enabled to avoid problems with daylight savings time.

8/22/2019 User Guide Indu Soft
http://slidepdf.com/reader/full/user-guide-indu-soft 121/1279
Database Gateway: Enter the Host Name/IP Address where the IWS Database Gatewaywill be running. The TCP Port number can also be specified, but if you are not using thedefault, you will have to configure the IWS Database Gateway with the same TCP Port.See the Studio Database Gateway section for information about how to configure theadvanced settings for the IWS ADO Gateway.
Disable Primary Keys: For some modules, IWS will try to define a primary key to thetable in order to speed up the queries. If you are using a database that does not supportprimary keys (e.g., Microsoft Excel), then you should select (check) this option
Table Pane
This area allows you to configure the settings of the Table where the data will be saved. All tasks canshare the same database. However, each task (Alarm, Events, Trend worksheets) must be linked toits own Table. IWS does not check for invalid configurations on this field, therefore you should makesure that the configuration is suitable for the database that you are using.
Use default name checkbox: When this option is checked (default), IWS saves and/orretrieves the data in the Table with the default name written in the Name field.
Automatically create checkbox: When this option is checked (default), IWS creates a tablewith the name written in the Name field automatically. If this option is not checked, IWS doesnot create the table automatically. Therefore, it will not be able to save data in the database,unless you have configured a table with the name configured in the Name field manually in thedatabase.
Name: Specifies the name of the Table from the database where the history data will be saved.
Tip: To specify a sheet in a Microsoft Excel spreadsheet file, use the following syntax:
[sheetname$]
Refresh button: If the database configured is currently available, you can press the Refresh
button to populate the Name combo-box with the name of the tables currently available in thedatabase. In this way, you can select the table where the history data should be saved insteadof writing the Table name manually in the Name field.
Run-Time Pane
This area allows you set runtime values. The following fields are available:
Status (output) checkbox: The tag in this field will receive one of the following values:
Value Description
0 Disconnected from the database. The database is not available; yourconfiguration is incorrect or it is an illegal operation.

8/22/2019 User Guide Indu Soft
http://slidepdf.com/reader/full/user-guide-indu-soft 122/1279
Value Description
1 The database is connected successfully.
2 The database is being synchronized.
Reload (output): Specify a reload tag if you are using curly brackets in any of the configurationfields. When you want to reconnect to the database using the updated values on your tags, set
the tag on this field to 1. IWS will update the configuration when trying to perform an action inthe database, setting the tag back to 0 when it is finished.
See also:
Configuring a Default Database for All Task History.
Parent topic: Options tabParent topic: Database InterfaceInduSoft Web Studio v7.0 Technical ReferenceCopyright © 2003–2010 Indusoft, Inc.

8/22/2019 User Guide Indu Soft
http://slidepdf.com/reader/full/user-guide-indu-soft 123/1279
Configuring additional project settings >
Viewer tabUse this tab to configure the project viewer and change certain runtime behaviors.
Figure 1. Project Settings: Runtime Desktop tab
Titlebar checkbox and text field: Click (enable) this box and type a new name into the fieldprovided to specify or change the default titlebar text for the Viewer window.
Minimize Box, Maximize Box, and Close Boxcheckboxes: Click these boxes to display(enable) or hide (disable) these buttons on the Viewer window.
Start Maximized checkbox: Click (enable) this box to maximize the Viewer window
automatically when you run your project.Menu checkbox and Options… button: Click (enable) the checkbox and the Options… buttonto specify which menu options are available at runtime. When the Runtime menu options dialogdisplays (as follows), click the checkboxes to display (enable) or hide (disable) these menuoptions.
Figure 2. Runtime Menu Options dialog

8/22/2019 User Guide Indu Soft
http://slidepdf.com/reader/full/user-guide-indu-soft 124/1279
Resize Border checkbox: Click (enable) this box to allow the user to resize the Viewer windowduring runtime.
Status Line checkbox: Click (enable) this box to display the Status Line in the runtime project.
Startup screen field: Click the combo box and select the screen (.SCR) or screen group (.SG)you want to display automatically when you open the runtime project.
Note: Another way to specify a screen or screen group as the startup screen is to right-
click on it in the Project Explorer and then choose Set as startup from the shortcut menu.
Show ???? when quality is not GOOD checkbox: Click (enable) this box to display questionmarks (???) instead of the tag's value when their quality is not good.
Hide Taskbar checkbox: Click (enable) this box to hide the Windows taskbar by default.
Enable ToolTips checkbox: Click (enable) this box to see Windows ToolTips when running yourproject. You can configure tooltips in the Hint field of the Object Properties dialog of eachobject.
Auto Screen Scaling checkbox: Click (enable) this box to automatically scale project screenswhen you resize the Viewer window. This feature is available for local projects running onWindows PC or in the Thin Client. This parameter is not available for projects running on
Windows Embedded target systems.
Active area indication pane: Click (enable) the Show Object Edge and Change Mouse Cursor
checkboxes in this area to modify the object edge and the mouse cursor when moving thecursor over any object where the Command animation has been applied.
Virtual Keyboard: When this option is checked, the Virtual Keyboard is enabled for yourproject. (This option does not apply when your project is running on a Thin Client; for moreinformation, see Project Settings: Web.) The keyboard allows the user to enter data duringruntime on touchscreen panels — that is, without typing on a physical keyboard. For example, aText object with the Text Data Link animation applied and the Input Enabled option checked.
You can establish a default configuration for the virtual keyboard:
Default: Select the default keyboard type to be used in your project, when no keyboardtype is specified by the calling object or function.
Scale: Using this option, you can shrink or enlarge the keyboard to fit the size of thetarget display. A value of 100% represents the default size of each keyboard type.
Show Hint checkbox and field: When this option is checked, a hint is displayed in the titlebar of the keyboard. For individual objects, the hint is configured in the Object Properties
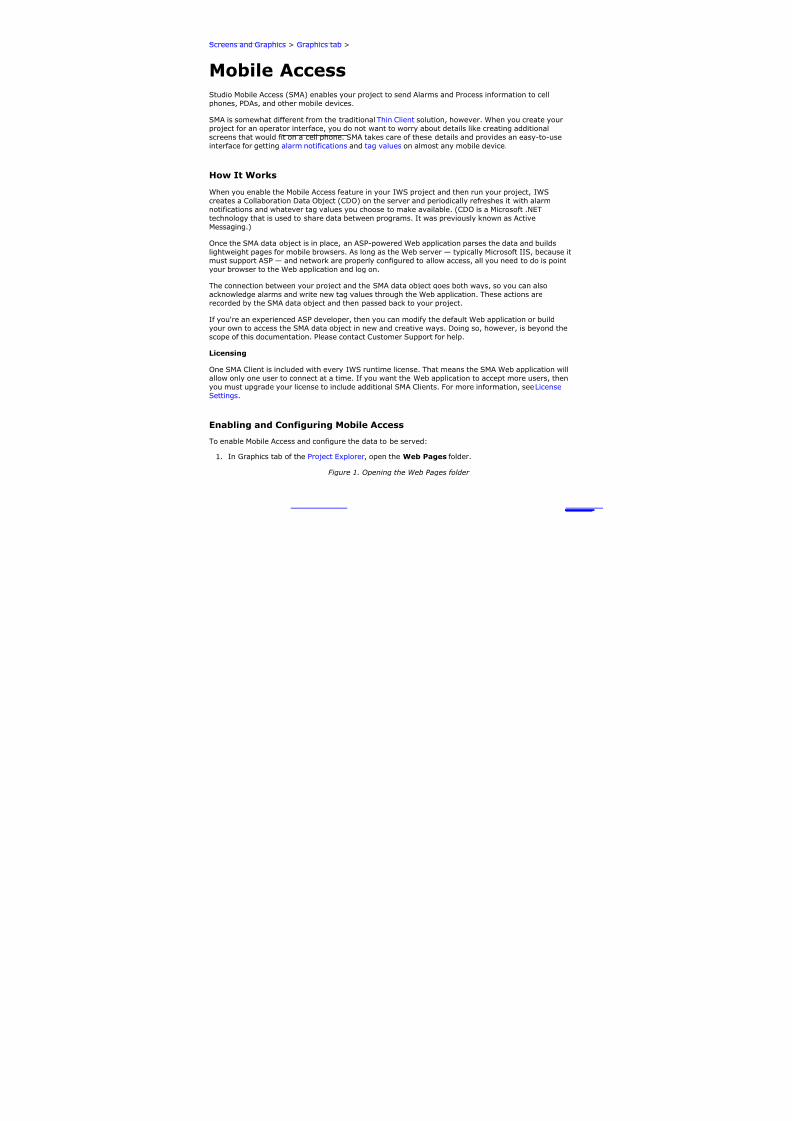
8/22/2019 User Guide Indu Soft
http://slidepdf.com/reader/full/user-guide-indu-soft 125/1279
dialog. Otherwise, type a string value in the Show Hint field to serve as a defaut hint.
Show Min/Max Fields option: When this option is checked, the minimum and maximumallowed values are displayed at the bottom of the keyboard. For objects, these values areconfigured in the Object Properties dialog. Otherwise, the Min and Max properties of theassociated Tag are used by default.
Note: The Min and Max fields are displayed only on the Keypad keyboard type, and
only when the associated Tag is defined as Integer or Real. If Min is greater than Max,then input will be disabled. If Min/Max configured on the object is different fromMin/Max configured in the Tag properties, then your project will attempt to scale theinput accordingly.
Mouse Cursor checkbox: Click (enable) this box to show the mouse cursor in the runtimeproject.
Note: The Mouse Cursor option is not supported in Windows CE running on Armv4I
processors.
Execute only topmost object commands checkbox: This option controls how your projectbehaves when the user clicks in an area where two or more screen objects overlap. If thisoption is checked, then only the commands on the topmost object will be executed. If thisoption is not checked, then the commands on all of the overlapping objects will be executed.
Note: The topmost object is the one with the highest ID number. (The ID number of anobject is displayed in the status bar at the bottom of the development environment.) Youcan use the Move to Back / Move to Front and Move Backward / Move Forward toolsto change the order in which objects are stacked.
Parent topic: Configuring additional project settings
Related information
Information tabOptions tabCommunication tabWeb tabPreferences tab
InduSoft Web Studio v7.0 Technical ReferenceCopyright © 2003–2010 Indusoft, Inc.

8/22/2019 User Guide Indu Soft
http://slidepdf.com/reader/full/user-guide-indu-soft 126/1279
Configuring additional project settings >
Communication tabUse this tab to specify communication parameters relating to your project in general.
Figure 1. Project Settings: Communication tab
Driver and OPC menu: Select the method used by all communication drivers and OPC Clientworksheets configured in the current project when writing values to the remote PLC/device:
Send every state: When the communication task is configured to write values upon achange of tag value, all changes in the tag value are buffered in a queue and sent to thedevice when the communication task (Driver or OPC) is executed.
Send last state: When the communication task is configured to write values upon achange of tag value, only the current (last) value of the tag is sent to the device when thecommunication task (Driver or OPC) is executed. When this method is selected, if the tagchanged value more than once while the communication task was not being executed, thetransient values of the tag are not sent to the device. This is the desired behavior for mostprojects.
TCP area: Configure the communication settings for the TCP/IP Client and Server modules:

8/22/2019 User Guide Indu Soft
http://slidepdf.com/reader/full/user-guide-indu-soft 127/1279
Port field: TCP Port used by the TCP/IP Client and TCP/IP Server modules running in thecurrent computer. When changing this value in the local project, be sure to change thesame value in the remote project that is communicating with the local one.
Note: This setting is required for all projects and cannot be left blank. Make sure thatyour network configuration will allow connections to this port on whichever station willbe the project server.
Send Period (ms) field: Period (in milliseconds) used between two consecutive messages
sent by the TCP/IP Client or TCP/IP Server modules to update tag values in the remotestation. Typically, a lower number equals better performance and higher traffic in thenetwork.
Enable binary control checkbox: Check this option to enable binary control when theTCP/IP Client or the TCP/IP Server module sends messages to the remote station. Binarycontrol increases the security of the system; however, it decreases the efficiency(performance) of the communication. When connecting two stations via the TCP/IP Clientand TCP/IP Server module, make sure this setting is either enabled in both projects ordisabled in both.
Remote Management area: Configure the communication settings for the Remote Managementoperation, which sends your project files to a target system:
Timeout (ms) field: Specifies the time (in milliseconds) that the project will wait tocommunicate with the target system.
Enable File Compression checkbox: Select this option to compress the system andproject files before sending them to the target system. This may reduce the download timeif you have a slow connection between your server and the target system. (If you have afast connection, however, then selecting this option may actually decrease performancebecause each compressed file must be decompressed on the target system before the next
file is sent. Select this option only if you have an extremely slow connection, such as dial-up.) File compression is disabled by default.
Preloading tags from server area: To improve performance, the runtime viewer loads all of the
Server tags on a screen into memory before it displays that screen. Configure the timeoutsettings for both remote and local viewers:
Timeout when executing on remote field: Specifies the time (in milliseconds) that aSecure Viewer or Thin Client running on a remote station will wait to load the tags.
Timeout when executing on local field: Specifies the time (in milliseconds) that theViewer running on the local station (i.e., the Server) will wait to load the tags.
Parent topic: Configuring additional project settings
Related information
Information tabOptions tab
Viewer tabWeb tabPreferences tab
InduSoft Web Studio v7.0 Technical ReferenceCopyright © 2003–2010 Indusoft, Inc.

8/22/2019 User Guide Indu Soft
http://slidepdf.com/reader/full/user-guide-indu-soft 128/1279
Configuring additional project settings >
Web tabSelect the Web tab on the Project Settings dialog:
Figure 1. Project Settings: Web tab
Note: If you change any of these settings, then you should verify your project before resendingit to the target device.
Configure the parameters on this tab as follows:
Data Server IP field: Type the IP address (or host name) of your data server station. The dataserver station is the computer or device where the TCP/IP server module of IWS is running. If this field is left blank, then the Thin Client will assume that the Web server (i.e., the addressentered into the browser) is also the data server.
Tip: You can use the IP address 127.0.0.1 (localhost) to access the TCP/IP server on thelocal computer, regardless of its actual address on the network. This option is useful for

8/22/2019 User Guide Indu Soft
http://slidepdf.com/reader/full/user-guide-indu-soft 129/1279
local tests; however, you are not able to access the data server from remote computersusing this configuration.
Send Period field: Type a value to specify the send period (in milliseconds) used to exchangedata between the server and the Thin Client stations. It means that the Thin Client will send apackage with the new tag values to the server every n millisecond(s).
The Send Period of the server is configured in the project settings (Communication on the
Project tab of the ribbon). The default value is 1000 (milliseconds). You can set a lower value inthis field to increase the update rate between the server and the Thin Clients. Doing so mayresult in higher traffic in the network (the network will be accessed more frequently) if the tagsare changing continuously (faster than 1 second).
Disable Remote Client Commands checkbox: Click to enable this box, to prevent a remoteclient from issuing commands from your Thin Client to your server. When this option is enabled,the Thin Client can read data from the server, but cannot send data (tag values, set-points) tothe data server. In this case, the Thin Client station becomes a Read Only station.
Enable ToolTips checkbox: Click to enable this box, to display the ToolTips configured on theobjects of the screens when viewing them on the Thin Client (web browser).
Auto Screen Scaling checkbox: Click to enable this box, to automatically scale screens
displayed in a web browser window. Using this option, the screen fits to the size of the webbrowser window, regardless of its resolution.
Note: The Auto Screen Scaling option is not valid for Web browsers running underWindows CE operating systems.
Enable File Compression checkbox: Click to enable this box to compress the files stored onthe Web sub-folder of your project folder. This option is useful for reducing download time,
particularly if you have a slow connection between your server and the Thin Client.
Log (Enable checkbox and FileName text field): Click to enable the checkbox, and type a file
name into the text field to generate a log file on the Thin Client station. You can use this log file
for debugging purposes.Virtual Keyboard: When this option is checked, the Virtual Keyboard is enabled for yourproject running Thin Clients. The keyboard allows the user to enter data during runtime ontouchscreen panels — that is, without typing on a physical keyboard. For example, a Text objectwith the Text Data Link animation applied and the Input Enabled option checked.
You can establish a default configuration for the virtual keyboard:
Default: Select the default keyboard type to be used in your project, when no keyboardtype is specified by the calling object or function.
Scale: Using this option, you can shrink or enlarge the keyboard to fit the size of thetarget display. A value of 100% represents the default size of each keyboard type.
Show Hint checkbox and field: When this option is checked, a hint is displayed in the titlebar of the keyboard. For objects, the hint is configured in the Object Properties dialog.Otherwise, enter a string or string Tag in the Show Hint field to serve as a defaut hint.
Show Min/Max Fields option: When this option is checked, the minimum and maximumallowed values are displayed at the bottom of the keyboard. For objects, these values areconfigured in the Object Properties dialog. Otherwise, the Min and Max properties of theassociated Tag are used by default.

8/22/2019 User Guide Indu Soft
http://slidepdf.com/reader/full/user-guide-indu-soft 130/1279
Note: The Min and Max fields are displayed only on the Keypad keyboard type, andonly when the associated Tag is defined as Integer or Real. If Min is greater than Max,then input will be disabled. If Min/Max configured on the object is different fromMin/Max configured in the Tag properties, then your project will attempt to scale theinput accordingly.
IP Security Settings
IP Security button: Click this button to open the IP Security dialog.
Figure 2. IP Security dialog
Use the parameters on this dialog to specify the range of IP addresses for the computers that areallowed to access your project as Thin Clients. This option is useful when you can control the IPAddress of the Thin Client computers allowed to connect to the Web server.
Click the Enable checkbox, and when the Edit pane parameters become active, type IP addesses inthe From and To fields to specify the IP address range. Use the Add and Remove buttons to movethe IP addresses into the IP Address Range list. When a Thin Client attempts to connect to theserver, it checks for an IP address for the Thin Client station that is within any range configured inthe IP Security dialog. If one is not found, the server refuses the connection request from the ThinClient station.
Note: By default, IP security applies only to Thin Clients connecting to the Data Server. You canalso implement IP security for database synchronization between projects running on differentstations. To do this, insert the following parameter into your project file ( project_name.app):
[TCP]
UseWebIPSecurity=1

8/22/2019 User Guide Indu Soft
http://slidepdf.com/reader/full/user-guide-indu-soft 131/1279
Advanced Settings
Advanced button: Click this button to open a dialog where you can edit the Advanced Web settings.
For most cases, these settings do not need to be modified. However, depending on the architectureused in your project, you have the flexibility to configure advanced settings.
Figure 3. Advanced dialog
Secondary Data Server IP Address field: Type the IP address (or host name) of thesecondary data server station. The data server station is the computer or device where theTCP/IP server module of IWS is running. This field must be filled when you are using redundantdata servers from the Thin Clients. If the primary data server fails, the Thin Client will attemptto connect to the secondary data server automatically.
BackUp URL field: Type the URL where the Web files are stored (files from the Web sub-folder
of your project folder). This URL is used to download the files from the secondary Web serverwhen the primary Web server is not available.
ISSymbol URL field: When the Thin Client connects to the server, it attempts to load theISSymbol control. If ISSymbol is not registered in the local computer (Thin Client), the browser
will attempt to download it from the URL specified in this field. The default URL is a web sitewhere InduSoft keeps the most updated version of ISSymbol available for download. You mayneed to configure a different location, especially when the Thin Client computer is not connectedto the internet. The ISSymbolVM.cab (stored in the \BIN sub-folder of IWS) must be available in
the URL configured in this field.
Tip: When the Thin Client stations do not have access to the internet, it is recommended

8/22/2019 User Guide Indu Soft
http://slidepdf.com/reader/full/user-guide-indu-soft 132/1279
that the ISSymbolVM.cab file be made available at the Web server station, and that the URLbe configured for it in this field.
Note: Web browsers running under the Windows CE operating system are not able todownload ISSymbol control (ISSymbolCE.ocx) automatically from a remote location.
ISSymbolCE.ocxmust be manually registered in the Windows CE device to be used as a ThinClient.
Web Tunneling Gateway checkbox: Check this option to enable the Web Tunneling Gateway.Depending on the architecture of your project, you may need to use the Web TunnelingGateway to route the Thin Client computers to the data server.
TCP Port: Select this option when using HTTP with the Web server of Microsoft IIS. You canspecify the TCP port used by your HTTP Web server (80 is the default TCP port for HTTP
protocol).
SSL Port: Select this option when using SSL (Secure Socket Layer) with the Microsoft IIS Webserver. You can specify the TCP port used by your HTTPS Web server (443 is the default TCPport for HTTPS protocol).
IP Address: IP address of the Web server computer where the Web Tunneling Gateway is
running. This must be the IP address of the Web server accessible from the Thin Clientstation(s).
Secondary IP Address: IP address of the Web server computer where the secondary WebTunneling Gateway is running. This must be the IP address of the secondary Web serveraccessible from the Thin Client station(s). This field must be configured when you are usingredundant Web servers.
Tip: Most of the Web settings can be modified dynamically by the SetWebConfig function.It is especially useful when you want to create a project just once, and make sure that theWeb settings are automatically configured when you run your project on different stationswith different IP Addresses.
Parent topic: Configuring additional project settings
Related information
Information tabOptions tabViewer tabCommunication tabPreferences tab
InduSoft Web Studio v7.0 Technical ReferenceCopyright © 2003–2010 Indusoft, Inc.

8/22/2019 User Guide Indu Soft
http://slidepdf.com/reader/full/user-guide-indu-soft 133/1279
Configuring additional project settings >
Preferences tabUse this tab to configure your preferences when building projects with the developmentenvironement.
Figure 1. Project Settings: Preferences tab
Warning Messages
Display warning message before downloading screen to the target system option:When this option is checked and IWS is connected to a remote station (Remote Managementdialog), you are prompted to download the updated screen to the remote station immediatelyafter saving a screen on the screen editor. If this option is not checked, the screen isdownloaded automatically, regardless of any confirmation.
Display confirmation message when renaming project tags option: When this option ischecked and you modify the name of any tag in the Project Tags worksheet, you are promptedto replace the old tag name with the new tag name in the whole project. If this option is

8/22/2019 User Guide Indu Soft
http://slidepdf.com/reader/full/user-guide-indu-soft 134/1279
checked, IWS will execute the global replace command to replace the old tag name with thenew tag name in all documents of your project (screens and worksheets).
Display confirmation message when changing the screen position and size option:When this option is checked, you are prompted to update the screen attributes (Width, Height,Top and Left) after modifying them on the Layout interface.
Display warning message after saving symbols option: When this option is checked, awarning message is shown after saving symbols.
Quality Feedback Service
This section allows you to configure InduSoft Web Studio or CEView to generate log files and/or dumpfiles that can be used to diagnose hardware and software problems, such as memory leaks andunexpected errors. These files are saved in the \Web\Dump sub-folder of the running project.
Generate a log file when an unexpected error happens option: When this option ischecked, the runtime modules append the Log File (\Web\Dump\Dump.txt) whenever an internal
exception (error) occurs. These exceptions may not necessarily crash the runtime modules, butthey can affect the stability of the system and should be investigated.
Note: The Log File is continually appended until it reaches its maximum size of 2MB. Afterit reaches its maximum size, the existing file is deleted and a new file is created.
Generate a dump file when an unexpected error happens option: When this option ischecked, the runtime modules generate a new Dump File (\Web\Dump\*.dmp) with useful
information about the conditions of the error. This is a binary file that can only be read by thesoftware vendor.
Note: Dump Files are named WinXXX.dmp — where XXX is an identifying number (in
hexadecimal format) automatically generated by the system — in order to prevent an
existing file from being overwritten when an new error occurs. Therefore, if more than oneerror occurs, then you will find multiple Dump Files in the directory. The Log File indicatesthe name of the Dump File associated with each error.
Enable log of memory option: When this option is checked, the runtime modules append theLog File every 15 minutes with information about the current memory allocation. (The first logentry is written out 15 minutes after the runtime module is started.) This information can beused to identify memory leaks.
Even if none of these Quality Feedback options are checked, a post-mortem Dump File(\Web\Dump\WinDump.dmp) will always be generated when the runtime module is terminated by a
fatal error. However, for debugging purposes, it is strongly recommend that you enable all options in
this section and then send the Log File and all Dump Files to your software vendor.
Other Preferences
Reset Tags Database when starting project option: When this option is checked, theproject tags are reset automatically whenever you run the project (Run on the Home tab of the

8/22/2019 User Guide Indu Soft
http://slidepdf.com/reader/full/user-guide-indu-soft 135/1279
ribbon). See Reset Tags Database for additional details about this feature.
Enforce Web functionality equivalence in local project screens option: When this optionis checked, the development software will automatically warn you when you try to selectfuctions or features that are incompatible with the remote runtime modules (e.g., Thin Clientand Secure Viewer).
Note: This option is unchecked by default in order to maintain compatibility with previous
versions of InduSoft Web Studio.
Auto reload project on Viewer/Web Clients when it is changed option: When this optionis checked, remote stations (i.e., Thin Clients and Secure Viewers) will check the server to see if they have the most recent version of the project. If they do not, then they will automaticallydownload the new version from the server.
Parent topic: Configuring additional project settings
Related information
Information tabOptions tab
Viewer tabCommunication tabWeb tab
InduSoft Web Studio v7.0 Technical ReferenceCopyright © 2003–2010 Indusoft, Inc.

8/22/2019 User Guide Indu Soft
http://slidepdf.com/reader/full/user-guide-indu-soft 136/1279
Screens and Graphics > Graphics tab >
Mobile AccessStudio Mobile Access (SMA) enables your project to send Alarms and Process information to cellphones, PDAs, and other mobile devices.
SMA is somewhat different from the traditional Thin Client solution, however. When you create yourproject for an operator interface, you do not want to worry about details like creating additionalscreens that would fit on a cell phone. SMA takes care of these details and provides an easy-to-useinterface for getting alarm notifications and tag values on almost any mobile device.
How It Works
When you enable the Mobile Access feature in your IWS project and then run your project, IWScreates a Collaboration Data Object (CDO) on the server and periodically refreshes it with alarmnotifications and whatever tag values you choose to make available. (CDO is a Microsoft .NETtechnology that is used to share data between programs. It was previously known as ActiveMessaging.)
Once the SMA data object is in place, an ASP-powered Web application parses the data and buildslightweight pages for mobile browsers. As long as the Web server — typically Microsoft IIS, because itmust support ASP — and network are properly configured to allow access, all you need to do is pointyour browser to the Web application and log on.
The connection between your project and the SMA data object goes both ways, so you can alsoacknowledge alarms and write new tag values through the Web application. These actions arerecorded by the SMA data object and then passed back to your project.
If you're an experienced ASP developer, then you can modify the default Web application or buildyour own to access the SMA data object in new and creative ways. Doing so, however, is beyond thescope of this documentation. Please contact Customer Support for help.
Licensing
One SMA Client is included with every IWS runtime license. That means the SMA Web application willallow only one user to connect at a time. If you want the Web application to accept more users, thenyou must upgrade your license to include additional SMA Clients. For more information, see LicenseSettings.
Enabling and Configuring Mobile Access
To enable Mobile Access and configure the data to be served:
In Graphics tab of the Project Explorer, open the Web Pages folder.
Figure 1. Opening the Web Pages folder
1.

8/22/2019 User Guide Indu Soft
http://slidepdf.com/reader/full/user-guide-indu-soft 137/1279
Double-click the Mobile Access icon.
The Mobile Access Settings dialog is displayed.
Figure 2. Mobile Access Settings dialog
2.
Select Enable Mobile Access.3.
In the LogOn Access Level text-box, type the user security level needed to log on to the Webapplication. For more information about security levels, see Security.
4.
The Web application will show all active alarms to all logged-on users; there is currently no wayto show or hide specific alarms. You can set the user security level needed to acknowledgealarms, however, and it may be different from the level needed to log on. In the Ack Access
Level text-box, type the required level.
5.
To have the Web application show tag values, select Enable in the Process group-box.6.
For each tag you want to show:
In the Tag Name column, type the name of tag or double-click to open the Object Finderand select the tag.
a.
In the Description column, type a description of the tag. This description is displayed onlyb.
7.
8/22/2019 User Guide Indu Soft
http://slidepdf.com/reader/full/user-guide-indu-soft 138/1279
in the Web application and it may be different from the tag's existing description in theProject Tags datasheet.
In the Write column, select the checkbox to make the tag writeable from the Webapplication.
c.
In the Write Access Level text-box, type the user security level needed to write new tagvalues. This applies to all tags that are made writeable.
8.
You may choose to decrease the data refresh rate to improve application performance,
especially in non-critical applications where alarms are uncommon and/or tag values do notchange frequently. The refresh rates for Alarms and for Process information can be adjustedseparately — in the corresponding Refresh Rate text-box, type the new rate in seconds.
9.
Click OK where you are done.10.
The following screenshot show Mobile Access enabled with a selection of tags:
Figure 3. Example of Mobile Access settings
Installing and Configuring IIS
Studio Mobile Access (SMA) uses Collaboration Data Objects (CDO) and Active Server Pages (ASP) tobuild the Web application pages for mobile browsers. The mobile browser does not need to supportJava®, Flash™, or any other advanced features because the pages are built entirely on the server-

8/22/2019 User Guide Indu Soft
http://slidepdf.com/reader/full/user-guide-indu-soft 139/1279
side and then sent to the browser as simple HTML. The Web server, however, must support CDO andASP, and that typically means it must be Microsoft IIS running on Windows. For more informationabout installing and configuring IIS, see "Configuring a Web server to host your project pages" aswell as the Microsoft IIS documentation.
Accessing the Web Application
Once you've enabled Mobile Access, configured IIS, and run your project, you can access yourproject by entering the URL in your mobile browser:
If the IIS home directory is set to the Web sub-folder in your project folder, then the URL is
http://server address/SMA/LogOn.asp
If the IIS home directory is set to the \Web\SMA sub-folder in your project folder, then the URL is
http://server address/LogOn.asp
The first page is a standard security login, similar to the LogOn dialog in your project. Log on withyour IWS username and password (not your Windows user account), and then SMA Main Menu isdisplayed.
Main Menu
The main menu has three options:
Click Alarms to see and acknowledge alarms.
Click Process to see and write tags.
Click Log Off to log off from the Web application.
This menu is also displayed in the Alarms and Process pages described below.

8/22/2019 User Guide Indu Soft
http://slidepdf.com/reader/full/user-guide-indu-soft 140/1279
Alarms
The Alarms table shows the currently active alarms in your project. To acknowledge an alarm fromyour mobile browser, simply click on the alarm name.
Process
You can use the Process table to configure set points, turn pumps on and off, send messages to users— anything that involves writing to tags. To write to a tag, simply click on the tag value.
Tip: By default, a user session will automatically expire after 10 minutes (600 seconds) of inactivity. If you want a user to be able to stay logged on, then open the file \Web\SMA\config.inc
in your project folder and change the parameter logonExpiration to the desired period in seconds.
For example, if you want a user to stay logged on for up to four hours, then change theparameter to:
logonExpiration = 14400
Please note that as long as a user is logged on, he counts against the number of SMA Clients inthe runtime license. If too many users stay logged on for extended periods, then you may runout of available connections.

8/22/2019 User Guide Indu Soft
http://slidepdf.com/reader/full/user-guide-indu-soft 141/1279
Parent topic: Graphics tabInduSoft Web Studio v7.0 Technical ReferenceCopyright © 2003–2010 Indusoft, Inc.

8/22/2019 User Guide Indu Soft
http://slidepdf.com/reader/full/user-guide-indu-soft 142/1279
Configuring your project's defaultemail settings
Some features in InduSoft Web Studio, such as alarms and certain functions, are able to send emailto designated recipients. To use these features, you must configure your project's email settings.
The email settings can be configured at any point during runtime by calling the CnfEmail function.However, you can also configure default settings that are automatically used when the project is firstrun and then restored as needed during runtime, overwriting any changes made by calling the
CnfEmail function.
On the Project tab of the ribbon, in the Web group, click Email/FTP. The Email/FTPConfiguration dialog is displayed.
1.
Click the Email tab.2.

8/22/2019 User Guide Indu Soft
http://slidepdf.com/reader/full/user-guide-indu-soft 143/1279
In the Email box, type your email address / account.3.
In the Server and Port boxes, type the server address and port number. The default port forSMTP is 25, but it depends on your server and network configuration. Please consult your serveradministrator.
4.
If your outgoing mail server requires authentication, type your credentials in the User Name
and Password boxes. Most outgoing mail servers do require authentication, to preventspamming and other abuse from unknown users.
5.
In the Status box, type the name of a tag (Integer type) that will receive status codes whenthe project sends email.
6.
In the Reload box, type a tag/expression. When the value of this tag/expression changes, theproject will reload these default email settings.
7.
Click OK to save your configuration and close the dialog.8.
Related tasksConfiguring your project's default FTP settings
InduSoft Web Studio v7.0 Technical ReferenceCopyright © 2003–2010 Indusoft, Inc.

8/22/2019 User Guide Indu Soft
http://slidepdf.com/reader/full/user-guide-indu-soft 144/1279
Configuring your project's defaultFTP settings
Some features in InduSoft Web Studio, such as certain functions, are able to transfer files betweencomputers using FTP. To use these features, you must configure your project's FTP settings.
The FTP settings can be configured at any point during runtime by calling the CnfFTP function.However, you can also configure default settings that are automatically used when the project is firstrun and then restored as needed during runtime, overwriting any changes made by calling the CnfFTP
function.
On the Project tab of the ribbon, in the Web group, click Email/FTP. The Email/FTPConfiguration dialog is displayed.
1.
Click the FTP tab.2.

8/22/2019 User Guide Indu Soft
http://slidepdf.com/reader/full/user-guide-indu-soft 145/1279
In the User Name and Password boxes, type your credentials for the FTP server.3.
In the Server and Port boxes, type the server address and port number. The default port forFTP is 21, but it depends on your server and network configuration. Please consult your serveradministrator.
4.
Select Active or Passive mode, depending on the server's configuration. Passive FTP mode canbe used to bypass some network firewalls. Again, please consult your server administrator.
5.
In the Status box, type the name of a tag (Integer type) that will receive status codes whenthe project transfers a file.
6.
In the Reload box, type a tag/expression. When the value of this tag/expression changes, theproject will reload these default FTP settings.
7.
Click OK to save your configuration and close the dialog.8.
Related tasks
Configuring your project's default email settings
InduSoft Web Studio v7.0 Technical ReferenceCopyright © 2003–2010 Indusoft, Inc.
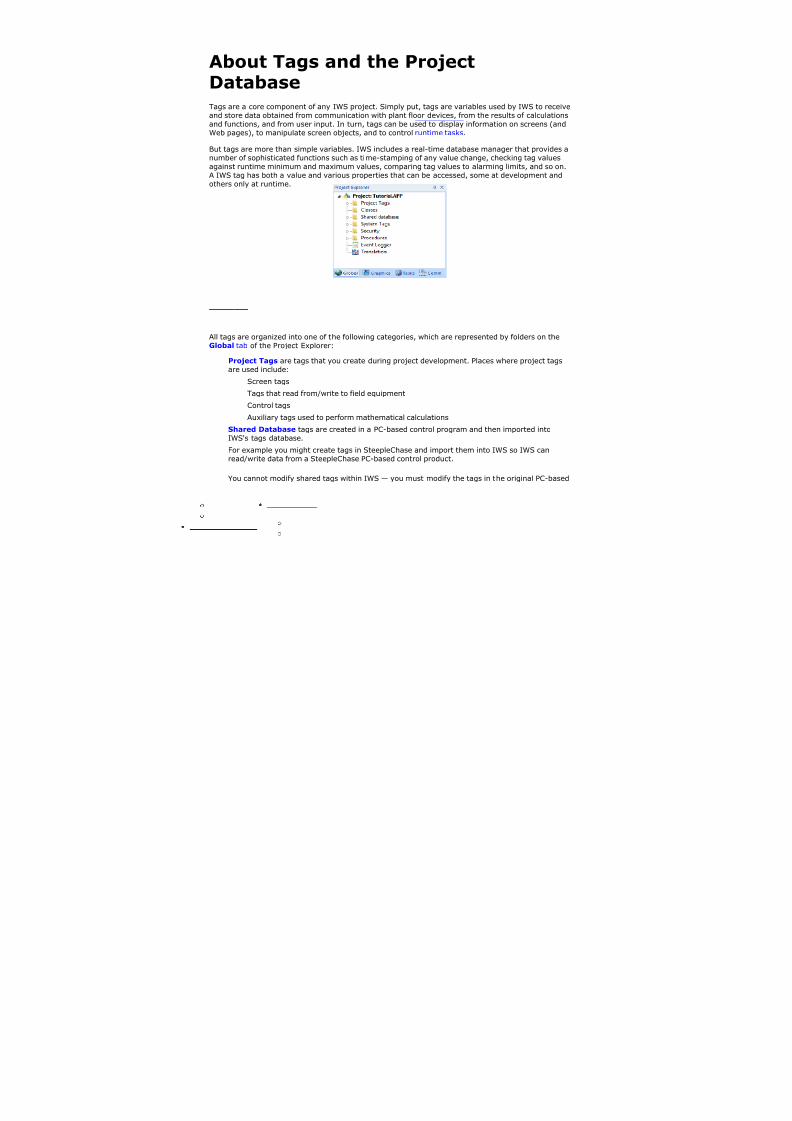
8/22/2019 User Guide Indu Soft
http://slidepdf.com/reader/full/user-guide-indu-soft 146/1279
Execution Tasks dialogThe Execution Tasks dialog is used to configure which tasks must be automatically started when theproject is run, as well as to manually start/stop tasks during runtime.
The Execution Tasks tab displays the list of available tasks for the current project. Their status andstartup modes (Automatic or Manual) are also displayed.
Figure 1. Execution Tasks dialog – Execution Tasks
The following table lists the tasks that are not available for projects running on Windows Embeddedtarget systems:
Task Available for Windows Embedded
Background Task Yes
Database ClientRuntime
Yes

8/22/2019 User Guide Indu Soft
http://slidepdf.com/reader/full/user-guide-indu-soft 147/1279
Task Available for Windows Embedded
Database Spy No
DDE Client Runtime No
DDE Server No
HDA OPC Server No
Driver Runtime Yes
LogWin No
ODBC Runtime No
OPC Client Runtime Yes
Studio Scada OPCServer
Yes
TCP/IP ClientRuntime
Yes
TCP/IP Server Yes
Viewer Yes
You can configure tasks for automatic execution when the project is run by selecting the task in thelist, clicking Startup, and then selecting Automatic.
The tasks configured with Startup = Automatic are automatically executed when the project is run;the tasks configured with Startup = Manual are not.
You can also Start/Stop each runtime task by clicking the name and then pressing the Start or Stop
button.
Tip: You can also start/stop each task during runtime by using the StartTask and EndTask built-in functions. You can also use the IsTaskRunning function to check if each task is running duringruntime.
InduSoft Web Studio v7.0 Technical ReferenceCopyright © 2003–2010 Indusoft, Inc.

8/22/2019 User Guide Indu Soft
http://slidepdf.com/reader/full/user-guide-indu-soft 148/1279
Running a Project Under WindowsServicesYour IWS project can be configured to run under Windows services . Microsoft Windows services, formerl
automatically started when the computer boots, can be paused and restarted, and do not show any userinterfere with other users who are working on the same computer. You can also run services in the securiinformation about services, please refer to the Microsoft Developer Network (MSDN) Library .
Why would you want to run your project under Windows services?
To ensure that your project always runs with whatever system privileges it needs, regardless of the
To prevent the user from interfering with your project while it is running; or
To let your project keep running when there is no user logged on at all.
Creating and Configuring the Windows Service
Note: All of the procedures described below were tested using Microsoft Windows XP Service Pack 3.
Also, to perform these actions, you must be logged on as a user with administrative privileges and youchoose Manage from the shortcut menu.)
There are two ways to create and configure the Windows service for your project: you can use the Servic
Service Configuration Tool
You can configure and run a new service from within the development application by clicking Service on
Figur

8/22/2019 User Guide Indu Soft
http://slidepdf.com/reader/full/user-guide-indu-soft 149/1279
Project box
The location of the project file ( project_name .app ) that the service will load and run when it is s
User box
The Windows user account under which the service will run. This is an optional setting; if it's not us
Note: Try to avoid running the service under Local System. That account has too much privilegeuser solely to run IWS and configure its privileges to fit the needs of your project. For more abou
Password box
The password for the specified user account. This is an optional setting; it's not needed if no user i
Startup Type pane
How the Windows service will start. The following options are available:
Automatic : The service will start automatically when the computer boots.
Manual : The service can be started manually in the Computer Management console or by cli
Disabled : The service will be created and then disabled. It cannot run until an administrativ
Action paneStart or stop the service. Please note that these buttons are not enabled until the service is actuall
Creating a New Service
To create a new service:
1.

8/22/2019 User Guide Indu Soft
http://slidepdf.com/reader/full/user-guide-indu-soft 150/1279
Next to the Project box, click … to open a standard Windows file browser. Use the browser to find1.
In the User and Password boxes, type the username and password (if any) for the Windows user2.
Select a Startup Type .3.
Click Apply . The service is created with the specified settings.4.
After the service has been created, it will appear in the Services console (Start > Control Panel > Adm
service, if you don't want to run the IWS development environment.
Command-line Utility
You can also configure the service by using the command-line utility StdSvcInst.exe . It offers a few morecan be used without launching the IWS development environment. The utility is located in the \Bin folde
with the desired options.
The utility has the following command syntax:
StdSvcInst { -create -app filepath-startup { auto | manual | disabled } -user username-password password -name d
-create
Creates the Windows service.
-app f i l e p at h
Specifies which project file ( project_name .app ) the service will load and run when it is started. (
enclosed in quotes.
This switch is required when you create a new service.
-startup { auto | manual | disabled }
Specifies how the service will start. (This is the same as the Startup Type in the Service Configur
-user u se r n am e
Specifies the Window user account under which the service will run. (This is the same as the User
-password p as sw o r d
Specifies the password for the given user account. (This is the same as the Password box in the Suser doesn't have a password.
-name d is p la y n am e
Defines the service name that is displayed in the Computer Management console. The name must
-descr d e scr ip t io n
Defines the service description that is displayed in the Computer Management console. The descrip
-start
Starts the service. This is the same as starting the service using the Computer Management consol
-stop
Stops the service. This is the same as stopping the service using the Computer Management conso

8/22/2019 User Guide Indu Soft
http://slidepdf.com/reader/full/user-guide-indu-soft 151/1279
-delete
Deletes the service.
Example: Creating the Service
In this example, we want to create a new Windows service with the following options:IWS Project File
C:\Users\username \My Documents\InduSoft Web Studio v7.0 Projects\ project_name \ projecStartup ModeAutomaticUserIWSPasswordIWSService Name"InduSoft Web Studio "Service Description"Starts a IWS project"
Note that the system must already have a user account named "Studio" with password "Studio".
So, to create the service with the desired options:
Make sure you're logged in as a user with administrative privileges.1.
Open a command prompt (Start > All Programs > Accessories > Command Prompt ).2.
Navigate to the Bin folder:3.
cd C:\Program Files\InduSoft Web Studio v7.0\Bin
Enter the command:4.
StdSvcInst –create –app "C:\Users\username\My Documents\InduSoft Web Studio v7.0 Proje
If the procedure is successful, then the system will display the message Service created . Otherwise, it wi
Example: Changing the Project File
After you create the service, you may want to change the IWS project file that it runs. You can do this by
Make sure you're logged in as a user with administrative privileges.1.
Stop the service if it is running.2.
Open a command prompt.3.
Navigate to the Bin directory.4.
Enter the command — for example, to set NTDemo as the project file:5.

8/22/2019 User Guide Indu Soft
http://slidepdf.com/reader/full/user-guide-indu-soft 152/1279
StdSvcInst –app "C:\Program Files\InduSoft Web Studio v7.0\Demos\NTDemo\NTDemo.app"
Example: Deleting the Service
To delete the service:
Make sure you're logged in as a user with administrative privileges.1.Stop the service if it is running.2.
Open a command prompt.3.
Navigate to the Bin directory.4.
Enter the command:5.
StdSvcInst –delete
Configuring User Privileges
The service will run under the privileges of the user account specified in the User field of the Service Condoesn't have privileges, it will fail. Therefore, you must configure the account to have the necessary privil
Note: The following actions can be performed only by a user with full administrator privileges.
Enabling the User Account to Log On as a Service
Before anything else, the specified user account must be enabled to log on to the computer as a service.
Open the Local Security Settings console (Start > Control Panel > Administrative Tools > Loc1.
In the console window, select the folder "Security Settings\Local Policies\User Rights Assignment".2.
In the list of available policies, double-click Log on as a service .
Figure 2.
3.

8/22/2019 User Guide Indu Soft
http://slidepdf.com/reader/full/user-guide-indu-soft 153/1279
The Log on as a service properties page is displayed.
Click Add User or Group .
The Select Users or Groups dialog is displayed.
4.
Type the name of the user account under which you want the service to run.5.
Click OK .6.
Giving the User Account Full Control Over the Program Directory
For your IWS project to run properly, the specified user account must have full control over the program
Open Windows Explorer (Start > All Programs > Accessories > Windows Explorer ).1.
Choose Tools > Folder Options .
The Folder Options dialog is displayed.
2.
Click the View tab.3.
Make sure the option Use simple file sharing is not selected.
Figure 3.
4.

8/22/2019 User Guide Indu Soft
http://slidepdf.com/reader/full/user-guide-indu-soft 154/1279
Click OK to close the Folder Options dialog.5.
Still in Windows Explorer , locate and select your IWS program directory, i.e., the folder that contai
In this example, the folder is NTDemo .
6.
Right-click the folder and choose Properties from the shortcut menu.
The directory's property sheet is displayed.
7.
Click the Security tab.
Figure 4.
8.

8/22/2019 User Guide Indu Soft
http://slidepdf.com/reader/full/user-guide-indu-soft 155/1279
Click Add and then add the user account you specified when you created the service.
In this example, the user is iws .
9.
Select this user and then set its "Full Control" permission to Allow .10.
Click OK to apply your changes and close the dialog.11.
Close Windows Explorer .12.
Allowing the User Account to Run the OPC Client/Server Module
As mentioned previously, normal users have too little privileges to properly run the OPC Client/Server m
Open the Component Services console (Start > Control Panel > Administrative Tools > Comp1.
In the console window, select the folder "Console Root\Component Services\Computers\My Comput
Figure 5. Selecting the
2.

8/22/2019 User Guide Indu Soft
http://slidepdf.com/reader/full/user-guide-indu-soft 156/1279
In the DCOM Config pane, right-click the Studio Scada OPC Server icon and then choose Proper
The Studio SCADA OPC Server propety sheet is displayed.
3.
Click the Identity tab.4.
Click This user and then complete the fields with the same user and password that you specified w
In this example, user is Studio and password is also Studio .
Figure
5.
Click OK to apply your changes and close the property sheet.6.Close the Component Services console.7.
Troubleshooting
When IWS runs under Windows services, it has no user interface. Therefore, if an error occurs, it will onlPanel > Administrative Tools > Event Viewer ).
Figure 7. I
8/22/2019 User Guide Indu Soft
http://slidepdf.com/reader/full/user-guide-indu-soft 157/1279
InduSoft Web Studio v7.0 Technical ReferenceCopyright © 2003–2010 Indusoft, Inc.

8/22/2019 User Guide Indu Soft
http://slidepdf.com/reader/full/user-guide-indu-soft 158/1279
About Tags and the ProjectDatabase
Tags are a core component of any IWS project. Simply put, tags are variables used by IWS to receiveand store data obtained from communication with plant floor devices, from the results of calculationsand functions, and from user input. In turn, tags can be used to display information on screens (andWeb pages), to manipulate screen objects, and to control runtime tasks.
But tags are more than simple variables. IWS includes a real-time database manager that provides anumber of sophisticated functions such as time-stamping of any value change, checking tag valuesagainst runtime minimum and maximum values, comparing tag values to alarming limits, and so on.A IWS tag has both a value and various properties that can be accessed, some at development andothers only at runtime.
All tags are organized into one of the following categories, which are represented by folders on theGlobal tab of the Project Explorer:
Project Tags are tags that you create during project development. Places where project tagsare used include:
Screen tags
Tags that read from/write to field equipment
Control tags
Auxiliary tags used to perform mathematical calculations
Shared Database tags are created in a PC-based control program and then imported intoIWS's tags database.
For example you might create tags in SteepleChase and import them into IWS so IWS canread/write data from a SteepleChase PC-based control product.
You cannot modify shared tags within IWS — you must modify the tags in the original PC-based
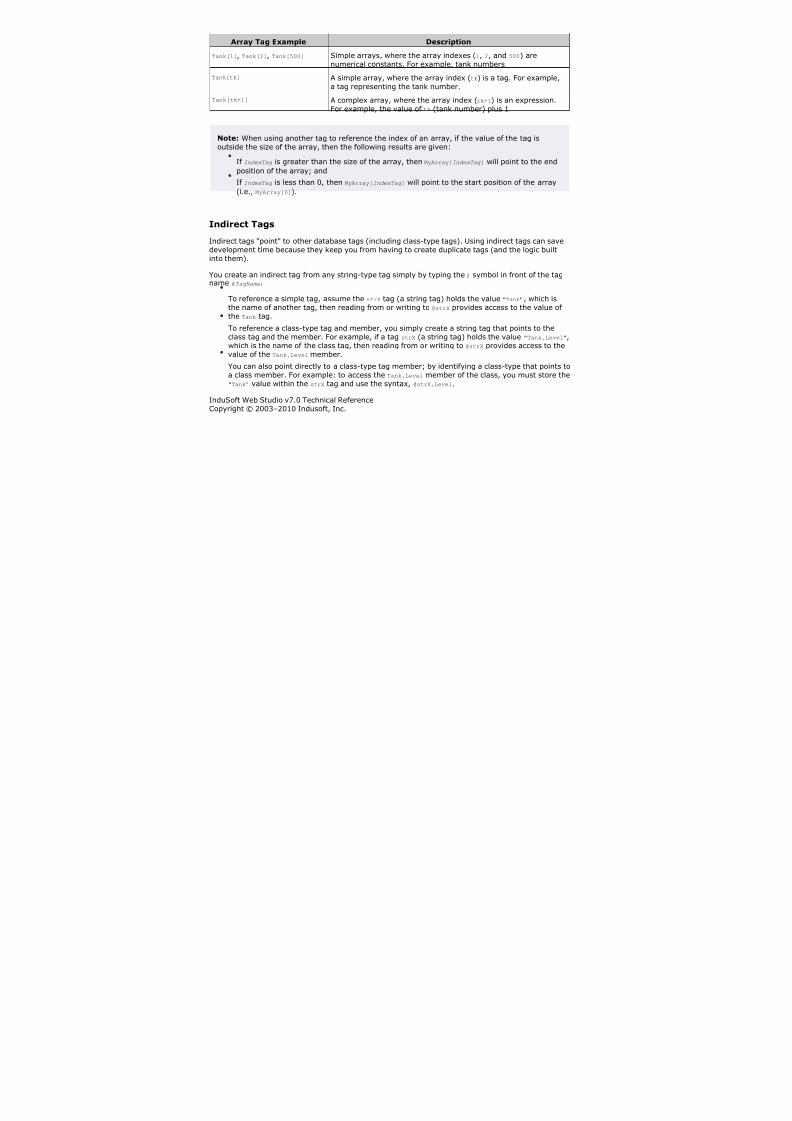
8/22/2019 User Guide Indu Soft
http://slidepdf.com/reader/full/user-guide-indu-soft 159/1279
control program, and then re-import them into the Tags database.
System Tags are predefined tags with predetermined functions that are used for IWSsupervisory tasks. For example,
Date tags hold the current date in string format
Time tags hold the current time in string format
Most system tags are read-only , which means you cannot add, edit, or remove these tags from
the database.
To see a list of the system tags, select the Global tab in the Project Explorer, open the System
Tags folder, and open the Tag List subfolder. The above figure shows a partial list of systemtags.
After creating a tag, you can use it anywhere within the project, and you can use the same tag formore than one object or attribute.
Project Tags Folder
Classes Folder
Shared Database Folder
System Tags Folder
InduSoft Web Studio v7.0 Technical ReferenceCopyright © 2003–2010 Indusoft, Inc.

8/22/2019 User Guide Indu Soft
http://slidepdf.com/reader/full/user-guide-indu-soft 160/1279
About Tags and the Project Database >
Project Tags FolderThe Project Tags folder contains all tags created and customized by the user. You can create projecttags for displays, to read from and write to field equipment, for control, to perform mathematicalcalculations, and so forth.
To update a list of project tags, right-click on the Project Tags folder (or Datasheet View icon )and select the Refresh option.
Important: Before deleting a tag, we strongly recommend using the Object Finder tool(on the Home tab of the ribbon) to verify that you are not using the tag in another part of theproject (screens, math sheets, so forth). If you delete a tag from the project database that isbeing used in another part of the project, you will cause a compiling error and the project willfunction poorly.
To create a new tag, right-click on the Project Tags folder, the Tag List sub-folder, or Datasheet
View icon and select Insert Tag from the shortcut menu. You also can click Tag on the Insert tab of the ribbon.
The New Tag dialog displays, as shown in the following figure:
Figure 1. New Tag dialog
Use this dialog to specify the following parameters:
Name field: Type a name for the new tag. The first character must be a letter and you can useup to 255 characters in the name.
Array Size field: Type a value to specify the size of the tag. Any size greater than 0 impliesthat the tag is an array.
Type combo-box: Select a standard tag type from the list (Boolean, Integer, Real, or

8/22/2019 User Guide Indu Soft
http://slidepdf.com/reader/full/user-guide-indu-soft 161/1279
String). You also can define new types as structures formed by the classes.
Description text box: Type a tag description for documentation purposes.
Scope combo-box: Click to select one of the following options:
Local: Select if you do not want to share the information in this tag over the Internet.
Server. Select if you want to share the information in this tag over the Internet.
These options have no affect on projects that do not have Web capabilities. If you select a Scope
option for a project with Web capabilities, then any object property using the Local tag will not workproperly over the Web.
Note: You must create unique tag names. You cannot create a tag that uses the name of anexisting tag.
You can view or edit the properties of a tag from either of the following dialoges:
Tag Property dialog: Click Properties on the Home tab of the ribbon when the tag namedisplays in the Tag name field or double-click on the tag name in the Tag List subfolder locatedin the Project Tags folder.
Project Tags dialog: Click the Datasheet View icon in the Project Tags folder.
The Project Tags datasheet contains five columns (see the following sample dialog).
Figure 2. Project Tags dialog
Use this dialog to create, modify, or delete tags or tag properties. You can right-click on a tagproperty and use standard Windows commands to cut (Ctrl+X), copy (Ctrl+C), or paste (Ctrl+V), anytag and its properties. You can also undo (Ctrl+Z) the last modification to a field.
Tip: You can sort the data in the Project Tags sheet and/or insert/remove additional columnsto/from the sheet by right-clicking on it and choosing the applicable option from the shortcut

8/22/2019 User Guide Indu Soft
http://slidepdf.com/reader/full/user-guide-indu-soft 162/1279
menu.
Extending the Project Tags datasheet
The Project Tags worksheet can be extended up to 65,488 rows, if necessary.
Parent topic: About Tags and the Project DatabaseInduSoft Web Studio v7.0 Technical ReferenceCopyright © 2003–2010 Indusoft, Inc.

8/22/2019 User Guide Indu Soft
http://slidepdf.com/reader/full/user-guide-indu-soft 163/1279
About Tags and the Project Database > Project Tags Folder >
Extending the Project TagsdatasheetThe Project Tags worksheet can be extended up to 65,488 rows, if necessary.
The datasheet is normally limited to a maximum of 32,721 rows. (This is separate from themaximum size of the project database as a whole, as well as the runtime limit that is set when youselect a target platform for a new project.)
To extend the worksheet, edit your project file ( project_name.app) to include the following entry:
[Options]
EnableExtendedTagCount=1
Doing so, however, brings the following restrictions:
Project tags in rows 32,722–65,488 of the worksheet cannot be used as array indices inexpressions. That is, in an expression like Abs(numArray[indexTag]), indexTag cannot be in thatrange of rows. (This restriction does not apply to the VBScript interface.)
In a Class worksheet, only the first 32 class members can have alarms. For all class membersafter the first 32, alarms will not work.
Generally speaking, extending the Project Tags datasheet stretches the capabilities of IWS andshould be done only when it's absolutely necessary. It is better to design your project to conservetags.
Parent topic: Project Tags FolderInduSoft Web Studio v7.0 Technical ReferenceCopyright © 2003–2010 Indusoft, Inc.

8/22/2019 User Guide Indu Soft
http://slidepdf.com/reader/full/user-guide-indu-soft 164/1279
About Tags and the Project Database >
Classes FolderThe Classes folder contains all of the project classes and their respective members. Classes arecompound tags consisting of user-defined data-type structures or tag types (Integer , Real , Boolean,and String). Classes allow for high-level encapsulation in the project database. A class-type tagprovides a set of values for its members.
To define a class you must define the members and their types. Class members are variables thathold values for an object with particular characteristics. Thus, the defining a class can be very usefulfor projects with a repeating group of variables.
Note: When you create a class folder, a Class icon displays in the Tag List subfolder locatedin the Project Tags folder.
To access the members of a class, use the following syntax with a period (.) as the separator:
TagName.MemberName. For example: tk.LEV or tk.TMP.
If the tk tag is an array, you use the following syntax:
ArrayTagName[ArrayIndex ].MemberName
For example: tk[1].LEV or tk[n].TMP
A class-type tag contains a set of values (rather than a single value) associated with the class. Youcreate class-type tags by grouping simple tags, which become the members. The maximum numberof members for any class depends on the product specification. Class members can hold standard
Integer , Real , Boolean, and String values, as mentioned previously.
To create a new class, use one of the following methods to open the Insert Class dialog:
On the Insert tab of the ribbon, in the Global group, click Class;
Right-click on the Classes folder, the Members List sub-folder, or the Datasheet View icon inthe Classes folder; or
Create a new class tag in the Project Tags folder.
When the Insert Class dialog displays, enter a class name in the Name field, and then click OK toclose the dialog.
Figure 1. Insert Class dialog

8/22/2019 User Guide Indu Soft
http://slidepdf.com/reader/full/user-guide-indu-soft 165/1279
Note: You must type a unique class name. You cannot create two classes with the same name.In addition, you cannot configure shared tags and system tags as classes.
IWS saves class folders in the Tag List subfolder (located in the Project Tags folder). You can edit theclasses in this folder.
When the Class datasheet displays, you can use it to create, modify, or delete any class membersand their viewable properties. (You cannot edit classes from the Tag Property dialog.)
Figure 2. Class Datasheet
Note: The maximum number of members for each class is 512 as long as it does not exceed themaximum number of tags supported by the license (Product Type) selected for the project.When a tag is created from a class type, each member from the class counts as one tag forlicensing restrictions, because each member has an independent value.
To edit a class member or property, you can right-click on the item and use standard Windowscommands to cut (Ctrl+X), copy (Ctrl+C), or paste (Ctrl+V). You can also undo (Ctrl+Z) the lastmodification to a field.
You also edit member properties as follows:
Name field: Type a name for the member or member property. The first character must be aletter and you can use up to 255 characters in the name.
Type combo-box: Select a member type (Boolean, Integer , Real , or String).
Description field: Type a description of the member property for documentation purposes.
Note: Members of a class cannot be of another class type.
Also, you must create a unique class name. You cannot reuse the name of an existing class.

8/22/2019 User Guide Indu Soft
http://slidepdf.com/reader/full/user-guide-indu-soft 166/1279
However, you can create members with the same name in different classes.
To delete a class and all its members, right-click on a class folder and select delete. IWS disables thedelete option if you are running any runtime tasks. In addition, you cannot delete a class if it is
associated with any tag.
Parent topic: About Tags and the Project DatabaseInduSoft Web Studio v7.0 Technical Reference
Copyright © 2003–2010 Indusoft, Inc.

8/22/2019 User Guide Indu Soft
http://slidepdf.com/reader/full/user-guide-indu-soft 167/1279
About Tags and the Project Database >
Shared Database Folder
The Shared database folder contains all tags shared between IWS and the selected PC-based Controldevice. You must create and modify these tags in the PC-based Control software, and then they willbe imported automatically into IWS under the following conditions:
When you start IWS; or
When you right-click on the Shared Tags folder, which refreshes (updates) the database.
Note: Each PC-based Control software package has its own individual interface characteristicsand conditions that allow IWS to import its tags. For example, the PC-based Control softwareapplication might have to be running for you to import database tags into IWS.
If there are no PC-based Control software products associated with the application, the Datasheet
View and Tag List subfolders (located in the Shared Database folder) will be empty.
You cannot edit shared tags in the IWS environment, but you can modify them in the PC-basedControl software. You can, however configure shared tags in any IWS task like any other tag. Sharedtags are read-only, and viewable on the Tag Property dialog and the Shared Tag datasheet.
Note: Right-click on the Shared Database folder (or click Datasheet View) and select theRefresh option to update your last "version" of the PC-based Control software's tags database.To change the Shared tags database (create a new tag, delete tags, or change tag properties),you must activate this command update the IWS shared database.
To view the Tag Property dialog:
Click on the Tag Properties tool on the Tag Properties toolbar (the tag name must be in theTag name field); or
Double-click on the tag name located in the Tag List subfolder (Project Tags folder)
When the Shared Tag datasheet displays, it contains four columns (Name, Size, Type, andDescription). This datasheet is read-only, you can use it to view shared tags only.
Parent topic: About Tags and the Project DatabaseInduSoft Web Studio v7.0 Technical ReferenceCopyright © 2003–2010 Indusoft, Inc.

8/22/2019 User Guide Indu Soft
http://slidepdf.com/reader/full/user-guide-indu-soft 168/1279
About Tags and the Project Database >
System Tags FolderThe System Tags folder contains predefined tags that have specific functions (time, date,acknowledge alarms, storage of the logged user, and so forth). You cannot edit or delete these tags;but you can access their values from any IWS task, copy them, and use them elsewhere.
Note: To update IWS's shared database with the system tags files, right-click on the SystemTags folder or Datasheet View icon, and then click the Refresh option.
For a list of system tags, including their properties and descriptions, see List of System Tags.
You can view the properties of a system tag using the System Tags datasheet, which contains fourcolumns (Name, Size, Type, and Description).
Important: Most system tags are read-only. To change the time, for example, you must use
the proper math function and set the system time rather than writing to the system time tag.
Parent topic: About Tags and the Project DatabaseInduSoft Web Studio v7.0 Technical ReferenceCopyright © 2003–2010 Indusoft, Inc.

8/22/2019 User Guide Indu Soft
http://slidepdf.com/reader/full/user-guide-indu-soft 169/1279
Understanding the Tag Name Syntax
Observe the following guidelines when naming a tag:
Your tag names must be unique — you cannot specify the same name for two different tags(or functions). If you type an existing tag name, IWS recognizes that the name exists and willnot create the new tag.
You must begin each tag name with a letter . Otherwise, you can use letters, numbers, and theunderscore character (_) in your tag name.
You cannot use the following symbols in a tag name:
~ ! @ # $ % & * ( ) - = \ + \ [ ] { } < > ?
You can use a maximum of 255 characters for a tag name or a class member name.You can use
uppercase and lowercase characters. Tag names are not case sensitive. Because IWS does notdifferentiate between uppercase and lowercase characters, you can use both to make tagnames more readable. (For example: TankLevel instead of tanklevel.)
Tag names must be different from system tag names and math functions.
Note: Use the @ character at the beginning of a tag name to indicate that the tag will be used asan indirect tag in the project.
Some valid tag examples include:
Temperature
pressure1
count
x
InduSoft Web Studio v7.0 Technical ReferenceCopyright © 2003–2010 Indusoft, Inc.

8/22/2019 User Guide Indu Soft
http://slidepdf.com/reader/full/user-guide-indu-soft 170/1279
Choosing the Tag Type
IWS allows you to create the following types of tags:
Basic tags hold a single value.
Array tags are a set of tags that use the same name with unique indexes.
Class tags are a set of compound tags that consist of user-defined data types (Boolean,
Integer, Real or String) or data-type structures.
Indirect tags are pointers that provide indirect access to another tag type, including classtags.
A discussion of these tag types follows.
Basic Tags
A basic tag receives a single value. Typically, most tags defined for a project are basic tags. Someexamples of a basic tag include:
TankID (to identify different tanks in your project)
Temperature (to identify the current temperature of an object)
Status (to identify whether an object is open or closed)
Array Tags
An array tag consists of a set of tags that all have the same name, but use unique array indexes (amatrix of n lines and one column) to differentiate between each tag. An array index can be a fixed
value, another tag or an expression. Maximum array sizes are determined by product specifications.
You can use array tags to:
Simplify configurations
Enable multiplexing in screens, recipes, and communication interfaces
Save development time during tag declaration
You specify array tags in one of two formats:
For a simple array tag, type:
ArrayTagName[ArrayIndex ]
For a complex array tag (where the array index is an expression consisting of a tag and anarithmetic operation), type:

8/22/2019 User Guide Indu Soft
http://slidepdf.com/reader/full/user-guide-indu-soft 171/1279
ArrayTagName[ArrayIndex +c]
Where:
ArrayTagName is the tag name;
[ArrayIndex ] is the unique index (fixed value or another tag);
+ is an arithmetic operation; and
c is a numerical constant.
Note:
You must specify a maximum index for each array tag by typing a value (n) inthe ArraySizecolumn of an Project Tags datasheet or in the Array Size field on a New Tag dialog.(See "Creating project database Tags").
When you create an n-position array tag, IWS actually creates n +1 positions (from 0 to n).For example, if you specify ArrayTag[15], the array will have 16elements, where 0 is thestart position and 15 is the end position.
You must not use spaces in an array tag.
When IWS reads a tag it begins with the first character and continues until it finds the firstspace or null character. Consequently, the system does not recognize any charactersfollowing the space as part of the array tag.
For example, if you type a[second + 1] IWS regards a[second as the tag and considers itinvalid because IWS does not find (recognize) the closing bracket. However, if you typea[second+1], this is a valid array tag.
You can specify an array tag wherever you would use a variable name. Also, because array tagsgreatly simplify configuration tasks and can save development time, we suggest using them
whenever possible.
For example, suppose you want to monitor the temperature of four tanks. The conventionalconfiguration method is:
temperature1 — high temperature on tank 1
temperature2 — high temperature on tank 2
temperature3 — high temperature on tank 3
temperature4 — high temperature on tank 4
You can use array tags to simplify this task as follows (where [n] represents the tank number):
temperature[n] — high temperature on tank n
The following table contains some additional examples of an array tag:
Table 1. Array Tag Examples

8/22/2019 User Guide Indu Soft
http://slidepdf.com/reader/full/user-guide-indu-soft 172/1279
Array Tag Example Description
Tank[1], Tank[2], Tank[500] Simple arrays, where the array indexes (1, 2, and 500) arenumerical constants. For example, tank numbers.
Tank[tk] A simple array, where the array index (tk) is a tag. For example,a tag representing the tank number.
Tank[tk+1] A complex array, where the array index (tk+1) is an expression.
For example, the value of tk (tank number) plus 1.
Note: When using another tag to reference the index of an array, if the value of the tag isoutside the size of the array, then the following results are given:
If IndexTag is greater than the size of the array, then MyArray[IndexTag ] will point to the end
position of the array; and
If IndexTag is less than 0, then MyArray[IndexTag ] will point to the start position of the array
(i.e., MyArray[0]).
Indirect Tags
Indirect tags "point" to other database tags (including class-type tags). Using indirect tags can savedevelopment time because they keep you from having to create duplicate tags (and the logic builtinto them).
You create an indirect tag from any string-type tag simply by typing the @ symbol in front of the tagname @TagName.
To reference a simple tag, assume the strX tag (a string tag) holds the value "Tank", which isthe name of another tag, then reading from or writing to @strX provides access to the value of the Tank tag.
To reference a class-type tag and member, you simply create a string tag that points to theclasstag and the member. For example, if a tag strX (a string tag) holds the value "Tank.Level",which is the name of the class tag, then reading from or writing to @strX provides access to thevalue of the Tank.Level member.
You can also point directly to a class-type tag member; by identifying a class-type that points toa class member. For example: to access the Tank.Level member of the class, you must store the"Tank" value within the strX tag and use the syntax, @strX.Level.
InduSoft Web Studio v7.0 Technical ReferenceCopyright © 2003–2010 Indusoft, Inc.

8/22/2019 User Guide Indu Soft
http://slidepdf.com/reader/full/user-guide-indu-soft 173/1279
Choosing the Tag Data Type
Another consideration when designing a tag is what type of data the tag will receive. IWS recognizesthe following, standard tag data types:
Boolean (one bit ): Simple boolean with the possible values of 0 (false) and 1 (true). Equivalentto the "bool" data type in C++. Typically used for turning objects off and on or for closing andopening objects.
Integer (four bytes): Integer number (positive, negative, or zero) internally stored as a signed32-bit. Equivalent to the "signed long int" data type in C++. Typically used for counting wholenumbers or setting whole number values. Examples: 0, 5, -200.
Real (floating point, eight bytes): Real number that is stored internally as a signed 64-bit.Equivalent to the "double" data type in C++. Typically used for measurements or for decimal orfractional values.
String (alphanumeric data, up to 1024 characters): Character string up to 1024 characters that
holds letters, numbers, or special characters. Supports both ASCII and UNICODE characters.Examples: Recipe product X123, 01/01/90, *** On ***.
You can also make a tag into a compound tag by assigning it a Class. A Class is a template consistingof two or more tag definitions, each with its own data type. You can use Classes in projects that haveitems (e.g., tanks of liquid) with multiple attributes (e.g., fill level, temperature, pressure) to bemonitored or controlled.
You can find these tag types (and their respective icons) in the Global tab of the Project Explorer.
See also: Understanding Tag Properties and Parameters
Changing How Boolean Tags Receive Numeric Values
By default, if any numeric value other than 0 (i.e., 0) is written to a Boolean tag, then the tagautomatically assumes a value of 1. You can change this behavior, if necessary, by editing the
project_name.app file to change the following setting:
[Options]
BooleanTrueAboveZero=value
If BooleanTrueAboveZero is set to the default 0, then the project will behave as described above. If
BooleanTrueAboveZero is set to 1, then the project will behave as follows:
When you write any numeric value less than or equal to 0 (i.e., =0) to a Boolean tag, the tagassumes a value of 0 (false).
When you write any numeric value greater than 0 (i.e., >0) to a Boolean tag, the tag assumesa value of 1 (true).

8/22/2019 User Guide Indu Soft
http://slidepdf.com/reader/full/user-guide-indu-soft 174/1279
CAUTION:
This is a global runtime setting. If you only want to change how certain tags are
handled, then you should not change this setting.
InduSoft Web Studio v7.0 Technical ReferenceCopyright © 2003–2010 Indusoft, Inc.

8/22/2019 User Guide Indu Soft
http://slidepdf.com/reader/full/user-guide-indu-soft 175/1279
Choosing the Tag Scope
IWS allows you to decide whether a tag "lives" on the project server or on each local station:
Server (default): The tag is maintained on the project server and it's shared by all connectedclients (e.g., Thin Client, Secure Viewer). A change to the tag value affects the entire project.
Local: A virtual copy of the tag is maintained separately on each local station (server +clients), and a change to the tag value affects only the station on which the change was made.
InduSoft Web Studio v7.0 Technical ReferenceCopyright © 2003–2010 Indusoft, Inc.

8/22/2019 User Guide Indu Soft
http://slidepdf.com/reader/full/user-guide-indu-soft 176/1279
Adding Tags to the Datasheet
Use the following steps to create tags from the Project Tags datasheet:
Select the Global tab and open the Project Tags folder.1.
Double-click the Datasheet View icon to open the Project Tags datasheet:
Figure 1. Project Tags datasheet
2.
Locate an empty line in the datasheet and configure the following fields.
Tip: You can use the keyboard Tab key to move to the next column.
Name field: Type a name using the proper syntax. (For more information, see "TagSyntax".)
Array Size field:
For an array tag, type a value to specify the maximum index of the array.For any other tag type, type zero (0).
Type combo-box: Click the arrow to select a tag data type (Boolean, Integer, Real, orString) from the list. (If necessary, review "Choosing a Tag Data Type.")
Description field (optional): Type a description for documentation purposes only.
Scope combo-box: Click the arrow to specify whether the tag value will be shared with(displayed on) Thin Client stations. (For more information, see "Choosing the Tag Scope".)
3.
Click in a new line to create another tag, or if you have no other tags to create, then save andclose the Project Tags datasheet.
4.
The following example shows a variety of tags configured in an Project Tags datasheet.
Figure 2. Example Project Tags Datasheet

8/22/2019 User Guide Indu Soft
http://slidepdf.com/reader/full/user-guide-indu-soft 177/1279
InduSoft Web Studio v7.0 Technical ReferenceCopyright © 2003–2010 Indusoft, Inc.

8/22/2019 User Guide Indu Soft
http://slidepdf.com/reader/full/user-guide-indu-soft 178/1279
Creating Tags "On-the-Fly"
Instead of opening the Project Tags datasheet every time you want to create a new tag, you cancreate individual tags "on-the-fly" by performing any of the following actions:
On the Insert tab of the ribbon, in the Global group, click Tag;
In the Project Explorer, right-click on the Project Tags folder, the Datasheet View icon, orthe Tag List subfolder and then select Insert Tag from the shortcut menu; or
Figure 1. Inserting a Tag
Type a new tag name into any Tag/Expression text field (available from Object Propertiesdialogs, worksheets, and so forth). When the Question dialog asks if you want to create a newtag, click Yes.
Figure 2. Creating a New Tag
Any of these actions causes a New Tag dialog to display, which you can then complete as needed. Formore information, see "Configuring a New Tag".
InduSoft Web Studio v7.0 Technical ReferenceCopyright © 2003–2010 Indusoft, Inc.
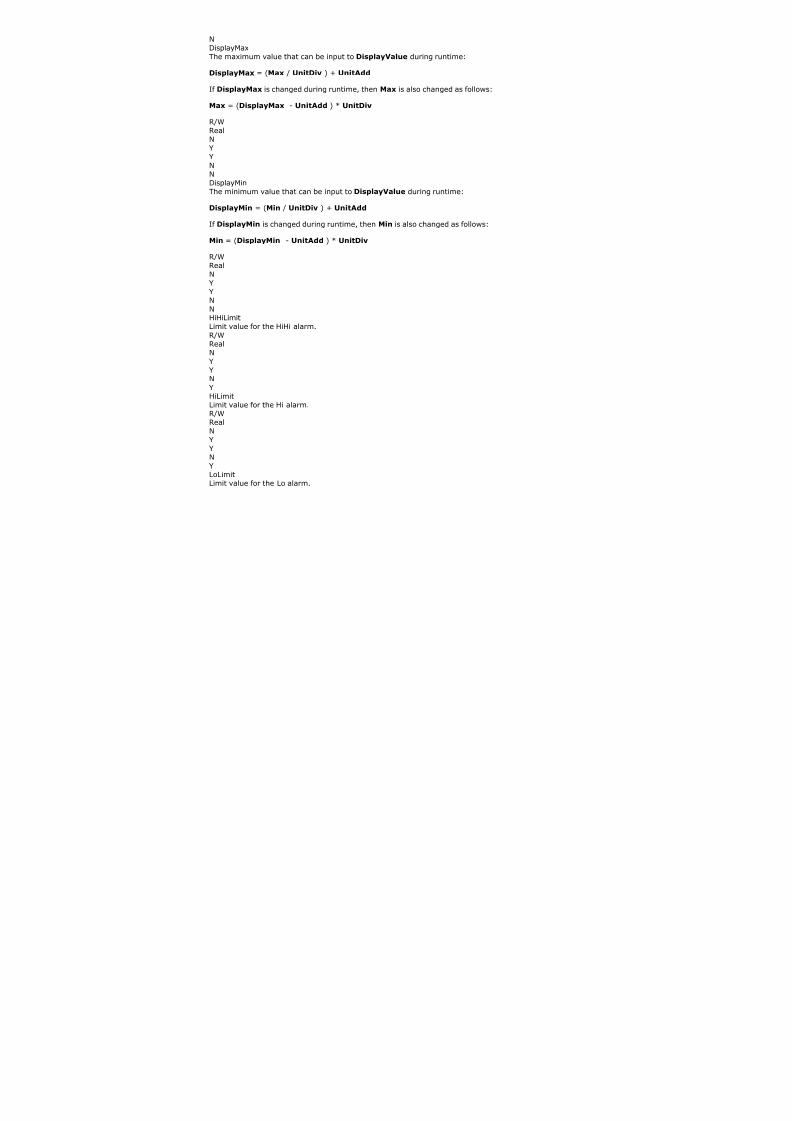
8/22/2019 User Guide Indu Soft
http://slidepdf.com/reader/full/user-guide-indu-soft 179/1279
Editing TagsYou can change the properties of a tag at any time during development or runtime. This sectiondescribes two methods you can use to edit tags.
Note: You can right-click on a tag property and use standard Windows commands to cut(Ctrl+X), copy (Ctrl+C), or paste (Ctrl+V) any tag and its properties. You can also Undo (Ctrl+Z)the last modification to a field.
From the Project Tags Datasheet
Use the following steps to edit one or more tags in the Project Tags datasheet:
Select the Global tab, open the Project Tags folder, and double-click on the Datasheet View
button.1.
When the Project Tags datasheet opens, locate your tag.2.
Double-click in the column containing the information to be changed, and type the newinformation into the datasheet.
3.
When you are finished editing, save your changes to the tags database.
Tip: You can sort the data in the Project Tags sheet and/or insert/remove additionalcolumns to/from the sheet by right-clicking on it and choosing the applicable option fromthe shortcut menu.
4.
From the Tag List Folder
Use the following steps to edit one or more tags from the Tag List folder:
Select the Global tab, open the Project Tags folder, and double-click on the the Tag List folderto view a list of all your tags.
1.
Locate your tag and double-click on the tag name to open a Properties dialog.
Note: You also can right-click on the tag's icon and choose Properties from the shortcutmenu.
Figure 1. Properties dialog
2.

8/22/2019 User Guide Indu Soft
http://slidepdf.com/reader/full/user-guide-indu-soft 180/1279
The Properties dialog contains fields and combo-boxes that correspond in name and function tothe columns on the Project Tags datasheet.
Make your changes in the Properties dialog as follows:
To change the current Type or Scope properties, click the arrow button and select thenew information from the list.
To change the Size or Description, highlight the existing text and type the new
information into the text box.
3.
Click OK to save your changes to the tags database and close the Properties dialog.
Tip: You can sort the data in the Project Tags sheet and/or insert/remove additionalcolumns to/from the sheet by right-clicking on it and choosing the applicable option fromthe shortcut menu.
4.
InduSoft Web Studio v7.0 Technical ReferenceCopyright © 2003–2010 Indusoft, Inc.

8/22/2019 User Guide Indu Soft
http://slidepdf.com/reader/full/user-guide-indu-soft 181/1279
Creating Classes
To create a new class tag:
From the Global tab, right-click the Classes folder and then select Insert Class from theresulting shortcut menu.
1.
When the Insert Class dialog displays, type a name into the Name text box using the designguidelines and tag name syntax.
Figure 1. Insert Class dialog
2.
Click OK to close theInsert Class dialog. The Class: worksheet is displayed automatically.
Configure the columns in this worksheet as follows:
Name field: Type a class member name.
Type drop-down list: Click the arrow to select the class member's data type (Boolean,Integer, Real, or String) from the list.
Description field (optional): Type a description of the class member (for documentationpurposes only).
Figure 2. Sample CTank worksheet
3.
Click in the next blank line and provide the information for the next class member you want toinclude in this class. Or, if you are finished adding members, you can close the Class worksheet.
You can expand the Classes folder and subfolders to see the data structure:
Figure 3. Expanded Classes folder
4.

8/22/2019 User Guide Indu Soft
http://slidepdf.com/reader/full/user-guide-indu-soft 182/1279
Next, use the instructions provided in "Adding Tags to the Datasheet" to create and associate atag with the new class.
Note that when you click the arrow button to view the Type list, your new class name (CTank) isincluded (see line 5 in the following figure). Select the class name from this list.
Figure 4. Creating the Tank Class Tag
5.
When you are done, save your work and close the worksheet.6.
InduSoft Web Studio v7.0 Technical ReferenceCopyright © 2003–2010 Indusoft, Inc.

8/22/2019 User Guide Indu Soft
http://slidepdf.com/reader/full/user-guide-indu-soft 183/1279
Understanding Tag Properties andParameters
Each tag type has the following properties:
Parameters
Alarms Properties
History Properties
To configure these properties for a tag, click Properties on the Home tab of the ribbon. A TagProperties dialog displays, similiar to the following:
Figure 1. Tag Properties dialog for Boolean tag
Use the parameters on this dialog to configure the different tag properties. Instructions forconfiguring each type of tag follows.
String-Type Tag Parameters
From the Tag Properties dialog, specify string-type parameter properties as follows:
Retentive Value checkbox: Click (check) to save the tag value continuously in case the systemunexpectedly shuts down, so that it restarts from the last saved value.
Retentive Parameters checkbox: Click (check) to save runtime changes in the tag'sproperties. Only certain properties can be saved; for a complete list of which can and cannot,see List of Tag Properties.

8/22/2019 User Guide Indu Soft
http://slidepdf.com/reader/full/user-guide-indu-soft 184/1279
CAUTION:
Enabling either of the Retentive options for tags that frequently change values
can cause heavy disk access, which slows performance.
Startup Value field: Type a tag value for the system load. The tag assumes this value if youdisable the Retentive Value option.
Unit field: Type any string (up to 9 characters) as a brief description or reference. This tag isaccessible during runtime.
Note: IWS will not accept writing values that fall outside the ranges defined in the Min and Max
fields. In addition, IWS generates a message in the Output window to indicate that the systemtried to write a value outside the defined range.
Integer and Real-Type Tag Parameters
Note: For descriptions of the Retentive Value, Retentive Parameters, Startup Value, and
Unit parameters, see String-Type Tag Parameters above.
From the Tag Properties dialog, specify integer and real-type parameter properties as follows:
Engineering Units area
Min field: Specify a minimum value for the tag in engineering units. This tag is accessible
during runtime.
Max field: Specify maximum value for the tag in engineering units. This tag is accessibleduring runtime.
Unit field: Type any string (up to 9 characters) as a brief description or reference of thetag. This tag is accessible during runtime.
Signal Conditioning area
Dead Band checkbox: Click (check) to insert the dead band value of a tag. Dead bandvalue is a variation around a central value of the tag, which is not recognized for alarms.
Smoothing checkbox: Click (check) to reduce the rate of change for the tag's values. Useonly for integers and real tags. For example, if you select the Smoothing option for theLEVEL1 tag containing the value = 50. Then in the next search, if the LEVEL1 changes to 60,the system will store the average of 50 + 60 in the database, so the new value = 55.
Boolean-Type Tag Parameters
Note: For descriptions of these parameters, see String-Type Tag Parameters above.
See also: Using Tag Properties: Alarms, Using Tag Properties: History
InduSoft Web Studio v7.0 Technical ReferenceCopyright © 2003–2010 Indusoft, Inc.

8/22/2019 User Guide Indu Soft
http://slidepdf.com/reader/full/user-guide-indu-soft 185/1279
Using Tag Properties: AlarmsUse the Tag Properties dialog to view the configured alarms for a selected tag. IWS disables thiscommand if there are open alarm worksheets. Before using these dialogs, you should have alreadycreated the alarm groups.
ALARM TYPES:
HiHi: A Very High alarm is present.
Hi: A High alarm is present.
Lo: A Low alarm is present.
LoLo: A Very Low alarm is present.
Rate: An alarm based on rate of change is present.
Deviation: An alarm based on deviation from a given set point is present. Example:
If SetPoint = 50, Deviation + = 5, Deviation - = 5, and Deviation Dead Band = 0.5;
IWS generates an alarm when the temp = 55 or temp = 45; and
A return to the normal occurs when temp = 54.5 or temp = 45.5.
ALARM LIMITS:
HiHiLimit: When creating Very High alarms in the Tag Properties dialog, use this field tospecify the limits. You can access this field during runtime and use it during modifications on thefly.
HiLimit: When creating High alarms in the Tag Properties dialog, use this field to specify thelimits. You can access this field during runtime and use it during modifications on the fly.
LoLimit: When creating Low alarms in the Tag Properties dialog, use this field to specify the
limits. You can access this field during runtime and use it during modifications on the fly.LoLoLimit: When creating Very Low alarms in the Tag Properties dialog, use this field tospecify the limits. You can access this field during runtime and use it during modifications on thefly.
DevSetpoint: Reference point for a tag value deviation that triggers an alarm. Define thealarm message in the Tag Properties dialog or on an Alarm worksheet. You can access this fieldduring runtime.
Dev+Limit: Limit deviation to a value higher than the DevSetpoint in a tag value that triggersan alarm. Define the alarm message in the Tag Properties dialog or on an Alarm worksheet. Youcan access this field during runtime.
Dev+Limit: Limit deviation to a value lower than the DevSetpoint in a tag value that triggers
an alarm. Define the alarm message in the Tag Properties dialog or on an Alarm worksheet. Youcan access this field during runtime.
RateLimit: Limit of rate variation in a tag value that triggers an alarm. Define the alarmmessage in the Tag Properties dialog or on an Alarm worksheet. You can access this field duringruntime.

8/22/2019 User Guide Indu Soft
http://slidepdf.com/reader/full/user-guide-indu-soft 186/1279
Alarms for Integer and Real Type Tags
From the Tag Properties dialog, specify an alarm for integer and real-type tags as follows:
Alarms Enabled checkbox: Click (check) to enable checking according to configuration.
Remote Ack tag field: Type a tag to acknowledge this alarm.
Dead Band Value field: Type a value of the filter for alarms normalization. For example: if the
TEMP1 tag is configured with an alarm with Hi Limit = 90 and Dead Band = 5, then IWSgenerates an alarm when TEMP1 = 90. The return to normal occurs when TEMP1 = 85.
Translation Enabled checkbox: Click (check) to enable the translation of messages defined onthe Options tab in the Project Settings dialog. For additional information about translations, seeTranslation Tools.
Note: IWS saves Alarm messages with the Translation Enabled attribute enabled in a filecalled Alarm.TXT located in your project's \DATABASE\ directory.
HiHi (HiHiLimit) checkbox: Click (check) to indicate a Very High alarm is present. Accessibleduring runtime.
Hi (HiLimit) checkbox: Click (check) to indicate a High alarm is present. Accessible duringruntime.
Lo (LoLimit) checkbox: Click (check) to indicate a Low alarm is present. Accessible duringruntime.
LoLo (LoLoLimit) checkbox: Click (check) to indicate a Very Low alarm is present. Accessibleduring runtime.
Rate (RateLimit) checkbox: Click (check) to indicate a Rate alarm is present. Accessibleduring runtime.
Deviation+ checkbox: Click (check) to indicate a Deviation alarm is present. Accessible duringruntime.
Deviation- checkbox: Click (check) to indicate a Deviation alarm is present. Accessible duringruntime.
Deviation SetPoint field: Specify a reference point for the deviation. Accessible duringruntime.
Deviation Dead Band field: Specify a reference value for the deviation.
Alarms for Boolean-Type Tags
Use the Alarms-Bool Type tab on the Tag Properties dialog to specify alarm properties for Boolean-type tags.
Figure 1. Alarms-Bool Type Tab

8/22/2019 User Guide Indu Soft
http://slidepdf.com/reader/full/user-guide-indu-soft 187/1279
Configure the parameters as follows:
Alarms Enabled checkbox: Click (check) to enable checking according to configuration.
Remote Ack tag field: Type a tag to enable remote alarm acknowlegement, which occurs whenthe tag values change.
Translation Enabled checkbox: Click (check) to enable the translation of messages defined onthe Options tab in the Project Settings dialog. For additional information about translations, seeTranslation Tools.
Note: IWS saves Alarm messages with the Translation Enabled attribute enabled in a file
called Alarm.TXT located in your project's \DATABASE\ directory.
Off checkbox: Click (enable) to generate an alarm message always when the tag value is zero.
On checkbox: Click (enable) to generate an alarm message always when the tag value is one.
Changed checkbox: Click (enable) to generate an alarm message always when the tag value
changes.
Text value pane: Use the Off , On, and Ack fields to configure mnemonics (for example,Closed or Open) for the Off , On, and Ack alarm states (Boolean tags only). During runtime, theAlarm Control object will display this text in the Value column of the alarm message. You canalso access this text using the tag fields.
Note: If you do not configure a mnemonic, the Alarm Control object displays the tag value(0 or 1) in the Value column.
InduSoft Web Studio v7.0 Technical ReferenceCopyright © 2003–2010 Indusoft, Inc.

8/22/2019 User Guide Indu Soft
http://slidepdf.com/reader/full/user-guide-indu-soft 188/1279
Using Tag Properties: HistoryUse the Tag Properties dialog to view the history for a selected tag. IWS disables this command if there are open trend worksheets. Before using this dialog, you should have already created the trendgroups.
Note: History does not support string-type tags. See Recipes folder for information about storingstring values.
Integer and Real Type History
From the Tag Properties dialog, enable history for integer and real-type tags as follows:
History Enabled checkbox: Click (check) to enable storage of the selected tag value samples.
Group Number field: Specify the group number to which this tag is associated.
Log Dead Band field: Specify a value sample taken when the variation value is equal to, orgreater than, the Log Dead Band.
Boolean Type History
From the Tag Properties dialog, enable history for Boolean-type tags as follows:
History Enabled checkbox: Click (check) to enable storage of the selected tag value samples.
Group Number field: Specify the group number to which this tag is associated.
InduSoft Web Studio v7.0 Technical ReferenceCopyright © 2003–2010 Indusoft, Inc.

8/22/2019 User Guide Indu Soft
http://slidepdf.com/reader/full/user-guide-indu-soft 189/1279
List of Tag PropertiesTag properties (also known as "tag fields") are metadata attached to each tag in the database. Mostof these properties can be set using the Tag Properties dialog, which you can open by clicking theTag Properties button on the Tag Properties toolbar.
To access a tag property during runtime, use the following syntax (without spaces) anywhere thatyou would normally specify a tag:
tag name-> property name
You can access the following tag properties during runtime:NameThe name of the tag, as configured in the Project Tags database.RString, up to 32charsYYYYn/aMemberName
The name of the class member, in a properly configured Class . NOTE: The syntax must be:
Class.Member ->MemberName
Example: Tank.Lvl->MemberName = Lvl
RString, up to 32charsYYY
Yn/aSizeArray Size. If the tag is not an array tag, it returns the value 0RInteger
YYYYn/aIndexThe index number of an element in an Array . (An Array is any Tag of size greater than 0.) NOTE:

8/22/2019 User Guide Indu Soft
http://slidepdf.com/reader/full/user-guide-indu-soft 190/1279
The syntax must be:
Tag [Index ]->Index
Example: Tag[1]->Index = 1
R
IntegerYYYYn/aDescriptionThe description of the tag, configured in the Tags datasheet.RStringYY
YYYQualityTag quality (192=GOOD; 0=BAD). IWS updates this field every time the tag receives the result of anexpression or a value from a communication task (such as driver or OPC).
If the expression is invalid (such as, division by zero) or if there is a reading communication errorassociated with the tag, IWS sets the quality to BAD.
RIntegerY
YYYN
TimeStampTime and date when the value of the tag last changed.RStringYYYY
NBlockedThis property can have two values:
0: The tag is blocked and all runtime tasks will ignore it. It is effectively removed from theproject database.
1: The tag is unblocked and all runtime tasks can access it normally.

8/22/2019 User Guide Indu Soft
http://slidepdf.com/reader/full/user-guide-indu-soft 191/1279
This is useful when you want to dynamically disable all actions associated with a specific tag. Evenwhen a tag is blocked, however, it still counts towards the total number of tags used for licensingpurposes.
R/WBooleanYYYYNUnitA brief description (up to 9 characters) of the Engineering Unit (i.e., the unit of measurement) for theTag value. For example, Kg , BTU , psi .R/WString, up to 9charsYYYY
YMaxThe maximum value that can be written to the tag during runtime.R/WRealNYYN
YMinThe minimum value that can be written to the tag during runtime
R/WRealNYYNYB0 … B31Value (0 or 1) of any of the 32 bits (b0, b1, b2, … b31) of an Integer tag. (B0: LSB B31: MSB)R/WBooleanNYNNNDisplayValueA converted Tag value that is only displayed on-screen:
DisplayValue = (Value / UnitDiv ) + UnitAdd

8/22/2019 User Guide Indu Soft
http://slidepdf.com/reader/full/user-guide-indu-soft 192/1279
This is used when the actual Tag values have one Engineering Unit (see Unit above) but need to bedisplayed on-screen in another Engineering Unit (see DisplayUnit below). For example, Celsiusdegrees and Farenheit degrees.
If user input changes DisplayValue during runtime, then the conversion is reversed before thechange is actually written to the Tag:
Value = (DisplayValue - UnitAdd ) * UnitDiv
R/WRealNYYNn/aDisplayUnitA brief description (up to 9 characters) of the Engineering Unit for DisplayValue .
NOTE: This property can only be set by using the SetDisplayUnit() and SetTagDisplayUnit() functions.
RString, up to 9charsNYYNNUnitDivNumber by which the Tag value is divided to get DisplayValue . To perform no division, UnitDiv
should be 1.
NOTE: This property can only be set by using the SetDisplayUnit() and SetTagDisplayUnit() functions.
RRealNYYNNUnitAddNumber added to the Tag value to get DisplayValue . To perform no addition, UnitAdd should be 0.
NOTE: This property can only be set by using the SetDisplayUnit() and SetTagDisplayUnit() functions.
RRealNYYN

8/22/2019 User Guide Indu Soft
http://slidepdf.com/reader/full/user-guide-indu-soft 193/1279
NDisplayMaxThe maximum value that can be input to DisplayValue during runtime:
DisplayMax = (Max / UnitDiv ) + UnitAdd
If DisplayMax is changed during runtime, then Max is also changed as follows:
Max = (DisplayMax - UnitAdd ) * UnitDiv
R/WRealNYY
NNDisplayMinThe minimum value that can be input to DisplayValue during runtime:
DisplayMin = (Min / UnitDiv ) + UnitAdd
If DisplayMin is changed during runtime, then Min is also changed as follows:
Min = (DisplayMin - UnitAdd ) * UnitDiv
R/WRealNYYNNHiHiLimitLimit value for the HiHi alarm.
R/WRealNYYNYHiLimitLimit value for the Hi alarm.R/WReal
NYYNYLoLimitLimit value for the Lo alarm.

8/22/2019 User Guide Indu Soft
http://slidepdf.com/reader/full/user-guide-indu-soft 194/1279
R/WRealNYYNYLoLoLimit
Limit value for the LoLo alarm.R/WRealNYYNYRateLimitLimit value for the Rate alarm.R/WReal
NYYNYDevSetpointSetpoint value for Deviation alarms.R/WRealNYYNn/a
DevPLimitLimit value for the Deviation+ alarm.R/WRealNYYNYDevMLimitLimit value for the Deviation- alarm.
R/WRealNYYNY

8/22/2019 User Guide Indu Soft
http://slidepdf.com/reader/full/user-guide-indu-soft 195/1279
HiHiIf 0, the HiHi alarm is not active. If 1, the HiHi alarm is active.RBooleanYYYN
n/aHiIf 0, the Hi alarm is not active. If 1, the Hi alarm is active.RBooleanYYYNn/aLoIf 0, the Lo alarm is not active. If 1, the Lo alarm is active.
RBooleanYYYNn/aLoLoIf 0, the LoLo alarm is not active. If 1, the LoLo alarm is active.RBooleanYYY
Nn/aRateIf 0, the Rate alarm is not active. If 1, the Rate alarm is active.RBooleanYYYNn/a
DevPIf 0, the Deviation+ alarm is not active. If 1, the DevP alarm is active.RBooleanNYY

8/22/2019 User Guide Indu Soft
http://slidepdf.com/reader/full/user-guide-indu-soft 196/1279
Nn/aDevMIf 0, the Deviation- alarm is not active. If 1, the DevM alarm is active.RBooleanNY
YNn/aAlrStatusInteger value with the status of the current active alarms associated to the tag. Each bit of thisinteger value indicates a specific status:
Bit 0 (LSB): HiHi Alarm active
Bit 1: Hi Alarm active
Bit 2: Lo Alarm active
Bit 3: LoLo Alarm active
Bit 4: Rate Alarm active
Bit 5: Deviation+ Alarm active
Bit 6: Deviation- Alarm active
Examples: If Tag->AlrStatus returns the value 2, it means that "Hi" alarm is active. If it returns thevalue 3, it means that the "HiHi" and the "Hi" alarm are active simultaneously.
If this property returns the value 0, it means that there are no active alarms associated to this tag.
For Boolean tags, only the values 1 (bit 1), 4 (bit 2) or 16 (bit 4) can be returned.
R
IntegerYYYNNAckThis property can have two values:
0: There are no alarms associated with this tag that require acknowledgment.
1: There is at least one alarm associated with this tag that requires acknowledgment.
This works as a global acknowledge for the tag and goes to 0 only when all alarms for the tag havebeen acknowledged.
RBooleanYY

8/22/2019 User Guide Indu Soft
http://slidepdf.com/reader/full/user-guide-indu-soft 197/1279
YNNUnAckThis property can have two values:
0: There is at least one alarm associated with this tag that requires acknowledgment.
1: There are no alarms associated with this tag that require acknowledgment.
If you manually set this value to 1, then the active alarms (if any) are acknowledged. The value of this property is always the opposite of the Ack property.
R/WBooleanYYYNNAlrAckValue
Text associated with the Acknowledged state of a Boolean tag. This text is displayed in the Valuecolumn of an Alarm/Event Control .
You can also edit this text in the Tag Properties dialog (Alarms – Bool Type).
R/WString, up to 32charsYNNNYAlrOffValue
Text associated with the Normalized state of a Boolean tag. This text is displayed in the Value columnof an Alarm/Event Control .
You can also edit this text in the Tag Properties dialog (Alarms – Bool Type).
R/WString, up to 32charsYNNNYAlrOnValueText associated with the Active state of a Boolean tag. This text is displayed in the Value column of an Alarm/Event Control .
You can also edit this text in the Tag Properties dialog (Alarms – Bool Type).
R/WString, up to 32chars

8/22/2019 User Guide Indu Soft
http://slidepdf.com/reader/full/user-guide-indu-soft 198/1279
YNNNYAlrDisableThis property can have two values:
0: The alarms associated with this tag are enabled. This means that when an alarm conditionoccurs, the alarm will become active.
1: The alarms associated to this tag are disabled. This means that even if an alarm conditionoccurs, the alarm will not become active.
R/WBooleanYYYNN
Tag
Property
Description R or
R/W
Data
Type
Available on Data Type… Retentive
Boolean Integer Real String
Note:
If a property is marked "n/a" with regards to being retentive, it's because the property isinherent in the tag definition (e.g., Name, Size) or the value of the property is continuouslyderived during runtime (e.g., alarm activation, DisplayValue). To enable retention for a tag,select the Retentive Parameters option in the Tag Properties dialog .
If the project attempts to write a value outside of the range specified in the Min and Maxproperties, the Tags Database will not accept the new value and a warning message iswritten in the Output window. If both Min and Max properties are configured with thevalue 0 (zero), it means that any value applied to the tag type will can be written to thetag.
You cannot use tag properties (such as Bit fields) to configure Alarm or Trend worksheets.
Although you can apply tag properties to System Tags , those properties will not persistwhen you download your project to a CE device.
InduSoft Web Studio v7.0 Technical ReferenceCopyright © 2003–2010 Indusoft, Inc.

8/22/2019 User Guide Indu Soft
http://slidepdf.com/reader/full/user-guide-indu-soft 199/1279
Using Tags in Your ProjectOnce you have added a tag to the project database, you can use that tag in your project byassociating it to objects on a screen.
The basic process for associating tag to screen objects consists of the following steps:
In the project screen, select the object to which you want to apply the tag.1.
Click one of the buttonsin the Animations group to apply that animation to the object.2.
Double-click on the object to open its Object Properties dialog.3.
Locate the Tag text box for that property and type the tag name into the field.
Tag text box names and locations will vary, depending on the type of property you are using.For example:
Figure 1. Applying Tags to an Object
4.
Comprehensive instructions for applying tags to screen objects are provided throughout the
documentation where appropriate.
InduSoft Web Studio v7.0 Technical ReferenceCopyright © 2003–2010 Indusoft, Inc.

8/22/2019 User Guide Indu Soft
http://slidepdf.com/reader/full/user-guide-indu-soft 200/1279
Deleting a tag from the projectdatabase
Delete a tag that's no longer in use by deleting its line in the Project Tags datasheet.
Before you delete a tag, we strongly recommend that you use the Cross-Reference tool to makesure the tag is not being used anywhere in your project. (If you delete a tag that is still being used,then you will not be able to verify and run your project.) Fix any screens or worksheets where the tagis being used before you proceed.
Stop the project if it is running.1.
Open the Project Tags datasheet.2.
Right-click anywhere in the datasheet and then select Disable Sort from the shortcut menu.Tags cannot be deleted when the datasheet is sorted in any way. The tags revert to theirdefault order — that is, the order in which they were created.
3.
In the datasheet, find the line for the tag you want to delete.4.
Right-click the line and then select Delete Line from the shortcut menu. (If the option isdisabled, then you still need to disable sorting as described above.) An alert dialog is displayedasking you to confirm the action.
5.
Click Yes. The line is deleted from the datasheet.6.
Save and close the datasheet.7.
InduSoft Web Studio v7.0 Technical ReferenceCopyright © 2003–2010 Indusoft, Inc.

8/22/2019 User Guide Indu Soft
http://slidepdf.com/reader/full/user-guide-indu-soft 201/1279
Using the Tags ToolbarThe Tags toolbar provides a text box and several tools (shortcuts) that enable you to create, locate,and access different tags, functions, and tag properties.
Figure 1. Tags tools
Global Replace Tool
Replacing project tags in a document or screen object
Removing unused tags from the project database
The Remove unused tags tool is used to scan the project database for unused tags, whichyou can then select and remove.
Reset Tags Database
Tagname Text Box
Object Finder Tool
Cross Reference Tool
Tag Properties Tool
InduSoft Web Studio v7.0 Technical ReferenceCopyright © 2003–2010 Indusoft, Inc.

8/22/2019 User Guide Indu Soft
http://slidepdf.com/reader/full/user-guide-indu-soft 202/1279
Using the Tags Toolbar >
Global Replace Tool
When clicking on the Global Replace tool from the Tag Properties Toolbar, the following windowdisplays:
Figure 1. Global Replace dialog
From the Global Replace dialog, you can replace any tag(s) from all documents (screens andworksheets) of the whole project. You can edit both the From and the To column.
When replacing composed tags (array size > 0 and/or Type = Class), you can configure a specificarray position (for example, TagA[1]) or class member (for example, TagB.MemberX) or both (for
example, TagC[3].MemberY). If you configure only the Main Tag Name (for example, TagC) in the Fromcolumn, all tags from this main tag will be modified for the tag configured in the To column.
If an invalid replacement is configured (for example, replace the Main Tag tag from a class type tagfor a simple tag (not a class tag), the OK button will be disabled. When the OK button is pressed, thetags configured on the Global Replace dialog will be replaced in the order that they were configuredon the dialog interface.
Note: You must close all documents (screens and worksheets) before executing this command.
When changing the tag name on the Project Tags database worksheet, IWS will ask you if you intendto replace this tag through the whole project.
The Replace option will be created in the Edit menu. By using this option, the Global Replace dialogis prompted, however, the changes are applied only the current screen or worksheet in focus.
Parent topic: Using the Tags ToolbarInduSoft Web Studio v7.0 Technical ReferenceCopyright © 2003–2010 Indusoft, Inc.

8/22/2019 User Guide Indu Soft
http://slidepdf.com/reader/full/user-guide-indu-soft 203/1279
The Development Environment >Using the Tags Toolbar >Screens and Graphics > Editing >
Replacing project tags in a
document or screen object
To replace all occurences of a tag in the current document, do one of the following:
On the Home tab of the ribbon, in the Tags group, click Replace; or
On the Graphics tab of the ribbon, in the Editing group, click Replace.
To replace all occurences of a tag in a screen object, double-click the object to open its ObjectProperties dialog and then click Replace.
All of these methods will open the Replace dialog, which is descibed below.
You can replace one or more tags by clicking the Whole Tag Name tab. Current tags used aredisplayed. The original tag names are shown in the From column on the left, and you can enter yournew tag names in the To column on the right.
Figure 1. Whole Tag Name tab
Note that this does not rename or delete any tag — it only replaces the tags used in the object withother tags from the database.
You can also replace one or more strings (e.g., button captions, descriptive text) by clicking theString Value tab.

8/22/2019 User Guide Indu Soft
http://slidepdf.com/reader/full/user-guide-indu-soft 204/1279
Figure 2. String Value tab
When you are done, click OK.
Parent topic: The Development EnvironmentParent topic: Using the Tags ToolbarParent topic: EditingInduSoft Web Studio v7.0 Technical ReferenceCopyright © 2003–2010 Indusoft, Inc.

8/22/2019 User Guide Indu Soft
http://slidepdf.com/reader/full/user-guide-indu-soft 205/1279
Using the Tags Toolbar >
Removing unused tags from theproject databaseThe Remove unused tags tool is used to scan the project database for unused tags, which you canthen select and remove.
"Unused tags" are tags that you have defined in the project database but have not used in anyscreen or task worksheet. Since your project has a limited number of available tags (as determined
by your product/license type), you may want to remove some or all of these unused tags to decreaseyour project's tag count.
Save and close all open project screens and worksheets.1.
On the Home tab of the ribbon, in the Tags group, click Remove unused tags. Thedevelopment application automatically verifies your project. If it finds unused tags, then it liststhem in the Remove Unused Tags dialog.
Figure 1. Unused tags listed in Remove Unused Tags dialog
2.
Determine which tags you want to remove, if any.
If you want to remove all of the listed tags, click Remove.
3.

8/22/2019 User Guide Indu Soft
http://slidepdf.com/reader/full/user-guide-indu-soft 206/1279
If you want to keep some of the listed tags, clear the Remove options for these tags andthen click Remove.
Note: The listed tags may include some that are accessed during runtime usingindirect syntax (e.g., GetTagValue(TagName) or @TagName, where the value of TagName isthe name of an unused tag).
If you do not want to remove any of the listed tags, click Close.The development application removes the selected tags and then asks if you want to verify theproject again.
Click Yes to verify the project again.4.
Parent topic: Using the Tags ToolbarInduSoft Web Studio v7.0 Technical ReferenceCopyright © 2003–2010 Indusoft, Inc.

8/22/2019 User Guide Indu Soft
http://slidepdf.com/reader/full/user-guide-indu-soft 207/1279
Using the Tags Toolbar >
Reset Tags DatabaseSelect Reset Tags Database to "reload" the tags database on the local station. This commandaffects all tags stored in the Project Tags folder. This option is useful for resetting the project tagsand restoring the values they had when the project was loaded for the first time. When you stop theproject but leave the development environment open, the tags are not reset by default when theproject is run again. Therefore, you can execute this command to reset them before the project runsagain.
When this command is executed, the Startup Value configured for each tag (Tags Properties dialog)is written to the respective tag. If you did not configure any Startup Value for a numeric tag(Boolean, Integer or Real), the value 0 (zero) is written to the tag. If you did not configure anyStartup Value for a string tag, the empty value ("") is written to the tag.
This command is disabled (in gray) if there is at least one runtime task running on the local station.
You must close all runtime tasks (Stop on the Home tab of the ribbon) before this command can be
executed.
Note: The tags stored in the System Tags folder and in the Shared Tags folder (if any) are notaffected by this command.
Tip: If you want to reset the project tags automatically whenever you run the project (Run onthe Home tab of the ribbon), you can check the option Reset Tags Database when startingproject on the Preferences tab of the Project Settings dialog.
Parent topic: Using the Tags ToolbarInduSoft Web Studio v7.0 Technical ReferenceCopyright © 2003–2010 Indusoft, Inc.

8/22/2019 User Guide Indu Soft
http://slidepdf.com/reader/full/user-guide-indu-soft 208/1279
Using the Tags Toolbar >
Tagname Text Box
Type a name into the Tagname text box to create a new tag for your project. The Cross
Reference and Tag Properties tools will reference this tag name for their actions.
Parent topic: Using the Tags ToolbarInduSoft Web Studio v7.0 Technical ReferenceCopyright © 2003–2010 Indusoft, Inc.

8/22/2019 User Guide Indu Soft
http://slidepdf.com/reader/full/user-guide-indu-soft 209/1279
Using the Tags Toolbar >
Object Finder Tool
Click the Object Finder tool to open the Object Finder dialog, which lists all Tags andFunctions currently configured for the project.
Figure 1. Object Finder dialog
To select an existing tag/function, double-click on the tag/function name, and then click OK to closethe box. The selected name displays in the Tagname text box.
To select a specific array index, click the Index button after specifying the array tag name.
To select a specific member name, click the Member button after specifying the class tagname.
To create a new tag, click the New button.
When the New Tag dialog displays, enter the following information, then click OK to close thebox:
Name
Array Size
Type (Boolean, Integer, Real, String, Class:Control, Class:msgonline, or Class:Alr)
Description

8/22/2019 User Guide Indu Soft
http://slidepdf.com/reader/full/user-guide-indu-soft 210/1279
Scope (local or server)
Parent topic: Using the Tags ToolbarInduSoft Web Studio v7.0 Technical ReferenceCopyright © 2003–2010 Indusoft, Inc.

8/22/2019 User Guide Indu Soft
http://slidepdf.com/reader/full/user-guide-indu-soft 211/1279
Using the Tags Toolbar >
Cross Reference Tool
Click the Cross Reference tool to search all project screens and worksheets for the tag noted inthe Tagname text box. This function writes a log, detailing all the occurrences of the tag, to theXRef tab in the Output window. For example, the results of searching for a BlinkFast tag are asfollows:
Figure 1. XRef Results
Parent topic: Using the Tags ToolbarInduSoft Web Studio v7.0 Technical ReferenceCopyright © 2003–2010 Indusoft, Inc.

8/22/2019 User Guide Indu Soft
http://slidepdf.com/reader/full/user-guide-indu-soft 212/1279
Using the Tags Toolbar >
Tag Properties Tool
Click the Tag Properties tool to configure parameters for each tag. The Tag Properties dialogdisplays so you can specify these parameters. (For more information about specifying tag properties,see Understanding Tag Properties and Parameters.)
Figure 1. Sample Tag Properties dialog
Note: The Tag Properties dialog that displays for Boolean, Integer, Real, and String tags willdiffer in content.
Parent topic: Using the Tags ToolbarInduSoft Web Studio v7.0 Technical ReferenceCopyright © 2003–2010 Indusoft, Inc.

8/22/2019 User Guide Indu Soft
http://slidepdf.com/reader/full/user-guide-indu-soft 213/1279
Import WizardThe Import Wizard is a powerful tool that reduces engineering time during project development.Using the Import Wizard, you can import tags from different data sources directly to the project tagsdatabase. Depending on the data source, you can import not only the tag names, but also thecommunication interface (the link between the tags and the PLC addresses).
When you click Import Wizard on the Home tab of the ribbon, an Import Database Wizard dialogdisplays to step you through the process of importing tags. There are three steps for importing tagsfrom these data source types:
InduSoft Web Studio Project Database
OPC Server Database
CSV Database
ODBC Database
RSLogix™ 5000 CSV Database
PanelBuilder32™ Database
OMRON™ CX Programmer Database
TwinCAT™ PLC Database
PanelMate Plus™ Database
Step1: Select the Source Type
Figure 1. Import Wizard

8/22/2019 User Guide Indu Soft
http://slidepdf.com/reader/full/user-guide-indu-soft 214/1279
Click the data Source Type, which is where the tags are being imported from. Click Next.
Continue to the appropriate section for the instructions you need to complete the import databaseprocedure:
Importing from Other project databases
Importing from OPC Server DatabasesImporting from CSV Databases
Importing from ODBC Databases
Importing from PanelBuilder32 Databases
Importing from RSLogix 5000 CSV Databases
Importing from OMRON CX Programmer Databases
Importing from TwinCAT PLC Databases
Importing from PanelMate Plus Databases
Step 2: Configure the Source Type Settings
Figure 2. Import OPC Server dialog

8/22/2019 User Guide Indu Soft
http://slidepdf.com/reader/full/user-guide-indu-soft 215/1279
Most of the settings in the second window depend on the data Source Type selected in the first step.The screenshot above is an example of one data Source Type (OPC Server Database). The settingsthat are common for any data Source Type are described below:
Options box: Select Do not import duplicated tags if you do not want imported tags tooverwrite tags with the same name that already exist in the Tags Database of the currentproject. Select Replace duplicates with tags imported to overwrite tags in the Tags
Database with imported tags of the same name.
Use Prefix: Check to specify a prefix (up to 4 characters) to be concatenated to the name of the imported tags. It is useful to use a prefix to differentiate the imported tags from the tagscreated manually.
Note: The other settings vary according to the data source selected in the first step, and theyare described in the specific sections for each data Source Type.
After configuring the settings in this dialog, click Next.
Step 3: Filter the tags
Figure 3. Import OPC Server dialog

8/22/2019 User Guide Indu Soft
http://slidepdf.com/reader/full/user-guide-indu-soft 216/1279
The screenshot above is an example of one data Source Type (OPC Server Database). The fields andsettings that are common for all data Source Types include the following:
Grid: Displays the list of tags found on the data source.
checkbox: Check to import the tag from the data source to the Tags Database of thecurrent project.
TagName: Name of the tag
Size: Array size of the tag
Type: Data type of the tag (Boolean, Integer, Real, String or Class:<ClassName>)
Description: Description of the tag
Check button: Click to select/import all tags in the grid
Uncheck button: Click to uncheck all tags in the grid
Filter button: Click to filter the tags. The Filter dialog will display, allowing you to specify amask for each column in the grid. Wild cards (* and ?) can be used to filter data.
Clear Filter button: Click to reset the filter.
Import Filtered Tags Only checkbox: Check this option to import only the tags that arevisible in the grid (filtered).
Status box: Displays a message describing the status of the tag currently selected in the grid.This information is especially useful to indicate why a tag cannot be imported.
Legend box: Describes the meaning of the colors that represent tag status:
(Red) Error:Tag cannot be imported because it is not supported by IWS. See the Status
box for a detailed description of the error.

8/22/2019 User Guide Indu Soft
http://slidepdf.com/reader/full/user-guide-indu-soft 217/1279
(Blue) Tag will be imported:Tag will be imported after you click the Finish button.
(Gray) Tag can be imported:Tag can be imported but it has not been checked.
Database size box: Displays summary information regarding the current Import Wizard:
Current: Indicates the number of tags configured in the Project Tags database of thecurrent project
Importing: Indicates the number of tags selected to be imported
Replacing: Indicates the number of tags configured in the Project Tags database of thecurrent project that will be replaced by an imported tag with the same name.
After selecting the tags to import, click the Finish button, or click Cancel to abort the operation.
Note: The other settings vary according to the data source selected in the first step, and theyare described in the specific sections for each data Source Type (see below).
Data Source Types
Continue to the appropriate section for the instructions you need to complete the import databaseprocedure:
Importing from Other project databases
Importing from OPC Server Databases
Importing from CSV Databases
Importing from ODBC Databases
Importing from PanelBuilder Database Wizard
Importing from RSLogix 5000 CSV Database Wizard
Importing from OMRON CX Programmer Databases
Importing from TwinCAT PLC Databases
Importing from PanelMate Wizard
InduSoft Web Studio v7.0 Technical ReferenceCopyright © 2003–2010 Indusoft, Inc.

8/22/2019 User Guide Indu Soft
http://slidepdf.com/reader/full/user-guide-indu-soft 218/1279
Importing from Other ProjectDatabases
This wizard allows you to import the interfaces (tags and worksheets) of other IWS projects. Whenyou import only the tags (rather than the whole project) from a remote computer, the TCP/IP Clientworksheet can be automatically created to link the tags between both stations (the local and theremote), and to share the value of these tags between both stations during runtime.
Figure 1. Import Project Database Wizard dialog
Import tags only: When this option is selected, the tags from the other project will beimported to the current project. The other interfaces of the project (worksheets) will not beimported.
Import the whole project: When this option is selected, the following interfaces from the
other project will be imported to the current project:
Tags Database
Global Procedures
Screens
Screen Groups

8/22/2019 User Guide Indu Soft
http://slidepdf.com/reader/full/user-guide-indu-soft 219/1279
Web Pages
Alarms
Trends
Recipes
Reports
ODBC
Math
Scripts
Scheduler
Drivers
OPC
TCP/IP
DDE
This option is useful for merging projects and importing template projects.
Note: When you select the option to Import the whole project, the following worksheetswill always be imported, regardless of existing worksheets with the same number in thecurrent project: ODBC, Math, Script, Scheduler, Drivers, OPC, TCP/IP and DDE. If there areworksheets with the same number in the current project, worksheets imported from theother project will be inserted as additional worksheets in the current project, and thenumber of each worksheet will be automatically increased to avoid replacing files on thecurrent project.
Do not import duplicated: When this option is selected, the following interfaces are notimported in case there is already an equivalent interface in the current project:
Tags Database (tags with the same name will not be imported)
Global Procedures (the global procedures will not be imported at all)Screens (screens with the same name will not be imported)
Screen Groups (screen groups with the same name will not be imported)
Web Pages (Web pages with the same name will not be imported)
Alarms (alarms assigned to tags with the same name will not be imported)
Trend (trend logs assigned to tags with the same name will not be imported)
Recipes (recipes with the same name will not be imported)
Reports (reports with the same name will not be imported)
Script (the startup script will not be imported at all)
Application: Click Browse and select the project_name.APP file that has the tags you want toimport.
Generate TCP/IP Client worksheet: If you want your project to share tags with another IWSproject running on a remote server, select this option and enter the IP address of that server.IWS will automatically configure the TCP/IP Client worksheet to exchange data with the remoteproject.

8/22/2019 User Guide Indu Soft
http://slidepdf.com/reader/full/user-guide-indu-soft 220/1279
Use prefix: Select this option to specify a prefix (up to 4 characters) that will be prepended tothe names of the imported tags. It is useful to differentiate the imported tags from the tagscreated manually.
InduSoft Web Studio v7.0 Technical ReferenceCopyright © 2003–2010 Indusoft, Inc.

8/22/2019 User Guide Indu Soft
http://slidepdf.com/reader/full/user-guide-indu-soft 221/1279
Importing from OPC ServerDatabases
This wizard allows you to import tags from either a local OPC Server or a remote one. When youimport tags from the OPC Server, the OPC Client worksheet is automatically created to link the tags,eliminating the need to configure the communication interface between the OPC Client from IWS andthe external OPC Server.
Figure 1. Import OPC Server Database Wizard
Local/Remote: Provide the following options:
Local:Select this option to import tags from an OPC Server installed in the local computer.
Remote:Select this option to import tags from an OPC Server installed in a remote
computer. Type the IP Address (or the host name) of the remote computer where IWS isrunning in the Remote field.
Merge Local and Remote OPC Servers checkbox: If you selected a Remote server, checkthis option to display the list of OPC Servers installed in the local computer and also in theremote computer. Uncheck this checkbox to display only the list of OPC Servers installed in theremote computer.

8/22/2019 User Guide Indu Soft
http://slidepdf.com/reader/full/user-guide-indu-soft 222/1279
Identifier combo-box: Displays the list of available OPC Servers.
Branch: Click on the Browse button (…) to select the branch of the OPC Server from which thetags (items) will be imported. Leave this field blank if you want to import tags from all branchesconfigured in the OPC Server.
Use the item path for the tagname checkbox: Check this option to concatenate the pathname to the item name when importing tags from the OPC Server. Uncheck this option to useonly the item names configured in the OPC Server.
In the grid displayed in Step 3 (Import Wizard on the Home tab of the ribbon) for this Data SourceType, there is an additional field with the label OPC, which displays the name of the items from theOPC Server.
Note: See Steps 1, 2 and 3 of Import Wizard for the settings and fields that are common forall Source Types.
InduSoft Web Studio v7.0 Technical ReferenceCopyright © 2003–2010 Indusoft, Inc.

8/22/2019 User Guide Indu Soft
http://slidepdf.com/reader/full/user-guide-indu-soft 223/1279
Importing from CSV DatabasesThis wizard allows you to import tags from a text file in the CSV (Comma Separated Values) format,or any similar format.
Figure 1. Import CSV Database Wizard
File Name: Press the Browse button to select the text file from which the tags will be imported.
Data Column box: Select a number for each tag property that corresponds to its columnnumber in the import file. For example, if the Tag, Array Size and Type are listed in the second,third and first columns in the import file, respectively, select 2 in Tag, 3 in Array Size and 1 inType. The Tag property (tag name) is mandatory, but the other properties are optional.
For properties that are not included in the text file, select the option Not used. IWS will insertdefaults or leave the field blank, according to the following list:
Array Size:0
Type:Integer
Description:<Blank>
Web Data:Local
Delimiters checkbox: Select the delimiter(s) used in the text file to divide one column from

8/22/2019 User Guide Indu Soft
http://slidepdf.com/reader/full/user-guide-indu-soft 224/1279
another. For a CSV file, the delimiter is Comma (the default). You can select more than onedelimiter at a time, and you can use the Other option to enter a custom delimiter.
Note: See Steps 1, 2 and 3 of Import Wizard for the settings and fields that are common for
all Source Types.
InduSoft Web Studio v7.0 Technical Reference
Copyright © 2003–2010 Indusoft, Inc.

8/22/2019 User Guide Indu Soft
http://slidepdf.com/reader/full/user-guide-indu-soft 225/1279
Importing from ODBC DatabasesThis wizard allows you to import tags from an external SQL Relational Database such as MicrosoftAccess, SQL Server, Oracle, My SQL, Sybase and others, through the ODBC interface.
Figure 1. Import ODBC Database Wizard
Select Data Source button: Click to select the ODBC Data Source Name (DSN) linked to thedatabase from which the tags will be imported. The DSN must have previously been createdwith the Data Sources (ODBC) window (Control Panel > Administrative Tools > Data
Sources [ODBC]). After you select a DSN, the other fields in this window will be populatedautomatically with information from the selected database.
Table combo-box: Select the table that holds the tags in the import database.
Tag combo-box: Select the name of the column that holds the tags in the import database.
Array Size combo-box: Select the name of the column that holds the array size for the tags inthe import database.
Type combo-box: Select the name of the column that holds the tag type in the importdatabase.
Description combo-box: Select the name of the column that holds the tag description in theimport database.

8/22/2019 User Guide Indu Soft
http://slidepdf.com/reader/full/user-guide-indu-soft 226/1279
Web Data combo-box: Select the name of the column that holds the Web Data for the tags inthe import database.
Note: See Steps 1, 2 and 3 of Import Wizard for the settings and fields that are common for
all Source Types.
InduSoft Web Studio v7.0 Technical Reference
Copyright © 2003–2010 Indusoft, Inc.

8/22/2019 User Guide Indu Soft
http://slidepdf.com/reader/full/user-guide-indu-soft 227/1279
Importing from PanelBuilder32Databases
Note: This wizard is sold as an add-on and requires a license to be enabled. Consult yoursoftware for further information.
This wizard allows you to import not only the tags, but also the screens, alarm configuration andcommunication interface from a text file (report) exported by the PanelBuilder32™ software. Usingthis wizard, you can convert PanelView™ program (developed with PanelBuilder32™) into the IWSformat and run them under any platform supported by IWS.
Figure 1.
Import Screens: Check this option to import the graphical screens (including their objects andanimations) to IWS.
Import Comm. Configuration: Check this option to import the communication interface (tagslinked to PLC addresses) to IWS.

8/22/2019 User Guide Indu Soft
http://slidepdf.com/reader/full/user-guide-indu-soft 228/1279
Report File: Press the Browse button to select the name of the text file exported fromPanelBuilder32™ (report printed to a text file).
ControlLogix Only: When importing a program that was configured to exchange data withControlLogix PLCs, IWS can convert the communication interface to Ethernet/IP (ABCIP driver).To do so, type the IP Address of the PLC and its slot number. This information will be used tocreate the communication interface for the imported program. If the original program wasalready configured to use the Ethernet/IP interface, these fields can be left blank, because theIP Address and CPU Slot Number are retrieved from the program file itself.
In the grid displayed in Step 3 for this Data Source Type, there is an additional field with the labelAddress, which displays the tag addresses from the PanelBuilder project.
Tip: Please consult the documentation for this import wizard for detailed information about howto export an program from the *.PBA format to the text (*.TXT) format, using PanelBuilder32™,
and import it into IWS.
Note: See Steps 1, 2 and 3 of Import Wizard for the settings and fields that are common forall Source Types.
Note: IWS does not support some special characters (e.g., [ ] . –) in tag names. When youimport your PaneBuilder database into IWS, these special characters will be converted intounderscores (_).
InduSoft Web Studio v7.0 Technical ReferenceCopyright © 2003–2010 Indusoft, Inc.

8/22/2019 User Guide Indu Soft
http://slidepdf.com/reader/full/user-guide-indu-soft 229/1279
Importing from RSLogix 5000 CSVDatabases
This wizard allows you to import tags from a program for ControlLogix/FlexiLogix PLC developed withRSLogix™ 5000 and exported to a CSV file. When you import tags from the RSLogix™ 5000 CSV file,the ABCIP driver worksheet is automatically created to link the tags imported with the PLC,eliminating the need to configure the communication interface between IWS and the PLC manually.
Figure 1.
PLC Options box: Provides the following options:
Use Full Scope: Select to import the tags using the full scope configured in the PLCprogram.
Do Not Use Scope:Select to ignore the scope of the tags configured in the PLC program.Use Limited Scope:Select to set the number of characters from the Scope that must beused when importing the tags from the PLC program.
PLC IP Address:Type the IP Address of the PLC. This information will be used toconfigure the communication driver worksheets automatically.
CSV File: Click the Browse button to select the CSV file exported by the RSLogix™ 5000 with

8/22/2019 User Guide Indu Soft
http://slidepdf.com/reader/full/user-guide-indu-soft 230/1279
the list of tags configured in the PLC program.
L5K File: Click the Browse button to select the L5K file saved by the RSLogix™ 5000 with thelist of UDT (User Defined Type) tags configured in the PLC program. This file is optional for thewizard. However, if this file is not selected, the UDT tags will not be imported.
Create class tags when suitable: Check this checkbox to create tags and classes for UDTtags imported from the PLC program. Uncheck this checkbox to import tags as single tags(rather than class type) from the PLC program.
In the grid displayed in Step 3 (Importing a Database) for this Data Source Type, there is anadditional field with the label Address, which displays the name of the items from the RSLogix™program.
Note: See Steps 1, 2 and 3 of Import Wizard for the settings and fields that are common forall Source Types.
InduSoft Web Studio v7.0 Technical ReferenceCopyright © 2003–2010 Indusoft, Inc.

8/22/2019 User Guide Indu Soft
http://slidepdf.com/reader/full/user-guide-indu-soft 231/1279
Importing from OMRON CXProgrammer Databases
Note: This import wizard creates the communication driver for the OMRON communicationdriver, which is enabled only for customers that purchase the product directly from OMRON.Consult your software vendor for further details. Moreover, the OMRON communication drivercommunicates with the OMRON PLCs by the FINS Gateway, which is supported for the Windows2000/XP operating systems. Therefore, the FINS Gateway must be installed on the computer toenable communication between IWS and the PLCs through the OMRON driver.
This wizard allows you to import tags from a program for OMRON PLCs developed with CXProgrammer and exported to a CXT file. When importing tags from the CX Programmer CXT file, theOMRON driver worksheet is automatically created to link the tags imported with the PLC, eliminatingthe need to configure the communication interface between IWS and the PLC manually.
Figure 1.
Prefix: This box allows you to concatenate one of the following types of prefixes to the tagsimported from the CX Programmer program:

8/22/2019 User Guide Indu Soft
http://slidepdf.com/reader/full/user-guide-indu-soft 232/1279
Custom: Check this option to concatenate a custom prefix with up to 8 characters to thename of the imported tags.
PLC: Check this option to concatenate either the PLC name or the PLC Number to thename of the imported tags.
Program: Check this option to concatenate either the Program name or the ProgramNumber to the name of the imported tags.
Serial Auto Address: This area allows you to configure the Network Address and the Initial
Node Address for the PLCs configured in the product with Serial communication (if any):
Network Address: This setting will be applied to all PLCs configured in the project withSerial communication.
Node Address: This setting will be applied to the first PLC configured in the project withSerial communication. This setting will be incremented and applied to subsequent PLCsconfigured in the product with Serial communication.
CXT File: Click the Browse button to select the CXT file, exported by CX Programmer, fromwhich the tags will be imported.
In the grid displayed in Step 3 for this Data Source Type, there is an additional field with the labelAddress, which displays the name of the tags from the CX Programmer program.
Note: See Steps 1, 2 and 3 of Import Wizard for the settings and fields that are common forall Source Types.
InduSoft Web Studio v7.0 Technical ReferenceCopyright © 2003–2010 Indusoft, Inc.

8/22/2019 User Guide Indu Soft
http://slidepdf.com/reader/full/user-guide-indu-soft 233/1279
Importing from TwinCAT PLCDatabases
This wizard allows you to import database variables from a TwinCAT PLC program that has beendeveloped with Beckhoff's TwinCAT software. Also, when you run the import, IWS automaticallycreates and configures a TWCAT driver worksheet, eliminating the need to manually configure thecommunication between IWS and TwinCAT.
Note: Please refer to Step 2 of the Import Wizard instructions for settings that are common toall sources.
Figure 1. Import TwinCAT PLC Database Wizard
The Import TwinCAT PLC Database Wizard dialog allows you to configure the following settings:
AMS Net ID: Enter the AMS Net ID of the TwinCAT PLC that you want to communicate with.For example: 5.0.112.206.1.1
TCP Port: Select the port on which the PLC's runtime system has been configured to run. Youcan select one of the standard ports (e.g., 801, 811, 821 or 831), or enter a custom portnumber.

8/22/2019 User Guide Indu Soft
http://slidepdf.com/reader/full/user-guide-indu-soft 234/1279
Symbol File: Click the Browse button to select the TwinCAT symbol file (.SYM or .TPY) thatcontains the variables to be imported. For more information, please see "Exporting the SymbolFile from TwinCAT" below.
You are now ready to import the variables into IWS. Return to Step 3 of the Import Wizard.
Exporting the Symbol File from TwinCAT
The TwinCAT development software automatically exports the program database to a "symbol file"every time you rebuild your TwinCAT project. However, TwinCAT exports the entire database bydefault, including many system and library variables that IWS cannot import. Before you run theimport wizard, you must reconfigure your TwinCAT project options to export only the POUs andGlobal Variables and then rebuild your TwinCAT project to generate a fresh symbol file.
Note: As of version 2.8, the TwinCAT development software exports the symbol file in both .SYM
and .TPY formats:
.SYM is a legacy format that is included for backward compatibility. Beckhoff recommendsthat it be used only with TwinCAT OPC Server.
.TPY is a new, XML-based format that should be used in all other situations, includingimporting into IWS.
To reconfigure your project options and generate a fresh symbol file:
Open your TwinCAT project using the TwinCAT development software.1.
Choose Project > Options from the menu bar. The Options window is displayed.2.
Select Symbol configuration from the Category list:
Figure 2. Selecting "Symbol configuration"
3.

8/22/2019 User Guide Indu Soft
http://slidepdf.com/reader/full/user-guide-indu-soft 235/1279
Click (check) the Dump symbol entries option.4.
Click the Configure symbol file… button. The Set object attributes dialog is displayed.5.
For the sake of expediency, you should first disable the export of all objects and then reenableonly the objects that you want to export to IWS — typically, the POUs and Global Variables.Select all of the objects in the tree and uncheck all options for them at the bottom of the dialog.For example:
Figure 3. Configuring the symbol file
6.

8/22/2019 User Guide Indu Soft
http://slidepdf.com/reader/full/user-guide-indu-soft 236/1279
Note: You may need to check Export variables of object in order to activate the othercheckboxes and then uncheck them.
Reselect only the POUs and Global Variables that you want to export to IWS. Do not select
libraries. With the objects selected, check all of the options at the bottom of the dialog. Forexample:
Figure 4.
7.

8/22/2019 User Guide Indu Soft
http://slidepdf.com/reader/full/user-guide-indu-soft 237/1279
Click OK to close the Set object attributes dialog, and then click OK again to close the Optionswindow.
8.
Choose Project > Rebuild All from the menu bar. The system will rebuild the project,
generating a symbol file that contains the desired POUs and Global Variables .
9.
InduSoft Web Studio v7.0 Technical ReferenceCopyright © 2003–2010 Indusoft, Inc.

8/22/2019 User Guide Indu Soft
http://slidepdf.com/reader/full/user-guide-indu-soft 238/1279
Importing from PanelMate PlusDatabases
Note: This wizard is sold as an add-on and requires a license to be enabled. Consult yoursoftware vendor for further information.
This wizard allows you to import not only the tags, but also the screens, alarm configuration andcommunication interface from a project created with PanelMate Plus™ software. Using this wizard,you can convert a PanelMate™ program (developed with PanelMate Plus™) into the IWS format andrun it under any platform supported by IWS.
Figure 1.
Import Screens: Check this option to import the graphical screens (including their objects and
animations) to IWS.
PanelMate Model: Press the Browse button to select the directory where the database files of the PanelMate Plus project that you intend to import are stored.
Application: After selecting the correct path on the PanelMate Model field, the programsavailable in this directory will be available in this combo-box. Select the program that you intendto import before pressing the Next button.

8/22/2019 User Guide Indu Soft
http://slidepdf.com/reader/full/user-guide-indu-soft 239/1279
Tip: Please consult the documentation for this import wizard for detailed information about howto export an program from the PanelMate Plus™ software into IWS.
Note: See Steps 1, 2 and 3 of Import Wizard for the settings and fields that are common forall Source Types.
InduSoft Web Studio v7.0 Technical ReferenceCopyright © 2003–2010 Indusoft, Inc.

8/22/2019 User Guide Indu Soft
http://slidepdf.com/reader/full/user-guide-indu-soft 240/1279
Integrating the project databasewith a TwinCAT PLC
More than simply importing the tags and interface from a TwinCAT program, you can fully integrateyour project database with a running TwinCAT PLC so that tags are synchronized between thesystems, without the extra configuration required by an OPC Client worksheet.
Before you can integrate with a TwinCAT PLC, you must do the following:
Make sure the PLC is running and available on your network, and then note its AMS Net ID andruntime system port number; and
Export a new symbol file (*.TPY) from the TwinCAT development application containing only the
program variables that your project can use, and then copy the file to a location where the IWSdevelopment application can access it. (Typically, you should copy the symbol file to yourproject folder.) For more infomation, see Exporting the Symbol File from TwinCAT.
On the Project tab of the ribbon, in the Settings group, click Communication. The ProjectSettings dialog is displayed, with the Communication tab selected.
1.
In the Tag Integration area, click Add. The Tag Integration Source dialog is displayed.
Figure 1. Tag Integration Source dialog
2.
In the Type list, select Integrated if it's not already selected.3.
In the Provider list, select TwinCAT if it's not already selected.4.
In the Name box, type a name for the source. This name will be used as a prefix for all tagsreceived from the source. For example, a TwinCAT PLC tag named switch1 would subsequentlybe named DEV_switch1 in your project.
5.
Click Add. The TwinCAT Interface Configuration dialog is displayed.6.

8/22/2019 User Guide Indu Soft
http://slidepdf.com/reader/full/user-guide-indu-soft 241/1279
Figure 2. TwinCAT Interface Configuration dialog
In the AMS Net ID box, type the AMS Net ID of the TwinCAT PLC that you want tocommunicate with. For example: 5.0.112.206.1.1.
7.
Select the port number on which the TwinCAT runtime system has been configured to run.8.
To the right of the Symbol File box, click Browse. A standard Open dialog is displayed.9.
Use the Open dialog to locate and select the TwinCAT symbol file (*.TPY).10.
Click OK to close the Open dialog.11.
Click OK to close the TwinCAT Interface Configuration dialog.12.
The integrated tags are listed in the Shared Database folder. They can be used in your project likenormal tags, and they will be synchronized between the systems during project runtime.
InduSoft Web Studio v7.0 Technical ReferenceCopyright © 2003–2010 Indusoft, Inc.

8/22/2019 User Guide Indu Soft
http://slidepdf.com/reader/full/user-guide-indu-soft 242/1279
Screens and GraphicsThe most basic function performed by IWS is to provide a window into the process. The ability todisplay the status of the process by interacting with instrumentation (or computers), is described asthe Human-Machine Interface (HMI).
IWS allows you to create projects that can monitor processes using high-resolution color screens.
The IWS graphic tools consist of two modules:
The Screen/Worksheet Editor in the IWS development environment (used to create or importgraphics); and
The runtime project Viewer .
You can use animations to create dynamic graphic objects or symbols. Animations cause objects andsymbols to change appearance to reflect changes in the value of a tag or an expression. Each screen
is an association of static and animated objects.
Screens can have an optional bitmap that acts as a background in the object window. On thefollowing screen for example, the static images can be part of a bitmap in the background object andobjects with animation in the animation object layer can reflect the changes in the plant, giving theillusion that the screen is three-dimensional.
Figure 1. Sample CEView Emulation Screen
All IWS configuration tasks require a Windows-compatible pointing device, such as a mouse or touch
pad. You can run a project in the Viewer without a pointing device if you configure keypad orkeyboard keys for all commands.
Graphics tab
The Graphics tab of the Project Explorer contains all of the screens, screen groups, and

8/22/2019 User Guide Indu Soft
http://slidepdf.com/reader/full/user-guide-indu-soft 243/1279
symbols in your project.
Format tab
The Format tab of the ribbon is used to format and arrange objects in a project screen.
InduSoft Web Studio v7.0 Technical ReferenceCopyright © 2003–2010 Indusoft, Inc.

8/22/2019 User Guide Indu Soft
http://slidepdf.com/reader/full/user-guide-indu-soft 244/1279
Screens and Graphics > Graphics tab >
Screens folderThe Screens folder is located in the Graphics tab of the Project Explorer. It contains all of yourScreen worksheets, both completed and still in development.
To create a new Screen worksheet, do one of the following:
On the Insert tab of the ribbon, in the Graphics group, click Screen;
Right-click the Screens folder in the Project Explorer, and the click Insert on the shortcutmenu; or
Click the Application button, click New on the Application menu, click the File tab in the Newdialog, select Screen from the list of worksheet types, and then click OK.
When a Screen worksheet is opened for the first time, the Screen Attributes dialog for that worksheetis automatically displayed. For more information, see Screen Attributes dialog.
To open an existing Screen worksheet, expand the Screens folder and then double-click theworksheet.
Screen Attributes dialog
The Screen Attributes dialog is used to configure runtime settings — such as size, location, titlebar, security level, and screen logic — for a specific project screen.
Modifying a screen's background color or image
A project screen can have either a solid background color or an editable background image.
Parent topic: Graphics tabInduSoft Web Studio v7.0 Technical ReferenceCopyright © 2003–2010 Indusoft, Inc.

8/22/2019 User Guide Indu Soft
http://slidepdf.com/reader/full/user-guide-indu-soft 245/1279
Screens and Graphics > Graphics tab > Screens folder >
Screen Attributes dialogThe Screen Attributes dialog is used to configure runtime settings — such as size, location, title bar,security level, and screen logic — for a specific project screen.
Accessing the dialog
The Screen Attributes dialog is automatically displayed when you add a new Screen worksheet.
You can also access the dialog for an existing Screen worksheet (assuming the worksheet is open forediting) by doing one of the following:
On the Graphics tab of the ribbon, in the Screen group, click Attributes; or
Right-click anywhere in the Screen worksheet and then click Screen Attributes on the shortcutmenu.
The dialog in detail
Figure 1. Screen Attributes dialog
Table 1. Elements in Screen Attributes dialog

8/22/2019 User Guide Indu Soft
http://slidepdf.com/reader/full/user-guide-indu-soft 246/1279
Area / Element Name Description
Description A brief description of the project screen. This is notshown anywhere during runtime.
BackgroundPicture EnableBackground Enables the background picture layer and specifiesthe file type of the picture.
When this option is selected, a new BMP file with thesame name as the screen is automatically saved inthe Screen sub-folder of your project folder (e.g.,\ project_name\Screen\screen_name.BMP). You can
then edit this image using a third-party image editor.For more information, see Changing a screen'sbackground color or image.
SharedImage Uses the specified image file located in the Screensub-folder of your project folder.
If you want to specify a tag/expression that providesthis value, so that you can programmatically change
the value during runtime, then the tag/expressionmust be enclosed in curly brackets. For example:{myTag}
Do not include the extension in the file name. If thefile format is not BMP, then use the list to the right of the Enable Background option above to select the
correct format.
Note: Only BMP files are supported in projectsdeveloped for Windows Embedded target systems.
Size Width The default width of the screen (in pixels) when it is
initially displayed.
The user can change the size during runtime if thescreen is set to be resizable; see Border below.
Height The default height of the screen (in pixels) when it isinitially displayed.
The user can change the size during runtime if thescreen is set to be resizable; see Border below.
Location Top The default distance (in pixels) between the top of the computer display and the top of the screen when
the screen is initially displayed.
The user can change the location during runtime if the screen is set to have a border and title bar; seeBorder below.
Left The default distance (in pixels) between the left side

8/22/2019 User Guide Indu Soft
http://slidepdf.com/reader/full/user-guide-indu-soft 247/1279
Area / Element Name Description of the computer display and the left side of thescreen when the screen is initially displayed.
The user can change the location during runtime if the screen is set to have a border and title bar; seeBorder below.
Security The minimum security level that a user must have toaccess this screen.
Hide Keeps the screen loaded in memory after it is calledthe first time, so that it opens more quickly everytime thereafter. Any user action or system processthat would close the screen in fact only hides it.
CAUTION:
This option should be selected only for critical
screens that must open quickly. If too many
screens are kept in memory, then overall
project performance will be affected.
RuntimeProperties Style The general runtime behavior of the screen:
Overlapped
Opens the screen without closing any otherscreens.
Popup
Forces the screen in front of all other screensbut does not close them.
Replace (Partial)Opens the screen and closes all other Replaceand Popup screens.
This is the default.
Dialog
Similar to Popup except that the other screensare also disabled until the dialog is closed.
Replace (Complete)
Similar to Replace (Partial) except that italso closes Overlapped and Dialog screens.
Border The type of border around the screen:
None
No border; the screen is a flat, immovablerectangle on the computer display.

8/22/2019 User Guide Indu Soft
http://slidepdf.com/reader/full/user-guide-indu-soft 248/1279
Area / Element Name Description
This is the default.
Thin
A thin border that makes the screen a movablewindow. Includes title bar.
ResizingA thick border that makes the screen amovable, resizable window. Includes title bar.
Titlebar Shows the window's title bar with the specifiedwindow name.
If you want to specify a tag/expression that providesthis value, so that you can programmatically changethe value during runtime, then the tag/expressionmust be enclosed in curly brackets. For example:{myTag}
Tip: It is useful to specify a window name even whenthe title bar is not shown, because when the screen isprinted, the window name is included in the pageheader.
SystemMenu Provides a menu of basic window commands at the
left end of the title bar.
MaximizeBox Shows the Maximize button at the right end of thetitle bar.
MinimizeBox Shows the Minimize button at the right end of thetitle bar.
Don'tRedraw While this tag/expression evaluates as TRUE, thescreen's graphics are not updated.
DisableCommands While this tag/expression evaluates as TRUE, the
screen is locked against user interaction but thegraphics continue to be updated.
ScreenLogic OnOpen Lists expressions to be evaluated once when thescreen is opened, similar to a Math worksheet.
WhileOpen Lists expressions to be continuously evaluated whilethe screen is open, similar to a Math worksheet.
If you also configure a tag/expression in Trigger,then instead of being continuously evaluated, thelisted expressions will be evaluated once each timethe value of the trigger changes while the screen isopen.

8/22/2019 User Guide Indu Soft
http://slidepdf.com/reader/full/user-guide-indu-soft 249/1279
Area / Element Name Description
OnClose Lists expressions to be evaluated once when thescreen is closed, similar to a Math worksheet.
Focus Receive Focus on
Open
When the screen is opened, the focus willautomatically go to the first object in the screen(according to Object ID) that can receive focus, as if
the user tabbed into the screen.Share Tab Order
with Other Screens
When the user tabs through the last object in thescreen, the focus will go to the next open screen(according to Tab Order below) rather than back tothe first object in the current screen.
TabOrder Similar to Object ID for screen objects, thisdetermines the tab order between screens whenmultiple screens are open. When the user tabsthrough the last object in a screen, the focus will goto the open screen with the next higher Tab Ordernumber.
Each screen should have a unique Tab Order numberbetween 0 and 32767.
Parent topic: Screens folderInduSoft Web Studio v7.0 Technical ReferenceCopyright © 2003–2010 Indusoft, Inc.

8/22/2019 User Guide Indu Soft
http://slidepdf.com/reader/full/user-guide-indu-soft 250/1279
Screens and Graphics > Graphics tab > Screens folder >
Modifying a screen's backgroundcolor or imageA project screen can have either a solid background color or an editable background image.
Selecting a screen's background color
By default, a newly created project screen has a solid white background. To change this backgroundcolor:
Make sure the screen file is open for editing.1.
On the Graphics tab of the ribbon, in the Screen group, click Background Color. A standard
color picker is displayed as a shortcut menu.
2.
Use the color picker to select a color. The color is applied to the entire project screen.3.
Tip: If you want to set a background color for only part of a screen, draw a shape object andthen send it to the back.
Enabling a screen's background image
To enable the background image for a screen and then edit it:
Make sure the screen file is open for editing.1.
On the Graphics tab of the ribbon, in the Screen group, click Attributes.The Screen Attributesdialog is displayed.
2.
Select the Enable Background option. A new BMP file with the same name as the screen isautomatically saved in the Screen sub-folder of your project folder (e.g.,\ project_name\Screen\screen_name.BMP).
3.
Click OK to close the Screen Attributes dialog.4.
On the Graphics tab of the ribbon, in the Screen group, click Background Image. Microsoft
Paint is started and the BMP file is opened for editing.
5.
Use Paint to edit the background image as needed.6.
Specifying an existing image file as the background
To select an existing image file, especially if it's in a format other than BMP:
Copy the image file that you want to use to the Screen sub-folder of your project folder.1.
In the development application, make sure the screen file is open for editing.2.

8/22/2019 User Guide Indu Soft
http://slidepdf.com/reader/full/user-guide-indu-soft 251/1279
On the Graphics tab of the ribbon, in the Screen group, click Attributes.The Screen Attributesdialog is displayed.
3.
Select the Enable Background option.4.
Select the Shared Image option, and in the box, type the name of the image file. Do notinclude the file extension.
5.
In the list to the right of the Enable Background option, select the graphics format of theimage file.
Note: Only BMP files are supported in projects developed for Windows Embedded targetsystems.
6.
Click OK to close the Screen Attributes dialog. If the development application can find and loadthe specified file, then it will be shown in the screen. If not, then a warning message will bedisplayed.
7.
Parent topic: Screens folderInduSoft Web Studio v7.0 Technical ReferenceCopyright © 2003–2010 Indusoft, Inc.

8/22/2019 User Guide Indu Soft
http://slidepdf.com/reader/full/user-guide-indu-soft 252/1279
Screens and Graphics > Graphics tab >
Screen Group FolderThe Screen Group folder combines individual screens from the Screens folder into more manageablegroups.
To open a specific screen group, open the Screen Group folder and right-click on the subfolder.
To remove a specific screen group, right-click on its subfolder and click the prompt screen to delete.
To create a new screen group:
On the Insert tab of the ribbon, in the Graphics group, click Screen Group to open the InsertScreen Group dialog:
Figure 1. Insert a Screen Group dialog
1.
Type a name for the new folder into the Name field.2.
Create a group of screens for this folder by selecting screens from the List of screens list. Toselect multiple screens press the Ctrl key as you click on the screen names. Release the Ctrl
key when you finish.
This list contains only those screens currently located in Screens folder.
3.
Click OK to close the Insert Screen Group dialog.4.
Parent topic: Graphics tabInduSoft Web Studio v7.0 Technical ReferenceCopyright © 2003–2010 Indusoft, Inc.

8/22/2019 User Guide Indu Soft
http://slidepdf.com/reader/full/user-guide-indu-soft 253/1279
Screens and Graphics > Graphics tab >
Web Pages FolderIWS also enables you to save screens in the HTML format. You cannot create the HTML pages contained iWeb folder directly; instead they are generated from pre-existing screens.
To create an HTML page, you must first create a screen. Configure a screen as you usually would (createadd properties, and so on) but keep in mind that this screen will become a Web page. Save the screen awhen you finish. Then, with the screen still open, click Save As HTML on the Application menu.
CAUTION:
The Web pages that are generated when you click Save As HTML are independent of the scr
files from which they were generated. Consequently, if you change that screen, the change
not appear on the Web page until you click Save As HTML again.
To view your Web pages during runtime, you must first configure the project settings (Thin Client on th
tab of the ribbon).
Figure 1. Project Settings dialog — Web tab
1.

8/22/2019 User Guide Indu Soft
http://slidepdf.com/reader/full/user-guide-indu-soft 254/1279
Open the dialog and type the IP address (from which to run the project) in the Data Server IP Ad
field.1.
Type a value in the Send Period (ms) field to specify the send period (in milliseconds) used to excdata between the Server and the Thin Client stations.
2.
In the URL field, enter the address of the project file using the following format:3.
http://IP address of the server / path from the server root to the directory containing your Web pages / project na
You can also enter a local file path using the following format:
file:///volume name/ path to the directory containing your Web pages / project name.app
Click (enable) the following checkboxes if applicable:
Disable Remote Client Commandscheckbox: Click (enable) this box to prevent a remote cliissuing commands from your Thin Client to your Server.
Enable ToolTipscheckbox: Click (enable) this box to see Windows ToolTips when viewing the
screens on the Thin Client (browser).
Auto Screen Scalingcheckbox: Click (enable) this box to automatically scale screens displayBrowser window.
Enable this parameter if you are running remotely on a Thin Client, and you want IWS to scaleautomatically when you resize the Browser window.
Enable File Compressioncheckbox: Click (enable) this box to compress the files stored in th
sub-folder of your project folder. This option is useful for reducing download time, particularlyhave a slow connection between your Server and the Thin Client.
4.
Click the IP Security button to open the IP Security dialog (see figure). Use the parameters on thispecify the range of IP addresses for the computers that are allowed to access the project as Thin C
Figure 2. IP Security dialog
5.

8/22/2019 User Guide Indu Soft
http://slidepdf.com/reader/full/user-guide-indu-soft 255/1279
When the Edit pane parameters become active, type IP addesses in the From and To fields to speciaddress range. Use the Add and Remove buttons to move the IP addresses into the IP Address
list. IWS permits the computers listed in this pane to access the project as Thin Clients
To enable logging for the Thin Client, move to the Log pane and click (enable) the Enable checkboa file name into the Filename field to generate a log file on the Thin Client station. You can use thisfor debugging purposes.
6.
Click OK to close the Project Settings dialog.7.
Note: If you change any of the Web information on the Project Settings dialog, you must re-verify thefor the new setting to take effect. To verify the project, click Verify on the Home tab of the ribbon. (If have any windows open in the development system, IWS prompts you close them before you verify thproject).
Also, because the Web pages display information from the project through the Web server, you must brunning the runtime system, Web server, and the TCP/IP server to view your Web pages.
Parent topic: Graphics tabInduSoft Web Studio v7.0 Technical Reference
Copyright © 2003–2010 Indusoft, Inc.

8/22/2019 User Guide Indu Soft
http://slidepdf.com/reader/full/user-guide-indu-soft 256/1279
Screens and Graphics > Graphics tab >
Layout Tool
Click the Layout tool to open the Layout tab.
This interface displays all screens currently open in the Screen Editor and allows you to:
Modify the Screen Attributes: Right-click on the screen displayed on the Layout tab and usethe alignment options or the Screen Attributes link to modify the screen position. You can alsoclick and drag the screen to change its position (Top and Left) or resize it (Width and Height).
Visualize how the screens fit together during runtime. This option is especially usefulwhen creating pop-up/dialog screens or groups of screens.
Note: The screens open in the Layout tab according to the order that they are open in thedevelopment environment. When you change the position of the screen tabs in the developmentenvironment (to the left or to the right), you will change the order in which these screens will be
displayed in the Layout tab.
Tip: Right-click on the title of the Layout tab to display the option to enable/disable the Auto
Scale. If you enable this option, the screens will be auto-scaled automatically to fit in the Layouttab.
Parent topic: Graphics tabInduSoft Web Studio v7.0 Technical ReferenceCopyright © 2003–2010 Indusoft, Inc.

8/22/2019 User Guide Indu Soft
http://slidepdf.com/reader/full/user-guide-indu-soft 257/1279
Screens and Graphics >
EditingThe Editing group (see figure on the left) provides tools for general screen editing.
Figure 1. Editing group
Selection
Disabling drag in a screen
You can disable the dragging of objects in the screen editor, to prevent accidental moves afteryou've layed out the screen exactly as you want it.
Replacing project tags in a document or screen object
Object Properties dialog
This dialog shows the configurable properties of a screen object or animation. Each type of screen object and animation has its specific properties, but all types have a few properties incommon.
Grid Settings
Undo
Format tab
The Format tab of the ribbon is used to format and arrange objects in a project screen.
Parent topic: Screens and GraphicsInduSoft Web Studio v7.0 Technical ReferenceCopyright © 2003–2010 Indusoft, Inc.

8/22/2019 User Guide Indu Soft
http://slidepdf.com/reader/full/user-guide-indu-soft 258/1279
Screens and Graphics > Editing >
SelectionOn the Graphics tab of the ribbon, in the Editing group, click Selection to display a mouse cursorthat you can use to select and move objects on the screen.
Parent topic: EditingInduSoft Web Studio v7.0 Technical ReferenceCopyright © 2003–2010 Indusoft, Inc.

8/22/2019 User Guide Indu Soft
http://slidepdf.com/reader/full/user-guide-indu-soft 259/1279
Screens and Graphics > Editing >
Disabling drag in a screenYou can disable the dragging of objects in the screen editor, to prevent accidental moves after you'velayed out the screen exactly as you want it.
On the Graphics tab of the ribbon, in the Editing group, click Disable Drag.Parent topic: EditingInduSoft Web Studio v7.0 Technical ReferenceCopyright © 2003–2010 Indusoft, Inc.

8/22/2019 User Guide Indu Soft
http://slidepdf.com/reader/full/user-guide-indu-soft 260/1279
The Development Environment >Screens and Graphics > Editing >
Object Properties dialogThis dialog shows the configurable properties of a screen object or animation. Each type of screenobject and animation has its specific properties, but all types have a few properties in common.
Accessing the dialog
To access the Object Properties dialog for a specific screen object, do one of the following:
Select the screen object, and then on the Graphics tab, in the Editing group, clickProperties;
Select the screen object, and then press Alt+Enter;
Right-click the screen object, and then click Properties on the shortcut menu; or
Double-click the screen object.
The dialog in detail
All Object Properties dialogs contain the following elements:
Area / Element Name Description
PushpinWhen the pin button is released, the focus is passed to the objecton the screen as soon as that object is selected. When the pinbutton is pressed, the focus is kept on the Object Properties
window even when you click the objects on the screen.
Replace Launches the Replace dialog, where you can replace strings, tagsor properties for the selected object or group of objects.
Hint Tooltip displayed during runtime, when the user hovers the mousecursor over the object. This can be used to provide quick-help tothe user.
The text in the Hint field is also temporarily written to the Hint
system tag, so that you can trigger actions based on the value of this tag when the mouse cursor is moved over a specific object.
To show hints/tooltips during runtime, the Enable Tooltip optionmust be selected in the Project Settings dialog. You canenable/disable this feature separately for full project viewers(Viewer on the Project tab of the ribbon) and for thin clients(Thin Client on the Project tab of the viewer).

8/22/2019 User Guide Indu Soft
http://slidepdf.com/reader/full/user-guide-indu-soft 261/1279
Area / Element Name Description
The combo-box at the right side of the dialog allows you to selectthe specific object, group of objects, or animation that must beedited.
Parent topic: The Development Environment
Parent topic: EditingInduSoft Web Studio v7.0 Technical Reference
Copyright © 2003–2010 Indusoft, Inc.

8/22/2019 User Guide Indu Soft
http://slidepdf.com/reader/full/user-guide-indu-soft 262/1279
Screens and Graphics > Editing >
Grid SettingsTo show/hide the grid in the screen editor, click Grid Settings on the Graphics tab of the ribbon andthen click View Gridlines on the shortcut menu.
To edit the grid settings, do one of the following:
Click Grid Settings on the Graphics tab of the ribbon and then click Grid Settings on theshortcut menu; or
Right-click anywhere in the screen editor and then click Grid Settings on the shortcut menu.
Either method will open the Grid Settings dialog:
Figure 1. Grid Settings dialog
Parent topic: EditingInduSoft Web Studio v7.0 Technical ReferenceCopyright © 2003–2010 Indusoft, Inc.

8/22/2019 User Guide Indu Soft
http://slidepdf.com/reader/full/user-guide-indu-soft 263/1279
Screens and Graphics > Editing >
UndoSelect Undo to cancel the last action performed (and up to 20 actions taken prior to the last action)while working on a screen. (Object Properties actions do not increase Undo steps.)
Note: Using the Undo menu option is the same as using Undo tool located on the Standardtoolbar.
Parent topic: EditingInduSoft Web Studio v7.0 Technical ReferenceCopyright © 2003–2010 Indusoft, Inc.

8/22/2019 User Guide Indu Soft
http://slidepdf.com/reader/full/user-guide-indu-soft 264/1279
Screens and Graphics >
ShapesThe Shapes group provides the following tools, which you can use to create polygons, rectangles,lines, and other objects for your screen.
Figure 1. Shapes group
Line object
Open Polygon object
Closed Polygon object
Rectangle object
Rounded Rectangle object
Ellipse object
Parent topic: Screens and GraphicsInduSoft Web Studio v7.0 Technical ReferenceCopyright © 2003–2010 Indusoft, Inc.

8/22/2019 User Guide Indu Soft
http://slidepdf.com/reader/full/user-guide-indu-soft 265/1279
Screens and Graphics > Shapes >
Line object
On the Graphics tab, in the Shapes group, click Line to draw an orthogonal line in the drawingarea, as follows:
Click the left mouse button to set the starting point of the line.1.
Drag the cursor to adjust the line size.2.
Click again to place the object.3.
To view the object properties, double-click on the object. The Object Properties dialog displaysas follows.
Figure 1. Object Properties: Line
4.
Use the Object Properties dialog to specify the following parameters for the orthogonal line:
Line: Specify a line style by clicking the No Line, Solid Line, or Dashed Line button.
Color: Specify a line color by clicking the Color button. When the Color dialog opens, click acolor to select it and then close the dialog.
Weight: Specify the line width (in pixels) by typing a number representing the line width intothe text box.
Parent topic: Shapes
Related information
Open Polygon objectClosed Polygon object
Rectangle objectRounded Rectangle objectEllipse object
InduSoft Web Studio v7.0 Technical ReferenceCopyright © 2003–2010 Indusoft, Inc.

8/22/2019 User Guide Indu Soft
http://slidepdf.com/reader/full/user-guide-indu-soft 266/1279
Screens and Graphics > Shapes >
Open Polygon objectOn the Graphics tab, in the Shapes group, click Open Polygon to draw an open polygon with aborder in the specified foreground color.
To draw an open polygon in the drawing area:
Click the left mouse button to set the starting point of the polygon.1.
Move the cursor to a new location and click again to place the second vertex.2.
Repeat this process until you create the desired polygon shape.3.
Double-click to stop drawing the polygon.
To change the shape of a polygon after you've drawn it, select it and drag any of its points.
Tip: If a polygon's individual points are not draggable, they may be grouped. To ungroupthe points, right-click on the polygon and choose Ungroup from the shortcut menu.
To view the object properties, double-click on the polygon object and the Object Propertiesdialog is displays as follows.
Figure 1. Object Properties: Open Polygon
4.
Use the Object Properties dialog to specify the following parameters for the polygon:
Line: Specify a border line style by clicking the No Line, Solid Line, or Dashed Line button.
Color: Specify a border line color by clicking the Color button. When the Color dialog opens,click on a color to select it and then close the dialog.
Weight: Specify the borderline width (in pixels) by typing a number representing the line widthinto the text box.
Parent topic: Shapes
Related information
Line object

8/22/2019 User Guide Indu Soft
http://slidepdf.com/reader/full/user-guide-indu-soft 267/1279
Closed Polygon objectRectangle objectRounded Rectangle objectEllipse object
InduSoft Web Studio v7.0 Technical ReferenceCopyright © 2003–2010 Indusoft, Inc.

8/22/2019 User Guide Indu Soft
http://slidepdf.com/reader/full/user-guide-indu-soft 268/1279
Screens and Graphics > Shapes >
Closed Polygon objectOn the Graphics tab, in the Shapes group, click Closed Polygon to draw a closed polygon, using aborder in the specified foreground color.
To draw a closed polygon in the drawing area:
Click the left mouse button to set the starting point of the polygon.1.
Move the cursor to a new location and click again to place the second point.2.
Repeat this process until you create the desired polygon shape.3.
Double-click or right-click to stop drawing the polygon.4.
To view the object properties, double-click on the polygon object.
To change the shape of a polygon after you've drawn it, select it and drag any of its points.
Tip: If a polygon's individual points are not draggable, they may be grouped. To ungroupthe points, right-click on the polygon and choose Ungroup from the shortcut menu.
The Object Properties dialog is displays as follows.
Figure 1. Object Properties Dialog: Closed Polygon
5.
Use the Object Properties dialog to specify the following parameters for the polygon:
Line: Specify a border line style by clicking the No Line, Solid Line, or Dashed Line button.
Color: Specify a border line color by clicking the Color button. When the Color dialog opens,click a color to select it and then close the dialog.
Weight: Specify the borderline width (in pixels) by typing a number representing the line widthinto the text box.
Fill: To specify whether the polygon is filled, click No Fill or Fill.
If you enable the Fill option, you can specify a fill Color by clicking on the Color button. Whenthe Color dialog displays, click a color to select it and close the dialog.

8/22/2019 User Guide Indu Soft
http://slidepdf.com/reader/full/user-guide-indu-soft 269/1279
Parent topic: Shapes
Related information
Line objectOpen Polygon objectRectangle objectRounded Rectangle objectEllipse object
InduSoft Web Studio v7.0 Technical ReferenceCopyright © 2003–2010 Indusoft, Inc.

8/22/2019 User Guide Indu Soft
http://slidepdf.com/reader/full/user-guide-indu-soft 270/1279
Screens and Graphics > Shapes >
Rectangle object
On the Graphics tab, in the Shapes group, click Rectangle to create rectangles, as follows:
Click in the drawing area and drag the mouse/cursor to draw the rectangle.1.
Release the mouse button when the rectangle is the size you want.2.
Double-click on the object to view the Object Properties dialog.
Figure 1. Object Properties: Rectangle
3.
Use the Object Properties dialog to specify the following parameters for the orthogonal line:
Type: Specify a border line style by clicking on None, Solid, Dashed, Etched, Raised orSunken.
Color: Specify a border line color by clicking the Color button to open the Color dialog. Clickthe color to select it, and then close the dialog.
Weight: Specify a border line width by typing a number representing the line width (in pixels)into the text box provided.
Fill: Specify whether to fill the rectangle by clicking No Fill or Fill.
If you select the Fill option, specify a fill color by clicking on the Color rectangle. When the Colordialog displays, click a color to select it and close the dialog.
Color: Specify a fill color by clicking the Color button to open the Color dialog. Click a color toselect it, then close the dialog.
Caption: Press this button to open the Caption dialog where you can edit the text that can bewritten inside the rectangle object:
Figure 2. Caption dialog

8/22/2019 User Guide Indu Soft
http://slidepdf.com/reader/full/user-guide-indu-soft 271/1279
Caption: Enter the text that you want to display inside the rectangle object. You caninclude a tag by enclosing it in curly brackets (e.g., {tagname}).
Fonts: Specify a font style for the caption by clicking the Fonts button.
Align: Specify the alignment for the caption of the rectangle.
Multiline: Allow the caption of the rectangle to be shown in more than one line, when
checked.
Auto Format: When checked, if the caption includes a decimal value enclosed by curlybrackets (e.g., {1.2345}) or a tag of Real type (see Caption above), then the value will beformatted according to the virtual table created by the SetDecimalPoints function.
Wrap Text: When checked, the object automatically wraps the text when necessary.
Auto gray out: Turns the caption of the rectangle to gray when the Command animationapplied to the rectangle is disabled by the Disable field or due to the Security System.
Enable translation: Click (check) to enable translation during runtime using theTranslation Tool.
Parent topic: Shapes
Related information
Line objectOpen Polygon objectClosed Polygon objectRounded Rectangle object
Ellipse object
InduSoft Web Studio v7.0 Technical Reference
Copyright © 2003–2010 Indusoft, Inc.

8/22/2019 User Guide Indu Soft
http://slidepdf.com/reader/full/user-guide-indu-soft 272/1279
Screens and Graphics > Shapes >
Rounded Rectangle object
On the Graphics tab, in the Shapes group, click Rounded Rectangle to draw rounded rectangles(empty or filled), as follows:
Click in the drawing area and drag the mouse/cursor to create the rectangle.1.
Release the mouse button to stop drawing the object.2.
Double-click on the object to view the Object Properties dialog.
Figure 1. Object Properties: Rounded Rectangle
3.
Note: You cannot use the rounded rectangle tool to create a bar graph for projects running onWindows Embedded target systems.
Tip: A rounded rectangle has one extra handle in the bottom-right corner, which enables you tomodify the arc angle.
Use the Object Properties dialog to specify the following parameters for the orthogonal line:
Line: Specify a borderline style by clicking the No Line, Solid Line, or Dashed Line button.
Color: Specify a borderline color by clicking the Color button to open the Color dialog. Click thecolor to select it and then close the dialog.
Weight: Specify a borderline width by typing a number representing the line width (in pixels)into the text box provided.
Fill: Specify whether the rectangle is filled by clicking No Fill or Fill.
If you select the Fill option, specify a fill color by clicking on the Color button. When the Colordialog displays, click a color to select it and close the dialog.
Color: Specify a fill color by clicking the Color button to open the Color dialog. Click a color toselect it, then close the dialog.
Caption: This option is not enabled for this object.

8/22/2019 User Guide Indu Soft
http://slidepdf.com/reader/full/user-guide-indu-soft 273/1279
Parent topic: Shapes
Related information
Line objectOpen Polygon objectClosed Polygon objectRectangle objectEllipse object
InduSoft Web Studio v7.0 Technical ReferenceCopyright © 2003–2010 Indusoft, Inc.

8/22/2019 User Guide Indu Soft
http://slidepdf.com/reader/full/user-guide-indu-soft 274/1279
Screens and Graphics > Shapes >
Ellipse object
On the Graphics tab, in the Shapes group, click Ellipse to draw ellipses, chords, arcs, and rings(see the following figures).
Figure 1. Ellipse, Chord, Arc, and Ring
Tip: The Ring style is particularly useful when you are creating plumbing drawings.
To create an ellipse, use the following steps:
Click in the drawing area and drag the mouse/cursor to create an ellipse shape.1.
Release the mouse button to stop drawing the ellipse.2.
Use the Object Properties dialog to change the shape to a chord, arc, or ring.3.
Double-click on the object to view the Object Properties dialog.
Figure 2. Object Properties: Ellipse
4.
Use the Object Properties dialog to specify the following parameters for the ellipse:
Style: Specify the object style by selecting Ellipse, Arc, Chord, or Ring from the drop-downlist. Next, select Left-Bottom, Left-Top, Right-Bottom, or Right-Top from the Style list tochoose the quadrant into which the ellipse is drawn.
For example to represent a half-circle pipe, create two Ring objects. Specify one as Left-

8/22/2019 User Guide Indu Soft
http://slidepdf.com/reader/full/user-guide-indu-soft 275/1279
Bottom and the other as Right-Bottom then join the two objects to create a half-pipe.
Fill: To specify whether the ellipse is filled, click No Fill or Fill.
If you select the Fill option, specify a fill color by clicking on the Color button. When the Colordialog displays, click on a color to select it and close the dialog.
Line: Specify a line style for the ellipse border by clicking the No Line, Solid Line, or Dashed
Line button.
Color: Specify the ellipse borderline color by clicking the Color button to open the Color dialog.Click the color to select it, then close the dialog.
Weight: Specify a line width for the ellipse border by typing a number representing the linewidth (in pixels) into the text box provided.
Parent topic: Shapes
Related information
Line objectOpen Polygon objectClosed Polygon objectRectangle objectRounded Rectangle object
InduSoft Web Studio v7.0 Technical ReferenceCopyright © 2003–2010 Indusoft, Inc.

8/22/2019 User Guide Indu Soft
http://slidepdf.com/reader/full/user-guide-indu-soft 276/1279
Screens and Graphics >
Active ObjectsThe Active Objects toolbar provides the following tools, which you can use to create interactiveobjects. Active objects typically require more parameters than simple shapes.
Figure 1. Active Objects group
Text object
Button object
The Button object
Pushbutton object
Check Box object
The Check Box object is useful to create interfaces where the users can enable/disable an optionon the display.
Radio Button objectThe radio button object is useful to create interfaces where the users can chose one option frommultiple options on the display.
Combo Box object
List Box object
Smart Message object
Parent topic: Screens and Graphics
InduSoft Web Studio v7.0 Technical ReferenceCopyright © 2003–2010 Indusoft, Inc.

8/22/2019 User Guide Indu Soft
http://slidepdf.com/reader/full/user-guide-indu-soft 277/1279
Screens and Graphics > Active Objects >
Text object
On the Graphics tab, in the Active Objects group, click Text to create text objects, as follows:
Click in the drawing area. When a cursor displays, you can type a line of text.1.
After entering the text string, double-click on the new text object to view the Object Propertiesdialog.
Figure 1. Object Properties: Text
2.
Use the Object Properties dialog to specify the following properties:
Caption: Specify a text string by typing a caption in the text box.
Text data link button: Click to apply the Text Data Link animation to the Text object.
If the caption doesn't include any placeholder characters (###) for the text-data link, thenclicking this button also automatically appends those characters.
Align: Align the text by selecting Left, Center, or Right from the combo-box.
Fonts: Specify a font style for the text by clicking the Fonts button. When the Fonts dialogdisplays, you can specify the following parameters:
Font (typeface)
Font style
Size
Effects
Color
Script
Border: Specify a text border by clicking the Border box.
To select a border color, click the Color rectangle. When the Color dialog displays, click a colorto select it, then close the dialog.
Background: Specify a background color by clicking the Color button. When the Color dialog

8/22/2019 User Guide Indu Soft
http://slidepdf.com/reader/full/user-guide-indu-soft 278/1279
displays, click a color to select it, then close the dialog.
Enable translation (optional): Specify an external translation file for the text by clicking(checking) this box.
Parent topic: Active Objects
Related information
Button object
Pushbutton objectCheck Box objectRadio Button objectCombo Box objectList Box objectSmart Message object
InduSoft Web Studio v7.0 Technical ReferenceCopyright © 2003–2010 Indusoft, Inc.

8/22/2019 User Guide Indu Soft
http://slidepdf.com/reader/full/user-guide-indu-soft 279/1279
Screens and Graphics > Active Objects >
Button objectThe Button object
On the Graphics tab, in the Active Objects group, click Button to create custom-sized buttons, asfollows:
Click in the drawing area and drag the mouse/cursor to create the button shape.1.
Release the mouse button when the button is the size you want.2.
Double-click on the object to view the Object Properties dialog.
Figure 1. Object Properties: Button
3.
Use the Object Properties dialog to specify the following parameters for the button:
Caption: Specify a caption by typing the text into the text box. You can include a tag byenclosing it in curly brackets (e.g., {tagname}).
Style: Select a style for the button:
3D Sharp: A raised, rounded button with somewhat sharpened corners, suitable for
touchscreen displays.
3D Soft: A raised, rounded button with softened corners, suitable for touchscreendisplays.
OS Like: A button styled to match the operating system on which the project client isrunning, suitable for Windows desktops running the Web Thin Client or Secure Viewer.
Standard: The standard, flat button from the previous versions of IWS.
Figure 2. Examples of button styles

8/22/2019 User Guide Indu Soft
http://slidepdf.com/reader/full/user-guide-indu-soft 280/1279
Background color: Select a background color for the button.
Align: Select the alignment for the caption of the button.
Fonts: Specify a font style for the caption by clicking the Fonts.
When the Fonts dialog is displayed, specify the following parameters:
Font (typeface)
Font style
Size
Effects
Color
Script style
Images: Insert an image file into the button button by clicking the Images button.
When the Images dialog is displayed, specify the following parameters:
File: Type the file path to the image file. You can also click the browse button to the rightof the box, to open a standard Windows file browser.
By default, the image is automatically resized to fit the button. To change this, in the Size
list, select Custom, and then configure the desired Width and Height (in pixels) of theimage.
Alignment: Select which side of the button that the image should be aligned with.
Gap: Specify the gap (in pixels) between the image and the side of the button.
Transparent Color: Select which color in the image should be transparent. Thebackground color (see above) will show through these areas.
Advanced: Specify advanced settings for the button by clicking the Advanced button.
When the Advanced dialog is displayed, specify the following parameters:
Enable translation (optional ): Specify an external translation file for the button label by

8/22/2019 User Guide Indu Soft
http://slidepdf.com/reader/full/user-guide-indu-soft 281/1279
clicking (checking) the box.
Multiline: Allow the caption of the button to be shown in more than one line, whenchecked.
Wrap Text: When checked, the object automatically wraps the text when necessary.
Auto gray out: Turns the caption of the button to gray when the Command animationapplied to the button is disabled by the Disable field or due to the Security System.
Auto Format: When checked, if the caption includes a decimal value enclosed by curlybrackets (e,g, {1.2345}) or a tag of Real type (see Caption above), then the value will beformatted according to the virtual table created by the SetDecimalPoints() function.
Command: Click to automatically apply a Command animation to the button and then switch tothe animation's properties.
Parent topic: Active Objects
Related information
Text objectPushbutton objectCheck Box objectRadio Button objectCombo Box objectList Box objectSmart Message object
InduSoft Web Studio v7.0 Technical ReferenceCopyright © 2003–2010 Indusoft, Inc.

8/22/2019 User Guide Indu Soft
http://slidepdf.com/reader/full/user-guide-indu-soft 282/1279
Screens and Graphics > Active Objects >
Pushbutton objectOn the Graphics tab, in the Active Objects group, click Pushbutton to create a Pushbutton objectusing the Command animation with an object or pre-configured pushbuttons.
IWS provides the following pre-configured button types, all of which mimic the standard panelbuttons of the same name:
Momentary (default): Changes state (Open or Closed) when you press the button and revertsto its initial state when you release the button. This button type always displays in its normalposition when you open the screen.
Maintained: Changes state (Open or Closed) when you press the button but does not revertto its initial state when you release the button. You must press the button again to change itspresent state. This button type maintains its state across screen changes.
Latched: Changes state (Open or Closed) when you press the button and remains in thisstate until you release it by changing the Reset tag.
IWS also provides the following button styles:
Rectangular with a faceplate and indicator light
Rectangular without a faceplate or indicator light (default)
Rectangular with a 3-D
Rectangular with a floating appearance
To add one or more pre-configured buttons to a screen:
Click the Pushbutton tool, and position the mouse (pointer) on the screen.1.
Click and drag to create/adjust the size of the rectangular button.The button size and text font characteristics determine how much text you can display and howmuch area you can touch on a touch screen. You can resize the button and change the fontcharacteristics later to permit longer messages to be shown in a given space.
2.
Double-click on the object to open the Object Properties dialog.
Tip: Alternatively, you can right-click on the pushbutton object or highlight the object,press Alt+Enter, and select Properties from the resulting shortcut menu to open the
Object Properties dialog.
3.
Object Properties: Pushbutton
Figure 1. Object Properties: Pushbutton

8/22/2019 User Guide Indu Soft
http://slidepdf.com/reader/full/user-guide-indu-soft 283/1279
You can use this dialog to specify the following parameters:
Type drop-down list: Click to select the pushbutton type (Momentary (default), Maintained,or Latched).
State drop-down list: Click to specify a default state for the pushbutton (Normally Open
(default) or Normally Closed).
Click the button to toggle between its default and non-default state (according to its specifiedType). For example, in the button's initial state, it may conform to characteristics specified inthe Open area of the Configuration dialog (see below). Click the button again to toggle to theopposite state, which in this example is Closed, and conform to characteristics specified in theClosed area.
Tag/Exp text box: Type a tag or an expression to accomplish the following:
Type in a tag to receive the Write Value from the appropriate state (Open or Closed)area in the Configuration dialog.
Type an expression to execute On Down, when you press the pushbutton down.
Note: IWS does not write the result of any expression in the Tag/Exp field into a tag.
Indicator text box: Type a tag to define an indicator that causes the button to change to aspecified color when the tag value matches one of two specified values. You must define boththe colors and tag values in the Configuration dialog. If you leave this field blank, the indicatorchanges color automatically when you press the button.
E-Sign checkbox: When this option is checked, the user will be prompted to enter the ElectronicSignature before executing the animation.
Reset text box (active for Latched pushbutton type only): Type a tag to control the button's
latched state, as follows:
Type a zero and the button will remain in a latched state after you press it.
Type a nonzero value and a latched button will become unlatched after you press it. You
must reset the tag value to zero before you can press the button again.
Key area: Specify a keyboard key or create a key combination to toggle a pushbutton when youhave no pointing device (mouse or touch screen) or if you want to create shortcut keys inaddition to pushbuttons.
Key drop-down list: Type a key in the text box or select a non-alphanumeric key from the drop-down list. Enter a single character or key only. Numbers are not valid entries for this field.

8/22/2019 User Guide Indu Soft
http://slidepdf.com/reader/full/user-guide-indu-soft 284/1279
Click (check) the Shift, Ctrl, or Alt box to create a combination key, meaning the Shift, Ctrl, orAlt key must be pressed with the key specified in the drop-down list.
Click the browse button … to open the Key Modifier dialog, which enables you to modify your
combination keys. You can choose Left, Right or Left or Right to specify the position on thekeyboard of the Shift, Ctrl or Alt key in the combination key. If you choose Left or Right, thecommand will be executed any time either of these keys is pressed in combination with the keyspecified in the drop-down list.
Disable text box: Type a tag using a nonzero value to disable this pushbutton so that pressingthe button has no effect. This box is empty by default, which also enables the Commandanimation.
Ext Trans. checkbox: Click (check) to translate the text automatically using pre-configuredtranslation worksheets. (See the Translation Tool for more information.)
Security text box: Type a value to specify a security level (0 to 255) for this button. If the userdoes not have the specified security level, the button becomes inactive. If the user has theappropriate security level, or you leave this field blank, the button remains active.
Config button: Click to open the Configuration dialog, which allows you to specify style andstate parameters for the pushbutton:
Figure 2. Configuration dialog
This dialog provides the following parameters:
Style combo-box: Click the combo-box button to select a pushbutton style (Rectangle
(default) or Rectangle with Indicator).Effect combo-box: Click to select a 3-D effect for the pushbutton.
Floating (default): Buttons resemble a flat object with a shadow
3D: Buttons have beveled edges and appear to "depress" into the screen when pressed.
You can use the Style and Effect parameters in combination to create four different buttons, as

8/22/2019 User Guide Indu Soft
http://slidepdf.com/reader/full/user-guide-indu-soft 285/1279
shown in the following figures:
Figure 3. Pushbutton Styles
Align: Specify the alignment for the caption of the pushbutton.
Button Color box: Click to specify a default color for the button area of a pushbutton objectthat includes an indicator and a faceplate. When the Color dialog displays, click on a color toselect it, and close the dialog.
Legend Plate Color box: Click to specify or change a default color for the legend plate area of a pushbutton object that includes an indicator. When the Color dialog displays, click on a colorto select it, and close the dialog.
A legend plate encloses a button and indicator light. This field becomes inactive if the
pushbutton Style does not include an indicator.Open and Closed areas: The following parameters are used to configure the appearance of apushbutton object in its open and closed states.
Color box: Click to specify a default color for an indicator in each State. When the Colordialog displays, click on a color to select it, and close the dialog.
If you selected a pushbutton style that does not include an indicator, you can use this fieldto specify a button color for each State.
Blink combo-box: Click to specify whether the color you specified in the Color box blinksand how fast it blinks for each state (None (no blinking, default ), Slow, and Fast).
If you set the color to blink, it alternates between the color specified in the Color box andthe Legend Plate Color (if an indicator) or the Button Color (if a button).
Caption text box: Use this text box to enter the caption of the button. Alternatively, if thebutton style includes an indicator, the legend plate. You can include a tag by enclosing it incurly brackets (e.g., {tagname}).
Fonts button: Click to open the Font dialog, which you can use to specify or change themessage font characteristics for each state.
Text Blink combo-box: Click to specify whether the text you specified blinks and how fastit blinks for each state (None (no blinking, default ), Slow, and Fast). Unlike a blinkingcolor, blinking text appears and disappears.
Write Value combo-box: Click to select a value in either field. When the pushbutton is inthe appropriate state (Open or Closed), IWS writes this value to the tag specified in theTag/Exp field (Object Properties dialog).
Auto Format: When checked, if the caption includes a decimal value enclosed by curly brackets(e,g, {1.2345}) or a tag of Real type (see Caption above), then the value will be formattedaccording to the virtual table created by the SetDecimalPoints() function.
Parent topic: Active Objects
Related information

8/22/2019 User Guide Indu Soft
http://slidepdf.com/reader/full/user-guide-indu-soft 286/1279
Text objectButton objectCheck Box objectRadio Button objectCombo Box objectList Box objectSmart Message object
InduSoft Web Studio v7.0 Technical ReferenceCopyright © 2003–2010 Indusoft, Inc.

8/22/2019 User Guide Indu Soft
http://slidepdf.com/reader/full/user-guide-indu-soft 287/1279
Screens and Graphics > Active Objects >
Check Box objectThe Check Box object is useful to create interfaces where the users can enable/disable an option onthe display.
On the Graphics tab, in the Active Objects group, click Check Box to create a Check Box objecton your screen:
Click in the drawing area and drag the mouse/cursor to draw the check box and its label.1.
Release the mouse button when the object is the size you want.2.
Double-click on the object to view the Object Properties dialog.3.
Figure 1. Object Properties: Check Box
Tip: To change the default size of the check box, edit your project file ( project_name.app) toadd the following setting:
[Objects]
CheckBoxSize=height_in_pixels
Doing this will change the size of all check boxes in your project, so be careful. Also, this onlyworks for projects running in the project viewer (Viewer.exe); it does not work for projectsrunning in CEView or the Web thin client.
Use the Object Properties dialog to specify the following parameters for the Check Box object:
Caption: Specify a caption by typing the text into the text box. You can include a tag byenclosing it in curly brackets (e.g., {tagname}).
Fonts: Specify a font style for the caption by clicking the Fonts button.
E-Sign: When this option is checked, the user will be prompted to enter the ElectronicSignature before executing the command.

8/22/2019 User Guide Indu Soft
http://slidepdf.com/reader/full/user-guide-indu-soft 288/1279
Confirm check box: Click (check) this box to ensure IWS prompts you to confirm the action atruntime.
Key drop-down list: Select a key from the list to associate that keyboard key with the object orgroup of objects. You can then press this key to check/uncheck the check box.
Click (check) the Shift, Ctrl, or Alt box to create a combination key, meaning the Shift,Ctrl, or Alt key must be pressed with the key specified in the drop-down list.
Click the browse button … to open the Key Modifier dialog, which enables you to modify
your combination keys. You can choose Left, Right or Left or Right to specify theposition on the keyboard of the Shift, Ctrl or Alt key in the combination key. If you chooseLeft or Right, the command will be executed any time either of these keys is pressed incombination with the key specified in the drop-down list.
Disable field: Type a tag or expression into this field to enable and disable the object. Youdisable the Check Box object when you enter a value different from 0.
Security field: Type a value in this field to specify a security level for the object, as definedunder Security. When a user logs on, and does not have the specified security level, IWSdisables the object.
Tag field: When the user clicks on the check box during runtime, the value of this tag isupdated. If no Feedback was specified, the value of this tag is also used to indicate the current
status of the object.
True Value field: Specify a value that will be used to change the control to TRUE state and toindicate that the control is in TRUE state. For more information about states, please refer to thestates table.
Advanced button: Press this button to open the Advanced dialog:
Figure 2. Advanced dialog
Tri-State: If enabled the control has a third state. The third state will be displayed whenthe tag configured in the Feedback field assumes the value specified in the Tri-State
field. If the Feedback field is left in blank, the third state will be displayed when the tagconfigured in the Tag field assumes the value specified in the Tri-State field.
CAUTION:
The Tri-State field must not be configured with the same value as the True
Value field, nor with an empty string value.
Feedback:Value that indicates the state of the object (FALSE, TRUE, or TRI-STATE).

8/22/2019 User Guide Indu Soft
http://slidepdf.com/reader/full/user-guide-indu-soft 289/1279
When the value of the tag configured in Feedback is equal to the value of the tagconfigured in True Value, the state is set to TRUE. When the value of the tag configuredin Feedback is equal to the value of the tag configured in Tri-State, the state is set toTRI-STATE. When none of these conditions are satisfied, the state is set to FALSE. If theFeedback field is left in blank, then the tag configured in the Tag field will be used as theFeedback tag.
Ext Trans.: When this option is checked, the caption of the object supports thetranslation.
Auto gray out: Turns the caption of the object to gray when it is disabled by the Disable
field or due to the Security System.
Force: Click (check) this box to force the Tag Database to recognize a tag change whenthe user clicks on the object, even if the value of the tag in question does not change.
Enable Focus: When this option is checked, the object can receive the focus during
runtime by the navigation keys.
Push Like: When this option is checked the control is displayed as a button, instead of thestandard check box standard shape.
Fill Color: Specify the fill color for the button. This option is enabled only when the Push
Like option is checked.
Auto Format: When checked, if the caption includes a decimal value enclosed by curlybrackets (e,g, {1.2345}) or a tag of Real type (see Caption above), then the value will beformatted according to the virtual table created by the SetDecimalPoints function.
Modes of Operation
The Check Box object can operate in two different modes: Normal and Tri-State. For moreinformation, see Modes of operation for Check Box and Radio Button objects.
Parent topic: Active Objects
Related informationText objectButton objectPushbutton objectRadio Button objectCombo Box object
List Box objectSmart Message object
InduSoft Web Studio v7.0 Technical ReferenceCopyright © 2003–2010 Indusoft, Inc.

8/22/2019 User Guide Indu Soft
http://slidepdf.com/reader/full/user-guide-indu-soft 290/1279
Screens and Graphics > Active Objects >
Radio Button objectThe radio button object is useful to create interfaces where the users can chose one option frommultiple options on the display.
On the Graphics tab, in the Active Objects group, click Radio Button to create a radio buttonobject on your screen:
Click in the drawing area and drag the mouse/cursor to draw the radio button and its label.1.
Release the mouse button when the object is the size you want.2.
Double-click on the object to view the Object Properties dialog.
Figure 1. Object Properties: Radio Button
3.
Tip: To change the default size of the radio button, edit your project file ( project_name.app) to
add the following setting:
[Objects]
RadioButtonSize=height_in_pixels
Doing this will change the size of all radio buttons in your project, so be careful. Also, this onlyworks for projects running in the project viewer (Viewer.exe); it does not work for projectsrunning in CEView or the Web thin client.
Use the Object Properties dialog to specify the following parameters for the radio button object:
Caption: Specify a caption by typing the text into the text box. You can include a tag byenclosing it in curly brackets (e.g., {tagname}).
Fonts: Specify a font style for the caption by clicking the Fonts button.
E-Sign: When this option is checked, the user will be prompted to enter the ElectronicSignature before executing the command.
Confirm checkbox: Click (check) this box to ensure IWS prompts you to confirm the action at

8/22/2019 User Guide Indu Soft
http://slidepdf.com/reader/full/user-guide-indu-soft 291/1279
runtime.
Key drop-down list: Select a key from the list to associate that keyboard key with the object orgroup of objects. You can then press this key to check/uncheck the radio button.
Click (check) the Shift, Ctrl, and/or Alt boxes to create a combination key, meaning the Shift,Ctrl, and/or Alt key must be pressed with the key specified in the drop-down list.
Click the browse button … to open the Key Modifier dialog, which enables you to further modify
your combination keys. You can choose Left, Right or Left or Right to specify the position onthe keyboard of the Shift, Ctrl, or Alt key in the combination key. If you choose Left or Right,the command will be executed any time either of these keys is pressed in combination with thekey specified in the drop-down list.
Disable field: Type a tag or expression into this field to enable and disable the object. Youdisable the radio button object when you enter a value different from 0.
Security field: Type a value in this field to specify a security level for the object, as definedunder Security. When a user logs on, and does not have the specified security level, IWSdisables the object.
Tag field: When the user clicks on the radio button during runtime, the value of this tag is
updated. If no Feedback was specified, the value of this tag is also used to indicate the current
status of the object.True Value: Specify a value that will be used to change the control to TRUE state and toindicate that the control is in TRUE state. For more information about states, please refer to thestates table.
Advanced: Press this button to open the Advanced dialog:
Figure 2. Advanced dialog
Tri-State: If enabled the control has a third state. The third state will be displayed whenthe tag configured in the Feedback field assumes the value specified in the Tri-State
field. If the Feedback field is left in blank, the third state will be displayed when the tagconfigured in the Tag field assumes the value specified in the Tri-State field.
CAUTION:
The Tri-State field must not be configured with the same value as the True
Value field, nor with an empty string value.
Feedback: Value that indicates the state of the object (FALSE, TRUE, or TRI-STATE).

8/22/2019 User Guide Indu Soft
http://slidepdf.com/reader/full/user-guide-indu-soft 292/1279
When the value of the tag configured in Feedback is equal to the value of the tagconfigured in True Value, the state is set to TRUE. When the value of the tag configuredin Feedback is equal to the value of the tag configured in Tri-State, the state is set toTRI-STATE. When none of these conditions are satisfied, the state is set to FALSE. If theFeedback field is left in blank, then the tag configured in the Tag field will be used as theFeedback tag.
Ext Trans.: When this option is checked, the caption of the object supports thetranslation.
Auto gray out: Turns the caption of the object to gray when it is disabled by the Disable
field or due to the Security System.
Force: Click (check) this box to force the Tag Database to recognize a tag change whenthe user clicks on the object, even if the value of the tag in question does not change.
Enable Focus: When this option is checked, the object can receive the focus during
runtime by the navigation keys.
Push Like: When this option is checked the control is displayed as a button, instead of thestandard radio button standard shape.
Fill Color: Specify the fill color for the button. This option is enabled only when the Push
Like option is checked.
Auto Format: When checked, if the caption includes a decimal value enclosed by curlybrackets (e,g, {1.2345}) or a tag of Real type (see Caption above), then the value will beformatted according to the virtual table created by the SetDecimalPoints() function.
Modes of Operation
The Radio Button object can operate in two different modes: Normal and Tri-State. For moreinformation, see Modes of operation for Check Box and Radio Button objects.
Parent topic: Active Objects
Related informationText objectButton objectPushbutton objectCheck Box objectCombo Box object
List Box objectSmart Message object
InduSoft Web Studio v7.0 Technical ReferenceCopyright © 2003–2010 Indusoft, Inc.

8/22/2019 User Guide Indu Soft
http://slidepdf.com/reader/full/user-guide-indu-soft 293/1279
Screens and Graphics > Active Objects >
Combo Box objectOn the Graphics tab, in the Active Objects group, click Combo Box to select a single label from acombo-box list of labels.
If the list is longer that the space allotted, a scroll bar is enabled for the list. During runtime, if youselect a label from the list, the combo-box hides itself and the selected label displays in the combobox.
Double-click on the combo-box object to open the Object Properties dialog.
Figure 1. Object Properties: Combo Box
You can use this dialog to set the following parameters:
Data Sources button: Click to open the Data Sources dialog.
Fonts button: Click to open a standard Font dialog. Use this dialog to change the characteristicsof a message font.
Label text box: Type a string tag to receive the value of the label currently displayed in thecombo box.
Position text box: Type an integer tag, which corresponds to the label currently displayed inthe combo box. Changing this tag value changes the label being displayed.
Input Enabled checkbox: Click (check) to allow an operator to select a label by typing thecontents of that label into a tag in the Label field.
Sort checkbox: Click (check) to display the contents of your array of labels in alphabeticalorder. This parameter is available only when you select the Array Tag type.
Enable translation checkbox: Click (check) to enable automatic translation of the combo boxlabels using the Translation Tool.
Confirm checkbox: Click (check) to prompt an operator to confirm a command during runtime.
E-Sign checkbox: When this option is checked, the user will be prompted to enter the ElectronicSignature before executing the animation.
VK: Virtual Keyboard type used for this object. You need to select the Virtual Keyboard option

8/22/2019 User Guide Indu Soft
http://slidepdf.com/reader/full/user-guide-indu-soft 294/1279
in the Viewer settings (Viewer on the Project tab of the ribbon) before configuring the VirtualKeyboard for this interface.
Disable text box: Type a tag with a nonzero value to disable this combo box. Type a zero, orleave the field blank (default) to enable the Command animation. If you disable the combo box,it appears grayed out during runtime.
Security text box: Type a security level for the command (0 to 255). If an operator logs on anddoes not have the specified security level, the command becomes inactive. If an operator logs
on and does have the specified security level, or you leave this field blank, the Commandanimation remains active.
Advanced button: Click to open the Combo Box - Advanced dialog:
Figure 2. Combo Box - Advanced
Align combo-box: Click to specify the label alignment (Left, Center, or Right) whichaffects the alignment in both the combo box and its list.
Color box: Click to specify a background color for the combo box. When the Color dialogopens, click a color to select it, then click OK to close the dialog.
Drop List Size (Items) field: Enter an integer (or a tag of Integer type) to specify the
number of items that should be displayed at one time when the user clicks on the combobox. The higher the number of items, the longer the drop list will appear.
Note: If this number is less than the total number of items in the list, then the droplist will also scroll.
Decimal Points: Select how decimal values will be displayed on-screen:
Auto Format: Decimal values will be formatted according to the virtual table createdby the SetDecimalPoints() function.
Custom: Enter the number of decimal places to display (e.g., 2) for all decimalvalues.
Data Sources
Use the Data Sources dialog to configure the items/labels that will be displayed in the Combo Boxobject.

8/22/2019 User Guide Indu Soft
http://slidepdf.com/reader/full/user-guide-indu-soft 295/1279
Figure 3. Data Sources dialog
Type combo box: Select the type of data source that you want to use, and the click theSettings… button to configure the source. Each type of source is described in detail below.
Field field (for Text File and Database only): Specify which field/column of the data source toread from.
Reload field (for Text File and Database only): Enter a tag name. When the value of thespecified tag changes, the combo box will reload the labels from the data source.
Type: Static Labels
When Type is set to Static Labels, you can configure the following settings:
Figure 4. Static Labels dialog
Enter your labels — with one label per line — just as if you were editing a plain text file. You caninclude tags or expressions in a label by enclosing them in curly brackets. For example: Tank #1 in
area {AreaNameTag}.
The labels are not sorted in any way, so be sure to put them in the order you want them displayedduring runtime. The first line is position 0, the second line is position 1, and so on.
Click OK when you're done.
Type: Array Tag

8/22/2019 User Guide Indu Soft
http://slidepdf.com/reader/full/user-guide-indu-soft 296/1279
When the Type is set to Array Tag, you can configure the following settings:
Figure 5. Array Tag dialog
Array Tag: Enter the name of an array tag of String type that contains the items for the combobox.
Number of Items: Specify how much of the array should be displayed in the combo box.Keeping in mind that the combo box counts array index 0 as the first item, if you enter a valueof 4, then the combo box will display array index 0 through array index 3.
Click OK when you're done.
Type: Text File
When the Type is set to Text File, you can configure the following settings:
Figure 6. Grid Data – Text File dialog
File: Enter the name of the text file source. You can either type the file name and its path orclick the … button to browse for it. (If the file is stored in your project folder, then you can omitthe path in the name.)
Tip: You can configure tag names between curly brackets (e.g., {TagName}) in the File field.
Delimiters: Set the delimiter(s) used in the data source file. For instance, if the data will beread from a CSV (comma separated values) file, you would select the Comma option. You caneven choose a custom delimiter by checking the Other option and typing the custom delimiterin the field beside it.
Click OK when you're done.

8/22/2019 User Guide Indu Soft
http://slidepdf.com/reader/full/user-guide-indu-soft 297/1279
Type: Database
When the Type is set to Database, you can configure the following settings:
Figure 7. Database Configuration dialog
Please refer to the Database Configuration dialog for further information about this dialog.
Parent topic: Active Objects
Related information
Text objectButton objectPushbutton objectCheck Box objectRadio Button objectList Box objectSmart Message object
InduSoft Web Studio v7.0 Technical ReferenceCopyright © 2003–2010 Indusoft, Inc.

8/22/2019 User Guide Indu Soft
http://slidepdf.com/reader/full/user-guide-indu-soft 298/1279
Screens and Graphics > Active Objects >
List Box objectOn the Graphics tab, in the Active Objects group, click List Box to create a List Box object onyour screen. Generally, when you run a project, the active List Box object displays a list of messages.
On a screen containing only one List Box object and no text input boxes, the List Box object will beactive automatically.
On a screen containing multiple List Box objects and text input boxes, you can use a cursor (pointingdevice) or the Tab key to select and activate a List Box object.
You can select a message from the active list box during runtime and write the message value to atag. (If a list is too long to fit within the viewable area of a List Box object, the object provides scrollbars.)
Use the Enter Reqd box on the Object Properties dialog to configure selected messages as follows:
Check (enable) the Enter Reqd box and use the keyboard/keypad keys, list control objectsfrom the Library, pointing devices, or user-defined keys containing the PostKeys() function toscroll through the message list. Then, use the Enter key to select the message and write itsvalue to the write tag. You can use the Esc and Tab keys to return to the previously selectedmessage at any time prior to pressing the Enter key.
Uncheck (disable) the Enter Reqd field to write the value of a selected (highlighted) messagethe write tag automatically.
To add List Box objects to a screen:
On the Graphics tab of the ribbon, in the Active Objects group, click List Box.1.
Click in the screen and drag to create/adjust an expanding rectangle.
Height and the font size determine how many messages are visible.
Width determines how much of the message length is visible.
After creating a rectangle, you can adjust the size and font characteristics to allow moremessages to display in the given space.
2.
Double-click on the object to open the Object Properties dialog.3.
Figure 1. Object Properties: List Box

8/22/2019 User Guide Indu Soft
http://slidepdf.com/reader/full/user-guide-indu-soft 299/1279
Tip: You also can open the Object Properties dialog, by right-clicking on the List Box object or byhighlighting the object, pressing the Alt+Enter keys, and selecting Properties from the resultingshortcut menu.
You can use this dialog to specify the following parameters:
Value drop-down list (located below the Replace button): Click to select one of the followingthe tag values used to index the message list.
Boolean
Integer (default)
LSB (Least Significant Bit)
Note: For more information, see the discussion about the State field on the MessagesConfiguration dialog.
Messages button: Click to open the Messages Configuration dialog.
User Enable text box: Type a tag, expression, or a (nonzero) number to select a message inthe runtime project. The default is1 (true or enabled ).
Control Enable text box: Type a tag, expression, or a (nonzero) number to select a message
in the runtime project — depending on the current value of the Read/Search Tag. The defaultis1 (true or enabled ).
IWS bases this parameter on the Value field (in the Messages Configuration dialog) that youassociate with the selected message. Enabling this field allows tag changes triggered by theprocess to affect which messages you can select.
Read/Search Tag text box: Type an integer or a Boolean tag to point to a selected messagebased on the message Value field (in the Messages Configuration dialog). You can use theControl Enable and User Enable fields to control whether the operator or a process can alterthis tag.
Write Tag text box (optional ): Type a string tag to receive the Message value of the last-selected message. When you close and reopen the screen containing a List Box object, IWSuses this tag value to determine the last message selected in the list box.

8/22/2019 User Guide Indu Soft
http://slidepdf.com/reader/full/user-guide-indu-soft 300/1279
E-Sign checkbox: When this option is checked, the user will be prompted to enter the ElectronicSignature before executing the animation.
Row checkbox: Click (check) to include set up and set down arrows in the List Box object scrollbar.
Page checkbox: Click (check) to include page up and page down arrows in the List Box objectscroll bar.
Start/End checkbox: Click (check) to include home and end arrows in the List Box object scroll
bar.
List wrap checkbox: Click (check) to continue displaying and scrolling the message list(starting at the opposite end) after you scroll to the beginning or end of the list.
Enter Reqd checkbox: Clicking (checking) this box allows you to select messages using theEnter key only. It prevents the Tab key from selecting messages.
Color boxes: Click a color box to open the Color dialog or the 16-color Color Selection dialog.Either dialog allows you to specify or change colors for the List Box object. Click a color to selectit and then click OK to close the dialog.
Highlight Color box: Specify a color for highlighting messages (default is blue).
Text Color box: Specify a color for highlighting message text (default is black).
Win Color box: Specify a color for the list box background (default is white).
Border Color box: Specify a color for the list box border (default is black).
Messages Configuration Dialog
Figure 2. Message Configuration dialog

8/22/2019 User Guide Indu Soft
http://slidepdf.com/reader/full/user-guide-indu-soft 301/1279
Use the parameters on this dialog as follows:
State field (read-only ): Use this field to view the indexed individual messages. IWS numbersthis field based on the Read/Search Tag type you selected:
Boolean: Provides two valid states, labeled 0 and 1
Integer: Provides 255 valid states, labeled 1 to 255
LSB: Provides 32 valid states (32 bits in an integer value) labeled 0 to 31
Message field: Enter the string to be displayed in the List Box object. You can include tags in amessage by enclosing them in curly brackets (e.g., {tagname}).
Value field: Type a message value matching the specified Read/Search Tagvalue. (Also, thesame value written to the write tag.)
If you specify LSB for the Value field, IWS uses the value specified in the State field for boththe Read/Search Tagand the write tag.
Text Foreground color field: Click to specify a color for the message text foreground. Whenthe Color dialog displays, click on a color to select it, and close the dialog.
Text Blink checkbox: Click (check) to cause a selected message to blink, once per second,when it displays.
Fonts button: Click to open the Font dialog, which allows you to change the characteristics(style, size, and so forth) of the message font.
Enable translation: Click (check) to enable translation during runtime using the TranslationTool.

8/22/2019 User Guide Indu Soft
http://slidepdf.com/reader/full/user-guide-indu-soft 302/1279
Auto Format: When checked, if a message includes a decimal value enclosed by curly brackets(e,g, {1.2345}) or a tag of Real type (see Message above), then the value will be formattedaccording to the virtual table created by the SetDecimalPoints() function.
Parent topic: Active Objects
Related information
Text object
Button objectPushbutton objectCheck Box objectRadio Button object
Combo Box objectSmart Message object
InduSoft Web Studio v7.0 Technical ReferenceCopyright © 2003–2010 Indusoft, Inc.

8/22/2019 User Guide Indu Soft
http://slidepdf.com/reader/full/user-guide-indu-soft 303/1279
Screens and Graphics > Active Objects >
Smart Message object
On the Graphics tab, in the Active Objects group, click Smart Message to create one or moresmart message objects, which you can use to display messages and graphics based on tag valueswhen you run your project. IWS provides the following smart message object types:
Message Display: Enables you to display any one of multiple messages within a single screenobject.
Multistate Indicator: Enables you to display any one of multiple messages within a singlescreen object, and also has the ability to display bitmap images with the messages.
Multistate Pushbutton: Enables you to display messages and bitmap images. This object alsoresembles a multi-position switch in that it allows you to switch (toggle between) messages byclicking on the object during runtime.
These smart message object types vary in their ability to display messages and graphics, write to atag, and control how many messages and graphics display on the screen. However, all of the objecttypes can receive process input (Read Tag value) to determine which message to display.
To add a smart message object to the screen:
Click the Smart Message button and position the mouse on the screen.1.
Click and drag to create (and adjust the size of) a rectangle.
You use the rectangle's size and font size to determine how much text and how large a bitmapimage you can display on the screen. Later, you can change the rectangle's size and fontcharacteristics to allow longer messages to display in a given space.
2.
Double-click on the object to open the Object Properties dialog.3.
Figure 1. Object Properties: Smart Message
You can use this dialog to specify the following parameters:
Type combo-box: Click to select the smart message object type. The object type sets the

8/22/2019 User Guide Indu Soft
http://slidepdf.com/reader/full/user-guide-indu-soft 304/1279
behavior of the object during runtime and the features supported by it:
Message Display (default)
Multistate Indicator
Multistate Pushbutton
Value drop-down list: Select the type of values used to index the message list:
Boolean: Provides two valid states. Use this selection when you want to display either one
of two different messages, based on a boolean value (0 or 1).
Integer (default): Provides 500 valid states. Use this selection when you want to displaydifferent messages based on specific values from an Integer tag.
LSB (least significant bit): Provides 32 valid states (32 bits in an integer value). Use thisselection when you want to display different messages based on which bit from an integertag is set. If more than one bit from the Integer tag is set simultaneously, the messageassociated with the least significant bit that is set (value 1) will be displayed.
Note: If Multistate Pushbutton is the Smart Message type, only 16 different messagescan be associated with the object, even for Integer or LSB values.
Read Tag/Expr text box: Enter the name of an integer or a Boolean tag. The value of this tagwill determine which message will displayed by the object during runtime.
Write Tag text box (optional and available for Multistate Pushbutton only): Enter the nameof an integer or a Boolean tag. The value associated with the message currently displayed by
the object is written to this tag.
Align: Select the alignment of the text displayed by the Smart Message object.
Key area (optional and available for Multistate Pushbutton only): Shortcut used to go to thenext message (step) using a keyboard when the Multistate Pushbutton type is selected. Thisoption is especially useful when creating projects for runtime devices that do not provide amouse or touch-screen interface, when the keyboard is the only physical interface available tointeract with your project during runtime.
Event drop-down list (available for Multistate Pushbutton only): Select one of the followingoptions to specify when the message is changed:
On Down: Switch to the next message when you click on the object (default).
While Down: Switch to the next message continuously while you hold the mouse buttondown on the object.
On Up: Switch to the next message when you release the mouse button on the object.
E-Sign (available for Multistate Pushbutton only): When this option is checked, the user willbe prompted to enter the Electronic Signature before executing the animation.
Security (available for Multistate Pushbutton only): System Access Level required for theobject/animation.
No line: When this option is checked, the line border of the object is not visible.
Line Weight: Defines the thickness of the line drawn around the object (the border).
Fonts: Launches the Fonts dialog, where you can configure the font settings for the text
displayed in the object.
Config…: Launches the Configuration dialog, where you can configure the messages for theobject, as follows:

8/22/2019 User Guide Indu Soft
http://slidepdf.com/reader/full/user-guide-indu-soft 305/1279
Figure 2. Smart Message Configuration Dialog
Data Source: The messages displayed by the object can be either configured directly onthe object (Data Source = Static) or can be read from an external text file (Data
Source = Text File). When the Data Source = Static, the Configuration dialog is
displayed as pictured above, and you can configure all the settings on the grid. When theData Source = Text File, the Configuration dialog displays a field for entering the pathand name of the file from which the messages will be read (the source file). See "SourceFile Format" below for more information about the format of the text file supported by theSmart Message object when the Data Source = Text File.
Enable translation: Click (check) to enable translation during runtime using theTranslation Tool.
Auto Format: When checked, if a message includes a decimal value enclosed by curlybrackets (e,g, {1.2345}) or a tag of Real type (see Text/Message below), then the valuewill be formatted according to the virtual table created by the SetDecimalPoints function.
The following table describes the meaning of the properties associated with each message, regardlessof the Data Source:
Property Description
Text/Message Message (text) that will be displayed when selected during runtime. You caninclude tags in a message by enclosing them in curly brackets (e.g., {tagname}).
Value You must associate a unique value with each message. during runtime, theobject will display the message associated with the value that matches thevalue of the tag configured in the Read Tag field. If there is no such message,the message configured in the first row (State = Error) displays duringruntime. When the object Type is set as Multistate Pushbutton, the valueassociated with the current message is also written to the tag configured in theWrite Tag field (if any).
Text (FG) Foreground color for the messages displayed during runtime.
Text (BG) Background color for the messages displayed during runtime.
Text Blink If checked, the message text will blink during runtime.

8/22/2019 User Guide Indu Soft
http://slidepdf.com/reader/full/user-guide-indu-soft 306/1279
Property Description
Rec (FG) Line color (Border) for the rectangle behind the message.
Rec (BG) Background (Fill) color for the rectangle behind the message.
Rec Blink If checked, the rectangle behind the message will blink during runtime.
Graphic File Path and name of the bitmap file (*.BMP) (if any) that will be displayed when
the message associated with it is selected during runtime. If you do not specifythe path, the bitmap file must be stored in your project folder.
Transparent Select the color that will be transparent in the graphic file, if the En.
Transparent checkbox is checked.
En.Transparent If checked, the color selected in the Transparent field will be set astransparent in the graphic file.
Note: The properties Graphic File, Transparent and En. Transparent are not available forthe Message Display type.
Tip: You can copy data from this dialog and paste it into an Excel worksheet, and vice versa.
Source File Format
This section describes the format of the text file supported by the Smart Message object when theData Source = Text File. The main advantage of using an external text file instead of static valuesis that it gives you the flexibility to change the messages during runtime, by pointing to a differenttext file, or even by changing the content of the text file dynamically.
The text file must be created in the CSV format (comma separated values), where the commacharacter (
,) is used to divide the columns (data) in each line (row) of the file. Therefore, you can
use any CSV editor such as Microsoft Notepad and Microsoft Excel to create the CSV file with themessages and their properties for the Smart Message object.
The description of each property associated with the messages is provided in the Smart Messagesection. The order of the data in the CSV file is described in the following table:
Column
#
Property Default Value
1 Text/Message -
2 Value -
3 Text (FG) 0
4 Text (BG) 16777215
5 Text Blink 0

8/22/2019 User Guide Indu Soft
http://slidepdf.com/reader/full/user-guide-indu-soft 307/1279
Column
#
Property Default Value
6 Rec (FG) 8421376
7 Rec (BG) 16777215
8 Rec Blink 0
9 Graphic File -10 Transparent 0
11 En. Transparent 0
When configuring text messages that have the comma character as part of the message, you mustconfigure the whole message between quotes (e.g., "Warning, Turn the motor Off"); otherwise, thecomma will be interpreted as a data separator instead of as part of the message.
The first line of this file is equivalent to the State = Error. In other words, if there is nomessage associated with the current value of the tag configured in the Read Tag field, themessage configured in the first row (State = Error) is displayed during runtime.
The data configured in the Value column of the first row from this file is irrelevant. This rowmust always be configured, regardless of the object type (even for Multistate Pushbutton).
Only the Text/Message and Value columns are mandatory. The other columns are optional,and the default values will be used if you do not specify any value for them (see table).
The fields Text(FG), Text(BG), Rec(FG), Rec(BG) and Transparent can be configured with
the code of the color associated with it. The code can be entered directly in decimal format(e.g., 255) or in hexadecimal format using the syntax #value (e.g., #0000FF).
The fields Text Blink, Rec Blink and En. Transparent can be configured with Boolean values0 or 1 (0 = Unchecked; 1 = Checked), or with the keywords FALSE or TRUE (FALSE =Unchecked; TRUE = Checked).
Example:
Error Message,,0,16777215,1,8421376,16777215,1,error.bmp,0,0
Message Zero,0,0,16777215,0,8421376,16777215,0,open.bmp,65280,1
Message Ten,10,0,16777215,0,8421376,16777215,0,closed.bmp,65280,1
Message Twenty,20,0,16777215,0,8421376,16777215,0,,0,0
Message Thirty,30,0,16777215,0,8421376,16777215,0,,0,0
Tip: You can use the Smart Message editor (Data Source = Static) to configure the messages,
values and colors. To do so, select the configuration, copy it and paste it into an Excelworksheet. Then, you can save the Excel worksheet as a CSV file (File > Save As). Thisprocedure provides you with a user friendly interface for configuring the color codes.
Parent topic: Active Objects

8/22/2019 User Guide Indu Soft
http://slidepdf.com/reader/full/user-guide-indu-soft 308/1279
Related information
Text objectButton objectPushbutton objectCheck Box objectRadio Button objectCombo Box objectList Box object
InduSoft Web Studio v7.0 Technical ReferenceCopyright © 2003–2010 Indusoft, Inc.

8/22/2019 User Guide Indu Soft
http://slidepdf.com/reader/full/user-guide-indu-soft 309/1279
Screens and Graphics >
Symbols
The Library is a visual browser for all of the Symbols that are available to be inserted in a projectscreen. To open the Library window, do one of the following:
On the Graphics tab of the ribbon, in the Libraries group, click Symbols; or
In the Graphics tab of the Project Explorer, double-click Symbols.
Figure 1. Symbols Library window
The Library is divided into two main directories: the Project Symbols directory contains the sameuser-made Symbols that are saved in the Symbols folder of the current project; and the SystemSymbols folder contains all of the premade Symbols that are installed with IWS, sorted by category(e.g., Buttons, Meters, Tanks).
To select a Symbol and place it in a project screen:
Find the Symbol you want in the Library and then double-click it. The Library window willautomatically close and the mouse cursor will change to indicate that you have a Symbol
waiting to be placed.
1.
Return to the project screen where you want to place the Symbol.2.
Click anywhere in the project screen to place the selected Symbol.3.
Edit the Symbol's Object Properties as needed, including any Custom Properties.4.
For more information, please see Inserting a Symbol in a Screen.

8/22/2019 User Guide Indu Soft
http://slidepdf.com/reader/full/user-guide-indu-soft 310/1279
Making a User-Made Symbol Available to Other Projects
User-made Symbols are normally available only in the project where they were initially created andsaved — that is, the Project Symbols directory of the Library is specific to each project. However, youcan send a user-made Symbol to the System Symbols directory, to make it available to all projects:
Right-click on the Symbol file (.sym) in the Symbols folder and choose Send to SystemSymbols from the shortcut menu. A standard Save As dialog is displayed, pointing to the\Symbol directory of IWS (instead of the \Symbols directory of the current project).
Figure 2. Saving a Symbol
1.
Choose a location to save the Symbol file. You can choose one of the existingcategories/directories, or you can create a new one.
2.
Click Save. The Symbol file is saved chosen location and the Symbol is displayed in SystemSymbols directory of the Library.
Figure 3. Saving a Symbol
3.

8/22/2019 User Guide Indu Soft
http://slidepdf.com/reader/full/user-guide-indu-soft 311/1279
Saving your own project symbols
Parent topic: Screens and GraphicsInduSoft Web Studio v7.0 Technical ReferenceCopyright © 2003–2010 Indusoft, Inc.

8/22/2019 User Guide Indu Soft
http://slidepdf.com/reader/full/user-guide-indu-soft 312/1279
Screens and Graphics > Symbols >
Saving your own project symbolsA Symbol is a set of one or more Objects that is saved to the Symbols folder (in the Graphics tab of the Project Explorer), so that you can reuse it again and again in your projects.
Every time you reuse a Symbol, you actually make a copy that is linked to the master Symbol file inthe Symbols folder. (These linked copies are also called "instances" of the Symbol.) Thereafter, if youmake any changes to the Master Symbol, then those changes automatically propagate to everylinked copy in every project.
You can customize each linked copy of the Master Symbol by defining Custom Properties. Forexample, when you create a gauge that displays tank levels and then save that gauge as a MasterSymbol, you can define Custom Properties on the Symbol that will allow each linked copy to displaythe level of a different tank.
Figure 1. Symbols Folder in the Graphics Tab
Creating a Master Symbol
To create a master Symbol and save it to the Symbols folder:
Design your Symbol just as you would normally draw a project screen, using any combination of Static and Active Objects. For example, three check boxes in a rectangular pane:
Figure 2. Drawing Objects in a Screen
1.

8/22/2019 User Guide Indu Soft
http://slidepdf.com/reader/full/user-guide-indu-soft 313/1279
Select the Object(s) or Group that you want to save as a Symbol.
Figure 3. Selecting the Objects
Note: It is not necessary to make a Group out of two or more Objects before saving themas a Symbol. Saving the Objects together as a Symbol effectively groups them.
There is a situation, however, where you may want to group the Objects first. A Symbol canhave only one Hint. If more than one Object has a Hint configured on it (in the ObjectProperties), those Hints are not shown when the Objects are saved together as a Symbol. To
specify a Hint for the Symbol as a whole, you must first group the Objects and then configurethe Hint on the Group. That Hint will carry through when you save the Group as a Symbol.
2.
Right-click on the selection, and then click Create Linked Symbol on the shortcut menu.
Figure 4. Creating a Linked Symbol
3.

8/22/2019 User Guide Indu Soft
http://slidepdf.com/reader/full/user-guide-indu-soft 314/1279
A standard Save As dialog is displayed, and you are prompted to give the new Symbol a filename. Symbol files (.sym) are saved in the \Symbol folder of your project.
Figure 5. Saving the Symbol File
4.
Click Save to save the file. The Symbol appears in the Symbols folder, in the Graphics tab of theProject Explorer.
Figure 6. Symbol File in the Project Explorer
5.

8/22/2019 User Guide Indu Soft
http://slidepdf.com/reader/full/user-guide-indu-soft 315/1279
The Symbol also appears in the Project Symbols folder of the Library.
The Symbol is now ready to be reused in your project, but the way it is currently saved, every copywill have identical properties. You must now define Custom Properties on the Symbol — that is, theproperties you want to be able to customize each time you reuse the Symbol.
Editing the Master Symbol
You can edit a master Symbol after you've initially saved it, to add or delete Objects in the Symbol orto define Custom Properties on it. Remember that any changes you make to the master Symbol willautomatically propagate to every linked copy in every project.
Note: There is one exception. If you change the Hint on a Symbol — as described in "Creating aMaster Symbol" — then the change will appear only on new instances of the Symbol. Existinginstances will be unchanged.
To edit a Symbol:
Right-click on the Symbol file in the Symbols folder, and then choose Edit from the shortcutmenu.
Figure 7. Editing the Symbol File
Tip: You can also right-click on any instance of the Symbol and choose Edit Linked
1.

8/22/2019 User Guide Indu Soft
http://slidepdf.com/reader/full/user-guide-indu-soft 316/1279
Symbol from the shortcut menu.
The Symbol file is opened for editing in its own window. This Symbol Editor works in the sameway as a regular Screen Editor, except that every Object in the window is part of the Symbol. If you add, move or delete Objects in the Symbol Editor, then you may change the size or shapeof the Symbol and disrupt the layout of any Screens where it is used.
Figure 8. Symbol File Opened for Editing
Besides adding, moving or deleting Objects in the Symbol, you can also edit the ObjectProperties as you normally would. You may want some properties to be the same in everyinstance of the Symbol, but other properties need to be customized according to where and howthe Symbol is used. In this example, you probably want to customize the captions for the threecheck boxes, the tags with which the check boxes are associated, and the caption for the paneitself.
Select the first Object in the Symbol and open its Object Properties. For example, the first checkbox:
Figure 9. Object Properties for the First Check Box
2.
In any field where you would normally configure a tag, expression, or value, you can insteaddefine a Custom Property using the sytax…
3.
#[Category.]Property :[Value]
…where:
Category is an optional name for a collection of related properties, such as all captions or allCheck Box values. If you do not specify Category for a property, then it will be automatically
listed under the "Main" category.
4.
Property is a label to identify the specific property. Property is required for each property, and it
must always be followed by a colon (:).
5.

8/22/2019 User Guide Indu Soft
http://slidepdf.com/reader/full/user-guide-indu-soft 317/1279
Value is an optional default value for the property.
Note: All Tag/Expression syntax rules apply to Value, including tag names, pointers,arrays, strings, numerical and boolean values, and scripting functions.
6.
In the following example, we want to be able to customize which tag will be set when the Check Box
is selected or cleared. So, in the Tag field, type #Option1.Tag: as shown.
Figure 10. Defining a Custom Property for the Tag Field
When you go to complete the properties on an instance of the Symbol, #Option1.Tag: will appear likethis:
Figure 11. Custom Properties on a Symbol
But more about that later…
Depending on the context, some Object properties require a specific type of value like a String, a
Boolean or a numerical value. For these properties, you must enclose the Custom Propertydeclaration in curly brackets ({}).
In this example, the Caption field requires a String, so type {#Option1.Caption:"Option 1"} asshown.
Figure 12. Defining a Custom Property for the Caption Field

8/22/2019 User Guide Indu Soft
http://slidepdf.com/reader/full/user-guide-indu-soft 318/1279
Again, when you go to complete the properties on an instance of the Symbol, they will appear likethis:
Figure 13. Custom Properties on a Symbol
Repeat steps 2 through 4 as needed, to define the rest of the Custom Properties on the Symbol.
In this example, the finished Symbol has all of the following properties:
Figure 14. Custom Properties on a Symbol

8/22/2019 User Guide Indu Soft
http://slidepdf.com/reader/full/user-guide-indu-soft 319/1279
Save the Symbol and close the Symbol Editor.
On the Home tab of the ribbon, in the Tools group, click Verify. This will update all existinginstances of the Symbol in your project.
Adding Tooltips to Custom Properties
You can configure a description for each Custom Property available in the Symbol. After creating aSymbol, open it with the Symbol Editor, right-click in the Symbol Editor (not on the Symbol itself)and choose Edit Symbol Properties from the shortcut menu.
Figure 15.
When assigning values to the Custom Properties of the Symbol on the screens, the user can read thedescription as Tooltips just by moving the mouse cursor on the property name, as illustrated on thefollowing picture:
Figure 16. Tooltip Showing Description of the Property
Making a User-Made Symbol Available to Other Projects
User-made Symbols are normally available only in the project where they were initially created andsaved. However, you can send a user-made Symbol to the System Symbols folder of the Library, tomake it available to all of your projects:
In the Symbols folder of the Project Explorer, right-click the desired Symbol file (.sym) andthen choose Send to System Symbols from the shortcut menu. A standard Save As dialog is
1.

8/22/2019 User Guide Indu Soft
http://slidepdf.com/reader/full/user-guide-indu-soft 320/1279
displayed, automatically pointing to the \Symbol sub-directory of the IWS program directoryinstead of the \Symbol sub-folder of your project folder.
Figure 17. Saving a Symbol
Choose a location in which to save the Symbol file. You can choose one of the existing
categories/folders, or you can create a new one.
2.
Click Save. The Symbol file is saved in the specified location and the Symbol is displayed in theSystem Symbols folder of the Library.
Figure 18. Saving a Symbol
3.
For more information, see Using the Library.
Inserting a Symbol in a Screen

8/22/2019 User Guide Indu Soft
http://slidepdf.com/reader/full/user-guide-indu-soft 321/1279
To insert a Symbol in a Screen and then complete its Custom Properties:
Open the desired project screen from the Screens folder, or insert a new screen. The screen isopened for editing.
1.
Open the Symbols Library by doing one of the following:
On the Graphics tab of the ribbon, in the Libraries group, click Symbols;
Double-click Symbols in the Project Explorer; or
Right-click in the screen where you want to insert the symbol, and then click Insert
Linked Symbol on the shortcut menu.
2.
Select the symbol from the Symbols Library, and then click in the screen:
Figure 19. Symbol Placed in a Screen
Once the Symbol is inserted, you can manipulate it like any other object in the screen. You canalign and distribute it with other Objects, and you can apply Animations to it. However, the firstthing to do is complete the Custom Properties for this instance of the Symbol.
Figure 20. Object Properties dialog for the Symbol
3.
Open the Object Properties for the Symbol.4.
Click Expand to open the Symbol Properties dialog.
Figure 21. Symbol Properties dialog for the Symbol
5.

8/22/2019 User Guide Indu Soft
http://slidepdf.com/reader/full/user-guide-indu-soft 322/1279
To see all of the properties at the same time, select the Display properties from all
categories check box.
Figure 22. Displaying Properties from All Categories
Enter the property values as needed. In this example, the three check boxes are used todetermine whether to alert Tom, Dick and/or Harry. The captions are updated accordingly, andthe check box tags are configured with the first three elements of a Boolean array calledAlertOptions.
Figure 23. Completed Properties for the Symbol
6.

8/22/2019 User Guide Indu Soft
http://slidepdf.com/reader/full/user-guide-indu-soft 323/1279
Click OK to close the Symbol Properties dialog, and then close the Object Properties dialog.7.
The Custom Properties are resolved during runtime, as shown below.
Figure 24. Symbol During Editing (top) and During Runtime (bottom)
Note: Remember, the completed Custom Properties on each instance of a Symbol areindependent from every other instance of that Symbol, but if you make any changes to themaster Symbol file, then those changes automatically propagate to every instance.

8/22/2019 User Guide Indu Soft
http://slidepdf.com/reader/full/user-guide-indu-soft 324/1279
Parent topic: SymbolsInduSoft Web Studio v7.0 Technical ReferenceCopyright © 2003–2010 Indusoft, Inc.

8/22/2019 User Guide Indu Soft
http://slidepdf.com/reader/full/user-guide-indu-soft 325/1279
Screens and Graphics >
ActiveX Control objectOn the Graphics tab, in the Libraries group, click ActiveX Control to open the Insert ActiveXControl dialog, which you can use to place ActiveX components on your screen.
When the dialog opens (as in the following figure), it contains a list of all ActiveX components that areregistered on your PC.
Figure 1. Insert ActiveX Control dialog
Note: When you use ActiveX controls in your project, your runtime stations should have thesame controls already installed and registered. Stations often have "auto download" and "auto
install" features disabled for security reasons, so they may not be able to get ActiveX controlsthat are called by your project. Consult your hardware manufacturer and ActiveX controlsprovider for more information about how to manually install controls.
If you still want to enable automatic download of ActiveX controls, you can do so by manuallyediting your project file ( project_name.app) to include the following settings:
[UsedControls]
EnableDownload=1
Count=number of controls
[UsedControl1]

8/22/2019 User Guide Indu Soft
http://slidepdf.com/reader/full/user-guide-indu-soft 326/1279
CLSID=class ID of the ActiveX control
Version=version of the ActiveX control
Codebase=URL of the ActiveX control file, or of the .CAB file that contains the ActiveX control files
RegFile1=name of a specific .OCX or .DLL file within the .CAB file; see below
RegFilen=name of a specific .OCX or .DLL file within the .CAB file; see below
…
[UsedControln]…
The CLSID and Version settings are required for each ActiveX control, and they must match the IDand version of the actual control file(s) to which Codebase links. This allows a runtime station tocheck the control against those that are already registered. If the settings do not match, thenthe runtime station may unnecessarily download the same control again.
If you don't know the CLSID and Version settings for an ActiveX control, you can find them in theregistry key of an already installed and registered control. Search for the control file inHKEY_CLASSES_ROOT\CSLID in the Windows Registry.
Also, the URL for the Codebase setting can be either absolute or relative to the Web server's
"home" directory. For example:
Codebase=http://server address/AddOns/IndDateTimePick.ocx
…or…
Codebase=AddOns/IndDateTimePick.ocx
Finally, the Regfile settings are required only if Codebase links to a .CAB file. If it does, then useone or more Regfile settings to name the specific files within the .CAB file that must bedownloaded and registered.
ActiveX controls are components designed according to a standard. Because InduSoft Web Studio isan ActiveX container, you can configure and run ActiveX controls in the screens created with IWS.ActiveX controls can provide the following interfaces:
Properties: Variables whose values can be read and/or written for your project (e.g., ObjectColor, FileName, URL, and so forth)
Methods: Functions from the ActiveX object that can be triggered by your project (e.g., open a
dialog, execute a calculation, and so forth)
Events: Internal messages that can trigger the execution of expressions in your project (e.g.,Mouse_Click, Download_Completed, and so forth)
The name of the properties, methods and events supported by each ActiveX depends on its ownimplementation.

8/22/2019 User Guide Indu Soft
http://slidepdf.com/reader/full/user-guide-indu-soft 327/1279
There are two different ways to interface your project with the ActiveX control:
By using the ActiveX functions XGet(), XSet() and XRun()
OR
By using the Object Properties window to configure the object
Double-click on the ActiveX Control to open the Object Properties dialog.
Figure 2. Object Properties: ActiveX Control
The Object Properties window displays the name of the ActiveX control. Generally, each ActiveXcontrol is either a *.dll or a *.ocx file registered in your local computer. You must assign a name(alias) to the ActiveX control on the Name field (e.g., MyControl). This name is used to reference theobject when calling one of the ActiveX functions that are provided in the Built-in Scripting Language.
Note: You should not configure two ActiveX controls on the same screen with the same name.For instance, if you insert two "Windows Media Player" ActiveX controls on the same screen, andassign the name MyMP1 to one object (Name field), you cannot assign the same name to thesecond object on the same screen. You would have to assign the name MyMP2, for example, to
the second object.
The Property Pages button opens the standard window for configuring the Static Properties (if any).The layout and the options in this dialog depend on the implementeation of each ActiveX Control. Usethis interface to set properties that should not be changed during runtime (fixed properties).
The Configuration button on the Object Properties window opens dialogs that allow you to do thefollowing:
Associate tags to properties of the ActiveX Control;
Trigger methods from the ActiveX Control based on tag change; and
Configure scripts, which are executed when Events from the ActiveX Control occur.
The following sections describe how to configure these interfaces.
Note: Although the Configuration dialog displays the list of all properties, methods and events,you only have to configure the items that you need for your project.
The screen shots used in the following sections depict the Acrobat 3D Office control. The names of

8/22/2019 User Guide Indu Soft
http://slidepdf.com/reader/full/user-guide-indu-soft 328/1279
the properties, methods and events vary for each ActiveX control, but the configuration interface isthe same. The concepts described here apply to all controls.
Configuring Properties
The Properties tab provides a grid with the following fields:
Figure 3. Configuration Dialog – Properties Tab
Property: Lists all properties available from the ActiveX object, and indicate their types:
Property
Icon
Property Type
Boolean
Integer
Real
String
Tag/Expression: The tag configured in this field is associated with the respective property of the ActiveX object. The Action column will define whether the value of this tag will be written tothe ActiveX property, or if the value of the ActiveX property will be written to this tag (or both).
Note: You can configure an expression in this field if you want to write the result of anexpression to the property of the ActiveX object. However, in this case, the value of theproperty cannot be read back to one tag (unless you use the XGet() function). Therefore,an expression is configured in this field, the Scan field is automatically set to Set.
Action: Defines the direction of the interface between the tag or expression configured in the

8/22/2019 User Guide Indu Soft
http://slidepdf.com/reader/full/user-guide-indu-soft 329/1279
Tag/Expression field and the ActiveX property, according to the following table:
Action Description
Get Read the value of the ActiveX property and write it to the tag configured inthe Tag/Expression field.
Set Write the value from the tag or expression configured in theTag/Expression field into the ActiveX property.
Get+Set Executes both actions (Get and Set). However, when opening a screenwith the ActiveX object, IWS executes the Get command before executingany Set command. That is, the tag configured in the Tag/Expression
field is updated with the value of the ActiveX property when IWS opens thescreen where the ActiveX is configured.
Set+Get Executes both actions (Get and Set). However, when opening a screenwith the ActiveX object, IWS executes the Set command before executingany Get command. That is, the ActiveX property is updated with the valueof the tag configured in the Tag/Expression field when IWS opens thescreen where the ActiveX is configured.
Note: When the value of the property is "Read-only" (cannot by overwritten by yourproject), the Action field is automatically set to Get.
Scan: Defines the polling method to get values from the ActiveX propreties, according to thefollowing table:
Scan Description
No The value of the ActiveX property is read and written to the tag configuredin the Tag/Expression field, only when the screen with the ActiveX object isopen, and when the ActiveX object sends a message to IWS to update thistag.
Always IWS keeps polling the value of the ActiveX property and updating the tagconfigured in the Tag/Expression field with this value.
Note: Some ActiveX controls are designed to send messages to their containers (e.g., yourproject) indicating that a property changed value and the new value should be read (Get) again.However, other ActiveX controls do not implement this algorithm. In this case, the only way toget the updated values of the ActiveX properties is to keep polling these values from the ActiveXcontrol (Scan=Always).
Configuring Methods
The Methods tab provides a grid with the following fields:
Figure 4. Configuration Dialog – Methods Tab

8/22/2019 User Guide Indu Soft
http://slidepdf.com/reader/full/user-guide-indu-soft 330/1279
Method: List all methods available from the ActiveX object.
Parameters: The tags configured in this field are associated with the parameters of the methodof the corresponding ActiveX object. If the method does not support any parameter, the fixedtext <None> is displayed in the Parameters field. Otherwise, you can type the tags associatedin the parameters of the ActiveX object. When the method has more than one parameter, youcan type one tag for each parameter, separating them by a comma (,). For example, TagA ,
TagB , TagC. When the method is executed, either the value of the tags are written to theparameters of the method (input parameters), or, after the method is executed, the ActiveXwrites the value of the parameters to the tags (output parameters).
Tip: When you click the Browse button ( ), it will display the list of parameters supportedby the method, allowing you to associate one tag with each parameter.
Trigger: When the tag configured in this field changes value, the respective method of theActiveX control is executed.
Return: The tag configured in this field receives the value returned by the method (if any).
Configuring Events
The Events tab provides a grid with the following fields:
Figure 5. Configuration Dialog – Events Tab

8/22/2019 User Guide Indu Soft
http://slidepdf.com/reader/full/user-guide-indu-soft 331/1279
Event: List all events available from the ActiveX object.Parameters: The tags configured in this field are associated with the parameters of the eventof the corresponding ActiveX object. If the event does not support any parameter, the fixed text<None> is displayed in the Parameters field. Otherwise, you can type the tags associated withthe parameters of the ActiveX object. When the event has more than one parameter, you cantype one tag for each parameter, separating them by a comma (,). For example, TagA , TagB ,TagC. When the event is generated, either the value of the tags are written to the parameters of the event (input parameters), or the parameter values are written to the tags (outputparameters).
Tip: When you click the Browse button ( ), it will display the list of parameters supportedby the event, allowing you to associate one tag with each parameter.
Script: The script configured in this field will be executed when the event is triggered by theActiveX control.
Tip: When you click the Browse button ( ), it will display a dialog with the complete scriptassociated with the event. The main dialog displays only the expression configured in thefirst line of the script.
Parent topic: Screens and GraphicsInduSoft Web Studio v7.0 Technical Reference
Copyright © 2003–2010 Indusoft, Inc.

8/22/2019 User Guide Indu Soft
http://slidepdf.com/reader/full/user-guide-indu-soft 332/1279
Screens and Graphics >
.NET Control object
.NET Components are designed according to the Microsoft .NET Framework, which is a standard formodular programming technologies. Because IWS is a .NET container, you can configure and run.NET Components in your project screens. The actual functions of a .NET Component are containedwithin a .NET Control object, which provides the configuration dialogs.
.NET Components include the following interfaces:
Properties: Variables whose values can be read and/or written for your project (e.g., ObjectColor, FileName, URL, and so forth)
Methods: Functions from the .NET Component that can be triggered by your project (e.g.,open a dialog, execute a calculation, and so forth)
Events: Internal messages that can trigger the execution of expressions in your project (e.g.,Mouse_Click, Download_Completed, and so forth)
The properties, methods and events supported by each .NET Component vary according to thecomponent's implementation.
CAUTION:
When using .NET Components in your project, make sure that the target system
(runtime station) can support the same components and that they are properly
installed and registered. Your project includes links to the .NET Components;
however, the installation of these components on the target system must be done
separately. Furthermore, when .NET Components are used on screens open in remote
Thin Clients, the .NET Components must also be manually installed on the Thin Client
stations. The Microsoft Windows operating system installs a large selection of
components by default, but additional components are offered by third-party
providers. Consult your .NET Component provider for further information about how
to install.
Selecting and Placing a .NET Control Object
To select and place a .NET Control object in your project screen:
On the Graphics tab, in the Libraries group, click .NET Control.1.
When the .NET Framework Components dialog opens (as in the following figure), it contains alist of all .NET Components that are registered on your computer.
Figure 1. .NET Framework Components dialog
2.

8/22/2019 User Guide Indu Soft
http://slidepdf.com/reader/full/user-guide-indu-soft 333/1279
Select a component from the list, and then click OK to place it in your project screen. You can
also click the Browse… button to find an unregistered component on your computer.
Tip: Registered .NET Components are typically stored in the following directory:
C:\WINDOWS\Microsoft.NET\Framework\
However, you can have the application include unregistered components in the .NETFramework Components dialog by editing the project_name.APP file to add this
parameter:
[Execution Environment]DotNetControlPath=OptionalPath
For example:
[Execution Environment]
DotNetControlPath=C:\DOTNET CONTROLS BACKUP
Thereafter, the .NET Framework Components dialog will list all registered components and
all components found in the specified directory.
3.
By default, a new .NET Control object is placed in the upper-left corner of your project screen.Click on the object and drag it to where you want it placed.
4.
Once the object is placed, double-click on it to open its Object Properties dialog.
Figure 2. Object Properties: .NET Control
5.

8/22/2019 User Guide Indu Soft
http://slidepdf.com/reader/full/user-guide-indu-soft 334/1279
The Object Properties dialog shows the name of the .NET Component. You must assign a name(alias) to the component in the Name box (e.g., CheckBox1). This name is used to reference thecomponent when using the scripting languages (VBScript and built-in scripting).
Note: You should not configure two .NET Control objects on the same screen with the samename. For instance, if you place two CheckBox components on the same screen and assign thename CheckBox1 to one object (Name field), you cannot assign the same name to the secondobject on the same screen. You would have to assign the name CheckBox2, for example, to thesecond object.
The Property Pages button opens the standard window for configuring the Static Properties (if any).The layout and the options in this dialog depend on the implementeation of each .NET Component.Use this interface to set properties that should not be changed during runtime (fixed properties).
The Members button on the Object Properties dialog opens additional dialogs that allow you to dothe following:
Associate tags to properties of the .NET Component
Trigger methods from the .NET Component based on tag change
Configure scripts, which are executed when Events from the .NET Component occur
The following sections describe how to configure these interfaces.
Note: Although the Members dialog displays the list of all properties, methods and events, youonly have to configure the items that you need for your project.
The screen shots used in the following sections depict the CheckBox component. Although the namesof properties, methods and events varies by component, the configuration interface is the same forany .NET Component. The concepts described here apply to all of them.
Configuring Properties
The Properties tab provides a grid with the following fields:
Figure 3. Members Dialog – Properties tab

8/22/2019 User Guide Indu Soft
http://slidepdf.com/reader/full/user-guide-indu-soft 335/1279
Property: List all properties available from the .NET Component, and indicate their types:
Property
Icon
Property Type
Boolean
Integer
Real
String
Tag/Expression: The tag configured in this field is associated with the respective property of the .NET Component. The Action column will define whether the value of this tag will be written
to the property, or if the value of the property will be written to this tag (or both).
Action: Defines the direction of the interface between the tag or expression configured in theTag/Expression field and the .NET property, according to the following table:
Action Description
Get Read the value of the property and write it to the tag configured in theTag/Expression field.
Set Write the value from the tag or expression configured in theTag/Expression field into the property.
Get+Set Executes both actions (Get and Set). However, when opening a screenwith the .NET Component, IWS executes the Get command beforeexecuting any Set command. That is, the tag configured in theTag/Expression field is updated with the value of the property when IWSopens the screen where the .NET Component is configured.

8/22/2019 User Guide Indu Soft
http://slidepdf.com/reader/full/user-guide-indu-soft 336/1279
Action Description
Set+Get Executes both actions (Get and Set). However, when opening a screenwith the .NET Component, IWS executes the Set command beforeexecuting any Get command. That is, the property is updated with thevalue of the tag configured in the Tag/Expression field when IWS opensthe screen where the .NET Component is configured.
Note: When the value of the property is "Read-only" (cannot by overwritten by yourproject), the Action field is automatically set to Get.
Scan: Defines the polling method to get values from the propreties. For .NET Components, allproperties scan Always by default. That is, IWS keeps polling the value of the property andupdating the tag configured in the Tag/Expression field with this value.
Configuring Methods
The Methods tab provides a grid with the following fields:
Figure 4. Members Dialog – Methods tab
Method: Lists all methods available from the .NET Component.
Parameters: The tags configured in this field are associated with the corresponding method. If the method does not support any parameter, then the fixed text <None> is displayed. Otherwise,you can enter the tags that you want to associate with the parameter. When the method hasmore than one parameter, you can enter one tag for each parameter, separating them by acomma (,). For example, TagA , TagB , TagC.
Tip: When you click the Browse button ( ), it will display the list of parameters supported

8/22/2019 User Guide Indu Soft
http://slidepdf.com/reader/full/user-guide-indu-soft 337/1279
by the method, allowing you to associate one tag with each parameter.
When the method is executed, either the value of the tags are written to the parameters of themethod (input parameters), or, after the method is executed, the .NET Component writes thevalue of the parameters to the tags (output parameters).
Trigger: When the tag configured in this field changes value, the respective method of the .NETComponent is executed.
Return: The tag configured in this field receives the value returned by the method (if any).
Configuring Events
The Events tab provides a grid with the following fields:
Figure 5. Members Dialog – Events tab
Event: Lists all events available from the .NET Component.
Parameters: The tags configured in this field are associated with the corresponding event. If the event does not support any parameter, then the fixed text <None> is displayed. Otherwise,you can enter the tags that you want to associate with the parameter. When the event hasmore than one parameter, you can enter one tag for each parameter, separating them by acomma (,). For example, TagA , TagB , TagC.
Tip: When you click the Browse button ( ), it will display the list of parameters supportedby the event, allowing you to associate one tag with each parameter.
When the event occurs, either the value of the tags are written to the parameters of themethod (input parameters), or, after the event occurs, the .NET Component writes the value of the parameters to the tags (output parameters).

8/22/2019 User Guide Indu Soft
http://slidepdf.com/reader/full/user-guide-indu-soft 338/1279
Script: The script configured in this field will be executed when the event is triggered by the.NET Component.
Tip: When you click the Browse button ( ), it will display a dialog with the complete scriptassociated with the event. The main dialog displays only the expression configured in thefirst line of the script.
Parent topic: Screens and GraphicsInduSoft Web Studio v7.0 Technical ReferenceCopyright © 2003–2010 Indusoft, Inc.

8/22/2019 User Guide Indu Soft
http://slidepdf.com/reader/full/user-guide-indu-soft 339/1279
Screens and Graphics >
Linked PictureOn the Graphics tab, in the Libraries group, click Linked Picture to paste a linked picture onto theactive screen, while maintaining a connection to the source. A linked picture is information (theobject) created in a source file (another project or another screen). The linked picture isautomatically updated whenever you update the source file, but the picture does not become part of the screen. If you put a picture file in a project folder or a sub-folder, you can download the file withthe project to the runtime workstation.
Tip: You can associate a linked picture (path and name) to a string tag value so you can switchfrom one picture to another dynamically during runtime by modifying the string tag name.
Parent topic: Screens and GraphicsInduSoft Web Studio v7.0 Technical ReferenceCopyright © 2003–2010 Indusoft, Inc.

8/22/2019 User Guide Indu Soft
http://slidepdf.com/reader/full/user-guide-indu-soft 340/1279
Screens and Graphics >
Applying animations to screenobjectsUse the Animations group to apply animations to a screen object or group of objects. Animationsenable you to modify object properties on the fly (during runtime) according to tag values. Someanimations also enable you to execute commands or insert values (set points) to the tags.
Figure 1. Animations group
Command animation
Hyperlink animation
Bargraph animation
Text Data Link animation
Color animation
Position animation
The Position animation allows you to move an object horizontally and/or vertically duringruntime.
Resize animation
The Resize animation allows you to increase or decrease the size of an object during runtime.
Rotation animation
Parent topic: Screens and GraphicsInduSoft Web Studio v7.0 Technical ReferenceCopyright © 2003–2010 Indusoft, Inc.

8/22/2019 User Guide Indu Soft
http://slidepdf.com/reader/full/user-guide-indu-soft 341/1279
Screens and Graphics > Applying animations to screen objects >
Command animationOn the Graphics tab, in the Animations group, click Command to add the animation to a selectedobject or group of objects. The animation enables you to click on the object or press a pre-definedkey to execute the command at runtime. Double-click on the object to view its object properties.
Figure 1. Object Properties: Command
The Command animation provides one tag for each one of the events supported by it. Notice thatmore than one event can be configured simultaneously for the same Command animation:
On Down: Executes the command/script once when the user clicks on the object with the leftmouse button.
On While: Keeps executing the command/script continuously while the mouse pointer ispressed on the object. The period (in milliseconds) of execution for the command/script is set inthe Rate field from the Configuration dialog screen, except for the VBScript option, which isexecuted as fast as possible.
On Up: Executes the command/script once when the user releases the left mouse button on the
object.
On Right Down: Executes the command/script once when the user clicks on the object withthe right mouse button.
On Right Up: Executes the command/script once when the user releases the right mousebutton on the object.
On Double Click: Executes the command/script once when the user double-clicks on the

8/22/2019 User Guide Indu Soft
http://slidepdf.com/reader/full/user-guide-indu-soft 342/1279
object with the left mouse button.
Note:
The runtime project handles touchscreen actions the same as mouse pointer actions.
The events On Right Down, On Right Up and On Double Click are not supported inprojects running on Windows Embedded target systems.
When creating a project for a touchscreen device, keep in mind that events On RightDown and On Right Up cannot be triggered on such devices.
Type menu: This setting defines the type of action that must be executed by the event of theCommand animation. Notice that each event has its own type. Therefore, the same Commandanimation can be configured with different types of action for different events. The followingtypes are supported:
Type Description
Built-inLanguage Allows you to configure a script using the IWS built-in language. When thistype is selected, the user can configure up to 12 expressions for eachevent in the Expression column. The expressions are executedsequentially from the first row until the last one when the event istriggered. The result of each expression is written to the tag configured inthe Tag column (if any). Consult the Built-in Scripting Language
chapter for more information.
VBScript Allows you to configure a script using the standard VBScript language.When this type is selected, the user can configure a script in the VBScripteditor for the Command animation. Consult the VBScript chapter forfurther information about the VBScript language.
Open Screen Allows you to configure the Command animation to open a specific screenwhen the event is triggered during runtime. This type is equivalent to theOpen function. You can either type the screen name in the Open Screen
field or browse it. Furthermore, you can type a string tag between curly
brackets {TagName} in this field. When the event is executed, the projectwill attempt to open the named screen.
Close Screen Allows you to configure the Command animation to close a specificscreen when the event is triggered during runtime. This type is equivalentto the Close function. You can either type the screen name in the Close
Screen field or browse it. You can also type a string tag between curlybrackets {TagName} in this field. When the event is executed, the projectwill attempt to close the named screen.
Set Tag Allows you to configure the Command animation to set a tag when theevent is triggered during runtime. You can either type the tag name in theSet Tag field or browse it. When the event is executed, the project will
write the value 1 to the tag configured in this field.
Reset Tag Allows you to configure the Command animation to reset a tag when theevent is triggered during runtime. You can either type the tag name in theReset Tag field or browse it. When the event is executed, the project willwrite the value 0 to the tag configured in this field.
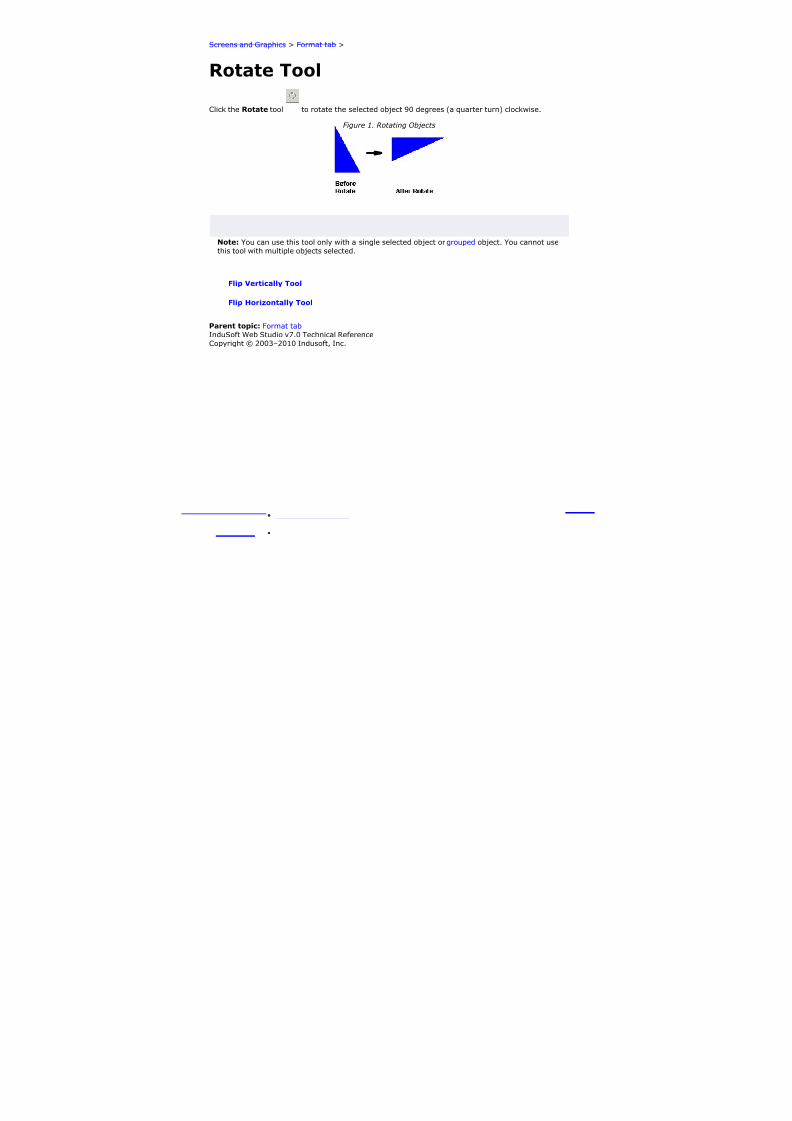
8/22/2019 User Guide Indu Soft
http://slidepdf.com/reader/full/user-guide-indu-soft 343/1279
Type Description
Toggle Tag Allows you to configure the Command animation to toggle a tag when theevent is triggered during runtime. You can either type the tag name in theToggle Tag field or browse it. When the event is executed, the projectwill toggle the value of the tag configured in this field.
Config button: Launches the Configuration dialog, where the Command animation can be fullyconfigured.
Back to button: Click to go back to the object properties of the underlying Button object.
Configuration dialog
This dialog allows you to fully configure the Command animation…
Figure 2. Configuration dialog
The event tabs (e.g., On Down, On While, etc.) and the Type menu are the same as in the Object

8/22/2019 User Guide Indu Soft
http://slidepdf.com/reader/full/user-guide-indu-soft 344/1279
Properties dialog described above. The remaining settings are shared for all events:
Options pane:
Enable Focus checkbox: When this option is checked, the object that the Commandanimation was applied to can receive the focus during runtime by the navigation keys.
Force checkbox: When this option is checked, any tag that receives a value will generateevents based on its change, even if the value of the tag in question does not change. Forinstance, if a tag has the value 0 and the Command animation overwrites the same value0 to this tag, any other task in the runtime project will recognize that this tag changedvalue (even if it did not) after executing the animation. This option is useful when youwant to make sure that actions driven by tag changes (e.g., Write on Tag Change from acommunication driver) are triggered after the Command animation is executed.
Note: For projects created with InduSoft Web Studio v6.1+SP3 or earlier, the Force
option is enabled by default and cannot be disabled.
Beep checkbox: When this option is checked, a short beep is played when the Command
is executed. This option is useful to provide an audio feed-back to the user, indicating that
the Command was executed. It does not indicate, however, if the action triggered by theCommand animation was successful or not.
Release checkbox: When this option is checked, the On Up event is executed when youdrag the cursor (or your finger) out of the object area (whether the button was released ornot). This option is useful to make sure that the On Up event will always be executed afteran On Down event, even if the user releases the mouse cursor out of the object areabefore releasing it.
Confirm checkbox: When this option is checked, user will have to answer a confirmationquestion before executing the command. This option is useful for decreasing the accidentaltriggering of critical events during runtime.
E-Sign checkbox: When this option is checked, the user will be prompted to enter the
Electronic Signature before executing the command.Key Only checkbox: When this option is checked, the user can only use the keyboardshortcut (configured in the Key pane described below) to execute commands.
Disable: Disables action by the user when the result of the expression configured in this field isTRUE (value different from 0).
Security: Security access level required to use the Command animation.
Key pane: Shortcut used to trigger the events On Down, While Down and On Up using akeyboard. (In other words, pressing this keyboard shortcut is the same as clicking the leftmouse button.) This option is especially useful when creating projects for runtime devices thatdo not provide a mouse or touch-screen interface — the keyboard is the only physical interfaceavailable to interact with your project during runtime.
Shift, Ctrl, or Alt boxes: Click to create a key combination key, meaning the Shift, Ctrland/or Alt key must be pressed with the key specified in the drop-down list.
Click the browse button (…) to open the Key Modifer dialog, which enables you to modifyyour combination keys. You can choose Left, Right or Left or Right to specify theposition on the keyboard of the Shift, Ctrl or Alt key in the key combination. If you chooseLeft or Right, the command will be executed any time either of these keys is pressed in

8/22/2019 User Guide Indu Soft
http://slidepdf.com/reader/full/user-guide-indu-soft 345/1279
combination with the key specified in the drop-down list.
Parent topic: Applying animations to screen objects
Related information
Hyperlink animationBargraph animationText Data Link animation
Color animationPosition animationResize animationRotation animation
InduSoft Web Studio v7.0 Technical ReferenceCopyright © 2003–2010 Indusoft, Inc.

8/22/2019 User Guide Indu Soft
http://slidepdf.com/reader/full/user-guide-indu-soft 346/1279
Screens and Graphics > Applying animations to screen objects >
Hyperlink animationOn the Graphics tab, in the Animations group, click Hyperlink to add the animation to a selectedobject or group of objects. Applying this animation allows you to click on the object(s) duringexecution to launch the default browser and load the specified URL.
Double-click on the object to open the Object Properties dialog.
Figure 1. Object Properties: Hyperlink
You can use this dialog to specify the following parameters:
Hyperlink Type combo-box: Click the combo-box button to select a URL protocol from the list.The project uses this protocol when it loads the URL.
URL field: Type the URL address you want to load.
Tip: You are not required to enter the protocol type in the URL field. When you select aprotocol type from the Hyperlink Type list, the project automatically adds the protocol'sprefix to the URL address.
Disable field: Type a value greater than zero into this field to disable the hyperlink Commandanimation for the selected object(s).
E-Sign checkbox: When this option is checked, the user will be prompted to enter the ElectronicSignature before executing the animation.
Security field: Type a value into this field to specify a security level for the object(s). If a user
logs on but does not have the required security level, the project disables the hyperlinkcommand for the object(s).
Parent topic: Applying animations to screen objects
Related information
Command animation

8/22/2019 User Guide Indu Soft
http://slidepdf.com/reader/full/user-guide-indu-soft 347/1279
Bargraph animationText Data Link animationColor animationPosition animationResize animationRotation animation
InduSoft Web Studio v7.0 Technical Reference
Copyright © 2003–2010 Indusoft, Inc.

8/22/2019 User Guide Indu Soft
http://slidepdf.com/reader/full/user-guide-indu-soft 348/1279
Screens and Graphics > Applying animations to screen objects >
Bargraph animationOn the Graphics tab, in the Animations group, click Bargraph to add bar graph properties to aselected object, then double-click on the object to open the Object Properties dialog.
Figure 1. Object Properties: BarGraph
Use the Object Properties dialog to specify the following parameters:
Tag/Expression field: Type a tag or expression that evaluates the bar graph level. You alsocan click the icon to browse your directories for an existing tag or expression.
Minimum Value field: Type a numeric constant or a tag value into this field to define theminimum value used to calculate the height (if vertical) or width (if horizontal) of the bars.
Maximum Value field: Type a numeric constant or a tag value into this field to define themaximum value used to calculate the height (if vertical) or width (if horizontal) of the bars.
If you do not specify a value for this field, the application opens a dialog requesting you confirmcreation of the tag.
Tip: The application also allows you to enter constants in tag/numeric value fields.Constant values (defined by the # character) are equivalent to numeric values, except thatconstants display in the Tag Replace dialog. You may find constants useful fordocumentation purposes or for creating generic objects.
For example: #Name:100.
Where the value (100) following the semicolon (:) is the constant, and Name is a constantmnemonic only and not added to database.
Foreground Color: To specify a fill color for the bars, click the combo-box button. When theColor dialog displays, click on a color to select it, and then close the dialog.
Direction area: Click the Vertical or Horizontal radio button to specify the direction of thebar graph.

8/22/2019 User Guide Indu Soft
http://slidepdf.com/reader/full/user-guide-indu-soft 349/1279
Orientation area: Click the Up, Center, or Down radio button to specify the orientation of themaximum and minimum values when drawing the bars.
Parent topic: Applying animations to screen objects
Related information
Command animationHyperlink animation
Text Data Link animationColor animationPosition animationResize animation
Rotation animation
InduSoft Web Studio v7.0 Technical Reference
Copyright © 2003–2010 Indusoft, Inc.

8/22/2019 User Guide Indu Soft
http://slidepdf.com/reader/full/user-guide-indu-soft 350/1279
Screens and Graphics > Applying animations to screen objects >
Text Data Link animationOn the Graphics tab, in the Animations group, click Text Data Link to add the animation input oroutput text property to a selected Text object. Applying the Text Data Link property allows you toinsert and display tag values in real time if you are using the keyboard or on-screen keypad to run aproject.
Note: You can only apply this animation to Text objects that include one or more # characters.Each # represents one character of input/output. You can combine # characters with regular textin the same Text object — for example, MyLabel ##### or $###.##.
It's important to remember that the runtime project will always display the most significantdigits of a numeric value, regardless of the number or placement of # characters in the text. Thatmeans if you do not have sufficient # characters to display the value, then it will be transformedin some way depending on the format of the value (as set by the Fmt option described below):
In Decimal format, the number of decimal places is determined by the position of thedecimal separator in the ### text. However, if you do not have enough # characters to theleft of the decimal separator to display the whole value, then the whole value will overrunthe fractional value. For example, if you try to display a value of 112.64 in #.##, you will see112.
In Hexa and Binary formats, if you have more # characters than you need to display the
value, then the runtime project will fill in with leading zeroes. If you have less charactersthan you need, then the value will simply be truncated.
In Auto format, the runtime project will ignore the number of # characters and display theentire numeric or string value. Numeric values will be displayed in decimal format with theircomplete whole and fractional values, regardless of the placement of the decimal separatorin the ### text. Given an exceptionally large value or long string, this may disrupt the layoutof your screens.
Double-click on the object to open the Object Properties dialog. You can use this dialog to specify thefollowing parameters:
Figure 1. Object Properties: Text Data Link

8/22/2019 User Guide Indu Soft
http://slidepdf.com/reader/full/user-guide-indu-soft 351/1279
Tag/Expression text field: Type one of the following into the field:
The name of a tag on which to perform an input or output operation; or
An expression on which to perform an output operation only.
You can also click the browse button … to open the Object Finder to find an existing tag orexpression.
Note: If the configured tag/expression is invalid, then during runtime, the placeholdercharacters (###) will be displayed instead.
Format combo-box: Click to select how the numeric value (if any) of the specified tag orexpression will be formatted and displayed on-screen. Available options include Decimal, Hexa
(i.e., hexadecimal), Binary and Auto. If you select Auto, then the value will be formattedaccording to the virtual table created by the SetDecimalPoints function.
This option does not actually change the specified tag or expression in any way. For example,Tag/Expression is set to a tag of Integer type, Input Enabled is checked, and Fmt is set toHexa. You may input a new value in hexadecimal format, but it is saved in your project
database as an integer.
Input Enabled checkbox: Click (check) this option to allow user input to the specified tag.Disable (uncheck) this option to only display the output from the specified tag or expression.
Back to text: Click to go back to the object properties of the underlying Text object.
Minimum Value field: Enter a minimum value for the tag associated with this Text object. Auser will not be permitted to input a number lower than this value.
Maximum Value field: Enter a maximum value for the tag associated with this Text object. Auser will not be permitted to input a number greater than this value.
Password checkbox: Click (check) this option to hide password text entries by replacing thetext with asterisks (*).
Confirm checkbox: Click (check) this option to require users to confirm any new values setduring runtime.
Auto Size checkbox: Click (check) this option to automatically resize the Text object to fit theoutput. This option is not available if Input Enabled is checked (see above).
E-Sign checkbox: When this option is checked, the user will be prompted to enter the ElectronicSignature before changing the tag value.
VK: Virtual Keyboard type used for this object. You need to select the Virtual Keyboard optionin the Viewer settings (Viewer on the Project tab of the ribbon) before configuring the VirtualKeyboard for this interface.
Disable field: Type a value greater than zero in this field to disable the tag's data inputproperty.
Security field: Type a value in this field to specify the security level for a specific data inputobject (as defined in the Security section).
Parent topic: Applying animations to screen objects
Related information
Command animation

8/22/2019 User Guide Indu Soft
http://slidepdf.com/reader/full/user-guide-indu-soft 352/1279
Hyperlink animationBargraph animationColor animationPosition animationResize animationRotation animation
InduSoft Web Studio v7.0 Technical Reference
Copyright © 2003–2010 Indusoft, Inc.

8/22/2019 User Guide Indu Soft
http://slidepdf.com/reader/full/user-guide-indu-soft 353/1279
Screens and Graphics > Applying animations to screen objects >
Color animationOn the Graphics tab, in the Animations group, click Color to add the animation to a selectedobject. The Colors animation allows you to modify the color of a static object during runtime based onthe value of a tag or expression.
Double-click on the object to open the Object Properties dialog.
Figure 1. Object Properties: Colors
You can use this dialog to specify the following parameters:
Type: Determines the mode in which this animation works:
By Limit: When selecting this type, you can specify up to four limits (Change Limit) for
this animation and a color for each limit. When the value of the tag or expressionconfigured in the Tag/Expr field reaches the limits, the color associated with the respectivelimit is applied to the object.
By Color: When selecting this type, you can specify the code of the color that must beapplied to the object directly in the Tag/Expr field. Using this code, you can apply any colorsupported by your device to the object.
Tip: You can configure the RGBColor function in the Tag/Expr field when Type = By Color.This allows you to configure the color by its RGB codes. See Color Interface for a table withthe codes for the most commonly used colors.
Tag/Expression field: Type the name of a tag or expression you want to monitor. When Type= By Limit, IWS compares the result of the tag/expression with the specified Change Limits todetermine the proper color for the selected object. When Type = By Color, the result of this fieldsets the color that will be applied to the object.
Change Limit field: Type a limit value (a numeric constant or tag) for the color change. Thenumbers must be configured in ascendant order according to the following sequence of thefields displayed on the Object Properties dialog: Upper left, lower left, upper right and lower

8/22/2019 User Guide Indu Soft
http://slidepdf.com/reader/full/user-guide-indu-soft 354/1279
right field. If you click on the More button, you can configure up to 16 different limits for thecolor animation.
Figure 2. Color Limits dialog
Color combo box: Click the combo-box button to associate a color with each color change limit.When the Color dialog opens, click a color to select it, and then close the dialog.
Blink combo-box: Click the combo-box button to specify whether the color change will blink,
and how fast it will do so.
Note: The following fields are automatically disabled (grayed out) when Type = By Color:Change Limit, Color and Blink.
Parent topic: Applying animations to screen objects
Related information
Command animationHyperlink animation
Bargraph animationText Data Link animationPosition animationResize animationRotation animation
InduSoft Web Studio v7.0 Technical ReferenceCopyright © 2003–2010 Indusoft, Inc.

8/22/2019 User Guide Indu Soft
http://slidepdf.com/reader/full/user-guide-indu-soft 355/1279
Screens and Graphics > Applying animations to screen objects >
Position animationThe Position animation allows you to move an object horizontally and/or vertically during runtime.
On the Graphics tab, in the Animations group, click Position to add the animation to an object.Double-click on the object to open its Object Properties dialog.
Figure 1. Object Properties: Position
Use the dialog to configure the following properties:
Show on condition text box: Configure a tag/expression in this field to control when theobject is shown. When the tag/expression is TRUE (i.e., any non-zero value), the object isshown. When the value is FALSE (i.e., 0 or a blank space), the object is not shown. You can alsoleave the field blank to always show the object.
Slider check box: Click (check) this option to operate the object like a slider, which means thatyou can drag the object around the screen to send values to the configured tags. (See Movebelow.)
Click the Slider button to configure additional settings:
Disable text box: Configure a tag/expression in this field to control when sliding isdisabled. When the value of the tag/expression is TRUE (i.e., any non-zero value), slidingis disabled. When the value is FALSE (i.e., 0 or a blank space), sliding is enabled.
Security text box: Enter the security level required to use the object as a slider.
Move area: Configure these settings to determine how the object moves on the screen:
Tag / Expression text boxes: The meaning of these boxes depends on whether theSlider option is enabled (see above):
Expression text box: If the Slider option is not enabled, then configure either a tagor an expression in this field. The current value of the tag / expression determinesthe current position of the object. As the value changes, the object is moved on thescreen.
Tag text box: If the Slider option is enabled, then enter only an Integer or Real tagin this field. The tag will receive a value that is equivalent to the current position of the object. As the user moves the object, the value is changed.
For the Horz (horizontal) position, the value increases as the object moves to the right andit decreases at the object moves to the left. For the Vert (vertical) position, the valueincreases as the object moves to the bottom and it decreases at the object moves to thetop.
Range text boxes: Enter the minimum and maximum values for the tag / expression. If the actual value goes outside of its range, then the value is ignored and the limit is usedinstead.

8/22/2019 User Guide Indu Soft
http://slidepdf.com/reader/full/user-guide-indu-soft 356/1279
Position text boxes: Enter values to specify how far (in pixels) the object can move fromits starting position. The starting position is equal to "0,0". Values greater than 0 allow theobject to move right and down, and values less than 0 allow the object to move left andup.
During runtime, the object's position is proportional to the tag / expression value within itsrange. For example, if Position is 0 to 100 and Range is 0 to 10, then each increment inthe value will move the object 10 pixels. This is true for both Horz and Vert.
Reference drop-down lists: Select a reference point on the object. The following tableshows how your selections for Horz and Vert work in combination:
LEFT CENTER RIGHT
TOP
CENTER
BOTTOM
This reference point is meaningful only if you have the Size animation added to the sameobject. The position of the object is always based on this reference point, regardless of thesize or shape of the object.
Parent topic: Applying animations to screen objects
Related information
Command animationHyperlink animationBargraph animationText Data Link animationColor animationResize animationRotation animation
InduSoft Web Studio v7.0 Technical ReferenceCopyright © 2003–2010 Indusoft, Inc.

8/22/2019 User Guide Indu Soft
http://slidepdf.com/reader/full/user-guide-indu-soft 357/1279
Screens and Graphics > Applying animations to screen objects >
Resize animationThe Resize animation allows you to increase or decrease the size of an object during runtime.
On the Graphics tab, in the Animations group, click Resize to add the animation to an object.Double-click on the object to open its Object Properties dialog.
Figure 1. Object Properties: Size
Use the dialog to configure the following properties:
Tag text boxes: Enter the tags that will control the Height and Width of the object. Leaveeither field blank if you don't want the object to change size in that dimension.
Range text boxes: Enter the minimum and maximum values for the specified tag(s). If a tag's
actual value goes outside of its range, then the value is ignored and the limit is used instead.Size (%) text boxes: Enter the minimum and maximum values for the size of the object. Theminimum value can be as low as 0% (making the object effectively invisible), and the maximumvalue can be as high as you want. 100% is the original size of the object when you draw it inthe Screen Editor, so 200% would be double the original size, and so on.
During runtime, the object's size is proportional to the tag value within its range. For example, if Size (%) is 0 to 100 and Range is 0 to 10, then each increment in the value will increase theobject size by 10%. This is true for both Height and Width.
Reference drop-down lists: Select a reference point to determine the directions in which theobject will change size. The following table shows how your selections for Height and Widthwork in combination:

8/22/2019 User Guide Indu Soft
http://slidepdf.com/reader/full/user-guide-indu-soft 358/1279
LEFT CENTER RIGHT
TOP
CENTER
BOTTOM
Parent topic: Applying animations to screen objects
Related information
Command animationHyperlink animationBargraph animationText Data Link animationColor animationPosition animationRotation animation
InduSoft Web Studio v7.0 Technical ReferenceCopyright © 2003–2010 Indusoft, Inc.

8/22/2019 User Guide Indu Soft
http://slidepdf.com/reader/full/user-guide-indu-soft 359/1279
Screens and Graphics > Applying animations to screen objects >
Rotation animationOn the Graphics tab, in the Animations group, click Rotation to add the animation to an OpenPolygon, Closed Polygon, Line, or Linked Picture object. Double-click on the object to open the ObjectProperties dialog.
Figure 1. Object Properties: Rotation animation
Use this dialog to specify the following parameters:
Tag/Expression field: Enter a Tag name or expression to associate with the Rotationanimation. The value of Tag/Expression determines the actual rotation of the object; as thevalue changes, so does the amount of rotation.
Range area: Enter the Minimum and Maximum values allowed for Tag/Expression. Values
less than the minimum and greater than the maximum are disregarded.
Rotation (degrees) area: Enter the Start and End positions (in degrees) of the object. Theactual rotation is proportional to the value of Tag/Expression within Range. An object canrotate up to 360 degrees, and it rotates clockwise by default.
Tip: For example, a Rotation animation has the following settings: Minimum is 0,Maximum is 100, Start is 0, and End is 180. If the current value of Tag/Expression is50 (i.e., halfway between Minimum and Maximum), then the actual rotation of the object is
90 degrees (i.e., halfway between Start and End). A value of 25 is equal to 45 degrees, avalue of 75 is equal to 135 degrees, and so on.
Reference combo-box: Select one of the following as a pivot point on which to rotate theobject:
Left-Top: Upper-left corner of the object.
Left-Bottom: Lower-left corner of the object.
Center: Center of the object.

8/22/2019 User Guide Indu Soft
http://slidepdf.com/reader/full/user-guide-indu-soft 360/1279
Right-Top: Upper-right corner of the object.
Right-Bottom: Lower-right corner of the object.
You can fine tune the pivot point by configuring the Offset settings described below.
Advanced button: Click to open the Advanced dialog, where you can configure the followingsettings:
Figure 2. Object Properties: Rotation animation – Advanced Dialog
Offset (pixels) area: Enter the number of pixels by which to offset the Reference (i.e.,pivot point) on the X axis and/or Y axis.
Counter Clockwise checkbox: Click (enable) this option to make the object rotatecounterclockwise instead of clockwise.
Parent topic: Applying animations to screen objects
Related information
Command animationHyperlink animationBargraph animationText Data Link animationColor animationPosition animation
Resize animation
InduSoft Web Studio v7.0 Technical ReferenceCopyright © 2003–2010 Indusoft, Inc.

8/22/2019 User Guide Indu Soft
http://slidepdf.com/reader/full/user-guide-indu-soft 361/1279
Screens and Graphics > Format tab >
Move to Front and Move to BackIWS assigns a unique identification number (ID#) to every object on the screen. These ID#s alwaysstart at zero and range up to the total number of objects on the screen. You can click on an object todisplay its ID# in the status bar.
IWS uses ID#s to determine whether an object displays in front of, or behind, another object on thescreen. Objects with lower ID#s display behind objects with higher ID#s.
Use the following object layer tools to move selected object(s) behind or in front of another screenobject(s).
Note: You can use these tools only with a single selected object or group of objects. You cannotuse these tools with multiple objects selected.
Also, if you select a group of objects and move them the behind or in front of another object,
then the selected group of objects maintain their original display order.
Click the Move to back tool to move a selected object or objects behind all other objects on thescreen. IWS assigns the object the lowest ID# and moves that object behind all other objects on thescreen.
Figure 1. Moving Objects to Back
Note: Alternatively, right-click on an object and select Move to back from the object's shortcutmenu.
Click the Move to front tool to move a selected object or objects in front of all other objects on thescreen. IWS assigns the object the highest ID# and moves that object behind all other objects on thescreen.
Figure 2. Moving Objects to Front

8/22/2019 User Guide Indu Soft
http://slidepdf.com/reader/full/user-guide-indu-soft 362/1279
Note: Alternatively, right-click on an object and select Move to front from the object's shortcutmenu.
Parent topic: Format tabInduSoft Web Studio v7.0 Technical ReferenceCopyright © 2003–2010 Indusoft, Inc.

8/22/2019 User Guide Indu Soft
http://slidepdf.com/reader/full/user-guide-indu-soft 363/1279
Screens and Graphics > Format tab >
Move Backward and Move ForwardIWS assigns a unique identification number (ID#) to every object on the screen. These ID#s alwaysstart at zero and range up to the total number of objects on the screen. You can click on an object todisplay its ID# in the status bar.
IWS uses ID#s to determine whether an object displays in front of or behind another object on thescreen. Objects with lower ID#s display behind objects with higher ID#s.Use the following objectlayer tools to move selected object(s) behind or in front of another screen object(s).
Note: You can use these tools only with a single selected object or group of objects. You cannotuse these tools with multiple objects selected. Also, if you select a group of objects and movethem the behind or in front of another object, the selected group of objects maintain theiroriginal display order.
Click the Move backward tool to move the selected object or group one layer below the next objecton the screen. (Alternatively, right-click on the object and select Move backward from the shortcutmenu.) IWS assigns the selected object the next available ID# less than the object behind which itwas moved.
Click the Move forward tool to move the selected object or group one layer above the next objecton the screen. (Alternatively, right-click on the object and select Move forward from the shortcutmenu.) IWS assigns the selected object the first available ID# greater than the object in front of which it was moved.
Parent topic: Format tabInduSoft Web Studio v7.0 Technical ReferenceCopyright © 2003–2010 Indusoft, Inc.

8/22/2019 User Guide Indu Soft
http://slidepdf.com/reader/full/user-guide-indu-soft 364/1279
Screens and Graphics > Format tab >
Group and Ungroup ToolsUse the following tools to group and ungroup two or more selected objects.
Note: All objects with animations and Group of Symbols objects (which includes most symbolsand library objects) have multiple Object Properties dialogs and properties. You can use thedrop-down list on the Object Properties dialog (Properties on the Graphics tab of the ribbon) toaccess these different dialogs and properties.
Click the Group tool to combine multiple objects into a single object to facilitate object selection andmanipulation. (You can access each part of the group in the Object Properties dialog.)
Note: Alternatively, you can right-click on an object and select Group from the object's shortcutmenu.
Click the Ungroup tool to separate a grouped object into its individual components.
Note: Alternatively, you can right-click on an object and select Ungroup from the object'sshortcut menu.
Tip: A complex grouped object can consist of several sets of grouped objects (known assubgroups). Consequently, you may find it necessary to ungroup all of the subgroups tocompletely ungroup a complex object.
Parent topic: Format tabInduSoft Web Studio v7.0 Technical Reference
Copyright © 2003–2010 Indusoft, Inc.

8/22/2019 User Guide Indu Soft
http://slidepdf.com/reader/full/user-guide-indu-soft 365/1279
Screens and Graphics > Format tab >
Align, Center and Distribute ToolsWhen you select a series of objects (two or more), you can align those objects based on the locationof the last object selected. As you select objects, solid handles display on the last object selected, andthe handles on all previously selected objects become empty (unfilled) boxes.
Note: In all of the figures provided, the rectangle represents the last object selected.
Use the following alignment tools to align a series of objects.
Click the Align left tool to align all selected objects to the left edge of the last object selected. For anexample, see the following figure:
Figure 1. Aligning Objects Left
Click the Align right tool to align all selected objects to the right edge of the last object selected. Foran example, see the following figure:
Figure 2. Aligning Objects Right
Click the Align top tool to align all selected objects to the top edge of the last objected selected. Foran example, see the following figure:
Figure 3. Aligning Object Tops

8/22/2019 User Guide Indu Soft
http://slidepdf.com/reader/full/user-guide-indu-soft 366/1279
Click the Align bottom tool to align all selected objects to the bottom edge of the last objectselected. For an example, see the following figure:
Figure 4. Aligning Object Bottoms
Click the Center Vertically tool to align all selected objects to the vertical center of the last objectselected. For an example, see the following figure:
Figure 5. Centering Objects Vertically
Click the Center Horizontally tool to align all selected objects to the horizontal center of the lastobject selected. For an example, see the following figure:
Figure 6. Centering Objects Horizontally
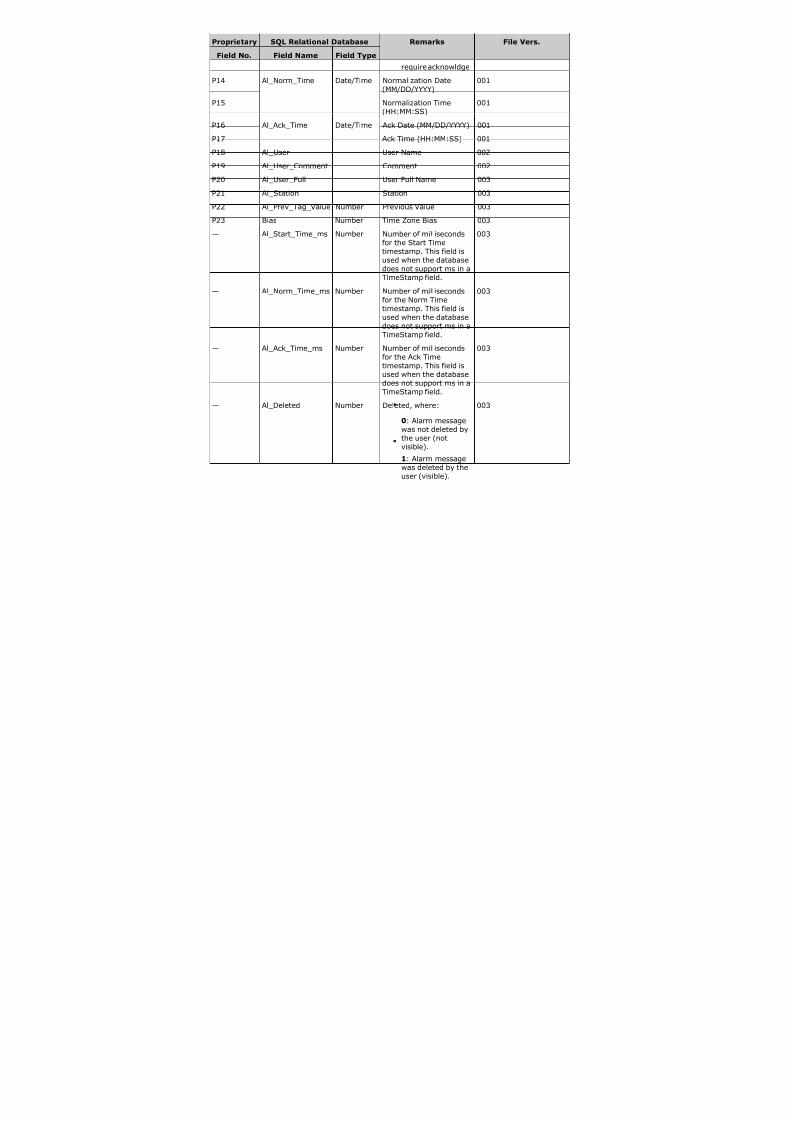
8/22/2019 User Guide Indu Soft
http://slidepdf.com/reader/full/user-guide-indu-soft 367/1279
Click the Evenly distribute horizontally tool to put an equal amount of horizontal space between aseries of objects (two or more). For an example, see the following figure:
Figure 7. Distributing Objects Horizontally
Click the Evenly distribute vertically tool to put an equal amount of vertical space between aseries of objects (two or more). For an example, see the following figure:
Figure 8. Distributing Objects Vertically
Note: The distribution tools may move the last object selected (with solid handles) by no more
than a few pixels to equally space all of the objects.
Parent topic: Format tabInduSoft Web Studio v7.0 Technical Reference
Copyright © 2003–2010 Indusoft, Inc.

8/22/2019 User Guide Indu Soft
http://slidepdf.com/reader/full/user-guide-indu-soft 368/1279
Screens and Graphics > Format tab >
Rotate Tool
Click the Rotate tool to rotate the selected object 90 degrees (a quarter turn) clockwise.
Figure 1. Rotating Objects
Note: You can use this tool only with a single selected object or grouped object. You cannot usethis tool with multiple objects selected.
Flip Vertically Tool
Flip Horizontally Tool
Parent topic: Format tabInduSoft Web Studio v7.0 Technical ReferenceCopyright © 2003–2010 Indusoft, Inc.

8/22/2019 User Guide Indu Soft
http://slidepdf.com/reader/full/user-guide-indu-soft 369/1279
Screens and Graphics > Format tab > Rotate Tool >
Flip Vertically Tool
Click the Flip Vertically tool to invert the selected object vertically. The object rotates around animaginary line through its vertical center until it is a mirror image of the original object. For anexample, see the following figure:
Figure 1. Flipping Objects Vertically
Note: You can use this tool only with a single selected object or grouped object. You cannot usethis tool with multiple objects selected.
Parent topic: Rotate ToolInduSoft Web Studio v7.0 Technical ReferenceCopyright © 2003–2010 Indusoft, Inc.

8/22/2019 User Guide Indu Soft
http://slidepdf.com/reader/full/user-guide-indu-soft 370/1279
Screens and Graphics > Format tab > Rotate Tool >
Flip Horizontally Tool
Click the Flip Horizontally tool to invert the selected object horizontally. The object rotates aroundan imaginary line through its horizontal center until it is a mirror image of the original object. Forexample, see the following figure:
Figure 1. Flipping Objects Horizontally
Note: You can use this tool only with a single selected object or grouped object. You cannot usethis tool with multiple objects selected.
Parent topic: Rotate ToolInduSoft Web Studio v7.0 Technical ReferenceCopyright © 2003–2010 Indusoft, Inc.

8/22/2019 User Guide Indu Soft
http://slidepdf.com/reader/full/user-guide-indu-soft 371/1279
Screens and Graphics > Format tab >
Resize Tools
Use the following ribbon options for resizing:
Click the Resize width tool to set the width of all selected objects to the width of the lastobject selected, or to resize one selected object so that its width equals its height.
Click the Resize height tool to set the height of all selected objects to the height of the lastobject selected, or to resize one selected object so that its height equals its width.
Tip: You can use Resize width and Resize height to turn an ellipse into a circle or a rectangleinto a square. Make sure you have only one object selected, however.
You also can use the mouse pointer and arrow keys to resize objects. When you select an object (orgroup of objects) with the pointer, handles are displayed at each corner and at the midpoint of eachside. You can use these handles as follows:
To enlarge an object, drag a handle in the direction you want to resize the object. Dragging aside handle resizes the object in one direction only (height only or width only). Dragging acorner handle resizes the entire object (height and width).
When you drag a corner handle, the object's proportions are constrained by default. To freelyresize the object, hold down the SHIFT key as you drag the handle.
To resize an object one pixel at a time, click and hold a handle and then press the arrowkeys. For the corner handles and the left and right side handles, press the LEFT ARROW andRIGHT ARROW keys. For the top and bottom handles, press the UP ARROW and DOWN ARROWkeys.
To resize an Open or Closed Polygon, draw a selection box around all of the polygon's
points and group them. You can then resize the polygon like a normal object.
Note: When you resize a Symbol, a Group, or any other collection of selected objects, all of theobjects in the collection are resized in the same direction and to the same degree.
Parent topic: Format tabInduSoft Web Studio v7.0 Technical ReferenceCopyright © 2003–2010 Indusoft, Inc.

8/22/2019 User Guide Indu Soft
http://slidepdf.com/reader/full/user-guide-indu-soft 372/1279
Screens and Graphics > Format tab >
Fill Color Tool
Click the Fill Color tool to specify a default fill color for the following objects:
Closed Polygons
Ellipses
Rounded Rectangles
Rectangles
Tip: To save development time, select several objects (of any type specified in the precedinglist) and use Fill Color to specify a default fill color for all of them at once.
Parent topic: Format tabInduSoft Web Studio v7.0 Technical Reference
Copyright © 2003–2010 Indusoft, Inc.

8/22/2019 User Guide Indu Soft
http://slidepdf.com/reader/full/user-guide-indu-soft 373/1279
Screens and Graphics > Format tab >
Line Color Tool
Click the Line Color tool to specify a line color for selected objects or to set a default color for newobjects, including the following:
Open Polygons
Closed Polygons
Lines
Ellipses
Rounded Rectangles
Rectangles
When you click the Line Color tool, the Line Selection dialog displays. Use this dialog to specify linestyles and color for the selected objects.
Tip: To save development time, you can select several of the preceding objects and use theLine Color tool to specify a line color for all of the objects at once.
Parent topic: Format tabInduSoft Web Studio v7.0 Technical ReferenceCopyright © 2003–2010 Indusoft, Inc.

8/22/2019 User Guide Indu Soft
http://slidepdf.com/reader/full/user-guide-indu-soft 374/1279
Screens and Graphics > Format tab >
Fonts ToolClick the Fonts tool to specify the font and color for selected Text objects, or to specify a default fontand color for new Text objects.
Tip: To save development time, select several Text objects and use the Fonts tool to specifyfont and color settings for all of the objects at once. (You cannot use this function for groupedText objects however.)
Parent topic: Format tabInduSoft Web Studio v7.0 Technical ReferenceCopyright © 2003–2010 Indusoft, Inc.

8/22/2019 User Guide Indu Soft
http://slidepdf.com/reader/full/user-guide-indu-soft 375/1279
Data Logging and DisplayThe Alarm and Trend tasks are used to log historical data, and the Alarm/Event and Trend Controlobjects are used to display historical data on a project screen.
These two features are normally used together, but they do not need to be; project data may belogged without being displayed during runtime, and the data displayed during runtime may be takenfrom outside the project.
Alarm worksheet
The Alarms folder enables you to configure alarm groups and tags related to each group. TheAlarm worksheet defines the alarm messages generated by the project. The primary purpose of an alarm is to inform the operator of any problems or abnormal condition during the process sohe can take corrective action(s).
Event Settings
Alarm/Event Control object
Use the Alarm/Event Control tool to add an Alarm or Event Control object to an projectscreen.
Trend worksheet
The Trend folder enables you to configure history groups that store trend curves. You can usethe Trend worksheet to declare which tags must have their values stored on disk, and to createhistory files for trend graphs. The project stores the samples in a binary history file (*.hst), andshows both history and on-line samples in a screen trend graph.
Trend Control objectThe Trend Control object displays data points (values) from different data sources in a graphicformat.
Grid object
The Grid object allows you to read/write data in a tabular format from the data source
configured in the object.
InduSoft Web Studio v7.0 Technical ReferenceCopyright © 2003–2010 Indusoft, Inc.

8/22/2019 User Guide Indu Soft
http://slidepdf.com/reader/full/user-guide-indu-soft 376/1279
Data Logging and Display >Background Tasks >
Alarm worksheetThe Alarms folder enables you to configure alarm groups and tags related to each group. The Alarmworksheet defines the alarm messages generated by the project. The primary purpose of an alarm isto inform the operator of any problems or abnormal condition during the process so he can takecorrective action(s).
The Alarm worksheet is executed by the Background Task module (see Execution Tasks). It handlesthe status of all alarms and save the alarm messages to the history, if configured to do so, but itdoes not display the alarm messages to the operator; the Alarm/Event Control screen object,available on the Graphics tab of the ribbon, must be created and configured in a screen in order todisplay alarms.
To create a new Alarm worksheet, do one of the following:
On the Insert tab of the ribbon, in the Task Worksheets group, click Alarm;Right-click the Alarms folder in the Project Explorer, and then click Insert on the shortcutmenu; or
Click New on the Application menu, click the File tab, and then select Alarm Worksheet.
To edit an existing Alarm worksheet, double-click it in the Project Explorer.
Figure 1. Alarm worksheet
You can create multiple Alarm groups (worksheets) and each group can be configured withindependent settings, such as message colors, history log enabled/disabled, and so forth.

8/22/2019 User Guide Indu Soft
http://slidepdf.com/reader/full/user-guide-indu-soft 377/1279
Each Alarm worksheet is composed of two areas:
Header: Settings applied to all tags and alarms configured in the same alarm group. Thesesettings allow you to configure the formatting of the message and the actions that must betriggered based on alarm events (e.g., print alarms, send alarms by email, and so forth). Formore information, see Header Settings.
Body: Configure alarm messages and associate them to conditions linked to tags. For moreinformation, see Body Settings.
Note:
You can configure the Alarm Group to send notifications by Email automatically, based onalarm events. For more information, see Email Settings.
The alarm properties associated to each tag (configured in the body of the alarm group)
can also be edited by the Tag Properties dialog (Properties on the Home tab of theribbon). However, before associating a tag to an alarm group, it is necessary to create thealarm group and configure the settings on its header, which will be applied to all tagsassociated to the group.
As of IWS v6.1+SP2, the Alarm task has been modified to avoid automatically
acknowledging alarms by another alarm. For example, the Hi (Lo) alarm should not beautomatically acknowledged when the HiHi (LoLo) alarm becomes active. To enable theprevious behavior, set the following key in your project (.APP) file:
[Alarm]
UseLegacyPriorityAck=1
CAUTION:
The settings configured in the body of each Alarm worksheet are stored in the Tags
Database archive(s). Therefore, changes to the tags database may affect the content
of the Alarm worksheets (body). Notice that each tag/type cannot be available inmore than one Alarm group simultaneously because the Alarm Group is a property
associated to each Tag/Alarm Type (e.g., Tag: Level; Alarm Type: Hi; Alarm Group: 2).
Alarm Worksheet Header
Alarm Worksheet Body
Setting the Alarm Database
The alarm history can be saved either in the IWS proprietary format or to an external SQL
Relational database by ADO.
Parent topic: Data Logging and DisplayParent topic: Background TasksInduSoft Web Studio v7.0 Technical ReferenceCopyright © 2003–2010 Indusoft, Inc.

8/22/2019 User Guide Indu Soft
http://slidepdf.com/reader/full/user-guide-indu-soft 378/1279
Data Logging and Display > Alarm worksheet >
Alarm Worksheet Header
The following table describes the Header settings on an Alarm worksheet:
Field Remarks Syntax
Description Description of the alarm group. It is displayed onthe workspace. This field is used fordocumentation only.
Text(upto80chars)
GroupName Name of the Alarm group. During runtime, theoperator can filter alarms based on the GroupName by the built-in Filters dialog of theAlarm/Event control object.
Text(upto32chars)
EmailSettings Launches the Email Settings dialog, where youcan configure the settings for emails sentautomatically based on alarm conditions.
Button
Advanced Launches the Advanced Settings dialog, whereyou can configure the settings for emails sentautomatically based on alarm conditions.
Button
OnLine>DisplayinAlarmControls When checked, the alarms are available to bedisplayed on the Alarm/Event Control object. Checkbox

8/22/2019 User Guide Indu Soft
http://slidepdf.com/reader/full/user-guide-indu-soft 379/1279
Field Remarks Syntax
OnLine >AckRequired When checked, the alarms requireacknowledgment. In this case, the alarms aredisplayed on the Alarm/Event Control object(Online mode) until they are acknowledged ANDnormalized.
Checkbox
OnLine >Beep When checked, the computer keeps beepingwhile there are alarm(s) to be acknowledged,currently active.
Checkbox
OnLine >SendtoPrinter When checked, the alarm messages are sent tothe printer as soon as the alarm event occurs.When using this option, you must use a matrixprinter (instead of DeskJet or LaserJet) in orderto print the message(s) and feed just one line —otherwise, each alarm will be printed in adifferent sheet of paper. The alarms will beprinted in the default printer. If you want to sendalarms to a printer different from the default
printer, you can specify the printer path/name,editing the following parameter in the
project_name.APP file:
[AlarmLog]
Device=PrinterPath/PrinterName
Checkbox
History >SavetoDisk When checked, the alarm messages are storedin the history log when they become active.
Checkbox
History
>GenerateAckMessages
When checked, the alarm messages are stored
in the history log when they are acknowledged.
Checkbox
History>GenerateNormMessages
When checked, the alarm messages are storedin the history log when they become normalized.
Checkbox
ColorsinAlarmControls>Enable
When checked, the alarms configured in thisgroup will be displayed with the colors assignedto each alarm state (Activation,Acknowledgement or Normalization),according to the colors configured in the AlarmGroup.
Color
ColorsinAlarmControls>FGandBG
You can configure the text foreground color (FG)and background color (BG) for the alarms
displayed on the Alarms/Events Control object.Each alarm state can be displayed with adifferent color schema:
Activation: Alarm active and notacknowledged
Acknowledgement: Alarm active and
Color

8/22/2019 User Guide Indu Soft
http://slidepdf.com/reader/full/user-guide-indu-soft 380/1279
Field Remarks Syntax acknowledged
Normalization: Alarm no longer activeand not acknowledged.
Email Settings for Alarm Worksheet
Advanced Settings for Alarm Worksheet
Parent topic: Alarm worksheetInduSoft Web Studio v7.0 Technical ReferenceCopyright © 2003–2010 Indusoft, Inc.

8/22/2019 User Guide Indu Soft
http://slidepdf.com/reader/full/user-guide-indu-soft 381/1279
Data Logging and Display > Alarm worksheet > Alarm Worksheet Header >
Email Settings for Alarm WorksheetIWS has the ability to send emails automatically when alarm events occur. The emails are sent usingthe standard SMTP (Simple Message Transfer Protocol). Therefore, you just need a valid emailaccount with a SMTP Server and POP3 server — it is not necessary to install any additional software,such as Microsoft Outlook.
Important: Before being email to send emails, it is necessary to execute successfully theCnfEmail function (from the built-in language) at least once. This function sets the email accountparameters used when sending emails from the project (e.g., SMTP server, user name,password, and so forth).
Figure 1. Alarms Worksheet — Email Settings
Field Remarks Syntax
Enable send automaticemail
Name of the tag associated with the alarm. Checkbox
To, Cc, Bcc Target addresses to whom the emails will besent. You can configure multiple email addressesin each box (To, Cc and/or Bcc) by separatingthe addresses with the semi-colon character(;).
Textand/or{Tag} (upto 1024 chars)

8/22/2019 User Guide Indu Soft
http://slidepdf.com/reader/full/user-guide-indu-soft 382/1279
Field Remarks Syntax
Subject When selecting "Use alarm message", the alarmmessage itself is used as the subject of the emailto be sent. When selecting "Custom", you canconfigure a custom text to be used as Subjectwhen sending the alarm.
Radio-button/Text (upto 1024 chars)
Send 1 message peremail When checking this option, each alarm is sent inan individual email and all emails are sent whenthe Send Trigger is triggered. Otherwise, allalarm messages are buffered and sent in onlyone email when the Send Trigger is triggered.You cannot disable (uncheck) this option whenthe Subject option is configured with "Use alarmmessage".
Checkbox
Remove failedmessages from thebuffer
When checking this option, the emails areremoved from the buffer after attempting tosend them, even if there was an error (failure)and the email was not sent. Otherwise, the
messages are kept in the buffer until they aresent successfully or when the buffer reaches itsmaximum size.
checkbox
Send email when alarmis
Allow you to configure which alarm events shouldgenerate emails:
Active: When the alarm becomes active.
Ack: When the alarm is acknowledged.
Norm: When the alarm is normalized.
Notice that each event can be enabled/disabledindividually.
checkbox
CurrentStatus The tag configured in this field, if any, is updatedwith the current status of the current or lastemail that the project attempted to send:
-2: Incorrect version of the INDMail.DLLlibrary.
-1: The INDMail.DLL library is corrupted.
0: SendEmailExt function is not beingexecuted.
1: Sending email(s)
2: Last email was sent successfully.3: There was an error sending the lastemail.
Tag

8/22/2019 User Guide Indu Soft
http://slidepdf.com/reader/full/user-guide-indu-soft 383/1279
Field Remarks Syntax
CurrentError The tag configured in this field, if any, is updatedwith the error message describing the result of the last email that the project attempted tosend. Therefore, when configuring a tag in thisfield, this tag must be a String type.
Tag
MessageFormat This interface allows you to configure the actualformat of the message sent by email, based onthe alarm event(s):
Day, Month, Year, Hour, Minute,Second, MS: The options checked willcompose the timestamp for the alarmmessages. MS stands for milliseconds.
Items: The options checked will composethe email message for each alarm. You canconfigure the order of the items, by usingthe Move Up and Move Down buttons.
Separator: Allow you to choose theseparator used between the items checked
in this interface.
While you configure these settings, the Sample
field displays an example of the format of themessage according to the settings beingconfigured.
Checkbox and Radio-button
SendTrigger When the alarm events are generated, they are
kept in an internal buffer (memory). When thetag configured in this field changes of value, theemail(s) on the internal buffer are sent to the
addresses configured in the To, Cc and Bccfields. After being successfully sent, the emailsare removed from the internal buffer.
Tag
Maxbuffersize Maximum number of alarm messages (events)that can be stored in the internal buffersimultaneously. When this limit is reached, thebuffer follows a FIFO (First-In, First-Out)behavior, discharging the older messages assoon as the newer messages are generated,guaranteeing that the buffer does not exceed thelimit configured in this field.
Tag or Number
Buffersize The tag configured in this field, if any, is updatedwith the number of messages (events) currentlystored in the internal buffer.
Tag

8/22/2019 User Guide Indu Soft
http://slidepdf.com/reader/full/user-guide-indu-soft 384/1279
Field Remarks Syntax
ClearBuffer When the tag configured in this field changes of value, all messages (events) currently stored inthe buffer are deleted. These messages willnever be sent.
Tag
Disablesend When the value of the tag configured in this field
is TRUE, the Email feature is temporarilydisabled. Alarm events generated while the Emailfeature is disabled will not be stored in theinternal buffer. Also, emails will NOT be sent inthis condition, even if the tag configured in thefield Send Trigger changes of value.
Tag
Parent topic: Alarm Worksheet HeaderInduSoft Web Studio v7.0 Technical ReferenceCopyright © 2003–2010 Indusoft, Inc.

8/22/2019 User Guide Indu Soft
http://slidepdf.com/reader/full/user-guide-indu-soft 385/1279
Data Logging and Display > Alarm worksheet > Alarm Worksheet Header >
Advanced Settings for AlarmWorksheet
Figure 1. Alarm Worksheet, Advanced Settings Dialog
The following table describes the Advanced settings on an Alarm worksheet:
Field Remarks Syntax
Disable When the value of the tag configured in this isTRUE, all alarms configured in this group aretemporarily disabled. This option is useful todisable alarms under special conditions (e.g.,during maintenance).
Tag
TotalAlarms The tag configured in this field, if any, is updatedwith the number of alarms from this group,which are currently active.
Tag
TotalUnack The tag configured in this field, if any, is updatedwith the number of alarms from this group,which are currently active AND have not been
acknowledged yet.
Tag
RemoteAckTrigger When the tag configured in this field change of value, all active alarms from this group areacknowledged. This option can be used toacknowledge alarms regardless of any actionfrom the operator.
Tag

8/22/2019 User Guide Indu Soft
http://slidepdf.com/reader/full/user-guide-indu-soft 386/1279
Field Remarks Syntax
DeadBandTime>Activation
Each alarm must remain continuously in itsalarm condition for the period of time specified inthis field before becoming active. This option isuseful to avoid generating alarms on intermittentconditions (e.g., noise). If this field is left inblank, the alarm becomes active as soon as its
condition is true.
Tag or Number
DeadBandTime>Normalization
Each alarm must remain continuously out fromits alarm condition for the period of timespecified in this field before becomingnormalized. This option is useful to avoidnormalizing alarms on intermittent conditions(e.g., noise). If this field is left in blank, thealarm become normalized as soon as itscondition is no longer true.
Tag or Number
DeadBandTime>TimeStamp/Value
Each alarm maintains a time stamp of the lastsignificant activity, along with the value of thetag at that time. You can select the type of activity that updates the time stamp:
Activation/Norm (default): The timewhen the dead band ended — that is, whenthe alarm becomes activated or normalized.
Last Tag Change: The time when thevalue of the tag last changed during thedead band.
Start Condition: The time when the deadband started.
Combo
Parent topic: Alarm Worksheet HeaderInduSoft Web Studio v7.0 Technical ReferenceCopyright © 2003–2010 Indusoft, Inc.

8/22/2019 User Guide Indu Soft
http://slidepdf.com/reader/full/user-guide-indu-soft 387/1279
Data Logging and Display > Alarm worksheet >
Alarm Worksheet Body
The following table describes the Body settings on an Alarm worksheet:
Field Remarks Syntax
TagName Name of the tag associated with the alarm. Tag
Type Type of the alarm:
HiHi: Activates the alarm if the tag value is equalor higher than the limit.
Hi: Activates the alarm if the tag value is equal orhigher than the limit. (For Boolean tags, if thevalue is 1.)
Lo: Activates the alarm if the tag value is equal orlower than the limit. (For Boolean tags, if the valueis 0.)
LoLo: Activates the alarm if the tag value is equal
or lower than the limit.Rate: Activates the alarm if the tag value variesfaster than the rate specified to the alarm. (ForBoolean tags, if the value changes.)
DevP: Activates the alarm if the tag value is equalor higher than the Set Point tag plus the limit.
DevM: Activates the alarm if the tag value isequal or lower than the Set Point tag minus thelimit.
When using the types Rate, DevP and DevM, it isnecessary to configure additional settings by the TagProperties dialog (Properties on the Home tab of theribbon).
Combo-box

8/22/2019 User Guide Indu Soft
http://slidepdf.com/reader/full/user-guide-indu-soft 388/1279
Field Remarks Syntax
Limit Limit associated with each alarm. The limits can bemodified dynamically during runtime, by the tag fieldsHiHiLimit, HiLimit, LoLimit, LoLoLimit, Rate, DevP andDevM (e.g., TagLevel->HiLimit).
Number
Message Message associated to the alarm. The message can be
displayed on the Alarm/Event Control object and/orstored in the Alarm History and/or sent by Email,depending on the settings configured in the Header of the Alarm group.
Textand/or{Tag} (up to
256 chars)
Priority Priority number associated to the alarm. Whendisplaying alarms on the Alarm/Event Control object ,the operator can filter and/or sort the alarms bypriority.
Number (from 0 to 255)
Selection Alias associated to the alarm (e.g., AreaA, AreaB, etc).When displaying alarms on the Alarm/Event Controlobject, the operator can filter and/or sort the alarms bytheir selection value.
Text (up to 7 characters)
Parent topic: Alarm worksheetInduSoft Web Studio v7.0 Technical ReferenceCopyright © 2003–2010 Indusoft, Inc.

8/22/2019 User Guide Indu Soft
http://slidepdf.com/reader/full/user-guide-indu-soft 389/1279
Data Logging and Display > Alarm worksheet >
Setting the Alarm DatabaseThe alarm history can be saved either in the IWS proprietary format or to an external SQL Relationaldatabase by ADO.
On the Project tab of the ribbon, in the Settings group, click Options. The Project Settings dialog isdisplayed:
Figure 1. Project Settings - Options tab
The Alarm History and Events interface allows you to configure the following settings:
Field Remarks Syntax
History Life Time (days) The history for alarm/event messages older than thenumber of days specified in this field are automaticallydeleted, following a FIFO (First-In, First-Out) behavior.If this field is left in blank, the history of alarms/eventsare not deleted automatically.
Number

8/22/2019 User Guide Indu Soft
http://slidepdf.com/reader/full/user-guide-indu-soft 390/1279
Field Remarks Syntax
History Format Defines the format of the history of alarms/events:
Proprietary: Saves the history in the proprietaryformat. The alarm messages are saved in a textfile with the name ALyymmdd .ALH, where:
yy is the last two digits of the current year.
mm is the month.
dd is the day
There will be one history file for each day. Bydefault, the alarm history files created with theproprietary format are stored in the \Alarm sub-
folder of the project. However, it is possible todirect the alarms to a different directory by usingthe SetAppAlarmPath function from the built-inlanguage.
Database: Saves the history in a third-party SQLRelational Database (e.g., SQL Server).
Combo-box
Alarm Database When selecting Database as the format for the historyof alarms, the specific settings to interface with thethird-party SQL Relational Database can be configuredby the dialog launched when pressing this button. Forfurther details about support for third-party SQLRelational Databases, see Database Interface.
—
When saving the alarm history in the proprietary format, each alarm event is saved in a new line,using the pipe character (|) to delimiter the different fields, as illustrated below:
P1|P2|P3|P4|P5|P6|P7|P8|P9|P10|P11|P12|P13|P14|P15|P16|P17|P18|P19|P20|P21P1|P2|P3|P4|P5|P6|P7|P8|P9|P10|P11|P12|P13|P14|P15|P16|P17|P18|P19|P20|P21
.
.
P1|P2|P3|P4|P5|P6|P7|P8|P9|P10|P11|P12|P13|P14|P15|P16|P17|P18|P19|P20|P21
The format of the history both in proprietary format and in the SQL Relational Database format isdescribed in the following table:
Proprietary SQL Relational Database Remarks File Vers.
Field No. Field Name Field Type

8/22/2019 User Guide Indu Soft
http://slidepdf.com/reader/full/user-guide-indu-soft 391/1279
Proprietary SQL Relational Database Remarks File Vers.
Field No. Field Name Field Type
P1 — — File version (Current =003)
001
P2 Al_Start_Time Date/Time Start Date(MM/DD/YYYY)
001
P3 Start Time (HH:MM:SS) 001
P4 Al_Tag Text Tag Name 001
P5 Al_Message Text Alarm Message 001
P6 Al_Ack Number Ack, where:
0: Alarm wasacknowledged ordoes not requireacknowledgment
1: Alarm was not
acknowledged
001
P7 Al_Active Number Active, where:
0: Alarm is notactive
1: Alarm is active
001
P8 Al_Tag_Value Number Tag Value when theevent occurred
001
P9 Al_Group Number Alarm Group Number 001
P10 Al_Priority Number Priority Number 001
P11 Al_Selection Text Selection 001
P12 Al_Type Number Type, where:
1 is HiHi
2 is Hi(On)
4 is Lo(Off)
8 is LoLo
16 is Rate(Change)
32 is Deviation+
64 is Deviation-
001
P13 Al_Ack_Req Number Ack required, where:
0: Alarm requiresacknowledge
1: Alarm does not
001

8/22/2019 User Guide Indu Soft
http://slidepdf.com/reader/full/user-guide-indu-soft 392/1279
Proprietary SQL Relational Database Remarks File Vers.
Field No. Field Name Field Type require acknowldge
P14 Al_Norm_Time Date/Time Normalization Date(MM/DD/YYYY)
001
P15 Normalization Time(HH:MM:SS)
001
P16 Al_Ack_Time Date/Time Ack Date (MM/DD/YYYY) 001
P17 Ack Time (HH:MM:SS) 001
P18 Al_User User Name 002
P19 Al_User_Comment Comment 002
P20 Al_User_Full User Full Name 003
P21 Al_Station Station 003
P22 Al_Prev_Tag_Value Number Previous Value 003
P23 Bias Number Time Zone Bias 003
— Al_Start_Time_ms Number Number of millisecondsfor the Start Timetimestamp. This field isused when the databasedoes not support ms in aTimeStamp field.
003
— Al_Norm_Time_ms Number Number of millisecondsfor the Norm Timetimestamp. This field isused when the databasedoes not support ms in aTimeStamp field.
003
— Al_Ack_Time_ms Number Number of millisecondsfor the Ack Timetimestamp. This field isused when the databasedoes not support ms in aTimeStamp field.
003
— Al_Deleted Number Deleted, where:
0: Alarm message
was not deleted bythe user (notvisible).
1: Alarm messagewas deleted by theuser (visible).
003

8/22/2019 User Guide Indu Soft
http://slidepdf.com/reader/full/user-guide-indu-soft 393/1279
Proprietary SQL Relational Database Remarks File Vers.
Field No. Field Name Field Type
— Last_Update Date/Time Timestamp of the lastupdate for this event.
003
— Last_Update_ms Number Number of millisecondsfor the Last Event
timestamp. This field isused when the databasedoes not support ms in aTimeStamp field.
003
Tip: When saving the History Alarms in a SQL Relational Database (File Format = Database),you can customize the name of the columns created in the database by editing the
project_name.APP file, as follows:
[Alarm]
DefaultName=NewName
For example:
[Alarm]
Message=Alarm_Message
Ack=Acknowledgment
See also:
SQL Relational Databases
Studio Database Gateway
Database Appendix A: Using ODBC Databases
Configuring a Default Database for All Task History
Parent topic: Alarm worksheetInduSoft Web Studio v7.0 Technical ReferenceCopyright © 2003–2010 Indusoft, Inc.

8/22/2019 User Guide Indu Soft
http://slidepdf.com/reader/full/user-guide-indu-soft 394/1279
Data Logging and Display >
Event SettingsThis section describes IWS's logging and event-retrieval features. An event can be any tag change,generating reports or recipes, opening and closing screens, logging onto and logging off the securitysystem, and so forth. IWS saves all of these events in a log file, which can be retrieved by theAlarm/Event Control object.
Event log files are stored in the project's \Alarm folder (the same folder where the project saves alarmhistory files). The event log file names must conform to the evYYMMDD.evt format, where:
YY represents the last two digits of the year in which the event log file was generated
MM represents the month in which the event log file was generated
DD represents the day on which the event log file was generated
For example, a log file for May 7, 2003 would be ev030507.evt.
The event files (*.evt) are ASCII text files created according to the following format:
P1|P2|P3|P4|P5|P6|P7|P8|P9|P10
P1|P2|P3|P4|P5|P6|P7|P8|P9|P10
.
.
.
P1|P2|P3|P4|P5|P6|P7|P8|P9|P10
where:
P1 = File version (Current 1)
P2 = Event Type
SECURITY SYSTEM1.
DISPLAY2.
RECIPE3.
REPORT4.
CUSTOM MESSAGES5.
SYSTEM WARNING6.
LOG TAGS7.P3 = Event Time (DD/MM/YYYY HH:MM:SS.SSS )
P4 = Tag Name
P5 = Tag Value
P6 = Source (Not used)

8/22/2019 User Guide Indu Soft
http://slidepdf.com/reader/full/user-guide-indu-soft 395/1279
P7 = User Name
P8 = User Full Name
P9 = Event Message
P10 = Station
Configuring the Events SettingsUse the steps to configure the event-retrieval feature:
Select the Global tab.1.
Double-click the Event Logger icon to open the Event Settings dialog:
Figure 1. Event Settings dialog
2.
Configure the parameters on the Event Settings dialog as follows:
Enable event logger checkbox: Click (check) this box to enable event-logging.
Disable text box: Type a tag into this field. If the tag value is other than 0 (false), thenthe project automatically disables the Event Logger during runtime.
Event Database button: Click to open the Database Configuration dialog, in which youcan enter settings that will enable the project to save event history data to a database.
Settings:
Security System checkbox: Click (check) this box to include security system eventsin the historic event file. The project logs the following security system events:
Log On / Log Off users
User created/removed using the CreateUser() or RemoveUser() functions
3.

8/22/2019 User Guide Indu Soft
http://slidepdf.com/reader/full/user-guide-indu-soft 396/1279
User blocked/unblocked using the BlockUser() or UnblockUser() functions
User blocked by the security system after several attempts to enter an invalidpassword
Password expired
Password modified
Invalid Log On attempt
Display checkbox: Click (check) this box to include screen Open and Close events inthe historical event file.
Recipe checkbox: Click (check) this box to include recipe load, save, init, and deleteevents in the historical event file.
Report checkbox: Click (check) this box to include reports saved to disk or send to
printer events in the historical event file.
Custom Messages checkbox: Click (check) this box to include events generated bythe SendEvent(strEvent) function in the historical event file.
System Warning checkbox: Click (check) this box to include general systemwarnings (such as Division by zero, Attempted to access invalid array index, and soforth) in the historical event file. The project logs the following system warning
events:
Errors that occur when sending alarms by email
Tag was blocked/unblocked
Division by zero
Connection/Disconnection of the remote security system
Tags checkbox: Click (check) this box to enable and log tag changes in the historicalevent file. Configure the tags you want to log in the Tags table as follows:
Tag Name column: Type the name of the tag you want to log in the event file.
Dead Band column: Type a value to filter acceptable changes against.
For example, if you specify a Dead Band value = 5 for a tag value = 50 and the tagvalue changes to 52, the system will not register this variation in the event log file,because the variation is less than 5. However, if the tag value change is equal to orgreater than 5, the system will save the new value to the history file.
Message column: Type a string (message) related to this tag change. You canspecify tags in messages using the {tag name} syntax.
The Tags parameter can be useful if you want to generate a log file of events that are notnecessarily alarm conditions (for example, Motor On, Motor Off, and so forth).
Setting the Event Database
Parent topic: Data Logging and DisplayInduSoft Web Studio v7.0 Technical ReferenceCopyright © 2003–2010 Indusoft, Inc.

8/22/2019 User Guide Indu Soft
http://slidepdf.com/reader/full/user-guide-indu-soft 397/1279
Data Logging and Display > Event Settings >
Setting the Event Database
On the Project tab of the ribbon, in the Settings group, click Options. The Project Settings
dialog is displayed:
Figure 1. Project Settings: Options Tab
1.
In the Alarm History and Events pane, click the arrow to the right of the History Format field.Select Database.
2.
Click the Event Database button. This opens the Database Configuration dialog. Enter theapplicable data in this window. Click OK when you are done.
3.
Click OK to save the Project Settings data and close the window.4.
Event Table on a Relational Database
The fields saved in the History Event are described in the following table:

8/22/2019 User Guide Indu Soft
http://slidepdf.com/reader/full/user-guide-indu-soft 398/1279
Field Name Data Type Remarks
Version Integer This field is created only when the File Format isProprietary. Current version: 002
Event_Type Integer 1: SECURITY SYSTEM
2: DISPLAY
3: RECIPE
4: REPORT
5: CUSTOM MESSAGES
6: SYSTEM WARNING
7: LOG TAGS
Event_Time TimeStamp Timestamp indicating when the event occurred.
When the File Format is Proprietary, IWS saves the EventTime in the following format: MM/DD/YYYY
HH:MM:SS.MSS.
Event_Info String Tag Name
Value Real Tag value when the event occurred
Source String Name of the task that generated the event
User String User logged when the event occurred.
User_Full String Full name of the user logged when the event occurred.
Message String Event message
Station String Name of the station (computer) where the event occurred.
Comment String Comment (optional) typed by the operator when the eventoccurred. This field only exists for Version >=2
Previous_Value Real Tag value that occurred before the event. This field onlyexists for Version >=2
Deleted Boolean 0: Event message was not deleted
1: Event message was deleted
This field is created only when the File Format is Database.
Bias Integer Difference (in minutes) from the Time Stamp columns andthe GMT time. This field only exists for Version >=2
Last_Update TimeStamp Time Stamp when the register was created/modified. Thisfield is used to synchronize the databases when using theSecondary Database in addition to the Primary Database.This field is created only when the File Format is Database.

8/22/2019 User Guide Indu Soft
http://slidepdf.com/reader/full/user-guide-indu-soft 399/1279
Tip: When saving the Events in a SQL Relational Database (File Format = Database) you cancustomize the name of the columns created in the database by editing the project_name.APP file
as follows:
[EventLogger]
DefaultName=NewName
For example:
[EventLogger]
Event_Info=Information
Message=Event_Message
Parent topic: Event Settings
InduSoft Web Studio v7.0 Technical ReferenceCopyright © 2003–2010 Indusoft, Inc.

8/22/2019 User Guide Indu Soft
http://slidepdf.com/reader/full/user-guide-indu-soft 400/1279
Data Logging and Display >
Alarm/Event Control objectUse the Alarm/Event Control tool to add an Alarm or Event Control object to an project screen.
To create and configure an Alarm/Event Control object:
On the Graphics tab of the ribbon, in the Data Objects group, click Alarm/Event Control.1.
Click in the display, and drag the mouse to create and adjust the object's shape.2.
Double-click on the object to open the following Object Properties dialog.
Figure 1. Object Properties: Alarm/Event Control
You can use this dialog to specify the following parameters:
Select an alarm object mode in the Type pane:
Alarm Online: Display only current alarm messages.
Alarm History: Display only alarm messages from the Alarm History database.
Alarm History + Event: Display both alarm messages from the Alarm Historydatabase and logged events from the Event History database.
Event: Display only logged events from the Event History database.
Click (enable) the Show gridlines checkbox to display gridlines in the object.
Figure 2. Displaying a Grid
3.

8/22/2019 User Guide Indu Soft
http://slidepdf.com/reader/full/user-guide-indu-soft 401/1279
Click (enable) the Show Header checkbox to display a header on the object.
Figure 3. Displaying a Header
Use the Win color box to select a background color for the object. Click the color box to
open the color palette pop-up, then simply click a color to select it.
Click (enable) the Ext translation checkbox to enable the external translation of messages using the Translation Tool. (See The Translation Tool for more information.)
E-Sign checkbox: When this option is checked, the user will be prompted to enter theElectronic Signature before executing the animation.
VK: Virtual Keyboard type used for this object. You need to select the Virtual Keyboardoption in the Viewer settings (Viewer on the Project tab of the ribbon) before configuringthe Virtual Keyboard for this interface.
Fonts
Click the Fonts button to open a standard Fonts interface where you can specify display propertiesfor the message text.
Columns
Click the Columns button to open the Columns dialog where you can specify display properties forcolumns in the object.
Figure 4. Columns dialog

8/22/2019 User Guide Indu Soft
http://slidepdf.com/reader/full/user-guide-indu-soft 402/1279
The Available list contains all of the column types available for this object. The Visible listcontains all of the column types currently in use for the object.
Click the » and « buttons to move selections between the two lists.
Tip: You can configure an Alarm Control object to display recently replaced values togetherwith their new values. To do so, move both Value and Previous to the Visible list.
Click the Move Up or Move Down buttons to rearrange the order of columns in the Visible list.
Use the Label and Width fields in the Properties pane to change the default column labels andwidths at runtime.
Use the Align combo box to specify alignment (Left, Center, or Right) for the alarm message
text within a specified column.Click (enable) the Available during runtime checkbox to allow the user to add selectedcolumns to the visible list during runtime.
Use the Key box to assign a shortcut to each column. This allows you to sort the information onthe Alarm Control object by any column, using keyboard keys instead of the mouse cursor.
When you are finished, click OK to close the Column dialog.
Note: When acknowledging an alarm, the Alarm Control object sends a message to the Alarmtask with the following information: Tag Name, Type, User and Station. This is a solution tocontrol acknowledged alarms from a Thin Client.
Filters
To filter alarm messages during runtime, click the Filters button. The Filters dialog displays so youcan specify filtering parameters for the Alarm Control object.

8/22/2019 User Guide Indu Soft
http://slidepdf.com/reader/full/user-guide-indu-soft 403/1279
Figure 5. Filters dialog
Use the Group field to filter messages by the Alarm Worksheet number. The worksheets areorganized in the Alarms folder, in the Tasks tab of the Project Explorer, starting with 1. If youspecify a Group of 0, then all of the worksheets will be displayed. You can use commas ordashes to specify a range of groups; for example,1,3,5-6.
Use the Selection field to filter messages by the Selection text configured on the AlarmWorksheet.
In the Priority pane, use the From and To fields to filter messages by the Priority configured onthe Alarm Worksheet. Type numerical values into the these fields to delimit the priority range.
Use the Type field to filter messages by the alarm type (e.g., HiHi, Hi, Lo, LoLo, Rate, Dev+,Dev-). You can use commas to specify more than one type; for example,HiHi,LoLo.
Use the State field to filter messages by the alarm status:
Value Description
0 All alarms (default)
1 All active and unacknowledged alarms
2 All active and acknowledged alarms
3 All inactive and acknowledged alarms
4 All inactive and unacknowledgedalarms

8/22/2019 User Guide Indu Soft
http://slidepdf.com/reader/full/user-guide-indu-soft 404/1279
Leaving this field blank is effectively the same as entering a value of 0.
In the Search in columns pane, use the Tagname, Message, and/or Username text fields tospecify criteria for filtering messages. Type a tagname, message, and/or user name into thetext field for which you want IWS to search.
Use the parameters in the Interval pane to filter messages by the last x messages (Latest) or
based on a period of time (Period). If you do not specify any interval at all, then only thealarms for the current day will be displayed.
Note:
You can specify String tags in curly brackets (e.g.{tagname}) in the Group, Selection,
Tagname, Message, and Username fields, to change these values during runtime.
You must specify String tags without curly brackets (e.g.tagname) in the Type field and
the Period fields of the Interval pane. These fields cannot take values directly.
You can specify Integer tags in the From and To fields Priority pane, the State field,and the Latest field from the Interval pane.
You can use wildcards (* and ?) when specifying values for the Selection,Tagname, Message, and Username fields.
Use the Filter Expression pane to configure an expression that will filter unwanted messages outof the display. Only messages that satisfy the expression will be shown.
To enter an expression, click on the Edit button; the Alarm Filter Expression dialog is displayed.The filter expression must follow the basic syntax of…
[Column Name]Comparison Operator 'Value'
…where the Column Name is the name of a column in the Alarm/Event Control object. For
example:
[Activation Time]>'08/17/2007 15:00'
This filter will only show alarm messages with activation times greater (later) than 15:00 on08/17/2007.
Note:
The maximum number of characters is 1024 for Engineering Mode and 2048 forRuntime Mode.
The Display Value and State columns are not supported by the filter expression.
Tip:
You can combine several conditions simultaneously by using the logic operators AND,
OR, and NOT. For example:

8/22/2019 User Guide Indu Soft
http://slidepdf.com/reader/full/user-guide-indu-soft 405/1279
[Type]='HiHi' OR [Type]='LoLo' AND [Activation Time]>'08/17/2007 15:00'
You can use wildcards (* and ?) in the filter expression.
It is not necessary to use the square brackets when the Column Name is only one word
(e.g., Value).
You can change the filter expression during runtime by specifying String tags in curly
brackets. For example:
[Value]='{AlarmFilterValue}'
To use more than 1024 characters in the filter expression during runtime, you mustuse more than one tag between curly brackets using the {TagName1} AND {TagName2}
syntax.
Use the parameters in the Initial Sort pane to set the default sorting order. Select a sort typefrom the Column combo-box, and then select Asc or Desc to sort in ascending or descendingorder. You can configure up to three levels of sorting.
Note: If you configure all three levels with sort types other than Activation Time, then theproject will automatically sort on a fourth level according to Activation Time, in descendingorder.
You cannot change the type of this fourth-level sort, but you can toggle its default order —from descending to ascending — by manually editing your project file ( project_name.app)
to change the following setting:
[Objects]
DescendingAlarmListTime=TRUE or FALSE
TRUE sorts in descending order, FALSE sorts in ascending order. Please note that this settingonly works for projects created with or updated to InduSoft Web Studio v6.1+SP5 or later.
Click the Allow sort in runtime checkbox if you want to allow the user to change the sortorder during runtime.
Advanced
Click the Advanced button to open the Advanced dialog where you can specify advanced properties
for the Alarm Control object.
Figure 6. Advanced dialog

8/22/2019 User Guide Indu Soft
http://slidepdf.com/reader/full/user-guide-indu-soft 406/1279
Use the parameters in the Date & Time Format pane to control which date and time informationdisplays in the alarm message. Click (enable) a checkbox to include that element in the display.Note: MS stands for milliseconds.
Tip: Watch the Sample text to preview how the information will look in the alarmmessage.
Use the parameters in the Ack pane to control how alarms are acknowledged.
Security field: Type a numeric value to specify which security level can acknowlege analarm message. Only those users with the specified level can respond.
Ack All trigger field: Type a tag to receive a value. When the tag changes value, itindicates that all messages in the alarm object have been acknowleged.
Ack trigger field: Type a tag to receive a value. When the tag changes value, it indicatesthat the message at the top of the alarm object has been acknowleged.
Confirm checkbox: Click (enable) this box to display a confirmation dialog when the usertries to acknowledge a single alarm.
Enable comment (individual ack only) checkbox: Click (enable) this box to allow theuser to enter comments about the alarm, just after acknowledging it.
Use the parameters in the runtime dialog triggers pane to contol
Columns field: Type a tag to receive a value. When the tag changes value, it opens a

8/22/2019 User Guide Indu Soft
http://slidepdf.com/reader/full/user-guide-indu-soft 407/1279
dialog allowing the user to customize the columns visible in the object.
Filters field: Type a tag to receive a value. When the tag changes value, it opens a dialogallowing the user to filter the columns visible in the object.
Use the parameters in the Delete Message pane to control who can delete alarm messages fromthe Alarm History:
Security: Use this field to specify which security level can delete alarm messages. Onlythose users with the specified security level will be allowed to delete an alarm message.
Confirm: Click (enable) this box to require the user to confirm a message deletion beforeIWS actually deletes the selected alarm message.
Print Trigger: When the tag configured in this field is toggled, the current state of theAlarm/Event Control object is sent to the default printer.
PDF Trigger field: When the tag configured in this field is toggled, the current state of theAlarm/Event Control object is saved as a PDF file at the location specified by PDF Filename.
PDF Filename field: Enter a complete file path and name where the PDF file is to be saved.You can also enter a tag name using the {tag} syntax.
Note: PDF Trigger and PDF Filename are not supported in projects running on Windows
Embedded or Thin Client.
Multiline checkbox: When this option is checked, the print output or PDF will be formattedaccording to the available column space, and the text within each cell will be wrapped so that allof it is shown.
Total items field: Type an integer tag to see how many alarms remain after IWS filters thealarm object using parameters specified on the Filters dialog.
Auto Format checkbox: When checked, decimal values in the Display Value, Previous andValue columns will be formatted according to the virtual table created by the SetDecimalPoints()
function.
Selected tag field: Type a string tag to enable the end user to click on an alarm message to
see the name of the tag associated with that alarm event.First Row Text field: Type a string tag. This tag will receive the text of all fields from the firstrow of the Alarm/Event Control. The fields are tab delimited. Whenever the first row changes —either due to a new Alarm/Event, or simply because the rows are reordered — the value of theconfigured tag is updated.
Summary Changes field: Type an integer tag. This tag will receive a running count of thenumber of changes in the Alarm/Event Control. For example, when a new Alarm occurs or whenan Alarm is acknowledged, the value of the configured tag will be incremented. Reordering therows is not counted as a change.
Click the Navigation Triggers button to open the following dialog:
Figure 7. Navigation Triggers dialog

8/22/2019 User Guide Indu Soft
http://slidepdf.com/reader/full/user-guide-indu-soft 408/1279
You can make the on-screen Alarm Control object scroll up, scroll down, page up, page down,go to home (beginning) of page, or go to end of page by configuring tags in the correspondingfields. Whenever the values of the configred tags change, the Alarm Control object will navigate
that way. This is useful for adding navigation controls to the screen; for example, if youconfigure the same tag to the Up field in this dialog and a Pushbutton object, then the AlarmControl object will scroll up whenever the Pushbutton object is pressed.
When you are finished, click OK to close the Advanced dialog.
Parent topic: Data Logging and DisplayInduSoft Web Studio v7.0 Technical ReferenceCopyright © 2003–2010 Indusoft, Inc.

8/22/2019 User Guide Indu Soft
http://slidepdf.com/reader/full/user-guide-indu-soft 409/1279
Data Logging and Display >Background Tasks >
Trend worksheetThe Trend folder enables you to configure history groups that store trend curves. You can use theTrend worksheet to declare which tags must have their values stored on disk, and to create historyfiles for trend graphs. The project stores the samples in a binary history file (*.hst), and shows bothhistory and on-line samples in a screen trend graph.
The Trend worksheet is executed by the Background Task module (see Execution Tasks). It handlesthe saving of trend data to the history, but it does not display that data to the operator; the TrendControl screen object, available on the Graphics tab of the ribbon, must be created and configured ina screen in order to display trend data.
To create a new Trend worksheet, do one of the following:
On the Insert tab of the ribbon, in the Task Worksheets group, click Trend;
Right-click the Trends folder in the Project Explorer, and then click Insert on the shortcutmenu; or
Click New on the Application menu, click the File tab, and then select Trend Worksheet.
To edit an existing Trend worksheet, double-click it in the Project Explorer.
Figure 1. Trend worksheet
The Trend worksheet is divided into two areas:
Header area (top section), which contains information for the whole group
Body area (bottom section), where you define each tag in the group. This section containsseveral columns (only two are shown in the preceding figure).
Use the Header parameters on this worksheet as follows:

8/22/2019 User Guide Indu Soft
http://slidepdf.com/reader/full/user-guide-indu-soft 410/1279
Description field: Type a description of the worksheet for documentation purposes.
Type combo box: Click the arrow button to select a trend history format from the list. Theavailable options are:
Proprietary
File Format: Binary
Default Path: …\ project_name\Hst\GGYYDDMM.HST , where:
YY = Two last digits of the year
MM = Month
DD = Day
Note: IWS provides the HST2TXT.EXE and TXT2HST.EXE programs, which enable you
to convert trend history files from binary (.hst) to text (.txt) and vice versa. Formore information about these programs, see Converting Trend History Files fromBinary to Text and Converting Trend History Files from Text to Binary.
Database
Database Type: Chosen by the userDefault Table Name:TRENDGGG (GGG = Trend Worksheet Number; e.g., TREND001 forthe Trend Worksheet 001)
For more information about the structure of the database table that IWS uses to savehistory files, see Database Interface.
CAUTION:
You can specify String tags in many fields of the Trend worksheet, to change
those values during runtime, but doing so may affect how those values are saved
in the trend history:
When the history format is Proprietary, the value of the String tag is
converted to a numerical value (if possible) and then saved to the historyfile. If numeric conversion is not possible, then a value of 0 is saved.
When the history format is Database, the actual value of the String tag is
saved in the database.
Database Configuration: Opens the Database Configuration dialog, where you can enter therequisite settings to link the project to an external SQL Relational Database for the purpose of saving the trend history.
Save On Trigger checkbox and field: Click (enable) and type a tag name to save trendsamples when someone changes the specified tag. (Tag change can be an event from theScheduler.)
Save On Tag Change checkbox: Click (enable) to always save the trend sample when a value
change occurs in any of the tags from that group.
Advanced: Click to display the Trend Advanced Settings dialog. For information aboutcompleting the fields in this window, see Batch History Configuration.
Use the Body parameters on this worksheet as follows:
Tag Name field: Type the tag name to be saved in the history file.

8/22/2019 User Guide Indu Soft
http://slidepdf.com/reader/full/user-guide-indu-soft 411/1279
Dead Band field: Type a value to filter acceptable changes when Save on Tag Change isused. For example, Dead Band has value = 5. If the tag value is 50 and changes to 52, thesystem will not register this variation in the database, because it is less than 5. If the change isequal to or greater than 5, the new value will be saved to the history file.
Field field: Name of the field in the database where the tag will be stored. If this field is leftblank, the name of the tag will be used as the tag name. Array tags and classes will have thecharacters "[", "]" and "." replaced by "_". Examples:
Tag Name Default Field
MyArray[1] MyArray_1
MyClass.Member1 MyClass_Member1
MyClass[3].Member2 MyClass_3_Member2
Note: The Trend task can accept only up to 240 tags in a single worksheet. If you manuallyconfigure more than 240 tags in the same worksheet, then the Trend task will generate an errorwhen you run the finished project.
See also:
Converting Trend History Files from Binary to Text
Converting Trend History Files From Text to Binary
Creating Batch History
Configuring a Default Database for All Task History
Converting Trend History Files from Binary to Text
Converting Trend History Files from Text to Binary
Creating Batch History
Setting the Trend Database
Parent topic: Data Logging and DisplayParent topic: Background TasksInduSoft Web Studio v7.0 Technical ReferenceCopyright © 2003–2010 Indusoft, Inc.

8/22/2019 User Guide Indu Soft
http://slidepdf.com/reader/full/user-guide-indu-soft 412/1279
Data Logging and Display > Trend worksheet >
Converting Trend History Files fromBinary to TextBy default, IWS saves trend history files in a binary format (.hst). Because you may want to havethese files in .txt format, IWS provides the HST2TXT.EXE program to convert trend history filesfrom binary into text format.
To convert a file, use the following procedure:
From a DOS window, change directory (cd) to the IWS \Bin directory:1.
cd C:\Program Files\InduSoft Web Studio v7.0\Bin
At the command prompt, copy the Hst2txt.exe into the same directory where the .hst file islocated.2.
At the command prompt, type Hst2txt.exe and specify the following parameters:
filename: Name of the trend history file to convert
[separator]: Data separator character (default is <TAB>)
[/e]: Extended functionality (convert data with more than 10 characters)
[/i:HH:MM:SS]: Start time in hours (HH), minutes (MM), and seconds (SS)
[/f:HH:MM:SS]: Finish time in hours (HH), minutes (MM), and seconds (SS)
[/m]: Include milliseconds in the Time column (Type 1 to print the milliseconds value in
the text file created from the.hst file.)
For example:
Hst2txt.exe 01952010.hst
The program creates a .hdr (header) file and the .txt file, which are both plain text filesthat can be viewed using any text editor (for example, Notepad).
The .hdr file contains the name of the tags configured in the Trend Worksheet.
The .txt file contains the tag values saved in the history file.
3.
After the program converts the file, type Exit to close the DOS window.4.
Note: Alternatively, you can use the HST2TXT math script in a Math worksheet to convert binaryfiles into text format automatically without having to use a DOS window.
See also:
Converting Trend History Files From Text to Binary

8/22/2019 User Guide Indu Soft
http://slidepdf.com/reader/full/user-guide-indu-soft 413/1279
Creating Batch History
Configuring a Default Database for All Task History
Parent topic: Trend worksheetInduSoft Web Studio v7.0 Technical ReferenceCopyright © 2003–2010 Indusoft, Inc.

8/22/2019 User Guide Indu Soft
http://slidepdf.com/reader/full/user-guide-indu-soft 414/1279
Data Logging and Display > Trend worksheet >
Converting Trend History Files fromText to BinaryIWS provides the TXT2HST.EXE program to convert text files back into binary format.
To convert a file, use the following procedure:
From a DOS window, change directory (cd) to the IWS \Bin directory:1.
cd C:\Program Files\InduSoft Web Studio v7.0\Bin
At the command prompt, copy the Txt2hst.exe into the same directory where the .txt file islocated.
2.
At the command prompt, type Txt2hst.exe and specify the following parameters:filename: Name of the ASCII file with history data to convert
[separator]: Data separator character (default is <TAB>)
[/e]: Extended functionality (data value with more than 10 characters)
[/i:HH:MM:SS]: Start time of data value in hours (HH), minutes (MM), and seconds(SS)
[/f:HH:MM:SS]: Finish time of data value in hours (HH), minutes (MM), and seconds (SS)
For example:
Txtt2hst.exe 02950201.txt
The program creates a .hdr (header ) file and converts the .txt file into a .hst binaryfile.
3.
After the program converts the file, type Exit to close the DOS window.4.
Note: You cannot create a math script for the TXT2HST.EXE program and use it in a Math
worksheet to convert text files into binary format as you can for HST2TXT.EXE. The math scriptshortcut is available for binary files only.
See also:
Converting Trend History Files from Binary to Text
Creating Batch History
Configuring a Default Database for All Task History
Parent topic: Trend worksheetInduSoft Web Studio v7.0 Technical ReferenceCopyright © 2003–2010 Indusoft, Inc.

8/22/2019 User Guide Indu Soft
http://slidepdf.com/reader/full/user-guide-indu-soft 415/1279
Data Logging and Display > Trend worksheet >
Creating Batch History
IWS provides powerful tools that enable the user to create and manage batch historical information.The user is able to create batches by using the following formats:
Proprietary: When using the proprietary format, each batch will be stored on a differenthistorical file. The user can save historical data in both the normal historical file and batch filesat the same time (see Trend Folder for more information about these files).
Database: The historical data used for the batch is saved in the same table as the normalhistorical data; an additional table called BatchHistory keeps registers with the informationabout the batches. The list below describes the fields on the BatchHistory table:
Field Name Data Type Description
Group_Number Integer Trend group number. This is the number of the
worksheet that you are creating to specify the tags thatwill be stored on your batch history.
Batch_Name String Name of the batch
Start_Time TimeStamp Date and Time that the batch was started.
End_Time TimeStamp Date and Time that the batch was finished
Pri_Table String Reserved
Sec_Table String Reserved
Description String Batch description
Deleted Boolean0: Batch has not been deleted
1: Batch has been deleted
Tip: You can customize the name of the table and the name of the columns created in thedatabase by editing the project_name.APP file, as follows:
[Trend]
DefaultName=NewName
[TrendGroupPRI|SEC ]BatchHistory=TableName
For example:
[TREND001PRI]

8/22/2019 User Guide Indu Soft
http://slidepdf.com/reader/full/user-guide-indu-soft 416/1279
BatchHistory=MyTableForPrimaryDB
[TREND001SEC]
BatchHistory=MyTableForSecondaryDB
[Trend]
Group_Number=Trend_Worksheet
Batch_Name=Load_Number
Batch History Configuration
When you add a Trend worksheet (see Trend folder) and click the Advanced button, the followingwindow will display:
Figure 1. Trend Advanced Settings
The Batch pane provides the following fields:
Start/Stop (input): Enter the tag that will start/stop your batches. When the tag in this fieldis set to TRUE (different from 0), IWS will either start saving data to your batch file (if you areusing proprietary format), or add a new register to the BatchHistory table on your database,indicating that a batch has been started. Note that historical data will be saved according to theconfiguration in the fields Save Trigger and Save On Tag Change options on the TrendWorksheet.
Name (input): This field represents the batch name; its meaning depends on the formatselected on the Trend Worksheet:
If you selected Proprietary in the Type field, the Name should comply with the format[Path]<FileName>, where:
Path: An optional field. If the path is not specified, the batch history file will bestored in the same path as the project_name.app file.

8/22/2019 User Guide Indu Soft
http://slidepdf.com/reader/full/user-guide-indu-soft 417/1279
FileName: Name of the batch history file.
If you selected Databasein the Type field, the value in this field will be stored in theBatch_Name field of the BatchHistory table.
Tip: You can enter tag names between curly brackets in this field (e.g.,C:\MyBatches\{MyTagWithName}{MyTagWithNumber}.hst).
Delete (input): When the tag specified in this field changes its value, the batch will be deleted.With the Proprietary format, the batch history file will be removed. With the Database
format, it will set the Delete field in the BatchHistory table to true, but the saved historical datawill remain. The Trend object only sees batches that have the delete field set to 0 (zero).
Existent (output): The tag entered on this field will receive the value 1 if the batch specified inthe Name field already exists; otherwise the tag will receive the value 0.
Description (output): This field is available only when using the Database format. When thetag in the Start/Stop field changes to TRUE, the register that is added to the BatchHistorytable will display the string in this field.
Tip: You can enter tag names between curly brackets in this field (e.g., {MyTag})
Save data even if batch is not running: If this field is unchecked, the historical data will besaved only when the tag in the Start/Stop field is TRUE.
Tip: The Batch Historical data can be displayed to the user in either Graphical or Tableformat. See Trend Folder or Grid Object to display information in these formats.
Disk Space Control pane: The following options are available:
History Life Time (days) field: Specify how many days to keep the history file on thedisk. After the specified period, IWS automatically erases the file. Use this option only forfiles based on a date.
Compress After (days) field: Specify how many days to keep the trend history file(*.hst) on the disk before compressing the file. After the specified period, IWSautomatically compresses the file. Use this option only for files based on a date. Thisoption is not available for Windows Embedded target systems.
Disable All Data Saving field: Enter a tag to provide a temporary disable function. When thetag value is TRUE (different from zero [0]), the trend task stops recording data for thisworksheet.
See also:
Converting Trend History Files from Binary to Text
Converting Trend History Files From Text to BinaryConfiguring a Default Database for All Task History
Parent topic: Trend worksheetInduSoft Web Studio v7.0 Technical ReferenceCopyright © 2003–2010 Indusoft, Inc.

8/22/2019 User Guide Indu Soft
http://slidepdf.com/reader/full/user-guide-indu-soft 418/1279
Data Logging and Display > Trend worksheet >
Setting the Trend Database
Click the Tasks tab, and right-click the Trend folder. Double-click the applicable Trend.1.
Click the arrow to the right of the History Format field. Select Database.2.
Click the Database Configuration button. This opens the Database Configuration dialog. Enterthe applicable data in this window. Click OK when you are finished.
3.
Click the File drop-down menu, then click Save to save the changes to the Trend.4.
Trend Table on a Relational Database
The fields saved in the History Trend are described in the following table:
Field Name Data Type Remarks
Time_Stamp TimeStamp TimeStamp (Date and Time) when the data wassaved.
<TagName> Integer or Real (depending onthe tag type)
IWS will create one field (column) in thedatabase for each tag configured in the Trendworksheet.
Parent topic: Trend worksheetInduSoft Web Studio v7.0 Technical ReferenceCopyright © 2003–2010 Indusoft, Inc.

8/22/2019 User Guide Indu Soft
http://slidepdf.com/reader/full/user-guide-indu-soft 419/1279
Data Logging and Display >
Trend Control objectThe Trend Control object displays data points (values) from different data sources in a graphicformat.
The main features provided by the Trend Control object are:
Display of multiple pens simultaneously
Support for different Data Sources, such as Tag, Batch, Database and Text File
Capability to generate X/Y graphs from the configured data sources (please refer to Appendix Afor an example of an X/Y chart).
Simultaneous display of an unlimited number of data points. This feature might be limited bythe hardware used since available memory and performance will vary.
Built-in toolbar, which provides interfaces for the user to interact with the Trend Control objectduring runtime
Built-in legend, which displays the main information associated to each pen linked to the object
Zooming and auto-scaling tools
Horizontal and vertical orientation
Object Properties: Trend Control dialog
The Object Properties: Trend Control dialog is used to configure the basic properties of a TrendControl screen object.
Runtime Interface
Using the Data Source Text File
Using the Data Source Database
Parent topic: Data Logging and DisplayInduSoft Web Studio v7.0 Technical ReferenceCopyright © 2003–2010 Indusoft, Inc.

8/22/2019 User Guide Indu Soft
http://slidepdf.com/reader/full/user-guide-indu-soft 420/1279
Data Logging and Display > Trend Control object >
Object Properties: Trend ControldialogThe Object Properties: Trend Control dialog is used to configure the basic properties of a TrendControl screen object.
Accessing the dialog
To access the Object Properties dialog for a specific screen object, do one of the following:
Select the screen object, and then on the Graphics tab, in the Editing group, clickProperties;
Select the screen object, and then press Alt+Enter;
Right-click the screen object, and then click Properties on the shortcut menu; or
Double-click the screen object.
The dialog in detail
Figure 1. Object Properties: Trend Control dialog
In addition to the elements that are common to all Object Properties dialogs, the Object Properties:Trend Control dialog contains the following elements:
Area / Element Name Description
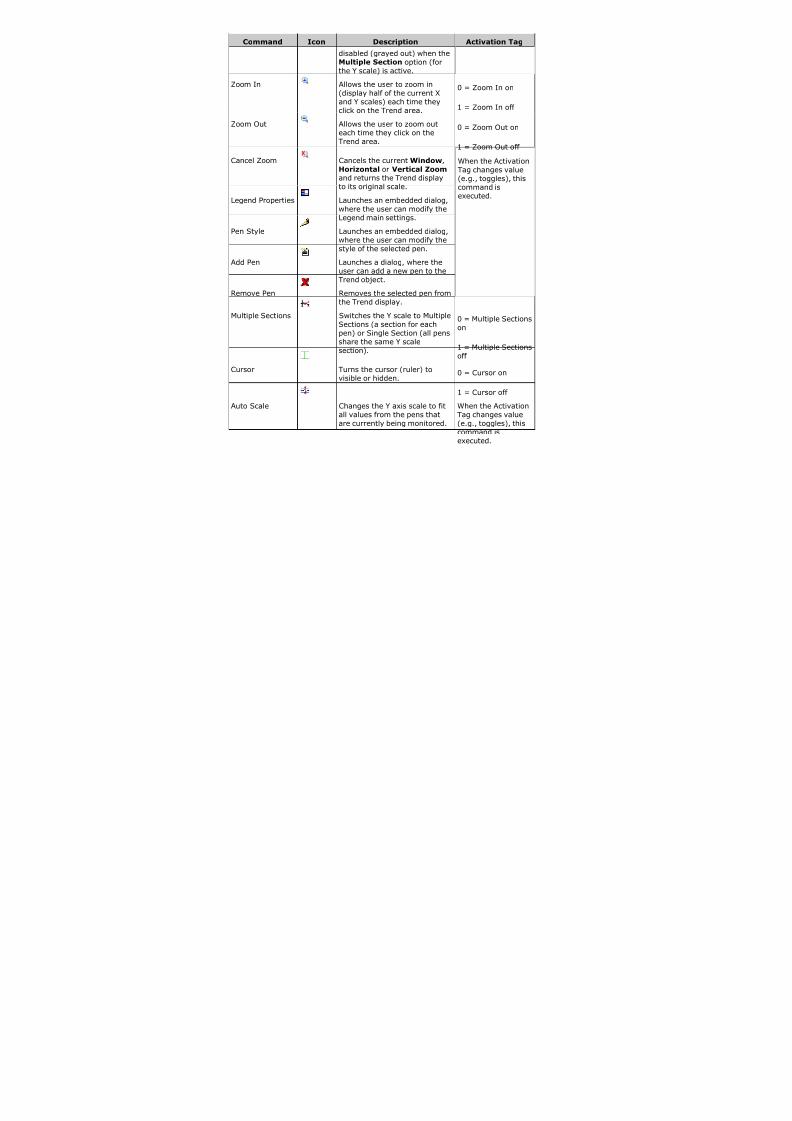
8/22/2019 User Guide Indu Soft
http://slidepdf.com/reader/full/user-guide-indu-soft 421/1279
Area / Element Name Description
Border Type Sets the type of border around the graph area of the trendcontrol. (There are no borders around the trend control's legendor toolbar.)
Color Sets the color of the border, if the border type is Solid. For moreinformation, see Selecting colors and fill effects.
Background No Fill / Fill Enables the background fill for the graph area of the trendcontrol. (There are no backgrounds for the trend control's legendor toolbar.) If the fill is not enabled, then the graph is transparentto whatever other screen objects are behind the trend control.
Color Sets the color and fill effect of the background fill, if it is enabled.For more information, see Selecting colors and fill effects.
Points Opens the, which allows configuration of the trend control's datapoints (or pens). For more information, see Trend Control: Pointsdialog.
Axes Allows configuration of the trend control's X and Y axes, as wellas its horizontal or vertical orientation. For more information, seeTrend Control: Axes dialog.
Toolbar Allows configuration of the user toolbar that is displayed abovethe trend control. For more information, see Trend Control:Toolbar dialog.
Data Sources Allows configuration of multiple data sources for the trend. Formore information, see Trend Control: Data Sources dialog.
Legend Allows configuration of the legend that is displayed below the
trend control. For more information, see Trend Control: Legenddialog.
Advanced Allows configuration of the trend control's advanced properties,such as runtime options and tag triggers. For more information,see Trend Control: Advanced dialog.
Although the Trend Control object supports flexible configurations to meet the specific needs of yourproject, most of the settings are set by defaults based on the most common interfaces. Therefore, inmany cases, you will only configure data points (displayed during runtime), which can be done easilyby clicking the Points button from the Object Properties window.
Points dialog
The Points dialog is used to configure the data points for a Trend Control screen object. Thevalue of each data point is represented as a pen in the trend display. You can dynamicallychange which data points are visible during runtime, regardless of how many data points areassociated with the screen object.
Axes dialog

8/22/2019 User Guide Indu Soft
http://slidepdf.com/reader/full/user-guide-indu-soft 422/1279
Toolbar dialog
The Toolbar dialog is used to customize the toolbar on the Trend Control screen object.
Data Sources dialog
Legend dialog
Advanced dialog
Parent topic: Trend Control objectInduSoft Web Studio v7.0 Technical ReferenceCopyright © 2003–2010 Indusoft, Inc.

8/22/2019 User Guide Indu Soft
http://slidepdf.com/reader/full/user-guide-indu-soft 423/1279
Data Logging and Display > Trend Control object > Object Properties: Trend Control dialog >
Points dialogThe Points dialog is used to configure the data points for a Trend Control screen object. The value of each data point is represented as a pen in the trend display. You can dynamically change which datapoints are visible during runtime, regardless of how many data points are associated with the screenobject.
Accessing the dialog
To access the Points dialog for a specific Trend Control screen object, first access the ObjectProperties dialog for that screen object and then click Points.
The dialog in detail
Figure 1. Points dialog
The following table summarizes the properties of each data point:
Column Name Description
Point A unique ID number for the point, which is assigned automatically when the pointis created in this interface.
Label The label associated with the Point can be displayed on the Legend, duringruntime, providing a short reference to the user for each Point.
Color The color of the pen usedColor of the pen used to draw the values of the Point onthe Trend Control object.
Data Source The data source for this point. Tag is available by default, but all other sourcesmust be configured in the Data Sources dialog.
Tag/Field The meaning of this parameter depends on the Data Source type associated withthe data point:
Tag: Type the name of the tag with values to display. If the tag is configuredin the Trend task, the history data is automatically retrieved; otherwise, onlythe online values are displayed.

8/22/2019 User Guide Indu Soft
http://slidepdf.com/reader/full/user-guide-indu-soft 424/1279
Column Name Description
Batch: Type the name of the tag with values to be retrieved from the BatchHistory file generated by the Trend Task, and displayed on the object.
Database: Type the name of the field (column) in the SQL RelationalDatabase that holds the data Point values.
Text File: Type the number of the column that holds the Point values. Thenumber 0 refers to the first column, 1 refers to the second column, and soon.
Min / Max The scale of the Y-axis for this point. This overrides the default scale that is set inthe Axes dialog.
Note: The Min and Max properties can hold real numeric values up to six decimalplaces. If you need more precision than that, then you must configure the Min andMax properties with Real tags and then store the values in those tags.
Style The line and marker styles for this point; click the button to open the Pen Styledialog.
Options Additional options for this point; click the button to open the Options dialog.Hide Tag trigger — when the value is TRUE, the data point is hidden in the trend
display.
Pen Style dialog
This dialog allows you to configure the style of the pen used to draw the data Point values onthe object during runtime.
Options dialog
Parent topic: Object Properties: Trend Control dialog
Related reference
Axes dialogToolbar dialogData Sources dialogLegend dialogAdvanced dialog
InduSoft Web Studio v7.0 Technical ReferenceCopyright © 2003–2010 Indusoft, Inc.

8/22/2019 User Guide Indu Soft
http://slidepdf.com/reader/full/user-guide-indu-soft 425/1279
Data Logging and Display > Trend Control object > Object Properties: Trend Control dialog > Pointsdialog >
Pen Style dialogThis dialog allows you to configure the style of the pen used to draw the data Point values on theobject during runtime.
Accessing the dialog
To access the Pen Style dialog for a specific data point, first access the Points dialog and then clickthe Style column for that data point.
Also, it can be launched during runtime, allowing the user to customize these settings on-the-fly.
The dialog in detailFigure 1. Pen Style dialog
The Pen Style dialog includes the following elements:
Table 1. Elements in the Pen Style dialog

8/22/2019 User Guide Indu Soft
http://slidepdf.com/reader/full/user-guide-indu-soft 426/1279
Area / Element Name Description
Line Settings State You have the option of defining a Hi Limit and a Lo Limit for eachdata Point, with the Options dialog. The Pen Style Dialog allowsyou to configure different settings for the pen (e.g., color), bothwhen its values are within the limits (Normal State) and notwithin the limits (Out of Limits state).
Use NormalSettings Available only for the Out of Limits state. When checked, thepen will always be displayed with the settings for the Normalstate, even if the data point values are not within the limitsconfigured for it.
Type The type of line (e.g., solid, dashed, dotted) that connects thedata points.
Weight The weight of the line that connects the data points.
Expansion The algorithm used to connect the points, as follows:
: Consecutive points are directly connected to eachother by an analog line. This option is suitable for numerical
values.
: Consecutive points are connected only throughhorizontal or vertical steps (depending on the orientation of the trend display). This option is suitable for Boolean values.
Marker The shape used to mark each data point. If no shape is selected,then only the connecting line between points is displayed.
Marker size The size of the data point marker.
Color The color of the trend line and data point markers.
Fill Fill Type The type of fill between the trend line and the number line.
Pattern File The graphic file used to fill the trend area. Available only Fill Typeis set to Custom Pattern.
Click the browse button to open a Windows file browser and thenselect the desired graphics file. The file should be located in yourproject folder.
See below for an example of trends with custom fill patterns.
Color The color used to fill the trend area. Available only when Fill Typeis set to Solid Color.
Fill
Transparency(%)
The transparency level of the fill. (If the fill is transparent, then
other trends behind it can be seen through it, making the entiregraph easier to read.) Available for both Custom Pattern andSolid Color.
Note: When viewing your project on either a Windows Embedded device or a Thin Client (anyOS), the Pen Style dialog — available during runtime — allows the user to change the pen color

8/22/2019 User Guide Indu Soft
http://slidepdf.com/reader/full/user-guide-indu-soft 427/1279
only.
Figure 2. Trends with custom fill patterns
Parent topic: Points dialogInduSoft Web Studio v7.0 Technical ReferenceCopyright © 2003–2010 Indusoft, Inc.

8/22/2019 User Guide Indu Soft
http://slidepdf.com/reader/full/user-guide-indu-soft 428/1279
Data Logging and Display > Trend Control object > Object Properties: Trend Control dialog > Pointsdialog >
Options dialog
Accessing the dialog
To access the Pen Style dialog for a specific data point, first access the Points dialog and then clickthe Options column for that data point.
The dialog in detail
Figure 1. Options dialog
The Options dialog includes the following elements:
Element
Name
Description
Description This text can be displayed in the legend, providing a short description about thedata point, during runtime. When tags are used, the default description is the oneconfigured for the tag.

8/22/2019 User Guide Indu Soft
http://slidepdf.com/reader/full/user-guide-indu-soft 429/1279
Element
Name
Description
Eng. Unit This text can be displayed in the legend, providing the engineering unit (i.e., theunit of measurement) associated with the data point, during runtime. When tagsare used, the default units are the ones configured for the tag.
Lo Limit When the data point value is below this limit, its pen can be displayed with a
different style (e.g., color) during runtime. See Pen Style dialog for furtherinformation. When tags are used, the default Low Limit is the Low Alarm valueconfigured for the tag.
Hi Limit When the data point value is above this limit, its pen can be displayed with adifferent style (e.g., color) during runtime. See Pen Style dialog for furtherinformation. When tags are used, the default High Limit is the High Alarm valueconfigured for the tag.
Hide Scale You can configure a tag in this field to control the visibility of the scale (Y axis)associated with this pen during runtime by changing the value of this tag (0=Show; 1=Hide).
Break
Interval
Maximum interval between two consecutive points. If the time between two
consecutive samples is higher than this number (in seconds), the Trend Controlassumes that there was no data collection in this period and does not draw a linelinking both samples. When the X Axis is configured as numeric, the value on thisfield represents a numeric scalar value. If the X Axis is configured as date/time,the value for this field is given in seconds.
This field has some special values:
-1 : Do not connect the points.
-2 : Connect only points in ascending order.
X-Axis Offset Off-set for this data point from the X-Axis scale configured for the object. Thisoption is useful when you want to display data from two or more data points using
a different X scale (period of time/value) for each one, so you can compare them.When the X Axis is configured as numeric, the value on this field represents anumeric scalar value. If the X Axis is configured as date/time, the value for thisfield is given in seconds.
Cursor Value You can configure a tag in this field. During runtime, the trend control updates thevalue of this tag with the value of the intersection between the data point pen andthe vertical cursor (if any).
Y-Axis Log
Base
Type a tag name or numeric value. When the value is 1, the Y-axis of the trend isdisplayed on a logarithmic (e.g., 1, 10, 100, 1000) rather than linear scale.
Annotation ID N/A
Style Modifier N/A
Parent topic: Points dialog
InduSoft Web Studio v7.0 Technical ReferenceCopyright © 2003–2010 Indusoft, Inc.

8/22/2019 User Guide Indu Soft
http://slidepdf.com/reader/full/user-guide-indu-soft 430/1279
Data Logging and Display > Trend Control object > Object Properties: Trend Control dialog >
Axes dialog
Accessing the dialog
To access the Axes dialog for a specific Trend Control screen object, first access the Object Properties
dialog for that screen object and then click Axes.
The dialog in detail
Figure 1. Axes dialog
The Axes dialog contains the following elements:
Area / Element Name Description
X-axis Data Type Date/Time
Numeric
Scale Format
Period (whenData Type isDate/Time)
TypeAuto: When this option is selected, theTrend Control object works with Start
Date/Time when is it triggered to Pause

8/22/2019 User Guide Indu Soft
http://slidepdf.com/reader/full/user-guide-indu-soft 431/1279
Area / Element Name Description Mode, and it works with Time Before
Now when it is triggered to Play Mode.
Start Date/Time: When this option isselected, the value of the tag configured inthe Time field defines the startingDate/Time for the data displayed on the
object.
Time Before Now: When this option isselected, the value of the tag configured inthe Time field defines the amount of timebefore the current Date/Time, which will beused as the starting Date/Time for the datadisplayed on the object.
Duration Defines the Period of data displayed on theobject. You can configure a string tag in thisfield, so you can change the durationdynamically during runtime by changing the
value of this tag. The format of the valuesupported by this property is HH:MM:SS. For
example, 36:00:00 (thirty six hours).
Time This field is optional. The value of the tagconfigured in this field represents a period of time, rather than a specific date or time. Themeaning of this value depends on the option setfor the Type property.
When the Type is set as Start Date/Time,the value of the tag configured in this fieldmust comply with the format Date Time.
For example, 02/10/2005 18:30:00.When the Type is set as Time Before Now,the value of the tag configured in this fieldmust comply with one of the followingformats:
Time (string value). For example, 48:00:00
(forty eight hours).1.
Number of hours (real value). For example,2.5 (two hours and thirty minutes).
2.
If the Time field is left blank (or if the tag
configured in this field has the value 0), the
object displays data up to the currentDate/Time.
Period (whenData Type isNumeric)
Min / Max Minimum and maximum values displayed on theX-axis.
The Min and Max properties can hold real

8/22/2019 User Guide Indu Soft
http://slidepdf.com/reader/full/user-guide-indu-soft 432/1279
Area / Element Name Description numeric values up to six decimal places. If youneed more precision than that, then you mustconfigure the Min and Max properties with Realtags and then store the values in those tags.
Eng. Units Engineering Unit (e.g., Kg, BTU, psi) that isassociated with the X-axis during runtime.
Grid Divisions You can configure the number of divisions(vertical or horizontal lines) drawn on the objectfor the X and/or Y-axis respectively, as well asthe color of these lines.
Color
Time Bar When checked, the Time bar is displayed belowthe X-axis during runtime; otherwise, it ishidden. The time bar is a standard interface thatcan be used by the operator to change the X-axis scale during runtime.
Scroll Bar When checked, the Scroll bar is displayed belowthe X-axis during runtime; otherwise, it ishidden. The time bar is a standard interface thatcan be used by the operator to navigate throughthe X-axis scale during runtime. Optionally, youcan configure a tag in the Scroll bar field, whichdefines the period for the scroll bar. If this fieldis left empty, the period is equal to the currentvalue for Duration of the X-axis.
Cursor The cursor is an optional ruler orthogonal to theX-axis, which can be used during runtime toobtain the value of any pen at a specific point(intersection of the pen with the cursor). When
you click this button, the Cursor dialog launches,where you can configure the settings for theoptional vertical cursor as follows:
Positon Defines the position of the X-axis, as well as itsdirection and orientation, as follows:
Y-axis Grid Divisions You can configure the number of divisions(vertical or horizontal lines) drawn on the objectfor the X and/or Y-axis respectively, as well asthe color of these lines.
Color Scale Min / Max Default minimum and maximum values
displayed in the Y-axis. Used when more thanone pen shares the same scale (MultipleSections disabled), and/or for the points whoseMin and Max fields are not configured (leftblank).

8/22/2019 User Guide Indu Soft
http://slidepdf.com/reader/full/user-guide-indu-soft 433/1279
Area / Element Name Description
Multiple
Selections
When checked, the Y scale is dividedautomatically into one section for each pen;otherwise, all pens share the same Y scale.
Format Launches a dialog for configuring the format of the labels displayed by the Y-axis.
Note: The tags configured in the Period/Range fields are automatically updated when the userchanges the X scale dynamically during runtime, using the Time bar embedded in the object.
Data Type: The X-axis can display either Date/Time values or numeric values, according to thissetting.
Data Type Scale Format
Date/Time
Numeric
Note: The number of decimal points for the X or Y scale (Decimals) can be configured witha tag. Therefore, this setting can be modified dynamically during runtime.
Cursor: The cursor is an optional ruler orthogonal to the X-axis, which can be used duringruntime to obtain the value of any pen at a specific point (intersection of the pen with the
cursor). When you click this button, the Cursor dialog launches, where you can configure thesettings for the optional vertical cursor as follows:
Figure 2. Cursor Dialog
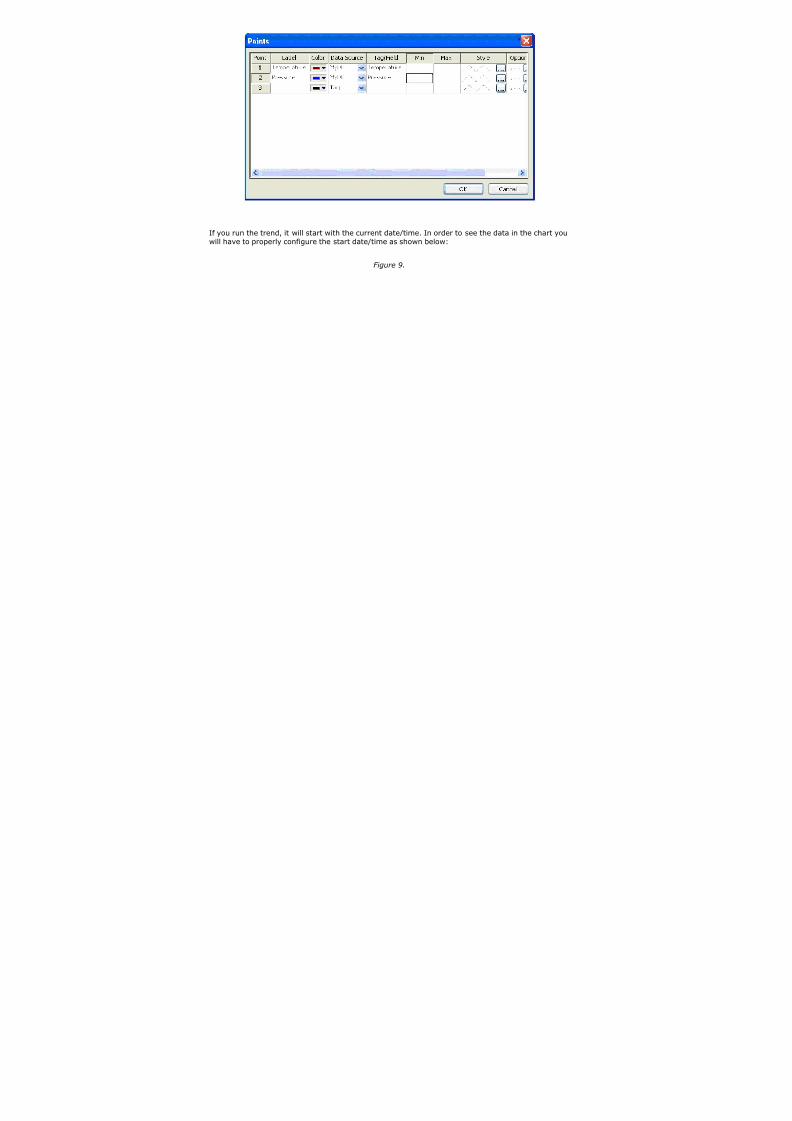
8/22/2019 User Guide Indu Soft
http://slidepdf.com/reader/full/user-guide-indu-soft 434/1279
Property Description
Enable When checked, the vertical cursor is visible during runtime.
Color Color of the line drawn for the cursor.
Position(0-100) You can configure a numeric tag in this field, which is proportional to theposition of the cursor on the X-axis, from 0 to 100%. When this value ischanged, the position of the cursor is automatically modified.
ValueOutput You can configure a string tag in this field that returns the value of the X-axis in which the cursor is currently positioned.
Position: Defines the position of the X-axis, as well as its direction and orientation, as follows:
Figure 3. Position Dialog
Property Description
Placement Side of the trend control on which the X-axis will be placed.
Direction Direction of the X-axis.
Orientation Orientation of the X-axis.
Vertical Label
Orientation
The orientation of the text labels on the vertical axis, regardless of whetherthe vertical axis is X or Y.
Parent topic: Object Properties: Trend Control dialog
Related reference
Points dialogToolbar dialogData Sources dialog

8/22/2019 User Guide Indu Soft
http://slidepdf.com/reader/full/user-guide-indu-soft 435/1279
Legend dialogAdvanced dialog
InduSoft Web Studio v7.0 Technical ReferenceCopyright © 2003–2010 Indusoft, Inc.

8/22/2019 User Guide Indu Soft
http://slidepdf.com/reader/full/user-guide-indu-soft 436/1279
Data Logging and Display > Trend Control object > Object Properties: Trend Control dialog >
Toolbar dialogThe Toolbar dialog is used to customize the toolbar on the Trend Control screen object.
Accessing the dialog
To access the Toolbar dialog for a specific Trend Control screen object, first access the ObjectProperties dialog for that screen object and then click Toolbar.
The dialog in detail
Figure 1. Toolbar dialog
The Show toolbar option controls whether the entire toolbar is shown during runtime. You may hidethe toolbar to save space or to prevent users from changing the trend display.
Also, each command/tool in the toolbar has the following properties:
Column Name Description
Command The name of the command/tool. For more information about each tool, see
Show The option to show the tool on the toolbar.
Activation
Tag
An optional tag trigger — when the value of the tag changes, the command istriggered as if the tool was clicked.
This can be used to script changes in the trend display, You can configure a tag inthis field (optional). When the tag changes value, it triggers the respectivecommand. This option is useful when you want to create customized interfaces to

8/22/2019 User Guide Indu Soft
http://slidepdf.com/reader/full/user-guide-indu-soft 437/1279
Column Name Description trigger the commands, instead of (or redundant with) the embedded toolbar.
Tooltip The tooltip that is displayed when the mouse cursor hovers over the tool.
Parent topic: Object Properties: Trend Control dialog
Related referencePoints dialogAxes dialogData Sources dialogLegend dialogAdvanced dialog
InduSoft Web Studio v7.0 Technical ReferenceCopyright © 2003–2010 Indusoft, Inc.
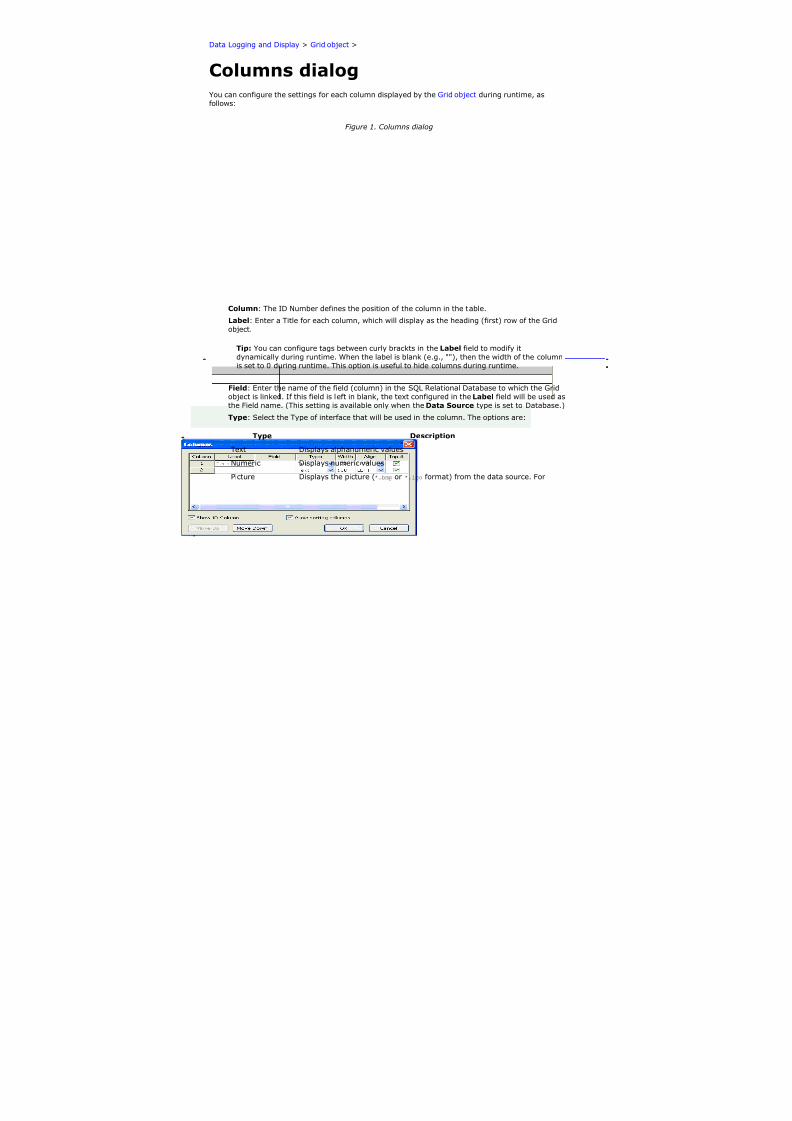
8/22/2019 User Guide Indu Soft
http://slidepdf.com/reader/full/user-guide-indu-soft 438/1279
Data Logging and Display > Trend Control object > Object Properties: Trend Control dialog >
Data Sources dialog
Accessing the dialog
To access the Data Sources dialog for a specific Trend Control screen object, first access the Object
Properties dialog for that screen object and then click Data Sources.
The dialog in detail
Figure 1. Data Sources dialog
The data source defines the location of the values from the data point(s) associated with it. Manypoints can share the same data source — you do not need to create one data source for each datapoint.
The data source tag is available by default to the Trend Control object. You can add additional datasources with the New button. The name you enter will be used as an alias to link the data points tothis new data source.
The other fields in this dialog allow you to edit the data source settings:
Source Type: Select the source type of the location of the data point values.X-Axis: Enter the name of the field (column) from the data source that holds the X axis data.
Max. Buffer: The maximum amount of data (in bytes) that will be held in runtime memory.
Load Progress: The tag in this field will receive a real value (0-100) that represents thepercentage of the Data Source load progress.
Sort: This option is useful for plotting data from a Text file. When enabled (checked), it sorts

8/22/2019 User Guide Indu Soft
http://slidepdf.com/reader/full/user-guide-indu-soft 439/1279
the data and shows the Cursor column value until the Max. Buffer is filled. When disabled(unchecked), the data are not sorted and the Cursor column value is not shown.
Keep Open: This option keeps the data source open as long as the screen that contains theTrend Control object is open. This improves the performance of the runtime project, but keepingthe data source open may cause other problems like database connection errors (when Source
Type is Database) and file write conflicts (when Source Type is Batch or Text File). To closethe data source after the data has been loaded, clear (uncheck) this option.
Data Source Settings: Click to define the settings for the selected Source Type.
The following table summarizes the settings for each Source Type:
Data Source
Type
Description X-Axis field Data Source Settings
Batch Batch generatedby the Trend taskof IWS
Disabled. The X-Axis data will beretrieved
automatically onthe correctposition from the
proprietary Batchfile generated byIWS. Enter the data point values in Batch
Name for their retrieval. You canconfigure a tag between curly bracketsin this field to change this settingdynamically during runtime.
Database SQL RelationalDatabase
Field name thatcontains the X axisdata
Configure the settings to link this DataSource to the SQL Relational Databasethat holds the data point values. SeeDatabase Configuration Dialog Windowfor further information about thisdialog interface. Please refer to

8/22/2019 User Guide Indu Soft
http://slidepdf.com/reader/full/user-guide-indu-soft 440/1279
Data Source
Type
Description X-Axis field Data Source Settings
Appendix B for an example of configuring databases.
Text File Text file (e.g., CSVfile) with datapoint valuesseparated by aspecific delimiter
Number of thecolumn that holdsthe X-Axis data.The number 0refers to the firstcolumn, 1 refersto the secondcolumn, and soon.
Enter the name of the text file thatholds the data points. The default pathis the current project folder. You canconfigure a tag between curly bracketsin this field to change this settingdynamically during runtime.
You can also choose one or moredelimiters for the data stored in thetext file. The value of each row iswritten in the text file between twodelimiters. When using a comma as adelimiter, the grid object is able toread data from CSV files. You can evenchoose a custom delimiter by checkingthe Other option. Please refer to
Appendix A for an example of configuring text files.
Parent topic: Object Properties: Trend Control dialog
Related reference
Points dialogAxes dialogToolbar dialogLegend dialogAdvanced dialog
InduSoft Web Studio v7.0 Technical ReferenceCopyright © 2003–2010 Indusoft, Inc.
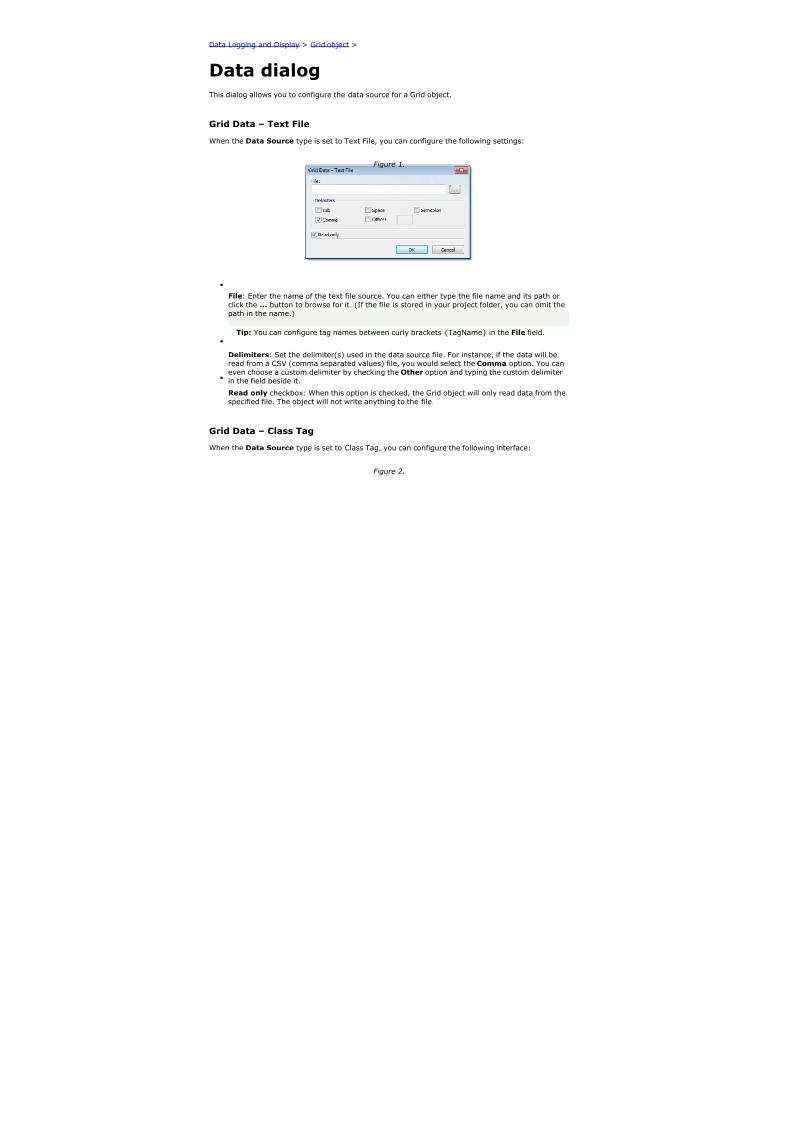
8/22/2019 User Guide Indu Soft
http://slidepdf.com/reader/full/user-guide-indu-soft 441/1279
Data Logging and Display > Trend Control object > Object Properties: Trend Control dialog >
Legend dialog
Accessing the dialog
To access the Legend dialog for a specific Trend Control screen object, first access the Object
Properties dialog for that screen object and then click Legend.
The dialog in detail
Figure 1. Legend dialog
The Legend dialog contains the following elements:
Show: When checked, the embedded legend is displayed during runtime. This interfaceprovides useful information associated with the pens currently linked to the object.
Available / Visible: The items in the Visible box are displayed in the legend during runtime.You can add items to and remove them from the Visible box using the » and « buttonsrespectively. Moreover, you can use the Move Up and Move Down buttons to change theorder in which the items are displayed in the legend during runtime.
The following table lists the available legend items:

8/22/2019 User Guide Indu Soft
http://slidepdf.com/reader/full/user-guide-indu-soft 442/1279
Item Legend Icon Description
Eng Units The tag/pen's Engineering Units.
Min The tag/pen's minimum possible value.
Max The tag/pen's maximum possible value.
Selection Press button to select another tag for this pen.
Remove Press button to completely remove this pen from thelegend and the Trend chart.
Hide Select (check) option to hide this pen in the Trendchart.
Pen Style Press button to change the pen's line style, weight,color, markers, and so on.
Scale Select (check) option to show the pen's scale on theTrend chart.
Description Description of the tag/pen.Current The current value of the tag configured to the pen.
Cursor The value of the pen where it intersects the cursor line.
Properties: Allows you to configure the properties for the field highlighted in the Available orVisible box:
Property Description
Label Label for the field displayed during runtime
Width Width for the field (in pixels) during runtime.
Align Alignment of the data displayed in the field.
Available during runtime When this option is checked, the user can show or hidethe field during runtime.
Maximum size: Defines the size of the legend in terms of number of rows. For instance, theuser might have 8 points being displayed in the trend object, if the maximum size is set to two,the legend will have a scroll bar to allow the user to scroll to the other points.
Number of items: Number of points (default) displayed on the legend. You can allow the userto add/remove points during runtime regardless of the value in this field.
Selected Item: You can configure a numeric tag in this field. The object writes in this tag the
number of the selected row. In addition, you can select different rows by writing their values inthis tag.
Fonts: Sets the font for the text displayed in the legend.
Parent topic: Object Properties: Trend Control dialog
Related reference

8/22/2019 User Guide Indu Soft
http://slidepdf.com/reader/full/user-guide-indu-soft 443/1279
Points dialogAxes dialogToolbar dialogData Sources dialogAdvanced dialog
InduSoft Web Studio v7.0 Technical ReferenceCopyright © 2003–2010 Indusoft, Inc.

8/22/2019 User Guide Indu Soft
http://slidepdf.com/reader/full/user-guide-indu-soft 444/1279
Data Logging and Display > Trend Control object > Object Properties: Trend Control dialog >
Advanced dialog
Accessing the dialog
To access the Advanced dialog for a specific Trend Control screen object, first access the Object
Properties dialog for that screen object and then click Advanced.
The dialog in detail
Figure 1. Advanced dialog
The Advanced dialog contains the following elements:
Area / Element Name Description
Run Mode
Options
Update
trigger
When the tag configured in this field changes value, the trend
object is updated (refreshed).Update
interval
When the update trigger is issued and the X Axis if of typenumeric, the value on this field will be added to the minimum andmaximum values of the X Axis.

8/22/2019 User Guide Indu Soft
http://slidepdf.com/reader/full/user-guide-indu-soft 445/1279
Area / Element Name Description
Load
indicator
Type the name of a project tag. While the trend control is loadingexternal data, the tag receives a value of 1, and when the trendcontrol has finished loading the data, the tag receives a value of 0.
Move to
current timeon run
When this box is checked, X axis shifts to the current time
automatically when the object is triggered to Play mode, duringruntime.
Retrieve
bounding
samples
When this box is checked, the object retrieve the data outboundthe object (first points only). Uncheck this option can improve theperformance, since the points outbound the object will not beretrieved from the history. On the other hand, the object will notdraw lines linking the first and last samples to the extremities of the object.
Run-Time
Config
Save trigger The settings of the Trend object modified during runtime can besaved in temporary files. This option can be used to:
Keep the settings consistent, so when the user closes the
screen and opens it again, or re-starts your project, thesettings configured during runtime are not lost.
Create standard settings for different scenarios and load theappropriate configuration during the runtime, based on apre-defined condition or based on the user-selection.
When the tag configured in this field changes value (e.g.,toggles), the current settings of the Trend object are saved in thetemporary file. This command is not available for the Thin Client.
Load trigger When the tag configured in this field changes value (e.g.,toggles), the settings from the temporary file are loaded andapplied to the Trend object during runtime.
Note: After the screen where the Trend object is configured issaved, the settings are not automatically loaded from thetemporary file when the screen is opened again, unless the Load
trigger command is executed before the screen is closed.
File Name If this field is left blank, the temporary file is saved in yourproject's Web sub-folder with the syntax
ScreenNameObjectID TrendControl.stmp (e.g.,MyScreen10TrendControl.stmp). The Thin Client station
saves/loads the temporary file in the standard Temp directory of the operating system (e.g., \Documents and
Settings\CurrentUser \Local Settings\Temp).
You can configure a customized file name for the temporary file inthis field or even configure a string tag between curly brackets,so the user can change the name of the configuration filedynamically during runtime by changing the value of this tag. If you do not specify any path, the file is saved in your project's Web

8/22/2019 User Guide Indu Soft
http://slidepdf.com/reader/full/user-guide-indu-soft 446/1279
Area / Element Name Description
sub-folder by default.
Auto Save When this box is checked, the current settings of the Trend areautomatically saved in the temporary file when the screen wherethe Trend is configured is closed during runtime. If the box is notchecked, the settings are saved only when the Save trigger
command is executed.
Custom Point
Selection
Screen This interface allows you to create your custom dialog to modifyor insert pens to the object.
Name of the screen which must be launched when the usertriggers a command to modify or insert a new pen to the objectduring runtime.
Point Number Point number (from the Points dialog), indicating the pointassociated to the pen that will be inserted or modified duringruntime.
Add Indicator Flag that indicates that the user triggered an action to insert anew pen (value 1) instead of modifying a pen that is already beenvisualized (value 0).
Export to File Trigger When the tag configured in this field changes value (e.g.,toggles), the current state of the trend control is exported to animage file. The toolbar and scroll bar are not included. The legendand time display are included only if the trend control isconfigured to show them.
File Name The file path and name of the exported file.
If no path is specified, then the file is saved in the projectdirectory. If no extension is specified, then it is determined byFormat.
Tip: You can specify a project tag in curly brackets (e.g.,{tagname}), to programatically change the file name during
runtime.
Status The tag configured in this field receives status codes that indicatethe success or failure of the export.
Format The graphic format of the exported file.
If Auto is selected, then the format is determined by theextension specified in File Name. If Auto is selected but noextension is specified, then the default format is BMP.
Size The image file is exported at full size by default. However, youcan specify the width and height (in pixels).
Options VK (VirtualKeyboard)
Virtual Keyboard type used for this object.

8/22/2019 User Guide Indu Soft
http://slidepdf.com/reader/full/user-guide-indu-soft 447/1279
Area / Element Name Description
Ignore X
Filter
When this box is checked, the X Filter is ignored to avoid addingthe WHERE or querying clause to the Data Sources.
Enable
translation
Enable the external translation for the text displayed by thisobject.
Auto Format When checked, decimal values in the Current, Cursor, Max, Min
and Scale columns will be formatted according to the virtual tablecreated by the SetDecimalPoints() function.
Note: For the Auto Format to work, decimals formatting on theX-axis must be disabled — that is, the Decimals field in the Axesdialog must be left blank.
Parent topic: Object Properties: Trend Control dialog
Related reference
Points dialog
Axes dialogToolbar dialogData Sources dialogLegend dialog
InduSoft Web Studio v7.0 Technical ReferenceCopyright © 2003–2010 Indusoft, Inc.

8/22/2019 User Guide Indu Soft
http://slidepdf.com/reader/full/user-guide-indu-soft 448/1279
Data Logging and Display > Trend Control object >
Runtime Interface
When enabled, some embedded interfaces can help the user to interact with the Trend Control duringruntime. This section describes these interfaces:
Toolbar: The commands available in the embedded Toolbar are described in the followingtable:
Command Icon Description Activation Tag
Run Sets the Trend to the Play
Mode. In this mode, the X axisis continuously updated (OnlineMode). This option is disabled(grayed out) when the trend isalready in Play Mode.
0 = Play Mode on
1 = Play Mode off
Stop Sets the Trend to the Stop
Mode. In this mode, the X axisis not continuously updated(History Mode), so the user canvisualize history data in afrozen period of time. Thisoption is disabled (grayed out)when the trend is already inStop Mode.
0 = Stop Mode on
1 = Stop Mode off
Period Launches an embedded dialog,where the user can modify the
X axis scale main settings.
When the ActivationTag changes value
(e.g., toggles), thiscommand isexecuted.
WindowZoom Allows the user to click on theTrend area and drag the cursorto select the area that must bevisible when the cursor isreleased. This option is disabled(grayed out) when theMultiple Section option (forthe Y scale) is active.
HorizontalZoom Allows the user to click on twopoints in the Trend area,
defining the horizontal scalethat must be available.
VerticalZoom Allows the user to click on twopoints in the Trend area,defining the vertical scale thatmust be available. This option is

8/22/2019 User Guide Indu Soft
http://slidepdf.com/reader/full/user-guide-indu-soft 449/1279
Command Icon Description Activation Tag disabled (grayed out) when theMultiple Section option (forthe Y scale) is active.
ZoomIn Allows the user to zoom in(display half of the current Xand Y scales) each time theyclick on the Trend area.
0 = Zoom In on
1 = Zoom In off
ZoomOut Allows the user to zoom outeach time they click on theTrend area.
0 = Zoom Out on
1 = Zoom Out off
CancelZoom Cancels the current Window,Horizontal or Vertical Zoom
and returns the Trend displayto its original scale.
When the ActivationTag changes value(e.g., toggles), thiscommand isexecuted.
LegendProperties Launches an embedded dialog,where the user can modify the
Legend main settings.
Pen Style Launches an embedded dialog,where the user can modify thestyle of the selected pen.
Add Pen Launches a dialog, where theuser can add a new pen to theTrend object.
RemovePen Removes the selected pen fromthe Trend display.
Multiple Sections Switches the Y scale to Multiple
Sections (a section for eachpen) or Single Section (all pensshare the same Y scalesection).
0 = Multiple Sectionson
1 = Multiple Sectionsoff
Cursor Turns the cursor (ruler) tovisible or hidden.
0 = Cursor on
1 = Cursor off
AutoScale Changes the Y axis scale to fitall values from the pens thatare currently being monitored.
When the ActivationTag changes value(e.g., toggles), this
command isexecuted.

8/22/2019 User Guide Indu Soft
http://slidepdf.com/reader/full/user-guide-indu-soft 450/1279
Command Icon Description Activation Tag
Print Prints the current state of theTrend display. (Historical dataare not printed.)
When the ActivationTag changes value(e.g., toggles), thiscommand isexecuted.
Legend: The commands available in the embedded Legend are described in the following table:
Command Icon Description
Selection Launches a dialog, where the user can replace the data pointassociated with the selected pen on the legend
Remove Removes the selected pen from the Trend object
Hide When checked, the selected pen is visible; otherwise, it ishidden.
Pen Style Launches an embedded dialog, where the user can modify the
style of the selected pen.Scale When this box is checked, the Y axis scale is visible;
otherwise, it is hidden. The scale can be hidden only when theMultiple Sections option is off.
Scroll bar: Using the Scroll bar, the user can slide through the X axis values, according to theperiod configured for this scale.
Time bar: Using the Time bar, the user can modify the Duration, as well as the StartDate/Time and/or the End Date/Time, for the data displayed on the object. Changing thesevalues will affect the tags associated with the X axis scale (if any).
Parent topic: Trend Control objectInduSoft Web Studio v7.0 Technical ReferenceCopyright © 2003–2010 Indusoft, Inc.

8/22/2019 User Guide Indu Soft
http://slidepdf.com/reader/full/user-guide-indu-soft 451/1279
Data Logging and Display > Trend Control object >
Using the Data Source Text FileThe Trend Control can generate trend charts from any Text File that has the values organized incolumns and rows. The columns should be separated from each other by special characters (usuallythe comma). Each sample (pair of values representing a point in the graph) is represented by a row(a line in the file). Suppose that the user wants to display a chart with the information in thefollowing table:
X Value Y1 Value Y2 Value
0 0 10
1 1 20
2 2 30
3 3 40
We have one variable that represents the X Axis and two variables (Y1 and Y2) that will representdifferent lines in the chart. The first step is to convert the data into a text file. If we adopt the commaas our separator the file will be as shown below:
Figure 1.
We strongly recommend that you save the file in the same folder where the project is. By doing so,you do not have to specify the entire path and your project will still work, even if it is copied to adifferent computer.
Once you have added the Trend Control to your screen, double-click on the object to open the ObjectProperties and click on Axis…. Change the Data Type of the X Axis to Numeric, and set the ranges
as shown in the picture below:
Figure 2.

8/22/2019 User Guide Indu Soft
http://slidepdf.com/reader/full/user-guide-indu-soft 452/1279
Click OK on this window and then, in the Object Properties window, click on the Data Sources…
button. The following window will display:
Figure 3. Trend Control – Data Sources dialog
We need to create a data source in order to access to the text file. Click on the New… button,specify the Data Source name MyTextFile and then click Create. You should see the following

8/22/2019 User Guide Indu Soft
http://slidepdf.com/reader/full/user-guide-indu-soft 453/1279
information now:
Figure 4. Setting X Ax i s f i e l d to 0
On the X Axis field we need to indicate which column in our text file represents the X Axis. In ourexample we are using column zero, so enter 0 for this field, then click Data Source Settings…. Thefollowing window will display:
Figure 5. Selecting the text file
If you have copied the text file to the project folder, you only have to specify the file name,otherwise, enter with the complete path where the file is located (use the browse button as needed).Click OK on this window and OK again to finish the data source configuration and close the DataSource configuration Window.
Now we need to define our Y1 and our Y2. They will be represented by points on our Trend Control.

8/22/2019 User Guide Indu Soft
http://slidepdf.com/reader/full/user-guide-indu-soft 454/1279
Double-click on the Trend Control again to access the Object Properties window and then click onPoints…. Your next step is to define the points according to the following figure:
After following these steps, run your project and you should see something similar to the figurebelow:
Figure 6.
Figure 7.

8/22/2019 User Guide Indu Soft
http://slidepdf.com/reader/full/user-guide-indu-soft 455/1279
Parent topic: Trend Control objectInduSoft Web Studio v7.0 Technical ReferenceCopyright © 2003–2010 Indusoft, Inc.

8/22/2019 User Guide Indu Soft
http://slidepdf.com/reader/full/user-guide-indu-soft 456/1279
Data Logging and Display > Trend Control object >
Using the Data Source DatabaseThe Trend Control can generate trend charts from any Relational Database that can be accessedthrough the ADO.Net technology. This Appendix illustrates how to access a Microsoft AccessDatabase; if you are using another type of database, almost all the definitions will apply, howeveryou will need to configure your connection on a different way. For information on how to configureother databases, please refer to the Appendixes in the Database Interface section of this manual.
Suppose that you have an access database at your C drive named mydata.mdb and that you want togenerate a chart based on the information in the following table:
Figure 1.
The first step is to add the Trend Control to your screen. Now double-click on the object to open thenObject Properties and click on Data Sources…. The following window will display:

8/22/2019 User Guide Indu Soft
http://slidepdf.com/reader/full/user-guide-indu-soft 457/1279
Figure 2. Trend Control – Data Sources dialog
We need to create a data source in order to access to the database. Click the New… button, specifythe Data Source name MyDB and then click Create. You should see the following information now:
Figure 3. Setting X Ax i s f i e l d to Time_Stamp
Change the Source Type to Database and specify Time_Stamp in the X Axis field. Then click on the
Data Source Settings… button, the following window will display:
Figure 4. Clearing the Us e p r o j ec t d ef au l t option

8/22/2019 User Guide Indu Soft
http://slidepdf.com/reader/full/user-guide-indu-soft 458/1279
Uncheck the checkbox Use project default and click on the browse button … in order to configurethe connection string. The following window will display:
Figure 5. Selecting the OLE DB Provider

8/22/2019 User Guide Indu Soft
http://slidepdf.com/reader/full/user-guide-indu-soft 459/1279
Select the Microsoft Jet 4.0 OLE DB Provider and click Next ». In the following window, you shouldspecify the database path:
Figure 6. Selecting the database file

8/22/2019 User Guide Indu Soft
http://slidepdf.com/reader/full/user-guide-indu-soft 460/1279
Click OK to finish the Connection String configuration. Now uncheck the option Use default nameand select the table from your database as shown below:
Figure 7. Selecting the table in the database

8/22/2019 User Guide Indu Soft
http://slidepdf.com/reader/full/user-guide-indu-soft 461/1279
Click OK on this window and OK again to finish the data source configuration and close the DataSource configuration window.
Now we need to define Temperature and Pressure. They will be represented by points on our TrendControl. Double-click on the Trend Control again to access the Object Properties window and thenclick Points…. Your next step is to define the points according to the following figure:
Figure 8.

8/22/2019 User Guide Indu Soft
http://slidepdf.com/reader/full/user-guide-indu-soft 462/1279
If you run the trend, it will start with the current date/time. In order to see the data in the chart youwill have to properly configure the start date/time as shown below:
Figure 9.

8/22/2019 User Guide Indu Soft
http://slidepdf.com/reader/full/user-guide-indu-soft 463/1279
Parent topic: Trend Control objectInduSoft Web Studio v7.0 Technical ReferenceCopyright © 2003–2010 Indusoft, Inc.

8/22/2019 User Guide Indu Soft
http://slidepdf.com/reader/full/user-guide-indu-soft 464/1279
Data Logging and Display >
Grid objectThe Grid object allows you to read/write data in a tabular format from the data source configured inthe object.
To draw one, do the following:
Click the Grid tool1.
Click on the screen, click the left mouse button, and drag the mouse across the screen to createa box of the desired size (while holding down the mouse button).
2.
Release the mouse button, and the Grid Object will display.
Figure 1. Sample Grid Object
3.
Right-click on the Grid Object, and select Properties from the menu. The Object Properties dialogwill open. Use this dialog to configure the Grid Object's parameters:
Figure 2. Object Properties: Grid
Data Source: Select the data source type. The object supports three data sources:
DataSource Description
Text File Displays data from a text file in the ASCII or Unicode format (e.g., CSVtext files).

8/22/2019 User Guide Indu Soft
http://slidepdf.com/reader/full/user-guide-indu-soft 465/1279
DataSource Description
Class Tag Displays values from a Class Tag, where the members of the tag are fields(columns) of the grid object, and each array position is one row of the gridobject.
Database Displays data from an SQL Relational Database, using ADO (ActiveXDatabase Object) to exchange data with the database.
E-Sign: When you check this option, the user will be prompted to enter an electronic signaturebefore entering or modifying data on the object.
VK: Select a Virtual Keyboard type used for this object. The option <Use Default> selects thedefault Virtual Keyboard configured in the Viewer settings (Viewer on the Project tab of theribbon). You can also specify a different Virtual Keyboard for this Grid object.
Security: Enter the security system access level required for the object/animation.
Disable: You can enter an expression in this field to disable data input or action by the user.
Highlight Color: Select a background color for the selected row, during runtime.
Text Color: Select a text color for the selected row, during runtime.
Win Color 1: Select a background color for the odd rows.
Win Color 2: Select a background color for the even rows.
Fonts: Click to launch the Fonts dialog, where you can configure the font settings for the textdisplayed in the Grid object.
Columns: Click to launch the Columns dialog, where you can configure the settings (such aslabel, column, width, etc.) for the columns of the Grid object.
Data: Click to launch the Data dialog, where you can specify a data source for the Grid object.
Advanced: Click to launch the Advanced dialog, where you can configure several settings forthe Grid object.
Columns dialog
Data dialog
This dialog allows you to configure the data source for a Grid object.
Advanced dialog
This dialog allows you to configure the advanced settings for a Grid object.
Parent topic: Data Logging and DisplayInduSoft Web Studio v7.0 Technical Reference
Copyright © 2003–2010 Indusoft, Inc.

8/22/2019 User Guide Indu Soft
http://slidepdf.com/reader/full/user-guide-indu-soft 466/1279
Data Logging and Display > Grid object >
Columns dialogYou can configure the settings for each column displayed by the Grid object during runtime, asfollows:
Figure 1. Columns dialog
Column: The ID Number defines the position of the column in the table.
Label: Enter a Title for each column, which will display as the heading (first) row of the Gridobject.
Tip: You can configure tags between curly brackts in the Label field to modify itdynamically during runtime. When the label is blank (e.g., ""), then the width of the columnis set to 0 during runtime. This option is useful to hide columns during runtime.
Field: Enter the name of the field (column) in the SQL Relational Database to which the Gridobject is linked. If this field is left in blank, the text configured in the Label field will be used asthe Field name. (This setting is available only when the Data Source type is set to Database.)
Type: Select the Type of interface that will be used in the column. The options are:
Type Description
Text Displays alphanumeric values
Numeric Displays numeric values
Picture Displays the picture (*.bmp or *.ico format) from the data source. For

8/22/2019 User Guide Indu Soft
http://slidepdf.com/reader/full/user-guide-indu-soft 467/1279
Type Description instance, if the value from the data source is MyFile.bmp, the grid objectwill display the picture from the file MyFile.bmp stored in your projectfolder. The picture will be automatically resized to fit the cell of the gridobject. The picture file(s) must be stored in the Web sub-folder of your
project folder to support this feature on the Thin Client stations. CEViewprojects support pictures in bitmap format (*.bmp), but not in icon format
(*.ico).Checkbox Displays checkbox interfaces. The checkbox will be unchecked if the value
read from the file is 0, <NULL> or "FALSE"; otherwise, the checkbox will bechecked. By default, IWS will use the value 0 for unchecked and the value1 for checked.
Time Displays the value in the Time format (e.g., HH:MM:SS). This setting isavailable only when the Data Source type is set to Database.
Date Displays the value in the Date format (e.g., MM/DD/YYYY). This setting is
available only when the Data Source type is set to Database.
Date/Time Displays the value in the Date/Time format (e.g., MM/DD/YYYY
HH:MM:SS). This setting is available only when the Data Source type isset to Database.
Note:
When the Data Source type is set to Database, it is important to make sure that theType for each column configured in the object matches the Type of the respectivefield in the database.
When the Data Source type is set to Database, you can configure valid SQLstatements directly in the field (e.g., List(DISTINCT [Cell_Name]) AS [Cell Name]). Youcan also configure tag names between curly brackets to modify this setting duringruntime (e.g., {MyFieldName}).
Tip: If Picture is the column type, the Grid object displays a default icon ( ) if the picturefile is not found during runtime. You can configure a different picture to be displayed whenthe file is not found by copying the picture file to the Web sub-folder of your project folder
and configuring its name on the project_name.app file, as follows:
[Objects]
GridDefaultPicture=PictureFileName
Width: Enter a width of the column, in pixels.
Align: Select an Alignment for the data shown in the column. There are three options: Left,Right or Center.
Input: Click (check) to allow the user to enter data in this column during runtime.
Key: Use this field to designate a shortcut for sorting the values. A shortcut is a combination of

8/22/2019 User Guide Indu Soft
http://slidepdf.com/reader/full/user-guide-indu-soft 468/1279
keys pressed on a keyboard at one time (e.g., CTRL+C, CTRL+V, etc.). This option is especiallyuseful when creating projects for runtime devices that do not provide a mouse or touchscreeninterface and only have a keyboard for interacting with the project during runtime.
Unit: Enter the name of the engineering unit (i.e., the unit of measurement), if any, thatapplies to the data displayed. You can also enter a String tag using the {tagname} syntax, which
allows you to change the value of Unit during runtime.
Decimal Points: Enter the number of decimal places to be displayed. You can also enter an
Integer tag using the {tagname} syntax, which allows you to change the value of DecimalPoints during runtime.
Note: When the Data Source type is set to Class Tag, and the Columns dialog is leftblank, the object displays the values from all members of the Class tag with the followingdefault column settings:
Label = <Name of the Member from the Class tag>
Type = Text
Width = <Minimum size to display the name of the member from the class tag on theheader of the grid object>
Align = Center
Input = Enabled (checked)
Key = <None>
Unit = <Unit of the Member from the Class tag>
The Unit of a class member or tag is set using the Tag Properties tool.
Show ID Column: Check to display the number of each row, automatically.
Allow sorting columns: Check to enable the user to sort the values in the columns duringruntime, either by clicking on the label or by using the shortcut configured for each column. Thisoption is disabled if the Show header option from the Advanced dialog is not checked.
Tip: Use the Move Up and Move Down buttons to reorder the display of the columns.
Parent topic: Grid objectInduSoft Web Studio v7.0 Technical ReferenceCopyright © 2003–2010 Indusoft, Inc.

8/22/2019 User Guide Indu Soft
http://slidepdf.com/reader/full/user-guide-indu-soft 469/1279
Data Logging and Display > Grid object >
Data dialogThis dialog allows you to configure the data source for a Grid object.
Grid Data – Text File
When the Data Source type is set to Text File, you can configure the following settings:
Figure 1.
File: Enter the name of the text file source. You can either type the file name and its path orclick the … button to browse for it. (If the file is stored in your project folder, you can omit thepath in the name.)
Tip: You can configure tag names between curly brackets {TagName} in the File field.
Delimiters: Set the delimiter(s) used in the data source file. For instance, if the data will beread from a CSV (comma separated values) file, you would select the Comma option. You caneven choose a custom delimiter by checking the Other option and typing the custom delimiterin the field beside it.
Read only checkbox: When this option is checked, the Grid object will only read data from thespecified file. The object will not write anything to the file.
Grid Data – Class Tag
When the Data Source type is set to Class Tag, you can configure the following interface:
Figure 2.

8/22/2019 User Guide Indu Soft
http://slidepdf.com/reader/full/user-guide-indu-soft 470/1279
Class Tag: Enter the name of the main class tag source. (Do not specify a specific member of the class tag.) You can specify the initial array position in this field (e.g., Mytag[10]); otherwise,0 (zero) will be used as the initial position by default.
Number of Items: Enter the number of array positions from the Class Tag that should bedisplayed.
View: When the tag configured in the optional field changes value (e.g., toggles) duringruntime, the grid object launches a dialog, allowing the user to show/hide each column or
modify their positions.
Figure 3.
Grid Data – Database Configuration
When the Data Source type is set to Database, you can configure the following settings:
Figure 4.

8/22/2019 User Guide Indu Soft
http://slidepdf.com/reader/full/user-guide-indu-soft 471/1279
Please refer to the Database Configuration dialog for further information about this dialog.
Parent topic: Grid objectInduSoft Web Studio v7.0 Technical ReferenceCopyright © 2003–2010 Indusoft, Inc.

8/22/2019 User Guide Indu Soft
http://slidepdf.com/reader/full/user-guide-indu-soft 472/1279
Data Logging and Display > Grid object >
Advanced dialogThis dialog allows you to configure the advanced settings for a Grid object.
Figure 1. Advanced dialog
User Enable: If the value of this tag is TRUE (different from 0), the user can select differentrows of the object by clicking on them during runtime. This field can be configured with a tag orwith a numeric value.
Selected Values: The values from each column of the selected row are written to each positionof the array tag configured in this field. Moreover, you can modify the value of the cellscurrently selected in the Grid object by changing the value of array tag configured in this field.
The initial array position (offset) can be configured in this field.
Number of Rows: The grid object writes the number of rows currently available in the gridobject to the tag configured in this field.
Row Number: The Grid object writes the number of the row currently selected during runtime.In addition, you can select different rows by writing their values in this tag.
Condition: Enter an expression to filter the grid data; only rows that match the expression willbe displayed. The expression must use the following syntax:
Column Operator Value

8/22/2019 User Guide Indu Soft
http://slidepdf.com/reader/full/user-guide-indu-soft 473/1279
For example…
ColumnX > 200
When Data Source (in the Grid Object Properties dialog) is set to Text File or Class Tag, theColumn is the value specified in the Label. When Data Sourse is set to Database, the column is
the value specified in the Field. (In this case, if the Field is left blank, then the column valuespecified is the Label.)
Also, expressions for Database must be formatted like a SQL Where statement. The followingtable shows which operators should be used:
Table 1. Condition Expression Operators
Comparison Data Source is Text
File…
Data Source is
Database…
equal to = LIKE
not equal to <> NOT LIKE
wildcard, single character ? _
wildcard, unlimited characters * %
As such, the following expression for Text File…
C1 = 'ab?d'
…means the same as the following expression for Database…
C1 LIKE 'ab_d'
Finally, you can combine several expressions simultaneously in the Condition field, using thelogic operators AND, OR, and NOT. For example:
ColumnAge > '10' OR ColumnName = 'John' AND ColumnDate > '05/20/2003'
Tip: You can configure tags between curly brackets {TagName} in the Condition field tochange the filtering condition during runtime.
Print Trigger: When the tag configured in this field is toggled, the current state of the Gridobject is sent to the default printer.

8/22/2019 User Guide Indu Soft
http://slidepdf.com/reader/full/user-guide-indu-soft 474/1279
PDF Trigger field: When the tag configured in this field is toggled, the current state of the Gridobject is saved as a PDF file at the location specified by PDF Filename.
PDF Filename field: Enter a complete file path and name where the PDF file is to be saved.You can also enter a tag name using the {tag} syntax.
Note: PDF Trigger and PDF Filename are not supported in projects running on WindowsEmbedded or Thin Client.
Multiline checkbox: When this option is checked, the print output or PDF will be formattedaccording to the available column space, and the text within each cell will be wrapped so that allof it is shown.
Reload: When the tag configured in this field is toggled, the object reloads the data from thedata source and displays it.
Save Trigger: When the tag configured in this field is toggled, the data source (Text File orDatabase) is updated with the current values of the grid object. This field is not available whenthe Data Source type is Class Tag, because the values are automatically updated in the tags asyou change a cell in the grid.
Insert Trigger: When Auto refresh after insert trigger is enabled (checked), the tag
configured in this field is used as a trigger to refresh the database table. Whenever the value of the tag changes, a new row is added to the table and the values of the array configured in theInserted Values field are automatically inserted.
Inserted Values: If the Insert Trigger is being used, then the array tag configured in thisfield provides the values that will be inserted. This field must only contain an array tag, althoughit can be of any size.
Save on data change: When this option is checked, the values are updated on the datasource (Text File or Database) as soon as the user enters a new value on the grid, duringruntime. This option is disabled when the Data Source type is Class Tag, because the values areautomatically updated in the tags as the user changes the value of the cells in the grid.
Enable Slider/Resize: If this box is not checked, the user is unable to scroll the list by
dragging the slider button, or to change the cell's size during runtime.Conditional checkbox: When this option is checked, the user cannot uncheck a checkbox onthe Grid during runtime, unless all preceding checkboxes in the same column are alreadyunchecked. This option is especially useful when you want to oblige the user to follow a pre-defined sequence. This field is not available when the Data Source type is Class Tag.
Show Header: When this option is checked, the header of the Grid object is visible duringruntime, displaying the label of each column.
Show gridlines: When this option is checked, the gridlines of the Grid object are visible duringruntime.
Ext. translation: When this option is checked, the text displayed by the Grid object will besusceptible to the Translation Tool during runtime.
Disable TAB to navigate through cells: When this option is checked, the user can onlynavigate through the cells of the Grid Object with the arrow keys, rather than the Tab key. Youshould disable the Tab key for navigation if you want it to be used for switching to the nextobject that supports focus on the screen.
Concatenate Label for picture: When this option is checked, the reference name for thepicture is the result of the concatenation of the name in the Field column with the value of the

8/22/2019 User Guide Indu Soft
http://slidepdf.com/reader/full/user-guide-indu-soft 475/1279
Label column. The result will be <Label name>_<Field value>.
Export: This interface allows you to export the data from the grid object to a class-array tag,regardless of the Data Source selected for the object. The following fields must be configured tosupport this feature:
Field Description
Classtag Type the main tag name of the class-array tag that will receive the
exported values. Each row from the grid object will be exported to onearray position of the array tag, by matching column labels. The initial arrayposition can be configured in this field; 0 is the default.
Trigger When the tag configured in this field changes value (e.g., toggles), thedata is exported from the Grid object to the class-array tag configured inthe Class tag field.
Tip: The Export feature is an easy and powerful tool to transfer data from different datasources to tags. After exporting the data to tags, you can use different tasks to manipulatethe data, such as the FileWrite() function, or the Recipe or Report tasks to save the data in
text files (e.g., CSV files).
Auto Format: When this option is checked, decimal values in columns of Numeric type will beformatted according to the virtual table created by the SetDecimalPoints() function. This optionwill work only in columns for which Decimal Points are not already configured. For moreinformation, please see Grid Object: Columns dialog.
Parent topic: Grid objectInduSoft Web Studio v7.0 Technical ReferenceCopyright © 2003–2010 Indusoft, Inc.

8/22/2019 User Guide Indu Soft
http://slidepdf.com/reader/full/user-guide-indu-soft 476/1279
Background TasksBackground tasks are, as the name implies, project features that run in the background, as opposedto the graphical screens with which the user interacts.
The background tasks are executed by the Background Tasks module (see Execution Tasks), andthey are defined by task worksheets in the Project Explorer.
Alarm worksheet
The Alarms folder enables you to configure alarm groups and tags related to each group. TheAlarm worksheet defines the alarm messages generated by the project. The primary purpose of an alarm is to inform the operator of any problems or abnormal condition during the process sohe can take corrective action(s).
Trend worksheet
The Trend folder enables you to configure history groups that store trend curves. You can usethe Trend worksheet to declare which tags must have their values stored on disk, and to createhistory files for trend graphs. The project stores the samples in a binary history file (*.hst), andshows both history and on-line samples in a screen trend graph.
Recipe worksheet
A Recipe worksheet is used to load tag values from or save tag values to an external file duringruntime. It is typically used to execute process recipes, but you can store any type of information (such as operation logs, passwords, and so on) in the external file.
Report worksheet
A Report worksheet is used to design a report that is dynamically generated during runtime
(using the current values of the included tags) and then either sent to a printer or saved to afile.
ODBC worksheet
The ODBC interface runs in a network environment and uses the standard Windows ODBCconfiguration. The ODBC task is capable of data interchange between IWS and any databasesupporting this interface.
Math worksheet
A Math worksheet is used to implement program logic (using the Built-in Scripting Language)that should be continuously executed during runtime, rather than on specific actions like theuser pressing a button on a screen.
Script worksheet
A Script worksheet is used to implement program logic (using VBScript) that should becontinuously executed during runtime, rather than on specific actions like the user pressing abutton on a screen.
Scheduler worksheet

8/22/2019 User Guide Indu Soft
http://slidepdf.com/reader/full/user-guide-indu-soft 477/1279
A Scheduler worksheet is used to execute program logic (using the Built-in Scripting Language)at a specific date/time, on a regular time interval, or upon a triggering event.
Database/ERP worksheet
In addition to ODBC, IWS also supports Microsoft .NET ActiveX Data Objects (ADO.NET) forinterfacing between the project tags database and other external databases. A Database/ERPworksheet is used to associate project tags with external database fields.
InduSoft Web Studio v7.0 Technical Reference
Copyright © 2003–2010 Indusoft, Inc.

8/22/2019 User Guide Indu Soft
http://slidepdf.com/reader/full/user-guide-indu-soft 478/1279
Background Tasks >
Recipe worksheetA Recipe worksheet is used to load tag values from or save tag values to an external file duringruntime. It is typically used to execute process recipes, but you can store any type of information(such as operation logs, passwords, and so on) in the external file.
To create a new Recipe worksheet, do one of the following:
On the Insert tab of the ribbon, in the Task Worksheets group, click Recipe;
Right-click the Recipes folder in the Project Explorer, and then click Insert on the shortcutmenu; or
Click New on the Application menu, click the File tab, and then select Recipe Worksheet.
To edit an existing Recipe worksheet, double-click it in the Project Explorer.
Figure 1. Recipe worksheet
The worksheet is divided into two areas:
Header area (top section), which contains information for the whole group
Body area (bottom section), where you define each tag in the group.
Use the Header parameters on this worksheet as follows:
Description field: Type a description of the worksheet, for documentation purposes.
File Name field: Type the name of the external file, using static text (File1
) or a indirect tag({FileNameTag}).
Register Number field: Type a tag to define the register number to be read or written into aDBF file. (This field is for legacy purposes only and is no longer used.)
Save As XML: Select (check) to save information in XML format, or deselect (uncheck) to savein DAT format.

8/22/2019 User Guide Indu Soft
http://slidepdf.com/reader/full/user-guide-indu-soft 479/1279
You can load information in a .DAT file into different tags using a second Recipe worksheet, butyou must load information in an .XML file into tags with the same name as the tag from whichthe data originated.
Note: As with HTML pages, you must be running the Web server to view XML data fromthe Web. Unlike the HTML pages in the runtime system, XML pages do not need to have theproject running to view the XML data. (You must be running Internet Explorer version 5.0or higher to view XML data.)
Unicode checkbox: Click (enable) to save the recipe in Unicode format (two bytes percharacter) or (disable) to save the recipe in ANSI format (one byte per character).
Note: When saving a worksheet, you can save it using any name you choose (you are notrequired to use a predefined file name). A configuration file using the default extension .RCP (or.XSL if you specify Save As XML) contains the recipe configuration and the File Name fieldcontains the data file name to be read or written.
Use the Body parameters on this worksheet as follows:
Tag Name field: Type tag names to update with file contents or with values to write to a file. If the tag is an array, you must specify the first position to use.
If the tag is an Array or a Class (or both), then the development application automaticallyenables every array position and class member by default. To configure a specific array positionand/or class member, type it in the Tag Name field as normal. For example, level[3].member.
Number of Elements field: Specify how many positions of the array tag are in use.
Tip: You can configure a tag name between curly brackets ({tagname}) in this field, allowing
the user to dynamically change the Number of Elements configured in the Recipe for eacharray tag, during runtime.
To execute a Recipe worksheet, use the Recipe function anywhere an expression is allowed.
Parent topic: Background TasksInduSoft Web Studio v7.0 Technical ReferenceCopyright © 2003–2010 Indusoft, Inc.

8/22/2019 User Guide Indu Soft
http://slidepdf.com/reader/full/user-guide-indu-soft 480/1279
Background Tasks >
Report worksheetA Report worksheet is used to design a report that is dynamically generated during runtime (usingthe current values of the included tags) and then either sent to a printer or saved to a file.
To create a new Report worksheet, do one of the following:
On the Insert tab of the ribbon, in the Task Worksheets group, click Report;
Right-click the Reports folder in the Project Explorer, and then click Insert on the shortcutmenu; or
Click New on the Application menu, click the File tab, and then select Report Worksheet.
To edit an existing Report worksheet, double-click it in the Project Explorer.
Figure 1. Report worksheet
The Report worksheet is divided into two areas:
Header area (top section), which contains information for the whole group; and
Body area (bottom section), where you define each tag in the group.
Use the Header parameters on this worksheet as follows:
Description field: Type a description of the worksheet for documentation purposes.
Output File field: Type a tag name for the output file (using the {tag } syntax) where data is
stored when you are printing to a file. Where the tag value is part of the file name.
For example: report{Day}.out. Where the generated file might be report1.out, report2.out,report3.out, and so on, according to the tag day value.
Note: A report configuration file uses.RCP as the default extension. The Output File fieldis the file where data is stored.

8/22/2019 User Guide Indu Soft
http://slidepdf.com/reader/full/user-guide-indu-soft 481/1279
Edit RTF file button: Click to access the report as an RTF file, which you can edit for layoutmodification and so forth.
Disk Append checkbox: When printing to a file
Check the box to add (amend) the new report to the end of an existing file
Uncheck the box to replace the existing report in that file with the new report
Unicode checkbox: Click (enable) to save the report in Unicode format (two bytes percharacter) or (disable) to save the report in ASCII format (one byte per character).
Lock Value into the {Tag/Exp} length checkbox: Click (enable) to automatically truncatethe values of Tags/Expressions in the report to fit between the curly brackets, as they are
positioned in the Body of the report (see below). This helps to preserve the layout of the report.If this option is left unchecked, then the full values of Tags/Expressions in the report will bedisplayed.
Use the Body portion of this worksheet for report formatting. You can configure a report using data inthe system and indicating where to print the tag values. Each tag name will replace the {tag_name}
tag name. For Real type tags, use the following syntax: {tag_name n}, where n is the number of
decimal places you want printed.
Note: If you are using the standard report editor (text only: ASCII or Unicode), then thenumber of characters reserved for the tag value will be equal to the number of characters usedto type the tag name (including the two "curly" brackets). For example, if you configure {TagA} inthe report body, reserve six characters for the tag value in the report file. This behavior is notvalid for reports in RTF format.
To execute a Report worksheet, use the Report function anywhere an expression is allowed.
Parent topic: Background TasksInduSoft Web Studio v7.0 Technical ReferenceCopyright © 2003–2010 Indusoft, Inc.

8/22/2019 User Guide Indu Soft
http://slidepdf.com/reader/full/user-guide-indu-soft 482/1279
Background Tasks >
ODBC worksheetThe ODBC interface runs in a network environment and uses the standard Windows ODBCconfiguration. The ODBC task is capable of data interchange between IWS and any databasesupporting this interface.
Note: In addition to configuring the ODBC worksheet, you must configure the Windows ODBCstandard driver. IWS refers to the User DSN (Data Source Name), which you configure throughthe Control Panel. For more information, refer to your Windows documentation.
Also, the ODBC interface is not available for projects running on Windows Embedded targetsystems.
To create a new ODBC worksheet, do one of the following:
On the Insert tab of the ribbon, in the Task Worksheets group, click ODBC;
Right-click the ODBC folder in the Project Explorer, and then click Insert on the shortcutmenu; or
Click New on the Application menu, click the File tab, and then select ODBC Worksheet.
To edit an existing ODBC worksheet, double-click it in the Project Explorer.
A new worksheet displays, as follows.
Figure 1. ODBC worksheet
ODBC worksheets are executed under the ODBC Runtime task. However, creating a new worksheetdoes not automatically enable the task; you must use the Execution Tasks dialog (Tasks on theHome tab of the ribbon) to configure the task to start at runtime. For more information, please see

8/22/2019 User Guide Indu Soft
http://slidepdf.com/reader/full/user-guide-indu-soft 483/1279
Execution Tasks.
The ODBC worksheet is divided into two areas:
Header area (top section), which contains information for the whole group, defines tags to startread and write events, sets return values, handles database access parameters, and so forth;and
Body area (bottom section), where you define each tag in the group and relate tags to fields in
the current register from the database table.
Use the Header parameters on this worksheet as follows:
Description field: Type a description of the worksheet for documentation purposes.
Data Source Name field: Type the same Data Source Name (DNS) specified in the WindowsControl Panel containing information about specific database access.
User field: Type a user name to access to the database.
Password field: Type the user's password.
Table field: Type a table name in the database.
Condition field: Type a search condition or filter.
Status field: Type a return value (fill in with a tag name). The tag should report 0 for successand use another value for an error code.
Transaction Completed field: Type a tag that changes value when the transaction isexecuted.
Select, Next, Insert, Delete, or Update Trigger fields: Type a tag to work as a trigger,where each value change causes the system to execute the corresponding command. At leastone trigger field is required.
Use the Body parameters on this worksheet as follows:
Tag Name field: Type the names of tags to update with file contents or tags whose values
should be written to a file.Column: Type the location in which to find data in the file (for example, R3CH corresponds toRow 3, Column H of an Excel sheet)
You must use the Windows Control Panel to set up the ODBC interface for Excel files. The procedureis as follows:
Click the Start > Settings > Control Panel.1.
When the Control Panel window displays, double-click on the ODBC icon to open the ODBC DataSource Administrator dialog.
2.
In the ODBC Data Source Administrator dialog, click Excel Files in the User Data Sources list,and then click the Configure button.
3.
When the ODBC Microsoft Excel Setup dialog displays, type the Windows configuration name tobe used in the DSN field on ODBC worksheet into the Data Source Name field.
4.
Click the Select Workbook button to configure the Excel file you want to use.5.
Return to the ODBC Data Source Administrator dialog and verify that your User DSN displays inthe list. Click OK to close the dialog.
6.
7.

8/22/2019 User Guide Indu Soft
http://slidepdf.com/reader/full/user-guide-indu-soft 484/1279
After configuring the ODBC Windows interface, you must configure the project's ODBCworksheets.
7.
From the Tasks tab, insert a new ODBC worksheet.8.
Be sure you set the ODBC Runtime to start automatically using the Execution Tasks dialog(Tasks on the Home tab of the ribbon).
9.
To start this configuration, you simply need to run the project. Your project will handle the Select,
Next, Insert, Delete, and Update triggers to allow data to exchange throughout rows in Excel andtags configured in the worksheet.
Consult your Windows documentation for the meaning of specific error codes.
The following is a list of IWS error codes:
Select command
1 - Error in the ODBCPREPARE function.
2 - Error in the ODBCBINDCOL function.
3 - Error in the ODBCEXECUTE function.
4 - Error in the ODBCSETCH function.
Next command
5 - Error in the ODBCSETCH function.
Insert command
6 - Error in the ODBCPREPARE function.
7 - Error in the ODBCEXECUTE function.
8 - Error in the ODBCCOMMITE function.
Update command
9 - Error in the ODBCPREPARE function.
10 - Error in the ODBCEXECUTE function.
11 - Error in the ODBCCOMMITE function.
Delete command
12 - Error in the ODBCPREPARE function.
13 - Error in the ODBCEXECUTE function.
14 - Error in the ODBCCOMMITE function.
Parent topic: Background TasksInduSoft Web Studio v7.0 Technical ReferenceCopyright © 2003–2010 Indusoft, Inc.

8/22/2019 User Guide Indu Soft
http://slidepdf.com/reader/full/user-guide-indu-soft 485/1279
Background Tasks >
Math worksheetA Math worksheet is used to implement program logic (using the Built-in Scripting Language) thatshould be continuously executed during runtime, rather than on specific actions like the user pressinga button on a screen.
Note: The Math worksheet is functionally similar to the Script worksheet, except that it uses theBuilt-in Scripting Language instead of VBScript.
To create a new Math worksheet, do one of the following:
On the Insert tab of the ribbon, in the Task Worksheets group, click Math;
Right-click the Math folder in the Project Explorer, and then click Insert on the shortcut menu;or
Click New on the Application menu, click the File tab, and then select Math Worksheet.
To edit an existing Math worksheet, double-click it in the Project Explorer.
Figure 1. Math worksheet
The Math worksheet is divided into two areas:
Header area (top section), which contains information for the whole group; and
Body area (bottom section), where you define each tag, expression, and Programming Lines(logical routines and mathematical calculations through functions and logical operations) in thegroup.
Use the Header parameters on this worksheet as follows:
Description field: Type a description of the worksheet for documentation purposes.
Execution field: Type an expression, a single tag, or a constant value to determine when theworksheet should execute.

8/22/2019 User Guide Indu Soft
http://slidepdf.com/reader/full/user-guide-indu-soft 486/1279
Note: The project executes the worksheet only when the Execution field result is not
zero. If you always want the worksheet to execute, type a 1 (constant value) in theExecution field.
Use the Body parameters on this worksheet as follows:
Tag Name field: Type a tag to receive a return value from the specified calculation in the
Expression column.
Expression field: Type an expression to return a return value to the specified tag in the Tag
Name column.
To execute a Math worksheet at a specific time, separate from whatever is configured in theExecution field, use the Math function anywhere an expression is allowed.
Parent topic: Background TasksInduSoft Web Studio v7.0 Technical ReferenceCopyright © 2003–2010 Indusoft, Inc.

8/22/2019 User Guide Indu Soft
http://slidepdf.com/reader/full/user-guide-indu-soft 487/1279
Background Tasks >VBScript Interfaces in the Software >
Script worksheetA Script worksheet is used to implement program logic (using VBScript) that should be continuously execruntime, rather than on specific actions like the user pressing a button on a screen.
Note: The Script worksheet is functionally similar to the Math worksheet, except that it uses VBScript ithe Built-in Scripting Language.
To create a new Script worksheet, do one of the following:
On the Insert tab of the ribbon, in the Task Worksheets group, click Script ;
Right-click the Script folder in the Project Explorer, and then click Insert on the shortcut menu; or
Click New on the Application menu, click the File tab, and then select Script Worksheet .
To edit an existing Script worksheet, double-click it in the Project Explorer.
Figure 1. Script worksheet
The code configured in each Script worksheet is executed by the Background Task. The project scans thesequentially (based on the worksheet number) and executes only the groups in which the condition confiExecution field of the worksheet is TRUE (i.e., non-zero).
Note: You must use the syntax supported by the Built-in Scripting Language in the Execution field. Oof the worksheet supports VBScript.
Variables declared in the worksheet have local scope for that specific group only. They are not available f VBScript interface.
You cannot define procedures (i.e., functions and subs) in the Script worksheet. However, you can call prdefined in the Global Procedures or in the Startup Script .

8/22/2019 User Guide Indu Soft
http://slidepdf.com/reader/full/user-guide-indu-soft 488/1279
Example:'Variables available only for this group can be declared here
Dim myVar, myTest
myTest = 1
'The code configured here is executed while the condition configured in the Execution f
myVar = $FindFile("c:\*.txt")
If MyVar > 0 Then
$TagNumOfFiles = myVarEnd If
CAUTION:
When any Script worksheet is saved during runtime (on-line configuration), the Startup Sc
executed again and the current value of the local variables of any Script worksheet will be
Startup Script worksheet
The Startup Script worksheet is a VBScript interface that is automatically executed when theproject is run.
Parent topic: Background TasksParent topic: VBScript Interfaces in the SoftwareInduSoft Web Studio v7.0 Technical ReferenceCopyright © 2003–2010 Indusoft, Inc.

8/22/2019 User Guide Indu Soft
http://slidepdf.com/reader/full/user-guide-indu-soft 489/1279
Background Tasks > Script worksheet >VBScript Interfaces in the Software >
Startup Script worksheetThe Startup Script worksheet is a VBScript interface that is automatically executed when the project is ru
To edit the Startup Script worksheet, double-click it in the Project Explorer. (It is located on the Tasks tafolder.) The worksheet is displayed:
Figure 1. Startup Script worksheet
The code configured in this worksheet is executed just once when the Background Task module (BGTaskinterface is useful for initializing variables or executing logics that must be implemented when the project
You can declare and initialize variables and define procedures. However, variables or procedures declarewill be available ONLY to the Script worksheets executed by the Background Task module — they are notVBScript interface from the Graphic Module.
Example:
'Variables available for all Script groups from the Script task can be declared and iniDim MyVar, Counter
MyVar = 100
'Procedures available for all Script groups from the Script task can be implemented her
Function AreaEquTriangle(base, high)
AreaEquTriangle = (base * high) / 2
End Function
Sub CheckLimits(myValue, myHiLimit, myLoLimit)
If (myValue > myHiLimit Or myValue < myLoLimit) Then
MsgBox("Value out of range")
End If
End Sub
'The code configured here is executed just once when the Background task is started
If $GetOS() = 3 Then
MsgBox ("Welcome! This project is running under Microsoft Windows Embedded operating

8/22/2019 User Guide Indu Soft
http://slidepdf.com/reader/full/user-guide-indu-soft 490/1279
Else
MsgBox("Welcome! This project Is running under Microsoft Windows desktop operating sy
End If
Parent topic: Script worksheetParent topic: VBScript Interfaces in the SoftwareInduSoft Web Studio v7.0 Technical ReferenceCopyright © 2003–2010 Indusoft, Inc.

8/22/2019 User Guide Indu Soft
http://slidepdf.com/reader/full/user-guide-indu-soft 491/1279
Background Tasks >
Scheduler worksheetA Scheduler worksheet is used to execute program logic (using the Built-in Scripting Language) at aspecific date/time, on a regular time interval, or upon a triggering event.
To create a new Scheduler worksheet, do one of the following:
On the Insert tab of the ribbon, in the Task Worksheets group, click Scheduler;
Right-click the Scheduler folder in the Project Explorer, and then click Insert on the shortcutmenu; or
Click New on the Application menu, click the File tab, and then select Scheduler Worksheet.
To edit an existing Scheduler worksheet, double-click it in the Project Explorer.
Figure 1. Scheduler worksheet
The Scheduler worksheet is divided into two areas:
Header area (top section), which contains information for the whole group
Body area (bottom section), where you define each tag, expression, and condition for thegroup.
Use the parameters on this worksheet as follows:
Description field: Type a description of the worksheet for documentation purposes.
Event drop-down list: Click to select an event type from the following:
Calendar: Generates time bases greater than 24 hours. For example, You can define anevent that prints a report every Friday at a specific time.
Note: Be sure to complete the Date field if you want a specific date for eventexecution.
Clock: Generates time bases smaller than 24 hours (intervals in minutes or seconds). Thisfunction is frequently used with trend graphics. For example, you can define a tag that willbe incremented each hour.

8/22/2019 User Guide Indu Soft
http://slidepdf.com/reader/full/user-guide-indu-soft 492/1279
Change: Event related to the change of a tag in the Trigger field.
Note: This only works for tag changes on the project server, regardless of a tag'sdefined scope.
Trigger field: This field is used only with the Change Event type. Type the name of a project
tag in this field, and when the value of the tag changes, Expression is evaluated.
Time field: This field is used with the Calendar and Clock Event types.
If the Event type is Calendar, then Time is a specific time of the day on Date. When thatDate and Time occurs, Expression is evaluated.
If the Event type is Clock, then Time is a time interval starting from when the project was run.Every time the interval occurs, Expression is evaluated.
Either way, type a time using the HH:MM:SS.ms format. Valid values are 00 to 23 for hours, 00 to 59
for minutes, 00 to 59 for seconds, and 1 to 9 for milliseconds. (Milliseconds are optional.)Examples: 03:00:00 is every three hours, 00:00:00.1 is every 100 milliseconds.
Date field: This field is used only with the Calendar Event type. Type a specific date using theMM/DD/YYYY format, and when that Date and Time occurs, Expression is evaluated.
Valid values are 01 to 12 for months, 01 to 31 for days, and 1900 to 2099 for years. If the field isleft blank, then the event occurs daily at the specified Time.
Tag field: Type a tag that will receive the value returned by Expression (if any).
Expression field: Type an expression to be evaluated. This field is used by all events.
Disable field: Contains a disable condition for the specified function. Leave this field blank oruse an expression value equal to zero to execute the function. Use an expression value equal toone and the function will not execute (Disable = 1).
Parent topic: Background TasksInduSoft Web Studio v7.0 Technical ReferenceCopyright © 2003–2010 Indusoft, Inc.

8/22/2019 User Guide Indu Soft
http://slidepdf.com/reader/full/user-guide-indu-soft 493/1279
Background Tasks >
Database/ERP worksheetIn addition to ODBC, IWS also supports Microsoft .NET ActiveX Data Objects (ADO.NET) forinterfacing between the project tags database and other external databases. A Database/ERPworksheet is used to associate project tags with external database fields.
Note: For more information about ADO.NET support in IWS — including how to communicatewith remote databases using the IWS Database Gateway software — please see DatabaseInterface.
To interface with an external database, you must first configure a connection to the database andthen build a worksheet that associates project tags with the database fields.
Database Connections
To create a new connection to a target database:
In the Project Explorer, open the Database/ERP folder and then right-click on Connections.1.
Choose Insert from the shortcut menu.
The Database Connection dialog is displayed.
Figure 1. Database Connection dialog
2.
In the Name field, enter the name that you want to use to reference the target database. Youcan create multiple database connections, but each connection must have a unique name.
3.
In the Connection String field, click the browse button … to open a standard Data LinkProperties dialog. Use the dialog to configure a connection string for the target database.
Note: The list of Database Providers shown in the Data Link Properties dialog depends onthe providers actually installed and available in the station where you are running thedevelopment application. For more information about using the Data Link Properties dialog,
4.

8/22/2019 User Guide Indu Soft
http://slidepdf.com/reader/full/user-guide-indu-soft 494/1279
please refer to Windows Help.
In the User Name and Password fields, enter an appropriate login for the target database.The login should already be created on the database server, and it should have enoughprivileges to read from and write to the database tables.
5.
If you are connecting to a remote database through the Studio Database Gateway, then clickthe Advanced button to open the advanced settings dialog, as shown below.
Figure 2. Database Connection (Advanced) dialog
6.
In the Host field, enter the IP address of the station that is running the IWS Database Gatewaysoftware (STADOSvr.exe). In the Port field, enter the port number on which the software hasbeen configured to run.
Other settings to configure, if necessary:
Disable Primary Keys checkbox: IWS will try to define a primary key to the table inorder to speed up the queries. If you are using a database that does not support primarykeys (e.g., Microsoft Excel), then you should check this box.
Disable Milliseconds in Date/Time Columns checkbox: IWS will try to includemilliseconds when saving a date/time in the database. If you are using a database thatdoes not support milliseconds, then you should check this box.
7.
Click OK to close the dialog and save the connection configuration.8.
Database connections are saved as XML files in the \ project_name\Config sub-folder. Each file is
given the same name as the name of the connection (as entered in the Name field of the DatabaseConnection dialog), with the .XDC file extension. For example, the connection configuration DB1 issaved in the file…
\ project_name\Config\DB1.XDC
Database Worksheet
Note: This feature emulates Structured Query Language (SQL) database operations. You should

8/22/2019 User Guide Indu Soft
http://slidepdf.com/reader/full/user-guide-indu-soft 495/1279
be familiar with how SQL commands are formed and executed before you use this feature.
Database worksheets allow asynchronous execution of database operations, and they offer a user-friendly interface for building SQL commands. Use one of the following methods to create a newdatabase worksheet:
On the Insert tab of the ribbon, in the Task Worksheets group, click Database; or
Right-click on the Database/ERP folder in the Project Explorer, and then click Insert on theshortcut menu; or
A new worksheet is displayed, as shown below:
Figure 3. Database worksheet
Database worksheets are saved in the \ project_name\Config directory, with the .XDB file extension.
Each new worksheet is automatically numbered in the order of its creation. For example, the firstworksheet created is saved in the file…
\ project_name\Config\DB001.XDB
Database worksheets are executed under the Database Client Runtime task. However, creating anew worksheet does not automatically enable the task; you must use the Execution Tasks dialog(Tasks on the Home tab of the ribbon) to configure the task to start at runtime. For moreinformation, please see Execution Tasks.
Also, database worksheets run only on the server, and all triggers must be configured with servertags.
Worksheet Header
The header of the database worksheet is configured as follows:

8/22/2019 User Guide Indu Soft
http://slidepdf.com/reader/full/user-guide-indu-soft 496/1279
Description field: Enter a description of the worksheet, for documentation purposes.
Status field: Enter the name of a numeric tag that will receive status codes for databaseoperations during runtime:
Table 1. Status codes for external database operations
StatusCode Description
4 Result set is empty
3 Cursor released and query successfully closed
2 Beginning of result set reached, usually while moving cursor to previousrow
1 End of result set reached, usually while moving cursor to next row
0 No errors; status normal
-1 Error while connecting to specified database (see Connection below)
-2 Error while selecting result set
-3 Error while moving cursor to next row (see Next trigger below)
-4 Error while moving cursor to previous row (see Previous trigger below)
-5 Error while closing the query (see Close Query trigger below)
-6 Error while inserting rows in result set (see Insert trigger below)
-7 Error while updating result set (see Update trigger below)
-8 Error while deleting result set (see Delete trigger below)
Completed field: Enter the name of a numeric tag that will be toggled when databasecommands are successfully executed.
Error Message field: Enter the name of a string tag that will receive detailed error messages, if errors occur during runtime.
Connection combo-box: Click to select a connection to the target database. All availableconnections are listed, as configured with the Database Connection dialog described above.
Type combo-box: Click to specify how the result set will be selected for the worksheet:
Table: Enter a table name and an optional filter condition. (The filter condition isequivalent to the SQL "Where" clause.) All rows of the table that match the filter conditionare selected.
SQL: Enter a custom SQL "Select" statement.
Note: For Table, Condition and SQL Statement, you can enter the names of project
tags that contain the desired information. This lets you programmatically change theselection during runtime. However, tag names must be enclosed in curly brackets ({}) todistinguish them from literal strings. Also, you must release an existing selection before youopen a new one; see Close Query below.
Cursor Triggers area…

8/22/2019 User Guide Indu Soft
http://slidepdf.com/reader/full/user-guide-indu-soft 497/1279
Select field: Enter any tag; when the value of the tag changes, a new cursor opens thefirst row of the result set and copies those values to the tags configured in the worksheetbody.
Next field: Enter any tag; when the value of the tag changes, the cursor moves to thenext row of the result set and copies those values to the tags configured in the worksheetbody.
Advanced button: Click to open the Advanced Cursor Options dialog…
Figure 4. Advanced Cursor Options dialog
Close Query field: Enter any tag; when the value of the tag changes, the cursorreleases the result set.
Previous field: Enter any tag; when the value of the tag changes, the cursor movesto the previous row of the result set and copies those values to the tag configured inthe worksheet body.
Total number of rows field: Enter a numeric tag that will receive the total numberof rows in the result set.
Current row number field: Enter a numeric tag that will receive the number of the
current row (i.e., the position of the cursor). When a result set is first opened usingthe Select trigger, this number is 1. Each Next trigger increments this number, andeach Previous trigger decrements it.
Table Triggers area…
Insert field: Enter any tag; when the value of the tag changes, a new row is inserted withthe current values of the tags configured in the worksheet body.
Update field: Enter any tag; when the value of the tag changes, all rows of the result setare overwritten with the current values of the tags configured in the worksheet body.
Delete field: Enter any tag; when the value of the tag changes, all rows of the result setare deleted.
Note: Table triggers are available only when Type is set to Table, because theseoperations work on the entire table row.
Worksheet Body

8/22/2019 User Guide Indu Soft
http://slidepdf.com/reader/full/user-guide-indu-soft 498/1279
In the body of the worksheet, you can map project tags to the columns (fields) of the result set. Foreach row of the body, enter a Tag Name and its corresponding Column. Which columns areavailable depends on how the result set is selected, and how it is selected may change duringruntime, so be sure to map all necessary columns.
Parent topic: Background TasksInduSoft Web Studio v7.0 Technical ReferenceCopyright © 2003–2010 Indusoft, Inc.

8/22/2019 User Guide Indu Soft
http://slidepdf.com/reader/full/user-guide-indu-soft 499/1279
Communication with Other DevicesCommunication tasks/worksheets are used to exchange tag values with other IWS projects, remotedevices such as PLCs and transmitters, and any other systems that implement supported protocolslike OPC and DDE.
To enable communication, configure the worksheets in the Comm tab of the Project Explorer.
Configuring direct communication with a remote device
A communication driver is a DLL containing specific information about the remote equipmentand implements the communication protocol. Drivers for dozens of common and not-so-common devices are installed with InduSoft Web Studio.
Configuring an OPC Client connection to an OPC Server
The OPC Client task/worksheet is used to communicate with any system that implements the
OPC Server protocol.
Configuring an OPC UA Client connection to an OPC UA Server
The OPC UA Client task/worksheet is to communicate with any system that implements the OPCUA Server protocol.
Configuring an OPC Xi Client connection to an OPC Xi server
The OPC Xi Client task/worksheet is to communicate with any system that implements the OPCXi Server protocol.
Configuring a TCP/IP Client connection to another project
The TCP/IP Client task/worksheet is used to communicate with another IWS project server.
Configuring a DDE Client connection to a DDE Server
The DDE Client task/worksheet is used to configure a DDE Client connection to a DDE Serverapplication such as Microsoft Excel (or any other Windows program supporting this interface).
InduSoft Web Studio v7.0 Technical ReferenceCopyright © 2003–2010 Indusoft, Inc.
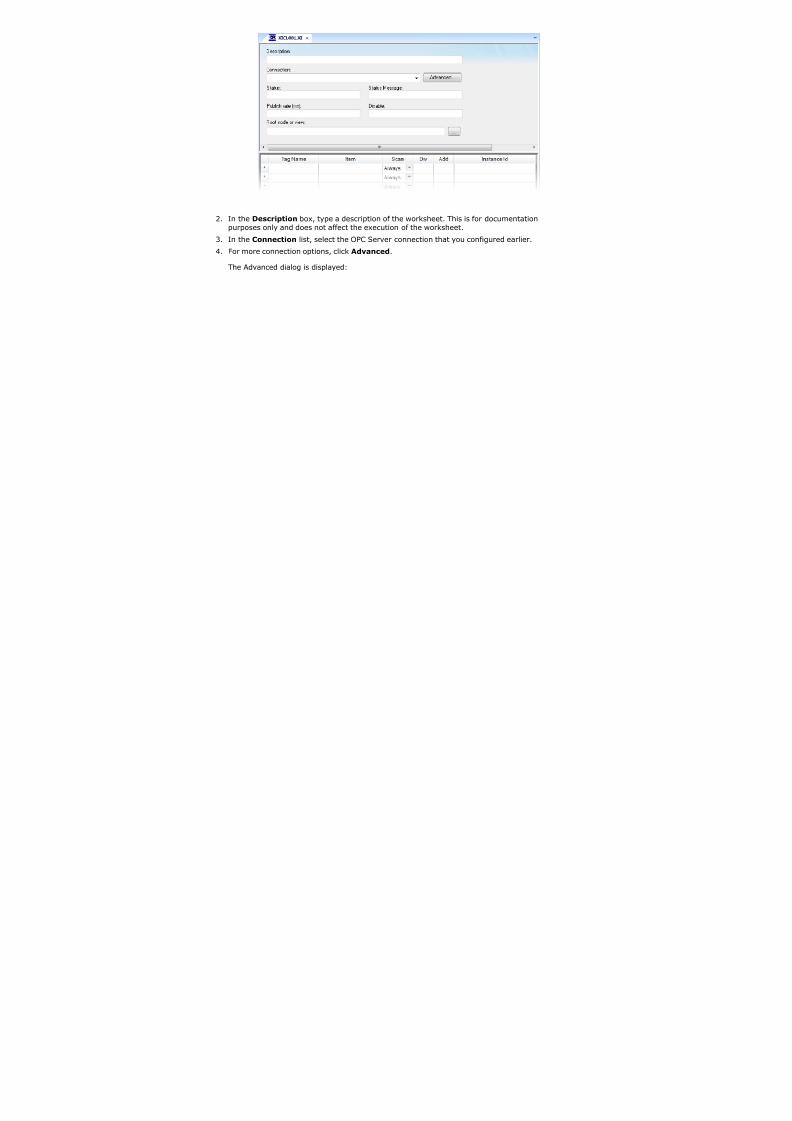
8/22/2019 User Guide Indu Soft
http://slidepdf.com/reader/full/user-guide-indu-soft 500/1279
Communication with Other Devices >
Configuring direct communicationwith a remote deviceA communication driver is a DLL containing specific information about the remote equipment andimplements the communication protocol. Drivers for dozens of common and not-so-common devicesare installed with InduSoft Web Studio.
( InduSoft also provides a toolkit to develop new communication drivers. For more information,please contact Customer Support.)
The Drivers task/worksheet allows you to define the communication interface (or interfaces) betweenthe project and remote equipment; such as a PLC, a single-loop, and transmitters.
Note: Consult the Help menu for a description of the functions and characteristics that arestandard for all drivers. When developing a project, you can also refer to the specificdocumentation provided with each communication driver. This documentation is usually locatedin the DRV directory.
To configure a communication driver, you must specify the interface parameters (for example, thestation address and the baud rate), specify the equipment addresses, and then link them to projecttags.
Use one of the following methods to add or remove a driver:
On the Insert tab of the ribbon, in the Communication group, click Add/Remove Driver; or
Right-click the Drivers folder in the Project Explorer, and then click Add/Remove drivers onthe shortcut menu.
Both methods open a Communication Drivers dialog, which displays a list of available drivers.
Figure 1. Communication Drivers dialog

8/22/2019 User Guide Indu Soft
http://slidepdf.com/reader/full/user-guide-indu-soft 501/1279
Use the parameters on this dialog, as follows:
Available Drivers field: Lists all available drivers and a brief description of each.
Help button: Click to open the Help menu, which contains detailed configuration instructionsfor the driver currently highlighted in the Available Drivers field.
Select button: Click to select the driver currently highlighted in the Available Drivers field.
Selected Drivers field: Lists all selected drivers and their descriptions (if available).
Remove button: Click to remove a driver currently highlighted in the Selected Drivers field.
When you click OK in the Communications Driver dialog, you create a subfolder for the selecteddriver(s) in the Drivers folder located on the Comm tab.
You can right-click on a driver subfolder to access the Settings option, which opens theCommunications Parameters dialog.
Figure 2. Sample Communications Parameters dialog

8/22/2019 User Guide Indu Soft
http://slidepdf.com/reader/full/user-guide-indu-soft 502/1279
Use the parameters on this dialog, as follows:
Serial Encapsulation field: Enables serial drivers to communicate with modem, TCP/IP or UDPconnections. This setting is supported only for serial drivers developed with the UNICOMMlibrary, which includes most of the serial drivers available in the product.
CAUTION:The Modem option is not supported for Pocket PC v3.00 or older.
Note: This section covers only the None option, which enables the driver to connect usinga normal serial channel. Please refer to "Using TCP/IP and UDP Encapsulation" and "UsingModem Connections" below for more information about other encapsulation modes. "SerialEncapsulation Tests" below lists the drivers that have been tested with modem, TCP/IP andUDP modes.
COM field: Click to select a serial communication port.
Baud Rate, Data Bits, Stop Bits, and Parity fields: Click to select parameters for a serial
port configuration.
Long1, Long2, String1, and String2 fields: These fields are driver custom settings. In theexample above, the driver uses Long1 to set up the error detection method and String1 todefine the PLC family type.
Advanced button: Click to open the Advanced settings dialog. Use this dialog to change thedefault driver parameters.
Figure 3. Advanced Settings dialog
Specify or change the default driver parameters as follows:
Timeout (ms) area:

8/22/2019 User Guide Indu Soft
http://slidepdf.com/reader/full/user-guide-indu-soft 503/1279
Start message field: Specify the timeout for the message start.
End message field: Specify the timeout for the message end.
Interval between char field: Specify the timeout between each character.
Wait CTS field: Specify the timeout for the Clear to Send wait.
Handshake area:
Control RTS drop-down list: Specify whether to use the "Request to Send" control.
Verify CTS drop-down list: Specify whether to use the "Clear to Send" type of verification.
Disable DTR checkbox: Click (enable) this box to disable the DTR function (the driver willnot set the DTR signal before starting the communication).
Enable IR checkbox (only available on Windows Embedded target systems): Click(enable) this box to enable the serial driver to use an Infrared interface (COM2 port)instead of a standard serial port to communicate with the device (such as the PLC, I/O,hand-held computers, and so forth).
Protocol area:
Station field: Some slave drivers such as the Modbus Slave (MODSL) require a slavenetwork address. Use this field to specify the slave address.
Retries field: Type a numeric value to specify how many times the driver will attempt toexecute the same communication command before considering a communication error forthis command.
Buffers length (bytes) area:
Tx Buffer field: Specify the transmission buffer length (in bytes).
Rx Buffer field: Specify the reception buffer length (in bytes).
Simultaneous Requests area (available only on selected drivers):
Maximum field: Specify the maximum number of requests that may be sentsimultaneously to all connected devices.
Maximum per station field: Specify the maximum number of requests that may be sent
simultaneously to a single device.
Note: The maximum number of simultaneous requests depends on the device and protocolspecifications. Please consult the device manufacturer's documentation.
The development application provides two interfaces, which you can use to configure the driver(associating project tags to device addresses):
MAIN DRIVER SHEET: Provides the easiest method for configuring communication betweenproject tags and device addresses. This interface allows you to automatically group tags toprovide the best performance during runtime. You cannot use this interface to control the timeneeded to scan a group of tags individually.
STANDARD DRIVER SHEETS: Allows you to control the time needed to scan a group of tagsindividually.
You can use both sheets at the same time.

8/22/2019 User Guide Indu Soft
http://slidepdf.com/reader/full/user-guide-indu-soft 504/1279
Using TCP/IP and UDP Encapsulation
Most of the serial drivers allow the use of TCP/IP or UDP/IP encapsulation. The encapsulation modehas been designed to provide communication with serial devices connected to terminal servers onyour ethernet or wireless networks. A terminal server can be seen as a virtual serial port. It convertsTCP/IP or UDP/IP messages on your Ethernet or Wireless network to serial data. Once the messagehas been converted to a serial form, you can connect standard devices that support serialcommunications to the terminal server. The following diagram provides one example of applying this
solution:
Figure 4. TCP/IP Encapsulation
You can enable the encapsulation by following the steps below:
Right-click on the driver's folder, and then choose Settings from the shortcut menu.
This will give you access to the communication parameters.
1.
In the Serial Encapsulation field, select TCP/IP or UDP/IP:2.
The following fields are available:

8/22/2019 User Guide Indu Soft
http://slidepdf.com/reader/full/user-guide-indu-soft 505/1279
IP Address field: Specify the IP Address for the Terminal Server. This field accepts tags in curlybrackets.
Port Number field: Enter the TCP/IP or UDP/IP port number.
Status Tag field: This field is available only when using TCP/IP. The tag on this field receivesthe value 1 when the TCP/IP connection is established; otherwise, it receives 0.
Server Mode field: The TCP/IP encapsulation allows the Server Mode, making the remote clientresponsible for establishing the connection to enable the communication.
Using Modem Connections
Most of the serial drivers allow the use of modem connections. The modem connection has beendesigned to enable communications with remote serial devices connected through a phone line. Thefollowing diagram provides one example of applying this solution:
Figure 5. Modem Connection
You can enable the modem connection by following the steps below:
Right-click on the driver's folder, and then choose Settings from the shortcut menu.
This will give you access to the communication parameters.
1.
In the Serial Encapsulation menu, select Modem:2.

8/22/2019 User Guide Indu Soft
http://slidepdf.com/reader/full/user-guide-indu-soft 506/1279
CAUTION:
The Modem option is not supported for Pocket PC v3.00 or older.
The following fields are available:
Name drop-down list: Select the modem that the driver will use to establish the connection. If you do not know the modem name, use the Auto Detect option. The Auto Detect 1 will use thefirst modem available, Auto Detect 2 will use the second, Auto Detect 3 will use the third,and Auto Detect 4 will use the fourth.
Phone field: Enter a phone number that the driver will use to connect to the remote device.This field accepts tags between curly brackets.
Settings button: Click on this button to configure the modem settings. The window thatdisplays when you click on this button depends on the operating system that you are using andon the modem type.
CAUTION:
The settings configured by clicking on this button are not saved with your
project. The information is saved on the operating system registry, and they are
valid only in the computer that you are interacting with. If you install your
project on another computer, you will have to reconfigure these settings.
Connection button: Click to open the Connection Control window. The default connectionsettings should suffice for most of the projects. However, you can take full control over theconnection, and also enable incoming calls, by clicking on this button.
Figure 6. Connection Control dialog

8/22/2019 User Guide Indu Soft
http://slidepdf.com/reader/full/user-guide-indu-soft 507/1279
Dial out trigger field: When the value of the tag configured in this field changes, thedriver will try to connect to the remote device. If the connection has already beenestablished, the command is ignored. You do not have to use this field if you are usingAuto Connect.
Hang up trigger field: When the value of the tag configured in this field changes, thedriver will disconnect from the remote device. If the device is disconnected the commandis ignored. You do not have to use this field if you are using Disconnect call if idle for morethan.
Auto Connect field: When this option is enabled, the driver will try to connect to theremote device before sending any information. If the connection fails, the next attempt willbe made after the Retry Interval has expired.
Disconnect call if idle for more than field: When this option is checked, the driver willautomatically disconnect from the remote device if no communication is performed afterthe time you specified.
Enable incoming calls field: Check this option if you want to enable the driver to receivecalls from the remote device. You can use the Hang up trigger to drop the call once it hasbeen established. Notice that one driver can use both incoming calls and outgoing calls.
Status area
Code field: Enter with a tag that will receive one of the following codes when the driver isrunning:
0 = Disconnected
1 = Connected
2 = Dialing
3 = Dropping
4 = Closing Line
Description field: Enter with a tag that will receive a complete description of the currentstatus. The description is associated with the Code field; however, it brings someadditional information about the current status.
Serial Encapsulation Tests
Most of the serial drivers should work with every serial encapsulation mode. However, most of thedrivers were developed before the encapsulation modes had been created. The following table liststhe drivers fully tested with certain encapsulation modes; if the driver that you intend to use is not

8/22/2019 User Guide Indu Soft
http://slidepdf.com/reader/full/user-guide-indu-soft 508/1279
listed and you are unsure whether it will work, please contact your distributor.
Driver Modem TCP/IP UDP/IP
MODSL X X X
ABKE X X X
MODBU X X
OMETH X
X = Item has been tested
Main Driver Sheet
The development application automatically inserts the MAIN DRIVER SHEET into the driverfolder as soon as you add the driver to your project.
Standard Driver SheetsIn addition to the unique MAIN DRIVER SHEET that is available for each driver, you can create
several STANDARD DRIVER SHEETS for each driver. The STANDARD DRIVER SHEETS provideadditional fields, which you can use to control communication.
Parent topic: Communication with Other DevicesInduSoft Web Studio v7.0 Technical ReferenceCopyright © 2003–2010 Indusoft, Inc.

8/22/2019 User Guide Indu Soft
http://slidepdf.com/reader/full/user-guide-indu-soft 509/1279
Communication with Other Devices > Configuring direct communication with a remote device >
Main Driver SheetThe development application automatically inserts the MAIN DRIVER SHEET into the driver folder assoon as you add the driver to your project.
Note: The MAIN DRIVER SHEET is not available for all drivers.
To configure the MAIN DRIVER SHEET, right-click on the icon, and select Open from the pop-up or just double-click on the icon.
The MAIN DRIVER SHEET dialog displays (see the following figure).
Figure 1. Sample MAIN DRIVER SHEET
The MAIN DRIVER SHEET worksheet is divided into two areas:
Header area (top section), contains parameters that affect the all tags configured in the Bodyarea of this worksheet; and
Body area (bottom section), where you define the relationship between tags in the project andtheir field equipment address.
Use the Header area parameters as follows:
Description field: Type a description of the MAIN DRIVER SHEET for documentation purposes.
Disable field: Type a tag or an expression to enable and disable the communication of eachMAIN DRIVER SHEET on the fly.
Type a value (or expression result) that is greater than zero to disable the MAIN DRIVERSHEET.
Type a zero (or leave this field blank) to enable the MAIN DRIVER SHEET.

8/22/2019 User Guide Indu Soft
http://slidepdf.com/reader/full/user-guide-indu-soft 510/1279
Read Completed field: Type in a tag and the communication driver toggles the tag when itcompletes a read command.
Read Status field: Type in a tag, which is updated with the status of the last read command.
Write Completed field: Type in a tag and the communication driver toggles the tag when itcompletes a write command.
Write Status field: Type in a tag, which is updated with the status of the last write command.
Min and Max checkbox: Click (check) to specify minimum and maximum values for data fromthe field equipment.
Min and Max fields (become active only when you enable the Min and Max checkbox): Type arange of values, which can be converted into an engineering format.
The project uses these fields to determine a minimum/maximum range of values for data fromthe field equipment. The scaling is done automatically. You must configure the engineeringrange using the Min and Max parameters on the Tag Properties dialog. This range affects alltags in the worksheet, except those with customized Min and Max values, as specified in theBody area of the driver sheet (Min and Max columns).
Use the Body area parameters as follows:
Tag Name field: Type the name of a project tag to be used by the communication driver.Station field: Type the number of the equipment station within the network. The syntax in thisfield varies with each communication driver. Refer to the appropriate driver's documentation forfurther information.
Tip: For some drivers, if you've configured the driver to do serial encapsulation via TCP/IPor UDP/IP, then the station may be specified using the following format:
IP address: port number |station
For example:
10.169.25.18:1234|Station5
To see if this feature is supported on your selected driver, refer to the driver'sdocumentation.
Tip: You can configure a tag name (string) between curly brackets in this field. In thiscase, the tag value will be the Station used by the driver. Therefore, you can change thestation dynamically during runtime.
Configuring a string tag between curly brackets in the Station field of the Main Driver Sheet
(MDS) is especially useful when configuring projects for redundant PLCs. Changing thevalue of the tag configured in the Station field, you can switch automatically from one PLCto the other in case of a failure of the primary PLC (hot/Stand-by).
I/O Address field: Type the address of the field equipment related to the project tag. Thesyntax in this field varies with each communication driver. Refer to the appropriate driver'sdocumentation for further information.

8/22/2019 User Guide Indu Soft
http://slidepdf.com/reader/full/user-guide-indu-soft 511/1279
Action field: Specify the communication direction, using one of the following options:
Read (the project continuously reads the address from the field device and updates theTag value.)
Write (the project writes the tag value to the field device when the tag value changes.)
Read+Write (Combines the procedures of both the Read and Writeparameters.)
Scan field: Specify how the read commands are enabled for each tag, using one of the following
options:Always permanently enables the read command so that the tag updates regularly,
regardless of whether it's currently being used.
Tip: By default, the project will trigger a read every 600 milliseconds, which is therate at which the system tag BlinkSlow updates. To change the rate, add the followingkey to the project file (i.e., project_name.APP):
[Options]
MainDrvAlwaysTrigger=tagname
tagname can be another system tag (e.g., BlinkFast, Second, Minute) or a tag thatyou've created. Whenever the value of the tag changes, the project will read from thedevice.
Screen enables the read command only when the tag is used in at least one open screen.
Tip: To improve performance, select Screen whenever possible. The project may notneed to keep updating tags that will not be displayed.
Div field: Specify the division constant when scale adjustment is required. This value is adivision factor in a read operation and a multiplication factor in a write operation. Do not use this
field if you are already using Min or Max in the configuration body.Add field: Specify the addition constant when scale adjustment is required. This value is anaddition factor in a read operation and a subtraction factor in a write operation. Do not use thisfield if you are already using Min or Max in the configuration body.
Parent topic: Configuring direct communication with a remote deviceInduSoft Web Studio v7.0 Technical ReferenceCopyright © 2003–2010 Indusoft, Inc.

8/22/2019 User Guide Indu Soft
http://slidepdf.com/reader/full/user-guide-indu-soft 512/1279
Communication with Other Devices > Configuring direct communication with a remote device >
Standard Driver SheetsIn addition to the unique MAIN DRIVER SHEET that is available for each driver, you can createseveral STANDARD DRIVER SHEETS for each driver. The STANDARD DRIVER SHEETS provideadditional fields, which you can use to control communication.
To open a STANDARD DRIVER SHEET, right-click on a driver subfolder and select Insert from theresulting popup (see the following figure).
Figure 1. Sample STANDARD DRIVER SHEET
The STANDARD DRIVER SHEET dialog is divided into two areas:
Header area (top section), contains parameters that affect the all tags configured in the Bodyarea of this worksheet
Body area (bottom section), where you define the relationship between tags in the project andtheir field equipment address.
Use the Header area parameters as follows:
Description field: Type a description of the STANDARD DRIVER SHEET for documentation
purposes.Increase Priority checkbox: Click (check) to keep the reading and writing commands for thissheet on the top of the communication queue whenever they are triggered.
CAUTION:
You must give special attention to this worksheet when you enable the Increase
Priority option. If the worksheet keeps triggering communication commands, the

8/22/2019 User Guide Indu Soft
http://slidepdf.com/reader/full/user-guide-indu-soft 513/1279
project may never be able to execute the other driver sheets.
Read Trigger field: Type a tag that triggers the project to read the worksheet automaticallywhen you change this tag's value.
Enable Read when Idle field: Type a tag or constant value. Use a tag (or constant) valuegreater than zero, to enable reading from the equipment.
CAUTION:
If you use a constant value (other than zero), be sure that your project requires
a continuous reading because this value places a reading request in every
communication scan.
Read Completed field: Type in a tag and the communication driver toggles the tag when itcompletes a read command.
Read Status field: Type in a tag and the communication driver updates the tag with the statusof the last read command.
Write Trigger field: Type a tag value to activate a group reading. Whenever you change thistag value, the program writes an equipment worksheet.
Enable Write on TagChange field: Type a tag or constant value (not zero) to enable the
communication driver to check the worksheet continuously for changes in the tag value. If achange occurs, the project writes this value to an address in the field equipment.
Write Completed field: Type in a tag and the communication driver toggles the tag in this fieldwhen a write command completes.
Write Status field: Type in a tag and the communication driver updates the tag with the statusof the last write command.
Station field: Type the equipment station number within the network. The syntax in this fieldvaries with each communication driver. Refer to the appropriate driver's documentation forfurther information.
Tip: For some drivers, if you've configured the driver to do serial encapsulation via TCP/IPor UDP/IP, then the station may be specified using the following format:
IP_address: port_number |station
For example:
10.169.25.18:1234|Station5
To see if this feature is supported on your selected driver, refer to the driver'sdocumentation.
Header field: Specify the data type and/or initial address to be read or written in theequipment. The syntax in this field varies with each communication driver. Refer to theappropriate driver's documentation for further information.

8/22/2019 User Guide Indu Soft
http://slidepdf.com/reader/full/user-guide-indu-soft 514/1279
Note: You can use text in the Station and Header fields with tag values using the text
{tag} syntax.
Min and Max checkbox (not labeled): Click (check) to specify the minimum and maximumvalues for field equipment data.
Min and Max fields (become active only when you enable the Min and Max checkbox): Type arange of values to be converted into an engineering format. These fields determine the
minimum and maximum range of values. These values affect all tags in the worksheet.
For example, Memory holds values from 0 to 4095, which means 0% to 100% in the userinterface. So for this example, you must specify 0 to 100 for the min and max tag parameters.
Use the Body area parameters as follows:
Tag Name field: Type a tag name for the communication driver to use.
Address field: Type a field equipment address (or address offset) related to the project tag.The syntax in this field varies with each communication driver. Refer to the appropriate driver's
documentation for further information.
Div field: Specify a division constant to use when scale adjustment is required. The project usesthis value as a division factor in a read operation and a multiplication factor in a write operation.Do not use this field if you are already using Min or Max in the configuration body.
Add field: Specify an addition constant to use when scale adjustment is required. The projectuses this value as an addition factor in a read operation and a subtraction factor in a writeoperation. Do not use this field if you are already using Min or Max in the configuration body.
Note: The maximum number of tags in each driver communication worksheet is 512. Forsome drivers, this number may be smaller. For more information, refer to your driverdocumentation.
For read operations:
tag = (value in the equipment ) / Div + Add
For write operations:
value in the equipment = (tag - Add) * Div
If you leave the cells empty in the Div and Add fields, this function is ignored.
Parent topic: Configuring direct communication with a remote device
InduSoft Web Studio v7.0 Technical ReferenceCopyright © 2003–2010 Indusoft, Inc.

8/22/2019 User Guide Indu Soft
http://slidepdf.com/reader/full/user-guide-indu-soft 515/1279
Communication with Other Devices >
Configuring an OPC Clientconnection to an OPC ServerThe OPC Client task/worksheet is used to communicate with any system that implements the OPCServer protocol.
This task implements the OPC standard as described in the OLE for Process Control Data Access
Standard Version 1.0A document, which is available at the OPC Foundation web site.
Note: Before using the OPC Client task/worksheet in your project, you must make sure the OPCserver software is properly installed and configured on the system to which you want to connect.
To configure a new connection, insert a new OPC Client worksheet on the Comm tab of the Project
Explorer.
Figure 1. Sample OPC Client worksheet
Use the following parameters in the configuration table for OPC:
Description text box: Type a description of the OPC task for documentation purposes only.(The OPC Client task ignores this information.)
Server Identifier: Type the name of the server you want to connect. If the server is alreadyinstalled on the computer, you can select the server name from the list.
Disable: Type a tag or a constant with a value other than 0, to disable communication with theOPC server. Specify 0, or leave the field blank to enable communication.
Read Update Rate: Specify how often the server should update this group (in milliseconds).

8/22/2019 User Guide Indu Soft
http://slidepdf.com/reader/full/user-guide-indu-soft 516/1279
Specify 0 to indicate the server should use the fastest practical rate.
Percent Deadband (valid for analog items only): Specify how much percent change in an itemvalue should cause a notification by the server.
Status: Type the name of a tag to receive the status of the connection. Good status is 1.
Remote Server Name: Node name or IP address of server on node network.
Read before writing checkbox: Check this option to force your project to read the original
values of items on the OPC server just before writing new values to the server. The project doesthis by first buffering the new values to be written and then reading the original values from theserver. Only after the project is synchronized with the server are the new values written fromthe buffer to the server.
Read after writing checkbox: Check this option to force your project to read back the newvalues of items on the OPC server just after the project has written those values.
CAUTION:
The Read before writing and Read after writing options are offered because the
OPC Client/Server specification says that the value of an item on the client — in
this case, your project — should not change unless the server sends the change.
That way, the client always stays in sync with the server.
Your project, however, may be designed to change those values according to
runtime processes or user input. Therefore, the best way to change the values
while staying in sync with the server is to make it seem like the changes
originate on the server. With both options enabled, the following sequence of
events happens on every scan of the OPC worksheet:
The new values on the client are buffered.1.
The original values on the server are read to the client — that is, the client is
synchronized with the server.
2.
The new values are written from the buffer to the server.3.
The new values on the server are read to the client — that is, the client is
again synchronized with the server.
4.
At the end of each scan, the values reflect what's happening in your project even
though, technically speaking, the project is merely staying in sync with the
server.
Both options should be enabled in most projects. In some projects, however, this
may cause items to bounce between the original values and the new values. If
this is a problem, try moving those items to another OPC worksheet where the
Read before writing and Read after writing options are disabled.
Accept Tag Name in the Item column checkbox: When this option is checked, the text
configured between curly brackets in the Item field is resolved as a Tag Name (string tag). Inthis case, the value of this tag is used as the name of the item from the OPC Server, allowingthe user to point to different item names during runtime, by changing the value of the tag(s)configured in the OPC Client worksheet (Item column).
When the Accept Tag Name in the Item column option is unchecked, all charactersconfigured in the Item column are considered part of the Item name (including the curlybrackets).

8/22/2019 User Guide Indu Soft
http://slidepdf.com/reader/full/user-guide-indu-soft 517/1279
Tag Name: Type the names of tags linked to the server items.
Item: Enter the name of the server's items. After selecting an OPC Server, you can select itemsfrom the Server using the OPC Browser. Right-click in the Item field and select the OPC
Browser option.
Tip: You can configure a tag name between curly brackets (e.g., {TagName}) in this field,allowing the user to change the item names dynamically, during runtime.
Scan: Specify one of the following:
Screen: The project performs an update when you open a screen containing the specified
tag.
Always: The project performs an update in the Read Update Rate specified in theworksheet header.
Div field: Specify the division constant when scale adjustment is required. This value is adivision factor in a read operation and a multiplication factor in a write operation.
Add field: Specify the addition constant when scale adjustment is required. This value is aaddition factor in a read operation and a subtraction factor in a write operation.
To run the OPC Client runtime task, you can choose to run it automatically on start up, or run thetask manually by clicking Tasks (either local or remote) on the Home tab of the ribbon. After runningthis program, a small icon displays in your system tray.
To close the OPC Client runtime task, right-click the icon in the system tray, and click Exit.
Note: IWS and CEView also provide an OPC Server communication task named Studio.Scada.OPC.This task starts automatically when any OPC Client (local or remote) attempts to connect to theStudio.Scada.OPC server. An OPC Client can exchange data with the tags database (Project Tags,System Tags, and Shared tags) using the OPC interface.
In addition, you can start the OPC Server task automatically when you run the project. Select
the OPC Server task in the Execution Tasks dialog (Tasks on the Home tab of the ribbon), clickthe Startup button, and specify Automatic.
Tip: You can also use the OPC interface to exchange data between remote stations runningInduSoft Web Studio or CEView. You must configure the OPC Client in one station and you mustexecute the OPC Server in the other station.
OPC Troubleshooting
When you are using OPC and have problems establishing communication, you should first verify the
messages in the LogWin.
If you are running the project on a Windows Embedded target system, there are two ways to checkthe log:
Remote LogWin1.
Local Log2.

8/22/2019 User Guide Indu Soft
http://slidepdf.com/reader/full/user-guide-indu-soft 518/1279
For information about using these logs, please refer to Using the LogWin task.
If you find error messages in the log, look them up in this manual/help system, and follow thedocumented steps for solving the problems. (Use <CTRL> + F to find them in the manual; use theIndex to find them in the context sensitive help system.)
If you feel that you need to contact your distributor for technical support, make sure that you providethem with the following information:
Log file1.
Software vendor and product name of the OPC Server/Client that you are using2.
If possible, a copy or an evaluation version of the OPC Server for testing purposes3.
The contact information for your OPC Server/Client technical support4.
Three possible errors and their resolutions are listed below…
Security
Error Code: 0x80070005 or -2147024891
Reason for error: When the OPC Client tries to connect to the OPC Server, the DCOM layer usuallyrequires authentication. The computer that is running the OPC Server needs to recognize the userlogged on to the OPC Client computer, and such a user needs to have privileges to access the OPCServer.
Solution: The first step is to create a single user in both computers that has Administrator privilegesand the same password. Log on with this user to both ends, and then try to establish the connection.
If you cannot use the same user in both computers because of some specific requirement of your
project, or if the problem persists even after you have logged on as the same user, please read thedocuments below. They will help you solve the security issues:
DCOM Security Configuration (external link)
Using DCOM with Windows XP + SP2 (external link)
Name Resolution
Error: Couldn't create connection with advise sink, error: -2147022986 (0x80070776)
Reason for error: There is a problem resolving the computer name.
Solution: This problem can be solved by specifying the IP address of the server instead of specifyingthe computer name.
Proxy for Windows CE
Error: OPCServer: IIndCP::Advise - Could not query callback interface: 0x80040155
Reason for error: Your Windows Embedded device is missing the OPCCOMN_PS.dll.
Solution: You should download the .dll to the device and register it. The .dll should be available withyour IWS distribution, most probably in […]\InduSoft Web Studio v7.0\Redist\Wince

8/22/2019 User Guide Indu Soft
http://slidepdf.com/reader/full/user-guide-indu-soft 519/1279
x.x \ processor \
If you do not find the .dll in the folder for your processor, contact your IWS distributor.
Parent topic: Communication with Other DevicesInduSoft Web Studio v7.0 Technical ReferenceCopyright © 2003–2010 Indusoft, Inc.

8/22/2019 User Guide Indu Soft
http://slidepdf.com/reader/full/user-guide-indu-soft 520/1279
Communication with Other Devices >
Configuring an OPC UA Clientconnection to an OPC UA ServerThe OPC UA Client task/worksheet is to communicate with any system that implements the OPC UAServer protocol.
About OPC UA
The OPC UA Client task/worksheet uses the new OPC Unified Architecture protocol introduced by theOPC Foundation. According to the foundation:
The existing OPC COM based specifications have served the OPC Community well over the past10 years, but as technology moves on so must our interoperability standards. Here are thefactors that influenced the decision to create a new architecture:
Microsoft has deemphasized COM in favor of cross-platform capable Web Services and SOA(Service Oriented Architecture)
OPC Vendors want a single set of services to expose the OPC data models (DA, A&E, HDA ...)
OPC Vendors want to implement OPC on non-Microsoft systems, including embedded devices
Other collaborating organizations need a reliable, efficient way to move higher levelstructured data
In other words, OPC UA is intended to be a platform- and language-independent protocol that is alsobackwards-compatible with OPC "Classic" systems. For more information, go tohttp://www.opcfoundation.org/UA/.
Note: This feature includes cryptographic software written by Eric Young ([email protected]).
Configuring a new OPC UA server connection
To configure a new connection to an OPC UA server:
Do one of the following:On the Insert tab of the ribbon, in the Communication group, click OPC Client and thenselect OPC UA Connection from the drop-down list; or
In the Comm tab of the Project Explorer, right-click OPC UA Connections and then clickInsert on the shortcut menu.
The UA Server Configuration dialog is displayed:
1.

8/22/2019 User Guide Indu Soft
http://slidepdf.com/reader/full/user-guide-indu-soft 521/1279
Figure 1. UA Server Configuration dialog
In the Connection Name box, type a name for the connection.
This name will be displayed in the OPC UA Connections folder in the Project Explorer, and it isthe name you will look for when you configure the OPC UA Client worksheet.
2.
In the End point box, type the URL of the OPC UA server to which you want to connect.
If you don't know the URL, then click the browse button to the right of the box. The UADiscovery dialog is displayed:
Figure 2. UA Discovery dialog
Use this dialog to find the discovery server, which publishes a list of OPC UA servers on thenetwork, and then select the server to which you want to connect.
3.
In the User Name and Password boxes, type your login credentials for the OPC UA server.4.
If the OPC UA server is configured to require a secure connection, then you must take the extrasteps of installing the server certificate in your project and generating a client certificate to beinstalled on the server:
Get the server certificate and then save it in the Config sub-folder of your project foldera.
5.

8/22/2019 User Guide Indu Soft
http://slidepdf.com/reader/full/user-guide-indu-soft 522/1279
(e.g., […]\My Documents\InduSoft Web Studio v7.0
Projects\ project_name\Config\). The method for getting the server certificate depends
on the server, so please consult the server vendor.
In the UA Server Configuration dialog, click Security. The OPC UA Security dialog isdisplayed.
b.
In the Server Certificate list, select the server certificate. (All certificates saved in theConfig sub-folder should be listed here.)
c.
In the Security Policy and Message Security Mode lists, select the appropriate optionsfor how the OPC UA server is configured. Again, please consult the server vendor.
d.
Click Generate Certificate. The client certificate is generated and saved in the Configsub-folder.
e.
Click OK to close the OPC UA Security dialog.f.
Install the client certificate on the OPC UA server. The method for doing this depends onthe server, so again, please consult the server vendor.
g.
For more information, download the white paper "The OPC UA Security Model forAdministrators" from the OPC Foundation.
Click OK. The connection is saved in the OPC UA Connections folder in the Project Explorer.6.
Configuring a new OPC UA Client worksheet
To configure a new OPC UA Client worksheet:
Do one of the following:
On the Insert tab of the ribbon, in the Communication group, click OPC Client and thenselect OPC UA Client from the drop-down list; or
In the Comm tab of the Project Explorer, right-click OPC UA and then click Insert on theshortcut menu.
A new OPC UA Client worksheet is displayed:
Figure 3. OPC UA Client worksheet
1.

8/22/2019 User Guide Indu Soft
http://slidepdf.com/reader/full/user-guide-indu-soft 523/1279
In the Description box, type a description of the worksheet. This is for documentationpurposes only and does not affect the execution of the worksheet.
2.
In the Connection list, select the OPC Server connection that you configured earlier.3.
For more connection options, click Advanced.
The Advanced dialog is displayed:
4.

8/22/2019 User Guide Indu Soft
http://slidepdf.com/reader/full/user-guide-indu-soft 524/1279
Review the options and configure as needed:
Area / Element Description
Read actions Enable
subscription
When this value is TRUE (non-zero), the client will constantlyrequest updates from the server.
Note: This is enabled by default. If it is disabled, then youmust use read triggers (see below).
Maximum
group size
The maximum number of tag reads that may be performedin a single read operation.
For example, if you have 1000 items/rows configured in theworksheet and Maximum group size is set to 100, then 10read operations will be performed during each scan of theworksheet.
Synchronous
read trigger
When the value of this tag/expression changes, theworksheet is scanned and all tag values are read from the
server. The project waits for the scan to complete beforecontinuing.

8/22/2019 User Guide Indu Soft
http://slidepdf.com/reader/full/user-guide-indu-soft 525/1279
Area / Element Description
Asynchronous
read trigger
When the value of this tag/expression changes, theworksheet is scanned and all tag values are read from theserver. The project continues running without waiting for thescan to complete.
Read count The name of a tag (Integer type) that will receive a count of
the number of read operations performed since the projectwas run.
Status The name of a tag (Integer type) that will receive a statuscode for the last read operation performed by a trigger.
Status
message
The name of a tag (String type) that will receive thecorresponding status message.
Maximum
aging
The maximum age (in milliseconds) of values that will beaccepted from the server's cache. If a value is older thanthis, then the server will be forced to get the latest valuefrom the target device.
Write
actions
Enable write
on tag
change
When this value is TRUE (non-zero), a write will beautomatically performed whenever the value of the projecttag changes.
Note: This is enabled by default. If it is disabled, then youmust use write triggers (see below).
Maximum
group size
The maximum number of tag writes to be performed in asingle write operation.
For example, if you have 1000 items/rows configured in theworksheet and Maximum group size is set to 100, then 10write operations will be performed during each scan of the
worksheet.Synchronous
write trigger
When the value of this tag/expression changes, theworksheet is scanned and all tag values are written to theserver. The project waits for the scan to complete before
continuing.
Asynchronous
write trigger
When the value of this tag/expression changes, theworksheet is scanned and all tag values are written to theserver. The project continues running without waiting for thescan to complete.
Write count The name of a tag (Integer type) that will receive a count of the number of write operations performed since the project
was run.
Status The name of a tag (Integer type) that will receive a statuscode for the last write operation performed by a trigger.
Status
message
The name of a tag (String type) that will receive thecorresponding status message.

8/22/2019 User Guide Indu Soft
http://slidepdf.com/reader/full/user-guide-indu-soft 526/1279
Area / Element Description
Reload trigger Indirect tags (e.g., {MyTag}) configured in the body of theworksheet will be reloaded only when the value of thistag/expression changes.
Refresh IDs on startup When this option is selected, the node IDs in the worksheetwill be refreshed from the specified item paths every time the
project is run.
Note: Refreshing IDs like this may cause the project to takelonger to start up, so if you select this option, then youshould also specify a root node (see below) to limit howmuch of the server's list of items must scanned.
Note: IWS's OPC UA Client does not normally use the Triggering Mode that is defined theOPC UA protocol. Instead, it allows any change in any tag/expression to be used as atrigger. If you want to use Triggering Mode, configure one worksheet to read the triggervalues and then configure another worksheet that specifies the read values as triggers.
Click OK to close the Advanced dialog and return to the worksheet.5.
In the Status box, type the name of a tag (Integer type) that will receive connection statuscodes during project runtime.
6.
In the Status Message box, type the name of a tag (String type) that will receive thecorresponding status messages.
7.
In the Publish Rate box, type the frequency (in milliseconds) at which the client will requestupdates from the server.
8.
In the Disable box, type a tag/expression. When the value is TRUE (non-zero), the worksheetwill not be executed.
9.
In the Root node or view box, specify the server node that will serve as the root for all itemsin the worksheet body. Specifying a root node makes it easier to find items and improvesruntime performance.
10.
For each row of the worksheet body, specify the following:
Tag Name: The name of a project tag.
You may use indirect tags (e.g., {MyTag}), but if you do, then be sure to configure theReload trigger option above.
Item: The server item with which the project tag should be associated.
To browse the server's list of items, right-click in this field and then click Browse on theshortcut menu.
Scan: If Always, then the row is continuously scanned during runtime. If Screen, thenthe row is scanned only when a project screen that uses the specified tag is open.
Div: For scaling — the value is divided by this number when reading from the server, andit is multiplied by this number when writing to the server.
Add: For scaling — this number is added to the value when reading from the server, and itis subtracted from the value when writing to the server.
11.

8/22/2019 User Guide Indu Soft
http://slidepdf.com/reader/full/user-guide-indu-soft 527/1279
Node ID: The node ID is automatically generated from the full path of the server item.
Save and close the worksheet.12.
Enabling the OPC UA Client task
To enable the OPC UA Client task for runtime:
On the Home tab of the ribbon, in either the Local Management or Remote Management group(depending on where the project server will be), click Tasks.
The Execution Tasks dialog is displayed.
1.
In the list of tasks, select OPC UA Client.2.
Click Startup.
The Startup dialog is displayed.
3.
Select Automatic, and then click OK.4.
Click OK again to close the Execution Tasks dialog.5.
Parent topic: Communication with Other Devices
InduSoft Web Studio v7.0 Technical ReferenceCopyright © 2003–2010 Indusoft, Inc.

8/22/2019 User Guide Indu Soft
http://slidepdf.com/reader/full/user-guide-indu-soft 528/1279
Communication with Other Devices >
Configuring an OPC Xi Clientconnection to an OPC Xi serverThe OPC Xi Client task/worksheet is to communicate with any system that implements the OPC XiServer protocol.
About OPC Xi
The OPC Xi Client task/worksheet uses the new OPC Express Interface protocol introduced by theOPC Foundation. According to the foundation:
The OPC Xi interface is the result of collaboration among several OPC vendor companies fromthe process industry to develop an easily integrated and secure solution for a variety of plant
communications. OPC Xi's primary objective was to provide a .NET-based migration path fromOPC Classic. Additionally, OPC Xi may be used as a standard .NET WCF interface for newlydeveloped OPC servers.
In other words, OPC Xi is intended to be a new version of OPC that leverages Microsoft's latest
technologies. For more information, go to http://www.opcfoundation.org/Xi/ .
Configuring a new OPC Xi server connection
To configure a new connection to an OPC Xi server:
Do one of the following:
On the Insert tab of the ribbon, in the Communication group, click OPC Client and thenselect OPC Xi Connection from the drop-down list; or
In the Comm tab of the Project Explorer, right-click OPC Xi Connections and then clickInsert on the shortcut menu.
The OPC Server Connection dialog is displayed:
Figure 1. OPC Server Connection dialog
1.

8/22/2019 User Guide Indu Soft
http://slidepdf.com/reader/full/user-guide-indu-soft 529/1279
In the Connection Name box, type a name for the connection.
This name will be displayed in the OPC Xi Connections folder in the Project Explorer, and it is thename you will look for when you configure the OPC Xi Client worksheet.
2.
In the Discovery Server list, type or select the URL of the discovery server that publishes a listof OPC Xi servers on the network. If no discovery server appears to be available, click Refresh
to scan the network again.
Note: This feature requires that the Peer Name Resolution Protocol service be running on
both the client station and and the discovery server. PNRP has been built into MicrosoftWindows since Windows XP Service Pack 2, so this shouldn't be a problem in mostsituations.
3.
In the Server list, type or select the URL of the OPC Xi server to which you want to connect. If the server you want doesn't appear to be available, click Refresh the update the list from thediscovery server.
4.
In the Protocol list, select the network protocol to be used to connect to the server. (For moreinformation about the available protocols, please refer to Microsoft's documentation for WindowsCommunication Foundation.)
Note: If your OPC Xi configuration has different servers/endpoints for each operation, thendo the following:
In the Protocol list, select custom. The Custom button becomes enabled.a.
Click the Custom button. The Endpoints dialog is displayed.b.
5.

8/22/2019 User Guide Indu Soft
http://slidepdf.com/reader/full/user-guide-indu-soft 530/1279
Use the dialog to specify the server/endpoint for each operation.c.
In the User Name and Password boxes, type your login credentials for the OPC Xi server.
Note: If the OPC Xi server is using Microsoft Active Directory, then User Name must be inthe domain\username format.
6.
Select Callback to have the server send values to the client only when the values change, orselect Polling to have the client periodically request values from the server.
In most cases, you should select Polling to keep the connection active.
7.
Click OK. The connection is saved in the OPC Xi Connections folder in the Project Explorer.8.
Configuring a new OPC Xi Client worksheet
To configure a new OPC Xi Client worksheet:
Do one of the following:
On the Insert tab of the ribbon, in the Communication group, click OPC Client and thenselect OPC Xi Client from the drop-down list; or
In the Comm tab of the Project Explorer, right-click OPC Xi and then click Insert on theshortcut menu.
A new OPC Xi Client worksheet is displayed:
Figure 2. OPC Xi Client worksheet
1.

8/22/2019 User Guide Indu Soft
http://slidepdf.com/reader/full/user-guide-indu-soft 531/1279
In the Description box, type a description of the worksheet. This is for documentationpurposes only and does not affect the execution of the worksheet.
2.
In the Connection list, select the OPC Server connection that you configured earlier.3.
For more connection options, click Advanced.
The Advanced dialog is displayed:
4.

8/22/2019 User Guide Indu Soft
http://slidepdf.com/reader/full/user-guide-indu-soft 532/1279
Review the options and configure as needed:
Area / Element Description
Read actions Enable
subscription
When this value is TRUE (non-zero), the client will constantlyrequest updates from the server.
Note: This is enabled by default. If it is disabled, then youmust use a read trigger (see below).
Maximum
group size
The maximum number of tag reads that may be performedin a single read operation.
For example, if you have 1000 items/rows configured in theworksheet and Maximum group size is set to 100, then 10read operations will be performed during each scan of theworksheet.
Synchronous
read trigger
When the value of this tag/expression changes, theworksheet is scanned and all tag values are read from the
server. The project waits for the scan to complete beforecontinuing.
Asynchronous
read trigger
N/A for OPC Xi Client.

8/22/2019 User Guide Indu Soft
http://slidepdf.com/reader/full/user-guide-indu-soft 533/1279
Area / Element Description
Read count The name of a tag (Integer type) that will receive a count of the number of read operations performed since the projectwas run.
Status The name of a tag (Integer type) that will receive a statuscode for the last read operation performed by a trigger.
Statusmessage
The name of a tag (String type) that will receive thecorresponding status message.
Maximum
aging
N/A for OPC Xi Client.
Write
actions
Enable write
on tag
change
When this value is TRUE (non-zero), a write will beautomatically performed whenever the value of the projecttag changes.
Note: This is enabled by default. If it is disabled, then youmust use a write trigger (see below).
Maximumgroup size
The maximum number of tag writes to be performed in asingle write operation.
For example, if you have 1000 items/rows configured in theworksheet and Maximum group size is set to 100, then 10write operations will be performed during each scan of theworksheet.
Synchronous
write trigger
When the value of this tag/expression changes, theworksheet is scanned and all tag values are written to theserver. The project waits for the scan to complete beforecontinuing.
Asynchronous
write trigger
N/A for OPC Xi Client.
Write count The name of a tag (Integer type) that will receive a count of the number of write operations performed since the projectwas run.
Status The name of a tag (Integer type) that will receive a statuscode for the last write operation performed by a trigger.
Status
message
The name of a tag (String type) that will receive thecorresponding status message.
Reload trigger Indirect tags (e.g., {MyTag}) configured in the body of theworksheet will be reloaded only when the value of this
tag/expression changes.
Refresh IDs on startup N/A for OPC Xi Client.
Click OK to close the Advanced dialog and return to the worksheet.5.
In the Status box, type the name of a tag (Integer type) that will receive connection status6.

8/22/2019 User Guide Indu Soft
http://slidepdf.com/reader/full/user-guide-indu-soft 534/1279
codes during project runtime.
In the Status Message box, type the name of a tag (String type) that will receive thecorresponding status messages.
7.
In the Publish Rate box, type the frequency (in milliseconds) at which the client will requestupdates from the server.
8.
In the Disable box, type a tag/expression. When the value is TRUE (non-zero), the worksheetwill not be executed.
9.
In the Root node or view box, specify the server node that will serve as the root for all itemsin the worksheet body. Specifying a root node makes it easier to find items and improvesruntime performance.
10.
For each row of the worksheet body, specify the following:
Tag Name: The name of a project tag.
You may use indirect tags (e.g., {MyTag}), but if you do, then be sure to configure theReload trigger option above.
Item: The server item with which the project tag should be associated.
To browse the server's list of items, right-click in this field and then click Browse on theshortcut menu.
Scan: If Always, then the row is continuously scanned during runtime. If Screen, thenthe row is scanned only when a project screen that uses the specified tag is open.
Div: For scaling — the value is divided by this number when reading from the server, andit is multiplied by this number when writing to the server.
Add: For scaling — this number is added to the value when reading from the server, and itis subtracted from the value when writing to the server.
Instance ID: The instance ID is automatically generated from the full path of the serveritem.
11.
Save and close the worksheet.12.
Enabling the OPC Xi Client task
To enable the OPC Xi Client task for runtime:
On the Home tab of the ribbon, in either the Local Management or Remote Management group(depending on where the project server will be), click Tasks.
The Execution Tasks dialog is displayed.
1.
In the list of tasks, select OPC Xi Client.2.
Click Startup.
The Startup dialog is displayed.
3.
Select Automatic, and then click OK.4.
Click OK again to close the Execution Tasks dialog.5.
Parent topic: Communication with Other DevicesInduSoft Web Studio v7.0 Technical ReferenceCopyright © 2003–2010 Indusoft, Inc.

8/22/2019 User Guide Indu Soft
http://slidepdf.com/reader/full/user-guide-indu-soft 535/1279
Communication with Other Devices >
Configuring a TCP/IP Clientconnection to another projectThe TCP/IP Client task/worksheet is used to communicate with another IWS project server.
TheTCP/IP Client and Server tasks enable two or more projects to keep their databasessynchronized. These tasks use the TCP/IP protocol to provide communication between projects.Before using the TCP/IP Client and Server tasks, you must make sure that TCP/IP (Ethernet)communication is properly configured and running on both servers.
To configure the server: You do not have to configure anything on the server itself. You justhave to run the IWS TCP/IP Server task. You can choose to run it automatically on start up, orrun the task manually by clicking Tasks (either local or remote) on the Home tab of the ribbon.After running this program, a small icon displays in your system tray.
To close the IWS TCP/IP Server task: Right-click the TCP/IP Server icon in the system trayand click Exit.
To configure the client: You must use the TCP/IP Client Configuration program to specify theserver IP address and the tags you want to share with the server on the client system.
The TCP/IP Client Configuration program is located on the Comm tab and it uses the samecommands as the Driver Configuration program.
Figure 1. TCP/IP Client Worksheet Configuration
Use the following parameters to complete the TCP/IP Client Configuration:
Description field: Type a description of the TCP/IP Client worksheet, for documentationpurposes only. The TCP/IP Client task ignores this information.
Connection Status field: Type a tag name and the TCP/IP Client Configuration task will updatethis tag according to its connection status. A tag value of zero indicates the connection is okay.Any other tag value indicates an error code returned by the Windows Socket library.

8/22/2019 User Guide Indu Soft
http://slidepdf.com/reader/full/user-guide-indu-soft 536/1279
Disable: Type a tag name in this field. When this tag has any value other than 0, this TCP/IPworksheet will be disabled. Using this field, you can enable/disable the TCP/IP Client worksheetduring runtime.
Server IP Address field: Type the IP address and Port (optional) of the target server — forexample, 169.254.182.158:123. The Port should be the same on both the Client and Serverstations.
You can also specify a String tag enclosed in curly brackets (e.g., {tagname}) if you want to
dynamically change this address during runtime.Send Fields checkbox:
Disable this box and the TCP/IP Client/Server tasks exchange only the tag values, andtheir TimeStamp and Quality.
Enable this box and the TCP/IP Client/Server tasks also exchange the Min, Max, Ack, Unit,LoLoLimit, LoLimit, HiLimit, HiHiLimit, RateLimit, DevSetPoint, DevpLimit, and DevenLimittag fields.
Note: It is possible to add other fields to the TCP/IP communication or to disable any fieldindividually. Contact your vendor for more information.
Tag Name field: Type the tags you want to share with the server.
If the tag is an array or a class (or both), the project automatically enables every array positionand class member for TCP/IP communication by default.
To configure a specific array position and/or a specific class member, type the array positionand/or class member in square brackets following the tag name. For example,level[3].member.
Remote Tag field (optional ): Type the name of a tag to be linked with the tag you specified inthe Tag Name field. If you leave this field blank, the project uses the same tag name used inthe client and in the server.
Note: If you need to share an array, the tag in the server should contain the same number of
elements as the tag in the client. If the tag is a class, the class definition should be the same inboth server and client programs. If you do not follow these rules, unpredictable results canoccur.
You can run the TCP/IP Client task automatically on start up or run the program manually by clickingTasks (either local or remote) on the Home tab of the ribbon. After running this program, a smallicon displays in your system tray.
Only the Client task uses the ConnectionRetryTimeout parameter.
Parent topic: Communication with Other DevicesInduSoft Web Studio v7.0 Technical Reference
Copyright © 2003–2010 Indusoft, Inc.

8/22/2019 User Guide Indu Soft
http://slidepdf.com/reader/full/user-guide-indu-soft 537/1279
Communication with Other Devices >
Configuring a DDE Client connectionto a DDE ServerThe DDE Client task/worksheet is used to configure a DDE Client connection to a DDE Serverapplication such as Microsoft Excel (or any other Windows program supporting this interface).
Dynamic Data Exchange (DDE) is a protocol for dynamic data exchange between Windowsapplications, such as Excel. A DDE conversation is an interaction between server and client programs.IWS provides interfaces that run as clients or as servers. See DDE Client Runtime and DDE Server inthe Runtime Tasks (Tasks on the Home tab of the ribbon).
To run as a server, start the DDE or NetDDE server task as described in Runtime Tasks.
To run as a client, configure the DDE interface worksheet on the Comm tab.
Network Dynamic Data Exchange (NetDDE) is an extension of DDE that works across computers on anetwork.
To run IWS as a server to a NetDDE connection, you must start the DDE Server application.
To run IWS as a client to a NetDDE connection, use the same DDE interface worksheets with
the proper configuration to address a IWS project.
Note: When running NetDDE, IWS accepts the WRITE triggers only. To read data, you mustconfigure a write command on the server computer.
To open a new DDE worksheet, right-click on the DDE folder and click the prompt screen.
A new DDE worksheet displays, as in the following figure.
Figure 1. DDE Worksheet

8/22/2019 User Guide Indu Soft
http://slidepdf.com/reader/full/user-guide-indu-soft 538/1279
The DDE worksheet dialog is divided into two areas:
Header area (top section), contains information for the whole group and defines the tags tostart the reading and writing and to receive connection status
Body area (bottom section), where you define tags in the project and items related to the DDEserver application
Every DDE interface is based on addressing an application using the following three structures:
Application Name
Topic
Item
The first task is to find these identifiers in the DDE Server application.
Use the parameters in the DDE client worksheet Header area as follows:
Description field: Type a description of the DDE worksheet for documentation purposes.
Application Name field: Type the DDE server application name.
Topic field: Specify a topic in the server application.
Connect field: Type a tag to control the connection of the IWS DDE client and DDE serverapplication. When this tag is set to 1, it requests a connection to the server. If the connection isnot possible or if it fails, IWS sets the tag to zero again. If the connection is OK, this valueremains set to 1.
Read Trigger field: Type a tag to command a reading of the table. When this tag changesvalue, IWS generates polling to the DDE server. You can use this parameter with local DDEonly; you cannot use it with NetDDE servers.
Enable Read when Idle field: Type a tag value higher than zero to enable a reading of theequipment.
Read Status field: Contains the status of the reading command.
Write Trigger field: Type a tag enabling IWS to generate poke commands to the server.
Enable Write on Tag Change field: Type a tag value higher than zero to enable thecommunication driver to check continuously for changes in a tag value in the worksheet. Whenthe driver detects a change occurs, it writes the changed tag on the equipment, along with thetag's address.
Write Status field: Contains the status of the writing command.
Use the DDE client Body area parameters as follows:
Tag Name field: Type a tag to read or write the IWS database from the DDE server application.
Item field: Type the ITEM part of the DDE address on the server. Refer to your server software
documentation for information about the proper syntax for APP, TOPIC, and ITEM.
You can configure the Topic and Item fields with tags on the address using the syntax:text{tag}. IWS evaluates the value of {tag} to a string and uses it on the address. For example:
Topic: topic_{tag_topic_name}_example
Item: {tag_item_name} or A{tag_number}

8/22/2019 User Guide Indu Soft
http://slidepdf.com/reader/full/user-guide-indu-soft 539/1279
Configuring a NetDDE connection is similar to configuring a DDE connection, except for the HeaderApplication name and topic. Before starting your tests, verify that you enable the DDE Server on thestation with which you want to exchange data.
Note: When connecting to servers other than IWS, please refer to the server documentation forinformation about the proper syntax of APP, TOPIC, and ITEM.
Use the NetDDE Client worksheet Header parameters to define the tags that start reading andwriting, and tags that receive the connection status, as follows:
Application Name field: Type computer name\NDDE$, where computer name must be a valid
network computer name.
Topic field: Type the UNISOFT$ topic name to connect to another IWS station.
Use the DDE client worksheet Body parameters to relate each tag to each ITEM part of the DDEserver address, as follows:
Tag Name field: Specify the IWS local database tag name that is related to some remote tagname.
Item field: Specify the remote tag name that is related to the local tag name.
Note: By default, the DDE Client module supports DDE Servers that handle string data in theUNICODE format. If the DDE Server handles string data in the ASCII ANSI format, the followingsetting must be configured manually in the project_name.app file (you can use Notepad to edit
this file):
[Options]
DDEANSI=1
Parent topic: Communication with Other Devices
InduSoft Web Studio v7.0 Technical ReferenceCopyright © 2003–2010 Indusoft, Inc.

8/22/2019 User Guide Indu Soft
http://slidepdf.com/reader/full/user-guide-indu-soft 540/1279
Project SecurityInduSoft Web Studio includes a project security system that manages how users and user groups canaccess a project, during both development and runtime.
About security modes
In addition to managing users and groups locally, entirely within a single project, you can alsoget pre-defined users and groups from other IWS projects or from an LDAP-compliant domainserver.
About security access levels
Almost every item in a project — screen object, object animation, project screen, taskworksheet — can be assigned a security access level. That access level determines which usergroups can edit the item during development and/or use the item during runtime.
Using the security system configuration wizardThe security system configuration wizard helps you through the steps of configuring the projectsecurity system.
Configuring server settings for security modes
If you set your project's security mode to either Distributed – Client or Domain (LDAP), thenyou must also configure server settings.
Group Account dialog
The Group Account dialog is used to create and delete user groups, as well as to configure theaccess privileges for a selected group.
Creating and configuring usersTo create and maintain accounts for project users, click the Users button on the SecuritySystem dialog. (Alternately, to configure a user, open the Users folder located in the Securityfolder.)
Security System dialog
The main Security System dialog is used to manage the project security system after it hasbeen initially configured.
Backing up the security system configuration
You can back up your project's security system configuration by exporting it to a file. You canalso import a configuration either from a file or from another runtime project.
Logging on/off
If the project security system has been enabled and the default "Guest" user's privileges havebeen restricted, then you must log on to fully use the development application and/or theruntime project.

8/22/2019 User Guide Indu Soft
http://slidepdf.com/reader/full/user-guide-indu-soft 541/1279
Blocking or unblocking a user
An individual user in the project security system may be completely blocked from accessing theproject, and a blocked may subsequently be unblocked.
Password-protecting screens, symbols, and worksheets
Screens, symbols, and worksheets in the Project Explorer can be password-protected. You canassign individual passwords to each file, or you can assign a single password to all files in theproject
InduSoft Web Studio v7.0 Technical ReferenceCopyright © 2003–2010 Indusoft, Inc.

8/22/2019 User Guide Indu Soft
http://slidepdf.com/reader/full/user-guide-indu-soft 542/1279
Project Security >
About security modesIn addition to managing users and groups locally, entirely within a single project, you can also getpre-defined users and groups from other IWS projects or from an LDAP-compliant domain server.
IWS supports four security modes:
Local Only
This is the standard mode for most projects: users and groups are created in the developmentapplication, and they apply only to the project for which they're created.
Distributed – Server
This is similar to Local Only, except that the project's security system configuration is alsomade available to other IWS projects (that are set to Distributed – Client) on the samenetwork. Furthermore, if the project loses its security system configuration for some reason,
then it can reimport the configuration from one of its client projects.
Distributed – Client
When this mode is selected, the project gets its entire security system configuration fromanother IWS project (that is set to Distributed – Server) on the same network. The projectcaches this configuration and can continue to run even if it loses communication with the serverproject.
Domain (LDAP)
The Lightweight Directory Access Protocol (LDAP) is a recognized standard for managing usersand groups across many different applications on a network. When this mode is selected, theproject gets its users and groups from an LDAP-compliant domain server, such as Microsoft
Active Directory for Windows or OpenLDAP for Linux. However, only the user names,passwords, and group memberships are taken from the domain; specific rights must still beconfigured within the project.
Parent topic: Project SecurityInduSoft Web Studio v7.0 Technical ReferenceCopyright © 2003–2010 Indusoft, Inc.
8/22/2019 User Guide Indu Soft
http://slidepdf.com/reader/full/user-guide-indu-soft 543/1279
Project Security >
About security access levelsAlmost every item in a project — screen object, object animation, project screen, task worksheet —can be assigned a security access level. That access level determines which user groups can edit theitem during development and/or use the item during runtime.
There are 255 possible access levels, allowing a large amount of granularity. Each user group isconfigured with ranges of levels for both development and runtime, and the groups' ranges mayoverlap.
Figure 1. Example of security access levels
This means that for a user to be able to edit and/or use an item, the item's access level must fallwithin the range specified for that user's group.
For example, UserA of GroupA has a security access level range of 1-10 and UserB of GroupB has asecurity access level range of 5-15. To continue the example:

8/22/2019 User Guide Indu Soft
http://slidepdf.com/reader/full/user-guide-indu-soft 544/1279
Item #1 has Access Level = 1
Item #2 has Access Level = 7
Item #3 has Access Level = 12
Item #4 has Access Level = 20
Consequently,
Only UserA can access Item #1
Both users can access Item #2
Only UserB can access Item #3
Neither user can access Item #4
Note: The default access level for all items is 0, and all users can use all items at that level.
Setting access levels for different types of items
For project screens, the access level can be set in the Screen Attributes dialog.
Figure 2. Security (access level) setting in Screen Attributes dialog
For screen objects and object animations, the access level can be set in the individual ObjectProperties dialog. (If the option is not available in the main dialog, then it should be available in oneof the sub-dialogs.)
Figure 3. Security (access level) setting in Object Properties dialog
For task worksheets, do the following:
Open the worksheet for editing.1.
Click anywhere in the body of the worksheet. The Access Level control, on the Project tab of the ribbon, is enabled.
2.
Click Access Level. The Security dialog is displayed.3.

8/22/2019 User Guide Indu Soft
http://slidepdf.com/reader/full/user-guide-indu-soft 545/1279
Figure 4. Security dialog
In the Access Level box, type an access level for editing the worksheet.4.
Click OK.5.
Parent topic: Project SecurityInduSoft Web Studio v7.0 Technical ReferenceCopyright © 2003–2010 Indusoft, Inc.

8/22/2019 User Guide Indu Soft
http://slidepdf.com/reader/full/user-guide-indu-soft 546/1279
Project Security >
Using the security systemconfiguration wizardThe security system configuration wizard helps you through the steps of configuring the projectsecurity system.
Start the wizard.
If you are configuring the security system for the first time, then the wizard will startautomatically when you do one of the following:
On the Project tab of the ribbon, in the Security tab, click Configure; or
In the Global tab of the Project Explorer, right-click Security and then click Settingson the shortcut menu.
Note: After the first time, doing one of these will open the Security System dialoginstead.
If you have already configured the security system, click Configure on the ribbon to openthe Security System dialog and then click Run Wizard.
The first page of the wizard is displayed.
Figure 1. Security System Configuration Wizard
This page always shows how the security system is currently configured.
1.

8/22/2019 User Guide Indu Soft
http://slidepdf.com/reader/full/user-guide-indu-soft 547/1279
Click Next. The second page of the wizard is displayed.2.
Select Enable Security System.3.
Click Next. The third page of the wizard is displayed.4.
Select the security mode.5.

8/22/2019 User Guide Indu Soft
http://slidepdf.com/reader/full/user-guide-indu-soft 548/1279
For Distributed – Client and Domain (LDAP), click Server Settings and then configure thesettings as needed.
6.
Click Next. The fourth page of the wizard is displayed.7.
If you need to create or configure groups, click Create/Configure Groups. The Group Accountdialog is displayed. When you're done with that dialog, it will automatically return to the wizard.
8.
Click Next. The fifth page of the wizard is displayed.9.

8/22/2019 User Guide Indu Soft
http://slidepdf.com/reader/full/user-guide-indu-soft 549/1279
If you need to create or configure users, click Create/Configure Users. The User Accountdialog is displayed. When you're done with that dialog, it will automatically return to the wizard.
10.
Click Next. The sixth page of the wizard is displayed.11.
Review your configuration, and then click Finish to close the wizard.12.
Parent topic: Project Security
InduSoft Web Studio v7.0 Technical ReferenceCopyright © 2003–2010 Indusoft, Inc.

8/22/2019 User Guide Indu Soft
http://slidepdf.com/reader/full/user-guide-indu-soft 550/1279
Project Security >
Configuring server settings forsecurity modesIf you set your project's security mode to either Distributed – Client or Domain (LDAP), then youmust also configure server settings.
When you click Server Settings in either the security system configuration wizard or the mainSecurity System dialog, the appropriate Server Settings dialog will be displayed.
Configuring server settings for Distributed – Client
To configure the server settings:
Figure 1. Server Settings dialog for Distributed – Client
In the Server IP and Server Port boxes, type the IP address of a runtime project that is set toDistributed – Server.
1.
In the Connection timeout box, type the timeout (in seconds) after which the client willattempt to reconnect to the server. (A typical connection timeout is 3 seconds.)
2.
In the Synchronization Period box, type the frequency (in seconds) at which the client willsynchronize its security system configuration with the server's. (A typical synchronization periodis 10 seconds.)
3.
In the Force Cache Reload box, type the name of a project tag (Integer or Boolean type). If the tag value is TRUE (non-zero) and the specified server has a timestamp older than the client,then the local security system will be updated with outdated server information.
4.
In the Status Tag box, type the name of a project tag (Integer type) that will receive serverconnection status codes during runtime:
5.

8/22/2019 User Guide Indu Soft
http://slidepdf.com/reader/full/user-guide-indu-soft 551/1279
Status Description
0 No cache
1 Updated cache
2 Outdated local cache
3 Outdated server cache4 Disconnected from server
Click OK.6.
Configuring server settings for Domain (LDAP)
To configure the server settings:
Figure 2. Server Settings dialog for Domain (LDAP)
In the Domain box, type the domain name of the LDAP server.1.In the User and Password boxes, type your logon credentials for the LDAP server.
Note: You must have sufficient privileges to get lists of groups and users. Please consultyour LDAP administrator.
2.

8/22/2019 User Guide Indu Soft
http://slidepdf.com/reader/full/user-guide-indu-soft 552/1279
In the Connection timeout box, type the timeout (in seconds) after which the client willattempt to reconnect to the LDAP server. (A typical connection timeout is 4–5 seconds.)
3.
In the Retry interval box, type the frequency (in seconds) at which the client will try toconnect to the LDAP server if the connection could not be established.
4.
Click Check Connection to confirm that the project can connect to the specified domain. If itcannot, review and correct your settings.
5.
Click OK.6.
Note: The project security system will cache the most recent users in case the project loses itsconnection to the LDAP server. These users will still be able to log onto the project. You canmake the cache size unlimited by setting Cache size to 0, and you can make the cache neverexpire by setting Cache expiration to 0.
In the LDAP Advanced Settings tab of the dialog, there are additional settings that should beconfigured only by experienced LDAP administrators:
Figure 3. LDAP Advanced Settings
Server Address Manual Configuration
If for some reason the LDAP server cannot be accessed using its domain name, then you canmanually configure the server's IP address: select Enable, and then type the IP address andport number of the LDAP server.
Note: The default port for LDAP is 389. However, please verify the port number with theserver administrator.

8/22/2019 User Guide Indu Soft
http://slidepdf.com/reader/full/user-guide-indu-soft 553/1279
Save Rights to Server
By default, IWS security rights are saved entirely within your project. However, you can savethose rights back to the LDAP server, either to make them available to other projects that usethe same LDAP server or for simple redundancy.
To make this option work, you must first extend the server's LDAP schema to containadditional information about the project security system. See Extending the LDAP schema to
allow saving of security rights.
Once that is done, click Modify to provide your LDAP server credentials and then selectEnable.
LDAP Query Customization
By default, the LDAP server provides a list of all registered users and groups, so in a large orcomplex network environment, that can result in an impractically long list to manage whenyou're configuring your project security system.
To restrict the list of users and groups, you may customize the LDAP query to eliminate anyonewho should never have access to your project: click Modify to provide your LDAP servercredentials, select Enable, and then configure the Search Base and Filter Query settings.
For the proper syntax, consult the LDAP server documentation.
Extending the LDAP schema to allow saving of security rights
In order to save IWS project security rights back to a Domain (LDAP) server, the server's LDAPschema must be extended to contain the additional information.
Parent topic: Project Security
InduSoft Web Studio v7.0 Technical ReferenceCopyright © 2003–2010 Indusoft, Inc.

8/22/2019 User Guide Indu Soft
http://slidepdf.com/reader/full/user-guide-indu-soft 554/1279
Project Security > Configuring server settings for security modes >
Extending the LDAP schema to allowsaving of security rightsIn order to save IWS project security rights back to a Domain (LDAP) server, the server's LDAP schemaextended to contain the additional information.
The server must already be configured and running on your network, and you must have sufficient privilemake changes to the server configuration.
In this procedure, you will create a new attribute called "proprietarySCADAInfo" to contain the IWS projesecurity rights, and then you will add the attribute to the "person" and "group" classes in the serverconfiguration. These classes correspond to users and groups in the project security system.
Please note this procedure only shows how to extend the schema in Microsoft Active Directory running onWindows Server 2003. The exact procedure is different for other LDAP servers and operating systems, b
basic steps should be essentially the same. Please consult your LDAP server documentation.
CAUTION:
Extending a server's LDAP schema cannot be undone.
Register the schema management DLL.
Click Start > All Programs > Accessories > Command Prompt . A Command Prompt windisplayed.
a.
At the prompt, type cd %SystemRoot%\System32 and then press Return. The working directory is cb.
Type regsvr32 schmmgmt.dll and then press Return. If the DLL is successfully registered, then aconfirmation message is displayed.
c.
Click OK to dismiss the message.d.
1.

8/22/2019 User Guide Indu Soft
http://slidepdf.com/reader/full/user-guide-indu-soft 555/1279
Close the Command Prompt window.e.
Add the Active Directory Schema snap-in to the console root.
Click Start > All Programs > Accessories > Run . A Run dialog is displayed.a.
In the Open box, type mmc , and then click OK .
(If you have User Access Control (UAC) enabled, then you will be asked if you want to allow MiManagement Console to make changes. Click Yes .) A console window is displayed.
b.
In the console window, click File > Add/Remove Snap-in .c.
2.

8/22/2019 User Guide Indu Soft
http://slidepdf.com/reader/full/user-guide-indu-soft 556/1279
The Add/Remove Snap-in dialog is displayed.
In the Snap-ins added to list, select Console Root , and then click Add . The Add Standaloin dialog is displayed.
d.
In the list of available snap-ins, select Active Directory Schema , and then and click Add .e.

8/22/2019 User Guide Indu Soft
http://slidepdf.com/reader/full/user-guide-indu-soft 557/1279
The snap-in is added to Console Root.
Click OK to close the Add/Remove Snap-in dialog.f.
Create the proprietarySCADAInfo attribute in the Active Directory Schema snap-in.
In the Console Root tree-view, expand Active Directory Schema .a.
3.

8/22/2019 User Guide Indu Soft
http://slidepdf.com/reader/full/user-guide-indu-soft 558/1279
Right-click Active Directory Schema > Attributes , and then click Create Attribute on thshortcut menu. A message is displayed explaining that your schema will be permanent change
b.
Click Continue . A Create New Attribute dialog is displayed.c.
In the dialog, complete the fields as follows.
Common Name : proprietarySCADAInfo
LDAP Display Name : proprietarySCADAInfo
Unique X500 Object ID : 0.7.7777.77777777.777.7.7
Note: An unique Object ID should be used.
Description : proprietarySCADAInfo
Syntax : Octect String
Minimum : 0
Maximum : 10240
d.

8/22/2019 User Guide Indu Soft
http://slidepdf.com/reader/full/user-guide-indu-soft 559/1279
Click OK to close the dialog.e.
The proprietarySCADAInfo attribute is added to the list.
Add the proprietarySCADAInfo attribute to the person and group classes.
In the Console Root tree-view, select Active Directory Schema > Classesa.
4.

8/22/2019 User Guide Indu Soft
http://slidepdf.com/reader/full/user-guide-indu-soft 560/1279
In the list of classes, right-click person , and then click Properties on the shortcut menu. ThProperties dialog is displayed.
b.
In the dialog, click the Attributes tab.c.

8/22/2019 User Guide Indu Soft
http://slidepdf.com/reader/full/user-guide-indu-soft 561/1279
Click Add . The Select Schema Object dialog is displayed.d.
In the list of schema objects, select proprietarySCADAInfo , and then click OK .e.

8/22/2019 User Guide Indu Soft
http://slidepdf.com/reader/full/user-guide-indu-soft 562/1279
The attribute is added to the class properties.
Click OK to close the Properties dialog.f.
Repeat steps b through f for the group class.g.
In the Console Root tree-view, right-click Active Directory Schema , and then click Refresh onshortcut menu.
5.
Click File > Exit to close the console window.6.
Restart the server.7.
Parent topic: Configuring server settings for security modesInduSoft Web Studio v7.0 Technical ReferenceCopyright © 2003–2010 Indusoft, Inc.

8/22/2019 User Guide Indu Soft
http://slidepdf.com/reader/full/user-guide-indu-soft 563/1279
Project Security >
Group Account dialogThe Group Account dialog is used to create and delete user groups, as well as to configure the accessprivileges for a selected group.
Accessing the dialog
Assuming the project security system has already been enabled (i.e., you have used the securitysystem configuration wizard at least once), then you can access this dialog by doing one of thefollowing:
Open the Security System dialog, and then click Groups; or
In the Global tab of the Project Explorer, right-click Groups and then click Groups properties
on the shortcut menu.
The dialog in detail
Figure 1. Group Account dialog
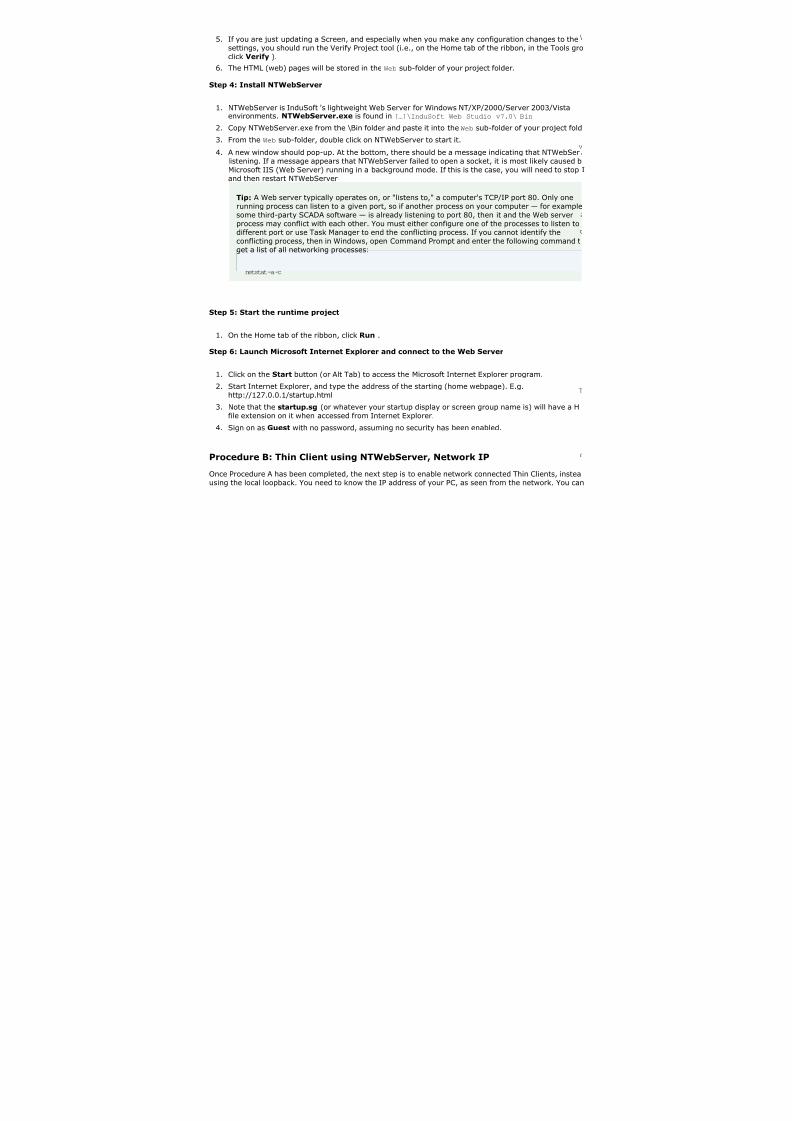
8/22/2019 User Guide Indu Soft
http://slidepdf.com/reader/full/user-guide-indu-soft 564/1279
Area / Element Description
Group Account The user group that you are currently configuring.
Note: There are two default groups for all projects: Guest and(Default Rights).
Note: If the security mode is set to Domain (LDAP), thenplease note that the built-in groups in Microsoft Active Directorywill not appear in this list of groups and cannot be added to theproject.
New Creates a new group. In the New Group Account dialog, type thename of the new group and then click OK.
Delete Deletes the currently selected group.
Reset Resets the privileges of the currently selected group to match the(Default Rights) group.
This does not lock the group to the default; you can make furtherchanges. To lock the group, see Use Default Rights below.
Advanced Opens the Group Account Advanced dialog (see below).
Security
Rights –
Development
Use Default
Rights
Locks the development privileges of the currently selected groupto those configured for the (Default Rights) group. If changesare made to the (Default Rights) group, then they also apply tothis group.
Security
Level –
Development
Range The range of access levels that this group may access in the
development application.
Engineering
Access
Project
Settings
Members of the group may modify the project settings.
Drivers, Data
Sources
Members of the group may create, modify device drivers andexternal data sources.
Network
Configuration
Members of the group may create, modify TCP/IP Clientworksheets.
Create,
modify tags
Members of the group may create, modify project tags.
Create,
modify
screens
Members of the group may create, modify project screens.
Create,
modify task
sheets
Members of the group may create, modify task worksheets.

8/22/2019 User Guide Indu Soft
http://slidepdf.com/reader/full/user-guide-indu-soft 565/1279
Area / Element Description
Security
Rights –
Runtime
Use Default
Rights
Locks the runtime privileges of the currently selected group tothose configured for the (Default Rights) group. If changes aremade to the (Default Rights) group, then they also apply to thisgroup.
Security
Level –Runtime
Range The range of access levels that this group may access in the
runtime project.
Runtime
Access
Start Project Members of the group may run the project.
Close Project Members of the group may stop the project.
Database Spy
(write)
Members of the group may write values to the project databaseusing the Database Spy window.
Note: This only applies to projects running locally. For projectsrunning remotely, see Enable Remote Debugging Tools below.
Task switch
enabled
Members of the group may switch away from the runtime project
to another Windows task.
(This option does not apply to projects running on WindowsEmbedded target systems; the user may always switch awayfrom the runtime project.)
Edit Security
System
Members of the group may make changes to the project securitysystem during runtime.
Note: Be careful not to clear this option for your own group, oryou may not be able to undo your own changes.
Enable
Remote
Debugging
Tools
Members of the group may use Remote Database Spy andRemote LogWin.
Windows
Task Manager
Members of the group may open the Windows Task Manager.
(This option does not apply to projects running on WindowsEmbedded target systems; the user may always open theWindows Task Manager.)
Note: Clearing this option means disabling the Task Managerduring runtime, which requires Administrator privileges. You will
need to run the project with elevated privileges.
Runtime group A user created during runtime by calling the CreateUser functionmay be assigned to this group.
Web Thin Client Access Members of the group may access the runtime project by using aWeb Thin Client.

8/22/2019 User Guide Indu Soft
http://slidepdf.com/reader/full/user-guide-indu-soft 566/1279
Area / Element Description
Secure Viewer Access Members of the group may access the runtime project by using aSecure Viewer.
Figure 2. Advanced dialog – Password Options
Area / Element Description
Min password size To make user passwords more complex and therefore moresecure, you can require that they contain a certain number of alpha (A-Z, a-z), numeric (0-9), and special (punctuation)
characters. When the user is prompted to change his password —for example, when his old password expires (see Password
aging below) — the new password will not be accepted unless itmeets these requirements.
Min number of special
characters
Min number of numeric
characters
Min number of alpha
characters
Case-sensitive If this option is selected, then passwords are case sensitive — thatis, passwords created with both upper and lowercase charactersmust be entered the same way by the user.
Note: In projects created with InduSoft Web Studio v6.1+SP2through v6.1+SP6, all passwords were case sensitive.
Password aging Longevity (in days) of the password for all users in this group.After the specified number of days, the project will force the userto change his password: when the user tries to log in, the ChangePassword dialog is automatically displayed and the user cannotcomplete the logon process until he provides a new password.

8/22/2019 User Guide Indu Soft
http://slidepdf.com/reader/full/user-guide-indu-soft 567/1279
Area / Element Description
By default, the user must choose a new password that is differentfrom the old password. To change this so that the user can re-usethe same password, manually edit the project file( project_name.app) to include the following setting:
[Security]ChangePasswordMode=1
To make passwords never expire, set Password aging to 0.
E-signature time-out Timeout period (in minutes) of the E-sign prompt for all users inthis group. The user must enter his user name and passwordbefore the specified timeout to use project features that requirean e-signature.
Disable e-signature When the value in this box is TRUE (non-zero), users in this groupcannot use any project features that require an e-signature.
You can configure a project tag in this box, so that e-signature isdynamically enabled/disabled during runtime.
Figure 3. Advanced dialog – Auto LogOff/LockUp
Area / Element Description
Auto Log Off Log Off after Number of minutes after which the current user must be loggedoff automatically. If this field is left in blank (or with the value 0),the current user is never logged off automatically.

8/22/2019 User Guide Indu Soft
http://slidepdf.com/reader/full/user-guide-indu-soft 568/1279
Area / Element Description
Counting
from logon
When this option is selected, the current user is automaticallylogged off after the period of time configured in the Log Off after
field elapsed since when the current user was logged on thesystem.
Counting
from user'slast action
When this option is selected, the current user is automatically
logged off after the period of time configured in the Log Off afterfield elapsed since the last action (mouse, touchscreen, orkeyboard action) was performed by the current user.
Disconnect
Web Thin
Client on auto
logoff
If the user logged on through a Web Thin Client, then when theuser is logged off, the client is automatically disconnected fromthe data server.
Auto Lock-up Enable Enables the auto lock-up features described below.
Lock up
account after
Maximum number of times a user can try to log on to an account.If the user exceeds the specified maximum number of attempts(provides an invalid password) within the period of time specified
in the Reset counter after field, the project will automaticallyblock the user.
Reset counter
after
Defines how long after an invalid log-on attempt the project willwait (in minutes) until it resets the log-on attempts counter.
Note: If a user is assigned to more than one group (see Creating and configuring users), thenthe groups' settings may conflict with each other. How the settings are resolved depends on
which settings they are:
The settings in the Group Account dialog above are permissive — that is, the mostpermissive setting from all of a user's groups applies to the user. For example, if any of thegroups can create and modify tags, then the user can create and modify tags.
The settings in the Group Account Advanced dialog (both tabs) are restrictive — that is, themost restrictive setting from all of a user's groups applies to the user. For example, if onegroup has a minimum password size of 8 and another group has a minimum password sizeof 12, then the user's minimum password size is 12. (For Auto Log Off in particular,Counting from logon overrides Counting from user's last action.)
Parent topic: Project SecurityInduSoft Web Studio v7.0 Technical ReferenceCopyright © 2003–2010 Indusoft, Inc.

8/22/2019 User Guide Indu Soft
http://slidepdf.com/reader/full/user-guide-indu-soft 569/1279
Project Security >
Creating and configuring usersTo create and maintain accounts for project users, click the Users button on the Security Systemdialog. (Alternately, to configure a user, open the Users folder located in the Security folder.)
The User Account dialog displays.
Figure 1. User Account dialog
After the project initializes, if no users log on (or when the current user logs off), then the projectautomatically logs on the default user (Guest). In addition to the default Guest user, there is aGuest group, which has default privileges that enable all tasks. We recommend that you evaluateand edit the Guest group's privileges to specify a minimal amount of privileges for the start upprocedure.
To create a new user, click New to open the New User Account dialog.
To delete a user, click the User combo-box button, select the user name from list, and then clickDelete.
To configure a user, use the following procedure:
Click the User combo-box button and select a user from the list.1.
If necessary, click the User is blocked checkbox to block the selected user.
Note: The Runtime user option indicates that a user was created during runtime usingthe CreateUser function. It cannot be selected for a user created using the proceduredescribed here.
2.
Click the new Settings button to open the User Settings dialog:
Figure 2. User Settings dialog
3.

8/22/2019 User Guide Indu Soft
http://slidepdf.com/reader/full/user-guide-indu-soft 570/1279
Configure the parameters on this dialog as follows:User Full Name text box (optional ): Type the user's full name.
New Password text box: Type the user's password.
Confirm Password text box: Re-type the user's password.
4.
In the Available Groups list, select the group(s) to which the user should be assigned, andthen click > to move those group(s) to the Assigned Groups list.
5.
When you are finished, click OK to apply the changes and close the Settings dialog.6.
Parent topic: Project SecurityInduSoft Web Studio v7.0 Technical ReferenceCopyright © 2003–2010 Indusoft, Inc.

8/22/2019 User Guide Indu Soft
http://slidepdf.com/reader/full/user-guide-indu-soft 571/1279
Project Security >
Security System dialogThe main Security System dialog is used to manage the project security system after it has beeninitially configured.
Accessing the dialog
Assuming the project security system has already been enabled (i.e., you have used the securitysystem configuration wizard at least once), then you can access this dialog by doing one of thefollowing:
On the Project tab of the ribbon, in the Security group, click Configure; or
In the Global tab of the Project Explorer, right-click Security and then click Settings on theshortcut menu.
If you do either of these before the security system has been enabled, then the security systemconfiguration wizard will open automatically.
If you've already configured the security system and set a main password, then you'll be prompted toenter it.
The dialog in detail
Figure 1. Security System dialog

8/22/2019 User Guide Indu Soft
http://slidepdf.com/reader/full/user-guide-indu-soft 572/1279
Area / Element Description
Enable Security System Indicates whether the project security system is currentlyenabled. If it is, then the users and groups' specified accessprivileges are enforced.
Main Password Opens a dialog where you can specify a main administrativepassword for the entire project.
Security
Mode
Mode The current security mode of the project.
Server
Settings
Opens the Server Settings dialog, where you can configure theserver settings for Distributed – Client or Domain (LDAP).
Run Wizard Opens the security system configuration wizard.
Backup Opens the Import/Export dialog, where you can export or importthe security system configuration.
Accounts
Management
Groups Opens the Group Account dialog, where you can create andconfigure groups.
Users Opens the User Account dialog, where you can create andconfigure users.
Display list of
users at
logon
Displays a list of available users (in the Log On dialog) when auser is prompted to log on. The user may select from this listrather than type his user name.
Log On on E-
Signature
Forces a user to log on with their own user account when they'reprompted to e-sign an event. If this is not selected, then thecurrent user account remains logged on regardless of who e-signsthe event.
Default User This user is automatically logged on when no other user is logged
on, such as when the previous user times out or manually logsoff.
Note: This user's privileges should be heavily restricted, toprevent your project from being left vulnerable.
Virtual Keyboard The type of virtual keyboard that is displayed on the client whenthe user is prompted to log on.
Parent topic: Project SecurityInduSoft Web Studio v7.0 Technical ReferenceCopyright © 2003–2010 Indusoft, Inc.

8/22/2019 User Guide Indu Soft
http://slidepdf.com/reader/full/user-guide-indu-soft 573/1279
Project Security >
Backing up the security systemconfigurationYou can back up your project's security system configuration by exporting it to a file. You can alsoimport a configuration either from a file or from another runtime project.
Exporting the configuration to a file
To export the security system configuration:
In the main Security System dialog, click Backup. The Import/Export dialog is displayed.1.
Click Export to file. A standard Save As dialog is displayed.2.
Specify a file name and location for the file, and then click OK.3.
The exported file is encrypted, using the main password configured in the Security System dialog.
Tip: You can also export the configuration during runtime by calling the ExportSeruritySystemfunction.
Importing the configuration from a file
If your project's security mode is set to Local Only, then you can import a configuration from apreviously exported file.
To import the security system configuration:
In the main Security System dialog, click Backup. The Import/Export dialog is displayed.1.
Click Import from file. A standard Open dialog is displayed.2.
Locate the configuration file (*.dat) that you want to import, and then click OK. You will be
prompted for the configuration's main password.
3.
Type the password, and then click OK. The Import from File dialog is displayed.4.
Select an import method:
Import only settings that do not conflict: Merge the imported settings with the
current project settings. In the case of conflicts, keep the current settings.Import all settings and replace conflicts: Merge the imported settings with the projectsettings. In the case of conflicts, use the imported settings.
Replace the current settings: Completely replace the current project settings with thesettings imported from the file.
5.
Click OK.6.

8/22/2019 User Guide Indu Soft
http://slidepdf.com/reader/full/user-guide-indu-soft 574/1279
Tip: You can also import the configuration during runtime by calling the ImportSecuritySystemfunction.
Importing the configuration from another project
If your project's security mode is set to Distributed – Server, then you can import a configurationfrom another project if:
The other project's security mode is set to Distributed – Client, and its server settings areconfigured to use your project as the server; and
The other project is currently running on the same network.
To import the security system configuration:
In the main Security System dialog, click Backup. The Import/Export dialog is displayed.1.
Click Import from client station. The Import Security from Client Station dialog is
displayed.
The dialog shows a list of runtime projects that are using your project as their security systemserver. Each project/client listing includes a time stamp that shows when it last cached thesecurity system configuration.
2.
Select a client station, and then click Import from client. You will be prompted for theconfiguration's main password.
3.
Type the password, and then click OK.4.
Parent topic: Project Security
Related reference
ExportSecuritySystemImportSecuritySystem
InduSoft Web Studio v7.0 Technical ReferenceCopyright © 2003–2010 Indusoft, Inc.

8/22/2019 User Guide Indu Soft
http://slidepdf.com/reader/full/user-guide-indu-soft 575/1279
Project Security >
Logging on/off If the project security system has been enabled and the default "Guest" user's privileges have beenrestricted, then you must log on to fully use the development application and/or the runtime project.
Note: The project security system must be enabled before you can use this feature.
To log on to the development application, click Log On on the Project tab of the ribbon.
To prompt a user to log on to the runtime project, do one of the following:
Call the LogOn function somewhere that an expression can be configured — for example, draw aButton object in a screen and then apply the Command animation to it, so that pressing thebutton shows a logon prompt; or
Select the Log On on E-Signature option (in the main Security System dialog), which forces
the user to log on whenever he performs some action that requires an e-signature.
In either the development application or the runtime project, the Log On dialog is displayed:
Figure 1. Log On dialog
Use this dialog as follows:
To log on as yourself, type your user name and password in the appropriate boxes and thenclick OK.
To log on as the default "Guest" user, type guest in the User Name box and then click OK.
Note: By default, "Guest" has no password, so you can leave the Password box empty.
However, if you've changed the password or you're getting your security settings from aserver (either Distributed or Domain), then you will need to enter a password for "Guest."
To log off, simply click Log Off . The default user (typically "Guest," but this may be changed inthe main Security System dialog) is automatically logged on to replace you.
8/22/2019 User Guide Indu Soft
http://slidepdf.com/reader/full/user-guide-indu-soft 576/1279
CAUTION:
If the security mode is set to Domain (LDAP) and a user created on the LDAP server is
required to change his password the first time he logs onto the domain, then he must
do that before he will be able to log onto the IWS project.
Parent topic: Project SecurityInduSoft Web Studio v7.0 Technical ReferenceCopyright © 2003–2010 Indusoft, Inc.

8/22/2019 User Guide Indu Soft
http://slidepdf.com/reader/full/user-guide-indu-soft 577/1279
Project Security >
Blocking or unblocking a userAn individual user in the project security system may be completely blocked from accessing theproject, and a blocked may subsequently be unblocked.
A user may be blocked in the following ways:
By manually selecting the User is blocked option in the User Account dialog;
By calling the BlockUser function during runtime; or
Automatically if the user enters the wrong password too many times. (The number of attemptsallowed is configured in the Group Account dialog.)
To check whether a user is blocked, do one of the following:
Look at their user icon in the Project Explorer, which will be marked with a red circle; or
Call the GetUserState function during runtime.
Figure 1. User is blocked
To unblock a blocked user, do one of the following:
Clear the User is blocked option in the User Account dialog; or
Call the UnblockUser function during runtime.
Parent topic: Project SecurityInduSoft Web Studio v7.0 Technical ReferenceCopyright © 2003–2010 Indusoft, Inc.

8/22/2019 User Guide Indu Soft
http://slidepdf.com/reader/full/user-guide-indu-soft 578/1279
Project Security >
Password-protecting screens,symbols, and worksheetsScreens, symbols, and worksheets in the Project Explorer can be password-protected. You can assignindividual passwords to each file, or you can assign a single password to all files in the project
Almost all project files are encrypted as a matter of course, to prevent unauthorized analysis bythird-party tools. (Screen files are not encrypted, because decrypting them during runtime woulddecrease performance.) However, you can take the extra step of password-protecting your files toprevent unauthorized changes or re-use by other IWS project developers.
Note: These passwords are always case sensitive.
Assigning a password to a single file
To assign a password to a single project file:
In the Project Explorer, find and right-click the desired file, and then click Password
Protection on the shortcut menu. The Edit Protection dialog is displayed.1.
Type the new password, and then type it again to confirm.2.
Click OK to close the dialog.3.
The file is now protected. The next time you try to open it, you will be prompted for the password.
Clearing the password from a single file
To clear a password from a single project file:
In the Project Explorer, find and double-click the desired file to open it. You will be prompted forthe password.
1.
With the file open for editing, right-click the file in the Project Explorer and then click Password
Protection on the shortcut menu. The Edit Protection dialog is displayed.2.
Leave the New password and Confirm password boxes empty.3.
Click OK to close the dialog.4.
The file is no longer protected. You can open the file without being prompted for the password.
Assigning a password to all files
To assign a single password to all files in your project:

8/22/2019 User Guide Indu Soft
http://slidepdf.com/reader/full/user-guide-indu-soft 579/1279
On the Home tab of the ribbon, in the Tools group, click Verify. The Verify Project dialog isdisplayed.
1.
Click Set password for all files. The Edit Protection dialog is displayed.2.
Type the current password for your project, if any.3.
Type the new password, and then type it again to confirm.4.
Click OK. The verification routine proceeds.5.
Click Close to close the Verify Project dialog.6.
All files in your project are now protected. The next time you try to open one, you will be promptedfor the password.
Clearing the password from all files
To assign a single password to all files in your project:
On the Home tab of the ribbon, in the Tools group, click Verify. The Verify Project dialog isdisplayed.
1.
Click Set password for all files. The Edit Protection dialog is displayed.2.Type the current password for your project.3.
Leave the New password and Confirm password boxes empty.4.
Click OK. The verification routine proceeds.5.
Click Close to close the Verify Project dialog.6.
Your project files are no longer protected.
Parent topic: Project SecurityInduSoft Web Studio v7.0 Technical ReferenceCopyright © 2003–2010 Indusoft, Inc.

8/22/2019 User Guide Indu Soft
http://slidepdf.com/reader/full/user-guide-indu-soft 580/1279
Automatic TranslationYou can quickly translate your project's user interface to multiple languages, leveraging the power of automatic translation through Google Translate, and you can switch your project's language duringruntime with a simple function call.
Adding a language to the Translation Table
The Translation Table is used to manage the languages to which you want to translate yourproject. Adding a language to the table can be as simple as selecting it from a list and thenautomatically translating your project texts.
Setting the project's language at startup
Even when you have multiple languages configured for your project, you must still specify whichlanguage you want your project to start in at runtime.
Setting the project's language during runtimeYou can set your project's language during runtime by using the SetLanguage functionanywhere that an expression can be configured.
Disabling translation of selected screen objects
By default, translation is enabled for all screen objects that have text to be translated. However,you can disable translation of selected objects if you need to preserve their original text.
InduSoft Web Studio v7.0 Technical ReferenceCopyright © 2003–2010 Indusoft, Inc.

8/22/2019 User Guide Indu Soft
http://slidepdf.com/reader/full/user-guide-indu-soft 581/1279
Automatic Translation >
Adding a language to theTranslation TableThe Translation Table is used to manage the languages to which you want to translate your project.Adding a language to the table can be as simple as selecting it from a list and then automaticallytranslating your project texts.
Open the Translation Table worksheet by doing one of the following.
On the Insert tab of the ribbon, in the Global group, click Translation; or
In the Global tab of the Project Explorer, double-click Translation.The Translation Table worksheet is opened for editing, with the Source column alreadypopulated with all of the translatable text strings in your project.
Figure 1. Translation Table worksheet
1.
Make sure the Enable Translation option is selected.2.
In the Target languages area, click Add. The Languages dialog is displayed.3.
In the Languages dialog, select the language to which you want to translate your project andthen click OK. The language is added to the Select list.
4.
Configure Date order and Date separator as desired for the target language. For example,5.

8/22/2019 User Guide Indu Soft
http://slidepdf.com/reader/full/user-guide-indu-soft 582/1279
for English-United States (i.e., American English), Date order is typically MDY and Date
separator is typically /, resulting in a date format of MM/DD/YYYY.
Click Auto Translate. The Automatic Translation dialog is displayed.
Figure 2. Automatic Translation dialog
6.
Confirm the source and target language codes. Language codes are defined by ISO 639-1.7.
If you want to overwrite any previous translations, select Replace existent translations.Please note that this will overwrite both automatic translations and manual edits.
8.
Click OK. The application processes the Source column of the worksheet through GoogleTranslate and then populates the Target column with the results.
9.
Review and manually edit the translation results as needed. Use the Filters to search theworksheet for a text string; as you type a few characters, the list is dynamically filtered to showonly the strings that match.
10.
Save and close the worksheet.11.
Changes made to the Translation Table will not take effect until you either call the SetLanguagefunction or restart the runtime project.
Tip: The Translation Table is saved as a tab-delimited text file in your project folder, at […]\My
Documents\InduSoft Web Studio v7.0 Projects\ project_name\Web\Translation.trn. You
can open and directly edit this file with Microsoft Excel, if you choose to do so.
Parent topic: Automatic Translation
Related reference
SetLanguage
InduSoft Web Studio v7.0 Technical ReferenceCopyright © 2003–2010 Indusoft, Inc.

8/22/2019 User Guide Indu Soft
http://slidepdf.com/reader/full/user-guide-indu-soft 583/1279
Automatic Translation >
Setting the project's language atstartupEven when you have multiple languages configured for your project, you must still specify whichlanguage you want your project to start in at runtime.
This procedure assumes that you have already added at least one target language to the TranslationTable. For more information, see Adding a language.
Open the Translation Table worksheet by doing one of the following.
On the Insert tab of the ribbon, in the Global group, click Translation; or
In the Global tab of the Project Explorer, double-click Translation.The Translation Table worksheet is opened for editing.
1.
In the Startup target language list, select the language in which you want your project tostart. The list of available languages includes the source language in which you developed theproject and any target languages that you've added.
2.
Save and close the worksheet.3.
Parent topic: Automatic TranslationInduSoft Web Studio v7.0 Technical ReferenceCopyright © 2003–2010 Indusoft, Inc.

8/22/2019 User Guide Indu Soft
http://slidepdf.com/reader/full/user-guide-indu-soft 584/1279
Automatic Translation >
Setting the project's languageduring runtimeYou can set your project's language during runtime by using the SetLanguage function anywhere thatan expression can be configured.
This procedure assumes that you have already added at least one target language to the TranslationTable. For more information, see Adding a language.
The SetLanguage function takes one parameter: a numeric code representing the target language.The codes are shown in parentheses in the list of languages — for example, English-United States is1033.
The following very basic example shows how to draw two Button objects that switch the project'slanguage between English and French.
In the Graphics tab of the Project Explorer, double-click a project screen to open it for editing.1.
On the Graphics tab of the ribbon, in the Active Objects group, click Button.2.
Draw a Button object in the project screen.3.
Double-click the Button object. The Object Properties dialog is displayed.4.
In the Caption box, type English.5.
Click Command. The Command animation properties are displayed in the dialog.6.
In the first row of the On Down tab, in the Expression field, type SetLanguage(1033).7.

8/22/2019 User Guide Indu Soft
http://slidepdf.com/reader/full/user-guide-indu-soft 585/1279
Close the Object Properties dialog.8.
Duplicate the Button object, either by copy-and-paste or by Ctrl+Click.9.
Repeat steps 4 through 8, replacing the caption with French and the expression withSetLanguage(1036).
10.
Save and close the project screen.11.
During project runtime, clicking each button will set the language of the entire project to thatlanguage, using the translated text from the Translation Table.
Parent topic: Automatic Translation
Related reference
SetLanguage
InduSoft Web Studio v7.0 Technical ReferenceCopyright © 2003–2010 Indusoft, Inc.

8/22/2019 User Guide Indu Soft
http://slidepdf.com/reader/full/user-guide-indu-soft 586/1279
Automatic Translation >
Disabling translation of selectedscreen objectsBy default, translation is enabled for all screen objects that have text to be translated. However, youcan disable translation of selected objects if you need to preserve their original text.
Double-click a screen object to open its Object Properties dialog.1.
In the dialog, look for the Enable translation option. If the option is not available in theobject's basic properties, then click Advanced to access the advanced properties
2.
Clear the Enable translation option.3.
Close the Object Properties dialog.4.
Once the option is cleared on an object, its text will no longer be translated during project runtime.The text is still added to the translation table and may be processed though the automatic translationengine, along with all other project texts, but the resulting translation will not actually be applied tothe object during runtime.
Parent topic: Automatic TranslationInduSoft Web Studio v7.0 Technical ReferenceCopyright © 2003–2010 Indusoft, Inc.

8/22/2019 User Guide Indu Soft
http://slidepdf.com/reader/full/user-guide-indu-soft 587/1279
Using the LogWin ModuleThis module provides a continuous record of activities and tags for debugging over long periods of time. It creates a file into which you can dump the data collection results, and this file continues togrow in size until you stop the logging (data collection) process. Use the LogWin module (local andremote) to record DDE, OPC, and TCP/IP transactions, activate modules, trace tags, and so forth.
To enable the LogWin module as a part of your project:
On the Home tab of the ribbon, in either the Local Management group or the RemoteManagement group (depending on where the project is being served from), click Tasks. TheExecution Tasks dialog is displayed:
Figure 1. Execution Tasks dialog
1.
Select LogWin from the Task list.2.
With the LogWin task selected, click Startup. The Startup dialog is displayed.
Figure 2. Startup dialog
3.

8/22/2019 User Guide Indu Soft
http://slidepdf.com/reader/full/user-guide-indu-soft 588/1279
Click the Automatic radio button.4.
Click OK to apply your choice and close the Startup dialog.5.
Click OK again to close the Execution Tasks dialog.6.
Note:
To start the LogWin module directly on your Windows Embedded device, choose Tools >LogWin from the CEView menu bar.
To enable logging in the Thin Client version of a project, use the Log feature in the projectsettings (Thin Client on the Project tab of the ribbon).
InduSoft Web Studio v7.0 Technical ReferenceCopyright © 2003–2010 Indusoft, Inc.

8/22/2019 User Guide Indu Soft
http://slidepdf.com/reader/full/user-guide-indu-soft 589/1279
Remote Database SpyYou can use the Remote Database Spy tool (located in the Tools menu) to monitor the DatabaseSpy of an IWS project running on a remote computer. The project must have the Database Spyexecution task enabled, and the remote computer must be in runtime.
To use the Remote Database Spy tool:
On the Home tab of the ribbon, in the Remote Management group, click Database Spy. TheRemote Computer dialog is displayed.
1.
Enter the IP address of the remote computer, as shown below.
Figure 1. Entering a Remote IP
Note: The IP address 192.168.1.52 is only an example. Please verify the IP address of thecomputer to which you want to connect.
2.
Click OK to connect to the specified address. If the connection is good, then the RemoteDatabase Spy window is displayed.
Figure 2. Remote Database Spy
Note: You cannot add or remove tags remotely; the Database Spy tag list must beconfigured on the remote computer itself.
3.

8/22/2019 User Guide Indu Soft
http://slidepdf.com/reader/full/user-guide-indu-soft 590/1279
When you are done, click Close to disconnect from the remote computer.
InduSoft Web Studio v7.0 Technical ReferenceCopyright © 2003–2010 Indusoft, Inc.

8/22/2019 User Guide Indu Soft
http://slidepdf.com/reader/full/user-guide-indu-soft 591/1279
Remote LogWinYou can use the Remote LogWin tool (located in the Tools menu) to monitor the Output log(LogWin) of an IWS project running on a remote computer. The project must have the LogWinexecution task enabled, and the remote computer must be in runtime.
To use the Remote LogWin tool:
On the Home tab of the ribbon, in the Remote Management group, click LogWin. The RemoteComputer dialog is displayed.
1.
Enter the IP address of the remote computer, as shown below.
Figure 1. Entering a Remote IP
Note: The IP address 192.168.1.52 is only an example. Please verify the IP address of thecomputer to which you want to connect.
2.
Click OK to connect to the specified address. If the connection is good, then the Remote LogWinwindow is displayed.
Figure 2. Remote LogWin
3.
When you are done, just close the window to disconnect.
InduSoft Web Studio v7.0 Technical ReferenceCopyright © 2003–2010 Indusoft, Inc.

8/22/2019 User Guide Indu Soft
http://slidepdf.com/reader/full/user-guide-indu-soft 592/1279
Introduction to Thin ClientsIWS is built on a Client/Server architecture, and you can support both Thin Clients and Thick Client.The choice of the type of Client architecture depends upon your system requirements.
Thick Client
A Thick (Fat) Client is a computer that performs most, if not all, of the processing activity. The ThickClient has sufficient processing power, memory, memory, graphics, etc. to run the project. The ThickClient can exchange data with the Server as required (e.g., archival of data, programsynchronization). A Server can also be a Thick Client to another Server.
Thin Client
A Thin (Lean) Client is a computer that depends primarily on the central Server for processingactivities. The Thin Client needs to have a processor with minimal memory, a browser (InternetExplorer) and a network connection (e.g., to the Internet or Intranet). We use the term "Web Client"
to refer to a Thin Client solution. IWS lets you choose the type of browser that is best for yourruntime environment:
Microsoft Internet Explorer. This type of browser is best for desktop or remote accessenvironments.
InduSoft's Secure Viewer, a dedicated viewer for IWS projects. Secure Viewer does not let theuser browse to other websites, and will only connect to a specified IWS Server. Secure Viewer isintended for plant floor environments were browsing to other web sites is not required ordesired.
In this chapter, we will explore using Thin Clients with IWS. Thick Clients will be covered in asubsequent chapter.
Thin Clients in IWS
IWS allows you to create screens that can be visualized in a remote station a regular web browser(e.g., Internet Explorer). The station where the user can visualize the graphical interface (screens)on the web browser is called the Thin Client. The Thin Client (Browser) is the host.
Figure 1. Typical Thin Client Architecture

8/22/2019 User Guide Indu Soft
http://slidepdf.com/reader/full/user-guide-indu-soft 593/1279
IWS is installed on the Server station only. Also, the project (screen files, tags database,configuration worksheets, etc.) is stored on the Server only. You do not need to install thedevelopment application or the runtime project on the Thin Client. This solution provides a high levelof flexibility because any computer physically linked to the Server station (via a TCP/IP link) canaccess the graphical screen and online/history data from the Server without installing thedevelopment application or the runtime project on the Thin Client stations.
All background tasks (Math, Scheduler etc) and communication tasks (e.g., Driver, OPC, DDE TCP/IP)are executed only on the Server station. The Thin Client is able to load the graphical interfaceconfigured on the Server (screens with objects and animations) and display the online values fromthe tags configured in the server, as well as history data (Alarm, Events and Trend history data).
Note: Since VBScript and the IWS Scripting Language can be associated with a screen as well asa Command animation for an Object, these Scripts can execute on a Thin Client.
Any computer or device (e.g., a PDA powered by Windows Mobile 5.0) running Microsoft InternetExplorer 6.0 (or later) or our Secure Viewer program can be a Thin Client for your project. Moreover,IWS provides a sophisticated Security System to prohibit unauthorized access to the project.
From the Thin Client, you are able to visualize data from the Server and capable of changing setpoints, acknowledging alarms and/or sending commands to the Server. When configuring the project,you can optionally enable or disable all commands from the Thin Client to the Server. Even if theServer has disabled all command from the Thin Client, the Thin Client can still read data from theServer but cannot send any data to the Server.
Thin Client Competitive Advantages
IWS is built on a Client/Server architecture that supports true Thin Clients. This capability is built intoIWS and is not an add-on. This means that:
The IWS Server supports a large number of concurrent Thin Clients (up to 128 IE-based and128 Secure Viewer-based). Each Thin Client can view the same or different screens as anotherThin Client.

8/22/2019 User Guide Indu Soft
http://slidepdf.com/reader/full/user-guide-indu-soft 594/1279
The IWS Server knows which display each Thin Client viewing and automatically "pushes" anyupdated Tag values to the Thin Client, keeping the Thin Client display current and eliminatingthe need for screen refreshes
The IWS Server can support runtime language switching for each Thin Client. This means thatone Thin Client can be viewing a screen in English while another Thin Client can display thesame screen in Spanish.
Many competitive products offer either a static display on a Thin Client (i.e., it must be manually"refreshed" to get the latest data), a Terminal Server solution (requires the Server to build multipleinstances of the project to support each Thin Client), or offer a Thin Client solution similar to IWS butwith expensive "add-on" software products.
Other Thin Client advantages include:
Optional Secure Viewer that does not allow navigation outside the IWS project. Secure Viewer isnot based on Microsoft's Internet Explorer.
Ability to run VBScript and the Built-in Scripting Language on the Thin Client
Can build Thin Client projects using Windows Embedded devices as the Server.
Ability to support redundant Web Servers and Data Servers, with automatic switchover.
Thin Client Licensing
The maximum number of Thin Client stations connected simultaneously to the Server depends on thesettings of the license installed on the Server. The user does not have to install any license on theThin Client. For more information, see License Settings.
InduSoft Web Studio v7.0 Technical ReferenceCopyright © 2003–2010 Indusoft, Inc.

8/22/2019 User Guide Indu Soft
http://slidepdf.com/reader/full/user-guide-indu-soft 595/1279
Building a Simple Thin clientprogramAs we will see shortly, there is no one way to build a Thin client program. The following procedures allow
to develop a simple, unsecured Thin client program.
Procedure A: Thin Client using NTWebServer, Local Loopback
An easy way to initially develop and test a Thin client program is to use the light-weight Web serverNTWebServer on your development PC, initiate the runtime project and use Microsoft Internet Explorerthe same PC to display the Web pages.
Step 1: Configure IWS Settings
On the Project tab of the ribbon, in the Web group, click Thin Client .
In the Data Server IP Address field, enter 127.0.0.1
1.

8/22/2019 User Guide Indu Soft
http://slidepdf.com/reader/full/user-guide-indu-soft 596/1279
Check the Auto Screen Scaling , Enable File Compression , and Enable Tooltips checkbare checked
Click on the IP Security Button . Be sure then Enable checkbox is unchecked. Click OK .
Click on the Advanced Button . Be sure the Web Tunneling Gateway Enabled checkbox iunchecked. Click OK.
Open the Execution Tasks dialog (Tasks on the Home tab of the ribbon) and be sure the TCP/IP
Server task is set to Automatic.2.
Step 2: Configure Database
In the Development Environment, select the Global tab of the Project Explorer. Open the Project
folder.1.
Be sure the project tags are properly set to either Server or Local. If the tags are to be exposed toWeb Client, then set them to Server , otherwise set to Local .
2.
Step 3: Develop your Screens and create HTML screens
Develop your project screen. Depending on your Thin Client screen size, you may want to develop aseparate set of screens with a different resolution. Auto Screen scaling is supported (enabled in a pstep), but auto screen scaling naturally has limitations.
1.
Save and close all project screens.2.
Be sure you have defined a Startup Screen (Viewer on the Project tab of the ribbon).3.
You can save individual screens as HTML by selecting the Save as HTML or Save Screen Group a
HTML options in the Application menu, or save all Screens and Screen Groups as HTML by selectingSave All as HTML option.
4.

8/22/2019 User Guide Indu Soft
http://slidepdf.com/reader/full/user-guide-indu-soft 597/1279
If you are just updating a Screen, and especially when you make any configuration changes to thesettings, you should run the Verify Project tool (i.e., on the Home tab of the ribbon, in the Tools groclick Verify ).
5.
The HTML (web) pages will be stored in the Web sub-folder of your project folder.6.
Step 4: Install NTWebServer
NTWebServer is InduSoft 's lightweight Web Server for Windows NT/XP/2000/Server 2003/Vistaenvironments. NTWebServer.exe is found in […]\InduSoft Web Studio v7.0\ Bin
1.
Copy NTWebServer.exe from the \Bin folder and paste it into the Web sub-folder of your project fold2.
From the Web sub-folder, double click on NTWebServer to start it.3.
A new window should pop-up. At the bottom, there should be a message indicating that NTWebSerlistening. If a message appears that NTWebServer failed to open a socket, it is most likely caused bMicrosoft IIS (Web Server) running in a background mode. If this is the case, you will need to stop Iand then restart NTWebServer
Tip: A Web server typically operates on, or "listens to," a computer's TCP/IP port 80. Only onerunning process can listen to a given port, so if another process on your computer — for example
some third-party SCADA software — is already listening to port 80, then it and the Web serverprocess may conflict with each other. You must either configure one of the processes to listen todifferent port or use Task Manager to end the conflicting process. If you cannot identify theconflicting process, then in Windows, open Command Prompt and enter the following command tget a list of all networking processes:
netstat -a -o
4.
Step 5: Start the runtime project
On the Home tab of the ribbon, click Run .1.
Step 6: Launch Microsoft Internet Explorer and connect to the Web Server
Click on the Start button (or Alt Tab) to access the Microsoft Internet Explorer program.1.
Start Internet Explorer, and type the address of the starting (home webpage). E.g.http://127.0.0.1/startup.html
2.
Note that the startup.sg (or whatever your startup display or screen group name is) will have a Hfile extension on it when accessed from Internet Explorer.
3.
Sign on as Guest with no password, assuming no security has been enabled.4.
Procedure B: Thin Client using NTWebServer, Network IP
Once Procedure A has been completed, the next step is to enable network connected Thin Clients, insteausing the local loopback. You need to know the IP address of your PC, as seen from the network. You can

8/22/2019 User Guide Indu Soft
http://slidepdf.com/reader/full/user-guide-indu-soft 598/1279
this information from the Network Settings in the Control Panel, or putting the function GetComputerIP
a Rectangle Object on a screen and running the project.
Step 1: Configure IWS Settings
Stop any active runtime project.1.
On the Project tab of the ribbon, in the Web group, click Thin Client . In the Data Server IP Addres
field, enter the IP address of your PC (as viewed from the network). E.g. 192.168.1.100
2.
Run the Verify Project tool (Verify on the Home tab of the ribbon). This will set change the DataServer IP address in the web pages, so that the Thin Client will automatically exchange data with thcorrect Data Server.
3.
Step 2: Start the runtime project
On the Home tab of the ribbon, click Run .1.
Be sure NTWebServer is still running.2.
Step 3: Launch Microsoft Internet Explorer and connect to the Web Server
Click on the Start button (or Alt Tab) to access the Microsoft Internet Explorer program.1.
Start Internet Explorer, and type the address of the starting (home webpage). E.g.http://192.168.1.100/startup.html
2.
Sign on as Guest with no password, assuming no security has been enabled.3.
Procedure C: Thin Client using IIS, Network IP
Once Procedure B has been completed, the next step is to enable IIS to become the Web Server for yourClients instead of NTWebServer. The following are the basic steps to configuring IIS, although depending
your network and Operating System environment, additional settings may need to be configured such assecurity.
Step 1: Configure IWS Settings
Be sure NTWebServer is terminated.1.
Click the Start button, then Control Panel > Administrative Tools .2.
Select (click on) Internet Information Services .3.
Expand the Web Sites tree structure to see the Default Web Site .4.

8/22/2019 User Guide Indu Soft
http://slidepdf.com/reader/full/user-guide-indu-soft 599/1279
Right click on the Default Web Site and select Properties to get the Default Web Site Properties dia5.

8/22/2019 User Guide Indu Soft
http://slidepdf.com/reader/full/user-guide-indu-soft 600/1279
Click on the Home Directory tab. Click on the Local Path Browse button and point to your projeWeb subfolder.
6.
Click on the Web Site tab. Make sure the TCP port is set to 80. You can click the Advanced buttonenable the IIS Web Server to respond to specific IP addresses and IP Port numbers.
7.
If your Web Server is behind a Proxy, be sure to check the HTTP Keep-Alives Enabled checkbox. Itnot hurt anything if this is always checked.
8.

8/22/2019 User Guide Indu Soft
http://slidepdf.com/reader/full/user-guide-indu-soft 601/1279
Click on the HTTP Headers tab. Click on the MIME Map File Types button to open the File Type
dialog. Next, click on the New Type button to add a new MIME type. Put the file extension in theAssociated Extension field. In the Content type (MIME) field, put MIME type followed by a /
character, followed by the file extension name (application/studio). E.g.
Associated Extension: .scc
Content Type: application/studio
9.

8/22/2019 User Guide Indu Soft
http://slidepdf.com/reader/full/user-guide-indu-soft 602/1279
Click on the Directory Security tab. From this tab, you can change the settings for Anonymous UsAccess and Authentication Control as well as Secure Communications (i.e., using SSL 3.0).
10.
Click on the Anonymous User Access and Authentication Control Edit button to get theAuthentication Methods dialog. Normally, you do not have to do anything in this dialog but depeon the Security system your network administrator has installed, you may need to adjust settings idialog.
11.
The Secure Communications Server Certificate button opens a wizard that lets you define a12.

8/22/2019 User Guide Indu Soft
http://slidepdf.com/reader/full/user-guide-indu-soft 603/1279
Certificate for support of secure communications using SSL.
About MIMEs
MIME, or Multipurpose Internet Mail Extensions, types instruct a Web browser how to handle files
received from a server. For example, when a Web browser requests an item on a server, it alsorequests the MIME type of the object. Some MIME types, like graphics, can be displayed inside thebrowser. Others, such as word processing documents, require an external helper program to bedisplayed.
When IIS delivers a Web page to a client Web browser, it also sends the MIME type of the data it issending. If there is an attached or embedded file in a specific format, IIS also tells the client prograthe MIME type of the embedded or attached file. The client program then knows how to process ordisplay the data being received from IIS.
IIS serves only files with known extensions registered in the MIME types list or with the operatingsystem. IIS allows you to configure additional MIME types and change or remove MIME types. Rema MIME type in IIS does not block access to that MIME type by other programs if it is also registere
with the operating system.
IIS is preconfigured to recognize a default set of global MIME types. These MIME types are recognizby all Web sites you create in IIS. MIME types can also be defined at the Web site and directory levindependent of one another or the types defined globally. When you view MIME types at the Web sidirectory level, only the types unique to that level are displayed, not all types inherited from the nelevel up.

8/22/2019 User Guide Indu Soft
http://slidepdf.com/reader/full/user-guide-indu-soft 604/1279
IIS returns a 404.3 error if a client request refers to a file name extension that is not defined in theMIME types
MIME configuration is usually only required for Windows Server 2003, not Windows XP or Vista dueWindows 2003 default settings.
MIME types should include all file extensions found in the Web directory. These include:
.app
.bin
.csv
.gis
.html
.ico
.ini
.lst
.scc
.sg
.stmp
.tra
.txt
Step 2: Start IIS and start the IWS Project
Be sure NTWebServer is terminated.1.
Click on the IIS Start button.2.
Run the project.3.

8/22/2019 User Guide Indu Soft
http://slidepdf.com/reader/full/user-guide-indu-soft 605/1279
Notes:
If IIS is not installed on your PC, you can add it (to Windows XP Pro/Windows 2000 or Windows Ser2003) by opening the Control Panel, then selecting Add/Remove Programs > Add/Remove
Windows Components and checking the Internet Information Services (IIS) checkbox in the WinComponents Wizard. You can click on the Details button to select various components of IIS to inst
Note that you may need to have your Windows installation disk.You can get more information on IIS by opening a browser and entering http://localhost/iishelp in tbrowser navigation address bar. Note that IIS must be running.
NTWebServer is a Windows program, while IIS is a Windows service.
It is STRONGLY SUGGESTED that you use IIS instead of NTWebServer in a runtime mode. It is mreliable and higher performance than NTWebServer.
Troubleshooting:
If you get a Can n o t f in d Se r v e r error message,
From the browser, ping the server IP address (primary and/or backup). You can ping using thaddress or use the NetBios name to ping the server (e.g., from a command prompt enter
Ping 152.57.100.25 or Ping ServerName.
Be sure IIS is running
Be sure your project is running
Make sure the TCP/IP Server (in the project's Tasks) is running
Be sure IIS is set to the correct Home Page (root directory).

8/22/2019 User Guide Indu Soft
http://slidepdf.com/reader/full/user-guide-indu-soft 606/1279
Be sure the Port addresses are correct (HTTP – Port 80, HTTPS (SSL) – Port 443, Data – Port1234)
Make sure you firewall has these ports open
If you are using a Windows Embedded device, be sure ISSymbol is properly loaded and regist
Be sure your runtime license supports the Web Client configuration
If you get a Pa g e ca n n o t b e d is p la y e d error message,
From the browser, ping the server IP address
Stop and restart IIS
Be sure the MIME types are properly set
Make sure you updated your web pages (i.e., Save as HTML) and use the Verify Project toolyou change any Web settings.
Verify the Windows security settings are properly set
Be sure that the Screen name (and Web Page name) do not have any spaces in the name
If the web pages are incorrect:
Be sure you are pointing to the correct primary URL
Be sure your backup URL (if you use it) has the correct (updated) web pages
InduSoft Web Studio v7.0 Technical ReferenceCopyright © 2003–2010 Indusoft, Inc.

8/22/2019 User Guide Indu Soft
http://slidepdf.com/reader/full/user-guide-indu-soft 607/1279
The Underlying TechnologyIn a IWS project, there are several components used to implement the Thin Client capability.
These components are:
Data Server
The Data Server is built-in to the IWS runtime. The Data Server has direct access to the IWSProject Tags Database (runtime) and is responsible for working with ISSymbol to make sureany Tag data being displayed on a Web page at any Thin Client is updated with the latestvalue(s).
IWS can support a backup or secondary Data Server that will be used should the Primary DataServer become unavailable. The Thin Client will automatically switch over to the Secondarywithout user intervention required.
Web Server
The Primary Web Server is responsible for providing Web pages on demand (i.e., whenrequested by the Client) through navigation to various project screens by the Thin Client. TheWeb Server communicates with the Thin Client via HTTP protocol over TCP/IP. SSL (SecureSocket Layer) encrypted communications can be enabled. The Web Server does not need toreside on the same PC as the IWS runtime project. In fact, the Web Server could be a non-Windows corporate Web Server. However, the Web Server needs to have access to the HTMLfiles that are the project Web pages.
IWS supports a Secondary Web Server that will be automatically switched to (by the Client) incase the Primary Web Server becomes unavailable.
Web Browser
The Web Browser is located on the Thin Client PC and provides the graphical interface functionwith the user. Web pages (HTML) is passed to the browser via demand ("pull") and data is"pushed" to the browser by the Data Server whenever a Tag or Tags referenced on the Screendisplayed on the Web Client is updated in the Tag Database.
ISSymbol
ISSymbol is a InduSoft-provided ActiveX Control that facilitates the interaction between thebrowser on the Web Client and the Web Server as well as the Data Server. There are ISSymbol
ActiveX Control versions for Windows XP/Vista/7 and all Windows Embedded platforms.
The ISSymbol ActiveX Control is used for both the Internet Explorer-based and Secure Viewer-based browsers.
Web Tunneling Gateway
The (Primary) Web Tunneling Gateway is a bridge between the Web Server and the Data

8/22/2019 User Guide Indu Soft
http://slidepdf.com/reader/full/user-guide-indu-soft 608/1279
Server that is used in one of two situations. The first is whenever data security is required(e.g., IWS data exchanged with the Thin Client needs to be encrypted). The second situation iswhen the Data Server is "hid" behind a corporate firewall, and only the Web Server IP address(or URL) is exposed.
IWS supports a backup (Secondary) Web Tunneling Gateway to be used if the Primary WebTunneling Gateway becomes unavailable. The Thin Client will automatically switch over to thesecondary Web Tunneling Gateway.
The Web Tunneling Gateway is automatically installed when InduSoft Web Studio is installed onyour PC if the installation program detects that IIS is present.
Note:
The Web Tunneling Gateway is automatically installed if IIS is detected during theinstallation process. Otherwise, it must be manually installed.
The main function of the Web Tunneling gateway is to encapsulate data packets in HTTP orHTTPS for communication through a firewall.
InduSoft Web Studio v7.0 Technical ReferenceCopyright © 2003–2010 Indusoft, Inc.

8/22/2019 User Guide Indu Soft
http://slidepdf.com/reader/full/user-guide-indu-soft 609/1279
ISSymbol Control LayerISSymbol is a component designed by InduSoft that is able to display the screens created with IWSin the Web browser and exchange data (tag values and history data) with the TCP/IP server moduleof the project. On the Thin Client station, the Web browser (e.g., Internet Explorer) is the containerthat hosts the ISSymbol control.
ISSymbol works as a control layer between the project and the Web browser — equivalent to theJava Virtual Machine for Java-based applications. This approach provides a high level of securitybecause ISSymbol does not allow the project to access the operating system directly.
When the Web browser downloads the HTML page specified by the user, it checks for ISSymbolcontrol registration on the current computer. If it does not find it, the browser attempts to downloadregistration from the URL specified in the project settings (Thin Client on the Project tab of theribbon). The Web browser is not able to display the screens from the project if the ISSymbol controlis not properly registered in the Thin Client station.
CAUTION:Make sure your Web browser is enabled to download signed ActiveX controls, in order
to download ISSymbol automatically. Otherwise, you will need to register ISSymbol
manually in the Thin Client station. Check your Web browser's documentation about
security settings if you have questions about how to configure these settings.
Manually Installing the ISSymbol Control
You can also install the ISSymbol control manually in the Thin Client station. The procedure to installISSymbol in each operating system is described below:
Windows PC
Copy the following files…
[…]\InduSoft Web Studio v7.0\Bin\ISSymbolReg.exe
[…]\InduSoft Web Studio v7.0\Bin\ISSymbolVM.cab
…into any directory of the Thin Client station. Make sure that both files are stored in the samedirectory.
1.
Run ISSymbolReg.exe to register the ISSymbol control on the PC.2.
Windows Embedded
Determine the OS version and processor type of the Windows Embedded device, and then findthe corresponding redistribution folder in the IWS program directory:
1.
[…]\InduSoft Web Studio v7.0\Redist\CE_version\ processor_type\Bin\
For example, for a MIPS IV processor running Windows CE 5.0 or later:

8/22/2019 User Guide Indu Soft
http://slidepdf.com/reader/full/user-guide-indu-soft 610/1279
[…]\InduSoft Web Studio v7.0\Redist\WinCE 5.0\MIPSIV\Bin\
From that directory, copy the following files…
IndHTTP.dll
IndVkStd.dll
ISSymbolCE.ocx
…and one of the following Virtual Keyboard layouts…
VKEN.ini (for English)
VKGE.ini (for German)
…into any directory in non-volatile memory on the Windows Embedded device. Make sure thatall files are stored in the same directory.
2.
At the Windows command prompt, execute the following command:3.
regsvrce.exe "\ISSymbol directory \ISSymbolCE.ocx"
For example:
regsvrce.exe "\Storage Card\ISSymbolCE.ocx"
Save the registry settings to keep ISSymbolCE.ocx registered when you reboot the WindowsEmbedded device.
4.
Windows Mobile / Pocket PC
Follow steps 1 and 2 of the instructions for Windows Embedded (above).1.
Run the programRegSvrCE.exe
on the Windows Mobile device. While in the program, do the
following:
Locate the file ISSymbolCE.ocx in the directory to which you copied it.a.
Select the Register option.b.
Click OK.c.
2.
Tip: Your Windows Mobile device may not come with the program RegSvrCE.exe, because such
consumer devices (i.e., smartphones and PDAs) are typically not meant to be used like this. If you need to acquire this program — or VBScript.dll, which is also left off most Windows Mobile
devices — then please contact Customer Support.
How It Works
After you open the Web browser, you must type the URL for one web page available in the WebServer station (e.g., http://127.0.0.1/main.html ) into the Address field. At this point, the Thin Clientexecutes the following process:

8/22/2019 User Guide Indu Soft
http://slidepdf.com/reader/full/user-guide-indu-soft 611/1279
The Web browser downloads the HTML page of the screen you specified.1.
The Web browser checks for ISSymbol control registration in the local computer. If it does notfind it, the Web browser attempts to download the ISSymbol component from the URLconfigured in the project (settings saved in the HTML page). Since the ISSymbol control isproperly registered in the Thin Client station, the Web browser loads it.
From this point on, ISSymbol takes over the communication with the server station, and theWeb browser is used only as a host for ISSymbol.
2.
ISSymbol connects to the data server. You configure the data server IP Address in the projectsettings (Thin Client on the Project tab of the ribbon). This setting is embedded in the HTMLpage.
3.
ISSymbol prompts a window on the Thin Client, asking for the User Name and Password. Thedata you enter is codified by Binary Control and sent to the server. The server station checksthe validity of the data and whether you have the rights to open the startup screen. If so, theprocess continues. If not, you are prompted with an error message indicating that the UserName and Password are invalid. In this case, the process will not continue.
Note: Step 4 is skipped if the Security System is disabled during the configuration of theproject.
4.
ISSymbol downloads the necessary files to display the screen specified by the user (screen files,tags database, translation files and so forth).
5.
ISSymbol connects to the data server and reads the value of the tags that are displayed in thescreen you specified.
6.
ISSymbol displays the screen on the Web browser and keeps updating the objects according tothe values read from the server. Whenever the value of any tag displayed on the openscreen(s) changes on the server, the new value is sent to the Thin Client (and vice-versa).
Therefore, there is no pooling between the Thin Client and the server station. This methodincreases the communication performance and optimizes the traffic in the network.
7.
Notice that there are two servers in this process:
Web server (HTTP Server): Provides the files from the server to the Thin Client via HTTPprotocol over TCP/IP.
Data server (TCP/IP Server module from IWS): Provides tag values and/or history data fromthe project running on the server to the Thin Client station(s).
Although both servers are usually running in the same computer, IWS provides the flexibility to runeach server in a different station, if necessary. See Web-based application typical architectures forfurther information.
InduSoft Web Studio v7.0 Technical ReferenceCopyright © 2003–2010 Indusoft, Inc.

8/22/2019 User Guide Indu Soft
http://slidepdf.com/reader/full/user-guide-indu-soft 612/1279
Examples of Client/ServerArchitectureThis section describes some example architectures applied for web-based solutions and provides
information on how to configure the project for each architecture. This section does not describe allpossible architectures, but it provides the concepts necessary to design and configure differentscenarios based on the basic architectures illustrated below
The Web Settings are configured by the Web tab of the Project Settings dialog. To open this dialog:on the Project tab of the ribbon, in the Web group, click Thin Client . By pressing the Advancedbutton, you access additional settings. The following pictures illustrate these dialoges:

8/22/2019 User Guide Indu Soft
http://slidepdf.com/reader/full/user-guide-indu-soft 613/1279
The following table describes the meaning of the main Web settings illustrated in the above dialoges:Data Server IP Address
When the Web Tunneling Gateway is disabled : The Thin Client Control (ISSymbol) uses the DataServer IP Address to connect to the IWS TCP/IP Server Task.
When the Web Tunneling Gateway is enabled : The Web Tunneling Gateway uses the Data Server IPAddress to connect to the IWS TCP/IP Server Task.
Secondary Data Server IP AddressSame as the Data Server IP Address. However, the Secondary IP Address is used only when theconnection with the Data Server IP Address fails.
Web Tunneling Gateway IP AddressThe Thin Client Control (ISSymbol) uses the Web Tunneling Gateway IP Address to connect to theWeb Tunneling Gateway.Web Tunneling Gateway Secondary IP Address
Same as the Web Tunneling Gateway IP Address. However, the Web Tunneling Gateway SecondaryIP Address is used only when the connection with the Web Tunneling Gateway IP Address fails.
Setting Description
The Secondary addresses can be used in the following scenarios:
When the Thin Clients can connect to either one of two redundant Servers (Web or Data); orWhen the Thin Clients can connect to the Server through the Intranet (LAN – Local AreaNetwork) or through the Internet (WAN – Wide Area Network). In this case, the Primaryaddresses should be configured based on the network used more often by the Thin Clients. Inthe following examples, the LAN addresses are used as Primary and the WAN addresses areused as Secondary.

8/22/2019 User Guide Indu Soft
http://slidepdf.com/reader/full/user-guide-indu-soft 614/1279
The following table describes the meaning from some terms used in the next examples:LANLocal Area Network (for example, Intranet)WANWide Area Network (for example, Internet)Server
Station where the following components are running:
IWS (TCP/IP Server task)
Web Server (for example, Internet Information Services from Microsoft – IIS)
Web Tunneling Gateway for IIS (if enabled)
Although IWS does not need to run in the same station where the other components are running, thefollowing examples assume that it is.
Thin Client LANThin Client station (Web Browser + ISSymbol control) that connects the Server via the LAN.Thin Client WAN
Thin Client station (Web Browser + ISSymbol control) that connects the Server via the WAN.IP_SERVER_LANIP Address of the Server on the LAN.IP_SERVER_WANIP Address of the Server on the WAN.IP_ROUTER_LANIP Address of the Router on the LAN.IP_ ROUTER_WANIP Address of the Router on the WAN.ScreenNameName of the project screen, saved as HTML, that is open on the Thin Client station.
Term Description
Example 1: Web Server and Thin Client in the same Intranet (LAN)
Figure 1.
This is the very common architecture, as well as the simplest to configure. In this architecture, both

8/22/2019 User Guide Indu Soft
http://slidepdf.com/reader/full/user-guide-indu-soft 615/1279
the Web Server (e.g., Microsoft IIS) and the Data Server (i.e., the IWS TCP/IP Server module) arerunning on the same PC. The Thin Client connects to the Web Server to download the HTML screenfile(s). Then it connects to the Data Server to exchange data with the IWS runtime project. Sinceboth the Thin Client and the Server station are connected to the same network, the Thin Client canaccess the Server station directly through its IP address (or host name).
Configuration :Data Server IP Address
IP_SERVER_LANIP_SERVER_LAN
Secondary Data Server IP Address--Web Tunneling Gateway IP AddressIP_SERVER_LAN-Web Tunneling Gateway Secondary IP Address--
Setting WTGEnabled
WebGateway
Disabled
Note:
URL From Thin Client LAN: http://IP_SERVER_LAN/ScreenName.html
Home directory of the web server (HTTP server) on the server station: Web sub-folder of
the project
Example 2: Web Server with Intranet (LAN) and Internet (WAN)Connections
Figure 2.

8/22/2019 User Guide Indu Soft
http://slidepdf.com/reader/full/user-guide-indu-soft 616/1279
This architecture has both the Web Server (e.g., Microsoft IIS) and the Data Server (i.e., the IWSTCP/IP Server module) running on the same PC. Thin Clients can connect to the Server througheither an Intranet (LAN) connection to the Server or an Internet (WAN) connection to the Server
(e.g., two different Ethernet ports).
Configuration :Data Server IP AddressIP_SERVER_LANIP_SERVER_LANSecondary Data Server IP AddressIP_SERVER_LANIP_SERVER_WANWeb Tunneling Gateway IP AddressIP_SERVER_LAN
-
Web Tunneling Gateway Secondary IP AddressIP_SERVER_WAN-
Setting Web
Gateway
Enabled
Web
Gateway
Disabled
Note:
URL From Thin Client LAN: http://IP_SERVER_LAN/ScreenName.html
URL From Thin Client WAN: http://IP_SERVER_WAN/ScreenName.htmlHome directory of the Web Server (HTTP server) on the Server station: Web sub-folder of
your project folder
You must assign a Fixed IP address to the Web Server on the Internet (WAN), and theproject must be running in this Server. Consult your ISP provider or IT department forfurther information about how to get a Fixed IP address for your Server.

8/22/2019 User Guide Indu Soft
http://slidepdf.com/reader/full/user-guide-indu-soft 617/1279
Example 3: Web Server with Intranet (LAN) and Router Internet (WAN)Connections
Figure 3.
This architecture has both the Web Server (e.g., Microsoft IIS) and the Data Server (i.e., the IWSTCP/IP Server module) running in the same PC. Thin Clients can connect to the Server through eitheran Intranet (LAN) connection or an Internet (WAN) connection. There is a Router between theIntranet (LAN) and the Internet (WAN).
Configuration :Data Server IP AddressIP_SERVER_LANIP_SERVER_LANSecondary Data Server IP AddressIP_SERVER_LANIP_ROUTER_WANWeb Tunneling Gateway IP AddressIP_SERVER_LAN-Web Tunneling Gateway Secondary IP AddressIP_ROUTER_WAN-
Setting Web
Gateway
Enabled
Web
Gateway
Disabled
Note:
URL From Thin Client LAN: http://IP_SERVER_LAN/ScreenName.html
URL From Thin Client WAN: http://IP_ROUTERR_WAN/ScreenName.html
The Router must be configured to forward the TCP Port(s) from its public IP(IP_ROUTER_WAN) to the Server private IP (IP_SERVER_LAN).

8/22/2019 User Guide Indu Soft
http://slidepdf.com/reader/full/user-guide-indu-soft 618/1279
If the Web Gateway is enabled , only the HTTP Port (80, by default) or the HTTPS Port(SSL Port 443, by default) must be forwarded from IP_ROUTER_WAN to theIP_SERVER_LAN.
If the Web Gateway is disabled , both the HTTP Port (80, by default) and the StudioTCP/IP Server Port (1234, by default) must be forwarded from IP_ROUTER_WAN to theIP_SERVER_LAN. Consult the Router documentation for further information about how toconfigure Port Forwarding on it.
Home directory of the Web Server (HTTP server) on the Server station: Web sub-folder of
your project folder
You must assign a Fixed IP address to the Router on the Internet (WAN), and the projectmust be running in this Server. Consult your ISP provider or IT department for furtherinformation about how to get a Fixed IP address for your Server.
InduSoft Web Studio v7.0 Technical ReferenceCopyright © 2003–2010 Indusoft, Inc.

8/22/2019 User Guide Indu Soft
http://slidepdf.com/reader/full/user-guide-indu-soft 619/1279
Configuring the Data ServerIWS has a couple dialoges that are used for configuration of the Data Server and the Web Serverconfiguration to be used. This information is embedded in the HTML web pages that correspond thescreens. The Data Server is part of the IWS runtime project and uses the TCP/IP Server module.There are three (3) basic steps to this configuration:
Step 1: Web Settings dialog configuration
On the Project tab of the ribbon, in the Web group, click Thin Client.1.
In the Data Server IP Address field, type the IP address of the PC where the runtime projectwill reside.
2.
Check the checkboxes for Auto Screen Scaling, Enable File Compression and Enable
Tooltips. If you want to disable the Web Client from issuing commands to the Server, checkthe Disable Remote Client Commands checkbox.
3.
If the Web Client is to use a Virtual Keyboard, check the Virtual Keyboard checkbox and any4.

8/22/2019 User Guide Indu Soft
http://slidepdf.com/reader/full/user-guide-indu-soft 620/1279
additional settings for the Virtual Keyboard at the Thin Client.
By clicking on the Advanced button, you can define a backup URL (i.e., backup Website forweb pages) and a Secondary Data Server IP address. This is for a redundant Web Server and/ora redundant Data Server, respectively. Web Tunneling can also be enabled in this dialog. TheURL for the ISSymbol OCX can also be defined if it is not found on the Web Server.
5.
By clicking on the IP Security button, you can define a range of IP addresses that will beaccepted by the Data Server. If a request for data comes from an IP address outside of thedefined ranges, the request will not be acknowledged. This is an Embedded Firewall function.
6.

8/22/2019 User Guide Indu Soft
http://slidepdf.com/reader/full/user-guide-indu-soft 621/1279
Step 2: Communication Settings dialog configuration
On the Project tab of the ribbon, in the settings group, click Communication.1.
Enter the Port number (1234 is the default) for the Data Server. You can also define the DataSend Period (i.e., time period for updated communication of data values to the Web Client).
2.
Optionally enable Binary Control of the data. It is more secure, but is slower. The default isdisabled.
3.
Step 3: Enable the TCP/IP task
On the Home tab of the ribbon, click Tasks (local or remote, depending on the project's targetsystem).
1.

8/22/2019 User Guide Indu Soft
http://slidepdf.com/reader/full/user-guide-indu-soft 622/1279
Be sure the TCP/IP Server is set to Automatic. This should be the default state, but can bemanually configured by selecting the Startup button.
2.
Be sure the TCP Port number is properly set (see Communication Settings above), otherwisethe TCP/IP Server will start then stop.
3.
Note:
This configuration information (from Step 1 & 2) gets embedded in the Web Pagesgenerated from the IWS development environment when you Save As HTML.
If you change any of these settings, you MUST run the Verify Project tool.
Using the SetWebConfig Function
The SetWebConfig() built-in function allows the developer to programmatically configure the DataServer and Web Client configuration, and the resulting configuration settings are automaticallyupdated in your project's HTML files (located in the Web sub-folder). This function always runs on the
IWS Server, and works in both a Windows and Windows Embedded environment.
For more information, see SetWebConfig() function.

8/22/2019 User Guide Indu Soft
http://slidepdf.com/reader/full/user-guide-indu-soft 623/1279
Configuring the Web Server to Support IE and Secure Viewer
IWS is capable of supporting both Interned Explorer (IE)-based browsers and Secure Viewer-basedbrowser at the same time. To do this however, you need to take some care in how you configureyour system.
From the Web-server side
All HTML files go into the project Web sub-folder.
Configure your Web Server (e.g., IIS) to have its root folder point to the project folder.
Put ISSymbolVM.cab in the project folder if an Internet connection to InduSoft's Web site is notavailable and the ISSymbol ActiveX control is not installed on the IE-based Web Client.
From the Web-Client side
The Secure Viewer-based browser should be configured to point to the .APP file in the projectfolder
The IE-based browser should have as an initial URL something like as follows:
http://192.168.1.100/Web/startup.html
…where startup.html is your startup web page.
InduSoft Web Studio v7.0 Technical ReferenceCopyright © 2003–2010 Indusoft, Inc.

8/22/2019 User Guide Indu Soft
http://slidepdf.com/reader/full/user-guide-indu-soft 624/1279
Configuring a Web server to hostyour project pages
As part of deploying your IWS project over the Web, you must configure a Web server to host yourproject screens.
You are not required to use a Windows PC or a Windows Embedded device to host your projectpages. The pages are essentially static files waiting to be downloaded; all runtime processing ishandled by the project viewer (i.e., Internet Explorer with ISSymbol installed, or Secure Viewer) onthe Thin Client. As such, you can use any standards-compliant Web server on any computer platformto host your pages.
For example, if you already have a Unix-based intranet server, then you can copy your project's Web
sub-folder (or whatever folder in which you've saved your project pages) to the server and have yourThin Clients point to that server's address.
Please note, however, that the Web server you choose may not be robust enough to serve yourproject in a production environment and/or it may not support all features of InduSoft Web Studio. If you want to use these features, then in most cases you should use Microsoft IIS as described below.Specifically:
To support Mobile Access (SMA), the server must be able to process Collaborative Data Objects(CDO) and Active Server Pages (ASP); and
To support Web Tunneling Gateway (WTG), the server must allow Internet Service API (ISAPI)extensions.
Before you install and configure any software, please review its documentation thoroughly.
Tip: A Web server typically operates on, or "listens to," a computer's TCP/IP port 80. Only onerunning process can listen to a given port, so if another process on your computer — forexample, some third-party SCADA software — is already listening to port 80, then it and theWeb server process may conflict with each other. You must either configure one of the processesto listen to a different port or use Task Manager to end the conflicting process. If you cannotidentify the conflicting process, then in Windows, open Command Prompt and enter the following
command to get a list of all networking processes:
netstat -a -o
NTWebServer and CEWebServer
NTWebServer and CEWebServer are lightweight, zero-configuration Web servers included free withInduSoft Web Studio. You can use them to demonstrate your project and run basic tests withoutmaking the financial and technical investment in a full-featured Web server. However, they are not

8/22/2019 User Guide Indu Soft
http://slidepdf.com/reader/full/user-guide-indu-soft 625/1279
robust and they do not support SMA or WTG. For real-world applications, we recommend that youuse Microsoft IIS as described below.
NTWebServer can be run on any supported Windows PC, and it can be found in the IWS programdirectory at […]\InduSoft Web Studio v7.0\Bin\NTWebServer.exe. Copy it to your project's Web
sub-folder before you run it; it must be located in the same folder as the pages it will serve. After yourun it, that folder becomes the top level (or "home" directory) of the Web site.
CEWebServer can be run on any supported Windows Embedded device, and it can be found in theIWS program directory at […]\InduSoft Web Studio
v7.0\Redist\CE_version\CE_processor \CEWebServer.exe. Assuming you've already copied yourproject's Web sub-folder to the device's non-volatile memory, copy CEWebServer.exe to the same
folder and then run it. Again, that folder becomes the top level of the Web site.
Note: Both NTWebServer and CEWebServer must run as normal programs; they cannot run asWindows services.
Microsoft IIS
Internet Information Services (IIS) is the full-featured server software that is bundled with WindowsServer and "professional" versions of Windows:
Table 1. Versions of IIS
Version of Windows Version of IIS Notes
Windows XP Professional IIS 5.1 Maximum of 10 simultaneous connections.
Windows Server 2003
Windows XP Professional x64Edition
IIS 6.0 No limit on connections.
Windows Server 2008
Windows Vista (most versions)
IIS 7.0 No limit on connections.
Windows Server 2008 R2
Windows 7 (all versions)
IIS 7.5 No limit on connections.
Windows CE and WindowsMobile 5.0 and later
IIS for CE .NET Must be included in Platform Builder. Default ismaximum of 10 simultaneous connections.
IIS supports all features of InduSoft Web Studio and it is robust enough to serve almost any IWSproject in a production environment. It's the Web server that we recommend for most users.However, to properly install and configure it, you should be experienced with administering Windowson a network.
For the sake of system security, IIS is turned off by default when the operating system is installed.To turn it on, use the Windows Features dialog (in Windows 7, Control Panel > Programs >Programs and Features > Turn Windows features on or off ):

8/22/2019 User Guide Indu Soft
http://slidepdf.com/reader/full/user-guide-indu-soft 626/1279
Figure 1. Turning on IIS in the Windows Features dialog
If you want to use SMA and/or WTG in your IWS project, then make sure ASP and ISAPI Extensionsare also turned on:
Figure 2. Turning on ASP and ISAPI Extensions in the Windows Features dialog
Once IIS is turned on, you can use Administrative Tools (in Windows 7, Control Panel > System
and Security > Administrative Tools) to configure it. For more information, please refer toMicrosoft's extensive documentation.

8/22/2019 User Guide Indu Soft
http://slidepdf.com/reader/full/user-guide-indu-soft 627/1279
Apache for Windows
If IIS is not available to you or if you choose not to use it, then the second most popular Web serverfor Windows is the open-source Apache. However, it requires even more expertise than IIS toproperly install and configure, so please review the documentation thoroughly before you attempt it.
InduSoft Web Studio v7.0 Technical ReferenceCopyright © 2003–2010 Indusoft, Inc.

8/22/2019 User Guide Indu Soft
http://slidepdf.com/reader/full/user-guide-indu-soft 628/1279
Configuring the Web TunnelingGateway
Thin Clients are commonly connected to the Web Server via the Internet. However, the DataServer(s) (PC where the IWS is running) is often not directly connected to the Internet. In this case,the Data Server computer does not have an IP address recognized on the internet. Therefore, theData Server cannot be connected directly through the Internet.
The Web Tunneling Gateway (WTG), developed by InduSoft, provides the routing capabilities to solvethis problem. The WTG must be installed in the PC with the Fixed IP Address on the Internet.Generally, this is the Web Server. Consult your ISP provider for further information about how to geta Fixed IP Address for your PC on the Internet. The PC where the WTG is running must have theMicrosoft IIS Web Server installed and running. The WTG is an ISAPI extension for IIS.
The Web Tunneling Gateway also provides the ability to encapsulate the data packets between theData Server and the Web Client in HTTP or HTTPS.
Follow the procedure below to install the WTG on the Web Server computer:
Copy the WebGtw.exe file from the \BIN sub-folder of IWS into any directory of the webserver computer.
1.
Execute the WebGtw.exe file on the web server computer.2.
The WTG works as a router between the Thin Clients (connected to the Internet) and the Data ServerPC (connected to the Intranet). The same WTG can route information for more than one Data Server
simultaneously.
InduSoft Web Studio v7.0 Technical Reference
Copyright © 2003–2010 Indusoft, Inc.

8/22/2019 User Guide Indu Soft
http://slidepdf.com/reader/full/user-guide-indu-soft 629/1279
Configuring the Thin ClientIWS supports two types of Web Browsers for use with Thin Clients; Microsoft Internet Explorer, whichsupports ActiveX Controls, and the InduSoft-developed Secure Viewer. Both browsers can use usedconcurrently with the Web Server, and the choice of browser depends on the project requirements.The Secure Viewer is targeted at plant floor use, while the Internet Explorer browser is generallymore appropriate for desktop applications or where the Thin Client needs to connect to differentproject servers.
Configuring Microsoft Internet Explorer
There is really very little that needs to be done to configure Microsoft Internet Explorer to be used asa Web Browser for a Thin Client. The primary items are:
Make sure ActiveX Controls are enabled.
The settings to control this are generally found in Tools > Internet Options > Security. Clickon the Custom Level button and be sure to allow the ISSymbol ActiveX Control to be installed,then you can return to a higher security level. (Otherwise, be sure to install the ISSymbolActiveX Control manually).
Be sure VBScript is supported on your PC. This is generally not an issue with desktop PCs, but itcan be an issue on Windows Embedded devices. You will need to be sure the VBRun.dll isinstalled and registered on your PC.
If you are going to use Microsoft Internet Explorer as your Web browser for Thin Client projects, youmay want to remove some navigation bars and buttons to reduce the amount of space taken up bythese items.
You can create an icon on the desktop that is a shortcut to your startup web page on the Web
Server. This will take you to the web page when you click on the icon. Additionally, you can put thisshortcut in the Startup folder so that the Web page is automatically started whenever the browser isstarted.
Installing the Secure Viewer
Installing on Windows PC
You will need to install the Secure Viewer from your CD (or download from the InduSoft Web site).Follow the following steps:
Request the Secure Viewer installer from your software vendor, save it to the designatedcomputer, and start it.
1.
Follow the instructions of the installation wizard. There are only two settings that must beconfigured during installation:
URL: Enter the URL or filepath of the project file ( project_name.app) on the Web Server.
Server IP: Enter the IP address or hostname of the Data Server (a.k.a. TCP/IP Server).
2.

8/22/2019 User Guide Indu Soft
http://slidepdf.com/reader/full/user-guide-indu-soft 630/1279
Finish the installation and click Finish to close the installer.3.
The installation wizard automatically installs and registers the Thin Client ActiveX component(ISSymbol.ocx), so if you have correctly configured the URL and Server IP settings, then the SecureViewer should be ready to go.
Note: For additional security of the runtime environment, add a shortcut to the Secure Viewer(Viewer.exe) to the Startup directory in Windows. Viewer.exe will install into the \Bin sub-folderwhere the IWS program installs.
Installing on Windows Embedded
You can also install the Secure Viewer on a Windows Embedded device, by copying the necessary filesto the device's non-volatile memory. To install Secure Viewer:
Determine the OS version and processor type of the Windows Embedded device, and then findthe corresponding sub-folder in the IWS program directory. For example, for Windows CE 5.0running on a MIPS processor, find the […]\InduSoft Web Studio v7.0\Redist\WinCE
5.0\MIPS\Bin sub-folder.
1.
Select the following files in the sub-folder:
IndVkStd.dll
ISSymbolCE.ocx
Tagi.bin
Viewer.exe
ViewerCfg.exe
2.
Copy the files to non-volatile memory on the Windows Embedded device.3.
Register the ISSymbol control on the Windows Embedded device by executing the followingcommand from the Prompt window:
4.
regsvrce.exe "\ISSymbolPath\ISSymbolCE.ocx"
Example:
regsvrce.exe "\Storage Card\ISSymbolCE.ocx"
Save the registry settings to keep ISSymbolCE.ocx registered when you reboot the WindowsEmbedded device.
Tip: Check the device manufacturer's documentation for how to save the registry settings.
5.
Start the Secure Viewer by running Viewer.exe.6.
Changing the Secure Viewer Configuration

8/22/2019 User Guide Indu Soft
http://slidepdf.com/reader/full/user-guide-indu-soft 631/1279
After initial installation, the configuration of the Secure Viewer is saved in the viewer.ini file, whichshould be in the same directory as Viewer.exe. (This should be in the \Bin sub-folder where theSecure Viewer program is installed). There are two ways to change the configuration of the SecureViewer after it has been installed. First, you can run the Viewer configuration utility (ViewerCfg.exe)that was also installed.
Figure 1.
Note: On WIndows Vista and Windows 7, the Secure Viewer configuration utility must haveAdministrator privileges to run properly. It should be installed with those privileges by default,but if you still have problems, then check the file properties for ViewerCfg.exe and make sure
Run as Administrator is selected.
The configuration utility provides the following options:
Save button: Immediately save the current settings to a viewer.ini in the same directory asthe ViewerCfg.exe utility.
Import button: Load a viewer.ini file from another directory.Export button: Save the viewer.ini file to another directory.
Data Server IP field: Enter the IP address (or host name) of your data server station.
The data server station is the computer or device where the TCP/IP Server module is running.
TCP Port field: Enter the port number of the Data Server, if it is different than the default portof 1234.
URL field: Enter the URL or filepath of the project file (*.app) on the Web Server.
Enable Splash Window option: Check (enable) this option to see a splash window when youstart the Secure Viewer.
Enable Progress Bar option: Check (enable) this option to see a progress bar while the Secure
Viewer loads the project file.
Advanced button: Click to access additional configuration options:
Figure 2. Secure Viewer Configuration Utility — Advanced Settings

8/22/2019 User Guide Indu Soft
http://slidepdf.com/reader/full/user-guide-indu-soft 632/1279
Secondary Data Server IP field: Type the IP address (or host name) of the secondarydata server station. If the primary data server fails, the Secure Viewer will attempt toconnect to the secondary data server automatically.
Backup URL field: Type the URL of the backup location of the project file.
Date Format: Adjust the date format on the Secure Viewer station to match the DataServer. This is to maintain compatibility with any Alarm/Event Control or Trend Controlobjects that you have in your project.
Timeout for switching stations field: Enter the number of seconds that the SecureViewer should wait before attempting to connect to the secondary Server, in the eventthat the primary Server fails. (For more information, see Web tab.)
Log on as Guest option: Check (enable) to have the Secure Viewer automatically log onas Guest, eliminating the need to enter a Username or Password.
Disable Commands option: Check (enable) to prevent the Secure Viewer from sendinguser commands back to the Server. It will only display current information from theServer.
Web button: If you have configured a Web Tunneling Gateway to bridge your intranet tothe Internet, then enter the addresses for the gateway here.
The second way to change the configuration of the Secure Viewer is to manually edit the viewer.ini
file with a text editor. The structure of the file is as follows:
[Options]
nosplash= // Enable (0) or disable (1) the splash window
noprogressbar= // Enable (0) or disable (1) the progress bar
ds1= // Data Server Primary
ds2= // Data Server Secondary
dsp= // Data Server Port
wtg1= // Web Tunneling Gateway Primary
wtg2= // Web Tunneling Gateway Secondary
url= // URL from project file (*.app)
proxyip= // Proxy Address
proxyp= // Proxy Port
ceemul= // Enable (1) or disable (0) CEView emulation

8/22/2019 User Guide Indu Soft
http://slidepdf.com/reader/full/user-guide-indu-soft 633/1279
Example
PC with IWS runtime project (has both Web Server (NTWebServer or IIS) and Data Server):
IP Address is 192.168.1.106
Project name is SecureViewerTest
Project file is SecureViewerTest.app
Secure Viewer configuration dialog:
Data Server IP = 192.168.1.106
TCP Port = 1234
URL = http://192.168.1.106//SecureViewerTest.app
Alternatively, you could edit the viewer.ini file:
[Options]
url=http://192.168.1.106//SecureViewerTest.app
noprogressbar=1
ds1=192.168.1.106
nosplash=1
ds2=
dsp=1234
wtg1=
wtg2=
user=Guest
[OEM]
Splash=Splash.bmp //this is a splash screen
Note:
Your InduSoft Web Studio runtime license must support a Secure Viewer (Thin Client)otherwise the connection to the Data Server will be refused.
Be sure to put NTWebServer in your project folder (not Web sub-folder) or point IIS to your
project folder.
InduSoft Web Studio v7.0 Technical Reference
Copyright © 2003–2010 Indusoft, Inc.

8/22/2019 User Guide Indu Soft
http://slidepdf.com/reader/full/user-guide-indu-soft 634/1279
Implementing Security for Web-based ApplicationsThere are various methods for implementing security of Web-based applications. The approach that you
require can depend on a number of factors, and may involve one or more methods of implementingSecurity.
Method 1: Password Protection
IWS provides the ability to create Groups of Users and individual Users within a Group. Each Group (e.g.,Operators, Supervisors, Maintenance) can have different security levels and access different levels of functionality. Individual passwords can be configured for each User.
Figure 1. Security Groups and Users
In addition, Groups can have advanced settings, allowing features like minimum password size, passworaging, e-signature on Objects with Command animations, Account Auto-lockup (e.g., lock up after anumber of invalid attempts to access), and User Account blocking (temporarily disable – e.g., when
employee is on vacation).
Figure 2.

8/22/2019 User Guide Indu Soft
http://slidepdf.com/reader/full/user-guide-indu-soft 635/1279
If System Security is enabled, these Password Protection features are also available at the Thin Clientstation. When a User at a Thin Client station attempts to connect to the Web Server, they will be promptfor a User Name and a Password. If either is invalid, the User will not be let on to the system.
Figure 3. Log On dialog
Within a project, the various screen objects and their animations, and Screen access can have a securitylevel assigned to it. The current User logged on must have a access level range which matches the desireObject or Screen. The following is a representative method of assigning security access levels by Group.

8/22/2019 User Guide Indu Soft
http://slidepdf.com/reader/full/user-guide-indu-soft 636/1279
For more information, see Security .
Method 2: Disabling Thin Client Commands
IWS allows bi-directional data exchange between the Thin Client and the Data Server. However, forsecurity reasons it may be advantageous to only allow the Thin Client to view the process or machinedata, and not send any data back to the Data Server.
Selecting (checking) the Disable Remote Client Commands option in the project settings (Thin Clien
on the Project tab of the ribbon) ensures that all commands coming from a Thin Client station are blockeThe communication becomes unidirectional (from the Server to the Thin Clients):
Figure 4. Project Settings — Web tab

8/22/2019 User Guide Indu Soft
http://slidepdf.com/reader/full/user-guide-indu-soft 637/1279
Method 3: Embedded Firewall
This feature allows the user to filter access to the project based on the Thin Clients IP Address. When aThin Client attempts to connect to the Server station, the Server checks if the IP Address of the Thin Clie
station is authorized to access the project. The ranges of authorized IP Addresses can be configured in thServer station by clicking IP Security in the project settings (Thin Client on the Project tab of theribbon):
Figure 5. IP Security dialog

8/22/2019 User Guide Indu Soft
http://slidepdf.com/reader/full/user-guide-indu-soft 638/1279
Figure 6. Access allowed by IP address
Method 4: Encrypted Communications (SSL)
By enabling the Web Tunneling Gateway (WTG), you can enable all communications between the DataServer + Web Server and the Thin Client to be encrypted using RC6, a highly-secure 128-bit encryptionstandard. To use SSL, you must do the following:
Click Advanced in the project settings (Thin Client on the Project tab of the ribbon). Select (checthe Web Tunneling Gateway Enabled option. Click on the SSL radio button and be sure the SSLport is set to 443. Click OK .
Figure 7. Project Settings — Web — Advanced dialog
1.
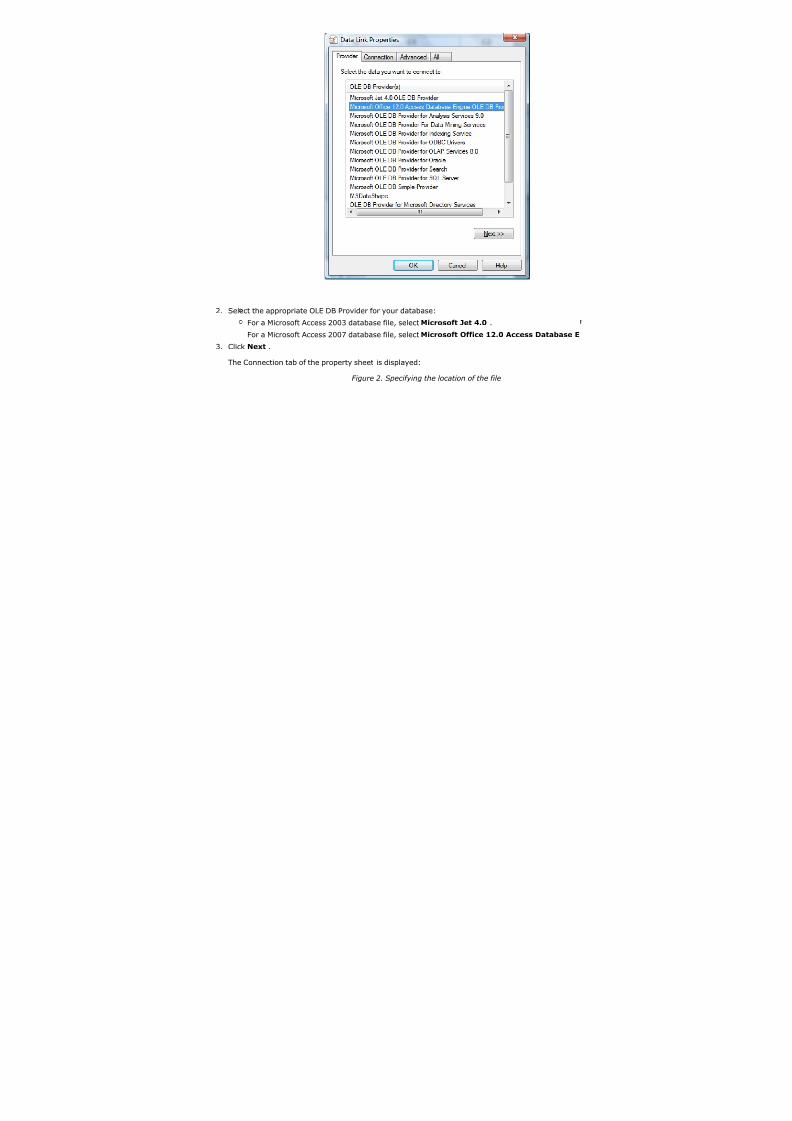
8/22/2019 User Guide Indu Soft
http://slidepdf.com/reader/full/user-guide-indu-soft 639/1279
In your Web Server, be sure SSL capabilities are enabled and that a SSL Certificate of Authenticatiois present.
2.
Be sure SSL is enabled in the Web Client3.
Set up all other Web configurations to support the WTG.4.
Method 5: VPN
A VPN is a Virtual Private Network. It is called virtual since it really uses the public Internet to transportdata from one computer to another. But since this network is encrypted and uses other securitymechanisms enabled by the ISP, is it a very secure Private Network. While VPN's are inherently secure,
they are more costly that a simple public Internet connection.
InduSoft Web Studio v7.0 Technical ReferenceCopyright © 2003–2010 Indusoft, Inc.

8/22/2019 User Guide Indu Soft
http://slidepdf.com/reader/full/user-guide-indu-soft 640/1279
Port Usage
There are various ports that are used by IWS and/or related software. These are:
Port # Program
20 FTP Server (Data)
21 FTP Server (Command)
25 SMTP Server
80 Microsoft IIS Server for HTTP packets
110 POP3
118 Microsoft SQL Server Services
161 SNMP
162 SNMP Trap
389 LDAP
443 Microsoft IIS Server for HTTPS packets(SSL)
502 Modbus TCP/IP protocol
663 LDAP over SSL
1028 FTP Client (Command)
1029 FTP Client (Data)
1234 Project TCP/IP Server
1443 Microsoft SQL Server
1444 Microsoft SQL Server default port (Monitor)
1521 Oracle
1526 Oracle
2030 Oracle
3001 A-B Ethernet TCP/IP Protocol (default)
3306 MySQL (can be configured to use 3306-
3309)3872 Oracle Management Remote Agent
3997 Studio ADO Gateway
4322 Remote Agent (CEServer)

8/22/2019 User Guide Indu Soft
http://slidepdf.com/reader/full/user-guide-indu-soft 641/1279
Port # Program
5432 PostgreSQL
47808 BACNet UDP Protocol (default)
You may need to accommodate one or more of these port's usage in your Firewall settings.
InduSoft Web Studio v7.0 Technical ReferenceCopyright © 2003–2010 Indusoft, Inc.
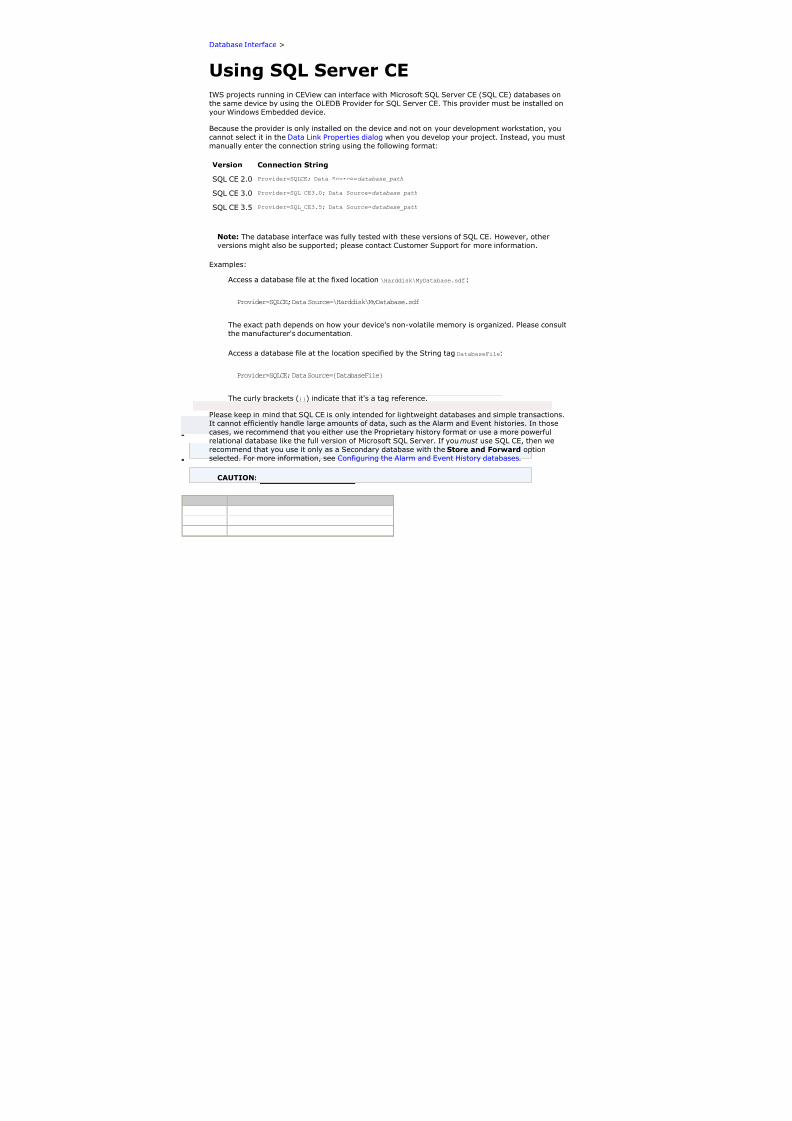
8/22/2019 User Guide Indu Soft
http://slidepdf.com/reader/full/user-guide-indu-soft 642/1279
Exercise: Viewing Your Project onthe Web
To view your project, use the following steps:
Expand the Screens folder and double-click on your Main.scr screen.1.
To save the screen in HTML format, click Save as HTML on the Application menu.
Web files are stored in the Web folder, so open the folder and verify that you saved the Main
screen successfully. You should see main.html.
2.
On the Project tab of the ribbon, in the Web group, click Thin Client.
Figure 1. Open the Project Settings dialog
3.
Configure the Data Server IP Address to use the IP Address of the Server station (computeron which you are running) at runtime.
The Thin Client station exchanges on-line data (tag values) with the station specified in thisfield.
4.
5.

8/22/2019 User Guide Indu Soft
http://slidepdf.com/reader/full/user-guide-indu-soft 643/1279
Type the URL path to your main.html file (in the Web folder) into the URL field.
The URL depends on the Home directory configured in the Web Server of your Server station.
Note: Microsoft provides Web Servers for any Microsoft operating system. Consult yourMicrosoft documentation about installing and configuring a Web Server.
5.
After configuring the Web settings, click OK to close the Project Settings dialog.6.
Save and close all screens and worksheets, and then verify the project (Verify on the Home tabof the ribbon) to update the Web settings to your Web page.
CAUTION:
You must verify the project again any time you change the project settings.
7.
To test your Web-based application, use the following steps:
Click Run (on the Home tab of the ribbon, in the Local Management group) to run your projectlocally on the Server station.
1.
Open an Internet Browser (Microsoft Internet Explorer or Netscape) and type the URL addressto open your main.html screen from the Server station.
2.
When the Log On dialog displays in the Browser, type guest into the User Name field, thenclick OK to open the main.html screen in the Browser.
Figure 2. Log On dialog
Notice that you can modify the level of any tank locally (Server station) using the Viewer run-time module or remotely (Thin Client) using the Browser.
3.
Note: A Thin Client requires an ActiveX component (ISSymbol.ocx) to handle screens on theBrowser. If you connect the Thin Client to the Internet, this component is downloaded andregistered automatically.
InduSoft Web Studio v7.0 Technical ReferenceCopyright © 2003–2010 Indusoft, Inc.

8/22/2019 User Guide Indu Soft
http://slidepdf.com/reader/full/user-guide-indu-soft 644/1279
Configuring the Target System
After configuring a project and testing it locally (on your development workstation), you candownload the project to a remote runtime workstation that is running IWS on Windows XP/Vista/7 orrunning CEView on a Windows Embedded device.
Before you begin, verify that the Remote Agent (CEServer.exe) is running on the target
(remote) workstation.
On a Windows platform, the CEServer.exe file is located in the […]\InduSoft Web Studio
v7.0\Redist\CE Version\Processor Type\Bin folder.
On a Windows Embedded device, the file is located in the \non-volatile folder.
1.
Run the CEServer.exe on the target workstation, and when the Remote Agent dialog is displayed,click Setup.
Figure 1. Remote Agent dialog
The Setup dialog opens:
Figure 2. Setup dialog
2.

8/22/2019 User Guide Indu Soft
http://slidepdf.com/reader/full/user-guide-indu-soft 645/1279
Use the parameters on this dialog to configure communication between the development andtarget systems:
Serial Port: To establish a serial connection to the project server, select Serial Port andthen select the specific port from the drop-down combo box.
If you click Advanced, the Serial Advanced Settings dialog is displayed.
Figure 3. Serial Advanced Settings dialog
You can use the parameters on this dialog to control the flow of data between your targetand development stations:
Baud Rate: Select a baud rate from this drop-down combo box.
Control RTS: Select (check) this to use a "Request to Send" control, where IWSsends an RS-232 signal from the transmitting station to the receiving stationrequesting permission to transmit.
Control CTS: Select (check) this to use a "Clear to Send" control, where IWS sendsan RS-232 signal from the receiving station to the transmitting station to indicate thereceiving station is ready to accept data.
When you finish setting these parameters, click OK to close the Serial Advanced Settingsdialog.
TCP/IP: Enable this button to establish a TCP/IP connection to the development station.
Tip: For better performance, we recommend using a TCP/IP connection instead of aSerial Link connection.
When you are finished, click OK to close the Setup dialog, but leave the Remote Agent programrunning in the remote workstation.
3.
Continue to "Configuring the Development Station."
InduSoft Web Studio v7.0 Technical ReferenceCopyright © 2003–2010 Indusoft, Inc.

8/22/2019 User Guide Indu Soft
http://slidepdf.com/reader/full/user-guide-indu-soft 646/1279
Configuring the DevelopmentStation
After configuring the target system to receive data, use the following steps to configure thedevelopment station to send the project data:
On the Home tab of the ribbon, in the Remote Management group, click Connect. The RemoteManagement dialog is displayed:
Figure 1. Remote Management dialog
1.
Select the Target tab and use the following options to specify the target system to which youare going to connect.
Network IP: Select this button and type the IP address of the target system into the textbox if you specified a TCP/IP connection when you configured the target system.
Serial Port: Select this button and select a port from the combo-box list if you specified aSerial Port connection when you configured the target system.
Microsoft ActiveSync: Select this button to connect to devices on which ActiveSync isenabled.
2.
Click the Connect button to connect to the target system.
If the target system is a Windows Embedded device, then you can click Install System Files
to install the CEView runtime engine on the station.
3.
Select the Project tab.4.
In the Target box, verify the directory for the project files on the target system. If the path isincorrect, then click the browse button to the right of the Target field to select a new directory.
5.

8/22/2019 User Guide Indu Soft
http://slidepdf.com/reader/full/user-guide-indu-soft 647/1279
(Assuming you are properly connected to the target system, you should be able to browse it likeany network drive.)
Note: You can download the project files only to folders that are below where the CEServeris installed and running. For example, if CEServer is installed at \Storage Card\CEView\,
then the project files should be installed at \Storage Card\CEView\ project_name\.
Click Send to Target to download the entire project to the target system. (Or click Send Fileto select an individual file to send.)
CAUTION:
When you send a project to the target system, the new project replaces the old
one automatically and immediately, even if the old project is still running. Also, if
you uncheck (disable) the Only newer files option, then the development
application will delete all of the old files in the project folder before downloading
the new files. As such, you may want to manually stop the old project (by
clicking Stop) before you send the new one. That way, you can make sure it stops
gracefully and doesn't disrupt any other processes.
It's not strictly necessary to stop the project, however, so if your project is
robust enough to handle the switch then you can send new files whenever youneed to.
Note:
Once you've initially configured the Remote Management settings, you can use Send
project to target (on the Home tab of the ribbon) to send updated project files atany time without opening this dialog.
You can compress the project files to make them download more quickly over a slownetwork connection. To do this, select the Enable File Compression check box inthe Communication tab of the Project Settings dialog.
If the download is interrupted, then the development application will requestconfirmation to continue and advise you that the project may not run properly.
6.
After the download is complete, click Run to start the project on the target system.7.
InduSoft Web Studio v7.0 Technical ReferenceCopyright © 2003–2010 Indusoft, Inc.

8/22/2019 User Guide Indu Soft
http://slidepdf.com/reader/full/user-guide-indu-soft 648/1279
Automatically Running a ProjectBy default, you must manually run your finished project on the Windows Embedded device, eitherfrom your PC by using the Project tab of the Remote Management dialog (see above) or on thedevice itself by clicking the Start button in the Remote Agent dialog.
However, you can configure the Windows Embedded device to automatically run a specified project.To do this, edit the file CEServer.ini on the WIndows CE device to include the following setting:
[Setup]
AppName=Applicaion Path
Where project_name is the location of the IWS project files on the Windows Embedded device. For
example:
[Setup]
AppName=\Harddisk\Test\CEserverTest
The next time the Windows Embedded device boots up and opens the Remote Agent dialog(CEServer.exe), it will read this setting and automatically run the specified project.
There are three ways to edit the CEServer.ini file:
Edit the file directly on the Windows Embedded device using an attached keyboard or thetouchscreen keypad. The file should be located in the same directory as the CEServer.exe file,which was installed earlier.
Mount the Windows Embedded device as a shared volume on your PC and edit the file there.
Edit the file in the […]\InduSoft Web Studio v7.0\Redist directory before you install the
system files on the Windows Embedded device.
CAUTION:
This last method changes the default copy of CEServer.ini that is included with
IWS. Use this method only if:
You back up the file before editing it;
You are installing the same system files on multiple, identical Windows
Embedded devices; and
You already know the location (file path) of the IWS project files on thedevice (perhaps by using the normal installation method on a test device).
InduSoft Web Studio v7.0 Technical ReferenceCopyright © 2003–2010 Indusoft, Inc.

8/22/2019 User Guide Indu Soft
http://slidepdf.com/reader/full/user-guide-indu-soft 649/1279
Database InterfaceConfiguring a database interface with IWS is basically linking tasks from IWS (Alarms, Events orTrends) to tables of external databases via a specific Database Provider that supports the databaseyou have chosen.
Each history task (Alarm, Events or Trend) can be configured to save data either to files with theproprietary format from IWS or to external SQL Relational Databases. Use the Options tab toconfigure the database to save Alarm and Event history. (See the Trend Folder for instructions forsaving history for the trend tasks.)
IWS supports ADO.NET to provide an intuitive, simple, flexible and powerful interface with standard
technologies from MDAC (Microsoft Data Access Components) such as OLE-DB (Object LinkingEmbedded — Database) and ODBC (Open Database Connectivity). By using this capability, you canconnect to any database that is MDAC compatible (please see the Conformance Table for the list of databases already tested)
The following tasks support the database interface:
Alarms : The project can save and/or retrieve the alarm history messages in a relationaldatabase.
Events : The project can save and/or retrieve the event messages in a relational database.
Trends : The project can save and/or retrieve the Trend history values in a relational database.
Viewer : Database information can be displayed both in table format (Alarm/Event Control andGrid objects) or in a graphical format (Trend Control object).
Web : Because the items listed below are already available in IWS Web interface, you candeploy a project that stores/saves data in a relational database and have it working over theWeb.
Using its embedded database interface, IWS can easily provide data from the plant floor to third-party systems (e.g., ERP) or get data from them.
IWS can interface with any relational database supported by a valid ADO.NET Provider, OLE DBprovider or ODBC driver. However, the conformance tests were executed with the followingdatabases:Microsoft SQL Server 20008.0System.Data.SqlClient1.0.5000.0Microsoft Access 20009.0.3821 SR-1System.Data.OleDbClient1.0.5000.0Microsoft Excel 20009.0.3821 SR-1System.Data.OleDbClient1.0.5000.0Oracle

8/22/2019 User Guide Indu Soft
http://slidepdf.com/reader/full/user-guide-indu-soft 650/1279
10g Release 1 for WindowsSystem.Data.OracleClient1.0.5000.0SybaseAnywhere 9.0.1.1751iAnywhere.Data.AsaClient9.0.1.1751MySQL
4.0.20aByteFX.MySqlClient0.7.6.15073
Table 1. Conformance Test Table
Database Database Version ADO.NET Provider Assembly Version
Note: For information about how to configure a specific database, please refer to the following:
Database Appendix A: Using ODBC Databases
Database Appendix B: Using Microsoft SQL ServerDatabase Appendix C: Using ORACLE Databases
Database Appendix D: Using Microsoft Access Databases
Database Appendix E: Using SQL Server CE
Database Appendix F: Using Sybase
Database Appendix G: Using Microsoft Excel
Database Appendix H: Using MySQL
SQL Relational Databases
A SQL Relational Database is a set of information stored in tables with fields and registers,which support SQL commands.
Linking the Database Through a Remote DB Provider
Studio Database Gateway
Database Configuration
Configuring a Default Database for All Task History
Database Troubleshooting
InduSoft Web Studio v7.0 Technical ReferenceCopyright © 2003–2010 Indusoft, Inc.Database Interface >

8/22/2019 User Guide Indu Soft
http://slidepdf.com/reader/full/user-guide-indu-soft 651/1279
SQL Relational DatabasesA SQL Relational Database is a set of information stored in tables with fields and registers, which supportSQL commands.
Each database can have one or more tables. Each table is composed of fields (columns) and registers
(rows). Typically, the fields are pre-defined and the project adds or reads one or more registers, accordinto the query condition.
IWS uses Database Providers (ADO.NET) to interface with SQL Relational Databases. Database Providersare libraries developed to access data from different databases through SQL commands. The ADO.NETProvider for a specific database can be supplied by the operating system or by the database manufacture
The following picture illustrates how IWS can interface with different databases using a different DatabasProvider for each database.
Figure 1.

8/22/2019 User Guide Indu Soft
http://slidepdf.com/reader/full/user-guide-indu-soft 652/1279
The previous picture shows some of the most popular ADO.NET Providers for databases. Notice that theMicrosoft ADO.NET Provider for ODBC Drivers allows you to access the database through an ODBC driverSee Database Appendix A: Using ODBC Databases for information about how to use this provider. It is al
possible that you do not have an ADO.NET provider, but an OLE DB provider is available. By using theMicrosoft ADO.NET Provider for OLE DB you can get access to the database; the Microsoft Jet OLE DBprovider gives access to applications in the Microsoft Office package by using this approach.
Note: It is important to note that IWS provides the interface for ADO.NET Providers. However, theADO.NET Providers and/or the ODBC Driver/OLE DB Provider must be supplied either by the operatingsystem or by the database manufacturer. If your Connection String does not refer to a valid ADO.NETProvider, the OLE.DB Provider will be used.
Although most projects typically link to only one type of database, IWS gives you the flexibility to link eatask to a specific database supported by a Database Provider. Furthermore, by using this architecture, y
do not need to worry about the specific characteristics of each database (it is mostly handled by the
Database Provider for each database or by the IWS Database Gateway interface). Therefore, the projectsettings are mostly uniform, regardless of the specific database chosen by you.
Parent topic: Database InterfaceInduSoft Web Studio v7.0 Technical ReferenceCopyright © 2003–2010 Indusoft, Inc.Database Interface >

8/22/2019 User Guide Indu Soft
http://slidepdf.com/reader/full/user-guide-indu-soft 653/1279
Linking the Database Through aRemote DB Provider
Depending on the architecture of your project, the ADO.NET Provider for the SQL Relational Databasemay not be available in the same stations where IWS is running. This scenario is especially commonwhen the project is run on a Windows Embedded target system (currently, most of the Providers arenot supported for Windows Embedded). In order to solve this problem, we have designed a flexiblesolution that allows you to configure distributed systems, as illustrated in the picture below:
The project is running on the Server station (where InduSoft Web Studio or CEView is installed). Theproject can communicate with the IWS Database Gateway (running in a remote computer) viaTCP/IP. The Gateway implements the interface with the Database through the Database Provideravailable in the computer where it is running.
The Studio Database Gateway does not require complex configuration. Just copy the files STADOSvr.exe
and StADOSrv.ini from the \BIN sub-folder of IWS and paste them under any directory of the
computer that will be used as the Gateway station and execute the STADOSvr.exe program. There areadvanced settings associated with the IWS Database Gateway, but they should be changed onlyunder special circumstances. See Studio Database Gateway for information on how to configure theIWS Database Gateway advanced settings.
Note: The Studio Database Gateway is a TCP/IP Server for the IWS project and it uses the TCPPort 3997 by default. You can specify a different port number when executing the STADOSvr.exe
program according to the following syntax:
STADOSvr.exe Port Number
Example: STADOSvr 3998
Parent topic: Database InterfaceInduSoft Web Studio v7.0 Technical Reference

8/22/2019 User Guide Indu Soft
http://slidepdf.com/reader/full/user-guide-indu-soft 654/1279
Copyright © 2003–2010 Indusoft, Inc.Database Interface >
Studio Database GatewayThe Studio Database Gateway is a TCP/IP server that interacts with databases using the Microsoft
.Net Framework. It can run on the same computer that is running the IWS project, or on a differentcomputer. The Database Gateway Host in the Advanced Settings (see Database Configuration dialog) specifies whether the gateway will be running on the local computer or not. If you are using thelocal computer you should enter either localhost or 127.0.0.1 in the Host name. You do not need toworry about starting or stopping the gateway because it will be done automatically by IWS tasks. Onthe other hand, when running the gateway remotely, you need to start the gateway manually. To doso, copy the files StADOSvr.exe and StADOSvr.ini from the \BIN folder to the remote computer, and
then execute the StADOSvr.exe .
The gateway can be started multiple times for different TCP/IP port numbers. The default portnumber is 3997, and it is changed by specifying the desired port number in the command prompt(e.g., StADOSvr 1111 ). When running the StADOSvr, it will add the following icon to the system tray:
Figure 2.
When you right-click on the icon, the following shortcut menu is displayed:
Figure 3.
The Hide option controls whether the Studio Database Gateway window is displayed on the desktop.(The gateway software runs continuously after you launch it, regardless of whether the window isdisplayed.) If you disable the Hide option, then the window is displayed:
Figure 4. Studio Database Gateway

8/22/2019 User Guide Indu Soft
http://slidepdf.com/reader/full/user-guide-indu-soft 655/1279
Any failure that occurs during operations with databases will be displayed both in this window andalso in the LogWin window. The messages are reported by exceptions generated by the ADO.NETProvider. (Please refer to Database Troubleshooting for more information about error messages inthe gateway module.)
You can configure the output in this window by using the Log menu:
Show Log menu option: Shows the IWS Database Gateway log files.
Options menu option: Open the Configure Messages dialog.
Figure 5. Studio Database Gateway: Configure Messages dialog
Show Messages pane: Select Errors Only to show only error messages in the log, orselect All Messages to show all database messages.
Additional Information pane: Configure to show additional information about eachdatabase message.
Message Type checkbox: Click (check) this option to show the type of the message.
Date/Time checkbox: Click (check) this option to show the timestamp of the

8/22/2019 User Guide Indu Soft
http://slidepdf.com/reader/full/user-guide-indu-soft 656/1279
message.
Advanced Settings
The Studio Database Gateway has Advanced Settings that are configured in the StADOvr.ini file. If you are having problems interfacing with a specific database, you will probably need to change someof these settings or add new providers to the file. The following parameters are available:ProvidersSaveMSec1 : Disable 2 : Enable 3:SeparateColumnThis setting specifies the default behavior for the provider when saving milliseconds. The default canbe changed on the Advanced Settings in the Database Configuration Dialogs.AssemblyAny string that contains a .Net Framework assemblyAssembly option for all providers. The assembly has all the classes required to interface with thedatabase. Most of the providers are inside the System.Data assembly.ConnectionClassAny connection class inside the assemblyThe Connection Class is the one that implements the System.Data.IDbConnection interface.
DateAdapterClassAny data adapter class inside the assemblyThe Data Adapter class is used on operations where updates to the database are necessary. It mustbe compatible with the connection class specified and it should implement IDbDataAdapter.CommandBuilderClassAny command builder class inside the assemblyThe Command Builder class is also responsible for updates on databases. It must be compatible withthe connection class.ProviderName of the providerOne of the parameters in the connection string is the "Provider". The Studio ADO Gateway comparesthe value on the connection string with the value for this parameter in each provider and defines the
proper one to be used.ColumnDelimiterPrefixAny character or group of charactersSpecify a character that will be placed before column names on SQL statementsColumnDelimiterSuffixAny character or group of charactersSpecify a character that will be placed after column names on SQL statementsTableDelimiterPrefixAny character or group of charactersSpecify a character that will be placed before table names on SQL statementsTableDelimiterSuffixAny character or group of characters
Specify a character that will be placed after table names on SQL statements
ValueStringAny stringThis value indicates how constant values are identified on SQL statements. For Microsoft SQLdatabases for instance, the value should be @Value, for ODBC question mark (?)ValueStringPrefixAny stringThis value indicates a prefix to be used before the values. Oracle values, for instance, require the

8/22/2019 User Guide Indu Soft
http://slidepdf.com/reader/full/user-guide-indu-soft 657/1279
prefix. The SQL statements use value identifiers by using their prefixes, but the parameters in theConnection class do not use the prefix.ValueAddNumber0 or 1Indicates whether a sequential number should be added to the ValueString to identify the parameteror not. For Microsoft SQL database, this parameter should have the value 1, because parameters areidentified by using @Value1, @Value2, …, @ValueN. For ODBC, this parameter should be 0.BoolType
Any string representing a valid data type for the databaseWhen trying to create columns to store boolean values, the data type specified on this parameter willbe used. You need to make sure that the data type specified is able to save boolean values.IntegerTypeAny string representing a valid data type for the databaseWhen trying to create columns to store integer values, the data type specified on this parameter willbe used. You need to make sure that the data type specified here is able to store 32 bit values.RealTypeAny string representing a valid data type for the databaseWhen trying to create columns to store real values, the data type specified on this parameter will beused. You need to make sure that the data type specified here is able to store 64 real values.StringType
Any string representing a valid data type for the databaseWhen trying to create columns to store string values, the data type specified on this parameter willbe used. You need to make sure that the data type specified is able to save the number of charactersthat you are willing to save on your project.TimeStampTypeAny string representing a valid data type for the databaseWhen trying to create columns to store TimeStamp values, the data type specified on this parameterwill be used.EnableTop0 or 1When this field is set to 1, the ADO will place the TOP in the SQL statement to limit the amount of registers required.SingleConnection0 or 1
When this field is set to 1, the ADO will open only one connection with the database, regardless of how many tasks or computers are requesting services from it. The synchronization between the taskswill be performed by the gateway, and they will not be able to be executed simultaneously if thisoption is enabled.CommunicationTimeOut2Time out to perform insert and update operationsTimeOut5Time out to perform connection and query updates
TimeOut60Time out to perform synchronizationConnectionRegBufSize128Size of the internal buffer used by the database API.

8/22/2019 User Guide Indu Soft
http://slidepdf.com/reader/full/user-guide-indu-soft 658/1279
Sectionof.INIFile Parameter Accepted Values Description
The paramters are grouped into three sections — Providers , Communication , and Connection — but allof the parameters for configuring database providers are listed in the Providers section of the file. Thedefault values are specified in the beginning of the file, using the prefix "Default" in each parameteras shown below:
[Providers]
DefaultSaveMSec=3
DefaultAssembly=System.Data
DefaultConnectionClass=System.Data.OleDb.OleDbConnection
DefaultDataAdapterClass=System.Data.OleDb.OleDbDataAdapter
DefaultCommandBuilderClass=System.Data.OleDb.OleDbCommandBuilder
DefaultValueString=@Value
DefaultValueAddNumber=1 DefaultBoolType=INTEGER
DefaultIntegerType=INTEGER DefaultRealType=REAL
DefaultStringType=VARCHAR(255) DefaultTimeStampType=DATETIMEDefaultSingleConnection=0
The next item on the file lists the amount of providers:
Count=5
The providers are identified by the "Provider" parameter followed by a number. When connecting to adatabase, the Provider parameter in the connection string is compared to the provider's identification,
in order to determine which provider will be used. If there is no provider with the value on theconnection string, all the default values are assumed. Besides its identification, each provider canhave its own value per each parameter. Again, if no value is specified, the default is used. Below is anexample with seven providers:
Count=7
Provider1=MICROSOFT.JET.OLEDB
SaveMSec1=3
ColumnDelimiterPrefix1=[
ColumnDelimiterSuffix1=]
SingleConnection1=1
Provider2=SQLOLEDB
ConnectionClass2=System.Data.SqlClient.SqlConnection
DataAdapterClass2=System.Data.SqlClient.SqlDataAdapter
CommandBuilderClass2=System.Data.SqlClient.SqlCommandBuilder
ColumnDelimiterPrefix2=[

8/22/2019 User Guide Indu Soft
http://slidepdf.com/reader/full/user-guide-indu-soft 659/1279
ColumnDelimiterSuffix2=]
TableDelimiterPrefix2=[
TableDelimiterSuffix2=]
RealType2=FLOAT
Provider3=MSDASQL
ConnectionClass3=System.Data.Odbc.OdbcConnection
DataAdapterClass3=System.Data.Odbc.OdbcDataAdapterCommandBuilderClass3=System.Data.Odbc.OdbcCommandBuilder
ValueString3=?
ValueAddNumber3=0
StringType3=VARCHAR(128)
EnableTop3=0
Provider4=ORAOLEDB
Assembly4=System.Data.OracleClient
ConnectionClass4=System.Data.OracleClient.OracleConnection
DataAdapterClass4=System.Data.OracleClient.OracleDataAdapter
CommandBuilderClass4=System.Data.OracleClient.OracleCommandBuilder
ValueString4=Value
ValueAddNumber4=1
ValueStringPrefix4=:
BoolType4=Number(1)
IntegerType4=Number(10)
RealType4=Number
StringType4=VARCHAR(255)
TimeStampType4=TIMESTAMP(0)
EnableTop4=0
Provider5=ASAPROV
Assembly5=iAnywhere.Data.AsaClient
ConnectionClass5=iAnywhere.Data.AsaClient.AsaConnection
DataAdapterClass5=iAnywhere.Data.AsaClient.AsaDataAdapter
CommandBuilderClass5=iAnywhere.Data.AsaClient.AsaCommandBuilder
ValueString5=?
ValueAddNumber5=0
ColumnDelimiterPrefix5=[
ColumnDelimiterSuffix5=]
TableDelimiterPrefix5=[
TableDelimiterSuffix5=]
Provider6=MYSQLPROVAssembly6=ByteFX.MySqlClient
ConnectionClass6=ByteFX.Data.MySqlClient.MySqlConnection
DataAdapterClass6=ByteFX.Data.MySqlClient.MySqlDataAdapter
CommandBuilderClass6=ByteFX.Data.MySqlClient.MySqlCommandBuilder
ValueString6=@Value

8/22/2019 User Guide Indu Soft
http://slidepdf.com/reader/full/user-guide-indu-soft 660/1279
ValueAddNumber6=1
StringType6=VARCHAR(128)
EnableTop6=0
Provider7=MSDAORA
Assembly7=System.Data.OracleClient
ConnectionClass7=System.Data.OracleClient.OracleConnection
DataAdapterClass7=System.Data.OracleClient.OracleDataAdapterCommandBuilderClass7=System.Data.OracleClient.OracleCommandBuilder ValueString7=Value
ValueAddNumber7=1
ValueStringPrefix7=:
BoolType7=Number(1)
IntegerType7=Number(10)
RealType7=Number
StringType7=VARCHAR(255)
TimeStampType7=TIMESTAMP(0)
EnableTop7=0
Parent topic: Database InterfaceInduSoft Web Studio v7.0 Technical ReferenceCopyright © 2003–2010 Indusoft, Inc.

8/22/2019 User Guide Indu Soft
http://slidepdf.com/reader/full/user-guide-indu-soft 661/1279
Database Interface >
Database Troubleshooting
IWS database interface provides powerful tools that will help you to identify configuration problemswith databases. If you are having problems interfacing with a database, you should first enable theDatabase Messages in the Logwindow. You can do so by following the steps below:
In the IWS Development environment, make sure to show the Output window (Output
Window check box on the View tab of the ribbon).1.
Right-click in the Outputwindow (usually located in the lower-right corner of the developmentenvironment), and then click Settings on the shortcut menu:
2.
In the Log Settings dialog, check the Database Messages option:
Figure 1. enabling Database Messages
3.

8/22/2019 User Guide Indu Soft
http://slidepdf.com/reader/full/user-guide-indu-soft 662/1279
After enabling this option, the Output window will display error messages related to the database.The FAQ section below lists some common errors that you can see in the Output window.
GENERAL QUESTIONSQ: I configured my database, but the runtime modules (Alarm, Trend, and Events) are not beingsaved to the database. I only see the following error message in the Output window:
Database: Error: Error to add new register[CMD_ADD].
A: Most of the database errors in the Output window will be followed by additional information suchas the SQL command being executed, the Connection String and the Table name. Error messagessuch as the one described above, will usually happen after a more detailed message. For example, if your Trend task fails to add a register in the database because the cable is disconnected, you shouldfirst receive a network error; if the task tries to add more registers before the time specified in theRetry field (see Database Configuration dialog), it will only display Database: Error: Error to add new
register[CMD_ADD]. If you think that your configuration is correct, and you want to debug this type of problem, reduce the Retry. Then you should see more detailed information.
Q: When I try to access the MySQL database server, I get the following message:Object is not set to an instance of an object.
A: This problem was detected under the following conditions:
A known bug in MySQL Connector/Net v6.1.2 would not correctly specify the charset; and
The database table you are trying to access doesn't exist.
To solve this problem, make sure you are using MySQL Connector/Net v6.2.0 and that the table youare accessing exists in the database.
Q: Why is the Database Interface automatically closing some connections?
A: By default, the Database Interface can have a maximum of 1000 connections. When thismaximum is exceeded, the oldest connection is automatically closed to allow the new connection andthe Output window displays an extended message describing which connection was closed and what
was the last command executed.
To increase the maximum number of database connections, open the project file( project_name.app) in a text editor and change the following setting:
[StDB]
MaxConnections=number of connections
Keep in mind that increasing the maximum number of connections may decrease project
performance.
Q: I configured my Connection String using the browser and the Data Link Properties Window. WhenI click the Test button, it says "Test succeeded". However, when I run my project, the DatabaseInterface displays error messages, and I am not able to save data.
A: The Data Link Properties Window uses OLE DB to interface with the Database. IWS Database

8/22/2019 User Guide Indu Soft
http://slidepdf.com/reader/full/user-guide-indu-soft 663/1279
Interface uses ADO.NET; therefore, you can have the OLE DB provider on your machine and bemissing the ADO.NET provider. It is also possible that you are using an ADO.NET provider that is notlisted in the StADOSvr.ini file. Please refer to Studio Database Gateway for more information aboutadding ADO.NET providers to the StADOSvr.ini file.
Q: Why, when I update information in one line in the Grid object, is it updating more than one line inmy database?
A: The grid object issues an update command in the database using the values in all the columns forthe specific row that you are trying to update. If you have rows with duplicate values, you might seethis problem. If your table has a primary key or any other unique field that you do not want todisplay in the Grid object, you can add it to the Columns but specify the Width 0. This will fix theproblem.
Q: Why do I have to use a separate Column to store the milliseconds on my database?
A: Some databases do not support milliseconds in the Time Stamp field. IWS Database interface, bydefault, requires another column for the milliseconds. If your database can handle milliseconds, or if you do not want to record the milliseconds, you can change the default behavior in the Advancedsettings. Note that some databases are able to store milliseconds, but they have lower precision. If you mix different databases with different precisions in redundant mode, you can get synchronization
problems.
Q: My project works fine when I run in emulation mode. But when I send to the Windows Embeddeddevice, it cannot communicate with my database.
A: It might be the case that your Windows Embedded device does not have the .Net Framework orthat it does not have the provider that you are using. Try to use the gateway remotely by followingthe instructions in Linking the Database Through a Remote DB Provider.
Q: When I try to connect to the database, why do I receive the message, Error to create connection
class?
A: The .Net Provider that you are trying to use is not installed on your machine. This error messageis usually followed by the provider name; if you are using the Sybase database, for instance, the
message is followed by [iAnywhere.Data.AsaClient.AsaConnection] . The Provider is theiAnywhere.Data.AsaClient. You can check if the provider is installed on your machine by going to theControl Panel > Administrative Tools > Microsoft .Net Framework x.x Configuration. Theprovider should be listed in the Assembly Cache.
Q: What if I have the provider assembly (usually a .dll file) but it is not listed in the AssemblyCache?
A: If your assembly has a strong name, you can register it in the Assembly Cache using the gcautilprogram. Or it should work if you copy your assembly to the same folder as the StADOSvr.exe
(usually the […]\InduSoft Web Studio v7.0\Bin folder).
Q: I am not able to access my table from the Grid when I use a specific condition. But if no conditionis applied, it works fine. Why is that?
A: You should check for the following items:
Follow the Troubleshooting steps, and look for error messages in the log. An error message cantell you if you have made a mistake, such as entering with a wrong column name or specifying
1.

8/22/2019 User Guide Indu Soft
http://slidepdf.com/reader/full/user-guide-indu-soft 664/1279
an invalid data format.
Some databases have problems when you use reserved words as column names. Therefore, youshould avoid using column names such as Time, Date, Numeric, etc.
2.
If your column name starts with AND or OR (e.g., ORange), enter the name surrounded bysquare brackets. For example, instead of ORange=10, enter [ORange]=10.
3.
If you are using SQL Server CE, you might have some problems when querying string fields. Ithas been identified that filters do not work with NCHAR data types; however, they do work if
you declare these fields as NVARCHAR(<Number>). You might try to recreate your table byusing this data type. An example of a command that creates a table with strings that can bequeried is displayed below:
4.
CREATE TABLE Table1 (Name NVARCHAR(128), Age Numeric, Sex NVARCHAR(1))
ORACLE
Q: When I lose the connection with an ORACLE database, it does not recover. I receive the followingmessage in the logwin: Database: Error: ORA-03114: not connected to ORACLE. Is that a problem withthe IWS Database Interface?
A: The Oracle .Net Provider has a problem managing the connection pool. You need to install a QFE830173. At the time that this document was written, more information about this problem could befound at this site (external link).
Q: When I try to access the database, I get the following error message: ORA-00162: external dbid
length 19 is greater than maximum (16). What should I do?
A: At the time that this document was written, there was a problem on the Oracle .NET Provider; theServer Name (SERVER/TNS) could not exceed 16 characters. In order to fix this problem, you
should try to reduce your Server Name field. One way of doing this is to edit the file\WINDOWS\system32\drivers\etc\hosts to add an entry with a smaller server name. For instance, theserver name specified by 192.168.89.98, has 13 characters, it could be reduced to 3 by adding thefollowing line in the file:
192.168.89.98 ora
Now you can configure the Server Name configuration using ORA/TNS instead of 192.168.89.98/TNS.
MYSQLQ: When I try to access the database from my local machine it works fine, but when I move myproject to a remote machine, it says Access Denied.
A: Each user on a MySQL database has a property associated with it that indicates the computerfromwhich it can get access to the database. By default, this property is set to localhost, so you will

8/22/2019 User Guide Indu Soft
http://slidepdf.com/reader/full/user-guide-indu-soft 665/1279
only be able to access the database if you are accessing from the local computer. You should readthe MySQL manual for information about changing this setting.
Q: Sometimes when I try to synchronize a remote MySQL database with a local MySQL database, orif I try to use application redundancy, a connection to the ADO.NET interface is opened and neverclosed.
A: Go to the Database Configuration dialog and uncheck the Automatically Create option.
SYBASE
Q: I configured my Sybase database using the Browse button. When I click the test button, the testsucceeds, but when I try to run my project I get the following error: Database: Error: Parse error:
DSN 'MyDatabase' does not exist. What am I doing wrong?
A: Please refer to Database Appendix F - Using Sybase for more information about this problem.
Q: Why, when I try to connect to the Sybase database, am I receiving the error Error to create
connection class [iAnywhere.Data.AsaClient.AsaConnection]?
A: You do not have the ADO.NET Provider installed on your computer. The database setup programhas an option to install the Provider. Rerun the setup program, and make sure to check that option.
SQL SERVER CE
Q: Why does the gateway show TypeLoad failure when I try to access my SQL Server CE database?
A: This problem usually happens when you do not have the SQL Server CE .NET Provider installed onyour CE Device.
Q: Why am I getting the error message, There is a file sharing violation. A different process might
be using the file?
A: You have another progarm with the SQL Server CE database open. For instance, this will happen if you are using the SQL Server CE configuration software.
Parent topic: Database InterfaceInduSoft Web Studio v7.0 Technical ReferenceCopyright © 2003–2010 Indusoft, Inc.

8/22/2019 User Guide Indu Soft
http://slidepdf.com/reader/full/user-guide-indu-soft 666/1279
Database Interface >
Using ODBC DatabasesAlmost every database provides an ODBC interface that can be used to interface with it. Thedatabase features provided by IWS can be used with ODBC drivers through the ADO.NET interface forODBC. In order to use this capability, you must use Microsoft .NET Framework 1.1 or higher.
Note: Microsoft .NET Framework 2.0 is automatically installed with InduSoft Web Studiov6.1+SP5 and later.
The Database Configuration dialog allows you to provide connection strings that will connect to anODBC DSN. The connection string can be built automatically by clicking on the Browse button (…).When the Data Link window displays, you should select the option Microsoft OLE DB Provider forODBC Drivers as shown below:
Figure 1. Data Link Properties, Provider - ODBC

8/22/2019 User Guide Indu Soft
http://slidepdf.com/reader/full/user-guide-indu-soft 667/1279
When you click Next, the following window will display:
Figure 2. Data Link Properties, Provider - Connection
Select the DSN that you want to connect to and click OK. If you want to specify the user name andpassword on this window instead of specifying on the Object Properties dialog, remember to checkthe Allow saving password checkbox.
Parent topic: Database InterfaceInduSoft Web Studio v7.0 Technical ReferenceCopyright © 2003–2010 Indusoft, Inc.

8/22/2019 User Guide Indu Soft
http://slidepdf.com/reader/full/user-guide-indu-soft 668/1279
Database Interface >
Using Microsoft SQL Server
IWS Database Interface allows you to retrieve and store information on Microsoft SQL Serverrelational databases. You should follow the steps below in order to configure the SQL Server database:
Click on the Browse button in the Database Configuration Dialog window . The following windowwill display:
Figure 1. Data Link Properties, Provider - SQL Server
1.
Select the Microsoft OLE Provider for SQL Server and click Next . The following window willdisplay:
Figure 2. Data Link Properties, Connection - SQL Server
2.

8/22/2019 User Guide Indu Soft
http://slidepdf.com/reader/full/user-guide-indu-soft 669/1279
Fill out the fields on this window with your database information. If you are not using WindowsNT Integrated security, remember to check the Allow saving password checkbox to save thepassword when the Data Link Properties window is closed.
3.
Click OK to finish the Connection String configuration.4.
Your connection string should be very similar to this one:
Provider=SQLOLEDB.1; Integrated Security=SSPI; Initial Catalog=MyDatabase; Data Source=192.168.23.200
Note: These procedures were tested using Microsoft SQL Server 2000.
Parent topic: Database InterfaceInduSoft Web Studio v7.0 Technical ReferenceCopyright © 2003–2010 Indusoft, Inc.

8/22/2019 User Guide Indu Soft
http://slidepdf.com/reader/full/user-guide-indu-soft 670/1279
Database Interface >
Using ORACLE Databases
IWS Database Interface allows you to retrieve and store information on ORACLE relational databases.You should follow the steps below in order to configure the ORACLE database:
Click on the Browse button in the Database Configuration Dialog window. The following windowwill display:
Figure 1. Data Link Properties, Provider - Oracle
1.
Select the Microsoft OLE Provider for Oracle and click Next. The following window will display:
Figure 2. Data Link Properties, Connection - Oracle
2.

8/22/2019 User Guide Indu Soft
http://slidepdf.com/reader/full/user-guide-indu-soft 671/1279
Fill out the fields on this window with your database information. Remember to check the Allow
saving password checkbox to save the password when the Data Link Properties window isclosed. The server name information has the following format:
3.
Server /TNS
Where:
Server : Computer where the Oracle Database is running4.
TNS: Oracle TNS name5.
CAUTION:
At the time that this document was written, the Server Name field could not beconfigured with more than 16 letters. If more than 16 letters were specified, you
would receive the following error: ORA-00162: external dbid length 19 is greater than
maximum (16), where 19 is the number of letters in the Server Name. Please see
Database Troubleshooting for more hints to work around this problem.

8/22/2019 User Guide Indu Soft
http://slidepdf.com/reader/full/user-guide-indu-soft 672/1279
Click OK to finish the Connection String configuration.
Note: These procedures were tested using ORACLE 10g Release 1.
Parent topic: Database InterfaceInduSoft Web Studio v7.0 Technical ReferenceCopyright © 2003–2010 Indusoft, Inc.

8/22/2019 User Guide Indu Soft
http://slidepdf.com/reader/full/user-guide-indu-soft 673/1279
Database Interface >
Using Microsoft Access DatabasesIWS 's database interface lets you store information in and retrieve information from Microsoft Access da(ACCDB) files.
You do not need to have Access installed on the same computer as IWS ; IWS can directly read from andexisting ACCDB file. However, you do need to use Access to create the initial file — either a blank databadata or a populated database for reference data. Once you've created the file, you can move it to any locestablish a connection to it there.
Note: This procedure was last tested using Microsoft Access 2007 (12.0.6211.1000).
To establish a connection between your IWS project and your ACCDB file:
In the Database Configuration property sheet , click the Browse button (… ).
The Data Link Properties property sheet is displayed:
Figure 1. Selecting the OLE DB Provider
1.

8/22/2019 User Guide Indu Soft
http://slidepdf.com/reader/full/user-guide-indu-soft 674/1279
Select the appropriate OLE DB Provider for your database:
For a Microsoft Access 2003 database file, select Microsoft Jet 4.0 .
For a Microsoft Access 2007 database file, select Microsoft Office 12.0 Access Database E
2.
Click Next .
The Connection tab of the property sheet is displayed:
Figure 2. Specifying the location of the file
3.

8/22/2019 User Guide Indu Soft
http://slidepdf.com/reader/full/user-guide-indu-soft 675/1279
In the Data Source text box, type the complete file path for your ACCDB file.
Although the file can be located anywhere on your computer or network, it may be useful to keep it
project folder. For example:
C:\Users\username\My Documents\InduSoft Web Studio v7.0 Projects\ project_name\Datab
If you do this, however, then you must update the file path whenever you move the project folder.
4.
Specify the User name and Password , if any, for the ACCDB file.5.
Click Test Connection .
If a connection can be successfully established, then an appropriate message is displayed.
6.
Click OK to save your changes and return to the Database Configuration property sheet.7.
Note: Be sure to select (check) the Disable Primary Keys option in the Database Configuration dialodo not, then IWS will not be able to connect to your Access database
Important: Desktop office applications such as Microsoft Access and Microsoft Excel cannot efficiently

8/22/2019 User Guide Indu Soft
http://slidepdf.com/reader/full/user-guide-indu-soft 676/1279
large amounts of data. If you try to save all of your project's historical data in an Access database or Espreadsheet, then the queries will become slow and you might get unexpected results. Therefore, werecommend that Access or Excel be used only as a Secondary Database, with the Store and Forward enabled, or to relay data to third-party software.
To handle large amounts of historical data, we recommend that you use either IWS 's proprietary formdedicated relational database such as Microsoft SQL Server or ORACLE.
Parent topic: Database InterfaceInduSoft Web Studio v7.0 Technical ReferenceCopyright © 2003–2010 Indusoft, Inc.

8/22/2019 User Guide Indu Soft
http://slidepdf.com/reader/full/user-guide-indu-soft 677/1279
Database Interface >
Using SQL Server CEIWS projects running in CEView can interface with Microsoft SQL Server CE (SQL CE) databases onthe same device by using the OLEDB Provider for SQL Server CE. This provider must be installed onyour Windows Embedded device.
Because the provider is only installed on the device and not on your development workstation, youcannot select it in the Data Link Properties dialog when you develop your project. Instead, you mustmanually enter the connection string using the following format:
Version Connection String
SQL CE 2.0 Provider=SQLCE; Data Source=database_path
SQL CE 3.0 Provider=SQL_CE3.0; Data Source=database_path
SQL CE 3.5 Provider=SQL_CE3.5; Data Source=database_path
Note: The database interface was fully tested with these versions of SQL CE. However, otherversions might also be supported; please contact Customer Support for more information.
Examples:
Access a database file at the fixed location \Harddisk\MyDatabase.sdf:
Provider=SQLCE; Data Source=\Harddisk\MyDatabase.sdf
The exact path depends on how your device's non-volatile memory is organized. Please consultthe manufacturer's documentation.
Access a database file at the location specified by the String tag DatabaseFile:
Provider=SQLCE; Data Source={DatabaseFile}
The curly brackets ({}) indicate that it's a tag reference.
Please keep in mind that SQL CE is only intended for lightweight databases and simple transactions.It cannot efficiently handle large amounts of data, such as the Alarm and Event histories. In those
cases, we recommend that you either use the Proprietary history format or use a more powerfulrelational database like the full version of Microsoft SQL Server. If you must use SQL CE, then werecommend that you use it only as a Secondary database with the Store and Forward optionselected. For more information, see Configuring the Alarm and Event History databases.
CAUTION:

8/22/2019 User Guide Indu Soft
http://slidepdf.com/reader/full/user-guide-indu-soft 678/1279
When using a Database worksheet or the DB/ERP functions to access a SQL CE
database, remember…
Column/field names must match exactly or the database commands will fail; and
IWS data types will be converted into possibly unexpected SQL data types. The
following table shows how they're converted:
IWS SQL CE
Boolean int
Integer int
Real real
String nvarchar
Parent topic: Database InterfaceInduSoft Web Studio v7.0 Technical ReferenceCopyright © 2003–2010 Indusoft, Inc.

8/22/2019 User Guide Indu Soft
http://slidepdf.com/reader/full/user-guide-indu-soft 679/1279
Database Interface >
Using SybaseYou need to install the AsaClient provider on your computer; the tests with IWS were performedusing the architecture explained in the topic Linking the Database Through a Remote DB Provider.
If you are using the browse button to automatically generate the connection string, the stringreturned will have the following format:
Provider=ASAProv.90; Data Source=Test
This format requires that you create an ODBC DSN with the same name as the Data Source (in thiscase, Test) in order to communicate with the database. If the DSN is not created, the following errorwill display in the LogWin when connecting to the database:
Database: Error: Parse error: DSN 'Test' does not exist
To void an ODBC DSN, you can enter with the connection string manually as shown in the examplebelow:
Provider=ASAProv.90; DBF=C:\ Test.db
Note: These procedures were tested using Sybase Server Anywhere 9.0.1.1751.
Parent topic: Database InterfaceInduSoft Web Studio v7.0 Technical ReferenceCopyright © 2003–2010 Indusoft, Inc.

8/22/2019 User Guide Indu Soft
http://slidepdf.com/reader/full/user-guide-indu-soft 680/1279
Database Interface >
Using Microsoft ExcelIWS 's database interface lets you store information in and retrieve information from Microsoft Excelspreadsheet (XLS or XLSX) files.
You do not need to have Excel installed on the same computer as IWS ; IWS can directly read from andan existing XLS/XLSX file. However, you do need to use Excel to create the initial file — either a blankspreadsheet for new data or a populated spreadsheet for reference data. Once you've created the file, yomove it to any location and establish a connection to it there.
Note: This procedure was last tested using Microsoft Excel 2007 (12.0.6331.5000).
To establish a connection between your IWS project and your XLS/XLSX file:
In the Database Configuration property sheet , click the Browse button (… ).
The Data Link Properties property sheet is displayed:
Figure 1. Selecting the OLE DB Provider
1.
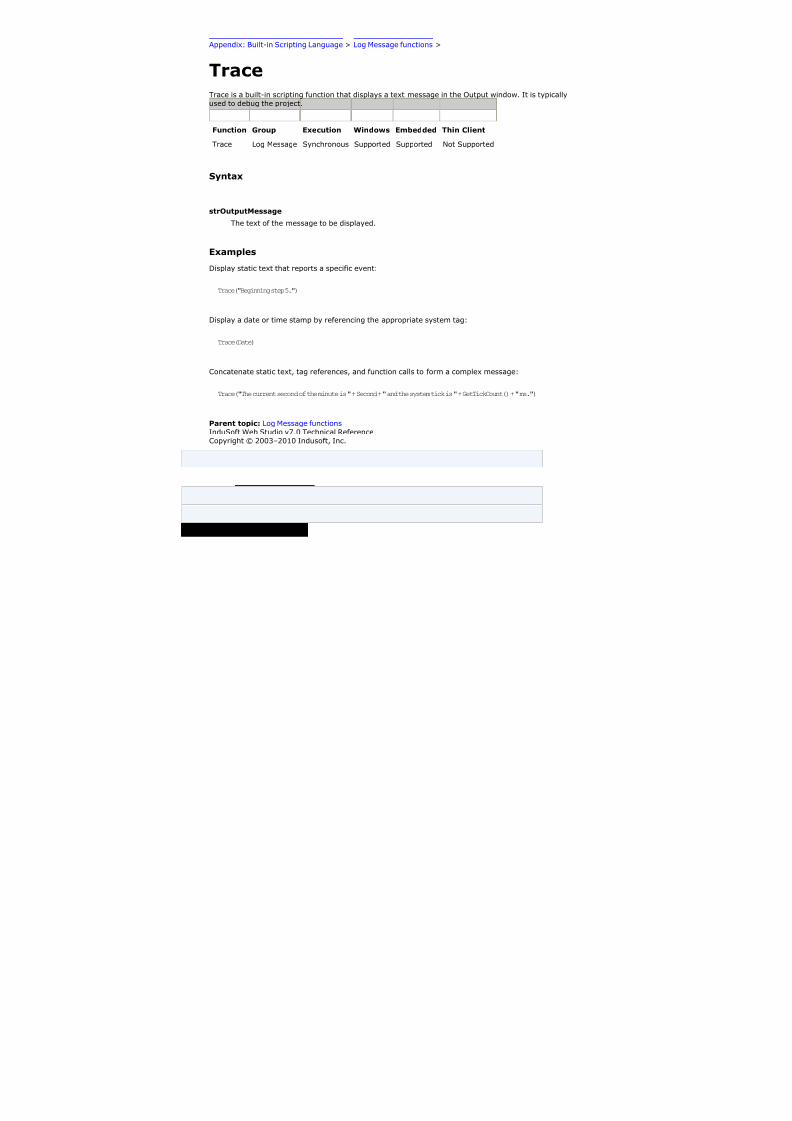
8/22/2019 User Guide Indu Soft
http://slidepdf.com/reader/full/user-guide-indu-soft 681/1279
Select the appropriate OLE DB Provider for your database:
For a Microsoft Excel 2003 spreadsheet file, select Microsoft Jet 4.0 .
For a Microsoft Excel 2007 spreadhseet file, select Microsoft Office 12.0 Access Database
Engine .
2.
Click Next .
The Connection tab of the property sheet is displayed:
Figure 2. Specifying the location of the file
3.

8/22/2019 User Guide Indu Soft
http://slidepdf.com/reader/full/user-guide-indu-soft 682/1279
In the Data Source text box, type the complete file path for your XLS/XLSX file.
Although the file can be located anywhere on your computer or network, it may be useful to keep it
your project folder. For example:
C:\Users\username\My Documents\InduSoft Web Studio v7.0 Projects\ project_name\Book1.
If you do this, however, then you must update the file path whenever you move the project folder.
4.
Click the All tab.5.
Select Extended Properties and then click Edit Value .
The Edit Property Value dialog is displayed.
6.
In the Property Value text box, type one of the following values:
For a Microsoft Excel 2003 spreadsheet file, type Excel 11.0 .
For a Microsoft Excel 2007 spreadhseet file, type Excel 12.0 .
7.
Click OK to close the Edit Property Value dialog.8.

8/22/2019 User Guide Indu Soft
http://slidepdf.com/reader/full/user-guide-indu-soft 683/1279
Editing the value of Extended Properties
Click the Connection tab.9.
Click Test Connection .
If a connection can be successfully established, then an appropriate message is displayed.
10.
Click OK to save your changes and return to the Database Configuration property sheet.11.
Note: Be sure to select (check) the Disable Primary Keys option in the Database Configuration dialoyou do not, then IWS will not be able to connect to your Excel spreadsheet.
Important: Desktop office applications such as Microsoft Access and Microsoft Excel cannot efficientlyhandle large amounts of data. If you try to save all of your project's historical data in an Access databor Excel spreadsheet, then the queries will become slow and you might get unexpected results. Theref we recommend that Access or Excel be used only as a Secondary Database, with the Store and Forw
option enabled, or to relay data to third-party software.
To handle large amounts of historical data, we recommend that you use either IWS 's proprietary formor a dedicated relational database such as Microsoft SQL Server or ORACLE.

8/22/2019 User Guide Indu Soft
http://slidepdf.com/reader/full/user-guide-indu-soft 684/1279
Parent topic: Database InterfaceInduSoft Web Studio v7.0 Technical ReferenceCopyright © 2003–2010 Indusoft, Inc.

8/22/2019 User Guide Indu Soft
http://slidepdf.com/reader/full/user-guide-indu-soft 685/1279
Database Interface >
Using MySQLIWS can interface with MySQL databases, but to do so, you must install an ADO.Net provider for MySQL.
The provider required by IWS is MySQL Connector/Net, and at the time of this writing, the necessarysoftware can be downloaded from the official MySQL site . (Please note that the linked site is beyond ourcontrol and may change without notice.)
Once the provider is installed, you can use the Database Configuration property sheet to configure a MySdatabase connection. However, unlike for other database types, you cannot use the Data Link Propertiesdialog (which is accessed by clicking ... to the right of the Connection string box) to form the connectiostring. Instead, you must directly enter the connection string using this basic format:
Provider=MYSQLCLIENT; Server=myServerAddress; Database=myDataBase; Uid=myUsername; Pwd=myPasswor
The following optional parameters can be appended to the connection string:Port=number ;
Specifies what port to use for the connection. The default port is 3306, but any port can be specified as las it matches the server configuration.
If a port of -1 is specified, then the connection will use the named pipes network protocol (see Protocol
below).
Server=myServerAddress1 & myServerAddress2 & … & myServerAddressN ;
Use any server in a replicated server configuration.Encryption=true;
Enables SSL encryption for all data sent between the client and the server. The server must have a valid
certificate installed.Encrypt=true;
An alternative to Encryption above, in case there are errors.Default Command Timeout=milliseconds ;
Specifies a default command timeout for the connection. This does not supercede any timeout propertiesindividual commands.Connection Timeout=seconds ;
Specifies how long the client will wait for a server connection before terminating the attempt.Ignore Prepare=true;
Instructs the database provider to ignore Command.Prepare statements, to prevent corruption from server-prepared commands.Protocol=myProtocol ;
Specifies which network protocol to use. The default is socket or tcp , but you can specify pipe to use a n
pipes connection or memory to use a shared memory object.Shared Memory Name=MySQL;
Specifies the name of the shared memory object to be used for communication. (This parameter appliesif the Protocol parameter above is set to memory .)CharSet=UTF8;
Specifies which character set to use to encode queries to the server.

8/22/2019 User Guide Indu Soft
http://slidepdf.com/reader/full/user-guide-indu-soft 686/1279
Please note that query results are encoded in the same character set that the data itself is recorded.
Table 1. Optional
parameters for the MySQL
Connector/Net connection
string
Parameter Description
Note: These procedures were tested using MySQL v5.1.11 and MySQL Connector/Net v6.2.0.
Parent topic: Database InterfaceInduSoft Web Studio v7.0 Technical ReferenceCopyright © 2003–2010 Indusoft, Inc.

8/22/2019 User Guide Indu Soft
http://slidepdf.com/reader/full/user-guide-indu-soft 687/1279
Troubleshooting
General Troubleshooting
Frequently Asked Questions
Using the Help Menu
InduSoft Web Studio v7.0 Technical ReferenceCopyright © 2003–2010 Indusoft, Inc.

8/22/2019 User Guide Indu Soft
http://slidepdf.com/reader/full/user-guide-indu-soft 688/1279
Troubleshooting >
General TroubleshootingIf you do find yourself in need of technical assistance, there are certain things that you will need toknow before you contact technical support. Regardless of the problem, you will need to know thesequence of events that led to you discovering the problem. It must be explained in as much detail aspossible and you should be careful not to ad-lib, as it may drastically affect troubleshooting time andprocedures. It's also best to be in front of the computer you are having problems with, and to keep apen and paper handy.
Before Contacting Technical Support
Some things you should try before you contact technical support are:
Check out the documentation
The application help and release notes can be accessed on the Help tab of the ribbon, and moredocumentation is available on our website. You may find that your particular issue has alreadybeen documented.
Consider recent changes on your system
If something used to work, think about what may have changed. New software installation orgeneral system changes can affect performance and general functionality of other software on yoursystem.
Try reproducing the problem in a new file
If the problem can not be reproduced in a new test file, compare the new file with your original file
to find and eliminate the differences. This will help narrow down the cause of the issue.
Try reproducing the problem on another machine
If the problem goes away on another machine, compare what is different between the twosystems. If this is the case, there is most likely a system conflict.
Verifying Your Project
If you change, reorder or delete any tags in the Tags database, or if you reconfigure any settings in theWeb tab of the Project Settings dialogue, then you must verify your project to realign all of yourscreens and worksheets to the current state of your database. On the Home tab of the ribbon, in theTools group, click Verify .
Related Publications
The IWS Getting Started Guide is designed for first-time users. This publication contains informationabout the basic functions of InduSoft Web Studio , and it is provided in the Documentation folder onthe InduSoft Web Studio installation CD.

8/22/2019 User Guide Indu Soft
http://slidepdf.com/reader/full/user-guide-indu-soft 689/1279
The driver User Guides explain how to configure the direct communication drivers, according to theirunique protocol characteristics. One customized user guide is included with each driver. Thesepublications are provided in the […]\InduSoft Web Studio v7.0\ Drv directory, or from the Help tab
of the ribbon. (On the Help tab of the ribbon, in the Documentation group, click Communication
Drivers . When the Object Properties dialog is displayed, highlight the driver you're using and then clickHelp .)
Figure 1. Help Menu
Contacting Technical Support
If you cannot find an answer to your technical question in the product documentation or help system,our Technical Support Specialists are available to assist any customer with current product maintenance.The telephone number is 1-877-INDUSOFT (1-877-463-8763) .
Please try to define the problem before you contact Technical Support so that you can repeat the stepsthat led to the problem and specifically identify when and how the problem occurred. The supportrepresentative will need to know exactly what the problem is in order to provide help. These steps willhelp us pinpoint and solve your problem more quickly.
Please have the following information available:
Hardware environment: available memory, processor type, output device
Software environment: operating system, version of Windows®, network platform
Product name, version number, and product registration number
Amount of memory installed on your system
Amount of free hard disk space on your system
Screen resolution (screen size in pixels, for example, 1024 by 768)
Screen color depth (number of colors or bits, for example, 256 colors or 8-bit color)
Graphics card manufacturer, model name, and driver version numberSound card manufacturer and model name
A list of external devices connected to the computer
Brief description of the problem or error, and the specific text of any error messages
Description of the steps you have taken to troubleshoot the issue, for example, how manymachines you have tested on, and whether the issue is reproducible in a new file

8/22/2019 User Guide Indu Soft
http://slidepdf.com/reader/full/user-guide-indu-soft 690/1279
Steps to reproduce the issue, if it is reproducible. If the issue is not reproducible, it may be andevelopment issue rather than an issue with the product.
If your project crashes completely during runtime, it will generate a debugger report and save it to:
[…]\My Documents\InduSoft Web Studio v7.0 Projects\ project_name\Web\Dump\WindDump.dmp
Please have this file ready to send to Technical Support for analysis.
When you contact us, please have your system information ready. You can get this by using theSupport Information command located in the Help menu.
If your problem or question is not urgent, you may choose to email Customer Support [email protected] . Email is answered daily .
Parent topic: TroubleshootingInduSoft Web Studio v7.0 Technical ReferenceCopyright © 2003–2010 Indusoft, Inc.

8/22/2019 User Guide Indu Soft
http://slidepdf.com/reader/full/user-guide-indu-soft 691/1279
Troubleshooting >
Frequently Asked Questions
Database & Security System
Q. What does the Shared Tags folder store?
A. The Shared Tags folder stores the tags imported from the PC-based Control linked to the IWS project.
Q. How do I count how many tags are configured in the project database?
A. The number of tags currently used in the project is displayed in the status bar at the bottom of the de
Q. How do I see the list of "Users" I've added during runtime in my project that I have created with the C
A. Execute the following command: "Studio Path \BIN\Studio Manager.exe" "Studio Path \BIN\ExtUser.dll" users created by the CreateUser() function, and you can then create or delete users.
Graphics
Q. How do I insert and configure an ActiveX object in a project?
A. To insert an ActiveX object in a project screen:
On the Graphics tab of the ribbon, in the Libraries group, click ActiveX Control .1.
Select the ActiveX control that you want to insert from the list, and then click OK . The ActiveX obje2.
Double-click on the ActiveX object and assign a name to it (enter a value in the Name field). The aabout the objects properties can be found in the component documentation, provided by the compo
3.
There are three functions to access the ActiveX component during runtime:
XGet(strName,strProperties) : Returns the value of the properties strProperties from the object strN
(for example, Color(PropGet) ).
XSet(strName,strProperties,Value) : Writes the value Value to the properties strProperties of the obj
(PropPut) (for example, Color(PropPut) ).
XRun(strName, strMethod, Parameter1, Parameter2, …, ParameterN) : Executes the method strMethod frProperties dialog from the object, with the syntax Method Name (Method) (for example, OpenFile(Metho
Tip: Before inserting an ActiveX control (usually an OCX file) into the project, make sure it has been prribbon.
Note: The amount of parameters set in the XRun() function can vary from 0 up to 255 and it dependsinteger, string or real).

8/22/2019 User Guide Indu Soft
http://slidepdf.com/reader/full/user-guide-indu-soft 692/1279
Q. How do I designate one screen that will open each time I start the project?
A. On the Project tab of the ribbon, in the Settings group, click Viewer , and then in the Project Settings
Q. How do I insert a background picture on the screen?
A. Right click on the screen and select the option Screen Attributes from the popup menu. Enable theand rename it with the same name of the screen (ScreenName .scr file). Using the Shared image option,
in the Share d image field.
Tasks
Q. How do I convert the History Trend to an ASCII file?
A. To convert a History Trend file to an ASCII format, copy the file "StudioPath \bin\hst2txt.exe" to the p
having to use a DOS window.
Q. How do I exchange data with FOX Pro by an ODBC protocol?
A. When exchanging data with FOX Pro database, it's necessary to set the parameter UseQuote=0 from th
Q. How do I set a DATE field for an ODBC interface with an Oracle package?
A. Configure the "Column" cells in the ODBC worksheet with the syntax ColumnName .ts (for example: MyD
Q. How do I execute a Math worksheet during the startup and another Math worksheet during the projec
A.
Startup : Execute a Math worksheet during the startup by creating a Math worksheet and filling in<TagName> tag type should be Boolean .
Shutdown : Instead of executing the ShutDown() function directly, execute one Math worksheet and
Communication
Q. How do I set a "communication error" alarm?
A. Configure a tag in the Write Status or Read Status field of the driver worksheets and configure an
Q. How do I communicate with a Siemens S7-200 PLC without using Prodave software?
A. Siemens S7-200 PLC has a Freeport that can implement any protocol via PLC programming. There isin the PLC with IWS 's Modbus driver (MODBU), you can exchange information between them.
Q. How do I start and stop communication drivers during runtime?
A. There are three functions available to handle the execution of the communication drivers during runti
Start all drivers configured in the project: StartTask("Driver")
For example: StartTask("Driver")

8/22/2019 User Guide Indu Soft
http://slidepdf.com/reader/full/user-guide-indu-soft 693/1279
Start a specific driver configured in the project:
WinExec("StudioPath\bin\Studio Manager.exe" + " + " StudioPath\bin\Driver.dll" + " + " DriverName")
For example:
WinExec( Asc2Str(34) + "C:\Program Files\InduSoft Web Studio v7.0\Bin\Studio Manager.e
Note: The Asc2Str(34) function is used to concatenate quotation marks for paths where there are
Stop a specific driver configured in the project: EndTask("DriverDriverName ")
For example: EndTask("DriverMODBU")
Tip: You can start or stop other tasks using the StartTask(TaskName ) and EndTask(TaskName ) functions.
Q. What are the parameters of the IWS DDE Server?
A. The IWS DDE Server and NetDDE Server parameters are shown in the table below:Network DDE\\<Computer Name>\NDDE$
UNISOFT$<TagName>Local DDEUNIDDEDB<TagName>Network DDE\\<Computer Name>\NDDE$
UNISOFT$<TagName>Local DDEUNIDDEDB<TagName>
Comm.
Type
Application Topic Item
Q. How do I exchange data with Excel by using NetDDE?
A. NetDDE can be used to exchange data, via the DDE protocol, between networked stations.
Start the DDEServer module from the development application (Tasks on the Home tab of the ribb1.
Run Excel in the remote station.2.
Open an Excel worksheet and fill the cells that must exchange data with IWS , using the following s3.

8/22/2019 User Guide Indu Soft
http://slidepdf.com/reader/full/user-guide-indu-soft 694/1279
='\computer name\NDDE$'|'UNISOFT$'!tag name
For example:
='\PC\NDDE$'|'UNISOFT$'!second
Note:
When running under Windows NT or Windows2000, it is necessary to make sure that the services
When running under Windows 98, it is necessary to run the program WindowsPath etdde.exe in bot
Q. Is the IWS OPC interface compliant with OPC specification v1.0a or v2.0?
A. The IWS OPC Client and OPC Server modules are compliant with both OPC specification v1.0a and v2.
Q. How do I get errors from Intellution / GE Fanuc iFIX applications?
A. If your project is communicating via TCP/IP with an iFIX application, then you should add the followin
[TCP]
SetQualityToBadOnError=1
After you do this, if the iFIX application generates an error during runtime, then the quality of the affecte
General
Q. What operating systems are compatible with InduSoft Web Studio and CEView?
A. See table below. "N" means that the operating system is NOT supported, and "Y" means that the operWindows Vista
AnyNNNYNNN
NWindows XPAnyNYYY

8/22/2019 User Guide Indu Soft
http://slidepdf.com/reader/full/user-guide-indu-soft 695/1279
NNNNWindows 2000AnyNY
YYNNNNWindows NTv4.0+SP4 or higherYYYN
NNNNWindows MEAnyNYNNNNNN
Windows 98AnyNYNNNNNNWindows 95
AnyYYNNNN

8/22/2019 User Guide Indu Soft
http://slidepdf.com/reader/full/user-guide-indu-soft 696/1279
NNWindows CEv2.12NNNN
YNNNv3.xNNNNYYY
YWindows CE.Netv4.0NNNNNNYYv4.1NN
NNNNYYv4.2NNNN
NNYYv5.0NN

8/22/2019 User Guide Indu Soft
http://slidepdf.com/reader/full/user-guide-indu-soft 697/1279
NNNNNYv6.0N
NNNNNNY
Operating System
Name Version
Q. How do I start IWS automatically when the computer is powered on?
A. Create a shortcut to […]\InduSoft Web Studio v7.0\ Bin\RunStudio.exe and then place it in your
Q. How do I disable Dr. Watson?
A. The step-by-step procedure to disable Dr. Watson under Windows NT is described below:
Execute the program WindowsPath \RegEdit.exe (for example, C:\WinNT\Regedit.exe )1.
Select the path HKEY_LOCAL_MACHINE\SOFTWARE\Microsoft\Windows NT\CurrentVersion\AeDebug2.
Set the value 0 (zero) to the parameter "Auto" from the path selected.3.
Close the Registry Editor window.4.
CAUTION:
Special cautions must be taken when editing parameters in the Registry Editor program be
There are two ways to modify the data format in IWS :
Off-Line : Set the parameters Order=<DateFormat> (for example, DMY ) and Separator=Separator (for
Note: You will need to verify your project to apply date settings to previously saved Web pages.
On-Line : Use the function SetDateFormat(strSeparator , strDateFormat ). For example, SetDateFo
Q. What features are not supported by CEView?
A. The main features not supported by CEView are: DDE, NetDDE, ODBC, PasteLink, and a number of fu
Q. How do I show a splashwindow when starting a project in CEView?

8/22/2019 User Guide Indu Soft
http://slidepdf.com/reader/full/user-guide-indu-soft 698/1279
A. To enable your project to show a splash window during startup, add the following key to the device's C
[OEM]
SpashWnd = Path to bitmap File // default is Splash.bmp
SplashWndTime = Time in milliseconds // default is 1000
Q. How do I see runtime messages and errors on a "blind" Windows Embedded device — that is, a devic
A. If the device has a network connection, then you can use the Remote LogWin tool to view the device's
You can also save the messages to a dump file (dump.txt ) and access the file at your convenience. To cre
[OEM]
BlindDevice = 1
Q. What are the main steps to create a Web-based application?
A. Follow the procedure below:
Develop the project locally. Don't use features that are not supported by Thin Clients for the screen1.
After saving the screens in the standard format (Save in the Application menu), save the screens t2.
On the Project tab of the ribbon, in the Web group, click Thin Client .3.
In the Data Server IP box, type the IP address of the Server station (i.e., the station where the pr4.
On the Home tab of the ribbon, click Tasks , and then set the TCP/IP Server module as Startup=A5.
Open the project tags database and set the option Server instead of Local in the Scope column fo6.
Verify the project (Verify on the Home tab of the ribbon) to update the HTML files with these new s7.
If there is no Web Server running on the computer, copy the program NTWebServer.exe from the Bin the root directory of the server. The Web Server is necessary to export data (web files) in HTTP pro
8.
Run the project on the Server station.9.
Using a browser (for example, Internet Explorer v4.1+SP1 or newer version) in the Thin Client stati10.
Note: The Thin Client requires an ActiveX component (ISSymbol.ocx ) to handle the screens on the br\OSPath \System32 directory of the Thin Client and register it by the command regsvr32 ISSymbol.ocx . Th
Q. How do I maintain communication between a Thin Client connecting via proxy and a Web Gateway ap
A. Microsoft Internet Information Services (IIS) has a configuration option to keep HTTP connections aliv
Start Internet Services Manager.1.
In the Internet Information Services window, open the local server (* server name ).2.
Right-click on Default Web Sites and select Properties from the shortcut menu. The Default Web3.
Select the Web Site tab of the Default Web Site Properties dialog.4.
In the Connections pane of the Web Site tab, uncheck the HTTP Keep-Alives Enabled option.5.

8/22/2019 User Guide Indu Soft
http://slidepdf.com/reader/full/user-guide-indu-soft 699/1279
Click OK to save the change and close the dialog.6.
Q. How do I send an email from the IWS project?
A. Follow the procedure below:
Execute the function CNFEMail(strSMTP,strFrom,strPOP3,strUser, strPassword,numTimeOut) to configuremost projects execute this function just once, after starting the project;
Execute the function SendEMail(strSubject,strMessage,strTO) and/or SendEMailExt(strSubject,strMessa
table:
ExecutionSynchronousAsynchronousSupports Subject textYYSupports Message textYYSupports TO addresses
YYSupports CC addressesNYSupports BCC addressesNYSupports attached filesNY
Characteristic SendEmail SendEmailExt
Q. The runtime task (TCP/IP, OPC, DDE, ODBC, etc) does not work.
A. Make sure the runtime task is set to Automatic in the Execution Tasks dialog (Tasks on the Home ta
Q. The browser from the Thin Client does not display the screen and launches a warning message regardi
A. Make sure the runtime task is set to Automatic in the Execution Tasks dialog (Tasks on the Home ta
Q. The browser of the Thin Client launches an error message missing the ISSymbol.ocx and does not displ
A. ISSymbol.ocx is the ActiveX object used by the browser from the Thin Client to view the web pages. If tnecessary to copy it to the \WinNT\System32 folder of the Thin Client station and register it manually. Once
Note: Use the command regsvr32 ISSymbol32.ocx to register the ActiveX component in the Thin Client.
Q. The screens are shown on the Thin Client (Browser); however, the data (tags values) are not read fro

8/22/2019 User Guide Indu Soft
http://slidepdf.com/reader/full/user-guide-indu-soft 700/1279
A. Make sure the parameter in the column Scope from the project tags database is set as Server insteaServer and in the Thin Client (Browser).
CAUTION:
It's necessary to verify the project (Verify on the Home tab of the ribbon) after modifying t
Q. The "On Up" expressions configured in the Command animation are not executed.
A. The "On Up" expressions from the Command animation are not executed if the mouse pointer is dragexecuted even if the mouse pointer is dragged out the object area before releasing it.
Q. The Trend History does not work after adding or removing tags in the Trend worksheet.
A. When a tag is inserted or removed FROM a Trend worksheet, the format of the history files (*.hst ) ior remove tags for history files, there are two valid procedures: Create a new Trend worksheet or delete
Q. The value of indirect tags (@TagName ) is not shown in the Thin client program.
A. When a screen is saved as HTML, IWS saves a ScreenName .tagl file in the \WEB subfolder. This file has t
"enabled" for TCP/IP communication with the server station. It provides an optimized communication bet
When using indirect tags in this way (@IndirectTag ), the tags pointed will not exchange data with the S
enable the TCP/IP communication for these tags with the server station.
Tip: Add a transparent rectangle (no fill and no line) in the screen corner. Apply the Command animatiTag Name fields blank). These tags will be added to the ScreenName .TAGL file, and they will be availabl
Q. Which functionalities are not supported by PocketPC platforms (for example, IPaq, Cassiopeia, Jornad
A. Windows CE devices powered PocketPC do not support some functionality which are supported by WinDCOM (Distributed Component Object Model): It means that all features based on DCOM (for example, rDialGetClientIP() function does not work for PocketPC devices
Functionality not supported by PocketPC devices
Q. How do I enable the "Hibernate" options from the operating system after installing IWS on a notebook
A. Follow the procedure below:
Run the Registry Editor (<Start button>\Run egedit ).1.
Select the following path from the Registry Editor : HKEY_LOCAL_MACHINE\System\CurrentControlSet\Ser2.
The IoPortAddress parameter from the path mentioned above is set with the hexadecimal value,3.
Close the Registry Editor and reboot the computer.4.
Tip: The Hexadecimal address of the LPT1 parallel port of the notebook can be gotten from the Control the hexadecimal address 0x00000378 .
Parent topic: Troubleshooting

8/22/2019 User Guide Indu Soft
http://slidepdf.com/reader/full/user-guide-indu-soft 701/1279
InduSoft Web Studio v7.0 Technical ReferenceCopyright © 2003–2010 Indusoft, Inc.

8/22/2019 User Guide Indu Soft
http://slidepdf.com/reader/full/user-guide-indu-soft 702/1279
Troubleshooting >
Using the Help MenuThis section describes the Help menu. You can use the commands (links) on this menu to accessinformation about InduSoft and the InduSoft Web Studio software.
Figure 1. Help menu
The Help menu commands and options are discussed on the following pages.
Technical Reference
Home Page
Release Notes
Communication Drivers
Support Information
About
Technical Reference
License Agreement
Release Notes
Home Page
Communication Drivers
Support Information
About
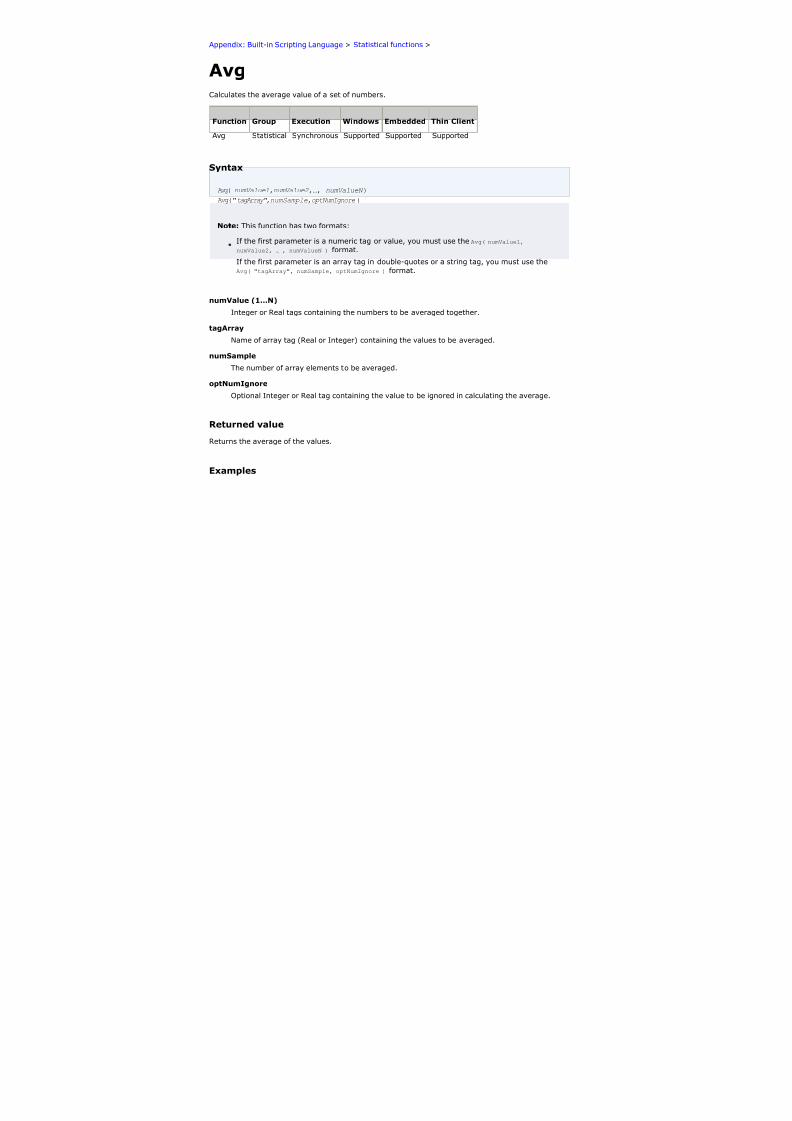
8/22/2019 User Guide Indu Soft
http://slidepdf.com/reader/full/user-guide-indu-soft 703/1279
Parent topic: TroubleshootingInduSoft Web Studio v7.0 Technical ReferenceCopyright © 2003–2010 Indusoft, Inc.

8/22/2019 User Guide Indu Soft
http://slidepdf.com/reader/full/user-guide-indu-soft 704/1279
Troubleshooting > Using the Help Menu >
Technical ReferenceTo open the help system for the InduSoft Web Studio software, click Help on the Help tab of theribbon.
Tip: This documentation is also available as a PDF on the InduSoft Web Studio installation CD.
Parent topic: Using the Help MenuInduSoft Web Studio v7.0 Technical ReferenceCopyright © 2003–2010 Indusoft, Inc.

8/22/2019 User Guide Indu Soft
http://slidepdf.com/reader/full/user-guide-indu-soft 705/1279
Troubleshooting > Using the Help Menu >
License AgreementTo display a PDF copy of the InduSoft Web Studio software license, click License Agreement on theHelp tab of the ribbon.
Parent topic: Using the Help MenuInduSoft Web Studio v7.0 Technical ReferenceCopyright © 2003–2010 Indusoft, Inc.

8/22/2019 User Guide Indu Soft
http://slidepdf.com/reader/full/user-guide-indu-soft 706/1279
Troubleshooting > Using the Help Menu >
Release NotesTo view the release notes for InduSoft Web Studio, click Release Notes on the Help tab of theribbon.
The release notes are distributed as a styled XML file, so you must have an XML-capable browser likeInternet Explorer 7 or Internet Explorer 8 to view the file as intended.
Parent topic: Using the Help MenuInduSoft Web Studio v7.0 Technical ReferenceCopyright © 2003–2010 Indusoft, Inc.

8/22/2019 User Guide Indu Soft
http://slidepdf.com/reader/full/user-guide-indu-soft 707/1279
Troubleshooting > Using the Help Menu >
Home PageTo go to the InduSoft company site, click Product Web Site on the Help tab of the ribbon.
Parent topic: Using the Help MenuInduSoft Web Studio v7.0 Technical ReferenceCopyright © 2003–2010 Indusoft, Inc.

8/22/2019 User Guide Indu Soft
http://slidepdf.com/reader/full/user-guide-indu-soft 708/1279
Troubleshooting > Using the Help Menu >
Communication DriversTo see the available documentation for the communication drivers, click Communication Drivers onthe Help tab of the ribbon.
Figure 1. Communication Drivers dialog
From this dialog, you can select an installed driver then click the Help button to open AdobeAcrobat® Reader™ and display a detailed document about that driver in PDF format.
Parent topic: Using the Help Menu
InduSoft Web Studio v7.0 Technical ReferenceCopyright © 2003–2010 Indusoft, Inc.

8/22/2019 User Guide Indu Soft
http://slidepdf.com/reader/full/user-guide-indu-soft 709/1279
Troubleshooting > Using the Help Menu >
Support InformationThe Support Information dialog displays basic information about your computer's operating system,your InduSoft Web Studio installation and license, and your project settings. If you need to contactCustomer Support, then you should have this information ready to answer their questions.
To open the dialog, click Support on the Help tab of the ribbon. The dialog will be displayed:
Figure 1. Support Information dialog
To copy the information to the Clipboard, click Copy. You can then paste the information into anotherwindow or text field, such as the body of an email message.
To save the information to a file, click Save to File. A standard Save As dialog will be displayed.
When you are done, click Close.
Parent topic: Using the Help MenuInduSoft Web Studio v7.0 Technical ReferenceCopyright © 2003–2010 Indusoft, Inc.

8/22/2019 User Guide Indu Soft
http://slidepdf.com/reader/full/user-guide-indu-soft 710/1279
Troubleshooting > Using the Help Menu >
AboutTo get more information about the InduSoft Web Studio software, click About on the Help tab of thebrowser.
Figure 1. About InduSoft Web Studio dialog
Parent topic: Using the Help MenuInduSoft Web Studio v7.0 Technical ReferenceCopyright © 2003–2010 Indusoft, Inc.

8/22/2019 User Guide Indu Soft
http://slidepdf.com/reader/full/user-guide-indu-soft 711/1279
Appendix: Built-in ScriptingLanguage
This section describes the functions that make up the built-in scripting language. Each functiondescription includes complete syntax, possible returned values, and examples of usage.
Logic and arithmetic operators
The built-in scripting language supports the following logic and arithmetic operators.
How to read function descriptions
This is a key to reading the descriptions of the built-in scripting functions.
Log Message functions
These functions are used to display status and debug messages in the Output window (for localruntime) or Remote LogWin window (for remote runtime).
Arithmetic functions
These functions are used to perform advanced arithmetic operations and bit manipulation on
numeric values.
Statistical functions
These functions are used to get certain statistics — such as average, maximum, and minimum— from two or more numeric values.
Logarithmic functions
These functions are used to perform logarithmic operations on numeric values.
Logical functions
These functions are used to perform logical operations (e.g., if/then, true/false) on tags andexpressions.
String functions
These functions are used to manipulate text strings or convert them into numeric values.
Date & Time functions
These functions are used to interact with the system clock or manipulate timestamps.
Trigonometric functionsThese functions are used to perform trigonometric operations (e.g., sine, cosine, tangent) onnumeric values.
Screen functions
These functions are used to open and close project screens.

8/22/2019 User Guide Indu Soft
http://slidepdf.com/reader/full/user-guide-indu-soft 712/1279
Security functions
These functions are used to manage users and groups in the project's security system.
Module Activity functions
These functions are used to manage a project's various runtime modules — such as backgroundtasks, the data server, and the project viewer — as well as those modules' interactions with theoperating system.
File functions
These functions are used to read from, write to, print, move, and delete external files.
Graphic functions
These functions are used to manipulate and print project screens.
Translation functions
These functions are used to access the translation tool during runtime.
Multimedia functions
These functions are used to play external audio and video files.
System Info functions
These functions are used get information about the computer that is running the project (eitherserver or client, depending on the function), as well as to change some project settings on thatcomputer.
Tags Database functions
These functions are used to directly change the values of project tags.
Loop functions
These functions are used to implement repeating, incrementing loop within a script.
ODBC functionsThese functions are used interact with an external database via Open Database Connectivity(ODBC).
Email functions
These functions are used to configure and send email from within a project.
Dial-up functions
These functions are used to configure the computer's modem (if any) and establish dial-upconnections to other computers.
ActiveX and .NET Control functions
These functions are used to directly run ActiveX and .NET Control objects in the project, as wellas to get and set property values on those objects.
Event Logger functions
These functions are used to send events and comments to the Event Logger.

8/22/2019 User Guide Indu Soft
http://slidepdf.com/reader/full/user-guide-indu-soft 713/1279
FTP functions
These functions are used to configure the FTP settings for the project, as well as to get filesfrom and put files on a remote server.
Database/ERP functions
These functions are used interact with external databases and ERP systems using SQL-likecommands.
InduSoft Web Studio v7.0 Technical Reference
Copyright © 2003–2010 Indusoft, Inc.

8/22/2019 User Guide Indu Soft
http://slidepdf.com/reader/full/user-guide-indu-soft 714/1279
Appendix: Built-in Scripting Language >
Logic and arithmetic operatorsThe built-in scripting language supports the following logic and arithmetic operators.
Logic operators
Operator Usage Description
AND A AND B TRUE if A and B are both TRUE
OR A OR B TRUE if A is TRUE, or B is TRUE, or both
XOR A XOR B TRUE if A is TRUE, or B is TRUE, but not both
NOT NOT A TRUE if A is FALSE
= X = Y TRUE if X is equal to Y
> X > Y TRUE if X is greater than Y
>= X >= Y TRUE if X is greater than or equal to Y
< X < Y TRUE if X is less than Y
<= X <= Y TRUE if X is less than or equal to Y
<> X <> Y TRUE if X is not equal to Y
& X & Y Bitwise AND:
0101 (decimal 5)AND 0011 (decimal 3)
= 0001 (decimal 1)
| X | Y Bitwise OR:
0101 (decimal 5)
OR 0011 (decimal 3)
= 0111 (decimal 7)
^ X ^ Y Bitwise XOR:
0101 (decimal 5)
XOR 0011 (decimal 3)
= 0110 (decimal 6)

8/22/2019 User Guide Indu Soft
http://slidepdf.com/reader/full/user-guide-indu-soft 715/1279
~ ~ X Bitwise NOT:
NOT 0101 (decimal 5)
= 1010 (decimal 10)
>> n X >> Y Rotate n bits to right:
0110 (decimal 6) ROTATE RIGHT
= 0011 (decimal 3)
<< n X << Y Rotate n bits to left:
0110 (decimal 6) ROTATE LEFT
= 1100 (decimal 12)
Tip: For more complex logic, try the Logical and Loop functions.
Arithmetic operators
Operator Usage Description
+ X + Y Add (plus)
- X - Y Subtract (minus)
* X * Y Multiply by
/ X / Y Divide by
Arithemtic operators are resolved from left to right according to the standard order of evaluation. Tochange the order, enclose in parentheses the part of the equation to be resolved first. For example,the following equation produces a result of 11 because multiplication is evaluated before addition; theequation multiplies 2 by 3 and then adds 5 to the result:
5+2*3
In contrast, if you use parentheses to change the syntax, 5 and 2 are added together and thenmultiplied by 3 to produce 21:
(5+2)*3

8/22/2019 User Guide Indu Soft
http://slidepdf.com/reader/full/user-guide-indu-soft 716/1279
Tip: For more complex math, try the Arithmetic, Statistical, Logarithmic and Trigonometricfunctions.
Parent topic: Appendix: Built-in Scripting LanguageInduSoft Web Studio v7.0 Technical Reference
Copyright © 2003–2010 Indusoft, Inc.

8/22/2019 User Guide Indu Soft
http://slidepdf.com/reader/full/user-guide-indu-soft 717/1279
Appendix: Built-in Scripting Language >
How to read function descriptionsThis is a key to reading the descriptions of the built-in scripting functions.
Each function description is broken into several sections.
Function attributes
Every function has certain attributes that are described in a single-row table:
Function Group Execution Windows Embedded ThinClient
function
name
group
name
synchronous or
asynchronous
supported or not
supported
supported or not
supported
supported or not
supported
First, obviously, the exact name of the function as it should be used in your project.
Next, the functions are organized into groups according to the type of calculcation they perform orthe part of your project upon which they act. You can use the group names to find the functions youwant in the Object Finder and in this documentation.
Next, the execution of the function is either synchronous or asynchronous:
Synchronous means that when the function is executed on either the project server or theproject client, that station requires some response or acknowledgement from the other. Theproject pauses, however briefly, while it waits for the response. In other words, the server andclient must remain synchronized.
This is normally not an issue because most functions are executed almost instantly, but if aclient makes unusually frequent function calls or your network is slow, then your project maysuffer decreased performance.
Asynchronous means that the function can be executed on either the project server or theproject client without waiting for the other. The project continues to run without interruption.
Finally, the function is either supported or unsupported on each of the target system types:
Windows includes Server and Client stations running on a full desktop or server version of Microsoft Windows.
Embedded includes Server and Client stations running on some version of Windows Embedded.
Thin Client includes Client stations running the Secure Viewer program or in a Web browser.
For more information about these system types, see System Requirements.
Syntax diagram and parameters

8/22/2019 User Guide Indu Soft
http://slidepdf.com/reader/full/user-guide-indu-soft 718/1279
A basic syntax diagram shows how the function should be entered and what parameters it takes.
In most cases, a parameter can take either a literal value or the name of a project tag that containsthe value. The data type of the parameter is indicated by its prefix:
bool means the parameter can take either a literal Boolean value or the name of a Boolean tag.For example, either 0 or boolTag.
num means the parameter can take either a literal numerical value or the name of an Integer
or Real tag. For example, either 45.6543 or numTag.
str means the parameter can take either a text string enclosed in quotation marks or the nameof a String tag. For example, either "My string" or strTag.
The additional prefix opt indicates that a parameter is optional. If you do not specify a value for theparameter, then the function will take the default value mentioned in the parameter description.
In the few cases where a parameter must take a project tag or some other special input, it will befully explained in the parameter description.
Returned value
This section describes the value returned by the function, if any.
Some functions return a calculated value, depending on the nature of the function.
Other functions return an error code that indicates how well the function was executed. The possiblecodes and their meanings are provided in a table.
Notes
This section describes any additional notes or cautions on the use of the function.
Examples
This section shows how the function can be called in your project. Multiple examples are provided toshow how the function can take both literal values and project tags, as well as how the function maybe called if it has optional parameters.
Parent topic: Appendix: Built-in Scripting LanguageInduSoft Web Studio v7.0 Technical ReferenceCopyright © 2003–2010 Indusoft, Inc.

8/22/2019 User Guide Indu Soft
http://slidepdf.com/reader/full/user-guide-indu-soft 719/1279
Appendix: Built-in Scripting Language >
Log Message functionsThese functions are used to display status and debug messages in the Output window (for localruntime) or Remote LogWin window (for remote runtime).
Trace
Trace is a built-in scripting function that displays a text message in the Output window. It istypically used to debug the project.
Parent topic: Appendix: Built-in Scripting LanguageInduSoft Web Studio v7.0 Technical ReferenceCopyright © 2003–2010 Indusoft, Inc.

8/22/2019 User Guide Indu Soft
http://slidepdf.com/reader/full/user-guide-indu-soft 720/1279
Appendix: Built-in Scripting Language > Log Message functions >
TraceTrace is a built-in scripting function that displays a text message in the Output window. It is typicallyused to debug the project.
Function Group Execution Windows Embedded ThinClient
Trace LogMessage Synchronous Supported Supported NotSupported
Syntax
strOutputMessage
The text of the message to be displayed.
Examples
Display static text that reports a specific event:
Trace("Beginning step 5.")
Display a date or time stamp by referencing the appropriate system tag:
Trace(Date)
Concatenate static text, tag references, and function calls to form a complex message:
Trace("The current second of the minute is " + Second + " and the system tick is " + GetTickCount() + " ms.")
Parent topic: Log Message functions
InduSoft Web Studio v7.0 Technical ReferenceCopyright © 2003–2010 Indusoft, Inc.

8/22/2019 User Guide Indu Soft
http://slidepdf.com/reader/full/user-guide-indu-soft 721/1279
Appendix: Built-in Scripting Language >
Arithmetic functionsThese functions are used to perform advanced arithmetic operations and bit manipulation on numericvalues.
Abs
Abs is a built-in scripting function that gets the absolute value of a specified numeric value.
Div
Div is a built-in scripting function that gets the dividend of two specified numeric values.
Format
Format is a built-in scripting function that formats a numerical value and returns it as a string.
GetBitGetBit is a built-in scripting function that gets the value of a single bit in a numeric value.
Mod
Mod is a built-in scripting function that gets the remainder from a division operation.
Pow
Pow is a built-in scripting function that gets the result of raising a numeric value to a specifiedexponent.
ResetBit
Resets a single bit in an Integer tag to 0.
Round
Rounds numValue to the nearest integer.
SetBit
Sets a single bit in an Integer tag to 1.
Sqrt
Takes the square root of numValue.
Swap16
Swaps the two lower bytes of a tag.
Swap32
Swaps two words in a tag.
TruncTruncates the value of numValue.

8/22/2019 User Guide Indu Soft
http://slidepdf.com/reader/full/user-guide-indu-soft 722/1279
Parent topic: Appendix: Built-in Scripting Language
InduSoft Web Studio v7.0 Technical ReferenceCopyright © 2003–2010 Indusoft, Inc.

8/22/2019 User Guide Indu Soft
http://slidepdf.com/reader/full/user-guide-indu-soft 723/1279
Appendix: Built-in Scripting Language > Arithmetic functions >
AbsAbs is a built-in scripting function that gets the absolute value of a specified numeric value.
Function Group Execution Windows Embedded ThinClient
Abs Arithmetic Synchronous Supported Supported Supported
Syntax
numValue
The numeric value from which the function takes the absolute value.
Returned value
The absolute value of the specified numeric value.
Examples
TagName Expression
Tag ABS( "-54.9788" ) // Returned value = 54.9788
Tag ABS( numValue ) // Returned value = absolute value of the number in the numValue
tag.
Parent topic: Arithmetic functionsInduSoft Web Studio v7.0 Technical ReferenceCopyright © 2003–2010 Indusoft, Inc.

8/22/2019 User Guide Indu Soft
http://slidepdf.com/reader/full/user-guide-indu-soft 724/1279
Appendix: Built-in Scripting Language > Arithmetic functions >
DivDiv is a built-in scripting function that gets the dividend of two specified numeric values.
Function Group Execution Windows Embedded ThinClient
Div Arithmetic Synchronous Supported Supported Supported
Syntax
Div( numNumerator ,numDenominator )
numNumerator
The numerator of the division operation.
numDenominator
The denominator of the division operation.
Returned value
This function returns the dividend only as a whole number. The remainder is omitted.
Tip: Use the Mod function to get the remainder instead of the dividend.
Examples
TagName Expression
numValue Div( 100, 8 ) // Returns the value 12.5
numValue Div( 16, 4 ) // Returns the value 4
numValueDiv( 100, 12.5 ) // Returns the value 8
Parent topic: Arithmetic functionsInduSoft Web Studio v7.0 Technical ReferenceCopyright © 2003–2010 Indusoft, Inc.

8/22/2019 User Guide Indu Soft
http://slidepdf.com/reader/full/user-guide-indu-soft 725/1279
Appendix: Built-in Scripting Language > Arithmetic functions >
FormatFormat is a built-in scripting function that formats a numerical value and returns it as a string.
Function Group Execution Windows Embedded ThinClient
Format Arithmetic Synchronous Supported Supported Supported
Syntax
strFlag
A description of how the given numerical value should be formated, according to the syntax%width.precisionFormat, where:
width is the minimum number of characters to be returned by the function. If the value tobe returned is shorter than this, then it is padded with either blank spaces (" ") or zeroes("0"); see examples below. The value is not truncated even if the result is longer than thespecified width. Applicable for flags d, x, X, o, b, f, e, E, g, G, s, c and h.
.precision is the number of decimal places for a floating-point number. Applicable for flagsf, e, E, g and G.
F is the specific format:
Format Description
d Decimal
x Hexadecimal (alphabetic characters in lowercase)
X Hexadecimal (alphabetic characters in uppercase)
o Octal
b Binary
f Floating-point
e Scientific notation (e in lowercase)
E Scientific notation (E in uppercase)
g Rounded (e in lowercase, when applicable)
G Rounded (E in uppercase, when applicable)
s String
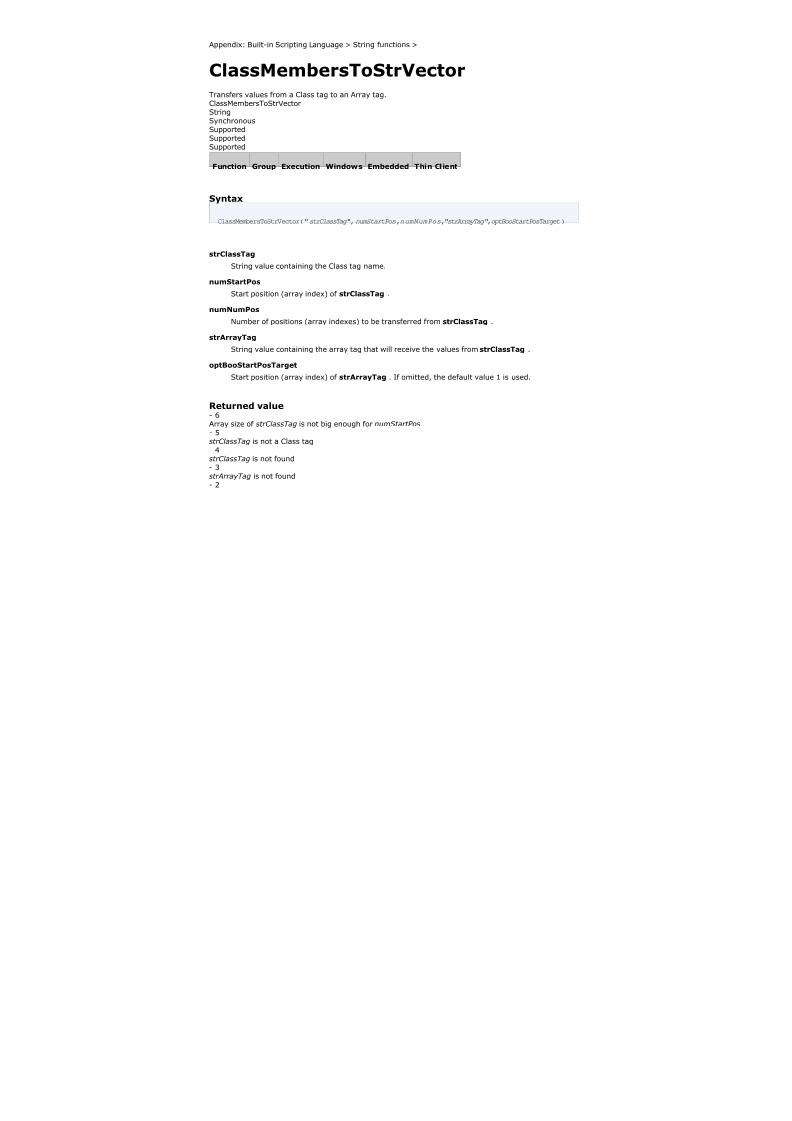
8/22/2019 User Guide Indu Soft
http://slidepdf.com/reader/full/user-guide-indu-soft 726/1279
c ASCII character (i.e., the numerical value is interpreted as an ASCII charactercode)
h Hour (hh:mm:ss)
Alternatively, the format can be set using the syntax ##.###, where the numerical value isrounded to the specified number of decimal places.
numValue
The numerical value to be formatted.
Returned value
This function returns a string that contains the formatted numerical value.
Notes
Format is similar to the printf function in other programming languages, and it allows most of thesame formatting options. However, unlike printf, Format can be used to format only one numericalvalue at a time.
This function is particularly useful for formatting values to be printed in reports.
Examples
TagName Expression
Tag Format( "%d", 12.34 ) // Returned value = "12"
Tag Format( "%04d", 12.34 ) // Returned value = "0012"
Tag Format( "%4d", 12.34 ) // Returned value = "12"
TagName Expression
Tag Format( "%x", 26 ) // Returned value = "1a"
Tag Format( "%04x", 26 ) // Returned value = "001a"
Tag Format( "%4x", 26 ) // Returned value = "1a"
TagName Expression
Tag Format( "%X", 26 ) // Returned value = "1A"
Tag Format( "%04X", 26 ) // Returned value = "001A"
Tag Format( "%4X", 26 ) // Returned value = "1A"

8/22/2019 User Guide Indu Soft
http://slidepdf.com/reader/full/user-guide-indu-soft 727/1279
TagName Expression
Tag Format( "%o", 16 ) // Returned value = "20"
Tag Format( "%04o", 16 ) // Returned value = "0020"
Tag Format( "%4o", 16 ) // Returned value = "20"
TagName Expression
Tag Format( "%b", 2 ) // Returned value = "10"
Tag Format( "%4b", 2 ) // Returned value = "0010"
Tag Format( "%04b", 2 ) // Returned value = "0010"
TagName Expression
Tag Format( "%0.1f", 12.34 ) // Returned value = "12.3"
Tag Format( "%06.1f", 12.34 ) // Returned value = "0012.3"
Tag Format( "%6.1f", 12.34 ) // Returned value = "12.3"
TagName Expression
Tag Format( "%e", 12.34 ) // Returned value = "1.234000e+001"
Tag Format( "%0.1e", 12.34 ) // Returned value = "1.2e+001"
Tag Format( "%09.1e", 12.34 ) // Returned value = "01.2e+001"
Tag Format( "%9.1e", 12.34 ) // Returned value = " 1.2e+001"
TagName Expression
Tag Format( "%E", 12.34 ) // Returned value = "1.234000E+001"
Tag Format( "%0.1E", 12.34 ) // Returned value = "1.2E+001"
Tag Format( "%09.1E", 12.34 ) // Returned value = "01.2E+001"
Tag Format( "%9.1E", 12.34 ) // Returned value = " 1.2E+001"
TagName Expression
Tag Format( "%0.1g", 12.34 ) // Returned value = "1e+001"
Tag Format( "%0.2g", 12.34 ) // Returned value = "12"
Tag Format( "%0.3g", 12.34 ) // Returned value = "12.3"

8/22/2019 User Guide Indu Soft
http://slidepdf.com/reader/full/user-guide-indu-soft 728/1279
TagName Expression
Tag Format( "%05.3g", 12.34 ) // Returned value = "012.3"
Tag Format( "%5.3g", 12.34 ) // Returned value = " 12.3"
TagName Expression
Tag Format( "%0.1G", 12.34 ) // Returned value = "1E+001"
Tag Format( "%0.2G", 12.34 ) // Returned value = "12"
Tag Format( "%0.3G", 12.34 ) // Returned value = "12.3"
Tag Format( "%05.3G", 12.34 ) // Returned value = "012.3"
Tag Format( "%5.3G", 12.34 ) // Returned value = "12.3"
TagName Expression
Tag Format( "%s", 12.34 ) // Returned value = "12"
Tag Format( "%04s", 12.34 ) // Returned value = "0012"
Tag Format( "%4s", 12.34 ) // Returned value = "12"
TagName Expression
Tag Format( "%c", 97 ) // Returned value = "a"
Tag Format( "%4c", 97 ) // Returned value = "a"
Tag Format( "%04c", 97 ) // Returned value = "000a"
TagName Expression
Tag Format( "%h", 30 ) // Returned value = "00:00:30"
Tag Format( "%h", 60 ) // Returned value = "00:01:00"
Tag Format( "%h", 90 ) // Returned value = "00:01:30"
Tag Format( "%h", 3600 ) // Returned value = "01:00:00"
TagName Expression
Tag Format( "##.#", 26.56789 ) // Returned value = "26.6"
Tag Format( "#.##", 26.56789 ) // Returned value = "26.57"
Tag Format( "##.##", 26.56789 ) // Returned value = "26.57"
Parent topic: Arithmetic functions

8/22/2019 User Guide Indu Soft
http://slidepdf.com/reader/full/user-guide-indu-soft 729/1279
InduSoft Web Studio v7.0 Technical ReferenceCopyright © 2003–2010 Indusoft, Inc.

8/22/2019 User Guide Indu Soft
http://slidepdf.com/reader/full/user-guide-indu-soft 730/1279
Appendix: Built-in Scripting Language > Arithmetic functions >
GetBitGetBit is a built-in scripting function that gets the value of a single bit in a numeric value.
Function Group Execution Windows Embedded ThinClient
GetBit Arithmetic Synchronous Supported Supported Supported
Syntax
GetBit( tagName,numBitNumber )
tagName
The name of an Integer tag from which the bit value will be gotten.
Note: To directly specify the name of a tag, rather than take the value of the tag, youmust enclose the tag name in double-quotes. For example, GetBit( "Second", 1 ).
numBitNumber
A numeric tag or value specifying the position (0…31) of the bit to get.
Returned value
Returns the value (0 or 1) of the specified bit.
Notes
You also can use the Bit field to read/write values from specific bits in an integer tag. For example,enter Second->b0 to access the LSB (Least Significant Bit of the Second tag), and Second->b31 to accessthe MSB (Most Significant Bit of the Second tag).
Examples
TagName Expression

8/22/2019 User Guide Indu Soft
http://slidepdf.com/reader/full/user-guide-indu-soft 731/1279
TagName Expression
Tag GetBit( "numSource", 4 ) // If the tag numSource holds a value of 15, then thisfunction returns 0.
Tag GetBit( "numSource", 1 ) // If the tag numSource holds a value of 19, then thisfunction returns 1.
Parent topic: Arithmetic functionsInduSoft Web Studio v7.0 Technical ReferenceCopyright © 2003–2010 Indusoft, Inc.

8/22/2019 User Guide Indu Soft
http://slidepdf.com/reader/full/user-guide-indu-soft 732/1279
Appendix: Built-in Scripting Language > Arithmetic functions >
ModMod is a built-in scripting function that gets the remainder from a division operation.
Function Group Execution Windows Embedded ThinClient
Mod Arithmetic Synchronous Supported Supported Supported
Group Execution WindowsPC WindowsCE ThinClient
Arithmetic Synchronous Supported Supported Supported
Syntax
Mod( numNumerator ,numDenominator )
numNumerator
Integer or Real tag containing the Numerator of the function.
numDenominator
Integer or Real tag containing the Denominator of the function.
Returned value
Returns the remainder (as a real number) after dividing numNumerator by numDenominator.
Tip: Use the Div function to get the whole number dividend of the operation.
Examples
TagName Expression
Tag Mod( 50, 4 ) // Returned value = 2
Tag Mod( 16, 4 ) // Returned value = 0
Tag Mod( 100, 8.2 ) // Returned value = 1.600
8/22/2019 User Guide Indu Soft
http://slidepdf.com/reader/full/user-guide-indu-soft 733/1279
Parent topic: Arithmetic functionsInduSoft Web Studio v7.0 Technical ReferenceCopyright © 2003–2010 Indusoft, Inc.

8/22/2019 User Guide Indu Soft
http://slidepdf.com/reader/full/user-guide-indu-soft 734/1279
Appendix: Built-in Scripting Language > Arithmetic functions >
PowPow is a built-in scripting function that gets the result of raising a numeric value to a specifiedexponent.
Function Group Execution Windows Embedded ThinClient
Pow Arithmetic Synchronous Supported Supported Supported
Syntax
Pow( numBase,numExponent)
numBase
Integer or Real tag containing the Base of the function.
numExponent
Integer or real tag containing the Exponent of the function.
Returned value
Returns the result of raising the base to the exponent.
Examples
TagName Expression
Tag Pow( 2, 3 ) // Returned value = 8
Tag Pow( 10, 4 ) // Returned value = 10000
Parent topic: Arithmetic functions
InduSoft Web Studio v7.0 Technical ReferenceCopyright © 2003–2010 Indusoft, Inc.

8/22/2019 User Guide Indu Soft
http://slidepdf.com/reader/full/user-guide-indu-soft 735/1279
Appendix: Built-in Scripting Language > Arithmetic functions >
ResetBitResets a single bit in an Integer tag to 0.
Function Group Execution Windows Embedded ThinClient
ResetBit Arithmetic Synchronous Supported Supported Supported
Syntax
ResetBit( tagName,numBitNumber )
tagName
The name of an Integer tag where the bit value will be reset.
Note: To directly specify the name of a tag, rather than take the value of the tag, youmust enclose the tag name in double-quotes. For example, ResetBit( "Second", 1 ).
numBitNumber
A numeric tag or value specifying the position (0…31) of the bit to reset.
Returned value
0 No error
1 Invalidparameter
2 Tag does notexist
Notes
You can use the Bit field to read/write values from specific bits in an integer tag. For example, enterSecond->b0 to access the LSB (Least Significant Bit of the Second tag), and Second->b31 to access theMSB (Most Significant Bit of the Second tag).

8/22/2019 User Guide Indu Soft
http://slidepdf.com/reader/full/user-guide-indu-soft 736/1279
Examples
TagName Expression
Tag ResetBit( "numSource", 4 ) // If the tag numSource held a value of 16, then thefunction returns 0 and numSource holds a new value of 0.
Tag ResetBit( "numSource", 1 ) // If the tag numSource held the value 19, then the
function returns 0 and numSource holds a new value of 17.
Parent topic: Arithmetic functionsInduSoft Web Studio v7.0 Technical ReferenceCopyright © 2003–2010 Indusoft, Inc.

8/22/2019 User Guide Indu Soft
http://slidepdf.com/reader/full/user-guide-indu-soft 737/1279
Appendix: Built-in Scripting Language > Arithmetic functions >
RoundRounds numValue to the nearest integer.
Function Group Execution Windows Embedded ThinClient
Round Arithmetic Synchronous Supported Supported Supported
Syntax
Round( numValue)
numValue
A Real tag that holds the value to be rounded.
Returned value
Returns the integer result of the round function.
Examples
TagName Expression
Tag Round( "345.87" ) // Returned value = 346
Tag Round( "65.323" ) // Returned value = 65
Parent topic: Arithmetic functionsInduSoft Web Studio v7.0 Technical Reference
Copyright © 2003–2010 Indusoft, Inc.

8/22/2019 User Guide Indu Soft
http://slidepdf.com/reader/full/user-guide-indu-soft 738/1279
Appendix: Built-in Scripting Language > Arithmetic functions >
SetBitSets a single bit in an Integer tag to 1.
Function Group Execution Windows Embedded ThinClient
SetBit Arithmetic Synchronous Supported Supported Supported
Syntax
SetBit( tagName,numBitNumber )
tagName
The name of an Integer tag where the bit value will be set.
Note: To directly specify the name of a tag, rather than take the value of the tag, youmust enclose the tag name in double-quotes. For example, SetBit( "Second", 1 ).
numBitNumber
A numeric tag or value specifying the position (0…31) of the bit to set.
Returned value
0 No error
1 Invalidparameter
2 Tag does notexist
Notes
You can also use the Bit field to read/write values from specific bits of an integer tag. For example,enter Second->b0 to access the LSB (Least Significant Bit of the Second tag), and Second->b31 to accessthe MSB (Most Significant Bit of the Second tag).

8/22/2019 User Guide Indu Soft
http://slidepdf.com/reader/full/user-guide-indu-soft 739/1279
Examples
TagName Expression
Tag GetBit( "numSource", 4 ) // If the tag numSource held a value of 0, then thisfunction returns 0 and numSource holds a new value of 16.
Tag GetBit( "numSource", 1 ) // If the tag numSource held the value 17, then this
function returns 0 and numSource holds a new value of 19.
Parent topic: Arithmetic functionsInduSoft Web Studio v7.0 Technical ReferenceCopyright © 2003–2010 Indusoft, Inc.

8/22/2019 User Guide Indu Soft
http://slidepdf.com/reader/full/user-guide-indu-soft 740/1279
Appendix: Built-in Scripting Language > Arithmetic functions >
SqrtTakes the square root of numValue.
Function Group Execution Windows Embedded ThinClient
Sqrt Arithmetic Synchronous Supported Supported Supported
Syntax
Sqrt( numValue)
numValue
Integer or Real tag to be square rooted.
Returned value
Returns the square root of the value in the numValue tag.
Note: If numValue has a negative value, then this function returns the value 0 and sets thequality of the returned tag to BAD.
Examples
TagName Expression
Tag SQRT( 25 ) // Returns the value 5
Tag SQRT( 67 ) // Returns the value 8.185353
Parent topic: Arithmetic functions
InduSoft Web Studio v7.0 Technical ReferenceCopyright © 2003–2010 Indusoft, Inc.

8/22/2019 User Guide Indu Soft
http://slidepdf.com/reader/full/user-guide-indu-soft 741/1279
Appendix: Built-in Scripting Language > Arithmetic functions >
Swap16Swaps the two lower bytes of a tag.
Function Group Execution Windows Embedded ThinClient
Swap16 Arithmetic Synchronous Supported Supported Supported
Syntax
Swap16( numValue)
numValue
Integer tag that holds the numeric value of the bytes to be swapped.
Returned value
Returns the numeric value after swapping the bytes.
Examples
TagName Expression
Tag Swap16( 16 ) // 16 = 0000000000010000 in binary. Returned value = 4096 =0001000000000000 in binary.
Tag Swap16( 43760 ) // 43760 = 1010010111110000 in binary. Returned value =61610 = 1111000010100101 in binary.
Parent topic: Arithmetic functionsInduSoft Web Studio v7.0 Technical ReferenceCopyright © 2003–2010 Indusoft, Inc.

8/22/2019 User Guide Indu Soft
http://slidepdf.com/reader/full/user-guide-indu-soft 742/1279
Appendix: Built-in Scripting Language > Arithmetic functions >
Swap32Swaps two words in a tag.
Function Group Execution Windows Embedded ThinClient
Swap32 Arithmetic Synchronous Supported Supported Supported
Syntax
Swap32( numValue)
numValue
Integer tag that holds the numeric value of the words to be swapped.
Returned value
Returns the numeric value after swapping the words.
Examples
TagName Expression
Tag Swap32( 16 ) // 16 = 00000000000000000000000000010000 in binary.Returned value = 1048576 = 00000000000100000000000000000000 inbinary.
Tag Swap32( 246333120 ) // 286333120 = 1010101010101010101111111100000000in binary. Returned value = -1094709586=11111111000000001010101010101010 in binary.
Parent topic: Arithmetic functionsInduSoft Web Studio v7.0 Technical ReferenceCopyright © 2003–2010 Indusoft, Inc.

8/22/2019 User Guide Indu Soft
http://slidepdf.com/reader/full/user-guide-indu-soft 743/1279
Appendix: Built-in Scripting Language > Arithmetic functions >
TruncTruncates the value of numValue.
Function Group Execution Windows Embedded ThinClient
Trunc Arithmetic Synchronous Supported Supported Supported
Syntax
Trunc( numValue)
numValue
Real tag to be truncated.
Returned value
Returns the integer portion of the real number value of numValue.
Examples
TagName Expression
Trunc( 234.987 ) // Returned value = 234
Trunc( -3465.9 ) // Returned value = -3465
Parent topic: Arithmetic functionsInduSoft Web Studio v7.0 Technical Reference
Copyright © 2003–2010 Indusoft, Inc.

8/22/2019 User Guide Indu Soft
http://slidepdf.com/reader/full/user-guide-indu-soft 744/1279
Appendix: Built-in Scripting Language >
Statistical functionsThese functions are used to get certain statistics — such as average, maximum, and minimum —from two or more numeric values.
Avg
Calculates the average value of a set of numbers.
Max
Returns the maximum value of a set of numbers.
Min
Returns the minimum value of a set of numbers.
RandGenerates a random number between 0 and 1.
Parent topic: Appendix: Built-in Scripting LanguageInduSoft Web Studio v7.0 Technical ReferenceCopyright © 2003–2010 Indusoft, Inc.

8/22/2019 User Guide Indu Soft
http://slidepdf.com/reader/full/user-guide-indu-soft 745/1279
Appendix: Built-in Scripting Language > Statistical functions >
AvgCalculates the average value of a set of numbers.
Function Group Execution Windows Embedded ThinClient
Avg Statistical Synchronous Supported Supported Supported
Syntax
Avg( numValue1,numValue2, … , numValueN )
Avg( "tagArray ",numSample,optNumIgnore)
Note: This function has two formats:
If the first parameter is a numeric tag or value, you must use the Avg( numValue1,
numValue2, … , numValueN ) format.
If the first parameter is an array tag in double-quotes or a string tag, you must use theAvg( "tagArray", numSample, optNumIgnore ) format.
numValue (1…N)
Integer or Real tags containing the numbers to be averaged together.
tagArray
Name of array tag (Real or Integer) containing the values to be averaged.
numSample
The number of array elements to be averaged.
optNumIgnore
Optional Integer or Real tag containing the value to be ignored in calculating the average.
Returned value
Returns the average of the values.
Examples

8/22/2019 User Guide Indu Soft
http://slidepdf.com/reader/full/user-guide-indu-soft 746/1279
TagName Expression
Tag Avg( 1, 2.34, 5, 7, 4, 8, 9.4 ) // Returned value =5.248571
Tag Avg( 1, 5, -9, 0, 5, 3 ) // Returned value = 0.833333
TagName Expression
Tag Avg( "tagArray[1]", 3 ) // If tagArray[1]=10, tagArray[2]=20 andtagArray[3]=60, then the Returned Value = 30
Tag Avg( "tagArray[1]", 3, 10 ) // If tagArray[1]=10, tagArray[2]=20 andtagArray[3]=60, then the Returned Value = 40
Parent topic: Statistical functionsInduSoft Web Studio v7.0 Technical ReferenceCopyright © 2003–2010 Indusoft, Inc.

8/22/2019 User Guide Indu Soft
http://slidepdf.com/reader/full/user-guide-indu-soft 747/1279
Appendix: Built-in Scripting Language > Statistical functions >
MaxReturns the maximum value of a set of numbers.
Function Group Execution Windows Embedded ThinClient
Max Statistical Synchronous Supported Supported Supported
Syntax
Max( numValue1,numValue2, … , numValueN )
Max( "tagArray ",numSample,optNumIgnore)
Note: This function has two formats:
If the first parameter is a numeric tag or value, you must use the Max( numValue1,
numValue2, … , numValueN ) format.
If the first parameter is an array tag in double-quotes or a string tag, you must use theMax( "tagArray", numSample, optNumIgnore ) format.
numValue (1…N)
Integer or Real tags containing the numbers to be analyzed.
tagArray
Name of array tag (Real or Integer) containing the values to be analyzed.
numSample
The number of array elements to be analyzed.
optNumIgnore
Integer or Real tags containing the value to be ignored in the analysis.
Returned value
Returns the maximum value of the set.
Examples

8/22/2019 User Guide Indu Soft
http://slidepdf.com/reader/full/user-guide-indu-soft 748/1279
TagName Expression
Tag Max( 1, 2.34, 5, 7, 4, 8, 9.4 ) // Returned value = 9.4
Tag Max( 1, 5, -9, 0, 5, 3 ) // Returned value = 5
Tag Max( "tagArray[1]", 3 ) // If tagArray[1]=10, tagArray[2]=20 andtagArray[3]=60, then the Returned Value = 60
Tag Max( "tagArray[1]", 3, 10 ) // If tagArray[1]=10, tagArray[2]=20 andtagArray[3]=60, then the Returned Value = 60
Parent topic: Statistical functionsInduSoft Web Studio v7.0 Technical ReferenceCopyright © 2003–2010 Indusoft, Inc.

8/22/2019 User Guide Indu Soft
http://slidepdf.com/reader/full/user-guide-indu-soft 749/1279
Appendix: Built-in Scripting Language > Statistical functions >
MinReturns the minimum value of a set of numbers.
Function Group Execution Windows Embedded ThinClient
Min Statistical Synchronous Supported Supported Supported
Syntax
Min( numValue1,numValue2, … , numValueN )
Min( "tagArray ",numSample,optNumIgnore)
Note: This function has two formats:
If the first parameter is a numeric tag or value, you must use the Min( numValue1,
numValue2, … , numValueN ) format.
If the first parameter is an array tag in double-quotes or a string tag, you must use theMin( "tagArray ", numSample, optNumIgnore ) format.
numValue (1…N)
Integer or Real tags containing the numbers to be analyzed.
tagArray
Name of an array tag (Real or Integer) containing the values to be analyzed.
numSample
The number of array elements to be analyzed.
optNumIgnore
Integer or Real tags containing a value to be ignored in the analysis.
Returned value
Returns the minimum value of the set.
Examples

8/22/2019 User Guide Indu Soft
http://slidepdf.com/reader/full/user-guide-indu-soft 750/1279
TagName Expression
Tag Min( 1, 2.34, 5, 7, 4, 8, 9.4 ) // Returned value = 1
Tag Min( 1, 5, -9, 0, 5, 3 ) // Returned value = -9
Tag Min( "tagArray[1]", 3 ) // If tagArray[1]=10, tagArray[2]=20 andtagArray[3]=60, then the Returned Value = 10
Tag Min( "tagArray[1]", 3, 10 ) // If tagArray[1]=10, tagArray[2]=20 andtagArray[3]=60, then the Returned Value = 20
Parent topic: Statistical functionsInduSoft Web Studio v7.0 Technical ReferenceCopyright © 2003–2010 Indusoft, Inc.

8/22/2019 User Guide Indu Soft
http://slidepdf.com/reader/full/user-guide-indu-soft 751/1279
Appendix: Built-in Scripting Language > Statistical functions >
RandGenerates a random number between 0 and 1.
Function Group Execution Windows Embedded ThinClient
Rand Statistical Synchronous Supported Supported Supported
Syntax
This function has no parameters.
Returned value
Returns a real number between 0 and 1.
Examples
TagName Expression
Tag Rand() // Returned value = ?, Where: 0<?<1
Parent topic: Statistical functionsInduSoft Web Studio v7.0 Technical ReferenceCopyright © 2003–2010 Indusoft, Inc.

8/22/2019 User Guide Indu Soft
http://slidepdf.com/reader/full/user-guide-indu-soft 752/1279
Appendix: Built-in Scripting Language >
Logarithmic functionsThese functions are used to perform logarithmic operations on numeric values.
Exp
Calculates the value of e (2.718282) raised to the power of numValue.
Log
Calculates the natural log of numValue.
Log10
Calculates the log base 10 of numValue.
Parent topic: Appendix: Built-in Scripting LanguageInduSoft Web Studio v7.0 Technical ReferenceCopyright © 2003–2010 Indusoft, Inc.

8/22/2019 User Guide Indu Soft
http://slidepdf.com/reader/full/user-guide-indu-soft 753/1279
Appendix: Built-in Scripting Language > Logarithmic functions >
ExpCalculates the value of e (2.718282) raised to the power of numValue.
Function Group Execution Windows Embedded ThinClient
Exp Logarithmic Synchronous Supported Supported Supported
Syntax
numValue
Integer or Real tag containing the exponent of e.
Returned value
Returns the value of e^( numValue ).
Examples
TagName Expression
Tag Exp( 1 ) // Returned value = 2.718282
Tag Exp( 5.25896 ) // Returned value = 192.281415
Parent topic: Logarithmic functionsInduSoft Web Studio v7.0 Technical ReferenceCopyright © 2003–2010 Indusoft, Inc.
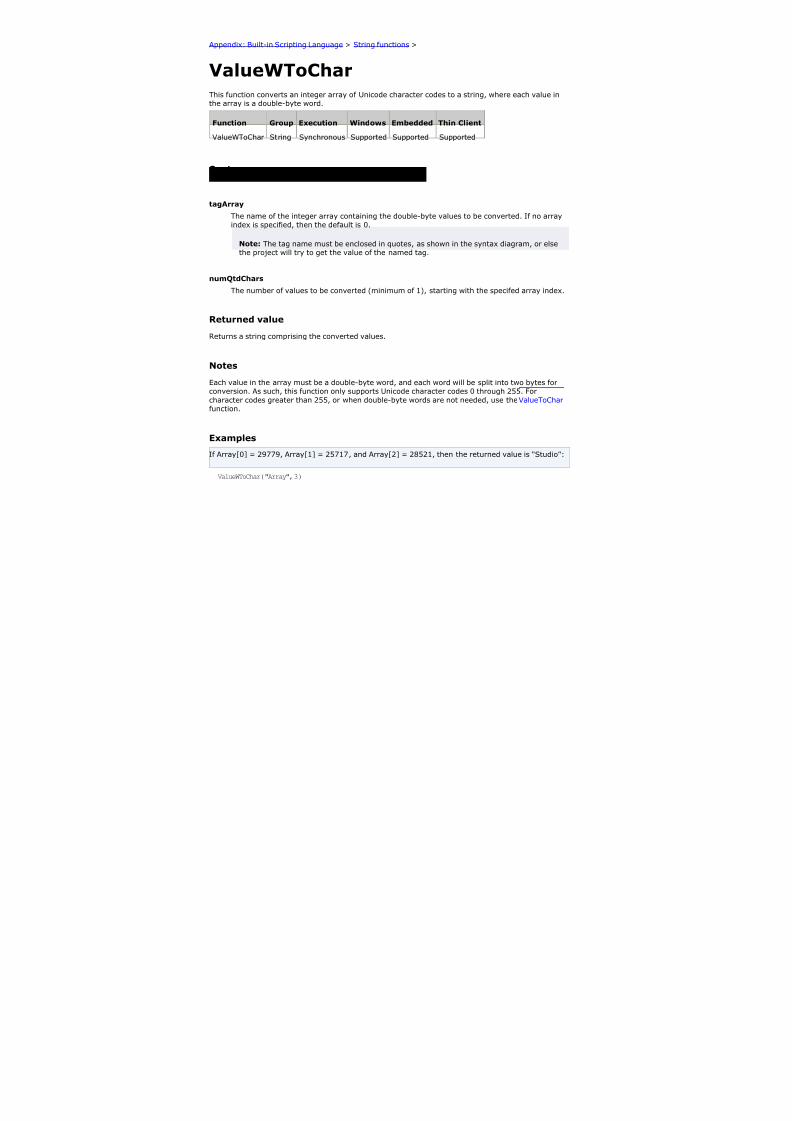
8/22/2019 User Guide Indu Soft
http://slidepdf.com/reader/full/user-guide-indu-soft 754/1279
Appendix: Built-in Scripting Language > Logarithmic functions >
LogCalculates the natural log of numValue.
Function Group Execution Windows Embedded ThinClient
Log Logarithmic Synchronous Supported Supported Supported
Syntax
numValue
Integer or Real tag from which the natural log is taken.
Returned value
Returns the value of ln( numValue ).
Note: If numValue has a negative value, then this function will return the value 0 and it will setthe quality of the returned tag to BAD.
Examples
TagName Expression
Tag Log( 2.718282 ) // Returned value = 1
Tag Log( 100 ) // Returned value = 4.605170
Parent topic: Logarithmic functionsInduSoft Web Studio v7.0 Technical ReferenceCopyright © 2003–2010 Indusoft, Inc.

8/22/2019 User Guide Indu Soft
http://slidepdf.com/reader/full/user-guide-indu-soft 755/1279
Appendix: Built-in Scripting Language > Logarithmic functions >
Log10Calculates the log base 10 of numValue.
Function Group Execution Windows Embedded ThinClient
Log10 Logarithmic Synchronous Supported Supported Supported
Syntax
numValue
Integer or Real tag, from which the log base 10 is taken.
Returned value
Returns the value of log10( numValue ).
Note: If numValue has a negative value, then this function will return the value 0 and it will setthe quality of the returned tag to BAD.
Examples
TagName Expression
Tag Log10( 1000 ) // Returned value = 3
Tag Log10( 43.05 ) // Returned value = 1.633973
Parent topic: Logarithmic functionsInduSoft Web Studio v7.0 Technical ReferenceCopyright © 2003–2010 Indusoft, Inc.

8/22/2019 User Guide Indu Soft
http://slidepdf.com/reader/full/user-guide-indu-soft 756/1279
Appendix: Built-in Scripting Language >
Logical functionsThese functions are used to perform logical operations (e.g., if/then, true/false) on tags andexpressions.
False
Determines whether the specified tag or expression is logically false.
If
Determines whether the contents of numExpression are logically true, then returns the value of numThen or optNumElse accordingly.
Toggle
Returns the toggled value from the contents of numValue tag.
True
Determines whether the specified tag or expression is logically true.
Parent topic: Appendix: Built-in Scripting LanguageInduSoft Web Studio v7.0 Technical ReferenceCopyright © 2003–2010 Indusoft, Inc.

8/22/2019 User Guide Indu Soft
http://slidepdf.com/reader/full/user-guide-indu-soft 757/1279
Appendix: Built-in Scripting Language > Logical functions >
FalseDetermines whether the specified tag or expression is logically false.
Function Group Execution Windows Embedded ThinClient
False Logical Synchronous Supported Supported Supported
Syntax
TagOrExpression
Tag or expression to be used in the function.
Returned value
0 If the tag or expression is not logicallyfalse.
1 If the tag or expression is logicallyfalse.
Tip: You may find this function useful if you need to return an actual value of 0 when theexpression returns some value other than 0.
Examples
TagName Expression
Tag False( 1 ) // Returned value = 0
Tag False( 5 < 2 ) // Returned value = 1
Parent topic: Logical functionsInduSoft Web Studio v7.0 Technical ReferenceCopyright © 2003–2010 Indusoft, Inc.

8/22/2019 User Guide Indu Soft
http://slidepdf.com/reader/full/user-guide-indu-soft 758/1279
Appendix: Built-in Scripting Language > Logical functions >
If Determines whether the contents of numExpression are logically true, then returns the value of numThen
or optNumElse accordingly.
Function Group Execution Windows Embedded ThinClient
If Logical Synchronous Supported Supported Supported
Syntax
If(numExpression,numThen,optNumElse)
numExpression
Tag or expression used as the condition in the function.
numThen
Tag or expression used if the condition is logically true.
optNumElse
Optional tag or expression used if the condition is logically false.
Returned value
numThen If the numExpression is logically true.
optNumElse If the numExpression is logically false.
No valuereturned
If the numExpression is logically false and there is no optNumElse in the function.
Notes
The numExpression parameter can be a combination of logic statements (AND, OR, and NOT). Forexample, If(TagA>TagB AND TagA=10,1,0).
The numThen parameter can be another function, including the If() function. Therefore, you canuse If() functions in cascade. For example, if(TagA>TagB,If(TagA<TagC,1, 2),3).

8/22/2019 User Guide Indu Soft
http://slidepdf.com/reader/full/user-guide-indu-soft 759/1279
Examples
TagName Expression
Tag If( 5 > 4,10, 6 ) // Returned value = 10
Tag If( 5 < 2, 0, 2 ) // Returned value = 0
Tag If( 3 = 9, 67 ) // No Returned value. (Tag retains previousvalue.)
Parent topic: Logical functionsInduSoft Web Studio v7.0 Technical ReferenceCopyright © 2003–2010 Indusoft, Inc.

8/22/2019 User Guide Indu Soft
http://slidepdf.com/reader/full/user-guide-indu-soft 760/1279
Appendix: Built-in Scripting Language > Logical functions >
ToggleReturns the toggled value from the contents of numValue tag.
Function Group Execution Windows Embedded ThinClient
Toggle Logical Synchronous Supported Supported Supported
Syntax
Toggle( numValue)
numValue
Boolean tag containing the value to be toggled.
Returned value
Numerical result (0 or 1) of the value to be toggled.
Notes
This function does not actually change the value of the tag, but it can be used in a command oroperation that does.
Examples
TagName Expression
Tag Toggle( MyBoolTag ) // Returned value = 1 if MyBoolTag value equals 0, or 0 if MyBoolTag value equals 1
Tag Toggle( numValue ) // Returned value = toggled value of the number in the
numValue tag
Parent topic: Logical functionsInduSoft Web Studio v7.0 Technical ReferenceCopyright © 2003–2010 Indusoft, Inc.

8/22/2019 User Guide Indu Soft
http://slidepdf.com/reader/full/user-guide-indu-soft 761/1279
Appendix: Built-in Scripting Language > Logical functions >
TrueDetermines whether the specified tag or expression is logically true.
Function Group Execution Windows Embedded ThinClient
True Logical Synchronous Supported Supported Supported
Syntax
TagOrExpression
Tag or expression to be used in the function.
Returned value
0 If the tag or expression is notlogically true.
1 If the tag or expression is logicallytrue.
Tip: You may find this function useful if you need to return an actual value of 1 when theexpression returns some value other than 0.
Examples
TagName Expression
Tag True( 1 ) // Returned value = 1
Tag True( 5 < 2 ) // Returned value = 0
Parent topic: Logical functionsInduSoft Web Studio v7.0 Technical ReferenceCopyright © 2003–2010 Indusoft, Inc.
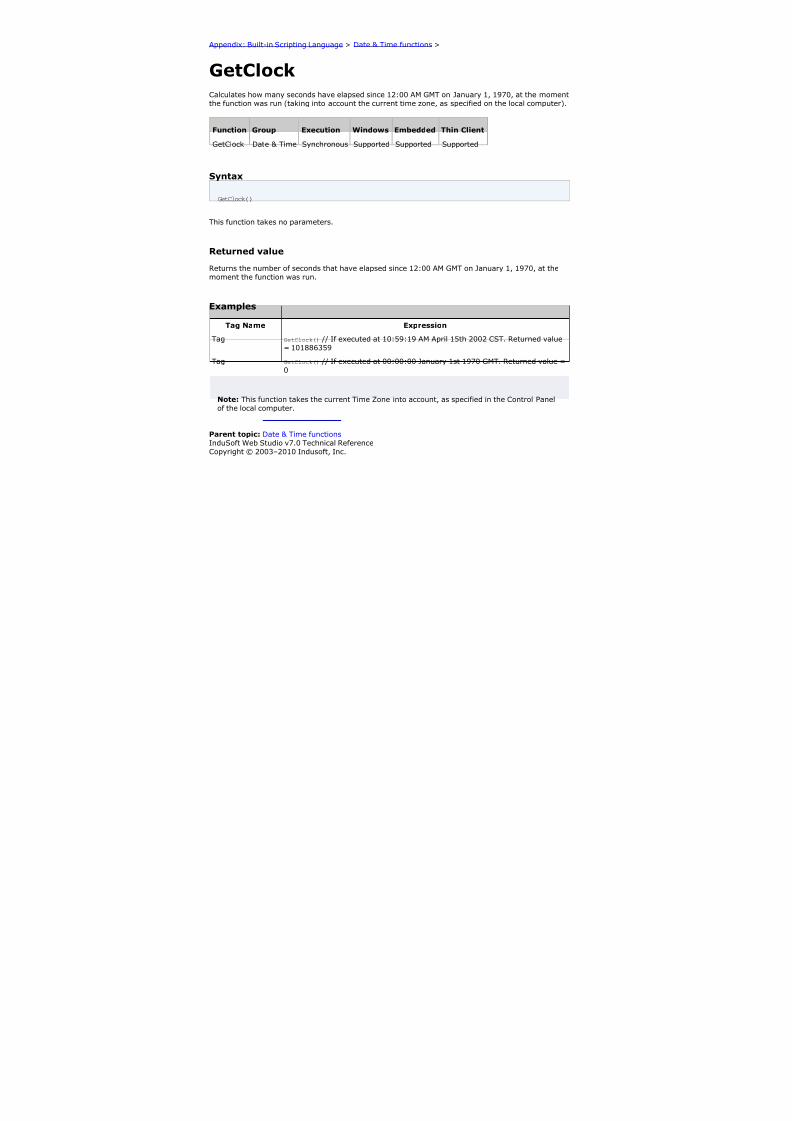
8/22/2019 User Guide Indu Soft
http://slidepdf.com/reader/full/user-guide-indu-soft 762/1279
Appendix: Built-in Scripting Language >
String functionsThese functions are used to manipulate text strings or convert them into numeric values.
Asc2Str
This function converts one or more Unicode character codes to a string.
CharToValue
This function converts a string to Unicode character codes and then stores those values in aninteger array.
CharToValueW
This function converts a string to Unicode character codes, combines each two codes into adouble-byte word, and then stores those values in an integer array.
ClassMembersToStrVector
Transfers values from a Class tag to an Array tag.
NCopy
Copies a defined section of a larger string.
Num
Converts a string into a float.
Str
Converts a number into a string.
Str2Asc
This function onverts a character to its corresponding Unicode character code.
StrCompare
Compares two strings to see if they are identitical.
StrCompareNoCase
Compares two strings to see if they are identitical, ignoring the case of letters (i.e., the lower-case "a" is considered to have the same value as the upper-case "A").
StrFromIntConverts an integer into its string representation in another base number system, such asbinary (base-2) or octal (base-8).
StrFromReal
StrFromReal is a built-in scripting function that converts a real numerical value to a string value,in either floating-point or exponential notation.

8/22/2019 User Guide Indu Soft
http://slidepdf.com/reader/full/user-guide-indu-soft 763/1279
StrFromTime
Converts a timestamp from UTC standard notation into a formatted string, adjusted to reflectthe Time Zone setting in the Control Panel of the local computer.
StrGetElement
Gets a specific element from a string source.
StrLeftCopies the first characters of a larger string.
StrLen
Determines the length of a string.
StrLower
Converts a string to all lower case characters.
StrRChr
Isolates the final occurrence of a character sequence within a string.
StrRight
Copies the last characters in a larger string.
StrSetElement
Sets a specific element in a string source.
StrStr
Isolates the first occurrence of a character sequence within a string.
StrStrPos
Finds the first occurrence of a character within a string.
StrTrim
Removes unwanted spaces from a string.
StrTrimAll
Eliminates a specific char from the whole string.
StrUpper
Converts a string to all uppercase characters.
ValueToChar
This function converts an integer array of Unicode character codes to a string.
ValueWToChar
This function converts an integer array of Unicode character codes to a string, where each valuein the array is a double-byte word.
Parent topic: Appendix: Built-in Scripting Language

8/22/2019 User Guide Indu Soft
http://slidepdf.com/reader/full/user-guide-indu-soft 764/1279
InduSoft Web Studio v7.0 Technical ReferenceCopyright © 2003–2010 Indusoft, Inc.

8/22/2019 User Guide Indu Soft
http://slidepdf.com/reader/full/user-guide-indu-soft 765/1279
Appendix: Built-in Scripting Language > String functions >
Asc2StrThis function converts one or more Unicode character codes to a string.
Function Group Execution Windows Embedded ThinClient
Asc2Str String Synchronous Supported Supported Supported
Syntax
Asc2Str( numChar1,numChar2, … , numCharN )
numChar (1-N)
A Unicode character code (in decimal).
Returned value
Returns a string comprising the converted codes.
Notes
Although the name of this function implies it only supports ASCII characters, it is in fact a legacy of previous versions of the software. The current version supports the full Unicode character set.
Examples
TagName Expression
Tag Asc2Str( 65 ) // Returned value = "A"
Tag Asc2Str( 65, 66, 67 ) // Returned value = "ABC"
Tag Asc2Str( Array[0], Array[1], Array[2] ) // Returned value ="ABC"
Parent topic: String functionsInduSoft Web Studio v7.0 Technical ReferenceCopyright © 2003–2010 Indusoft, Inc.
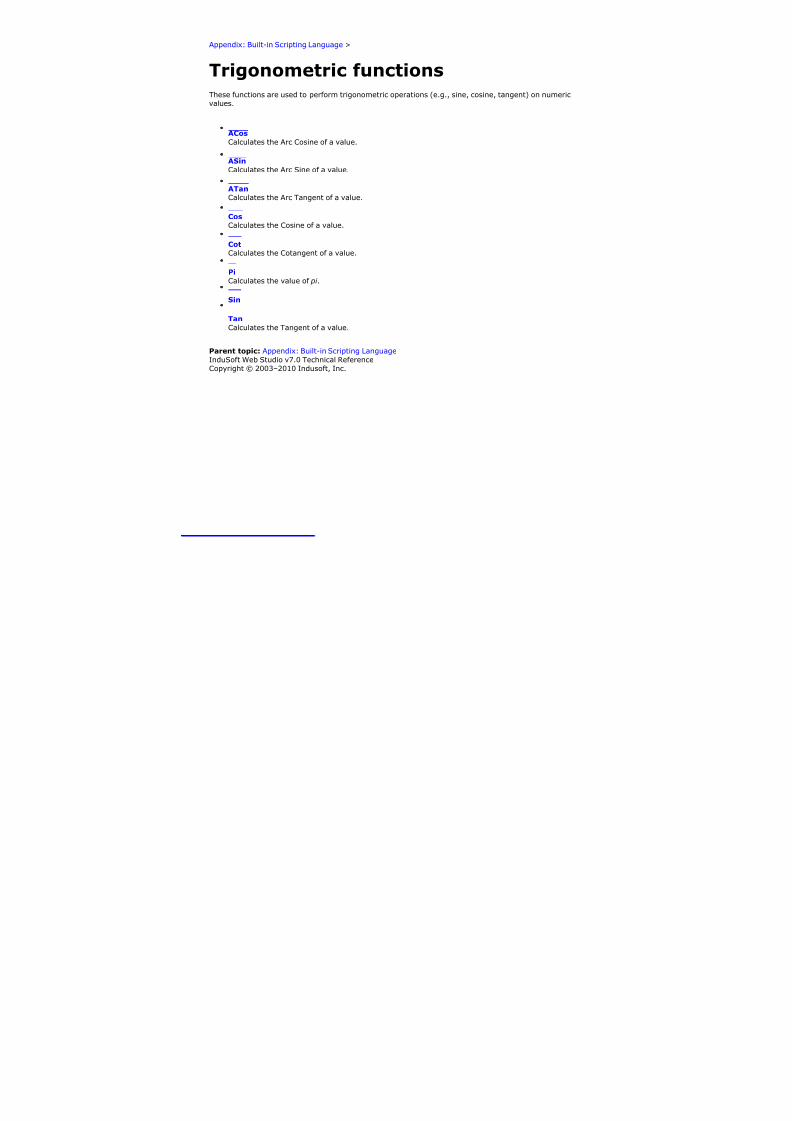
8/22/2019 User Guide Indu Soft
http://slidepdf.com/reader/full/user-guide-indu-soft 766/1279
Appendix: Built-in Scripting Language > String functions >
CharToValueThis function converts a string to Unicode character codes and then stores those values in an integerarray.
Function Group Execution Windows Embedded ThinClient
CharToValue String Synchronous Supported Supported Supported
Syntax
tagString
The name of the string tag, whose value will be converted.
Note: The tag name must be enclosed in quotes, as shown in the syntax diagram, or elsethe project will try to get the value of the named tag.
tagArray
The name of the integer array that will receive the converted values. If no array index isspecfied, then the default is 0.
Note: The tag name must be enclosed in quotes, as shown in the syntax diagram, or elsethe project will try to get the value of the named tag.
Returned value
Returns the number of array elements used, which should be equal to the number of characters inthe string.
Examples
If StrTag = "ABC", then Array[0] = 65, Array[1] = 66, and Array[2] = 67:
CharToValue( "StrTag", "Array" )
If StrTag = "ABC", then Array[10] = 65, Array[11] = 66, and Array[12] = 67:

8/22/2019 User Guide Indu Soft
http://slidepdf.com/reader/full/user-guide-indu-soft 767/1279
CharToValue( "StrTag", "Array[10]" )
Parent topic: String functionsInduSoft Web Studio v7.0 Technical ReferenceCopyright © 2003–2010 Indusoft, Inc.

8/22/2019 User Guide Indu Soft
http://slidepdf.com/reader/full/user-guide-indu-soft 768/1279
Appendix: Built-in Scripting Language > String functions >
CharToValueWThis function converts a string to Unicode character codes, combines each two codes into a double-byte word, and then stores those values in an integer array.
Function Group Execution Windows Embedded ThinClient
CharToValueW String Synchronous Supported Supported Supported
Syntax
tagString
The name of the string tag, whose value will be converted.
Note: The tag name must be enclosed in quotes, as shown in the syntax diagram, or elsethe project will try to get the value of the named tag.
tagArray
The name of the integer array that will receive the converted values. If no array index isspecfied, then the default is 0.
Note: The tag name must be enclosed in quotes, as shown in the syntax diagram, or elsethe project will try to get the value of the named tag.
Returned value
Returns the number of array elements used, which should be equal to half the number of charactersin the string.
Notes
Because of how each two character codes are combined into single value, this function only supportsUnicode character codes 0 through 255. For character codes greater than 255, or when double-bytewords are not needed, use the CharToValue function.
Examples

8/22/2019 User Guide Indu Soft
http://slidepdf.com/reader/full/user-guide-indu-soft 769/1279
If StrTag = "Studio", then Array[0] = 29779 ("St"), Array[1] = 25717 ("ud"), and Array[2] = 28521("io"):
CharToValue( "StrTag", "Array" )
If StrTag = "Studio", then Array[10] = 29779 ("St"), Array[11] = 25717 ("ud"), and Array[12] =
28521 ("io"):
CharToValue( "StrTag", "Array[10]" )
Parent topic: String functionsInduSoft Web Studio v7.0 Technical ReferenceCopyright © 2003–2010 Indusoft, Inc.

8/22/2019 User Guide Indu Soft
http://slidepdf.com/reader/full/user-guide-indu-soft 770/1279
Appendix: Built-in Scripting Language > String functions >
ClassMembersToStrVectorTransfers values from a Class tag to an Array tag.ClassMembersToStrVectorStringSynchronousSupportedSupportedSupported
Function Group Execution Windows Embedded ThinClient
Syntax
ClassMembersToStrVector( "strClassTag " ,numStartPos,numNumPos, "strArrayTag ",optBooStartPosTarget)
strClassTag
String value containing the Class tag name.
numStartPos
Start position (array index) of strClassTag .
numNumPos
Number of positions (array indexes) to be transferred from strClassTag .
strArrayTag
String value containing the array tag that will receive the values from strClassTag .
optBooStartPosTarget
Start position (array index) of strArrayTag . If omitted, the default value 1 is used.
Returned value- 6Array size of strClassTag is not big enough for numStartPos
- 5strClassTag is not a Class tag- 4strClassTag is not found- 3strArrayTag is not found- 2

8/22/2019 User Guide Indu Soft
http://slidepdf.com/reader/full/user-guide-indu-soft 771/1279
Invalid data type of the parameters- 1Invalid number of parameters0Transferred successfully
Notes
If strClassTag has more than one member, the value of each member will be transferred tostrArrayTag . Therefore, it is importatnt to make sure that the array size of strArrayTag is bigenough to receive all values from strClassTag .
ExamplesTagClassMembersToStrVector( "Classtag", 5, 3, "Arraytag" )
Tag
ClassMembersToStrVector( "Classtag", 5, 3, "Arraytag", 0 )TagClassMembersToStrVector ( TagName, 0, 1, ArrayName )
TagName Expression
Parent topic: String functionsInduSoft Web Studio v7.0 Technical ReferenceCopyright © 2003–2010 Indusoft, Inc.

8/22/2019 User Guide Indu Soft
http://slidepdf.com/reader/full/user-guide-indu-soft 772/1279
Appendix: Built-in Scripting Language > String functions >
NCopyCopies a defined section of a larger string.
Function Group Execution Windows Embedded ThinClient
NCopy String Synchronous Supported Supported Supported
Syntax
NCopy( strSource,numStartChar ,numQtdChar )
strSource
The source string.
numStartChar
Integer tag containing a number corresponding to the first character being copied.
numQtdChar
The number of characters to be copied.
Returned valueReturns a string that is part of the source string (as defined by the function).
Examples
TagName Expression
Tag NCopy( "Studio version 7.0", 7, 7 ) // Returned value ="version"
Tag NCopy( "Technical Reference", 0, 9 ) // Returned value =
"Technical"
Note: The first character in the string will be assigned the value 0.
Parent topic: String functions

8/22/2019 User Guide Indu Soft
http://slidepdf.com/reader/full/user-guide-indu-soft 773/1279
InduSoft Web Studio v7.0 Technical ReferenceCopyright © 2003–2010 Indusoft, Inc.

8/22/2019 User Guide Indu Soft
http://slidepdf.com/reader/full/user-guide-indu-soft 774/1279
Appendix: Built-in Scripting Language > String functions >
NumConverts a string into a float.
Function Group Execution Windows Embedded ThinClient
Num String Synchronous Supported Supported Supported
Syntax
Num( strValue)
strValue
The number of characters to be converted into float format.
Returned value
Returns the number (formerly in a string format) in float format.
Examples
TagName Expression
Tag Num( "321654.987" ) // Returned value = 321654.987
Tag Num( "5.6589626246" ) // Returned value =5.6589626246
Note: The float string cannot use characters other than the numbers (0..9) and a decimal point(.), or the function returns the value 0.0.
Parent topic: String functionsInduSoft Web Studio v7.0 Technical ReferenceCopyright © 2003–2010 Indusoft, Inc.

8/22/2019 User Guide Indu Soft
http://slidepdf.com/reader/full/user-guide-indu-soft 775/1279
Appendix: Built-in Scripting Language > String functions >
StrConverts a number into a string.
Function Group Execution Windows Embedded ThinClient
Str String Synchronous Supported Supported Supported
Syntax
Str(numValue)
numValue
Integer or float tag containing a number to be converted to a string.
Returned value
Returns the string, in a float format.
Examples
TagName Expression
Tag Str( 321654.987 ) // Returned value ="321654.987"
Tag Str( 5.65896246 ) // Returned value = "5.658962"
Parent topic: String functions
InduSoft Web Studio v7.0 Technical ReferenceCopyright © 2003–2010 Indusoft, Inc.
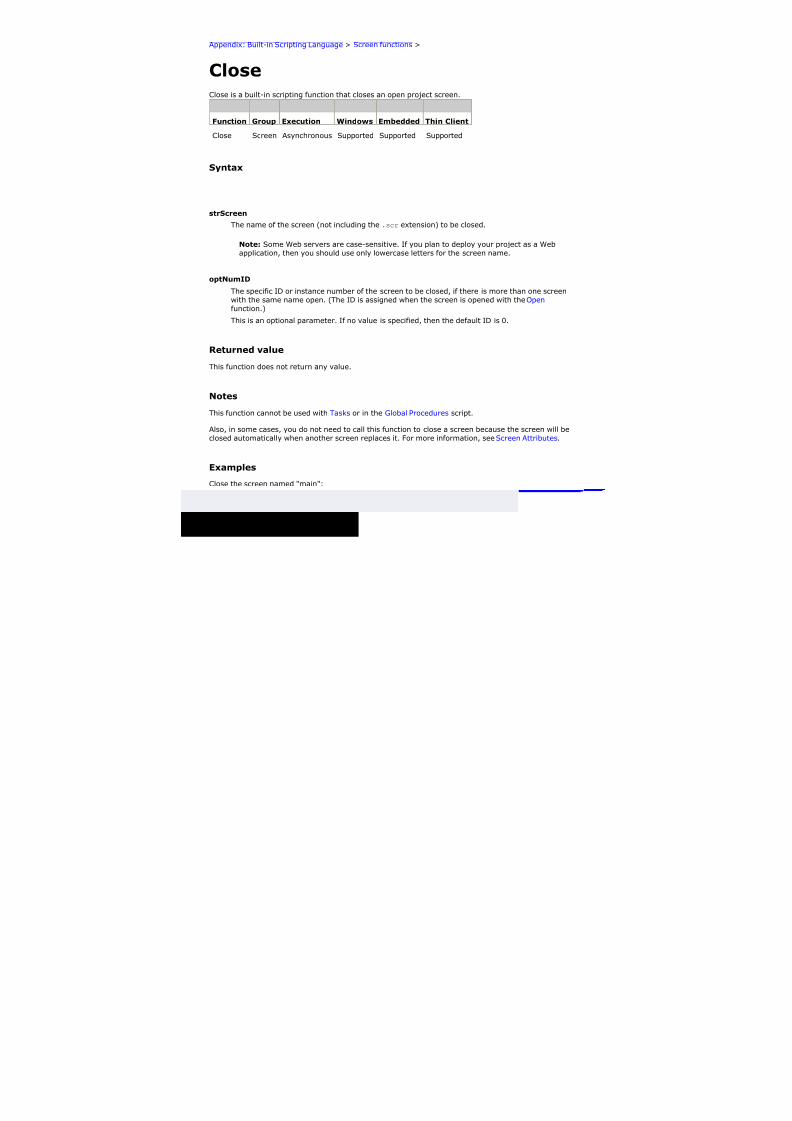
8/22/2019 User Guide Indu Soft
http://slidepdf.com/reader/full/user-guide-indu-soft 776/1279
Appendix: Built-in Scripting Language > String functions >
Str2AscThis function onverts a character to its corresponding Unicode character code.
Function Group Execution Windows Embedded ThinClient
Str2Asc String Synchronous Supported Supported Supported
Syntax
strChar
The character to be converted.
Returned value
Returns the Unicode character code (in decimal) for the specified character.
Notes
Although the name of this function implies it only supports ASCII characters, it is in fact a legacy of previous versions of the software. The current version supports the full Unicode character set.
Examples
TagName Expression
Tag Str2Asc( "C" ) // Returned value = 67
Tag Str2Asc( "o" ) // Returned value = 111
Parent topic: String functionsInduSoft Web Studio v7.0 Technical ReferenceCopyright © 2003–2010 Indusoft, Inc.

8/22/2019 User Guide Indu Soft
http://slidepdf.com/reader/full/user-guide-indu-soft 777/1279
Appendix: Built-in Scripting Language > String functions >
StrCompareCompares two strings to see if they are identitical.
Function Group Execution Windows Embedded ThinClient
StrCompare String Synchronous Supported Supported Supported
Syntax
StrCompare( strValue1,strValue2)
strValue1
A string, or a tag of String type. This is the first string in the comparison.
strValue2
A string, or a tag of String type. This is the second string in the comparison.
Returned value
- 1 The value of strValue1 is less than the value of
strValue2.
0 strValue1 and strValue2 are identical.
1 The value of strValue1 is greater than the value of strValue2.
Examples
TagName Expression
Tag StrCompare( "Text1", "Text2" ) // Returned value = -1
Tag
Tag1="Text"
Tag2 = "Text"
StrCompare( Tag1, Tag2 ) // Returned value = 0

8/22/2019 User Guide Indu Soft
http://slidepdf.com/reader/full/user-guide-indu-soft 778/1279
TagName Expression
TagTag1="Text1"Tag2 = "Text2"
StrCompare( Tag1, Tag2 ) // Returned value = -1
Parent topic: String functionsInduSoft Web Studio v7.0 Technical ReferenceCopyright © 2003–2010 Indusoft, Inc.

8/22/2019 User Guide Indu Soft
http://slidepdf.com/reader/full/user-guide-indu-soft 779/1279
Appendix: Built-in Scripting Language > String functions >
StrCompareNoCaseCompares two strings to see if they are identitical, ignoring the case of letters (i.e., the lower-case"a" is considered to have the same value as the upper-case "A").
Function Group Execution Windows Embedded ThinClient
StrCompareNoCase String Synchronous Supported Supported Supported
Syntax
StrCompareNoCase( strValue1,strValue2)
strValue1
A string, or a tag of String type. This is the first string in the comparison.
strValue2
A string, or a tag of String type. This is the second string in the comparison.
Returned value
- 1The value of
strValue1is less than the value of
strValue2.
0 strValue1 and strValue2 are identical.
1 The value of strValue1 is greater than the value of strValue2.
Examples
TagName Expression
Tag StrCompareNoCase( "Text1", "TEXT1" ) // Returned value = 0
TagTag1="Text1"Tag2 = "TEXT1"
StrCompareNoCase( Tag1, Tag2 ) // Returned value = 0

8/22/2019 User Guide Indu Soft
http://slidepdf.com/reader/full/user-guide-indu-soft 780/1279
Parent topic: String functionsInduSoft Web Studio v7.0 Technical ReferenceCopyright © 2003–2010 Indusoft, Inc.

8/22/2019 User Guide Indu Soft
http://slidepdf.com/reader/full/user-guide-indu-soft 781/1279
Appendix: Built-in Scripting Language > String functions >
StrFromIntConverts an integer into its string representation in another base number system, such as binary(base-2) or octal (base-8).
Function Group Execution Windows Embedded ThinClient
StrFromInt String Synchronous Supported Supported Supported
Syntax
StrFromInt( numValue,numBase)
numValue
The numeric value to be converted into a string.
numBase
The base number system to convert into.
Returned value
This function returns a string representation of the given integer, in the specified base numbersystem. The returned value can be stored in any tag of String type.
Notes
You can specify a real number instead of an integer, but only the whole part of the number will beconverted. To convert the entire real number, use the StrFromReal function instead.
Also, if you do not need to change the base, then use the Str function instead.
Examples
TagName Expression
Tag StrFromInt( 26, 2 ) // Returned value = "11010"
Tag StrFromInt( 26, 8 ) // Returned value = "32"

8/22/2019 User Guide Indu Soft
http://slidepdf.com/reader/full/user-guide-indu-soft 782/1279
Parent topic: String functionsInduSoft Web Studio v7.0 Technical ReferenceCopyright © 2003–2010 Indusoft, Inc.

8/22/2019 User Guide Indu Soft
http://slidepdf.com/reader/full/user-guide-indu-soft 783/1279
Appendix: Built-in Scripting Language > String functions >
StrFromRealStrFromReal is a built-in scripting function that converts a real numerical value to a string value, ineither floating-point or exponential notation.
Function Group Execution Windows Embedded ThinClient
StrFromReal String Synchronous Supported Supported Supported
Syntax
numValue
The numerical value to be converted.
numPrecision
The number of decimal places to be shown in the resulting string. Please note that the valuewill be rounded rather than truncated.
strType
A single-character code that specifies how the resulting string should be formatted, asdescribed in the following table:
Value of
strType
Description
f Formatted in floating-point notation.
e Formatted in exponential notation with a lower-case "e".
E Formatted in exponential notation with an upper-case "E".
Returned value
This function returns a string representation of the given numerical value, with the specified precisionand notation.

8/22/2019 User Guide Indu Soft
http://slidepdf.com/reader/full/user-guide-indu-soft 784/1279
Examples
StrFromReal( 263.355, 2, "f" )
…returns a string value of "263.36".
StrFromReal( 263.355, 2, "e" )
…returns a string value of "2.63e+002".
StrFromReal( 263.355, 2, "E" )
…returns a string value of "2.63E+002".
Parent topic: String functionsInduSoft Web Studio v7.0 Technical ReferenceCopyright © 2003–2010 Indusoft, Inc.

8/22/2019 User Guide Indu Soft
http://slidepdf.com/reader/full/user-guide-indu-soft 785/1279
Appendix: Built-in Scripting Language > String functions >
StrFromTimeConverts a timestamp from UTC standard notation into a formatted string, adjusted to reflect theTime Zone setting in the Control Panel of the local computer.
Function Group Execution Windows Embedded ThinClient
StrFromTime String Synchronous Supported Supported Supported
Syntax
StrFromTime( numUTCTime,numType)
numUTCTime
An integer, or a tag of Integer type. A timestamp given in UTC standard notation.
numType
An integer, or a tag of Integer type. Specifies the format of the resulting string, as described inthe following table:
Value of
numType
Description
1 Displays the date in the same format that is selected in the Control Panel onthe local computer.
2 Displays the time in the same format that is selected in the Control Panel onthe local computer.
3 Displays a standard 24-character string that shows both date and time.
4 Displays the abbreviated name of the day of the week.
5 Displays the full name of the day of the week.
Returned value
This function returns a string representation of the given timestamp, with the specified formatting.The returned value can be stored in any tag of String type.

8/22/2019 User Guide Indu Soft
http://slidepdf.com/reader/full/user-guide-indu-soft 786/1279
Notes
The Coordinated Universal Time (UTC) standard counts the number of seconds elapsed since 12:00AM GMT on January 1, 1970. Each day consists of 86,400 seconds.
Examples
Note: The examples below are for a computer set to Eastern Standard Time (or UTC -05:00).
TagName Expression
Tag StrFromTime( 86400, 1 ) // Returned value = "1/1/70"
Tag StrFromTime( 86400, 2 ) // Returned value = "07:00:00 PM"
Tag StrFromTime( 86400, 3 ) // Returned value = "Thu Jan 01 19:00:00
1970"
Tag StrFromTime( 86400, 4 ) // Returned value = "Thu"
Tag StrFromTime( 86400, 5 ) // Returned value = "Thursday"
Parent topic: String functionsInduSoft Web Studio v7.0 Technical ReferenceCopyright © 2003–2010 Indusoft, Inc.

8/22/2019 User Guide Indu Soft
http://slidepdf.com/reader/full/user-guide-indu-soft 787/1279
Appendix: Built-in Scripting Language > String functions >
StrGetElementGets a specific element from a string source.
Function Group Execution Windows Embedded ThinClient
StrGetElement String Synchronous Supported Supported Supported
Syntax
StrGetElement( strSource,strDelimiter ,numElementNumber )
strSource
The source string.
strDelimiter
Char used as delimiter between the elements.
numElementNumber
Number of the element which will be returned by the function. The first element has thenumber 1. The second element has the number 2 and so forth.
Returned value
Returns the element (string value) retrieved from strSource.
Examples
TagName Expression
Tag StrGetElement( "a|b|c", "|", 2 ) // returned value ="b"
Tag StrGetElement( "a,b,c", ",", 3 ) // returned value ="c"
Parent topic: String functionsInduSoft Web Studio v7.0 Technical ReferenceCopyright © 2003–2010 Indusoft, Inc.

8/22/2019 User Guide Indu Soft
http://slidepdf.com/reader/full/user-guide-indu-soft 788/1279
Appendix: Built-in Scripting Language > String functions >
StrLeftCopies the first characters of a larger string.
Function Group Execution Windows Embedded ThinClient
StrLeft String Synchronous Supported Supported Supported
Syntax
StrLeft(strSource,numQtdChar )
strSource
The source string.
numQtdChar
The number of characters to be copied.
Returned value
Returns a string containing the left-most characters in the source string.
Examples
TagName Expression
Tag StrLeft( "Studio version 7.0", 8 ) // Returned value = Studiov
Tag StrLeft ( "Technical Reference", 9 ) // Returned value =Technical
Parent topic: String functionsInduSoft Web Studio v7.0 Technical ReferenceCopyright © 2003–2010 Indusoft, Inc.

8/22/2019 User Guide Indu Soft
http://slidepdf.com/reader/full/user-guide-indu-soft 789/1279
Appendix: Built-in Scripting Language > String functions >
StrLenDetermines the length of a string.
Function Group Execution Windows Embedded ThinClient
StrLen String Synchronous Supported Supported Supported
Syntax
StrLen( strSource)
strSource
The string.
Returned value
Returns an integer that is the number of characters in the string.
Examples
TagName Expression
Tag StrLen( "Studio version 7.0" ) // Returned value =18
Tag StrLen( "Technical Reference" ) // Returned value =19
Parent topic: String functionsInduSoft Web Studio v7.0 Technical ReferenceCopyright © 2003–2010 Indusoft, Inc.

8/22/2019 User Guide Indu Soft
http://slidepdf.com/reader/full/user-guide-indu-soft 790/1279
Appendix: Built-in Scripting Language > String functions >
StrLowerConverts a string to all lower case characters.
Function Group Execution Windows Embedded ThinClient
StrLower String Synchronous Supported Supported Supported
Syntax
StrLower( strSource)
strSource
The string to be converted.
Returned value
Returns the string, where all the characters are in lowercase.
Examples
TagName Expression
Tag StrLower( "Studio version 7.0" ) // Returned value = "studio version7.0"
Tag StrLower( "Technical Reference" ) // Returned value = "technicalreference"
Parent topic: String functionsInduSoft Web Studio v7.0 Technical ReferenceCopyright © 2003–2010 Indusoft, Inc.

8/22/2019 User Guide Indu Soft
http://slidepdf.com/reader/full/user-guide-indu-soft 791/1279
Appendix: Built-in Scripting Language > String functions >
StrRChrIsolates the final occurrence of a character sequence within a string.
Function Group Execution Windows Embedded ThinClient
StrRChr String Synchronous Supported Supported Supported
Syntax
StrRChr( strSource,strChrSequence)
strSource
The source string.
strCharSequence
The reference string.
Returned value
Returns a string of characters following the last occurrence of a character within the source string.
Examples
TagName Expression
Tag StrRChr( "Studio version 7.0", "i" ) // Returned value = "ion7.0"
Tag StrRChr( "Technical Reference", "n" ) // Returned value="nce"
Parent topic: String functionsInduSoft Web Studio v7.0 Technical ReferenceCopyright © 2003–2010 Indusoft, Inc.

8/22/2019 User Guide Indu Soft
http://slidepdf.com/reader/full/user-guide-indu-soft 792/1279
Appendix: Built-in Scripting Language > String functions >
StrRightCopies the last characters in a larger string.
Function Group Execution Windows Embedded ThinClient
StrRight String Synchronous Supported Supported Supported
Syntax
StrRight( strSource,numQtdChar )
strSource
The source string.
numQtdChar
The number of characters to be copied.
Returned value
Returns a string containing the right-most characters in a source string.
Examples
TagName Expression
Tag StrRight( "Studio version 7.0", 8 ) // Returned value = "sion7.0"
Tag StrRight( "Technical Reference", 9 ) // Returned value ="Reference"
Parent topic: String functionsInduSoft Web Studio v7.0 Technical ReferenceCopyright © 2003–2010 Indusoft, Inc.

8/22/2019 User Guide Indu Soft
http://slidepdf.com/reader/full/user-guide-indu-soft 793/1279
Appendix: Built-in Scripting Language > String functions >
StrSetElementSets a specific element in a string source.
Function Group Execution Windows Embedded ThinClient
StrSetElement String Synchronous Supported Supported Supported
Syntax
StrSetElement( strSource,strDelimiter ,numElementNumber ,strValue)
strSource
The source string.
strDelimiter
Char used as delimiter between the elements.
numElementNumber
Number of the element where the string value will be written by the function. The first elementhas the number 1. The second element has the number 2 and so forth.
strValue
String value that will be written to the numElementNumber of the strSource string tag.
Returned value
Returns the string value updated with the strValue.
Examples
TagName Expression
StringTag StrSetElement( strSource, "|", 2, "abcd" )
StringTag StrSetElement( strSource, ",", 3, "defg" )
Parent topic: String functionsInduSoft Web Studio v7.0 Technical Reference

8/22/2019 User Guide Indu Soft
http://slidepdf.com/reader/full/user-guide-indu-soft 794/1279
Copyright © 2003–2010 Indusoft, Inc.

8/22/2019 User Guide Indu Soft
http://slidepdf.com/reader/full/user-guide-indu-soft 795/1279
Appendix: Built-in Scripting Language > String functions >
StrStrIsolates the first occurrence of a character sequence within a string.
Function Group Execution Windows Embedded ThinClient
StrStr String Synchronous Supported Supported Supported
Syntax
StrStr(strSource,strCharSequence)
strSource
The source string.
strCharSequence
The reference string.
Returned value
Returns the string of characters following the first occurrence of a character within the source string.
Examples
TagName Expression
Tag StrStr( "Studio version 7.0", "i" ) // Returned value = "io version7.0"
Tag StrStr( "Technical Reference", "n" ) // Returned value ="nicalReference"
Parent topic: String functionsInduSoft Web Studio v7.0 Technical ReferenceCopyright © 2003–2010 Indusoft, Inc.

8/22/2019 User Guide Indu Soft
http://slidepdf.com/reader/full/user-guide-indu-soft 796/1279
Appendix: Built-in Scripting Language > String functions >
StrStrPosFinds the first occurrence of a character within a string.
Function Group Execution Windows Embedded ThinClient
StrStrPos String Synchronous Supported Supported Supported
Syntax
StrStrPos( strSource,strCharSequence)
strSource
The source string.
strCharSequence
The reference string.
Returned value
Returns an integer corresponding to the first occurrence of a character within the source string.
Examples
TagName Expression
Tag StrStrPos( "Studio version 7.0", "i" ) // Returned value =4
Tag StrStrPos( "Technical Reference", "a" ) // Returned value= 7
Note: The first character in the string assigned the value 0.
Parent topic: String functionsInduSoft Web Studio v7.0 Technical ReferenceCopyright © 2003–2010 Indusoft, Inc.

8/22/2019 User Guide Indu Soft
http://slidepdf.com/reader/full/user-guide-indu-soft 797/1279
Appendix: Built-in Scripting Language > String functions >
StrTrimRemoves unwanted spaces from a string.
Function Group Execution Windows Embedded ThinClient
StrTrim String Synchronous Supported Supported Supported
Syntax
StrTrim( strReference,optNumFlag )
strReference
A string, or a tag of String type that contains the source string.
optNumFlag
An optional integer or tag of Integer type:
Value of
optNumFlag
Description
0 Removes all spaces from both the beginning and the end of the string.
1 Removes all spaces only from the beginning of the string.
2 Removes all spaces only from the end of the string.
3 Removes all spaces except for single spaces between words.
Note: If no value is given for optNumFlag, then 0 is the default.
Returned value
This function returns a string equal to strReferance minus the specified space characters. Thereturned value can be stored in any tag of String type.
Examples

8/22/2019 User Guide Indu Soft
http://slidepdf.com/reader/full/user-guide-indu-soft 798/1279
TagName Expression
Tag StrTrim( " Studio version 7.0 " ) // Returned value = "Studio version
7.0"
Tag StrTrim( " Studio version 7.0 ", 0 ) // Returned value = "Studio version
7.0"
Tag StrTrim( " Studio version 7.0 ", 1 ) // Returned value = "Studio version7.0 "
Tag StrTrim( " Studio version 7.0 ", 2 ) // Returned value = " Studio version
7.0"
Tag StrTrim( " Studioversion7.0 ", 3 ) // Returned value = "Studio
version 7.0"
Parent topic: String functions
InduSoft Web Studio v7.0 Technical ReferenceCopyright © 2003–2010 Indusoft, Inc.

8/22/2019 User Guide Indu Soft
http://slidepdf.com/reader/full/user-guide-indu-soft 799/1279
Appendix: Built-in Scripting Language > String functions >
StrTrimAllEliminates a specific char from the whole string.
Function Group Execution Windows Embedded ThinClient
StrTrimAll String Synchronous Supported Supported Supported
Syntax
StrTrimAll( strReference,optStrTrimChar )
strReference
A The source string.
optStrTrimChar
Char that will be removed from the string. If this parameter is omitted, the space char will beremoved from the string, by default.
Returned value
Returns a string equal to strReference minus the characters removed by the function.
Examples
TagName Expression
Tag StrTrimAll( "Studio version 7.0 ", " ") // Returned value ="Studioversion7.0"
Parent topic: String functionsInduSoft Web Studio v7.0 Technical Reference
Copyright © 2003–2010 Indusoft, Inc.

8/22/2019 User Guide Indu Soft
http://slidepdf.com/reader/full/user-guide-indu-soft 800/1279
Appendix: Built-in Scripting Language > String functions >
StrUpperConverts a string to all uppercase characters.
Function Group Execution Windows Embedded ThinClient
StrUpper String Synchronous Supported Supported Supported
Syntax
StrUpper( strSource)
strSource
The string.
Returned value
Returns the string with all characters are in uppercase.
Examples
TagName Expression
Tag StrUpper( "Studio version 7.0" ) // Returned value = "STUDIO VERSION6.1"
Tag StrUpper( "Technical Reference" ) // Returned value = "TECHNICALREFERENCE"
Parent topic: String functionsInduSoft Web Studio v7.0 Technical ReferenceCopyright © 2003–2010 Indusoft, Inc.

8/22/2019 User Guide Indu Soft
http://slidepdf.com/reader/full/user-guide-indu-soft 801/1279
Appendix: Built-in Scripting Language > String functions >
ValueToCharThis function converts an integer array of Unicode character codes to a string.
Function Group Execution Windows Embedded ThinClient
ValueToChar String Synchronous Supported Supported Supported
Syntax
tagArray
The name of the integer array containing the values to be converted. If no array index is
specified, then the default is 0.
Note: The tag name must be enclosed in quotes, as shown in the syntax diagram, or elsethe project will try to get the value of the named tag.
numQtdChars
The number of values to be converted (minimum of 1), starting with the specifed array index.
Returned value
Returns a string comprising the converted values.
Examples
If Array[0] = 65, Array[1] = 66, and Array[2] = 67, then the returned value will be "ABC":
ValueToChar( "Array", 3 )
If Array[10] = 65, Array[11] = 66, and Array[12] = 67, then the returned value will be "ABC":
ValueToChar( "Array[10]", 3 )
Parent topic: String functionsInduSoft Web Studio v7.0 Technical Reference

8/22/2019 User Guide Indu Soft
http://slidepdf.com/reader/full/user-guide-indu-soft 802/1279
Copyright © 2003–2010 Indusoft, Inc.

8/22/2019 User Guide Indu Soft
http://slidepdf.com/reader/full/user-guide-indu-soft 803/1279
Appendix: Built-in Scripting Language > String functions >
ValueWToCharThis function converts an integer array of Unicode character codes to a string, where each value inthe array is a double-byte word.
Function Group Execution Windows Embedded ThinClient
ValueWToChar String Synchronous Supported Supported Supported
Syntax
tagArray
The name of the integer array containing the double-byte values to be converted. If no arrayindex is specified, then the default is 0.
Note: The tag name must be enclosed in quotes, as shown in the syntax diagram, or elsethe project will try to get the value of the named tag.
numQtdChars
The number of values to be converted (minimum of 1), starting with the specifed array index.
Returned valueReturns a string comprising the converted values.
Notes
Each value in the array must be a double-byte word, and each word will be split into two bytes forconversion. As such, this function only supports Unicode character codes 0 through 255. For
character codes greater than 255, or when double-byte words are not needed, use the ValueToCharfunction.
Examples
If Array[0] = 29779, Array[1] = 25717, and Array[2] = 28521, then the returned value is "Studio":
ValueWToChar( "Array", 3 )

8/22/2019 User Guide Indu Soft
http://slidepdf.com/reader/full/user-guide-indu-soft 804/1279
If Array[10] = 29779, Array[11] = 25717, and Array[12] = 28521, then the returned value is"Studio":
ValueWToChar( "Array[10]", 3 )
Parent topic: String functionsInduSoft Web Studio v7.0 Technical ReferenceCopyright © 2003–2010 Indusoft, Inc.

8/22/2019 User Guide Indu Soft
http://slidepdf.com/reader/full/user-guide-indu-soft 805/1279
Appendix: Built-in Scripting Language >
Date & Time functionsThese functions are used to interact with the system clock or manipulate timestamps.
ClockGetDate
Calculates the date, based on how many seconds have elapsed since 12:00 AM GMT on January1, 1970 (taking into account the current time zone of the computer).
ClockGetDayOfWeek
Calculates the day of the week, based on how many seconds have elapsed since 12:00 AM GMTon January 1, 1970 (taking into account the current time zone of the local computer).
ClockGetTime
Calculates the time based on how many seconds have elapsed since 12:00 AM GMT on January
1, 1970 (taking into account the current time zone as specified on the local computer).
DateTime2Clock
Calculates how many seconds have elapsed since 12:00 AM GMT on January 1, 1970 (takinginto account the current time zone specified on the local computer.)
GetClock
Calculates how many seconds have elapsed since 12:00 AM GMT on January 1, 1970, at themoment the function was run (taking into account the current time zone, as specified on thelocal computer).
Hour2Clock
Converts time in the HH:MM:SS format into seconds.
SetSystemDate
Sets the date in the operating system's clock.
SetSystemTime
Sets the time in the operating system's clock.
Parent topic: Appendix: Built-in Scripting LanguageInduSoft Web Studio v7.0 Technical ReferenceCopyright © 2003–2010 Indusoft, Inc.

8/22/2019 User Guide Indu Soft
http://slidepdf.com/reader/full/user-guide-indu-soft 806/1279
Appendix: Built-in Scripting Language > Date & Time functions >
ClockGetDateCalculates the date, based on how many seconds have elapsed since 12:00 AM GMT on January 1,1970 (taking into account the current time zone of the computer).
Function Group Execution Windows Embedded ThinClient
ClockGetDate Date & Time Synchronous Supported Supported Supported
Syntax
ClockGetDate( numSeconds)
numSeconds
The number of seconds elapsed since 12:00 AM GMT on January 1, 1970.
Returned value
Returns the date calculated in string format.
Examples
TagName Expression
Tag ClockGetDate( 0 ) // If the computer is in the Central time zone. Returned value= 12/31/1969
Tag ClockGetDate( 1018886359 ) // If the computer is in the Central time zone.Returned value = 04/15/2002
Note: This function takes into account the current Time Zone as specified in the Control Panel of the local computer.
Parent topic: Date & Time functionsInduSoft Web Studio v7.0 Technical ReferenceCopyright © 2003–2010 Indusoft, Inc.

8/22/2019 User Guide Indu Soft
http://slidepdf.com/reader/full/user-guide-indu-soft 807/1279
Appendix: Built-in Scripting Language > Date & Time functions >
ClockGetDayOfWeekCalculates the day of the week, based on how many seconds have elapsed since 12:00 AM GMT onJanuary 1, 1970 (taking into account the current time zone of the local computer).
Function Group Execution Windows Embedded ThinClient
ClockGetDayOfWeek Date & Time Synchronous Supported Supported Supported
Syntax
ClockGetDayOfWeek( numSeconds)
numSeconds
The number of seconds elapsed since 12:00 AM GMT on January 1, 1970
Returned value
Returns the day of the week (calculated in integer format) as follows:
0 Sunday
1 Monday
2 Tuesday
3 Wednesday
4 Thursday
5 Friday
6 Saturday
Examples
TagName Expression
Tag ClockGetDayOfWeek( 0 ) // If the computer is in the Central time zone. Returnedvalue = 3

8/22/2019 User Guide Indu Soft
http://slidepdf.com/reader/full/user-guide-indu-soft 808/1279
TagName Expression
Tag ClockGetDayOfWeek( 1018886359 ) // If the computer is in the Central time zone.Returned value = 1
Note: This function takes into account the current Time Zone, as specified in the Control Panelof the local computer.
Parent topic: Date & Time functionsInduSoft Web Studio v7.0 Technical ReferenceCopyright © 2003–2010 Indusoft, Inc.

8/22/2019 User Guide Indu Soft
http://slidepdf.com/reader/full/user-guide-indu-soft 809/1279
Appendix: Built-in Scripting Language > Date & Time functions >
ClockGetTimeCalculates the time based on how many seconds have elapsed since 12:00 AM GMT on January 1,1970 (taking into account the current time zone as specified on the local computer).
Function Group Execution Windows Embedded ThinClient
ClockGetTime Date & Time Synchronous Supported Supported Supported
Syntax
ClockGetTime( numSeconds)
numSeconds
The number of seconds elapsed since 12:00 AM GMT on January 1, 1970.
Returned value
Returns the time calculated in string format.
Examples
TagName Expression
Tag ClockGetTime( 0 ) // If the computer is in the Central time zone. Returned value= 18:00:00
Tag ClockGetTime( 1018886359 ) // If the computer is in the Central time zone.Returned value = 10:59:19
Note: This function takes into account the current Time Zone, as specified in the Control Panelof the local computer.
Tip: To convert the number of seconds strictly into the HH:MM:SS format, you must use theFormat() function instead of the ClockGetTime() function.
Parent topic: Date & Time functions

8/22/2019 User Guide Indu Soft
http://slidepdf.com/reader/full/user-guide-indu-soft 810/1279
InduSoft Web Studio v7.0 Technical ReferenceCopyright © 2003–2010 Indusoft, Inc.

8/22/2019 User Guide Indu Soft
http://slidepdf.com/reader/full/user-guide-indu-soft 811/1279
Appendix: Built-in Scripting Language > Date & Time functions >
DateTime2ClockCalculates how many seconds have elapsed since 12:00 AM GMT on January 1, 1970 (taking intoaccount the current time zone specified on the local computer.)
Function Group Execution Windows Embedded ThinClient
DateTime2Clock Date & Time Synchronous Supported Supported Supported
Syntax
DateTime2Clock( strDate,strTime)
strDate
The date to be used in the calculation.
strTime
The time to be used in the calculation.
Returned value
Returns the number of seconds that have elapsed since 12:00 AM GMT on January 1, 1970.
Examples
TagName Expression
Tag DateTime2Clock( "12/31/1969", "18:00:00" ) // If the computer is in the Centraltime zone. Returned value = 0
Tag DateTime2Clock( "04/15/2002", "10:59:19" ) // If the computer is in the Centraltime zone. Returned value = 01018886359
Note: This function takes into account the current Time Zone, as specified in the Control Panelof the local computer.
Parent topic: Date & Time functionsInduSoft Web Studio v7.0 Technical Reference

8/22/2019 User Guide Indu Soft
http://slidepdf.com/reader/full/user-guide-indu-soft 812/1279
Copyright © 2003–2010 Indusoft, Inc.

8/22/2019 User Guide Indu Soft
http://slidepdf.com/reader/full/user-guide-indu-soft 813/1279
Appendix: Built-in Scripting Language > Date & Time functions >
GetClockCalculates how many seconds have elapsed since 12:00 AM GMT on January 1, 1970, at the momentthe function was run (taking into account the current time zone, as specified on the local computer).
Function Group Execution Windows Embedded ThinClient
GetClock Date & Time Synchronous Supported Supported Supported
Syntax
GetClock( )
This function takes no parameters.
Returned value
Returns the number of seconds that have elapsed since 12:00 AM GMT on January 1, 1970, at themoment the function was run.
Examples
TagName Expression
Tag GetClock() // If executed at 10:59:19 AM April 15th 2002 CST. Returned value= 101886359
Tag GetClock() // If executed at 00:00:00 January 1st 1970 GMT. Returned value =0
Note: This function takes the current Time Zone into account, as specified in the Control Panelof the local computer.
Parent topic: Date & Time functionsInduSoft Web Studio v7.0 Technical ReferenceCopyright © 2003–2010 Indusoft, Inc.

8/22/2019 User Guide Indu Soft
http://slidepdf.com/reader/full/user-guide-indu-soft 814/1279
Appendix: Built-in Scripting Language > Date & Time functions >
Hour2ClockConverts time in the HH:MM:SS format into seconds.
Function Group Execution Windows Embedded ThinClient
Hour2Clock Date & Time Synchronous Supported Supported Supported
Syntax
Hour2Clock( strTime)
strTime
The number of hours, minutes, and seconds in HH:MM:SS format.
Returned value
Returns the number of seconds equivalent to the total number of hours, minutes, and secondsspecified.
Examples
TagName Expression
Tag Hour2Clock( "01:00:00" ) // Returned value = 3600
Tag Hour2Clock( "10:01:01" ) // Returned value =36061
Parent topic: Date & Time functionsInduSoft Web Studio v7.0 Technical ReferenceCopyright © 2003–2010 Indusoft, Inc.

8/22/2019 User Guide Indu Soft
http://slidepdf.com/reader/full/user-guide-indu-soft 815/1279
Appendix: Built-in Scripting Language > Date & Time functions >
SetSystemDateSets the date in the operating system's clock.
Function Group Execution Windows Embedded ThinClient
SetSystemDate Date & Time Synchronous Supported Supported Supported
Syntax
SetsystemDate( strDate)
strDate
The date in MM/DD/YYYY format in which to set the clock.
Returned value
Returns no values.
Examples
TagName Expression
SetSystemDate( "04/15/2002" ) // Sets the system clock to April 15th2002.
Parent topic: Date & Time functionsInduSoft Web Studio v7.0 Technical ReferenceCopyright © 2003–2010 Indusoft, Inc.

8/22/2019 User Guide Indu Soft
http://slidepdf.com/reader/full/user-guide-indu-soft 816/1279
Appendix: Built-in Scripting Language > Date & Time functions >
SetSystemTimeSets the time in the operating system's clock.
Function Group Execution Windows Embedded ThinClient
SetSystemTime Date & Time Synchronous Supported Supported Supported
Syntax
SetSystemTime( strTime)
strTime
The time in HH:MM:SS format in which to set the clock.
Returned value
No Returned Value.
Examples
TagName Expression
SetSystemTime( "15:45:18" ) // Sets the system clock to 3:45:18PM.
Parent topic: Date & Time functionsInduSoft Web Studio v7.0 Technical ReferenceCopyright © 2003–2010 Indusoft, Inc.

8/22/2019 User Guide Indu Soft
http://slidepdf.com/reader/full/user-guide-indu-soft 817/1279
Appendix: Built-in Scripting Language >
Trigonometric functionsThese functions are used to perform trigonometric operations (e.g., sine, cosine, tangent) on numericvalues.
ACos
Calculates the Arc Cosine of a value.
ASin
Calculates the Arc Sine of a value.
ATan
Calculates the Arc Tangent of a value.
CosCalculates the Cosine of a value.
Cot
Calculates the Cotangent of a value.
Pi
Calculates the value of pi .
Sin
Tan
Calculates the Tangent of a value.
Parent topic: Appendix: Built-in Scripting Language
InduSoft Web Studio v7.0 Technical ReferenceCopyright © 2003–2010 Indusoft, Inc.

8/22/2019 User Guide Indu Soft
http://slidepdf.com/reader/full/user-guide-indu-soft 818/1279
Appendix: Built-in Scripting Language > Trigonometric functions >
ACosCalculates the Arc Cosine of a value.
Function Group Execution Windows Embedded ThinClient
ACos Trigonometric Synchronous Supported Supported Supported
Syntax
ACos( numValue)
numValue
Numerical tag from which the Arc Cosine will be taken.
Returned value
Returns the Arc Cosine of numValue in radians.
Examples
TagName Expression
Tag ACos( 1 ) // Returned value = 0.000000
Tag ACos( 0 ) // Returned value = 1.570796
Parent topic: Trigonometric functionsInduSoft Web Studio v7.0 Technical Reference
Copyright © 2003–2010 Indusoft, Inc.

8/22/2019 User Guide Indu Soft
http://slidepdf.com/reader/full/user-guide-indu-soft 819/1279
Appendix: Built-in Scripting Language > Trigonometric functions >
ASinCalculates the Arc Sine of a value.
Function Group Execution Windows Embedded ThinClient
ASin Trigonometric Synchronous Supported Supported Supported
Syntax
ASin( numValue)
numValue
Numerical tag from which the Arc Sine will be taken.
Returned value
Returns the Arc Sine of numValue in radians.
Examples
TagName Expression
Tag ASin( 1 ) // Returned value = 1.570796
Tag ASin( 0 ) // Returned value = 0.000000
Parent topic: Trigonometric functionsInduSoft Web Studio v7.0 Technical Reference
Copyright © 2003–2010 Indusoft, Inc.

8/22/2019 User Guide Indu Soft
http://slidepdf.com/reader/full/user-guide-indu-soft 820/1279
Appendix: Built-in Scripting Language > Trigonometric functions >
ATanCalculates the Arc Tangent of a value.
Function Group Execution Windows Embedded ThinClient
ATan Trigonometric Synchronous Supported Supported Supported
Syntax
ATan( numValue)
numValue
Numerical tag from which the Arc Tangent will be taken.
Returned value
Returns the Arc Tangent of numValue in radians.
Examples
TagName Expression
Tag ATan( 1 ) // Returned value = 0.785398
Tag ATan( 0 ) // Returned value = 1.570796
Parent topic: Trigonometric functionsInduSoft Web Studio v7.0 Technical Reference
Copyright © 2003–2010 Indusoft, Inc.

8/22/2019 User Guide Indu Soft
http://slidepdf.com/reader/full/user-guide-indu-soft 821/1279
Appendix: Built-in Scripting Language > Trigonometric functions >
CosCalculates the Cosine of a value.
Function Group Execution Windows Embedded ThinClient
Cos Trigonometric Synchronous Supported Supported Supported
Syntax
Cos( numAngle)
numAngle
The Angle (in radians) from which to calculate the Cosine.
Returned value
Returns the Cosine of numAngle.
Examples
TagName Expression
Tag Cos( 1.570796 ) // Returned value = 0.000000
Tag Cos( 0 ) // Returned value = 1.000000
Parent topic: Trigonometric functionsInduSoft Web Studio v7.0 Technical Reference
Copyright © 2003–2010 Indusoft, Inc.

8/22/2019 User Guide Indu Soft
http://slidepdf.com/reader/full/user-guide-indu-soft 822/1279
Appendix: Built-in Scripting Language > Trigonometric functions >
CotCalculates the Cotangent of a value.
Function Group Execution Windows Embedded ThinClient
Cot Trigonometric Synchronous Supported Supported Supported
Syntax
Cot( numAngle)
numAngle
The Angle (in radians) from which to calculate the Cotangent.
Returned value
Returns the Cotangent of numAngle.
Note: Although mathematically the tangent of Pi is infinite, IWS only returns the largest numberpossible.
Examples
TagName Expression
Tag Cot( 0.785398 ) // Returned value = 1.000000
Tag Cot( 0 ) // Returned value = 0.00000
Parent topic: Trigonometric functions
InduSoft Web Studio v7.0 Technical ReferenceCopyright © 2003–2010 Indusoft, Inc.

8/22/2019 User Guide Indu Soft
http://slidepdf.com/reader/full/user-guide-indu-soft 823/1279
Appendix: Built-in Scripting Language > Trigonometric functions >
PiCalculates the value of pi .
Function Group Execution Windows Embedded ThinClient
Pi Trigonometric Synchronous Supported Supported Supported
Syntax
Pi()
This function takes no parameters. You must still include the parentheses, however, or it will beevaluated as a tag rather than a function.
Returned value
Returns the value of pi .
Examples
TagName Expression
Tag Pi() // Returned value = 3.141593
Parent topic: Trigonometric functionsInduSoft Web Studio v7.0 Technical ReferenceCopyright © 2003–2010 Indusoft, Inc.

8/22/2019 User Guide Indu Soft
http://slidepdf.com/reader/full/user-guide-indu-soft 824/1279
Appendix: Built-in Scripting Language > Trigonometric functions >
Sin
Function Group Execution Windows Embedded ThinClient
Sin Trigonometric Synchronous Supported Supported Supported
Description
Calculates the Sine of a value.
Syntax
Sin( numAngle)
numAngle
The Angle (in radians) from which to calculate the Sine.
Returned value
Returns the Sine of numAngle.
Examples
TagName Expression
Tag Sin( 0 ) // Returned value = 0.000000
Tag Sin( 1.570796 ) // Returned value = 1.000000
Parent topic: Trigonometric functionsInduSoft Web Studio v7.0 Technical Reference
Copyright © 2003–2010 Indusoft, Inc.

8/22/2019 User Guide Indu Soft
http://slidepdf.com/reader/full/user-guide-indu-soft 825/1279
Appendix: Built-in Scripting Language > Trigonometric functions >
TanCalculates the Tangent of a value.
Function Group Execution Windows Embedded ThinClient
Tan Trigonometric Synchronous Supported Supported Supported
Syntax
Tan( numAngle)
numAngle
The Angle (in radians) from which to calculate the Tangent.
Returned value
Returns the Tangent of numAngle.
Note: Although mathematically the tangent of Pi() is infinite, IWS only returns the largestnumber possible.
Examples
TagName Expression
Tag Tan( 0 ) // Returned value = 0.00000
Tag Tan( 0.785398 ) // Returned value = 1.00000
Parent topic: Trigonometric functions
InduSoft Web Studio v7.0 Technical ReferenceCopyright © 2003–2010 Indusoft, Inc.

8/22/2019 User Guide Indu Soft
http://slidepdf.com/reader/full/user-guide-indu-soft 826/1279
Appendix: Built-in Scripting Language >
Screen functionsThese functions are used to open and close project screens.
Close
Close is a built-in scripting function that closes an open project screen.
Open
Open is a built-in scripting function that opens a project screen.
OpenPrevious
OpenPrevious is a built-in scripting function that re-opens the last screen to be closed.
ShowInplaceInput
This function shows a simple text input dialog at a specified location in the project client/viewer.
ShowMessageBox
This function shows a simple message box with either an OK button or Yes / No buttons.
Parent topic: Appendix: Built-in Scripting LanguageInduSoft Web Studio v7.0 Technical ReferenceCopyright © 2003–2010 Indusoft, Inc.

8/22/2019 User Guide Indu Soft
http://slidepdf.com/reader/full/user-guide-indu-soft 827/1279
Appendix: Built-in Scripting Language > Screen functions >
CloseClose is a built-in scripting function that closes an open project screen.
Function Group Execution Windows Embedded ThinClient
Close Screen Asynchronous Supported Supported Supported
Syntax
strScreenThe name of the screen (not including the .scr extension) to be closed.
Note: Some Web servers are case-sensitive. If you plan to deploy your project as a Webapplication, then you should use only lowercase letters for the screen name.
optNumID
The specific ID or instance number of the screen to be closed, if there is more than one screenwith the same name open. (The ID is assigned when the screen is opened with the Openfunction.)
This is an optional parameter. If no value is specified, then the default ID is 0.
Returned value
This function does not return any value.
Notes
This function cannot be used with Tasks or in the Global Procedures script.
Also, in some cases, you do not need to call this function to close a screen because the screen will beclosed automatically when another screen replaces it. For more information, see Screen Attributes.
Examples
Close the screen named "main":

8/22/2019 User Guide Indu Soft
http://slidepdf.com/reader/full/user-guide-indu-soft 828/1279
Close( "main" )
Close the screen named "alarms":
Close( "alarms" )
Close the screen named "main" with ID 10:
Close( "main", 10 )
Parent topic: Screen functionsInduSoft Web Studio v7.0 Technical ReferenceCopyright © 2003–2010 Indusoft, Inc.

8/22/2019 User Guide Indu Soft
http://slidepdf.com/reader/full/user-guide-indu-soft 829/1279
Appendix: Built-in Scripting Language > Screen functions >
OpenOpen is a built-in scripting function that opens a project screen.
Function Group Execution Windows Embedded ThinClient
Open Screen Asynchronous Supported Supported Supported
Syntax
strScreen
The name of the screen (not including the .scr extension) to be opened.
Note: Some Web servers are case-sensitive. If you plan to deploy your project as a Webapplication, then you should use only lowercase letters for the screen name.
optNumX1
optNumY1
optNumX2
optNumY2
The coordinates, in pixels, for the top-left (X1,Y1) and bottom-right (X2,Y2) corners of thescreen.
These are optional parameters. If no values are specified, then the default screen size andlocation are used. For more information, see Screen Attributes.
Please note the following special circumstances:
You can open the screen at the mouse's current position by using Open( "screen", 1 ), orOpen( "screen", 1, -1, -1, -1, … ) if the parameters at the end are needed.
If optNumX1 equals optNumX2 and optNumY1 equals optNumY2, then the defaultscreen size is used but the screen is centered at (X1,Y1).
If optNumX2 is less than optNumX1 and/or optNumY2 is less than optNumY1, or if all four parameters are set to -1, then the parameters are ignored and the default screen

8/22/2019 User Guide Indu Soft
http://slidepdf.com/reader/full/user-guide-indu-soft 830/1279
size and location are used.
optNumResizeFlag
Specifies whether objects in the screen will be resized when the screen is opened:
Value Description
0 Screen objects will not be resized.
1 Screen objects will be automatically resized to fit the new dimensions of the screen,as specified by the coordinates described above. The resizing is done at the momentthe screen is opened, so if the user changes the screen size after the screen isopened, then the objects will not be resized again.
This parameter is required if all four coordinates are specified.
optNumID
An ID or instance number to be assigned to the screen, because you can open multipleinstances of the same screen file. (This ID is required when a screen is closed using the Closefunction.)
This is an optional parameter. If no value is specified, then the default ID is 0.
optStrMnemonicList
A string that describes how the custom properties of any generic objects or linked symbols inthe screen will be completed when the screen is opened. This string has the syntax…
#Label:Value
…where Label is the name of the property and Value is the tag, expression or literal value that theproperty will receive. You can declare more than one mnemonic as long as the mnemonics areseparated by spaces. For more information, see "Examples" below.
Returned value
This function will return one of the following values:
Value Description
0 Success
1 Error
Notes
This function cannot be used with Tasks or in the Global Procedures script.

8/22/2019 User Guide Indu Soft
http://slidepdf.com/reader/full/user-guide-indu-soft 831/1279
Examples
Open the screen "main" using the default screen size and location:
Open( "main" )
Open the screen at the mouse's current position:
Open( "main", 1 )
Open the screen at the mouse's current position and assign it an ID of 10:
Open( "main", 1, -1, -1, -1, 0, 10)
Open the screen using the default screen size but centered at the coordinates (500,250), and assignit an ID of 10:
Open( "main", 500, 250, 500, 250, 0, 10)
Open the screen using the default screen size and location, and replace the custom properties Mne1
and Mne2 with Tag1 and Tag2, respectively:
Open( "main", -1, -1, -1, -1, 1, 0, "#Mne1:Tag1 #Mne2:Tag2" )
Parent topic: Screen functionsInduSoft Web Studio v7.0 Technical ReferenceCopyright © 2003–2010 Indusoft, Inc.

8/22/2019 User Guide Indu Soft
http://slidepdf.com/reader/full/user-guide-indu-soft 832/1279
Appendix: Built-in Scripting Language > Screen functions >
OpenPreviousOpenPrevious is a built-in scripting function that re-opens the last screen to be closed.
Function Group Execution Windows Embedded ThinClient
OpenPrevious Screen Asynchronous Supported Supported Not Supported
Syntax
optNumX1
optNumY1
optNumX2
optNumY2
The coordinates, in pixels, for the upper-left (X1,Y1) and lower-right (X2,Y2) corners of thescreen.
These are optional parameters. If no values are specified, then the default screen size andlocation are used. For more information, see Screen Attributes.
Returned value
This function will return one of the following values:
Value Description
0 Success
1 Error
Notes
This function cannot be used with Tasks or in the Global Procedures script.
Examples

8/22/2019 User Guide Indu Soft
http://slidepdf.com/reader/full/user-guide-indu-soft 833/1279
Open the previous screen using its default size and location:
OpenPrevious()
Open the previous screen in the top-left corner of the display and sized to 800x600:
OpenPrevious( 0, 0, 800, 600 )
Parent topic: Screen functionsInduSoft Web Studio v7.0 Technical ReferenceCopyright © 2003–2010 Indusoft, Inc.

8/22/2019 User Guide Indu Soft
http://slidepdf.com/reader/full/user-guide-indu-soft 834/1279
Appendix: Built-in Scripting Language > Screen functions >
ShowInplaceInputThis function shows a simple text input dialog at a specified location in the project client/viewer.
Function Group Execution Windows Embedded ThinClient
ShowInplaceInput Screen Asynchronous Supported Supported Not supported
Syntax
tagOutput
The name of a tag that will receive the input.
Note: The tag name must be enclosed in quotes, as shown in the syntax diagram, or elsethe project will try to get the value of the named tag.
numStartXPos
The starting X position of the top-left corner of the input dialog — that is, the number of pixelsbetween that corner and the left side of the display.
numStartYPos
The starting Y position of the top-left corner of the input dialog — that is, the number of pixelsbetween that corner and the top of the display.
optNumMin
The minimum numeric value that will be accepted by the input dialog.
This is an optional parameter. If no value is specified, then the dialog will accept any value.
optNumMax
The maximum numeric value that will be accepted by the input dialog.
This is an optional parameter. If no value is specified, then the dialog will accept any value.

8/22/2019 User Guide Indu Soft
http://slidepdf.com/reader/full/user-guide-indu-soft 835/1279
optNumEnablePasswordMode
An option to enable password mode, which obfuscates the operator's input as if it's apassword:
Value Description
0 Show input as plain text.
1 Obfuscate input.
This is an optional parameter. If no value is specified, then the default is 0.
optNumShowOSVK
An option to show the default Virtual Keyboard, which is configured in the project settings:
Value Description
0 Do not show Virtual Keyboard.
1 Show Virtual Keyboard.
This is an optional parameter. If no value is specified, then the default is 0.
Returned value
This function returns the following possible values:
Value Description
0 Success.
-1 Invalid tag specified for tagOutput.-2 Invalid number of parameters.
-3 Viewer is not running.
Examples
ShowInplaceInput( "OperatorInput", 50, 50 )
ShowInplaceInput( "OperatorInput", 50, 50, 1, 100 )
ShowInplaceInput( "OperatorInput", 50, 50, 1, 100, 0, 1 )

8/22/2019 User Guide Indu Soft
http://slidepdf.com/reader/full/user-guide-indu-soft 836/1279
Parent topic: Screen functionsInduSoft Web Studio v7.0 Technical ReferenceCopyright © 2003–2010 Indusoft, Inc.

8/22/2019 User Guide Indu Soft
http://slidepdf.com/reader/full/user-guide-indu-soft 837/1279
Appendix: Built-in Scripting Language > Screen functions >
ShowMessageBoxThis function shows a simple message box with either an OK button or Yes / No buttons.
Function Group Execution Windows Embedded ThinClient
ShowMessageBox Screen Asynchronous Supported Supported Not supported
Syntax
strMessage
The message body that will be displayed in the box.
optNumButtons
A numeric flag that specifies which kind of confirmation buttons to display in the message box:
Value Description
0 OK button
4 Yes / No buttons
Tip: To add an exclamation mark to the box — to make it an alert or warning rather thana plain message — add 48 (vbExclamation) to this parameter. For more information, see"Examples" below.
This is an optional parameter. If no value is specified, then the default is 0.
optStrTitle
The title of the message.
This is an optional parameter. If no value is specified, then no title will be displayed.
Returned value
This function returns the following possible values:

8/22/2019 User Guide Indu Soft
http://slidepdf.com/reader/full/user-guide-indu-soft 838/1279
Value Description
1 Operator clicked OK.
6 Operator clicked Yes.
7 Operator clicked No.
Examples
ShowMessageBox( "The action could not be completed." )
ShowMessageBox( "The action could not be completed.", 0+48, "Alert" )
ShowMessageBox( "Continue with action?", 4 )
Parent topic: Screen functionsInduSoft Web Studio v7.0 Technical ReferenceCopyright © 2003–2010 Indusoft, Inc.

8/22/2019 User Guide Indu Soft
http://slidepdf.com/reader/full/user-guide-indu-soft 839/1279
Appendix: Built-in Scripting Language >
Security functionsThese functions are used to manage users and groups in the project's security system.
BlockUser
BlockUser is a built-in scripting function that blocks an existing user from logging onto a project.
CheckESign
CheckESign is a built-in scripting function that prompts the runtime user to electronically signan event by entering their username and password. It can be called to secure specificexpressions and scripts, just as the E-Sign option secures screen objects.
CreateUser
This function creates a new user in the project security system.
ExportSecuritySystem
This function exports the security system configuration to an encrypted file.
GetUserFullName
This function gets the full name (if any) of a specified user in the project security system.
GetUserNames
GetUserPwdAging
Returns the time remaining before the password for a specific user expires.
GetUserState
Use to see the current status of a selected user.
ImportSecuritySystem
This function imports a security system configuration from an external file.
RemoveUser
Removes a user from the system.
SetPassword
Use to specify a new user password.
UnblockUser
Use to unblock a blocked user in the system.
Parent topic: Appendix: Built-in Scripting LanguageInduSoft Web Studio v7.0 Technical Reference

8/22/2019 User Guide Indu Soft
http://slidepdf.com/reader/full/user-guide-indu-soft 840/1279
Copyright © 2003–2010 Indusoft, Inc.

8/22/2019 User Guide Indu Soft
http://slidepdf.com/reader/full/user-guide-indu-soft 841/1279
Appendix: Built-in Scripting Language > Security functions >
BlockUserBlockUser is a built-in scripting function that blocks an existing user from logging onto a project.
Function Group Execution Windows Embedded ThinClient
BlockUser Security Synchronous Supported Supported Supported
Syntax
strUserName
The name of the user to block.
Returned value
This function returns the following possible values:
Value Description
0 User blocked successfully.
1 Invalid number of parameters.
2 Wrong parameter type.
3 Specified user does not exist.
4 User currently logged on does not have the rights to block (i.e., user does not have Edit
Security System).
5 The operation on the distributed security system failed.
6 User cannot be blocked.
7 The current Security Mode does not allow user to be blocked/unblocked.
8 Internal error.
Examples
Block the user named Bob:
BlockUser( "Bob" )

8/22/2019 User Guide Indu Soft
http://slidepdf.com/reader/full/user-guide-indu-soft 842/1279
Block the user named in position 3 of the array badUsers:
BlockUser( badUsers[3] )
Block the user that is currently logged on:
BlockUser( UserName )
Parent topic: Security functionsInduSoft Web Studio v7.0 Technical ReferenceCopyright © 2003–2010 Indusoft, Inc.

8/22/2019 User Guide Indu Soft
http://slidepdf.com/reader/full/user-guide-indu-soft 843/1279
Appendix: Built-in Scripting Language > Security functions >
CheckESignCheckESign is a built-in scripting function that prompts the runtime user to electronically sign anevent by entering their username and password. It can be called to secure specific expressions andscripts, just as the E-Sign option secures screen objects.
Function Group Execution Windows Embedded ThinClient
CheckESign Security Synchronous Supported Supported Supported
Syntax
This function takes no parameters. Calling the function displays a security dialog, where the usermust enter their username and password.
Returned value
This function returns the following possible values:
Value Description
0 Username and/or password not accepted.
1 Username and password accepted.
Notes
Usernames and passwords are stored in the Security Folder.
Examples
CheckESign()
Parent topic: Security functionsInduSoft Web Studio v7.0 Technical ReferenceCopyright © 2003–2010 Indusoft, Inc.

8/22/2019 User Guide Indu Soft
http://slidepdf.com/reader/full/user-guide-indu-soft 844/1279
Appendix: Built-in Scripting Language > Security functions >
CreateUserThis function creates a new user in the project security system.
Function Group Execution Windows Embedded ThinClient
CreateUser Security Synchronous Supported Supported Supported
Syntax
strUserName
The name of the user to be created.
strGroup
The name of the group to which the user will belong.
strPassw
The user's password.
optStrUserFullName
The full name of the user.
Returned value
This function returns the following possible values:

8/22/2019 User Guide Indu Soft
http://slidepdf.com/reader/full/user-guide-indu-soft 845/1279
Value Description
-1 Internal error; contact Technical Support.
0 New user created successfully.
1 Invalid number of parameters.
2 Wrong parameter type.3 User name already exists.
4 Group does not exist.
5 Failed to save to configuration file.
6 Invalid user.
7 User full name already exists.
8 Reentrant function call not allowed.
9 User clicked Cancel button when using the standard Create User dialog.
10 Invalid password, check the minimum password size specified for the group.
11 Invalid group. (Group may not have Runtime group option selected.)
12 Would open dialog.
13 User currently logged on does not have the rights to create user (i.e., user does not haveEdit Security System).
14 The current Security Mode does not allow user to be created.
Notes
Users created with this function are not shown in the project's Security folder because they arestored in a secondary database. To manage this database, use the ExtUser.exe program (located inthe Bin sub-folder of the application folder).
Examples
CreateUser( "Bob", "Admin", "Chocolate", "Bob Smith" )
CreateUser( "Albert", "Engineering", "EMC2", "Albert Jones" )
Parent topic: Security functionsInduSoft Web Studio v7.0 Technical ReferenceCopyright © 2003–2010 Indusoft, Inc.

8/22/2019 User Guide Indu Soft
http://slidepdf.com/reader/full/user-guide-indu-soft 846/1279
Appendix: Built-in Scripting Language > Security functions >
ExportSecuritySystemThis function exports the security system configuration to an encrypted file.
Function Group Execution Windows Embedded ThinClient
ExportSecuritySystem Security Synchronous Supported Supported Supported
Syntax
strFileName
The complete file path and name where you want to save the configuration file.
strPassword
The main password for the security system. This same password will be used to protect theexported file.
Returned value
This function returns the following possible values:
Value Description
-2 Wrong parameter type.
-1 Invalid number of parameters.
0 Couldn't write security data.
1 File exported successfully.
Examples
ExportSecuritySystem( "C:\security.txt" )
ExportSecuritySystem( "C:\security.txt", "mypa55w0rd" )
Parent topic: Security functions

8/22/2019 User Guide Indu Soft
http://slidepdf.com/reader/full/user-guide-indu-soft 847/1279
Related reference
ImportSecuritySystem
Related information
Backing up the security system configuration
InduSoft Web Studio v7.0 Technical ReferenceCopyright © 2003–2010 Indusoft, Inc.

8/22/2019 User Guide Indu Soft
http://slidepdf.com/reader/full/user-guide-indu-soft 848/1279
Appendix: Built-in Scripting Language > Security functions >
GetUserFullNameThis function gets the full name (if any) of a specified user in the project security system.
Function Group Execution Windows Embedded ThinClient
GetUserFullName Security Synchronous Supported Supported Supported
Syntax
strUserName
The name of a user in the project security system.
tagUserFullName
The name of a tag (String type) that will receive the full name of the specified user. If thespecified user does not have a full name defined, then the tag will receive an empty string ("").
Note: The tag name must be enclosed in quotes, as shown in the syntax diagram, or elsethe project will try to get the value of the named tag.
Returned value
This function returns the following possible values:
Value Description
0 Specified user does not exist.
1 Success; specified user exists.
Examples
Get the full name of the currently logged user (via the system tag UserName):
GetUserFullName( UserName, "UserFullName" )
Get the full name of the user "engineer1":

8/22/2019 User Guide Indu Soft
http://slidepdf.com/reader/full/user-guide-indu-soft 849/1279
GetUserFullName( "engineer1", "UserFullName" )
Parent topic: Security functionsInduSoft Web Studio v7.0 Technical ReferenceCopyright © 2003–2010 Indusoft, Inc.

8/22/2019 User Guide Indu Soft
http://slidepdf.com/reader/full/user-guide-indu-soft 850/1279
Appendix: Built-in Scripting Language > Security functions >
GetUserNames
Function Group Execution Windows Embedded ThinClient
GetUserNames Security Synchronous Supported Supported Executed on Server
Syntax
GetUserNames( "tagUsers",optNumUserType, "opttagGroups" )
tagUsers
Name of the array tag that will receive users.
optNumUserType
0 Return all users
1 Only users created during runtime
2 Only users created using the developmentenvironment
opttagGroups
Name of the array tag that will receive the group for each specific user.
Returned value
The number of users, or a negative number that can be one of the following:
- 1 Invalid number of parameters
- 2 tagUsers is invalid
- 3 optNumUserType is invalid
- 4 opttagGroups is invalid
- 5 Error, function cannot be called in the ThinClient

8/22/2019 User Guide Indu Soft
http://slidepdf.com/reader/full/user-guide-indu-soft 851/1279
Examples
TagName Expression
NumberOfUsers GetUserNames("UsersArray") // Retrieves all users, stores names in the UsersArray
tag and the number of users in the NumberOfUsers tag.
NumberOfUsersGetUserNames("UsersArray", 1) // Retrieves all users created during runtime,stores names in the UsersArray tag and the number of users in the NumberOfUsers
tag.
NumberOfUsers GetUserNames("UsersArray", 2) // Retrieves all users created in the developmentenvironment, stores names in the UsersArray tag and the number of users inthe NumberOfUsers tag.
NumberOfUsers GetUserNames("UsersArray", 2, "Groups") // Retrieves all users created in thedevelopment environment, stores names in the UsersArray tag and the numberof users in the NumberOfUsers tag. The group name per each user is stored in theGroups tag.
Parent topic: Security functionsInduSoft Web Studio v7.0 Technical ReferenceCopyright © 2003–2010 Indusoft, Inc.

8/22/2019 User Guide Indu Soft
http://slidepdf.com/reader/full/user-guide-indu-soft 852/1279
Appendix: Built-in Scripting Language > Security functions >
GetUserPwdAgingReturns the time remaining before the password for a specific user expires.
Function Group Execution Windows Embedded ThinClient
GetUserPwdAging Security Synchronous Supported Supported Supported
Syntax
GetUserNames( strUser )
strUser
User name whose password aging is checked.
Returned value
=0 Number of hours since password expired.
0 Specified user is not logged on.
>0 Number of hours remaining until passwordexpires.
Note: If the function is not executed properly (e.g., User Name is invalid), or if the specifieduser is not logged on, then the function returns BAD quality.
Examples
TagName Expression
TagHoursToExpire GetUserPwdAging("John") // Returns the number of hours before the
password for the User "John" expires.
TagHoursToExpire GetUserPwdAging(UserName) // Returns the number of hours before thepassword for the current User logged on the system expires.
Parent topic: Security functions

8/22/2019 User Guide Indu Soft
http://slidepdf.com/reader/full/user-guide-indu-soft 853/1279
InduSoft Web Studio v7.0 Technical ReferenceCopyright © 2003–2010 Indusoft, Inc.

8/22/2019 User Guide Indu Soft
http://slidepdf.com/reader/full/user-guide-indu-soft 854/1279
Appendix: Built-in Scripting Language > Security functions >
GetUserStateUse to see the current status of a selected user.
Function Group Execution Windows Embedded ThinClient
GetUserState Security Synchronous Supported Supported Supported
Syntax
strUserName
The name of the user
Returned value
This function returns the following possible values:
Value Description
-3 Specified user does not exist.
-2 Wrong parameter type.
-1 Invalid number of parameters.
0 Specified user is unblocked.
1 Specified user is blocked.
Examples
TagName Expression
Tag GetUserState( "Bob" )
Tag GetUserState ( "Albert" )
Parent topic: Security functionsInduSoft Web Studio v7.0 Technical ReferenceCopyright © 2003–2010 Indusoft, Inc.

8/22/2019 User Guide Indu Soft
http://slidepdf.com/reader/full/user-guide-indu-soft 855/1279
Appendix: Built-in Scripting Language > Security functions >
ImportSecuritySystemThis function imports a security system configuration from an external file.
Function Group Execution Windows Embedded ThinClient
ImportSecuritySystem Security Synchronous Supported Supported Supported
Syntax
strSecuritySystemPassword
The main password for the project's current security system configuration. (The securitysystem must be enabled.)
strFileName
The complete file path and name of the configuration file that you want to import. (The filemust have been previously exported from a IWS project using either the Security Systemconfiguration tool or the ExportSecuritySystem function.)
strFilePassword
The password for the specified configuration file.
optNumMode
A numeric flag indicating how the imported settings should be handled:
Value Description
0 Append the imported settings to the current settings. In the event of a conflict,replace with the imported settings.
1 Append the imported settings to the current settings. In the event of a conflict, keepthe current settings.
2 Completely replace the current settings with the imported settings.
This parameter is optional; if no value is specified, then the default value is 0.
Returned value

8/22/2019 User Guide Indu Soft
http://slidepdf.com/reader/full/user-guide-indu-soft 856/1279
This function returns the following possible values:
Value Description
-2 Wrong parameter type.
-1 Invalid number of parameters.
0 Couldn't read security data.
1 File imported successfully.
Examples
ExportSecuritySystem( "curr3ntPa55w0rd", "C:\security.txt", "1mp0rtPa55w0rd" )
ExportSecuritySystem( "curr3ntPa55w0rd", "C:\security.txt", "1mp0rtPa55w0rd", 2 )
Parent topic: Security functions
Related reference
ExportSecuritySystem
Related information
Backing up the security system configuration
InduSoft Web Studio v7.0 Technical ReferenceCopyright © 2003–2010 Indusoft, Inc.

8/22/2019 User Guide Indu Soft
http://slidepdf.com/reader/full/user-guide-indu-soft 857/1279
Appendix: Built-in Scripting Language > Security functions >
RemoveUserRemoves a user from the system.
Function Group Execution Windows Embedded ThinClient
RemoveUser Security Synchronous Supported Supported Supported
Syntax
RemoveUser( strUserName)
strUserName
The name of the user to be removed.
Returned value
This function returns the following possible values:
Value Description
0 User removed successfully.
1 Invalid number of parameters.2 Wrong parameter type.
3 User currently logged on does not have the rights to remove (i.e., user does not have Edit
Security System).
4 User cannot be removed.
5 Specified user does not exist.
6 Component-level failure.
7 Failed to save to configuration file.
8 The current Security Mode does not allow user to be removed.
Examples

8/22/2019 User Guide Indu Soft
http://slidepdf.com/reader/full/user-guide-indu-soft 858/1279
TagName Expression
Tag RemoveUser( "Bob" )
Tag RemoveUser( "Albert" )
Note: You can use this function to remove only those users you created using the CreateUser( )function.
Parent topic: Security functionsInduSoft Web Studio v7.0 Technical ReferenceCopyright © 2003–2010 Indusoft, Inc.

8/22/2019 User Guide Indu Soft
http://slidepdf.com/reader/full/user-guide-indu-soft 859/1279
Appendix: Built-in Scripting Language > Security functions >
SetPasswordUse to specify a new user password.
Function Group Execution Windows Embedded ThinClient
SetPassword Security Synchronous Supported Supported Supported
Syntax
SetPassword( strUserName,optStrNewPassword )
strUserName
The name of the user.
optStrNewPassword
Optional The new password
Note: If you omit the this parameter, then the SetPassword function will launch an Enter anew password dialog, so the user can enter a new password.
Returned value
This function returns the following possible values:

8/22/2019 User Guide Indu Soft
http://slidepdf.com/reader/full/user-guide-indu-soft 860/1279
Value Description
-1 Internal error; contact Technical Support.
0 Password set successfully.
1 Invalid number of parameters.
2 Wrong parameter type.3 Specified user does not exist.
4 Reentrant call not allowed.
5 User clicked Cancel.
6 Group does not exist.
7 Password too weak.
8 Invalid password.
9 Invalid user.
10 User currently logged on does not have the rights to set user password (i.e., user does nothave Edit Security System).
11 Server offline.
12 Error.
13 Confirm password does not match.
14 Would open dialog.
15 The current Security Mode does not allow user password to be changed.
Examples
TagName Expression
Tag SetPassword( "Bob" )
Tag SetPassword( "Albert", "anemarie" )
Parent topic: Security functionsInduSoft Web Studio v7.0 Technical Reference
Copyright © 2003–2010 Indusoft, Inc.

8/22/2019 User Guide Indu Soft
http://slidepdf.com/reader/full/user-guide-indu-soft 861/1279
Appendix: Built-in Scripting Language > Security functions >
UnblockUserUse to unblock a blocked user in the system.
Function Group Execution Windows Embedded ThinClient
UnblockUser Security Synchronous Supported Supported Supported
Syntax
UnblockUser( strUserName)
strUserName
The name of the user to unblock.
Returned value
This function returns the following possible values:
Value Description
0 User blocked successfully.
1 Invalid number of parameters.2 Wrong parameter type.
3 Specified user does not exist.
4 User currently logged on does not have the rights to unblock (i.e., user does not have Edit
Security System).
5 The operation on the distributed security system failed.
6 Specified user cannot be blocked.
7 The current Security Mode does not allow user to be blocked/unblocked.
8 Internal error.
Examples

8/22/2019 User Guide Indu Soft
http://slidepdf.com/reader/full/user-guide-indu-soft 862/1279
TagName Expression
Tag UnblockUser( "Bob" )
Tag UnblockUser( "Albert" )
Parent topic: Security functionsInduSoft Web Studio v7.0 Technical ReferenceCopyright © 2003–2010 Indusoft, Inc.

8/22/2019 User Guide Indu Soft
http://slidepdf.com/reader/full/user-guide-indu-soft 863/1279
Appendix: Built-in Scripting Language >
Module Activity functionsThese functions are used to manage a project's various runtime modules — such as backgroundtasks, the data server, and the project viewer — as well as those modules' interactions with theoperating system.
AppActivate
AppActivate is a built-in scripting function that activates (i.e., brings to the front) anotherapplication window that is already open.
AppIsRunning
AppIsRunning is a built-in scripting function that verifies another application window is open andrunning.
AppPostMessageAppPostMessage is a built-in scripting function that sends a Windows system message toanother application window.
AppSendKeys
Sends keyboard commands to the active application.
CleanReadQueue
Removes all reading messages from the communications module.
CloseSplashWindow
Closes the IWS splash screen.
DisableMath
DisableMath is a built-in scripting function that pauses the execution of all Math worksheets.
EnableMath
EnableMath is a built-in scripting function that resumes the execution of all Math worksheets.
EndTask
Stops the IWS module that is currently running.
ExitWindows
Exits the Windows operating system in a specified manner.
IsScreenOpen
Verifies that a project screen is open.
IsTaskRunning
Verifies that a background task is running.

8/22/2019 User Guide Indu Soft
http://slidepdf.com/reader/full/user-guide-indu-soft 864/1279
IsViewerInFocusVerifies that the project viewer (Viewer.exe) is in focus on the display.
KeyPad
Displays a Virtual Keyboard to prompt the runtime user to enter a tag value.
LogOff
This function logs off the current user and then logs on the default user (typically "guest").
LogOn
This function either logs on a specified user or displays a Log On dialog.
Math
Executes the specified Math worksheet.
PostKey
Posts key codes to the currently displayed project screen.
RecipeExecutes the specified Recipe worksheet.
Report
Executes the specified Report worksheet and sends the output to hard disk, printer, or PDF.
RunGlobalProcedureOnServer
Runs a function or sub-routine, as declared in the Global Procedures interface. The procedure isrun on the server, but it can be called by any local or remote client.
RunVBScript
Executes a statement in VBScript language.
SecureViewerReload
SecureViewerReload is a built-in scripting function that closes the Secure Viewer program andthen reloads it with a new configuration file.
SendKeyObject
Sends key event codes to objects in the currently displayed project screen. You can use thisfunction to trigger Command animations on these objects.
SetAppPath
Sets the new file path for the project folder. After this function is executed, IWS will look for allof the project files (i.e.,screens, alarms, trends, database, events) in this folder.
SetViewerInFocus
SetViewerInFocus is a built-in scripting function that moves the project viewer in front of allother open windows and then maximizes it to fill the display.
SetViewerPos

8/22/2019 User Guide Indu Soft
http://slidepdf.com/reader/full/user-guide-indu-soft 865/1279
Sets the height, width, and position of the project viewer or thin client.
ShutDown
Shuts down all of the active project modules.
StartTask
Starts a project module that is not currently running.
ViewerPostMessage
Posts a Windows System Message to the specified project screen.
Wait
Pauses the project for a specified number of milliseconds.
WinExec
WinExec is a built-in scripting function that executes a Windows command as if it was enteredat the command prompt.
WinExecIsRunning
Indicates whether a program started by the WinExec function is still running.
Parent topic: Appendix: Built-in Scripting LanguageInduSoft Web Studio v7.0 Technical ReferenceCopyright © 2003–2010 Indusoft, Inc.

8/22/2019 User Guide Indu Soft
http://slidepdf.com/reader/full/user-guide-indu-soft 866/1279
Appendix: Built-in Scripting Language > Module Activity functions >
AppActivateAppActivate is a built-in scripting function that activates (i.e., brings to the front) another applicationwindow that is already open.
Function Group Execution Windows Embedded ThinClient
AppActivate Module Activity Asynchronous Supported Supported Supported
Syntax
strAppTitle
The full title (as shown in the title bar) of the application window.
optNumActiv
Controls how the specified window is to be activated:

8/22/2019 User Guide Indu Soft
http://slidepdf.com/reader/full/user-guide-indu-soft 867/1279
Value Command Description
0 SW_HIDE Hides the currently active window and then activates thespecified window.
1 SW_SHOWNORMAL Activates and displays the specified window. If the window isminimized or maximized, then it is restored to its original size
and position.You should use this command when displaying a window for thefirst time.
2 SW_SHOWMINIMIZED Activates the specified window and then minimizes it.
3 SW_SHOWMAXIMIZED Activates the specified window and then maximizes it.
4 SW_SHOWNOACTIVATE Displays the specified window, but does not activate it. If thewindow is minimized or maximized, then it is restored to itsoriginal size and position.
5 SW_SHOW Activates and displays the specified window in its current sizeand position. This is similar to SW_SHOWNORMAL except that if the
window is minimized or maximized, then it remains in thatstate.
6 SW_MINIMIZE Minimizes the specified window and then activates the nextopen window.
7 SW_SHOWMINNOACTIVATE Displays the specified window as a minimized window, but does
not activate it.
8 SW_SHOWNA Displays the specified window in its current size and position,but does not activate it. This is similar to SW_SHOWNOACTIVATE
except that if the window is minimized or maximized, then it
remains in that state.
9 SW_RESTORE Activates and displays the specified window. If the window isminimized or maximized, then it is restored to its original sizeand position.
You should use this command when restoring a minimizedwindow.
This is an optional parameter. If no value is specified, then the default command is SW_RESTORE.
optNumTimeout
The timeout period (in milliseconds) for the function to be successfully executed. If, forwhatever reason, the function is not executed in this period, then it is aborted.
This is an optional parameter. If no value is specified, then the default timeout is five seconds(or 5000 milliseconds).
Returned value

8/22/2019 User Guide Indu Soft
http://slidepdf.com/reader/full/user-guide-indu-soft 868/1279
This function will return one of the following values:
Value Description
0 ERROR: The specified application window was not activated or otherwise did not respondwithin the timeout period.
1 SUCCESS: The specified application window was successfully activated.
Notes
AppActivate is similar to the function ShowWindow in the Microsoft Windows API, and it allows manyof the same options. For more information, please refer to the Windows API documentation.
Examples
Show the Microsoft Word document named test.doc:
AppActivate( "test.doc — Microsoft Word", 5 )
Parent topic: Module Activity functionsInduSoft Web Studio v7.0 Technical ReferenceCopyright © 2003–2010 Indusoft, Inc.

8/22/2019 User Guide Indu Soft
http://slidepdf.com/reader/full/user-guide-indu-soft 869/1279
Appendix: Built-in Scripting Language > Module Activity functions >
AppIsRunningAppIsRunning is a built-in scripting function that verifies another application window is open andrunning.
Function Group Execution Windows Embedded ThinClient
AppIsRunning Module Activity Synchronous Supported Supported Supported
Syntax
strAppTitle
The full title (as shown in the title bar) of the application window.
optNumTimeout
The timeout period (in milliseconds) for the function to be successfully executed. If, forwhatever reason, the function is not executed in this period, then it is aborted.
This is an optional parameter. If no value is specified, then the default timeout is five seconds(or 5000 milliseconds).
Returned value
This function will return one of the following values:
Value Description
0 ERROR: The specified application window is not open or otherwise did not respond withinthe timeout period.
1 SUCCESS: The specified application window is open and running.
Notes
AppIsRunning is similar to the function IsWindow in the Microsoft Windows API. For moreinformation, please refer to the Windows API documentation.
Examples

8/22/2019 User Guide Indu Soft
http://slidepdf.com/reader/full/user-guide-indu-soft 870/1279
Verify the Microsoft Word document named test.doc is open and running:
AppIsRunning( "test.doc — Microsoft Word" )
Parent topic: Module Activity functionsInduSoft Web Studio v7.0 Technical Reference
Copyright © 2003–2010 Indusoft, Inc.

8/22/2019 User Guide Indu Soft
http://slidepdf.com/reader/full/user-guide-indu-soft 871/1279
Appendix: Built-in Scripting Language > Module Activity functions >
AppPostMessageAppPostMessage is a built-in scripting function that sends a Windows system message to anotherapplication window.
Function Group Execution Windows Embedded ThinClient
AppPostMessage Module Activity Synchronous Supported Supported Supported
Syntax
strAppTitle
The full title (as shown in the title bar) of the application window.
strMessage
The name or code of the system message.
Note: The CLOSE, MINIMIZE, MAXIMIZE and RESTORE messages can be given as string valuesenclosed in quotes. All other message codes must be given as numeric values.
numWParam
Additional message-specific information.
numLParam
Additional message-specific information.
optNumTimeout
The timeout period (in milliseconds) for the function to be successfully executed. If, forwhatever reason, the function is not executed in this period, then it is aborted.
This is an optional parameter. If no value is specified, then the default timeout is five seconds(or 5000 milliseconds).
Returned value
This function will return one of the following values:

8/22/2019 User Guide Indu Soft
http://slidepdf.com/reader/full/user-guide-indu-soft 872/1279
Value Description
0 ERROR: The system message was not sent, or the specified application window did notrespond, within the timeout period.
1 SUCCESS: The system message was successfully sent.
Notes
AppPostMessage is similar to the function PostMessage in the Microsoft Windows API, and it allowsmany of the same options. For more information, including a list of available system messages,please refer to the Windows API documentation.
Examples
Close the Calculator application:
AppPostMessage( "Calculator", "CLOSE", 3, 1 )
Parent topic: Module Activity functionsInduSoft Web Studio v7.0 Technical ReferenceCopyright © 2003–2010 Indusoft, Inc.

8/22/2019 User Guide Indu Soft
http://slidepdf.com/reader/full/user-guide-indu-soft 873/1279
Appendix: Built-in Scripting Language > Module Activity functions >
AppSendKeysSends keyboard commands to the active application.
Function Group Execution Windows Embedded ThinClient
AppSendKeys Module Activity Synchronous Supported Not supported Supported
Syntax
AppSendKeys( strKeys1,strKeys2, … , strKeysN )
strKeys (1-N)
String tags containing the keyboard commands to be used.
Returned value
No returned values.
Examples
TagName Expression
AppSendKeys( "S", "t", "u", "d", "i", "o", "<ENTER>"
)
AppSendKeys( "<Alt>F" )
Note: You can specify <ALT>, <CTRL>, or <SHIFT> in the text to send a code equal to the Alt, Ctrl,or Shift keyboard commands. To send the < character, specify << in the text.
Parent topic: Module Activity functions
InduSoft Web Studio v7.0 Technical ReferenceCopyright © 2003–2010 Indusoft, Inc.

8/22/2019 User Guide Indu Soft
http://slidepdf.com/reader/full/user-guide-indu-soft 874/1279
Appendix: Built-in Scripting Language > Module Activity functions >
CleanReadQueueRemoves all reading messages from the communications module.
Function Group Execution Windows Embedded ThinClient
CleanReadQueue Module Activity Synchronous Supported Not supported Executed on Server
Syntax
This function takes no parameters.
Returned value
No returned values.
Examples
TagName Expression
CleanReadQueue()
Note: You should not use this function in new projects, but it is still valid for projects built usingearlier versions of IWS.
Parent topic: Module Activity functionsInduSoft Web Studio v7.0 Technical ReferenceCopyright © 2003–2010 Indusoft, Inc.

8/22/2019 User Guide Indu Soft
http://slidepdf.com/reader/full/user-guide-indu-soft 875/1279
Appendix: Built-in Scripting Language > Module Activity functions >
CloseSplashWindowCloses the IWS splash screen.
Function Group Execution Windows Embedded ThinClient
CloseSplashWindow Module Activity Synchronous Supported Not supported Executed on Server
Syntax
This function takes no parameters.
Returned value
No returned values.
Examples
TagName Expression
CloseSplashWindow()
Parent topic: Module Activity functionsInduSoft Web Studio v7.0 Technical ReferenceCopyright © 2003–2010 Indusoft, Inc.

8/22/2019 User Guide Indu Soft
http://slidepdf.com/reader/full/user-guide-indu-soft 876/1279
Appendix: Built-in Scripting Language > Module Activity functions >
DisableMathDisableMath is a built-in scripting function that pauses the execution of all Math worksheets.
Function Group Execution Windows Embedded ThinClient
DisableMath Module Activity Asynchronous Supported Supported Executed on Server
Syntax
This function takes no parameters.
Returned value
There are no returned values for this function.
Notes
To resume the execution of Math worksheets, call the EnableMath function.
Examples
TagName Expression
DisableMath()
Parent topic: Module Activity functionsInduSoft Web Studio v7.0 Technical ReferenceCopyright © 2003–2010 Indusoft, Inc.

8/22/2019 User Guide Indu Soft
http://slidepdf.com/reader/full/user-guide-indu-soft 877/1279
Appendix: Built-in Scripting Language > Module Activity functions >
EnableMathEnableMath is a built-in scripting function that resumes the execution of all Math worksheets.
Function Group Execution Windows Embedded ThinClient
EnableMath Module Activity Asynchronous Supported Supported Executed on Server
Syntax
This function takes no parameters.
Returned value
There are no returned values for this function.
Notes
In most cases, execution was paused by calling the DisableMath function.
Examples
TagName Expression
EnableMath()
Parent topic: Module Activity functionsInduSoft Web Studio v7.0 Technical ReferenceCopyright © 2003–2010 Indusoft, Inc.

8/22/2019 User Guide Indu Soft
http://slidepdf.com/reader/full/user-guide-indu-soft 878/1279
Appendix: Built-in Scripting Language > Module Activity functions >
EndTaskStops the IWS module that is currently running.
Function Group Execution Windows Embedded ThinClient
EndTask Module Activity Asynchronous Supported Supported Executed on Server
Syntax
strTask
The name of the task to stop (must be one of the following):
BGTASK Background Tasks
VIEWER Viewer
DBSPY Database Spy
LOGWIN LogWin
DRIVERDriverName Driver
UNIDDECL DDE client
UNINDDE DDE server
UNIODBC ODBC
TCPSERVER TCP/IP Server
TCPCLIENT TCP/IP Client
OPCCLIENT OPC
Returned value
No returned values.
Examples
TagName Expression
EndTask( "Viewer" )

8/22/2019 User Guide Indu Soft
http://slidepdf.com/reader/full/user-guide-indu-soft 879/1279
Note: To close a driver, you must use the following syntax:
EndTask( "DriverDriverName" )
Where DriverName is the name of the driver's .dll file. For example:
EndTask( "DriverMODBU" )
Parent topic: Module Activity functionsInduSoft Web Studio v7.0 Technical ReferenceCopyright © 2003–2010 Indusoft, Inc.

8/22/2019 User Guide Indu Soft
http://slidepdf.com/reader/full/user-guide-indu-soft 880/1279
Appendix: Built-in Scripting Language > Module Activity functions >
ExitWindowsExits the Windows operating system in a specified manner.
Function Group Execution Windows Embedded ThinClient
ExitWindows Module Activity Asynchronous Supported Not supported Supported
Syntax
numExitCode
A numeric code specifying how Windows should be exited:
Value Description
0 Restart
1 Log off
2 Shut down
Returned value
No returned values.
Examples
TagName Expression
ExitWindows( 1 )
Parent topic: Module Activity functionsInduSoft Web Studio v7.0 Technical Reference
Copyright © 2003–2010 Indusoft, Inc.

8/22/2019 User Guide Indu Soft
http://slidepdf.com/reader/full/user-guide-indu-soft 881/1279
Appendix: Built-in Scripting Language > Module Activity functions >
IsScreenOpenVerifies that a project screen is open.
Function Group Execution Windows Embedded ThinClient
IsScreenOpen Module Activity Asynchronous Supported Supported Not supported
Note: This function cannot be used with Tasks or in the Global Procedures script.
Syntax
strScreen
The name of the project screen to be verified.
optNumID
The specific instance number of the screen. (This number is assigned when the screen isopened with the Open function.)
This is an optional parameter. If no value is specified, then the default ID is 0.
Returned value0 Screen is not
open.
1 Screen is open.
Examples
TagName Expression
Tag IsScreenOpen( "main" ) // Is "main" screen open?
Tag IsScreenOpen( "main", 10 ) // Is "main" screen with ID 10open?
Parent topic: Module Activity functions

8/22/2019 User Guide Indu Soft
http://slidepdf.com/reader/full/user-guide-indu-soft 882/1279
InduSoft Web Studio v7.0 Technical ReferenceCopyright © 2003–2010 Indusoft, Inc.

8/22/2019 User Guide Indu Soft
http://slidepdf.com/reader/full/user-guide-indu-soft 883/1279
Appendix: Built-in Scripting Language > Module Activity functions >
IsTaskRunningVerifies that a background task is running.
Function Group Execution Windows Embedded ThinClient
IsTaskRunning Module Activity Synchronous Supported Supported Executed on Server
Syntax
strTask
The name of the task to be verified.
Returned value
0 Task is notrunning.
1 Task is running.
Examples
Is the project viewer (Viewer.exe) running?
IsTaskRunning( "Viewer" )
Parent topic: Module Activity functionsInduSoft Web Studio v7.0 Technical ReferenceCopyright © 2003–2010 Indusoft, Inc.

8/22/2019 User Guide Indu Soft
http://slidepdf.com/reader/full/user-guide-indu-soft 884/1279
Appendix: Built-in Scripting Language > Module Activity functions >
IsViewerInFocusVerifies that the project viewer (Viewer.exe) is in focus on the display.
Function Group Execution Windows Embedded ThinClient
IsViewerInFocus Module Activity Synchronous Supported Not supported Not supported
Syntax
This function takes no parameters.
Returned value
0 Viewer is not infocus.
1 Viewer is in focus.
Examples
IsViewerInFocus()
Parent topic: Module Activity functionsInduSoft Web Studio v7.0 Technical ReferenceCopyright © 2003–2010 Indusoft, Inc.

8/22/2019 User Guide Indu Soft
http://slidepdf.com/reader/full/user-guide-indu-soft 885/1279
Appendix: Built-in Scripting Language > Module Activity functions >
KeyPadDisplays a Virtual Keyboard to prompt the runtime user to enter a tag value.
Function Group Execution Windows Embedded ThinClient
KeyPad Module Activity Asynchronous Supported Supported Supported
Syntax
KeyPad( "strTagName",optStrKeyboardName,optNumIsPassword ,optStrHint,optNumMin,optNumMax )
strTagName
The name of the tag to which the Virtual Keyboard will write.
This name must be enclosed in quotes; if it is not, then the project will try to get the contentsof the tag.
optStrKeyboardName
Type of Virtual Keyboard that will be launched (e.g., AlphaNumeric, EnhKeypad, or Keypad). If thisparameter is omitted, then the default Virtual Keyboard will be launched.
optNumIsPassword
If this parameter is set with any value different from 0 (zero), the characters typed in the
Virtual Keyboard will appear as asterisks ("*"). This option is useful when the user is typing apassword.
optStrHint
The value specified for this parameter is displayed in the title bar of the Virtual Keyboardwindow, if the Show Hint option is selected in the project settings.
optNumMin, optNumMax
Minimum and maximum numeric values for the Tag when using the Keypad keyboard type, if the Show MIN/MAX fields option is selected in the project settings. (These values areignored for all other keyboard types.) These parameters are optional, but you must specifyboth to have them implemented. If you specify only one parameter — for example, Min but not
Max — then it will be ignored.
Returned value

8/22/2019 User Guide Indu Soft
http://slidepdf.com/reader/full/user-guide-indu-soft 886/1279
Error Description
0 Success
1 Error
2 Tag does not exist
3 Reentrant error, function is already executing
4 Invalid number of parameters
5 Internal error, contact Technical Support for moreinformation
Examples
TagName Expression
Tag KeyPad( "tagA" )
Tag KeyPad( "tagA", "EnhKeypad" )
Tag KeyPad( "tagA", "EnhKeypad", 1 )
Tag KeyPad( "tagA", "EnhKeypad", 1, "My Input", 0, 100
)
Parent topic: Module Activity functionsInduSoft Web Studio v7.0 Technical ReferenceCopyright © 2003–2010 Indusoft, Inc.

8/22/2019 User Guide Indu Soft
http://slidepdf.com/reader/full/user-guide-indu-soft 887/1279
Appendix: Built-in Scripting Language > Module Activity functions >
LogOff This function logs off the current user and then logs on the default user (typically "guest").
Function Group Execution Windows Embedded ThinClient
LogOff Module Activity Asynchronous Supported Supported Supported
Syntax
This function takes no parameters.
Returned value
This function returns the following possible values:
Value Description
0 Error.
1 Success.
Examples
LogOff()
Parent topic: Module Activity functionsInduSoft Web Studio v7.0 Technical ReferenceCopyright © 2003–2010 Indusoft, Inc.

8/22/2019 User Guide Indu Soft
http://slidepdf.com/reader/full/user-guide-indu-soft 888/1279
Appendix: Built-in Scripting Language > Module Activity functions >
LogOnThis function either logs on a specified user or displays a Log On dialog.
Function Group Execution Windows Embedded ThinClient
LogOn Module Activity Asynchronous Supported Supported Supported
Syntax
optStrUsername
The name of the user to log on.
optStrPassword
The specified user's password.
optStrUsername and optStrPassword are optional parameters. If they're not specified, then theproject will instead display a Log On dialog, to prompt the station's current operator — whoever it is— to log on.
Returned value
This function returns the following possible values:
Value Description
0 Error (e.g., username or password is invalid) or cancellation.
1 Success.
Examples
Display a Log On dialog:
LogOn()
Log on username Albert with password EMC2:

8/22/2019 User Guide Indu Soft
http://slidepdf.com/reader/full/user-guide-indu-soft 889/1279
LogOn( "Albert", "EMC2" )
Parent topic: Module Activity functionsInduSoft Web Studio v7.0 Technical ReferenceCopyright © 2003–2010 Indusoft, Inc.

8/22/2019 User Guide Indu Soft
http://slidepdf.com/reader/full/user-guide-indu-soft 890/1279
Appendix: Built-in Scripting Language > Module Activity functions >
MathExecutes the specified Math worksheet.
Function Group Execution Windows Embedded ThinClient
Math Module Activity Synchronous Supported Supported Executed on Server
Group Execution WindowsPC WindowsCE ThinClient
Module Activity Synchronous Supported Supported Notsupported
Syntax
Math( numWorksheet)
numWorksheet
The number of the math worksheet to be executed.
Returned value
No returned values.
Examples
TagName Expression
Math( 6 )
CAUTION:
Running a Math worksheet from inside another module will pause that module until
the Math worksheet finishes. Consequently, use this function only when absolutely
necessary to avoid decreasing the performance of the other modules.
Parent topic: Module Activity functionsInduSoft Web Studio v7.0 Technical Reference

8/22/2019 User Guide Indu Soft
http://slidepdf.com/reader/full/user-guide-indu-soft 891/1279
Copyright © 2003–2010 Indusoft, Inc.

8/22/2019 User Guide Indu Soft
http://slidepdf.com/reader/full/user-guide-indu-soft 892/1279
Appendix: Built-in Scripting Language > Module Activity functions >
PostKeyPosts key codes to the currently displayed project screen.
Function Group Execution Windows Embedded ThinClient
PostKey Module Activity Synchronous Supported Supported Supported
Note: This function cannot be used with Tasks or in the Global Procedures script.
Syntax
PostKey( numKeydownOrKeyup,numwParam,numlParam)
numKeydownOrKeyup
Numerical tag containing a 0 (to indicate a KeyDown event) or a 1 (to indicate a KeyUp event).
numwParam
Numerical tag containing key code to be sent.
numlParam
Numerical tag containing message lParam.
Returned value
No returned values.
Examples
TagName Expression
PostKey( 0, 0x24, 0 )
Parent topic: Module Activity functionsInduSoft Web Studio v7.0 Technical ReferenceCopyright © 2003–2010 Indusoft, Inc.

8/22/2019 User Guide Indu Soft
http://slidepdf.com/reader/full/user-guide-indu-soft 893/1279
Appendix: Built-in Scripting Language > Module Activity functions >
RecipeExecutes the specified Recipe worksheet.
Function Group Execution Windows Embedded ThinClient
Recipe Module Activity Synchronous Supported Supported Supported
Syntax
Recipe( strFunction)
strFunction
String tag specifing the operation to be performed and the Recipe worksheet to be used in the[Operation]:[Recipe sheet] format.
Operations:
Save Saves data to a data file.
Load Loads data from a data file.
Delete Deletes a data file.
Init Initializes a data file with a value of 0 in all the
tags.
Returned value
0 No error
1 If the tag is numeric
2 Expression does not contain ":"
3 Previous command to the
invalid ":"4 Task not found by the system
5 Disk error

8/22/2019 User Guide Indu Soft
http://slidepdf.com/reader/full/user-guide-indu-soft 894/1279
Examples
TagName Expression
Tag Recipe( "Save:Recipe1" )
Tag Recipe( "Load:Recipe5" )
Note:
You must be running the Background Task to execute the recipe functions.
When this function is called on a Thin Client, the command is sent to the Server (viaTCP/IP) and the Recipe task on the Server executes the command. Therefore, be awarethat tags configured with a Scope of Local rather Server will still be updated on theServer.
Parent topic: Module Activity functionsInduSoft Web Studio v7.0 Technical Reference
Copyright © 2003–2010 Indusoft, Inc.

8/22/2019 User Guide Indu Soft
http://slidepdf.com/reader/full/user-guide-indu-soft 895/1279
Appendix: Built-in Scripting Language > Module Activity functions >
ReportExecutes the specified Report worksheet and sends the output to hard disk, printer, or PDF.
Function Group Execution Windows Embedded ThinClient
Report Module Activity Synchronous Supported Supported Supported
Syntax
Report( "strFunction" ,optNumOrientation)
strFunction
String specifying the operation to perform and the Report worksheet to output, using thesyntax "Operation:Report worksheet", where…
Operation is either Disk (saves data file to hard disk), Prn (sends report to default printer), or
Pdf (generates a PDF file of the report); and
Report worksheet is the name of the Report worksheet file (*.rep) to output.
optNumOrientation
Set the paper orientation as follows: 0 (default) is Portrait, 1 is Landscape. This parameter isignored if the Operation is other than Prn.
Note: Some features of this function are not supported when running the project on a WindowsEmbedded device: it cannot generate PDFs; it cannot change paper orientation using theoptNumOrientation parameter; and it does not support Report worksheets in RTF format.
Returned value
Value Description
0 Success
1 strFunction is configured with a numeric value (invalid)
2 strFunction does not contain ":" (invalid)
3 strFunction contains an invalid output type before the ":"
4 Background Task is not running (see Tip below)

8/22/2019 User Guide Indu Soft
http://slidepdf.com/reader/full/user-guide-indu-soft 896/1279
Value Description
5 Disk error (e.g., disk full, read-only file cannot be overwritten, orinvalid path)
6 Specifed Report worksheet does not exist
Tip: The Background Task must be running in order to execute this function. Otherwise, theoperation will not be executed and the function will return the value 4 indicating error. For moreinformation, see Execution Tasks.
Examples
TagName Expression
Report( "Disk:Report1.rep" )
Report( "Prn:Report2.rep", 0 )
Report( "Prn:Report3.rep", 1 )
Report( "Pdf:Report1.rep" )
Parent topic: Module Activity functionsInduSoft Web Studio v7.0 Technical ReferenceCopyright © 2003–2010 Indusoft, Inc.

8/22/2019 User Guide Indu Soft
http://slidepdf.com/reader/full/user-guide-indu-soft 897/1279
Appendix: Built-in Scripting Language > Module Activity functions >
RunGlobalProcedureOnServerRuns a function or sub-routine, as declared in the Global Procedures interface. The procedure is runon the server, but it can be called by any local or remote client.
Function Group Execution Windows Embedded ThinClient
RunGlobalProcedureOnServer Module Activity Synchronous Supported Supported Supported
Syntax
RunGlobalProcedureOnServer( strNameProcedure, param1, param2, … )
strNameProcedure
The name of the function or sub-routine to be run.
param1, param2, …
Parameters that are passed to the procedure. Parameters must be passed as strings.
Returned value
This function returns whatever value is returned by the called procedure.
Examples
Given the following procedure that is declared in the Global Procedures interface:
Function AddMe(intNumber)
If intNumber >= 6 Then
AddMe = 0
Else
AddMe = intNumber + 2
End If
End Function
TagName Expression
TagResult RunGlobalProcedureOnServer( "AddMe", "2" ) // Executes the procedure and returns avalue of 4.

8/22/2019 User Guide Indu Soft
http://slidepdf.com/reader/full/user-guide-indu-soft 898/1279
Parent topic: Module Activity functionsInduSoft Web Studio v7.0 Technical ReferenceCopyright © 2003–2010 Indusoft, Inc.
8/22/2019 User Guide Indu Soft
http://slidepdf.com/reader/full/user-guide-indu-soft 899/1279
Appendix: Built-in Scripting Language > Module Activity functions >
RunVBScriptExecutes a statement in VBScript language.
Function Group Execution Windows Embedded ThinClient
RunVBScript Module Activity Synchronous Supported Supported Supported
Syntax
RunVBScript ( strScript, "optTagReturnError " )
strScript
Script statement that must be executed by the function.
optTagReturnError
Name of the tag that will receive the error (if any) generated by the statement (e.g., "Divisionby zero"). The tag name must be configured between double-quotes and it must be a Stringtag.
Returned value
0 Error
1 Success
Examples
TagName Expression
TagResult RunVBScript("MsgBox(Time)") // Executes the MsgBox function from VBScript anddisplays the current time.
RunVBScript(TagStatement) // Executes the statement configured in the value of the string tag TagStatement.
RunVBScript("$TagC=$TagA/$TagB", "TagError") // Writes in TagC the result of TagAdivided by TagB. The error generated by the operation (if any) is written to thestring tag TagError (e.g., "Division by zero").

8/22/2019 User Guide Indu Soft
http://slidepdf.com/reader/full/user-guide-indu-soft 900/1279
Tip: This function is useful to execute VBScript statements from interfaces that support thebuilt-in language only (e.g., Scheduler groups). You can also call VBSCript functions created inthe Global Procedures.
Note: The runtime station must support the VBScript statements configured in this function inorder to execute them.
Parent topic: Module Activity functionsInduSoft Web Studio v7.0 Technical ReferenceCopyright © 2003–2010 Indusoft, Inc.

8/22/2019 User Guide Indu Soft
http://slidepdf.com/reader/full/user-guide-indu-soft 901/1279
Appendix: Built-in Scripting Language > Module Activity functions >
SecureViewerReloadSecureViewerReload is a built-in scripting function that closes the Secure Viewer program and thenreloads it with a new configuration file.SecureViewerReloadModuleActivitySynchronousNotSupportedNotSupportedSecureVieweronly
Function Group Execution Windows Embedded ThinClient
Syntax
strFileName
The file path of an INI file (*.ini ) that describes the new configuration. (If the file is located inthe same folder as Viewer.exe , then only the file name is needed.) The file should be
structured the same and contain all of the same settings as the default configuration file(Viewer.ini ).
This parameter must specify either the name of a String tag or a text string enclosed in quotes.
Returned value
This function does not return any value.
Examples
SecureViewerReload( configFile1 )
SecureViewerReload( "C:\Program Files\Secure Viewer\Bin\Config1.ini" )
Parent topic: Module Activity functionsInduSoft Web Studio v7.0 Technical ReferenceCopyright © 2003–2010 Indusoft, Inc.

8/22/2019 User Guide Indu Soft
http://slidepdf.com/reader/full/user-guide-indu-soft 902/1279
Appendix: Built-in Scripting Language > Module Activity functions >
SendKeyObjectSends key event codes to objects in the currently displayed project screen. You can use this functionto trigger Command animations on these objects.
Function Group Execution Windows Embedded ThinClient
SendKeyObject Module Activity Synchronous Supported Not supported Not supported
Note: This function cannot be used with Tasks or in the Global Procedures script.
Syntax
SendKeyObject( numEvent,strMainKey ,numShift,numCtrl,numAlt,strTargetScreen,optNumID )
numEvent
The event code for "On Down", "On While" or "On Up" of the Command animation, as follows:
0 On Down
1 While Down
2 On Up
Note: The "On While" event requires special attention. Each time the SendKeyObject()
function is executed, IWS executes the expressions configured for the "On While" sheet(from the object's Command animation) just once.
strMainKey
The key to be sent to the screen. The following values are accepted:
"F1" … "F20"
"+ "
"-""/"
"*"
"HOME"
"END"

8/22/2019 User Guide Indu Soft
http://slidepdf.com/reader/full/user-guide-indu-soft 903/1279
"INSERT"
"DELETE"
"DOWN"
"UP"
"LEFT"
"RIGHT"
"PAGEUP"
"PAGEDOWN"
"SPACE"
"RETURN"
"BACKSPACE"
"ESCAPE"
"A" … "Z"
numShift
A numeric value or tag; whether to include Shift with the key (0 is no, 1 is yes).
numCtrl
A numeric value or tag; whether to include Ctrl with the key (0 is no, 1 is yes).
numAlt
A numeric value or tag; whether to include Alt with the key (0 is no, 1 is yes).
strTargetScreen
The name of the screen to receive the key event code.
Note: The numShift, numCtrl, numAlt and strTargetScreen parameters are optional. However,
if you configure one of them, then you must configure the others as well.
optNumID
The specific instance number of the screen. (The ID is assigned when the screen is opened withthe Open() function.) This is an optional parameter; the default ID is 0.
Returned value
This function returns no values.
Examples

8/22/2019 User Guide Indu Soft
http://slidepdf.com/reader/full/user-guide-indu-soft 904/1279
TagName Expression
SendKeyObject( 0, "R", 1, 0, 0, "main", 10 ) // Sends Shift-R to the "main"screen with ID 10.
Parent topic: Module Activity functionsInduSoft Web Studio v7.0 Technical Reference
Copyright © 2003–2010 Indusoft, Inc.

8/22/2019 User Guide Indu Soft
http://slidepdf.com/reader/full/user-guide-indu-soft 905/1279
Appendix: Built-in Scripting Language > Module Activity functions >
SetAppPathSets the new file path for the project folder. After this function is executed, IWS will look for all of theproject files (i.e.,screens, alarms, trends, database, events) in this folder.
Function Group Execution Windows Embedded ThinClient
SetAppPath Module Activity Synchronous Supported Not supported Executed on Server
Syntax
strPath
The file path.
Returned value
0 Failed to set path.
1 Succeeded in settingpath
Examples
TagName Expression
SetAppPath( "C:\Studio\" )
Note: If the computer is on a network, you can use the //IP address or host name/Path
syntax to define a location on another node of the network.
Parent topic: Module Activity functions
InduSoft Web Studio v7.0 Technical ReferenceCopyright © 2003–2010 Indusoft, Inc.

8/22/2019 User Guide Indu Soft
http://slidepdf.com/reader/full/user-guide-indu-soft 906/1279
Appendix: Built-in Scripting Language > Module Activity functions >
SetViewerInFocusSetViewerInFocus is a built-in scripting function that moves the project viewer in front of all otheropen windows and then maximizes it to fill the display.
Function Group Execution Windows Embedded ThinClient
SetViewerInFocus ModuleActivity Synchronous Supported NotSupported Supported
Syntax
There are no parameters.
Returned value
This function does not return any value.
Notes
Beginning with Windows XP, system security features prevent program windows from movingthemselves in front of others without user input. As such, when you call this function, the Viewerprogram will request the user's attention by blinking in the Windows taskbar. (Some anti-virus
software may also flag this as suspicious behavior.) Only when the user selects the program will theprogram window move to the front.
To work around this, you must call SetViewerInFocus at least once in your project's Startup Script.Allow twenty seconds more for your project to finish starting up, and then after that, any additionalcalls of this function should work normally.
Examples
SetViewerInFocus()
Parent topic: Module Activity functionsInduSoft Web Studio v7.0 Technical ReferenceCopyright © 2003–2010 Indusoft, Inc.

8/22/2019 User Guide Indu Soft
http://slidepdf.com/reader/full/user-guide-indu-soft 907/1279
Appendix: Built-in Scripting Language > Module Activity functions >
SetViewerPosSets the height, width, and position of the project viewer or thin client.
Function Group Execution Windows Embedded ThinClient
SetViewerPos Module Activity Synchronous Supported Not supported Supported
Syntax
SetViewerPos( numLeft,numTop,optNumWidth,optNumHeight)
numLeft
A numeric flag that specifies the left-side position of the Viewer in pixels.
numTop
A numeric flag that specifies the top-side position of the Viewer in pixels.
optNumWidth
Optional numeric tag specifying the Viewer width in pixels.
optNumHeight
Optional numeric tag containing the Viewer height in pixels.
Returned value
0 Error
1 Success
Examples
TagName Expression
Tag SetViewerPos( 50, 50, 640, 480 )
Note: When you omit the optional parameters (numWidth and numHeight), IWS gets size of theViewer window from the project resolution.

8/22/2019 User Guide Indu Soft
http://slidepdf.com/reader/full/user-guide-indu-soft 908/1279
Parent topic: Module Activity functionsInduSoft Web Studio v7.0 Technical ReferenceCopyright © 2003–2010 Indusoft, Inc.

8/22/2019 User Guide Indu Soft
http://slidepdf.com/reader/full/user-guide-indu-soft 909/1279
Appendix: Built-in Scripting Language > Module Activity functions >
ShutDownShuts down all of the active project modules.
Function Group Execution Windows Embedded ThinClient
ShutDown Module Activity Asynchronous Supported Supported Not supported
Syntax
This function takes no parameters.
Returned value
No returned values.
Notes
This function does not close the development environment, Database Spy, or LogWin.
Examples
TagName Expression
ShutDown()
Parent topic: Module Activity functionsInduSoft Web Studio v7.0 Technical ReferenceCopyright © 2003–2010 Indusoft, Inc.

8/22/2019 User Guide Indu Soft
http://slidepdf.com/reader/full/user-guide-indu-soft 910/1279
Appendix: Built-in Scripting Language > Module Activity functions >
StartTaskStarts a project module that is not currently running.
Function Group Execution Windows Embedded ThinClient
StartTask Module Activity Asynchronous Supported Supported Executed on Server
Syntax
strTask
The name of the task to start (must be one of the following tasks):
Value Description
BGTask Background Tasks
Viewer Viewer
DBSpy Database Spy
LogWin LogWin
Driver Driver
UniDDECl DDE Client
UniNDDE DDE Server
UniODBC ODBC
TCPServer TCP/IP Server
TCPClient TCP/IP Client
OPCClient OPC Client
Returned value
No returned values.
Examples

8/22/2019 User Guide Indu Soft
http://slidepdf.com/reader/full/user-guide-indu-soft 911/1279
TagName Expression
StartTask( "Viewer" )
Note: The StartTask( "Driver" ) function starts all drivers configured in the project. To start a
specific driver, you must use the WinExec() function.
Parent topic: Module Activity functionsInduSoft Web Studio v7.0 Technical ReferenceCopyright © 2003–2010 Indusoft, Inc.

8/22/2019 User Guide Indu Soft
http://slidepdf.com/reader/full/user-guide-indu-soft 912/1279
Appendix: Built-in Scripting Language > Module Activity functions >
ViewerPostMessagePosts a Windows System Message to the specified project screen.
Function Group Execution Windows Embedded ThinClient
ViewerPostMessage Module Activity Asynchronous Supported Supported Supported
Note: This function cannot be used with Tasks or in the Global Procedures script.
Syntax
ViewerPostMessage( strScrTitle,numMessage,numwParam,numlParam,optNumID )
strScrTitle
The name of the screen to which the message will be posted.
numMessage
The number of the Windows System Message to be posted.
numwParam
A numeric value or tag; additional message-specific information, which is passed to wParam of the Windows System Message.
numlParam
A numeric value or tag; additional message-specific information, which is passed to lParam of the Windows System Message.
optNumID
The specific instance number of the screen. (The ID is assigned when the screen is opened withthe Open() function.) This is an optional parameter; the default ID is 0.
Returned value
This function returns no values.
Notes
This function emulates the PostMessage function in Microsoft Windows. For more information,

8/22/2019 User Guide Indu Soft
http://slidepdf.com/reader/full/user-guide-indu-soft 913/1279
including a complete list of available Windows System Messages, please consult Microsoft DevelopersNetwork.
Examples
TagName Expression
ViewerPostMessage( "main", 16, 3, 1, 10 )
// Sends message 16 to the "main" screen with ID10.
Parent topic: Module Activity functionsInduSoft Web Studio v7.0 Technical ReferenceCopyright © 2003–2010 Indusoft, Inc.

8/22/2019 User Guide Indu Soft
http://slidepdf.com/reader/full/user-guide-indu-soft 914/1279
Appendix: Built-in Scripting Language > Module Activity functions >
WinExecWinExec is a built-in scripting function that executes a Windows command as if it was entered at thecommand prompt.
Function Group Execution Windows Embedded ThinClient
WinExec Module Activity Asynchronous Supported Supported Supported
Syntax
strCommand
The command to be executed.
optNumState
The initial state of the program (if any) that is run by the command:
Value Description
0 Hides the program and gives control to another one.
1 Activates and displays the program.
2 Activates the program and displays it as an icon.
3 Activates the program and maximizes it.
4 Shows the program at its recent size. The program is still active.
7 Shows the program as an icon. The program is still active.
This is an optional parameter. If no value is specified, then the default value is 1.
optNumSync
A setting that specifies whether the command will execute synchronously or asynchronously:
Value Description
0 Execute asynchronously; the function will return immediately.
1 Execute synchronously; the function will return when the command has finishedexecuting.

8/22/2019 User Guide Indu Soft
http://slidepdf.com/reader/full/user-guide-indu-soft 915/1279
This is an optional parameter. If no value is specified, then the default value is 0.
Tip: To verify that a command executed asynchronously has finished, use theoptTagReturnOrHandle parameter below and the WinExecIsRunning function.
optTagReturnOrHandle
The name of a project tag (enclosed in quotes) that will store feedback about the execution of the command:
If it is executed asynchronously, then the tag will receive a handle that can used with theWinExecIsRunning function to determine whether the command is still running.
If it is executed synchronously, then the tag will receive the command's exit code. (This isseparate from the function's own returned value.)
This is an optional parameter, but given its nature, there is no default value.
Returned value
This function returns the following possible values:
Value Description
0 Command was not executed successfully.
1 Command was executed successfully.
Please note that this indicates only whether the command started its execution successfully,particularly if it is executed asynchronously. It does not indicate when or how the command finishedits execution.
Examples
Start Notepad, and then immediately continue to the next line of the script:
WinExec( "C:\Windows\System32\notepad.exe", 4 )
Start MS Paint, and then immediately continue to the next line of the script:
WinExec( "C:\Windows\System32\mspaint.exe" )
Call a batch file, execute it in hidden mode, wait until it is finished before continuing, and then storethe exit code in the tag return:

8/22/2019 User Guide Indu Soft
http://slidepdf.com/reader/full/user-guide-indu-soft 916/1279
WinExec( "CMD /C call C:\Temp\MyBatch.bat", 0, 1, "return" )
Call a VBScript file, execute it in hidden mode, and then immediately continue, storing the handle inthe tag handle:
WinExec( "CMD /C call C:\Temp\MyScript.vbs", 0, 0, "handle" )
Note: Calling VBScript files is not supported on Windows Embedded target systems.
Parent topic: Module Activity functionsInduSoft Web Studio v7.0 Technical ReferenceCopyright © 2003–2010 Indusoft, Inc.

8/22/2019 User Guide Indu Soft
http://slidepdf.com/reader/full/user-guide-indu-soft 917/1279
Appendix: Built-in Scripting Language > Module Activity functions >
WinExecIsRunningIndicates whether a program started by the WinExec function is still running.
Function Group Execution Windows Embedded ThinClient
WinExecIsRunning Module Activity Synchronous Supported Supported Supported
Syntax
WinExecIsrunning( numHandle, "optTagReturn" )
numHandle
Handle number stored in the tag in the optStrReturnorHandle parameter of the WinExecfunction.
"optTagReturn"
Tag that receives the code returned by the program executed by the WinExec function.
Returned value
0 Successful execution.
-1 Invalid parameter(s).
-2 Failed to open file. Disk is write protected or file nameis invalid.
Examples
TagName Expression
Tag WinExecIsRunning( numHandle )
Tag WinExecIsRunning( numHandle, "return" )
Parent topic: Module Activity functionsInduSoft Web Studio v7.0 Technical ReferenceCopyright © 2003–2010 Indusoft, Inc.

8/22/2019 User Guide Indu Soft
http://slidepdf.com/reader/full/user-guide-indu-soft 918/1279
Appendix: Built-in Scripting Language >
File functionsThese functions are used to read from, write to, print, move, and delete external files.
DeleteOlderFiles
Deletes files that are older than a date matching the configured mask from the configured path.
DirCreate
Creates the specified directory.
DirDelete
Deletes the specified directory.
DirLength
Returns the size of a specific directory.
DirRename
Renames directories.
FileCopy
Copies the file(s) configured in the strSourceFile parameter to the path/file configured in thestrTargetFile parameter.
FileDelete
Deletes the specified file.
FileLength
Gets the size of a file.
FileRename
FileRename is a built-in scripting function that renames a specified file.
FileWrite
Writes a string to a specified ASCII or Unicode file. If the file doesn't exist, then the function willcreate the file.
FindFile
FindFile is a built-in scripting function that searches for all files that match a given search string.
FindPath
Verifies whether a directory exists.
GetFileAttributes
Reads the attributes of a specified file.

8/22/2019 User Guide Indu Soft
http://slidepdf.com/reader/full/user-guide-indu-soft 919/1279
GetFileTime
Reads the time and date the file was last modified.
GetHstInfo
Returns the Start Time, End Time, and Duration of the specified history (*.HST) file.
GetLine
Gets a specified line or search string from a text file and then stores the line in a String tag.
HST2TXT
Export information from the Trend history file(s) in proprietary binary format (*.hst) to a plaintext (*.txt) or comma-delimited (*csv) file.
HST2TXTIsRunning
Returns the status of the HST2TXT function.
LookupContains
This function verifies that an external file contains the specified keyword in its key column.
LookupGet
This function gets a value from an external file by cross-referencing from a specified keyword.
LookupLoad
This function loads an external file — typically, a delimited text file — that can be used to lookup table values. One column of the file is designated as the keywords column, and anothercolumn is designated as the values column.
PDFCreate
Creates a PDF file from the specified source file.
PrintPrints a text file.
RDFileN
Launches a File Browser window allowing you to select a file.
WebGetFile
Downloads a file from a specified address and then saves it locally.
Parent topic: Appendix: Built-in Scripting LanguageInduSoft Web Studio v7.0 Technical Reference
Copyright © 2003–2010 Indusoft, Inc.
8/22/2019 User Guide Indu Soft
http://slidepdf.com/reader/full/user-guide-indu-soft 920/1279
Appendix: Built-in Scripting Language > File functions >
DeleteOlderFilesDeletes files that are older than a date matching the configured mask from the configured path.
Function Group Execution Windows Embedded ThinClient
DeleteOlderFiles File Synchronous Supported Supported Supported
Syntax
DeleteOlderFiles( strPath,strMask,strDate)
strPath
The path to the files that will be deleted.
strMask
The mask of the files to be deleted.
strDate
The cut-off date. Any files older than this date will be deleted.
Note: This parameter must be configured using the date format specified for the project(such as MDY or DMY) with the appropriate separator (/, :, ., and so forth.).
Returned value
Returns the number of files deleted.
Examples
TagName Expression
Tag DeleteOlderFiles( "C:\Studio\Project\HST\", "*.hst","04/12/2002" )
Parent topic: File functionsInduSoft Web Studio v7.0 Technical ReferenceCopyright © 2003–2010 Indusoft, Inc.

8/22/2019 User Guide Indu Soft
http://slidepdf.com/reader/full/user-guide-indu-soft 921/1279
Appendix: Built-in Scripting Language > File functions >
DirCreateCreates the specified directory.
Function Group Execution Windows Embedded ThinClient
DirCreate File Synchronous Supported Supported Executed on Server
Syntax
DirCreate( strDirectory ,optBooFullPath)
strDirectory
The name and file path of the directory to create.
optBooEmptyOnly
Optional flag. If omitted or if this parameter has the value 0, the directory is created only if allprevious directories exist. If this parameter has the value different from 0, the full pathspecified in the strDirectory parameter is created.
Returned value
-1 Invalid parameters
0 Failed to create the directory (e.g., Drive doesnot exist.)
1 Directory created successfully.
Examples
TagName Expression
Tag DirCreate("C:\Studio\Temp") // The Temp folder is created in the C:\Studio path(only if the C:\Studio path already exists).
Tag DirCreate("C:\Studio\Temp",1) // The C:\Studio\Temp full path is created.
Parent topic: File functionsInduSoft Web Studio v7.0 Technical Reference

8/22/2019 User Guide Indu Soft
http://slidepdf.com/reader/full/user-guide-indu-soft 922/1279
Copyright © 2003–2010 Indusoft, Inc.

8/22/2019 User Guide Indu Soft
http://slidepdf.com/reader/full/user-guide-indu-soft 923/1279
Appendix: Built-in Scripting Language > File functions >
DirDeleteDeletes the specified directory.
Function Group Execution Windows Embedded ThinClient
DirDelete File Synchronous Supported Supported Executed on Server
Syntax
DirDelete( strDirectory ,optBooEmptyOnly )
strDirectory
The name and file path of the directory to delete.
Tip: This parameter supports wildcards (* and ?).
optBooEmptyOnly
Optional flag. If this parameter has a value of 1, then the directory is deleted only if it isempty. By default — that is, if the parameter is omitted or has a value of 0 — the directory isdeleted whether it is empty or not.
Returned value
Value Description
-2 Attempted to delete a non-empty directory when this action is not allowed (i.e.,optBooEmptyOnly does not equal 0).
-1 Invalid parameters.
0 Failed to delete the directory (i.e., directory does not exist).
1 Directory deleted successfully.
Examples

8/22/2019 User Guide Indu Soft
http://slidepdf.com/reader/full/user-guide-indu-soft 924/1279
TagName Expression
Tag DirDelete( "C:\Studio\Temp" ) // The Temp folder from C:\Studio is deleted.
Tag DirDelete( "C:\Studio\Temp", 1 ) // The Temp folder from C:\Studio is deletedonly if it is empty.
Parent topic: File functionsInduSoft Web Studio v7.0 Technical ReferenceCopyright © 2003–2010 Indusoft, Inc.

8/22/2019 User Guide Indu Soft
http://slidepdf.com/reader/full/user-guide-indu-soft 925/1279
Appendix: Built-in Scripting Language > File functions >
DirLengthReturns the size of a specific directory.
Function Group Execution Windows Embedded ThinClient
DirLength File Synchronous Supported Supported Executed on Server
Description
Returns the size of a specific directory.
Syntax
strPath
The path of the directory that will be checked.
Returned value
- 2 Directory does not exist.
- 1 Invalid parameters
n Size (in bytes) of the files and sub-folders in thedirectory
Notes
CAUTION:
This function executes synchronously, which means that the project pauses while it
waits for the function to return. As such, if the specified directory is unusually large,
then the project could be paused for several seconds while size of the directory is
calculated.
Examples

8/22/2019 User Guide Indu Soft
http://slidepdf.com/reader/full/user-guide-indu-soft 926/1279
TagName Expression
Tag DirLength("C:\Studio") // Returns the size (in bytes) of all files and sub-foldersfrom C:\Studio.
Parent topic: File functions
InduSoft Web Studio v7.0 Technical ReferenceCopyright © 2003–2010 Indusoft, Inc.

8/22/2019 User Guide Indu Soft
http://slidepdf.com/reader/full/user-guide-indu-soft 927/1279
Appendix: Built-in Scripting Language > File functions >
DirRenameRenames directories.
Function Group Execution Windows Embedded ThinClient
DirRename File Synchronous Supported Supported Executed on Server
Syntax
strPath
The path of the directory that will be renamed.
Tip: This function supports wildcard ( * and ? ).
strDirectoryFrom
The original name of the directory that will be renamed.
strDirectoryTo
The target name used to rename the original directory.
Returned value
- 1 Invalid parameters
0 Failed to rename the directory (e.g., strDirectoryFrom doesnot exist.)
1 Directory renamed successfully.
Examples
TagName Expression
Tag DirRename("C:\Studio\","Temp", "New") // C:\Studio\Temp is renamed toC:\Studio\New.
Parent topic: File functions

8/22/2019 User Guide Indu Soft
http://slidepdf.com/reader/full/user-guide-indu-soft 928/1279
InduSoft Web Studio v7.0 Technical ReferenceCopyright © 2003–2010 Indusoft, Inc.

8/22/2019 User Guide Indu Soft
http://slidepdf.com/reader/full/user-guide-indu-soft 929/1279
Appendix: Built-in Scripting Language > File functions >
FileCopyCopies the file(s) configured in the strSourceFile parameter to the path/file configured in thestrTargetFile parameter.
Function Group Execution Windows Embedded ThinClient
FileCopy File Synchronous Supported Supported Supported
Syntax
strSourceFile
The file path and name the file(s) to be copied.
Tip: This function supports wildcards (* and ?).
strTargetFile
The file path where the file(s) are to be copied.
optNumTimeOut
Numerical tag containing an integer to set the timeout time for the operation.
If you use the optNumTimeOut parameter, the function returns the value -1 after thespecified timeout time and the scan continues. Though the function returns a -1, it does notcancel the copying procedure. Instead, it creates an internal process to finish the copyingprocedure.
Returned value
- 1 Timeout time expired.
0 Failed to copy file(s).
1 File(s) copiedsuccessfully.
Notes
CAUTION:

8/22/2019 User Guide Indu Soft
http://slidepdf.com/reader/full/user-guide-indu-soft 930/1279
This function executes synchronously, which means that the project pauses while it
waits for the function to return. As such, if the function is called to copy files from or
to another volume across a slow network, then the project could be paused for long
time.
Examples
TagName Expression
Tag FileCopy( "C:\Studio\Project\HST\*.hst", "C:\Temp\Hst\", 1000 )
Tag FileCopy( "C:\Studio\Project opert.txt", "C:\Temp\Tuesday_Report.txt",
500 )
Parent topic: File functionsInduSoft Web Studio v7.0 Technical ReferenceCopyright © 2003–2010 Indusoft, Inc.

8/22/2019 User Guide Indu Soft
http://slidepdf.com/reader/full/user-guide-indu-soft 931/1279
Appendix: Built-in Scripting Language > File functions >
FileDeleteDeletes the specified file.
Function Group Execution Windows Embedded ThinClient
FileDelete File Synchronous Supported Supported Supported
Syntax
strFile
The file path and name of the file to delete.
Returned value
0 Failed to delete file
Real Returns the size of the filedeleted
Examples
TagName Expression
Tag FileDelete( "C:\Studio\Readme.txt" )
Parent topic: File functionsInduSoft Web Studio v7.0 Technical ReferenceCopyright © 2003–2010 Indusoft, Inc.

8/22/2019 User Guide Indu Soft
http://slidepdf.com/reader/full/user-guide-indu-soft 932/1279
Appendix: Built-in Scripting Language > File functions >
FileLengthGets the size of a file.
Function Group Execution Windows Embedded ThinClient
FileLength File Synchronous Supported Supported Supported
Syntax
strFile
The file path and name of the file.
Returned value
Returns the size of the specified file in bytes.
Examples
TagName Expression
Tag FileLength( "C:\Readme.txt" )
Parent topic: File functionsInduSoft Web Studio v7.0 Technical ReferenceCopyright © 2003–2010 Indusoft, Inc.

8/22/2019 User Guide Indu Soft
http://slidepdf.com/reader/full/user-guide-indu-soft 933/1279
Appendix: Built-in Scripting Language > File functions >
FileRenameFileRename is a built-in scripting function that renames a specified file.
Function Group Execution Windows Embedded ThinClient
FileRename File Synchronous Supported Supported Supported
Syntax
strOldName
The path and old name of the file.
strNewName
The path and new name of the file.
Returned value
This function does not return any value.
Examples
FileRename( "C:\readme.txt", "C:\readthis.txt" )
Parent topic: File functionsInduSoft Web Studio v7.0 Technical ReferenceCopyright © 2003–2010 Indusoft, Inc.

8/22/2019 User Guide Indu Soft
http://slidepdf.com/reader/full/user-guide-indu-soft 934/1279
Appendix: Built-in Scripting Language > File functions >
FileWriteWrites a string to a specified ASCII or Unicode file. If the file doesn't exist, then the function willcreate the file.
Function Group Execution Windows Embedded ThinClient
FileWrite File Synchronous Supported Supported Supported
Description
Writes a string to a specified ASCII or Unicode file. If the file doesn't exist, then the function willcreate the file.
Syntax
strFileName
A string value enclosed in quotes, or the name of a String tag that contains the value,specifying the file name.
By default, the file will be written in your project folder (i.e., the folder that contains the file project_name.APP). To write in another folder, specify the complete file path.
strWriteText
A string value enclosed in quotes, or the name of a String tag that contains the value,specifying the text to be written to the file.
optNumAppend
A numerical value, or the name of an Integer tag that contains the value, specifying the textencoding of the file:
Value Description
0 Creates a new ASCII file with the given file name. If the file already exists,then it is overwritten.
1 Appends to an existing ASCII file with the given file name. If the file doesn'texist, then a new file is created.
2 Creates a new Unicode (UTF-16LE) file with the given file name. If the filealready exists, then it is overwritten.

8/22/2019 User Guide Indu Soft
http://slidepdf.com/reader/full/user-guide-indu-soft 935/1279
Value Description
3 Appends to an existing Unicode file with the given file name. If the filedoesn't exist, then a new file is created.
This is an optional parameter . If any value other than 0 through 3 is given, or if the parameteris not used, then 0 is the default.
Returned value
0 Successful execution.
- 1 Invalid parameter(s).
- 2 Failed to open file. Disk is write protected or file name isinvalid.
Examples
TagName Expression
Tag FileWrite( "c: est.txt", "This is a test" )
Tag FileWrite( strFileName, strWriteText )
Tag FileWrite( strFileName, strWriteText, 1 )
Parent topic: File functionsInduSoft Web Studio v7.0 Technical Reference
Copyright © 2003–2010 Indusoft, Inc.

8/22/2019 User Guide Indu Soft
http://slidepdf.com/reader/full/user-guide-indu-soft 936/1279
Appendix: Built-in Scripting Language > File functions >
FindFileFindFile is a built-in scripting function that searches for all files that match a given search string.
Function Group Execution Windows Embedded ThinClient
FindFile File Synchronous Supported Supported Supported
Syntax
strFile
The name of the file(s) to search for.
You may use wildcards (*) to find multiple files. For example, *.gif to find all GIF files orlog*.txt to find all log files in a sequence (e.g., log001.txt, log002.txt, log003.txt).
By default, the function only searches the project folder, but you may specify a file path (eitherrelative or absolute) to search elsewhere. For example, if strFile is defined as…
\\volume name or IP address \Logs\log*.txt
…then the function will search the Logs directory on the specified network volume.
optTagFilesFound
An array (of String type) that will receive the names of the matching files. The array namemust be enclosed in quotes; if it is not, then the function will try to get the contents of thearray.
This is an optional parameter. If no value is specified, then the file names will not be saved andthe function will only return the number of files found. For more information, see "Returnedvalue" below.
Note: The array will receive only the file names and not their paths, even if you definestrFile to search outside the default directory.
optNumTimeout
The timeout period (in milliseconds) for the function to be successfully executed.
This is an optional parameter. If no value is specified, then the project will continue searchinguntil it has completely searched the specified directory.

8/22/2019 User Guide Indu Soft
http://slidepdf.com/reader/full/user-guide-indu-soft 937/1279
Returned value
This function will return one of the following values:
Value Description
-1
Function timed out.0 No matching files found.
n Number of matching files found.
Notes
This function may be called by any project client, but it is always executed on the project server. Bydefault, it only searches the server's project folder, and if strFile includes a relative file path, then it
must be relative to the that same directory.
Furthermore, because the function is executed synchronously on the project server, if strFile ispoorly defined and/or optNumTimeout is not used, then the entire project — both the server andthe clients — may hang while it searches for the files.
Finally, optNumTimeout is not supported if the project server is a Windows Embedded device.
Examples
Find all text files in the Server's project folder:
FindFile( "*.txt" )
Find all Microsoft Word files in the project folder and then send the names of the matching files toStringArray, within a timeout period of 1000 milliseconds:
FindFile( "*.doc", "StringArray", 1000 )
Parent topic: File functionsInduSoft Web Studio v7.0 Technical Reference
Copyright © 2003–2010 Indusoft, Inc.

8/22/2019 User Guide Indu Soft
http://slidepdf.com/reader/full/user-guide-indu-soft 938/1279
Appendix: Built-in Scripting Language > File functions >
FindPathVerifies whether a directory exists.
Function Group Execution Windows Embedded ThinClient
FindPath File Synchronous Supported Supported Supported
Syntax
strPathName
The file path for which to search.
Returned value
0 Path notfound
1 Path found
Examples
TagName Expression
Tag FindPath( "C:\WINNT\" )
Parent topic: File functionsInduSoft Web Studio v7.0 Technical ReferenceCopyright © 2003–2010 Indusoft, Inc.

8/22/2019 User Guide Indu Soft
http://slidepdf.com/reader/full/user-guide-indu-soft 939/1279
Appendix: Built-in Scripting Language > File functions >
GetFileAttributesReads the attributes of a specified file.
Function Group Execution Windows Embedded ThinClient
GetFileAttributes File Synchronous Supported Supported Supported
Syntax
strFile
The file path and name of the file from which to read the attributes.
Returned value
- 1 Error
1 Read only
2 Hidden
4 System
16 Directory
32 Archive
128 Normal
256 Temporary
Examples
TagName Expression
Tag GetFileAttributes( "C:\Readme.txt" )
Parent topic: File functionsInduSoft Web Studio v7.0 Technical ReferenceCopyright © 2003–2010 Indusoft, Inc.

8/22/2019 User Guide Indu Soft
http://slidepdf.com/reader/full/user-guide-indu-soft 940/1279
Appendix: Built-in Scripting Language > File functions >
GetFileTimeReads the time and date the file was last modified.
Function Group Execution Windows Embedded ThinClient
GetFileTime File Synchronous Supported Supported Supported
Syntax
strFileName
The file path and name of the file to be read.
numFormat
A numeric flag specifiying the format of the returned data:
0: Returns the date and time from the file.
1: Returns only the file date.
2: Returns only the file time.
Returned value
Returns the date and or time the file was last modified.
Examples
TagName Expression
Tag GetFileTime( "C:\Readme.txt" )
Parent topic: File functionsInduSoft Web Studio v7.0 Technical ReferenceCopyright © 2003–2010 Indusoft, Inc.

8/22/2019 User Guide Indu Soft
http://slidepdf.com/reader/full/user-guide-indu-soft 941/1279
Appendix: Built-in Scripting Language > File functions >
GetHstInfoReturns the Start Time, End Time, and Duration of the specified history (*.HST) file.
Function Group Execution Windows Embedded ThinClient
GetHstInfo File Synchronous Supported Supported Supported
Syntax
strFileName
The file path and name of the history file to be read.
numFormat
A numeric flag specifying the type of information to be returned:
0: Returns the Start Time of the file.
1: Returns the End Time of the file.
2: Returns the Duration (in hours) of the file.
Returned value
If the file cannot be read or the specified information cannot be returned, then an error is generated:
-1 Failed to retrieve the Start Time; verify the history file exists and is valid.
-2 Failed to retrieve the End Time; verify the history file exists and is valid.
-3 Internal program error; please contact Technical Support.
-4 The Studio TCP/IP server returned a Time that is incompatible with the formatspecified in the project screen or Web page. Please use the Verify Project tool toupdate the project and try again.
Examples
TagName Expression
Tag GetHstInfo( "batch", 0 )

8/22/2019 User Guide Indu Soft
http://slidepdf.com/reader/full/user-guide-indu-soft 942/1279
TagName Expression
Tag GetHstInfo( "hst/02060801.hst", 1 )
Tag GetHstInfo( "C:\batch.bat", 2 )
Parent topic: File functions
InduSoft Web Studio v7.0 Technical ReferenceCopyright © 2003–2010 Indusoft, Inc.

8/22/2019 User Guide Indu Soft
http://slidepdf.com/reader/full/user-guide-indu-soft 943/1279
Appendix: Built-in Scripting Language > File functions >
GetLineGets a specified line or search string from a text file and then stores the line in a String tag.
Function Group Execution Windows Embedded ThinClient
GetLine File Synchronous Supported Supported Supported
Syntax
GetLine( strFileName,Search, "tagStore",optNumCase, "optOveflowTag ",optRunFromServer )
strFileName
A string value enclosed in quotes, or the name of a String tag that contains the value,specifying the name of the file to be searched. The name can be a fully qualified file path (e.g.,C:\File.txt) or a simple file name (e.g., File.txt). In the latter case, the project will search forthe file in the following paths:
Local Station: The project will search for the file in the project folder and Web sub-folder.
Thin Client: If the parameter optRunFromServer is set to 0, the path where the file will besearched is undetermined. If is set to 1, it will search for the file in the URL typed in theBrowser, and if the file is not found, in the Backup URL.
Note: For Web-enabled projects, we recommend setting the optRunFromServer parameterto 1 and placing your files in the project's Web sub-folder.
Search
There are two options for this parameter, based on the data type of the value you give it:
If it is a string value or tag, then the function will search the text file for the firstoccurance of the string and then copy the entire line that contains the occurance to thetag specified by tagStore. Additional occurances are counted (see Returned Values below)
but not copied.
If it is a numeric value or tag, then the function will go to that line number in the text fileand then copy the line to the tag specified by tagStore. The first line of the file is line 0.
tagStore
Name of the String tag receiving the contents of the line pointed to by the function. This namemust be enclosed in quotes; if it isn't, then the function will use the contents of the tag ratherthan its name.

8/22/2019 User Guide Indu Soft
http://slidepdf.com/reader/full/user-guide-indu-soft 944/1279
optNumCase
Optional numeric tag specifying whether the search is case-sensitive.
0: Not case-sensitive
1: Case-sensitive
optOverflowTag
Optional numeric tag receiving the result of overflow verification.
0: OK
1: Overflow
optRunFromServer
Optional numeric tag ignored when the function is called on local stations. On Thin Clients, thisparameter indicates the following:
0: Retrieves the file from the Thin Client machine (do not use this value with non-fullyqualified names)
1: Retrieves the file from the Web Server. If the file name is not a URL, then the function
will ignore the project path and search for the file in the URL where the screen files arelocated.
Returned value
If the function is successfully executed, then it returns the total number lines in which the searchstring was found. Otherwise, the function returns one of the following errors:
0 String was not found in thetarget file
-1 File not found
-2 Invalid strFileName parameter
-3 Invalid strSeqChar parameter
-4 Invalid strStoreTag parameter
-5 Invalid optNumCase parameter
-6 Invalid optNumOverflowTag
parameter
-7 Invalid number of parameters
-8 Invalid line number
Notes

8/22/2019 User Guide Indu Soft
http://slidepdf.com/reader/full/user-guide-indu-soft 945/1279
Note: This function only supports ASCII and UTF-16LE text encoding. (UTF-16LE is the Unicodeimplementation that is natively supported by Windows.) If you use this function to get text froma UTF-8 or UTF-16BE encoded file, then you may see some invalid characters.
Important: This function can only read up to 509 characters in a single function call. If a linehas more than 509 characters (i.e., 507 alphanumeric + CR + LF), then the function will read itas two or more lines. This will also increase the effective line count for the purposes of the
Search parameter. So, for line 100 that has 1024 characters (i.e., 1022 alphanumeric + CR +LF), the function must be called three times:
GetLine( "C:\FileName.txt", 100, "strTagStore[1]") //Reads the first 509 characters
GetLine( "C:\FileName.txt", 101, "strTagStore[2]") //Reads the second 509 characters
GetLine( "C:\FileName.txt", 102, "strTagStore[3]") //Reads the last 6 characters
After this, line 101 of the source file is actually counted by the function as line 103. Therefore, toavoid unnecessarily complicated line counting, you should make sure the source file is limited to509 characters per line.
Examples
TagName Expression
Tag GetLine( "C:\TechRef v61.doc", "Studio version 6.1",
"ReturnedLine" )
// Gets the first occurance of "Studio version 6.1".
Tag GetLine( "C:\Readme.txt", 1, "ReturnedLine", 0, "Overflow" )
// Gets the second line of the file.
Parent topic: File functionsInduSoft Web Studio v7.0 Technical ReferenceCopyright © 2003–2010 Indusoft, Inc.

8/22/2019 User Guide Indu Soft
http://slidepdf.com/reader/full/user-guide-indu-soft 946/1279
Appendix: Built-in Scripting Language > File functions >
HST2TXTExport information from the Trend history file(s) in proprietary binary format (*.hst ) to a plain text (*.
) file.HST2TXTFileAsynchronousSupportedSupportedSupported
Function Group Execution Windows Embedded ThinClient
Syntax
HST2TXT( strStartDate,strStartTime,numDuration,numGroup,strTargetFile,optStrSeparator ,optNumMilliseconds,
strStartDate
The start date of the data.
strStartTime
The start time of the data.
numDuration
Numerical tag containing duration of the data in hours.
numGroup
Numerical tag containing trend group number.
strTargetFile
String tag containing path and name of the file to be written.
optStrSeparator
Optional The data separator character for file. If omitted, the function uses the TAB character (\t) ttext file.
optNumMilliseconds
Optional numeric tag. If this parameter is false (0 ), the text file created will not show milisecond-peach history sample.
optStrFormat

8/22/2019 User Guide Indu Soft
http://slidepdf.com/reader/full/user-guide-indu-soft 947/1279
String tag, which specifies the order of the Month (M), Day (D), and Year (Y) for the time-stamp fo
"DMY": Day, Month, Year
"MDY": Month, Day, Year
"YMD": Year, Month, Day
If omitted, the function uses the format DMY for the timestamp in the text file.
optNumIntervalOptional numeric tag specifying the sampling interval. Only line itmes at this interval are written asline items in the Trend history are discarded.
For example, if optNumInterval has a value of 10, then only every tenth line item is written out.
Returned value- 3Invalid number of parameters- 2Dll functions not found
- 1InStudiot.dll not found0Function was executed successfully1Error. Previous execution of the HST2TXT has not yet been completed
ExamplesTagHST2TXT( "04/14/2002", "06:30:00", 0.1, 3, "C:\Studio\data.txt", "\" )
TagHST2TXT( "04/14/2002", "06:30:00", 0.1, 3, "C:\Studio\data.csv", "," , "MDY" )
TagHST2TXT( "04/14/2002", "06:30:00", 0.1, 3, "C:\Studio\data.csv", "," , "MDY", 10 )
TagName Expression
Tip: When using the comma character (,) as optStrSeparator , the function creates a file in the CSV forValues). It is a useful tool for exporting the Trend history data from the proprietary binary format intoMicrosoft Excel.
Parent topic: File functionsInduSoft Web Studio v7.0 Technical ReferenceCopyright © 2003–2010 Indusoft, Inc.

8/22/2019 User Guide Indu Soft
http://slidepdf.com/reader/full/user-guide-indu-soft 948/1279
Appendix: Built-in Scripting Language > File functions >
HST2TXTIsRunningReturns the status of the HST2TXT function.
Function Group Execution Windows Embedded ThinClient
HST2TXTIsRunning File Synchronous Supported Not supported Executed on Server
Syntax
This function takes no parameters.
Returned value
0 HST2TXT is still running.
- 1 Last conversion process was executed properly.
- 2 Reserved.
- 3 File not fond. There are no history files in the configured time interval for thegroup specified.
-4 Cannot open HST file.
-5 Cannot create/open ASCII file.
-6 Cannot read file information from HST file.
-7 Invalid file type.
-8 Cannot read header information from HST file.
-9 Invalid number of tag in the header information (0 > nTags > 250).
-10 Cannot create Header file (.hdr).
-20 InStudiot.dll was not found.
-30 Cannot access dll function.
Examples
HST2TXTIsRunning()

8/22/2019 User Guide Indu Soft
http://slidepdf.com/reader/full/user-guide-indu-soft 949/1279
Parent topic: File functionsInduSoft Web Studio v7.0 Technical ReferenceCopyright © 2003–2010 Indusoft, Inc.

8/22/2019 User Guide Indu Soft
http://slidepdf.com/reader/full/user-guide-indu-soft 950/1279
Appendix: Built-in Scripting Language > File functions >
LookupContainsThis function verifies that an external file contains the specified keyword in its key column.
Function Group Execution Windows Embedded ThinClient
LookupContains File Synchronous Supported Supported Supported
Syntax
strKey
The keyword to look for in the file's keywords column.
Returned value
This function returns the following possible values:
Value Description
0 Specified keyword not found.
1 Specified keyword found.
Notes
The external file must already be loaded by calling the LookupLoad function.
Examples
LookupContains( "customer167" )
Parent topic: File functions
Related reference
LookupGetLookupLoad

8/22/2019 User Guide Indu Soft
http://slidepdf.com/reader/full/user-guide-indu-soft 951/1279
InduSoft Web Studio v7.0 Technical ReferenceCopyright © 2003–2010 Indusoft, Inc.

8/22/2019 User Guide Indu Soft
http://slidepdf.com/reader/full/user-guide-indu-soft 952/1279
Appendix: Built-in Scripting Language > File functions >
LookupGetThis function gets a value from an external file by cross-referencing from a specified keyword.
Function Group Execution Windows Embedded ThinClient
LookupGet File Synchronous Supported Supported Supported
Syntax
strKey
The keyword to look for in the file's keywords column.
Returned value
This function returns (as a string) the cross-referenced value from the file's specified values column.
If no value is found, then this function returns strKey.
Notes
The external file must already be loaded by calling the LookupLoad function.
Examples
LookupGet( "customer167" )
Parent topic: File functions
Related reference
LookupContains
LookupLoad
InduSoft Web Studio v7.0 Technical ReferenceCopyright © 2003–2010 Indusoft, Inc.

8/22/2019 User Guide Indu Soft
http://slidepdf.com/reader/full/user-guide-indu-soft 953/1279
Appendix: Built-in Scripting Language > File functions >
LookupLoadThis function loads an external file — typically, a delimited text file — that can be used to look uptable values. One column of the file is designated as the keywords column, and another column isdesignated as the values column.
Function Group Execution Windows Embedded ThinClient
LookupLoad File Synchronous Supported Supported Supported
Syntax
strFileNameThe file path and name of the external file.
numColKey
The number of the column/field that contains the keywords.
numColValue
The number of the column/field that contains the desired values.
strDelimiters
The delimiter that separates the columns/fields.
Returned value
This function returns the number of rows/lines in the specified file.
If the specified file cannot be found, then this function returns a negative number as an error code.
Notes
This function only loads the specified file; it doesn't do anything with the file. To use the file, call theLookupContains and LookupGet functions.
Also, to load another file, simply call this function again. Only one file can be loaded at a time,however; the new file replaces the old in the project's memory.
Examples

8/22/2019 User Guide Indu Soft
http://slidepdf.com/reader/full/user-guide-indu-soft 954/1279
LookupLoad( "C:\Temp\customerlist.csv", 1, 4, "," )
Parent topic: File functions
Related reference
LookupContains
LookupGet
InduSoft Web Studio v7.0 Technical ReferenceCopyright © 2003–2010 Indusoft, Inc.

8/22/2019 User Guide Indu Soft
http://slidepdf.com/reader/full/user-guide-indu-soft 955/1279
Appendix: Built-in Scripting Language > File functions >
PDFCreateCreates a PDF file from the specified source file.
Function Group Execution Windows Embedded ThinClient
PDFCreate File Synchronous Supported Not supported Supported
Syntax
strSourceFile
String specifying the file path and name of the desired source file (*.doc, *.txt, or *.rtf). If acomplete path is not specified, then the function will look for the source file in the projectfolder.
optStrPdfFile
Optional string specifying the file path and name of the created PDF file. If a file path is notspecified, then the PDF file will be saved in the same location as the source file. If thisparameter is omitted — that is, if no file path or name is specified at all — then the PDF file willbe saved in the same location and with the same name as the source file. Only a new extensionis added. For example, \ path\MyDocument.rtf becomes \ path\MyDocument.pdf.
Note: When entering the file name without a path, a leading backlash ("\") is optional.
Returned value
Value Description
0 Success
1 Error in PDF profile information
3 Error saving PDF file
4 Job canceled
101 Error initializing PDF resource
102 Specified source file not found
103 Error generating PDF file

8/22/2019 User Guide Indu Soft
http://slidepdf.com/reader/full/user-guide-indu-soft 956/1279
Value Description
104 Wrong number of parameters
105 Wrong parameter type
Note: This function only supports the execution of one job at a time. If more than one user or
command attempts to call the function at the same time, then the function will fail and return avalue of 101.
Examples
TagName Expression
PDFCreate( "C:\Report1.rtf" )
PDFCreate( "C:\Report2.doc", "C:\Converted1.pdf" )
PDFCreate( "C:\Report3.txt", "C:\Data\Converted1.pdf")
Parent topic: File functionsInduSoft Web Studio v7.0 Technical ReferenceCopyright © 2003–2010 Indusoft, Inc.

8/22/2019 User Guide Indu Soft
http://slidepdf.com/reader/full/user-guide-indu-soft 957/1279
Appendix: Built-in Scripting Language > File functions >
PrintPrints a text file.
Function Group Execution Windows Embedded ThinClient
Print File Asynchronous Supported Supported Supported
Syntax
strFilePath
Path and name of the text file that will be printed.
optNumOrientation
Set the paper orientation as follows:
0 (default) = Portrait
1 = Landscape
Returned value
No returned values.
Note: The optNumOrientation parameter is not supported when running the project on a WindowsEmbedded target system.
Examples
TagName Expression
Print("C:\ReadMe.txt")
Print("C:\ReadMe.txt", 1)
Print(TagFileName, 0)
Note: This function can be used to print the contents of text files only. Information in any otherformat (e.g., pictures, binary files, etc.) cannot be printed with this function.

8/22/2019 User Guide Indu Soft
http://slidepdf.com/reader/full/user-guide-indu-soft 958/1279
Parent topic: File functionsInduSoft Web Studio v7.0 Technical ReferenceCopyright © 2003–2010 Indusoft, Inc.

8/22/2019 User Guide Indu Soft
http://slidepdf.com/reader/full/user-guide-indu-soft 959/1279
Appendix: Built-in Scripting Language > File functions >
RDFileNLaunches a File Browser window allowing you to select a file.
Function Group Execution Windows Embedded ThinClient
RDFileN File Synchronous Supported Supported Supported
Syntax
RDFileN( "tagSelectedFile",strSearchPath,strMask,optNumChangeDir )
tagSelectedFile
Name of the string tag receiving the name and path of a selected file. The tag name must beenclosed in quotes, or the project will try to get the contents of the tag. Moreover, it must be avalid tag name — it cannot be a VBScript variable name, for example.
strSearchPath
The file path (directory) to search.
strMask
The mask used to filter the files.
optNumChangeDir
Optional numeric tag that indicates whether the operator will be able to change the browsingdirectory. If this parameter is omitted or set TRUE (1), then the window opened by this functionwill allow the operator to navigate to different directories. If it is set FALSE (0), then thewindow will be restricted to the directory specified by strSearchPath.
Returned value
0 Success
1 One of the parameters is not astring
2 Parameter 1 contains an invalid tagname
3 The user canceled the operation

8/22/2019 User Guide Indu Soft
http://slidepdf.com/reader/full/user-guide-indu-soft 960/1279
Examples
TagName Expression
Tag RDFileN( "FileName", "C:\Studio\", "*.doc", 1 )
Parent topic: File functionsInduSoft Web Studio v7.0 Technical ReferenceCopyright © 2003–2010 Indusoft, Inc.

8/22/2019 User Guide Indu Soft
http://slidepdf.com/reader/full/user-guide-indu-soft 961/1279
Appendix: Built-in Scripting Language > File functions >
WebGetFileDownloads a file from a specified address and then saves it locally.
Function Group Execution Windows Embedded ThinClient
WebGetFile File Synchronous Supported Supported Supported
Syntax
strURL
The URL (i.e., the Web address) of the file you want to download.
strLocalPath
The complete local file path where you want to save the file.
Returned value
- 1 Timeout
0 File not found
1 File savedsuccessfully
Examples
TagName Expression
Tag WebGetFile( "http://www.the-internet.com/myfile.txt",
"C:\myfile.txt" )
Tag WebGetFile( myURL, myFilePath )
Parent topic: File functionsInduSoft Web Studio v7.0 Technical ReferenceCopyright © 2003–2010 Indusoft, Inc.

8/22/2019 User Guide Indu Soft
http://slidepdf.com/reader/full/user-guide-indu-soft 962/1279
Appendix: Built-in Scripting Language >
Graphic functionsThese functions are used to manipulate and print project screens.
AutoFormat
Automatically formats a real number to a preset number of decimal places, according to thevirtual table of settings created by the SetDecimalPoints function. (This is similar to the Formatfunction, except that you do not need to specify the number of decimal places.)
GetScrInfo
Retrieves information from the project about an open screen.
PrintSetup
Opens the standard setup dialog from the operating system, from where the printer can be
selected and configured.
PrintWindow
Prints a screenshot of a project screen. The screen does not need to be open and active; thefunction can print a screen running in the background or even closed screen file.
ResetDecimalPointsTable
Resets the virtual table of settings created by the SetDecimalPoints function.
RGBColor
Returns the number of the color defined by the RGB (Red, Green, Blue) codes.
RGBComponent
RGBComponent is a built-in scripting function that gets the level of a color component (red,green, or blue) in a specified color.
SaveScreenShot
This function takes a screen shot of the project screen and saves it to an image file.
SetDecimalPoints
Sets the number of decimal places to be displayed, for a specified range of real numbers. Thissetting will be used by all screen objects and animations that have the Auto Format optionenabled, as well as by the AutoFormat function.
SetDisplayUnit
Finds all tags and all Grid object and Trend Control object values that have a specificengineering unit (as stored in the Unit tag field), and then sets the DisplayUnit, UnitDiv, andUnitAdd fields on those tags.
SetTagDisplayUnit

8/22/2019 User Guide Indu Soft
http://slidepdf.com/reader/full/user-guide-indu-soft 963/1279
Sets the DisplayUnit, UnitDiv, and UnitAdd properties on a specific tag.
Parent topic: Appendix: Built-in Scripting LanguageInduSoft Web Studio v7.0 Technical ReferenceCopyright © 2003–2010 Indusoft, Inc.

8/22/2019 User Guide Indu Soft
http://slidepdf.com/reader/full/user-guide-indu-soft 964/1279
Appendix: Built-in Scripting Language > Graphic functions >
AutoFormatAutomatically formats a real number to a preset number of decimal places, according to the virtualtable of settings created by the SetDecimalPoints function. (This is similar to the Format function,except that you do not need to specify the number of decimal places.)
Function Group Execution Windows Embedded ThinClient
AutoFormat Graphic Synchronous Supported Supported Supported
Syntax
numValueThe real number to be formatted.
Returned value
This function returns a formatted string.
Examples
In the following examples, the SetDecimalPoints function has already been used to set 3 decimal
places for values greater than equal to 1.5 and 1 decimal place for values less than or equal to -3.
TagName Expression
Tag AutoFormat( 1.543210 ) // Returned value ="1.543"
Tag AutoFormat( -3.123456 ) // Returned value ="-3.1"
Parent topic: Graphic functions
InduSoft Web Studio v7.0 Technical ReferenceCopyright © 2003–2010 Indusoft, Inc.

8/22/2019 User Guide Indu Soft
http://slidepdf.com/reader/full/user-guide-indu-soft 965/1279
Appendix: Built-in Scripting Language > Graphic functions >
GetScrInfoRetrieves information from the project about an open screen.
Function Group Execution Windows Embedded ThinClient
GetScrInfo Graphic Synchronous Supported Supported Supported
Syntax
GetScrInfo( strScreenName, "tagResult",optNumResultType,optNumID )
strScreenName
The name of the screen for which information is required.
tagResult
The name of the tag that will receive the information retrieved by the function. This name mustbe enclosed in quotes, or the project will try to get the contents of the tag.
optNumResultType
A numeric flag specifying the type of information to be retrieved by the function:
Value Description
0 Default value. Writes the TOP, LEFT, BOTTOM and RIGHT screen coordinates to eachconsecutive position of the array tag specified by the tagResult parameter.
1 Writes the TOP screen coordinate to the tag specified by the tagResult parameter.
2 Writes the LEFT screen coordinate to the tag specified by the tagResult parameter.
3 Writes the BOTTOM screen coordinate to the tag specified by the tagResult
parameter.
4 Writes the RIGHT screen coordinate to the tag specified by the tagResult parameter.
This is an optional parameter; the default value is 0.
optNumID
The specific instance number of the screen. (The ID is assigned when the screen is opened withthe Open function.) This is an optional parameter; the default ID is 0.

8/22/2019 User Guide Indu Soft
http://slidepdf.com/reader/full/user-guide-indu-soft 966/1279
Returned value
0 Success
-1 The first and/or second parameters are not strings.
-2 Memory allocation error.
-3 optNumResultType is zero, but tagResult does not specify an
array tag.
-4 Invalid tag by the tagResult parameter.
Examples
TagName Expression
TagErrorCode GetScrInfo( "main" , "TagXY[0]" ) // Retrieves the TOP, LEFT, BOTTOM andRIGHT coordinates of the "main" screen and then writes them to the first fourpositions of the array tag TagXY.
TagErrorCode GetScrInfo( "main", "TagXY", 3 ) // Retrieves the BOTTOM coordinate of the"main" screen and then writes it to TagXY.
TagErrorCode GetScrInfo( "main" , "TagXY", 2, 10 ) // Retrieves the LEFT coordinate of the"main" screen with ID 10 and then writes it to TagXY.
Parent topic: Graphic functionsInduSoft Web Studio v7.0 Technical ReferenceCopyright © 2003–2010 Indusoft, Inc.

8/22/2019 User Guide Indu Soft
http://slidepdf.com/reader/full/user-guide-indu-soft 967/1279
Appendix: Built-in Scripting Language > Graphic functions >
PrintSetupOpens the standard setup dialog from the operating system, from where the printer can be selectedand configured.
Function Group Execution Windows Embedded ThinClient
PrintSetup Graphic Asynchronous Supported Supported Supported
Note: This function cannot be used with Tasks or in the Global Procedures script.
Syntax
This function takes no parameters.
Returned value
No returned values.
Examples
PrintSetup()
Parent topic: Graphic functionsInduSoft Web Studio v7.0 Technical ReferenceCopyright © 2003–2010 Indusoft, Inc.

8/22/2019 User Guide Indu Soft
http://slidepdf.com/reader/full/user-guide-indu-soft 968/1279
Appendix: Built-in Scripting Language > Graphic functions >
PrintWindowPrints a screenshot of a project screen. The screen does not need to be open and active; the functioncan print a screen running in the background or even closed screen file.
Function Group Execution Windows Embedded ThinClient
PrintWindow Graphic Asynchronous Supported Supported Supported
Note: This function cannot be used with Tasks or in the Global Procedures script.
Syntax
PrintWindow( strScreenName,optNumOrientation,optNumID ,optStrMnemonicList)
strScreenName
The name of the screen to be printed. If this parameter is omitted, then the currently activescreen will be printed. (This parameter must be omitted when executing the function on aWindows Embedded target system.)
optNumOrientation
A numeric flag specifying the paper orientation:
Value Description
0 Portrait
1 Landscape
Default value is 0.
Note: The optNumOrientation parameter is not supported when running the project ona Windows Embedded target system.
optNumIDThe specific instance number of the screen. (The ID is assigned when the screen is opened withthe Open function.) This is an optional parameter; the default ID is 0.
optStrMnemonicList
A string that describes how the custom properties of any generic objects or linked symbols inthe screen will be completed when the screen is printed. This string has the following syntax…

8/22/2019 User Guide Indu Soft
http://slidepdf.com/reader/full/user-guide-indu-soft 969/1279
#Label:Value
…where Label is the name of the property and Value is the tag, expression or literal value that the
property will receive. You can declare two or more mnemonics, as long as they are separated byspaces. See the Examples section below for an example.
Note: The optStrMnemonicList parameter does not work for a screen that is already open; if the screen has been opened, then the custom properties have already received their defaultvalues.
Returned value
This function does not return any value.
Examples
TagName Expression
PrintWindow( ) // Prints the currently active screen in portrait orientation.
PrintWindow( "Main", 1 ) // Prints the "Main" screen in landscape orientation.
PrintWindow( TagScreenName ) // Prints the screen specified by TagScreenName.
PrintWindow( "Main", 1, 10 ) // Prints the "Main" screen with ID 10.
PrintWindow ( "Main", 1, 0, "#Mne1:Tag1 #Mne2:Tag2" ) // Prints the "Main"
screen, replacing the custom properties Mne1 and Mne2 with Tag1 and Tag2,
respectively.
Tip: You can use this function to print graphical reports that include Alarm/Event Control andTrend Control objects.
Parent topic: Graphic functionsInduSoft Web Studio v7.0 Technical ReferenceCopyright © 2003–2010 Indusoft, Inc.

8/22/2019 User Guide Indu Soft
http://slidepdf.com/reader/full/user-guide-indu-soft 970/1279
Appendix: Built-in Scripting Language > Graphic functions >
ResetDecimalPointsTableResets the virtual table of settings created by the SetDecimalPoints function.
Function Group Execution Windows Embedded ThinClient
ResetDecimalPointsTable Graphic Synchronous Supported Supported Supported
ResetDecimalPointsTable()
Syntax
This function takes no parameters.
Returned value
This function does not return any value.
Examples
TagName Expression
ResetDecimalPointsTable( ) // Resets the virtual table of settings.
Parent topic: Graphic functionsInduSoft Web Studio v7.0 Technical ReferenceCopyright © 2003–2010 Indusoft, Inc.

8/22/2019 User Guide Indu Soft
http://slidepdf.com/reader/full/user-guide-indu-soft 971/1279
Appendix: Built-in Scripting Language > Graphic functions >
RGBColorReturns the number of the color defined by the RGB (Red, Green, Blue) codes.
Function Group Execution Windows Embedded ThinClient
RGBColor Graphic Synchronous Supported Supported Supported
Syntax
numRed
Red code from the RGB code.
numGreen
Green code from the RGB code.
numBlue
Blue code from the RGB code.
Returned value
This function returns the number of the color defined by the RGB (Red, Green, Blue) codes.
Examples
TagName Expression
TagColor RGBColor(51,153,102) // This function returns the value 13434828, which is thecolor code for Sea Green.
TagColor RGBColor(TagRed,TagGreen,TagBlue) // This function returns the color code of theRGB values set in the tags TagRed, TagGreen and TagBlue, respectively.
Tip: See the list of RGB Codes and Color values for the most used colors in the Color Interfacesection.
Parent topic: Graphic functionsInduSoft Web Studio v7.0 Technical ReferenceCopyright © 2003–2010 Indusoft, Inc.

8/22/2019 User Guide Indu Soft
http://slidepdf.com/reader/full/user-guide-indu-soft 972/1279
Appendix: Built-in Scripting Language > Graphic functions >
RGBComponentRGBComponent is a built-in scripting function that gets the level of a color component (red, green, orblue) in a specified color.
Function Group Execution Windows Embedded ThinClient
RGBComponent Graphic Synchronous Supported Supported Supported
Syntax
numColor
The decimal code for a 24-bit RGB color, which can be any integer value between 0 and16777215. (This color model is also known as "Truecolor" or "millions of colors.")
numComponent
The color component for which you want to get the level: 0 is red, 1 is green, and 2 is blue.
Returned value
This function returns an integer value between 0 or 255, which represents the level of the colorcomponent in the specified color.
Notes
For a list of frequently used RGB color codes and their equivalent "plain English" names, see ColorInterface.
ExamplesGet the level of red in color code 13434828 (i.e., sea green):
RGBComponent( 13434828, 0 )

8/22/2019 User Guide Indu Soft
http://slidepdf.com/reader/full/user-guide-indu-soft 973/1279
Get the level of the component specified by TagComponent in the color specified by TagCode:
RGBComponent( TagCode, TagComponent )
Parent topic: Graphic functionsInduSoft Web Studio v7.0 Technical Reference
Copyright © 2003–2010 Indusoft, Inc.

8/22/2019 User Guide Indu Soft
http://slidepdf.com/reader/full/user-guide-indu-soft 974/1279
Appendix: Built-in Scripting Language > Graphic functions >
SaveScreenShotThis function takes a screen shot of the project screen and saves it to an image file.
Function Group Execution Windows Embedded ThinClient
SaveScreenShot Graphic Synchronous Supported Supported (only for openscreens)
Executed onServer
Syntax
optStrScreenName
The name of a project screen file (*.scr). If no file path is specified, then the file must be
located in the Screen sub-folder of the project folder (e.g.,\ project_name\Screen\screen_name.scr).
For projects running on Windows, the screen may be either open or closed. For projectsrunning on Windows Embedded, the screen must be open.
This is an optional parameter; if no value (or "") is specified, then the currently open andactive screen is used.
optStrOutputFile
The name of the output file. If no file path is specified, then the file is saved in the Web sub-folder of the project folder (e.g., \ project_name\Web\screen_name.jpg)
This is an optional parameter; if no value is specified, then either the value of optStrScreenName or simply ScreenShot.jpg is used.
optNumFormat
The format of the image file:

8/22/2019 User Guide Indu Soft
http://slidepdf.com/reader/full/user-guide-indu-soft 975/1279
Value Description
0 BMP
1 JPG
2 PNG
3 GIF4 TIFF
5 Auto
This is an optional parameter; if no value is specified, then the default is 1 (JPG).
Returned value
This function returns the following possible values:
Value Description
-1 Wrong number of parameters.
-2 Wrong parameter types.
-3 Invalid directory.
-4 Second parameter cannot be empty.
-5 Wrong format / invalid option for third parameter.
-6 Failed to save file.
-7 Failed to create compatible bitmap.0 Success.
Notes
The Viewer task must be running for this function to be executed. The function can be called by theBackground Task (e.g., by a Script or Math worksheet), but it will fail if the Viewer task is notrunning.
Examples
Save the currently active screen to \ project_name\Web\ScreenShot.JPG:
SaveScreenShot()

8/22/2019 User Guide Indu Soft
http://slidepdf.com/reader/full/user-guide-indu-soft 976/1279
Save the screen file main.scr to \ project_name\Web\main.JPG:
SaveScreenShot( "main.scr" )
Save the currently active screen as a BMP with the name of the currently logged user:
SaveScreenShot( "", UserName, 0 )
Parent topic: Graphic functionsInduSoft Web Studio v7.0 Technical ReferenceCopyright © 2003–2010 Indusoft, Inc.

8/22/2019 User Guide Indu Soft
http://slidepdf.com/reader/full/user-guide-indu-soft 977/1279
Appendix: Built-in Scripting Language > Graphic functions >
SetDecimalPointsSets the number of decimal places to be displayed, for a specified range of real numbers. This settingwill be used by all screen objects and animations that have the Auto Format option enabled, as wellas by the AutoFormat function.
Function Group Execution Windows Embedded ThinClient
SetDecimalPoints Graphic Synchronous Supported Supported Supported
Syntax
numBaseValueThe base value of the range of real numbers. For negative values, the range includes all realnumbers less than or equal to that value. For positive values, the range includes all realnumbers greater than or equal to that number. (You can set the other limit of the range bycalling the function again with a new set of parameters.)
numDecimalPoints
The number of decimal places to be displayed, for the range of real numbers specified bynumBaseValue.
Returned value
0 Error
1 Success
Notes
If you call this function more than once with different parameters for each call, then you can build avirtual table of format settings. You can set a different number of decimal places for each range of real numbers, and all of the settings are saved for the duration of runtime or until you reset the table
using the ResetDecimalPointsTablefunction.
Note: This formatting does not change the actual value of any tag or expression. It onlychanges how the value is displayed by on-screen objects.

8/22/2019 User Guide Indu Soft
http://slidepdf.com/reader/full/user-guide-indu-soft 978/1279
Examples
TagName Expression
Tag SetDecimalPoints( 1.5, 3 ) // Displays 3 decimal places for all real numbersgreater than or equal to 1.5.
Tag SetDecimalPoints( -3, 1 ) // Displays 1 decimal place for all real numbers less
than or equal to -3.
Parent topic: Graphic functionsInduSoft Web Studio v7.0 Technical ReferenceCopyright © 2003–2010 Indusoft, Inc.

8/22/2019 User Guide Indu Soft
http://slidepdf.com/reader/full/user-guide-indu-soft 979/1279
Appendix: Built-in Scripting Language > Graphic functions >
SetDisplayUnitFinds all tags and all Grid object and Trend Control object values that have a specific engineering unit(as stored in the Unit tag field), and then sets the DisplayUnit, UnitDiv, and UnitAdd fields onthose tags.
Function Group Execution Windows Embedded ThinClient
SetDisplayUnit Graphic Synchronous Supported Supported Supported
Syntax
strUnitOriginThe engineering unit to be matched.
strDisplayUnit
The new value for the DisplayUnit tag field.
numDiv
The new value for the UnitDiv tag field.
numAdd
The new value for the UnitAdd tag field.
Returned value
0 Success.
-1 Wrong number of parameters.
-2 strUnitOrigin parameter is empty.
-3 numDiv parameter is invalid (equalto 0).
Notes
This function only affects how the tag values are displayed on screen; it does not change the actualtag values in any way.

8/22/2019 User Guide Indu Soft
http://slidepdf.com/reader/full/user-guide-indu-soft 980/1279
Examples
TagName Expression
Tag SetDisplayUnit( "C", "F", 0.555556, 32 ) // For all tags and object values with aUnit of "C", the DisplayUnit tag field is set to "F", the UnitDiv tag field is setto 0.555556, and the UnitAdd tag field is set to 32.
Parent topic: Graphic functionsInduSoft Web Studio v7.0 Technical ReferenceCopyright © 2003–2010 Indusoft, Inc.

8/22/2019 User Guide Indu Soft
http://slidepdf.com/reader/full/user-guide-indu-soft 981/1279
Appendix: Built-in Scripting Language > Graphic functions >
SetTagDisplayUnitSets the DisplayUnit, UnitDiv, and UnitAdd properties on a specific tag.
Function Group Execution Windows Embedded ThinClient
SetTagDisplayUnit Graphic Synchronous Supported Supported Supported
Syntax
strTagName
The name of the specific tag on which the DisplayUnit, UnitDiv and UnitAdd tag fields will
be set.
Note: If this parameter is given a tag, then that tag should contain the name of the tag onwhich the tag fields will be set.
strDisplayUnit
The new value for the DisplayUnit tag field.
numDiv
The new value for the UnitDiv tag field.
numAdd
The new value for the UnitAdd tag field.
Returned value
0 Success.
-1 Wrong number of parameters.
-2 Specified tag doesn't exist.
-3 numDiv parameter is invalid (equalto 0).
Examples

8/22/2019 User Guide Indu Soft
http://slidepdf.com/reader/full/user-guide-indu-soft 982/1279
TagName Expression
Tag SetTagDisplayUnit( "TagTemp", "F", 0.555556, 32 ) // For the tag "TagTemp", theDisplayUnit tag field is set to "F", the UnitDiv tag field is set to 0.555556,and the UnitAdd tag field is set to 32.
Parent topic: Graphic functionsInduSoft Web Studio v7.0 Technical ReferenceCopyright © 2003–2010 Indusoft, Inc.

8/22/2019 User Guide Indu Soft
http://slidepdf.com/reader/full/user-guide-indu-soft 983/1279
Appendix: Built-in Scripting Language >
Translation functionsThese functions are used to access the translation tool during runtime.
Ext
Translates specified text using the active translation file.
SetLanguage
This function sets the language of the project to one of the languages configured in theTranslation Table.
SetTranslationFile
Sets the active translation file and translates all enabled text within the project.
Parent topic: Appendix: Built-in Scripting LanguageInduSoft Web Studio v7.0 Technical ReferenceCopyright © 2003–2010 Indusoft, Inc.

8/22/2019 User Guide Indu Soft
http://slidepdf.com/reader/full/user-guide-indu-soft 984/1279
Appendix: Built-in Scripting Language > Translation functions >
ExtTranslates specified text using the active translation file.
Function Group Execution Windows Embedded ThinClient
Ext Translation Synchronous Supported Supported Supported
Syntax
strText
The text to be translated.
Returned value
Returns the text translation using the active translation file.
Examples
TagName Expression
Tag Ext( "Start" ) // Returned value if translating to Portuguese =
"Iniciar"
Tag Ext( "Stop" ) // Returned value if translating to German ="Anschlag"
Parent topic: Translation functionsInduSoft Web Studio v7.0 Technical ReferenceCopyright © 2003–2010 Indusoft, Inc.

8/22/2019 User Guide Indu Soft
http://slidepdf.com/reader/full/user-guide-indu-soft 985/1279
Appendix: Built-in Scripting Language > Translation functions >
SetLanguageThis function sets the language of the project to one of the languages configured in the TranslationTable.
Function Group Execution Windows Embedded ThinClient
SetLanguage Translation Synchronous Supported Supported Supported
Syntax
numLanguageCode
The code for the langauge that you want to set as the current translation. The language mustalready be configured in the Translation Table.
Returned value
This function returns the following possible values:
Value Description
0 Error
1 Success
Notes
Language codes are defined by ISO 639-1.
Examples
Set the language to "English – United States":
SetLanguage( 1033 )
Set the language to "French – France":

8/22/2019 User Guide Indu Soft
http://slidepdf.com/reader/full/user-guide-indu-soft 986/1279
SetLanguage( 1036 )
Parent topic: Translation functions
Related tasks
Adding a language to the Translation TableSetting the project's language during runtime
InduSoft Web Studio v7.0 Technical ReferenceCopyright © 2003–2010 Indusoft, Inc.

8/22/2019 User Guide Indu Soft
http://slidepdf.com/reader/full/user-guide-indu-soft 987/1279
Appendix: Built-in Scripting Language > Translation functions >
SetTranslationFileSets the active translation file and translates all enabled text within the project.
Function Group Execution Windows Embedded ThinClient
SetTranslationFile Translation Synchronous Supported Supported Supported
Syntax
strFileName
The name of a translation file
optStrColumnName
The name of the column from the translation file, which must be used to translate the texts in
the project. When omitted, the second column from the translation file will be used by default.
Returned value
0 Success.
- 1 Invalid number of parameters.
- 2 Wrong parameter type.
- 3 Translation file could not be found oropened.
Examples
TagName Expression
Tag SetTranslationFile( "Portuguese.tra" )
Tag SetTranslationFile( "German.tra" )
Tag SetTranslationFile( "Mytranslation.csv" , "Portuguese"
)
Tag SetTranslationFile( "Mytranslation.csv" , "German" )

8/22/2019 User Guide Indu Soft
http://slidepdf.com/reader/full/user-guide-indu-soft 988/1279
Note: You must enable the Translation option from the Project Settings dialog for this functionto work.
CAUTION:
You must have a translation file in the Translation Tool.
Parent topic: Translation functionsInduSoft Web Studio v7.0 Technical ReferenceCopyright © 2003–2010 Indusoft, Inc.

8/22/2019 User Guide Indu Soft
http://slidepdf.com/reader/full/user-guide-indu-soft 989/1279
Appendix: Built-in Scripting Language >
Multimedia functionsThese functions are used to play external audio and video files.
Play
Plays a specified WAV audio file.
Parent topic: Appendix: Built-in Scripting Language
InduSoft Web Studio v7.0 Technical ReferenceCopyright © 2003–2010 Indusoft, Inc.

8/22/2019 User Guide Indu Soft
http://slidepdf.com/reader/full/user-guide-indu-soft 990/1279
Appendix: Built-in Scripting Language > Multimedia functions >
PlayPlays a specified WAV audio file.
Function Group Execution Windows Embedded ThinClient
Play Multimedia Asynchronous Supported Supported Supported
Note: For this function to work on a Thin Client, the target WAV file must be located in the samefile path on the remote station.
Description
Plays a specified WAV audio file.
Syntax
strFileName
The file path and name of the WAV file to play.
optNumSynchronous
A numeric flag specifying whether the function executes synchronously or asynchronously:
Value Description
0 Asynchronous (i.e., the project continues without waiting for the function to return)
1 Synchronous (i.e., the project pauses while it waits for the function to return)
This is an optional paramter; if no value is specified, then the default is 0.
Returned value
This function does not return any value.
Examples

8/22/2019 User Guide Indu Soft
http://slidepdf.com/reader/full/user-guide-indu-soft 991/1279
TagName Expression
Play( "C:\Sounds\Wav\alarm.wav" )
Parent topic: Multimedia functionsInduSoft Web Studio v7.0 Technical Reference
Copyright © 2003–2010 Indusoft, Inc.

8/22/2019 User Guide Indu Soft
http://slidepdf.com/reader/full/user-guide-indu-soft 992/1279
Appendix: Built-in Scripting Language >
System Info functionsThese functions are used get information about the computer that is running the project (eitherserver or client, depending on the function), as well as to change some project settings on thatcomputer.
DbVersion
DbVersion is a built-in scripting function that gets the version number of your project tagsdatabase.
GetAppHorizontalResolution
Gets the default horizontal screen resolution (in pixels) of the project.
GetAppPath
Returns the file path of the project folder.
GetAppVerticalResolution
Gets the default vertical screen resolution (in pixels) of the project.
GetComputerIP
Returns the first IP Address of the local computer.
GetComputerName
Returns the local computer name.
GetCursorX
Gets the X-coordinate of the mouse cursor on the screen.
GetCursorY
Gets the Y-coordinate of the mouse cursor on the screen.
GetDisplayHorizontalResolution
Gets the horizontal resolution (in pixels) of the display connected to the local station.
GetDisplayVerticalResolution
Gets the vertical resolution (in pixels) of the display connected to the local station.
GetFreeMemoryCEReturns the free memory available in a Windows Embedded device.
GetHardKeyModel
Returns the model name of your Hardkey.
GetHardKeySN

8/22/2019 User Guide Indu Soft
http://slidepdf.com/reader/full/user-guide-indu-soft 993/1279
Returns the serial number of the Hardkey.
GetIPAll
Returns the number of IP Addresses assigned to the local station and stores the IP Addresses ina string array tag.
GetMemoryCE
Returns the total memory available in a Windows Embedded device.
GetNetMACID
Gets the MAC ID unique code from the currently installed network adapter(s).
GetOS
Reports the current operating system.
GetPrivateProfileStringReads a specified parameter from an .ini file using the standard .ini format.
GetProductPath
Gets the path to the program directory.
GetRegValue
Gets a the value of a variable in the Windows registry.
GetRegValueType
Gets the data type of the value of a variable in the Windows registry.
GetServerHostName
Gets the host name of the project's Server station.
GetTickCount
Gets the current value of the clock ticks counter.
InfoAppAlrDir
Returns the file path of the project's Alarm sub-folder.
InfoAppHSTDir
Returns the file path of the project's History sub-folder.
InfoDiskFree
Returns free disk space on the local computer.
InfoResourcesReturns the local computer's disposable resources.
IsActiveXReg
Determines whether an ActiveX control is registered with the operating system.
IsAppChangedOnServer

8/22/2019 User Guide Indu Soft
http://slidepdf.com/reader/full/user-guide-indu-soft 994/1279
When executed on the Client, this function checks to see if the project files available on theServer are newer than the files currently on the Client.
NoInputTime
Returns the time elapsed since the last keyboard action.
ProductVersion
Returns the program version number.
RegSaveCE
Saves the Windows Embedded system registry. This function will only work if the save registrycapability is enabled in the Windows Embedded device image.
ReloadAppFromServer
When executed on the Client, this function reloads the necessary project files from the Serverwhile maintaining the current state of the project on the Client.
SaveAlarmFile
Use this function to enable/disable the saving feature for alarm history and to set the path
where the alarm history files must be handled.
SetAppAlarmPath
Sets the Alarm path for the current project.
SetAppHSTPath
Sets the file path (directory) where Trend history files will be saved, in the proprietary format(.HST).
SetDateFormat
Sets the format and separator for the date string.
SetKeyboardLanguageSets the language of any Virtual Keyboards in the project.
SetRegValue
Sets the value of a variable in the Windows registry.
SetWebConfig
Configures the Web settings for the current project. The settings configured in the function areupdated on the HTML files of the project.
SNMPGet
Gets information from computers or network devices through the SNMP protocol.
SNMPSet
Uses the Simple Network Management Protocol (SNMP) to set a value on a target computer of network device.
WritePrivateProfileString

8/22/2019 User Guide Indu Soft
http://slidepdf.com/reader/full/user-guide-indu-soft 995/1279
Writes a specified setting to the project viewer initialization file, using the standard .ini format.
Parent topic: Appendix: Built-in Scripting LanguageInduSoft Web Studio v7.0 Technical ReferenceCopyright © 2003–2010 Indusoft, Inc.

8/22/2019 User Guide Indu Soft
http://slidepdf.com/reader/full/user-guide-indu-soft 996/1279
Appendix: Built-in Scripting Language > System Info functions >
DbVersionDbVersion is a built-in scripting function that gets the version number of your project tags database.
Function Group Execution Windows Embedded ThinClient
DbVersion System Info Synchronous Supported Supported Supported
Syntax
This function takes no paramters.
Returned value
This function returns a numerical value equal to the version number of the database.
Notes
This function only applies to the native database within your project. There currently is no function toget the version number of an external or historical database.
Examples
DbVersion()
Parent topic: System Info functionsInduSoft Web Studio v7.0 Technical ReferenceCopyright © 2003–2010 Indusoft, Inc.

8/22/2019 User Guide Indu Soft
http://slidepdf.com/reader/full/user-guide-indu-soft 997/1279
Appendix: Built-in Scripting Language > System Info functions >
GetAppHorizontalResolutionGets the default horizontal screen resolution (in pixels) of the project.
Function Group Execution Windows Embedded ThinClient
GetAppHorizontalResolution SystemInfo
Synchronous Supported Notsupported
Executed onServer
Syntax
This function takes no parameters.
Returned value
Returns the default value as it is stored in the project file, but does not test the Windowsconfiguration.
Examples
TagName Expression
Tag GetAppHorizontalResolution() // Returned value =640
Tag GetAppHorizontalResolution() // Returned value =800
Parent topic: System Info functionsInduSoft Web Studio v7.0 Technical ReferenceCopyright © 2003–2010 Indusoft, Inc.

8/22/2019 User Guide Indu Soft
http://slidepdf.com/reader/full/user-guide-indu-soft 998/1279
Appendix: Built-in Scripting Language > System Info functions >
GetAppPathReturns the file path of the project folder.
Function Group Execution Windows Embedded ThinClient
GetAppPath System Info Synchronous Supported Supported Executed on Server
Syntax
This function takes no paramters.
Returned value
Returns the file path as a string.
Examples
TagName Expression
Tag GetAppPath() // Returned value = "C:\DemoProject\"
Tag GetAppPath() // Returned value =
"C:\Studio\Projects\ project_name\"
Note: This function must return the current path of the project, including the "\" at the end of the path.
Parent topic: System Info functionsInduSoft Web Studio v7.0 Technical ReferenceCopyright © 2003–2010 Indusoft, Inc.

8/22/2019 User Guide Indu Soft
http://slidepdf.com/reader/full/user-guide-indu-soft 999/1279
Appendix: Built-in Scripting Language > System Info functions >
GetAppVerticalResolutionGets the default vertical screen resolution (in pixels) of the project.
Function Group Execution Windows Embedded ThinClient
GetAppVerticalResolution SystemInfo
Synchronous Supported Notsupported
Executed onServer
Syntax
This function takes no parameters.
Returned value
Returns the default value as it is stored in the project file, but does not test the Windowsconfiguration.
Examples
TagName Expression
Tag GetAppVerticalResolution() // Returned value =480
Tag GetAppVerticalResolution() // Returned value =600
Parent topic: System Info functionsInduSoft Web Studio v7.0 Technical ReferenceCopyright © 2003–2010 Indusoft, Inc.

8/22/2019 User Guide Indu Soft
http://slidepdf.com/reader/full/user-guide-indu-soft 1000/1279
Appendix: Built-in Scripting Language > System Info functions >
GetComputerIPReturns the first IP Address of the local computer.
Function Group Execution Windows Embedded ThinClient
GetComputerIP System Info Synchronous Supported Supported Supported
Syntax
This function takes no parameters.
Returned value
Returns the first IP Address of the local station as a string.
Examples
TagName Expression
Tag GetComputerIP() // Returned value ="192.168.0.1"
Tag GetComputerIP() // Returned value ="248.12.2.78"
Parent topic: System Info functionsInduSoft Web Studio v7.0 Technical Reference
Copyright © 2003–2010 Indusoft, Inc.

8/22/2019 User Guide Indu Soft
http://slidepdf.com/reader/full/user-guide-indu-soft 1001/1279
Appendix: Built-in Scripting Language > System Info functions >
GetComputerNameReturns the local computer name.
Function Group Execution Windows Embedded ThinClient
GetComputerName System Info Synchronous Supported Not supported Supported
Syntax
This function takes no parameters.
Returned value
Returns the local computer name as a string.
Examples
TagName Expression
Tag GetComputerName() // Returned value = "Terminal53"
Tag GetComputerName() // Returned value =
"BobsComputer"
Parent topic: System Info functionsInduSoft Web Studio v7.0 Technical ReferenceCopyright © 2003–2010 Indusoft, Inc.

8/22/2019 User Guide Indu Soft
http://slidepdf.com/reader/full/user-guide-indu-soft 1002/1279
Appendix: Built-in Scripting Language > System Info functions >
GetCursorXGets the X-coordinate of the mouse cursor on the screen.
Function Group Execution Windows Embedded ThinClient
GetCursorX System Info Synchronous Supported Supported Supported
Syntax
This function takes no parameters.
Returned value
This function returns the X-coordinate of the cursor on the screen, or -1 if an error occurs.
Examples
TagName Expression
GetCursorX() // Returned value = 1024
Parent topic: System Info functionsInduSoft Web Studio v7.0 Technical ReferenceCopyright © 2003–2010 Indusoft, Inc.

8/22/2019 User Guide Indu Soft
http://slidepdf.com/reader/full/user-guide-indu-soft 1003/1279
Appendix: Built-in Scripting Language > System Info functions >
GetCursorYGets the Y-coordinate of the mouse cursor on the screen.
Function Group Execution Windows Embedded ThinClient
GetCursorY System Info Synchronous Supported Supported Supported
Syntax
This function takes no parameters.
Returned value
This function returns the Y-coordinate of the cursor on the screen, or -1 if an error occurs.
Examples
TagName Expression
GetCursorY() // Returned value = 768
Parent topic: System Info functionsInduSoft Web Studio v7.0 Technical ReferenceCopyright © 2003–2010 Indusoft, Inc.

8/22/2019 User Guide Indu Soft
http://slidepdf.com/reader/full/user-guide-indu-soft 1004/1279
Appendix: Built-in Scripting Language > System Info functions >
GetDisplayHorizontalResolutionGets the horizontal resolution (in pixels) of the display connected to the local station.
Function Group Execution Windows Embedded ThinClient
GetDisplayHorizontalResolution System Info Synchronous Supported Supported Supported
Syntax
This function takes no parameters.
Returned value
This function returns the horizontal resolution of the display as an integer.
Examples
TagName Expression
GetDisplayHorizontalResolution() // Returned value =1024
Parent topic: System Info functionsInduSoft Web Studio v7.0 Technical ReferenceCopyright © 2003–2010 Indusoft, Inc.

8/22/2019 User Guide Indu Soft
http://slidepdf.com/reader/full/user-guide-indu-soft 1005/1279
Appendix: Built-in Scripting Language > System Info functions >
GetDisplayVerticalResolutionGets the vertical resolution (in pixels) of the display connected to the local station.
Function Group Execution Windows Embedded ThinClient
GetDisplayVerticalResolution System Info Synchronous Supported Supported Supported
Syntax
This function takes no parameters.
Returned value
This function returns the vertical resolution of the display as an integer.
Examples
TagName Expression
GetDisplayVerticalResolution( ) // Returned value =768
Parent topic: System Info functionsInduSoft Web Studio v7.0 Technical ReferenceCopyright © 2003–2010 Indusoft, Inc.
8/22/2019 User Guide Indu Soft
http://slidepdf.com/reader/full/user-guide-indu-soft 1006/1279
Appendix: Built-in Scripting Language > System Info functions >
GetFreeMemoryCEReturns the free memory available in a Windows Embedded device.
Function Group Execution Windows Embedded ThinClient
GetFreeMemoryCE System Info Synchronous Not supported Supported Supported
Syntax
optNumType
A numeric flag that specifies which type of free memory the project should retrieve from thedevice:
Value Description
0 Total free program memory
This is an optional parameter; if no value is specified, then the default is 0.
Returned value
>0 Size of free memory in bytes.
- 1 Coredll.dll file not found.
- 2 GetMemoryCE function notfound.
- 3 Invalid optional parameter.
- 4 Type of memory unavailable.
Examples
TagName Expression
Tag GetFreeMemoryCE()

8/22/2019 User Guide Indu Soft
http://slidepdf.com/reader/full/user-guide-indu-soft 1007/1279
Parent topic: System Info functionsInduSoft Web Studio v7.0 Technical ReferenceCopyright © 2003–2010 Indusoft, Inc.

8/22/2019 User Guide Indu Soft
http://slidepdf.com/reader/full/user-guide-indu-soft 1008/1279
Appendix: Built-in Scripting Language > System Info functions >
GetHardKeyModelReturns the model name of your Hardkey.
Function Group Execution Windows Embedded ThinClient
GetHardKeyModel System Info Synchronous Supported Not supported Executed on Server
Syntax
This function takes no parameters.
Returned value
If the Hardkey is installed, then the function returns a string with the Hardkey model name.
If the Hardkey is not installed, then the function returns 0.
Notes
You must attach the Hardkey before executing this function, or the function will not execute properly.
Examples
TagName Expression
Tag GetHardKeyModel() // Returned value = "Local Interface"
Tag GetHardKeyModel() // Returned value = "AdvancedServer"
Parent topic: System Info functionsInduSoft Web Studio v7.0 Technical Reference
Copyright © 2003–2010 Indusoft, Inc.

8/22/2019 User Guide Indu Soft
http://slidepdf.com/reader/full/user-guide-indu-soft 1009/1279
Appendix: Built-in Scripting Language > System Info functions >
GetHardKeySNReturns the serial number of the Hardkey.
Function Group Execution Windows Embedded ThinClient
GetHardKeySN System Info Synchronous Supported Not supported Executed on Server
Syntax
This function takes no parameters.
Returned value
If the Hardkey is installed, then the function returns a string with the Hardkey serial number.
If the Hardkey is not installed, then the function returns 0.
Notes
You must attach the Hardkey before executing this function, or the function will not execute properly.
Examples
TagName Expression
Tag GetHardkeySN() // Returned value = 120.745
Tag GetHardkeySN() // Returned value = 224.941
Parent topic: System Info functionsInduSoft Web Studio v7.0 Technical ReferenceCopyright © 2003–2010 Indusoft, Inc.

8/22/2019 User Guide Indu Soft
http://slidepdf.com/reader/full/user-guide-indu-soft 1010/1279
Appendix: Built-in Scripting Language > System Info functions >
GetIPAllReturns the number of IP Addresses assigned to the local station and stores the IP Addresses in astring array tag.
Function Group Execution Windows Embedded ThinClient
GetIPAll System Info Synchronous Supported Supported Supported
Syntax
GetIPAll( "tagArrayIP ",optRefresh)
tagArrayIP
Name of the string array tag receiving the IP addresses found. This name must be enclosed inquotes, or the project will try to get the contents of the array tag.
optRefresh
Optional tag that triggers a refresh of this function, if you use it in a Text Data Link animation.Every time this tag changes value, the project will refresh the function.
Returned value
n Number of IP addressesfound
- 1 Invalid number of parameters
- 2 Invalid parameter type
Examples
TagName Expression
Tag GetIPAll( "TagArrayIP" ) // Returned value = 1
Tag GetIPAll( "TagArrayIP", Second ) // Returned value =2

8/22/2019 User Guide Indu Soft
http://slidepdf.com/reader/full/user-guide-indu-soft 1011/1279
Parent topic: System Info functionsInduSoft Web Studio v7.0 Technical ReferenceCopyright © 2003–2010 Indusoft, Inc.

8/22/2019 User Guide Indu Soft
http://slidepdf.com/reader/full/user-guide-indu-soft 1012/1279
Appendix: Built-in Scripting Language > System Info functions >
GetMemoryCEReturns the total memory available in a Windows Embedded device.
Function Group Execution Windows Embedded ThinClient
GetMemoryCE System Info Synchronous Not supported Supported Supported
Syntax
optNumType
A numeric flag that specifies which type of memory the project should retrieve from the device:
Value Description
0 Total program memory
1 Total storage memory
2 Total memory
This is an optional parameter; if no value is specified, then the default is 0.
Returned value
>0 Size of memory in bytes.
- 1 Coredll.dll file not found.
- 2 GetMemoryCE function notfound.
- 3 Invalid optional parameter.
Examples
TagName Expression
Tag GetMemoryCE( 1 )

8/22/2019 User Guide Indu Soft
http://slidepdf.com/reader/full/user-guide-indu-soft 1013/1279
Parent topic: System Info functionsInduSoft Web Studio v7.0 Technical ReferenceCopyright © 2003–2010 Indusoft, Inc.

8/22/2019 User Guide Indu Soft
http://slidepdf.com/reader/full/user-guide-indu-soft 1014/1279
Appendix: Built-in Scripting Language > System Info functions >
GetNetMACIDGets the MAC ID unique code from the currently installed network adapter(s).
Function Group Execution Windows Embedded ThinClient
GetNetMACID System Info Synchronous Supported Supported Supported
Syntax
GetNetMACID( "optTagMACID ", "optTagAdapterName" )
optStrMACID
Name of a string tag, which receives the MAD ID of the network adapter. If there is more thanone network adapter currently installed in the station, the user can configure a string array tagin this parameter, so each array position receives the MAC ID from one network adapter.
optStrAdapterName
Name of a string tag, which receives the name of the network adapter. If there is more thanone network adapter currently installed in the station, the user can configure a string array tagin this parameter, so each array position receives the name from one network adapter. Thisparameter is optional.
Returned value
Value Description
>0 Number of network adapters found.
0 No network adapters found.
-1 Invalid number of parameters.
-2 One of the parameters is not string type.
-3 Tag configured in optTagMACID does not exist.
-4 Tag configured in optTagAdapterName does notexist.
Examples

8/22/2019 User Guide Indu Soft
http://slidepdf.com/reader/full/user-guide-indu-soft 1015/1279
TagName Expression
NumNIC GetNetMACID("MACIDTag")
NumNIC GetNetMACID("MACIDTag", "AdapterName")
NumNIC GetNetMACID("MACIDTag[1]", "AdapterName[1]")
Parent topic: System Info functionsInduSoft Web Studio v7.0 Technical ReferenceCopyright © 2003–2010 Indusoft, Inc.

8/22/2019 User Guide Indu Soft
http://slidepdf.com/reader/full/user-guide-indu-soft 1016/1279
Appendix: Built-in Scripting Language > System Info functions >
GetOSReports the current operating system.
Function Group Execution Windows Embedded ThinClient
GetOS System Info Synchronous Supported Supported Supported
Syntax
This function takes no parameters.
Returned value
0 Windows 3.11
1 Windows 95/98/ME
2 Windows2000/XP/Vista/7
3 WindowsCE/Mobile
Examples
TagName Expression
Tag GetOS() //Returned value = 2
Parent topic: System Info functionsInduSoft Web Studio v7.0 Technical ReferenceCopyright © 2003–2010 Indusoft, Inc.

8/22/2019 User Guide Indu Soft
http://slidepdf.com/reader/full/user-guide-indu-soft 1017/1279
Appendix: Built-in Scripting Language > System Info functions >
GetPrivateProfileStringReads a specified parameter from an .ini file using the standard .ini format.
Function Group Execution Windows Embedded ThinClient
GetPrivateProfileString System Info Synchronous Supported Supported Supported
Syntax
GetPrivateProfileString( strSection,strName,strDefault,strFileName)
strSection
The section name to be read.
strName
The parameter name to be read.
strDefault
The default setting for this parameter. If the parameter is not found in the .ini file, thefunction will return this default setting.
strFileName
The path and name of the .ini file to be read.
Returned value
Returns the value of the specified parameter.
Examples
TagName Expression
Tag GetPrivateProfileString( "boot loader", "timeout", "50", "C:\boot.ini" ) //Returned value = 30
Parent topic: System Info functionsInduSoft Web Studio v7.0 Technical ReferenceCopyright © 2003–2010 Indusoft, Inc.

8/22/2019 User Guide Indu Soft
http://slidepdf.com/reader/full/user-guide-indu-soft 1018/1279
Appendix: Built-in Scripting Language > System Info functions >
GetProductPathGets the path to the program directory.
Function Group Execution Windows Embedded ThinClient
GetProductPath System Info Synchronous Supported Supported Supported
Syntax
This function takes no parameters.
Returned value
Returns the path to the program directory as a string.
Examples
TagName Expression
Tag GetProductPath() // Returned value = "C:\Program Files\InduSoft WebStudio v7.0\"
Parent topic: System Info functionsInduSoft Web Studio v7.0 Technical ReferenceCopyright © 2003–2010 Indusoft, Inc.

8/22/2019 User Guide Indu Soft
http://slidepdf.com/reader/full/user-guide-indu-soft 1019/1279
Appendix: Built-in Scripting Language > System Info functions >
GetRegValueGets a the value of a variable in the Windows registry.
Function Group Execution Windows Embedded ThinClient
GetRegValue System Info Synchronous Supported Supported Not supported
Syntax
GetRegValue( numMainKey ,strKey ,strValueName)
numMainKey
Numeric tag with the following possible values:
0 HKEY_LOCAL_MACHINE
1 HKEY_CLASSES_ROOT
2 HKEY_CURRENT_USER
3 HKEY_USERS
4 HKEY_CURRENT_CONFIG
5 HKEY_PERFORMANCE_DATA
strKey
Path where the value is located in the Main Key.
strVariableName
Name of the variable to get. The maximum length is 255 characters.
Returned value
If the function succeeds, then the function returns the variable value. Otherwise one of the followingerror codes will be returned:
8/22/2019 User Guide Indu Soft
http://slidepdf.com/reader/full/user-guide-indu-soft 1020/1279
- 1 Invalid number of parameters or invalid Main Key.
- 2 Variable type is not supported. You can only read DWord or String values fromthe registry.
- 3 Failed to read the variable value; verify that you have the proper securityrights.
Examples
TagName Expression
Tag GetRegValue( 0, "HARDWARE\DESCRIPTION\System", "SystemBiosDate" ) // Returnedvalue = "08/14/03"
Tag GetRegValue( 2, "Control Panel\Current", "Color Schemes" ) // Returned value ="Windows Standard "
Parent topic: System Info functionsInduSoft Web Studio v7.0 Technical ReferenceCopyright © 2003–2010 Indusoft, Inc.

8/22/2019 User Guide Indu Soft
http://slidepdf.com/reader/full/user-guide-indu-soft 1021/1279
Appendix: Built-in Scripting Language > System Info functions >
GetRegValueTypeGets the data type of the value of a variable in the Windows registry.
Function Group Execution Windows Embedded ThinClient
GetRegValueType System Info Synchronous Supported Supported Not supported
Syntax
GetRegValueType( numMainKey ,strKey ,strValueName)
numMainKey
Numeric tag with the following possible values:
0 HKEY_LOCAL_MACHINE
1 HKEY_CLASSES_ROOT
2 HKEY_CURRENT_USER
3 HKEY_USERS
4 HKEY_CURRENT_CONFIG
5 HKEY_PERFORMANCE_DATA
strKey
Path where the value is located in the Main Key.
strVariableName
Name of the variable to get. The maximum length is 255 characters.
Returned value

8/22/2019 User Guide Indu Soft
http://slidepdf.com/reader/full/user-guide-indu-soft 1022/1279
1 Variable type is String.
0 Variable type is DWord.
- 1 Invalid number of parameters or invalid Main Key.
- 2 Variable type is not supported. You can only read DWord or String values fromthe registry.
- 3 Failed to read the variable value; verify that you have the proper securityrights.
Examples
TagName Expression
Tag GetRegValueType( 0, "HARDWARE\DESCRIPTION\System", "SystemBiosDate" ) //Returned value = 1
Tag GetRegValueType( 2, "Control Panel\Desktop", "Smooth Scroll" ) // Returnedvalue = 0
Parent topic: System Info functionsInduSoft Web Studio v7.0 Technical ReferenceCopyright © 2003–2010 Indusoft, Inc.

8/22/2019 User Guide Indu Soft
http://slidepdf.com/reader/full/user-guide-indu-soft 1023/1279
Appendix: Built-in Scripting Language > System Info functions >
GetServerHostNameGets the host name of the project's Server station.
Function Group Execution Windows Embedded ThinClient
GetServerHostName System Info Synchronous Not supported Not supported Supported
Syntax
This function takes no parameters.
Returned value
Server host name for ISSymbol and 127.0.0.1 for others.
Parent topic: System Info functionsInduSoft Web Studio v7.0 Technical ReferenceCopyright © 2003–2010 Indusoft, Inc.

8/22/2019 User Guide Indu Soft
http://slidepdf.com/reader/full/user-guide-indu-soft 1024/1279
Appendix: Built-in Scripting Language > System Info functions >
GetTickCountGets the current value of the clock ticks counter.
Function Group Execution Windows Embedded ThinClient
GetTickCount System Info Synchronous Supported Supported Supported
Syntax
This function takes no parameters.
Returned value
Returns an integer with the number of milliseconds counted by the clock for each initialization of theoperational system.
Examples
TagName Expression
Tag GetTickCount() // Returned value = 9400907
Parent topic: System Info functionsInduSoft Web Studio v7.0 Technical ReferenceCopyright © 2003–2010 Indusoft, Inc.

8/22/2019 User Guide Indu Soft
http://slidepdf.com/reader/full/user-guide-indu-soft 1025/1279
Appendix: Built-in Scripting Language > System Info functions >
InfoAppAlrDirReturns the file path of the project's Alarm sub-folder.
Function Group Execution Windows Embedded ThinClient
InfoAppAlrDir System Info Synchronous Supported Supported Supported
Syntax
This function takes no parameters.
Returned value
Returns the Alarm directory of the current project as a string.
Examples
TagName Expression
Tag InfoAppAlrDir() // Returned value = "C:\DemoApp\Alarm\"
Tag InfoAppAlrDir() // Returned value =
"C:\Studio\Projects\App\Alarm\"
Parent topic: System Info functionsInduSoft Web Studio v7.0 Technical ReferenceCopyright © 2003–2010 Indusoft, Inc.

8/22/2019 User Guide Indu Soft
http://slidepdf.com/reader/full/user-guide-indu-soft 1026/1279
Appendix: Built-in Scripting Language > System Info functions >
InfoAppHSTDirReturns the file path of the project's History sub-folder.
Function Group Execution Windows Embedded ThinClient
InfoAppHSTDir System Info Synchronous Supported Supported Supported
Syntax
This function takes no parameters.
Returned value
Returns the History directory for the current project as a string.
Examples
TagName Expression
Tag InfoAppHSTDir() // Returned value = "C:\DemoApp\HST\"
Tag InfoAppHSTDir() // Returned value =
"C:\Studio\Projects\App\HST\"
Parent topic: System Info functionsInduSoft Web Studio v7.0 Technical ReferenceCopyright © 2003–2010 Indusoft, Inc.

8/22/2019 User Guide Indu Soft
http://slidepdf.com/reader/full/user-guide-indu-soft 1027/1279
Appendix: Built-in Scripting Language > System Info functions >
InfoDiskFreeReturns free disk space on the local computer.
Function Group Execution Windows Embedded ThinClient
InfoDiskFree System Info Synchronous Supported Not supported Supported
Syntax
strDisk
The name of the disk volume to be checked.
Returned value
Returns disposable free space in the disk in bytes.
Examples
TagName Expression
Tag InfoDiskFree( "C" ) // Returned value =
2803804605.000000
Parent topic: System Info functionsInduSoft Web Studio v7.0 Technical ReferenceCopyright © 2003–2010 Indusoft, Inc.

8/22/2019 User Guide Indu Soft
http://slidepdf.com/reader/full/user-guide-indu-soft 1028/1279
Appendix: Built-in Scripting Language > System Info functions >
InfoResourcesReturns the local computer's disposable resources.
Function Group Execution Windows Embedded ThinClient
InfoResources System Info Synchronous Supported Supported Supported
Syntax
numSelect
A numeric flag that specifies which resource to examine:
Value Description
0 System functions (%)
1 GDI functions (%)
2 USER functions (%)
3 Memory (in bytes)
Examples
TagName Expression
Tag InfoResources( 0 ) // Returned value = 76.000000
Tag InfoResources( 1 ) // Returned value = 76.000000
Tag InfoResources( 2 ) // Returned value = 80.000000
Tag InfoResources( 3 ) // Returned value =16150528.000000
Note: The only valid selection on an Windows PC station is 3. Selecting 0, 1 or 2 returns 0.000000
only.
Parent topic: System Info functionsInduSoft Web Studio v7.0 Technical ReferenceCopyright © 2003–2010 Indusoft, Inc.

8/22/2019 User Guide Indu Soft
http://slidepdf.com/reader/full/user-guide-indu-soft 1029/1279
Appendix: Built-in Scripting Language > System Info functions >
IsActiveXRegDetermines whether an ActiveX control is registered with the operating system.
Function Group Execution Windows Embedded ThinClient
IsActiveXReg System Info Synchronous Supported Supported Supported
Syntax
IsActiveXReg( numType,strProgIDorFileName)
numType
A numeric flag that specifies a format for the strProgIDorFileName parameter:
0 Verify by ProgramID
1 Verify by FileName
strProgIDorFileName
The program ID or file path of the ActiveX control.
Returned value
0 ActiveX is notregistered.
1 ActiveX is registered.
Examples
TagName Expression
Tag IsActiveXReg( 0, "ISSYMBOL.ISSymbolCtrl.1" ) // Returned value = 0
Tag IsActiveXReg( 1, "C:\WinNT\system32\MediaPlayer.ocx" ) // Returnedvalue = 1

8/22/2019 User Guide Indu Soft
http://slidepdf.com/reader/full/user-guide-indu-soft 1030/1279
Parent topic: System Info functionsInduSoft Web Studio v7.0 Technical ReferenceCopyright © 2003–2010 Indusoft, Inc.

8/22/2019 User Guide Indu Soft
http://slidepdf.com/reader/full/user-guide-indu-soft 1031/1279
Appendix: Built-in Scripting Language > System Info functions >
IsAppChangedOnServerWhen executed on the Client, this function checks to see if the project files available on the Serverare newer than the files currently on the Client.
Function Group Execution Windows Embedded ThinClient
IsAppChangedOnServer System Info Synchronous Supported Supported Supported
Syntax
optTagUpdateTrigger
An alphanumeric string enclosed in quotes, or the name of a String tag that contains thedesired string. This string, in turn, should be the name of the tag that will trigger the function— when the value of this tag changes, the function is automatically executed. (Normally, afunction executes only when it is explicity called, such as with the Command animation.) Toexecute the function at a regular interval, you can use one of project's system tags like Day orMonth.
This parameter is optional.
Returned value
0 No1 Yes
Notes
For this function, "Server" means the station that is actually running your project and has the TCP/IPServer module enabled, and "Client" means a Thin Client or Secure Viewer that is communicatingwith the Server via TCP/IP. For more information, see Configuring a Web Solution.
Tip: If the files on the Server are newer — that is, if this function returns TRUE — then you canuse ReloadAppFromServer to update the Client.
Examples

8/22/2019 User Guide Indu Soft
http://slidepdf.com/reader/full/user-guide-indu-soft 1032/1279
TagName Expression
Tag IsAppChangedOnServer()
Tag IsAppChangedOnServer( "CheckVersion" ) // Function is automatically called whenthe value of CheckVersion changes.
Parent topic: System Info functionsInduSoft Web Studio v7.0 Technical ReferenceCopyright © 2003–2010 Indusoft, Inc.

8/22/2019 User Guide Indu Soft
http://slidepdf.com/reader/full/user-guide-indu-soft 1033/1279
Appendix: Built-in Scripting Language > System Info functions >
NoInputTimeReturns the time elapsed since the last keyboard action.
Function Group Execution Windows Embedded ThinClient
NoInputTime System Info Synchronous Supported Supported Keyboard input only
Syntax
optTagUpdateTrigger
Optional tag that triggers an update when this function is used in a Text Data Link animation.
Every time this tag's value changes, the project triggers the function.
Returned value
Returns the time (in seconds) since the last keyboard action.
Examples
TagName Expression
Tag NoInputTime()
Note: You cannot implement this function directly from a Text object.
Parent topic: System Info functionsInduSoft Web Studio v7.0 Technical ReferenceCopyright © 2003–2010 Indusoft, Inc.

8/22/2019 User Guide Indu Soft
http://slidepdf.com/reader/full/user-guide-indu-soft 1034/1279
Appendix: Built-in Scripting Language > System Info functions >
ProductVersionReturns the program version number.
Function Group Execution Windows Embedded ThinClient
ProductVersion System Info Synchronous Supported Supported Supported
Syntax
This function takes no paramters.
Returned value
Returns the program version number as a real number.
Examples
TagName Expression
Tag ProductVersion() // Returned value = 7.000000
Parent topic: System Info functionsInduSoft Web Studio v7.0 Technical ReferenceCopyright © 2003–2010 Indusoft, Inc.

8/22/2019 User Guide Indu Soft
http://slidepdf.com/reader/full/user-guide-indu-soft 1035/1279
Appendix: Built-in Scripting Language > System Info functions >
RegSaveCESaves the Windows Embedded system registry. This function will only work if the save registrycapability is enabled in the Windows Embedded device image.
Function Group Execution Windows Embedded ThinClient
RegSaveCE System Info Synchronous Not supported Supported Not supported
Syntax
This function takes no paramters.
Returned value
0 Success.
- 1 Failed to saveHKEY_CLASSES_ROOT.
- 2 Failed to saveHKEY_CURRENT_USER.
- 3 Failed to saveHKEY_LOCAL_MACHINE.
- 4 Failed to save HKEY_USERS.
- 5 Function executed in NT platform.
Note: This function calls the RegFlushKey function from the Windows CE API. The implementationof this function is OEM dependent therefore it is not guaranteed to work with all the WindowsEmbedded devices.
Examples
TagName Expression
n/a RegSaveCE( ) // Returned value = 0 if successful
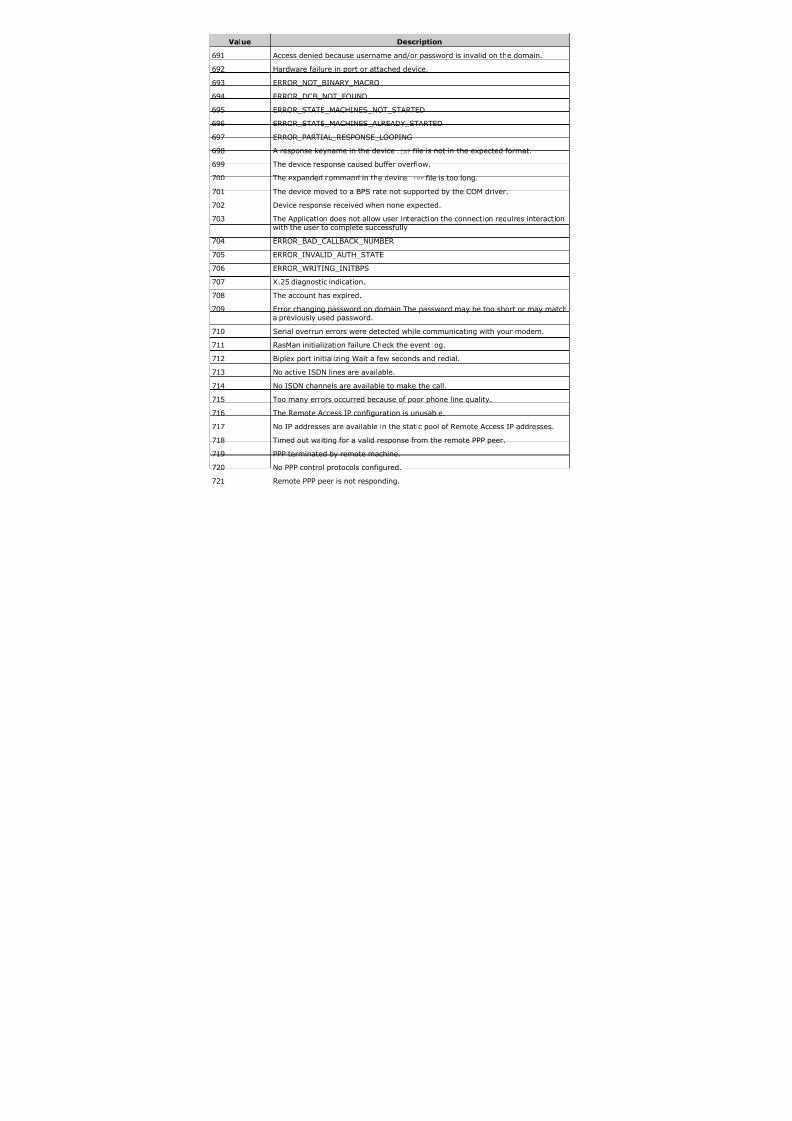
8/22/2019 User Guide Indu Soft
http://slidepdf.com/reader/full/user-guide-indu-soft 1036/1279
Parent topic: System Info functionsInduSoft Web Studio v7.0 Technical ReferenceCopyright © 2003–2010 Indusoft, Inc.

8/22/2019 User Guide Indu Soft
http://slidepdf.com/reader/full/user-guide-indu-soft 1037/1279
Appendix: Built-in Scripting Language > System Info functions >
ReloadAppFromServerWhen executed on the Client, this function reloads the necessary project files from the Server whilemaintaining the current state of the project on the Client.
Function Group Execution Windows Embedded ThinClient
ReloadAppFromServer System Info Synchronous Supported Supported Supported
Syntax
This function takes no paramters.
Returned value
This function always returns 0.
Notes
For this function, "Server" means the station that is actually running your project and has the TCP/IPServer module enabled, and "Client" means a Thin Client or Secure Viewer that is communicatingwith the Server via TCP/IP. For more information, see Configuring a Web Solution.
Tip: Before calling this function, you can use IsAppChangedOnServer to check the version of theproject files that are already on the Client. If the files on the Client match the files on the Server,then you may choose not to call this function.
Examples
TagName Expression
Tag ReloadAppFromServer( )
Parent topic: System Info functionsInduSoft Web Studio v7.0 Technical ReferenceCopyright © 2003–2010 Indusoft, Inc.

8/22/2019 User Guide Indu Soft
http://slidepdf.com/reader/full/user-guide-indu-soft 1038/1279
Appendix: Built-in Scripting Language > System Info functions >
SaveAlarmFileUse this function to enable/disable the saving feature for alarm history and to set the path where thealarm history files must be handled.
Function Group Execution Windows Embedded ThinClient
SaveAlarmFile System Info Synchronous Supported Supported Not supported
Syntax
SaveAlarmFile( numType,optRemotePath)
numType
Tag containing the number and operation, as follows:
0 Disable save the alarm file to the local disk
1 Enable save the alarm file to local disk
2 Enable save the alarm file to local disk and to the remote path specified inthe OptRemotePath parameter
optRemotePath
Tag containing the name of the remote computer where the alarm file will be savedsimultaneously to the local computer and to the remote path when numType equals 2.
Returned value
0 Success
1 2nd parameter is not astring
2 2nd parameter is missing
Examples

8/22/2019 User Guide Indu Soft
http://slidepdf.com/reader/full/user-guide-indu-soft 1039/1279
TagName Expression
Tag SaveAlarmFile( 0 )
Tag SaveAlarmFile( 1 )
Rag SaveAlarmFile( 2, "Z:\Apps\AppDemo" )
Parent topic: System Info functionsInduSoft Web Studio v7.0 Technical ReferenceCopyright © 2003–2010 Indusoft, Inc.

8/22/2019 User Guide Indu Soft
http://slidepdf.com/reader/full/user-guide-indu-soft 1040/1279
Appendix: Built-in Scripting Language > System Info functions >
SetAppAlarmPathSets the Alarm path for the current project.
Function Group Execution Windows Embedded ThinClient
SetAppAlarmPath System Info Synchronous Supported Supported Executed on Server
Syntax
strPath
The new Alarm path for the current project.
Returned value
This function does not return any value.
Examples
TagName Expression
SetAppAlarmPath( "C:\Studio\Alarm\" )
Parent topic: System Info functionsInduSoft Web Studio v7.0 Technical ReferenceCopyright © 2003–2010 Indusoft, Inc.

8/22/2019 User Guide Indu Soft
http://slidepdf.com/reader/full/user-guide-indu-soft 1041/1279
Appendix: Built-in Scripting Language > System Info functions >
SetAppHSTPathSets the file path (directory) where Trend history files will be saved, in the proprietary format(.HST).
Function Group Execution Windows Embedded ThinClient
SetAppHSTPath System Info Synchronous Supported Supported Executed on Server
Syntax
strPath
The file path (directory) where Trend history files will be saved.
Returned value
This function does not return any value.
Notes
This function is useful when you intend to change the file path during runtime. You can also set thefile path to a network drive by mapping it on the local station, or by using the following syntax:
\Network Drive\File Path
Please note that this function does not copy existing history files from the default directory to a newone; it only sets the file path for new history files saved after the function is called.
Examples
TagName Expression
SetAppHstPath("C:\Studio\History\")
Parent topic: System Info functionsInduSoft Web Studio v7.0 Technical ReferenceCopyright © 2003–2010 Indusoft, Inc.

8/22/2019 User Guide Indu Soft
http://slidepdf.com/reader/full/user-guide-indu-soft 1042/1279
Appendix: Built-in Scripting Language > System Info functions >
SetDateFormatSets the format and separator for the date string.
Function Group Execution Windows Embedded ThinClient
SetDateFormat System Info Synchronous Supported Supported Supported
Syntax
SetDateFormat( strSeparator ,strFomat)
strSeparator
The separator character for the date string.
strFormat
String tag, which specifies the order of the Month (M), Day (D), and Year (Y) in the date string.
DMY Day, Month, Year
MDY Month, Day, Year
YMD Year, Month, Day
Returned value
0 No error
1 Invalidparameter
Examples
TagName Expression
Tag SetDateFormat( "/", "MDY" ) // Date =04/18/2002

8/22/2019 User Guide Indu Soft
http://slidepdf.com/reader/full/user-guide-indu-soft 1043/1279
TagName Expression
Tag SetDateFormat( ":", "MYD" ) // Date =04:2002:18
Parent topic: System Info functionsInduSoft Web Studio v7.0 Technical Reference
Copyright © 2003–2010 Indusoft, Inc.

8/22/2019 User Guide Indu Soft
http://slidepdf.com/reader/full/user-guide-indu-soft 1044/1279
Appendix: Built-in Scripting Language > System Info functions >
SetKeyboardLanguageSets the language of any Virtual Keyboards in the project.
Function Group Execution Windows Embedded ThinClient
SetKeyboardLanguage System Info Synchronous Supported Supported Supported
Syntax
strLanguage
String tag with the language code used for the Virtual Keyboards. The currently available
options include:
EN English (default)
GE German
Returned value
0 Success
1 Error
Examples
TagName Expression
Tag SetKeyboardLanguage( "EN" )
Tag SetKeyboardLanguage( tagLanguage )
Parent topic: System Info functionsInduSoft Web Studio v7.0 Technical ReferenceCopyright © 2003–2010 Indusoft, Inc.

8/22/2019 User Guide Indu Soft
http://slidepdf.com/reader/full/user-guide-indu-soft 1045/1279
Appendix: Built-in Scripting Language > System Info functions >
SetRegValueSets the value of a variable in the Windows registry.
Function Group Execution Windows Embedded ThinClient
SetRegValue System Info Synchronous Supported Supported Not supported
Syntax
SetRegValue( numMainKey ,strKey ,strVariableName,numType,strOrNumValue)
numMainKey
Numeric tag with the following possible values:
0 HKEY_LOCAL_MACHINE
1 HKEY_CLASSES_ROOT
2 HKEY_CURRENT_USER
3 HKEY_USERS
4 HKEY_CURRENT_CONFIG
5 HKEY_PERFORMANCE_DATA
strKey
Path where the value is located in the Main Key.
strVariableName
Name of the variable to be set. The maximum length is 255 characters.
numType
Two types are currently supported:
0 DWord
1 String
strOrNumValue
Variable value.

8/22/2019 User Guide Indu Soft
http://slidepdf.com/reader/full/user-guide-indu-soft 1046/1279
Returned value
0 Success.
- 1 Invalid number of parameters or invalid Main Key.
- 2 Invalid type.
- 3 Failed to read the variable value; verify that you have the propersecurity rights.
Examples
TagName Expression
Tag SetRegValue( 0, "HARDWARE\DEVICEMAP\SERIALCOMM", "\Device\Serial1", 1, "COM3" )
// Returned value = 0 if successful
Tag SetRegValue( 2, "Control Panel\Desktop", "Smooth Scroll", 0, 1 ) // Returnedvalue = 0 if successful
CAUTION:
This register can affect the Windows system configuration. You should be extremely
careful and edit the registry on ly when you are certain about the configuration.
Parent topic: System Info functionsInduSoft Web Studio v7.0 Technical ReferenceCopyright © 2003–2010 Indusoft, Inc.

8/22/2019 User Guide Indu Soft
http://slidepdf.com/reader/full/user-guide-indu-soft 1047/1279
Appendix: Built-in Scripting Language > System Info functions >
SetWebConfigConfigures the Web settings for the current project. The settings configured in the function are updatedSetWebConfigSystem InfoSynchronousSupportedSupportedExecuted on Server
Function Group Execution Windows Embedded ThinClient
Syntax
SetWebConfig( strServerIP ,optStrBackupURL,optStrPathFile,optNumHostPort,optStrSecondaryServerIP ,optNumP
strServerIP
Data Server IP Address. IP address (or hostname) of the computer where the TCP Server module
optStrBackupURL
Optional alternative URL for the project's Web pages. The Thin Client will look for the Web pages inWeb browser.
optStrPathFile
Optional file path and name of the HTML file to be updated. If you specify only the file path without
Note: You can specify an individual file (e.g., you only want to update one file. This is especially
optNumHostPort
Optional TCP Port number that the Thin Client must use to exchange data with the TCP Server mod
optStrSecondaryServerIP
Optional alternative data server IP address. The Thin Client will attempt to connect to the TCP Servmodule running in the IP Address specified in the strServerIP parameter.
optNumProtocolFlag
Optional When you use the Web Tunneling Gateway option, this parameter specifies whether the T– Secure Socket Layer). If this flag has the value 0, the Thin Client will use HTTP. If this flag has th
optNumGtwPort

8/22/2019 User Guide Indu Soft
http://slidepdf.com/reader/full/user-guide-indu-soft 1048/1279
Optional TCP Port number that the Thin Client must use to exchange data with the Web Server wh
optStrGtwIP
Optional IP Address (or hostname) of the computer where the Web Tunneling Gateway is running.
optStrSecondaryGtwIP
Optional Alternative IP Address (or hostname) of the computer where the Web Tunneling Gatewaythis IP Address if it is not able to connect to the Web Tunneling Gateway running in the IP Address
optStrISSymbolURL
Optional URL from where the updated version of ISSymbol (ActiveX control) must be downloaded i
Note:
You can use tags or expressions as arguments of this function. Therefore, you can use this functinetwork settings of each project (IP address, Web Server URL, and so forth).
Only the first parameter of this function (strServerIP ) is mandatory. All other parameters are opvalue configured in the Web tab of Project Settings.
The following parameters should be omitted unless you intend to use the Web Tunneling Gateway
and optStrISSymbolURL .
Returned value0No error1Invalid number of parameters2Invalid Server IP address 13Invalid URL4Invalid optional path5No Web pages found
Error Description
ExamplesTag
SetWebConfig( "192.168.1.28" )TagSetWebConfig( "192.168.1.28", "http://192.168.1.28/" )
TagSetWebConfig( GetComputerIP(), "http://" + GetComputerIP() + "/" )
TagSetWebConfig( "192.168.1.28", "http://192.168.1.28/", "C:\MyWebPages\" )
Tag

8/22/2019 User Guide Indu Soft
http://slidepdf.com/reader/full/user-guide-indu-soft 1049/1279
SetWebConfig( "192.168.1.28", "http://192.168.1.28/", "C:\MyWebPages\", 1234 )
TagSetWebConfig( "192.168.1.28", "http://200.0.0.10/", "C:\MyWebPages\", 1234, "192.168.1.29", 0, 80, "200.
TagName Expression
Parent topic: System Info functions
InduSoft Web Studio v7.0 Technical ReferenceCopyright © 2003–2010 Indusoft, Inc.

8/22/2019 User Guide Indu Soft
http://slidepdf.com/reader/full/user-guide-indu-soft 1050/1279
Appendix: Built-in Scripting Language > System Info functions >
SNMPGetGets information from computers or network devices through the SNMP protocol.
Function Group Execution Windows Embedded ThinClient
SNMPGet System Info Synchronous Supported Not supported Supported
Syntax
SNMPGet( strAddress,strCommunity ,strOID , "strTagName" )
strAddress
The address of the machine/computer (e.g., "127.0.0.1" or "localhost").
strCommunity
SNMP community name when communicating with the computer (e.g., "public").
strOID
OID to be consulted (e.g., ".1.3.6.1.2.1.1.1.0").
strTagName
Name of the tag that will receive the requested value.
Note: The tag name must be enclosed in quotes, as shown in the syntax diagram, or elsethe project will try to get the value of the named tag.
Returned value
Value Description
0 No error
- 1 Invalid number of parameters
- 2 Invalid parameter
- 3 Cannot connect to the remote machine
- 4 Cannot connect to the remote machine
- 5 GET operation failed

8/22/2019 User Guide Indu Soft
http://slidepdf.com/reader/full/user-guide-indu-soft 1051/1279
Value Description
- 6 Invalid OID
- 7 Invalid tag name
- 8 Invalid tag type
- 9 This function is not supported in the current
OS
Examples
TagName Expression
ErrorTag SNMPGet( "127.0.0.1", "public", ".1.3.6.1.2.1.1.1.0", "SysDescrTag" )
//ErrorTag will receive the error code. If the function succeeds, the value in theOID ".1.3.6.1.2.1.1.1.0" will be saved in the tag SysDescrTag.
Parent topic: System Info functionsInduSoft Web Studio v7.0 Technical ReferenceCopyright © 2003–2010 Indusoft, Inc.

8/22/2019 User Guide Indu Soft
http://slidepdf.com/reader/full/user-guide-indu-soft 1052/1279
Appendix: Built-in Scripting Language > System Info functions >
SNMPSetUses the Simple Network Management Protocol (SNMP) to set a value on a target computer of network device.
Function Group Execution Windows Embedded ThinClient
SNMPSet System Info Synchronous Supported Not supported Supported
Syntax
SNMPSet( strAddress,strCommunity ,strOID ,Value,optNumType)
strAddress
The address of the target computer or device (e.g., "127.0.0.1" or "localhost").
strCommunity
The SNMP community name (e.g., "public") when communicating with the target computer ordevice.
strOID
The Object ID (OID) to be set.
Value
The value to be set to the specified OID.
optNumType
A numeric value, or a tag of Integer type, specifying the data type of Value. This is an optional
parameter, but if it is included, then it must have one of following values:
Value Type Description
0 OCTETSTRING An ctet string variable
1 INTEGER32 A 32-bit signed integervariable
2 TIMETICKS A timeticks variable
3 GAUGE32 A gauge variable
4 COUNTER32 A counter variable
5 IPADDRESS An IP address variable

8/22/2019 User Guide Indu Soft
http://slidepdf.com/reader/full/user-guide-indu-soft 1053/1279
Value Type Description
6 OBJECTIDENTIFIER An object identifier variable
7 SEQUENCE An ASN sequence variable
8 OPAQUE An opaque variable
Returned value
Value Description
0 No error
- 1 Invalid number of parameters
- 2 Invalid parameter
- 3 Cannot connect to the remote machine
- 4 Cannot connect to the remote machine
- 5 SET operation failed
- 6 Invalid OID
- 7 Invalid tag name
- 8 Invalid tag type
- 9 This function is not supported in the currentOS
Examples
TagName Expression
SNMPSet( "127.0.0.1", "public", ".1.3.6.1.2.1.1.1.0", 123, 1 ) //Sets aninteger value of 1 to the specified OID on the localhost (127.0.0.1).
Parent topic: System Info functionsInduSoft Web Studio v7.0 Technical ReferenceCopyright © 2003–2010 Indusoft, Inc.

8/22/2019 User Guide Indu Soft
http://slidepdf.com/reader/full/user-guide-indu-soft 1054/1279
Appendix: Built-in Scripting Language > System Info functions >
WritePrivateProfileStringWrites a specified setting to the project viewer initialization file, using the standard .ini format.
Function Group Execution Windows Embedded ThinClient
WritePrivateProfileString System Info Synchronous Supported Supported Supported
Syntax
WritePrivateProfileString ( strSection,strName,strValue,strFileName)
strSection
The section name to be written.
strName
The parameter name to be written.
strValue
The value to be written.
strFileName
The path and name of the .ini file to be written.
Returned value
The function returns 1 if the file was updated successfully.
Notes
When running on Windows Embedded this function will rewrite the entire file, therefore its use is notrecommended for lengthy files on Windows Embedded devices. The function will also add thefollowing lines at the end of the file when on a Windows Embedded device:
[FileBackUpControl]
Valid=1

8/22/2019 User Guide Indu Soft
http://slidepdf.com/reader/full/user-guide-indu-soft 1055/1279
Examples
TagName Expression
Tag WritePrivateProfileString( Section, Name, Value, FileName )
Tag WritePrivateProfileString( "Options", "ds1", "Value",
"C:\Viewer.ini" )
Parent topic: System Info functionsInduSoft Web Studio v7.0 Technical ReferenceCopyright © 2003–2010 Indusoft, Inc.

8/22/2019 User Guide Indu Soft
http://slidepdf.com/reader/full/user-guide-indu-soft 1056/1279
Appendix: Built-in Scripting Language >
Tags Database functionsThese functions are used to directly change the values of project tags.
ExecuteAlarmAck
This function acknowledges an active alarm on the specified tag. The advantage of using thisfunction is that if used from the Thin Client, the Alarm task will store the user name and stationfrom which the alarm was acknowledged.
ForceTagChange
Forces the database to write a value to a tag and act as if it were a tag change even if the newvalue is equal to the old value.
GetTagValue
Gets the value of the specified tag from the project tags database.
RunGlobalProcedureOnFalse
This function directly executes a VBScript procedure when the value of a specifiedtag/expression becomes FALSE.
RunGlobalProcedureOnTrigger
This function directly executes a VBScript procedure when the value of a specified tag changes.
RunGlobalProcedureOnTrue
This function directly executes a VBScript procedure when the value of a specifiedtag/expression becomes TRUE.
SetTagValue
Sets the value of the specified tag in the project tags database.
Parent topic: Appendix: Built-in Scripting Language
InduSoft Web Studio v7.0 Technical ReferenceCopyright © 2003–2010 Indusoft, Inc.

8/22/2019 User Guide Indu Soft
http://slidepdf.com/reader/full/user-guide-indu-soft 1057/1279
Appendix: Built-in Scripting Language > Tags Database functions >
ExecuteAlarmAckThis function acknowledges an active alarm on the specified tag. The advantage of using this functionis that if used from the Thin Client, the Alarm task will store the user name and station from whichthe alarm was acknowledged.
Function Group Execution Windows Embedded ThinClient
ExecuteAlarmAck Tags Database Synchronous Supported Supported Supported
Syntax
ExecuteAlarmAck( "strTagName",optStrComment,optStrAlarmType)
strTagName
Name of the tag on which the alarm will be acknowledged.
Note: The tag name must be enclosed in quotes, as shown in the syntax diagram, or elsethe project will try to get the value of the named tag.
optStrComment
An optional comment to send to the Alarm task, along with the user name and station.
optStrAlarmType
If more than one alarm is active on the specified tag, you can specify which alarm (e.g., Hi, Lo,HiHi, LoLo) to acknowledge. Otherwise, the function acknowledges the most recently activatedalarm.
Returned value
Value Description
0 Successfully executed.
-1 Invalid number of parameters.
-2 Invalid tag name.
Examples

8/22/2019 User Guide Indu Soft
http://slidepdf.com/reader/full/user-guide-indu-soft 1058/1279
TagName Expression
Tag ExecuteAlarmAck ("a","Hi alarm in tag a","Hi") // Returned value = 0 if successfully executed
Parent topic: Tags Database functions
InduSoft Web Studio v7.0 Technical ReferenceCopyright © 2003–2010 Indusoft, Inc.

8/22/2019 User Guide Indu Soft
http://slidepdf.com/reader/full/user-guide-indu-soft 1059/1279
Appendix: Built-in Scripting Language > Tags Database functions >
ForceTagChangeForces the database to write a value to a tag and act as if it were a tag change even if the new valueis equal to the old value.
Function Group Execution Windows Embedded ThinClient
ForceTagChange Tags Database Synchronous Supported Supported Supported
Syntax
ForceTagChange( "strTagName",numValue)
strTagName
The name of the tag being forced to accept the new value.
Note: The tag name must be enclosed in quotes, as shown in the syntax diagram, or elsethe project will try to get the value of the named tag.
numValue
The new value to be written to the specified tag.
Returned value
This function does not return any value.
Examples
TagName Expression
n/a ForceTagChange( "TagA", 5 )
Parent topic: Tags Database functionsInduSoft Web Studio v7.0 Technical ReferenceCopyright © 2003–2010 Indusoft, Inc.

8/22/2019 User Guide Indu Soft
http://slidepdf.com/reader/full/user-guide-indu-soft 1060/1279
Appendix: Built-in Scripting Language > Tags Database functions >
GetTagValueGets the value of the specified tag from the project tags database.
Function Group Execution Windows Embedded ThinClient
GetTagValue Tags Database Synchronous Supported Supported Supported
Syntax
GetTagValue( "strTagName",optNumRefresh)
strTagName
The name of the tag of which you want to get the value.
Note: The tag name must be enclosed in quotes, as shown in the syntax diagram, or elsethe project will try to get the value of the named tag.
optNumRefresh
Tag that you want to use as a trigger to refresh the function. When the value of the specifiedTag changes, the function is executed again. (Normally, a function executes only when theobject on which it is configured changes in some way, such as when a Pushbutton object is
clicked.) To execute the function at a regular interval, you can use one of project's system tagssuch as Second, Minute or Hour.
Returned value
This function only returns the value of the Tag specified by strTagName. If the specified Tag does notexist, then the function returns null.
Note: The value of the Tag specified by optNumRefresh does not affect the function's returnedvalue in any way.
Examples
TagName Expression

8/22/2019 User Guide Indu Soft
http://slidepdf.com/reader/full/user-guide-indu-soft 1061/1279
TagName Expression
requiredTag = 15 GetTagName( "requiredTag", Second ) // Return = 15
pointerTag="RequiredTag"
requiredTag = 15
optNum = Second
GetTagName( pointerTag, optNum ) // Return = 15
Parent topic: Tags Database functionsInduSoft Web Studio v7.0 Technical ReferenceCopyright © 2003–2010 Indusoft, Inc.

8/22/2019 User Guide Indu Soft
http://slidepdf.com/reader/full/user-guide-indu-soft 1062/1279
Appendix: Built-in Scripting Language > Tags Database functions >
RunGlobalProcedureOnFalseThis function directly executes a VBScript procedure when the value of a specified tag/expressionbecomes FALSE.
Function Group Execution Windows Embedded ThinClient
RunGlobalProcedureOnFalse Tags Database Synchronous Supported Supported Supported
Syntax
strCondition
A project tag or expression.
Note: The tag name must be enclosed in quotes, as shown in the syntax diagram, or elsethe project will try to get the value of the named tag.
strProcedureOnFalse
The name of the procedure (in the Procedures folder) to execute when the value of strCondition becomes FALSE (zero).
Returned valueThis function returns the following possible values:
Value Description
0 Error
1 Success
Notes
Once this function is called, it remains active until the runtime project is stopped. That means everytime the tag/expression becomes FALSE, the procedure is executed. However, the procedure isexecuted only once when the tag/expression becomes FALSE; it is not continuously executed while
the tag/expression is FALSE.
The procedure is executed on the Client. To execute a procedure on the Server, use the

8/22/2019 User Guide Indu Soft
http://slidepdf.com/reader/full/user-guide-indu-soft 1063/1279
RunGlobalProcedureOnServer function.
Examples
When the value of TagOnFalse becomes FALSE (zero), execute the procedure UsingOnFalse:
RunGlobalProcedureOnFalse( "TagOnFalse", "UsingOnFalse" )
Parent topic: Tags Database functions
Related reference
RunGlobalProcedureOnTriggerRunGlobalProcedureOnTrue
InduSoft Web Studio v7.0 Technical ReferenceCopyright © 2003–2010 Indusoft, Inc.

8/22/2019 User Guide Indu Soft
http://slidepdf.com/reader/full/user-guide-indu-soft 1064/1279
Appendix: Built-in Scripting Language > Tags Database functions >
RunGlobalProcedureOnTriggerThis function directly executes a VBScript procedure when the value of a specified tag changes.
Function Group Execution Windows Embedded ThinClient
RunGlobalProcedureOnTrigger Tags Database Synchronous Supported Supported Supported
Syntax
strTagName
The name of a project tag.
Note: The tag name must be enclosed in quotes, as shown in the syntax diagram, or elsethe project will try to get the value of the named tag.
strProcedureOnTrigger
The name of the procedure (in the Procedures folder) to execute when the value of thespecified tag changes.
Returned value
This function returns the following possible values:
Value Description
0 Error
1 Success
Notes
Once this function is called, it remains active until the runtime project is stopped. That means everytime the value of the tag changes, the procedure is executed.
The procedure is executed on the Client. To execute a procedure on the Server, use theRunGlobalProcedureOnServer function.

8/22/2019 User Guide Indu Soft
http://slidepdf.com/reader/full/user-guide-indu-soft 1065/1279
Examples
When the value of TagTrigger changes, execute the procedure UsingTrigger:
RunGlobalProcedureOnTrigger( "TagTrigger", "UsingTrigger" )
Parent topic: Tags Database functions
Related reference
RunGlobalProcedureOnFalse
RunGlobalProcedureOnTrue
InduSoft Web Studio v7.0 Technical Reference
Copyright © 2003–2010 Indusoft, Inc.

8/22/2019 User Guide Indu Soft
http://slidepdf.com/reader/full/user-guide-indu-soft 1066/1279
Appendix: Built-in Scripting Language > Tags Database functions >
RunGlobalProcedureOnTrueThis function directly executes a VBScript procedure when the value of a specified tag/expressionbecomes TRUE.
Function Group Execution Windows Embedded ThinClient
RunGlobalProcedureOnTrue Tags Database Synchronous Supported Supported Supported
Syntax
strCondition
A project tag or expression.
Note: The tag name must be enclosed in quotes, as shown in the syntax diagram, or elsethe project will try to get the value of the named tag.
strProcedureOnTrue
The name of the procedure (in the Procedures folder) to execute when the value of strCondition becomes TRUE (non-zero).
Returned valueThis function returns the following possible values:
Value Description
0 Error
1 Success
Notes
Once this function is called, it remains active until the runtime project is stopped. That means everytime the tag/expression becomes TRUE, the procedure is executed. However, the procedure isexecuted only once when the tag/expression becomes TRUE; it is not continuously executed while thetag/expression is TRUE.
The procedure is executed on the Client. To execute a procedure on the Server, use the

8/22/2019 User Guide Indu Soft
http://slidepdf.com/reader/full/user-guide-indu-soft 1067/1279
RunGlobalProcedureOnServer function.
Examples
When the value of TagOnTrue becomes TRUE (non-zero), execute the procedure UsingOnTrue:
RunGlobalProcedureOnTrue( "TagOnTrue", "UsingOnTrue" )
Parent topic: Tags Database functions
Related reference
RunGlobalProcedureOnFalseRunGlobalProcedureOnTrigger
InduSoft Web Studio v7.0 Technical ReferenceCopyright © 2003–2010 Indusoft, Inc.

8/22/2019 User Guide Indu Soft
http://slidepdf.com/reader/full/user-guide-indu-soft 1068/1279
Appendix: Built-in Scripting Language > Tags Database functions >
SetTagValueSets the value of the specified tag in the project tags database.
Function Group Execution Windows Embedded ThinClient
SetTagValue Tags Database Synchronous Supported Supported Supported
Syntax
SetTagValue( "strTagName",TagValue)
strTagName
The name of the tag that you want to set.
Note: The tag name must be enclosed in quotes, as shown in the syntax diagram, or elsethe project will try to get the value of the named tag.
TagValue
The new value to be set to the specified tag.
Returned value
Value Description
- 1 Invalid tag name
0 No error
Examples
TagName ExpressionTagA SetTagValue( "TagA", "Hello" ) // Return = Hello
TagA SetTagValue( "TagA", 123 ) // Return = 123
TagA TagB= 15
SetTagValue( "TagA", TagB ) // Return = 15

8/22/2019 User Guide Indu Soft
http://slidepdf.com/reader/full/user-guide-indu-soft 1069/1279
Parent topic: Tags Database functionsInduSoft Web Studio v7.0 Technical ReferenceCopyright © 2003–2010 Indusoft, Inc.

8/22/2019 User Guide Indu Soft
http://slidepdf.com/reader/full/user-guide-indu-soft 1070/1279
Appendix: Built-in Scripting Language >
Loop functionsThese functions are used to implement repeating, incrementing loop within a script.
For … Next
Implements a For … Next loop within a Math worksheet or Command animation. The section of the script affected by the loop begins with the For() function call and ends with the Next
notation. The Next notation directs back to the beginning of the loop.
Parent topic: Appendix: Built-in Scripting LanguageInduSoft Web Studio v7.0 Technical ReferenceCopyright © 2003–2010 Indusoft, Inc.

8/22/2019 User Guide Indu Soft
http://slidepdf.com/reader/full/user-guide-indu-soft 1071/1279
Appendix: Built-in Scripting Language > Loop functions >
For … NextImplements a For … Next loop within a Math worksheet or Command animation. The section of thescript affected by the loop begins with the For() function call and ends with the Next notation. TheNext notation directs back to the beginning of the loop.
Function Group Execution Windows Embedded ThinClient
For Loop N/A Supported Supported Supported
Syntax
For( numInitialValue,numFinalValue,numStep ) … Next
numInitialValue
The initial step (increment) of the loop.
numFinalValue
The final step (increment) of the loop.
numStep
The step (increment) of the loop.
Returned value
Returns the step on which the loop is currently running.
Examples
TagName Expression
Tag For( 1, 5, 1 )
Next
Note: You must partner every For function with a Next notation. As shown in the example, youmust place the Next notation in the tag field of the math script.

8/22/2019 User Guide Indu Soft
http://slidepdf.com/reader/full/user-guide-indu-soft 1072/1279
Parent topic: Loop functionsInduSoft Web Studio v7.0 Technical ReferenceCopyright © 2003–2010 Indusoft, Inc.

8/22/2019 User Guide Indu Soft
http://slidepdf.com/reader/full/user-guide-indu-soft 1073/1279
Appendix: Built-in Scripting Language >
ODBC functionsThese functions are used interact with an external database via Open Database Connectivity (ODBC).
Note: These functions are provided to support legacy database interfaces. In most cases, werecommend that you use the newer Database/ERP connections manager and functions.
ODBCBeginTrans
Begins a transaction with the connected data source.
ODBCBindCol
Binds a column to a tag.
ODBCCanAppend
Returns whether the database will allow you to add new records.
ODBCCanTransact
Returns whether the database allows transactions.
ODBCCanUpdate
Returns whether the database can be updated.
ODBCClose
Closes a connection to the database.
ODBCCommitTrans
Commits a transaction. Call this function upon completing transactions.
ODBCDelete
Deletes the current record.
ODBCExecuteSQL
Directly executes an SQL statement.
ODBCInsert
Inserts a new record in the database.
ODBCIsBOF
Returns whether you have gone above the first record of the record set. (Call this function
before scrolling from record to record.)
ODBCIsDeleted

8/22/2019 User Guide Indu Soft
http://slidepdf.com/reader/full/user-guide-indu-soft 1074/1279
Reports whether the current record was deleted.
ODBCIsEOF
Reports whether you have gone beyond the last record of the record set. (Call this function asyou scroll from record to record.)
ODBCIsFieldNULL
Reports whether a specified field in a record set was flagged as NULL.
ODBCIsFieldNullable
Reports whether a specified field is nullable (i.e., can be set to a NULL value).
ODBCMove
Moves the current record pointer within a record set, either forward or backward.
ODBCMoveFirst
Moves to the first record within the record set.
ODBCMoveLast
Moves to the last record within the record set.
ODBCMoveNext
Moves to the next record within the record set.
ODBCMovePrev
Moves to the next record within the record set.
ODBCOpen
Opens a connection to the database and returns a numeric handler to be used by other ODBCfunctions.
ODBCQueryRetrieves the currently selected record from a database.
ODBCRollBack
Reverses the changes made during a transaction.
ODBCSetFieldNULL
Flags a field data member in the record set as NULL (specifically having no value) or as non-NULL.
ODBCSetFilter
Constrains the records selected in a database.
ODBCSetSort
Sorts the records selected in a database.
ODBCUnbindCol
Unbinds a column that was previously bound using the ODBCBindCol function.

8/22/2019 User Guide Indu Soft
http://slidepdf.com/reader/full/user-guide-indu-soft 1075/1279
ODBCUpdate
Updates the current record.
Parent topic: Appendix: Built-in Scripting LanguageInduSoft Web Studio v7.0 Technical ReferenceCopyright © 2003–2010 Indusoft, Inc.
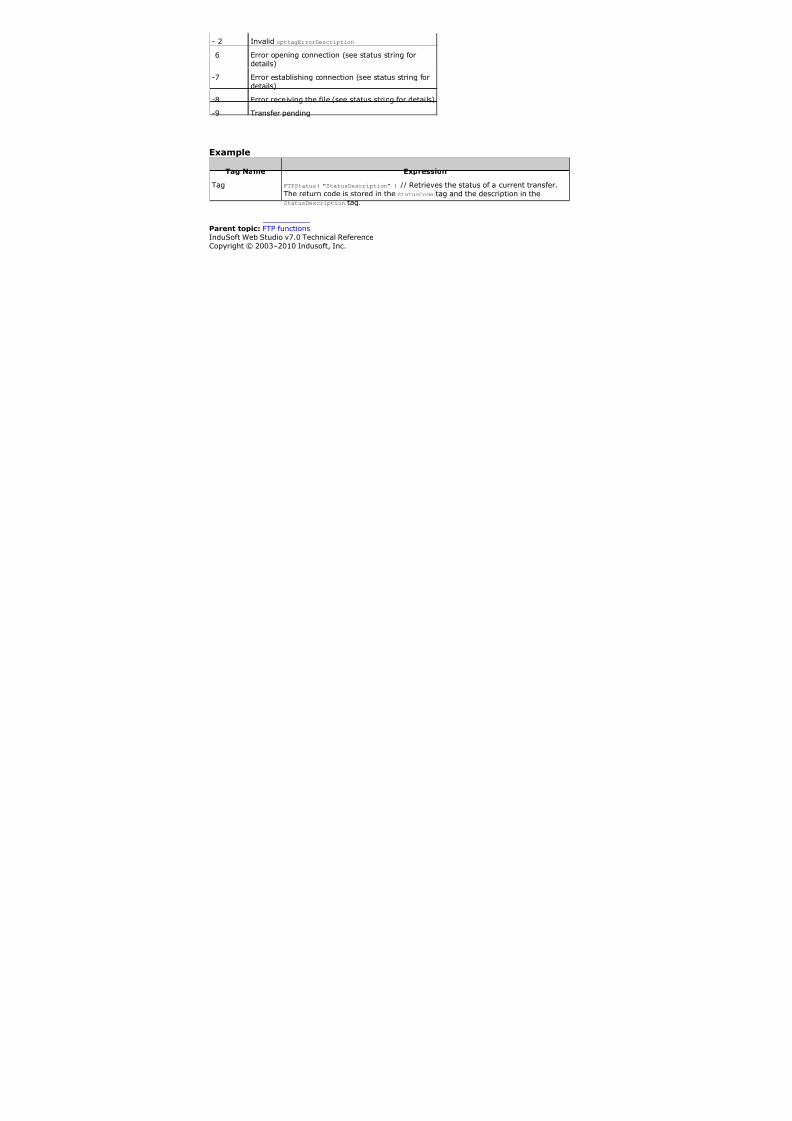
8/22/2019 User Guide Indu Soft
http://slidepdf.com/reader/full/user-guide-indu-soft 1076/1279
Appendix: Built-in Scripting Language > ODBC functions >
ODBCBeginTransBegins a transaction with the connected data source.
Function Group Execution Windows Embedded ThinClient
ODBCBeginTrans ODBC Synchronous Supported Not supported Executed on Server
Syntax
numHandler
The handler returned by the ODBCOpen function.
Returned value
0 Success
1 Invalid handler
2 Database not open
3 Error beginningtransaction
Examples
TagName Expression
Tag ODBCBeginTrans( 5 )
Parent topic: ODBC functionsInduSoft Web Studio v7.0 Technical ReferenceCopyright © 2003–2010 Indusoft, Inc.

8/22/2019 User Guide Indu Soft
http://slidepdf.com/reader/full/user-guide-indu-soft 1077/1279
Appendix: Built-in Scripting Language > ODBC functions >
ODBCBindColBinds a column to a tag.
Function Group Execution Windows Embedded ThinClient
ODBCBindCol ODBC Synchronous Supported Not supported Executed on Server
Syntax
ODBCBindCol( numHandler ,strColName,strColType,strTagName)
numHandler
The handler returned by the ODBCOpen function.
strColName
The Database column name.
strColType
The SQL data type (one of the following):
SQL_BIT
SQL_TINYINT
SQL_LONGVARCHAR
SQL_CHAR
SQL_VARCHAR
SQL_DECIMAL
SQL_NUMERIC
SQL_DATE
SQL_TIME
SQL_TIMESTAMP
SQL_DOUBLE
SQL_REAL
SQL_SMALLINT
SQL_INTEGER
strTagName
The name of the tag to bind to the column.

8/22/2019 User Guide Indu Soft
http://slidepdf.com/reader/full/user-guide-indu-soft 1078/1279
Returned value
0 Success
1 Invalid Handler
2 Invalid parameter type
3 One of the parameters has an emptystring
4 ColType contains an invalid type
Notes
Every time you finish binding columns, you must call the ODBCQuery function.
Examples
TagName Expression
Tag ODBCBindCol( 5, "OrderDate", "SQL_DATE", "Order_Date"
)
See also: ODBCUnbindCol()
Parent topic: ODBC functionsInduSoft Web Studio v7.0 Technical Reference
Copyright © 2003–2010 Indusoft, Inc.

8/22/2019 User Guide Indu Soft
http://slidepdf.com/reader/full/user-guide-indu-soft 1079/1279
Appendix: Built-in Scripting Language > ODBC functions >
ODBCCanAppendReturns whether the database will allow you to add new records.
Function Group Execution Windows Embedded ThinClient
ODBCCanAppend ODBC Synchronous Supported Not supported Executed on Server
Syntax
numHandler
The handler returned by the ODBCOpen function.
Returned value
0 Database does not allow appending new records
Non-Zero
Database does allow appending new records
Examples
TagName Expression
Tag ODBCCanAppend( 5 )
Parent topic: ODBC functionsInduSoft Web Studio v7.0 Technical ReferenceCopyright © 2003–2010 Indusoft, Inc.

8/22/2019 User Guide Indu Soft
http://slidepdf.com/reader/full/user-guide-indu-soft 1080/1279
Appendix: Built-in Scripting Language > ODBC functions >
ODBCCanTransactReturns whether the database allows transactions.
Function Group Execution Windows Embedded ThinClient
ODBCCanTransact ODBC Synchronous Supported Not supported Executed on Server
Syntax
numHandler
The handler returned by the ODBCOpen function.
Returned value
0 Database does not allow transactions.
Non-Zero
Database does allow transactions.
Examples
TagName Expression
Tag ODBCCanTransact( 2 )
Parent topic: ODBC functionsInduSoft Web Studio v7.0 Technical ReferenceCopyright © 2003–2010 Indusoft, Inc.

8/22/2019 User Guide Indu Soft
http://slidepdf.com/reader/full/user-guide-indu-soft 1081/1279
Appendix: Built-in Scripting Language > ODBC functions >
ODBCCanUpdateReturns whether the database can be updated.
Function Group Execution Windows Embedded ThinClient
ODBCCanUpdate ODBC Synchronous Supported Not supported Executed on Server
Syntax
numHandler
The handler returned by the ODBCOpen function.
Returned value
0 Database does not allow updates.
Non-Zero
Database does allow updates.
Examples
TagName Expression
Tag ODBCCanUpdate( 6 )
Parent topic: ODBC functionsInduSoft Web Studio v7.0 Technical ReferenceCopyright © 2003–2010 Indusoft, Inc.

8/22/2019 User Guide Indu Soft
http://slidepdf.com/reader/full/user-guide-indu-soft 1082/1279
Appendix: Built-in Scripting Language > ODBC functions >
ODBCCloseCloses a connection to the database.
Function Group Execution Windows Embedded ThinClient
ODBCClose ODBC Synchronous Supported Not supported Executed on Server
Syntax
numHandler
The handler returned by the ODBCOpen function.
Returned value
0 Success
1 InvalidHandler
Examples
TagName Expression
Tag ODBCClose( 5 )
Parent topic: ODBC functionsInduSoft Web Studio v7.0 Technical ReferenceCopyright © 2003–2010 Indusoft, Inc.

8/22/2019 User Guide Indu Soft
http://slidepdf.com/reader/full/user-guide-indu-soft 1083/1279
Appendix: Built-in Scripting Language > ODBC functions >
ODBCCommitTransCommits a transaction. Call this function upon completing transactions.
Function Group Execution Windows Embedded ThinClient
ODBCCommitTrans ODBC Synchronous Supported Not supported Executed on Server
Syntax
numHandler
The handler returned by the ODBCOpen function.
Returned value
0 Success
1 Invalid handler
2 Database not open
3 Error committingtransaction
Examples
TagName Expression
Tag ODBCCommitTrans( 1 )
Parent topic: ODBC functionsInduSoft Web Studio v7.0 Technical ReferenceCopyright © 2003–2010 Indusoft, Inc.

8/22/2019 User Guide Indu Soft
http://slidepdf.com/reader/full/user-guide-indu-soft 1084/1279
Appendix: Built-in Scripting Language > ODBC functions >
ODBCDeleteDeletes the current record.
Function Group Execution Windows Embedded ThinClient
ODBCDelete ODBC Synchronous Supported Not supported Executed on Server
Syntax
numHandler
The handler returned by the ODBCOpen function.
Returned value
0 Success
1 Invalid handler
2 Database notopen
3 Delete error
Notes
After a successful deletion, you must explicitly call one of the "move" functions (i.e., ODBCMove,ODBCMoveFirst, ODBCMoveLast, ODBCMoveNext, ODBCMovePrev) to move off the deleted record.
Examples
TagName Expression
Tag ODBCDelete( 5 )
Parent topic: ODBC functionsInduSoft Web Studio v7.0 Technical ReferenceCopyright © 2003–2010 Indusoft, Inc.

8/22/2019 User Guide Indu Soft
http://slidepdf.com/reader/full/user-guide-indu-soft 1085/1279
Appendix: Built-in Scripting Language > ODBC functions >
ODBCExecuteSQLDirectly executes an SQL statement.
Group Execution WindowsPC WindowsCE ThinClient
ODBC Synchronous Supported Notsupported
Executedon Server
Syntax
ODBCExecuteSQL( numHandler ,strSqlCommand )
numHandler
The handler returned by the ODBCOpen function.
strSqlCommand
A valid SQL statement.
Returned value
0 Success
1 Invalid handler
2 Database not open
3 Invalid parameter
4 Error executing SQLcommand
Note: This function does not return any records, regardless of the statement that is executed.
Examples

8/22/2019 User Guide Indu Soft
http://slidepdf.com/reader/full/user-guide-indu-soft 1086/1279
TagName Expression
Tag ODBCExecuteSQL( 3, " )
Tag ODBCExecuteSQL( 4, " )
Parent topic: ODBC functionsInduSoft Web Studio v7.0 Technical ReferenceCopyright © 2003–2010 Indusoft, Inc.

8/22/2019 User Guide Indu Soft
http://slidepdf.com/reader/full/user-guide-indu-soft 1087/1279
Appendix: Built-in Scripting Language > ODBC functions >
ODBCInsertInserts a new record in the database.
Function Group Execution Windows Embedded ThinClient
ODBCInsert ODBC Synchronous Supported Not supported Executed on Server
Syntax
numHandler
The handler returned by the ODBCOpen function.
Returned value
0 Success
1 Invalid handler
2 Database notopen
3 Insert error
Notes
This function uses the values of the tags bound by the ODBCBindCol function to create the newrecord.
Examples
TagName Expression
Tag ODBCInsert( 7 )
Parent topic: ODBC functionsInduSoft Web Studio v7.0 Technical ReferenceCopyright © 2003–2010 Indusoft, Inc.

8/22/2019 User Guide Indu Soft
http://slidepdf.com/reader/full/user-guide-indu-soft 1088/1279
Appendix: Built-in Scripting Language > ODBC functions >
ODBCIsBOFReturns whether you have gone above the first record of the record set. (Call this function beforescrolling from record to record.)
Function Group Execution Windows Embedded ThinClient
ODBCIsBOF ODBC Synchronous Supported Not supported Executed on Server
Syntax
numHandler
The handler returned by the ODBCOpen function.
Returned value
0 Record found
non-zero Record set contains no records or you move backward, above the firstrecord
You also can use this function along with the ODBCIsEOF function to determine whether the record
set contains any records or is empty. Immediately after calling the ODBCQuery function, and if therecord set contains no records, ODBCIsBOF returns non-zero. When you open a record set with atleast one record, the first record is the current record and ODBCIsBOF returns a zero (0). If the firstrecord is the current record, and you call ODBCMovePrev, ODBCIsBOF will subsequently return anon-zero.
Examples
TagName Expression
Tag ODBCIsBOF( 1 )
Parent topic: ODBC functionsInduSoft Web Studio v7.0 Technical ReferenceCopyright © 2003–2010 Indusoft, Inc.

8/22/2019 User Guide Indu Soft
http://slidepdf.com/reader/full/user-guide-indu-soft 1089/1279
Appendix: Built-in Scripting Language > ODBC functions >
ODBCIsDeletedReports whether the current record was deleted.
Function Group Execution Windows Embedded ThinClient
ODBCIsDeleted ODBC Synchronous Supported Not supported Executed on Server
Syntax
numHandler
The handler returned by the ODBCOpen function.
Returned value
0 Record set is not positioned on a deleted record.
non-zero
Record set is positioned on a deleted record.
If you move to a record and this function returns a non-zero, then you must move to another recordbefore you can perform any other operations.
Examples
TagName Expression
Tag ODBCIsDeleted( 8 )
Parent topic: ODBC functionsInduSoft Web Studio v7.0 Technical ReferenceCopyright © 2003–2010 Indusoft, Inc.

8/22/2019 User Guide Indu Soft
http://slidepdf.com/reader/full/user-guide-indu-soft 1090/1279
Appendix: Built-in Scripting Language > ODBC functions >
ODBCIsEOFReports whether you have gone beyond the last record of the record set. (Call this function as youscroll from record to record.)
Function Group Execution Windows Embedded ThinClient
ODBCIsEOF ODBC Synchronous Supported Not supported Executed on Server
Syntax
numHandler
The handler returned by the ODBCOpen function.
Returned value
0 Record found.
non-zero Record set contains no records or you moved forward, after the lastrecord.
You can use this function along with the ODBCIsBOF function to determine whether the record set
contains any records or is empty. Immediately after calling the ODBCQuery function, and if therecord set contains no records, ODBCIsBOF returns non-zero. When you open a record set with atleast one record, the first record is the current record and ODBCIsEOF returns a zero (0). If the lastrecord is the current record, and you call ODBCMoveNext, ODBCIsEOF will subsequently return anon-zero.
Examples
TagName Expression
Tag ODBCIsEOF( 5 )
Parent topic: ODBC functionsInduSoft Web Studio v7.0 Technical ReferenceCopyright © 2003–2010 Indusoft, Inc.

8/22/2019 User Guide Indu Soft
http://slidepdf.com/reader/full/user-guide-indu-soft 1091/1279
Appendix: Built-in Scripting Language > ODBC functions >
ODBCIsFieldNULLReports whether a specified field in a record set was flagged as NULL.
Function Group Execution Windows Embedded ThinClient
ODBCIsFieldNULL ODBC Synchronous Supported Not supported Executed on Server
Syntax
numHandler
The handler returned by the ODBCOpen function.
strColName
The column name.
Returned value
0 The specified field is not flagged as Null.
Non-Zero
The specified field is flagged as Null.
Examples
TagName Expression
Tag ODBCIsFieldNULL( 7, "CustomerName" )
Tag ODBCIsFieldNULL( 3, "CompanyName" )
Parent topic: ODBC functionsInduSoft Web Studio v7.0 Technical ReferenceCopyright © 2003–2010 Indusoft, Inc.

8/22/2019 User Guide Indu Soft
http://slidepdf.com/reader/full/user-guide-indu-soft 1092/1279
Appendix: Built-in Scripting Language > ODBC functions >
ODBCIsFieldNullableReports whether a specified field is nullable (i.e., can be set to a NULL value).
Function Group Execution Windows Embedded ThinClient
ODBCIsFieldNullable ODBC Synchronous Supported Not supported Executed on Server
Syntax
numHandler
The handler returned by the ODBCOpen function.
strColName
The column name.
Returned value
0 The specified field is not flagged as Nullable.
Non-Zero
The specified field is flagged as Nullable.
Examples
TagName Expression
Tag ODBCIsFieldNullable( 1, "Price" )
Tag ODBCIsFieldNullable( 1, "Model" )
Parent topic: ODBC functionsInduSoft Web Studio v7.0 Technical ReferenceCopyright © 2003–2010 Indusoft, Inc.

8/22/2019 User Guide Indu Soft
http://slidepdf.com/reader/full/user-guide-indu-soft 1093/1279
Appendix: Built-in Scripting Language > ODBC functions >
ODBCMoveMoves the current record pointer within a record set, either forward or backward.
Function Group Execution Windows Embedded ThinClient
ODBCMove ODBC Synchronous Supported Not supported Executed on Server
Description
Moves the current record pointer within a record set, either forward or backward.
Syntax
numHandler
The handler returned by the ODBCOpen function.
numOffset
The number of rows to move forward or backward:
Positive values move forward, toward the end of the record set.
Negative values move backward, toward the beginning of the record set.
A value of 0 refreshes the current record.
Returned value
0 Success
1 Invalid handler
2 Database notopen
3 Move error
Examples

8/22/2019 User Guide Indu Soft
http://slidepdf.com/reader/full/user-guide-indu-soft 1094/1279
TagName Expression
Tag ODBCMove( 2, 3 )
Tag ODBCMove( 8, 2 )
Parent topic: ODBC functionsInduSoft Web Studio v7.0 Technical ReferenceCopyright © 2003–2010 Indusoft, Inc.

8/22/2019 User Guide Indu Soft
http://slidepdf.com/reader/full/user-guide-indu-soft 1095/1279
Appendix: Built-in Scripting Language > ODBC functions >
ODBCMoveFirstMoves to the first record within the record set.
Function Group Execution Windows Embedded ThinClient
ODBCMoveFirst ODBC Synchronous Supported Not supported Executed on Server
Syntax
numHandler
The handler returned by the ODBCOpen function.
Returned value
0 Success.
1 Invalid handler.
2 Database notopen.
3 Move error.
Examples
TagName Expression
Tag ODBCMoveFirst( 4 )
Parent topic: ODBC functionsInduSoft Web Studio v7.0 Technical ReferenceCopyright © 2003–2010 Indusoft, Inc.

8/22/2019 User Guide Indu Soft
http://slidepdf.com/reader/full/user-guide-indu-soft 1096/1279
Appendix: Built-in Scripting Language > ODBC functions >
ODBCMoveLastMoves to the last record within the record set.
Function Group Execution Windows Embedded ThinClient
ODBCMoveLast ODBC Synchronous Supported Not supported Executed on Server
Syntax
numHandler
The handler returned by the ODBCOpen function.
Returned value
0 Success
1 Invalid handler
2 Database notopen
3 Move error
Examples
TagName Expression
Tag ODBCMoveLast( 7 )
Parent topic: ODBC functionsInduSoft Web Studio v7.0 Technical ReferenceCopyright © 2003–2010 Indusoft, Inc.

8/22/2019 User Guide Indu Soft
http://slidepdf.com/reader/full/user-guide-indu-soft 1097/1279
Appendix: Built-in Scripting Language > ODBC functions >
ODBCMoveNextMoves to the next record within the record set.
Function Group Execution Windows Embedded ThinClient
ODBCMoveNext ODBC Synchronous Supported Not supported Executed on Server
Syntax
numHandler
The handler returned by the ODBCOpen function.
Returned value
0 Success
1 Invalid handler
2 Database not open
3 End of record setreached
4 Move error
Examples
TagName Expression
Tag ODBCMoveNext( 9 )
Parent topic: ODBC functionsInduSoft Web Studio v7.0 Technical ReferenceCopyright © 2003–2010 Indusoft, Inc.

8/22/2019 User Guide Indu Soft
http://slidepdf.com/reader/full/user-guide-indu-soft 1098/1279
Appendix: Built-in Scripting Language > ODBC functions >
ODBCMovePrevMoves to the next record within the record set.
Function Group Execution Windows Embedded ThinClient
ODBCMovePrev ODBC Synchronous Supported Not supported Executed on Server
Syntax
numHandler
The handler returned by the ODBCOpen function.
Returned value
0 Success
1 Invalid handler
2 Database not open
3 Beginning of record setreached
4 Move error
Examples
TagName Expression
Tag ODBCMovePrev( 2 )
Parent topic: ODBC functionsInduSoft Web Studio v7.0 Technical ReferenceCopyright © 2003–2010 Indusoft, Inc.

8/22/2019 User Guide Indu Soft
http://slidepdf.com/reader/full/user-guide-indu-soft 1099/1279
Appendix: Built-in Scripting Language > ODBC functions >
ODBCOpenOpens a connection to the database and returns a numeric handler to be used by other ODBCfunctions.
Function Group Execution Windows Embedded ThinClient
ODBCOpen ODBC Synchronous Supported Not supported Executed on Server
Syntax
ODBCOpen( strDsn,strUser ,strPassw ,strTable,strFilter ,strSort)
strDsn
The name of the data source.
strUser
The user name.
strPassw
The password.
strTable
The name of the database table
strFilter
The SQL WHERE clause.
strSort
The SQL ORDER BY clause.
Returned value
n On success, returns the handler to identify the
database
- 1 Invalid parameter
- 2 DSN or TableName contain an empty string

8/22/2019 User Guide Indu Soft
http://slidepdf.com/reader/full/user-guide-indu-soft 1100/1279
Notes
This function does not read or write any data; it simply creates a handle to manipulate the database.You must bind the columns using the ODBCBindCol function, and then you must call the ODBCQueryfunction to retrieve the first record.
Examples
TagName Expression
Tag ODBCOpen( "MyDSNFile", "Alex", "", "Table1", "Name='Mayer'", "Name
ASC" )
Tag ODBCOpen( "DSNFileName", "Robert", "Robot", "Table1", "", "" )
Parent topic: ODBC functionsInduSoft Web Studio v7.0 Technical ReferenceCopyright © 2003–2010 Indusoft, Inc.

8/22/2019 User Guide Indu Soft
http://slidepdf.com/reader/full/user-guide-indu-soft 1101/1279
Appendix: Built-in Scripting Language > ODBC functions >
ODBCQueryRetrieves the currently selected record from a database.
Function Group Execution Windows Embedded ThinClient
ODBCQuery ODBC Synchronous Supported Not supported Executed on Server
Syntax
numHandler
The handler returned by the ODBCOpen function.
Returned value
0 Success
1 Invalid handler
2 No columns bound
3 Cannot opendatabase
4 Cannot restartdatabase
5 Query error
Notes
If you modify the column binding, or if you modify the filter and sort, then you must call this functionagain.
Examples
TagName Expression
Tag ODBCQuery( 6 )

8/22/2019 User Guide Indu Soft
http://slidepdf.com/reader/full/user-guide-indu-soft 1102/1279
Parent topic: ODBC functionsInduSoft Web Studio v7.0 Technical ReferenceCopyright © 2003–2010 Indusoft, Inc.

8/22/2019 User Guide Indu Soft
http://slidepdf.com/reader/full/user-guide-indu-soft 1103/1279
Appendix: Built-in Scripting Language > ODBC functions >
ODBCRollBackReverses the changes made during a transaction.
Function Group Execution Windows Embedded ThinClient
ODBCRollBack ODBC Synchronous Supported Not supported Executed on Server
Syntax
numHandler
The handler returned by the ODBCOpen function.
Returned value
0 Success
1 Invalid handler
2 Database no open
3 Error rolling backtransaction
Examples
TagName Expression
Tag ODBCRollback( 4 )
Parent topic: ODBC functionsInduSoft Web Studio v7.0 Technical ReferenceCopyright © 2003–2010 Indusoft, Inc.

8/22/2019 User Guide Indu Soft
http://slidepdf.com/reader/full/user-guide-indu-soft 1104/1279
Appendix: Built-in Scripting Language > ODBC functions >
ODBCSetFieldNULLFlags a field data member in the record set as NULL (specifically having no value) or as non-NULL.
Function Group Execution Windows Embedded ThinClient
ODBCSetFieldNULL ODBC Synchronous Supported Not supported Executed on Server
Syntax
ODBCSetFieldNULL( numHandler ,strColName,numValue)
numHandler
The handler returned by the ODBCOpen function.
strColName
The column name.
numValue
A numeric tag that specifies the field data as NULL if 0 and non-NULL if non-zero.
Returned value
0 Success
1 Invalid handler
2 Database not open
3 Invalid parameter
4 Invalid columnname
Examples
TagName Expression
Tag ODBCSetFieldNULL( 2, "Price", 1 )
Tag ODBCSetFieldNULL( 4, "CompanyName", 0 )

8/22/2019 User Guide Indu Soft
http://slidepdf.com/reader/full/user-guide-indu-soft 1105/1279
Parent topic: ODBC functionsInduSoft Web Studio v7.0 Technical ReferenceCopyright © 2003–2010 Indusoft, Inc.

8/22/2019 User Guide Indu Soft
http://slidepdf.com/reader/full/user-guide-indu-soft 1106/1279
Appendix: Built-in Scripting Language > ODBC functions >
ODBCSetFilterConstrains the records selected in a database.
Function Group Execution Windows Embedded ThinClient
ODBCSetFilter ODBC Synchronous Supported Not supported Executed on Server
Syntax
numHandler
The handler returned by the ODBCOpen function.
strFilter
The a SQL WHERE clause.
Returned value
0 Success
1 Invalid handler
2 Invalidparameter
Notes
You may find this function useful for selecting a subset of records, such as "all salespersons based inCalifornia" ("state = 'CA'"). Remember to call ODBCQuery after calling this function.
Examples
TagName Expression
Tag ODBCSetFilter( 3, "Name='Morgan'" )
Parent topic: ODBC functionsInduSoft Web Studio v7.0 Technical Reference

8/22/2019 User Guide Indu Soft
http://slidepdf.com/reader/full/user-guide-indu-soft 1107/1279
Copyright © 2003–2010 Indusoft, Inc.

8/22/2019 User Guide Indu Soft
http://slidepdf.com/reader/full/user-guide-indu-soft 1108/1279
Appendix: Built-in Scripting Language > ODBC functions >
ODBCSetSortSorts the records selected in a database.
Function Group Execution Windows Embedded ThinClient
ODBCSetSort ODBC Synchronous Supported Not supported Executed on Server
Syntax
numHandler
The handler returned by the ODBCOpen function.
strSort
The SQL ORDER BY clause.
Returned value
0 Success
1 Invalid handler
2 Invalid parametertype
Notes
You can use this feature to sort the records in one or more columns. Remember to call ODBCQueryafter calling this function.
Examples
TagName Expression
Tag ODBCSetSort( 5, "Name DESC" )
Parent topic: ODBC functionsInduSoft Web Studio v7.0 Technical Reference

8/22/2019 User Guide Indu Soft
http://slidepdf.com/reader/full/user-guide-indu-soft 1109/1279
Copyright © 2003–2010 Indusoft, Inc.

8/22/2019 User Guide Indu Soft
http://slidepdf.com/reader/full/user-guide-indu-soft 1110/1279
Appendix: Built-in Scripting Language > ODBC functions >
ODBCUnbindColUnbinds a column that was previously bound using the ODBCBindCol function.
Function Group Execution Windows Embedded ThinClient
ODBCUnbindCol ODBC Synchronous Supported Not supported Executed on Server
Syntax
numHandler
The handler returned by the ODBCOpen function.
strColName
The column name.
Returned value
0 Success
1 Invalid handler
2 Invalid parametertype
3 Column not bound
Examples
TagName Expression
Tag ODBCUnbindCol( 7, "Name" )
Parent topic: ODBC functionsInduSoft Web Studio v7.0 Technical ReferenceCopyright © 2003–2010 Indusoft, Inc.

8/22/2019 User Guide Indu Soft
http://slidepdf.com/reader/full/user-guide-indu-soft 1111/1279
Appendix: Built-in Scripting Language > ODBC functions >
ODBCUpdateUpdates the current record.
Function Group Execution Windows Embedded ThinClient
ODBCUpdate ODBC Synchronous Supported Not supported Executed on Server
Syntax
numHandler
The handler returned by the ODBCOpen function.
Returned value
0 Success
1 Invalid handler
2 Database notopen
3 Update error
Notes
This function uses the values of the tags bound by the ODBCBindCol function to update the currentrecord.
Examples
TagName Expression
Tag ODBCUpdate( 1 )
Parent topic: ODBC functionsInduSoft Web Studio v7.0 Technical ReferenceCopyright © 2003–2010 Indusoft, Inc.

8/22/2019 User Guide Indu Soft
http://slidepdf.com/reader/full/user-guide-indu-soft 1112/1279
Appendix: Built-in Scripting Language >
Email functionsThese functions are used to configure and send email from within a project.
CnfEmail
This function configures the email settings used by other features in the project that can sendemail, such as Alarm worksheets and the SendEmail and SendEmailExt functions.
GetStatusSendEmailExt
Returns status of the last email sent using the SendEmailExt function.
SendEmail
This function sends an email message.
SendEmailExtSends e-mail messages with attached files.
Parent topic: Appendix: Built-in Scripting LanguageInduSoft Web Studio v7.0 Technical ReferenceCopyright © 2003–2010 Indusoft, Inc.

8/22/2019 User Guide Indu Soft
http://slidepdf.com/reader/full/user-guide-indu-soft 1113/1279
Appendix: Built-in Scripting Language > Email functions >
CnfEmailThis function configures the email settings used by other features in the project that can send email, sucworksheets and the SendEmail and SendEmailExt functions.CnfEmailEmailSynchronousSupportedSupportedSupported
Function Group Execution Windows Embedded ThinClient
Syntax
strSMTP
The hostname or IP address of the outgoing email server, which is also known as the SMTP server.
a port number if the server does not use one of the standard SMTP ports.
Note: For projects that will run on Windows Embedded devices, you must specify an IP address.
strFrom
The email address from which emails will be sent and at which emails may be received. This shouldaddress on the POP3 server (see strPOP3 below).
strPOP3
The hostname or IP address of the incoming email server, which is also known as the POP3 server.a port number if the server does not use one of the standard POP3 ports.
Note: For projects that will run on Windows Embedded devices, you must specify an IP address.
strUser
The username to be used to log onto the POP3 server.

8/22/2019 User Guide Indu Soft
http://slidepdf.com/reader/full/user-guide-indu-soft 1114/1279
strPassword
The password to be used to log onto the POP3 server.
optNumTimeout
The timeout limit (in seconds) to be used when sending email. If no response is received from thewithin this period of time, then the operation is aborted.
This is an optional parameter; if no timeout is specified, then the project will keep trying forever un
response. You should specify some timeout, however, to make sure that your project won't freeze.
optNumAuthType
optStrSMTPUser
optStrSMTPPassword
By default, SMTP servers do not require authentication for outgoing email. If your server does requauthentication, set optNumAuthType to 1 and then specify the username and password.
Please note that if your SMTP username and password are the same as your POP3 username and pyou can skip optStrSMTPUser and optStrSMTPPassword . The project will automatically use thstrUser and strPassword .
Returned value0Success1
Invalid format for strSMTP
2Invalid format for strFrom
3Invalid format for strPOP3
4
Invalid format for strUser5Invalid format for strPassword
6Invalid format for optNumTimeout
7Wrong number of parameters8Error getting host IP address (invalid POP3 server)9Error connecting to POP3 server10
Error sending username11Error sending password12SMTP server does not support selected authentication mode13Invalid SMTP username

8/22/2019 User Guide Indu Soft
http://slidepdf.com/reader/full/user-guide-indu-soft 1115/1279
14Authentication failed
Value Description
Notes
The email configuration created by this function works only within the Windows process where the functi
For example, if you place a Button object in a screen and then set the object to call this function when it ithe resulting email configuration will work only on the Client station where the screen is displayed and thpressed. It will not work on any other Client stations nor on the Server station, because the project viewClient station only exchanges data (i.e., changes in tag values) with the data server running on the Servcannot directly call functions on the other; it can only use triggers to force the other to call functions. Pletrue even when the Client station and the Server station are the same physical device, because the projedata server are still two separate processes in Windows.
If you want an email configuration to apply to your project's Background Task — for example, to be able
when alarms become active — then you must call this function in some place like the project's Startup SGroup , or a Math worksheet .
Examples
CnfEmail( "smtp.company.com", "[email protected]", "pop.company.com", "RobertH", "Shades556", 100 )
CnfEmail( "smtp.company.com:4455", "[email protected]", "pop.company.com:9900", "RobertH", "Shades556", 5
CnfEmail( "195.11.22.33:4455", "[email protected]", "195.66.77.88:9900", "RobertH", "Shades556", 5, 1, "JohnS"
Parent topic: Email functionsInduSoft Web Studio v7.0 Technical ReferenceCopyright © 2003–2010 Indusoft, Inc.

8/22/2019 User Guide Indu Soft
http://slidepdf.com/reader/full/user-guide-indu-soft 1116/1279
Appendix: Built-in Scripting Language > Email functions >
GetStatusSendEmailExtReturns status of the last email sent using the SendEmailExt function.
Function Group Execution Windows Embedded ThinClient
GetStatusSendEmailExt Email Synchronous Supported Supported Supported
Syntax
optTagName
Optional tag that causes the function to update its return value. This parameter is optional butyou must use it when configuring this function for an object animation (e.g., Text Data Link,Position).
Returned value
- 2 Incorrect version of the INDMail.DLL library.
- 1 The INDMail.DLL library is corrupted.
0 SendEmailExt function is not being executed.
1 Still sending last email. Cannot execute the SendEmailExt function.
2 Last email was sent successfully. You can execute the SendEmailExtfunction again.
3 There was an error sending the last email. Execute the SendEmailExtfunction again.
Examples
TagName ExpressionTag GetStatusSendEmailExt( Second )
Tag GetStatusSendEmailExt()
Parent topic: Email functions

8/22/2019 User Guide Indu Soft
http://slidepdf.com/reader/full/user-guide-indu-soft 1117/1279
InduSoft Web Studio v7.0 Technical ReferenceCopyright © 2003–2010 Indusoft, Inc.
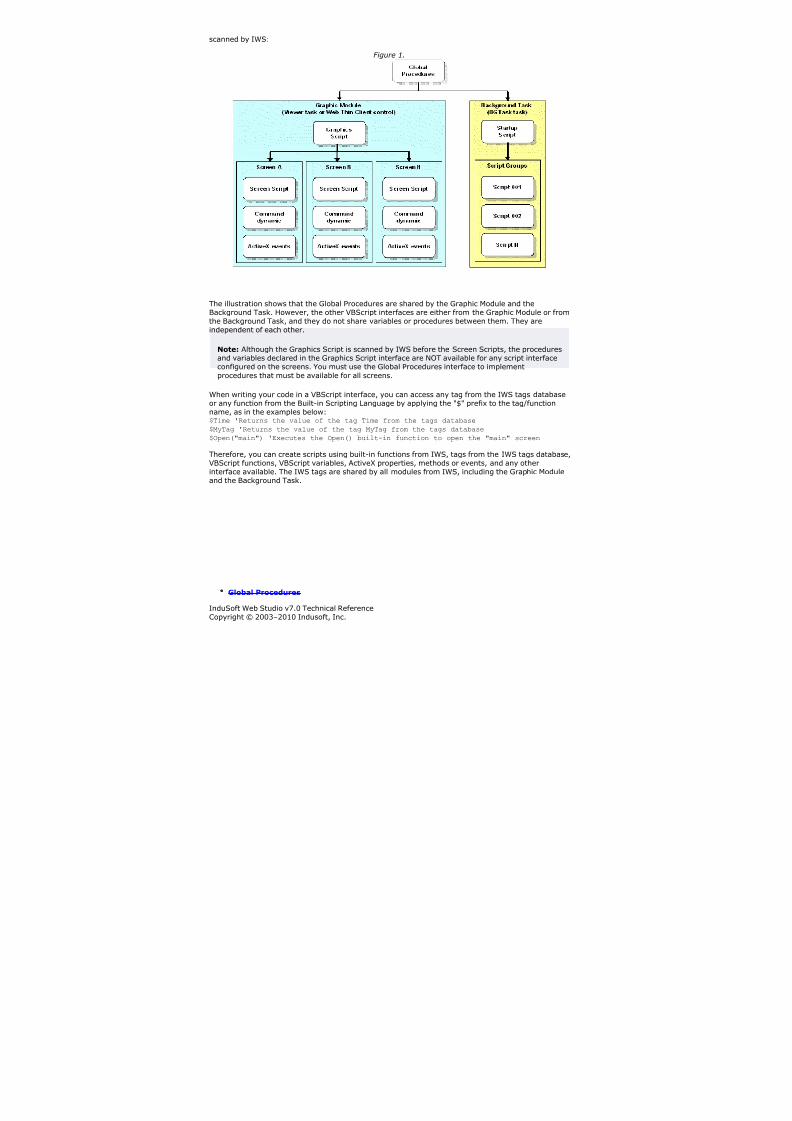
8/22/2019 User Guide Indu Soft
http://slidepdf.com/reader/full/user-guide-indu-soft 1118/1279
Appendix: Built-in Scripting Language > Email functions >
SendEmailThis function sends an email message.
Function Group Execution Windows Embedded ThinClient
SendEmail Email Synchronous Supported Supported Supported
Syntax
strSubject
The subject of the email.
strMessage
The message body of the email, up to 255 characters long.
strTo
The email address of the intended recipient.
Returned value
Value Description
0 Success
1 Invalid format for strSubject
2 Invalid format for strMessage
3 Invalid format for strTo
4 Wrong number of parameters
5 Start Socket error
6 Error getting host IP Address (i.e., invalid SMTPserver)
7 Error connecting to SMTP server8 Error sending HELO command (i.e., initialization)
9 Error sending MAIL command (i.e., the "From"address)

8/22/2019 User Guide Indu Soft
http://slidepdf.com/reader/full/user-guide-indu-soft 1119/1279
Value Description
10 Error sending RCPT command (i.e., the "To"address)
11 Error sending DATA (i.e., the message body)
12 Error sending SMTP authentication command
13 Invalid username14 Invalid password
Notes
Before you can send any email, you must first use the CnfEmail function to configure the emailsettings. Incorrect settings can result in several different error codes (see "Returned value" above).
Also, SendEmail cannot be used to send an email that contains Unicode characters. To do that, usethe SendEmailExt function instead.
Examples
SendEmail( "Hi!", "How are you?", "[email protected]" )
SendEmail( statusSummary, statusDetail, adminAddress )
Parent topic: Email functionsInduSoft Web Studio v7.0 Technical ReferenceCopyright © 2003–2010 Indusoft, Inc.

8/22/2019 User Guide Indu Soft
http://slidepdf.com/reader/full/user-guide-indu-soft 1120/1279
Appendix: Built-in Scripting Language > Email functions >
SendEmailExtSends e-mail messages with attached files.
Function Group Execution Windows Embedded ThinClient
SendEmailExt Email Asynchronous Supported Supported Supported
Syntax
SendEMailExt( strSubject,strMessage,strTo,optStrCc,optStrBcc,optStrFile1, … , optStrFileN )
strSubject
The e-mail subject (up to 255 characters).
strMessage
The e-mail message (up to 255 characters).
strTo
The recipient's address. You can specify more than one recipient, using a semicolon (;) toseparate the addresses.
optStrCc
The recipients' addresses to be Cc'ed. You can specify more than one recipient, using asemicolon (;) to separate the addresses.
This is an optional parameter, but if you need to use subsequent parameters, then you canspecify a null string ("") here.
optStrBcc
The recipients' addresses to be Bcc'ed. You can specify more than one recipient, using asemicolon (;) to separate the addresses.
This is an optional parameter, but if you need to use subsequent parameters, then you canspecify a null string ("") here.
optStrFile (1-N)
Complete file paths and names of file attachments.
Returned value

8/22/2019 User Guide Indu Soft
http://slidepdf.com/reader/full/user-guide-indu-soft 1121/1279
- 4 Some of the attached files were not found.
- 3 Wrong number of parameters (at least three parameters arerequired).
- 2 The INDMail.DLL library version is incorrect.
- 1 The INDMail.DLL library is corrupted.
0 Success
1 Cannot execute the function because the last e-mail has not beensent yet.
2 Internal error
Notes
Before you can send any email, you must first use the CnfEmail function to configure the email
settings. Incorrect settings can result in several different error codes (see "Returned value" above).
Examples
TagName Expression
Tag SendEmailExt( "Subject", "Message", "[email protected]", "", "", "C:\Projects
eport.txt" )
Tag SendEmailExt( "Subject", "Message", "[email protected]", "[email protected]",
"[email protected]", "C:\TechRef51.doc" )
Parent topic: Email functionsInduSoft Web Studio v7.0 Technical ReferenceCopyright © 2003–2010 Indusoft, Inc.

8/22/2019 User Guide Indu Soft
http://slidepdf.com/reader/full/user-guide-indu-soft 1122/1279
Appendix: Built-in Scripting Language >
Dial-up functionsThese functions are used to configure the computer's modem (if any) and establish dial-upconnections to other computers.
Note: These functions are not supported on Windows 7.
DialError
Returns the error codes regarding each connection.
DialGetClientIP
This function gets the IP address of a Remote Access Service (RAS) client station.
DialGetServerIP
DialGetServerIP is a built-in scripting function that gets the IP address of a Remote AccessService (RAS) server station.
DialStatus
Returns the status of the dial-up connection.
DialUp
Establishes a dial-up connection.
DialUpToCE
Runs the DialUpToCE program, which sends the information necessary to CERasSvr.exe calls backto the Server.
FindAllDevices
Returns the list of all the available modems and direct connection interfaces (COM ports) in thelocal station.
FindModem
Returns the list of all available modems in the local station.
HangUp
Hangs-up a dial-up connection.
PhoneDialUp
Dials to a phone number using Telephony Application Program Interface (TAPI).
PhoneDisableListen
Stops listening to the modem for incoming calls.

8/22/2019 User Guide Indu Soft
http://slidepdf.com/reader/full/user-guide-indu-soft 1123/1279
PhoneEnableListen
Resumes listening to the modem for incoming calls.
PhoneHangUp
Hangs up a dial-up connection previously established with the PhoneDialUp function.
PhoneStatus
Parent topic: Appendix: Built-in Scripting LanguageInduSoft Web Studio v7.0 Technical ReferenceCopyright © 2003–2010 Indusoft, Inc.

8/22/2019 User Guide Indu Soft
http://slidepdf.com/reader/full/user-guide-indu-soft 1124/1279
Appendix: Built-in Scripting Language > Dial-up functions >
DialErrorReturns the error codes regarding each connection.
Function Group Execution Windows Embedded ThinClient
DialError Dial-up Synchronous Supported (see note) Supported Supported
Syntax
DialError( numType,strPhonebookEntryOrModem, "optError ",optRefresh)
numType
A numeric flag that specifies the content of the strPhonebookEntryorModem parameter.
0: Phonebook Name
1: Modem Name
2: Direct Connection Name
strPhonebookEntryOrModem
The Phonebook Name, Modem Name, or Direct Connection Name used to make the connection.The numType parameter specifies which of these methods is used.
optErrorOptional The name of the string tag receiving the Error Message.
Note: The tag name must be enclosed in quotes, as shown in the syntax diagram, or elsethe project will try to get the value of the named tag.
optRefresh
Optional tag, which causes the function to update its return value. This parameter is optionalbut you must use it when configuring this function for an object animation (e.g., Text DataLink, Position).
Returned value
Value Description
0 OK

8/22/2019 User Guide Indu Soft
http://slidepdf.com/reader/full/user-guide-indu-soft 1125/1279
Value Description
- 1 Error: INDRas.DLL not found.
- 2 Error: INDRas.DLL damaged.
- 3 Error: invalid number of parameters (minimum=2).
-4 Invalid value for the numType parameter (0 or 1).
-5 PhoneBook or Modem does not exist.
600 An operation is pending.
601 The port handle is invalid.
602 The port is already open.
603 Caller's buffer is too small.
604 Wrong information specified.
605 Cannot set port information.
606 The port is not connected
607 The event is invalid.
608 The device does not exist.
609 The device type does not exist.
610 The buffer is invalid.
611 The route is not available.
612 The route is not allocated.
613 Invalid compression specified.
614 Out of buffers.
615 The port was not found.
616 An asynchronous request is pending.
617 The port or device is already disconnecting.
618 The port is not open.
619 The port is disconnected.
620 There are no endpoints.
621 Cannot open the phone book file.
622 Cannot load the phone book file.
623 Cannot find the phone book entry.
624 Cannot write the phone book file.
625 Invalid information found in the phone book file.
626 Cannot load a string.

8/22/2019 User Guide Indu Soft
http://slidepdf.com/reader/full/user-guide-indu-soft 1126/1279
Value Description
627 Cannot find key.
628 The port was disconnected.
629 The data link was terminated by the remote machine.
630 The port was disconnected due to hardware failure.
631 The port was disconnected by the user.
632 The structure size is incorrect.
633 The port is already in use or is not configured for Remote Access dial out.
634 Cannot register your computer on on the remote network.
635 Unknown error.
636 The wrong device is attached to the port.
637 The string could not be converted.
638 The request has timed out.
639 No asynchronous net available.
640 A NetBIOS error occurred.
641 The server cannot allocate NetBIOS resources needed to support the client.
642 One of your NetBIOS names is already registered on the remote network.
643 A network adapter at the server failed.
644 You will not receive network message pop-ups.
645 Internal authentication error.
646 The account is not permitted to log on at this time of day.
647 The account is disabled.
648 The password has expired.
649 The account does not have Remote Access permission.
650 The Remote Access server is not responding.
651 Your modem (or other connecting device) has reported an error.
652 Unrecognized response from the device.
653 A macro required by the device was not found in the device .INF file section.
654 A command or response in the device .INF file section refers to an undefined acro.
655 The <message macro was not found in the device .INF file secion.
656 The <defaultoff macro in the device .INF file section contains an undefined macro.
657 The device .INF file could not be opened.
658 The device name in the device .INF or media .INI file is too long.

8/22/2019 User Guide Indu Soft
http://slidepdf.com/reader/full/user-guide-indu-soft 1127/1279
Value Description
659 The media .INI file refers to an unknown device name.
660 The device .INF file contains no responses for the command.
661 The device.INF file is missing a command.
662 Attempted to set a macro not listed in device .INF file section.
663 The media .INI file refers to an unknown device type.
664 Cannot allocate memory.
665 The port is not configured for Remote Access.
666 Your modem (or other connecting device) is not functioning.
667 Cannot read the media .INI file.
668 The connection dropped.
669 The usage parameter in the media .INI file is invalid.
670 Cannot read the section name from the media .INI file.
671 Cannot read the device type from the media .INI file.
672 Cannot read the device name from the media .INI file.
673 Cannot read the usage from the media .INI file.
674 Cannot read the maximum connection BPS rate from the media .INI file.
675 Cannot read the maximum carrier BPS rate from the media .INI file.
676 The line is busy.
677 A person answered instead of a modem.
678 There is no answer.
679 Cannot detect carrier.
680 There is no dial tone.
681 General error reported by device.
682 ERROR_WRITING_SECTIONNAME
683 ERROR_WRITING_DEVICETYPE
684 ERROR_WRITING_DEVICENAME
685 ERROR_WRITING_MAXCONNECTBPS
686 ERROR_WRITING_MAXCARRIERBPS
687 ERROR_WRITING_USAGE
688 ERROR_WRITING_DEFAULTOFF
689 ERROR_READING_DEFAULTOFF
690 ERROR_EMPTY_INI_FILE

8/22/2019 User Guide Indu Soft
http://slidepdf.com/reader/full/user-guide-indu-soft 1128/1279
Value Description
691 Access denied because username and/or password is invalid on the domain.
692 Hardware failure in port or attached device.
693 ERROR_NOT_BINARY_MACRO
694 ERROR_DCB_NOT_FOUND
695 ERROR_STATE_MACHINES_NOT_STARTED
696 ERROR_STATE_MACHINES_ALREADY_STARTED
697 ERROR_PARTIAL_RESPONSE_LOOPING
698 A response keyname in the device .INF file is not in the expected format.
699 The device response caused buffer overflow.
700 The expanded command in the device .INF file is too long.
701 The device moved to a BPS rate not supported by the COM driver.
702 Device response received when none expected.
703 The Application does not allow user interaction the connection requires interactionwith the user to complete successfully
704 ERROR_BAD_CALLBACK_NUMBER
705 ERROR_INVALID_AUTH_STATE
706 ERROR_WRITING_INITBPS
707 X.25 diagnostic indication.
708 The account has expired.
709 Error changing password on domain The password may be too short or may matcha previously used password.
710 Serial overrun errors were detected while communicating with your modem.
711 RasMan initialization failure Check the event log.
712 Biplex port initializing Wait a few seconds and redial.
713 No active ISDN lines are available.
714 No ISDN channels are available to make the call.
715 Too many errors occurred because of poor phone line quality.
716 The Remote Access IP configuration is unusable.
717 No IP addresses are available in the static pool of Remote Access IP addresses.
718 Timed out waiting for a valid response from the remote PPP peer.
719 PPP terminated by remote machine.
720 No PPP control protocols configured.
721 Remote PPP peer is not responding.

8/22/2019 User Guide Indu Soft
http://slidepdf.com/reader/full/user-guide-indu-soft 1129/1279
Value Description
722 The PPP packet is invalid.
723 The phone number including prefix and suffix is too long.
724 The IPX protocol cannot dial-out on the port because the machine is an IPX router.
725 The IPX protocol cannot dial-in on the port because the IPX router is not installed
726 The IPX protocol cannot be used for dial-out on more than one port at a time.
727 Cannot access TCPCFG.DLL.
728 Cannot find an IP adapter bound to Remote Access.
729 SLIP cannot be used unless the IP protocol is installed.
730 Computer registration is not complete.
731 The protocol is not configured.
732 The PPP negotiation is not converging.
733 The PPP control protocol for this network protocol is not available on the server.
734 The PPP link control protocol terminated.
735 The requested address was rejected by the server.
736 The remote computer terminated the control protocol.
737 Loopback detected.
738 The server did not assign an address.
739 The authentication protocol required by the remote server cannot use theWindows NT encrypted password Redial, entering the password explicitly.
740 Invalid TAPI configuration.
741 The local computer does not support the required encryption type.
742 The remote computer does not support the required encryption type.
743 The remote computer requires encryption.
744 Cannot use the IPX network number assigned by remote server Check the eventlog.
745 ERROR_INVALID_SMM
746 ERROR_SMM_UNINITIALIZED
747 ERROR_NO_MAC_FOR_PORT
748 ERROR_SMM_TIMEOUT
749 ERROR_BAD_PHONE_NUMBER
750 ERROR_WRONG_MODULE
751 Invalid callback number Only the characters 0 to 9, T, P, W, (, ), -, @, and space areallowed in the number.

8/22/2019 User Guide Indu Soft
http://slidepdf.com/reader/full/user-guide-indu-soft 1130/1279
Value Description
752 A syntax error was encountered while processing a script.
753 The connection could not be disconnected because it was created by the Multi-Protocol Router.
Notes
This function is not supported on Windows 7.
Examples
TagName Expression
Tag DialError( 0, "Office DialUp" )
Tag DialError( 1, "USRobotics_SportsterFaxModem", "StatusMessage",
second )
Tag DialError( 2, "DirectDial", "DialupError" )
See also: FindModem()
Parent topic: Dial-up functionsInduSoft Web Studio v7.0 Technical ReferenceCopyright © 2003–2010 Indusoft, Inc.

8/22/2019 User Guide Indu Soft
http://slidepdf.com/reader/full/user-guide-indu-soft 1131/1279
Appendix: Built-in Scripting Language > Dial-up functions >
DialGetClientIPThis function gets the IP address of a Remote Access Service (RAS) client station.
Function Group Execution Windows Embedded ThinClient
DialGetClientIP Dial-up Synchronous Supported (see note) Supported Supported
Syntax
numType
The type of information specified by strPhoneBookOrModem: 0 is a Phonebook Name, 1 is aModem Name, and 2 is a Direct Connection Name.
strPhoneBookOrModem
The Phonebook Name, Modem Name, or Direct Connection Name used to make the connection.
tagClientIP
The name of a String tag that will receive the IP address.
Note: The tag name must be enclosed in quotes, as shown in the syntax diagram, or elsethe project will try to get the value of the named tag.
optTagRefresh
The name of a tag that, whenever the value of the tag changes, will trigger the function torefresh its returned value.
Also, this parameter is optional but you must include it when you configure the function on an
object animation such as Text Data Link or Position.
Returned value
This function returns the following possible values:

8/22/2019 User Guide Indu Soft
http://slidepdf.com/reader/full/user-guide-indu-soft 1132/1279
Value Description
-5 DialGetClientIP was not found inIndRAS.dll.
-4 Invalid type; check numType.
-3 Incorrect number of parameters.
-2 DialStatus was not found in IndRAS.dll.
-1 IndRAS.dll was not loaded.
n Status code returned by DialStatus.
This is the value returned by the function itself. The IP address is written to the tag specified bytagClientIP.
Notes
This function must be executed on the RAS client station, not on the server station. (Essentially, thestation gets its own IP address.)
Also, this function is not supported on Windows 7.
Examples
Use the Phonebook Name "Office DialUp" and write the resulting IP address to ClientIPTag:
DialGetClientIP( 0, "Office DialUp", "ClientIPTag" )
Use the Modem Name "USRobotics_SportsterFaxModem," write the resulting IP address toClientIPAddress, and refresh every second (that is, every time the system tag Second changes):
DialGetClientIP( 1, "USRobotics_SportsterFaxModem", "ClientIPAddress", Second )
Use the Direct Connection Name "DirectDial" and write the resulting IP address to IPAdd:
DialGetClientIP( 2, "DirectDial", "IPAdd" )
Parent topic: Dial-up functionsInduSoft Web Studio v7.0 Technical ReferenceCopyright © 2003–2010 Indusoft, Inc.

8/22/2019 User Guide Indu Soft
http://slidepdf.com/reader/full/user-guide-indu-soft 1133/1279
Appendix: Built-in Scripting Language > Dial-up functions >
DialGetServerIPDialGetServerIP is a built-in scripting function that gets the IP address of a Remote Access Service(RAS) server station.
Group Execution Windows Embedded ThinClient
Dial-up Synchronous Supported (seeNotes) NotSupported Supported
Syntax
numType
The type of information specified by strPhoneBookOrModem: 0 is a Phonebook Name, 1 is aModem Name, and 2 is a Direct Connection Name.
strPhoneBookOrModem
The Phonebook Name, Modem Name, or Direct Connection Name used to make the connection.
tagServerIP
The name of a String tag that will receive the IP address.
Note: The tag name must be enclosed in quotes, as shown in the syntax diagram, or elsethe project will try to get the value of the named tag.
optTagRefresh
The name of a tag that, whenever the value of the tag changes, will trigger the function torefresh its returned value.
Also, this parameter is optional but you must include it when you configure the function on anobject animation such as Text Data Link or Position.
Returned value

8/22/2019 User Guide Indu Soft
http://slidepdf.com/reader/full/user-guide-indu-soft 1134/1279
This function returns the following possible values:
Value Description
-5 DialGetServerIP was not found inIndRAS.dll.
-4 Invalid type; check numType.
-3 Incorrect number of parameters.
-2 DialStatus was not found in IndRAS.dll.
-1 IndRAS.dll was not loaded.
n Status code returned by DialStatus.
This is the value returned by the function itself. The IP address is written to the tag specified bytagServerIP.
NotesThis function must be executed on the RAS client station, not on the server station. (Essentially, thestation gets the IP address of the server to which it is connected.)
Also, this function is not supported on Windows 7.
Examples
Use the Phonebook Name "Office DialUp" and write the resulting IP address to ServerIPTag:
DialGetServerIP( 0, "Office DialUp", "ServerIPTag" )
Use the Modem Name "USRobotics_SportsterFaxModem," write the resulting IP address toServerIPAddress, and refresh every second (that is, every time the system tag Second changes):
DialGetServerIP( 1, "USRobotics_SportsterFaxModem", "ServerIPAddress", Second )
Use the Direct Connection Name "DirectDial" and write the resulting IP address to IPAdd:
DialGetServerIP( 2, "DirectDial", "IPAdd" )
Parent topic: Dial-up functionsInduSoft Web Studio v7.0 Technical ReferenceCopyright © 2003–2010 Indusoft, Inc.

8/22/2019 User Guide Indu Soft
http://slidepdf.com/reader/full/user-guide-indu-soft 1135/1279
Appendix: Built-in Scripting Language > Dial-up functions >
DialStatusReturns the status of the dial-up connection.
Function Group Execution Windows Embedded ThinClient
DialStatus Dial-up Synchronous Supported (see note) Supported Supported
Note: This function is not supported on Windows 7.
Syntax
DialStatus( numType,strPhonebookEntryOrModem, "optStatus",optRefresh)
numType
A numeric flag that specifies the content of the strPhonebookEntryorModem parameter.
0: Phonebook Name
1: Modem Name
2: Direct Connection Name
strPhonebookEntryOrModem
The Phonebook Name, Modem Name, or Direct Connection Name used to make the connection.The numType parameter specifies which of these methods is used.
optStatus
Optional The name of the string tag receiving the status message.
Note: The tag name must be enclosed in quotes, as shown in the syntax diagram, or elsethe project will try to get the value of the named tag.
optRefresh
Optional tag that causes the function to update its return value. This parameter is optional, but
you must use it when configuring this function for an object animation (e.g., Text Data Link,Position).
Returned value

8/22/2019 User Guide Indu Soft
http://slidepdf.com/reader/full/user-guide-indu-soft 1136/1279
Value Description
-5 PhoneBook or modem does not exist
-4 Invalid value for the numType parameter (0 or 1)
-3 Error: invalid number of parameters (minimum = 2)
-2 Error: INDRAS.DLL damaged
-1 Error: INDRAS.DLL not found
0 Opening the port…
1 Port was opened successfully.
2 Connecting to the device…
3 The device has connected successfully.
4 All devices in the device chain have successfully connected.
5 Verifying the user name and password…
6 An authentication event has occurred.7 Requested another validation attempt with a new user.
8 Server has requested a callback number.
9 The client has requested to change the password
10 Registering your computer on the network…
11 The link-speed calculation phase is starting…
12 An authentication request is being acknowledged.
13 Reauthentication (after callback) is starting.
14 The client has successfully completed authentication.
15 The line is about to disconnect for callback.
16 Delaying to give the modem time to reset for callback.
17 Waiting for an incoming call from server.
18 Projection result information is available.
19 User authentication is being initiated or retried.
20 Client has been called back and is about to resumeauthentication.
21 Logging on to the network…
22 Subentry has been connected.
23 Subentry has been disconnected
24 Terminal state supported by RASPHONE.EXE.
25 Retry authentication state supported by RASPHONE.EXE.

8/22/2019 User Guide Indu Soft
http://slidepdf.com/reader/full/user-guide-indu-soft 1137/1279
Value Description
26 Callback state supported by RASPHONE.EXE.
27 Change password state supported by RASPHONE.EXE.
8192 Connected to remote server successfully!
8193 Disconnected.
Examples
TagName Expression
Tag DialStatus( 0, "Office DialUp" )
Tag DialStatus( 1, "USRobotics_SportsterFaxModem", "StatusMessage",
second )
Tag DialStatus( 2, "DirectDial", "DialupError")
See also: FindModem()
Parent topic: Dial-up functionsInduSoft Web Studio v7.0 Technical ReferenceCopyright © 2003–2010 Indusoft, Inc.

8/22/2019 User Guide Indu Soft
http://slidepdf.com/reader/full/user-guide-indu-soft 1138/1279
Appendix: Built-in Scripting Language > Dial-up functions >
DialUpEstablishes a dial-up connection.DialUpDial-upAsynchronousSupported (see note)SupportedSupported
Function Group Execution Windows Embedded ThinClient
Note: This function is not supported on Windows 7.
Syntax
DialUp( numType,strPhonebookEntryOrModem,strUserName,strPassword ,optStrDomain,strPhoneNumber )
numType
A numeric flag that specifies the content of the strPhonebookEntryorModem parameter.
0: Phonebook Name
1: Modem Name
2: Direct Connection Name
strPhonebookEntryOrModem
The Phonebook Name, Modem Name, or Direct Connection Name used to make the connection.The numType parameter specifies which of these methods is used.
strUserName
The Username to use for logging on.
strPassword
The Password to use for logging on.
optStrDomain
Optional The domain name to specify when loggingon.
strPhoneNumber
The phone number to dial (used only when the parameter numType=1).

8/22/2019 User Guide Indu Soft
http://slidepdf.com/reader/full/user-guide-indu-soft 1139/1279
Returned value0OK: dialing started- 1Error: INDRAS.DLL not found- 2Error: INDRAS.DLL damaged
- 3Error: invalid number of parameters (minimum=5)-4Invalid value for the numType parameter (0 or 1)-5Invalid value for the strPhonebookEntryOrModem parameter (string)-6PhoneBook or Modem does not exist-7PhoneBook or Modem is in use-8
Depends of the numType parameter:
If numType = 0: Could not read properties from PhoneBook.
If numType = 1: More than 1000 connections are enabled at same time.
-9Unable to create a temporary PhoneBook.
Notes
The operating system's RAS Server executes the dial-in for Windows PC stations automatically.
ExamplesTagDialUp( 0, "OfficeDialup", "Guest", "Password" )
TagDialUp( 1, "USRobotics_SportsterFaxModem", "HR12378", "HRPass", "15125554321" )
TagDialUp( 2, "DirectDial", "Rberton", "MyPassword", "156.48.25.0")
TagName Expression
See also : FindModem()
Parent topic: Dial-up functionsInduSoft Web Studio v7.0 Technical ReferenceCopyright © 2003–2010 Indusoft, Inc.

8/22/2019 User Guide Indu Soft
http://slidepdf.com/reader/full/user-guide-indu-soft 1140/1279
Appendix: Built-in Scripting Language > Dial-up functions >
DialUpToCERuns the DialUpToCE program, which sends the information necessary to CERasSvr.exe calls back to the SeDialUpToCEDial-upAsynchronousSupported (see note)Not supportedSupported
Function Group Execution Windows Embedded ThinClient
Note: This function is not supported on Windows 7.
Syntax
DialUpToCE( numModem,strDialPhone,strMyNumber ,strUser ,strPassword ,optStrDomain,optAutoDial,optAutoCl
numModem
The modem used to dial to the Windows CE remote station.
strDialPhone
The telephone number of the Windows CE remote station.
strMyNumber
The telephone number sent to the Windows CE remote station. CERasSvr.exe will call back to this phnumber.
strUser
The user name to be sent to Windows CE remote station. CERasSvr.exe will use this name to connecWindows XP/Vista/7 computer after calling back to it.
strPassword
The password to be sent to Windows CE remote station. CERasSvr.exe will use this password to conthe Windows XP/Vista/7 computer after calling back to it.
optStrDomain
Optional The domain name to specify when logging on.
optAutoDial
Optional tag, which can be set to one of the following:

8/22/2019 User Guide Indu Soft
http://slidepdf.com/reader/full/user-guide-indu-soft 1141/1279
1: Triggers the DialupToCE connection automatically when the function is executed
0: Requests confirmation before triggering the DialupToCE connection automatically when theis executed
optAutoClose
Optional tag, which can be set to one of the following:
1: Closes the DialUpToCE dialog automatically after dialing the Windows CE remote station0: Leaves the DialUpToCE dialog open
Returned value0Fail, unable to call DialUpToCE .1Success, DialUpToCE executed.
Notes
The DialUpToCE program was developed to dial a remote Windows CE station. Because Windows CE v3.00not provide a RAS Server, you must be running the CERasSvr.exe program on the Windows Embedded deanswer a call, and call back to a Windows XP/Vista/7 computer using parameters sent by the DialUpToCEfunction. You must configure the RAS Server service on the Windows XP/Vista/7 computer to answer theback from the Windows Embedded device and set the TCP/IP connection.
ExamplesTag
DialUpToCE( 0, "12344321", "98765432", "Administrator", "MyPass" )
TagDialUpToCE( 0, "12344321", "98765432", "Administrator", "MyPass", "", 1, 1 )
TagName Expression
Parent topic: Dial-up functionsInduSoft Web Studio v7.0 Technical ReferenceCopyright © 2003–2010 Indusoft, Inc.

8/22/2019 User Guide Indu Soft
http://slidepdf.com/reader/full/user-guide-indu-soft 1142/1279
Appendix: Built-in Scripting Language > Dial-up functions >
FindAllDevicesReturns the list of all the available modems and direct connection interfaces (COM ports) in the localstation.
Function Group Execution Windows Embedded ThinClient
FindAllDevices Dial-up Synchronous Supported (see note) Supported Supported
Note: This function is not supported on Windows 7.
Syntax
FindAllDevices( "tagArray " )
tagArray
Name of a string array tag receiving the list of available modems and direct connectioninterfaces.
Returned value
Returns the number of modems and/or interfaces found.
Examples
TagName Expression
Tag FindAllDevices( "SerialConnections[1]" )
Parent topic: Dial-up functionsInduSoft Web Studio v7.0 Technical ReferenceCopyright © 2003–2010 Indusoft, Inc.

8/22/2019 User Guide Indu Soft
http://slidepdf.com/reader/full/user-guide-indu-soft 1143/1279
Appendix: Built-in Scripting Language > Dial-up functions >
FindModemReturns the list of all available modems in the local station.
Function Group Execution Windows Embedded ThinClient
FindModem Dial-up Synchronous Supported (see note) Supported Supported
Note: This function is not supported on Windows 7.
Syntax
FindModem( "tagArray " )
tagArray
Name of a string array tag receiving the list of available modems.
Returned value
Returns the number of modems found.
Notes
You can use this function to get the serial interface name for a dial-up connection via modem, andthen use this information to fill the strPhonebookEntryOrModem parameter for the DialError,
DialStatus, DialUp, and HangUp functions.
Examples
TagName Expression
Tag FindModem( "Modems[1]" )
Parent topic: Dial-up functionsInduSoft Web Studio v7.0 Technical ReferenceCopyright © 2003–2010 Indusoft, Inc.

8/22/2019 User Guide Indu Soft
http://slidepdf.com/reader/full/user-guide-indu-soft 1144/1279
Appendix: Built-in Scripting Language > Dial-up functions >
HangUpHangs-up a dial-up connection.
Function Group Execution Windows Embedded ThinClient
HangUp Dial-up Synchronous Supported (see note) Supported Supported
Note: This function is not supported on Windows 7.
Syntax
HangUp( numType,strPhonebookEntryOrModem)
numType
A numeric flag that specifies the content of the strPhonebookEntryorModem parameter.
0: Phonebook Name
1: Modem Name
2: Direct Connection Name
strPhonebookEntryOrModem
The Phonebook Name, Modem Name, or Direct Connection Name used to make the connection.The numType parameter specifies which of these methods is used.
Returned value
0 OK.
-1 Error: INDRAS.DLL not found
-2 Error: INDRAS.DLL damaged
-3 Invalid value for the numType parameter (0or 1)
-4 PhoneBook or modem does not exist
-5 No configured modems exist

8/22/2019 User Guide Indu Soft
http://slidepdf.com/reader/full/user-guide-indu-soft 1145/1279
Examples
TagName Expression
Tag HangUp( 0, "OfficeDialup" )
Tag HangUp( 1, "USRobotics_SportsterFaxModem" )
Tag HangUp( 2, "DirectDial", "Rberton", "MyPassword"
)
See also: FindModem()
Parent topic: Dial-up functionsInduSoft Web Studio v7.0 Technical ReferenceCopyright © 2003–2010 Indusoft, Inc.

8/22/2019 User Guide Indu Soft
http://slidepdf.com/reader/full/user-guide-indu-soft 1146/1279
Appendix: Built-in Scripting Language > Dial-up functions >
PhoneDialUpDials to a phone number using Telephony Application Program Interface (TAPI).
Function Group Execution Windows Embedded ThinClient
PhoneDialUp Dial-up Asynchronous Supported (see note) Not supported Supported
Note: This function is not supported on Windows 7.
Syntax
PhoneDialUp( strPhoneNumber ,optStrModemName)
strPhoneNumber
Telephone number the function will call.
optStrModemName
Name of the modem used to dial. If you do not specify a modem, the function will use the firstmodem found on the operating system.
Returned value
0 OK (dial triggered)
- 1 Invalid number of parameters
- 3 INDTAPI.DLL library not found
-4 PhoneDialUp () function not supported by the currentINDTAPI.DLL library
Examples
TagName Expression
PhoneDialUp ( "512-123-4567" )
PhoneDialUp ( StringPhoneNumberTag )

8/22/2019 User Guide Indu Soft
http://slidepdf.com/reader/full/user-guide-indu-soft 1147/1279
TagName Expression
PhoneDialUp ( StringPhoneNumberTag, StringModemNameTag
)
Parent topic: Dial-up functionsInduSoft Web Studio v7.0 Technical Reference
Copyright © 2003–2010 Indusoft, Inc.

8/22/2019 User Guide Indu Soft
http://slidepdf.com/reader/full/user-guide-indu-soft 1148/1279
Appendix: Built-in Scripting Language > Dial-up functions >
PhoneDisableListenStops listening to the modem for incoming calls.
Function Group Execution Windows Embedded ThinClient
PhoneDisableListen Dial-up Synchronous Supported (see note) Not supported Supported
Note: This function is not supported on Windows 7.
Syntax
PhoneDisableListen( optStrModemName)
optStrModemName
Name of the modem used to dial. If you do not specify a modem, the function will use the firstmodem found on the operating system.
Returned value
1 OK (stop listening for incoming calls)
- 1 INDTAPI.DLL library not found- 2 PhoneDisableListen () function not supported by the current
INDTAPI.DLL library
Examples
TagName Expression
PhoneDisableListen()
PhoneDisableListen( "Hayes Compatible Modem on COM1")
PhoneDisableListen( StringModemNameTag )
See also: PhoneEnableListen()

8/22/2019 User Guide Indu Soft
http://slidepdf.com/reader/full/user-guide-indu-soft 1149/1279
Parent topic: Dial-up functionsInduSoft Web Studio v7.0 Technical ReferenceCopyright © 2003–2010 Indusoft, Inc.

8/22/2019 User Guide Indu Soft
http://slidepdf.com/reader/full/user-guide-indu-soft 1150/1279
Appendix: Built-in Scripting Language > Dial-up functions >
PhoneEnableListenResumes listening to the modem for incoming calls.
Function Group Execution Windows Embedded ThinClient
PhoneEnableListen Dial-up Synchronous Supported (see note) Not supported Supported
Note: This function is not supported on Windows 7.
Syntax
PhoneEnableListen( optStrModemName)
optStrModemName
Name of the modem used to dial. If you do not specify a modem, the function will use the firstmodem found on the operating system.
Returned value
1 OK (listening for incoming calls)
0 Error executing the PhoneEnableListen() function- 1 INDTAPI.DLL library not found
- 2 PhoneEnableListen () function not supported by the currentINDTAPI.DLL library
Examples
TagName Expression
PhoneEnableListen()
PhoneEnableListen( "Hayes Compatible Modem on COM1"
)
PhoneEnableListen( StringModemNameTag )

8/22/2019 User Guide Indu Soft
http://slidepdf.com/reader/full/user-guide-indu-soft 1151/1279
See also: PhoneDisableListen()
Parent topic: Dial-up functionsInduSoft Web Studio v7.0 Technical ReferenceCopyright © 2003–2010 Indusoft, Inc.

8/22/2019 User Guide Indu Soft
http://slidepdf.com/reader/full/user-guide-indu-soft 1152/1279
Appendix: Built-in Scripting Language > Dial-up functions >
PhoneHangUpHangs up a dial-up connection previously established with the PhoneDialUp function.
Function Group Execution Windows Embedded ThinClient
PhoneHangUp Dial-up Asynchronous Supported (see note) Not supported Supported
Note: This function is not supported on Windows 7.
Syntax
PhoneHangUp( optStrModemName)
optStrModemName
Name of the modem used to dial. If you do not specify a modem, the function will use the firstmodem found on the operating system.
Returned value
1 OK (dial connection was dropped)
- 1 INDTAPI.DLL library not found- 2 PhoneHangUp () function not supported by the current
INDTAPI.DLL library
Examples
TagName Expression
PhoneHangUp()
PhoneHangUp( "Hayes Compatible Modem on COM1" )
PhoneHangUp( StringModemNameTag )
Parent topic: Dial-up functionsInduSoft Web Studio v7.0 Technical ReferenceCopyright © 2003–2010 Indusoft, Inc.
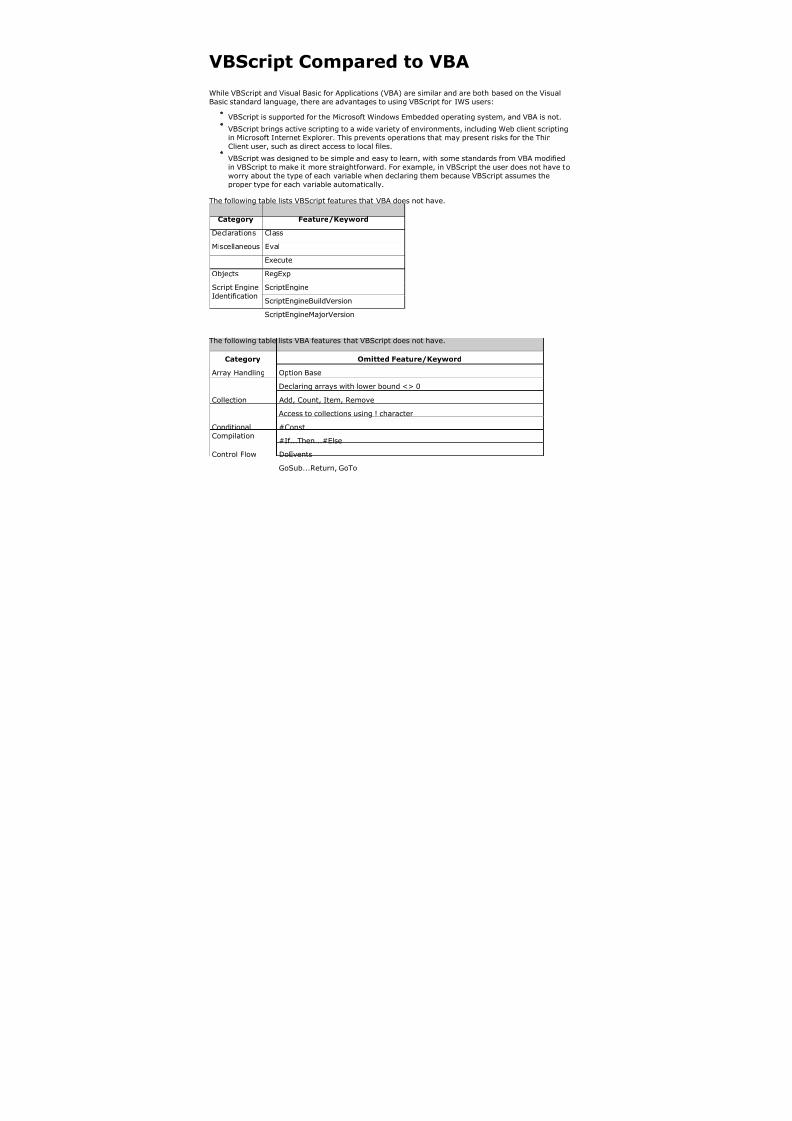
8/22/2019 User Guide Indu Soft
http://slidepdf.com/reader/full/user-guide-indu-soft 1153/1279
Appendix: Built-in Scripting Language > Dial-up functions >
PhoneStatus
Function Group Execution Windows Embedded ThinClient
PhoneStatus Dial-up Synchronous Supported (see note) Not supported Supported
Note: This function is not supported on Windows 7.
Description
Checks the status of the current connections.
Syntax
PhoneStatus ( "strStatus",optStrModemName)
strStatus
Name of the tag that will receive the status description text
optStrModemName
Name of the modem used to dial. If you do not specify a modem, the function will use the first
modem found on the operating system
Returned value

8/22/2019 User Guide Indu Soft
http://slidepdf.com/reader/full/user-guide-indu-soft 1154/1279
0 "Ready to make acall"
1 "Call was shutdown"
2 "Line Ringing"
3 "Dial Tone"
4 "Dialing Call"
5 "Call is Proceeding"
6 "Ring Back"
7 "Line is Busy"
8 "Line is Idle"
9 "Disconnected"
Examples
TagName Expression
Tag StatusCode
PhoneStatus( "String Tag Status" )
Tag StatusCode
PhoneStatus( "String Tag Status", "Hayes Compatible Modem on COM1" )
Tag StatusCode
PhoneStatus( "String Tag Status", "StringModemNameTag" )
Parent topic: Dial-up functionsInduSoft Web Studio v7.0 Technical ReferenceCopyright © 2003–2010 Indusoft, Inc.

8/22/2019 User Guide Indu Soft
http://slidepdf.com/reader/full/user-guide-indu-soft 1155/1279
Appendix: Built-in Scripting Language >
ActiveX and .NET Control functionsThese functions are used to directly run ActiveX and .NET Control objects in the project, as well as toget and set property values on those objects.
XGet
This function gets the current value of a Property on an ActiveX Control or .NET Control object.
XRun
This function runs a Method on an ActiveX Control or .NET Control object.
XSet
This function sets the value of a Property on an ActiveX Control or .NET Control object.
Parent topic: Appendix: Built-in Scripting LanguageInduSoft Web Studio v7.0 Technical ReferenceCopyright © 2003–2010 Indusoft, Inc.

8/22/2019 User Guide Indu Soft
http://slidepdf.com/reader/full/user-guide-indu-soft 1156/1279
Appendix: Built-in Scripting Language > ActiveX and .NET Control functions >
XGetThis function gets the current value of a Property on an ActiveX Control or .NET Control object.
Function Group Execution Windows Embedded ThinClient
XGet ActiveX and .NETControl
Asynchronous Supported ActiveX Controls only (seeNotes)
Supported
Syntax
strName
The unique name of the ActiveX Control or .NET Control object, as configured in the Name fieldof the Object Properties dialog.
strProperties
The Property that you want to get the value of. Available Properties are listed in theConfiguration (for an ActiveX Control) or Members (for a .NET Control) dialog.
Returned value
Returns the value of the specified Property.
Notes
This function cannot be used in Tasks or in the Global Procedures script. Also, this function is notsupported for .NET Control objects running on a Windows Embedded station.
Examples
Get the current value of the Color property on the ActiveX Control object named "ActXRec":
XGet( "ActXRec", "Color" )
Parent topic: ActiveX and .NET Control functionsInduSoft Web Studio v7.0 Technical ReferenceCopyright © 2003–2010 Indusoft, Inc.

8/22/2019 User Guide Indu Soft
http://slidepdf.com/reader/full/user-guide-indu-soft 1157/1279
Appendix: Built-in Scripting Language > ActiveX and .NET Control functions >
XRunThis function runs a Method on an ActiveX Control or .NET Control object.
Function Group Execution Windows Embedded ThinClient
XRun ActiveX and .NETControl
Asynchronous Supported ActiveX Controls only (seeNotes)
Supported
Syntax
strName
The unique name of the ActiveX Control or .NET Control object, as configured in the Name fieldof the Object Properties dialog.
strMethod
The Method that you want to run. Available Methods are listed in the Configuration (for anActiveX Control) or Members (for a .NET Control) dialog.
Parameter(1…N)
Data of various types that are required by the Method to run. The number of parameters canrange from 0 to 255 and depends on the specified Method. The data types (e.g., Boolean,Integer, Real or String) of referring tags must match the parameters on the Method.
Returned value
Returns the Method result as reported by the ActiveX Control or .NET Control object. Not all Methodsreturn results.
Notes
This function cannot be used in Tasks or in the Global Procedures script. Also, this function is notsupported for .NET Control objects running on a Windows Embedded station.
Examples
Run the XPos method on the ActiveX Control named "ActXCir," with four original values passed to themethod:

8/22/2019 User Guide Indu Soft
http://slidepdf.com/reader/full/user-guide-indu-soft 1158/1279
XRun( "ActXCir", "XPos", FALSE, 12, 4.6, "This is my text." )
Run the XPos method on the ActiveX Control named "ActXCir," with four referring tags passed to themethod:
XRun( "ActXCir", "XPos", TagA, TagB, TagC, TagD )
Parent topic: ActiveX and .NET Control functionsInduSoft Web Studio v7.0 Technical ReferenceCopyright © 2003–2010 Indusoft, Inc.

8/22/2019 User Guide Indu Soft
http://slidepdf.com/reader/full/user-guide-indu-soft 1159/1279
Appendix: Built-in Scripting Language > ActiveX and .NET Control functions >
XSetThis function sets the value of a Property on an ActiveX Control or .NET Control object.
Function Group Execution Windows Embedded ThinClient
XSet ActiveX and .NETControl
Asynchronous Supported ActiveX Controls only (seeNotes)
Supported
Syntax
strName
The unique name of the ActiveX Control or .NET Control object, as configured in the Name fieldof the Object Properties dialog.
strProperties
The Property that you want to set the value of. Available Properties are listed in theConfiguration (for an ActiveX Control) or Members (for a .NET Control) dialog.
Value
A tag, expression, or data value of any type; the value to which you want to set the Property.
Returned value
This function does not return any value.
Notes
This function cannot be used in Tasks or in the Global Procedures script. Also, this function is notsupported for .NET Control objects running on a Windows Embedded station.
Examples
Set the value of the Display property on the ActiveX Control named "ActXDisplay" to "StatusNormal":
XSet( "ActXDisplay", "Display", "Status Normal" )

8/22/2019 User Guide Indu Soft
http://slidepdf.com/reader/full/user-guide-indu-soft 1160/1279
Parent topic: ActiveX and .NET Control functionsInduSoft Web Studio v7.0 Technical ReferenceCopyright © 2003–2010 Indusoft, Inc.

8/22/2019 User Guide Indu Soft
http://slidepdf.com/reader/full/user-guide-indu-soft 1161/1279
Appendix: Built-in Scripting Language >
Event Logger functionsThese functions are used to send events and comments to the Event Logger.
SendEvent
Sends an event to the Event Logger.
Parent topic: Appendix: Built-in Scripting Language
InduSoft Web Studio v7.0 Technical ReferenceCopyright © 2003–2010 Indusoft, Inc.

8/22/2019 User Guide Indu Soft
http://slidepdf.com/reader/full/user-guide-indu-soft 1162/1279
Appendix: Built-in Scripting Language > Event Logger functions >
SendEventSends an event to the Event Logger.
Function Group Execution Windows Embedded ThinClient
SendEvent Event Logger Synchronous Supported Supported Supported
Description
Use to send an event to the Event Log file. When the Comment option is enabled, the user isprompted to enter a comment after executing the SendEvent() function. This comment will be savedin the Event Log file.
Syntax
SendEvent( strEvent,optBoolFlag ,optStrComment)
strEvent
The text to be saved in the Event Logger.
optBoolFlag
If omitted or 0 (zero), the event does not have a comment. Otherwise, there is a commentassociated to the event.
optStrComment
The text of the comment for the event saved in the database. If omitted, a standard dialogprompts the user to type a comment.
Returned value
0 Success
1 Event Logger is disabled in the Event Settings dialog
2 Event Logger is enabled, but Custom Messages are disabled in the EventSettings dialog

8/22/2019 User Guide Indu Soft
http://slidepdf.com/reader/full/user-guide-indu-soft 1163/1279
Notes
This function is synchronous. Therefore, the execution of the function finishes only after the eventdata (including the comment, if any) is saved in the database file. It is recommended that you do notconfigure this function in background tasks (e.g., Math and Scheduler), unless you do not plan to usethe comment or configure it directly (type from the dialog) in the function.
Examples
TagName Expression
Tag SendEvent( "Valve Open" ) // Saves the event message.
Tag SendEvent( "Valve Open Oven No. " + OvenID ) // Saves the event messageconcatenated with the value of the OvenID tag.
Tag SendEvent( "Valve Open" , 1 ) // Displays the dialog where the operator cantype comments.
Tag SendEvent( "Valve Open" , 1 , TagComment) // Saves the event message with the
comment configured in the TagComment tag.
Parent topic: Event Logger functionsInduSoft Web Studio v7.0 Technical ReferenceCopyright © 2003–2010 Indusoft, Inc.

8/22/2019 User Guide Indu Soft
http://slidepdf.com/reader/full/user-guide-indu-soft 1164/1279
Appendix: Built-in Scripting Language >
FTP functionsThese functions are used to configure the FTP settings for the project, as well as to get files from andput files on a remote server.
CnfFTP
This function configures the FTP settings used by other features in the project that can transferfiles, such the FTPGet and FTPPut functions.
FTPGet
Gets a file from a remote server and saves it on the local machine.
FTPPut
Puts a file on a remote server.
FTPStatus
This function returns the current status of a file transfer started with FTPGet or FTPPut.
Parent topic: Appendix: Built-in Scripting LanguageInduSoft Web Studio v7.0 Technical ReferenceCopyright © 2003–2010 Indusoft, Inc.

8/22/2019 User Guide Indu Soft
http://slidepdf.com/reader/full/user-guide-indu-soft 1165/1279
Appendix: Built-in Scripting Language > FTP functions >
CnfFTPThis function configures the FTP settings used by other features in the project that can transfer files,such the FTPGet and FTPPut functions.
Function Group Execution Windows Embedded ThinClient
CnfFTP FTP Synchronous Supported Supported Supported
Syntax
CnfFTP( strServer ,optStrUser ,optStrPwn,optNumPassiveMode,optNumPort)
strServer
The address of the FTP server.
optStrUser
The username for the FTP account.
This parameter is optional; if no value is given, then the username "anonymous" is used bydefault.
optStrPwd
The password for the FTP account.
This parameter is optional; if no value is given, then the password is left blank.
optNumPassiveMode
A numeric flag that specifies whether Passive FTP mode is enabled. (Passive FTP can be used tobypass some firewall configurations.)
0 Passive FTP mode isdisabled.
1 Passive FTP mode isenabled.
This parameter is optional; if no value is given, then Passive FTP mode is disabled by default.
optNumPort
The TCP/IP port number.
This parameter is optional; if no value is given, then port 21 is used by default.

8/22/2019 User Guide Indu Soft
http://slidepdf.com/reader/full/user-guide-indu-soft 1166/1279
Returned value
0 Success
- 1 Invalid number of parameters
- 2 Invalid server name
- 3 Invalid user name
Note: This function does not actually conncect to the server, so these error codes do not showthe quality of the connection. They only show whether the FTP settings have been successfullyconfigured.
Notes
You must call this function at least once to configure these settings before you can use the FTPGetand FTPPut functions to transfer files.
Example
TagName Expression
Tag CnfFTP( "ftp.mycompany.com", "admin", "12345", 1 ) // Configures the FTP serverusing passive mode.
Parent topic: FTP functionsInduSoft Web Studio v7.0 Technical ReferenceCopyright © 2003–2010 Indusoft, Inc.

8/22/2019 User Guide Indu Soft
http://slidepdf.com/reader/full/user-guide-indu-soft 1167/1279
Appendix: Built-in Scripting Language > FTP functions >
FTPGetGets a file from a remote server and saves it on the local machine.
Function Group Execution Windows Embedded ThinClient
FTPGet FTP Asynchronous Supported Supported Supported
Syntax
FTPGet( strRemoteFile,strLocalFile,numTransferType,numOverwrite)
strRemoteFile
The full path and name of the desired file on the remote server, using the syntax "/file
path/file name.extension". Some FTP servers are case sensitive, so you should always use
correct capitalization.
strLocalFile
The full path and name where you want to save the file on the local machine, using the syntax"C:\file name.extension".
numTransferType
A numeric flag that specifies the file transfer type. This parameter is optional; if no value isgiven, then the transfer type is unknown (0) by default.
0 Unknown
1 ASCII
2 Binary
10 Unknown, withoutcaching
11 ASCII, without caching
12 Binary, without caching
Note: In most cases, you should use option 10. This automatically detects the format(ASCII or Binary) of the remote file and sets the transfer type accordingly, and it alsoforces the project to download the file from the actual FTP server rather than from anintervening proxy or cache server.

8/22/2019 User Guide Indu Soft
http://slidepdf.com/reader/full/user-guide-indu-soft 1168/1279
numOverWrite
A numeric value that specifies whether the local file (specified by strLocalFile) may be
overwritten if it already exists. This parameter is optional; the default value is 0.
0 Do not overwrite — return an error if the filealready exists.
1 Overwrite.
Returned value
1 Failed to open FTPconnection
0 Success
-1 Invalid number of parameters
-2 Unknown system error
-3 Invalid remote file
-4 Invalid local file
-5 Invalid transfer type
Notes
Before you can call this function, you must configure the FTP settings (i.e., server address and login)
using the CnfFTP function.
Also, this function is executed asynchronously, so you must call the FTPStatus function to see if thetransfer has been completed successfully.
Example
TagName Expression
Tag FTPGet( "\Reports\040303.txt", "C:\Report.txt" ) // Retrieves the file 040303.txt
in the Reports directory, from the FTP server that was previously specified by
CnfFTP(), It then saves the file locally at C:\Report.txt.
Parent topic: FTP functionsInduSoft Web Studio v7.0 Technical ReferenceCopyright © 2003–2010 Indusoft, Inc.

8/22/2019 User Guide Indu Soft
http://slidepdf.com/reader/full/user-guide-indu-soft 1169/1279
Appendix: Built-in Scripting Language > FTP functions >
FTPPutPuts a file on a remote server.
Function Group Execution Windows Embedded ThinClient
FTPPut FTP Asynchronous Supported Supported Supported
Syntax
FTPPut( strLocalFile,strRemoteFile,numTransferType)
strLocalFile
Full qualified name of the local file (e.g., "C:\file.extension")
strRemoteFile
Full qualified name of the remote file (e.g., "/Folder/File.extension" ). Note that some FTPservers are case sensitive, so you have to enter the name of the file with the correctcapitalization.
numTransferType
0 Unknown
1 ASCII
2 Binary
Default is 0.
Returned value

8/22/2019 User Guide Indu Soft
http://slidepdf.com/reader/full/user-guide-indu-soft 1170/1279
1 Failed to create FTP thread
0 Success
- 1 Invalid number of parameters
- 2 Unknown system error
- 3 Invalid remote file
-4 Invalid local file
-5 Invalid transfer type
Notes
Before you can call this function, you must configure the FTP settings (i.e., server address and login)using the CnfFTP function.
Also, this function is executed asynchronously, so you must call the FTPStatus function to see if thetransfer has been completed successfully.
Example
TagName Expression
Tag FTPPut("C:\Report.txt", "\Reports\040303.txt") // Retrieves the fileC:\Report.txt with the name 040303.txtin the folder Reports in the FTP Server.
Parent topic: FTP functionsInduSoft Web Studio v7.0 Technical ReferenceCopyright © 2003–2010 Indusoft, Inc.

8/22/2019 User Guide Indu Soft
http://slidepdf.com/reader/full/user-guide-indu-soft 1171/1279
Appendix: Built-in Scripting Language > FTP functions >
FTPStatusThis function returns the current status of a file transfer started with FTPGet or FTPPut.
Function Group Execution Windows Embedded ThinClient
FTPStatus FTP Synchronous Supported Supported Supported
Syntax
strStatusTag
Name of the string tag that will receive the current status description when the function
returns.
Note: The tag name must be enclosed in quotes, as shown in the syntax diagram, or elsethe project will try to get the value of the named tag.
Returned value
1 Transaction executed successfully
2 Resolving name
3 Name resolved
4 Connecting to server
5 Connected to server
6 Closing connection
7 Connection closed
8 Sending request
9 Request sent
10 Receiving response
11 Intermediate response received
12 Response received
13 Request completed
0 No transaction is being executed

8/22/2019 User Guide Indu Soft
http://slidepdf.com/reader/full/user-guide-indu-soft 1172/1279
- 2 Invalid opttagErrorDescription
-6 Error opening connection (see status string fordetails)
-7 Error establishing connection (see status string fordetails)
-8 Error receiving the file (see status string for details)
-9 Transfer pending
Example
TagName Expression
Tag FTPStatus( "StatusDescription" ) // Retrieves the status of a current transfer.The return code is stored in the StatusCode tag and the description in theStatusDescription tag.
Parent topic: FTP functionsInduSoft Web Studio v7.0 Technical ReferenceCopyright © 2003–2010 Indusoft, Inc.

8/22/2019 User Guide Indu Soft
http://slidepdf.com/reader/full/user-guide-indu-soft 1173/1279
Appendix: Built-in Scripting Language >
Database/ERP functionsThese functions are used interact with external databases and ERP systems using SQL-likecommands.
DBCursorClose
Closes the cursor and releases the result set.
DBCursorColumnCount
Gets the total number of columns in a SQL result set.
DBCursorColumnInfo
Gets information about a column in a SQL result set. The column is specified by number ratherthan by name, so this function can be used to retrieve unknown column names.
DBCursorCurrentRow
Returns the row number of the current row (i.e., the cursor position) in a SQL result set.
DBCursorGetValue
Gets the value of the specified column of the current row (i.e., the cursor position) in a SQL
result set.
DBCursorMoveTo
Moves the cursor to the specified row in a SQL result set and copies that row's values to themapped tags. If the specified row doesn't exist — that is, if it's outside the range of the resultset — then the function returns an error code and doesn't change the mapped tags.
DBCursorNext
Moves the cursor to the next row in a SQL result set and copies that row's values to the mappedtags. If there is no next row — that is, if the current row is the last — then the function returnsan error code and doesn't change the mapped tags.
DBCursorOpen
Selects a set of rows and columns in a database table, initializes the cursor at the first row of the result set, copies that row's values to mapped tags, and then returns a cursor handle thatcan be referenced by other DB/ERP functions.
DBCursorOpenSQL
Selects a set of rows and columns in a database table, initializes the cursor at the first row of the result set, copies that row's values to mapped tags, and then returns a cursor handle thatcan be referenced by other DB/ERP functions. (This function is equivalent to a SQL SELECTstatement.)
DBCursorPrevious

8/22/2019 User Guide Indu Soft
http://slidepdf.com/reader/full/user-guide-indu-soft 1174/1279
Moves the cursor to the previous row of the result set and copies that row's values to themapped tags. If there is no previous row — that is, If the current row is the first — then thefunction returns an error code and doesn't change the mapped tags.
DBCursorRowCount
Gets the total number of rows in a SQL result set.
DBDelete
Deletes selected rows from a database table. (This function is equivalent to a SQL DELETEstatement.)
DBExecute
DBExecute is a built-in scripting function that executes a custom SQL statement on an externaldatabase. If the statement is a query (e.g., SELECT), then the database values are copied tospecified array tags.
DBInsert
Inserts one new row into a database table. (This function is equivalent to a SQL INSERTstatement.)
DBSelect
DBSelect is a built-in scripting function that selects a result set from an external database(equivalent to a SQL SELECT statement), maps the columns to array tags in your project, andcopies the values from the result set to the array tags.
DBUpdate
Selects a result set and then writes the same value to all rows of a specified column. (Thisfunction is equivalent to a SQL UPDATE statement.)
SyncAlarm
Synchronizes the alarm database.
SyncAlarmStatus
Returns the status of a previously called SyncAlarm function.
SyncEvent
Synchronizes the event database.
SyncEventStatus
Returns the status of a previously called SyncEvent function.
SyncTrend
Synchronizes the trend database.
SyncTrendStatus
Returns the status of a previously called SyncTrend function.
Parent topic: Appendix: Built-in Scripting LanguageInduSoft Web Studio v7.0 Technical Reference

8/22/2019 User Guide Indu Soft
http://slidepdf.com/reader/full/user-guide-indu-soft 1175/1279
Copyright © 2003–2010 Indusoft, Inc.

8/22/2019 User Guide Indu Soft
http://slidepdf.com/reader/full/user-guide-indu-soft 1176/1279
Appendix: Built-in Scripting Language > Database/ERP functions >
DBCursorCloseCloses the cursor and releases the result set.
Function Group Execution Windows Embedded ThinClient
DBCursorClose Database/ERP Synchronous Supported Supported Supported
Note: This feature emulates SQL (Structured Query Language) database operations. You shouldbe familiar with how SQL commands are formed and executed before you use this feature.
Syntax
DBCursorClose( numCur , "optStrErrorTag " )
numCur
The cursor handle of the result set. The cursor handle is returned by DBCursorOpen orDBCursorOpenSQL.
optStrErrorTag
The name of a String tag that will receive detailed error messages, if errors occur duringruntime.
Note: The tag name must be enclosed in quotes, as shown in the syntax diagram, or elsethe project will try to get the value of the named tag.
This is an optional parameter.
Returned value
In case of error, returns a negative number. Otherwise, returns 0.
Notes
When the cursor is closed, it is destroyed and cannot be used again. You must create a new cursorusing DBCursorOpen or DBCursorOpenSQL.
Examples

8/22/2019 User Guide Indu Soft
http://slidepdf.com/reader/full/user-guide-indu-soft 1177/1279
As used in a Math worksheet:
TagName Expression
nErrorCode DBCursorClose( nCursor )
Parent topic: Database/ERP functionsInduSoft Web Studio v7.0 Technical ReferenceCopyright © 2003–2010 Indusoft, Inc.

8/22/2019 User Guide Indu Soft
http://slidepdf.com/reader/full/user-guide-indu-soft 1178/1279
Appendix: Built-in Scripting Language > Database/ERP functions >
DBCursorColumnCountGets the total number of columns in a SQL result set.
Function Group Execution Windows Embedded ThinClient
DBCursorColumnCount Database/ERP Synchronous Supported Supported Supported
Note: This feature emulates SQL (Structured Query Language) database operations. You shouldbe familiar with how SQL commands are formed and executed before you use this feature.
Syntax
DBCursorColumnCount( numCur , "optStrErrorTag " )
numCur
The cursor handle of the result set. The cursor handle is returned by DBCursorOpen orDBCursorOpenSQL.
optStrErrorTag
The name of a String tag that will receive detailed error messages, if errors occur duringruntime.
Note: The tag name must be enclosed in quotes, as shown in the syntax diagram, or elsethe project will try to get the value of the named tag.
This is an optional parameter.
Returned value
Returns the number of columns. In case of error, returns a negative number.
Notes
See also DBCursorRowCount.
Examples

8/22/2019 User Guide Indu Soft
http://slidepdf.com/reader/full/user-guide-indu-soft 1179/1279
As used in a Math worksheet:
TagName Expression
nErrorCode DBCursorColumnCount( nCursor )
Parent topic: Database/ERP functions
InduSoft Web Studio v7.0 Technical ReferenceCopyright © 2003–2010 Indusoft, Inc.

8/22/2019 User Guide Indu Soft
http://slidepdf.com/reader/full/user-guide-indu-soft 1180/1279
Appendix: Built-in Scripting Language > Database/ERP functions >
DBCursorColumnInfoGets information about a column in a SQL result set. The column is specified by number rather thanby name, so this function can be used to retrieve unknown column names.
Function Group Execution Windows Embedded ThinClient
DBCursorColumnInfo Database/ERP Synchronous Supported Supported Supported
Note: This feature emulates SQL (Structured Query Language) database operations. You shouldbe familiar with how SQL commands are formed and executed before you use this feature.
Syntax
DBCursorColumnInfo( numCur ,numColumn,numTypeInfo, "optStrErrorTag " )
numCur
The cursor handle of the result set. The cursor handle is returned by DBCursorOpen orDBCursorOpenSQL.
numColumn
The number of the column about which you want to get information. Remember that a resultset may include only some of the columns in the original database table.
numTypeInfo
The type of information you want to get about the column:
Value Description
0 Column name
1 Column data type
optStrErrorTag
The name of a String tag that will receive detailed error messages, if errors occur during
runtime.
Note: The tag name must be enclosed in quotes, as shown in the syntax diagram, or elsethe project will try to get the value of the named tag.
This is an optional parameter.

8/22/2019 User Guide Indu Soft
http://slidepdf.com/reader/full/user-guide-indu-soft 1181/1279
Returned value
In case of error, returns a negative number. Otherwise, returns 0.
ExamplesAs used in a Math worksheet:
TagName Expression
nErrorCode DBCursorColumnInfo( nCursor, 2, 0 ) // Gets the column name of the secondcolumn in the result set.
Parent topic: Database/ERP functionsInduSoft Web Studio v7.0 Technical ReferenceCopyright © 2003–2010 Indusoft, Inc.

8/22/2019 User Guide Indu Soft
http://slidepdf.com/reader/full/user-guide-indu-soft 1182/1279
Appendix: Built-in Scripting Language > Database/ERP functions >
DBCursorCurrentRowReturns the row number of the current row (i.e., the cursor position) in a SQL result set.
Function Group Execution Windows Embedded ThinClient
DBCursorCurrentRow Database/ERP Synchronous Supported Supported Supported
Note: This feature emulates SQL (Structured Query Language) database operations. You shouldbe familiar with how SQL commands are formed and executed before you use this feature.
Syntax
DBCursorCurrentRow( numCur , "optStrErrorTag " )
numCur
The cursor handle of the result set. The cursor handle is returned by DBCursorOpen orDBCursorOpenSQL.
optStrErrorTag
The name of a String tag that will receive detailed error messages, if errors occur duringruntime.
Note: The tag name must be enclosed in quotes, as shown in the syntax diagram, or elsethe project will try to get the value of the named tag.
This is an optional parameter.
Returned value
Returns the number of the current row. In case of error, returns a negative number.
Examples
As used in a Math worksheet:
TagName Expression
nRow DBCursorCurrentRow( nCursor )

8/22/2019 User Guide Indu Soft
http://slidepdf.com/reader/full/user-guide-indu-soft 1183/1279
Parent topic: Database/ERP functionsInduSoft Web Studio v7.0 Technical ReferenceCopyright © 2003–2010 Indusoft, Inc.

8/22/2019 User Guide Indu Soft
http://slidepdf.com/reader/full/user-guide-indu-soft 1184/1279
Appendix: Built-in Scripting Language > Database/ERP functions >
DBCursorGetValueGets the value of the specified column of the current row (i.e., the cursor position) in a SQL resultset.
Function Group Execution Windows Embedded ThinClient
DBCursorGetValue Database/ERP Synchronous Supported Supported Supported
Note: This feature emulates SQL (Structured Query Language) database operations. You shouldbe familiar with how SQL commands are formed and executed before you use this feature.
Syntax
DBCursorGetValue( numCur ,strColumn, "optStrErrorTag " )
numCur
The cursor handle for the result set. The cursor handle is returned by DBCursorOpen orDBCursorOpenSQL.
strColumn
The name of the column.
optStrErrorTagThe name of a String tag that will receive detailed error messages, if errors occur duringruntime.
Note: The tag name must be enclosed in quotes, as shown in the syntax diagram, or elsethe project will try to get the value of the named tag.
This is an optional parameter.
Returned value
Returns the value of the specified column. If the value is NULL or the cursor is invalid, then it returnsan empty string with quality BAD.
Examples

8/22/2019 User Guide Indu Soft
http://slidepdf.com/reader/full/user-guide-indu-soft 1185/1279
As used in a Math worksheet:
TagName Expression
Tag DBCursorGetValue( nCursor, "Column1" )
Parent topic: Database/ERP functions
InduSoft Web Studio v7.0 Technical ReferenceCopyright © 2003–2010 Indusoft, Inc.

8/22/2019 User Guide Indu Soft
http://slidepdf.com/reader/full/user-guide-indu-soft 1186/1279
Appendix: Built-in Scripting Language > Database/ERP functions >
DBCursorMoveToMoves the cursor to the specified row in a SQL result set and copies that row's values to the mappedtags. If the specified row doesn't exist — that is, if it's outside the range of the result set — then thefunction returns an error code and doesn't change the mapped tags.
Function Group Execution Windows Embedded ThinClient
DBCursorMoveTo Database/ERP Synchronous Supported Supported Supported
Note: This feature emulates SQL (Structured Query Language) database operations. You shouldbe familiar with how SQL commands are formed and executed before you use this feature.
Syntax
DBCursorMoveTo( numCur ,numRow , "optStrErrorTag " )
numCur
The cursor handle of the result set. The cursor handle is returned by DBCursorOpen orDBCursorOpenSQL.
numRow
The row of the result set to which the cursor will be moved.
optStrErrorTag
The name of a String tag that will receive detailed error messages, if errors occur duringruntime.
Note: The tag name must be enclosed in quotes, as shown in the syntax diagram, or elsethe project will try to get the value of the named tag.
This is an optional parameter.
Returned value
In case of error, returns a negative number. Otherwise, returns 0.
Examples

8/22/2019 User Guide Indu Soft
http://slidepdf.com/reader/full/user-guide-indu-soft 1187/1279
As used in a Math worksheet:
TagName Expression
nErrorCode DBCursorMoveTo( nCursor, 4 ) // Moves the cursor to the fourth row of the resultset and copies those values.
Parent topic: Database/ERP functionsInduSoft Web Studio v7.0 Technical ReferenceCopyright © 2003–2010 Indusoft, Inc.

8/22/2019 User Guide Indu Soft
http://slidepdf.com/reader/full/user-guide-indu-soft 1188/1279
Appendix: Built-in Scripting Language > Database/ERP functions >
DBCursorNextMoves the cursor to the next row in a SQL result set and copies that row's values to the mappedtags. If there is no next row — that is, if the current row is the last — then the function returns anerror code and doesn't change the mapped tags.
Function Group Execution Windows Embedded ThinClient
DBCursorClose Database/ERP Synchronous Supported Supported Supported
Group Execution WindowsPC WindowsCE ThinClient
DB/ERP Synchronous Supported Supported Supported
Note: This feature emulates SQL (Structured Query Language) database operations. You shouldbe familiar with how SQL commands are formed and executed before you use this feature.
Syntax
DBCursorNext( numCur , "optStrErrorTag " )
numCur
The cursor handle of the result set. The cursor handle is returned by DBCursorOpen orDBCursorOpenSQL.
optStrErrorTag
The name of a String tag that will receive detailed error messages, if errors occur duringruntime.
Note: The tag name must be enclosed in quotes, as shown in the syntax diagram, or elsethe project will try to get the value of the named tag.
This is an optional parameter.
Returned value
In case of error, returns a negative number. Otherwise, returns 0.

8/22/2019 User Guide Indu Soft
http://slidepdf.com/reader/full/user-guide-indu-soft 1189/1279
Examples
As used in a Math worksheet:
TagName Expression
nErrorCode DBCursorNext( nCursor )
Parent topic: Database/ERP functionsInduSoft Web Studio v7.0 Technical ReferenceCopyright © 2003–2010 Indusoft, Inc.

8/22/2019 User Guide Indu Soft
http://slidepdf.com/reader/full/user-guide-indu-soft 1190/1279
Appendix: Built-in Scripting Language > Database/ERP functions >
DBCursorOpenSelects a set of rows and columns in a database table, initializes the cursor at the first row of the result scopies that row's values to mapped tags, and then returns a cursor handle that can be referenced by othDB/ERP functions.DBCursorOpenDatabase/ERPSynchronousSupportedSupportedSupported
Function Group Execution Windows Embedded ThinClient
Note: This feature emulates SQL (Structured Query Language) database operations. You should be
familiar with how SQL commands are formed and executed before you use this feature.
Syntax
DBCursorOpen( strDBConn,strTable,optStrCondition,optStrColumns,optStrTags,optStrOrder , "optStrErrorTag " )
strDBConn
The name of the database connection. Connections are configured in the Database/ERP folder.
strTable
The name of the table in the database.
optStrCondition
A string specifying which rows of the table to select. This is equivalent to the SQL WHERE clause, athe string should follow the same syntax.
This is an optional parameter. If no rows are specified, then all rows of the table will be selected.
optStrColumns
A string specifying which columns of the table to select. This list of column names should be comm
delimited.This is an optional parameter. If no columns are specified, then all columns of the table will beselected.
optStrTags
A string specifying the project tags to which the columns will be mapped. This list of tag namesshould be comma-delimited and in the same order as the columns specified by optStrColumns . As t

8/22/2019 User Guide Indu Soft
http://slidepdf.com/reader/full/user-guide-indu-soft 1191/1279
cursor is moved through the result set, the values in the current row are copied to these tags.
This is an optional parameter. If no tags are specified, then no values will be copied.
optStrOrder
The order in which the rows will be sorted. This is equivalent to the SQL ORDER BY clause, and thestring should follow the same syntax.
This is an optional parameter. If no order is specified, then the rows will be left in the default order
the table.
optStrErrorTag
The name of a String tag that will receive detailed error messages, if errors occur during runtime.
Note: The tag name must be enclosed in quotes, as shown in the syntax diagram, or else theproject will try to get the value of the named tag.
This is an optional parameter.
Returned value
Returns a numeric value that represents the cursor handle. In case of error, returns a negative number.
Notes
This function is equivalent to a SQL SELECT statement, except that it breaks the clauses of the statemeninto separate function parameters. If you know SQL and want to construct your own SELECT statementfrom scratch, you may use DBCursorOpenSQL instead.
See also DBCursorClose .
Examples
As used in a Math worksheet:nCursor
DBCursorOpen( "DB1", "Table1", "Column1 > 3", "Column1, Column2", "Tag1, Tag2", "Column1, Column2 DESC",
"TagError" ) // Opens Table1 of DB1 and selects all rows where Column1 has a value greater than 3.Column1 is mapped to Tag1, and Column2 is mapped to Tag2. Rows are ordered first by Column1, thenColumn2, in descending order. Error messages are written to TagError.
TagName Expression
Parent topic: Database/ERP functionsInduSoft Web Studio v7.0 Technical ReferenceCopyright © 2003–2010 Indusoft, Inc.

8/22/2019 User Guide Indu Soft
http://slidepdf.com/reader/full/user-guide-indu-soft 1192/1279
Appendix: Built-in Scripting Language > Database/ERP functions >
DBCursorOpenSQLSelects a set of rows and columns in a database table, initializes the cursor at the first row of the result shandle that can be referenced by other DB/ERP functions. (This function is equivalent to a SQL SELECT sDBCursorOpenSQLDatabase/ERPSynchronousSupportedSupportedSupported
Function Group Execution Windows Embedded ThinClient
Note: This feature emulates SQL (Structured Query Language) database operations. You should be fause this feature.
Syntax
DBCursorOpenSQL( strDBConn,strSQL,optStrTags, "optStrErrorTag " )
strDBConn
The name of the database connection. Connections are configured in the Database/ERP folder.
strSQLA string that gives a complete, syntactically correct SQL SELECT statement.
Note: In SQL, curly brackets ({} ) are typically used to enclose an expression that must be eval
SELECT * INTO inmates FROM OPENROWSET ('MSDASQL','Driver={Microsoft Text Driver (*.txt; *.csv)}
In IWS , however, curly brackets are used to reference tags in text fields that are not normally estatement that includes such an expression to DBCursorOpenSQL , then the project will try to ev
To pass the SQL statement so that the project can correctly evaluate the expression, create a nereference the tag in the SQL statement. For example:
$AuxTag = "{Microsoft Text Driver (*.txt; *.csv)} "
$DBCursorOpenSQL( "inmates", "SELECT * INTO inmates FROM OPENROWSET ('MSDASQL','Driver= {

8/22/2019 User Guide Indu Soft
http://slidepdf.com/reader/full/user-guide-indu-soft 1193/1279
optStrTags
A string that lists the project tags to which the columns will be mapped. This list of tag names shouby the WHERE clause of strSQL . As the cursor is moved through the result set, the values in the cu
This is an optional parameter. If no tags are specified, then no values will be copied.
optStrErrorTag
The name of a String tag that will receive detailed error messages, if errors occur during runtime.
Note: The tag name must be enclosed in quotes, as shown in the syntax diagram, or else the pr
This is an optional parameter.
Returned value
Returns a numeric value that represents the cursor handle. In case of error, returns a negative number.
Notes
See also DBCursorClose .
Examples
As used in a Math worksheet:nCursor
DBCursorOpenSQL( "DB1", "SELECT Column1, Column2 FROM Table1 WHERE Column1 > 3 ORDER BY Column1, Column2
TagName Expression
Parent topic: Database/ERP functionsInduSoft Web Studio v7.0 Technical ReferenceCopyright © 2003–2010 Indusoft, Inc.

8/22/2019 User Guide Indu Soft
http://slidepdf.com/reader/full/user-guide-indu-soft 1194/1279
Appendix: Built-in Scripting Language > Database/ERP functions >
DBCursorPreviousMoves the cursor to the previous row of the result set and copies that row's values to the mappedtags. If there is no previous row — that is, If the current row is the first — then the function returnsan error code and doesn't change the mapped tags.
Function Group Execution Windows Embedded ThinClient
DBCursorPrevious Database/ERP Synchronous Supported Supported Supported
Note: This feature emulates SQL (Structured Query Language) database operations. You shouldbe familiar with how SQL commands are formed and executed before you use this feature.
Syntax
DBCursorPrevious( numCur , "optStrErrorTag " )
numCur
The cursor handle of the result set. The cursor handle is returned by DBCursorOpen orDBCursorOpenSQL.
optStrErrorTag
The name of a String tag that will receive detailed error messages, if errors occur during
runtime.
Note: The tag name must be enclosed in quotes, as shown in the syntax diagram, or elsethe project will try to get the value of the named tag.
This is an optional parameter.
Returned value
In case of error, returns a negative number. Otherwise, returns 0.
Examples
As used in a Math worksheet:

8/22/2019 User Guide Indu Soft
http://slidepdf.com/reader/full/user-guide-indu-soft 1195/1279
TagName Expression
nErrorCode DBCursorPrevious( nCursor )
Parent topic: Database/ERP functionsInduSoft Web Studio v7.0 Technical Reference
Copyright © 2003–2010 Indusoft, Inc.

8/22/2019 User Guide Indu Soft
http://slidepdf.com/reader/full/user-guide-indu-soft 1196/1279
Appendix: Built-in Scripting Language > Database/ERP functions >
DBCursorRowCountGets the total number of rows in a SQL result set.
Function Group Execution Windows Embedded ThinClient
DBCursorRowCount Database/ERP Synchronous Supported Supported Supported
Note: This feature emulates SQL (Structured Query Language) database operations. You shouldbe familiar with how SQL commands are formed and executed before you use this feature.
Description
Gets the total number of rows in a SQL result set.
See also DBCursorColumnCount().
Syntax
DBCursorRowCount( numCur , "optStrErrorTag " )
numCur
The cursor handle of the result set. The cursor handle is returned by DBCursorOpen orDBCursorOpenSQL.
optStrErrorTag
The name of a String tag that will receive detailed error messages, if errors occur duringruntime.
Note: The tag name must be enclosed in quotes, as shown in the syntax diagram, or elsethe project will try to get the value of the named tag.
This is an optional parameter.
Returned value
Returns the number of rows. In case of error, returns a negative number.

8/22/2019 User Guide Indu Soft
http://slidepdf.com/reader/full/user-guide-indu-soft 1197/1279
Notes
See also DBCursorColumnCount.
Examples
As used in a Math worksheet:
TagName Expression
nRowCount DBCursorRowCount( nCursor )
Parent topic: Database/ERP functionsInduSoft Web Studio v7.0 Technical ReferenceCopyright © 2003–2010 Indusoft, Inc.

8/22/2019 User Guide Indu Soft
http://slidepdf.com/reader/full/user-guide-indu-soft 1198/1279
Appendix: Built-in Scripting Language > Database/ERP functions >
DBDeleteDeletes selected rows from a database table. (This function is equivalent to a SQL DELETEstatement.)
Function Group Execution Windows Embedded ThinClient
DBDelete Database/ERP Synchronous Supported Supported Supported
Note: This feature emulates SQL (Structured Query Language) database operations. You shouldbe familiar with how SQL commands are formed and executed before you use this feature.
Syntax
DBDelete( strDBConn,strTable,strCondition, "optStrErrorTag " )
strDBConn
The name of the database connection. Connections are configured in the Database/ERP
folder.
strTable
The name of the table in the database.
strConditionA string that specifies which rows of the table to select. This is equivalent to the SQL WHEREclause, and the string should follow the same syntax.
Tip: To delete all rows in the table, make the condition statement a single space (" ").
optStrErrorTag
The name of a String tag that will receive detailed error messages, if errors occur duringruntime.
Note: The tag name must be enclosed in quotes, as shown in the syntax diagram, or elsethe project will try to get the value of the named tag.
This is an optional parameter.

8/22/2019 User Guide Indu Soft
http://slidepdf.com/reader/full/user-guide-indu-soft 1199/1279
Returned value
Returns the number of rows deleted from the table. In case of error, returns a negative number.
Examples
As used in a Math worksheet:
TagName Expression
nRowsDeleted DBDelete( "DB1", "Table1", "Column1 > 1000", "TagError" ) // Deletes all rows inTable1 where the value of Column1 is greater than 1000. The returned value(i.e., the number of rows deleted) is written to TagError.
Tag DBDelete( "DB1", "Table1", " " ) // Deletes all rows of Table1.
Parent topic: Database/ERP functionsInduSoft Web Studio v7.0 Technical ReferenceCopyright © 2003–2010 Indusoft, Inc.

8/22/2019 User Guide Indu Soft
http://slidepdf.com/reader/full/user-guide-indu-soft 1200/1279
Appendix: Built-in Scripting Language > Database/ERP functions >
DBExecuteDBExecute is a built-in scripting function that executes a custom SQL statement on an external databasevalues are copied to specified array tags.DBExecuteDatabase/ERPSynchronousSupportedSupportedSupported
Function Group Execution Windows Embedded ThinClient
Syntax
strDBConn
The name of the database connection. Connections are configured in the Database/ERP folder in
strSQL
A complete, syntactically correct SQL statement.
Note: In SQL, curly brackets ({} ) are typically used to enclose an expression that must be evalexample:
SELECT * INTO inmates FROM OPENROWSET ('MSDASQL','Driver={Microsoft Text Driver (*.txt; *.csv)}
In IWS , however, curly brackets are used to reference project tags in text fields that are not noyou pass a SQL statement that includes such an expression to DBExecute , then the project willfunction will fail.
To pass the SQL statement so that the project can correctly evaluate the expression, create a nereference that tag in the SQL statement. For example:
AuxTag = "{Microsoft Text Driver (*.txt; *.csv)} "
DBExecute( "inmates", "SELECT * INTO inmates FROM OPENROWSET ('MSDASQL','Driver= {AuxTag};

8/22/2019 User Guide Indu Soft
http://slidepdf.com/reader/full/user-guide-indu-soft 1201/1279
optStrTags
A comma-delimited list of the names of array tags in your project, to which the columns of a SQL Scopied to these array tags, with the first row of the result set being copied to array index 0. Makeresult set.
This parameter is required only when strSQL contains a SQL SELECT statement. For all other typeHowever, if you need to maintain the syntax of the function in order to continue through to optStr
optNumMaxRows
The maximum number of rows to be copied from a SQL SELECT result set. In most cases, to copynumber of rows in the result set.
This parameter is required only when strSQL contains a SQL SELECT statement. For all other typeHowever, if you need to maintain the syntax of the function in order to continue through to optStr
optStrErrorTag
The name of a String tag that will receive detailed error messages, if errors occur during runtime.
Note: The tag name must be enclosed in quotes, as shown in the syntax diagram, or else the pr
This is an optional parameter.
Returned value
This function returns the total number of rows affected by the SQL statement. If an error occurs, then it
Please note this is the value returned by the function itself; in the case of a SQL SELECT statement, theoptStrTags .
Notes
This feature emulates SQL (Structured Query Language) database operations. You should be familiar witthis feature.
Examples
DBExecute( "DB1", "INSERT INTO Table1(Column1,Column2) values(1,1)" )
DBExecute( "DB1", "SELECT max(Column1),max(Column2) FROM Table1", "Tag1,Tag2", 1, "TagError" )
Parent topic: Database/ERP functionsInduSoft Web Studio v7.0 Technical Reference

8/22/2019 User Guide Indu Soft
http://slidepdf.com/reader/full/user-guide-indu-soft 1202/1279
Copyright © 2003–2010 Indusoft, Inc.

8/22/2019 User Guide Indu Soft
http://slidepdf.com/reader/full/user-guide-indu-soft 1203/1279
Appendix: Built-in Scripting Language > Database/ERP functions >
DBInsertInserts one new row into a database table. (This function is equivalent to a SQL INSERT statement.)
Function Group Execution Windows Embedded ThinClient
DBInsert Database/ERP Synchronous Supported Supported Supported
Note: This feature emulates SQL (Structured Query Language) database operations. You shouldbe familiar with how SQL commands are formed and executed before you use this feature.
Syntax
DBInsert( strDBConn,strTable,strValues,optStrColumns, "optStrErrorTag " )
strDBConn
The name of the database connection. Connections are configured in the Database/ERP folderin the Project Explorer.
strTable
The name of the table in the database.
strValues
A string that lists the values to be written in the new row. This list of values should be comma-delimited, and string values must be enclosed in single quotes.
optStrColumns
A string that lists the columns into which the values will be written. This list of column namesshould be comma-delimited and in the same order as the values specified by strValues.
This is an optional parameter. If no columns are specified, then the values will be written in thedefault column order of the database table.
optStrErrorTag
The name of a String tag that will receive detailed error messages, if errors occur duringruntime.
Note: The tag name must be enclosed in quotes, as shown in the syntax diagram, or elsethe project will try to get the value of the named tag.
This is an optional parameter.

8/22/2019 User Guide Indu Soft
http://slidepdf.com/reader/full/user-guide-indu-soft 1204/1279
Returned value
In case of error, returns a negative number. Otherwise, returns 1.
Examples
As used in a Math worksheet:
TagName Expression
nErrorCode DBInsert( "DB1", "Table1", "1, 'one'", "Column1,
Column2" )
Parent topic: Database/ERP functionsInduSoft Web Studio v7.0 Technical ReferenceCopyright © 2003–2010 Indusoft, Inc.

8/22/2019 User Guide Indu Soft
http://slidepdf.com/reader/full/user-guide-indu-soft 1205/1279
Appendix: Built-in Scripting Language > Database/ERP functions >
DBSelectDBSelect is a built-in scripting function that selects a result set from an external database (equivalent toSQL SELECT statement), maps the columns to array tags in your project, and copies the values from theresult set to the array tags.DBSelectDatabase/ERPSynchronousSupportedSupportedSupported
Function Group Execution Windows Embedded ThinClient
Syntax
strDBConn
The name of the database connection. Connections are configured in the Database/ERP folder in
the Project Explorer .
strTable
The name of the database table from which you want to select.
strTags
A comma-delimited list of the names of array tags in your project, to which the columns of thedatabase table will be mapped. The database values will be copied to these array tags, with the firsrow of the result set being copied to array index 0. Make sure the arrays are large enough to receiall of the rows in the result set.
strColumns
A comma-delimited list of which columns in the database table to select. The list order should
correspond to the list in strTags .To select all of the columns in the table, in their original order, give this parameter an empty string("" ).
strCondition
A statement specifying which rows in the database table to select. This is equivalent to the SQLWHERE clause and must follow the same syntax.

8/22/2019 User Guide Indu Soft
http://slidepdf.com/reader/full/user-guide-indu-soft 1206/1279
To select all of the rows in the table, give this parameter an empty string ("" ).
strOrder
A statement specifying the order in which the rows should be sorted. This is equivalent to the SQLORDER BY clause and must follow the same syntax.
To leave the rows in their original order, give this parameter an empty string ("" ).
optNumMaxRowsThe maximum number of rows to be copied. In most cases, to copy all of the rows, specify a numbgreater than the expected number of rows in the result set.
This is an optional parameter; if no value is specified, then only the first row of the result set will bcopied.
optStrErrorTag
The name of a String tag that will receive detailed error messages, if errors occur during runtime.
Note: The tag name must be enclosed in quotes, as shown in the syntax diagram, or else theproject will try to get the value of the named tag.
This is an optional parameter.
Returned value
This function returns the total number of rows in the result set. If an error occurs, then it returns anegative number.
Please note this is the value returned by the function itself; the database values are copied to the arraytags specified by strTags .
Notes
This feature emulates SQL (Structured Query Language) database operations. You should be familiar withow SQL statements are formed and executed before you use this feature.
Examples
DBSelect( "DB1", "Table1", "Array1,Array2", "Column1,Column2", "", "" )
DBSelect( "DB1", "Table1", "Array1,Array2", "Column1,Column2", "Column2 < Column1", "Column1", 4, "TagError" )
Parent topic: Database/ERP functionsInduSoft Web Studio v7.0 Technical Reference

8/22/2019 User Guide Indu Soft
http://slidepdf.com/reader/full/user-guide-indu-soft 1207/1279
Copyright © 2003–2010 Indusoft, Inc.

8/22/2019 User Guide Indu Soft
http://slidepdf.com/reader/full/user-guide-indu-soft 1208/1279
Appendix: Built-in Scripting Language > Database/ERP functions >
DBUpdateSelects a result set and then writes the same value to all rows of a specified column. (This function isequivalent to a SQL UPDATE statement.)
Function Group Execution Windows Embedded ThinClient
DBUpdate Database/ERP Synchronous Supported Supported Supported
Note: This feature emulates SQL (Structured Query Language) database operations. You shouldbe familiar with how SQL commands are formed and executed before you use this feature.
Syntax
DBUpdate( strDBConn,strTable,strValues,strColumns,optStrCondition, "optStrErrorTag " )
strDBConn
The name of the database connection. Connections are configured in the Database/ERP folderin the Project Explorer.
strTable
The name of the table in the database.
strValuesA string that lists the values to be written to the columns. This list of values should be comma-delimited, and string values must be enclosed in single quotes.
strColumns
A string that lists the columns into which the values will be written. This list of column namesshould be comma-delimited and in the same order as the values specified by strValues.
optStrCondition
A string that specifies which rows of the table to select. This is equivalent to the SQL WHEREclause, and the string should follow the same syntax.
This is an optional parameter. If no rows are specified, then all rows of the table will beselected.
optStrErrorTag
The name of a String tag that will receive detailed error messages, if errors occur duringruntime.

8/22/2019 User Guide Indu Soft
http://slidepdf.com/reader/full/user-guide-indu-soft 1209/1279
Note: The tag name must be enclosed in quotes, as shown in the syntax diagram, or elsethe project will try to get the value of the named tag.
This is an optional parameter.
Returned value
Returns the number of rows updated. In case of error, returns a negative number.
Examples
As used in a Math worksheet:
TagName Expression
Tag DBUpdate( "DB1", "Table1", "'X'", "Column2", "Column1 = 1", "TagError" ) // InTable1 of DB1, for all rows where Column1 equals 1, writes "X" to Column2.
Parent topic: Database/ERP functionsInduSoft Web Studio v7.0 Technical ReferenceCopyright © 2003–2010 Indusoft, Inc.

8/22/2019 User Guide Indu Soft
http://slidepdf.com/reader/full/user-guide-indu-soft 1210/1279
Appendix: Built-in Scripting Language > Database/ERP functions >
SyncAlarmSynchronizes the alarm database.
Function Group Execution Windows Embedded ThinClient
SyncAlarm Database/ERP Asynchronous Supported Supported Executed on Server
Syntax
SyncAlarm( optStrStartDate,optStrEndDate)
optStrStartDate
String with the start date. If this parameter is not specified, then the current date is used.
optStrEndDate
String with the end date. If this parameter is not specified, then the function uses the same asthe start date.
Returned value
Value Description
1 Fail to start synchronization; the database is probably beingsynchronized.
0 Success
-1 Invalid group number
-2 The format is not set to "Database".
-4 Start date specified is invalid.
-5 End date specified is invalid.
-6 Start date is greater than the end date.
Notes
This function is executed asynchronously, so it doesn't return the result of the synchronization. Toget that information, use the SyncAlarmStatus function.

8/22/2019 User Guide Indu Soft
http://slidepdf.com/reader/full/user-guide-indu-soft 1211/1279
Examples
TagName Expression
Tag SyncAlarm() // Synchronizes the database using the current date
Tag SyncAlarm("10/20/2004") // Synchronizes the database only for the day
10/20/2004
Tag SyncAlarm("10/20/2004", "10/28/2004") // Synchronizes the database from10/20/2004 to 10/28/2004
Parent topic: Database/ERP functionsInduSoft Web Studio v7.0 Technical ReferenceCopyright © 2003–2010 Indusoft, Inc.

8/22/2019 User Guide Indu Soft
http://slidepdf.com/reader/full/user-guide-indu-soft 1212/1279
Appendix: Built-in Scripting Language > Database/ERP functions >
SyncAlarmStatusReturns the status of a previously called SyncAlarm function.
Function Group Execution Windows Embedded ThinClient
SyncAlarmStatus Database/ERP Synchronous Supported Supported Executed on Server
Syntax
This function takes no parameters.
Returned value
Value Description
3 Synchronization has finished.
2 Fail synchronizing
1 Still synchronizing
0 No synchronization is beingexecuted.
-1 The format is not set to "Database".
Examples
TagName Expression
Tag SyncAlarmStatus()
Parent topic: Database/ERP functions
InduSoft Web Studio v7.0 Technical Reference
Copyright © 2003–2010 Indusoft, Inc.

8/22/2019 User Guide Indu Soft
http://slidepdf.com/reader/full/user-guide-indu-soft 1213/1279
Appendix: Built-in Scripting Language > Database/ERP functions >
SyncEventSynchronizes the event database.
Function Group Execution Windows Embedded ThinClient
SyncEvent Database/ERP Asynchronous Supported Supported Executed on Server
Syntax
SyncEvent( optStrStartDate,optStrEndDate)
optStrStartDate
String with the start date. If this parameter is not specified, then the current date is used.
optStrEndDate
String with the end date. If this parameter is not specified, then the function uses the same asthe start date.
Returned value
Value Description
1 Fail to start synchronization; the database is probably beingsynchronized.
0 Success
-1 Invalid group number
-2 The format is not set to "Database".
-4 Start date specified is invalid.
-5 End date specified is invalid.
-6 Start date is greater than the end date.
Notes
This function is executed asynchronously, so it doesn't return the result of the synchronization. Toget that information, use the SyncEventStatus function.

8/22/2019 User Guide Indu Soft
http://slidepdf.com/reader/full/user-guide-indu-soft 1214/1279
Examples
TagName Expression
Tag SyncEvent() // Synchronizes the database using the current date
Tag SyncEvent("10/20/2004") // Synchronizes the database only for the day
10/20/2004
Tag SyncEvent("10/20/2004", "10/28/2004") // Synchronizes the database from10/20/2004 to 10/28/2004
Parent topic: Database/ERP functionsInduSoft Web Studio v7.0 Technical ReferenceCopyright © 2003–2010 Indusoft, Inc.

8/22/2019 User Guide Indu Soft
http://slidepdf.com/reader/full/user-guide-indu-soft 1215/1279
Appendix: Built-in Scripting Language > Database/ERP functions >
SyncEventStatusReturns the status of a previously called SyncEvent function.
Function Group Execution Windows Embedded ThinClient
SyncEventStatus Database/ERP Synchronous Supported Supported Executed on Server
Syntax
This function takes no parameters.
Returned value
Value Description
3 Synchronization has finished.
2 Fail synchronizing
1 Still synchronizing
0 No synchronization is beingexecuted.
-1 The format is not set to "Database".
Examples
TagName Expression
Tag SyncEventStatus()
Parent topic: Database/ERP functions
InduSoft Web Studio v7.0 Technical Reference
Copyright © 2003–2010 Indusoft, Inc.

8/22/2019 User Guide Indu Soft
http://slidepdf.com/reader/full/user-guide-indu-soft 1216/1279
Appendix: Built-in Scripting Language > Database/ERP functions >
SyncTrendSynchronizes the trend database.
Function Group Execution Windows Embedded ThinClient
SyncTrend Database/ERP Asynchronous Supported Supported Executed on Server
Syntax
SyncTrend( numGroup,optStrStartDate,optStrEndDate)
numGroup
Trend group/worksheet number.
optStrStartDate
String with the start date. If this parameter is not specified, then the current date is used.
optStrEndDate
String with the end date. If this parameter is not specified, then the function uses the same asthe start date.
Returned value
Value Description
1 Fail to start synchronization; the database is probably beingsynchronized.
0 Success
-1 Invalid group number
-2 The format is not set to "Database".
-4 Start date specified is invalid.
-5 End date specified is invalid.
-6 Start date is greater than the end date.
Notes

8/22/2019 User Guide Indu Soft
http://slidepdf.com/reader/full/user-guide-indu-soft 1217/1279
This function is executed asynchronously, so it doesn't return the result of the synchronization. Toget that information, use the SyncTrendStatus function.
Examples
TagName Expression
Tag SyncTrend(1) // Synchronizes the group 1 database using the current date
Tag SyncTrend(1, "10/20/2004") // Synchronizes the group 1 database only for theday 10/20/2004
Tag SyncTrend(1, "10/20/2004", "10/28/2004") // Synchronizes the group 1 databasefrom 10/20/2004 to 10/28/2004
Parent topic: Database/ERP functionsInduSoft Web Studio v7.0 Technical ReferenceCopyright © 2003–2010 Indusoft, Inc.

8/22/2019 User Guide Indu Soft
http://slidepdf.com/reader/full/user-guide-indu-soft 1218/1279
Appendix: Built-in Scripting Language > Database/ERP functions >
SyncTrendStatusReturns the status of a previously called SyncTrend function.
Function Group Execution Windows Embedded ThinClient
SyncTrendStatus Database/ERP Synchronous Supported Supported Executed on Server
Syntax
numGroup
Trend group/worksheet number.
Returned value
Value Description
3 Synchronization has finished.
2 Fail synchronizing
1 Still synchronizing
0 No synchronization is beingexecuted.
-1 The format is not set to "Database".
Examples
TagName Expression
Tag SyncTrendStatus( 1 )
Parent topic: Database/ERP functionsInduSoft Web Studio v7.0 Technical ReferenceCopyright © 2003–2010 Indusoft, Inc.

8/22/2019 User Guide Indu Soft
http://slidepdf.com/reader/full/user-guide-indu-soft 1219/1279
Overview of VBScriptVBScript is a simple, standard and flexible scripting language that allows you to implement logics andalgorithms within your project.
IWS implements Visual Basic Scripting Edition 5.5 or higher. Because IWS hosts VBScript, you cantake advantage of every feature provided by this language, such as:
Syntax, operators and functions.
The ability to create new variables and procedures (functions and/or sub-routines).
Access to properties, methods and/or events from COM objects, including ActiveX controls.
The ability to execute the logics in any platform that supports VBScript, including MicrosoftWindows-based PCs (running as the IWS Server station), Microsoft Windows Embedded devices(via CEView), and Internet Explorer (via the Thin Client).
Note: If you are not sure if the image loaded on your device supports VBScript, please consult
the hardware manufacturer. The hardware manufacturer must enable the support for VBScripton the Windows Embedded device, so CEView will be able to execute the scripts configured in theVBScript language on the device.
The aim of this documentation is to provide an overview about the integration of VBScript withInduSoft Web Studio. Furthermore, it can be used as a quick reference for the most used features of the language. For a full description of the language as well as its interfaces and functions, pleaseconsult Microsoft. (At the time of this writing, the VBScript documentation could be accessed directlyat the Microsoft Developer Network. This link, however, is beyond our control and may changewithout notice.)
InduSoft Web Studio v7.0 Technical Reference
Copyright © 2003–2010 Indusoft, Inc.

8/22/2019 User Guide Indu Soft
http://slidepdf.com/reader/full/user-guide-indu-soft 1220/1279
VBScript Interfaces in the Software
The following table provides a summary of the VBScript interfaces supported by InduSoft WebStudio:
Interface Scope for Procedures and
Variables
Execution Functionality
Global Procedures Graphics and Tasks - Declaration of Procedures
Graphics Script Graphics Script interfaceonly
Server (Viewer) + ThinClients
Declaration of Variables
Declaration of Procedures
Execution
Screen Script Screen where the script isconfigured
Server (Viewer) + ThinClients
Declaration of Variables
Declaration of Procedures
Execution
Commandanimation
Object where the script isconfigured
Server (Viewer) + ThinClients
Declaration of Variables
Execution
ActiveX Events Object where the script isconfigured
Server (Viewer) + ThinClients
Declaration of Variables
Execution
Startup Script All Script Sheets from Tasks Server (BGTask) Declaration of Variables
Declaration of Procedures
Execution
Script Groups Script Group only Server (BGTask) Declaration of Variables
Execution
The following picture illustrates the scope of each VBScript interface and the order that they are

8/22/2019 User Guide Indu Soft
http://slidepdf.com/reader/full/user-guide-indu-soft 1221/1279
scanned by IWS:
Figure 1.
The illustration shows that the Global Procedures are shared by the Graphic Module and theBackground Task. However, the other VBScript interfaces are either from the Graphic Module or from
the Background Task, and they do not share variables or procedures between them. They areindependent of each other.
Note: Although the Graphics Script is scanned by IWS before the Screen Scripts, the proceduresand variables declared in the Graphics Script interface are NOT available for any script interfaceconfigured on the screens. You must use the Global Procedures interface to implement
procedures that must be available for all screens.
When writing your code in a VBScript interface, you can access any tag from the IWS tags databaseor any function from the Built-in Scripting Language by applying the "$" prefix to the tag/functionname, as in the examples below:$Time 'Returns the value of the tag Time from the tags database
$MyTag 'Returns the value of the tag MyTag from the tags database$Open("main") 'Executes the Open() built-in function to open the "main" screen
Therefore, you can create scripts using built-in functions from IWS, tags from the IWS tags database,VBScript functions, VBScript variables, ActiveX properties, methods or events, and any otherinterface available. The IWS tags are shared by all modules from IWS, including the Graphic Moduleand the Background Task.

8/22/2019 User Guide Indu Soft
http://slidepdf.com/reader/full/user-guide-indu-soft 1222/1279
Global Procedures
InduSoft Web Studio v7.0 Technical ReferenceCopyright © 2003–2010 Indusoft, Inc.

8/22/2019 User Guide Indu Soft
http://slidepdf.com/reader/full/user-guide-indu-soft 1223/1279
VBScript Interfaces in the Software >
Global ProceduresThis Global Procedures interface is used create a library of VBScript functions and sub-routines thatcan be called by any other scripting interface in IWS. The procedures declared here are never directlyexecuted during runtime; they must be explicitly called by another script.
CAUTION:
IWS will not prevent you from declaring two or more functions with the same name.
(This includes functions imported from external files; see "Importing Functions from
an External File" below.) However, if you do, then your project may behave
unexpectedly during runtime. Make sure that all of your functions are named
correctly.
To use the Global Procedures interface:
In the Global tab of the Project Explorer, right-click the Global Procedures folder and chooseOpen from the shortcut menu.
Figure 1. Global Procedures - Open option
The Global Procedures interface is displayed.
Figure 2. Global Procedures Interface
1.
Declare your functions and sub-routines in the interface. For example:2.Option Explicit

8/22/2019 User Guide Indu Soft
http://slidepdf.com/reader/full/user-guide-indu-soft 1224/1279
'Keep the Option Explicit statement in the first line of this interface.
'Procedures with global scope can be implemented here
'Global variables are NOT supported in this interface
Sub MyMessage(message)
MsgBox(message,0)
End Sub
Function MyAdd(number1, number2)
MyAdd = number1 + number2
Call MyMessage("The sum is" & MyAdd & ".")
End Function
Note: You can declare local variables within each procedure, but you cannot declare globalvariables in this interface. In most cases, you should use tags instead.
Save your changes. The functions and sub-routines are added to the Global Procedures folder inthe Project Explorer.
Figure 3. Global Procedures Tree
3.
Organizing Procedures into Subfolders
You can organize declared procedures into subfolders within the Global Procedures folder. To organize
procedures:
In the Global Procedures interface, insert the following line before the procedures that you wantto group together:
1.
'$region:foldername
…where foldername is the name of the subfolder. For example:Option Explicit
'Keep the Option Explicit statement in the first line of this interface.
'Procedures with global scope can be implemented here

8/22/2019 User Guide Indu Soft
http://slidepdf.com/reader/full/user-guide-indu-soft 1225/1279
'Global variables are NOT supported in this interface
'$region:My Subroutines
Sub MyMessage(message)
MsgBox(message,0)
End Sub
'$region:My Functions
Function MyAdd(number1, number2)MyAdd = number1 + number2
Call MyMessage("The sum is" & MyAdd & ".")
End Function
Save your changes. The procedures are organized into subfolders in the Project Explorer.2.
Importing Functions from an External File
You can also import functions from an external file and add them to the Global Procedures folder.This is useful if you have a library of existing functions that you want to reuse.
To import functions:
Save and close all open screens and worksheets.1.
Right-click the Global Procedures folder and then choose Import… from the shortcut menu.
The Import - Global Procedures dialog is displayed.
Figure 4. Import – Global Procedures dialog
2.
In the File field, click Browse to open a standard Windows file browser and select a globalprocedures file. (This is a plain text file that has been saved with the .gis file extension.)
3.
Select Replace functions if they already exist to overwrite functions in the GlobalProcedures folder with functions imported from the file, if the functions have the same names.
4.

8/22/2019 User Guide Indu Soft
http://slidepdf.com/reader/full/user-guide-indu-soft 1226/1279
In the Functions area, you can import All functions from the global procedures file (*.gis) orOnly selected functions.
5.
Click Import.6.
After the functions are imported, they should be available in the Global Procedures folder.
Parent topic: VBScript Interfaces in the SoftwareInduSoft Web Studio v7.0 Technical Reference
Copyright © 2003–2010 Indusoft, Inc.

8/22/2019 User Guide Indu Soft
http://slidepdf.com/reader/full/user-guide-indu-soft 1227/1279
VBScript Interfaces in the Software >
Graphics Script
The Graphics Script interface can be edited by its icon from the Graphics tab of the Project Explorer:
Figure 1.
This interface can be used to execute logics on the following events, based on pre-defined sub-routines:
Graphics_OnStart() : The code configured within this sub-routine is automatically executed justonce when the graphic module is started. This interface is useful for initializing variables orexecuting logics that must be implemented when running the project.
Graphics_WhileRunning() : The code configured within this sub-routine is automatically executedcontinuously while the graphic module is running. The rate in which this sub-routine is calleddepends on the performance of the platform where the project is running.
Graphics_OnEnd() : The code configured within this sub-routine is automatically executed justonce when the graphic module is closed.
Graphics_OnScreenResize( width, height ) : The code configured within this sub-routine is
automatically executed just once when the screen resolution of the runtime station changes.The new width and height of the screen (in pixels) are passed to the sub-routine as parameters.
Note: The Graphics_OnScreenResize() sub-routine is intended for projects running in CEViewon Windows Embedded devices that can switch between Portrait and Landscape display
modes. It is not supported for projects running on Windows PC or in the Thin Client.
Important: Do not change the name of the predefined sub-routines. If you do, then the systemwill not be able to automatically execute them.

8/22/2019 User Guide Indu Soft
http://slidepdf.com/reader/full/user-guide-indu-soft 1228/1279
Example:'Variables with local scope can be declared and initialized here
Dim MyDate
MyDate = Date()
Dim MyValue
MyValue = 100
'Procedures with local scope can be implemented here
Function MyNewProcedure(nCount)MyNewProcedure = nCount + 1
End Function
Function AreaRec(side1, side2)
AreaRec = side1 * side2
End Function
Sub CheckHiLimit(myValue, myHiLimit)
If myValue > myHiLimit Then
MsgBox("Value out of range")
End If
End Sub
'This procedure is executed just once when the graphic module is started
Sub Graphics_OnStart()
MsgBox("Welcome to the system!")
End Sub
'This procedure is executed continuously while the graphic module is running
Sub Graphics_WhileRunning()
If $UserName = "Guest" Then
$MyFlag = 0
End If
End Sub
'This procedure is executed just once when the graphic module is closed
Sub Graphics_OnEnd()
$LogOff()
End Sub
When the Sub-routines Are Executed
On the Server (where InduSoft Web Studio or CEView is running):
The graphic module is the Viewer task.
The Graphics_OnStart() sub-routine is executed once on the Server when the Viewer task is
launched.The Graphics_WhileRunning() sub-routine keeps being executed on the Server while the Viewertask is running. The Graphics_OnEnd() sub-routine is executed once on the Server when theViewer task is shut down.
On the Thin Client or Secure Viewer:

8/22/2019 User Guide Indu Soft
http://slidepdf.com/reader/full/user-guide-indu-soft 1229/1279
The graphic module is the ISSymbol control.
The Graphics_OnStart() sub-routine is executed once on the Thin Client station after logging insuccessfully.
The Graphics_WhileRunning() sub-routine keeps being executed on the Thin Client station whilethe ISSymbol control is hosted by the Web Browser.
The Graphics_OnEnd() sub-routine is executed once on the Thin Client station when the WebBrowser is shut down (or when the ISSymbol control is no longer hosted by the Web Browser).
The execution of the Graphic Script sub-routines on the Server is completely independent of theexecution on the Thin Client and Secure Viewer stations.
Calling Graphics Script Procedures in Other VBScript Interfaces
The three predefined sub-routines are strictly local to the Graphic Script interface and are executedonly on the events described above. Other procedures defined in the interface, however — under the'Procedures with local scope heading — may be called in any other Screen Script or Commandanimation. The procedures are called by using the syntax Graphics. procedure_name.
Taking the function MyNewProcedure that was declared in the example above, you could place a Buttonobject on your project screen and then apply a Command animation to it with the following line:
$NewTag = Graphics.MyNewProcedure($OldTag)
Parent topic: VBScript Interfaces in the SoftwareInduSoft Web Studio v7.0 Technical ReferenceCopyright © 2003–2010 Indusoft, Inc.

8/22/2019 User Guide Indu Soft
http://slidepdf.com/reader/full/user-guide-indu-soft 1230/1279
VBScript Interfaces in the Software >
Screen Script
To edit the screen script for a project screen, do one of the following:
On the Graphics tab of the ribbon, in the Screen group, click Script; or
Right-click in the screen and then select Screen Script option from the shortcut menu.
This interface can be used to execute logics on the following events, based on preconfigured sub-routines:
Screen_IsClosedByReplace() : This procedure determines whether the screen is automaticallyclosed when another screen is opened to replace it. If the procedure is given a value of 0 orFALSE, then automatic closing is disabled. When the function is given a positive value (e.g., 1) orTRUE, or if the procedure is not declared at all, then automatic closing is enabled.
Screen_OnOpen(): The code configured within this sub-routine is automatically executed just oncewhen the screen is opened.
Screen_WhileOpen(): The code configured within this sub-routine is automatically executedcontinuously while its screen is open. The rate in which this sub-routine is called depends on theperformance of the platform where the project is running.
Screen_OnClose():The code configured within this sub-routine is automatically executed just oncewhen the screen is closed.
The variables and procedures declared in this interface are available for the VBScript interfaces of thescreen where the Screen Script is configured.
CAUTION:
Do n o t change the names of the preconfigured sub-routines described above. If you
do, then the system will not be able to call them.

8/22/2019 User Guide Indu Soft
http://slidepdf.com/reader/full/user-guide-indu-soft 1231/1279
Note:
The execution of the Screen Script sub-routines on the server is totally independent of theexecution on the Thin Client stations. In other words, these sub-routines are executedasynchronously.
The procedures and/or variables declared in the Screen Script interface have local scope.They can be called only from the specific screen on which they are declared.
Example:'Variables available on this screen can be declared and initialized here
Dim Counter
'Procedures available on this screen can be implemented here
Function AreaCircle(radius)
AreaCircle = Sqr(radius) * $Pi()
End Function
Sub CheckLoLimit (myValue, myLoLimit)
If myValue < myLoLimit Then
MsgBox("Value out of range")End If
End Sub
'This procedure determines whether the screen is automatically closed
Function Screen_IsClosedByReplace()
Screen_IsClosedByReplace = $ReplaceModeTag
End Function
'This procedure is executed just once when this screen is open
Sub Screen_OnOpen()
MsgBox("The screen was open!")
End Sub
'This procedure is executed continuously while this screen is open
Sub Screen_WhileOpen()
If Counter < 100 Then
Counter = Counter + 1
Else
Counter = 0
End If
$SimulationTag = Counter
End Sub
'This procedure is executed just once when this screen is closed
Sub Screen_OnClose()MsgBox("The screen will be closed!")
End Sub
Parent topic: VBScript Interfaces in the SoftwareInduSoft Web Studio v7.0 Technical ReferenceCopyright © 2003–2010 Indusoft, Inc.

8/22/2019 User Guide Indu Soft
http://slidepdf.com/reader/full/user-guide-indu-soft 1232/1279
VBScript Interfaces in the Software >
Command Animation
To edit the Command animation interface, do the following:
Select the object.1.
Click the Command animations icon in the Animations group.2.
Right-click on the object. The Object Properties dialog for the Command animation will open.3.
Click the Config… button.4.Select VBScript as the Type.5.

8/22/2019 User Guide Indu Soft
http://slidepdf.com/reader/full/user-guide-indu-soft 1233/1279
Use this interface to execute logics when the user clicks on the object where the Command animation
is applied (during runtime) or presses the shortcut (Key) associated with the Command animation.
Variables declared in this interface are available for this interface only (local scope). In other words,they are not available for any other object in the project. You cannot implement procedures in thisinterface. You can, however, call procedures implemented in the Global Procedures or in the ScreenScript interface for the same screen where the Command animation is configured.
Note: For more information, see Command animation.
Example:
'The script below will be executed when the user clicks on the object'where this animation is configured
$MyValue = InputBox("Please enter the new set-point", "Set-point")
Parent topic: VBScript Interfaces in the SoftwareInduSoft Web Studio v7.0 Technical ReferenceCopyright © 2003–2010 Indusoft, Inc.

8/22/2019 User Guide Indu Soft
http://slidepdf.com/reader/full/user-guide-indu-soft 1234/1279
VBScript Interfaces in the Software >
ActiveX Events
To edit the ActiveX Events interface, select the Script option from the Events tab of the ActiveXobject inserted on the screen.
Click the ActiveX Control icon in the Active Objects toolbar.
The Insert ActiveX Control dialog opens.
1.
Select the ActiveX Control that you wish to use and then click OK.2.
The object that symbolizes the selected ActiveX Control will display. Right-click on this object to
open the Object Properties dialog.
3.

8/22/2019 User Guide Indu Soft
http://slidepdf.com/reader/full/user-guide-indu-soft 1235/1279
Click the Configuration button. The Configuration dialog will open. Click the Events tab.4.
Click the … button in the Script column.5.
Use this interface to execute logics when an ActiveX object triggers an event.
Variables declared in this interface are available for this interface only (local scope). In other words,they are not available for any other object in the project.
You cannot implement procedures in this interface. You can, however, call procedures implemented in

8/22/2019 User Guide Indu Soft
http://slidepdf.com/reader/full/user-guide-indu-soft 1236/1279
the Global Procedures or in the Screen Script interface for the same screen where the ActiveX objectis configured.
Note: For more information, see ActiveX Control object.
Example:'The script below will be executed when the Calendar Control ActiveX
'triggers its "AfterUpdate" event$MyYear = CalendarControl1.Year
$MyMonth = CalendarControl1.Month
$MyDay = CalendarControl1.Day
Parent topic: VBScript Interfaces in the SoftwareInduSoft Web Studio v7.0 Technical ReferenceCopyright © 2003–2010 Indusoft, Inc.

8/22/2019 User Guide Indu Soft
http://slidepdf.com/reader/full/user-guide-indu-soft 1237/1279
Operators
Table 1. Arithmetic Operators
Symbol Name Description
^ Exponentiation Raises a number to the power of an exponent.
- Unary negation Finds the difference between two numbers or indicatesthe negative value of a numeric expression.
* Multiplication Multiplies two numbers.
/ Division Divides two numbers and returns a floating-point result.
\ Integer division Divides two numbers and returns an integer result.
Mod Modulus arithmetic Divides two numbers and returns only the remainder.
+
Addition Finds the sum of two numbers.- Subtraction Finds the difference between two numbers or indicates
the negative value of a numeric expression.
& String concatenation Forces string concatenation of two expressions.
Table 2. Comparison Operators
Symbol Name Description
= Equality Comparison is True if the first expression is equal to the
second expression.
<> Inequality Comparison is True if the first expression is differentfrom the second expression.
< Less than Comparison is True if the first expression is less thanthe second expression.
> Greater than Comparison is True if the first expression is greater thanthe second expression.
<= Less than or equal to Comparison is True if the first expression is less than or
equal to the second expression.
>= Greater than or equal to Comparison is True if the first expression is greater thanor equal to the second expression.
Is Object equivalence Compares two object reference variables. Comparison isTrue if both object names refer to the same object.
Table 3. Logical Operators

8/22/2019 User Guide Indu Soft
http://slidepdf.com/reader/full/user-guide-indu-soft 1238/1279
Symbol Name Description
Not Logical negation Performs logical negation on an expression.
And Logical conjunction Performs a logical conjunction on twoexpressions.
Or Logical disjunction Performs a logical disjunction on twoexpressions.
Xor Logical exclusion Performs a logical exclusion on twoexpressions.
Eqv Logical equivalence Performs a logical equivalence on twoexpressions.
Imp Logical implication Performs a logical implication on twoexpressions.
Table 4. Assignment Operators
Symbol Name Description
= Assignment Assigns a value to a variable or
property.
InduSoft Web Studio v7.0 Technical ReferenceCopyright © 2003–2010 Indusoft, Inc.

8/22/2019 User Guide Indu Soft
http://slidepdf.com/reader/full/user-guide-indu-soft 1239/1279
Constants
Table 1. Color Constants
Constant Value Description
vbBlack &h00 Black
vbRed &hFF Red
vbGreen &hFF00 Green
vbYellow &hFFFF Yellow
vbBlue &hFF0000 Blue
vbMagenta &hFF00FF Magenta
vbCyan &hFFFF00 Cyan
vbWhite &hFFFFFF White
Table 2. Comparison Constants
Constant Value Description
vbBinaryCompare 0 Perform a binarycomparison
vbTextCompare 1 Perform a textualcomparison
Table 3. Date & Time Constants
Constant Value Description
vbSunday 1 Sunday
vbMonday 2 Monday
vbTuesday 3 Tuesday
vbWednesday 4 Wednesday
vbThursday 5 Thursday
vbFriday 6 Friday
vbSaturday 7 Saturday
vbUseSystemDayOfWeek 0 Use the day of the week specified in your systemsettings for the first day of the week.
vbFirstJan1 1 Use the week in which January 1 occurs (default).

8/22/2019 User Guide Indu Soft
http://slidepdf.com/reader/full/user-guide-indu-soft 1240/1279
Constant Value Description
vbFirstFourDays 2 Use the first week that has at least four days in thenew year.
vbFirstFullWeek 3 Use the first full week of the year.
Table 4. Date Format ConstantsConstant Value Description
vbGeneralDate 0 Display a date and/or time. For real numbers, display
a date and time. If there is no fractional part, displayonly a date. If there is no integer part, display timeonly. Date and time display is determined by yoursystem settings.
vbLongDate 1 Display a date using the long date format specified inyour computer's regional settings.
vbShortDate 2 Display a date using the short date format specified in
your computer's regional settings.vbLongTime 3 Display a time using the long time format specified in
your computer's regional settings.
vbShortTime 4 Display a time using the short time format specified inyour computer's regional settings.
Table 5. Miscellaneous Constants
Constant Value Description
vbObjectError -2147221504 User-defined error numbers should be greater
than this value.
Table 6. Box Constants – Buttons & Icons
Constant Value Description
vbOKOnly 0 Display OK button only.
vbOKCancel 1 Display OK and Cancel buttons.
vbAbortRetryIgnore 2 Display Abort, Retry, and Ignore buttons.
vbYesNoCancel 3 Display Yes, No, and Cancel buttons.
vbYesNo 4 Display Yes and No buttons.vbRetryCancel 5 Display Retry and Cancel buttons.
vbCritical 16 Display Critical Message icon.
vbQuestion 32 Display Warning Query icon.

8/22/2019 User Guide Indu Soft
http://slidepdf.com/reader/full/user-guide-indu-soft 1241/1279
Constant Value Description
vbExclamation 48 Display Warning Message icon.
vbInformation 64 Display Information Message icon.
vbDefaultButton1 0 First button is the default.
vbDefaultButton2 256 Second button is the default.
vbDefaultButton3 512 Third button is the default.
vbDefaultButton4 768 Fourth button is the default.
vbApplicationModal 0 Application modal. The user must respond to themessage box before continuing work in the currentapplication.
vbSystemModal 4096 System modal. On Win16 systems, all programs aresuspended until the user responds to the messagebox. On Win32 systems, this constant provides aprogram modal message box that always remains ontop of any other programs you may have running.
Table 7. Box Constants – Selected Button
Constant Value Description
vbOK 1 OK button was clicked.
vbCancel 2 Cancel button wasclicked.
vbAbort 3 Abort button wasclicked.
vbRetry 4 Retry button was
clicked.
vbIgnore 5 Ignore button wasclicked.
vbYes 6 Yes button was clicked.
vbNo 7 No button was clicked.
Table 8. String Constants
Constant Value Description
vbCr Chr(13) Carriage returnVbCrLf Chr(13) &
Chr(10)Carriage return…linefeed combination
vbFormFeed Chr(12) Form feed; not useful in Microsoft Windows

8/22/2019 User Guide Indu Soft
http://slidepdf.com/reader/full/user-guide-indu-soft 1242/1279
Constant Value Description
vbLf Chr(10) Line feed
vbNewLine Chr(13) & Chr(10) orChr(10)
Platform-specific newline character; whatever isappropriate for the platform
vbNullChar Chr(0) Character having the value 0
vbNullString String havingvalue 0
Not the same as a zero-length string (""); used forcalling external procedures
vbTab Chr(9) Horizontal tab
vbVerticalTab Chr(11) Vertical tab; not useful in Microsoft Windows
Table 9. Tristate Constants
Constant Value Description
vbUseDefault - 2 Use default from computer's
regional settings.vbTrue - 1 TRUE
vbFalse 0 FALSE
Table 10. VarType Constants
Constant Value Description
vbEmpty 0 Uninitialized (default)
vbNull 1 Contains no valid data
vbInteger 2 Integer subtypevbLong 3 Long subtype
vbSingle 4 Single subtype
vbDouble 5 Double subtype
vbCurrency 6 Currency subtype
vbDate 7 Date subtype
vbString 8 String subtype
vbObject 9 Object
vbError 10 Error subtype
vbBoolean 11 Boolean subtype
vbVariant 12 Variant (used only for arrays of variants)

8/22/2019 User Guide Indu Soft
http://slidepdf.com/reader/full/user-guide-indu-soft 1243/1279
Constant Value Description
vbDataObject 13 Data access object
vbDecimal 14 Decimal subtype
vbByte 17 Byte subtype
vbArray 8192 Array
InduSoft Web Studio v7.0 Technical ReferenceCopyright © 2003–2010 Indusoft, Inc.

8/22/2019 User Guide Indu Soft
http://slidepdf.com/reader/full/user-guide-indu-soft 1244/1279
Objects and Collections
Class Object
The object created using the Class statement. Provides access to the events of the class.
Debug Object
An intrinsic global object that can send output to a script debugger, such as the Microsoft ScriptDebugger.
Err Object
Contains information about runtime errors. Accepts the Raise and Clear methods for generatingand clearing runtime errors.
Match Object
Provides access to the read-only properties of a regular expression match.
Matches Collection
Collection of regular expression Match objects.
Regular Expression (RegExp) Object
Provides simple regular expression support.
SubMatches Collection
Collection of regular expression submatch strings.InduSoft Web Studio v7.0 Technical ReferenceCopyright © 2003–2010 Indusoft, Inc.

8/22/2019 User Guide Indu Soft
http://slidepdf.com/reader/full/user-guide-indu-soft 1245/1279
Properties
Description
Returns or sets a descriptive string associated with an error.
FirstIndex
Returns the position in a search string where a match occurs.
Global
Sets or returns a Boolean value that indicates if a pattern should match all occurrences in anentire search string or just the first one.
HelpContext
Sets or returns a context ID for a topic in a Help File.
HelpFile
Sets or returns a fully qualified path to a Help File.
IgnoreCase
Sets or returns a Boolean value that indicates if a pattern search is case-sensitive or not.
Length
Sets or returns a Boolean value that indicates if a pattern search is case-sensitive or not.
Number
Returns or sets a numeric value specifying an error. Number is the Err object's default
property.
Pattern
Sets or returns the regular expression pattern being searched for.
Source
Returns or sets the name of the object or application that originally generated the error.
Value
Returns the value or text of a match found in a search string.InduSoft Web Studio v7.0 Technical ReferenceCopyright © 2003–2010 Indusoft, Inc.

8/22/2019 User Guide Indu Soft
http://slidepdf.com/reader/full/user-guide-indu-soft 1246/1279
Statements
Call
Transfers control to a Sub or Function procedure.
Class
Declares the name of a class, as well as a definition of the variables, properties, and methodsthat comprise the class.
Const
Declares constants for use in place of literal values.
Dim
Declares variables and allocates storage space.
Do…Loop
Repeats a block of statements while a condition is True or until a condition becomes True.
Erase
Reinitializes the elements of fixed-size arrays and deallocates dynamic-array storage space.
Execute
Executes one or more specified statements.
ExecuteGlobal
Executes one or more specified statements in the global namespace of a script.
Exit
Exits a block of Do…Loop, For…Next, Function, or Sub code.
For Each…Next
Repeats a group of statements for each element in an array or collection.
For…Next
Repeats a group of statements a specified number of times.
Function
Declares the name, arguments, and code that form the body of a Function procedure.
If…Then…Else
Conditionally executes a group of statements, depending on the value of an expression.
Option Explicit
Forces explicit declaration of all variables in a script.

8/22/2019 User Guide Indu Soft
http://slidepdf.com/reader/full/user-guide-indu-soft 1247/1279
Private
Declares private variables and allocates storage space. Declares, in a Class block, a privatevariable.
Property Get
Declares, in a Class block, the name, arguments, and code that form the body of a Propertyprocedure that gets (returns) the value of a property.
Property Let
Declares, in a Class block, the name, arguments, and code that form the body of a Propertyprocedure that assigns (sets) the value of a property.
Property Set
Declares, in a Class block, the name, arguments, and code that form the body of a Propertyprocedure that sets a reference to an object.
Public
Declares public variables and allocates storage space. Declares, in a Class block, a private
variable.
Ramdomize
Initializes the random-number generator.
ReDim
Declares dynamic-array variables, and allocates or reallocates storage space at procedurelevel.
Rem
Includes explanatory remarks in a program.
Select
Executes one of several groups of statements, depending on the value of an expression.
Set
Assigns an object reference to a variable or property, or associates a procedure reference withan event.
Stop
Suspends execution.
Sub
Declares the name, arguments, and code that form the body of a Sub procedure.
While
Executes a series of statements as long as a given condition is True.
With
Executes a series of statements on a single object.InduSoft Web Studio v7.0 Technical Reference

8/22/2019 User Guide Indu Soft
http://slidepdf.com/reader/full/user-guide-indu-soft 1248/1279
Copyright © 2003–2010 Indusoft, Inc.

8/22/2019 User Guide Indu Soft
http://slidepdf.com/reader/full/user-guide-indu-soft 1249/1279
Methods
Clear
Clears all property settings of the Err object.
Execute
Executes a regular expression search against a specified string.
Raise
Generates a runtime error.
Replace
Replaces text found in a regular expression search.
Test
Executes a regular expression search against a specified string and returns a Boolean valuethat indicates if a pattern match was found.
Write
Sends strings to the script debugger.
WriteLine
Sends strings to the script debugger, followed by a newline character.InduSoft Web Studio v7.0 Technical ReferenceCopyright © 2003–2010 Indusoft, Inc.

8/22/2019 User Guide Indu Soft
http://slidepdf.com/reader/full/user-guide-indu-soft 1250/1279
Functions
Function Names
Abs Array Asc Atn
CBool CByte CCur CDate
CDbl Chr CInt CLng
Conversions Cos CreateObject CSng
CStr Date DateAdd DateDiff
DatePart DateSerial DateValue Day
Derived Math Escape Eval Exp
Filter FormatCurrency FormatDateTime FormatNumber
FormatPercent GetLocale GetObject GetRef
Hex Hour InputBox InStr
InStrRev Int, Fix IsArray IsDate
IsEmpty IsNull IsNumeric IsObject
Join LBound LCase Left
Len LoadPicture Log LTrim; RTrim; and Trim
Maths Mid Minute Month
MonthName MsgBox Now Oct
Replace RGB Right Rnd
Round ScriptEngine ScriptEngineBuildVersion ScriptEngineMajorVersion
ScriptEngineMinorVersion Second SetLocale Sgn
Sin Space Split Sqr
StrComp String StrReverse Tan
Time Timer TimeSerial TimeValue
TypeName UBound UCase Unescape
VarType Weekday WeekdayName Year
InduSoft Web Studio v7.0 Technical ReferenceCopyright © 2003–2010 Indusoft, Inc.

8/22/2019 User Guide Indu Soft
http://slidepdf.com/reader/full/user-guide-indu-soft 1251/1279
Keywords
Empty
The Empty keyword is used to indicate an uninitialized variable value. This is not the samething as Null.
False
The False keyword has a value equal to 0.
Nothing
The Nothing keyword in VBScript is used to disassociate an object variable from any actualobject.
Null
The Null keyword is used to indicate that a variable contains no valid data. This is not the same
thing as Empty.
True
The True keyword has a value equal to -1.InduSoft Web Studio v7.0 Technical ReferenceCopyright © 2003–2010 Indusoft, Inc.

8/22/2019 User Guide Indu Soft
http://slidepdf.com/reader/full/user-guide-indu-soft 1252/1279
Errors
Table 1. VBScript Runtime Errors
ErrorNumber
Description
5 Invalid procedure call or argument
6 Overflow
7 Out of memory
9 Subscript out of range
10 This array is fixed or temporarily locked
11 Division by zero
13 Type mismatch14 Out of string space
17 Can't perform requested operation
28 Out of stack space
35 Sub or function not defined
48 Error in loading DLL
51 Internal error
91 Object variable not set
92 For loop not initialized94 Invalid use of Null
424 Object required
429 ActiveX component can't create object
430 Class doesn't support Automation
432 File name or class name not found during Automation operation
438 Object doesn't support this property or method
445 Object doesn't support this action
447 Object doesn't support current locale setting
448 Named argument not found
449 Argument not optional
450 Wrong number of arguments or invalid property assignment

8/22/2019 User Guide Indu Soft
http://slidepdf.com/reader/full/user-guide-indu-soft 1253/1279
Error
Number
Description
451 Object not a collection
458 Variable uses an Automation type not supported in VBScript
462 The remote server machine does not exist or is unavailable
481 Invalid picture500 Variable is undefined
502 Object not safe for scripting
503 Object not safe for initializing
504 Object not safe for creating
505 Invalid or unqualified reference
506 Class not defined
507 An exception occurred
5008 Illegal assignment
5017 Syntax error in regular expression
5018 Unexpected quantifier
5019 Expected ']' in regular expression
5020 Expected ')' in regular expression
5021 Invalid range in character set
Table 2. VBScript Syntax Errors
Error Number Description
1001 Out of memory
1002 Syntax error
1005 Expected '('
1006 Expected ')'
1010 Expected identifier
1011 Expected '='
1012 Expected 'If'
1013 Expected 'To'
1014 Expected 'End'
1015 Expected 'Function'

8/22/2019 User Guide Indu Soft
http://slidepdf.com/reader/full/user-guide-indu-soft 1254/1279
Error Number Description
1016 Expected 'Sub'
1017 Expected 'Then'
1018 Expected 'Wend'
1019 Expected 'Loop'
1020 Expected 'Next'
1021 Expected 'Case'
1022 Expected 'Select'
1023 Expected expression
1024 Expected statement
1025 Expected end of statement
1026 Expected integer constant
1027 Expected 'While' or 'Until'
1028 Expected 'While,' 'Until,' or end of statement
1029 Expected 'With'
1030 Identifier too long
1037 Invalid use of 'Me' keyword
1038 'loop' without 'do'
1039 Invalid 'exit' statement
1040 Invalid 'for' loop control variable
1041 Name redefined
1042 Must be first statement on the line
1044 Cannot use parentheses when calling a Sub
1045 Expected literal constant
1046 Expected 'In'
1047 Expected 'Class'
1048 Must be defined inside a Class
1049 Expected Let or Set or Get in property declaration
1050 Expected 'Property'
1051 Number of arguments must be consistent across propertiesspecification
1052 Cannot have multiple default property/method in a Class
1053 Class initialize or terminate do not have arguments

8/22/2019 User Guide Indu Soft
http://slidepdf.com/reader/full/user-guide-indu-soft 1255/1279
Error Number Description
1054 Property Set or Let must have at least one argument
1055 Unexpected 'Next'
1057 'Default' specification must also specify 'Public'
1058 'Default' specification can only be on Property Get
InduSoft Web Studio v7.0 Technical ReferenceCopyright © 2003–2010 Indusoft, Inc.

8/22/2019 User Guide Indu Soft
http://slidepdf.com/reader/full/user-guide-indu-soft 1256/1279
VBScript Editor IntelliSenseIntelliSense provides an array of options that make language references easily accessible. Whencoding, you do not need to leave the Code Editor or the Immediate Mode command window toperform searches on language elements. You can keep your context, find the information you need,insert language elements directly into your code, and even have IntelliSense complete your typing foryou.
IntelliSense comprises the following options…
List Members
You can display a list of valid members from class tags, fields from any tag, properties/methods froman ActiveX object, or functions from the Built-in Scripting Language. Selecting from the list insertsthe member into your code.
When you type the $ character on any VBScript interface, a list box will automatically open with thelist of all tags available for the current project as well as all functions from the Built-in ScriptingLanguage.
Figure 1.
When you type the name of a class tag followed by the dot character ( . ) on any VBScript interface,a list box will automatically open with the list of all members from the class tag:
Figure 2.

8/22/2019 User Guide Indu Soft
http://slidepdf.com/reader/full/user-guide-indu-soft 1257/1279
When you type the name of a tag followed by the hyphen and greater than characters ( -> ) on anyVBScript interface, a list box will automatically open with the list of all fields available for this tag:
Figure 3.
The items are displayed in alphabetic order, and each item has an icon to identify its main type, as
follows:
Icon Type
Boolean Tag
Integer Tag
Real Tag
String Tag
Class Tag
Function from the Built-in Scripting
Language
When you type the name of an ActiveX control that is inserted on the screen followed by the dotcharacter ( . ) on any VBScript interface from the screen where the ActiveX object is inserted, a listbox will automatically open with the list of all properties and methods from the object:
Figure 4.

8/22/2019 User Guide Indu Soft
http://slidepdf.com/reader/full/user-guide-indu-soft 1258/1279
The items are displayed in alphabetic order, and each item has an icon to identify its main type, asfollows:
Icon Type
Property from the ActiveX
objectMethod from the ActiveX object
Parameter Quick Info
The Quick Info option displays pop-up boxes with the information about the functions from the Built-in Scripting Language. The information includes all the parameters supported by this function, withthe currently configured one in bold text.
Figure 5.
Complete Word
Complete word finishes a tag, member, field, function, or ActiveX property/method name once youhave entered enough characters to disambiguate the term. After you type the first few letters of thename, you can press Ctrl+Space to complete the name automatically.
InduSoft Web Studio v7.0 Technical ReferenceCopyright © 2003–2010 Indusoft, Inc.

8/22/2019 User Guide Indu Soft
http://slidepdf.com/reader/full/user-guide-indu-soft 1259/1279
VBScript Compared to VBA
While VBScript and Visual Basic for Applications (VBA) are similar and are both based on the VisualBasic standard language, there are advantages to using VBScript for IWS users:
VBScript is supported for the Microsoft Windows Embedded operating system, and VBA is not.
VBScript brings active scripting to a wide variety of environments, including Web client scriptingin Microsoft Internet Explorer. This prevents operations that may present risks for the ThinClient user, such as direct access to local files.
VBScript was designed to be simple and easy to learn, with some standards from VBA modifiedin VBScript to make it more straightforward. For example, in VBScript the user does not have toworry about the type of each variable when declaring them because VBScript assumes theproper type for each variable automatically.
The following table lists VBScript features that VBA does not have.
Category Feature/Keyword
Declarations Class
Miscellaneous Eval
Execute
Objects RegExp
Script EngineIdentification
ScriptEngine
ScriptEngineBuildVersion
ScriptEngineMajorVersion
The following table lists VBA features that VBScript does not have.
Category Omitted Feature/Keyword
Array Handling Option Base
Declaring arrays with lower bound <> 0
Collection Add, Count, Item, Remove
Access to collections using ! character
ConditionalCompilation #Const#If...Then...#Else
Control Flow DoEvents
GoSub...Return, GoTo

8/22/2019 User Guide Indu Soft
http://slidepdf.com/reader/full/user-guide-indu-soft 1260/1279
Category Omitted Feature/Keyword
On Error GoTo
On...GoSub, On...GoTo
Line numbers, Line labels
Conversion CVar, CVDate
Str, Val
Data Types All intrinsic data types except Variant
Type...End Type
Date/Time Date statement, Time statement
DDE LinkExecute, LinkPoke, LinkRequest, LinkSend
Debugging Debug.Print
End, Stop
Declaration Declare (for declaring DLLs)
Optional
ParamArray
Static
Error Handling Erl
Error
Resume, Resume Next
File Input/Output All traditional Basic file I/O
Financial All financial functions
ObjectManipulation
TypeOf
Objects Clipboard
Collection
Operators Like
Options Deftype
Option Base
Option Compare
Option Private Module
Select Case Expressions containing the Is keyword or any comparison operators
Expressions containing a range of values using the To keyword

8/22/2019 User Guide Indu Soft
http://slidepdf.com/reader/full/user-guide-indu-soft 1261/1279
Category Omitted Feature/Keyword
Strings Fixed-length strings
LSet, RSet
Mid Statement
StrConv
Using Objects Collection access using !
InduSoft Web Studio v7.0 Technical ReferenceCopyright © 2003–2010 Indusoft, Inc.

8/22/2019 User Guide Indu Soft
http://slidepdf.com/reader/full/user-guide-indu-soft 1262/1279
Screen Events
In addition to the Screen Script, you can configure logics using the Built-in Scripting Language for theOn Open, While Open and On Close events for the screen (see the Screen Logic interface from theScreen Attributes dialog). If you configure the Screen Script (VBScript language) and the ScreenLogic (Built-in Scripting Language), IWS will respect the following execution order:
Event Order of execution
When opening thescreen Screen_OnOpen() sub-routine from the Screen Script interface
(VBScript language)
On Open from the Screen Logic interface (Built-in ScriptingLanguage)
When closing thescreen On Close from the Screen Logic interface (Built-in Scripting
Language)
Screen_OnClose() sub-routine from the Screen Script interface(VBScript language)
InduSoft Web Studio v7.0 Technical ReferenceCopyright © 2003–2010 Indusoft, Inc.

8/22/2019 User Guide Indu Soft
http://slidepdf.com/reader/full/user-guide-indu-soft 1263/1279
MsgBox and InputBox FunctionsThe MsgBox() and InputBox() functions from the VBScript language allow you to display pop-upmessages during runtime. These functions are synchronous. When either one is executed, theremaining instructions from the code will not be executed before the pop-up messages launched bythe functions are closed.
Note: The text displayed in these pop-up messages are not affected by the Translation Tool of IWS, unless you configure the text explicitly using the $Ext() function from the Built-in ScriptingLanguage.
InduSoft Web Studio v7.0 Technical ReferenceCopyright © 2003–2010 Indusoft, Inc.

8/22/2019 User Guide Indu Soft
http://slidepdf.com/reader/full/user-guide-indu-soft 1264/1279
VBScript ProceduresIn VBScript, there are two kinds of procedures; the Sub procedure and the Function procedure.
Sub Procedures
A Sub procedure is a series of VBScript statements (enclosed by Sub and End Sub statements) that
perform actions but don't return a value. A Sub procedure can take arguments (constants, variables,or expressions that are passed by a calling procedure). If a Sub procedure has no arguments, its Sub
statement must include an empty set of parentheses ().
The following Sub procedure uses two intrinsic (built-in) VBScript functions, MsgBox and InputBox, toprompt a user for information. It then displays the results of a calculation based on that information.The calculation is performed in a Function procedure created with VBScript. The Function procedure isshown after the following discussion.Sub ConvertTemp()
temp = InputBox("Please enter the temperature in degrees F.", 1)
MsgBox "The temperature is " & Celsius(temp) & " degrees C."
End Sub
Function Procedures
A Function procedure is a series of VBScript statements enclosed by the Function and End Function
statements. A Function procedure is similar to a Sub procedure, but can also return a value. AFunction procedure can take arguments (constants, variables or expressions that are passed to it bya calling procedure). If a Function procedure has no arguments, its Function statement must includean empty set of parentheses. A Function returns a value by assigning a value to its name in one or
more statements of the procedure. The return type of a Function is always a Variant.
In the following example, the Celsius function calculates degrees Celsius from degrees Fahrenheit.When the function is called from the ConvertTemp Sub procedure, a variable containing the argumentvalue is passed to the function. The result of the calculation is returned to the calling procedure anddisplayed in a message box.Sub ConvertTemp()
temp = InputBox("Please enter the temperature in degrees F.", 1)
MsgBox "The temperature is " & Celsius(temp) & " degrees C."
End Sub
Function Celsius(fDegrees)
Celsius = (fDegrees - 32) * 5 / 9End Function
Getting Data Into and Out of Procedures
Each piece of data is passed into your procedures using an argument . Arguments serve as

8/22/2019 User Guide Indu Soft
http://slidepdf.com/reader/full/user-guide-indu-soft 1265/1279
placeholders for the data you want to pass into your procedure. You can name your arguments anyvalid variable name. When you create a procedure using either the Sub statement or the Function
statement, parentheses must be included after the name of the procedure. Any arguments are placedinside these parentheses, separated by commas. For example, in the following example, fDegrees is aplaceholder for the value being passed into the Celsius function for conversion.Function Celsius(fDegrees)
Celsius = (fDegrees - 32) * 5 / 9
End Function
To get data out of a procedure, you must use a Function. Remember, a Function procedure can
return a value; a Sub procedure cannot.
Using Sub and Function Procedures in Code
A Function in your code must always be used on the right side of a variable assignment or in anexpression. For example:Temp = Celsius(fDegrees)
or
MsgBox "The Celsius temperature is " & Celsius(fDegrees) & " degrees."
To call a Sub procedure from another procedure, type the name of the procedure along with valuesfor any required arguments, each separated by a comma. The Call statement is not required, but if you do use it, you must enclose any arguments in parentheses.
The following example shows two calls to the MyProc procedure. One uses the Call statement in thecode; the other doesn't. Both do exactly the same thing.Call MyProc(firstarg, secondarg)
MyProc firstarg, secondarg
Notice that the parentheses are omitted in the call when the Call statement isn't used.
InduSoft Web Studio v7.0 Technical ReferenceCopyright © 2003–2010 Indusoft, Inc.

8/22/2019 User Guide Indu Soft
http://slidepdf.com/reader/full/user-guide-indu-soft 1266/1279
Creating ConstantsA constant is a meaningful name that takes the place of a number or string and never changes.VBScript defines a number of intrinsic constants.
You create user-defined constants in VBScript using the Const statement. Using the Const statement,you can create string or numeric constants with meaningful names and assign them literal values. Forexample:Const MyString = "This is my string."
Const MyAge = 49
Note that the string literal is enclosed in quotation marks (" "). Quotation marks are the mostobvious way to differentiate string values from numeric values. You represent Date literals and timeliterals by enclosing them in number signs (#). For example:Const CutoffDate = #6-1-97#
You may want to adopt a naming scheme to differentiate constants from variables. This will prevent
you from trying to reassign constant values while your script is running. For example, you might wantto use a "vb" or "con" prefix on your constant names, or you might name your constants in all capital
letters. Differentiating constants from variables eliminates confusion as you develop more complexscripts.
InduSoft Web Studio v7.0 Technical ReferenceCopyright © 2003–2010 Indusoft, Inc.

8/22/2019 User Guide Indu Soft
http://slidepdf.com/reader/full/user-guide-indu-soft 1267/1279
Declaring VariablesA variable is a convenient placeholder that refers to a computer memory location where you canstore program information that may change during the time your script is running. In VBScript,variables are always of one fundamental data type, Variant.
You declare variables explicitly in your script using the Dim statement, the Public statement, and thePrivate statement. For example:Dim DegreesFahrenheit
You declare multiple variables by separating each variable name with a comma. For example:Dim Top, Bottom, Left, Right
You can also declare a variable implicitly by simply using its name in your script. That is not generallya good practice because you could misspell the variable name in one or more places, causingunexpected results when your script is run. For that reason, the Option Explicit statement isconfigured by default in the Global Procedures interface to require explicit declaration of all variables.
Unless you delete this statement, you need to declare all variables explicitly; otherwise, VBScript willgenerate errors during runtime indicating that the variable does not exist.
An expression should have the variable on the left side and the value you want to assign to thevariable on the right. For example:MyVar = 100
InduSoft Web Studio v7.0 Technical ReferenceCopyright © 2003–2010 Indusoft, Inc.

8/22/2019 User Guide Indu Soft
http://slidepdf.com/reader/full/user-guide-indu-soft 1268/1279
Scope and Lifetime of VariablesA variable's scope is determined by where you declare it. When you declare a variable within aprocedure, only code within that procedure can access or change the value of that variable. It haslocal scope and is a procedure-level variable. If you declare a variable outside a procedure, you makeit recognizable to all the procedures in your script. This is a script-level variable, and it has script-level scope.
The lifetime of a variable depends on how long it exists. The lifetime of a script-level variable extendsfrom the time it is declared until the time the script is finished running. At procedure level, a variableexists only as the procedure runs. When the procedure exits, the variable is destroyed. Localvariables are ideal as temporary storage space when a procedure is executing. You can have localvariables of the same name in several different procedures because each is recognized only by theprocedure in which it is declared.
InduSoft Web Studio v7.0 Technical Reference
Copyright © 2003–2010 Indusoft, Inc.

8/22/2019 User Guide Indu Soft
http://slidepdf.com/reader/full/user-guide-indu-soft 1269/1279
Boolean Tags and Boolean Variables
By default, Boolean variables in VBScript are handled differently than Boolean tags are handled inIWS. The Boolean states of FALSE and TRUE have the same meaning, but the numeric values of TRUE are different, as shown in the table below.
Boolean State Numeric Value in…
Project Tag VBScript Variable
FALSE 0 0
TRUE 1 - 1
Note: In VBScript, False and True are also reserved as keywords.
This difference in how Booleans are handled can seriously affect runtime behavior if you use VBScriptin your project. Logical and arithmetic operations — especially the NOT operator — could change tagvalues in unexpected ways.
You can change this behavior, if necessary, by changing your project's runtime settings.
Changing How VBScript Handles Boolean Tags
You can change the way VBScript handles Boolean tags by activating "VB Boolean" mode. To do this,edit your project file ( project_name.app) to change the following setting:
[Script]
VBBoolean=value
If VBBoolean is set to 0, then the project will behave as described above: all VBScript functions andoperations will read/write a value of -1 for TRUE to Boolean tags. This is the default setting forprojects created with InduSoft Web Studio v6.1+SP3 or earlier and then updated to v6.1+SP4, inorder to maintain backward compatibility.
If VBBoolean is set to 1, then VBScript — as it is implemented within IWS — will read/write a value of 1for TRUE to Boolean tags. (This does not affect Integer or Real tags.) This is the default setting for
projects created with InduSoft Web Studio v6.1+SP4 or later.
Note: Be careful when defining a custom property on a Linked Symbol using the #Label:@Pointer
syntax. For example:'The following statements are valid
If $MyBoolean = 1 Then
End If

8/22/2019 User Guide Indu Soft
http://slidepdf.com/reader/full/user-guide-indu-soft 1270/1279
If $MyBoolean = True Then
End If
If #Mne:@MyPointer = True Then
End If
'The following statement is invalid
If #Mne:@MyPointer = 1 ThenEnd If
InduSoft Web Studio v7.0 Technical ReferenceCopyright © 2003–2010 Indusoft, Inc.

8/22/2019 User Guide Indu Soft
http://slidepdf.com/reader/full/user-guide-indu-soft 1271/1279
Writing Real Values to Integer TagsBy default, a Real (i.e., floating point) value is truncated at the decimal point when it is written to anInteger tag. This behavior is the same in both the Built-in Scripting Language and in VBScript.
You can change this behavior in VBScript, however, by disabling the "TruncRealToInt" runtimesetting. To do this, edit your project file ( project_name.app) to change the following line:
[Script]
TruncRealToInt=value
If TruncRealToInt is set to 1, then the project will behave as described above: Real values will betruncated at the decimal point without rounding. (For example, a value of 5.56 will be written as 5 toan Integer tag.) This is the default setting for projects created with InduSoft Web Studio v6.1+SP4 orearlier and then updated to v6.1+SP5, in order to maintain backward compatibility.
If TruncRealToInt is set to 0, then VBScript functions and operations will round Real values to thenearest integer. (For example, a value of 5.56 will be written as 6 to an Integer tag.) This is thedefault setting for projects created with InduSoft Web Studio v6.1+SP5 or later.
Note: This setting only affects the behavior of VBScript in IWS. It does not affect the behavior of
the Built-in Scripting Language.
InduSoft Web Studio v7.0 Technical ReferenceCopyright © 2003–2010 Indusoft, Inc.

8/22/2019 User Guide Indu Soft
http://slidepdf.com/reader/full/user-guide-indu-soft 1272/1279
Precedence of VBScript OperatorsVBScript has a full range of operators, including arithmetic operators, comparison operators,concatenation operators, and logical operators.
When several operations occur in an expression, each part is evaluated and resolved in apredetermined order called "operator precedence." You can use parentheses to override the order of precedence and force some parts of an expression to be evaluated before others. Operations withinparentheses are always performed before those outside. Within parentheses, however, standardoperator precedence is maintained.
When expressions contain operators from more than one category, arithmetic operators areevaluated first, comparison operators are evaluated next, and logical operators are evaluated last.Comparison operators all have equal precedence; that is, they are evaluated in the left-to-right orderin which they appear. Arithmetic and logical operators are evaluated in the following order of precedence.
Arithmetic Comparison Logical
Negation (-) Equality (=) Not
Exponentiation (^) Inequality (<>) And
Multiplication and division (*, /) Less than (<) Or
Integer division (\) Greater than (>) Xor
Modulus arithmetic (Mod) Less than or equal to (<=) Eqv
Addition and subtraction (+, -) Greater than or equal to (>=) Imp
String concatenation (&) Is &
When multiplication and division occur together in an expression, each operation is evaluated as itoccurs from left to right. Likewise, when addition and subtraction occur together in an expression,each operation is evaluated in order of appearance from left to right.
The string concatenation (&) operator is not an arithmetic operator, but in precedence it falls after allarithmetic operators and before all comparison operators. The Is operator is an object referencecomparison operator. It does not compare objects or their values; it checks only to determine if twoobject references refer to the same object.
InduSoft Web Studio v7.0 Technical ReferenceCopyright © 2003–2010 Indusoft, Inc.

8/22/2019 User Guide Indu Soft
http://slidepdf.com/reader/full/user-guide-indu-soft 1273/1279
Logical Operator NOTThe logical operator NOT behaves differently in VBScript than it does in the built-in scriptinglanguage.
NOT Operator in VBScript
In VBScript, the NOT operator inverts the bits of a given numeric value, producing its complementnumber according to the "two's complement" system of signed numbers that is used by computers.The table below illustrates the behavior of the NOT operator in VBScript for the syntax…
result= NOT expression
If e x p r es s i o n is… Then r e su lt is…- 3 2
- 2 1
- 1 0
0 - 1
1 - 2
2 - 3
3 - 4
Note: By default, when you attempt to write any numeric value other than 0 to a Boolean tag,the tag automatically assumes a value of 1. Therefore, if VBScript's NOT operator is applied to aBoolean tag with a value of 1, then the value of the tag does not change; the operator returns avalue of -2, but the tag cannot accept this value so it again assumes a value of 1.
You can configure IWS to treat Boolean tags like Boolean variables in VBScript, so that the NOToperator in VBScript will work as expected. For more information, please see Boolean Tags andBoolean Variables.
NOT Operator in Built-in Language
In contrast, the NOT operator in the Built-in Scripting Language toggles the given numeric value as if it is a natural boolean. The table below illustrates the behavior of the NOT operator in the Built-inScripting Language for the syntax…
result= NOT expression

8/22/2019 User Guide Indu Soft
http://slidepdf.com/reader/full/user-guide-indu-soft 1274/1279
If e x p r es s i o n is… Then r e su lt is…
0 1
0 0
InduSoft Web Studio v7.0 Technical ReferenceCopyright © 2003–2010 Indusoft, Inc.

8/22/2019 User Guide Indu Soft
http://slidepdf.com/reader/full/user-guide-indu-soft 1275/1279
Using Conditional Statements
You can control the flow of your script with conditional statements and looping statements. Usingconditional statements, you can write VBScript code that makes decisions and repeats actions. Thefollowing conditional statements are available in VBScript:
If…Then…Else statement
Select Case statement
Making Decisions Using If…Then…Else
The If…Then…Else statement is used to evaluate whether a condition is True or False and, depending onthe result, to specify one or more statements to run. Usually the condition is an expression that usesa comparison operator to compare one value or variable with another. For information aboutcomparison operators, see Comparison Operators.
If…Then…Else statements can be nested to as many levels as you need.
Running Statements if a Condition is True
To run only one statement when a condition is True, use the single-line syntax for the If…Then…Else
statement. The following example shows the single-line syntax. Notice that this example omits theElse keyword:Sub FixDate()
Dim myDate
myDate = #2/13/95#
If myDate < Now Then myDate = Now
End Sub
To run more than one line of code, you must use the multiple-line (or block) syntax. This syntaxincludes the End If statement, as shown in the following example:Sub AlertUser(value)
If value = 0 Then
AlertLabel.ForeColor = vbRed
AlertLabel.Font.Bold = True
AlertLabel.Font.Italic = True
End If
End Sub
Running Certain Statements if a Condition is True and Running Others if a Condition is
False
You can use an If…Then…Else statement to define two blocks of executable statements: one block torun if the condition is True, and the other block to run if the condition is False:Sub AlertUser(value)
If value = 0 Then
AlertLabel.ForeColor = vbRed

8/22/2019 User Guide Indu Soft
http://slidepdf.com/reader/full/user-guide-indu-soft 1276/1279
AlertLabel.Font.Bold = True
AlertLabel.Font.Italic = True
Else
AlertLabel.Forecolor = vbBlack
AlertLabel.Font.Bold = False
AlertLabel.Font.Italic = False
End If
End Sub
Deciding Between Several Alternatives
A variation on the If…Then…Else statement allows you to choose from several alternatives. AddingElseIf clauses expands the functionality of the If…Then…Else statement, so you can control programflow based on different possibilities. For example:Sub ReportValue(value)
If value = 0 Then
MsgBox value
ElseIf value = 1 Then
MsgBox value
ElseIf value = 2 then
Msgbox value
Else
Msgbox "Value out of range!"
End If
End Sub
You can add as many ElseIf clauses as you need to provide alternative choices, but extensive use of the ElseIf clauses often becomes cumbersome. A better way to choose between several alternativesis the Select Case statement.
Making Decisions with Select Case
The Select Case structure provides an alternative to If…Then…ElseIf for selectively executing one blockof statements from among multiple blocks of statements. A Select Case statement provides capabilitysimilar to the If…Then…Else statement, but it makes code more efficient and readable.
A Select Case structure works with a single test expression that is evaluated once, at the top of thestructure. The result of the expression is then compared to the values for each Case in the structure.If there is a match, the block of statements associated with that Case is executed, as in the followingexample:Select Case Document.Form1.CardType.Options(SelectedIndex).Text
Case "MasterCard"
DisplayMCLogo
ValidateMCAccount
Case "Visa"DisplayVisaLogo
ValidateVisaAccount
Case "American Express"
DisplayAMEXCOLogo
ValidateAMEXCOAccount
Case Else

8/22/2019 User Guide Indu Soft
http://slidepdf.com/reader/full/user-guide-indu-soft 1277/1279
DisplayUnknownImage
PromptAgain
End Select
Notice that the Select Case structure evaluates an expression once at the top of the structure. Incontrast, the If…Then…ElseIf structure can evaluate a different expression for each ElseIf statement.You can replace an If…Then…ElseIf structure with a Select Case structure only if each ElseIf statementevaluates the same expression.
InduSoft Web Studio v7.0 Technical ReferenceCopyright © 2003–2010 Indusoft, Inc.

8/22/2019 User Guide Indu Soft
http://slidepdf.com/reader/full/user-guide-indu-soft 1278/1279
Looping Through CodeLooping allows you to run a group of statements repeatedly. Some loops repeat statements until acondition is False; others repeat statements until a condition is True. There are also loops that repeatstatements a specific number of times.
The following looping statements are available in VBScript:
Do…Loop: Loops while or until a condition is True
While…Wend: Loops while a condition is True
For…Next: Uses a counter to run statements a specified number of times
Using Do Loops
You can use Do…Loop statements to run a block of statements an indefinite number of times. The
statements are repeated either while a condition is True or until a condition becomes True.
Repeating Statements While a Condition is True
Use the While keyword to check a condition in a Do…Loop statement. You can check the conditionbefore you enter the loop (as shown in the following ChkFirstWhile example), or you can check it afterthe loop has run at least once (as shown in the ChkLastWhile example). In the ChkFirstWhile
procedure, if myNum is set to 9 instead of 20, the statements inside the loop will never run. In theChkLastWhile procedure, the statements inside the loop run only once because the condition is alreadyFalse.Sub ChkFirstWhile()
Dim counter, myNum
counter = 0
myNum = 20Do While myNum > 10
myNum = myNum - 1
counter = counter + 1
Loop
MsgBox "The loop made " & counter & " repetitions."
End Sub
Sub ChkLastWhile()
Dim counter, myNum
counter = 0
myNum = 9
DomyNum = myNum - 1
counter = counter + 1
Loop While myNum > 10
MsgBox "The loop made " & counter & " repetitions."
End Sub

8/22/2019 User Guide Indu Soft
http://slidepdf.com/reader/full/user-guide-indu-soft 1279/1279