user guide webex cloud connected audio (cca) 2016 page 2 of 67 user guide webex cloud connected...
TRANSCRIPT

December 2016 Page 1 of 67
User Guide WebEx Cloud
Connected Audio (CCA)
Overview
The changes identified in the WebEx Cloud Connected Audio User Guide will affect all users currently
utilizing WebEx.
What is WebEx Cloud Connected Audio?
Cisco’s secure, cloud-based audio server is referred to as Cisco WebEx Cloud Connected Audio (CCA). WebEx CCA is a Cloud-based server that will replace the on-premises Meet NY WebEx Audio server. When users call into WebEx, they will no longer hear the greeting “Welcome to Meeting Place”, instead they will hear “Welcome to WebEx”.
Why is WebEx CCA being implemented for New York State?
The on-premises MeetNY audio server is currently nearing its last day of support. This requires transition to a new server, and WebEx CCA was selected as an effective replacement.
The cloud-based solution provides additional redundancy as well as the ability to increase system capacity to handle additional users, or call volume, more quickly.
MeetNY WebEx CCA User Guide
This User Guide is designed to walk users through the process of hosting or attendance in a MeetNY meeting. The audio features will remain (“I Will Call In”, “Call me”) along with the addition of “Call Using Computer”. For this option, users will need a headset or speakers and a microphone.
December 2016 Page 2 of 67
User Guide WebEx Cloud
Connected Audio (CCA)
For hosts, this user guide will explain how to schedule an online meeting, invite attendees, and run an online meeting. Attendees will learn how to attend a MeetNY online meeting that they have been invited to attend.
Need Help?
The Enterprise Service Desk, your local Service Desk or LAN Administrator are ready to help you! Please see page 67 for details. If you experience any issues or need assistance, please contact the Enterprise Services Desk at 1-844-891-1786. Help is also available by email at [email protected], or you can chat online with a Service Desk representative at https://chat.its.ny.gov.

December 2016 Page 3 of 67
User Guide WebEx Cloud
Connected Audio (CCA)
How will this improve my WebEx user experience?
WebEx CCA will provide an exceptional user experience with integrated audio, video and web conferencing across any device. CCA allows for Cisco WebEx Integrated Audio, and gives attendees the option to connect using VoIP or their computers’ built-in audio. Wideband audio support for VoIP provides outstanding audio quality.
CCA is a global solution with connectivity in regions where WebEx conferencing does not provide it. CCA can accommodate telephony and VoIP participants simultaneously.
CCA offers the ability to create a “Personal WebEx Conference Room” where you can schedule ahead, or leave your virtual door open and let attendees “drop in.” For additional privacy, hosts may “lock” their
Personal room, so participants join only when you are ready.
How do I quickly start, schedule or join a WebEx CCA online meeting?
The quickest and easiest way to start, schedule or join a WebEx CCA online meeting is by downloading WebEx Meeting Center Productivity Tools.
Please check to see if you currently have the WebEx Productivity Tools by opening Microsoft Outlook.
You will see two extra WebEx buttons if you have the Tools installed already.
You will need to remove this version of the Productivity Tools. You must have admin rights to the PC to
install.
If you do not see these two icons you will only need to install the tools.
Please see page 4 for more information.

December 2016 Page 4 of 67
User Guide WebEx Cloud
Connected Audio (CCA)
Instructions are as follows:
1. Click on the Start Button 2. Click on Control Panel 3. Click on Programs 4. Under Programs and Features, click on Uninstall a Program 5. Scroll down to and click on WebEx Productivity Tools and click Uninstall. Follow the prompts to
uninstall. 6. You must then reinstall the new version of WebEx Productivity Tools.
Instructions are as follows:
Downloading Productivity Tools. You must have admin rights to the PC to install
1. Log in to your WebEx service site (meetny.webex.com.) 2. Click My WebEx, Click Support (left column) 3. Click Meeting Center (under Downloads for Individual Services) 4. Select a Windows or Mac version of Productivity Tools. 5. Click Download In the dialog box that opens at bottom, click Run.
6. In the Install Wizard will install box click Next
7. Click the I Accept radio button then click Next
8. User Control Box opens, click Yes
9. Change destination box will open, accept default location, click Next
10. Click Finish to complete the installation.
If you DO NOT see the two extra buttons on your Outlook toolbar, you do not have the Productivity
Tools and will need to install them by following the instructions below. Again, you must have admin
rights to your PC in order to do this install.
1. Log in to your WebEx service site (meetny.webex.com.) 2. Click My WebEx, Click Support (left column) 3. Click Meeting Center (under Downloads for Individual Services) 4. Select a Windows or Mac version of Productivity Tools. 5. Click Download In the dialog box that opens at bottom, click Run.
6. In the Install Wizard will install box click Next
7. Click the I Accept radio button then click Next
8. User Control Box opens, click Yes
9. Change destination box will open, accept default location, click Next
10. Click Finish to complete the installation.

December 2016 Page 5 of 67
User Guide WebEx Cloud
Connected Audio (CCA)
Configuring Productivity Tools:
From WebEx Settings, you can verify your account information, specify which programs use Productivity
Tools, select preferences for instant and scheduled meetings, and choose Meet Now settings. You can
access WebEx Settings from most programs in which Productivity Tools were installed.
To change WebEx Settings:
1. Select Edit WebEx Settings on the Cisco WebEx Meet Now Panel.
Note: If the panel is not visible, right-click the WebEx Meet Now icon in the system tray, then select
WebEx Meetings. The WebEx Settings dialog appears.

December 2016 Page 6 of 67
User Guide WebEx Cloud
Connected Audio (CCA)
2. Verify your WebEx site URL (https://meetny.webex.com, https://meetnydirect.webex.com) and user
name, enter your password, then click Apply.
https://meetny.webex.com/meetny or
https://meetnydirect.webex.com
NYS MeetNY Account email address
Outlook password
Click Apply

December 2016 Page 7 of 67
User Guide WebEx Cloud
Connected Audio (CCA)
3. Select the appropriate tab to configure your WebEx Settings.
Account: Your WebEx Account information is automatically configured during installation. Use this tab to
log in, or to change your WebEx site URL, host account user name, password, language or location.
"Meet Now" Settings: These options affect meetings started instantly from the Meet Now panel or
Microsoft Office Outlook.
Preferences: This tab enables you to specify the behavior of the Meet Now panel, and select options
that will be available when the panel is displayed. It also lists your default address book (Microsoft
Outlook) for scheduled meetings.
Tools: On this tab you can select which programs will include WebEx integrations and shortcuts. By
default, all programs installed on your computer will have Productivity Tools installed.
4. Make your changes, then choose one of the following options:
Click Apply to save your changes and keep the WebEx Settings dialog open.
Click OK to save your changes and close the WebEx Settings dialog.
The Communicating with server message is displayed while your settings are being updated.
Configuring Meet Now settings (Web version)
If you decide not to install Productivity Tools, you can still use Meet Now from your WebEx services site. The web version of Meet Now requires separate setup.
For information on using the desktop version of Meet Now, please see Productivity Tools: Using WebEx Meet Now--Desktop Client (WBS29.13, WBS30).

December 2016 Page 8 of 67
User Guide WebEx Cloud
Connected Audio (CCA)
To configure Meet Now settings (web version):
1. Log in to your Meeting Center service site.
2. Select My WebEx, then click Preferences in the left navigation menu. The Preferences page appears.

December 2016 Page 9 of 67
User Guide WebEx Cloud
Connected Audio (CCA)
3. Click "Meet Now" settings. The setup page appears.
4. Specify your Meeting Information and Audio Connection settings.
5. Click Save to save your settings, or click Save and Start Meeting to save the settings and start a
meeting.
Note: You can also start a meeting from the home page of your WebEx site by clicking Host a Meeting > Meet Now in the left navigation panel.
If “Use Personal Room for
all my instant meetings” is
checked you cannot
customize your Meet Now
meeting.

December 2016 Page 10 of 67
User Guide WebEx Cloud
Connected Audio (CCA)
Scheduling a WebEx Meeting
While you are scheduling an on-site meeting from Outlook, you can easily add a WebEx meeting so that attendees who are not on-site can participate online.
To schedule a WebEx meeting:
1. Click Schedule Meeting in the Outlook Ribbon. A new appointment window opens.
2. Enter the meeting information as you normally would.
3. Click Add WebEx Meeting, then select Add WebEx Meeting.
The WebEx Settings dialog appears.
4. Enter a meeting password.
Note: Modify settings as necessary. Refer to the tables following step 6 for explanations of the available features.
5. When you have finished scheduling and modifying settings, click OK.
6. Click Send. Attendees will receive an email invitation with a link to the meeting, and the meeting will be added to your Outlook calendar and to the scheduled meetings list on your My WebEx page.

December 2016 Page 11 of 67
User Guide WebEx Cloud
Connected Audio (CCA)
Meeting Information:
Use this option... To...
Meeting template
Select a template to use for the meeting. Templates are created on your WebEx service site and determine the basic settings that will be used for the meeting.
Service type Select the type of WebEx session you want to schedule. This option lists only the session types available for your site and user account.
Exclude password from invitation
If you select this option for added security, you will need to communicate the password to attendees using another method.
Attendees can join the meeting...
Select this option to allow attendees to join before the host. You must specify the number of minutes if you select this option.
Audio & Tracking:
Use this option... To...
Audio connection type
Select the type of audio connection you want to use.
WebEx CCA. Includes a WebEx integrated meeting. Instructions for joining meeting audio appear on participants’ screens when they join the meeting.
Other Meeting. Includes a meeting provided by another service, such as a third-party teleconferencing service or internal teleconferencing system.
Use VoIP only. Participants can connect to meeting audio only using integrated VoIP.
None. Does not include meeting or integrated VoIP. Participants will only able to communicate in the meeting using chat.
Entry and exit tone Select whether you want to hear a tone, or participants name's when they join and leave the meeting.

December 2016 Page 12 of 67
User Guide WebEx Cloud
Connected Audio (CCA)
Registration:
Use this option... To...
Require Attendee Registration Specify that all attendees must register to attend the meeting.
Automatically accept registration requests Accept all registration requests automatically, and let all registrants attend the meeting.
Resources:
Use this option... To...
Alternate host Specify an alternate host for the meeting.
Info tab templates Determine the meeting details displayed on the Meeting Info tab.
Auto-play presentation Upload a presentation or document, in UCF format, to display while attendees are waiting for the meeting to start.
To start a scheduled meeting:
If you have scheduled a WebEx meeting from Microsoft Outlook, you can start it in any of the following ways.
Open the appointment on your Outlook calendar, then click the meeting link.
Click Schedule Meeting in the Outlook Ribbon, select My WebEx, locate the meeting, and then click Start.
Click Schedule Meeting in the Outlook Ribbon, choose Start a Scheduled Meeting, select the meeting, then click Start.

December 2016 Page 13 of 67
User Guide WebEx Cloud
Connected Audio (CCA)
To cancel a scheduled meeting:
1. Open your Outlook calendar, then double-click the appointment. The Calendar Entry opens.
2. Click the Cancel WebEx Meeting. The button changes to Add WebEx Meeting.
3. Click Send Update. Attendees who received an invitation to the meeting will be notified that the WebEx portion of the meeting has been has been cancelled.
Note: This cancels only the WebEx portion of the meeting. It does not delete the meeting from your Outlook calendar.
Editing a single occurrence in a series:
You can change an occurrence of a recurring meeting from your Outlook calendar to:
Change the date and time
Note: The new date and time must be after the previous meeting in the series, and before the next meeting in the series.
Invite or remove attendees
Remove WebEx from a meeting series that includes WebEx.
Note: You cannot add WebEx to a meeting in a series that that does not already include WebEx.
To change an occurrence of a recurring meeting:
1. Locate the meeting you want to change on your Outlook calendar.
2. Double-click the meeting occurrence. The Open Recurring Item dialog is displayed.
3. Select Open this occurrence, then click OK.
4. Make your changes, then click Send Update. The meeting occurrence is updated on your Outlook calendar and on your WebEx site. Attendees are notified of the change. Any edit to an Outlook recurring meeting that includes WebEx WILL change the meeting ID but ONLY for that one occurrence. Please make sure all attendees make a note of the new meeting ID for the changed occurrence.

December 2016 Page 14 of 67
User Guide WebEx Cloud
Connected Audio (CCA)
Starting an Instant WebEx Meeting
Click Meet Now in the Outlook Ribbon. A WebEx meeting is launched.
To specify options for instant meetings:
1. Click Schedule Meeting in the Outlook Ribbon, then select Account Settings. The Account Settings dialog appears.
2. Click Meet Now Settings.
3. Make any necessary changes, then click OK. The updated settings will be used the next time you start an instant meeting.
December 2016 Page 15 of 67
User Guide WebEx Cloud
Connected Audio (CCA)
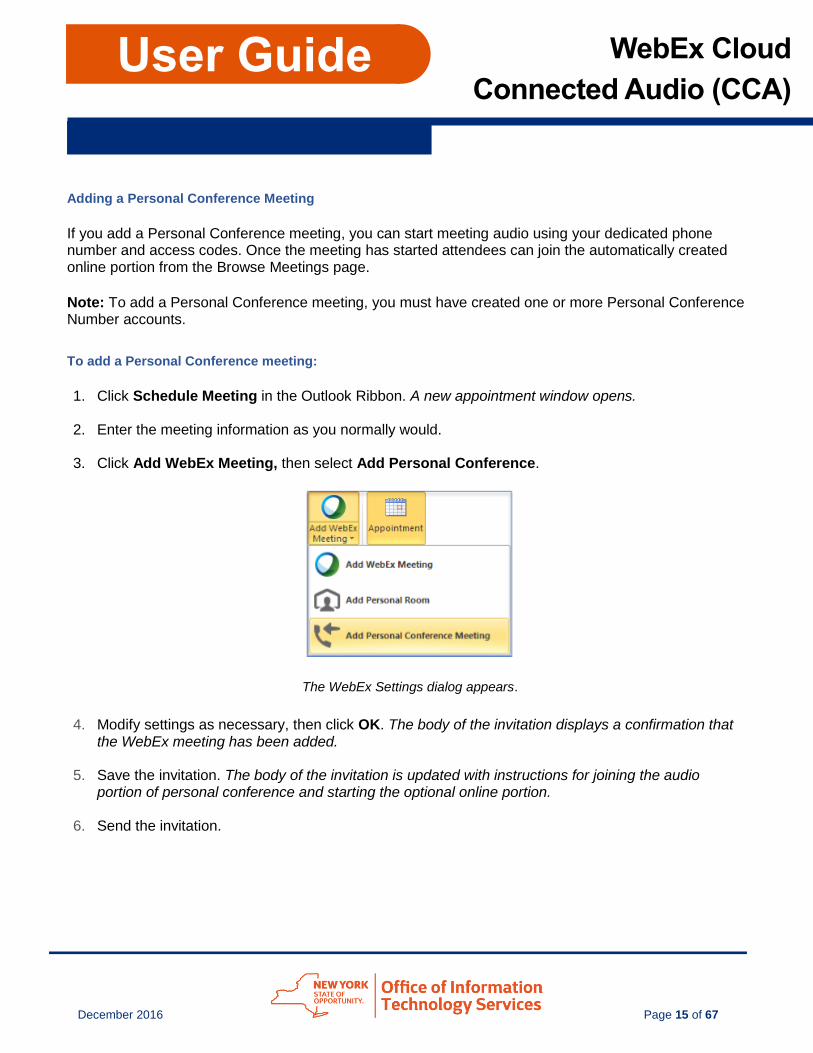
Adding a Personal Conference Meeting
If you add a Personal Conference meeting, you can start meeting audio using your dedicated phone number and access codes. Once the meeting has started attendees can join the automatically created online portion from the Browse Meetings page.
Note: To add a Personal Conference meeting, you must have created one or more Personal Conference Number accounts.
To add a Personal Conference meeting:
1. Click Schedule Meeting in the Outlook Ribbon. A new appointment window opens.
2. Enter the meeting information as you normally would.
3. Click Add WebEx Meeting, then select Add Personal Conference.
The WebEx Settings dialog appears.
4. Modify settings as necessary, then click OK. The body of the invitation displays a confirmation that the WebEx meeting has been added.
5. Save the invitation. The body of the invitation is updated with instructions for joining the audio portion of personal conference and starting the optional online portion.
6. Send the invitation.

December 2016 Page 16 of 67
User Guide WebEx Cloud
Connected Audio (CCA)
To start a Personal Conference meeting:
If you have scheduled a Personal Conference meeting from Microsoft Outlook:
Open the appointment on your Outlook calendar, then click the meeting link.
To cancel a Personal Conference meeting:
1. Open your Outlook calendar, then double-click the appointment. The Calendar Entry opens.
2. Click Cancel Personal Conference Meeting. The button changes to Add Personal Conference Meeting.
3. Click Send Update. Attendees who received an invitation to the meeting will be notified that the WebEx portion of the meeting has been has been cancelled.
Note: This cancels only the Personal Conference portion of the meeting. It does not delete the meeting from your Outlook calendar.
Starting an Impromptu Personal Conference Meeting
Once you have created one or more Personal Conference Number accounts, you can start impromptu Personal Conference Meetings from Outlook.

December 2016 Page 17 of 67
User Guide WebEx Cloud
Connected Audio (CCA)
To start an impromptu Personal Conference Meeting:
4. Click Schedule Meeting in the Outlook Ribbon, then Select Start Personal Conference Meeting.
The Start Personal Conference Meeting dialog appears.
2. Click Invite Attendees. A new appointment window opens. The Subject is prefilled with, "Please join my Personal Conference meeting now."
3. Enter the meeting information as you normally would, then click Send.
Adding a Personal Room Meeting
If you add a Personal Room meeting, invited attendees can access your personal room by clicking the link in the invitation email, or in the appointment on their Outlook calendar.

December 2016 Page 18 of 67
User Guide WebEx Cloud
Connected Audio (CCA)
To add your Personal Room meeting:
5. Click Schedule Meeting in the Outlook Ribbon. A new appointment window opens.
6. Enter the meeting information as you normally would.
7. Click Add WebEx Meeting, then select Add Personal Room.
The body of the invitation displays a confirmation that the WebEx meeting has been added.
3. Save the invitation.
The body of the invitation is updated with instructions for entering your personal room.

December 2016 Page 19 of 67
User Guide WebEx Cloud
Connected Audio (CCA)
5. Send the invitation.
Note: If you have not entered your personal room when attendees arrive, they will wait in the lobby until you enter, or until you admit them if you have locked the room.
To start a Personal Room meeting:
If you have scheduled a Personal Room meeting from Microsoft Outlook:
1. Open the appointment on your Outlook calendar, then click the meeting link. Your personal room page opens.
2. Click Enter Room.
3. Enter your user name and password if requested. The Meeting window opens and your meeting starts. Attendees you invited will be able to enter your Personal Room.

December 2016 Page 20 of 67
User Guide WebEx Cloud
Connected Audio (CCA)
To cancel a Personal Room meeting:
1. Open your Outlook calendar, then double-click the appointment. The Calendar Entry opens.
2. Click Cancel Personal Room. The button changes to Add Personal Room .
3. Click Send Update. Attendees who received an invitation to the meeting will be notified that the Personal Room portion of the meeting has been has been cancelled.
Note: This cancels only the Personal Room portion of the meeting. It does not delete the meeting from your Outlook calendar.
Joining a WebEx Meeting
Meeting attendees can join a WebEx meeting you schedule from Microsoft Outlook by doing any of the following.
Clicking the link in the invitation email.
Opening the meeting’s calendar entry (if it was added to the Outlook calendar), then clicking the link to the meeting.
Starting an Instant Meeting
8. Double click the WebEx Productivity Tools icon in the taskbar or on your desktop. The WebEx Meet Now panel appears.
9. Type the email addresses of people you want to invite to your meeting. Type a semi-colon between multiple addresses. You may enter up to 16 addresses.

December 2016 Page 21 of 67
User Guide WebEx Cloud
Connected Audio (CCA)
To select from your Outlook address book or contacts folder, click Address Book icon.
3. Click Meet Now. The meeting starts and invitations are sent. The Meet Now button changes to Invite to Meeting.
December 2016 Page 22 of 67
User Guide WebEx Cloud
Connected Audio (CCA)
Inviting Attendees to a Meeting
You can invite additional attendees to your meeting after it has started from the Meeting window, from the Meet Now panel, or by forwarding the meeting confirmation email.
From the Meeting window:
1. On the Quick Start page, click Invite & Remind.
2. Type the email addresses of people you want to invite, then click Send. Meeting invitations are sent.
From the Meet Now panel:
1. If the Meet Now panel is not displayed, click the WebEx Productivity Tools icon in the taskbar or on your desktop.
2. Type the email addresses of people you want to invite, then click Invite to Meeting. Meeting invitations are sent.
From your inbox:
1. Locate the meeting confirmation email in your inbox. It will have (Forward to Attendees) in the subject line.
2. Click Forward, type the email addresses of people you want to invite, then click Send.

December 2016 Page 23 of 67
User Guide WebEx Cloud
Connected Audio (CCA)
Join a Meeting in Progress
If you have the host’s email address, or the meeting number, you can use the Meet Now panel to join any meeting in progress. The host can choose to accept or reject your request to enter the meeting (if this option has been enabled in WebEx site administration).
To join a meeting in progress:
1. If the Meet Now panel is not displayed, click the WebEx Productivity Tools icon in the taskbar or on your desktop.
2. Enter the host’s email address or the meeting number.
3. Click Join Meeting. You are connected to the meeting, unless:
The meeting has not started.
You do not have an account on the WebEx site where the meeting is being held.
The email address or meeting number you entered is incorrect.
4. Depending on the host’s settings, wait for the host’s approval or enter the meeting password to join. Once you join, the controls on your Meet Now panel are deactivated.
Starting a Scheduled Meeting
1. If the Meet Now panel is not displayed, click the WebEx Productivity Tools icon in the taskbar or on your desktop.
2. Click Start Scheduled Meeting. A list of today’s scheduled meetings appears.
3. Click the meeting you want to start, then click Start. The meeting starts.
Note: If you have not previously invited attendees, you can do so during the meeting using one of the methods described under Inviting Attendees to a Meeting.

December 2016 Page 24 of 67
User Guide WebEx Cloud
Connected Audio (CCA)
Scheduling a Meeting Using Outlook
WebEx Productivity Tools enable you to schedule meetings using Microsoft Outlook.
To schedule a meeting:
1. If the Meet Now panel is not displayed, click the WebEx Productivity Tools icon in the taskbar or on your desktop.
2. Click Schedule Meeting. A new appointment message or calendar entry appears, depending on the scheduling program you have specified in WebEx Settings > Tools.
Note: If Schedule Meeting is not displayed in the Meet Now panel, click Edit WebEx Settings, click the Preferences tab, then select Show scheduling function in Productivity Tools panel.

December 2016 Page 25 of 67
User Guide WebEx Cloud
Connected Audio (CCA)
Starting a Meeting
You can start a meeting from any application on your computer that has WebEx Productivity Tools enabled.
Email:
Click... To...
Connect to your WebEx site to start and host a meeting.

December 2016 Page 26 of 67
User Guide WebEx Cloud
Connected Audio (CCA)
Microsoft Office:
Click... To...
Start a meeting and share the item as an application, allowing attendees to work in the application in real time.
A Web Browser:
Click... To...
Connect to your WebEx site to start a meeting and share your Web browser. Or, click WebEx, to select from additional options.
Note: Right-click an application or file icon on your computer, then click Share in WebEx Meeting to start a meeting and share the application or file.

December 2016 Page 27 of 67
User Guide WebEx Cloud
Connected Audio (CCA)
Connect to the Audio Conference
You can connect to the audio conference with a telephone, or with a computer through VoIP (Voice over Internet Protocol). After you join, click the audio button on the Quick Start page to connect using the last method you used.
Shows the previously used connection method and phone number.
Or, click the three dots to display more choices. The three dots at the bottom change to More.

December 2016 Page 28 of 67
User Guide WebEx Cloud
Connected Audio (CCA)
To connect to the audio:
Click... Then...
Call Me
You will receive a call and may be prompted to press 1 to connect.
Select Remember phone number on this computer if you want to store this number for future meetings.
I Will Call In
1. Dial the phone number listed, enter the meeting access code and your attendee ID #.
2. Close the window.
Call Using Computer
You are connected to the audio conference.
Test and adjust your speaker and microphone settings as needed.
Note: You cannot receive a call-back if your organization uses extension numbers; instead, you can call in to the conference directly.
The audio button on the Quick Start page indicates how you are connected to the audio.
Connected by phone Connected by computer

December 2016 Page 29 of 67
User Guide WebEx Cloud
Connected Audio (CCA)
Manage Stored Phone Numbers
You can edit the stored phone numbers that appear in the Audio Conference or Audio Connection dialog box.
Note: Stored phone numbers are either saved as cookies from previous WebEx meetings, or pulled from the call-back numbers listed in your My WebEx profile. You cannot edit phone numbers if you are currently connected to a meeting.
To edit stored phone numbers:
1. On the Quick Start page, click the audio button.
2. Select Call me at a different number, then click the arrow next to the phone number field.

December 2016 Page 30 of 67
User Guide WebEx Cloud
Connected Audio (CCA)
3. Click Manage phone numbers at the bottom of the window. The Manage Phone Numbers dialog box appears.
4. Select one of the following options.
Click Edit to modify the phone numbers in your My WebEx Profile on your WebEx site. Edit the phone numbers, then click Update to save your changes.
Click Clear to delete all previously used phone numbers.
Any changes you make to stored phone numbers will not take effect until the next time you join a meeting.

December 2016 Page 31 of 67
User Guide WebEx Cloud
Connected Audio (CCA)
Change the Audio Connection
You can switch audio connection modes at any time during a meeting, without missing the conversation or interrupting a speaker. For example, if you are connected using your mobile phone but your battery is running low, you can switch to your computer (if you have a sound card and headset with microphone plugged in to your computer).
To switch from telephone to computer:
1. On the Quick Start page, click Connected to Audio. 2. Click Switch Audio. 3. Click Call using Computer. You are connected to the audio conference.
To switch from computer to telephone:
1. On the Quick Start page, click Connected to Audio. 2. Click Switch Audio. 3. Select Call me, and enter a phone number if necessary, then click Call Me.
OR
Select I will call in, then follow the steps to connect. You may be prompted to press 1 on your phone to be connected to the conference.

December 2016 Page 32 of 67
User Guide WebEx Cloud
Connected Audio (CCA)
Use the Participants Panel
The Participants panel allows hosts and participants to manage their audio and communicate effectively during the meeting.
Phone icons identify participants connected through the telephone.
Headset icons identify participants connected through their computers.
Clicking the microphone icon next to a participant's name mutes or unmutes that participant's audio.
Note: Participants can mute their own audio. The host can mute anyone's audio.
A red “x” and a highlighted microphone icon identify muted participants.
Sound waves indicate an “active speaker” or a connection that is producing noise.
Optimize VoIP Audio Connections
WebEx integrated audio enables meeting hosts and attendees to use the Internet to connect to the audio portion of a session. Because a large number of connections can place a high demand on bandwidth, you should follow the guidelines below to maintain audio quality.

December 2016 Page 33 of 67
User Guide WebEx Cloud
Connected Audio (CCA)
As a participant:
Test your audio setup in a practice meeting, especially if you have never used WebEx or are using new hardware.
Close any applications not being used to free up bandwidth on your computer. Disconnect and then reconnect your audio if you experience a noisy connection or if other
participants say they hear an echo.
As a host:
Select Mute on Entry from the Participant menu for large meetings.
Do not play music over an active connection, and eliminate as much background noise as possible. Encourage hosts, presenters, and participants to use a headset with a good microphone.
Conduct a practice session to determine the correct sound levels. Avoid speaking during slide transitions to help manage bandwidth utilization. During scheduling, select the option to allow attendees to join before the meeting starts so they can
test their audio. Look for the “active speaker” sound wave indicator in the Participants panel to identify where
background noise might be originating.

December 2016 Page 34 of 67
User Guide WebEx Cloud
Connected Audio (CCA)
Disconnect Your Audio Conference
To disconnect your audio:
Click Open the Audio Connection window and click Disconnect Audio. You will be disconnected from the audio portion, but not the online portion, of the meeting.

December 2016 Page 35 of 67
User Guide WebEx Cloud
Connected Audio (CCA)
Setting Up Audio Options in Event Center
Depending on the how your organization’s Event Center site has been provisioned, you can select from four audio options.
To set up audio for an event:
4. On the Schedule an Event page, scroll down to Audio Conference Settings.
2. Click Select Conference Type, then choose from the drop-down menu.
WebEx CCA—Select this option to allow attendees to choose whether to join event audio using the telephone or their computer.
Other meeting service—Select this option if your organization uses a third-party telephony service, then type instructions that participants will need to join the audio conference.
Use VoIP only—Select this option if you want attendees to use only their computers to participate in event audio.

December 2016 Page 36 of 67
User Guide WebEx Cloud
Connected Audio (CCA)
Using VoIP Only in Event Center
If you selected Use VoIP only when scheduling the event, participants must have speakers and a headset or microphone connected to their computers to communicate.
The host or presenter can start an Integrated VoIP conference at any time during the event.
To start an integrated VoIP conference:
5. Start the event.
6. Click Call Using Computer on the Quick Start page.
OR
Select Audio > Integrated Voice Conference > Start Conference from the menu bar. The VoIP Conference starts and attendees are prompted to join.
7. Adjust your speaker and microphone settings in the Volume panel, or close the Volume panel to remove it from view.
December 2016 Page 37 of 67
User Guide WebEx Cloud
Connected Audio (CCA)
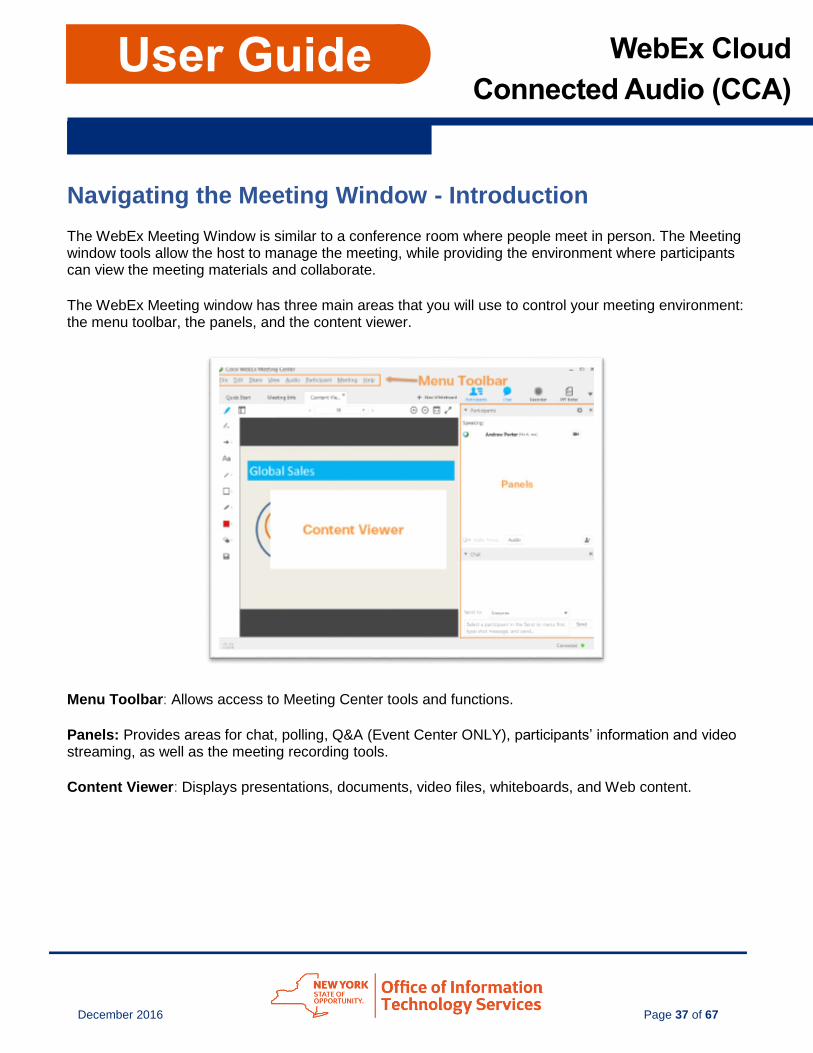
Navigating the Meeting Window - Introduction
The WebEx Meeting Window is similar to a conference room where people meet in person. The Meeting window tools allow the host to manage the meeting, while providing the environment where participants can view the meeting materials and collaborate.
The WebEx Meeting window has three main areas that you will use to control your meeting environment: the menu toolbar, the panels, and the content viewer.
Menu Toolbar: Allows access to Meeting Center tools and functions.
Panels: Provides areas for chat, polling, Q&A (Event Center ONLY), participants’ information and video streaming, as well as the meeting recording tools.
Content Viewer: Displays presentations, documents, video files, whiteboards, and Web content.

December 2016 Page 38 of 67
User Guide WebEx Cloud
Connected Audio (CCA)
Menu Toolbar
When you join the meeting, the Meeting window opens. The Menu Toolbar is located at the top of the page and it allows you to access the commands that control your meeting environment.
Click a menu option to open a pull down menu and make a selection.
From the Menu Toolbar you can share meeting content, join the audio conference, manage participant roles and privileges, control the recording, and end the meeting as needed.
Meeting Panels
Panels are located on the right side of the Meeting window. Dedicated panels enable you to manage and interact with participants, control video streaming, start and stop recording, and more.
To open the panel during a meeting:
Click the panel icon in the Icon tray at the top of the Panels.
If the panel icon is not displayed on the icon tray, select Manage Panels from the Panels menu, then select the panel from the Available panels and click Add.

December 2016 Page 39 of 67
User Guide WebEx Cloud
Connected Audio (CCA)
The panel is added to the Current panels and will be displayed in the Meeting Window.
Panels can be expanded or collapsed by right-clicking the panel’s title bar and selecting from the menu.

December 2016 Page 40 of 67
User Guide WebEx Cloud
Connected Audio (CCA)
Content Viewer
The Content Viewer is where meeting materials can be shared with participants during a WebEx meeting. Different types of content that could be shared include presentations, documents, video files, applications, whiteboards, web content and more.
You can access options for sharing content during your meeting from the Share menu on the Menu Toolbar.

December 2016 Page 41 of 67
User Guide WebEx Cloud
Connected Audio (CCA)
Select... To share...
My Screen The contents displayed on your computer monitor. If you have more than one monitor, choose the one you want to share.
File (including Video)… A file on your computer in the Content Viewer.
Application An application on your computer.
Whiteboard A whiteboard and annotation tools.
Web Content A website that attendees can navigate.
Web Browser A website that attendees can view.
Remote Computer A remote computer the presenter can share with participants.
My Meeting Window

December 2016 Page 42 of 67
User Guide WebEx Cloud
Connected Audio (CCA)
Annotation Toolbar
The Annotation Toolbar lets participants annotate files and whiteboards shared during a meeting. To enable or disable annotation privileges, click Allow to Annotate, then select a participant’s name.
To show or hide the Annotation toolbar, click Show/Hide at the top of the toolbar.

December 2016 Page 43 of 67
User Guide WebEx Cloud
Connected Audio (CCA)
Icons in the top right corner of the Content Viewer control how the presentation is displayed.
Zoom in and out of the displayed content.
Fit the displayed content to the width of the content viewer.
Display the shared content in full-screen mode.
Full-screen Mode
Click the arrow in the upper right corner of the Meeting Window to switch the presentation display to the Full Screen viewing mode.

December 2016 Page 44 of 67
User Guide WebEx Cloud
Connected Audio (CCA)
Shared content will fill whole screen and the controls will be available on the Meeting Control Panel.
Participants can click Return to leave the full screen mode. Presenters can click Stop Sharing to go back to the Meeting window.

December 2016 Page 45 of 67
User Guide WebEx Cloud
Connected Audio (CCA)
Using Video in Your Meetings - Introduction
If the host or presenter enables it, participants can view video from the presenter’s webcam and send video from their own webcams. When enabled, all participants can view the video even if they do not have a webcam installed on their computer.
Setting Meeting Video Options
From the Advanced Scheduler, the host can enable or disable video and select high-quality or high-definition video if enabled for the site.
To set video options:
1. Open the Meeting Center Advanced Scheduler. 2. On the right navigation bar, select Meeting Options. 3. Select the Video checkbox to enable or disable video. 4. Select Turn on high-quality video and Turn on high-definition video, if the checkboxes are
available.
During the meeting, the presenter can enable or disable video, as well as enable video thumbnails.

December 2016 Page 46 of 67
User Guide WebEx Cloud
Connected Audio (CCA)
To enable or disable video during a meeting:
1. Select Meeting > Options... from the menu bar. 2. Select the Video checkbox to enable or disable video.

December 2016 Page 47 of 67
User Guide WebEx Cloud
Connected Audio (CCA)
Share Video
When video is enabled, you can start and stop sending video from your webcam at any time during the meeting.
To select video options when you join a meeting:
When the meeting begins, you will be asked if you want to start your video. You can also choose one of the following:
Click Start my video in all meetings to have your video start automatically in each meeting you attend
Click X in the upper right corner to close the prompt without starting your video

December 2016 Page 48 of 67
User Guide WebEx Cloud
Connected Audio (CCA)
To start your video during a meeting:
If video is enabled for the meeting, you can start your video at any time.
1. If the Participants panel is not displayed, click the Participants icon. 2. Click the video (camera) icon.
Your video appears at the top of the Participants panel, and the video icon turns green. When a meeting participant speaks, you will see their video here.
You can control your video settings, and switch between cameras connected to your computer.

December 2016 Page 49 of 67
User Guide WebEx Cloud
Connected Audio (CCA)
To change video options:
1. Click Video Options (the gear icon). The Video Options dialog appears.
2. Select another camera connected to your computer, or click Advanced Options to change settings for the selected camera.
As participants join the meeting and start their video, their video will appear in either list-view or thumbnail view. Up to six thumbnail images can be displayed in the Participants panel. If there are more than six participants sharing video, scroll down to see additional thumbnails.
To change video display:
Click View on the menu bar, then select Video View.
OR
Click one of these icons (visible when you move your cursor over the video panel):
Show participants' video in list view.
Show participants' video in thumbnail view.
Show a selected participant's video in full-screen view.

December 2016 Page 50 of 67
User Guide WebEx Cloud
Connected Audio (CCA)
To enter and leave full-screen video mode:
Do one of the following to enter full-screen video:
Double-click the active-speaker video.
Right-click the active-speaker video, then select Expand to Full-Screen View.
To exit full-screen video mode:
Click Exit Full-Screen View in the upper right corner of your screen while the video is displayed in full-screen mode.
You can stop sharing your video at any time, while continuing to view other participants’ video.
To stop sharing video:
Click Video (the camera icon). Your video sharing stops, and the video icon turns gray.

December 2016 Page 51 of 67
User Guide WebEx Cloud
Connected Audio (CCA)
Lock Video Focus
The presenter can lock the video focus on a particular participant from standard view or from full-screen
mode. This option is not available to participants.
To lock video focus:
1. Move your mouse onto the active speaker’s video, then click the Lock icon in the lower left corner. The Lock Focus on a Participant dialog appears.
Click a specific participant, select a participant in the list, then click OK. Video is locked on the
selected participant until you unlock video, or lock video on another participant.
To unlock video:
1. Double click the participant’s name in the active speaker video image. The Lock Focus on a Participant dialog appears.
2. Select The active speaker.
3. Click OK.

December 2016 Page 52 of 67
User Guide WebEx Cloud
Connected Audio (CCA)
Sharing and Presenting Tools - Introduction
You can annotate on files and whiteboards that you share during a meeting. If you grant permissions,
participants can use both text and graphics tools to highlight, add notes, and create basic images. Then,
you can save and distribute all documents created and annotated.
Annotation Tools
You can give participants access to annotation tools when you schedule your meeting, or while the meeting is in progress.
To show or hide annotation tools, click Show-Hide.
To enable or disable annotation privileges, click Allow to Annotate, then select a participant’s name.
Click an annotation tool to turn it on. Click again to turn the tool off.
Tool Description
Use the pointer to draw attention to specific points on the screen. Color is assigned when joining a session. Click, then select Name Pointer or Laser Pointer. Name pointer appears when you click the left mouse button.
Use the text tool to add text. After typing, click to display the text to participants. Change the color by selecting from the color palette.
Use the line tool to draw straight lines. Change the color by selecting from the color palette. Click, then select a line type. Drag your mouse to draw.
Use the shape tool to draw squares, rectangles, ovals or circles, and to add check or X marks. Change the color by selecting from the color palette. Click, then select a shape or mark type.
Use the pen tool to draw freehand. Change the color by selecting from the color palette. Click, then select Pen or Pencil.
Click to open the color palette, then select a color for the text, line, shape or pen tools. The selected color is used the next time you select the tool.
Click to select the tool, then click on the annotation you want to erase. Or, click and select an option to clear pointers or annotations.

December 2016 Page 53 of 67
User Guide WebEx Cloud
Connected Audio (CCA)
Presentation Tools
When you are the presenter, you can use the page controls to move forward and backward through a document and change how participants’ view the content you are sharing. For example if you are sharing a PowerPoint presentation, you can use the controls to move through slides.
Note: The page controls will not advance through transitions and animations when sharing presentations created with PowerPoint 2013 or later.
To go to the next page in a document, click the right arrow.
To go to the previous page in a document, click the left arrow.
To go to a specific page in a document, click the down arrow, then select the page.
Click these icons to work with and change the view of your presentation:
Icon Function
Annotate the shared document.
Switch to thumbnail view when sharing content to preview images. Click an image to share that page in the document. Note that previews are not visible to participants unless they have been granted the Thumbnail privilege.
Zoom in and out of the shared document.
Fit the shared document to the width of the meeting window.
Make the shared document full-screen.
December 2016 Page 54 of 67
User Guide WebEx Cloud
Connected Audio (CCA)
To select a different page view:
Click View from the menu bar, then select an option.
Zoom in or out in increments, or select a specific magnification.
Rotate pages left or right for landscape or portrait orientation.
Synchronize all participants’ view to the same as the presenter’s view. Brings all participants’ meeting windows to the front if they are viewing other applications.

December 2016 Page 55 of 67
User Guide WebEx Cloud
Connected Audio (CCA)
Sharing Content
You can access all options for sharing content during your meeting from the Share menu. Or, from the sharing pane on the Quick Start page, you can click the large button to access your most recently used sharing option, and click the dots at the bottom to launch one of the other common sharing tools.
My Screen - Share what is currently on your computer screen with participants instantly. If you have multiple monitors connected to your computer, select the monitor you want to share. Participants will see everything on your screen within their Content Viewer, while you see it with session controls at the top of your screen.
File (Including Video - Locate files you want to share, then click Open. If you select multiple files for sharing, you can access them during your meeting using tabs at the top of the Content Viewer.
Note: If notes have been added to a shared PowerPoint presentation created with PowerPoint 2010 or earlier, they will be available to the presenter in the PPT Notes panel. For best results when sharing presentations created with PowerPoint 2013 or later, use Share Application.
Application - Select an application from the list of running applications, then click Share. Participants can see the application on your computer, even if they do not have it installed on their own.
Best Practice: Open the application before you share it. If you don’t have the application open, click Other Application, choose the application, then click Share.

December 2016 Page 56 of 67
User Guide WebEx Cloud
Connected Audio (CCA)
If you have multiple monitors connected to your system, avoid sharing applications displayed on different monitors.
Whiteboard - Open a new whiteboard for annotation. Use the annotation tools to draw or write on the whiteboard. Grant annotation privileges to allow your participants to also collaborate.
Web Content - Enter a URL and click OK. The web content opens in the Content Viewer and participants can navigate the site independently.
Tip: Sharing Web Content is useful when you want participants to complete a form individually.
Web Browser - Enter a URL and press Enter. Participants can see the website in your browser. You control what is displayed in the browser and participants follow along as you navigate the web.
Remote Computer - Select a computer and click Connect. Enables control of remote computer. The Access Anywhere agent is required and may not be available for all WebEx users.
My Meeting Window - Allows you to show your meeting window to participants. They will see the meeting and panels exactly as you do.
Best Practice: Close the Chat panel before sharing your meeting window.

December 2016 Page 57 of 67
User Guide WebEx Cloud
Connected Audio (CCA)
Sharing in Full-screen Mode
When you share in full-screen mode, session controls are available in a control panel at the top of your screen.
Note: The image above illustrates the presenter view. Participants see a simplified view.
Return - Exit full-screen view and return to the meeting window.
Share - Access the sharing menu to switch sharing modes instantly, without returning to the meeting window.
Assign - Make another participant the presenter, pass remote control, or assign privileges. If you change presenters while sharing, sharing will stop and all participants will be returned to the meeting window.
Pages - Navigate the pages of a document or presentation. This control shows only when there are multiple pages being shared.
Audio - Join or leave meeting audio, or switch audio connections.
Lock - Lock the Personal Room so that no further participants can join the meeting.
Mute Me - Mute or unmute yourself quickly without returning to the meeting window.
Participants - Display the Participants panel. While the panel is displayed you can drag it to position it anywhere on your screen.
Chat - Display the Chat panel. While the panel is displayed you can drag it to position it anywhere on your screen.
Recorder - Display the Recorder panel from which you can start and stop recording the meeting. While the panel is displayed you can drag it to position it anywhere on your screen.
Annotate - Display the Annotation tools from which you can select to annotate content while in full-screen view. While the panel is displayed you can drag it to position it anywhere on your screen. You must stop annotating before you can navigate to another page in a shared document or presentation.

December 2016 Page 58 of 67
User Guide WebEx Cloud
Connected Audio (CCA)
More Options - Manage panel layout, display the Notes panel, access audio options, synchronize full-screen view for all participants, invite and remind participants, or leave the room and end the meeting.

December 2016 Page 59 of 67
User Guide WebEx Cloud
Connected Audio (CCA)
In-Meeting Tools and Tips - Introduction
Meeting Center tools allow the host, presenters, and attendees to interact with each other just as they would if they were in the same location.
Sharing Features
Sharing Option What Attendees See Usage Tips
Screen Everything on your screen and your mouse pointer in full-screen mode.
Display and share multiple applications and files simultaneously
Show file directories
File (Including Video)
The item you choose to share in the content viewer portion of the meeting window.
Share .ppt, Word, Excel, pdf, jpg, video, and other types of files
Gather feedback about format, content, and layout
Present new information
Re-use PowerPoint presentations from in-person meetings
Application The application you share and your mouse pointer in full-screen mode
Share applications you want to teach to others
Demonstrate software
Collaborate with partners or clients to edit documents or files in real time
Whiteboard
A blank screen in the content viewer of the meeting window. Host and attendees can use Annotation tools to write, draw, and highlight information
Use annotation tools to sketch and diagram as if you were using a whiteboard in a conference room or classroom
Get attendees to actively participate in a session through brainstorming and ice breakers

December 2016 Page 60 of 67
User Guide WebEx Cloud
Connected Audio (CCA)
Sharing Option What Attendees See Usage Tips
Document action items and decisions
Web Content
Web pages loaded into the content viewer of the meeting window. Attendees can interact with web pages you share. They cannot see your mouse pointer.
Enable attendees to complete online forms
Guide several attendees through a process rather than one at a time
Demonstrate content and functionality of a web page
Use the pointer on the Annotation toolbar to indicate something on the screen.
Web Browser
Your Web browser and Web pages you share, as well as your mouse pointer
Enable attendees to look on as you navigate web pages
Refer to and view Web references on the fly
Share content that is dynamic or changes frequently

December 2016 Page 61 of 67
User Guide WebEx Cloud
Connected Audio (CCA)
Display Options
Display Option What Attendees See Usage Tips
Full Screen A view of your complete screen. Attendees can double-click on their screen to see their taskbars.
Present information on a full screen, such as flowcharts, graphics, or information best seen in full context
Minimize distractions among attendees
Synchronize for All
The meeting window on top of all other windows on their screen. If sharing a presentation, this also brings all attendees to the same slide in the content viewer.
Ensure that all attendees see the same thing
Regain the attention of multi-taskers (use this function sparingly to avoid annoying your attendees)
Zoom In A larger view of what is displayed.
Use to magnify small images
Show expanded blocks of text
Synchronize displays for all so that attendees can see that you zoomed in

December 2016 Page 62 of 67
User Guide WebEx Cloud
Connected Audio (CCA)
Communication Tools
Tool What Attendees See Usage Tips
Polls Questions you present in the Polling panel.
Gather information about attendees
Assess understanding of ideas and concepts Keep attendees involved
Build consensus for decision making
Chat In the Chat panel, instant messaging between attendees.
Communicate with a single participant, such as when you want to check on meeting involvement or when there are problems with audio
Elicit feedback or input from several or all attendees
Gather input when an audio response would be disruptive
Video In the Video panel, live video of a presenter or of attendees who have a webcam connected.
Add a sense of personal connection among attendees
Show a physical object or space
Use for first-time introductions at kickoff or sales meetings
Notes Attendees and presenters see only the text they enter in their own Notes panel.
Document ideas and action items
Record meeting minutes
Take notes to send to attendees
Annotation Tools
When enabled, the Annotation toolbar is available at the left side of the meeting window. Once selected, a tool stays active and will appear whenever you click your mouse unless you de-select it or the host turns off the option.
Interact with attendees
Add text and graphics to documents or the Whiteboard
Keep attendees engaged by requesting they provide feedback with the pointer, which displays the user's name
Disable Annotation tools when their use would be distracting

December 2016 Page 63 of 67
User Guide WebEx Cloud
Connected Audio (CCA)
Tool What Attendees See Usage Tips
Mute An indicator that their audio connection is muted.
Eliminate background noise over audio connections
Minimize verbal interruptions during a presentation (attendees can use the “raise hand” feature when they want to speak)
Mute disruptive attendees
File Transfer A folder containing files you upload for sharing.
Provide attendees with documents they reviewed during the meeting, or documents they will need in the future
Share meeting notes
Collaborate with attendees who do not have access to local network files
Avoid lost documents sent via email

December 2016 Page 64 of 67
User Guide WebEx Cloud
Connected Audio (CCA)
Trouble Shooting Your Meeting - Introduction
Use this article as a guide to resolving issues that may occur during your meeting. Don’t let challenges keep you from connecting with participants.
Addressing Technical Issues
No one joining your meeting
Check that the invitation contained the correct URL.
Verify that you scheduled the meeting for the correct time zone.
Contact attendees to rule out technical issues.
Participant can’t log in
Verify that the participant is using the correct password.
Ask the participant to open a new browser window and copy and paste the meeting URL from the invitation email into the browser Address bar.
WebEx session loads slowly
Ask the participant to log off and log back in again.
Ask the participant to close all applications except WebEx.
Have the participant clear the Web browser cache and delete temporary files and cookies.
Verify that the issue is not with the participant’s ISP by asking them to test a Web page they access frequently.
Participant’s meeting disconnects
Send a chat or an instant message to the participant and ask them to rejoin the audio conference by clicking the Audio button and selecting a phone or VoIP option.
Your browser crashes
Open a new browser window and try to rejoin the meeting using the meeting number and Host ID.
If you cannot rejoin, stay on the phone.
Have backup material that you can read over the phone, or ask your alternate host to present.

December 2016 Page 65 of 67
User Guide WebEx Cloud
Connected Audio (CCA)
You are hearing hold music
Use the audio indicator in the Participants panel to identify whose line it is, then mute that participant.
Send the participant a chat message asking to take you off hold.
Explain what happened, and explain how participants can mute their own connections.
Participants cannot hear one another
Make sure that audio connections are not muted.
Have participants check their phone or VoIP connections and confirm that microphones or headsets are powered and switched on.
Try to reset a VoIP connection by clicking Mute then Unmute.
Managing Distractions
Late arrival
Greet the late arrival when appropriate, but keep the meeting going.
Have a “cut-and-paste” chat message explaining that participants will have access meeting notes, chat, or the meeting recording later if they need to review what they missed.
Multi-tasking participant
Use planned interactivity, such as direct questions or polls, to engage the audience. For example, solicit feedback or input regularly, or call on specific attendees to contribute.
Ask participants to mute their audio, or do it for them.
Difficult participant
Ask that side-bar conversations be taken offline. You can do this through both audio and private chat.
Adjust the participant’s privileges (mute audio, remove chat and annotation privileges).
If the behavior continues, expel the participant. You might have to lock the meeting to keep the participant from rejoining.

December 2016 Page 66 of 67
User Guide WebEx Cloud
Connected Audio (CCA)
Is training available?
https://meetny.webex.com/support

December 2016 Page 67 of 67
User Guide WebEx Cloud
Connected Audio (CCA)
How do I get assistance?
For assistance, please contact the Enterprise Service Desk or your local Service Desk. When contacting your Service Desk, please be sure to include your contact information, including your work email address and your work location.
Contact the Enterprise Services Desk at:
1-844-891-1786
Reach us through online chat at: chat.its.ny.gov
Send us an email at: [email protected]
If your Agency is listed below, please continue to contact your Local Help Desk:
Administrative and General Services
Division of the Budget
(518) 486-4357
Citizens Services
State Board of Elections
State Inspector General
(518) 473-4803
(518) 474-1010
Environment and Energy
Adirondack Park Agency
(518) 891-4050
Public Safety
Department of Corrections and Community Supervision
Department of Homeland Security and Emergency Services
Division of State Police
Office for the Prevention of Domestic Violence
Office of Victim Services
Division of Criminal Justice Services
(800) 262-3257
ATTN: Local Districts of Social Services county employees: Please follow existing protocol and
contact your local Human Services Enterprise network (HSEN) LAN Administrators for assistance, before
reaching out to the ITS Enterprise Service Desk.