user interface extensions - carleton...
TRANSCRIPT

Chapter 7
User Interface Extensions
What is in This Chapter ?
This chapter discusses additional features that can be used to improve and extend your Graphical User Interfaces. It discusses the notion of various Layout panes that automatically lay out and resize the components on the window. The chapter also shows how to add menus to your user interfaces as well as develop your own dialog boxes.

COMP1406 - Chapter 7 - User Interface Extensions Winter 2018
- 187 -
7.1 Automatic Resizing Using Layouts As you may know ... JAVA was developed for the internet and JAVA applications were initially meant to run as applets within an internet browser. Since browsers are often resized, it is often desirable to allow an application's components to be rearranged so that they ALL fit on the browser window at all times. In fact, JAVA FX provides a mechanism called a Layout Pane that allows the automatic arrangement (i.e., "laying out") of the components of an application as the window is resized. Why should we use a layout pane ?
• we would not have to compute locations and sizes for our components • our components will resize automatically when the window is resized • our interface will appear "nicely" on all platforms
In JAVA FX, each layout defines methods necessary for a class to be able to arrange Components within a Container. There are some commonly used layout pane classes that we can use. We will discuss the following, although there are more available:
FlowPane, BorderPane, HBox, VBox, and GridPane
Layout panes are "set" for a pane using the setLayout() method. If set to null, then no layout manager is used ... which is what we have been doing up until this point. Let us now look at each of these layout managers in turn.
Example (FlowPane):
The simplest layout pane is the FlowPane. It is commonly used to arrange just a few components on a pane. With this pane, components (e.g., buttons, text fields, etc..) are arranged horizontally from left to right ... like lines of words in a paragraph written in English. If no space remains on the current line, components flow (or wrap around) to the next "line". The height of each line is the maximum height of any component on that line. By default, components are centered horizontally on each line, but
this can be changed. To use it, we simply replace our new Pane() code from before, with new
FlowPane():
import javafx.application.Application;
import javafx.scene.Scene;
import javafx.scene.control.Button;
import javafx.scene.layout.FlowPane;
import javafx.stage.Stage;
import javafx.scene.image.*;

COMP1406 - Chapter 7 - User Interface Extensions Winter 2018
- 188 -
public class FlowPaneExample extends Application {
public void start(Stage primaryStage) {
FlowPane aPane = new FlowPane();
aPane.getChildren().add(new Button("one"));
aPane.getChildren().add(new Button("two"));
aPane.getChildren().add(new Button("three"));
aPane.getChildren().add(new Button("Play", new ImageView(
new Image(getClass().getResourceAsStream("GreenButton.jpg")))));
aPane.getChildren().add(new Button("Stop", new ImageView(
new Image(getClass().getResourceAsStream("RedButton.jpg")))));
Button b = new Button();
b.setGraphic(new ImageView(
new Image(getClass().getResourceAsStream("Progress.gif"))));
aPane.getChildren().add(b);
primaryStage.setTitle("Flow Pane Example");
primaryStage.setScene(new Scene(aPane, 500,100));
primaryStage.show();
}
public static void main(String[] args) { launch(args); }
}
Here is the result obtained when the application window is resized in different ways ... take notice of how the components wrap around to the next "line". Keep in mind that the above example just places Buttons as the components, however any components can be used here:
We can also specify spacing between components as well as spacing around the pane's border. For example, we can use setVgap() to specify the vertical gap that we want to leave between each row of components as the components wrap around:

COMP1406 - Chapter 7 - User Interface Extensions Winter 2018
- 189 -
aPane.setVgap(0); aPane.setVgap(10); aPane.setVgap(30);
We can also use setHgap() to specify the horizontal gap that we want to leave between each column of components:
aPane.setHgap(0);
aPane.setHgap(30);
Lastly, we can specify the margins around the border of the frame by using setPadding() as follows:
aPane.setPadding(new Insets(20, 10, 30, 40));
COMP1406 - Chapter 7 - User Interface Extensions Winter 2018
- 190 -
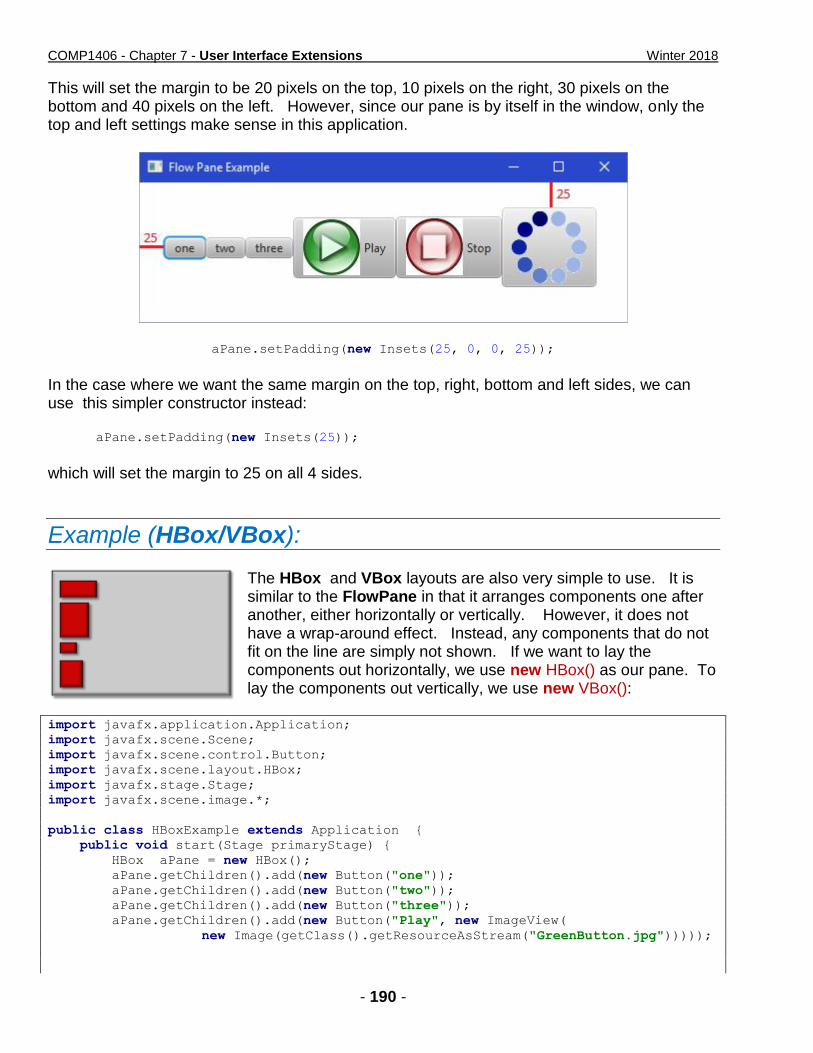
This will set the margin to be 20 pixels on the top, 10 pixels on the right, 30 pixels on the bottom and 40 pixels on the left. However, since our pane is by itself in the window, only the top and left settings make sense in this application.
aPane.setPadding(new Insets(25, 0, 0, 25));
In the case where we want the same margin on the top, right, bottom and left sides, we can use this simpler constructor instead:
aPane.setPadding(new Insets(25));
which will set the margin to 25 on all 4 sides.
Example (HBox/VBox):
The HBox and VBox layouts are also very simple to use. It is similar to the FlowPane in that it arranges components one after another, either horizontally or vertically. However, it does not have a wrap-around effect. Instead, any components that do not fit on the line are simply not shown. If we want to lay the components out horizontally, we use new HBox() as our pane. To lay the components out vertically, we use new VBox():
import javafx.application.Application;
import javafx.scene.Scene;
import javafx.scene.control.Button;
import javafx.scene.layout.HBox;
import javafx.stage.Stage;
import javafx.scene.image.*;
public class HBoxExample extends Application {
public void start(Stage primaryStage) {
HBox aPane = new HBox();
aPane.getChildren().add(new Button("one"));
aPane.getChildren().add(new Button("two"));
aPane.getChildren().add(new Button("three"));
aPane.getChildren().add(new Button("Play", new ImageView(
new Image(getClass().getResourceAsStream("GreenButton.jpg")))));

COMP1406 - Chapter 7 - User Interface Extensions Winter 2018
- 191 -
aPane.getChildren().add(new Button("Stop", new ImageView(
new Image(getClass().getResourceAsStream("RedButton.jpg")))));
Button b = new Button();
b.setGraphic(new ImageView(
new Image(getClass().getResourceAsStream("Progress.gif"))));
aPane.getChildren().add(b);
primaryStage.setTitle("HBox Example");
primaryStage.setScene(new Scene(aPane, 500,100));
primaryStage.show();
}
public static void main(String[] args) { launch(args); }
}
Here is the result obtained when the application window is resized in different ways ... take notice of how the components DO NOT wrap around to the next "line".
Of course, we can change HBox to VBox and obtain the following results: As with the FlowPane, we can specify the Insets as well as spacing between components:

COMP1406 - Chapter 7 - User Interface Extensions Winter 2018
- 192 -
aPane.setPadding(new Insets(10));
aPane.setSpacing(5);
Example (BorderPane):
The BorderPane is a very useful layout. Instead of re-arranging components, it allows you to place components at one of five anchored positions on the window (i.e., top, left, bottom, right or center). As the window resizes, components stay "anchored" to the side of the window or to its center. The components will grow accordingly. You may place at most one component in each of the 5 anchored positions ... but this one component may be a container such as another Pane that contains other components
inside of it. Typically, you do NOT place a component in each of the 5 areas, but choose just a few of the areas. We can add a componentOrPane to one of 5 areas of a BorderPane by using one of the following methods:
aBorderPane = new BorderPane();
componentOrPane1 = ...;
componentOrPane2 = ...;
...
aBorderPane.setTop(componentOrPane1);
aBorderPane.setRight(componentOrPane2);
aBorderPane.setBottom(componentOrPane3);
aBorderPane.setLeft(componentOrPane4);
aBorderPane.setCenter(componentOrPane5);
Here is an example with a simple TextArea component in the center and a pane with buttons at the bottom: import javafx.application.Application;
import javafx.geometry.Insets;
import javafx.scene.Scene;
import javafx.scene.control.*;
import javafx.scene.layout.*;
import javafx.stage.Stage;
public class BorderPaneExample extends Application {
public void start(Stage primaryStage) {
BorderPane aPane = new BorderPane();
aPane.setPadding(new Insets(10));
COMP1406 - Chapter 7 - User Interface Extensions Winter 2018
- 193 -
FlowPane buttonPane = new FlowPane();
buttonPane.setPadding(new Insets(10, 0, 0, 0));
buttonPane.setHgap(10);
buttonPane.getChildren().add(new Button("Add"));
buttonPane.getChildren().add(new Button("Remove"));
buttonPane.getChildren().add(new Button("Insert"));
buttonPane.getChildren().add(new Button("Edit"));
buttonPane.getChildren().add(new Button("Details"));
aPane.setBottom(buttonPane);
aPane.setCenter(new TextArea());
primaryStage.setTitle("BorderPane Example");
primaryStage.setScene(new Scene(aPane, 500,250));
primaryStage.show();
}
public static void main(String[] args) { launch(args); }
}
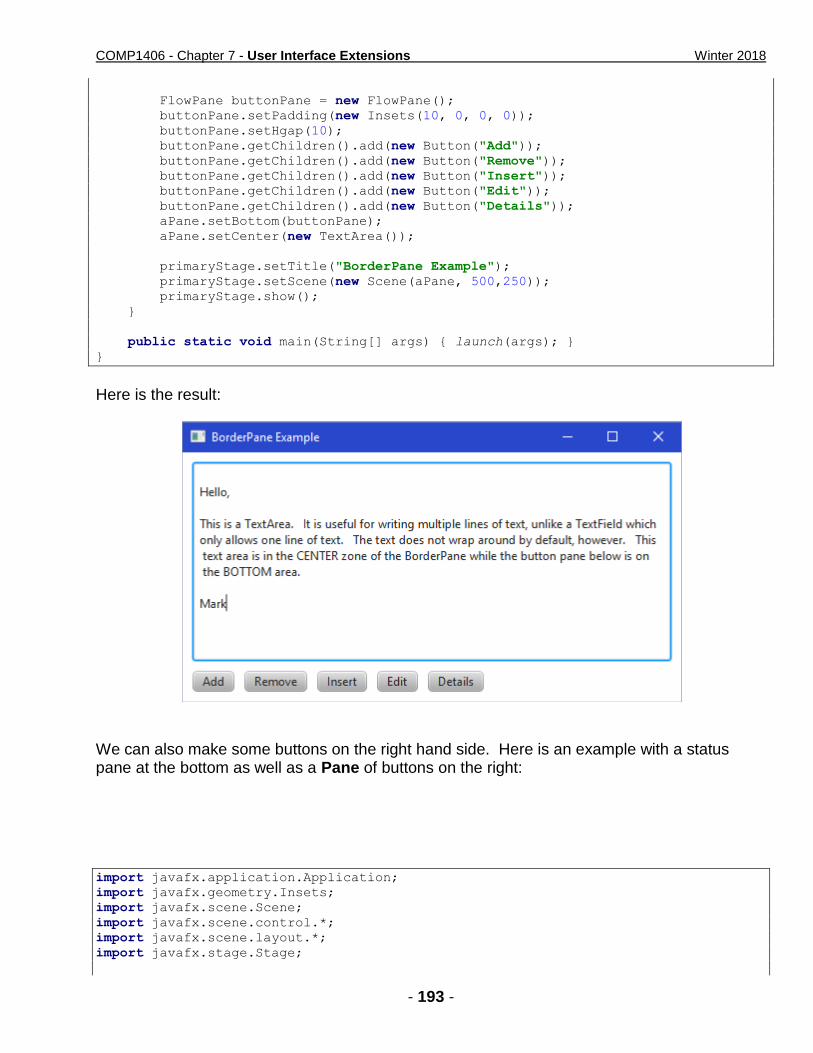
Here is the result:
We can also make some buttons on the right hand side. Here is an example with a status pane at the bottom as well as a Pane of buttons on the right: import javafx.application.Application;
import javafx.geometry.Insets;
import javafx.scene.Scene;
import javafx.scene.control.*;
import javafx.scene.layout.*;
import javafx.stage.Stage;
COMP1406 - Chapter 7 - User Interface Extensions Winter 2018
- 194 -
public class BorderPaneExample2 extends Application {
public void start(Stage primaryStage) {
Button[] buttons;
String[] names = {"New", "Open", "Save", "Compile", "Run", "Quit"};
BorderPane aPane = new BorderPane();
aPane.setPadding(new Insets(10));
VBox buttonPane = new VBox();
buttonPane.setPadding(new Insets(0, 0, 0, 10));
buttonPane.setSpacing(10);
buttons = new Button[names.length];
for (int i=0; i<names.length; i++) {
buttons[i] = new Button(names[i]);
buttons[i].setPrefWidth(100);
buttons[i].setPrefHeight(30);
buttonPane.getChildren().add(buttons[i]);
}
aPane.setRight(buttonPane);
aPane.setCenter(new TextArea());
TextField statusField = new TextField("This is like a status pane");
statusField.setStyle("-fx-background-color: GRAY; -fx-text-fill: WHITE;");
aPane.setMargin(statusField, new Insets(10,0,0,0)); // allows spacing at top
aPane.setBottom(statusField);
primaryStage.setTitle("BorderPane Example 2");
primaryStage.setScene(new Scene(aPane, 500,500));
primaryStage.show();
}
public static void main(String[] args) { launch(args); }
}
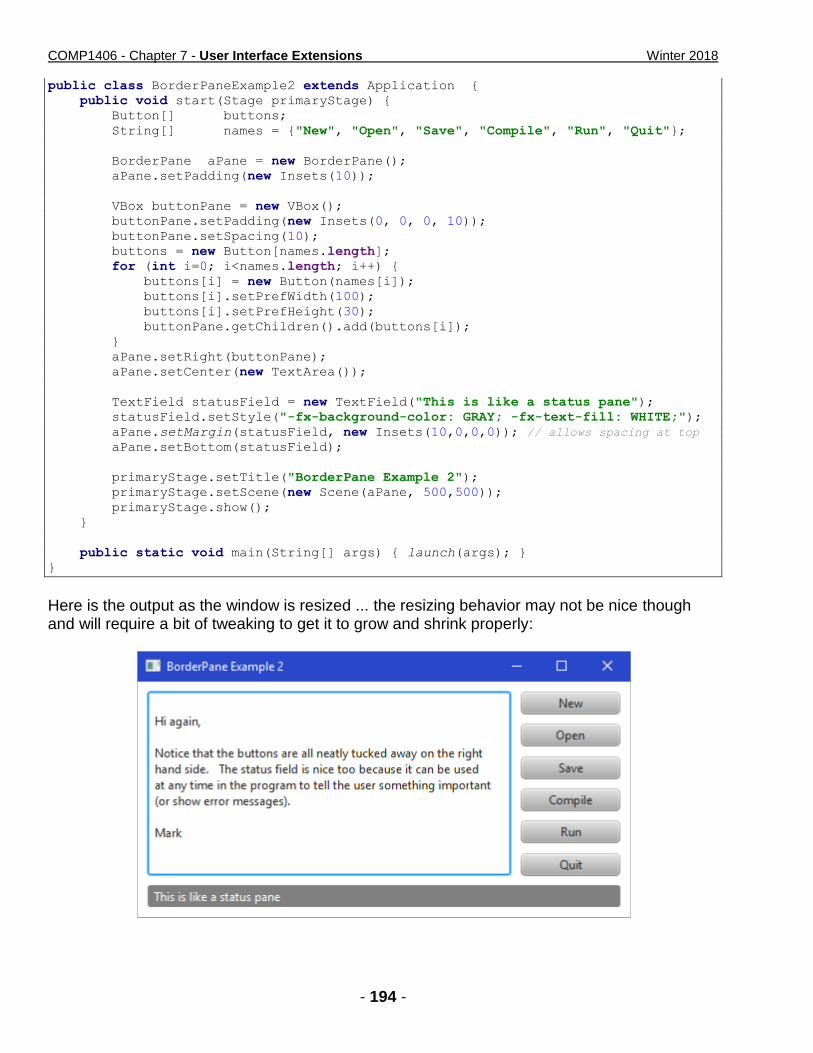
Here is the output as the window is resized ... the resizing behavior may not be nice though and will require a bit of tweaking to get it to grow and shrink properly:

COMP1406 - Chapter 7 - User Interface Extensions Winter 2018
- 195 -
Example (simple GridPane):
A GridPane is excellent for arranging a 2-dimensional grid of components (such as buttons on a keypad). It automatically aligns the components neatly into rows and columns. Typically, the components are all of the same size, however you can add different sized components as well. Components are added by specifying their column and row in the grid. aGridPane.add(aComponent, col, row);
JAVA determines the number of rows and columns to use for the grid by considering all of the row and col parameters that you use in these add() method calls. Again, the setHgap() and setVgap() specify the horizontal and vertical margin (in pixels) between components and the setPadding() allows you to specify margins around the outside of the pane. Here is a simple example that adds some buttons with random background colors of white or black: import javafx.application.Application;
import javafx.geometry.Insets;
import javafx.scene.Scene;
import javafx.scene.control.Button;
import javafx.scene.layout.GridPane;
import javafx.stage.Stage;
public class GridPaneExample extends Application {
public void start(Stage primaryStage) {
GridPane aPane = new GridPane();
aPane.setPadding(new Insets(10, 10, 10, 10));
aPane.setHgap(1);
aPane.setVgap(1);
for (int row=1; row<=6; row++)
for (int col=1; col<=8; col++) {
Button b = new Button();
// Make the buttons bigger than we want. They will be
// re-sized to fit within the shrunken pane.
b.setPrefWidth(200);
b.setPrefHeight(200);
if (Math.random() < 0.5)
b.setStyle("-fx-base: WHITE;");
else
b.setStyle("-fx-base: BLACK;");
aPane.add(b, col, row);
}
primaryStage.setTitle("Simple GridPane Example");
primaryStage.setScene(new Scene(aPane, 420,320));
primaryStage.show();
}
public static void main(String[] args) {
launch(args);
}
}
COMP1406 - Chapter 7 - User Interface Extensions Winter 2018
- 196 -
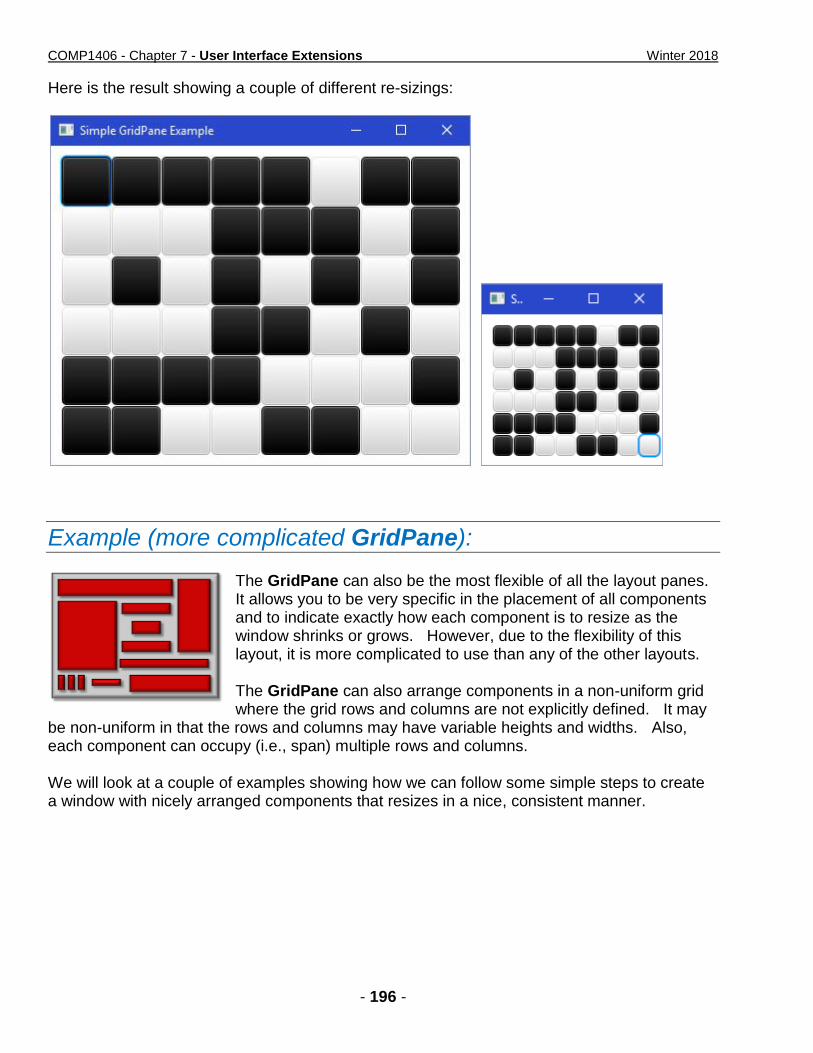
Here is the result showing a couple of different re-sizings:
Example (more complicated GridPane):
The GridPane can also be the most flexible of all the layout panes. It allows you to be very specific in the placement of all components and to indicate exactly how each component is to resize as the window shrinks or grows. However, due to the flexibility of this layout, it is more complicated to use than any of the other layouts. The GridPane can also arrange components in a non-uniform grid where the grid rows and columns are not explicitly defined. It may
be non-uniform in that the rows and columns may have variable heights and widths. Also, each component can occupy (i.e., span) multiple rows and columns. We will look at a couple of examples showing how we can follow some simple steps to create a window with nicely arranged components that resizes in a nice, consistent manner.

COMP1406 - Chapter 7 - User Interface Extensions Winter 2018
- 197 -
Recall our FruitListApp example shown here. How can we use a GridPane so that the window resizes in a way that re-arranges the components nicely ? Well, we can start by determining the components that lie in the same row and column. To do this, we just need to "imagine" some lines between components both vertically and horizontally as shown here. This forms a grid. We then number the columns and rows, starting at 0 at the top left. This will be the basis for laying out the components. We can lay out all the components by specifying the grid location (i.e., column and row) that each component lies in when we add it to the pane: GridPane aPane = new GridPane();
TextField newItemField = new TextField();
aPane.add(newItemField,0,0);
Button addButton = new Button("Add");
aPane.add(addButton,1,0);
ListView<String> fruitList = new ListView<String>();
aPane.add(fruitList,0,1);
Button removeButton = new Button("Remove");
aPane.add(removeButton,1,1); Here is what things will look like if we simply just set the rows and columns as above:

COMP1406 - Chapter 7 - User Interface Extensions Winter 2018
- 198 -
So, more work needs to be done. Specifically, we need to move the Remove button up, make the buttons the same size and add some spacing. Currently, the Remove button is centered vertically. We can change this by using:
aPane.setValignment(removeButton, VPos.TOP);
The setValignment() allows us to set the alignment of a component to VPos.TOP,
VPos.BOTTOM, or VPos.CENTER.
Here is the result --------------------------------> Now, we need to make the buttons the same size. The simplest way to do this is to specify the width and height that we want the buttons to have. We can make the buttons 100x30 in size by setting the minimum width and height as follows:
addButton.setMinHeight(30);
addButton.setMinWidth(100);
removeButton.setMinHeight(30);
removeButton.setMinWidth(100);
We will also set the TextField to have the same height as the buttons:
newItemField.setMinHeight(30);
Here is what we have now:
At this point, however, the window does not resize properly as shown here on the right. When the window is enlarged, the components do not grow properly to take up the extra window space. We fix this by simply specifying that we want the fruitList to be as large as possible to take up all

COMP1406 - Chapter 7 - User Interface Extensions Winter 2018
- 199 -
that extra space. To do this, we simply set the preferred width and height to the largest possible values:
fruitList.setPrefWidth(Integer.MAX_VALUE);
fruitList.setPrefHeight(Integer.MAX_VALUE);
Now the list resizes nicely when the window grows as shown here on the right ---------------------------------------> The last thing to do is to adjust the spacing around the components. We can use the setMargin() method for our components as follows:
aPane.setMargin(newItemField, new Insets(0, 0, 10, 0));
aPane.setMargin(addButton, new Insets(0, 0, 10, 10));
aPane.setMargin(removeButton, new Insets(0, 0, 0, 10));
This sets a 10 pixel spacing under the text field, 10 pixels below the Add button and also to the left of the Add button and 10 pixels to the left of the Remove button. Here is the result as the window is resized in various ways:

COMP1406 - Chapter 7 - User Interface Extensions Winter 2018
- 200 -
Here is the code: import javafx.application.Application;
import javafx.collections.FXCollections;
import javafx.geometry.*;
import javafx.scene.Scene;
import javafx.scene.control.*;
import javafx.scene.layout.GridPane;
import javafx.stage.Stage;
public class MoreComplicatedGridPaneExample extends Application {
public void start(Stage primaryStage) {
GridPane aPane = new GridPane();
aPane.setPadding(new Insets(10, 10, 10, 10));
TextField newItemField = new TextField();
newItemField.setMinHeight(30);
aPane.add(newItemField,0,0);
aPane.setMargin(newItemField, new Insets(0, 0, 10, 0));
Button addButton = new Button("Add");
aPane.add(addButton,1,0);
addButton.setMinHeight(30);
addButton.setMinWidth(100);
aPane.setMargin(addButton, new Insets(0, 0, 10, 10));
ListView<String> fruitList = new ListView<String>();
String[] fruits = {"Apples", "Oranges", "Bananas", "Cherries", "Lemons",
"Pears", "Strawberries", "Peaches", "Pomegranates",
"Nectarines", "Apricots"};
fruitList.setItems(FXCollections.observableArrayList(fruits));
fruitList.setPrefWidth(Integer.MAX_VALUE);
fruitList.setPrefHeight(Integer.MAX_VALUE);
aPane.add(fruitList,0,1);
Button removeButton = new Button("Remove");
aPane.add(removeButton,1,1);
removeButton.setMinHeight(30);
removeButton.setMinWidth(100);
aPane.setMargin(removeButton, new Insets(0, 0, 0, 10));
aPane.setValignment(removeButton, VPos.TOP);
primaryStage.setTitle("More Complicated GridPane Example");
primaryStage.setScene(new Scene(aPane, 420,320));
primaryStage.show();
}
public static void main(String[] args) { launch(args); }
}
Let's do another example which is a little more complicated.
COMP1406 - Chapter 7 - User Interface Extensions Winter 2018
- 201 -
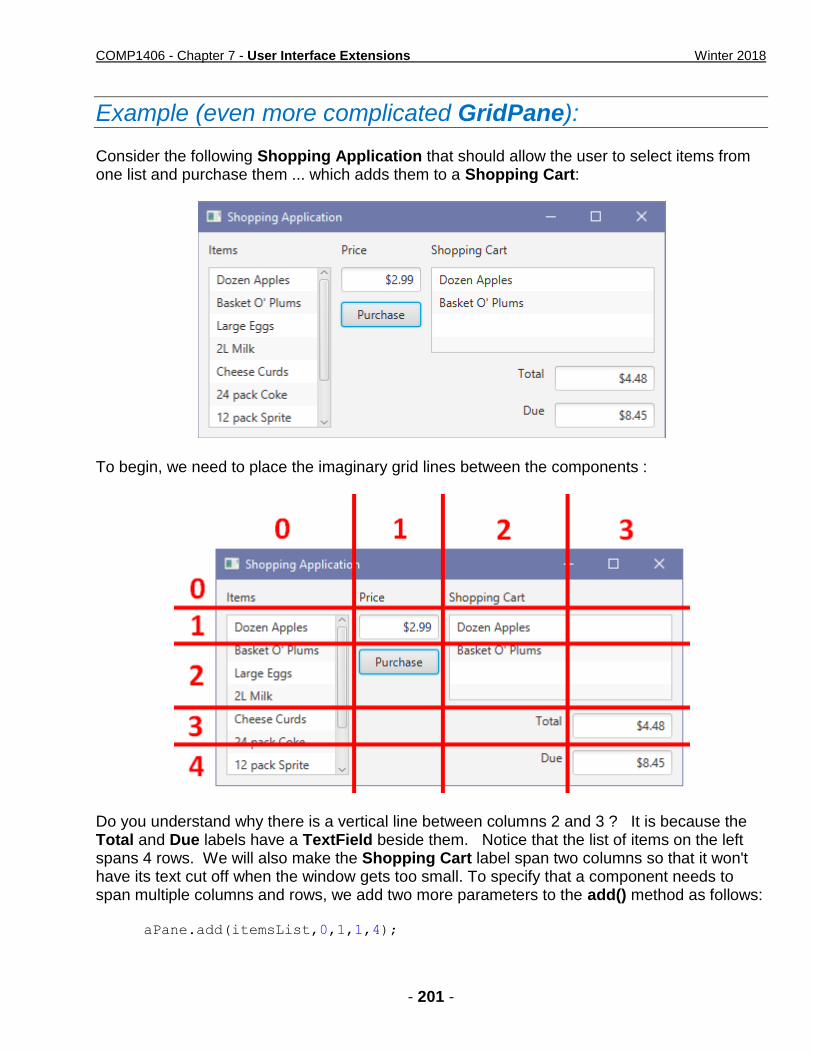
Example (even more complicated GridPane): Consider the following Shopping Application that should allow the user to select items from one list and purchase them ... which adds them to a Shopping Cart:
To begin, we need to place the imaginary grid lines between the components :
Do you understand why there is a vertical line between columns 2 and 3 ? It is because the Total and Due labels have a TextField beside them. Notice that the list of items on the left spans 4 rows. We will also make the Shopping Cart label span two columns so that it won't have its text cut off when the window gets too small. To specify that a component needs to span multiple columns and rows, we add two more parameters to the add() method as follows:
aPane.add(itemsList,0,1,1,4);

COMP1406 - Chapter 7 - User Interface Extensions Winter 2018
- 202 -
The first parameter is the component (i.e., the list on the left, in this case). The next two parameters are the column and row that contains the top left corner of the component (i.e., column 0 and row 1). The final two parameters indicate the #columns and #rows that the component must span (or occupy). In this case, the list takes 1 column and 4 rows. At this point, we can specify all of the components and their grid locations as follows: import javafx.application.Application;
import javafx.collections.FXCollections;
import javafx.geometry.*;
import javafx.scene.Scene;
import javafx.scene.control.*;
import javafx.scene.layout.GridPane;
import javafx.stage.Stage;
public class ComplicatedGridPaneExample extends Application {
public void start(Stage primaryStage) {
GridPane aPane = new GridPane();
// Put a 10-pixel margin all around the outside of the pane
aPane.setPadding(new Insets(10, 10, 10, 10));
// Add the labels at the top of the pane
Label aLabel = new Label("Items");
aPane.add(aLabel,0,0);
aLabel = new Label("Price");
aPane.add(aLabel,1,0);
aLabel = new Label("Shopping Cart");
aPane.add(aLabel,2,0,2,1); // spans 2 columns, 1 row
// Add the Price textfield and the Purchase button
TextField priceField = new TextField("$2.99");
aPane.add(priceField,1,1);
Button purchaseButton = new Button("Purchase");
aPane.add(purchaseButton,1,2);
// Add the Total and Due labels and text fields
aLabel = new Label("Total");
aPane.add(aLabel,2,3);
aLabel = new Label("Due");
aPane.add(aLabel,2,4);
TextField totalField = new TextField("$4.48");
aPane.add(totalField,3,3);
TextField dueField = new TextField("$8.45");
aPane.add(dueField,3,4);
// Add the Items List and Shopping Cart List
ListView<String> itemsList = new ListView<String>();
String[] fruits = {"Dozen Apples", "Basket O' Plums", "Large Eggs",
"2L Milk", "Cheese Curds", "24 pack Coke",
"12 pack Sprite", "Canned Olives"};

COMP1406 - Chapter 7 - User Interface Extensions Winter 2018
- 203 -
itemsList.setItems(FXCollections.observableArrayList(fruits));
aPane.add(itemsList,0,1,1,4); // spans 1 column, 4 rows
ListView cartList = new ListView();
String[] fruits2 = {"Dozen Apples", "Basket O' Plums"};
cartList.setItems(FXCollections.observableArrayList(fruits2));
aPane.add(cartList,2,1,2,2); // spans 2 columns, 2 rows
primaryStage.setTitle("Shopping Application");
primaryStage.setScene(new Scene(aPane, 660,480));
primaryStage.show();
}
public static void main(String[] args) { launch(args); }
}
Here is what everything looks like so far:
Now, as before, we need to anchor the Purchase button to the top of the grid cell:
aPane.setValignment(purchaseButton, VPos.TOP);
COMP1406 - Chapter 7 - User Interface Extensions Winter 2018
- 204 -
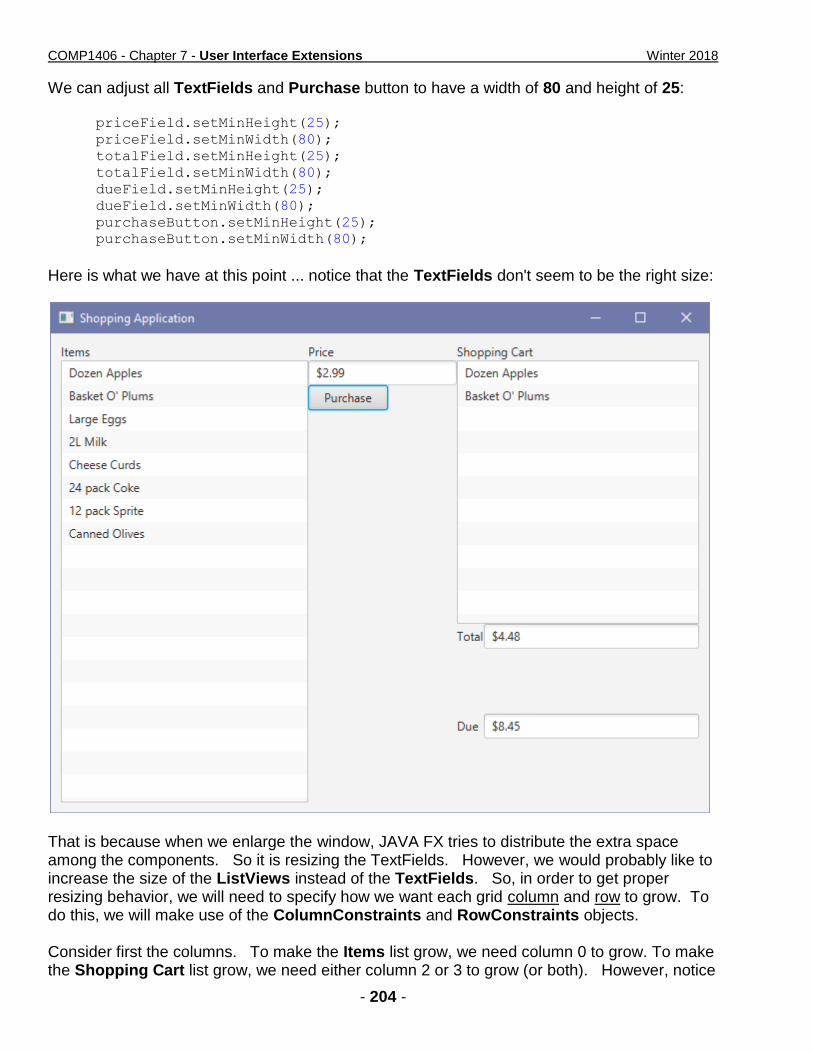
We can adjust all TextFields and Purchase button to have a width of 80 and height of 25:
priceField.setMinHeight(25);
priceField.setMinWidth(80);
totalField.setMinHeight(25);
totalField.setMinWidth(80);
dueField.setMinHeight(25);
dueField.setMinWidth(80);
purchaseButton.setMinHeight(25);
purchaseButton.setMinWidth(80);
Here is what we have at this point ... notice that the TextFields don't seem to be the right size:
That is because when we enlarge the window, JAVA FX tries to distribute the extra space among the components. So it is resizing the TextFields. However, we would probably like to increase the size of the ListViews instead of the TextFields. So, in order to get proper resizing behavior, we will need to specify how we want each grid column and row to grow. To do this, we will make use of the ColumnConstraints and RowConstraints objects. Consider first the columns. To make the Items list grow, we need column 0 to grow. To make the Shopping Cart list grow, we need either column 2 or 3 to grow (or both). However, notice

COMP1406 - Chapter 7 - User Interface Extensions Winter 2018
- 205 -
that column 3 contains TextFields ... which we likely do not want to grow, since the price field is wide enough to show any reasonable amount already. So, we need columns 0 and 2 to grow. For columns 1 and 3, we can set the width of them to some value that we want, since they won't grow. Since column 1 has the Price field and Purchase button with a width of 80 ... we should perhaps set the width of that column to 100 ... allowing for an extra 10 pixel margin on the left and on the right. We can also set column 4 to have the same width of 100. So, Here is the code that we need to use:
ColumnConstraints col0 = new ColumnConstraints(50, 300, Integer.MAX_VALUE);
ColumnConstraints col1 = new ColumnConstraints(100);
ColumnConstraints col2 = new ColumnConstraints(50, 300, Integer.MAX_VALUE);
ColumnConstraints col3 = new ColumnConstraints(100);
col0.setHgrow(Priority.ALWAYS);
col2.setHgrow(Priority.ALWAYS);
aPane.getColumnConstraints().addAll(col0, col1, col2, col3);
The ColumnConstraints object allows you to pass in 1 parameter (i.e., the width of the column) or you can supply 3 parameters which specify the minimum column width, the preferred column width and the maximum column width. For the columns that will grow, we can set the minimum to 50 so that the lists don't get too narrow. The preferred size of 300 is reasonable in size. The maximum value is set to the largest Integer value (around 2 billion). It is a bit of "overkill", but it tells JavaFX to allow it to grow as large as possible without limit. The setHgrow() method allows us to specify that we want certain columns to grow, otherwise they will not. Finally, we add these column constraints to the pane (as shown in the last line above). Note that the order is important. Here are some snapshots showing the result:

COMP1406 - Chapter 7 - User Interface Extensions Winter 2018
- 206 -
In addition, we need to set the RowConstraints in the same manner. Here is the code:
RowConstraints row0 = new RowConstraints(25);
RowConstraints row1 = new RowConstraints(35);
RowConstraints row2 = new RowConstraints(50, 300, Integer.MAX_VALUE);
RowConstraints row3 = new RowConstraints(40);
RowConstraints row4 = new RowConstraints(35);
row2.setVgrow(Priority.ALWAYS);
aPane.getRowConstraints().addAll(row0, row1, row2, row3, row4);
Notice that row 0 has a height of 25 ... which is the height of your labels. Rows 1, 3 and 4 will have a slightly higher height to allow for some margins above and below the text fields. But none of these rows need to grow. All the growth happens in row 2 ... which is shared by the Purchase button and the two ListViews. Here on the right, we see an example of how the rows are properly growing now. We are almost done. We need to specify some margins around some of the components. For the 3 labels at the top, we can set the margins with 10 pixels at the bottom and for the Price label, we can add an extra 10 pixels on the left to shift it to the right. We will do the same for the price TextField, Purchase button and the Total & Due labels:
aPane.setMargin(aLabel, new Insets(0, 0, 10, 0)); // Items label
aPane.setMargin(aLabel, new Insets(0, 0, 10, 10)); // Price label
aPane.setMargin(aLabel, new Insets(0, 0, 10, 0)); // Shopping Cart label
aPane.setMargin(priceField, new Insets(0, 10, 10, 10)); // Price field
aPane.setMargin(purchaseButton, new Insets(0, 10, 10, 10));// Purchase button
COMP1406 - Chapter 7 - User Interface Extensions Winter 2018
- 207 -
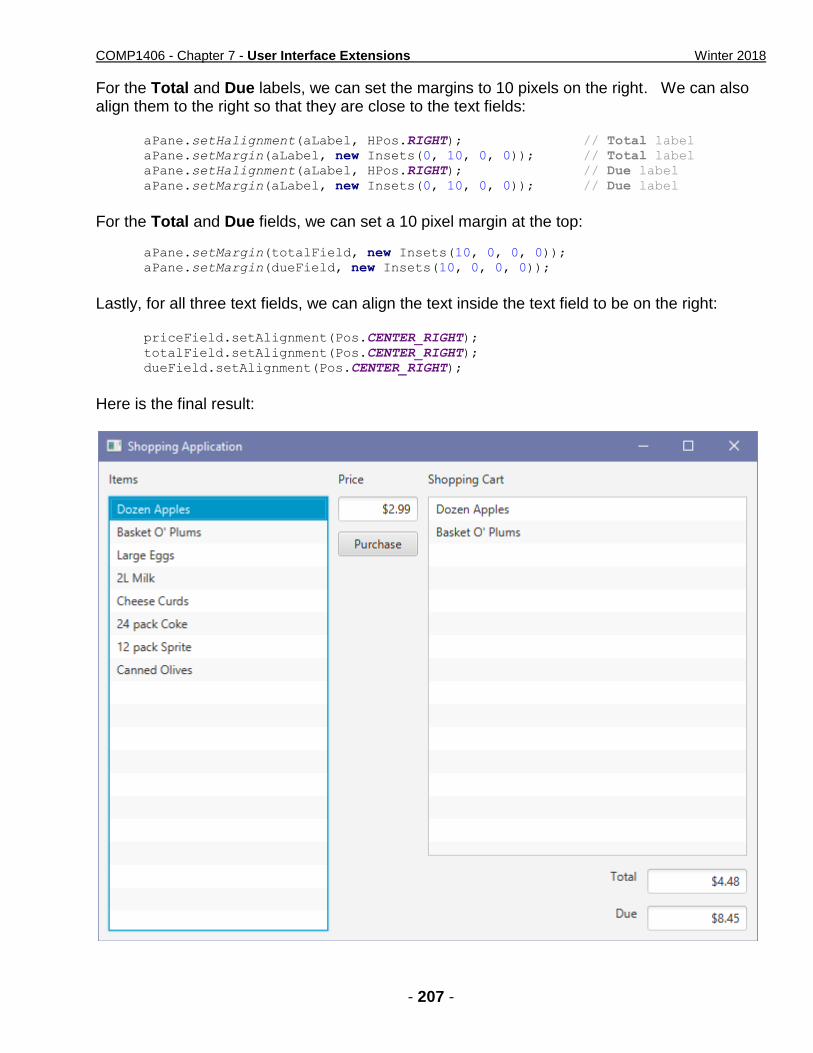
For the Total and Due labels, we can set the margins to 10 pixels on the right. We can also align them to the right so that they are close to the text fields:
aPane.setHalignment(aLabel, HPos.RIGHT); // Total label
aPane.setMargin(aLabel, new Insets(0, 10, 0, 0)); // Total label
aPane.setHalignment(aLabel, HPos.RIGHT); // Due label
aPane.setMargin(aLabel, new Insets(0, 10, 0, 0)); // Due label
For the Total and Due fields, we can set a 10 pixel margin at the top:
aPane.setMargin(totalField, new Insets(10, 0, 0, 0));
aPane.setMargin(dueField, new Insets(10, 0, 0, 0));
Lastly, for all three text fields, we can align the text inside the text field to be on the right:
priceField.setAlignment(Pos.CENTER_RIGHT);
totalField.setAlignment(Pos.CENTER_RIGHT);
dueField.setAlignment(Pos.CENTER_RIGHT);
Here is the final result:

COMP1406 - Chapter 7 - User Interface Extensions Winter 2018
- 208 -
Here is the code: import javafx.application.Application;
import javafx.collections.FXCollections;
import javafx.geometry.*;
import javafx.scene.Scene;
import javafx.scene.control.*;
import javafx.scene.layout.*;
import javafx.stage.Stage;
public class ComplicatedGridPaneExample extends Application {
public void start(Stage primaryStage) {
GridPane aPane = new GridPane();
// Put a 10-pixel margin all around the outside of the pane
aPane.setPadding(new Insets(10, 10, 10, 10));
// Add the labels at the top of the pane
Label aLabel = new Label("Items");
aPane.setMargin(aLabel, new Insets(0, 0, 10, 0));
aPane.add(aLabel,0,0);
aLabel = new Label("Price");
aPane.setMargin(aLabel, new Insets(0, 0, 10, 10));
aPane.add(aLabel,1,0);
aLabel = new Label("Shopping Cart");
aPane.setMargin(aLabel, new Insets(0, 0, 10, 0));
aPane.add(aLabel,2,0,2,1); // spans 2 columns, 1 row
// Add the Price textfield and the Purchase button
TextField priceField = new TextField("$2.99");
priceField.setAlignment(Pos.CENTER_RIGHT);
priceField.setMinHeight(25);
priceField.setMinWidth(80);
aPane.setMargin(priceField, new Insets(0, 10, 10, 10));
aPane.add(priceField,1,1);
Button purchaseButton = new Button("Purchase");
purchaseButton.setMinHeight(25);
purchaseButton.setPrefWidth(80);
aPane.setValignment(purchaseButton, VPos.TOP);
aPane.setMargin(purchaseButton, new Insets(0, 10, 10, 10));
aPane.add(purchaseButton,1,2);
// Add the Total and Due labels and text fields
aLabel = new Label("Total");
aPane.setHalignment(aLabel, HPos.RIGHT);
aPane.setMargin(aLabel, new Insets(0, 10, 0, 0));
aPane.add(aLabel,2,3);
aLabel = new Label("Due");
aPane.setHalignment(aLabel, HPos.RIGHT);
aPane.setMargin(aLabel, new Insets(0, 10, 0, 0));
aPane.add(aLabel,2,4);
TextField totalField = new TextField("$4.48");
totalField.setAlignment(Pos.CENTER_RIGHT);
totalField.setMinHeight(25);
totalField.setMinWidth(80);
aPane.setMargin(totalField, new Insets(10, 0, 0, 0));
aPane.add(totalField,3,3);
COMP1406 - Chapter 7 - User Interface Extensions Winter 2018
- 209 -
TextField dueField = new TextField("$8.45");
dueField.setAlignment(Pos.CENTER_RIGHT);
dueField.setMinHeight(25);
dueField.setMinWidth(80);
aPane.setMargin(dueField, new Insets(10, 0, 0, 0));
aPane.add(dueField,3,4);
// Add the Items List and Shopping Cart List
ListView<String> itemsList = new ListView<String>();
String[] fruits = {"Dozen Apples", "Basket O' Plums", "Large Eggs",
"2L Milk", "Cheese Curds", "24 pack Coke",
"12 pack Sprite", "Canned Olives"};
itemsList.setItems(FXCollections.observableArrayList(fruits));
aPane.add(itemsList,0,1,1,4); // spans 1 column, 4 rows
ListView cartList = new ListView();
String[] fruits2 = {"Dozen Apples", "Basket O' Plums"};
cartList.setItems(FXCollections.observableArrayList(fruits2));
aPane.add(cartList,2,1,2,2); // spans 2 columns, 2 rows
// Specify the size and growth for each column and row
ColumnConstraints col0 = new ColumnConstraints(50, 300, Integer.MAX_VALUE);
ColumnConstraints col1 = new ColumnConstraints(100);
ColumnConstraints col2 = new ColumnConstraints(50, 300, Integer.MAX_VALUE);
ColumnConstraints col3 = new ColumnConstraints(100);
col0.setHgrow(Priority.ALWAYS);
col2.setHgrow(Priority.ALWAYS);
aPane.getColumnConstraints().addAll(col0, col1, col2, col3);
RowConstraints row0 = new RowConstraints(25);
RowConstraints row1 = new RowConstraints(35);
RowConstraints row2 = new RowConstraints(50, 300, Integer.MAX_VALUE);
RowConstraints row3 = new RowConstraints(40);
RowConstraints row4 = new RowConstraints(35);
row2.setVgrow(Priority.ALWAYS);
aPane.getRowConstraints().addAll(row0, row1, row2, row3, row4);
primaryStage.setTitle("Shopping Application");
primaryStage.setScene(new Scene(aPane, 660,480));
primaryStage.show();
}
public static void main(String[] args) { launch(args); }
}

COMP1406 - Chapter 7 - User Interface Extensions Winter 2018
- 210 -
7.2 Adding Menus A menu is a list of commands presented to the user at his/her request. Menus can be attached to a menu bar at the top of an application or they may be pop-up menus that appear anywhere on the screen. In JAVA FX, menus are as easy to use as buttons. There are several component classes that may be used including MenuBar, Menu, ContextMenu, MenuItem, CheckMenuItem, SeparatorMenuItem and RadioMenuItem. The diagram below shows how these components are connected together:
Notice that the MenuBar is attached to the main application Pane as well as the ContextMenu. The individual Menus are then added to the MenuBar, or to another menu to form a cascaded menu (e.g., the Search menu here). The MenuItems are simply added to the Menus.
Example: Consider writing a program to produce the menu hierarchy in the above diagram. We will make a simple Application with nothing inside it except for the menu bar attached to a pane. To begin, we need to make the main Menu objects and add them to a MenuBar. Here is the basic template:

COMP1406 - Chapter 7 - User Interface Extensions Winter 2018
- 211 -
import javafx.application.Application;
import javafx.event.*;
import javafx.scene.Scene;
import javafx.scene.control.*;
import javafx.scene.layout.VBox;
import javafx.stage.Stage;
public class MenuExample extends Application {
private VBox aPane;
public void start(Stage primaryStage) {
aPane = new VBox();
Scene scene = new Scene(aPane, 300, 100); // Set window size
// Create the menus
Menu fileMenu = new Menu("_File");
Menu editMenu = new Menu("_Edit");
Menu settingsMenu = new Menu("_Settings");
// Add the menus to a menubar and then add the menubar to the pane
MenuBar menuBar = new MenuBar();
menuBar.getMenus().addAll(fileMenu, editMenu, settingsMenu);
aPane.getChildren().add(menuBar);
primaryStage.setTitle("Menu Example");
primaryStage.setScene(scene);
primaryStage.show();
}
public static void main(String[] args) { launch(args); }
}
It creates a simple window like this:
The underscore character is used in the Menu names to indicate that the next character in the string is to be used as the Mneumonic character. By doing this, the user will be able to select and open a menu by pressing the ALT key along with the underlined character. So, ALT+F will open the File menu. Now, to create the items in the menus, we simply create and add MenuItems.
MenuItem newItem = new MenuItem("New");
MenuItem openItem = new MenuItem("Open...");
MenuItem closeItem = new MenuItem("Close");
MenuItem saveAsItem = new MenuItem("Save As...");
fileMenu.getItems().addAll(newItem, new SeparatorMenuItem(),
openItem, closeItem, saveAsItem);

COMP1406 - Chapter 7 - User Interface Extensions Winter 2018
- 212 -
Notice that the MenuItems are added in the order that we want them to appear. Also notice that a SeparatorMenuItem was added between the New and Open... options in the menu. This is for visual effect only, allowing us to separate menu items into logical sections within the menu. It is good to often add key Accelerators, which are "quick key" presses that allow the user to select the menu item without having to go through the menus. Here is how to add some of these:
newItem.setAccelerator(KeyCombination.keyCombination("Ctrl+N"));
openItem.setAccelerator(KeyCombination.keyCombination("Ctrl+O"));
closeItem.setAccelerator(KeyCombination.keyCombination("Ctrl+C"));
saveAsItem.setAccelerator(KeyCombination.keyCombination("Ctrl+S"));
We can also disable a menu item by using setDisable() as follows:
closeItem.setDisable(true);
Here is what things look like now:
The Settings menu will have some RadioMenuItems on it so that only one will be selected at a time. Here is how to do that:
ToggleGroup settingGroup = new ToggleGroup();
RadioMenuItem smallItem = new RadioMenuItem("Small");
smallItem.setToggleGroup(settingGroup);
RadioMenuItem mediumItem = new RadioMenuItem("Medium");
mediumItem.setToggleGroup(settingGroup);
RadioMenuItem largeItem = new RadioMenuItem("Large");
largeItem.setToggleGroup(settingGroup);
settingsMenu.getItems().addAll(smallItem, mediumItem, largeItem);

COMP1406 - Chapter 7 - User Interface Extensions Winter 2018
- 213 -
Each RadioMenuItem is added to a ToggleGroup, to ensure that only one can be selected at a time, and then all are added to the menu:
CheckMenuItems are added in the same manner. Also, we can add a cascaded menu (i.e., a menu within a menu) just by adding a menu to another menu as if it was a MenuItem:
Menu searchMenu = new Menu("Search");
MenuItem findItem = new MenuItem("Find");
MenuItem replaceItem = new MenuItem("Replace");
searchMenu.getItems().addAll(findItem, replaceItem);
CheckMenuItem gridItem = new CheckMenuItem("Use GridLines");
MenuItem copyItem = new MenuItem("Copy");
editMenu.getItems().addAll(gridItem, new SeparatorMenuItem(),
copyItem, searchMenu);
Notice how the SearchMenu is created like any other menu, but it is then added to the Edit menu. Here is the result --------> A final menu to be added is a ContextMenu. This is a menu that will pop up wherever we right click on the pane. Notice that it is created like any other menu. However, it is not added to anything:
ContextMenu popupMenu = new ContextMenu();
MenuItem helpItem = new MenuItem("Help");
MenuItem inspectItem = new MenuItem("Inspect");
popupMenu.getItems().addAll(helpItem, inspectItem);
Instead, we create a MOUSE_CLICKED event handler to cause it to appear by using the show() method:
aPane.setOnMouseClicked(new EventHandler<MouseEvent>() {
public void handle(MouseEvent e) {
if (e.getButton() == MouseButton.SECONDARY)
popupMenu.show(aPane,e.getScreenX()-50,e.getScreenY()-25);
}
}
);
COMP1406 - Chapter 7 - User Interface Extensions Winter 2018
- 214 -
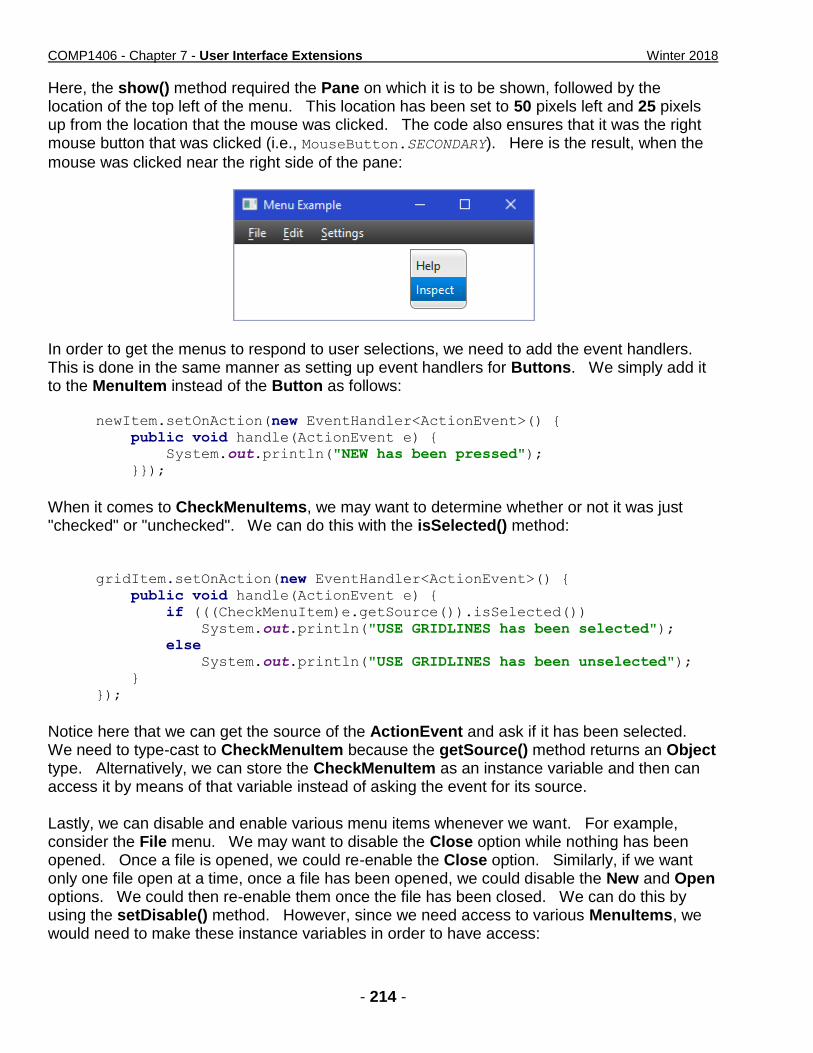
Here, the show() method required the Pane on which it is to be shown, followed by the location of the top left of the menu. This location has been set to 50 pixels left and 25 pixels up from the location that the mouse was clicked. The code also ensures that it was the right mouse button that was clicked (i.e., MouseButton.SECONDARY). Here is the result, when the
mouse was clicked near the right side of the pane:
In order to get the menus to respond to user selections, we need to add the event handlers. This is done in the same manner as setting up event handlers for Buttons. We simply add it to the MenuItem instead of the Button as follows:
newItem.setOnAction(new EventHandler<ActionEvent>() {
public void handle(ActionEvent e) {
System.out.println("NEW has been pressed");
}});
When it comes to CheckMenuItems, we may want to determine whether or not it was just "checked" or "unchecked". We can do this with the isSelected() method:
gridItem.setOnAction(new EventHandler<ActionEvent>() {
public void handle(ActionEvent e) {
if (((CheckMenuItem)e.getSource()).isSelected())
System.out.println("USE GRIDLINES has been selected");
else
System.out.println("USE GRIDLINES has been unselected");
}
});
Notice here that we can get the source of the ActionEvent and ask if it has been selected. We need to type-cast to CheckMenuItem because the getSource() method returns an Object type. Alternatively, we can store the CheckMenuItem as an instance variable and then can access it by means of that variable instead of asking the event for its source. Lastly, we can disable and enable various menu items whenever we want. For example, consider the File menu. We may want to disable the Close option while nothing has been opened. Once a file is opened, we could re-enable the Close option. Similarly, if we want only one file open at a time, once a file has been opened, we could disable the New and Open options. We could then re-enable them once the file has been closed. We can do this by using the setDisable() method. However, since we need access to various MenuItems, we would need to make these instance variables in order to have access:
COMP1406 - Chapter 7 - User Interface Extensions Winter 2018
- 215 -
newItem.setOnAction(new EventHandler<ActionEvent>() {
public void handle(ActionEvent e) {
closeItem.setDisable(false);
newItem.setDisable(true);
openItem.setDisable(true);
System.out.println("NEW has been pressed");
}
});
openItem.setOnAction(new EventHandler<ActionEvent>() {
public void handle(ActionEvent e) {
closeItem.setDisable(false);
openItem.setDisable(true);
newItem.setDisable(true);
System.out.println("OPEN has been pressed");
}
});
closeItem.setOnAction(new EventHandler<ActionEvent>() {
public void handle(ActionEvent e) {
openItem.setDisable(false);
newItem.setDisable(false);
closeItem.setDisable(true);
System.out.println("CLOSE has been pressed");
}
});
Here is the final code: import javafx.application.Application;
import javafx.event.*;
import javafx.scene.Scene;
import javafx.scene.control.*;
import javafx.scene.input.*;
import javafx.scene.layout.VBox;
import javafx.stage.Stage;
public class MenuExample extends Application {
private MenuItem openItem, closeItem, newItem;
private VBox aPane;
private ContextMenu popupMenu;
public void start(Stage primaryStage) {
aPane = new VBox();
Scene scene = new Scene(aPane, 300, 100); // Set window size
// Create the File menu
Menu fileMenu = new Menu("_File");
newItem = new MenuItem("New");
newItem.setAccelerator(KeyCombination.keyCombination("Ctrl+N"));
openItem = new MenuItem("Open...");
openItem.setAccelerator(KeyCombination.keyCombination("Ctrl+O"));
closeItem = new MenuItem("Close");
closeItem.setAccelerator(KeyCombination.keyCombination("Ctrl+C"));
closeItem.setDisable(true);
MenuItem saveAsItem = new MenuItem("Save As...");
saveAsItem.setAccelerator(KeyCombination.keyCombination("Ctrl+S"));

COMP1406 - Chapter 7 - User Interface Extensions Winter 2018
- 216 -
fileMenu.getItems().addAll(newItem, new SeparatorMenuItem(), openItem,
closeItem, saveAsItem);
// Set up the event handlers for the File menu
newItem.setOnAction(new EventHandler<ActionEvent>() {
public void handle(ActionEvent e) {
closeItem.setDisable(false);
newItem.setDisable(true);
openItem.setDisable(true);
System.out.println("NEW has been pressed");
}
});
openItem.setOnAction(new EventHandler<ActionEvent>() {
public void handle(ActionEvent e) {
closeItem.setDisable(false);
openItem.setDisable(true);
newItem.setDisable(true);
System.out.println("OPEN has been pressed");
}
});
closeItem.setOnAction(new EventHandler<ActionEvent>() {
public void handle(ActionEvent e) {
openItem.setDisable(false);
newItem.setDisable(false);
closeItem.setDisable(true);
System.out.println("CLOSE has been pressed");
}
});
saveAsItem.setOnAction(new EventHandler<ActionEvent>() {
public void handle(ActionEvent e) {
System.out.println("SAVE AS has been pressed");
}
});
//Create the Search menu
Menu searchMenu = new Menu("Search");
MenuItem findItem = new MenuItem("Find");
MenuItem replaceItem = new MenuItem("Replace");
searchMenu.getItems().addAll(findItem, replaceItem);
// Set up the event handlers for the Search menu
findItem.setOnAction(new EventHandler<ActionEvent>() {
public void handle(ActionEvent e) {
System.out.println("FIND has been pressed");
}
});
replaceItem.setOnAction(new EventHandler<ActionEvent>() {
public void handle(ActionEvent e) {
System.out.println("REPLACE has been pressed");
}
});
// Create the Edit menu
Menu editMenu = new Menu("_Edit");
CheckMenuItem gridItem = new CheckMenuItem("Use GridLines");
MenuItem copyItem = new MenuItem("Copy");
editMenu.getItems().addAll(gridItem, new SeparatorMenuItem(),
copyItem, searchMenu);

COMP1406 - Chapter 7 - User Interface Extensions Winter 2018
- 217 -
// Set up the event handlers for the Edit menu
gridItem.setOnAction(new EventHandler<ActionEvent>() {
public void handle(ActionEvent e) {
if (((CheckMenuItem)e.getSource()).isSelected())
System.out.println("USE GRIDLINES has been selected");
else
System.out.println("USE GRIDLINES has been unselected");
}
});
copyItem.setOnAction(new EventHandler<ActionEvent>() {
public void handle(ActionEvent e) {
System.out.println("COPY has been pressed");
}
});
// Create the Settings menu
Menu settingsMenu = new Menu("_Settings");
ToggleGroup settingGroup = new ToggleGroup();
RadioMenuItem smallItem = new RadioMenuItem("Small");
smallItem.setToggleGroup(settingGroup);
RadioMenuItem mediumItem = new RadioMenuItem("Medium");
mediumItem.setToggleGroup(settingGroup);
RadioMenuItem largeItem = new RadioMenuItem("Large");
largeItem.setToggleGroup(settingGroup);
settingsMenu.getItems().addAll(smallItem, mediumItem, largeItem);
// Set up the event handlers for the Settings menu
smallItem.setOnAction(new EventHandler<ActionEvent>() {
public void handle(ActionEvent e) {
System.out.println("SMALL has been selected");
}
});
mediumItem.setOnAction(new EventHandler<ActionEvent>() {
public void handle(ActionEvent e) {
System.out.println("MEDIUM has been selected");
}
});
largeItem.setOnAction(new EventHandler<ActionEvent>() {
public void handle(ActionEvent e) {
System.out.println("LARGE has been selected");
}
});
// Create a Contect (or popup) menu
popupMenu = new ContextMenu();
MenuItem helpItem = new MenuItem("Help");
MenuItem inspectItem = new MenuItem("Inspect");
popupMenu.getItems().addAll(helpItem, inspectItem);
aPane.setOnMouseClicked(new EventHandler<MouseEvent>() {
public void handle(MouseEvent e) {
if (e.getButton() == MouseButton.SECONDARY)
popupMenu.show(aPane,e.getScreenX()-50,e.getScreenY()-25);
}
});
// Set up the event handlers for the Popup menu
helpItem.setOnAction(new EventHandler<ActionEvent>() {
public void handle(ActionEvent e) {
System.out.println("HELP has been pressed");
}
});
COMP1406 - Chapter 7 - User Interface Extensions Winter 2018
- 218 -
inspectItem.setOnAction(new EventHandler<ActionEvent>() {
public void handle(ActionEvent e) {
System.out.println("INSPECT has been pressed");
}
});
// Add the menus to a menubar and then add the menubar to the pane
MenuBar menuBar = new MenuBar();
menuBar.getMenus().addAll(fileMenu, editMenu, settingsMenu);
aPane.getChildren().add(menuBar);
primaryStage.setTitle("Menu Example");
primaryStage.setScene(scene);
primaryStage.show();
}
public static void main(String[] args) { launch(args); }
}
7.3 Standard Dialog Boxes If a main application window has too many components on it, it will look cluttered and it will not be simple and easy to use. It is a good idea not to display components on your window if they are not needed at that time. For example, a main application may not want to display name, address and phone number fields until the user has selected some action that requires that information to be entered. Usually, this information is placed in a different window that "pops up" when needed.
A Dialog Box is a secondary window (i.e., not the main application window) that is
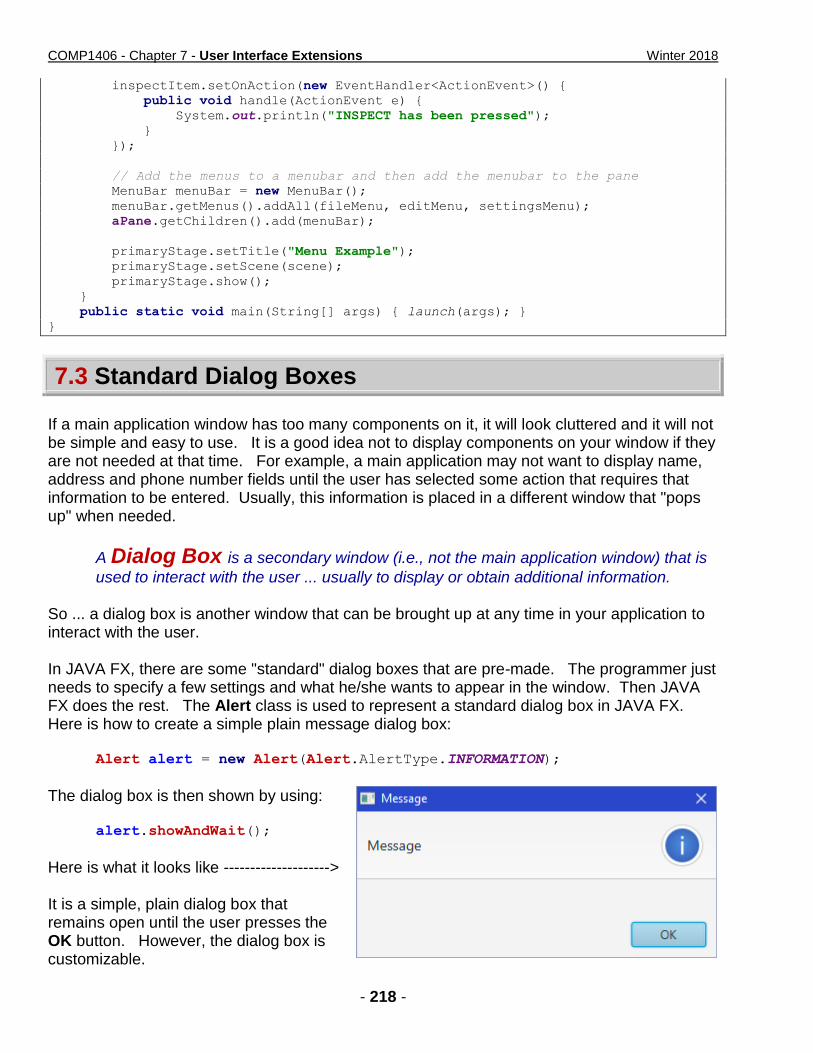
used to interact with the user ... usually to display or obtain additional information. So ... a dialog box is another window that can be brought up at any time in your application to interact with the user. In JAVA FX, there are some "standard" dialog boxes that are pre-made. The programmer just needs to specify a few settings and what he/she wants to appear in the window. Then JAVA FX does the rest. The Alert class is used to represent a standard dialog box in JAVA FX. Here is how to create a simple plain message dialog box:
Alert alert = new Alert(Alert.AlertType.INFORMATION);
The dialog box is then shown by using:
alert.showAndWait();
Here is what it looks like --------------------> It is a simple, plain dialog box that remains open until the user presses the OK button. However, the dialog box is customizable.

COMP1406 - Chapter 7 - User Interface Extensions Winter 2018
- 219 -
We can alter the title of the window, the "header" portion of the dialog box (i.e., the text to the left of the icon) as well as add some additional context-related text just above the OK button. Here are some methods that allow us to fully configure the dialog box:
alert.setTitle("Message To the User");
alert.setHeaderText("Important Reminder");
alert.setContentText("If you inserted a USB flash drive, make sure " +
"to take it with you when you leave. Some " +
"students have been forgetting their USB drive" +
" in the lab only to find that it is not there" +
" when they come back to look for it.");
Here is what it looks like now. Notice how the Context Text wraps around nicely:
You can also eliminate the Header text by setting it to null:
alert.setHeaderText(null);
You can change the icon from being an "information" icon to that of being a "warning" icon or an "error" icon simply by altering the static value used when creating the Alert:
Alert alert = new Alert(Alert.AlertType.WARNING);
alert.setTitle("Tip for the day");
alert.setHeaderText(null);
alert.setContentText("Don't eat yellow snow.");

COMP1406 - Chapter 7 - User Interface Extensions Winter 2018
- 220 -
Alert alert = new Alert(Alert.AlertType.ERROR);
alert.setTitle("Error !");
alert.setHeaderText(null);
alert.setContentText("Your program stopped working");
In addition to these simple messages, we can also have a message dialog come up with a lot of text within it by adding a TextArea to the Alert.
Alert alert = new Alert(Alert.AlertType.ERROR);
alert.setTitle("Error");
alert.setHeaderText(null);
alert.setContentText("Invalid Gregorian Calendar Date");
Label label = new Label("Date entered:");
TextArea textArea = new TextArea(new GregorianCalendar().toString());
textArea.setEditable(false);
textArea.setWrapText(true);
textArea.setMaxWidth(Double.MAX_VALUE);
textArea.setMaxHeight(Double.MAX_VALUE);
GridPane.setVgrow(textArea, Priority.ALWAYS);
GridPane.setHgrow(textArea, Priority.ALWAYS);
GridPane expandableContent = new GridPane();
expandableContent.setMaxWidth(Double.MAX_VALUE);
expandableContent.add(label, 0, 0);
expandableContent.add(textArea, 0, 1);
alert.getDialogPane().setExpandableContent(expandableContent);
Notice that we are just using a standard error dialog but that we are adding a GridPane with a Label and a TextArea. We added the data from today's date, created from a new GregorianCalendar object.

COMP1406 - Chapter 7 - User Interface Extensions Winter 2018
- 221 -
The setExpandableContent() method allows us to add that extra GridPane to the dialog box in a way that will allow the user to Hide or Show it as extra detail. Here is what the dialog box looks like with the data hidden.
And here is what it looks like with the expanded data being shown:
In addition to showing just simple messages, we can have dialog boxes that allow the user to make a simple decision.
Alert alert = new Alert(Alert.AlertType.CONFIRMATION);
alert.setTitle("Answer this Question");
alert.setHeaderText(null);
alert.setContentText("Do you want me to clean up your hard drive ?");
Optional<ButtonType> result = alert.showAndWait();
if (result.get() == ButtonType.OK){
System.out.println("OK, I'm erasing it now ...");
} else {
System.out.println("Fine then, you clean it up!");
}
Here is what the window looks like:
COMP1406 - Chapter 7 - User Interface Extensions Winter 2018
- 222 -
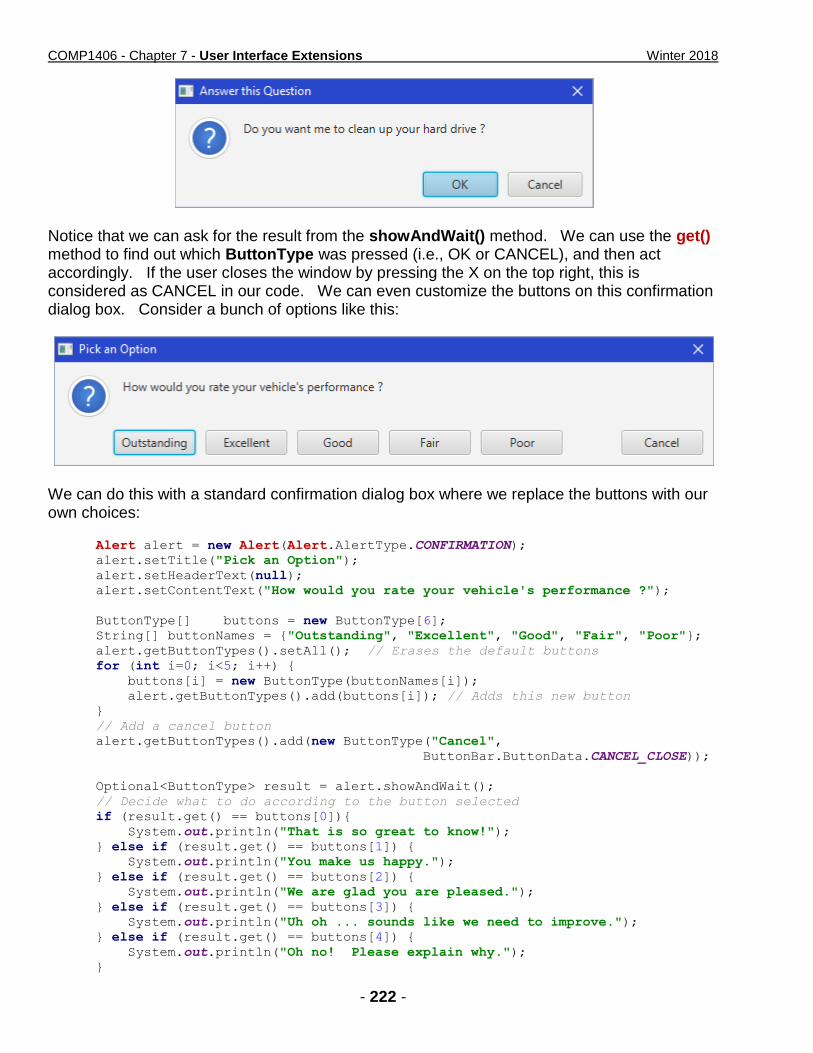
Notice that we can ask for the result from the showAndWait() method. We can use the get() method to find out which ButtonType was pressed (i.e., OK or CANCEL), and then act accordingly. If the user closes the window by pressing the X on the top right, this is considered as CANCEL in our code. We can even customize the buttons on this confirmation dialog box. Consider a bunch of options like this:
We can do this with a standard confirmation dialog box where we replace the buttons with our own choices:
Alert alert = new Alert(Alert.AlertType.CONFIRMATION);
alert.setTitle("Pick an Option");
alert.setHeaderText(null);
alert.setContentText("How would you rate your vehicle's performance ?");
ButtonType[] buttons = new ButtonType[6];
String[] buttonNames = {"Outstanding", "Excellent", "Good", "Fair", "Poor"};
alert.getButtonTypes().setAll(); // Erases the default buttons
for (int i=0; i<5; i++) {
buttons[i] = new ButtonType(buttonNames[i]);
alert.getButtonTypes().add(buttons[i]); // Adds this new button
}
// Add a cancel button
alert.getButtonTypes().add(new ButtonType("Cancel",
ButtonBar.ButtonData.CANCEL_CLOSE));
Optional<ButtonType> result = alert.showAndWait();
// Decide what to do according to the button selected
if (result.get() == buttons[0]){
System.out.println("That is so great to know!");
} else if (result.get() == buttons[1]) {
System.out.println("You make us happy.");
} else if (result.get() == buttons[2]) {
System.out.println("We are glad you are pleased.");
} else if (result.get() == buttons[3]) {
System.out.println("Uh oh ... sounds like we need to improve.");
} else if (result.get() == buttons[4]) {
System.out.println("Oh no! Please explain why.");
}

COMP1406 - Chapter 7 - User Interface Extensions Winter 2018
- 223 -
There is a limit to how many buttons would fit nicely on the window, but this gives you an idea. In addition to the Alert class, there is a ChoiceDialog class that allows the user to have a list of choices specified in a drop-down list as follows:
To do this, we need to specify options again and set them in the constructor:
String[] options = {"Apple", "Orange", "Strawberry", "Banana", "Peaches"};
ChoiceDialog<String> dialog = new ChoiceDialog<String>("Peaches", options);
dialog.setTitle("Fruit Information");
dialog.setHeaderText(null);
dialog.setContentText("Choose your favorite fruit");
Optional<String> result = dialog.showAndWait();
if (result.isPresent()){
System.out.println("Your choice: " + result.get());
}
Notice that we can also set the default value (i.e., "Peaches" in this case) within the constructor. The isPresent() method allows us to determine whether or not the user selected an item or pressed CANCEL. If he/she did not press CANCEL, then we use the get() method to get the value that was selected. We can also create a TextInputDialog which will allow the user to enter text from a simple text field:

COMP1406 - Chapter 7 - User Interface Extensions Winter 2018
- 224 -
The code to create the box is intuitive:
TextInputDialog dialog = new TextInputDialog("Mark");
dialog.setTitle("Input Required");
dialog.setHeaderText(null);
dialog.setContentText("Please enter your name:");
Optional<String> result = dialog.showAndWait();
if (result.isPresent()){
System.out.println("Your name is: " + result.get());
}
As a final dialog box, let's customize one that will allow a Username and Password to be entered. To make a general dialog box, we use the Dialog class:
Dialog dialog = new Dialog();
dialog.setTitle("Login Dialog");
dialog.setHeaderText(null);
ButtonType loginButtonType = new ButtonType("Login",
ButtonBar.ButtonData.OK_DONE);
dialog.getDialogPane().getButtonTypes().addAll(loginButtonType,
ButtonType.CANCEL);
This is a basic dialog box with a Login and Cancel button. You can change the "Login" to "Ok" for a more general dialog box. Now we can add a username and password field. We can create a GridPane to hold it all:
Here is the code to do this:
GridPane grid = new GridPane();
grid.setHgap(10);
grid.setVgap(10);
grid.setPadding(new Insets(10, 10, 10, 10));
COMP1406 - Chapter 7 - User Interface Extensions Winter 2018
- 225 -
TextField username = new TextField();
username.setPromptText("Username");
PasswordField password = new PasswordField();
password.setPromptText("Password");
grid.add(new Label("Username:"), 0, 0);
grid.add(username, 1, 0);
grid.add(new Label("Password:"), 0, 1);
grid.add(password, 1, 1);
dialog.getDialogPane().setContent(grid);
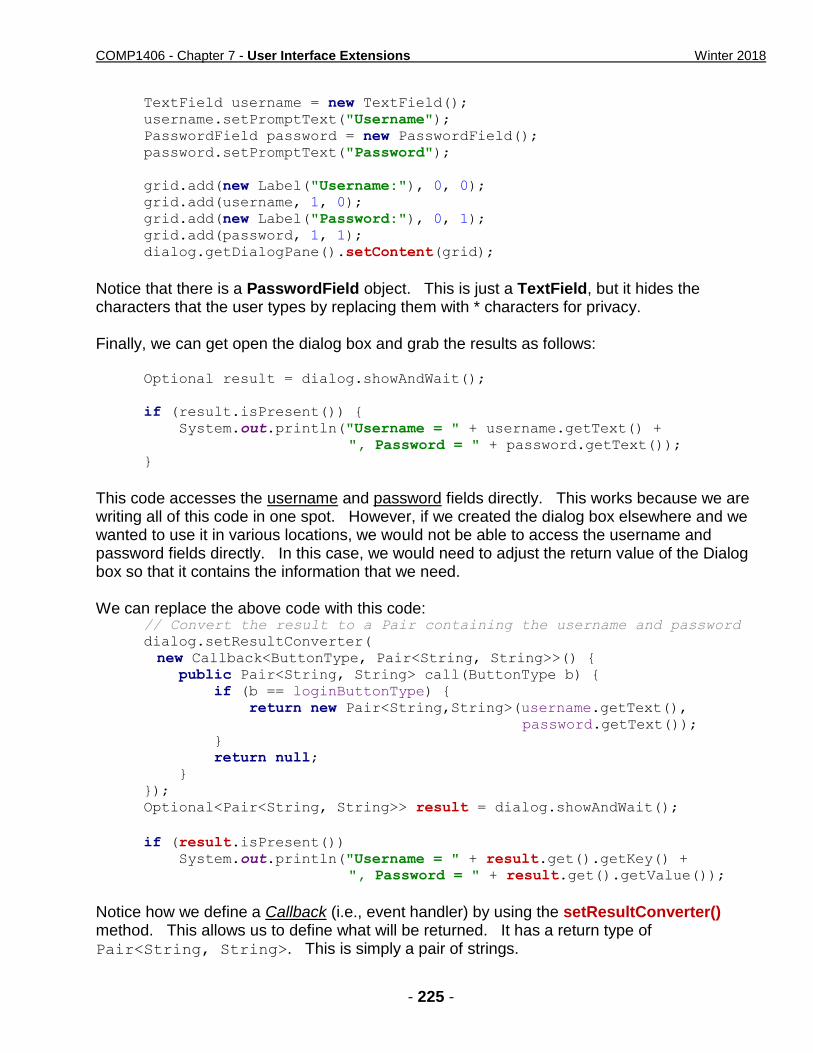
Notice that there is a PasswordField object. This is just a TextField, but it hides the characters that the user types by replacing them with * characters for privacy. Finally, we can get open the dialog box and grab the results as follows:
Optional result = dialog.showAndWait();
if (result.isPresent()) {
System.out.println("Username = " + username.getText() +
", Password = " + password.getText());
}
This code accesses the username and password fields directly. This works because we are writing all of this code in one spot. However, if we created the dialog box elsewhere and we wanted to use it in various locations, we would not be able to access the username and password fields directly. In this case, we would need to adjust the return value of the Dialog box so that it contains the information that we need. We can replace the above code with this code:
// Convert the result to a Pair containing the username and password
dialog.setResultConverter(
new Callback<ButtonType, Pair<String, String>>() {
public Pair<String, String> call(ButtonType b) {
if (b == loginButtonType) {
return new Pair<String,String>(username.getText(),
password.getText());
}
return null;
}
});
Optional<Pair<String, String>> result = dialog.showAndWait();
if (result.isPresent())
System.out.println("Username = " + result.get().getKey() +
", Password = " + result.get().getValue());
Notice how we define a Callback (i.e., event handler) by using the setResultConverter() method. This allows us to define what will be returned. It has a return type of Pair<String, String>. This is simply a pair of strings.

COMP1406 - Chapter 7 - User Interface Extensions Winter 2018
- 226 -
The code inside the callback sets the pair to be the username and password that was entered, as long as the LOGIN button was pressed. If CANCEL was pressed, or the window was closed, the result will be null. We then access this pair by calling get() and then we can use getKey() and getValue() to go inside the pair to get the username and password values. There are other minor adjustments that we can make. For example, we could have the dialog box come up with the focus in the username field:
username.requestFocus();
This allows the user to start typing right away when the dialog box first opens instead of having to click on the username field to start typing. It is not necessary, but it is convenient. We can also disable the LOGIN field unless the user has typed in something:
// Enable/Disable login btn depending on whether username was entered.
Node loginButton = dialog.getDialogPane().
lookupButton(loginButtonType);
loginButton.setDisable(true); // Disable upon start
username.textProperty().addListener(new ChangeListener() {
public void changed(ObservableValue observable, Object oldValue,
Object newValue) {
loginButton.setDisable(((String)newValue).trim().isEmpty());
}});
Now we have a nice username/password field dialog box. True, it is not a "standard" dialog box since we have customized it, but it is a type of dialog box that is commonly used.
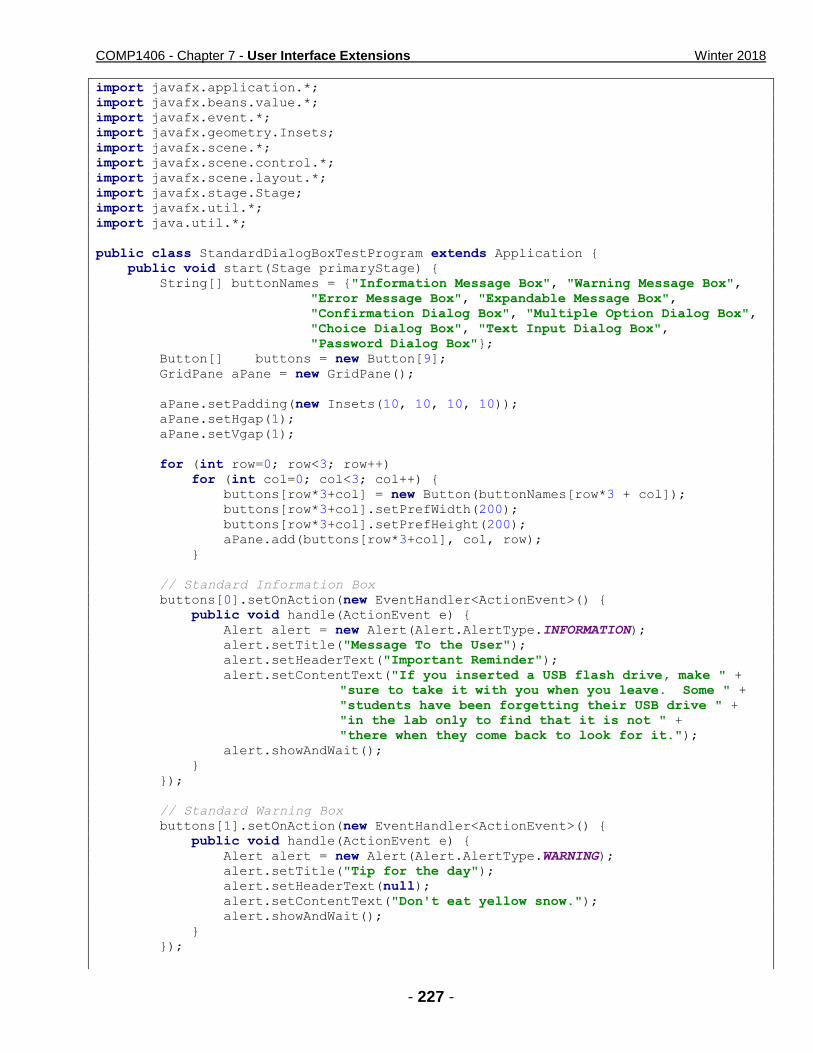
Example: By means of a summary, here is an application that creates the various dialog boxes mentioned in this section. The application brings up 9 buttons, each which themselves will bring up a different kind of dialog box as we have discussed already.
The code is as follows:
COMP1406 - Chapter 7 - User Interface Extensions Winter 2018
- 227 -
import javafx.application.*;
import javafx.beans.value.*;
import javafx.event.*;
import javafx.geometry.Insets;
import javafx.scene.*;
import javafx.scene.control.*;
import javafx.scene.layout.*;
import javafx.stage.Stage;
import javafx.util.*;
import java.util.*;
public class StandardDialogBoxTestProgram extends Application {
public void start(Stage primaryStage) {
String[] buttonNames = {"Information Message Box", "Warning Message Box",
"Error Message Box", "Expandable Message Box",
"Confirmation Dialog Box", "Multiple Option Dialog Box",
"Choice Dialog Box", "Text Input Dialog Box",
"Password Dialog Box"};
Button[] buttons = new Button[9];
GridPane aPane = new GridPane();
aPane.setPadding(new Insets(10, 10, 10, 10));
aPane.setHgap(1);
aPane.setVgap(1);
for (int row=0; row<3; row++)
for (int col=0; col<3; col++) {
buttons[row*3+col] = new Button(buttonNames[row*3 + col]);
buttons[row*3+col].setPrefWidth(200);
buttons[row*3+col].setPrefHeight(200);
aPane.add(buttons[row*3+col], col, row);
}
// Standard Information Box
buttons[0].setOnAction(new EventHandler<ActionEvent>() {
public void handle(ActionEvent e) {
Alert alert = new Alert(Alert.AlertType.INFORMATION);
alert.setTitle("Message To the User");
alert.setHeaderText("Important Reminder");
alert.setContentText("If you inserted a USB flash drive, make " +
"sure to take it with you when you leave. Some " +
"students have been forgetting their USB drive " +
"in the lab only to find that it is not " +
"there when they come back to look for it.");
alert.showAndWait();
}
});
// Standard Warning Box
buttons[1].setOnAction(new EventHandler<ActionEvent>() {
public void handle(ActionEvent e) {
Alert alert = new Alert(Alert.AlertType.WARNING);
alert.setTitle("Tip for the day");
alert.setHeaderText(null);
alert.setContentText("Don't eat yellow snow.");
alert.showAndWait();
}
});

COMP1406 - Chapter 7 - User Interface Extensions Winter 2018
- 228 -
// Standard Error Box
buttons[2].setOnAction(new EventHandler<ActionEvent>() {
public void handle(ActionEvent e) {
Alert alert = new Alert(Alert.AlertType.ERROR);
alert.setTitle("Error !");
alert.setHeaderText(null);
alert.setContentText("Your program stopped working");
alert.showAndWait();
}
});
// Standard Expandable Message Box
buttons[3].setOnAction(new EventHandler<ActionEvent>() {
public void handle(ActionEvent e) {
Alert alert = new Alert(Alert.AlertType.ERROR);
alert.setTitle("Error");
alert.setHeaderText(null);
alert.setContentText("Invalid Gregorian Calendar Date");
Label label = new Label("Date entered:");
TextArea textArea = new TextArea(new GregorianCalendar().
toString());
textArea.setEditable(false);
textArea.setWrapText(true);
textArea.setMaxWidth(Double.MAX_VALUE);
textArea.setMaxHeight(Double.MAX_VALUE);
GridPane.setVgrow(textArea, Priority.ALWAYS);
GridPane.setHgrow(textArea, Priority.ALWAYS);
GridPane expandableContent = new GridPane();
expandableContent.setMaxWidth(Double.MAX_VALUE);
expandableContent.add(label, 0, 0);
expandableContent.add(textArea, 0, 1);
alert.getDialogPane().setExpandableContent(expandableContent);
alert.showAndWait();
}
});
// Standard Confirmation Box
buttons[4].setOnAction(new EventHandler<ActionEvent>() {
public void handle(ActionEvent e) {
Alert alert = new Alert(Alert.AlertType.CONFIRMATION);
alert.setTitle("Answer this Question");
alert.setHeaderText(null);
alert.setContentText("Do you want me to clean up your hard drive ?");
Optional<ButtonType> result = alert.showAndWait();
if (result.get() == ButtonType.OK){
System.out.println("OK, I'm erasing it now ...");
} else {
System.out.println("Fine then, you clean it up!");
}
}
});
// Standard Customizable Confirmation Box
buttons[5].setOnAction(new EventHandler<ActionEvent>() {
public void handle(ActionEvent e) {
Alert alert = new Alert(Alert.AlertType.CONFIRMATION);

COMP1406 - Chapter 7 - User Interface Extensions Winter 2018
- 229 -
alert.setTitle("Pick an Option");
alert.setHeaderText(null);
alert.setContentText("How would you rate your vehicle's performance ?");
ButtonType[] buttons = new ButtonType[6];
String[] buttonNames = {"Outstanding", "Excellent", "Good",
"Fair", "Poor"};
alert.getButtonTypes().setAll(); // Erases the default buttons
for (int i=0; i<5; i++) {
buttons[i] = new ButtonType(buttonNames[i]);
alert.getButtonTypes().add(buttons[i]); // Adds this new button
}
// Add a cancel button
alert.getButtonTypes().add(new ButtonType("Cancel",
ButtonBar.ButtonData.CANCEL_CLOSE));
Optional<ButtonType> result = alert.showAndWait();
// Decide what to do according to the button selected
if (result.get() == buttons[0]){
System.out.println("That is so great to know!");
} else if (result.get() == buttons[1]) {
System.out.println("You make us happy.");
} else if (result.get() == buttons[2]) {
System.out.println("We are glad you are pleased.");
} else if (result.get() == buttons[3]) {
System.out.println("Uh oh, sounds like we need to improve.");
} else if (result.get() == buttons[4]) {
System.out.println("Oh no! Please explain why.");
}
}
});
// Standard Choice Dialog Box
buttons[6].setOnAction(new EventHandler<ActionEvent>() {
public void handle(ActionEvent e) {
String[] options = {"Apple", "Orange", "Strawberry",
"Banana", "Peaches"};
ChoiceDialog<String> dialog = new ChoiceDialog<String>("Peaches",
options);
dialog.setTitle("Fruit Information");
dialog.setHeaderText(null);
dialog.setContentText("Choose your favorite fruit");
Optional<String> result = dialog.showAndWait();
if (result.isPresent()){
System.out.println("Your choice: " + result.get());
}
}
});
// Standard Text Input Dialog Box
buttons[7].setOnAction(new EventHandler<ActionEvent>() {
public void handle(ActionEvent e) {
TextInputDialog dialog = new TextInputDialog("Mark");
dialog.setTitle("Input Required");
dialog.setHeaderText(null);
dialog.setContentText("Please enter your name:");
Optional<String> result = dialog.showAndWait();
if (result.isPresent()){

COMP1406 - Chapter 7 - User Interface Extensions Winter 2018
- 230 -
System.out.println("Your name is: " + result.get());
}
}
});
// Standard Customized Password Dialog Box
buttons[8].setOnAction(new EventHandler<ActionEvent>() {
public void handle(ActionEvent e) {
Dialog<Pair<String, String>> dialog = new Dialog<>();
dialog.setTitle("Login Dialog");
dialog.setHeaderText(null);
// Set the button types
ButtonType loginButtonType = new ButtonType("Login",
ButtonBar.ButtonData.OK_DONE);
dialog. getDialogPane().getButtonTypes().addAll(loginButtonType,
ButtonType.CANCEL);
// Create the username and password labels and fields.
GridPane grid = new GridPane();
grid.setHgap(10);
grid.setVgap(10);
grid.setPadding(new Insets(10, 10, 10, 10));
TextField username = new TextField();
username.setPromptText("Username");
PasswordField password = new PasswordField();
password.setPromptText("Password");
grid.add(new Label("Username:"), 0, 0);
grid.add(username, 1, 0);
grid.add(new Label("Password:"), 0, 1);
grid.add(password, 1, 1);
dialog. getDialogPane().setContent(grid);
// Disable login button if username not entered.
Node loginButton = dialog.getDialogPane().
lookupButton(loginButtonType);
loginButton.setDisable(true); // Disable upon start
username.textProperty().addListener(new ChangeListener() {
public void changed(ObservableValue observable,
Object oldValue, Object newValue) {
loginButton.setDisable(((String)newValue).trim().isEmpty());
}});
// Make the username field have the focus
username.requestFocus());
// Convert result to a Pair containing the username and password
dialog.setResultConverter(new Callback<ButtonType,
Pair<String, String>>() {
public Pair<String, String> call(ButtonType b) {
if (b == loginButtonType) {
return new Pair<String,String>(
username.getText(), password.getText());
}
return null;
}
});

COMP1406 - Chapter 7 - User Interface Extensions Winter 2018
- 231 -
// Open the dialog box and get the result
Optional<Pair<String, String>> result = dialog.showAndWait();
if (result.isPresent())
System.out.println("Username = " + result.get().getKey() +
", Password = " + result.get().getValue());
// This is the simplified version
/* Optional result = dialog.showAndWait();
if (result.isPresent())
System.out.println("Username = " + username.getText() +
", Password = " + password.getText());*/
}
});
primaryStage.setTitle("Standard Dialog Tester");
primaryStage.setScene(new Scene(aPane, 600,200));
primaryStage.setResizable(false);
primaryStage.show();
}
public static void main(String[] args) {
launch(args);
}
}
Example:
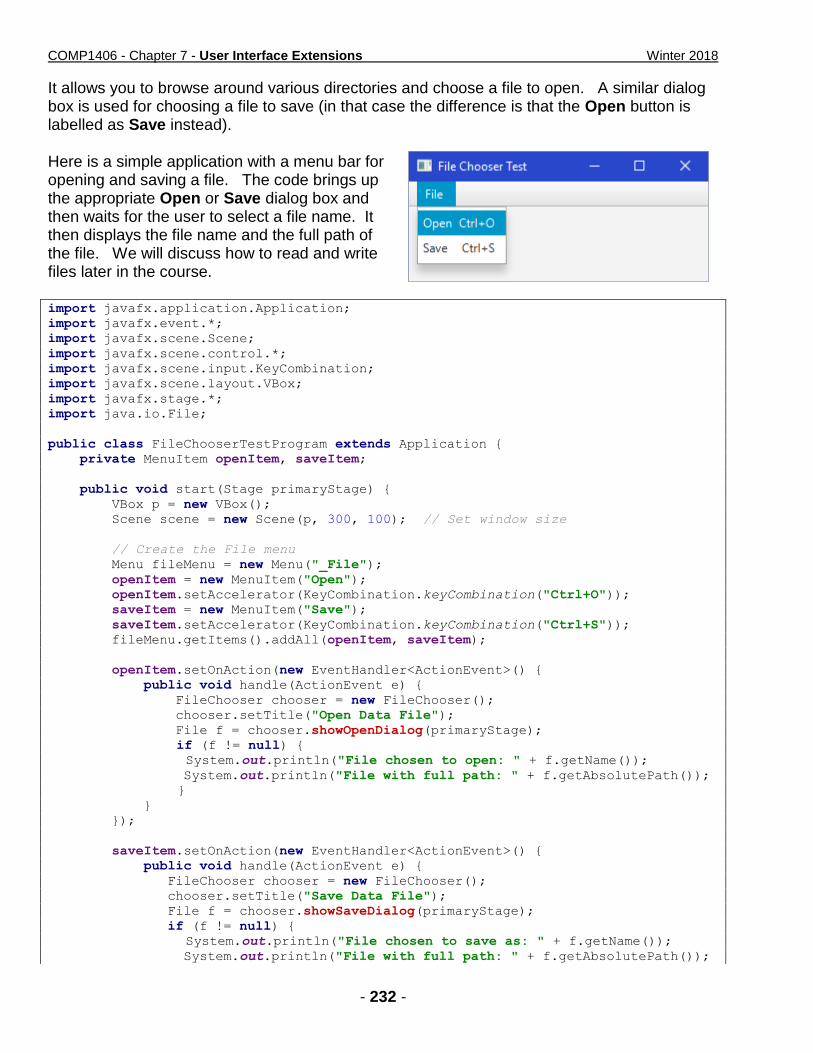
There is another useful standard dialog box in JAVA that is used for selecting files. It is called a FileChooser. Here is what it looks like:
COMP1406 - Chapter 7 - User Interface Extensions Winter 2018
- 232 -
It allows you to browse around various directories and choose a file to open. A similar dialog box is used for choosing a file to save (in that case the difference is that the Open button is labelled as Save instead).
Here is a simple application with a menu bar for opening and saving a file. The code brings up the appropriate Open or Save dialog box and then waits for the user to select a file name. It then displays the file name and the full path of the file. We will discuss how to read and write files later in the course.
import javafx.application.Application;
import javafx.event.*;
import javafx.scene.Scene;
import javafx.scene.control.*;
import javafx.scene.input.KeyCombination;
import javafx.scene.layout.VBox;
import javafx.stage.*;
import java.io.File;
public class FileChooserTestProgram extends Application {
private MenuItem openItem, saveItem;
public void start(Stage primaryStage) {
VBox p = new VBox();
Scene scene = new Scene(p, 300, 100); // Set window size
// Create the File menu
Menu fileMenu = new Menu("_File");
openItem = new MenuItem("Open");
openItem.setAccelerator(KeyCombination.keyCombination("Ctrl+O"));
saveItem = new MenuItem("Save");
saveItem.setAccelerator(KeyCombination.keyCombination("Ctrl+S"));
fileMenu.getItems().addAll(openItem, saveItem);
openItem.setOnAction(new EventHandler<ActionEvent>() {
public void handle(ActionEvent e) {
FileChooser chooser = new FileChooser();
chooser.setTitle("Open Data File");
File f = chooser.showOpenDialog(primaryStage);
if (f != null) {
System.out.println("File chosen to open: " + f.getName());
System.out.println("File with full path: " + f.getAbsolutePath());
}
}
});
saveItem.setOnAction(new EventHandler<ActionEvent>() {
public void handle(ActionEvent e) {
FileChooser chooser = new FileChooser();
chooser.setTitle("Save Data File");
File f = chooser.showSaveDialog(primaryStage);
if (f != null) { System.out.println("File chosen to save as: " + f.getName());
System.out.println("File with full path: " + f.getAbsolutePath());

COMP1406 - Chapter 7 - User Interface Extensions Winter 2018
- 233 -
}
}
});
// Add the menu to a menubar and then add the menubar to the pane
MenuBar menuBar = new MenuBar();
menuBar.getMenus().addAll(fileMenu);
p.getChildren().add(menuBar);
primaryStage.setTitle("File Chooser Test");
primaryStage.setScene(scene);
primaryStage.show();
}
public static void main(String[] args) {
launch(args);
}
}
Notice that we simply open the "Open" file dialog box as follows:
FileChooser chooser = new FileChooser();
File f = chooser.showOpenDialog(primaryStage);
We open the "Save" file dialog box similarly, but by using a different method name:
FileChooser chooser = new FileChooser();
File f = chooser.showSaveDialog(primaryStage);
In either case, the dialog box returns a File object (more on this later). We can extract the file's name and its full path name by using getName() or getAbsolutePath(), which both return String objects.
There are other settings that you can apply to the FileChooser dialog box. For example, you could have it open up in a particular directory by adding this before opening the chooser:
chooser.setInitialDirectory(new File("C:\\"));
You can insert any string representing a file folder/directory. You can even use System.getProperty(...) to get information from the system such as HOME-related system variables.
You can also specify various file filters so that only certain types of files are shown:
chooser.getExtensionFilters().addAll(
new FileChooser.ExtensionFilter("All Files", "*.*"),
new FileChooser.ExtensionFilter("JPG", "*.jpg"),
new FileChooser.ExtensionFilter("PNG", "*.png")
);
The above code allows either All Files, or just JPG and PNG files to be displayed or selected. Here is the window showing (at the bottom) how to select the desired filter:

COMP1406 - Chapter 7 - User Interface Extensions Winter 2018
- 234 -
Example:
There is another useful standard dialog box in JAVA that is used for choosing colors. It is a dialog box that is kind of hidden within a component called a ColorPicker. A ColorPicker is actually a special type of ComboBox. By default, it shows the color as well as either the name of the color or the amount of RGB within the color. Here is an application with a ColorPicker added as a component to the window.
import javafx.application.Application;
import javafx.event.*;
import javafx.scene.Scene;
import javafx.scene.control.ColorPicker;
import javafx.scene.layout.Pane;
import javafx.scene.paint.Color;
import javafx.stage.Stage;
public class ColorPickerTest extends Application {
public void start(Stage primaryStage) {
Pane aPane = new Pane();

COMP1406 - Chapter 7 - User Interface Extensions Winter 2018
- 235 -
ColorPicker colorPicker = new ColorPicker(Color.RED);
aPane.getChildren().add(colorPicker);
colorPicker.setOnAction(new EventHandler() {
public void handle(Event t) {
System.out.println(colorPicker.getValue());
}
});
primaryStage.setTitle("Color Picker Test");
primaryStage.setScene(new Scene(aPane, 300,50));
primaryStage.show();
}
public static void main(String[] args) { launch(args); }
}
Notice that we create the ColorPicker just like creating a button, but we get to specify the initial value (i.e., a Color) that it begins with (i.e., RED in the code above). The user can the select the value and a drop down box appears allowing the user to select a different color ------------------------->
In the above code, we set up an event handler so that once the user selects a color, we can extract this color by using:
colorPicker.getValue();
which returns a Color object.
We can then access the RGB values of the color if we would like to. If we select the Custom Color... link at the bottom of the drop down box, a new dialog box appears that allows us to pick a very precise color:

COMP1406 - Chapter 7 - User Interface Extensions Winter 2018
- 236 -
It is good to use this ColorPicker component in your programs whenever you want the user to be able to customize a color in your application. It allows for consistency across various applications and will be more flexible and intuitive for the user to use.
7.4 Making Your Own Dialog Boxes Dialog boxes have an owner which is the window that caused it to appear. This allows the dialog box to be closed automatically when the user quits the application from the main window (i.e., all windows belonging to the same application are closed when the application shuts down). Also, when the owner window is minimized, the dialog boxes are also minimized. Normally, an application communicates with its dialog box through a model of some kind. That is, the owner opens up a dialog box, passing model-specific information to it. The user may then change this information from the dialog box, which in turn modifies the model. When the dialog box is closed, then the main application continues with the modified model objects.
The next page shows a diagram of how everything should work. Notice that the model is used as the "middle-man" between the two windows. That is, when the dialog box is first opened, the model contents are used to populate the components (i.e., fill in the text fields, button selections etc...). The user then makes appropriate changes to the components. When the dialog box is closed with the OK button, the model is updated with these new changes. When the dialog box is closed with the CANCEL button, the model remains unchanged. When either button is clicked, the dialog box closes. The closing of the dialog box using the standard "close" (i.e., X at the top corner) should be treated as a cancel operation.
The dialog box itself is easy to make. It is simply another window. To create your own, simply make it a subclass of Dialog:
public class MyDialogBox extends Dialog {
...
}
Then, you can add components and event handlers to this dialog box as if it were a Pane. Typically, you will ensure that there is some combination of ok/apply and cancel/close buttons which are usually located at the bottom right or bottom center of a dialog box.
There are various constructors in the Dialog class. We will use the following format for our constructors:
public MyDialog(Stage owner, String title, ...) { setTitle(title);
}
The owner parameter is usually the main application's Stage object. The title parameter is what will appear on the dialog box title bar. We may also want to supply additional model-related parameters to pass information into the dialog box. Often the model itself is passed in

COMP1406 - Chapter 7 - User Interface Extensions Winter 2018
- 237 -
as a parameter so that we can (1) fill in the dialog box information based on the current model data, and (2) then we can modify the model as necessary after the user makes changes to the data and presses OK.
So dialog boxes are easy to create ... but how do we coordinate the interaction with the main application window and its dialog box ?
The dialog box is defined in a separate class than its owner application. As a result, the owner (i.e., the application that brought up the dialog box) has no idea what is going on within the dialog box class (nor should it need to know). The owner, however, usually needs to know

COMP1406 - Chapter 7 - User Interface Extensions Winter 2018
- 238 -
whether or not the interaction with the dialog box was accepted (i.e., OK was pressed) or whether or not it was cancelled. That is, it may need to know whether or not changes were made to the model. The simplest way to do this is to define what is to be returned when the dialog box closes. The Dialog class has a method called setResultConverter() which allows us to provide a function to be called which will define what is to be returned from the Dialog box when it is closed. We can return null to indicate that it was cancelled, and something else otherwise. Here is the basic format:
setResultConverter(new Callback<ButtonType, RETURN_TYPE>() {
public RETURN_TYPE call(ButtonType b) {
if (b == okButtonType) {
RETURN_TYPE result = new RETURN_TYPE();
// ... Extract data from the Dialog box to fill in result ...
return result;
}
return null;
}
});
Here, RETURN_TYPE could be any type of object that we want returned from the dialog box.
When bringing up the Dialog box, we use this code:
Optional<RETURN_TYPE> result = myDialog.showAndWait();
if (result.isPresent()) {
// Do something
}
else {
// Do something else
}
The RETURN_TYPE should match what was set in the dialog box.
Example: Consider having many "buddies" (i.e., friends) that you send e-mails to regularly. Consider making a nice little “electronic” address book that you can store the buddy's names along with his/her e-mail addresses. Perhaps you even want to categorize the buddies as being "hot" (i.e., you talk to them often), or "not-so-hot". What exactly is an e-mail buddy ? Well, we can easily develop a simple model of an EmailBuddy as follows: public class EmailBuddy {
private String name;
private String address;
private boolean onHotList;
// Here are some constructors
public EmailBuddy() {
name = "";
address = "";
onHotList = false;
}

COMP1406 - Chapter 7 - User Interface Extensions Winter 2018
- 239 -
public EmailBuddy(String aName, String anAddress) {
name = aName;
address = anAddress;
onHotList = false;
}
// Here are the get methods
public String getName() { return name; }
public String getAddress() { return address; }
public boolean onHotList() { return onHotList; }
// Here are the set methods
public void setName(String newName) { name = newName; }
public void setAddress(String newAddress) { address = newAddress; }
public void onHotList(boolean onList) { onHotList = onList; }
// The appearance of the buddy
public String toString() {
return(name);
}
}
As you may have noticed, there is nothing difficult here ... just your standard "run-of-the-mill" model class. However, this class alone does not represent the whole model for our GUI since we will have many of these EmailBuddy objects. So we will need a class to represent the list. We can do this in the same way that we created our grocery item list with an array of EmailBuddy objects: public class EmailBuddyList {
public final int MAXIMUM_SIZE = 100;
private EmailBuddy[] buddies;
private int size;
public EmailBuddyList() {
buddies = new EmailBuddy[MAXIMUM_SIZE];
size = 0;
}
// Return the number of buddies in the whole list
public int getSize() { return size; }
// Return all the buddies
public EmailBuddy[] getEmailBuddies() { return buddies; }
// Get a particular buddy from the list, given the index
public EmailBuddy getBuddy(int i) { return buddies[i]; }
// Add an email buddy to the list unless it has reached its capacity
public void add(EmailBuddy buddy) {
// Make sure that we do not go past the limit
if (size < MAXIMUM_SIZE)
buddies[size++] = buddy;
}
// Remove the buddy with the given index from the list

COMP1406 - Chapter 7 - User Interface Extensions Winter 2018
- 240 -
public void remove(int index) {
// Make sure that the given index is valid
if ((index >= 0) && (index < size)) {
// Move every item after the deleted one up in the list
for (int i=index; i<size-1; i++)
buddies[i] = buddies[i+1];
size--; // Reduce the list size by 1
}
}
// Return the number of buddies on the hot list
public int getHotListSize() {
int count = 0;
for (int i=0; i<size; i++)
if (buddies[i].onHotList())
count++;
return count;
}
// Get a particular "hot" buddy from the list, given the hot list index
public EmailBuddy getHotListBuddy(int i) {
int count = 0;
for (int j=0; j<size; j++) {
if (buddies[j].onHotList()) {
if (count == i)
return buddies[j];
count++;
}
}
return null;
}
}
Notice that there is a getSize() method that is a simple "get" method and there is also a getHotListSize() method that returns the number of buddies on the hot list. Notice as well that there are methods to get a buddy at a given index in the array. The method getHotListBuddy() will find the ith buddy that is on the hot list. You will see soon why these methods will be useful.
The task now is to design a nice interface for the main application. To start, we must decide what the interface should do. Here is a possible interface:
• A list of all buddies is shown (names only) • We should be able to:
o Add and Remove buddies from the list o Edit buddies when their name or email changes o Show only those buddies that are "hot" or perhaps show all of them

COMP1406 - Chapter 7 - User Interface Extensions Winter 2018
- 241 -
Assume that we have decided upon the following view for the interface: Notice that the interface does not show the e-mail addresses in the list. It may look cluttered, but we could certainly have done this. Perhaps we could have made a second list box or something that would show the e-mail addresses. Here is a practice exercise: make a TextField just beneath the list that will show the e-mail address of the currently selected EmailBuddy in the list. This is not hard to do. Nevertheless, it is not necessary for the purposes of explaining this dialog box example.
How can we build the view for this interface ? We will start by making a special GridPane and place various components on it:
import javafx.collections.FXCollections;
import javafx.geometry.*;
import javafx.geometry.Insets;
import javafx.scene.control.*;
import javafx.scene.control.Button;
import javafx.scene.layout.GridPane;
public class EmailBuddyPanel extends GridPane {
private EmailBuddyList model; // This is the list of buddies
// The components on the window
private ListView<EmailBuddy> buddyList;
private Button addButton;
private Button removeButton;
private CheckBox hotListButton;
public ListView<EmailBuddy> getBuddyList() { return buddyList; }
public Button getAddButton() { return addButton; }
public Button getRemoveButton() { return removeButton; }
public CheckBox getHotListButton() { return hotListButton; }
public EmailBuddyPanel(EmailBuddyList m) {
model = m; // Store the model so that the update() method can access it
setPadding(new Insets(10, 10, 10, 10));
buddyList = new ListView<EmailBuddy>();
buddyList.setItems(FXCollections.observableArrayList(m.getEmailBuddies()));
add(buddyList,0,0,1,3); // spans 1 column, 3 rows
buddyList.setPrefHeight(Integer.MAX_VALUE);
buddyList.setMinWidth(200);
buddyList.setPrefWidth(Integer.MAX_VALUE);
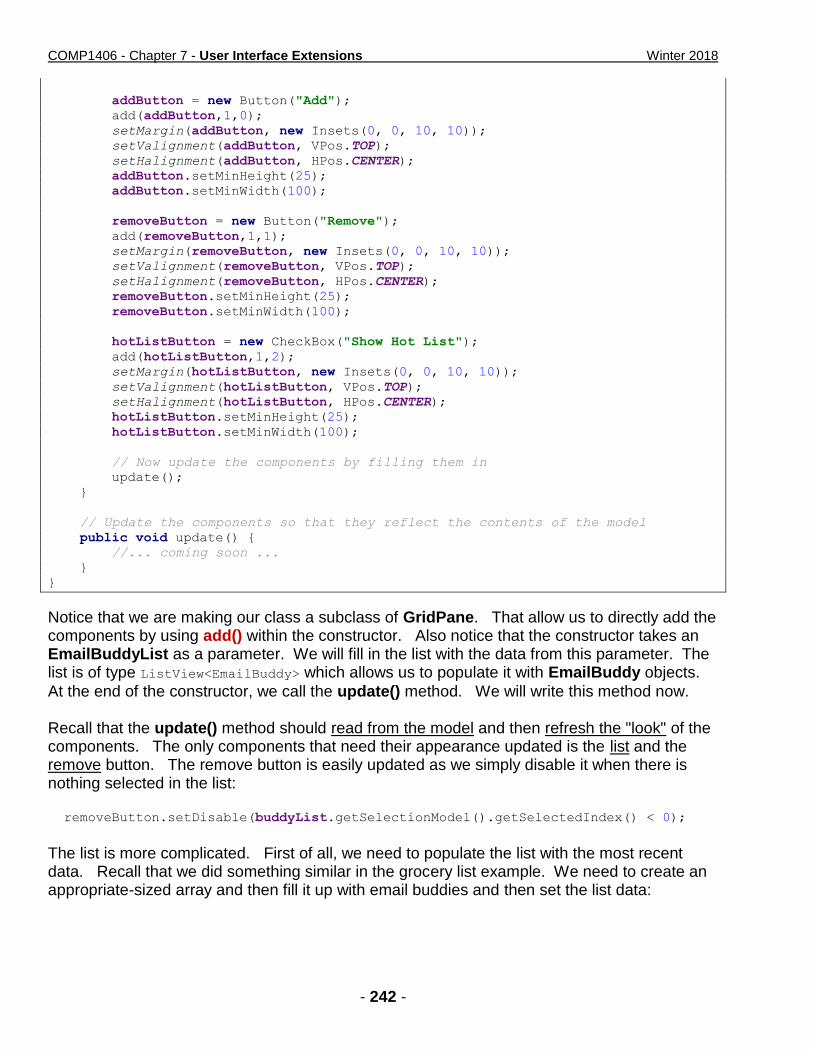
COMP1406 - Chapter 7 - User Interface Extensions Winter 2018
- 242 -
addButton = new Button("Add");
add(addButton,1,0);
setMargin(addButton, new Insets(0, 0, 10, 10));
setValignment(addButton, VPos.TOP);
setHalignment(addButton, HPos.CENTER);
addButton.setMinHeight(25);
addButton.setMinWidth(100);
removeButton = new Button("Remove");
add(removeButton,1,1);
setMargin(removeButton, new Insets(0, 0, 10, 10));
setValignment(removeButton, VPos.TOP);
setHalignment(removeButton, HPos.CENTER);
removeButton.setMinHeight(25);
removeButton.setMinWidth(100);
hotListButton = new CheckBox("Show Hot List");
add(hotListButton,1,2);
setMargin(hotListButton, new Insets(0, 0, 10, 10));
setValignment(hotListButton, VPos.TOP);
setHalignment(hotListButton, HPos.CENTER);
hotListButton.setMinHeight(25);
hotListButton.setMinWidth(100);
// Now update the components by filling them in
update();
}
// Update the components so that they reflect the contents of the model
public void update() {
//... coming soon ...
}
}
Notice that we are making our class a subclass of GridPane. That allow us to directly add the components by using add() within the constructor. Also notice that the constructor takes an EmailBuddyList as a parameter. We will fill in the list with the data from this parameter. The list is of type ListView<EmailBuddy> which allows us to populate it with EmailBuddy objects.
At the end of the constructor, we call the update() method. We will write this method now. Recall that the update() method should read from the model and then refresh the "look" of the components. The only components that need their appearance updated is the list and the remove button. The remove button is easily updated as we simply disable it when there is nothing selected in the list:
removeButton.setDisable(buddyList.getSelectionModel().getSelectedIndex() < 0);
The list is more complicated. First of all, we need to populate the list with the most recent data. Recall that we did something similar in the grocery list example. We need to create an appropriate-sized array and then fill it up with email buddies and then set the list data:

COMP1406 - Chapter 7 - User Interface Extensions Winter 2018
- 243 -
EmailBuddy[] exactList;
exactList = new EmailBuddy[model.getSize()];
for (int i=0; i<model.getSize(); i++)
exactList[i] = model.getBuddy(i);
buddyList.setItems(FXCollections.observableArrayList(exactList));
However, things are a little more difficult now. If we have the hot list button selected, then we do not want all the buddies ... instead we want only those on the hot list:
exactList = new EmailBuddy[model.getHotListSize()];
for (int i=0; i<model.getHotListSize(); i++)
exactList[i] = model.getHotListBuddy(i);
buddyList.setItems(FXCollections.observableArrayList(exactList));
We can use an IF statement to select the appropriate code:
EmailBuddy[] exactList;
if (hotListButton.isSelected()) {
exactList = new EmailBuddy[model.getHotListSize()];
for (int i = 0; i < model.getHotListSize(); i++)
exactList[i] = model.getHotListBuddy(i);
}
else {
exactList = new EmailBuddy[model.getSize()];
for (int i=0; i<model.getSize(); i++)
exactList[i] = model.getBuddy(i);
}
buddyList.setItems(FXCollections.observableArrayList(exactList));
One last point ... as we will see later when editing a buddy, sometimes the ListView does not refresh properly. To fix this, we simply first need to set the ListView contents to null first before setting it to the value that we want.
buddyList.setItems(null); /// Seems to be required for a proper update
buddyList.setItems(FXCollections.observableArrayList(exactList));
We will also need to ensure that we select the selected item each time we make an update. That is, if we were to select an item from the list and then update ... we want to make sure that the item remains selected. At this point, when we refresh the list contents, the selected item does not remain selected. So, we will need to remember which item was selected and then reselect it again after the list is re-populated. Here is the final update() method that must be added to the view code:
// Update the components so that they reflect the contents of the model
public void update() {
// Remember what was selected
int selectedItem = buddyList.getSelectionModel().getSelectedIndex();
// Now re-populate the list by creating and returning a new
// array with the exact size of the number of items in it.
EmailBuddy[] exactList;
if (hotListButton.isSelected()) {
exactList = new EmailBuddy[model.getHotListSize()];
for (int i = 0; i < model.getHotListSize(); i++)
exactList[i] = model.getHotListBuddy(i);
}

COMP1406 - Chapter 7 - User Interface Extensions Winter 2018
- 244 -
else {
exactList = new EmailBuddy[model.getSize()];
for (int i=0; i<model.getSize(); i++)
exactList[i] = model.getBuddy(i);
}
buddyList.setItems(null); /// Seems to be required for a proper update
buddyList.setItems(FXCollections.observableArrayList(exactList));
// Reselect the selected item
buddyList.getSelectionModel().select(selectedItem);
// Enable/disable the Remove button accordingly
removeButton.setDisable(buddyList.getSelectionModel().getSelectedIndex() < 0);
}
At this point, the view is complete and we just have to create the controller. The controller will keep track of the view as well as the model. We will be handling events for the pressing of the addButton, removeButton, hotListButton as well as buddyList selection. Here is the basic framework for the controller:
import javafx.application.Application;
import javafx.event.*;
import javafx.scene.Scene;
import javafx.scene.input.MouseEvent;
import javafx.stage.Stage;
public class EmailBuddyApp extends Application {
private EmailBuddyList model; // The model
private EmailBuddyPanel view; // The view
public void start(Stage primaryStage) {
// Initially, no buddies
model = new EmailBuddyList();
// Make a new viewing panel and add it to the pane
view = new EmailBuddyPanel(model);
//Handle the Add button
view.getAddButton().setOnAction(new EventHandler<ActionEvent>() {
// This is the single event handler for all of the buttons
public void handle(ActionEvent actionEvent) {
// Add buddy (code will be shown later)
}
});
// Handle the Remove button
view.getRemoveButton().setOnAction(new EventHandler<ActionEvent>() {
// This is the single event handler for all of the buttons
public void handle(ActionEvent actionEvent) {
// Remove buddy (code will be shown later)
}
});
// Handle the Hot List Button
view.getHotListButton().setOnAction(new EventHandler<ActionEvent>() {
// This is the single event handler for all of the buttons
public void handle(ActionEvent actionEvent) {
view.update();
}
});

COMP1406 - Chapter 7 - User Interface Extensions Winter 2018
- 245 -
// Handle a double-click in the list
view.getBuddyList().setOnMousePressed(new EventHandler<MouseEvent>() {
public void handle(MouseEvent mouseEvent) {
if (mouseEvent.getClickCount() == 2)
// Edit buddy (code will be shown later)
view.update();
}
});
primaryStage.setTitle("Email Buddy App");
primaryStage.setScene(new Scene(view, 400,300));
primaryStage.show();
}
public static void main(String[] args) { launch(args); }
}
Notice that the code is straight forward. The hot list button event handler only requires a refreshing of the list, so the view's update() method is called. We now need to decide what to do when the user clicks the Add button, Remove button and OnHotList button as well as when the user selects an item from the list. The Add button should bring up a dialog box to allow us to add a new buddy. We have not created this dialog box, but we will do so soon. The adding of the new email buddy should only occur if the user presses the OK button. If the CANCEL button is pressed, or the dialog box is closed down, then no email buddy should be added. To make the code simpler, it is a good idea to create the new email buddy when the Add button is pressed so that we can pass this buddy into the dialog box so that its contents can be set. If the user presses OK afterwards, we can add this new buddy to the model. The dialog box should allow the user to set the name, address and hot list status for the buddy that it is working on (i.e., either a newly added buddy or one being edited). Here is what the dialog box will look like:
We can create this dialog in a class called BuddyDetailsDialog. It will be a subclass of the Dialog class. The constructor will take three parameters: (1) the owner, which is a stage (2) a title for the window (3) an EmailBuddy to be edited. Here is the basic code that will bring up the window with the two Labels, TextFields and Checkbox:

COMP1406 - Chapter 7 - User Interface Extensions Winter 2018
- 246 -
import javafx.geometry.Insets;
import javafx.scene.control.*;
import javafx.scene.layout.GridPane;
import javafx.stage.Stage;
public class BuddyDetailsDialog extends Dialog {
public BuddyDetailsDialog(Stage owner, String title, EmailBuddy bud) {
setTitle(title);
// Set the button types
ButtonType okButtonType = new ButtonType("OK",
ButtonBar.ButtonData.OK_DONE);
getDialogPane().getButtonTypes().addAll(okButtonType, ButtonType.CANCEL);
// Create the and and address labels and fields.
GridPane grid = new GridPane();
grid.setHgap(10);
grid.setVgap(10);
grid.setPadding(new Insets(10, 10, 10, 10));
TextField nameField = new TextField(bud.getName());
nameField.setPromptText("Person's name to be shown in the list");
nameField.setMinWidth(300);
TextField addressField = new TextField(bud.getAddress());
addressField.setPromptText("Enter a valid email address");
addressField.setMinWidth(300);
CheckBox onHotList = new CheckBox("On Hot List");
onHotList.setSelected(bud.onHotList());
grid.add(new Label("Name:"), 0, 0);
grid.add(nameField, 1, 0);
grid.add(new Label("Address:"), 0, 1);
grid.add(addressField, 1, 1);
grid.add(onHotList, 1, 2);
getDialogPane().setContent(grid); // Puts the stuff on the window
}
}
The code is straight forward. However, there are some interesting points. Notice how the incoming EmailBuddy bud is used to populate the TextFields and set the HotList value. This allows the dialog box to come up with information already in the fields. Also notice how the GridPane is set for the dialog box in the last line. When the OK button is pressed, we need to update the EmailBuddy that was passed in as a parameter to have the name, address and hotList status as specified in the dialog box data. To do this, we write the setResultConverter() method which allows us to specify what to return to the main program that brought up this dialog box. In our case, we would like to return the EmailBuddy whose information was just added or edited. However, if the user pressed CANCEL or closed the window, then we do not want to return the EmailBuddy, but will return null instead ... to indicate that nothing is to be changed. Here is the code:

COMP1406 - Chapter 7 - User Interface Extensions Winter 2018
- 247 -
// Convert the result to an EmailBuddy containing the info
setResultConverter(new Callback<ButtonType, EmailBuddy>() {
public EmailBuddy call(ButtonType b) {
if (b == okButtonType) {
bud.setName(nameField.getText());
bud.setAddress(addressField.getText());
bud.onHotList(onHotList.isSelected());
return bud;
}
return null;
}
});
Notice that it checks the button type to see if it is the okButtonType that was created earlier. If so, it then extracts all the data from the dialog box and sets it for the buddy and returns the buddy. Otherwise, it returns null. The final addition that we will make is to disable the OK button unless the user has typed in both a name and an address ... or if the user selects/deselects the onHotList checkbox. The idea is to disable the button until something valid has been entered. To do this, we need event handlers to be called when the user types into a text field or checks the Checkbox. To start, we assume that the button should be disabled:
// Enable/Disable OK button depending on whether a username was entered.
Node okButton = getDialogPane().lookupButton(okButtonType);
okButton.setDisable(true); // Disable upon start
Then, the idea is to simply check to see whether or not both text fields have something in them. If they both have something, then we can enable the OK button, otherwise disable it. Here is the code to check that:
okButton.setDisable(nameField.getText().trim().isEmpty() ||
addressField.getText().trim().isEmpty());
We just need to put this into the event handlers now. Here is the completed code: import javafx.beans.value.*;
import javafx.event.*;
import javafx.geometry.Insets;
import javafx.scene.Node;
import javafx.scene.control.*;
import javafx.scene.layout.GridPane;
import javafx.stage.Stage;
import javafx.util.Callback;
public class BuddyDetailsDialog extends Dialog {
public BuddyDetailsDialog(Stage owner, String title, EmailBuddy bud) {
setTitle(title);
// Set the button types
ButtonType okButtonType = new ButtonType("OK",
ButtonBar.ButtonData.OK_DONE);
getDialogPane().getButtonTypes().addAll(okButtonType, ButtonType.CANCEL);
// Create the name and address labels and fields.
GridPane grid = new GridPane();

COMP1406 - Chapter 7 - User Interface Extensions Winter 2018
- 248 -
grid.setHgap(10);
grid.setVgap(10);
grid.setPadding(new Insets(10, 10, 10, 10));
TextField nameField = new TextField(bud.getName());
nameField.setPromptText("Person's name to be shown in the list");
nameField.setMinWidth(300);
TextField addressField = new TextField(bud.getAddress());
addressField.setPromptText("Enter a valid email address");
addressField.setMinWidth(300);
CheckBox onHotList = new CheckBox("On Hot List");
onHotList.setSelected(bud.onHotList());
grid.add(new Label("Name:"), 0, 0);
grid.add(nameField, 1, 0);
grid.add(new Label("Address:"), 0, 1);
grid.add(addressField, 1, 1);
grid.add(onHotList, 1, 2);
getDialogPane().setContent(grid);
// Enable/Disable OK button depending on whether username was entered.
Node okButton = getDialogPane().lookupButton(okButtonType);
okButton.setDisable(true); // Disable upon start
nameField.textProperty().addListener(new ChangeListener() {
public void changed(ObservableValue observable, Object oldValue,
Object newValue) {
okButton.setDisable(nameField.getText().trim().isEmpty() ||
addressField.getText().trim().isEmpty());
}
});
// Enable/Disable OK button depending on whether address was entered.
addressField.textProperty().addListener(new ChangeListener() {
public void changed(ObservableValue observable, Object oldValue,
Object newValue) {
okButton.setDisable(nameField.getText().trim().isEmpty() ||
addressField.getText().trim().isEmpty());
}
});
// Enable OK button if hotList has changed
onHotList.setOnAction(new EventHandler<ActionEvent>() {
public void handle(ActionEvent e) {
okButton.setDisable(nameField.getText().trim().isEmpty() ||
addressField.getText().trim().isEmpty());
}
});
// Convert the result to a Pair containing the EmailBuddy object
setResultConverter(new Callback<ButtonType, EmailBuddy>() {
public EmailBuddy call(ButtonType b) {
if (b == okButtonType) {
bud.setName(nameField.getText());
bud.setAddress(addressField.getText());
bud.onHotList(onHotList.isSelected());
return bud;
}
return null;
}
});
}
}

COMP1406 - Chapter 7 - User Interface Extensions Winter 2018
- 249 -
Now we are ready to go back to the main application and handle the pressing of the Add button. In this case, we need to create a new EmailBuddy, and then bring up the BuddyDetailsDialog in order to allow the user to enter the data for that buddy. Here is the code for adding a buddy. It needs to be inserted in the code above as the Add button event handler:
public void handle(ActionEvent actionEvent) {
EmailBuddy aBuddy = new EmailBuddy();
// Now bring up the dialog box
Dialog dialog = new BuddyDetailsDialog(primaryStage,
"New Buddy Details", aBuddy);
Optional<EmailBuddy> result = dialog.showAndWait();
if (result.isPresent()) {
model.add(aBuddy); // Add the buddy to the model
view.update();
}
}
The code is easy to follow. Notice how we decide what to do depending on the result coming back from the showing of the dialog box. If the result was present (i.e., OK was pressed), then we simply add the newly created EmailBuddy and update the view to reflect the changes. Otherwise, if CANCEL was pressed, then there is nothing to do. For the Remove button, we simply need to look at what is selected from the ListView and remove it from the model:
public void handle(ActionEvent actionEvent) {
int index = view.getBuddyList().getSelectionModel().getSelectedIndex();
if (index >= 0) {
model.remove(index);
view.update();
}
}
Notice how the code simply determines the index of the selected item in the list and then calls the remove() method in the model in order to remove the item from the list. The call to update() simply refreshes the window. Finally, in order to be able to edit an EmailBuddy, we need to create an event handler for the ListView. If a single-click was done on the list, there is not much to do except call update() so that the Remove button could be enabled, allowing us to remove the selected item. Here is the basic structure:
public void handle(MouseEvent mouseEvent) {
if (mouseEvent.getClickCount() == 2) {
// Handle editing of the selected buddy
}
else {
view.update(); // Allows Remove button to be enabled on single click
}
}

COMP1406 - Chapter 7 - User Interface Extensions Winter 2018
- 250 -
Notice how we can ask the MouseEvent for the click count. Now, to perform the editing, we will need to determine the selected EmailBuddy and then open up the BuddyDetailsDialog with that buddy so that it can be edited. Here is the code:
public void handle(MouseEvent mouseEvent) {
if (mouseEvent.getClickCount() == 2) {
EmailBuddy selectedBuddy;
int selectedIndex = view.getBuddyList().getSelectionModel().
getSelectedIndex();
if (selectedIndex >= 0) {
if (view.getHotListButton().isSelected())
selectedBuddy = model.getHotListBuddy(selectedIndex);
else
selectedBuddy = model.getBuddy(selectedIndex);
if (selectedBuddy == null)
return;
// Now bring up the dialog box
Dialog dialog = new BuddyDetailsDialog(primaryStage,
"Edit Buddy Details", selectedBuddy);
Optional<EmailBuddy> result = dialog.showAndWait();
if (result.isPresent()) {
view.update();
}
}
}
else {
view.update(); // Allows Remove button to be enabled on single click
}
}
Notice a couple of things. First, we need to ensure that there is a selected item in the list, otherwise we do nothing. We just check to make sure that it is not -1. Then, we need to determine which EmailBuddy was selected. This will depend on whether or not the Hot List is being shown. We have two model methods that we can call: getBuddy() and getHotListBuddy(). Each takes an integer indicating the number of the item in the list that we want. So we just call the appropriate method and it will return the selected EmailBuddy object accordingly. If the result is null, then there is nothing to do. Otherwise, we need to edit. To edit, we simply open up the dialog box as before, but now with a different title and with the selectedBuddy instead of a newly created one. If the OK button was pressed, we simply update the list, otherwise there is nothing to do. How does the EmailBuddy get edited ? Well, the code in the setResultConverter() of the BuddyDetailsDialog will ensure that if OK was pressed, then this selectedBuddy's contents will be changed to that which is in the TextFields. It all works out rather smoothly. Here is the final code:

COMP1406 - Chapter 7 - User Interface Extensions Winter 2018
- 251 -
import javafx.application.Application;
import javafx.event.*;
import javafx.scene.Scene;
import javafx.scene.control.Dialog;
import javafx.scene.input.MouseEvent;
import javafx.stage.Stage;
import java.util.Optional;
public class EmailBuddyApp extends Application {
private EmailBuddyList model; // The model
private EmailBuddyPanel view; // The view
public void start(Stage primaryStage) {
// Initially, no buddies
model = new EmailBuddyList();
// Make a new viewing panel and add it to the pane
view = new EmailBuddyPanel(model);
//Handle the Add button
view.getAddButton().setOnAction(new EventHandler<ActionEvent>() {
// This is the single event handler for all of the buttons
public void handle(ActionEvent actionEvent) {
EmailBuddy aBuddy = new EmailBuddy();
// Now bring up the dialog box
Dialog dialog = new BuddyDetailsDialog(primaryStage,
"New Buddy Details", aBuddy);
Optional<EmailBuddy> result = dialog.showAndWait();
if (result.isPresent()) {
model.add(aBuddy); // Add the buddy to the model
view.update();
}
}
});
// Handle the Remove button
view.getRemoveButton().setOnAction(new EventHandler<ActionEvent>() {
// This is the single event handler for all of the buttons
public void handle(ActionEvent actionEvent) {
int index = view.getBuddyList().getSelectionModel().
getSelectedIndex();
if (index >= 0) {
model.remove(index);
view.update();
}
}
});
// Handle the Hot List Button
view.getHotListButton().setOnAction(new EventHandler<ActionEvent>() {
// This is the single event handler for all of the buttons
public void handle(ActionEvent actionEvent) {
view.update();
}
});

COMP1406 - Chapter 7 - User Interface Extensions Winter 2018
- 252 -
// Handle a double-click in the list
view.getBuddyList().setOnMousePressed(new EventHandler<MouseEvent>() {
public void handle(MouseEvent mouseEvent) {
if (mouseEvent.getClickCount() == 2) {
EmailBuddy selectedBuddy;
int selectedIndex = view.getBuddyList().getSelectionModel().
getSelectedIndex();
if (selectedIndex >= 0) {
if (view.getHotListButton().isSelected())
selectedBuddy = model.getHotListBuddy(selectedIndex);
else
selectedBuddy = model.getBuddy(selectedIndex);
if (selectedBuddy == null)
return;
// Now bring up the dialog box
Dialog dialog = new BuddyDetailsDialog(primaryStage,
"Edit Buddy Details", selectedBuddy);
Optional<EmailBuddy> result = dialog.showAndWait();
if (result.isPresent()) {
view.update();
}
}
}
else {
view.update(); // Enables Remove button on single click
}
}
});
primaryStage.setTitle("Email Buddy App");
primaryStage.setScene(new Scene(view, 400,300));
primaryStage.show();
}
public static void main(String[] args) { launch(args); }
}