user manual apax-5570/5571 -...
TRANSCRIPT

User Manual
APAX-5570/5571
PC-based Controller with Celeron M CPU
CopyrightThe documentation and the software included with this product are copyrighted 2009by Advantech Co., Ltd. All rights are reserved. Advantech Co., Ltd. reserves the rightto make improvements in the products described in this manual at any time withoutnotice. No part of this manual may be reproduced, copied, translated or transmittedin any form or by any means without the prior written permission of Advantech Co.,Ltd. Information provided in this manual is intended to be accurate and reliable. How-ever, Advantech Co., Ltd. assumes no responsibility for its use, nor for any infringe-ments of the rights of third parties, which may result from its use.
AcknowledgementsIntel and Pentium are trademarks of Intel Corporation.Microsoft Windows and MS-DOS are registered trademarks of Microsoft Corp.All other product names or trademarks are properties of their respective owners.
Product Warranty (2 years)Advantech warrants to you, the original purchaser, that each of its products will befree from defects in materials and workmanship for two years from the date of pur-chase. This warranty does not apply to any products which have been repaired or altered bypersons other than repair personnel authorized by Advantech, or which have beensubject to misuse, abuse, accident or improper installation. Advantech assumes noliability under the terms of this warranty as a consequence of such events.Because of Advantech’s high quality-control standards and rigorous testing, most ofour customers never need to use our repair service. If an Advantech product is defec-tive, it will be repaired or replaced at no charge during the warranty period. For out-of-warranty repairs, you will be billed according to the cost of replacement materials,service time and freight. Please consult your dealer for more details.If you think you have a defective product, follow these steps:1. Collect all the information about the problem encountered. (For example, CPU
speed, Advantech products used, other hardware and software used, etc.) Note anything abnormal and list any onscreen messages you get when the problem occurs.
2. Call your dealer and describe the problem. Please have your manual, product, and any helpful information readily available.
3. If your product is diagnosed as defective, obtain an RMA (return merchandize authorization) number from your dealer. This allows us to process your return more quickly.
4. Carefully pack the defective product, a fully-completed Repair and Replacement Order Card and a photocopy proof of purchase date (such as your sales receipt) in a shippable container. A product returned without proof of the purchase date is not eligible for warranty service.
5. Write the RMA number visibly on the outside of the package and ship it prepaid to your dealer.
Part No. XXXXXXXXXX Edition 1Printed in Taiwan September 2009
APAX-5570 User Manual ii
CE
This product has passed the CE test for environmental specifications when shieldedcables are used for external wiring. We recommend the use of shielded cables. Thiskind of cable is available from Advantech. Please contact your local supplier forordering information.
FCC Class A
Note: This equipment has been tested and found to comply with the limits for a ClassA digital device, pursuant to part 15 of the FCC Rules. These limits are designed toprovide reasonable protection against harmful interference when the equipment isoperated in a commercial environment. This equipment generates, uses, and canradiate radio frequency energy and, if not installed and used in accordance with theinstruction manual, may cause harmful interference to radio communications. Opera-tion of this equipment in a residential area is likely to cause harmful interference inwhich case the user will be required to correct the interference at his own expense.
Technical Support and Assistance1. Visit the Advantech web site at www.advantech.com/support where you can find
the latest information about the product.2. Contact your distributor, sales representative, or Advantech's customer service
center for technical support if you need additional assistance. Please have the following information ready before you call:– Product name and serial number– Description of your peripheral attachments– Description of your software (OS, version, application software, etc.)– A complete description of the problem– The exact wording of any error messages
Safety Precaution - Static ElectricityFollow these simple precautions to protect yourself from harm and the products fromdamage.
To avoid electrical shock, always disconnect the power from your PC chassis before you work on it. Don't touch any components on the CPU card or other cards while the PC is on.
Disconnect power before making any configuration changes. The sudden rush ofpower as you connect a jumper or install a card may damage sensitive electroniccomponents.
iii APAX-5570 User Manual

Safety Instructions1. Read these safety instructions carefully.2. Keep this User Manual for later reference.3. Disconnect this equipment from any AC outlet before cleaning. Use a damp
cloth. Do not use liquid or spray detergents for cleaning.4. For plug-in equipment, the power outlet socket must be located near the equip-
ment and must be easily accessible.5. Keep this equipment away from humidity.6. Put this equipment on a reliable surface during installation. Dropping it or letting
it fall may cause damage.7. The openings on the enclosure are for air convection. Protect the equipment
from overheating. DO NOT COVER THE OPENINGS.8. Make sure the voltage of the power source is correct before connecting the
equipment to the power outlet.9. Position the power cord so that people cannot step on it. Do not place anything
over the power cord.10. All cautions and warnings on the equipment should be noted.11. If the equipment is not used for a long time, disconnect it from the power source
to avoid damage by transient overvoltage.12. Never pour any liquid into an opening. This may cause fire or electrical shock.13. Never open the equipment. For safety reasons, the equipment should be
opened only by qualified service personnel.14. If one of the following situations arises, get the equipment checked by service
personnel:15. The power cord or plug is damaged.16. Liquid has penetrated into the equipment.17. The equipment has been exposed to moisture.18. The equipment does not work well, or you cannot get it to work according to the
user's manual.19. The equipment has been dropped and damaged.20. The equipment has obvious signs of breakage.21. DO NOT LEAVE THIS EQUIPMENT IN AN ENVIRONMENT WHERE THE
STORAGE TEMPERATURE MAY GO BELOW -20° C (-4° F) OR ABOVE 60° C (140° F). THIS COULD DAMAGE THE EQUIPMENT. THE EQUIPMENT SHOULD BE IN A CONTROLLED ENVIRONMENT.
22. CAUTION: DANGER OF EXPLOSION IF BATTERY IS INCORRECTLY REPLACED. REPLACE ONLY WITH THE SAME OR EQUIVALENT TYPE RECOMMENDED BY THE MANUFACTURER, DISCARD USED BATTERIES ACCORDING TO THE MANUFACTURER'S INSTRUCTIONS.
23. The sound pressure level at the operator's position according to IEC 704-1:1982 is no more than 70 dB (A).
DISCLAIMER: This set of instructions is given according to IEC 704-1. Advantechdisclaims all responsibility for the accuracy of any statements contained herein.
APAX-5570 User Manual iv

1.3.1 RS-232 Interface (COM 1) ............................................................ 41.3.2 RS-422/485 Interface (COM 2) ..................................................... 41.3.3 Ethernet Ports ............................................................................... 51.3.4 USB Ports ..................................................................................... 61.3.5 DVI-I Display ................................................................................. 71.3.6 Battery Backup RAM and SD Card............................................... 81.3.7 Reset Button ............................................................................... 101.3.8 Audio........................................................................................... 101.3.9 Real Time Clock (RTC)............................................................... 101.3.10 Fan Cartridge .............................................................................. 101.3.11 Power Connector ........................................................................ 10
Chapter 2 Product Specifications......................132.1 CPU Modules .......................................................................................... 14
2.1.1 APAX-5570XPE.......................................................................... 142.1.2 APAX-5571XPE.......................................................................... 152.1.3 APAX-557X Dimensions ............................................................. 16
2.2 Power Supply Module ............................................................................. 172.2.1 APAX-5343 ................................................................................. 17
Chapter 3 Installation and Initiation ..................193.1 Assembly and Power Connections ......................................................... 20
3.1.1 Combining APAX-5000 I/O Modules with APAX-557X ............... 203.1.2 Combine with APAX-5343 Power Supply Module ...................... 27
3.2 Decommission and Disposal................................................................... 323.3 Mounting ................................................................................................. 32
3.3.1 DIN-rail Mounting ........................................................................ 323.3.2 Wall (Panel) Mounting................................................................. 35
Chapter 4 Error Handling and Diagnostics.......414.1 Error Handling and Diagnostics .............................................................. 42
v APAX-5570 User Manual

APAX-5570 User Manual vi

Chapter 1
1 Overview
1.1 IntroductionAPAX-557X is a high performance controller (CPU module) with Intel Celeron Mgrade CPU and Windows XP Embedded operating system. The operating system isinstalled in the internal CF card. Therefore, no extra external HD is required for theoperating system and application programs. Besides, APAX-557X provides an exter-nal SD slot for data storage (data-logging). By connecting with different APAX-5000 I/O modules, APAX-557X can execute con-trol tasks for various industrial control and automation applications. Through built-inutility, programmers can configure related hardware settings for the APAX-5000 I/Omodules. Then, programmers can build their own application programs underMicrosoft Visual Studio .NET or C/C++ programming environment.
APAX-557X offers two serial ports (1 x RS-232 port and 1 x RS-422/485 port) andtwo Ethernet ports to communicate with other devices. The two Ethernet ports areserved as two different MAC address, enabling APAX-557X to connect with two dif-ferent Ethernet network. Programmers can leverage the communication abilitythrough Modbus/RTU master/slave and Modbus/TCP server/client. APAX-557X provides one DVI-I interface and Four USB ports. Through these, APAX-557X can be connected to Advantech Industrial Monitor (FPM) or standard monitorwith DVI or VGA input. Touch functionality is connected via USB. Audio interfaceenables APAX-5570 to connect with other audio device such as microphone.
1.2 System ArchitectureThere are two slots on APAX-557X that you can insert various APAX-5000 I/O mod-ules, making it a complete control system. When connected with other APAX-5001 orAPAX-5002 backplane modules, even more APAX-5000 I/O modules can be inte-grated into the system to handle more complicated applications (refer to section 3.1.1for how to assemble APAX-5000 I/O modules). APAX-557X is powered by a standardpower supply with 18 ~ 30 VDC voltage input through the power connector. Userscan also leverage the APAX-5343 power supply module provided by Advantech,which features the same form factor as APAX-557X. APAX-5343 can be stacked onthe left side of APAX-557X. Since APAX-557X supports dual power input, two APAX-5343’s can be connected to one APAX-557X. Refer to Section 3.1.2 for how to con-nect APAX-5343 with APAX-557X.
APAX-557X supports backup function. To leverage this functionality, two CPU mod-ules (controllers) with the same control program are installed in one system. Afterboth controllers have enabled the backup function, APAX-5000 system will automati-cally delegate one of the two controllers as the master controller. The master control-ler will run the control program to execute the control process, while anothercontroller (the backup controller) is put on standby.
Note! Please refer to APAX-557X software manual for how to configure the hardware and program under Microsoft Visual Studio .NET or C/C++.
Note! With expansion port on backplanes, users can build a remote expansion architecture, remaining fast local-bus data transmission speed. Refer to Section 3.1.1 for how to build remote expansion.
APAX-5570 User Manual 2

Chapter 1
Overview
The master controller will periodically send live messages to the backup controller. Ifwithin 500 milliseconds, it will automatically become the master controller, take con-trol responsibility, and restart the control process. The maximum operation time forthe backup controller to become master controller (the take over time) won't begreater than 1.5 seconds. Changing the master controller means there is somethingwrong with the previous master controller. Therefore, engineers can check or changethe previous master controller with a new one and enable it to have backup function-ality, becoming a second backup controller. Then if the new master controller failsagain, the second backup controller will automatically take control.
This mechanism ensures the system will continuously run the control process andwon’t be stopped, even if controller fails. In the figure below there are two APAX-557X modules installed in one system. For each APAX-557X module, one APAX-5002 backplane is stacked backward for expansion. The APAX-5000 I/O modulesare inserted on the backplanes. Unmanaged industrial Ethernet switches (such asEKI-2528) with 100 Mbps transmission speed and standard Ethernet cable, connectthe two APAX-557X modules and APAX-5000 I/O modules. APAX-5000 series willautomatically decide which one is the master controller. Be aware that two APAX-557X modules MUST be configured with different controller ID numbers.
Warning! 1. It is suggested to power on all the I/O modules and the two APAX-557X controllers together to avoid any unpredictable situation.2. DO NOT use managed switch, hub or router between backplanes for expansion. 3. The network for the expansion should be a local network, NOT an external network (such as public network, including Internet).4. Shielded industrial Ethernet cable MUST be used instead of standard Ethernet cable when the system is used in harsh environment, such as factory automation. Cat 6 Ethernet cable is strongly recommended for better data transmission quality.
Note! The maximum length for the Ethernet cable between two backplanes is100 m.
3 APAX-5570 User Manual
1.3 Hardware Functionality
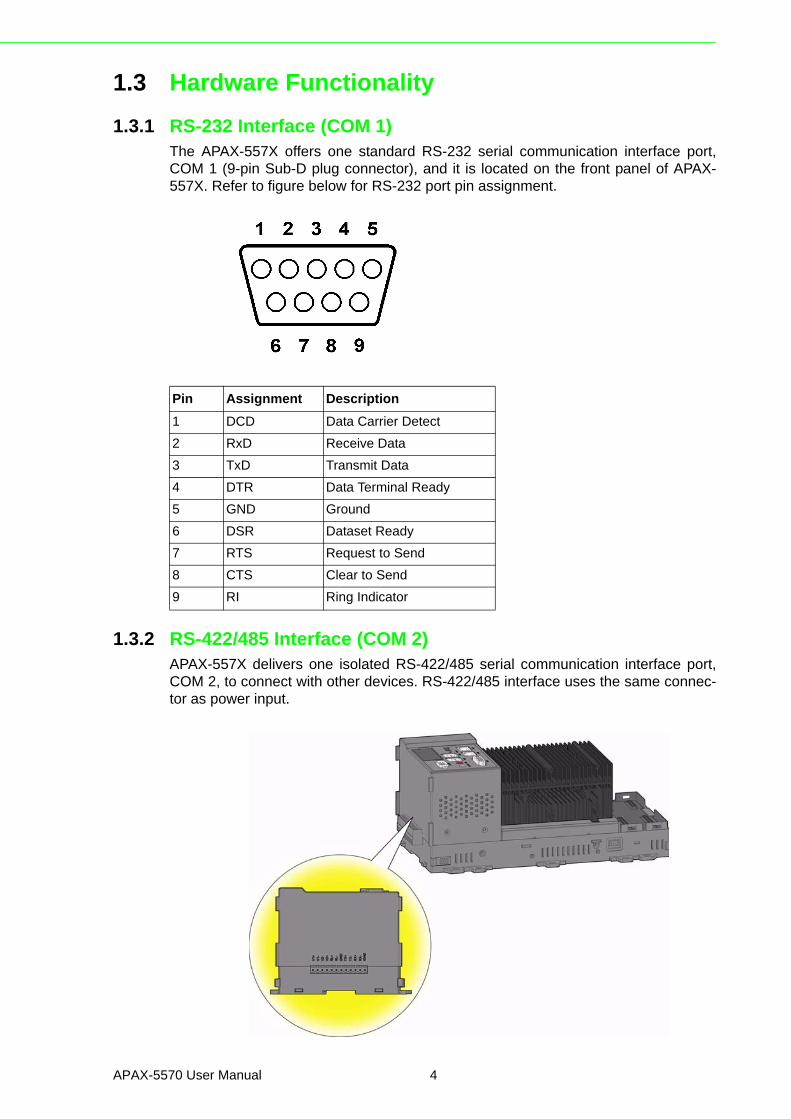
1.3.1 RS-232 Interface (COM 1) The APAX-557X offers one standard RS-232 serial communication interface port,COM 1 (9-pin Sub-D plug connector), and it is located on the front panel of APAX-557X. Refer to figure below for RS-232 port pin assignment.
1.3.2 RS-422/485 Interface (COM 2)APAX-557X delivers one isolated RS-422/485 serial communication interface port,COM 2, to connect with other devices. RS-422/485 interface uses the same connec-tor as power input.
Pin Assignment Description1 DCD Data Carrier Detect2 RxD Receive Data3 TxD Transmit Data4 DTR Data Terminal Ready5 GND Ground6 DSR Dataset Ready7 RTS Request to Send8 CTS Clear to Send9 RI Ring Indicator
APAX-5570 User Manual 4

Chapter 1
Overview
In RS-485 mode, it supports auto data flow control functionality: it automaticallydetects the direction of incoming data and switches its transmission direction accord-ingly. So no handshaking signal (e.g. RTS signal) is necessary. This lets you conve-niently build an RS-485 network with just two wires. More importantly, applicationsoftware previously written for half duplex RS-232 environments can be maintainedwithout modification.
1.3.3 Ethernet PortsThe APAX-557X is equipped with two Ethernet ports which are fully compliant withIEEE 802.3u 10/100/1000 Mbps Ethernet. The two Ethernet ports provide a standardRJ-45 jack on board, and LED indicators on the front side to show its status. Refer toTable below. Each Ethernet port has individual MAC address, and you can configuredifferent IP address for the two Ethernet ports. Therefore, APAX-557X can link to twodifferent Ethernet network.
RS-422
Pin Assignment Description1 Tx+ Data Transmit +2 Tx- Data Transmit -3 Rx+ Data Receive +4 RX- Data Receive -5 IGND Ground
RS-485
Pin Assignment Description1 Tx+ Data +2 Tx- Data -3 IGND Ground
Bottom LED (Speed)OFF 10 MbpsOrange 100 MbpsGreen 1000 MbpsUp LED (Link/Activity)OFF Not LinkGreen Link/Activity
5 APAX-5570 User Manual

1.3.4 USB PortsThe USB connector is used for connecting any device that conforms to the USB inter-face. Many recent digital devices conform to this standard. The USB interface sup-ports Plug and Play, which enables you to connect or disconnect a device wheneveryou want, without turning off the computer.
The APAX-557X provides four connectors of USB interfaces. The USB interfacecomplies with USB EHCI, Rev. 2.0 compliant. The USB interface can be disabled insystem BIOS setup. Refer to figure below for its pin assignments.
Pin Assignment1 LAN MDI 0+2 LAN MDI 0-3 LAN MDI 1+4 LAN MDI 2+5 LAN MDI 2-6 LAN MDI 1-7 LAN MDI 3+
8 LAN MDI 3-
Note! The Ethernet port is only used in LAN, not for connection to telecommu-nication circuits.
Note! APAX-557x LAN ports support teaming functionality through built-in Intel LAN chipset. You can enable the teaming function in the device man-ager. (After enabling the teaming function, the two LAN ports can link to the same device, offering communication redundancy. (The two LAN ports share the same IP address.)
Pin Assignment Description1 VBUS Power (+ 5V)2 D- Data-3 D+ Data+4 GND Ground
4
3
2
1
4
3
2
1
APAX-5570 User Manual 6
Chapter 1
Overview
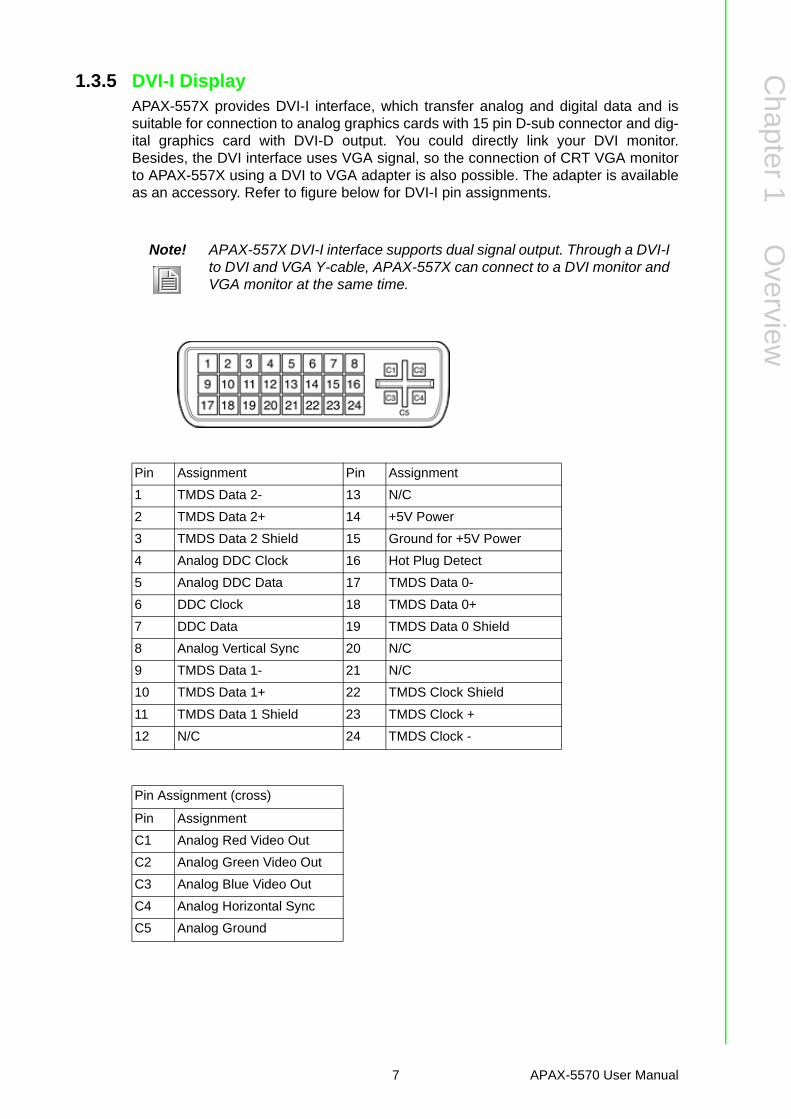
1.3.5 DVI-I DisplayAPAX-557X provides DVI-I interface, which transfer analog and digital data and issuitable for connection to analog graphics cards with 15 pin D-sub connector and dig-ital graphics card with DVI-D output. You could directly link your DVI monitor.Besides, the DVI interface uses VGA signal, so the connection of CRT VGA monitorto APAX-557X using a DVI to VGA adapter is also possible. The adapter is availableas an accessory. Refer to figure below for DVI-I pin assignments.
Note! APAX-557X DVI-I interface supports dual signal output. Through a DVI-I to DVI and VGA Y-cable, APAX-557X can connect to a DVI monitor and VGA monitor at the same time.
Pin Assignment Pin Assignment1 TMDS Data 2- 13 N/C2 TMDS Data 2+ 14 +5V Power3 TMDS Data 2 Shield 15 Ground for +5V Power4 Analog DDC Clock 16 Hot Plug Detect5 Analog DDC Data 17 TMDS Data 0-6 DDC Clock 18 TMDS Data 0+7 DDC Data 19 TMDS Data 0 Shield8 Analog Vertical Sync 20 N/C9 TMDS Data 1- 21 N/C10 TMDS Data 1+ 22 TMDS Clock Shield11 TMDS Data 1 Shield 23 TMDS Clock +12 N/C 24 TMDS Clock -
Pin Assignment (cross)
Pin AssignmentC1 Analog Red Video OutC2 Analog Green Video OutC3 Analog Blue Video OutC4 Analog Horizontal SyncC5 Analog Ground
7 APAX-5570 User Manual

1.3.6 Battery Backup RAM and SD CardAPAX-557X provide 512 KB battery backup RAM for saving important data. Thisensures that you have a safe place to store critical data. You can now write softwareapplications without being concerned that system crashes will erase critical data fromthe memory. When the external power for the system is loss, the battery can continu-ously provide power to the battery backup RAM to keep the data.
There is a BAT LED on the front panel of the APAX-557X. Please replace the lithiumbattery with a new one if the BAT LED is activated. (Meaning battery runs out of itspower)
APAX-557X has built-in Microsoft Windows XP Embedded operating system. Theoperating system is installed in the internal CF card. Your application program willalso be stored on the internal CF card. Besides, APAX-557X provides one externalSD card slot for data storage, and you can use standard SD card to store your data.The maximum size for the SD card is 16 GB. Refer to figure below for the location ofSD card slot.
Note! The battery is special designed to connect with APAX-557X. Spare bat-teries can be ordered from Advantech.
Warning! Don't turn off the external power supply connected to APAX-557x when changing the battery to prevent from data loss in battery backup mem-ory.
APAX-5570 User Manual 8

Chapter 1
Overview
Battery Specifications:Battery Type: CR2032Electrical Properties – Nominal voltage: 3.0 V– Nominal capacity: 210 mAh (Load: 15 k, End voltage: 2.0 V)Dimensions: – Diameter: 21.0 mm– Height: 5.5 mm– Weight: 3.0 g
Note! There are four disk devices provided by APAX-557x: Internal CF (C, D), External SD slot (E) and Battery Backup RAM (Disk Z). Refer to the fig-ure below. The operating system (Windows XP Embedded) and pro-gram applications are installed on the internal CF. Considering data storage for your applications, we strongly suggest NOT to use the inter-nal CF. Repeat writing CF will decrease the life for CF card. You can store your data in the battery backup RAM or SD card.
Warning! Battery may explode if mistreated. Do not recharge, disassemble or dis-pose of in fire.
9 APAX-5570 User Manual

1.3.7 Reset ButtonAPAX-557X features a reset button on the front panel. Operators can manuallyreboot the system with the reset button.
1.3.8 AudioAPAX-557X offers the audio interface. MIC input and Line Out output are available.The audio interfaces are accessed via the operating system.
1.3.9 Real Time Clock (RTC)APAX-557X delivers built-in real-time clock, and programmers can use it in theirapplication programs. When the power is loss, the RTC can still run using the powerfrom battery which has been described in section 1.3.6.
1.3.10 Fan CartridgeAPAX-557X with higher performance CPU needs fan for heat dissipation, such asAPAX-5571XPE. The fan is fixed on the side of the heat sink with screws. A cover isprovided to prevent items enter and damage the fan when the fan is running. The fanis powered by APAX-557X without any external power device.
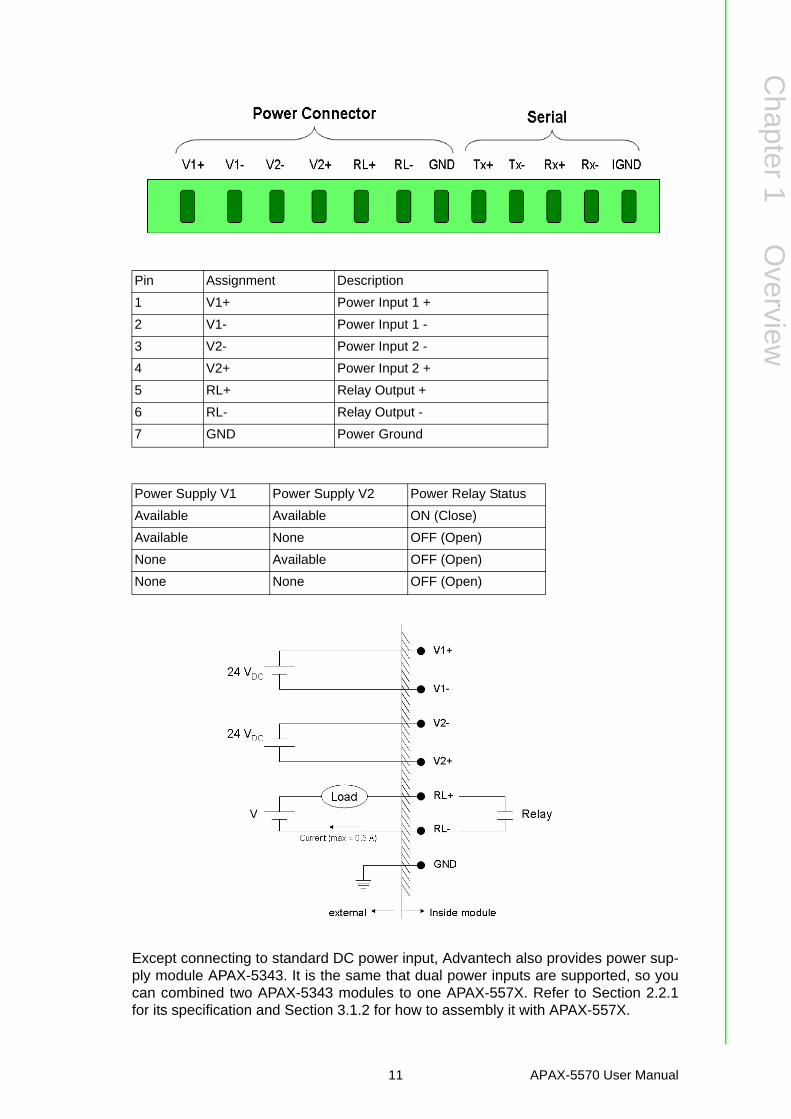
1.3.11 Power ConnectorAPAX-557X needs external DC power supply though the connector on the left side.
APAX-557X supports dual 18 ~ 48 VDC power input and power fail relay output. TwoDC power inputs can be connected to the system through the four pins: "V1+", "V1-","V2+" and "V2-". APAX-557X delivers one relay output to display if the two powerinputs are both available, through the "RL+" and "RL-" pin. You can connect an alarmindicator, buzzer or other signaling equipment through the relay output. Refer to tablebelow for how it changes its status.
APAX-5570 User Manual 10
Chapter 1
Overview
Except connecting to standard DC power input, Advantech also provides power sup-ply module APAX-5343. It is the same that dual power inputs are supported, so youcan combined two APAX-5343 modules to one APAX-557X. Refer to Section 2.2.1for its specification and Section 3.1.2 for how to assembly it with APAX-557X.
Pin Assignment Description1 V1+ Power Input 1 +2 V1- Power Input 1 -3 V2- Power Input 2 -4 V2+ Power Input 2 +5 RL+ Relay Output +6 RL- Relay Output -7 GND Power Ground
Power Supply V1 Power Supply V2 Power Relay StatusAvailable Available ON (Close)Available None OFF (Open)None Available OFF (Open)None None OFF (Open)
11 APAX-5570 User Manual

APAX-5570 User Manual 12

Chapter 2
2 Product Specifications
2.1 CPU Modules
2.1.1 APAX-5570XPECPU: Intel Celeron M 1 GHzMemory: 512 MB DDR2 DRAM onboard (Dual Channel Mode)Battery Backup Memory: 512 KBOperating System: Windows XP EmbeddedDiagnostic LEDs: 1 x Power, 1 x Run (controlled by software), 1 x Battery, 1 x Error (controlled by software), 2 x LAN link/activity/speedReal-time Clock: Yes (battery-backed)Watchdog Timer: YesReset Button: YesControl Software: .NET class library and C/C++ API Power Consumption: 30 W @ 24 VDC (typical, without module inserted)VGA: 1 (DVI-I interface)Audio Interface: MIC input, Line Out outputUSB Ports: 4 (USB 2.0)LAN Ports: 2 (10/100/1000 Mbps)Serial Ports: 2 (COM 1: RS-232, COM 2: RS-422/485)Serial Baud Rate (RS-232): 50 bps ~ 115.2 kbpsSerial Baud Rate (RS-422/485): 50 ~ 115200 bpsStorage: 1 x SD card slot (External) Dimensions: 270 x 142 x 126 mm (Width x Height x Depth)Weight: Approximate 2.42 kgCooling System: Heat Sink (fanless)Power Input: 18 ~ 30 VDC (Supports dual power input and power input reversal protection)Isolation Protection: 2500 VDC (between RS-422/485 and backplane)Operating Temperature: -10 ~ 55° C (Vertical mounting)Storage Temperature: -40 ~ 70° CRelative Humidity: 5 ~ 95% (non-condensing)Shock Resistance: 30 G @ wall mounting, duration 11 ms
(tested to IEC 60068 2-27)Vibration Resistance: 2 Grms @ wall mounting, random, 5 ~ 500 Hz, 3-axes,
1 hr/axis. (Tested to IEC 60068-2-64)
APAX-5570 User Manual 14

Chapter 2
ProductS
pecifications
2.1.2 APAX-5571XPECPU: Intel Celeron M 1.5 GHz (1 MB L2 cache)Memory: 512 MB DDR2 DRAM onboard (Dual Channel Mode)Battery Backup Memory: 512 KBOperating System: Windows XP EmbeddedDiagnostic LEDs: 1 x Power, 1 x Run (controlled by software), 1 x Battery, 1 x Error (controlled by software), 2 x LAN link/activity/linkReal-time Clock: Yes (battery-backed)Watchdog Timer: YesReset Button: YesControl Software: .NET class library and C/C++ APIPower Consumption: 45 W @ 24 VDC (typical, without module inserted)VGA: 1 (DVI-I interface)Audio Interface: MIC input, Line Out outputUSB Ports: 4 (USB 2.0)LAN Ports: 2 (10/100/1000 Mbps)Serial Ports: 2 (COM 1: RS-232, COM 2: RS-422/485)Serial Baud Rate (RS-232): 50 bps ~ 115.2 kbpsSerial Baud Rate (RS-422/485): 50 ~ 115200 bpsStorage: 1 x SD card slot (External) Dimensions: 270 x 142 x 126 mm (Width x Height x Depth)Weight (Approximate): 2.46 kgCooling System: Heat Sink with fanPower Input: 18 ~ 30 VDC (Supports dual power input and power input reversal protection)Isolation Protection: 2500 VDC (between RS-422/485 and backplane)Operating Temperature: -10 ~ 55° C (Vertical mounting)Storage Temperature: -40 ~ 70° CRelative Humidity: 5 ~ 95% (non-condensing)Shock Resistance: 30 G @ wall mounting, duration 11 ms,
(tested to IEC 60068 2-27)Vibration Resistance: 2 Grms @ wall mounting, random, 5 ~ 500 Hz, 3-axes,
1 hr/axis. (Tested to IEC 60068-2-64)
15 APAX-5570 User Manual
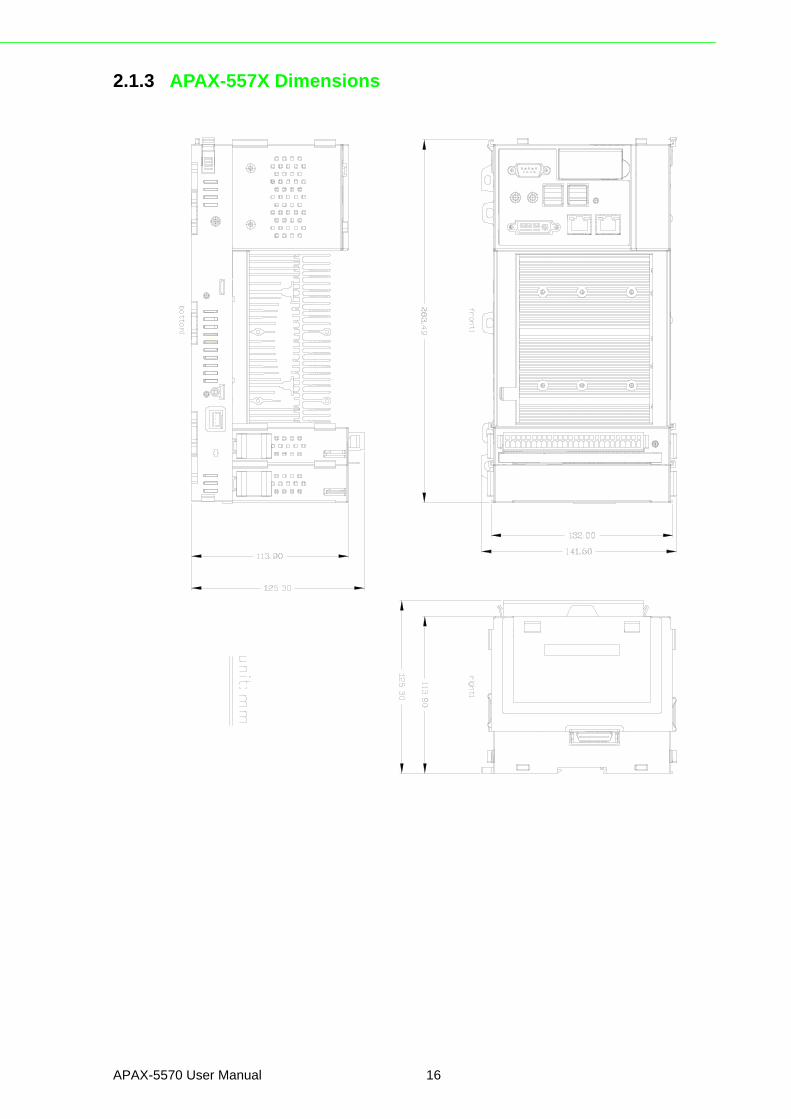
2.1.3 APAX-557X Dimensions
APAX-5570 User Manual 16

Chapter 2
ProductS
pecifications
2.2 Power Supply Module
2.2.1 APAX-5343
InputRated Voltage: 115/230 VACVoltage Range: 90 ~ 264 VAC Input Current: 1.5 A (at rated load) Input Frequency Range: 47 ~ 63 Hz Inrush Current: 50 A (one cycle at 25° C)
OutputOutput Power: 72 wattRated Voltage: 24 VDCRated Output Current: 3 AEfficiency: > 87% (at 115/230 VAC Input Voltage, Rated load)
ProtectionIsolation Protection (In/Out): 42/42 VDCOver Voltage Protection: 26 ~ 29 VDC, Latch off modeOver Load Protection: auto-recovery modeShort Circuit Protection: auto-recovery mode
GeneralDiagnostic LEDs: 1 x PowerDimensions (W x H x D): 75 x 151 x 115 mmOperating Temperature: -10 ~ 55° CStorage Temperature: -20 ~ 70° CRelative Humidity: 5 ~ 95% (non-condensing)
17 APAX-5570 User Manual

APAX-5570 User Manual 18
Chapter 3
3 Installation and Initiation
3.1 Assembly and Power Connections
3.1.1 Combining APAX-5000 I/O Modules with APAX-557X1. There are two blank modules inserted on APAX-557X in default. Pull up the
module locks on the two blank modules.
2. Detach the two blank modules from APAX-557X.
3. Insert APAX-5000 I/O module on the first slot on APAX-557X. Use tongue-and-groove slots to move the module.
APAX-5570 User Manual 20
Chapter 3
Installationand
Initiation
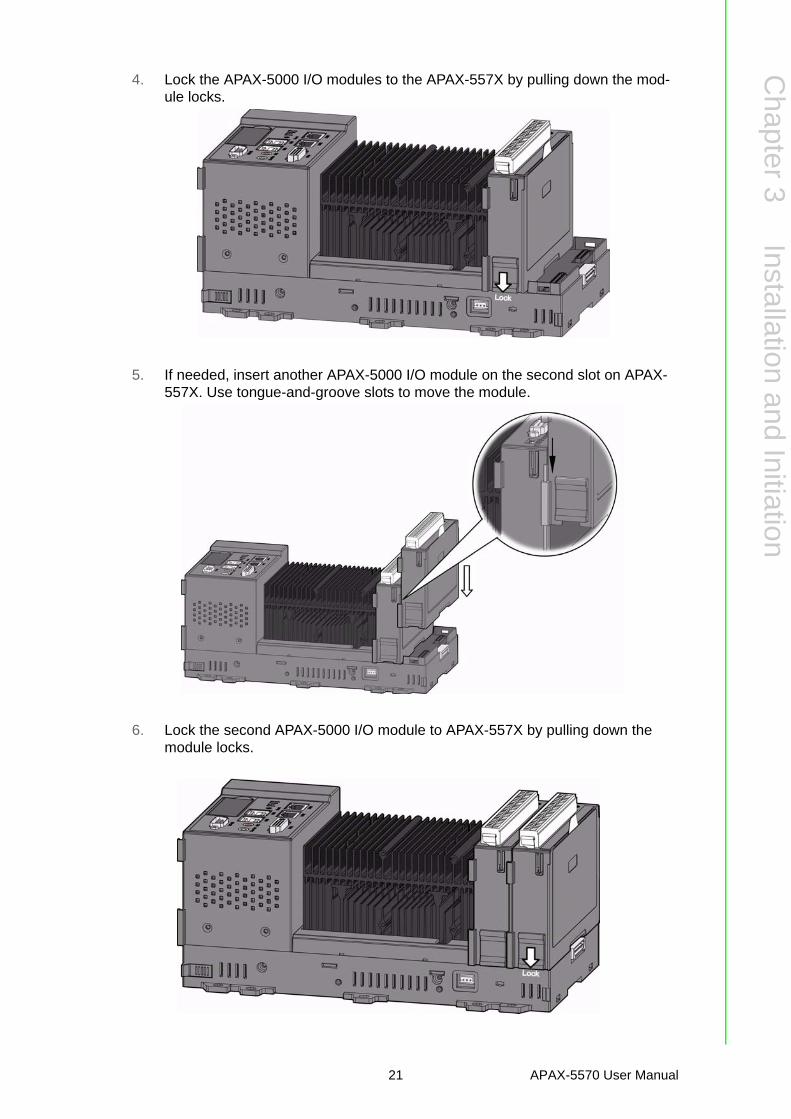
4. Lock the APAX-5000 I/O modules to the APAX-557X by pulling down the mod-ule locks.
5. If needed, insert another APAX-5000 I/O module on the second slot on APAX-557X. Use tongue-and-groove slots to move the module.
6. Lock the second APAX-5000 I/O module to APAX-557X by pulling down the module locks.
21 APAX-5570 User Manual

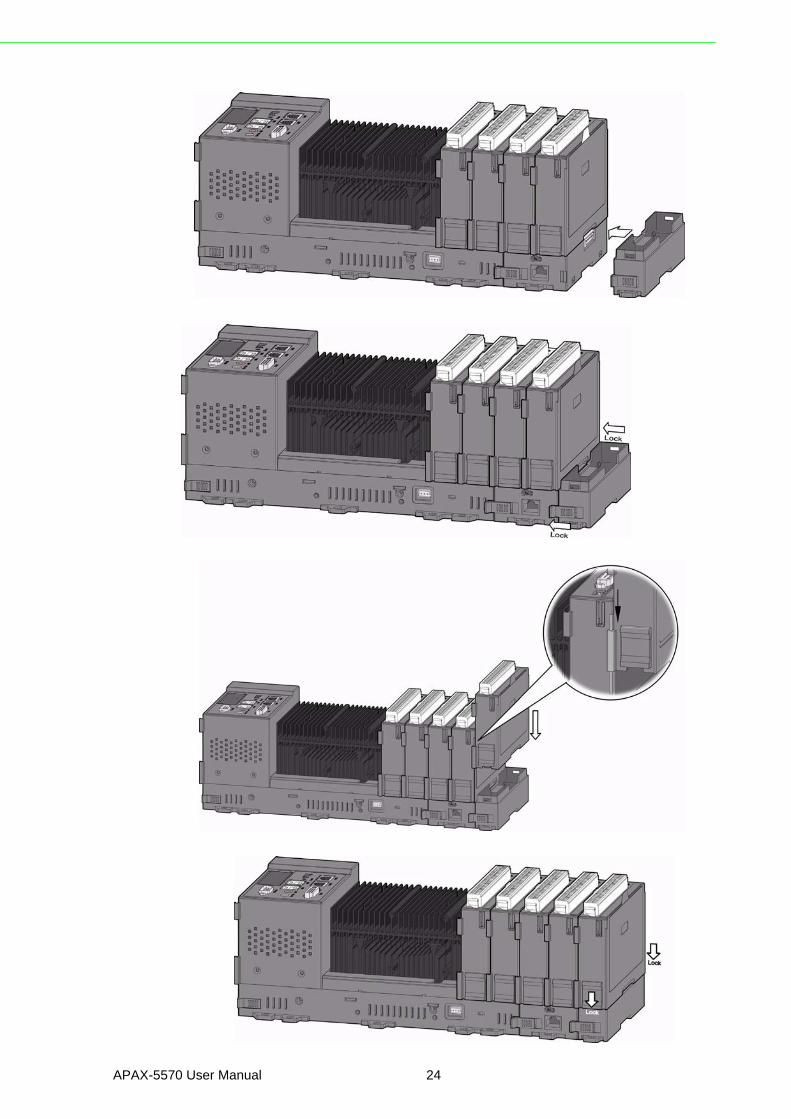
7. If you need more than two APAX-5000 I/O modules, stack one APAX-5002 backplane to the right side of APAX-557X.
8. Lock the stacked APAX-5002 backplane to APAX-557X by the backplane locks.
9. Insert the third APAX-5000 I/O module to the stacked APAX-5002 backplane. Use tongue-and-groove slots to move the module.
Warning! When you assembly different backplanes with APAX-557x together, remember to turn off the power connected to APAX-557x. If not, the backplanes may be damaged. Turn on the power again after you com-plete the assembly for all backplanes.
APAX-5570 User Manual 22
Chapter 3
Installationand
Initiation
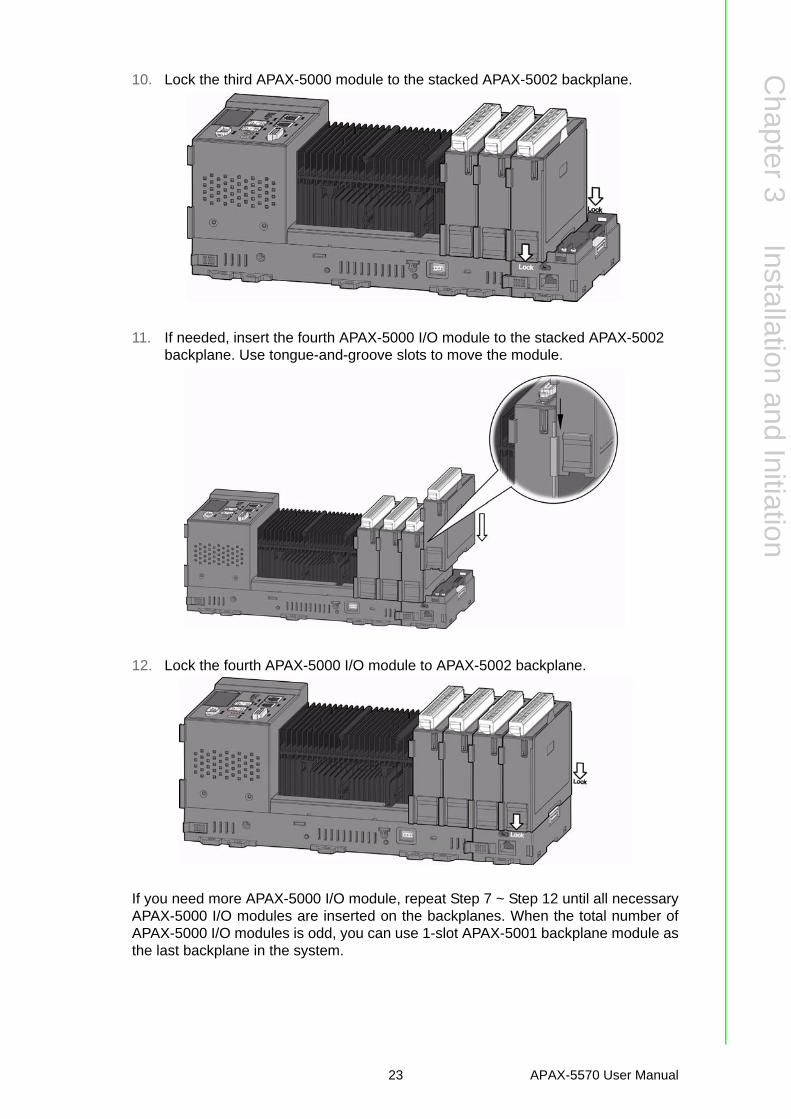
10. Lock the third APAX-5000 module to the stacked APAX-5002 backplane.
11. If needed, insert the fourth APAX-5000 I/O module to the stacked APAX-5002 backplane. Use tongue-and-groove slots to move the module.
12. Lock the fourth APAX-5000 I/O module to APAX-5002 backplane.
If you need more APAX-5000 I/O module, repeat Step 7 ~ Step 12 until all necessaryAPAX-5000 I/O modules are inserted on the backplanes. When the total number ofAPAX-5000 I/O modules is odd, you can use 1-slot APAX-5001 backplane module asthe last backplane in the system.
23 APAX-5570 User Manual
APAX-5570 User Manual 24

Chapter 3
Installationand
Initiation
There is an expansion port on front side of APAX-5002. With this port, users can builda remote expansion architecture, remaining fast local-bus data transmission speed.Standard Ethernet cables can be used to connect any two APAX-5002. However,shielded industrial Ethernet cable MUST be used instead of standard Ethernet cablewhen the system is used in harsh environment, such as factory automation. Unman-aged industrial Ethernet switches (such as Advantech EKI-2528) with 100 Mbpstransmission speed can also be used between two APAX-5002. Therefore, you canflexibly build any remote expansion with line, tree or star topology. All the APAX-5000I/O modules can benefit from the remote expansion architecture with local busspeed. Refer to figure below for the expansion topology.
Warning! 1. DO NOT use managed switch, hub or router between backplanes for expansion. 2. The network for the expansion should be a local network, NOT to con-nect with other external network (such as public network in enterprise network, including Internet).3. Cat 6 Ethernet cable is strongly recommended for better data trans-mission quality.4. It is suggested to power on APAX-557X and all the I/O modules together to avoid any unpredictable situation.
Warning! For the line topology, as shown by figure above, the maximum distance between two backplanes is 100 m. And there are maximum 30 APAX-5002 backplanes used in the system for line topology to remain real-time performance.
25 APAX-5570 User Manual

Warning! For the star topology, use an unmanaged industrial Ethernet switch (such as Advantech’s EKI-2528) with 100 Mbps transmission speed for expansion. DO NOT use management switch, hub or router between backplanes. The network for the expansion should be a local network, do not connect with other external network (like public network in enter-prise network, including Internet).
APAX-5570 User Manual 26

Chapter 3
Installationand
Initiation
3.1.2 Combine with APAX-5343 Power Supply ModuleAs described in Section 1.2, APAX-557X can be power-on by the power connector orAPAX-5343 power supply module. Refer to figures below for how to assembly APAX-5343 with APAX-557X.
1. Pull up the module locks on the upper case of one APAX-5343. Then you can separate the upper case of APAX-5343 from its backplane.
2. Then you can separate the upper case of APAX-5343 from its backplane.
27 APAX-5570 User Manual

3. Remove the power connector on the left side of APAX-557X.
4. Stack the backplane of APAX-5343 to the left side of APAX-557X.
5. Lock the stacked APAX-5343 backplane with APAX-557X by the backplane locks on the APAX-557X.
APAX-5570 User Manual 28
Chapter 3
Installationand
Initiation
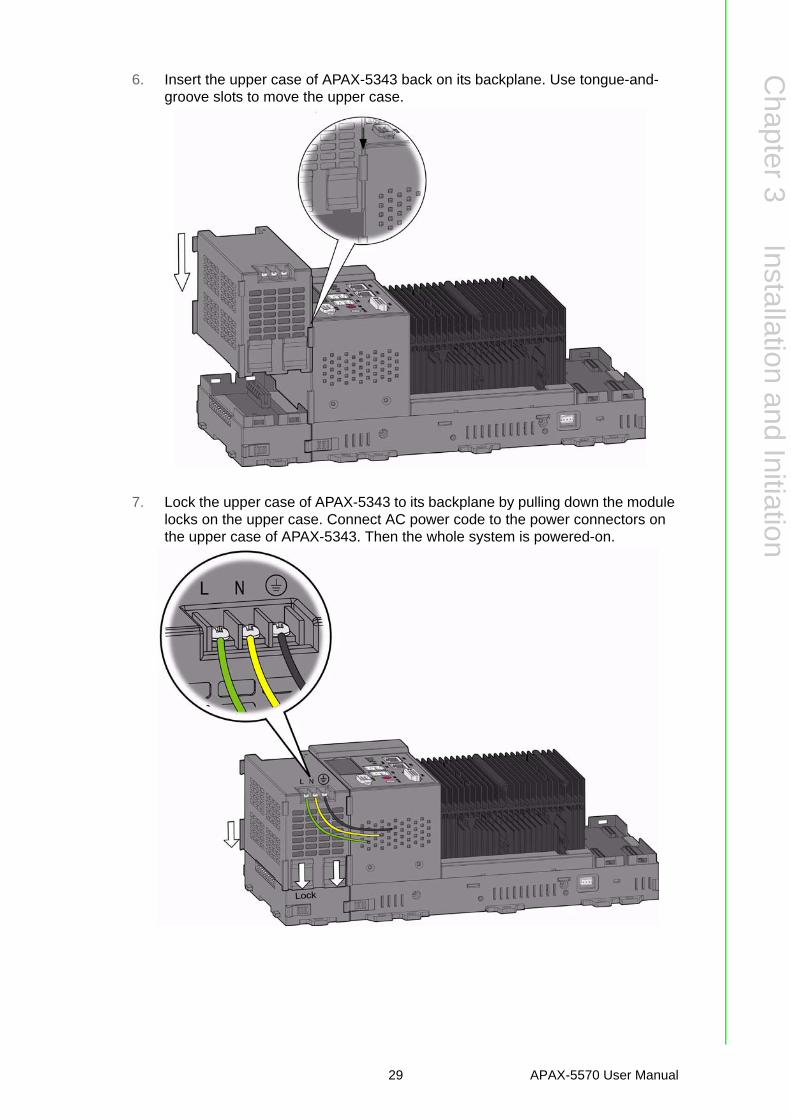
6. Insert the upper case of APAX-5343 back on its backplane. Use tongue-and-groove slots to move the upper case.
7. Lock the upper case of APAX-5343 to its backplane by pulling down the module locks on the upper case. Connect AC power code to the power connectors on the upper case of APAX-5343. Then the whole system is powered-on.
29 APAX-5570 User Manual

8. APAX-557X supports dual power input. If you need the second power input, repeat step 1 ~ step 2 to separate another APAX-5343.
9. Stack the backplane of the second APAX-5343 to the left side of the first APAX-5343.
10. Lock the second APAX-5343 backplane with the first APAX-5343 by the back-plane locks on the first APAX-5343.
Warning! When you stack the backplane of the second APAX-5343 to the first APAX-5343, remember to turn off the power connected to the first APAX-5343. If not, the backplanes may be damaged. Turn on the power again after you complete the assembly for second APAX-5343.
APAX-5570 User Manual 30
Chapter 3
Installationand
Initiation
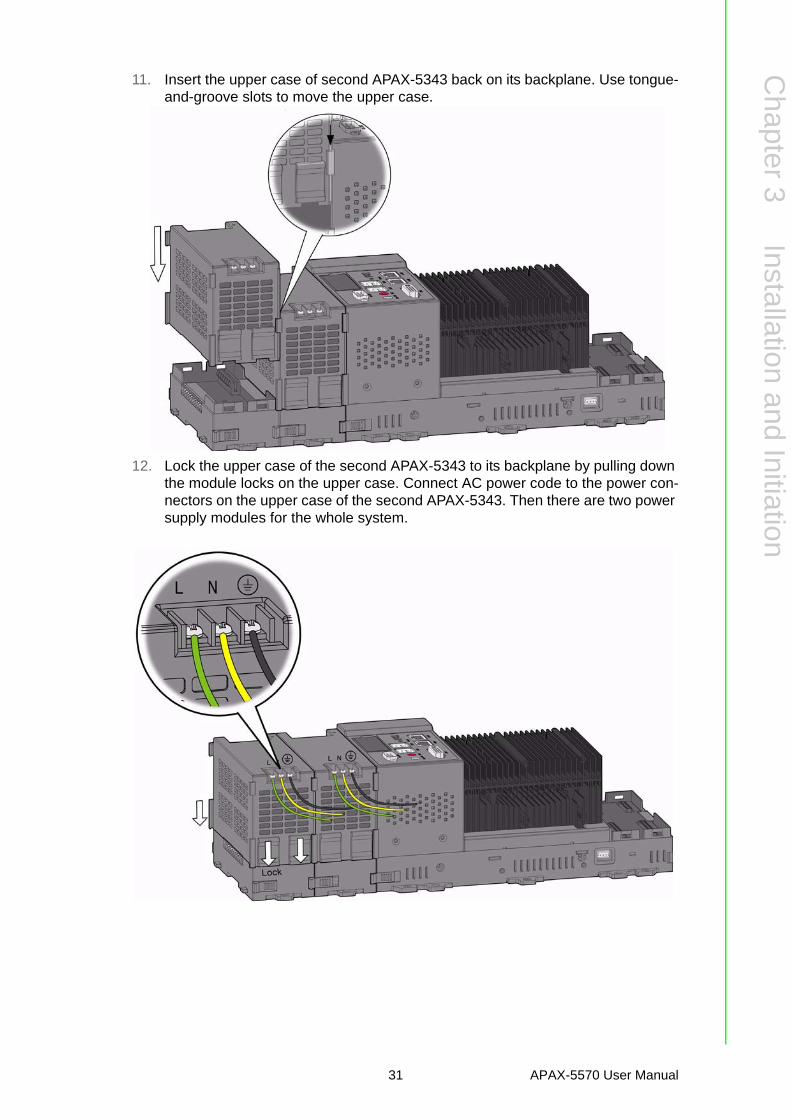
11. Insert the upper case of second APAX-5343 back on its backplane. Use tongue-and-groove slots to move the upper case.
12. Lock the upper case of the second APAX-5343 to its backplane by pulling down the module locks on the upper case. Connect AC power code to the power con-nectors on the upper case of the second APAX-5343. Then there are two power supply modules for the whole system.
31 APAX-5570 User Manual

3.2 Decommission and DisposalThe procedure to disassembly APAX-5000 I/O modules are opposite to the proce-dure of assembling APAX-5000 I/O modules. Before detaching every APAX-5000 I/Omodules, pull up the module locks first. And then detach the APAX-5000 I/O modulesfrom the APAX-557X or APAX-500x (APAX-5001 or APAX-5002) backplane. APAX-5000 I/O modules support hot-swap functionality. Therefore, you can detachthe APAX-5000 I/O modules when the system is powered-on. (No matter they areinserted on the APAX-557X or APAX-500X backplane.) It is the same that the APAX-5000 I/O modules can be inserted back to the backplane when the system is pow-ered-on. There are some PCI modules, such as APAX-5090P, which can only be inserted onthe two slots on APAX-557X. If you want to detach these PCI modules, remember topower off the system before detaching them. Then, pull up the module lock anddetach the PCI modules from APAX-557X. The device must be fully dismantled in order to dispose of it. Electronic parts must bedisposed of in accordance with national electronics scrap regulations.
3.3 Mounting
3.3.1 DIN-rail MountingAPAX-557X can be mounted to the following DIN-rails: 35 x 7.5 mm or 35 x 15 mm.Below are the procedures for the DIN-rails mounting.
1. Pull down the DIN-rail lock at the back of APAX-557X.
APAX-5570 User Manual 32
Chapter 3
Installationand
Initiation
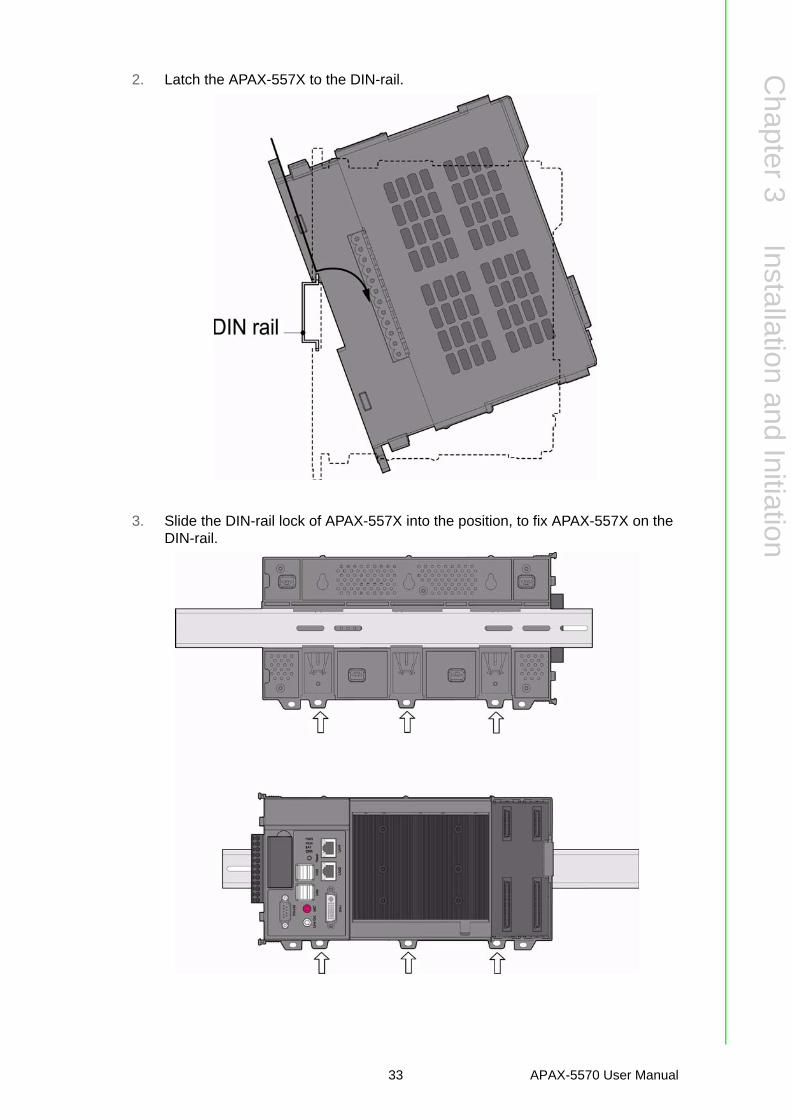
2. Latch the APAX-557X to the DIN-rail.
3. Slide the DIN-rail lock of APAX-557X into the position, to fix APAX-557X on the DIN-rail.
33 APAX-5570 User Manual

4. If more than two APAX-5000 I/O modules are needed, other APAX-5002 back-planes are needed to attach to the DIN-rail. Pull down the DIN-rail lock at the back of APAX-5002 backplane.
5. Latch the APAX-5002 backplane to the DIN-rail.
6. Repeat Step 4~ Step 5 until necessary APAX-5002 backplanes are all attached on the DIN-rail.
7. Move all backplanes to stack all the backplanes and APAX-557X together. Then slide the backplane locks on the backplanes to fasten all backplanes and APAX-557X. (Similar to Step 7 and 8 in section 3.1.1)
Note! When the total number of APAX-5000 I/O modules is odd, you can use APAX-5001 (1-slot backplane) as the last backplane in the system. And the procedure to attach APAX-5001 on the DIN-rail is similar as APAX-5002.
APAX-5570 User Manual 34

Chapter 3
Installationand
Initiation
8. Slide the DIN-rail lock of all backplanes into the position, to fix all backplanes to the DIN-rail.
9. Insert all necessary APAX-5000 I/O modules to the APAX-557X slots and stacked backplanes. (Similar to Step 3, Step 5, Step 9 and Step 11 in section 3.1.1)
10. Slide the module lock of all APAX-5000 I/O modules into the position, to fix these modules to related backplanes, including APAX-557X slots. (Similar to Step 4, Step 6, Step 10 and Step 12 in section 3.1.1)
3.3.2 Wall (Panel) MountingMount the APAX-557X module to a wall (panel) through backplane using 5 screwsper module (You can use 8 screws to strengthen the mounting) Refer to figure belowfor the dimensional template:
35 APAX-5570 User Manual
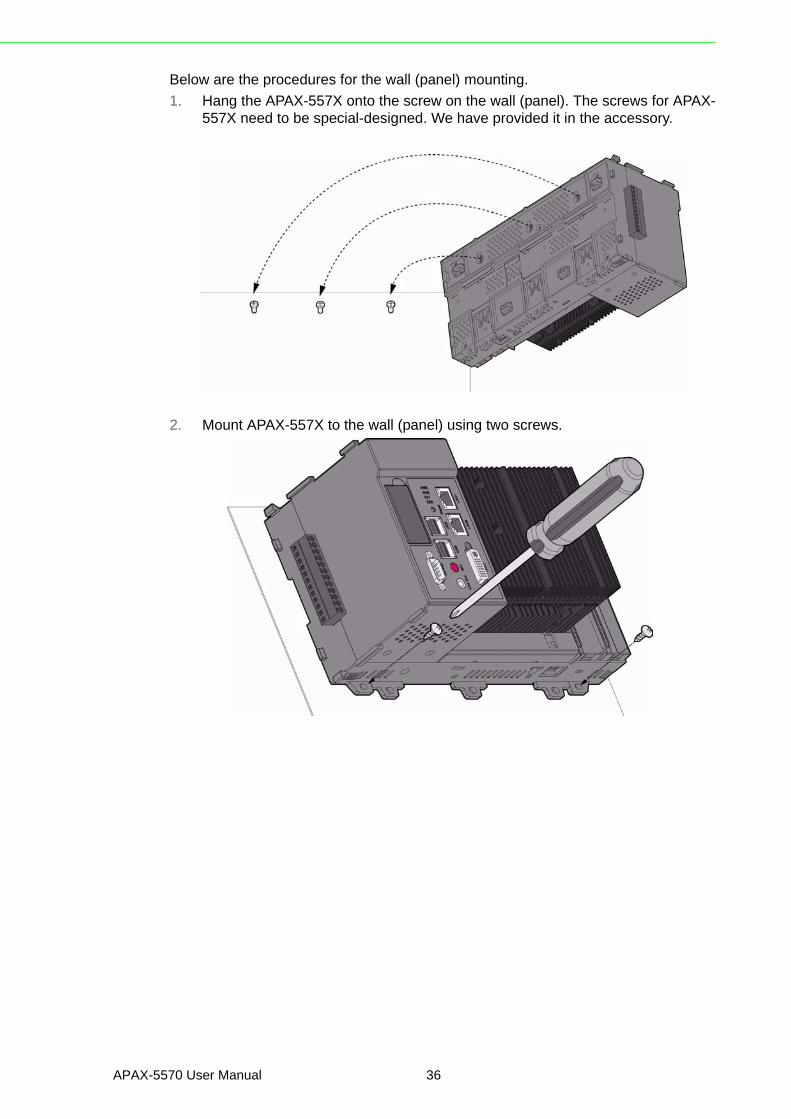
Below are the procedures for the wall (panel) mounting.1. Hang the APAX-557X onto the screw on the wall (panel). The screws for APAX-
557X need to be special-designed. We have provided it in the accessory.
2. Mount APAX-557X to the wall (panel) using two screws.
APAX-5570 User Manual 36

Chapter 3
Installationand
Initiation
3. If you want to have stronger mounting effect, pull down the DIN-rail locks and screw the three DIN-rail locks with three screws.
4. If needed, stack APAX-5002 backplane to APAX-557X. Lock the APAX-557X backplane to APAX-557X by the backplane locks. Mount that APAX-5002 back-plane to the wall (panel) using two screws.
37 APAX-5570 User Manual

5. Repeat Step 4 until all necessary APAX-5002 backplane are screwed on the wall (panel).
6. Inserted all necessary APAX-5000 I/O modules on the APAX-557X slots and the backplanes. (Similar to Step 3, Step 5, Step 9 and Step 11 in section 3.1.1)
Note! When the total number of APAX-5520 and APAX-5000 I/O modules is odd, you can use APAX-5001 (1-slot backplane) as the last backplane in the system. The procedure to screw APAX-5001 on the wall (panel) is similar as APAX-5002.
APAX-5570 User Manual 38
Chapter 3
Installationand
Initiation
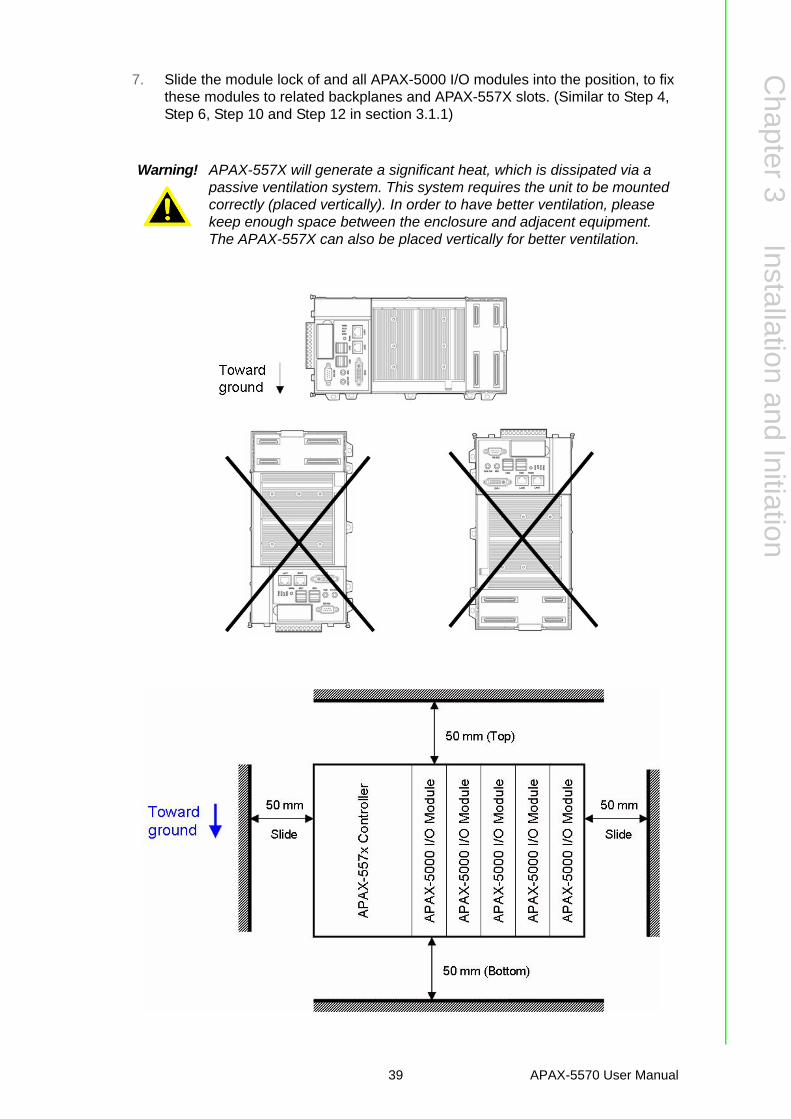
7. Slide the module lock of and all APAX-5000 I/O modules into the position, to fix these modules to related backplanes and APAX-557X slots. (Similar to Step 4, Step 6, Step 10 and Step 12 in section 3.1.1)
Warning! APAX-557X will generate a significant heat, which is dissipated via a passive ventilation system. This system requires the unit to be mounted correctly (placed vertically). In order to have better ventilation, please keep enough space between the enclosure and adjacent equipment. The APAX-557X can also be placed vertically for better ventilation.
39 APAX-5570 User Manual

APAX-5570 User Manual 40

Chapter 4
4 Error Handling and Diagnostics
4.1 Error Handling and DiagnosticsThere are four LED for diagnostics on the front panel of APAX-557X. When the LEDis lit, its color will become orange. Below are the meanings for the 4 LED:
PWR: When the APAX-5520 is powered, this LED will be lit RUN: Programmer can use software program controlling when this LED is lit. BAT: When the battery runs out of power, this LED will be lit. ERR: Programmer can use software program controlling when this LED is lit.
APAX-5570 User Manual 42