user manual carl zeiss cinemizer oled · cinemizer ® oled at a glance ... if the battery status...
TRANSCRIPT

Operating instructions

Introduction Requirements 1 The multimedia video glasses 2
Overview Contents of the package 3 cinemizer OLED controls 4 Battery box controls 5
Usage Powering on 6 Wearing comfort 7 Nose pad adapter 7 Ear clips 8 Acuity adjustment 9 Earpieces 10 Stereo audio jack 12 Volume 13 Integrated battery 14 Battery status 15 Battery charging 17 HDMI® connection 19 iPod/iPhone and iPad connection (30 pin) 20 iPod/iPhone and iPad connection (lightning) 21 Other playback devices via cinch video cable 22 Travel case 23Additional functions 3D support 24 3D formats supported 25 OSD settings 28 Activation of the OSD 28 Navigation in the OSD 29 Video 31 Aspect 36 Contrast 38 Info 38 Advanced 39 Exit 41Accessories Adapter kit for iPod and iPhone (30 Pin) 42 Headtracker (movement sensor) 43 Light shield 45Further information Troubleshooting 46 Technical support 46Index 47
Overview
1
Requirements
ATTENTION: For your own safety, read the complete instructions on the usage of the cinemizer ® OLED multimedia video glasses in this manual, the safety information in the quick guide for the cinemizer OLED multime-dia video glasses (provided in the package and available from www.zeiss.com/cinemizer/documents) and the instructions for the devices to which the cinemizer OLED multimedia video glasses are con-nected, before you use the cinemizer OLED.
The following are required to use the cinemizer OLED video glasses:
- A device with a USB connection for charging the battery, if necessary,
- A playback device, e.g. a computer, iPod/iPhone, gaming console, etc.
- A connection adapter (HDMI®, iPod/iPhone), or connection cable (3.5mm 4-pin jack to cinch)
If a stationary image (e.g. a log-on screen or permanently displayed image/icon) remains on the screen for an extended period, you may still see it as a feint residual image, even after the image has been changed. This is termed "burn-in". For this reason avoid the playback of unchang-ing images! If feint residual images are visible, they can be eliminated by playing back varied content that fills the screen.
Introduction
!
Introduction
RegistrationPlease register at www.zeiss.com/cinemizer/registration to receive notifications directly when a firmware update is available.

2
The multimedia video glasses
As you look into the cinemizer OLED video glasses you will obtain the visual im-pression of a television picture with a screen diagonal of 105 cm at a distance of 2 metres.
The ergonomic design and simple acuity adjustment between -5 and +2 dioptres for each eye make the cinemizer OLED video glasses very convenient to wear, even for the wearers of spectacles.
The stereo 3D support converts the cinemizer OLED multimedia video glasses into a portable 3D screen of universal application with which you can im-merse yourself in virtual worlds.
Introduction

3
Contents of the package
cinemizer ® OLED at a glance
Travel case
Battery box
cinemizer-HDMI® adapter(HDMI® mini jack type C)
HDMI® to mini HDMI® Adapter cable
Mini USB cableVideo cable 3.5mm to 3 x cinch
cinemizer OLED
Nose pad
Adapter A + B
Earpiecewith ear cap (medium)
Ear caps (in 2 sizessmall/large)
Ear clip
Quick guide and safety instructionsQuick Guide
Overview

4
cinemizer OLED controls
Overview
Ear clipfor fixing the glasses ergonomically
Removable earpiece
Earpiece storage clip (magnetic)for the safe storage of the earpieces
Nose padfor the ergonomic adjustment of the position of the glasses
Viewing windowfor different eye distances (59-69mm)
Adjustment wheelfor the stepless adjustment of the acuity for each eye(-5 to +2 dioptres)

5
Battery box controls
Overview
On/Off buttonvideo glasses
Multifunction switchfor activating the On-Screen Display (OSD), switching between 2D and 3D mode and for adjusting the volume
Mode LEDs2D/3D mode display
AV-in jackfor connecting (3.5mm, 4-pin) other playback devices
Battery status LEDcharging/battery status display
Mini USB jackfor charging the battery
cinemizer socketfor the connection of the HDMI® adapter or optionally an iPod/iPhone adapter
Earpiece jackfor the connection of stereo earpieces (3.5mm)
Reset buttonfor resetting the video glasses

6
Powering on the cinemizer OLED video glasses
Power on the cinemizer OLED video glasses by briefly pressing the On/Off but-ton until the mode and then the battery status LEDs illuminate. If an LED does not illuminate green after pressing the On/Off button, the battery is probably discharged and you should charge the battery for the cinemizer OLED video glasses using a USB cable. If the battery has been fully discharged, it can take up to 15 minutes until the battery status LED starts to flash on charging the cinemizer OLED via USB.
As long as video signal is not provided via the cinemizer HDMI® adapter or iPod/iPhone adapter, the text "NO SIGNAL" appears on the virtual screen in the multimedia video glasses. If a signal is not provided within 2 minutes of powering on, the cinemizer OLED power off automatically (time out).
Powering off the cinemizer OLED video glasses
If powered on, the cinemizer OLED can be powered off by pressing the On/Off button. The battery status and video mode LEDs go out.
Usage
Usage

7
Nose pad adapter
The soft silicone nose pad adapter ensures you find it pleasant to wear the cinemizer OLED glasses on your nose. Due to anatomical differences in the shapes of faces and noses, comfort can be improved using the optional nose pad adapters A and B.
The nose pad can be fastened in 3 different ways:
1) Nose pad without adapter
2) Node pad with adapter A
3) Nose pad with adapter B
The simplest method is to try all 3 ways and decide which suits you best.
Adapter B
Usage
Adapter A
!

8
Ear clips
The ear clips for the cinemizer OLED help both to securely attach the glasses to your head and to reduce the weight on your nose. You can then comfortably wear and use the cinemizer OLED video glasses for an extended period.
Prior to putting on the cinemizer OLED video glasses, please push the ear clips a little to the rear, put on the glasses and then push the ear clips from the rear to your ears.
Prior to putting away the cinemizer OLED multimedia video glasses in the travel case, you should remove the ear clips and place them loose in the travel case. In this way the ear clips are not subjected to mechanical forces that may irreparably damage them.
Usage
!
1 2 3

9
Acuity
The cinemizer OLED video glasses offer stepless adjustment of the acuity in the range from -5 to +2 dioptres. In this way wearers of spectacles with the need for eyesight correction in this range can use the cinemizer OLED video glasses without using their spectacles. Before you adjust the acuity, you should have adjusted the nose pad and the ear clips to suit you. You can continuously correct the dioptres separately for each eye using an adjustment wheel. How-ever it is not possible to correct astigmatism.
Please turn the adjustment wheel until the picture is sharp. For this purpose close one eye while you make the adjustment for the
other eye.
Usage
!

10
Earpieces
You can enjoy stereo sound with the cinemizer OLED using the two earpieces.
1. Connect earpieces
The earpiece connectors are connected as shown in figures 1-3.
First the connector is loosely fitted in the 2.5mm jack, then pushed with the fingernail until it engages, and finally the cable pressed into the cable chan-nel.
Usage
1Insert connector loosely into
the jack.
2Push to the stop using your
fingernail.
3Press cable into the cable
channel.

11
2. Use earpieces
With the glasses opened, please take the earpieces out of the magnetic stor-age clips and put on the cinemizer OLED glasses. Please insert the earpieces in your ears.
The rubberised ear caps fitted to the earpieces are important for the correct seating of the earpieces.
Ear capsEar caps in three different sizes are included with the earpieces: small (S), medium (M) and large (L). Please try the different sizes and decide which size is most suitable for you. The medium-sized ear caps are fitted in the factory.
Proceed as follows to fit different size ear caps:
Usage
1Pull the ear cap off the earpiece.
2Push the different size ear cap
onto the earpiece.

12
Stereo audio jack
If you want to use your own stereo earphones, you can connect them to the 3.5mm stereo audio jack provided.
In this case please remove the cinemizer OLED earpieces as shown in the figure below.
Usage
1Remove cable from the
cable channel.
2Press briefly using your
fingernail.
3Tilt slightly to remove the
connector.

13
Volume
You can change the volume of the cinemizer OLED video glasses using the multifunction switch.
On the usage of an iPod or iPhone with the cinemizer OLED glasses, the volume control on the iPod or iPhone is inhibited. On some iPod or iPhone models, the volume may still be indicated on the display if the volume but-tons are actuated, but the volume in the cinemizer OLED will not change.
With an iPod or iPhone connected you can only adjust the volume on the cinemizer OLED.
Each time you change the volume, the volume symbol will be displayed briefly on the virtual screen in the cinemizer OLED glasses.
Mute Lowest volume Maximum volume
A total of 11 different volume settings and a mute setting are available. Each time you power on the cinemizer OLED video glasses the volume is set to the default volume, which is 50% of the maximum volume.
+-
Usage
+
!

14
Integrated battery
The integrated battery allows you to use the cinemizer OLED glasses for up to 6 hours while you are travelling. The battery must have been fully charged prior to use. It takes approx. 2.5 hours to charge the battery.
Connection Operating time in hoursVideo cable 6iPod/iPhone 6HDMI® 2.5
Usage

15
Battery status
When the cinemizer OLED is powered on, the battery status LED indicates to you the charge status of the battery. Low battery capacity is signalled by an orange (critical) or red (very critical) LED. If the battery status LED illuminates red or orange, you should try to charge the battery using a USB cable.
Battery status LED Battery status
Illuminated red
The battery capacity is very low and therefore it is imperative the battery is charged. Depending on the playback device and the connection used (HDMI®, iPod, video), the battery will be able to supply power for max. 30 minutes.
Illuminated orange
The battery capacity is low and therefore the battery should be charged. Depending on the playback device and the connection used (HDMI®, iPod, video), the battery will be able to supply power for max. 60 minutes.
Illuminated green
The battery for the cinemizer OLED video glasses is charged. Depending on the playback device and the connection used (HDMI®, iPod, video), the cine-mizer OLED can be operated portably for up to 6 hours.
Usage

16
If the battery charge drops below one of the two limits (orange, red) dur-ing operation, the related battery symbol will be displayed on the screen in orange or red.
Charging recom-mended
Very critical charge statusCharging recommended
Charging imperative
With the cinemizer OLED powered on, the battery symbol is also displayed briefly in the glasses if the volume is changed using the multifunction switch.
Usage

17
Battery charging
To charge the cinemizer OLED battery you can connect the USB cable supplied to either a computer or a USB mains power supply plug. It is recommended to ensure the power source supplies at least 500 mA (e.g. USB 2.0).
While you charge the cinemizer OLED battery, the battery status LED flashes. The colour of the flashing battery status LED indicates the battery capacity in 3 different colours.
If the battery is completely discharged, the battery status LED will not flash immediately when the video glasses are connected using a USB cable. Please leave the cinemizer OLED video glasses connected to the PC via the USB cable for at least 15 minutes. Then disconnect the USB cable and connect again. The charging function is continued and the battery status LED illuminates.
The charging activity is indicated in the on-screen display by a progress bar in the battery symbol. This symbol is only visible if the volume is changed using the multifunction switch.
Usage

18 Usage
Battery status LED Battery status
Flashing red The battery capacity is very low. After charging for approx. 40 minutes the colour of the battery status LED will change from red to orange.
Flashing orange The battery charging status has reaches a state that is sufficient for approx. 1-3 hours of operation depending on the playback device and the connec-tion used.
Flashing green The battery capacity is almost fully charged.
The battery is fully charged when the battery status LED no longer flashes, but instead is continuously illuminated green.
Please read the safety instructions on the rechargeable battery in the section "Safety and usage" in the short guide included in the package.

19
HDMI® connection
The cinemizer OLED multimedia video glasses are supplied with a cinemizer-HDMI® adapter. Using this adapter the video glasses can be connected, e.g. to games consoles, Blu-ray players or other playback devices with an HDMI® interface.
Connect the HDMI® adapter to the battery box for the cinemizer OLED and connect your playback device using an appropriate HDMI® cable. The jack on the cinemizer-HDMI® adapter is compliant with the mini HDMI® specifica-tion (type C). Please check the type (A, C or D) of HDMI® jack on the play-back device before you purchase an HDMI® cable. Suitable HDMI® cables or adapters are available in any online electronics shop or electronics dealer.
The cinemizer-HDMI® adapter supports the following resolutions:480p/576p 1280 x 720p 50/60Hz 1920 x 1080i 50/60Hz 1920 x 1080p 50/60Hz 1920 x 1080p 24Hz
In addition the 3D mode as per the HDMI® 1.4 specification for the resolu-tions 720p and 1080p is supported.
Games console
Blu-ray player
Usage
cinemizer-HDMI® adapterHDMI® mini jack (type C)
HDMI® cable(is not included!)Connector type is dependent on the playback device
HDMI® to mini HDMI® adapter cable

20
iPod/iPhone connection
To use the cinemizer OLED multimedia video glasses with an iPod or iPhone an "Adapter Kit for iPod and iPhone" is available. This accessory kit, available from dealers or online shops (www.zeiss.com/cinemizer/shops), contains an adapter and a base plate with 3 retaining pads; these pads are placed one on top of the other on the base plate depending on the thickness of the iPod or iPhone model used. The cinemizer OLED multimedia video glasses support all iPod and iPhone models capable of video playback.
The cinemizer OLED multimedia video glasses support the "composite" and "component" video signals supplied by iPod and iPhone models. Depending on which video signal (576i, 480i, 576p, 480p) your iPod or iPhone supplies, the iPod/iPhone automatically communicates with the cinemizer OLED video glasses to provide the best image quality.
Should the retention properties of the retaining pads become less effective, you should wash off particles of dirt from the retaining pads using a lit-tle soap and water. Please do not use brushes as these could damage the surface of the nano pads.
Usage
iPod/iPhone base plateBattery boxiPod/iPhone adapter
Retaining pad(s)

21
Connection of smartphones and tablets via MHL and Lightning
New iPod, iPhone and iPad models with the Lighting connector are not mechanically compatible with the cinemizer adapter kit for iPod and iPhone.Smartphones and tablets with, e.g., the Android or iOS operating system transmit the contents of the display digitally via an HDMI interface to the exterior.
These new Apple models profit from digital video transmission and can be connected to the cinemizer OLED via HDMI using the Apple „Lightning Digital AV Adapter“. Other manufacturers of smartphones or tablets (e.g. Samsung, Motorola etc.) sell so-called MHL adapters that in turn permit connection to the cinemizer OLED via HDMI. Exceptional image quality is achieved by the digital image transmission. Normally the complete contents of the display are also transmitted digitally to the cinemizer OLED multimedia glasses, a feature that makes possible mobile video and also mobile gaming with breath-taking image quality.
Usage
Lightning or MHL to HDMI adapter cable

22
Other playback devices via cinch video cable
All playback devices that output a "video composite" signal via the familiar yellow cinch jack can be connected (e.g. DVD players, mobile phones, smart-phones, games consoles, multimedia hard disks, camcorders, digital reflect cameras, etc.) using the 3.5 mm AV-In jack integrated into the cinemizer OLED battery box.
A video cable is required for this connection; this cable in included in the package and is available from dealers or online shops (www.zeiss.com/cinemizer/shops).
Please note that the iPod/iPhone or HDMI adapter must be removed on playback via the AV-In jack!
On purchasing a video cable, it is IMPERATIVE you pay attention to the cor-rect PIN assignment.
Pin 1 = GND/CommonPin 2 = VideoPin 3 = Audio rightPin 4 = Audio left
Usage
!

23
Travel case
To protect the cinemizer OLED multimedia video glasses during transport, you can place them in the travel case supplied.
Prior to placing the cinemizer OLED multimedia video glasses in the travel case, you should remove the ear clips and place them loose in the travel case. In this way the ear clips are not subjected to mechanical forces that may irreparably damage them.
Please proceed as follows:1) First pull the ear clips off the two arms.
2) Place the glasses with the arms folded in the travel case.
3) Wind the cable around the glasses.
4) Place the black battery box with the adapter connected adapter and the ear clips removed previously on the cinemizer OLED and close the travel case.
Usage

24
3D support
The cinemizer OLED multimedia video glasses support real 3D. This feature is also termed stereo 3D or stereoscopic 3D. A stereoscopic 3D video or image always contains 2 images: 1. The perspective from the point of view of the left eye and 2. The perspective from the point of view of the right eye.
On supply with 3D content with the 3D mode activated, the cinemizer OLED displays the related image for the left and right eye. I.e. the images are separated as appropriate from the content played back and adapted for the left and right display.
Additional functions
Left retinal imageof left half of the stereo image
Right retinal imageof right half of the stereo image
4.
L R
Additional functions

25
After powering on the 2D video mode is set by default. You can change between the 2D and 3D video mode by pressing the multifunction switch for approx. 3 seconds.
The 3D mode is signalled by the blue mode LED.
If a device is connected via the HDMI® interface and this playback device is able to provide 3D via HDMI® 1.4 (frame packing), it is not possible to switch manually between 2D and 3D in the cinemizer OLED glasses. In this case the playback device takes over the signalling of 2D or 3D content and the cinemizer OLED switches over automatically. You must set whether you want 2D or 3D on the playback device, e.g. Blu-ray player, PS3 etc. After switching over to the 3D mode, the 3D mode LED ( ) illuminates and the 2D mode LED ( ) goes out.The following table shows the type of playback that supports 3D formats and the recommended formats.
Connection Video source Resolution Video mode 3D format
Side-by-side Top/bottom Line interleave HDMI® 1.4
External AV In 3.5 mm720 x 576i PAL composite ✓ - - -
720 x 480i NTSC composite ✓ - - -
iPod/iPhone adapter
iPhone (1G)720 x 576i
720 x 480i
Component interlaced
576i / 480i
✓ - - -
iPod touch 1G ✓ - - -
iPod 5th gen ✓ - - -
iPod/iPhone adapter
iPhone 3G/3Gs
720 x 576p
720 x 480p
Component progressive
576p / 480p
✓ ✓ - -
iPhone 4 ✓ ✓ - -
iPod touch 2G/3G ✓ ✓ - -
iPod nano 3G - 5G ✓ ✓ - -
HDMI® adapter HDMI® playback device
480p/576p SD ✓ ✓ - -
1280 x 720p 50/60Hz HD ready 720p ✓ ✓ - -
1920 x 1080i 50/60Hz HD 1080i interlaced ✓ - - -
1920 x 1080p 50/60Hz Full HD 1080p - ✓ ✓ -
1920 x 1080p 24Hz Full HD 1080p24 (cinema) - - - -
1920 x 1440p 60Hz HDMI® 1.4 720p frame - - - ✓
1920 x 2160 24Hz HDMI® 1.4 1080p frame - - - ✓
Table 1 - 3D formats supported by the cinemizer OLED multimedia video glasses (recommended 3D formats ✓)
Additional functions
2D mode 3D mode

26
The cinemizer OLED video glasses save the last 3D format setting used.
You will find general information on the topic of "Stereo 3D" on the cine-mizer OLED homepage www.zeiss.com/cinemizer/3d.
If you activate the 3D mode with a long press on the multifunction switch, please ensure specially formatted 3D content is available and you have set the correct 3D format on the OSD. The cinemizer OLED multimedia video glasses do not convert normal films or games to 3D. The cinemizer OLED multimedia video glasses support, depend-ing on the playback and resolution, the following standard 3D formats:
a) "Side-by-side" – also known as "Parallel" The related stereo images are reduced to 50% of the original width so that both images fit in one video frame.
b) "Top/bottom"The related stereo images are reduced to 50% of the original height so that both images fit in one video frame.
Left retinal imageof left half of the ste-reo image
Right retinal imageof right half of the stereo image
Additional functions
L R
L
R
Left retinal imageof left half of the ste-reo image
Right retinal imageof right half of the stereo image
27
L
R
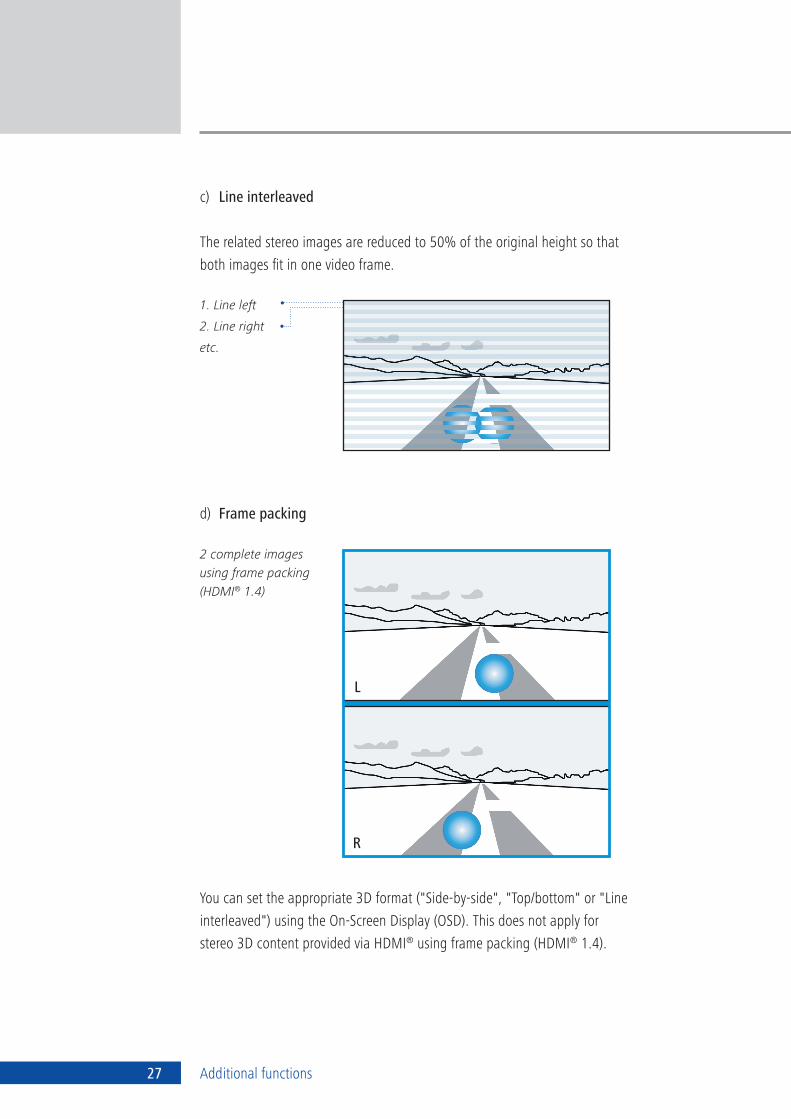
c) Line interleaved
The related stereo images are reduced to 50% of the original height so that both images fit in one video frame.
d) Frame packing
You can set the appropriate 3D format ("Side-by-side", "Top/bottom" or "Line interleaved") using the On-Screen Display (OSD). This does not apply for stereo 3D content provided via HDMI® using frame packing (HDMI® 1.4).
Additional functions
2 complete images using frame packing (HDMI® 1.4)
1. Line left
2. Line right
etc.

28
OSD settings
Activation of the OSD
You can change the settings for the multimedia video glasses using the integrated On-Screen Display (OSD). The on-screen display is a menu displayed in the virtual image generated by the video glasses.You can activate the OSD by briefly pressing the multifunction switch.
The menu page on the left contains the main menu and the menu page on the right contains the settings menu. The green bar always indi-cates the actual position of the cursor, which is either on the main menu or on the settings menu.
If you do not undertake any actions with the OSD activated, the OSD disappears automati-cally after 7 seconds.
Additional functions
VIDEO 3D-Mode Aspect Contrast
INFO Connection Status
ADVANCED Auto Adjust Man. Adjust Man. Adjust Brightness Bal
EXIT
Side-by-Side (L/R)Side-by-Side (R/L)Top/Bottom (L/R)Top/Bottom (R/L)
ttt Back

29
Navigation in the OSD
After activation of the OSD you can navigate up and down on the main menu by pushing the multifunction switch in the appropriate direction.
As you navigate up and down on the main menu, the current setting on the settings menu is displayed marked by a light-blue bar. To make settings in a specific menu item, please navigate to this point on the main menu and then press the multifunction switch.
The cursor then jumps from the main menu to the settings menu. Make the necessary settings on the settings menu by pushing the multifunc-tion switch in the appropriate direction. The setting is applied by pressing once. With the ex-ception of the two menu items "Horizontal Man. Adjust" and "Vertical Man. Adjust", the active cursor then changes back to the main menu.
Additional functions
VIDEO 3D-Mode Aspect Contrast
INFO Connection Status
ADVANCED Auto Adjust Man. Adjust Man. Adjust Brightness Bal
EXIT
VIDEO 3D-Mode Aspect Contrast
INFO Connection Status
ADVANCED Auto Adjust Man. Adjust Man. Adjust Brightness Bal
EXIT
VIDEO 3D-Mode Aspect Contrast
INFO Connection Status
ADVANCED Auto Adjust Man. Adjust Man. Adjust Brightness Bal
EXIT
Side-by-Side (L/R)Side-by-Side (R/L)Top/Bottom (L/R)Top/Bottom (R/L)
ttt Back
Auto16 : 94 : 3Zoom
ttt Back
Auto16 : 94 : 3Zoom
ttt Back

30
Side-by-Side (L/R)Side-by-Side (R/L)Top/Bottom (L/R)Top/Bottom (R/L)
ttt Back
If you do not want to make any changes or do not want to apply the changes, move the cur-sor to the " ttt Back" field and confirm by pressing the multifunction switch or wait until the OSD disappears after approx. 7 seconds.
Additional functions
VIDEO 3D-Mode Aspect Contrast
INFO Connection Status
ADVANCED Auto Adjust Man. Adjust Man. Adjust Brightness Bal
EXIT
In the case of the two menu items
Man. Adjust, Man. Adjust,
the changes must be specifically confirmed using "Store settings".
It the changes are not confirmed using "Store settings" (by pressing the multifunction switch once), the changes are not applied.

31
The supported 3D formats are displayed on the settings menu for selection as a function of the device connected and the resolution used. If a device is not yet con-nected, it is not possible to change to the 3D mode settings menu. In this case this main menu item is not available.
If a 3D video played back in side-by-side or top/bottom in the cinemizer OLED is not cleanly separated in the middle, a small amount of the image content for one eye will be seen in the other eye in the 3D mode. This problem can be corrected using the "Horizontal Man. Adjust" function for side-by-side or "Vertical Man. Adjust" for top/bottom.
Video
3D-Mode
Important: the 3D formats supported depend on the resolution used and the playback device or adapter used. An overview of the 3D format supported is given in section 4 in "3D support".
Additional functions
!

32
Side-by-Side (L/R)The default 3D mode is set to "Side-by-Side (L/R)", as this is the most common 3D format. With this format the left sub-image displays the perspective from the point of view of the left eye and the right sub-image the perspective from the point of view of the right eye.
Side-by-Side (R/L)With the format "Side-by-Side (R/L)" the per-spectives are reversed compared to the previous 3D format.
Additional functions
L R
R L
VIDEO 3D-Mode Aspect Contrast
INFO Connection Status
ADVANCED Auto Adjust Man. Adjust Man. Adjust Brightness Bal
EXIT
VIDEO 3D-Mode Aspect Contrast
INFO Connection Status
ADVANCED Auto Adjust Man. Adjust Man. Adjust Brightness Bal
EXIT
With both side-by-side variants (L/R and R/L) the related stereo images are reduced to 50% of the original width so that both images fit in one video frame.
Side-by-Side (L/R)Side-by-Side (R/L)Top/Bottom (L/R)Top/Bottom (R/L)
ttt Back
Side-by-Side (L/R)Side-by-Side (R/L)Top/Bottom (L/R)Top/Bottom (R/L)
ttt Back
An overview of the resolutions that support the 3D format side-by-side is given in the section "3D support".
Side-by-Side (L/R)
Side-by-Side (R/L)

33
Top/Bottom (L/R)Another 3D format supported is the so-called "top/bottom" 3D format. With this format the perspectives (left/right) are arranged one above the other.
Top/Bottom (R/L)If the perspectives (left/right) of your 3D film or 3D game are arranged such that "top" forms the right perspective and "bottom" forms the left perspective, then please select the mode "Top/Bottom (R/L)".
Additional functions
L
R
R
L
VIDEO 3D-Mode Aspect Contrast
INFO Connection Status
ADVANCED Auto Adjust Man. Adjust Man. Adjust Brightness Bal
EXIT
VIDEO 3D-Mode Aspect Contrast
INFO Connection Status
ADVANCED Auto Adjust Man. Adjust Man. Adjust Brightness Bal
EXIT
With both top/bottom variants (L/R and R/L) the related stereo images are reduced to 50% of the original height so that both images fit in one video frame.
Side-by-Side (L/R)Side-by-Side (R/L)Top/Bottom (L/R)Top/Bottom (R/L)
ttt Back
Side-by-Side (L/R)Side-by-Side (R/L)Top/Bottom (L/R)Top/Bottom (R/L)
ttt Back
An overview of the resolutions that support the 3D format top/bottom is given in the section "3D support".
Top/Bottom (L/R)
Top/Bottom (R/L)

34
Line interleavedOn the provision of "line interleaved" 3D con-tent, the left and right perspectives are nested alternately in each other. I.e. a line with the left perspective is followed with a line for the right perspective etc.
Line interleaved (L/R)
If the left and right perspectives are reversed, you can select the format "Interleaved (R/L)" on the settings menu. In this case it is expected that a line for the right image is provided first followed by a line for the left image etc.
Line interleaved (R/L)
Additional functions
VIDEO 3D-Mode Aspect Contrast
INFO Connection Status
ADVANCED Auto Adjust Man. Adjust Man. Adjust Brightness Bal
EXIT
VIDEO 3D-Mode Aspect Contrast
INFO Connection Status
ADVANCED Auto Adjust Man. Adjust Man. Adjust Brightness Bal
EXIT
Interleaved (L/R)Interleaved (R/L)Top/Bottom (L/R)Top/Bottom (R/L)
ttt Back
Interleaved (L/R)Interleaved (R/L)Top/Bottom (L/R)Top/Bottom (R/L)
ttt Back
L R
R L
With both line interleaved variants (L/R and R/L) the related stereo images are reduced to 50% of the original height so that both images fit in one video frame. An overview of the resolutions that support the 3D format line interleaved is given in the section "3D support".

35 Additional functions
VIDEO 3D-Mode Aspect Contrast
INFO Connection Status
ADVANCED Auto Adjust Man. Adjust Man. Adjust Brightness Bal
EXIT
Interleaved (L/R)Interleaved (R/L)Top/Bottom (L/R)Top/Bottom (R/L)
ttt Back
HDMI® 1.4 - frame packingIn the case of HDMI® 1.4, unlike the previous 3D formats (side-by-side, top/bottom and line interleaved) 2 complete images are transmitted in the so-called "frame packing format". This is only possible using the standard HDMI® 1.4. If a film or game in 3D is provided via HDMI® 1.4, the 3D mode in the cinemizer OLED video glasses is activated automatically. It is not possible or necessary to switch to the 3D mode, as the playback device signals whether the content is in 2D or 3D format. It is therefore not neces-sary to make any changes on the menu item "3D-Mode". In this case the settings menu is not available.
L
R
2 complete images using frame packing

36 Additional functions
Aspect
The aspect ratio defines the ratio between the lengths of the sides of the image for films or games. Using the "Aspect" menu you can set the aspect ratio for the image displayed. This setting is available for iPod and iPhone and in the case of playback via the AV video cable. But not in the case of HDMI®. The default setting is "Auto" and stands for automatic detection and setting. Normally signals are provided by the playback device that make it possible to identify the image aspect ratio for the film or game played. If this signal is not available, you can set manually the aspect ratio you prefer (16:9/4:3).
16 : 9
4 : 3
AutoThe cinemizer OLED detects the aspect ratio sig-nal defined by the playback device and adjust the aspect ratio correspondingly. If this aspect ratio signal is not available, the "4:3" aspect ratio is set automatically.
16:9With this setting you can change the aspect ratio to the wide screen format 16:9.
4:3With this setting you can change the aspect ratio to 4:3.
VIDEO 3D-Mode Aspect Contrast
INFO Connection Status
ADVANCED Auto Adjust Man. Adjust Man. Adjust Brightness Bal
EXIT
Auto16 : 94 : 3Zoom
ttt Back
Auto16 : 94 : 3Zoom
ttt Back
Auto16 : 94 : 3Zoom
ttt Back
VIDEO 3D-Mode Aspect Contrast
VIDEO 3D-Mode Aspect Contrast

37 Additional functions
ZoomThis setting enlarges the image horizontally and vertically. This setting is useful if you have Blu-ray films in the 21:9 format and as a result there are black bars at the top and bottom. This option can be switched on to see a full screen image. This setting is only possible with 1080p/24Hz.
The aspect ratio can also be set on the majority of playback devices. Please read the related section in the manual for your playback device. If you are using an iPod and change the aspect ratio with the device connected and in opera-tion, it is imperative you ensure the film or video is re-started, as a change in the aspect ratio during playback will not be detected by the iPod.
VIDEO 3D-Mode Aspect Contrast
INFO Connection Status
ADVANCED Auto Adjust Man. Adjust Man. Adjust Brightness Bal
EXIT
Auto16 : 94 : 3Zoom
ttt Back
!

38
Contrast
The default setting is "Normal" and should provide the best image quality for the majority of applications. In some films with very dark scenes, the setting "Film" should be selected to obtain better con-trast in dark scenes.
Info
The two menu items Connection and Status contain general system parameters. Settings cannot be made here.
If you select Connection, you will see informa-tion on which signal is being played back over which interface to the cinemizer OLED.
With the menu item Status selected you can see the system hardware and software version.
Additional functions
VIDEO 3D-Mode Aspect Contrast
INFO Connection Status
ADVANCED Auto Adjust Man. Adjust Man. Adjust Brightness Bal
EXIT
Video InputPAL VideoAdapteriPod/iPhone
VIDEO 3D-Mode Aspect Contrast
INFO Connection Status
ADVANCED Auto Adjust Man. Adjust Man. Adjust Brightness Bal
EXIT
Firmware version9.5.1Hardware versioniPod/iPhone0.2
VIDEO 3D-Mode Aspect Contrast
INFO Connection Status
ADVANCED Auto Adjust Man. Adjust Man. Adjust Brightness Bal
EXIT
NormalFilm
ttt Back

39 Additional functions
Auto AdjustBy activating the "Automatic Adjust" function the cinemizer OLED is prompted to scan the input signal and adjust the image if necessary.This function is only supported in case of HDMI® playback.
Man. AdjustIf the separation of the left and right image is not exactly in the middle of the original video you can move the image horizontally using the manual adjustment function. This function is particularly useful in case of 3D playback in the format side-by-side. Select and confirm the "t Shiftt" element to move the image to the left. Each time the function is confirmed the image moves one pixel to the left. Similarly with "Shift " the image moves one pixel to the right. The absolute shift is displayed in the line at the top, e.g. "Shift: +2pixel" and is visible in the background at the same time.After changing the image position, it is impera-tive you confirm this change. For this purpose click the "Store Setting" field, the active cursor leaves the settings menu and changes to the main menu.
VIDEO 3D-Mode Aspect Contrast
INFO Connection Status
ADVANCED Auto Adjust Man. Adjust Man. Adjust Brightness Bal
EXIT
VIDEO 3D-Mode Aspect Contrast
INFO Connection Status
ADVANCED Auto Adjust Man. Adjust Man. Adjust Brightness Bal
EXIT
If you make changes, but do not explicitly confirm this change using "Store Setting", the changes are not applied when you leave the settings menu using "ttt Back" or if do not undertake any action for 7 seconds and as a result the OSD disappears automatically.
Advanced
The settings on the "Advanced" menu normally only need to be changed or modified in exceptional cases.
Auto adjust
ttt Back
Shift: +2 pixel t Shift tStore Setting Shift
ttt Back

40 Additional functions
Man. AdjustYou can change the vertical position of the image using the function for the manual vertical adjustment. Select and confirm the " Shift " element to move the image upward. Each time the function is confirmed the image moves up one pixel. Similarly with each click on " Shift " the image moves down one pixel. The absolute shift is displayed in the line at the top, e.g. "Shift: +2 lines" and is visible in the background at the same time.After changing the image height, it is impera-tive you confirm this change. For this purpose click the "Store Setting" field, the active cursor leaves the settings menu and changes to the main menu.
Brightness BalIf you should perceive different brightness on the two displays, you can increase or reduce the brightness to obtain displays with brightness that is subjectively the same. The two displays are set in the factory to the same brightness. For the manual change 6 brightness levels (+4%, +7%, +10%, -4%, -7%, -10%) are defined for the right display. As soon as you navigate to one of the pre-defined brightness levels, you can see the result already in the background. If you press the multifunction switch with a brightness level selected, this level will be applied.
VIDEO 3D-Mode Aspect Contrast
INFO Connection Status
ADVANCED Auto Adjust Man. Adjust Man. Adjust Brightness Bal
EXIT
If you make changes, but do not explicitly confirm this change using "Store Setting", the changes are not applied when you leave the settings menu using "ttt Back" or if do not undertake any action for 7 seconds and as a result the OSD disappears automatically.
VIDEO 3D-Mode Aspect Contrast
INFO Connection Status
ADVANCED Auto Adjust Man. Adjust Man. Adjust Brightness Bal
EXIT
Shift: +2 lines
Shift Store Setting Shift
ttt Back
+10% right +7% right +4% rightCentre -4% right -7% right-10% right
ttt Back

41
Exit
If you want to leave the on-screen display, please navigate to and click the "Exit" field. If you do not undertake any further actions for more than 7 seconds with the on-screen display activated, the on-screen display disappears automatically.
Additional functions
VIDEO 3D-Mode Aspect Contrast
INFO Connection Status
ADVANCED Auto Adjust Man. Adjust Man. Adjust Brightness Bal
EXIT

42
Adapter kit for iPod and iPhone (30 Pin)
The adapter kit for iPod and iPhone is available as an accessory for the cinemizer OLED and can be purchased from dealers and online shops. A list of current dealers is available at www.zeiss.com/cinemizer/shops. In principle all iPod and iPhone models capa-ble of playing back video are supported by the adapter kit. You will find more detailed infor-mation on this kit in the section "iPod/iPhone connection" in this document.
Accessories5.
Accessories

43
The speed of the Headtracker can be set using an additional program (tray icon). The software is available at www.zeiss.com/cinemizer/software.
A getting started guide is available for down-load at www.zeiss.com/cinemizer/documents.
Accessories
cinemizer ®
headtracker
Headtracker (movement sensor)
The cinemizer OLED Headtracker is connected to the computer via a standard USB connector and is immediately detected as a PC mouse by all common operating systems such as Windows, Linux and OS X; it is then ready to use. As a result the Headtracker is suitable for all applications that can be controlled using a computer mouse and it is possible to look around a virtual room with natural movements of the head. The cinemizer OLED Headtracker features very fast reaction times and very little latency.The cinemizer OLED Headtracker is therefore particularly suitable for playing immersive games.
The cinemizer OLED Headtracker is attached to the right arm of the video glasses andhead movements are then detected by diverse sensors. Connect the Headtracker to a computer via USB and then do not move it for approx. 10 seconds. During this time the Headtracker undertakes a self-calibration.

44
To obtain the cinemizer headtracker SDK please fill in the web formular under www.zeiss.com/cinemizer/headtrackerSDK.
For professional applications an SDK is avai-lable for direct access to the sensor data (raw data and quaternions) from the USB HID.In this way the sensor data from the 3rd rotati-on axis and absolute viewing angle information can also be used in applications.
3rd rotation axis

45 Zubehör
Light shield
The Eyeshield is an accessory for the cinemizer OLED video glasses that shields the user from the outside world.
The flexible insert made of soft rubber and plastic can be straightforwardly attached to the multi-media glasses and completely encloses the area around the eyes.If you use the cinemizer OLED for instance as an external viewfinder or to watch films on the move, sunlight and other sources of interference from the outside are completely excluded. On playing games the outside world is completely shut out by the light shield and the player can intensively immerse completely in virtual worlds.

46
You will find comprehensive information on the multimedia video glasses on the website www.zeiss.com/cinemizer
cinemizer OLED support website
You can read frequently asked questions related to the cinemizer OLED and their answers at www.zeiss.com/cinemizer/faq.
Technical support
Before you contact technical support with technical questions, please make sure you have first read through the questions on the FAQ page. Should your questions still not have been answered, please contact technical support. For this purpose go to www.zeiss.com/cinemizer/support and complete the related form.
Further information6.
Further information

47
2D/3D mode display 5, 253D format 25, 313D mode 313D support 2, 24 Accessories 42Activation of the OSD 28 Acuity adjustment 4, 9 Adjustment wheel 4, 9Aspect ratio 36Aspect 36Auto Adjust 39AV-In jack 5, 22, 25Battery box controls 5 Battery box 3, 5, 9, 18, 19, 20, 22, 23Battery operating time 14Battery status LED 5, 6, 15, 17, 18Battery status 15, 17 Battery symbol 16, 17Blu-ray player 19, 25, 37Brightness Balance 40Charging battery 1, 5, 6, 15, 16, 17, 18Charging status 17 Charging/battery status display 5, 6, 15, 17Cinch jack 22Cinch video cable 22cinemizer controls 4cinemizer socket 5Connection 1, 5, 15, 18, 19, 25 Connection 38 Contents on the package 3 Default volume 13Dioptre correction 9Ear cap 3, 11Ear clip 4, 8, 23Earpiece 3, 4, 10, 11, 12Earpiece jack 5Earpiece storage clip 4, 11Earpiece 4, 10, 11,12
Index7.Ergonomic comfort 2, 4, 9Exit 41Eyeshield 45 Firmware version 38Games console 1, 19Hardware version 38HDMI® adapter (HDMI® 1.4) 3, 5, 19HDMI® adapter cable 3, 19Headtracker 43 Image adjustment 36Image resolution 25Info 38, 46iPod/iPhone adapter 5, 20, 25iPod/iPhone 6, 14, 20, 42 Line interleaved 27, 34, 35Manual Adjust 30, 39, 40Menu 28Mini USB cable 3Mini USB jack 5Mode LED 5, 6, 25Multifunction switch 5, 13, 16, 25, 28Muting 13Navigation in the OSD 29 Nose pad 3, 4, 7Nose pad adapter 3, 7On/Off button 5, 6OSD settings 28Playback device 5, 15, 18, 22, 25, 31, 36Powering off 6 Powering on 6, 13, 25Putting into use 6Reset button 5Short Guide 3Side-by-side 25, 31Status 38Stereo audio connector 12Stereo audio jack 12Stereo earphones 12
Index

48
Technical support 46Top/bottom 25, 31, 33Travel case 3, 8, 23 Troubleshooting 46 USB cable 3, 6, 15, 17USB mains power supply plug 17Video cable PIN assignment 21 Video cable 3, 14, 22, 36Video mode 25Video 31 Viewing window 4Volume symbol 13Volume 5, 13, 16, 17
iPhone and iPod are trademarks of Apple Inc., registered in the U.S. and other countries.
"Made for iPod" and "Made for iPhone" mean that an electronic accessory has been designed to con-nect specifically to iPod or iPhone, respectively, and has been certified by the developer to meet Apple performance standards. Apple is not responsible for the operation of this device or its compliance with safety and regulatory standards. Please note that the use of this accessory with iPod or iPhone may affect wireless performance.
, the HDMI® logo, and High-Definition Multimedia Interface are trademarks or registered trademarks of HDMI® Licensing LLC in the United States and other countries.
®
Index

Carl Zeiss AGCarl-Zeiss-Strasse 2273447 Oberkochen
www.zeiss.de/cinemizer
© Copyright Carl Zeiss AG 2012cinemizer ® OLED is a registered trademark of Carl Zeiss
Designed by Carl Zeiss Germany