user manual - clever life
TRANSCRIPT
Clever Life Pty Ltd CL-C-GD811 Vers. 001
pg. 1
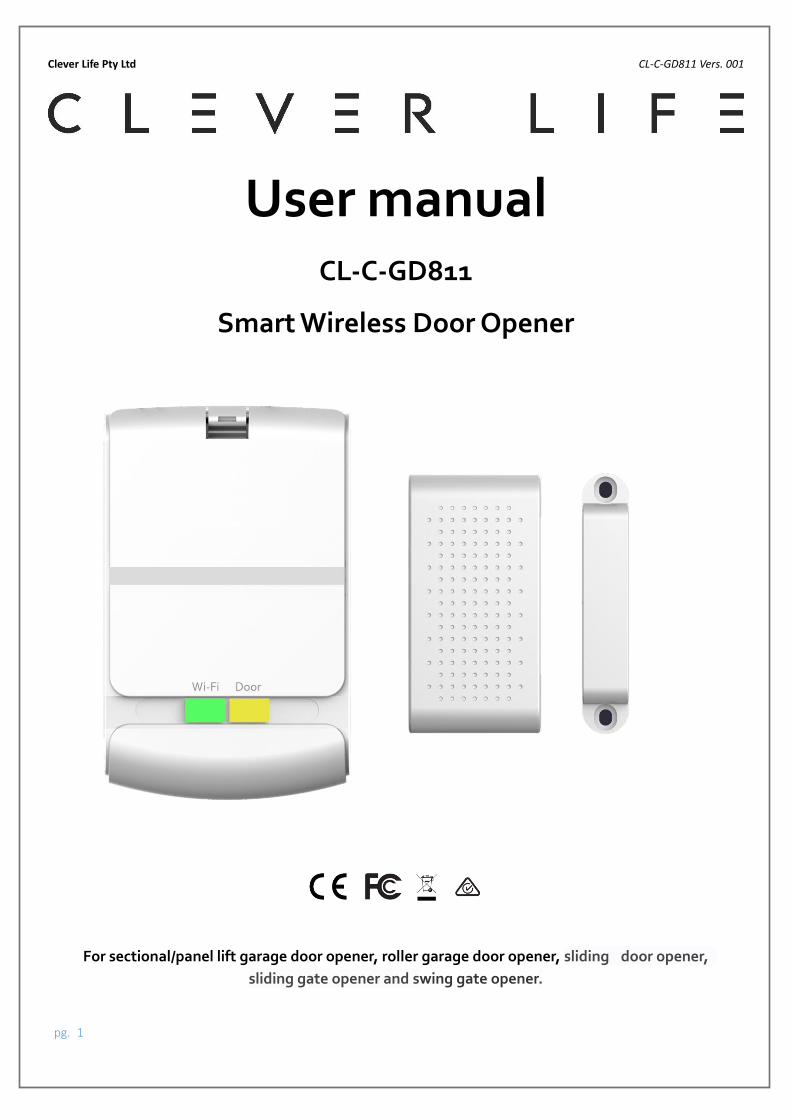
User manual CL-C-GD811
Smart Wireless Door Opener
For sectional/panel lift garage door opener, roller garage door opener, sliding door opener,
sliding gate opener and swing gate opener.
Clever Life Pty Ltd CL-C-GD811 Vers. 001
1
Introduction
CL-C-GD811 smart wireless door opener is the companion device of your existing door opener. It makes
your door smarter and adds extra security and peace of mind. By using it, your door opener can be
controlled or monitored remotely from your SMART phone or device.
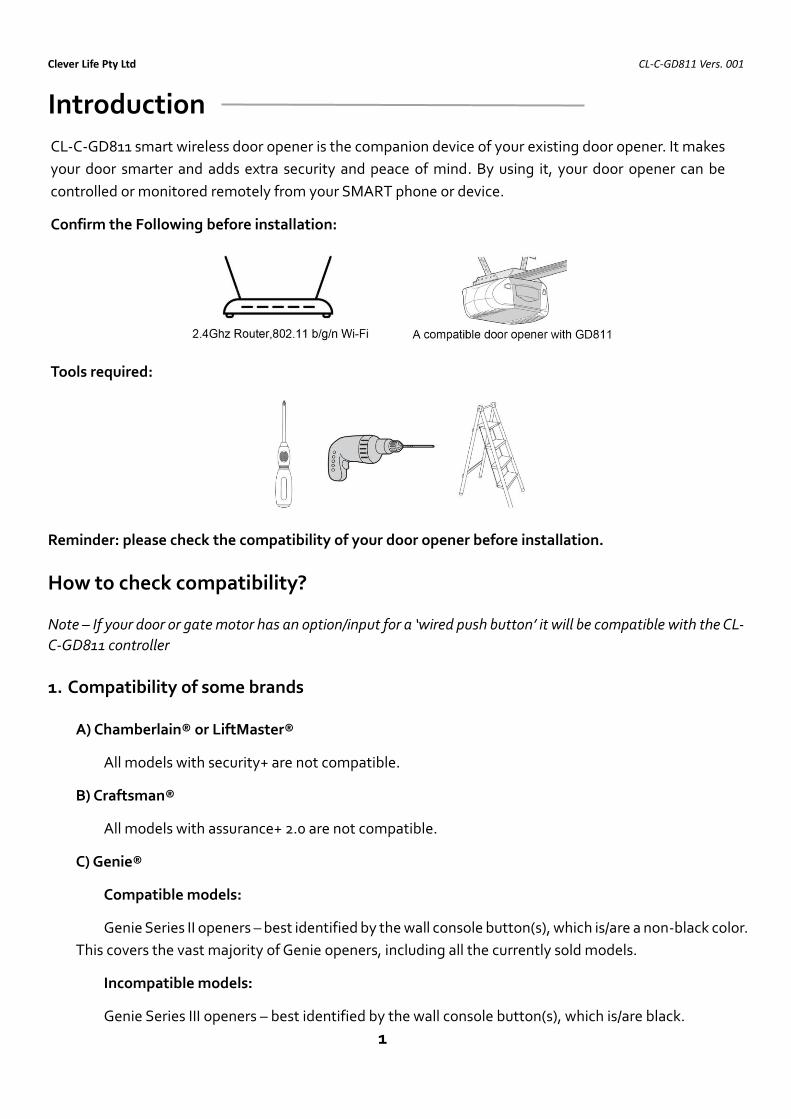
Confirm the Following before installation:
Tools required:
Reminder: please check the compatibility of your door opener before installation.
How to check compatibility?
Note – If your door or gate motor has an option/input for a ‘wired push button’ it will be compatible with the CL-
C-GD811 controller
1. Compatibility of some brands
A) Chamberlain® or LiftMaster®
All models with security+ are not compatible.
B) Craftsman®
All models with assurance+ 2.0 are not compatible.
C) Genie®
Compatible models:
Genie Series II openers – best identified by the wall console button(s), which is/are a non-black color.
This covers the vast majority of Genie openers, including all the currently sold models.
Incompatible models:
Genie Series III openers – best identified by the wall console button(s), which is/are black.
Clever Life Pty Ltd CL-C-GD811 Vers. 001
2
D) Linear®
All models are compatible.
E) Marantec®
All models are compatible.
F) Overhead Door®
Compatible models:
Series II openers– best identified by the wall console button(s), which is/are a non-black color.
Incompatible models:
Series III – best identified by the wall console button(s), which is/are black.
G) Stanley®
All models are compatible.
H) Wayne Dalton®
All models are compatible.
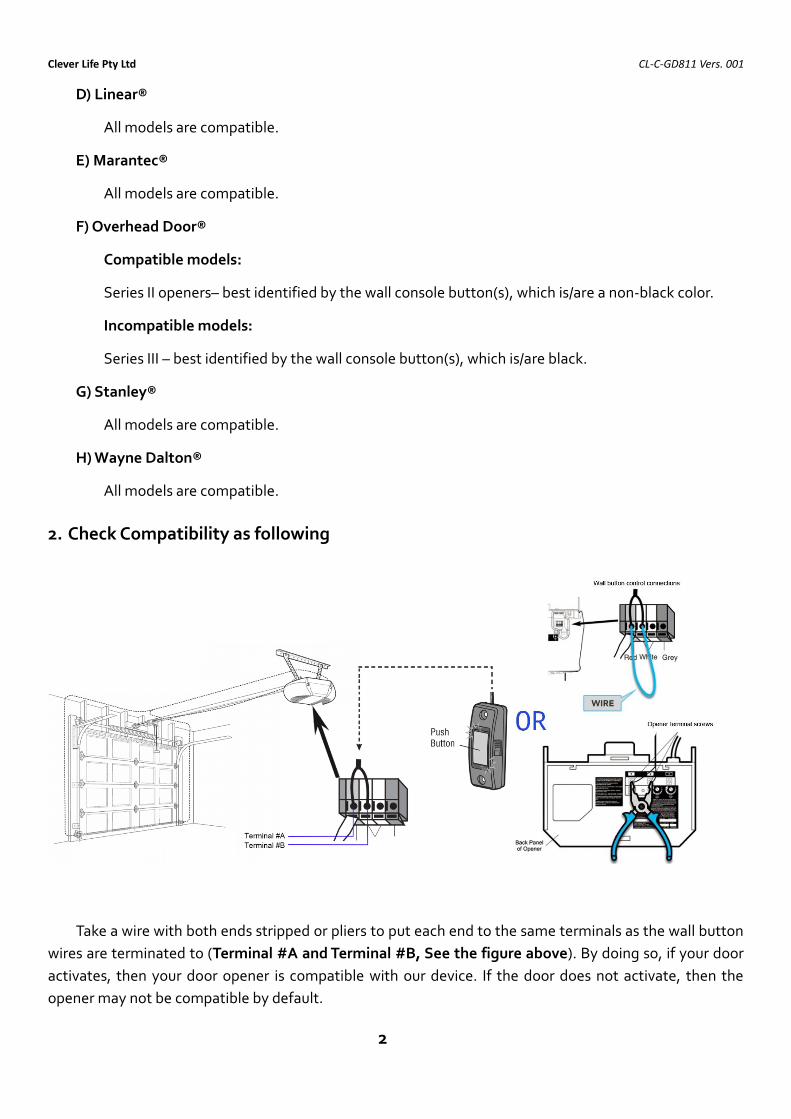
2. Check Compatibility as following
Take a wire with both ends stripped or pliers to put each end to the same terminals as the wall button
wires are terminated to (Terminal #A and Terminal #B, See the figure above). By doing so, if your door
activates, then your door opener is compatible with our device. If the door does not activate, then the
opener may not be compatible by default.
Clever Life Pty Ltd CL-C-GD811 Vers. 001
3
3. Need more Information?
Contact us at [email protected] or visit the website www.cleverlife.com.au
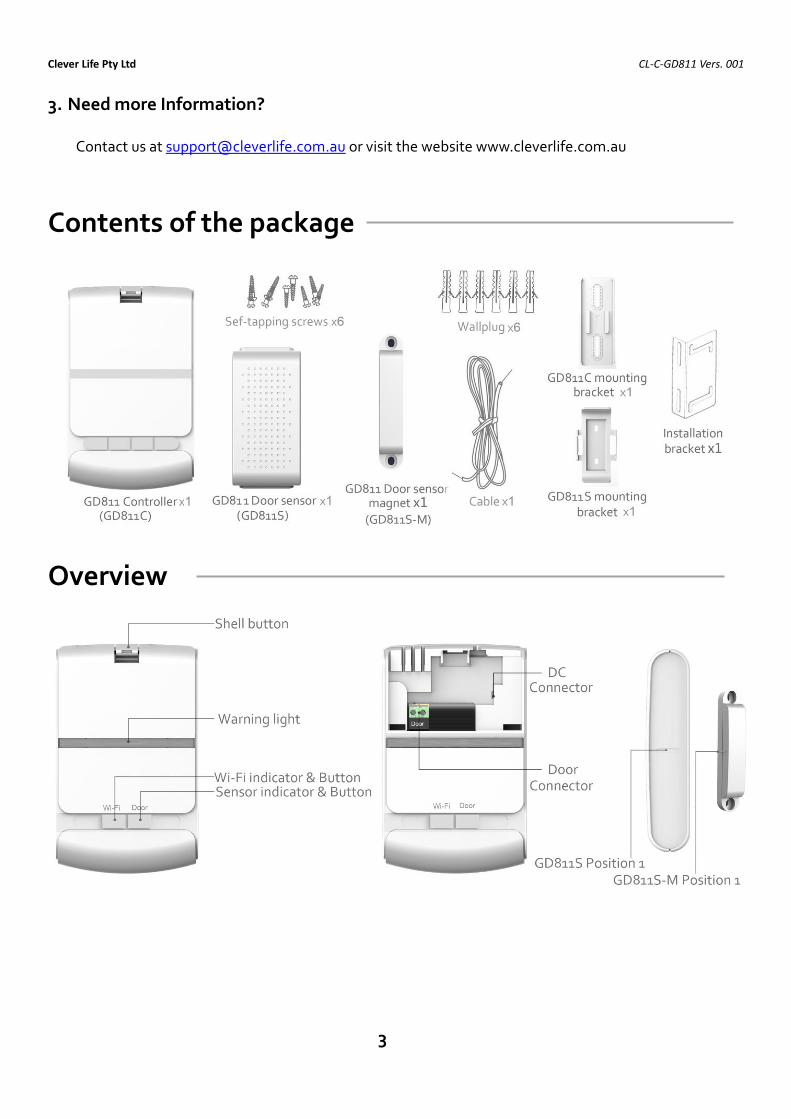
Contents of the package
Overview
Clever Life Pty Ltd CL-C-GD811 Vers. 001
4
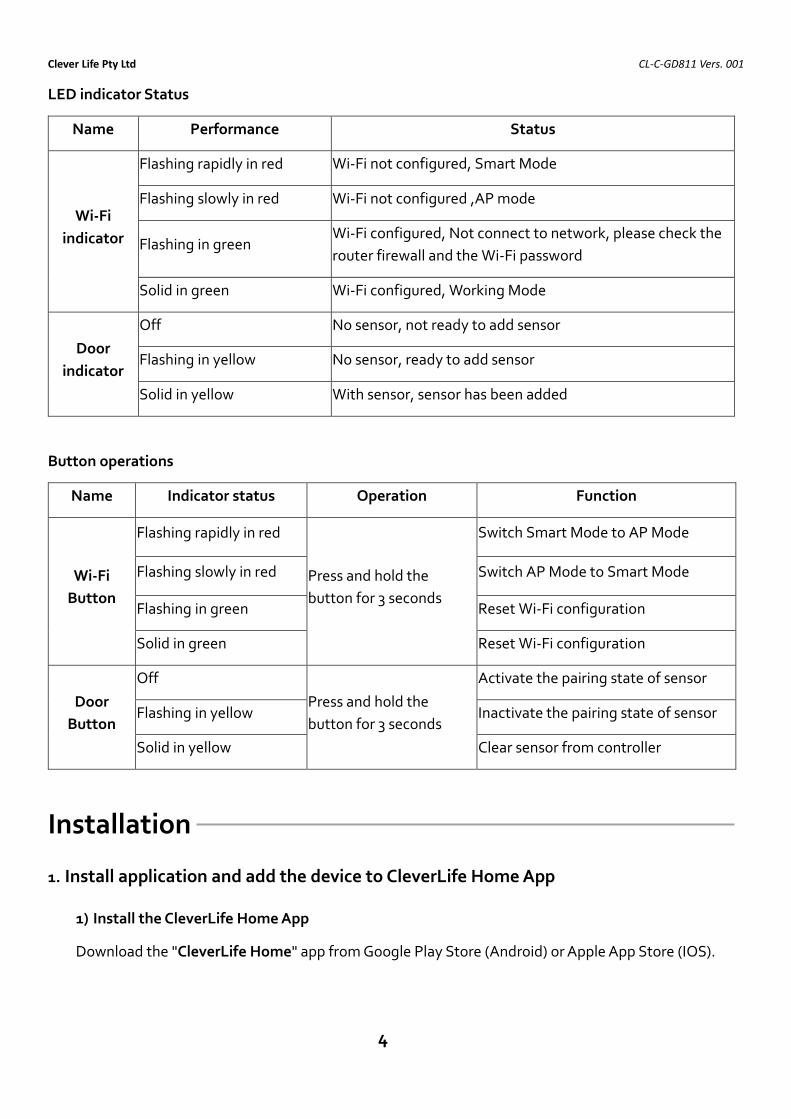
LED indicator Status
Name Performance Status
Wi-Fi
indicator
Flashing rapidly in red Wi-Fi not configured, Smart Mode
Flashing slowly in red Wi-Fi not configured ,AP mode
Flashing in green Wi-Fi configured, Not connect to network, please check the
router firewall and the Wi-Fi password
Solid in green Wi-Fi configured, Working Mode
Door
indicator
Off No sensor, not ready to add sensor
Flashing in yellow No sensor, ready to add sensor
Solid in yellow With sensor, sensor has been added
Button operations
Name Indicator status Operation Function
Wi-Fi
Button
Flashing rapidly in red
Press and hold the
button for 3 seconds
Switch Smart Mode to AP Mode
Flashing slowly in red Switch AP Mode to Smart Mode
Flashing in green Reset Wi-Fi configuration
Solid in green Reset Wi-Fi configuration
Door
Button
Off
Press and hold the
button for 3 seconds
Activate the pairing state of sensor
Flashing in yellow Inactivate the pairing state of sensor
Solid in yellow Clear sensor from controller
Installation
1. Install application and add the device to CleverLife Home App
1) Install the CleverLife Home App
Download the "CleverLife Home" app from Google Play Store (Android) or Apple App Store (IOS).
Clever Life Pty Ltd CL-C-GD811 Vers. 001
5
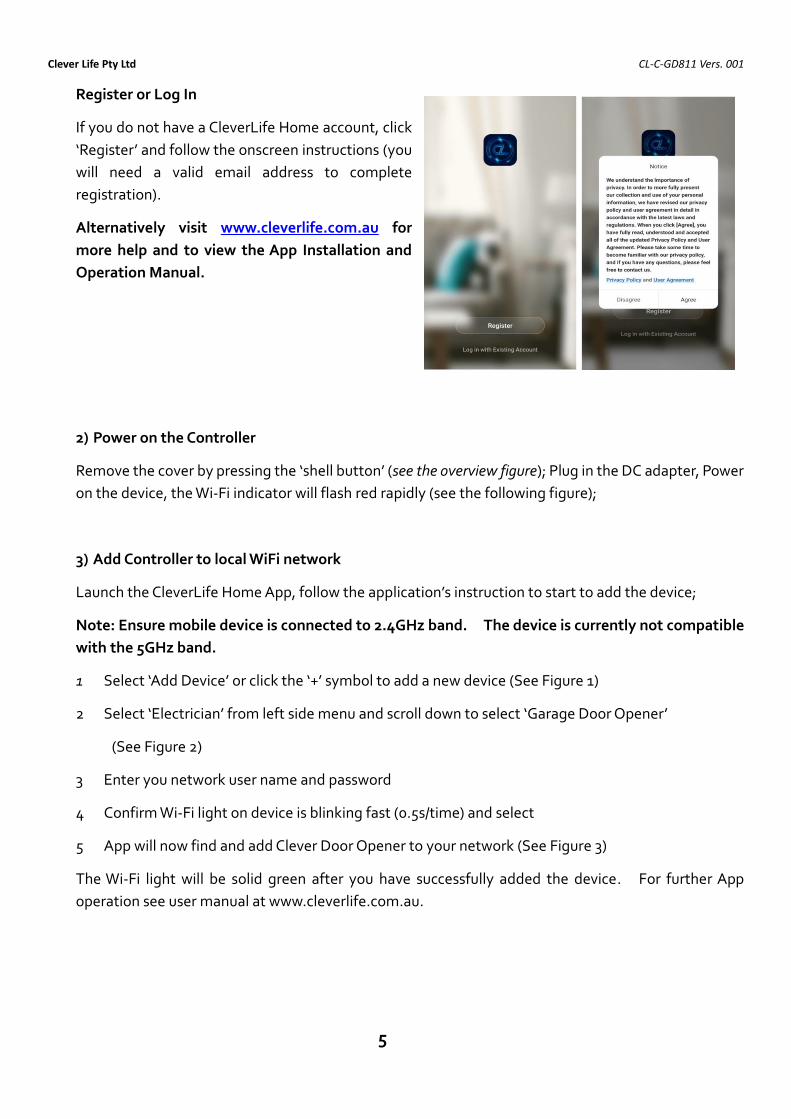
Register or Log In
If you do not have a CleverLife Home account, click
‘Register’ and follow the onscreen instructions (you
will need a valid email address to complete
registration).
Alternatively visit www.cleverlife.com.au for
more help and to view the App Installation and
Operation Manual.
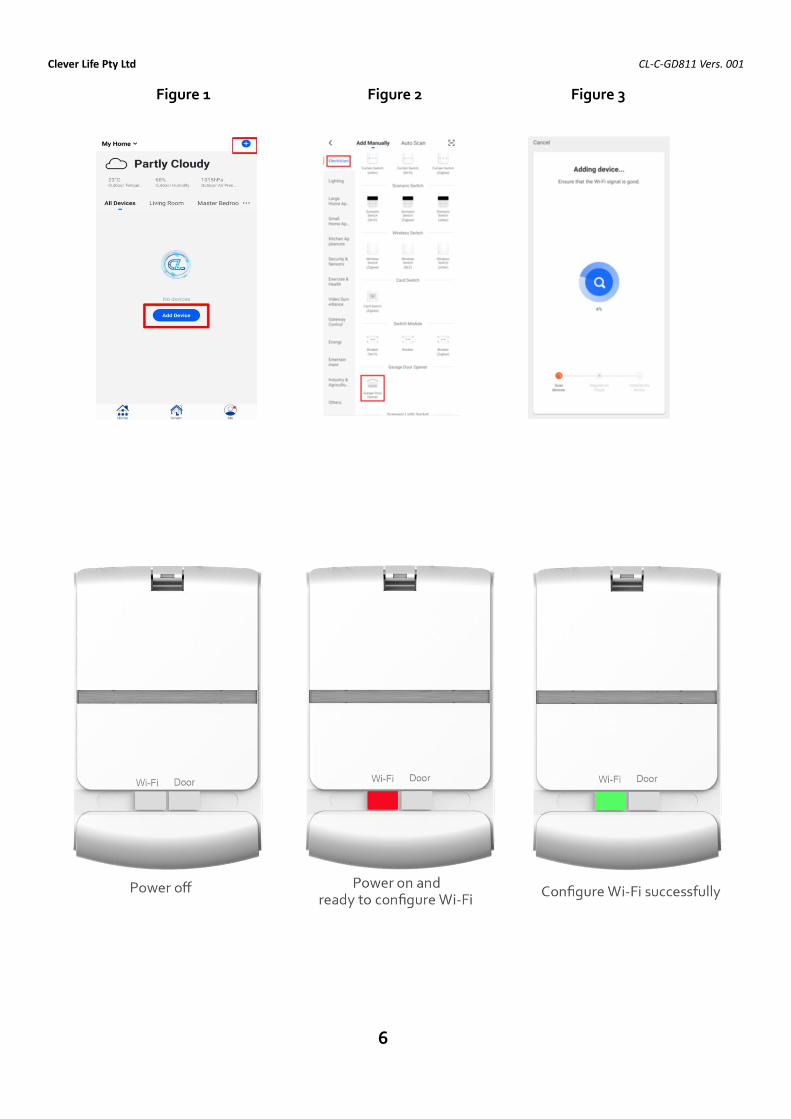
2) Power on the Controller
Remove the cover by pressing the ‘shell button’ (see the overview figure); Plug in the DC adapter, Power
on the device, the Wi-Fi indicator will flash red rapidly (see the following figure);
3) Add Controller to local WiFi network
Launch the CleverLife Home App, follow the application’s instruction to start to add the device;
Note: Ensure mobile device is connected to 2.4GHz band. The device is currently not compatible
with the 5GHz band.
1 Select ‘Add Device’ or click the ‘+’ symbol to add a new device (See Figure 1)
2 Select ‘Electrician’ from left side menu and scroll down to select ‘Garage Door Opener’
(See Figure 2)
3 Enter you network user name and password
4 Confirm Wi-Fi light on device is blinking fast (0.5s/time) and select
5 App will now find and add Clever Door Opener to your network (See Figure 3)
The Wi-Fi light will be solid green after you have successfully added the device. For further App
operation see user manual at www.cleverlife.com.au.
Clever Life Pty Ltd CL-C-GD811 Vers. 001
6
Figure 1 Figure 2 Figure 3
Clever Life Pty Ltd CL-C-GD811 Vers. 001
7
2. Add sensor to controller
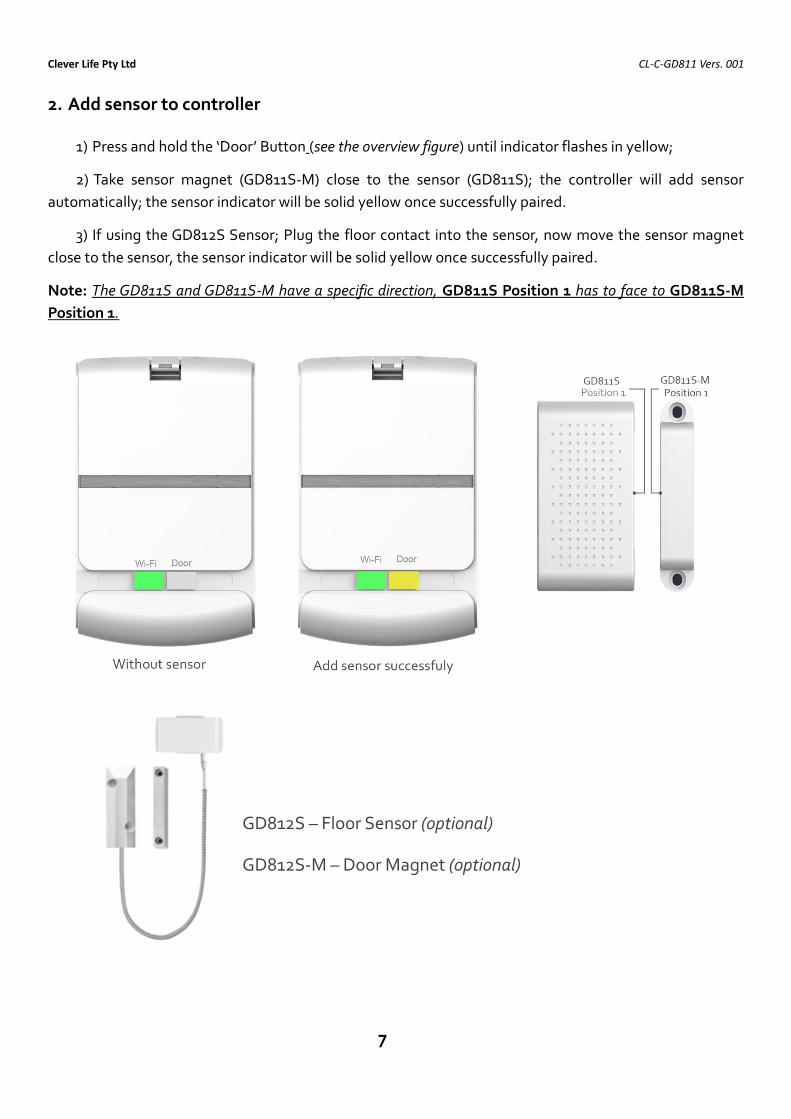
1) Press and hold the ‘Door’ Button (see the overview figure) until indicator flashes in yellow;
2) Take sensor magnet (GD811S-M) close to the sensor (GD811S); the controller will add sensor
automatically; the sensor indicator will be solid yellow once successfully paired.
3) If using the GD812S Sensor; Plug the floor contact into the sensor, now move the sensor magnet
close to the sensor, the sensor indicator will be solid yellow once successfully paired.
Note: The GD811S and GD811S-M have a specific direction, GD811S Position 1 has to face to GD811S-M
Position 1.
GD812S – Floor Sensor (optional)
GD812S-M – Door Magnet (optional)
Clever Life Pty Ltd CL-C-GD811 Vers. 001
8
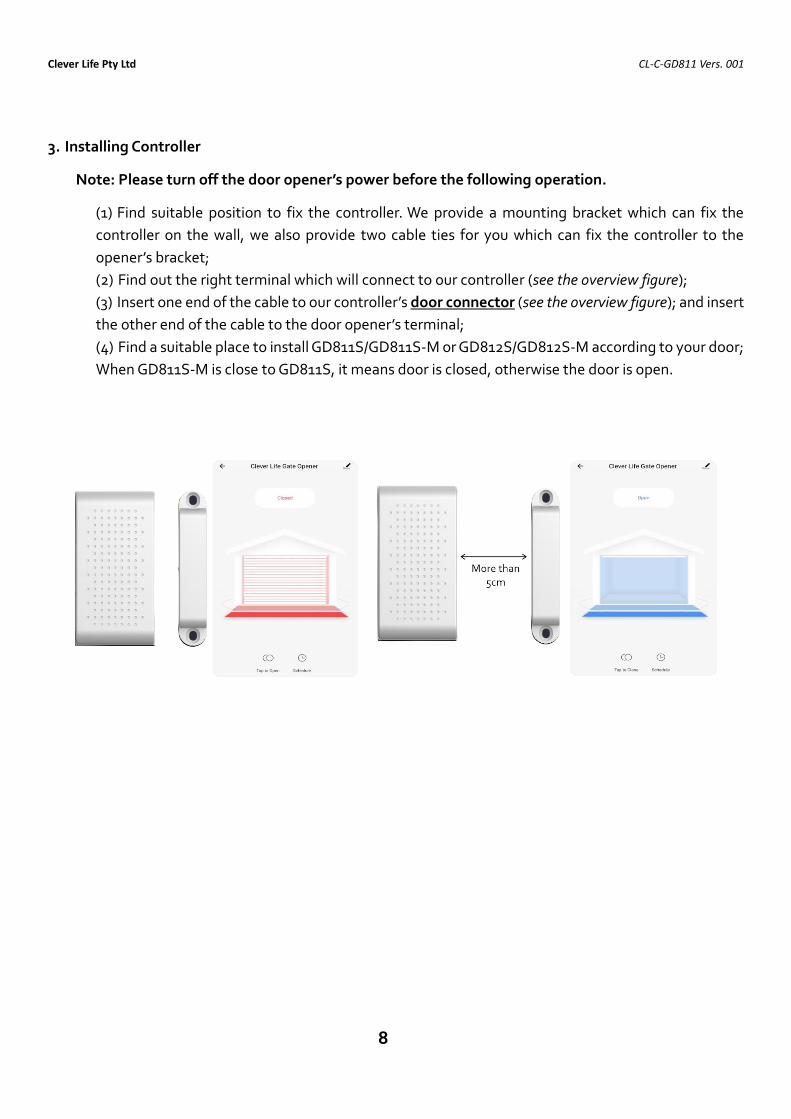
3. Installing Controller
Note: Please turn off the door opener’s power before the following operation.
(1) Find suitable position to fix the controller. We provide a mounting bracket which can fix the
controller on the wall, we also provide two cable ties for you which can fix the controller to the
opener’s bracket;
(2) Find out the right terminal which will connect to our controller (see the overview figure);
(3) Insert one end of the cable to our controller’s door connector (see the overview figure); and insert
the other end of the cable to the door opener’s terminal;
(4) Find a suitable place to install GD811S/GD811S-M or GD812S/GD812S-M according to your door;
When GD811S-M is close to GD811S, it means door is closed, otherwise the door is open.
Clever Life Pty Ltd CL-C-GD811 Vers. 001
9
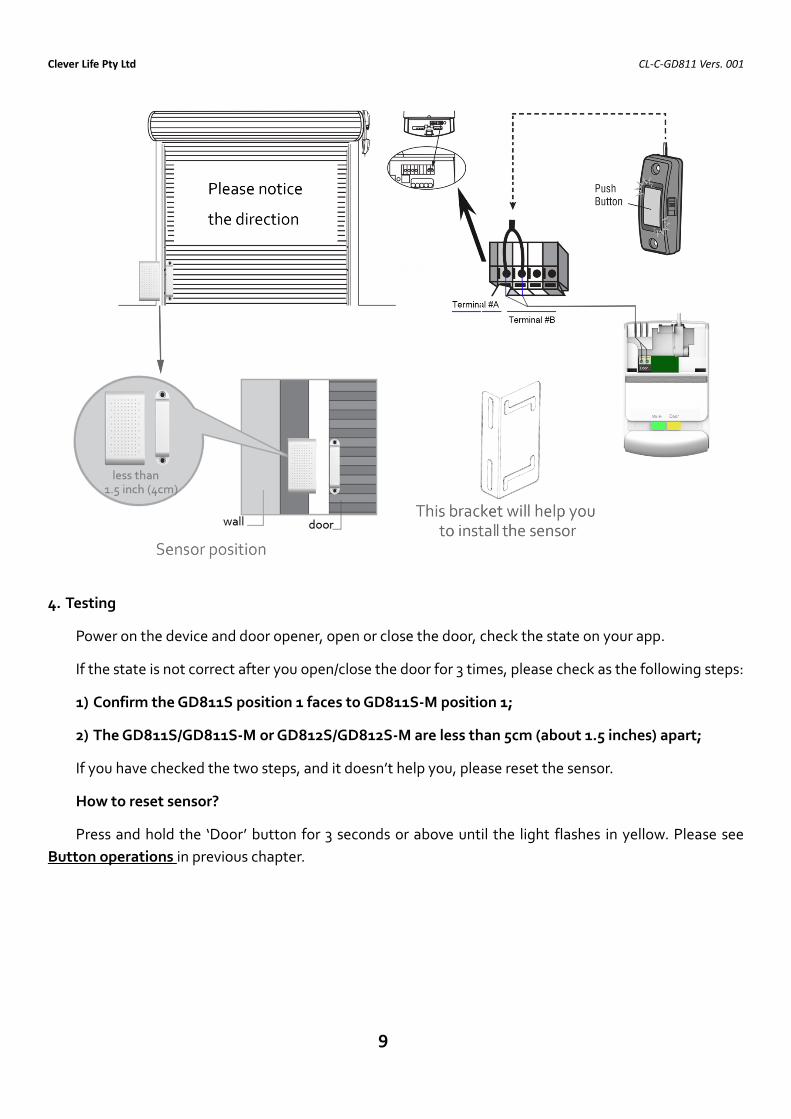
4. Testing
Power on the device and door opener, open or close the door, check the state on your app.
If the state is not correct after you open/close the door for 3 times, please check as the following steps:
1) Confirm the GD811S position 1 faces to GD811S-M position 1;
2) The GD811S/GD811S-M or GD812S/GD812S-M are less than 5cm (about 1.5 inches) apart;
If you have checked the two steps, and it doesn’t help you, please reset the sensor.
How to reset sensor?
Press and hold the ‘Door’ button for 3 seconds or above until the light flashes in yellow. Please see
Button operations in previous chapter.
Clever Life Pty Ltd CL-C-GD811 Vers. 001
10
FAQs
1. Wi-Fi connection issues
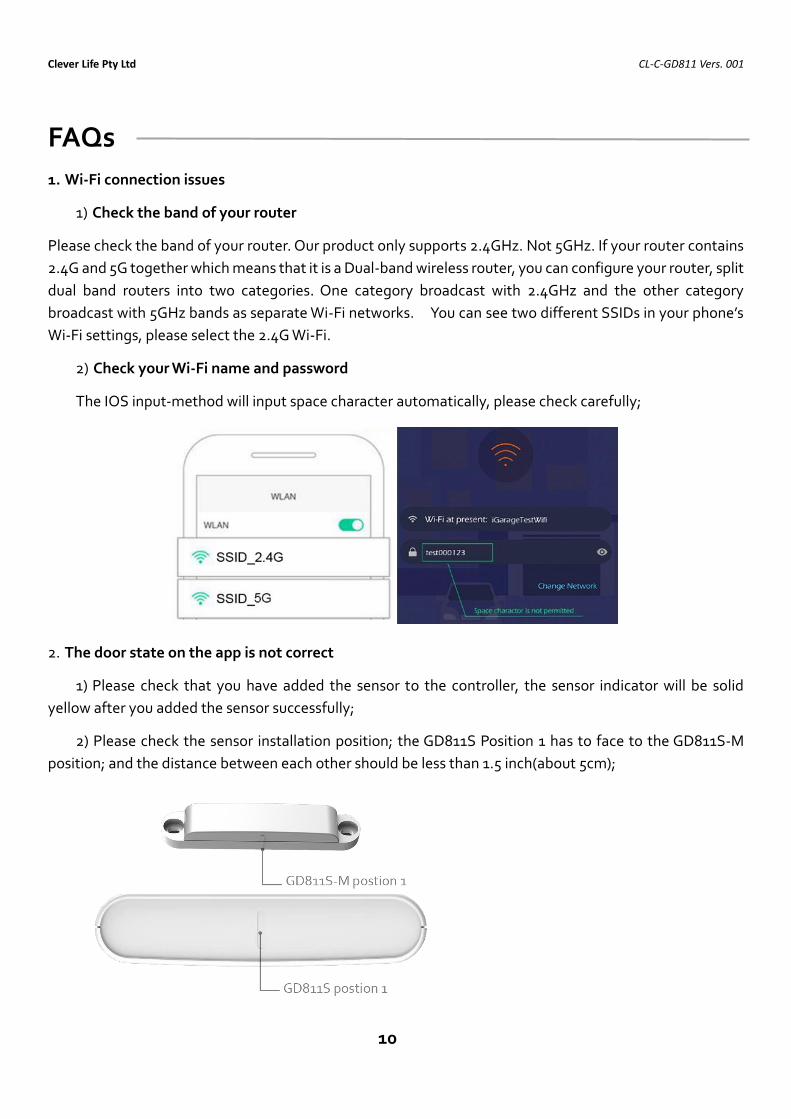
1) Check the band of your router
Please check the band of your router. Our product only supports 2.4GHz. Not 5GHz. If your router contains
2.4G and 5G together which means that it is a Dual-band wireless router, you can configure your router, split
dual band routers into two categories. One category broadcast with 2.4GHz and the other category
broadcast with 5GHz bands as separate Wi-Fi networks. You can see two different SSIDs in your phone’s
Wi-Fi settings, please select the 2.4G Wi-Fi.
2) Check your Wi-Fi name and password
The IOS input-method will input space character automatically, please check carefully;
2. The door state on the app is not correct
1) Please check that you have added the sensor to the controller, the sensor indicator will be solid
yellow after you added the sensor successfully;
2) Please check the sensor installation position; the GD811S Position 1 has to face to the GD811S-M
position; and the distance between each other should be less than 1.5 inch(about 5cm);

Clever Life Pty Ltd CL-C-GD811 Vers. 001
11
FCC WARNING:
Any Changes or modifications not expressly approved by the party responsible for compliance could void
the user's authority to operate the equipment.
Note: This equipment has been tested and found to comply with the limits for a Class B digital device,
pursuant to part 15 of the FCC Rules. These limits are designed to provide reasonable protection against
harmful interference in a residential installation. This equipment generates uses and can radiate radio
frequency energy and, if not installed and used in accordance with the instructions, may cause harmful
interference to radio communications. However, there is no guarantee that interference will not occur in a
particular installation. If this equipment does cause harmful interference to radio or television reception,
which can be determined by turning the equipment off and on, the user is encouraged to try to correct the
interference by one or more of the following measures:
-Reorient or relocate the receiving antenna.
-Increase the separation between the equipment and receiver.
-Connect the equipment into an outlet on a circuit different from that to which the receiver is connected.
-Consult an experienced radio/TV technician for help.
This equipment complies with FCC radiation exposure limits set forth for an uncontrolled environment. This
equipment should be installed and operated with minimum distance 20cm between the radiator & your
body.
The equipment has been tested to comply with ACMA and ERAC regulations for electrical and
communication safety within Australia and such displays the RCM logo.
Clever Life Pty Ltd
Proudly Australian Owned & Operated