user manual digital pressure gauge
TRANSCRIPT

User manual
HS108Digital Pressure Gauge

2
The operating instructions are parts of the products and must be kept in the immediate vicinity of the instrument and readily accessible to skilled personnel at any time.
Skilled personnel must have carefully read and understood the operating instructions prior to beginning any work.
The manufacturer's liability is void in the case of any damage caused by using the product contrary to its intended use, non-compliance with these operating instructions, assignment of insufficiently qualified skilled personnel or unauthorized modifications to the instrument.
HUAXIN reserve the rights to change the contents or form of these operating instructions at any time without prior notice having been given.
In order to protect your Huaxin products,your own and others safety,pls read this manual carefully before your operation,Otherwise it may cause trouble.
Claim
Disassembling the inner components may take toll or completely damage the equipment. Only the qualified technician could make a repairment. Any abnormal happened to the equipment pls call our service staff to make a repairment under their instruction.
To avoid over pressure damages,don't apply pressure that exceeds the limits listed in the pressure specification table.
Safety information
Please don't disassemble & repair the equipment by yourself
Pay attention to the range
This action might injure the product and influence the performance.
That will damage the items by using the wrong medium.
Don't beat and shock
Pay attention to the medium of the items
1
3
2
4
Warning
3
That will damage the items.and even may cause the fire or an electric shock.
Other power supply will damage to the product,and even may cause the fire or an electric shock.
The calibration should be carried out under a standard calibration condition, such as the standard gauge must be accuracy 3 times of HS108, ambient temperature (20±2)℃ .
Don't immersed in water or exposed to water or getting wet
Only use the special charger or battery
The calibration should be carried out under a standard calibration condition
Symbols
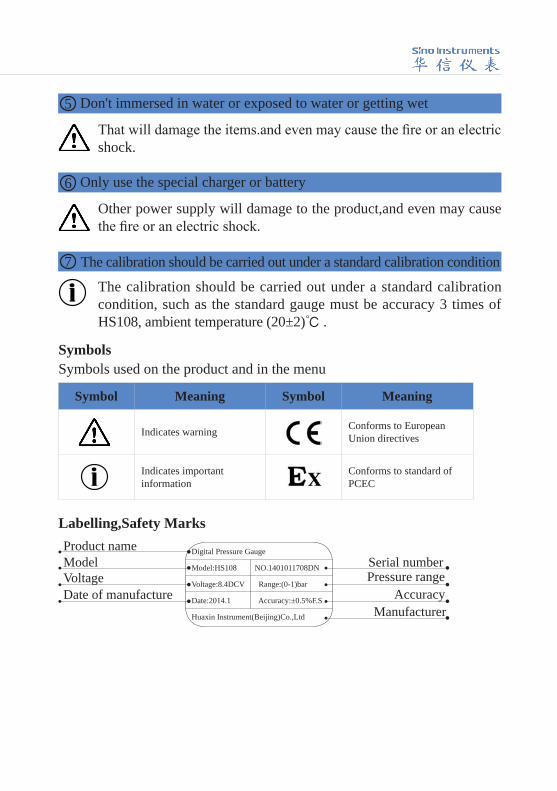
Labelling,Safety Marks
Symbols used on the product and in the menu
Symbol Meaning Symbol Meaning
Indicates warning Conforms to European Union directives
Indicates important information
Conforms to standard of PCEC
Digital Pressure Gauge
Model:HS108 NO.1401011708DN
Voltage:8.4DCV Range:(0-1)bar
Date:2014.1 Accuracy:±0.5%F.S
Huaxin Instrument(Beijing)Co.,Ltd
Product nameModelVoltageDate of manufacture Accuracy
Manufacturer
Pressure rangeSerial number
5
6
7
4
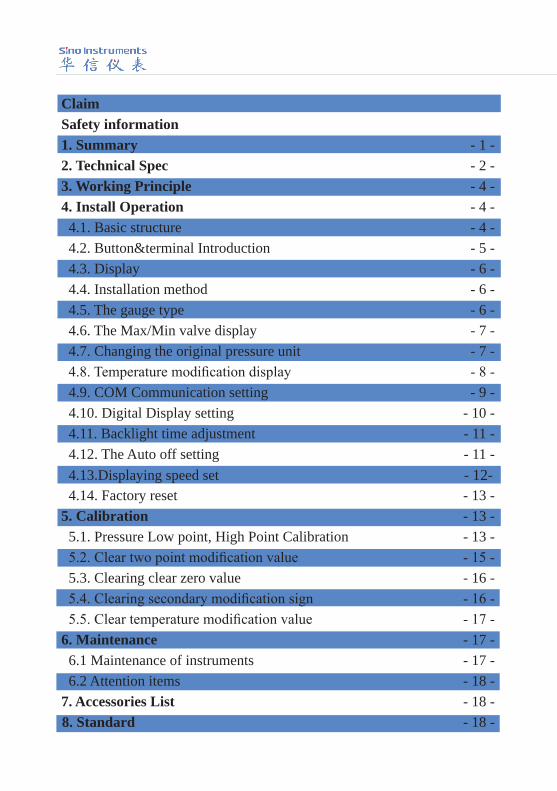
Claim Safety information 1. Summary - 1 -2. Technical Spec - 2 -3. Working Principle - 4 -4. Install Operation - 4 - 4.1. Basic structure - 4 - 4.2. Button&terminal Introduction - 5 - 4.3. Display - 6 - 4.4. Installation method - 6 - 4.5. The gauge type - 6 - 4.6. The Max/Min valve display - 7 - 4.7. Changing the original pressure unit - 7 - 4.8. Temperature modification display - 8 - 4.9. COM Communication setting - 9 - 4.10. Digital Display setting - 10 - 4.11. Backlight time adjustment - 11 - 4.12. The Auto off setting - 11 - 4.13.Displaying speed set - 12- 4.14. Factory reset - 13 -5. Calibration - 13 - 5.1. Pressure Low point, High Point Calibration - 13 - 5.2. Clear two point modification value - 15 - 5.3. Clearing clear zero value - 16 - 5.4. Clearing secondary modification sign - 16 - 5.5. Clear temperature modification value - 17 -6. Maintenance - 17 - 6.1 Maintenance of instruments - 17 - 6.2 Attention items - 18 -7. Accessories List - 18 -8. Standard - 18 -

1
1.Summary
CharacteristicsPressure range to 2500barHigh accuracy up to ±0.025%F.SLarge,easy to read dual display with 6-digit resolutionWhite backlight and RS232 communication portVarious Pressure Units selectableZero Point,Full Scale calibration functionMax/Min values function%Pressure indication with bar graph7.4Vdc rechargeable lithium battery or AC adapterData logging fuction,store measuring valueAuto Off can be set The backlight time is adjustableTemperature compensatingA compact cost effective pressure gauge in various application regionsWetted parts:316 Stainless steelDimension:Φ95mmx49mmTotal height:166(mm) Weight:0.75kg
HS108 is a high-precision single-range digital pressure gauge, which is composed of high-precision measurement chips, temperature measuring circuit&battery&voltage measuring circuit and intelligent digital pressure module.Every HS108 pass the high and lower temperature aging,so it could assure the products more accurate and reliable.the product combines a variety of accuracy levels to meet the customer requirments.it provides an accurate,reliable and economic solution for pressure application.This product can be used for real-time measurement of pressure value and as a pressure reference or in applications where high accuracy measurement is required.

2
ModelHS108 Digital Pressure Gauge
Accuracy±0.025% F.S±0.05% F.S±0.1%F.S
Gauge typesGauge pressureCompound pressureAbsolute pressureDifferential pressure
Work medium Oil, water&noncorrosive gases
Over pressure alarm 120%Full Scale
DisplayDescription: 6 digits big LCD with blacklight Display rate:Less than 0.025% of full scale is 150ms .More than 0.025% of full scale is 1s Numeral display height:16.5mm (0.65")%indication with bar graph scale for visual referenceA battery icon indicates the power
Pressure unitpsi, bar, mbar, kgf/cm2,Pa, kPa, MPa, mmH2O, mmHg
Temperature Compensated temperature: -10°C to 50°COperating temperature:-10°C to 50°CHumidity: <95%Storing temperature:-20°C to 70°C
Pressure connection1/4NPT maleM20×1.5 male Other connections customized
PowerBattery:One piece lithium battery & chargerBattery life:80 hours
HousingCase material:Plastic Wetted parts:316 Stainless steelDimension:Φ95mmx49mmTotal height:166(mm) Weight:0.75kg
Data storing Storage capacity :Calibration record of 30pcs gauge under test
CommunicationRS232
CertificateCE .....................EX .....................
2.Technical Specification

3
Compound pressure
Gauge pressure
No.Pressure Range
Accuracy Media(psi)
HS108-1 (0-10) (0-0.7) 0.025,0.05,0.1 G
HS108-2 (0-15) (0-1) 0.025,0.05,0.1 G
HS108-3 (0-30) (0-2) 0.025,0.05,0.1 G,L
HS108-4 (0-60) (0-4) 0.025,0.05,0.1 G,L
HS108-5 (0-100) (0-7) 0.025,0.05,0.1 G,L
HS108-6 (0-200) (0-14) 0.025,0.05,0.1 G,L
HS108-7 (0-300) (0-20) 0.025,0.05,0.1 G,L
HS108-8 (0-500) (0-35) 0.025,0.05,0.1 G,L
HS108-9 (0-600) (0-40) 0.025,0.05,0.1 G,L
HS108-10 (0-1000) (0-70) 0.025,0.05,0.1 G,L
HS108-11 (0-2000) (0-140) 0.025,0.05,0.1 G,L
HS108-12 (0-3000) (0-200) 0.025,0.05,0.1 G,L
HS108-13 (0-5000) (0-350) 0.025,0.05,0.1 G,L
HS108-14 (0-6000) (0-400) 0.025,0.05,0.1 G,L
HS108-15 (0-10000) (0-700) 0.025,0.05,0.1 G,L
HS108-16 (0-15000) (0-1000) 0.025,0.05,0.1 G,L
HS108-17 (0-24000) (0-1600) 0.05,0.1 G,L
HS108-18 (0-37000) (0-2500) 0.05,0.1 G,L
No.Pressure Range
Accuracy Media(psi)
HS108-19 (-0.4-0.4) (-0.025-0.025) 0.025,0.05,0.1 G,L
HS108-20 (-0.8-0.8) (-0.05-0.05) 0.025,0.05,0.1 G,L
HS108-21 (-1.5-1.5) (-0.1-0.1) 0.025,0.05,0.1 G,L
HS108-22 (-6-6) (-0.4-0.4) 0.025,0.05,0.1 G,L
HS108-23 (-15-15) (-1-1) 0.025,0.05,0.1 G,L
Remark:G=Gas,L=Liquid

4
3.Working Principle
4.Install Operation
Apply pressure to the pressure transducer,it outputs a electrical signal.First the corresponding electrical signal will be amplified.and then it will be converted to digital data by A/D converter.Then the microprocessor sequentially collects data to modify and correct,the final result will be displayed on the LCD Display.
4.1 Basic structure
Model
Screen
Buttons
Pressure range
Male thead
RS232Adapter socket
Label
1/4 NPT(or customized)
Temperature measuring circuit
A/D ConverterBattery&voltage measuring circuit
Transducer
Keys
CPU
LCD
RS232 DC+5V,3.3V
(X-XX)bar

5
1.Back cover insert 13.Lock nut
2.Front cover 14.Press cover
3.Key-press panel 15.Hole press cover
4.Button switch 16.Support pad for sensor
5.Power strip 17.Reinforcing pad for sensor
6.Front view window 18.Sensor
7.LCD 19.O-ring 9×1.8
8.PCB 20.High pressure sealing
9.Plugging terminal panel 21.Check ring 19
10.Back cover 22.O-ring 16×1.8
11.Li-ion battery pack 23.Sensor connector
12.Cover battery plate
4.2 Button&terminal Introduction
Back light.
Starting unit is kPa, press this key to switch unit circularly among mmHg、mmH2O、bar、mbar、psi、kgf/cm2、MPa and Pa.
Press this key to clear current value as zero drift value. Then this gauge would be already in a clearing zero status when you start it up again.
Confirm key,digital confirm key in menu.
Press this key for zero point and full scale calibration and linear revision to insure the accuracy.( Do not use the key when there are no necessary calibration equipments available.)ENTER
CAL
ZERO
UNIT
LIGHT
Connection terminals: RS232 for PC.DC8.4V Charging input DC8.4V.
16
22
23
1819
21
17
20
151413
12
34
67
21
8
9
10
11
5

6
The HS108 screen definitions: PC icon:the mark of PC connectionBattery icon:indicates state of chargeVoltage area:the current voltageTemperature area:current temperaturePressure display:displays data and menu.Units:9 pressure units selectableBar graph:displays the pressure process
1
2
Connect gauge under test and HS108 on the pressure comparator.
According to calibration regulation,make HS108 as standard gauge to finish the whole calibration process.
4.5 The gauge type
No.1:Gauge pressure No.2:Gauge pressureRang: ≤±100kPa
No.3:Differential pressure
1
542
3
4.4 Installation method
4.3 Display

7
Connecting pressure generatorOpen to airConnecting pressure generatorHigh pressure Low pressure
1
32
45
4.6 The Max/Min valve display
(1) In Measuring interface,press ENTER;enter into basic setting interface of Min value.
(2) Press ENTER again,enter into basic setting interface of Max value.
(3) Press ENTER once more and get back to the Measuring interface.
4.7 Changing the original pressure unit
(1) In Measuring interface,press CAL;enter into the interface of displaying Min value.
(2) Press CAL,enter into the Unit interface.

8
4.8 Temperature modification display(1)In Measuring interface,Press CAL,enter into basic setting interface.
(2) Press CAL,and enter into the Unit interface.
(3) Press ZERO three times enter into temperature interface below.
(4) Press CAL,enter into data modified interface.The fist character(“-”)located in activated interface.(No flashing)
(3) Press CAL,enter into the Unit choose interface(Unit flashing).
(4) Press Zero and choose the Unit you need.( if you choose the unit Pa)
(5) Press ENTER key,and save the current set.
(6) Press LIGHT three times continuously and back to the measuring interface.
At this time, the unit displayed is client measuring interface unit.maybe that is not match with the unit kPa in above pic.
Remark :Displaying unit,Pa、kPa、MPa.

9
(6) Press CAL,next character located in activated interface. (Flashing)
When decimal point bit flashing, press ZERO for setting decimal point.
(5) If you modify the activated value ,press ZERO and display“-”(flashing).If you do not need modify activated values,please enter into next step directly.
(Minus)
(7) Repeat step (6),until the last bit.
When the number flashing, press LIGHT for decreasing number from 9 to 0,press ZERO for increasing number from 0 to 9. After selecting your number, repeat step(6).
(8) Press ENTERkey,and save the current set.
(9) Press LIGHT twice continuously band back to the measuring interface.
4.9 COM Communication setting(1) In Measuring interface,press CAL and enter into basic setting interface.

10
(2) Press CAL,enter into the Unit interfac.
(3) Press ZERO key,and selecting menu,enter into setting interface below.
(4) Press CAL,switching ON/OFF.ON-1(Automatic)and ON-2(Semi-automatic)
(5) Press LIGHT twice continuously .and back to the measuring interface.
4.10 Digital Display setting(1)In Measuring interface,Press CAL key,enter into basic setting interface.
(2) Press CAL,enter into the Unit interface.
(3) Press ZERO,and selecting menu, enter into setting interface below.
(4) Press CAL,switching circularly4、5、6 bit.

11
(5) Press LIGHT twice continuously,and back to the measuring interface.
4.11 Backlight time adjustment
(1)In Measuring interface,press CAL key,enter into basic setting interface.
(2) Press CAL,enter into the Unit interface.
(3) Press ZERO(Press 6times zero),and selecting menu, enter into
(4) Press CAL key,the interface display in cycle:ON/15-S/30-S/45-S/60-S(UNIT:SECOND).
(5) Press LIGHT twice continuously ,and back to the measuring interface.
4.12 The Auto off setting
(1)In Measuring interface,press CAL key,enter into basic setting interface.
(2) Press CAL,enter into the Unit interface.
(3) Press ZERO(Press 7times zero),and selecting menu,enter into

12
(4) Press CAL key,the interface display in cycle:OFF/15/30/45/60/90/120(UNIT:MINUTE).
(4) Press CAL key, and switching 10-T、03-T、02-T、01-T (UNIT:times/s).
(5) Press LIGHT twice continuously ,and back to the measuring interface.
4.13 Displaying speed set
(1))In Measuring interface,press CAL key,enter into basic setting interface.
(2) Press CAL,enter into the Unit interface.
(3) Press ZERO (Press 8times zero), find “speed”.
(5) Press Light twice continuously.and back to the measuring interface.
13
(4) Press Enter,enter into restoring interface,after data restoring, that back to restoring to start up layout.
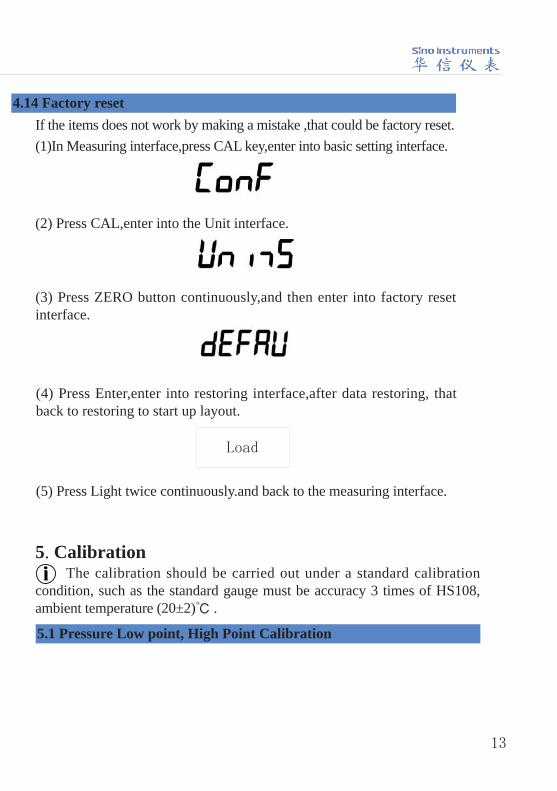
4.14 Factory reset
(1)In Measuring interface,press CAL key,enter into basic setting interface.
(2) Press CAL,enter into the Unit interface.
(3) Press ZERO button continuously,and then enter into factory reset interface.
If the items does not work by making a mistake ,that could be factory reset.
The calibration should be carried out under a standard calibration condition, such as the standard gauge must be accuracy 3 times of HS108, ambient temperature (20±2)℃ .
5.Calibration
5.1 Pressure Low point, High Point Calibration
(5) Press Light twice continuously.and back to the measuring interface.
Load

14
(4) Press ZERO key,enter into pressure low point, high Point calibrationInterface.
(5) Press CAL,enter into pressure low point calibration(Press ZERO button,enter into pressure high point calibration)interface.
(6) Press CAL,enter into low point calibration data modify interface.
(1) Pressure input add low point standard pressure.(2) Waitting for pressure stability.(3) In Measuring interface,Press CAL,enter into basic setting interface.
(7) Refer“4.8(7) step of Temperatue modification displaying”and amend low point pressure data(if the gauge had stored data,that do not amend,you may press CAL directly).
(8) Press CAL input the data ,waiting for standard pressure stability.(9) Press ENTER,save low point calibration data and return low point calibration interface.(10) Press ZERO,enter high point calibration interface.(11) Pressure input add high point standard pressure.(12) Waitting for pressure stability.

15
(14) Refer“4.8(7) step of Temperatue modification displaying” and amend high point pressure data(if the gauge had stored data,that do not amend,you may press CAL directly).
(13) Press CAL,enter into high point calibration data modify interface.
(1) In Measuring interface,Press CAL once time,and then press ZERO once time, that will display below.
(2) Press CAL once time,and then press ZERO twice,that will display below.
(15)Press CAL input data, waiting for standard pressure stability;Press ENTER,save high point calibration data and return high point calibration interface.(16)Press LIGHT twice continuously.and then back to measuring interface.
(3) Press ENTER once time, the interface have not any change .the clear is over.(4) Press LIGHT twice,saving and returning measuring interface.
5.2 Clear two point modification value

16
(1) In Measuring interface,Press CAL once time,and then press ZERO twice,that will display below.
(2) Press CAL once time,that will display below.
5.3 Clearing clear zero value
(3) Press ENTER once time,the interface have not any change.the clear is over.(4) Press LIGHT twice,saving and returning measuring interface.
5.4 Clearing secondary modification sign
(1) In Measuring interface,press CAL once time,and then press ZERO twice, that will display below.
(2) Press CAL once time, that will display below.
(3) Press ZERO once time, that will display below.
(4) Press ENTER once time, the interface have not any change .the clear is over.(5) Press LIGHT twice,saving and returning measuring interface.

17
5.5 Clear temperature modification value
(1) In Measuring interface,Press CALonce time,and then press ZERO twice,that will display below.
(2) Press CAL key once time, that will display below.
(3) Press ZERO twice,that will display below.
(4) Press ENTER once time,the interface have not any change.the clear is over.(5) Press LIGHT twice,saving and returning measuring interface.
6.Maintenance6.1 Maintenance of instruments
(1) Pay attention to the pressure range selected while measuring.Don't allow it work under over pressure environment;Over pressure alarm limit of the gauge is 1.1 times of the full-scale; (2) The using environment had to satisfied the manual demand,the user can operate by manual.(3) Make sure the normal display,the screen shows the upper limit of HS108.if it does not match with the label on the gauge,pls contract with supplier.(4) HS108 adopt the built-in DC7.4V rechargeable lithium battery. Automatically cut off power if the voltage is very low. Please charge in this case. when the item is charging,that displays red light. once it is completely charged,that displays green light.Please take out the power adapter.
18
6.2 Attention items(1) Pls operate under the manual.(2) HS108 is high precision measuring instrument, please don't free to beat, shock,disassemble and poke the metal diaphragm of sensor and pressure hole with sharp ware.(3) Self-disassembling is forbidden.(4) Please don't use it in high temperature and high humidity environment.With improvement of technology,the products performance will be adjusted without notice.
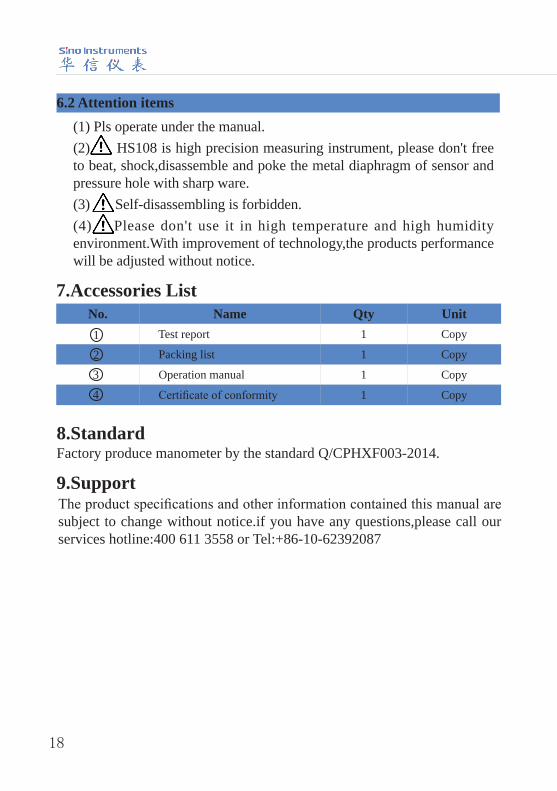
7.Accessories ListNo. Name Qty Unit
Test report 1 Copy
Packing list 1 Copy
Operation manual 1 Copy
Certificate of conformity 1 Copy
8.Standard
9.Support
Factory produce manometer by the standard Q/CPHXF003-2014.
The product specifications and other information contained this manual are subject to change without notice.if you have any questions,please call our services hotline:400 611 3558 or Tel:+86-10-62392087
1
32
4

Digital Pressure GaugeHX601/HS108
Intelligent Pressure Calibrator HS602
Pressure Comparator HS700(-0.5-0.5)barHS701(-0.95-6)bar HS702(-0.95-16/25)barHS703(-0.95-40/60)barHS720(0-140)bar HS704(0-160/250)bar HS705/HS705A(0-600/700)bar HS710/HS710A(0-600/700)bar HS706(0-1600/2500)bar
Electrical Pressure Comparator HS318L(0-600)bar 5pcs outputHS316L(0-25)bar 5pcs outputHS317L(0-60)bar 5pcs outputHS315(-0.95-0)bar 2pcs outputHS316(0-25)bar 3pcs outputHS318(0-600)bar 3pcs output
Automatic Pressure Calibrator HS620(-0.1-1)bar,(-0.95-25)bar
Sphygomanometer CalibratorME01 & ME02
Temperature Calibrator
HUAXIN Products series
HUAXIN INSTRUMENT(BEIJING)CO.,LTDAdd:No.11,Chuangxin road,Changping,Beijing,102200,China.E-mail:[email protected]/Web:http://www.sino-instruments.comTel:+86-10-62392087/Fax:+86-10-62345183