user manual nano rfid - tme · tel: +48 33 444 65 87 [email protected]. dear customer! ... user...
TRANSCRIPT

User manualNANO RFID
Soft >= 0.1
INVEO s.c.ul. Rzemieślnicza 21
43-340 Kozytel: +48 33 444 65 87

Dear Customer!
Thank you very much for choosing our product. Before its use, please read theseinstructions carefully. There are given here the most appropriate ways of dealing withthis device, the basic principles of safety and maintenance. Please also keep the usermanual so that you can read it during later use.
Remember!
The manufacturer is not liable for any damage caused by improper use ofthe device for its intended purpose or improper handling, as well as fault driverresulting from improper use.
User manual NANO RFID Strona 2 z 19

Table of contents:1 PRELIMINARY INFORMATIONS..................................................................................................................4
2 PURPOSE OF THE DEVICE.............................................................................................................................5
3 WARRANTY AND LIABILITY OF THE MANUFACTURERA...................................................................5
4 SAFETY GUIDELINES......................................................................................................................................5
4.1 POWER SUPPLY....................................................................................................................................................54.2 STORAGE AND WORKING CONDITIONS.......................................................................................................................54.3 INSTALLATION AND USE OF THE MODULE...................................................................................................................64.4 UTILISATION OF THE MODULE.................................................................................................................................6
5 CONSTRUCTION OF THE MODULE............................................................................................................7
5.1 GENERAL FEATURES..............................................................................................................................................75.2 TECHNICAL DATA.................................................................................................................................................7
6 DEVICE CONFIGURATION.............................................................................................................................8
6.1 CHANGING THE COMPUTER'S SUBNET FOR CONFIGURATION...........................................................................................86.2 HOME TAB.....................................................................................................................................................106.3 COMMUNICATION PROTOCOLS AND ADMINISTRATION.................................................................................................116.4 SNMP CONFIGURATION....................................................................................................................................12
7 COMMUNICATION WITH THE MODULE.................................................................................................13
7.1 MODBUS ADDRESSES......................................................................................................................................137.2 READOUT MODULE STATUS...................................................................................................................................147.3 CONTROL VIA HTTP..........................................................................................................................................157.4 INTEGRATION WITH OWN SOFTWARE......................................................................................................................167.5 COMMUNICATION WITH THE MODULE FROM THE EXTERNAL NETWORK..........................................................................16
8 DHCP...................................................................................................................................................................17
9 FACTORY DEFAULT RESET.........................................................................................................................17
10 SOFTWARE UPDATE....................................................................................................................................17
NOTES.................................................................................................................................................................18
User manual NANO RFID Strona 3 z 19

1 Preliminary informations
Before starting work with the controller, read The User manual and follow theinstructions contained therein!
Describtion of visual symboles used in this user manual:
This symbol is responsible for reviewing the appropriate place in theuser instructions, warnings and important information. Failure tofollow warnings could cause injury or damage to the module
Important informations and guidelines
Following this guidelines makes the use of the module easier.
Attention: The appearance of the screen shots shown in this manual may differ slightlyfrom the actual work with the module. The differences may relate to the size and fonttype and size of symbols. There are no differences in the content of the information.
User manual NANO RFID Strona 4 z 19

2 Purpose of the device
NANO RFID is used to read RFID Unique format tags i and integration with othersystems via MODBUS TCP, HTTP client / server, SNMP.
3 Warranty and liability of the manufacturera
The manufacturer provides a 2-year warranty on the module. The manufacturer alsoprovides post-warranty service for 10 years from the date of the introducing the module onthe market. The warranty covers all defects in material and workmanship The manufacturer undertakes to comply with the contract of guarantee, if the followingconditions are met:: all repairs, alterations, extensions and device calibrations are performed by the
manufacturer or authorized service, supply network installation meets applicable standards in this regard, the device is operated in accordance with the recommendations outlined in this manual the device is used as intended..
The manufacturer assumes no responsibility for consequences resulting from improperinstallation, improper use of the module, not following this manual and the repairs of themodule by individuals without permission.
This device doesn’t contain serviceable parts. The repairs can be doneonly by manufacturers approved repair service.
4 Safety guidelines
The module has been constructed using modern electronic components, accordingto the latest trends in the global electronics. In particular, much emphasis was placed onensuring optimum safety and reliability of control.The device has a housing with a high-quality plastic.
4.1 Power supplyRfid Nano is adapted to supply 10-24VDC.Powering of the device is carried out by the adapter POE.
4.2 Storage and working conditions
The device should be stored indoors, where the atmosphere is free from vapors andcaustic agents and:
the temperature is maintained in the range of -30 ° C to + 60 ° C, humidity range: 25% to 90% (no condensation)
The device is designed to operate under the following conditions: temperature range -10 ° C to + 55 ° C, relative humidity of 30% to 75%,
User manual NANO RFID Strona 5 z 19

4.3 Installation and use of the module
The module should be used following the guidelines shown in next part ofthe user manual.
4.4 Utilisation of the module
When it becomes necessary to liquidate the device (e.g., after the time of use),please contact the manufacturer or its representative, who are obliged to respondappropriately, i.e., collecting the module from the user. You can also ask the companiesinvolved in utilization and / or liquidation of electrical or computer equipment. Under nocircumstances should you place the device along with other garbage
User manual NANO RFID Strona 6 z 19

5 Construction of the module
5.1 General features
General view of the Nano RFID module is shown below.
Communication with the module is carried out by the LAN. User can choose fromthe following options to access the code read from the RFID tag:
– through built-in web server, using a standard web browser (preferred browsersare Mozilla Firefox, OPERA, CHROME)
– HTTP server mode– HTTP client mode– MODBUS TCP– SNMP
The module is equipped with LEDs that indicate the power supply and the currentstate of the device.
5.2 Technical data
Supply voltage: 10-24VDC (POE)Power consumption: 1,5WPower / communication: RJ24Tag standard: UNIQUE,Reading distance: to 8cm
Dimensions: height: 20 mm; width: 66,3 mm; length: 50,0 mm
User manual NANO RFID Strona 7 z 19
Nano RFID general view

6 Device configuration
When you first start, you need to configure the device.
6.1 Changing the computer's subnet for configuration.
After connecting to the network, there is need to change the subnet of thecomputer connected to the same network. To do this, proceed to network configuration: Start->Settings->Control panel->Network connections.Then select the network connection with right click and click "Properties".After selecting shows the configuration screen:
Changing the network configuration in theWindows system
Then select "Internet Protocol (TCP / IP)" and enter the following settings:
Examples of settings TCP / IP
User manual NANO RFID Strona 8 z 19

After accepting the settings, click OK, open a Web browser and enter theaddress:192.168.111.15 .Then select the "NETWORK" (The default user and password: admin/admin00)
To change the network settings of the module are the following fields:
MAC Address – MAC network address of the module – the read-onlyHost Name – NETBIOS name,Enable DHCP – Checking this box forces use the address assigned by the DHCP serverIP Address – IP address of the module (at the following module will be visible on thenetwork)Gateway Subnet Mask – Primary DNS, Secondary DNS – DNS servers addresses,HTTP Srv IP: – address of the server to which the module link in the "Control only toHTTP Client" modeHTTP Srv Port: – port on which the server is listening, HTTP Resource: - resource to call on the server side
After making changes, click Save Config.
User manual NANO RFID Strona 9 z 19
Configure the network connection

6.2 HOME tab
After selecting the HOME appears:
- SV:0.1 – software version- Last ID: 8500c2b4a8 – last read TAG code in HEX format- Number Of Read ID: 1 – the number of tags read from the device reset Warning:When after Last ID: 8500c2b4a8 appears (LOCK!) it means that reading of followingtags is locked until reset command releaseid.
User manual NANO RFID Strona 10 z 19
HOME tab

6.3 Communication protocols and administration
Administration menu allows to select services to be active and change the password.
Changing passwordTo change password follow the instructions in frames: Current Password, New Password, Re-type Password. New password need to be confirmed by clicking Save Config. Disable the password takes place by leaving the New Password empty.
Services settingsThe device allows you to choose which services will be available. Select the check box next to the name of the service activates the selected service.
Enable MODBUS TCP Protocol Enable SNMPControl only by HTTP GET Control only by HTTP Client Enable TFTP Bootloader
User manual NANO RFID Strona 11 z 19
Security settings.
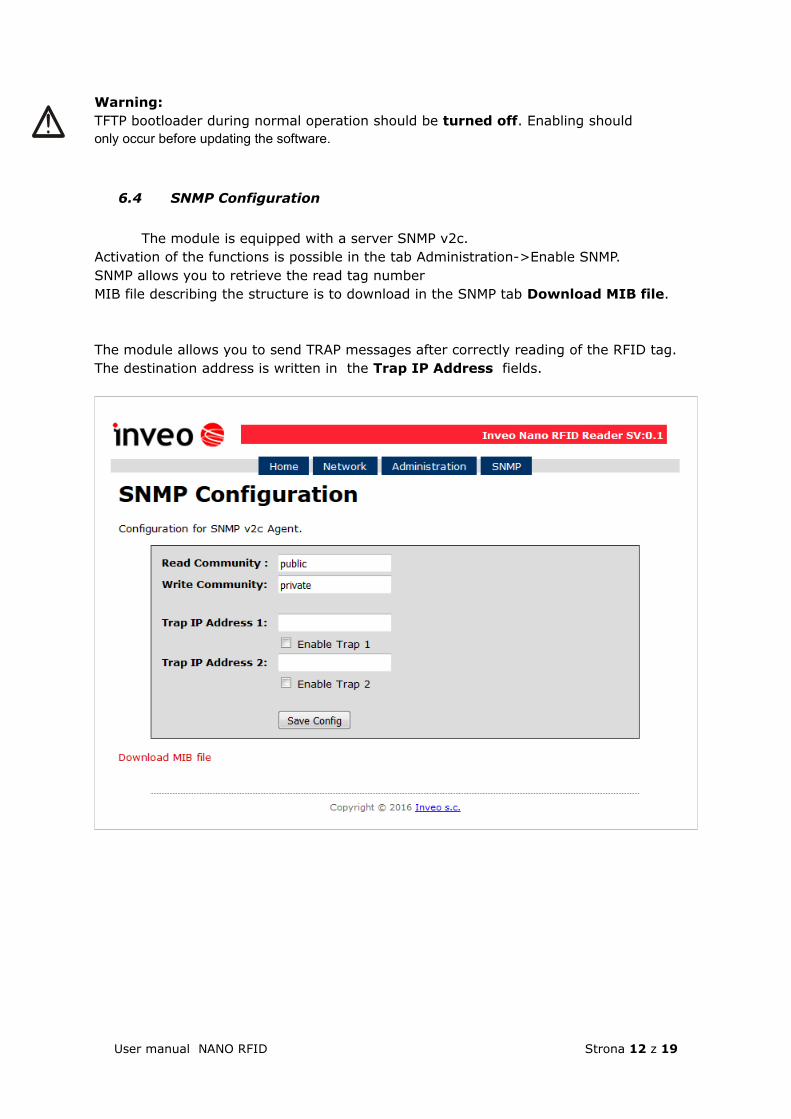
Warning:TFTP bootloader during normal operation should be turned off. Enabling shouldonly occur before updating the software.
6.4 SNMP Configuration
The module is equipped with a server SNMP v2c.Activation of the functions is possible in the tab Administration->Enable SNMP.SNMP allows you to retrieve the read tag numberMIB file describing the structure is to download in the SNMP tab Download MIB file.
The module allows you to send TRAP messages after correctly reading of the RFID tag. The destination address is written in the Trap IP Address fields.
User manual NANO RFID Strona 12 z 19
7 Communication with the module
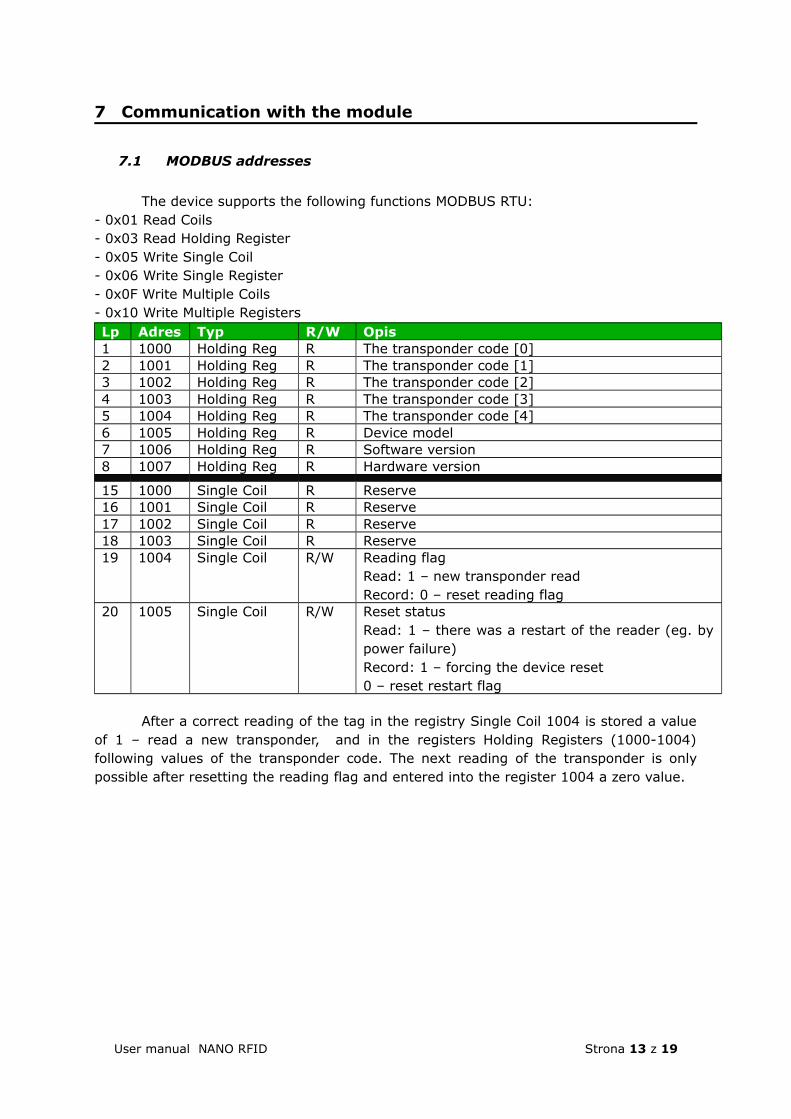
7.1 MODBUS addresses
The device supports the following functions MODBUS RTU:- 0x01 Read Coils- 0x03 Read Holding Register- 0x05 Write Single Coil- 0x06 Write Single Register- 0x0F Write Multiple Coils- 0x10 Write Multiple RegistersLp Adres Typ R/W Opis1 1000 Holding Reg R The transponder code [0]2 1001 Holding Reg R The transponder code [1]3 1002 Holding Reg R The transponder code [2]4 1003 Holding Reg R The transponder code [3]5 1004 Holding Reg R The transponder code [4]6 1005 Holding Reg R Device model7 1006 Holding Reg R Software version8 1007 Holding Reg R Hardware version
15 1000 Single Coil R Reserve16 1001 Single Coil R Reserve17 1002 Single Coil R Reserve18 1003 Single Coil R Reserve19 1004 Single Coil R/W Reading flag
Read: 1 – new transponder readRecord: 0 – reset reading flag
20 1005 Single Coil R/W Reset statusRead: 1 – there was a restart of the reader (eg. bypower failure)Record: 1 – forcing the device reset0 – reset restart flag
After a correct reading of the tag in the registry Single Coil 1004 is stored a valueof 1 – read a new transponder, and in the registers Holding Registers (1000-1004)following values of the transponder code. The next reading of the transponder is onlypossible after resetting the reading flag and entered into the register 1004 a zero value.
User manual NANO RFID Strona 13 z 19
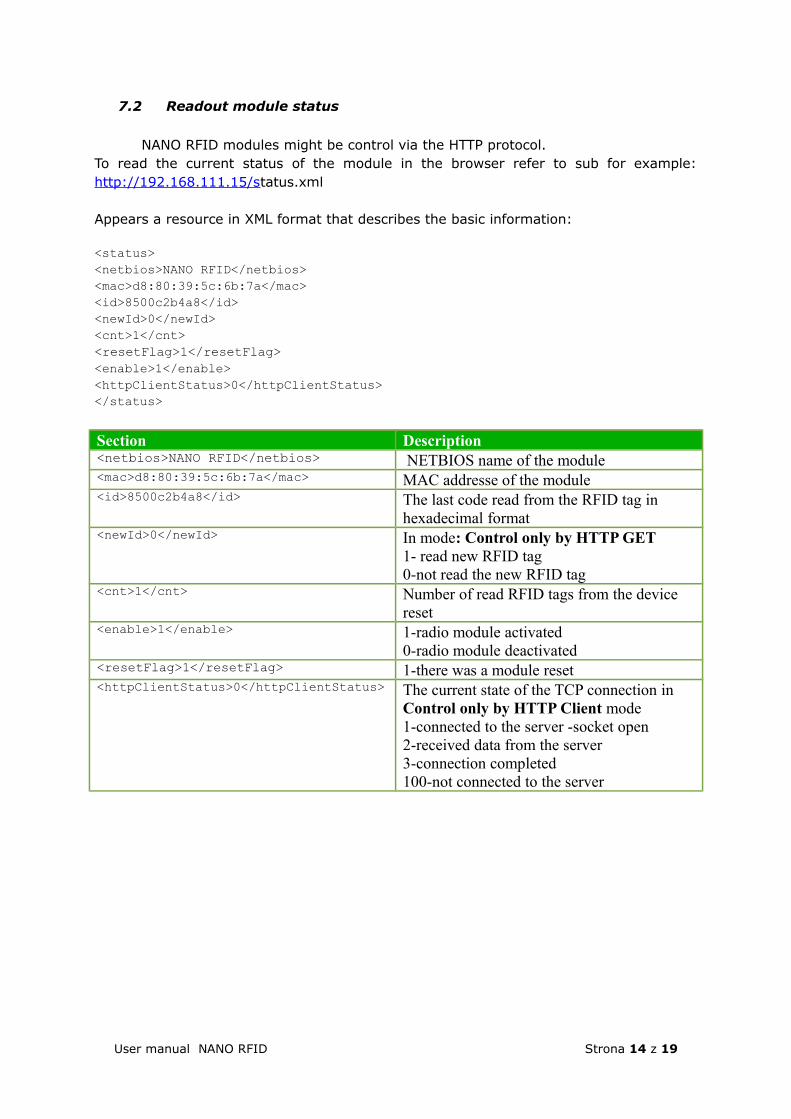
7.2 Readout module status
NANO RFID modules might be control via the HTTP protocol.To read the current status of the module in the browser refer to sub for example:http://192.168.111.15/status.xml
Appears a resource in XML format that describes the basic information:
<status><netbios>NANO RFID</netbios><mac>d8:80:39:5c:6b:7a</mac><id>8500c2b4a8</id><newId>0</newId><cnt>1</cnt><resetFlag>1</resetFlag> <enable>1</enable><httpClientStatus>0</httpClientStatus></status>
Section Description<netbios>NANO RFID</netbios> NETBIOS name of the module<mac>d8:80:39:5c:6b:7a</mac> MAC addresse of the module<id>8500c2b4a8</id> The last code read from the RFID tag in
hexadecimal format<newId>0</newId> In mode: Control only by HTTP GET
1- read new RFID tag0-not read the new RFID tag
<cnt>1</cnt> Number of read RFID tags from the device reset
<enable>1</enable> 1-radio module activated0-radio module deactivated
<resetFlag>1</resetFlag> 1-there was a module reset <httpClientStatus>0</httpClientStatus> The current state of the TCP connection in
Control only by HTTP Client mode1-connected to the server -socket open2-received data from the server3-connection completed100-not connected to the server
User manual NANO RFID Strona 14 z 19

7.3 Control via HTTP.
Control of the module in Control only by HTTP GET mode is based on sending theappropriate command to the module by HTTP protocol.
http://192.168.111.15/status.xml?Lp Command Name Description1 enable Enable RFID Enabling the antenna in the RFID module
http://192.168.111.15/status.xml?en able =1Disabling the antenna in RFID modulehttp://192.168.111.15/status.xml?en able =0
2 resetFlag Reset Flag After starting or reset the module flag set to 1.Deleting reset flaghttp://192.168.111.15/status.xml?resetFlag=0
3 releaseId Release ID Deleting read flag and waiting for the RFID taghttp://192.168.111.15/status.xml?releaseid=1
4 led Led control Enabling of the signaling LEDled=TimeOn,TimeOff,CntTimeOn*0.1 second, TimeOff*0.1 secondhttp://192.168.111.15/status.xml?led=5,3,4Enabling led for 0.5 seconds, off for 0.3 secondsand repeat the sequence 4 times
5 buzz Buzzer control Enabling of the signaling LEDled=TimeOn,TimeOff,CntTimeOn*0.1 second, TimeOff*0.1 secondhttp://192.168.111.15/status.xml?buzz=5,3,4Enabling sounder for 0.5 seconds, off for 0.3seconds and repeat the sequence 4 times
User manual NANO RFID Strona 15 z 19
7.4 Integration with own software
Nano RFID modules can be integrate with own software. They can work as aserver (in o Control only by HTTP GET mode) or client (in Control only by HTTPClient mode)
Server mode (Control only by HTTP GET):In this mode, an external host connects to the module and manages it through the httpprotocol. The manager host must periodically read the status.xml resource in Nano-RFIDmodule and depending on the state read from xml file call the appropriate functions. After approaching the tag to the field of reading, in the status.xml resource will becompleted the appropriate fields and the module locks the ability to read until calling thereleaseid function causing transition module to a state of waiting for next tag approching.Through appropriate functions the LED indicating reading the card can be light, a beepcan be generate, etc. The disadvantage of this method is the need to the cyclic reading ofstatus.xml resource .
Client mode (Control only by HTTP Client):In this mode, after the correct reading of the RFID tag, module automatically connects tothe server and sends the readout data to the appropriate server resource (by HTTP GET).As the answers can be retrieved information about the state of the LED or buzzer.The advantage of this mode is that immediately after reading the card, the device itselfsends the code to the server or controlling application.
An example might be to record to the mysql database or to the file on server the readoutRFID tag the MAC number of the reader and the readout time.
7.5 Communication with the module from the external network
If the module is in a different LAN than the computer that connects to it, it isrequired port forwarding.Depending on the used method of communication with the module, it is necessary tocontact the network administrator and port forwarding:
Operation via the website and http: - port TCP/IP 80
Operation via the MODBUS TCP:- port TCP/IP 502
Operation via the SNMP:- port UDP 161
User manual NANO RFID Strona 16 z 19
8 DHCP
To enable / disable DHCP needs:
1. Press the RESET button on the time between 5 and 10 seconds2. The indicator will blink approximately 2 times per second3. Release the RESET button
9 Factory Default Reset
To restore the factory setting neet to:
1. Switch on the device.2. Press the RESET button on the time between 10 and 15 seconds3. The green LED will start flashing about 4 times per second4. Release the RESET button
After the above steps the device will set the following parameters:– IP address: 192.168.111.15– IP mask: 255.255.255.0– User: admin– Password: admin00
10 Software Update
The module is equipped with the ability to update the software. The program isdelivered as a file with the extension .bin
Warning! Improper use of the update feature may damage the module.
To carry out programming operations, go to the Windows command line interface (Start->Run-> type ‘cmd’ and confirm with Enter).
Then go the catalog where the file .bin is located and enter the command:
tftp -i <ip_address_of_the_module> PUT file.bin
Programming takes approx. 1 minute. End of programming confirms the message 'FileTransferred'.
The latest software is available at: www.inveo.com.pl
User manual NANO RFID Strona 17 z 19

Notes
…………………………………………………………………………………………………………………………………………………
…………………………………………………………………………………………………………………………………………………
………………………………………………………………………………………………………………………………………………..
…………………………………………………………………………………………………………………………………………………
…………………………………………………………………………………………………………………………………………………
………………………………………………………………………………………………………………………………………………..
…………………………………………………………………………………………………………………………………………………
…………………………………………………………………………………………………………………………………………………
………………………………………………………………………………………………………………………………………………..
…………………………………………………………………………………………………………………………………………………
…………………………………………………………………………………………………………………………………………………
………………………………………………………………………………………………………………………………………………..
…………………………………………………………………………………………………………………………………………………
…………………………………………………………………………………………………………………………………………………
………………………………………………………………………………………………………………………………………………..
………………………………………………………………………………………………………………………………………………..
…………………………………………………………………………………………………………………………………………………
…………………………………………………………………………………………………………………………………………………
………………………………………………………………………………………………………………………………………………..
…………………………………………………………………………………………………………………………………………………
…………………………………………………………………………………………………………………………………………………
………………………………………………………………………………………………………………………………………………..
…………………………………………………………………………………………………………………………………………………
…………………………………………………………………………………………………………………………………………………
………………………………………………………………………………………………………………………………………………..
User manual NANO RFID Strona 18 z 19

User manual NANO RFID Strona 19 z 19