user manual - precision medical, inc. · pdf fileiso 13485 certified user manual ... caution...
TRANSCRIPT
SAVE THESE INSTRUCTIONS
300 Held Drive Tel: (+001) 610-262-6090Northampton, PA 18067 USA Fax: (+001) 610-262-6080
ISO 13485 Certified
U S E R M A N U A L
For the most current manual revision, please visit our Website: www.precisionmedical.com
PM66 SeriesPM66Li (Shown)

1
CONTENTSRECEIVING / INSPECTION .........................................................................................1INTENDED USE ...........................................................................................................1READ ALL INSTRUCTIONS BEFORE USING ............................................................1EXPLANATION OF ABBREVIATIONS .........................................................................1SAFETY INFORMATION - WARNINGS AND CAUTIONS ...........................................2SPECIFICATIONS ........................................................................................................4COMPONENT IDENTIFICATION .................................................................................5OPERATING INSTRUCTIONS .....................................................................................7MAINTENANCE ...........................................................................................................9CANISTER REMOVAL/ASSEMBLY
800cc Disposable................................................................................................101200cc Reusable ................................................................................................11
INLINE FILTER REPLACEMENT ...............................................................................12RETURNS ..................................................................................................................13DISPOSAL INSTRUCTIONS ......................................................................................13TROUBLESHOOTING ...............................................................................................13ACCESSORY / REPLACEMENT PARTS ..................................................................14DECLARATION OF CONFORMITY ...........................................................................15LIMITED WARRANTY ................................................................................................15
RECEIVING / INSPECTIONRemove the Precision Medical, Inc. Easy Go Vac Aspirator from packaging and inspect for damage. If there is any damage, DO NOT USE and contact your Provider.
INTENDED USEThe Easy Go Vac Aspirator provides a portable, AC/DC powered medical vacuum source. It is intended for use in the homecare / healthcare environments.
Only use this Aspirator for its Intended Use.
READ ALL INSTRUCTIONS BEFORE USINGThis manual instructs a Professional to install and operate the Easy Go Vac Aspirator.The Easy Go Vac Aspirator is to be used only by trained professional caregivers in a home or hospital environment.The Easy Go Vac Aspirator is to be used only by adults capable of reading and understanding the Instructions of Use written in the appropriate language.This manual is provided for your training, safety and to prevent damage to the Aspirator.If you do not understand this manual, DO NOT USE the Aspirator and contact your Provider.
EXPLANATION OF ABBREVIATIONSmmHg Millimeters of Mercury l/min Liters per MinuteinHg Inches of Mercury

2
DANGER Indicates an imminently hazardous situation which, if not avoided, will result in death or serious injury.
WARNING Indicates a potentially hazardous situation which, if not avoided, could result in death or serious injury.
CAUTION Indicates a potentially hazardous situation which, if not avoided, may result in minor or moderate injury.
CAUTION Used without the safety alert symbol indicates a potentially hazardous situation which, if not avoided, may result in property damage.PM66 SERIES WITH RESPECT TO ELECTRICAL SHOCK, FIRE AND MECHANICAL HAZARDS ONLY IN ACCORDANCE WITH ANSI/AAMI ES60601-1 (2012, 3.1 ed), CAN/CSAC22.2 No. 60601-1 (2014) 62NACaution! U.S. Federal Law restricts this device to sale by or on the order of a physician. This device may contain electrical components that are hazardous to the environment. DO NOT dispose device into standard trash. Contact your local waste Management for disposal of Electronic Equipment. Symbol indicates the device complies with the requirements of Directive 93/42/EEC concerning medical devices and all applicable International Standards.
Operating Instructions Follow Instructions for Use
General Warning Sign General Mandatory Action Sign
Date of manufacture Manufacture
Serial Number Model Number
Type BF applied part Class II Equipment
Push to Activate DO NOT disassemble
Battery Degree of protection against ingress of solids and/or liquids
Battery Low Alternating Current
Battery Charging Direct Current
Battery Full DC power connection, Positive Center.
“ON” for part of equipment “OFF” for part of equipment
Single Use
SAFETY INFORMATION - WARNINGS AND CAUTIONS

3
CAUTION• DO NOT store or operate the Aspirator outside the specified
environmental conditions.• Patients with special needs may require assistance to operate the
Aspirator.• Incorrect accessories connected to this device may affect the device flow
performance.• DO NOT allow Aspirator to exceed Operating or Storage Temperature
specifications.
DANGERTo reduce the risk of Electrocution:• Always unplug the Aspirator after using, except when battery is being
recharged.• DO NOT use, place or store the Aspirator where it can fall or be pulled
into a tub, sink, water or other liquids. Unplug from wall immediately.• DO NOT attempt to repair the Aspirator. Any attempt could result in
electrical shock.• Caution must be exercised when operating the Aspirator where oxygen
is being administered.• The Aspirator is not suitable for use in an enriched environment of
flammable anesthetic mixture with air, oxygen or nitrous oxide.
The PM66 Series Aspirators meet the requirements of IEC 60601-1-2 and are considered safe from producing electromagnetic interference with other devices when used normally in accordance with their intended use. Should the aspirator cause any interference, try repositioning it or moving it to another location.
WARNINGTo reduce risk of burns, electrocution, fire, or injury to persons:• Close supervision is necessary when this Aspirator is used by, on, or
near children or patients with special needs.• Use this Aspirator only for its "Intended Use" as described in this manual.• Use of accessories and connecting parts not designed for this Aspirator
may affect performance and/or cause damage to the device.• DO NOT use if the Aspirator has been damaged.• DO NOT clean the Aspirator with harsh or flammable chemicals.• If the Aspirator tubing becomes occluded against patient’s tissue,
powering off the device may not release tubing.• No modifications to this device are allowed.• The negative pressure of the unit must be checked by occluding the
end of the suction tubing before attaching it to the suction catheter, and prior to each suctioning event. Suction pressure should be set as low as possible to be effective.
• The connection of high vacuum / high flow devices to low flow accessories has the potential to harm the patient.

4
SPECIFICATIONSFor technical specifications contact Precision Medical, Inc.
or visit www.precisionmedical.com
Suction Canister: 800ml/1200ml Max Volume - Lid has a float shut off valve that protects the Aspirator from overfill.
Vacuum is not to exceed 25 inHg (635 mmHg)
Patient Tubing: 1/4 in. ID Non-Conductive PVC tubing, 6 ft. long, with 1/4 in.- 3/8 in. ID female connectors
Inlet Filter: Inline, Bacterial Filter (included)
Inline, Hydrophobic Filter (optional)
Operating Vacuum Range: ~2 to ≥19 inHg (~51 to ≥483 mmHg)
Electrical:
Car Charger (DC): 12 Volts, 1.8 Amps Household Current (AC): 100 - 240 Volts, 50-60 Hz, 0.35 - 0.80 - Amps, 60 Watts
Internal Battery Type:
Battery (PM66S): 12 Volt, Sealed Lead Acid Battery (PM66Li): 14.8 Volt, 4 cell Lithium Ion
Operating Temperature Range: 0°F to 122°F (-18°C to 50°C)
Storage / Transport Requirements:
Temperature Range: -40°F to 160°F (-40°C to 71-°C) Maximum Humidity: 95% Noncondensing
Duty Cycle: 15 Min ON / 15 Min OFF / within a 2 Hour cycle
Run Time: approx 1 hour (using internal battery)
Charge Time: 2-3 hours
Specifications are subject to change without prior notice.
5
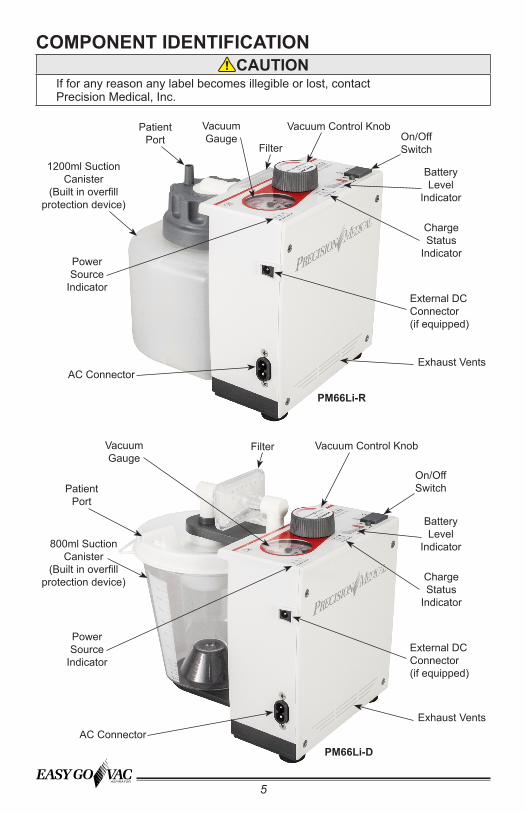
COMPONENT IDENTIFICATIONCAUTION
If for any reason any label becomes illegible or lost, contact Precision Medical, Inc.
Vacuum Control Knob
Vacuum Control Knob
1200ml Suction Canister
(Built in overfill protection device)
800ml Suction Canister
(Built in overfill protection device)
VacuumGauge
VacuumGauge
PowerSource
Indicator
PowerSource
Indicator
ChargeStatus
Indicator
ChargeStatus
Indicator
BatteryLevel
Indicator
BatteryLevel
Indicator
Exhaust Vents
Exhaust Vents
On/Off Switch
On/Off Switch
Patient Port
Patient Port
Filter
Filter
External DC Connector (if equipped)
External DC Connector (if equipped)
AC Connector
AC Connector
PM66Li-R
PM66Li-D
6
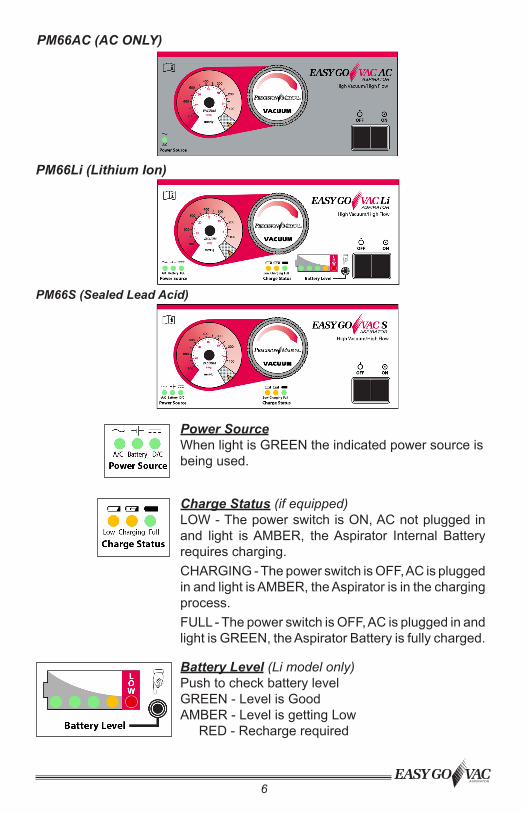
PM66Li (Lithium Ion)
PM66AC (AC ONLY)
Power SourceWhen light is GREEN the indicated power source is being used.
Charge Status (if equipped)LOW - The power switch is ON, AC not plugged in and light is AMBER, the Aspirator Internal Battery requires charging.CHARGING - The power switch is OFF, AC is plugged in and light is AMBER, the Aspirator is in the charging process.FULL - The power switch is OFF, AC is plugged in and light is GREEN, the Aspirator Battery is fully charged.
Battery Level (Li model only)Push to check battery levelGREEN - Level is GoodAMBER - Level is getting Low
RED - Recharge required
PM66S (Sealed Lead Acid)

7
CAUTIONDO NOT run the Aspirator without the Inline Filter, using aspirator without filter will void the warranty.Do not remove or damage canister overfill protection device.If liquid and/or solid material has been drawn into the device, immediately stop using the device and contact your equipment provider.Bacteria Filter will not stop liquid from entering the device.
1. Charge Device *
3. Connect suction tubing to canister
5. Block suction tubing 6. Adjust knob to desired vacuum level on gauge
4. Power “ON”
2. Connect to power source (for external power operation)
Block end to set vacuum level
Push button
OPERATING INSTRUCTIONS
Plug intowall outlet
*PM66Li and PM66S models only
Power“OFF”
Full charge2 to 3 hrs.
Push together
or

8
Device in carry bag
8. Power “OFF” when procedure completed
7. Perform ProcedurePush buttonConnect patient suction
attachment/perform procedure
OPERATING INSTRUCTIONS (continued)
CAUTION• Verify battery charge (if equipped) prior to use.• Charging Light is on when Aspirator is plugged in and is in the
“OFF” ( ) position only.• If automatic shut off occurs during battery operation, the Aspirator cannot
be restarted until the battery has been recharged or until the Aspirator is connected to either of the external power source options (AC or DC).
WARNINGOperating Aspirator after Amber Low Battery Light has been on continuously, will cause automatic shut down.

9
CLEANING / MAINTENANCE
WARNING• Turn the Aspirator “OFF” ( ) and disconnect from any external power
source before cleaning.• DO NOT clean the Aspirator with Alcohol, Acetone or other solvents.
CAUTION• Tubing is single patient use only. DO NOT clean.• Canister is single patient use only.
MAINTENANCEVacuum/Flow verification should be checked by the device provider as necessary - Recommended annually or between patients.
Cleaning for Exterior Components:
1. Disconnect the Aspirator from power source and other connections before cleaning.
2. Use a cloth or sponge dampened with mild soap and water.3. Wipe dry with a clean cloth or paper towel.4. Store the Aspirator in a clean area free from grease, oil, and other sources
of contamination.
1200cc canister (reusable) can be cleaned with a mild detergent or placed on top rack of dishwasher.For institutional cleaning: Exterior: Hospital approved quaternary cleaner; i.e., Sporociden® Reusable canister: Cydex® or equivalent

10
CANISTER REMOVAL/ASSEMBLY (800cc Disposable)1. Push tabs to release canister
3. Remove lid, empty & clean
5. Place canister on base
7. Push together until they engage (click)
2. Pull canister away from device
4. Reinstall lid securely
6. Align canister assembly with inlet port and locking tabs with openings on device
8. Correctly reassembled

11
CANISTER REMOVAL/ASSEMBLY (1200cc Reusable)1. Grasp filter and pull apart
3. Remove lid, empty & clean
5. Align indicators on lid and canister
7. Align with port & push together
2. Tilt off base to remove
4. Place lid on canister
6. Tilt and place canister on device base
8. Correctly installed canister is level

12
800cc Disposable Canister Inlet Adaptor Kit
1200cc Reusable Canister
INLINE FILTER REPLACEMENTCAUTION
• When installing inline filter be sure the side that has small nubs and says “OUT” is facing toward inlet port on device.
• Filter cannot be cleaned. If it becomes contaminated or clogged, it must be replaced.
Slightly twist and pull up
Elbow Elbow
Inline Filter
“OUT” toward device(side with nubs)
“OUT” toward device(side with nubs)
Inlet Port
Canister Adaptor
Inlet Adaptor Kit assembled
Nubs
“OUT”
To remove filter: Pull apartTo install: Push together

13
RETURNSReturned products require a Returned Goods Authorization (RGA) number, contact Precision Medical, Inc. All returns must be properly packaged to prevent shipping damage. Precision Medical, Inc. will not be responsible for goods damaged in transit. Refer to Precision Medical, Inc. Return Policy available on the Internet, www.precisionmedical.com. Precision Medical will NOT repair contaminated devices (biohazard).
TROUBLESHOOTINGIf the Aspirator fails to function, consult this Troubleshooting section. If the problem cannot be corrected, consult your Provider.There are no user serviceable parts inside this device. DO NOT open case.
Problem Probable Cause RemedyAspirator will not operate on battery
1. On/Off Switch in “OFF” position
2. Battery not charged (Low battery light on)
1. On/Off Switch to “ON’’ position
2. •Recharge battery•If battery will not charge,
contact your ProviderAspirator will not operate when connected to AC Power Source
1. On/Off Switch in “OFF” position
2. AC Power Cord not connected
1. On/Off Switch to “ON” position
2. Check connection at both AC Power Source and Aspirator
Continued on next page.
DISPOSAL INSTRUCTIONSDispose of Biohazard waste as described by your Healthcare Professional or Healthcare Facility protocol.
WARNING• The Aspirator may contain an internal battery. Batteries contain materials
which can contaminate the environment when improperly disposed of. Dispose of the Aspirator in accordance with local regulations.
• If Aspirator is used for treatment of infectious disease, consult your Physician or Healthcare Professional for recommended procedures for proper disposal.
• This device may contain electrical components that are hazardous to the environment. DO NOT dispose device into standard trash. Contact your local waste Management for disposal of Electronic Equipment.

14
TROUBLESHOOTING continuedProblem Probable Cause RemedyAspirator will not operate when connected to Auto DC Power Cord
1. On/Off Switch in “OFF” position
2. Car not turned on.3. Auto DC Power Cord not
connected properly4. Defective auto power port
receptacle5. Defective Auto DC Power
Cord
1. On/Off Switch to “ON” position
2. Turn on car to activate it’s DC outlet
3. Check connections at both ends of cord
4. Connect to a known working auto power port
5. Contact your ProviderBattery will not charge 1. Not connected to AC power
source2. Defective battery
1. Connect to AC power source2. Contact your Provider
Unable to achieve desired vacuum setting
1. Filter not connected properly
2. Filter not installed correctly.3. Suction Canister not
connected properly4. Defective Suction Canister5. Defective Aspirator6. Suction Tubing Leaks
1. Confirm and tighten connections
2. Confirm orientation of filter.3. Confirm and tighten
connections4. Replace Suction Canister5. Contact your Provider6. Replace Suction Tubing
Inlet Filter becomes blocked by fluid(Hydrophobic only)
1. Collection Canister overflow mechanism failed
1. Replace Collection Canister2. Replace Filter
Aspirator stops running, power switch “ON”, battery or AC power applied
1. Device overheating 1. Power “OFF” device and allow cooling.
2. Ensure device has adequate ventilation. Ensure vents are not blocked.
ACCESSORY / REPLACEMENT PARTS Only use accessories designed for use with this Aspirator.
• Use tubing intended for suction only. • Use Collection Canisters designed for use with this Aspirator only.
• Use Precision Medical: Inlet Filter, External AC & DC Power Cord & Carry Bag Only
Description Part #*Inlet Filter (Hydrophobic) 506851Inlet Filter (Bacterial) 507754800cc Canister, (Case-10 ea.) 502519-10800cc Inlet Adapter Kit 5075211200cc Canister 507522Patient Suction Tubing 1955Carry Bag 507263AC Power Cord 506961Auto DC Power Cord 507213
*Hydrophobic Filter will provide higher level of protection, stopping the egress of liquid into the device, if canister overfill protection should fail.
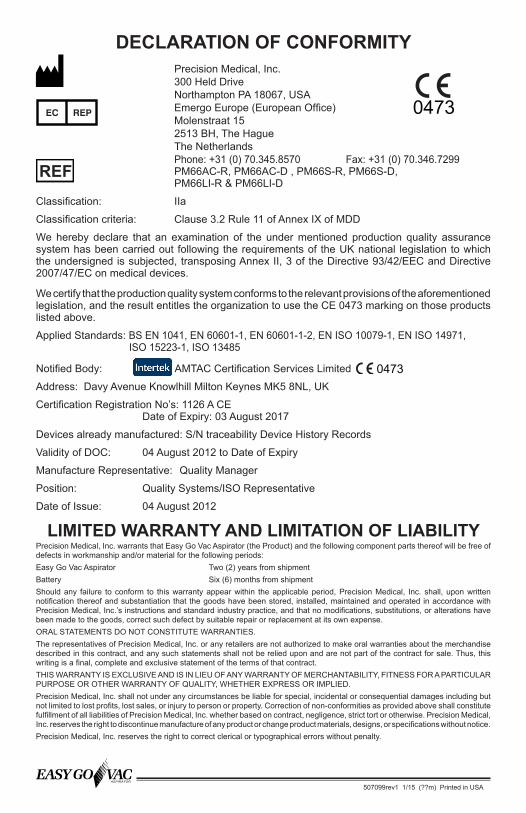
LIMITED WARRANTY AND LIMITATION OF LIABILITYPrecision Medical, Inc. warrants that Easy Go Vac Aspirator (the Product) and the following component parts thereof will be free of defects in workmanship and/or material for the following periods:Easy Go Vac Aspirator Two (2) years from shipmentBattery Six (6) months from shipmentShould any failure to conform to this warranty appear within the applicable period, Precision Medical, Inc. shall, upon written notification thereof and substantiation that the goods have been stored, installed, maintained and operated in accordance with Precision Medical, Inc.’s instructions and standard industry practice, and that no modifications, substitutions, or alterations have been made to the goods, correct such defect by suitable repair or replacement at its own expense.ORAL STATEMENTS DO NOT CONSTITUTE WARRANTIES.The representatives of Precision Medical, Inc. or any retailers are not authorized to make oral warranties about the merchandise described in this contract, and any such statements shall not be relied upon and are not part of the contract for sale. Thus, this writing is a final, complete and exclusive statement of the terms of that contract.THIS WARRANTY IS EXCLUSIVE AND IS IN LIEU OF ANY WARRANTY OF MERCHANTABILITY, FITNESS FOR A PARTICULAR PURPOSE OR OTHER WARRANTY OF QUALITY, WHETHER EXPRESS OR IMPLIED.Precision Medical, Inc. shall not under any circumstances be liable for special, incidental or consequential damages including but not limited to lost profits, lost sales, or injury to person or property. Correction of non-conformities as provided above shall constitute fulfillment of all liabilities of Precision Medical, Inc. whether based on contract, negligence, strict tort or otherwise. Precision Medical, Inc. reserves the right to discontinue manufacture of any product or change product materials, designs, or specifications without notice.Precision Medical, Inc. reserves the right to correct clerical or typographical errors without penalty.
507099rev1 1/15 (??m) Printed in USA
DECLARATION OF CONFORMITY Precision Medical, Inc.
300 Held Drive Northampton PA 18067, USA
Emergo Europe (European Office) Molenstraat 15 2513 BH, The Hague The Netherlands Phone: +31 (0) 70.345.8570 Fax: +31 (0) 70.346.7299
PM66AC-R, PM66AC-D , PM66S-R, PM66S-D, PM66LI-R & PM66LI-D
Classification: IIa
Classification criteria: Clause 3.2 Rule 11 of Annex IX of MDD
We hereby declare that an examination of the under mentioned production quality assurance system has been carried out following the requirements of the UK national legislation to which the undersigned is subjected, transposing Annex II, 3 of the Directive 93/42/EEC and Directive 2007/47/EC on medical devices.
We certify that the production quality system conforms to the relevant provisions of the aforementioned legislation, and the result entitles the organization to use the CE 0473 marking on those products listed above.
Applied Standards: BS EN 1041, EN 60601-1, EN 60601-1-2, EN ISO 10079-1, EN ISO 14971, ISO 15223-1, ISO 13485
Notified Body: AMTAC Certification Services Limited
Address: Davy Avenue Knowlhill Milton Keynes MK5 8NL, UK
Certification Registration No’s: 1126 A CE Date of Expiry: 03 August 2017
Devices already manufactured: S/N traceability Device History Records
Validity of DOC: 04 August 2012 to Date of Expiry
Manufacture Representative: Quality Manager
Position: Quality Systems/ISO Representative
Date of Issue: 04 August 2012