user manual v1 - wintal manual_v1.0.pdf · 3.2 volume control 17 3.3 channel ... 3. 12v dc power...
TRANSCRIPT

USER MANUAL v1.0

2 WINTAL PVR10HD USER MANUAL
Safety InStructIonSRead following items carefully before operating this receiver.
InStallatIon
▪ This receiver should be installed horizontally. Unbalanced installation may cause damage. ▪ Install the receiver in a place with:
▪ good ventilation (leave space not less than 10cm around this receiver) ▪ no heat source (burning candle, radiator, heater, fireplace, amplifier, etc) ▪ suitable temperature ▪ against humidity (especially bathroom, kitchen, etc) ▪ no direct sunlight ▪ low vibration
MaIntenance
▪ Unplug this receiver from wall outlet before changing connections between this unit and other related equipment.
▪ Don’t unplug or insert signal, audio and video cables when this receiver is turned on. ▪ To avoid the risk of lightning strike, unplug power adapter of the receiver from wall outlet in lightning storm. ▪ Unplug power adapter from wall outlet when the unit is not used for a long time or damaged accidentally. ▪ Turn off this unit first, after 1 to 2 hours turn it on when move this receiver from a cold environment to a hot
environment or vice versa. ▪ To avoid the risk of fire or electric shock, don’t expose this receiver to rain, splashing and don’t put object
with liquid on this unit. ▪ Do not cover vents of this receiver with newspaper, table cloth, curtain, etc. ▪ Don’t put heavy objects on this receiver. ▪ Unplug power adapter of this receiver from wall outlet before cleaning. To reduce damage, clean this unit with
dry cloth. Do not let liquid and spray flow into this device to avoid serious damage. ▪ There is dangerous voltage in product enclosure. Do not remove the cover (or back) to avoid the risk of fire or
electric shock.
Power Socket and Power adaPter
▪ Power socket should be available near the receiver and well grounded. ▪ Do not insert or pull out power adapter with wet hands to avoid electric shock or fire. ▪ Do not use damaged power adapter. If power adapter is damaged, contact your local operator for
replacement to avoid risk of fire or electric shock. ▪ Do not excessively bend power adapter, and do not place heavy objects on it, which could cause damage,
electric shock or fire.
reMote control Battery
▪ Batteries should be installed in accordance with the polarity markings (+/-) on battery compartment. ▪ Remove batteries if you will not be using your remote for an extended period of time. ▪ Replace batteries if there is not enough power and dispose battery waste properly for environmental
protection.
otherS
▪ All-pole power switch of this receiver is on rear panel. Switch it to “I” to turn it on. Switch it to “O” to completely disconnect power to your PVR10HD.
▪ Only use accessories specified by the manufacturer, as other unsupported accessories may cause damage to the receiver.

3
SyMBolS on the receIverPart 1: warnIng Mark
SHOCK HAZARD: DO NOT OPENRISQUE DE CHOC: NE PAS ENLEVER
This mark appears on rear panel of this receiver, painted prominently in contrasting colour to background. It consists of two graphical symbols and warning messages. The detailed specifications are as follows:Warning: To reduce the risk of electric shock, don’t remove the cover (or back). Equipment service and maintenance should be undertaken by qualified personnel.
This symbol alerts user to the presence of uninsulated “dangerous voltage” in product enclosure that sufficient magnitude will constitute risk to person.
This symbol reminds user of presence of important operation and maintenance instructions in literature accompanying this receiver.
Part 2: other MarkS
This mark appears on front panel of this receiver, painted prominently in contrasting colour to background.
dolByManufactured under license from Dolby Laboratories.Dolby and the double-D symbol are trademarks of Dolby Laboratories.
Please note: As software updates are issued to your PVR10HD, some parts of this manual may not reflect the complete operation of your unit. Screenshots used may not represent what actually shows on your screen, and there may be features added that are not mentioned in this manual. We therefore recommend that you check the Wintal web site www.wintal.com.au in case there might be an updated manual.

4 WINTAL PVR10HD USER MANUAL
contentS1. Before Using YoUr PVr10HD 6
1.1 IN thE Box 61.2 MAIN FEAtURE 61.3 FRoNt PANEL 61.4 REAR PANEL 71.5 REMotE CoNtRoL 7
1.5.2 REMOTE CONTROL - GENERAL KEYS 81.5.3 REMOTE CONTROL - PVR KEYS 91.5.4 REMOTE CONTROL - LEARNING KEYS 10
2. installation 112.1 CoNNECtING to YoUR tV 11
2.1.1 TV CONNECTION - HDMI 112.1.2 tV CoNNECtIoN - COMPONENT 122.1.3 tV CoNNECtIoN - S-VIDEO 132.1.4 tV CoNNECtIoN - COMPOSITE AV 14
2.2 ExtERNAL CoNNECtIoNS 152.2.1 ExTERNAL AV IN 152.2.2 CONNECTING TO OTHER DEVICES 16
2.3 PowER oN 172.4 SEARCh ChANNEL 17
3. Basic oPeration 173.1 SwItChING ChANNELS 173.2 VoLUME CoNtRoL 173.3 ChANNEL INFoRMAtIoN BAR 183.4 ChANNEL LISt 18
3.4.1 FAVOURITE CHANNEL LIST 193.5 AUdIo SEttING 193.6 tELEtExt 193.7 CLoSEd CAPtIoNS 203.8 PICtURE-IN-PICtURE (PIP) 20
3.8.1 ACTIVATE PIP 203.8.2 SHOW/ HIDE PIP WINDOW 203.8.3 SWAP PIP WINDOW 203.8.4 CHANGE POSITION OF PIP 213.8.5 SWITCH PIP MAIN CHANNEL 21
3.9 USING thE oN-SCREEN kEYBoARd 21
4. Personal ViDeo recorDing (PVr) featUres 224.1 BEFoRE YoU BEGIN 224.2 SEt StoRAGE dEVICE 224.3 PVR SEttINGS 22
4.3.1 SCHEDULE START/STOP TIME OFFSET 224.3.2 REMIND BEFORE SCHEDULE START 234.3.3 PVR ICON TIME OUT 234.3.4 MANUAL RECORDING DURATION 234.3.5 TIME-SHIFT START MODE 23
4.4 QUICk RECoRdING 244.4.1 START RECORDING 244.4.2 STOP RECORDING 24
4.5 SChEdULE RECoRdING 244.5.1 ADD SCHEDULE 244.5.2 MODIFY SCHEDULE 25

5
4.5.3 DELETE SCHEDULE 254.6 oPERAtIoN whILE RECoRdING 26
4.6.1 VIEW/ MODIFY RECORDING INFORMATION 264.6.2 SWITCHING CHANNELS WHILE RECORDING 274.6.3 PLAYBACK CURRENT PROGRAM 27
4.7 PLAYBACk PRE-RECoRdEd FILES 274.7.1 PAUSE 274.7.2 REWIND/ FAST FORWARD 274.7.3 SLOW FORWARD 284.7.4 PLAYBACK PROGRESS BAR 284.7.5 SKIP BACK/ SKIP FORWARD 284.7.6 BOOKMARKS 284.7.7 FILE EDITING (FILE CUT) 294.7.8 STOP PLAYBACK 29
4.8 FILE oPERAtIoNS 294.8.1 DELETE RECORDED FILES 304.8.2 GROUP RECORDED FILES 304.8.3 RENAME RECORDED FILE 314.8.4 LOCK RECORDED FILE 314.8.5 COPY FILE 32
4.9 tIME-ShIFt 32
5. UsB PlaYBacK 335.1 MP3 PLAYBACk 335.2 dIGItAL PhotoS 33
6. storage DeVice ManageMent 346.1 FoRMAt StoRAGE dEVICE 346.2 UNMoUNt USB dEVICE 35
7. tV gUiDe/ electronic PrograMMe gUiDe (ePg) 367.1 VIEw EPG INFoRMAtIoN 367.2 SChEdULE VIA EPG 37
8. cHannel searcH 378.1 MUx EdIt 37
8.1.1 ADD A TRANSPONDER 378.2 AUto SEARCh 388.3 MANUAL SEARCh 388.4 ChANNEL INFoRMAtIoN 38
9. eDit cHannel 399.1 LoCk ChANNEL 399.2 MoVE ChANNEL 399.3 dELEtE ChANNEL 409.4 EdIt FAVoURItES 40
10. settings 4110.1 GENERAL SEttINGS 4110.2 ChANGE PASSwoRd 4210.3 PG LoCk (PARENtAL GUIdANCE) 4210.4 NEtwoRk SEttINGS 4310.5 FACtoRY RESEt 4310.6 SoFtwARE UPdAtE 4410.7 SYStEM INFoRMAtIoN 44
11. aPPenDix 4511.1 tRoUBLEShootING 4511.2 SPECIFICAtIoN 46

6 WINTAL PVR10HD USER MANUAL
1. Before uSIng your Pvr10hd1.1 In the Box
Once you have unpacked your PVR10HD, please ensure that the following has been included:
1. rf cross over lead Switch between operation and standby modes
2. composite av lead Receive infrared remote control signal
3. 12v dc power supply Display status
4. remote control Open the cover to reveal the front USB port
5. 2x ‘aaa’ batteries Pull down from the right edge to open cover
6. customer care info sheet
1.2 MaIn feature
▪ 500GB Personal Video Recorder ▪ Time shift supported ▪ Dolby 5.1 supported ▪ PIP supported ▪ MP3 playing and photo browse ▪ Teletext/Closed Caption supported ▪ EPG supported ▪ Favourite channel groups
▪ Support automatic and manual search ▪ Powerful channel editing function ▪ Parental control supported ▪ Software upgrade supported ▪ Standby with low power consumption ▪ HDMI output: support 1080p/1080i/720p/576p ▪ S/P DIF audio supported ▪ USB 2.0 interface supported
1.3 front Panel
1 2 3
5 6
4 7
label function
1. Stand By Switch between operation and standby modes
2/3. ch-/+ Switch channels or move cursor down/up
4. SenSor Receive infrared remote control signal
5. dISPlay Display status
6. front uSB Open the cover to reveal the front USB port
7. front cover Pull down from the right edge to open cover

7
1.4 rear Panel
1 3 67 11
2 4 8
9 13 14 15 16 17 18 23 24
10 12 19 20 21 225
label function
1. ant In 1 Connect to your terrestrial antenna
2. looP out 1 Loop out RF signal to ANT IN 2 using the included cross over RF lead
3. ant In 2 Input RF signal from LOOP OUT 1 using the included cross over RF lead
4. looP out 2 Loop out RF signal to another receiver and/ or VCR
5. ethernet Connect to the internet
6-7-8. y Pb Pr Component video oUtPUt (supports high definition video output)
9. cvBS CVBS (composite) video oUtPUt
10-11. l-r Stereo Left and Right audio oUtPUt
12. S-vIdeo Y/C (S-VHS) video signal oUtPUt
13-14-15. InPut 1 Composite Audio/ Video signal INPUt from external source
16-17-18. InPut 2 Composite Audio/ Video signal INPUt from external source
19. uSB Rear USB port INPUt for JPG photos, MP3 music
20. hdMI HDMI high definition video oUtPUt
21. S/P dIf (Sony/ Philips Digital Interface) Digital Audio oUtPUt to amplifier/ AV receiver
22. 12v 3.0a DC power supply
23. rS-232 Serial port for firmware upgrades
24. on/ off Power switch
1.5 reMote control
Insert the “AAA” batteries provided before using your remote control. Please make sure you observe the correct polarity when inserting batteries.

8 WINTAL PVR10HD USER MANUAL
1.5.2 reMote control - general keyS
Button label function
Pvr PowerSwitches the PVR10HD between on and stand-by
Mute Mute/ Unmute audio
audIo Displays the AUDIO SELECT window
0 - 9 Switch channels or input numbers
text/ P+ Display Teletext Information/ Page Up
cc/ P- Turn Closed Captions On or Off/ Page Down
recall Back to previously viewed channel
Info Displays the channel information bar
ch Switch channel up/ move cursor up
ch Switch channel down/ move cursor down
vol Lower volume/ move cursor left
vol Increase volume/ move cursor right
ok Displays channel list/ Confirm operation
Menu Display/ Exit from main menu
ePg Displays EPG (Electronic Programme Guide)
fav Displays the favourites channel list
exIt Back to previous menu/ Exit from operation
PIP Displays the PIP (Picture-In-Picture) window
P.SwaP Swaps PIP window with main screen
P.Move Change position of PIP window

9
1.5.3 reMote control - Pvr keyS
Please note: Some keys may behave differently based on current operation and/ or what is displayed on the screen. If required, please refer to the instructions on-screen to determine what key needs to be pressed to complete an operation.
Button label function
hdd lISt Displays the recorded file list
fIrSt Skip backwards during playback
Set Mark Set a bookmark during playback
Play MarkPlay and jump to next bookmark during playback
end Skip forward during playback
PlayStart playback/ Resume normal playback speed
PauSe Pause playback/ Initiate time shift
StoP Stop playback/ Stop recording
recordRecord current program/ Display recording information
rew Rewind (2x, 4x, 8x, 16x, 32x speed)
ff Fast Forward (2x, 4x, 8x, 16x, 32x speed)
Slow Slow motion (1/2x, 1/4x, 1/8x speed)
tIMer record
Display schedule list window

10 WINTAL PVR10HD USER MANUAL
1.5.4 reMote control - learnIng keyS
The PVR10HD’s remote control has learning keys located on the top left corner. These keys (except for the SET key) can be used to memorize corresponding keys from an existing remote, such as your TV or AV receiver.
With this feature you could easily turn your TV on and off, and adjust the volume of your AV receiver using the PVR10HD’s remote control without having to touch the remote for your TV or AV receiver.
Instructions on how to pair your Pvr10hd remote with your existing tv remote:Please note: The basic principle outlined in the following instructions apply to other devices as well.
1. Press and hold the Set key on the PVR10HD remote for a few seconds until the TV POWER button lights up bright red.
2. Press one of the four learning keys (such as TV POWER key). The red led indicator will be flashing rapidly.
3. Aim your existing TV remote control at the “receiving window” of the PVR10HD remote, and press the corresponding key on your TV remote (such as TV POWER key) to learn. The indicator status changes from flashing to always bright, which means the learning process has completed successfully.
4. Repeat steps 2 and 3 to set other learning keys C1 (Custom 1), C2 (Custom 2) and TV/AV in the same way.
5. Once you’ve completed your set up press the Set key to exit.
If the operation fails, please repeat the steps above and try again.
notes: ▪ During the pairing process, put the two remote controls on the
same horizontal surface and ensure there is a 5cm or less space between the two remotes.
▪ If there is no activity for 15 seconds, your PVR10HD remote will automatically exit from learning mode
▪ Some TV remotes may not support this function.
P.SWAP P.MOVEPIP
OK
CH
CH
VOLVOL
HDD
PVRPOWERTV POWER
TV/AV QZ-
C1 C2
GHI
PRS TUV WXY
JKL MNO
ABC
1 2 3
4 5 6
7 8
0P-
P+ 9
DEF
SET
TEXT
CC RECALL INFO
MUTE AUDIO
PLAY MARK ENDSET MARKFIRST
STOP RECORDPAUSEPLAY
SLOW TIMERRECORD
FFREW
MENUFAV
EXIT
EPG
LIST
Learning Eye
TV REMOTE
PVR10HD REMOTE
5cm distance

11
2. InStallatIonBefore you turn on your PVR10HD, please connect your TV and other devices first.
If you wish to watch and record two channels simultaneously you will need to make sure that you have connected the LOOP OUT 1 output with the ANT IN 2 input using the supplied cross over RF cable!
2.1 connectIng to your tv
There are four ways to connect the PVR10HD to your TV.
2.1.1 tV CoNNECtIoN - hdMI
HDMI offers the best quality connection between your TV and PVR using a single digital cable to transmit audio and video.
RF CABLE
HDMI CABLE
Power SupplyUse cross over
RF cable to connect Loop Out 1 and ANT IN 2
▪ Use an RF cable to connect the TV antenna to the ANt IN 1 input on the PVR10HD. ▪ Using an HDMI lead, connect one end to the hdMI output on the PVR10HD and the other end to the HDMI
input on your TV. ▪ Switch to the HDMI source on your TV (refer to your TV manual if needed)

12 WINTAL PVR10HD USER MANUAL
2.1.2 tV CoNNECtIoN - coMPonent
COMPONENT INPUT AUDIO
RCA CABLEYPbPr CABLE
RF CABLE
Power Supply
▪ Use an RF cable to connect the TV antenna to the ANt IN 1 input on the PVR10HD. ▪ Using a 3x RCA component lead, connect the green Y , the blue Pb and the red Pr connectors to the
corresponding ports on your PVR10HD and TV. ▪ For audio, using a 2x RCA lead, connect the left channel audio (WHITE) and the right channel audio (RED)
connectors to the L and R ports on your PVR10HD (next to the Y Pb Pr output ports) and the other end to the corresponding ports on your TV.
▪ Switch to the Component source on your TV (refer to your TV manual if needed)

13
2.1.3 tV CoNNECtIoN - S-vIdeo
AUDIO S-VIDEO
RCA CABLE
S-VIDEO CABLE
RF CABLE
Power Supply
▪ Use an RF cable to connect the TV antenna to the ANt IN 1 input on the PVR10HD. ▪ Using an S-VIDEO (S-VHS) lead, connect one end to the S-VIDEO output on your PVR10HD and the other
end to the S-VIDEO input on your TV. ▪ For audio, using a 2x RCA lead, connect the left channel audio (WHITE) and the right channel audio (RED)
connectors to the L and R ports on your PVR10HD (next to the Y Pb Pr output ports) and the other end to the corresponding ports on your TV.
▪ Switch to the S-VIDEO (sometimes called S-VHS, YuV) source on your TV (refer to your TV manual if needed)

14 WINTAL PVR10HD USER MANUAL
2.1.4 tV CoNNECtIoN - coMPoSIte av
Use the included AV lead to make a connection between your TV and the PVR10HD.
AV INPUT
RCA CABLE
RF CABLE
Power Supply
▪ Use an RF cable to connect the TV antenna to the ANt IN 1 input on the PVR10HD. ▪ For video, connect the yellow end of the Composite AV lead to the CVBS input on the back of your PVR10HD
and to the VIDEO input on your TV. ▪ For audio, connect the left channel audio (WHITE) and the right channel audio (RED) connectors to the L and
R ports on your PVR10HD (just below the CVBS output) and the other end to the corresponding ports on your TV.
▪ Switch to the VIDEO (sometimes called VIDEO 1, CVBS) source on your TV (refer to your TV manual if needed)

15
2.2 external connectIonS
2.2.1 external av In
Your PVR10HD features two rear AV inputs that allow you to hook up any external AV source such as, another set top box, DVD player, Blu-ray player etc. You can view your external video sources directly from the channel list and choose to record to the internal hard drive or an external hard drive attached via USB.See the following diagram for connection options.
AV INPUT
AV OUTPUT
RCA CABLE
RCA CABLE
Power Supply

16 WINTAL PVR10HD USER MANUAL
2.2.2 connectIng to other devIceS
Your PVR10HD is able to connect to a variety of devices.
RF CABLE
RCA CABLE
HDMI CABLES/P DIFF CABLE
N
ETW
OR
K CABLE
Power Supply
Please note:ethernet Port
The ethernet port located on your PVR10HD will allow it to receive MHEG-5 broadcasts once it becomes available in Australia. We have included this to make your PVR10HD as future proof as possible. MHEG-5 provides interactive/hybrid services beyond broadcast TV and also allows for EPG data to be transmitted via the internet.
uSB Port
The PVR10HD accepts USB flash drives, 2.5” portable HDDs, 3.5” HDDs as well as card readers connected via the front and/ or rear USB ports. Refer to section 5. “USB Playback” on page 33 for more information.If you are having problems with connecting USB devices, please ensure that your drives are formatted as FAT32.Your PVR10HD can playback JPG photos and MP3 audio via USB, and can also record to your USB devices.
17
2.3 Power on
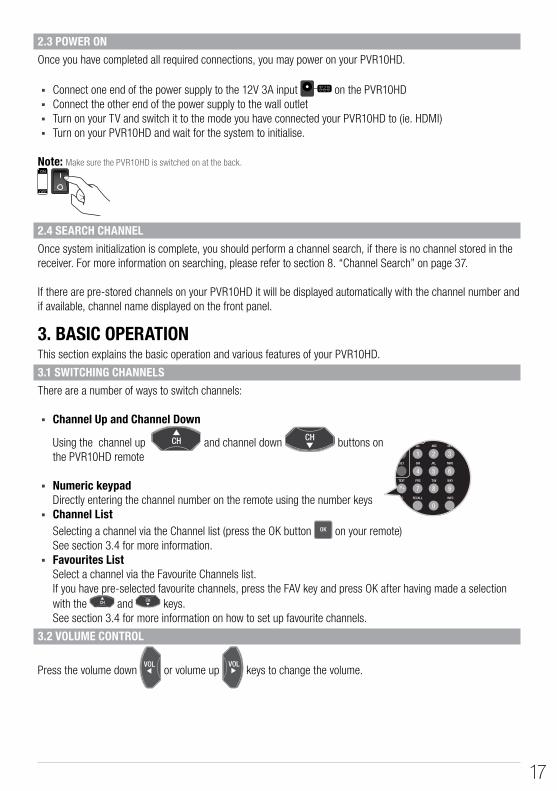
Once you have completed all required connections, you may power on your PVR10HD.
▪ Connect one end of the power supply to the 12V 3A input on the PVR10HD ▪ Connect the other end of the power supply to the wall outlet ▪ Turn on your TV and switch it to the mode you have connected your PVR10HD to (ie. HDMI) ▪ Turn on your PVR10HD and wait for the system to initialise.
note: Make sure the PVR10HD is switched on at the back.
2.4 Search channel
Once system initialization is complete, you should perform a channel search, if there is no channel stored in the receiver. For more information on searching, please refer to section 8. “Channel Search” on page 37.
If there are pre-stored channels on your PVR10HD it will be displayed automatically with the channel number and if available, channel name displayed on the front panel.
3. BaSIc oPeratIonThis section explains the basic operation and various features of your PVR10HD.
3.1 SwItchIng channelS
There are a number of ways to switch channels:
▪ channel up and channel down
Using the channel up and channel down buttons on the PVR10HD remote
▪ numeric keypad Directly entering the channel number on the remote using the number keys
▪ channel list Selecting a channel via the Channel list (press the OK button on your remote) See section 3.4 for more information.
▪ favourites list Select a channel via the Favourite Channels list. If you have pre-selected favourite channels, press the FAV key and press OK after having made a selection with the and keys. See section 3.4 for more information on how to set up favourite channels.
3.2 voluMe control
Press the volume down or volume up keys to change the volume.

18 WINTAL PVR10HD USER MANUAL
3.3 channel InforMatIon Bar
The Channel Information bar displays basic and extended information on the currently watched program. ▪ Press the Info key once to display the current channel information ▪ Press the info key twice to display current program information
Note: Switching channels will also bring up the channel information bar.
[Channel Information Bar]
1 Detailed information of current program2 Channel number and name3 Current and next program information4 Current audio mode5 Audio decoding standard6 Current time7 Standard/ High Definition mode icon
3.4 channel lISt
The Channel list window allows you to quickly and easily browse the available channels. It also allows you to set your favourite channels.
▪ Press the OK key on your remote to bring up the channel list.
▪ Use or to switch between different list types (Channel list/ Favourites)
▪ Use the and buttons to
select individual channels
▪ Press the P+ and P- buttons to page up or page down
▪ Press the key to confirm your selection

19
3.4.1 favourIte channel lISt
The favourites menu feature allows you to easily access your favourite and frequently watched channels. Press the FAV key on your remote to bring up the favourites list.
To add or remote channels from your favourite list: ▪ Press the to bring up the channel list ▪ Locate the channel you want to add to favourites using the and buttons ▪ Press the FAV key
You can confirm the operation if a heart has appeared next to the channel name.
Follow the above steps if you would like to remove a channel from your favourites list.
3.5 audIo SettIng
1. Press AUDIO key to display audio selection dialogue
2. Press the and keys to select an audio language and press key to confirm
3. Press or to select left, right or stereo mode
4. Press the EXIT key to save and exit
Note: The currently streaming program must contain multiple audio tracks to be able to change the audio language.
3.6 teletext
Teletext works as an electronic newspaper in which you can browse multiple pages of information, such as news, traffic, stock, weather, etc.
1. Press TEXT key to display Teletext information.
2. The first page shows the index. Browse to your desired page by entering its page number using the numeric keypad on your remote. In the example on the right, keying 300 on your remote will take you to the WEATHER page.
3. Press the EXIT key to hide the Teletext information.
Note: This function needs your local operator support.

20 WINTAL PVR10HD USER MANUAL
3.7 cloSed caPtIonS
Closed Captions is an option to display text that provides additional or interpretive information no the currently streaming program.If you have set closed captions to “On” under General Setup, you can press the CC key on your remote to turn closed captions on or off.
Note: This function needs your local operator support.
3.8 PIcture-In-PIcture (PIP)
PIP allows the display of two channels simultaneously. It is a useful feature where you may want to visually see whether a program has returned from an ad break, or if you want to keep an eye out on a sports game while watching another show.
3.8.1 actIvate PIP
Before you can use the PIP function you must enable it in the settings.
Select MEnu SEttINGS GENERAL SEttINGS and press the key to enter.
1. Highlight “PIP” and press the key to pop up a drop-down list.
2. Select “On” and press the key to confirm.
3. Press the EXIT key and a message box pops up for confirmation.
4. Select “OK” and press the key to confirm, and a reboot prompt pops up on-screen.
5. Select “OK” and press key to reboot or select “ExIT” and press OK key to cancel the operation.
Notes: ▪ This function is unavailable when certain screens are activated on the PVR10HD, such as the channel list screen, detailed information
window, etc. Just exit out to the main screen and try again. ▪ You can also press PIP key and activate PIP function when not in any menus. ▪ After making a change, please ensure you reboot the unit to have the PIP On or Off settings take effect.
IMPortant: PIP is not supported through Composite AV (CVBS) and S-VIDEO. Please make sure you connect via Component or HDMI if you wish to use this feature. If you have previously enabled PIP and connect your PVR10HD via composite or s-video, there will be no video output. If this is the case, connect the receiver to a HDTV via YPbPr or HDMI and disable PIP following the instructions above.
3.8.2 Show/ hIde PIP wIndow
Press the PIP key on your PVR10HD remote to show or hide the PIP window.
3.8.3 SwaP PIP wIndow
Press the P.SWAP key to switch the main window with the PIP window and vice versa.

21
3.8.4 change PoSItIon of PIP
Each time you press the P.MOVE key, the PIP window changes position.
3.8.5 SwItch PIP MaIn channel
Follow the instructions to change the main channel while PIP is active.
1. Press the to display the channel list window.
2. Use the and keys to select a channel
3. Press the again to confirm.
3.9 uSIng the on-Screen keyBoard
Your PVR10HD features an on-screen keyboard that you will wish to use from time to time when renaming files, groups etc.
Use the following guide to familiarise yourself with the keyboard.
1. To select characters, use the directional keys on your remote
2. Press the key to input the selected characters3. clear: Will clear the input field completely allowing you to start over.
caPS on/ off: Toggles between capital and lowercase letters. Back: Backspace key to delete the last character ok: Confirm keyboard entry cancel: Cancel name change
To enter a space, highlight the blank box and press .

22 WINTAL PVR10HD USER MANUAL
4. PerSonal vIdeo recordIng (Pvr) featureSYou can record programs on to the integrated hard drive or to an attached USB device. Your PVR10HD provides a number of handy PVR functions such as one-touch quick recording, schedule recording, time shift and more.
4.1 Before you BegIn
▪ Radio programs cannot be recorded. ▪ For ideal performance, the capacity of the attached USB device should not be less than 8GB and should be
high speed USB2.0 or greater. ▪ If space on your storage device is insufficient, recording will stop automatically. ▪ Do not unplug the USB device while a recording is in place. ▪ Make sure you “Unmount USB” before unplugging your USB drive from the PVR10HD. For detailed
instructions please refer to 6.2 “Unmount USB Device” on page 35.
4.2 Set Storage devIce
Select the storage device to store your recordings.
Press the MEnu key and navigate to SEttINGS
StoRAGE dEVICE and press key to enter.
1. Press the and keys to select a storage device.
2. Press the key to pop up a drop-down list.
3. Select dEFAULt StoRAGE and press the key to confirm.
4. Press the EXIT key to save and exit.
note: You can also select MEnu PVR StoRAGE dEVICE and press the key to enter. Select a storage device and press the
key to confirm.
4.3 Pvr SettIngS
If you don’t set any recording options, your PVR10HD will record based on default settings.
To customize the recording settings, select MEnu PVR PVR SEttING and press key to enter.
4.3.1 Schedule Start/StoP tIMe offSet
This feature allows you to decrease or increase the start time of scheduled recordings. This allows you to compensate for programs not starting at their pre-announced time. For example, if scheduled start time for a particular show is “13:00” and the Schedule Start Time Offset has been set to “-4 Min”, the recording will begin at 12:56.

23
Press the or keys to select a time from -10 to +30 minutes.
Options are: -10m/ -8m/ -6m/ -4m/ -2m/ 0m/ 2m/ 4m/ 6m/ 8m/ 10m/ 30 minutes
4.3.2 reMInd Before Schedule Start
Before a scheduled recording is about to commence, you will receive a pop up window notifying the start of recording. You can either turn this feature off, or change how many minutes prior to the start of a pre-scheduled recording you’d like to be notified.
Press the or keys to make your selection.
Options are: OFF/ 30s/ 60s/ 90s/ 120 seconds
4.3.3 Pvr Icon tIMe out
Sets the on-screen duration of the PVR icon which displays the recording information on the top left hand corner of the screen.
Press the or keys to make your selection.
Options are: ALWAYS/ 5s/ 10s/ 30s/ 60 secondsIf “Always” is selected, the PVR icon is displayed on-screen all through the recording.
4.3.4 Manual recordIng duratIon
Set the default recording duration for the one-touch recording feature pressing the rECOrd button on your remote.
Press the or keys to make your selection.
Options are: 1h/ 2h/ 3h/ 4h/ 8h/ 12h/ 16h/ 24 hours4.3.5 tIMe-ShIft Start Mode
Set time shift start mode.
Press the or keys to make your selection.
Options are: Always/ Never/ Pause Key
always: Time Shift is always on. When you start watching a channel, the PVR10HD will automatically begin recording in the background.
Pause key: Start time shift with the PAuSE key. While watching live tv, this option will pause the current program and start time-shift recording in the background.never: Disable time shift.
note: For detailed operations about time shift, please refer to section 4.9 “Time-Shift” on page 32.

24 WINTAL PVR10HD USER MANUAL
4.4 QuIck recordIng
If you want to record current program instantly, you can use this function.4.4.1 Start recordIng
When watching program, press the rECOrd key to start recording. is displayed in top left corner of screen indicating that a recording has begun.To record a program from another channel, switch to your desired channel while a current recording is in progress and press the rECOrd key again.
4.4.2 StoP recordIng
After pressing the STOP key when recording, a list of currently ongoing recordings will appear on-screen.Select a recording and press the key to stop.
note: If you are playing back a pre-recorded program while recording, pressing the STOP key will stop playback. To stop
recording, press the STOP key again.
4.5 Schedule recordIng
You can schedule to record future programs and at the set date and time, your PVR10HD will start recording automatically. You can modify schedules and delete unwanted schedules.
To view and edit your scheduled recording list, select MEnu PVR SChEdULE LISt and press key.
Alternatively, you can press the TIMEr rECOrd key to access the scheduled recording list when there’s no menu item on the screen.
note: You can schedule recordings directly in the EPG (Electronic Programme Guide) window. For detailed operations, please refer to section 7.2 “Schedule via EPG” on page 37.
4.5.1 add Schedule
1. Once in the SChEdULE LISt menu, press the key directly to display add schedule
window. note: If there is an existing schedule stored on your
PVR10HD, press to bring up a drop-down list,
select Add and press to display the add schedule
window.

25
2. Set schedule parameters as follows:
Schedule type: Press the or
keys to select REC or PLAY . Start time: Press the nuMbEr kEyS to set your schedule start date and time, or press to display the calendar window. Set your desired schedule start date and time according to screen information. end time: Press nuMbEr kEyS to input end time.
Schedule Mode: Press or keys to select oNCE , dAILY or wEEkLY . If “Weekly” is selected, press
to pop up the weekly window. Select one or more days with the and keys and press
to confirm. Highlight ok and press the key one last time to save and exit. channel name: Press to display channel list, select a channel with the and keys and press key to confirm.
3. Move cursor to ok and press to save the new schedule.
4.5.2 ModIfy Schedule
1. To modify an existing scheduled recording, make sure you are in the SChEdULE LISt menu and use the and keys to select the scheduled item you wish to modify.
2. Press the key to bring up a menu from which you can choose ModIFY . Press again to enter the edit menu.
3. Refer to the previous section on how to adjust the scheduled recording.
4.5.3 delete Schedule
1. To delete an existing scheduled recording, make sure you are in the SChEdULE LISt menu and use the and keys to select the scheduled item you wish to delete.
2. Press the key to bring up a menu from which you can choose dELEtE . Press to confirm and you will notice a red cross indicating that the item has been marked for deletion. If you would like to undo at this point, just press on the same item and choose CANCEL dEL .

26 WINTAL PVR10HD USER MANUAL
3. To confirm your choices, press the EXIT key choose ok when prompted to delete the items that have been flagged.
note: You can also choose to Delete All which will flag all the items in your scheduled list for deletion.
4.6 oPeratIon whIle recordIng
4.6.1 vIew/ ModIfy recordIng InforMatIon
While recording a program, you can view recording information, rename files and modify recording duration if needed.Select MEnu PVR RECoRdING INFo and press the key.
Alternatively, if you are watching the program that is currently being recorded, you can bring up the Record Info screen by pressing the
rECOrd key.
The following explains the different options:
Index: Press or to select R1
(Recording 1) or R2 (Recording 2) if active.
Mode: Displays the recording mode (Schedule or Quick; indicating whether it’s a pre-scheduled recording or a one-touch recording).
channel name: Displays the channel name that is currently being recorded.
file name: You can rename the file if needed. Press to pop up the on-screen keyboard and rename the file as desired. For detailed instructions on how to use the on-screen keyboard, please refer to section 3.9 “Using the On-screen Keyboard” on page 21.
valid record time: Displays the valid record time. Valid recording dismisses signal lost and will display the actual duration of successful recording.
Past time: Displays how long the recording has been going for.
duration: Press the or key to adjust the recording duration in minutes. Press and hold the keys to
adjust the time in big jumps.
Pause: Select “Pause” and press to pause recording. Select “Resume” to continue the recording.
ok: Select “OK” and press to confirm your changes.
cancel: Select “Cancel” and press key to cancel your changes.

27
4.6.2 SwItchIng channelS whIle recordIng
Because your PVR10HD has twin tuners, you are able to record two channels from two separate transponders (such as Channel 9 and Channel 10). At the same time, you are also able to watch a third sub-channel for Channel 9 or Channel 10 live.
For example, if you are recording Channel 9, and Channel 10 simultaneously, then you are able to watch a third sub-channel from either the Channel 9 transponder, or the Channel 10 transponder (ie. you can watch ONEHD or Channel 9’s GO! channel) but not SBS or channel 7 etc.
To see which channels you are able to switch to while two simultaneous recordings are going on, with nothing displayed on the screen, press the button to bring up the channel list. You will automatically be shown the Filtered List which in the above example would display the sub-channels for 9 and 10 only.If you attempt to switch to another channel from a third transponder, you will see a This operation is not available message.
note: You must stop at least one recording if you wish to watch another channel from a different transponder.
4.6.3 PlayBack current PrograM
You can start playing back the current program during recording. For detailed operations, please refer to section 4.9 “Time-Shift” on page 32.
4.7 PlayBack Pre-recorded fIleS
To playback a pre-recorded file located on your hard drive, press MEnu REC FILES and press .
Alternatively, with no menu or dialogue box
showing on-screen, press the key on your remote.
This brings up the Recorded Files list where you can browse and select pre-recorded files from the internal HDD or external USB drives. If present, you can also playback the currently recording files which are indicated in red text. To playback a file:
1. Press the and keys to choose your file.2. Press to bring up a pop-up dialogue3. Select PLAY and press to start playback.
Here are your options during playback;4.7.1 PauSe
To pause playback, press the PAuSE key. To resume playback press the PLAy key.
4.7.2 rewInd/ faSt forward
To rewind playback use the rEW key // to fast forward playback use the FF key

28 WINTAL PVR10HD USER MANUAL
Speed settings are: x2 - x4 - x8 - x16 - x32
Resume normal playback with the PLAy key.
4.7.3 Slow forward
Press the SLOW key to activate slow motion. Speed settings are: x1/2 - x1/4 - x1/8
Resume normal playback with the PLAy key.
4.7.4 PlayBack ProgreSS Bar
If you press the PLAy key or the InFO key during playback, you can bring up the playback progress bar.
1. File Name2. Current progress (hh:mm:ss)3. Operation help info
4. Time bar5. Total playback time
4.7.5 SkIP Back/ SkIP forward
This feature allows you to easily skip through a long recording in a very short amount of time.
1. Press the INFO key to display the progress bar
2. Press the FIrST or End key to skip back or forward in playback.
note: You can also skip back or forward in one minute intervals using the or keys during playback.
4.7.6 BookMarkS
You can jump to a position directly by bookmark function while playing back a pre-recorded file.
This feature allows you to easily tag important bits of a recording or resume playback from a previous viewing.
add Bookmark1. During playback, press the InFO key to
display the progress bar.

29
2. Press the green SET MArk key to add a bookmark at this point.
Note: You can set up to 20 bookmarks per recorded file.
go to Bookmark
1. During playback, press the InFO key to display the progress bar.
2. Press the yellow PLAy MArk key to jump to the next bookmark on the progress bar. Press the
PLAY MARK key again to jump through the available bookmarks (identified by the icon).
delete Bookmark
1. During playback, press the InFO key to display the progress bar.
2. Press the PLAy MArk key to jump to the desired bookmark.
3. Press the green SET MArk key to remove the bookmark.
4.7.7 fIle edItIng (fIle cut)
You can cut out certain parts of your pre-recorded files. This is an ideal solution to get rid of ads, or to cut out unwanted sections in a recording.
1. During playback, press the InFO key to display the progress bar.
2. Press to enter file cut mode.
3. Mark a start point by pressing the SET MArk key and mark your end point by pressing the PLAy
MArk key.
4. Press to complete the operation. A message box pops up for confirmation.
5. Select ok and press the key to confirm or select CANCEL and press the key to cancel.
4.7.8 StoP PlayBack
To manually stop playback press the STOP key.
4.8 fIle oPeratIonS
You can perform various operations on pre-recorded files such as ▪ Play ▪ Copy
▪ Delete ▪ Lock
▪ Group ▪ Rename
To bring up the file operation menu, first enter the RECoRdEd FILES list by pressing MEnu REC FILES and
press . Alternatively press the key on your remote.

30 WINTAL PVR10HD USER MANUAL
4.8.1 delete recorded fIleS
1. In the recorded files list use the and
keys to choose your file.
2. Press to bring up a pop-up dialogue box
3. Select dELEtE and press
4. You will notice a red cross indicating that
the item has been marked for deletion.
If you would like to undo at this point, just
press on the same item and choose
CANCEL dEL .5. To confirm your choices, press the EXIT key choose ok when prompted to delete the items that have been
flagged.
4.8.2 grouP recorded fIleS
The group feature allows you to easily categorize your recordings and is ideal, for example, when you’d like to put a particular TV show under its own listing.
Once you have set up your groups, it will appear on the left hand column in the Recorded Files list.
create a groupBefore you can use the group feature you will have to create a group.
1. In the recorded files list use the and keys to choose your file.
2. Press to bring up a pop-up dialogue box
3. Select GRoUPMGR from the list and press
4. Press the green SET MArk key to create a new group
5. Give your new group a name by using the on-screen keyboard (refer to section 3.9 “Using the On-screen
Keyboard” on page 21 for more information on using the keyboard)
6. When done, highlight OK on the on-screen keyboard and press to confirm the operation
7. You will see your newly created group in the Group Edit window8. Follow steps 4-7 to add more groups otherwise, if you want to add to the group you just created, make sure
the group is highlighted on the screen and press .
9. The icon next to your group name will change from to indicating that your file has been added.
note: A single recording can belong to multiple groups. Just select your desired group(s) and press to add or remove it.
add to a group
Follow steps 8 and 9 to add a file to an existing group

31
delete a groupWith the Group Edit window on-screen, press the
FIrST key to delete a group. Select ok on the warning dialogue box and press to confirm your operation.
rename a groupChoose the group you wish to rename in the Group Edit window and press the PLAy MArk
key to bring up the on-screen keyboard. Refer to the instructions in section 3.9 “Using the On-screen Keyboard” on page 21 for more information on how to use the on-screen keyboard.
When done renaming, highlight ok on the on-screen keyboard and press to confirm the operation.
4.8.3 renaMe recorded fIle
1. In the recorded files list use the and
keys to choose your file.
2. Press to bring up a pop-up dialogue box.3. Select RENAME and press to bring up
the on-screen keyboard. Refer to the instructions in section 3.9 “Using the On-screen Keyboard” on page 21 for more information on how to use the on-screen keyboard.
4. When done renaming, highlight ok on the on-screen keyboard and press to confirm the operation.
note: There is a 15 character limit (including spaces) on names you can enter in the input field. Your PVR10HD will automatically accept file names longer than 15 characters if the original recorded show name exceeds this limit, but you will not able to add to this.
4.8.4 lock recorded fIle
Locking a file will prevent accidentally deleting a recording that wasn’t intended to be deleted.It will also prevent local playback unless the user enters the local password (The default password is 0000).
It’s an ideal solution to make sure you don’t lose any recordings you wish to keep and protect children from inappropriate content.
32 WINTAL PVR10HD USER MANUAL
To lock a recorded file:
1. In the recorded files list use the and keys to choose your file.
2. Press to bring up a pop-up dialogue box.3. Select LoCk and press
4. You will notice a lock symbol indicating that the file has been marked for locking. If you would like to undo just press on the same item and choose lock again. You will be prompted to enter the local password.
5. Press the EXIT key to save and exit.
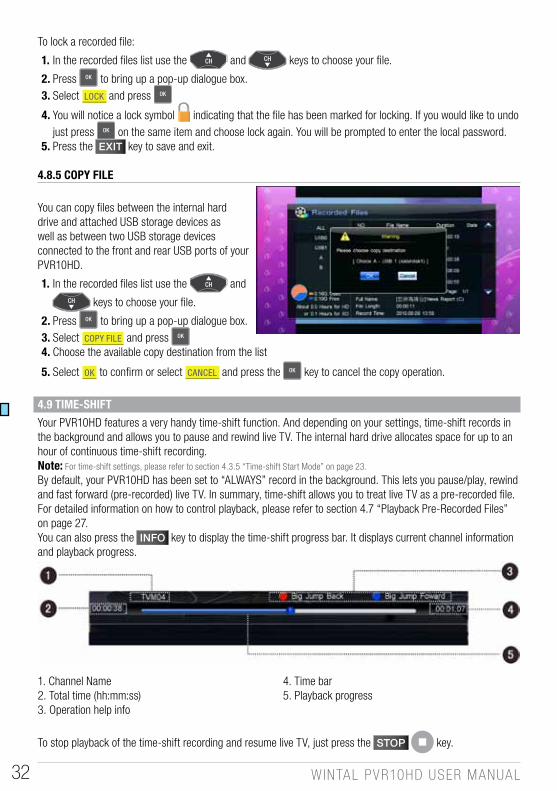
4.8.5 coPy fIle
You can copy files between the internal hard drive and attached USB storage devices as well as between two USB storage devices connected to the front and rear USB ports of your PVR10HD.
1. In the recorded files list use the and
keys to choose your file.
2. Press to bring up a pop-up dialogue box.3. Select CoPY FILE and press 4. Choose the available copy destination from the list
5. Select ok to confirm or select CANCEL and press the key to cancel the copy operation.
4.9 tIMe-ShIft
Your PVR10HD features a very handy time-shift function. And depending on your settings, time-shift records in the background and allows you to pause and rewind live TV. The internal hard drive allocates space for up to an hour of continuous time-shift recording. note: For time-shift settings, please refer to section 4.3.5 “Time-shift Start Mode” on page 23.
By default, your PVR10HD has been set to “ALWAYS” record in the background. This lets you pause/play, rewind and fast forward (pre-recorded) live TV. In summary, time-shift allows you to treat live TV as a pre-recorded file. For detailed information on how to control playback, please refer to section 4.7 “Playback Pre-Recorded Files” on page 27.You can also press the InFO key to display the time-shift progress bar. It displays current channel information and playback progress.
1. Channel Name2. Total time (hh:mm:ss)3. Operation help info
4. Time bar5. Playback progress
To stop playback of the time-shift recording and resume live TV, just press the STOP key.

33
5. uSB PlayBackYour PVR10HD is able to playback MP3 audio files and JPG photos from attached USB devices.notes:
▪ Your USB device should be connected to your PVR10HD before operation ▪ Do not abruptly unplug your USB device during playback!
▪ You should unmount your USB device before unplugging it from the PVR10HD. Please refer to section 6.2 “Unmount USB”
5.1 MP3 PlayBack
Insert a USB drive that contains MP3 audio files
to either the front or rear USB port.
Select MEnu MULtIMEdIA MP3 and
press the key.
1. Use the and keys to
choose your file.
2. Press to start music playback. You can
pause and resume playback using the key.
notes: ▪ Press the FAV key to switch between SINGLE PLAY | SEQUENCE PLAY | RANdoM PLAY
▪ SINGLE PLAY: Repeats the currently playing song ▪ SEQUENCE PLAY: Plays the songs in listed order ▪ RANdoM PLAY: Plays songs in random order
▪ Use the or keys to adjust the playback volume.
5.2 dIgItal PhotoS
Insert a USB drive that contains photos to either
the front or rear USB port.
Select MEnu MULtIMEdIA dIGItAL Photo
and press the key.
1. Use the directional keys to select a thumbnail
2. Press to display the selected photo in full screen
3. Press the or keys to skip to the previous or next photo

34 WINTAL PVR10HD USER MANUAL
4. Press the key to bring up the SLIdEShow and ExIt menu.
With SLIdEShow highlighted press to begin the slideshow.
Highlight ExIt and press to exit full screen mode and return to thumbnail view. Alternatively, press the
EXIT key on your remote.
6. Storage devIce ManageMent6.1 forMat Storage devIce
IMPortant: formatting your storage device will result in deleting all files.Please take care when choosing this option and make sure you back up any important data. Please refer to section 4.8.5 “COPY FILES” on how to copy and back up files between from the internal hard drive to an external HDD.
Select MEnu PVR FoRMAt and press the key.
1. With StoRAGE dEVICE highlighted press or the key to pop up a drop-down list of available storage
devices that can be formatted.
2. Use the and keys to select the storage device you wish to format and press
3. Use to key to highlight ok and press to get to the password prompt.
4. Enter the local password (default password is 0000) to confirm.
Alternatively, you can also select MEnu
SEtUP StoRAGE dEVICE and press the
key.
1. Enter the local password (default password is
0000) to confirm.
2. Use the and keys to select
the storage device you wish to format and
press
3. Select FoRMAt and press , a warning box pops up for confirmation.
4. With ok highlighted press to complete the format operation. There will not password confirmation once
you press as you’ve already entered the password to enter this screen in the first place.
note: In this screen you can verify free and used space for your storage device.

35
6.2 unMount uSB devIce
IMPortant: always make sure you unmount your uSB device before unplugging it!Failure to do so may result in corrupt data, damage your USB device, or cause your PVR10HD to behave abnormally.
Select MEnu PVR UNMoUNt USB and press the key.
1. The right hand column lists your currently attached USB devices. If you have more than one USB device attached, use the key to bring up a pop-up menu to choose the USB drive you wish to unmount.
2. If you have only one USB device attached, you can use the key to highlight ok and press
3. A confirmation window will pop up, choose ok to confirm, or ExIt to cancel the operation.
Alternatively, you can also select MEnu
SEtUP StoRAGE dEVICE and press the
key.
1. Enter the local password (default password is
0000) to confirm.
2. Use the and keys to select
the USB storage device you wish to unmount
and press
3. Select UNMoUNt USB and press , a warning box pops up for confirmation.
4. With ok highlighted press to complete the format operation. There will not password confirmation once
you press as you’ve already entered the password to enter this screen in the first place.
note: In this screen you can verify free and used space for your storage device. You will not see the UNMOUNT USB option for the Internal HDD.

36 WINTAL PVR10HD USER MANUAL
7. tv guIde/ electronIc PrograMMe guIde (ePg)The built-in EPG functionality provides continuously updated scheduling information for current and upcoming programming from all the available channels. You can view up to a weeks worth of programming via the EPG menu as long as this information has been broadcast by he broadcaster.
To enter the EPG screen,
Select MEnu EPG and press the key.
Alternatively just press the EPG key on your remote when in non-menu mode.
7.1 vIew ePg InforMatIon
The EPG window:
1. Channel list2. Preview window3. Current time4. Date table5. Program list6. Operation help info
Press the EPG key to toggle between the channel list and program list.
In channel list:
▪ Use the and keys to select your channel
EPG information for the highlighted channel appears in the program list window
▪ Press to view the selected channel in full screen.
In program list:
▪ Use the or keys to select the days of the week
▪ Use the and keys to select the program
▪ Press the InFO key for detailed information on selected program
▪ Press to play the selected program in full screen or to schedule for a future viewing/ recording

37
7.2 Schedule vIa ePg
You can easily schedule TV shows to be recorded or played back in advance.
▪ While in the program list window, use the
and keys to highlight the
show you wish to record. ▪ Press to bring up the EPG SChEdULE
window. ▪ From here you can choose to RECORD or
PLAY the selected show, either once, daily, or weekly. Refer to section 4.5.1 add Schedule on page 24 for more information about the schedule options.
▪ Once you have confirmed your action you will notice a (RECORD) or (PLAY) icon based on your choice to record or play the selected program.
▪ Press the EXIT key to save and exit.
note: Based on your reminder settings, your PVR10HD may remind you prior to recording or switching to the chosen scheduled program. See section 4.3.2 REMIND BEFORE SCHEDULE START on page 23.
8. channel SearchIMPortant: do not switch off your Pvr10hd while a channel search is in progress.
8.1 Mux edIt
the Mux edIt is for advanced users only. More often than not, you will not need to adjust any settings in this window.
In Mux edit window you will find preset transponders (TPs) and their related parameters. You can add, modify and delete TPs.
To enter the EPG screen,
Select MEnu ChANNEL MUx EdIt and press the key.
8.1.1 add a tranSPonder
1. Press OK to bring up a pop up menu2. Select “Add” 3. Input the Frequency (KHz) using the numeric
keypad and choose the required bandwidth from the list.
4. ExIT out to save your selection
You can also modify and delete transponders from this screen.

38 WINTAL PVR10HD USER MANUAL
8.2 auto Search
For most applications, AUTO SEARCH is the best option to quickly set up your PVR10HD.
Select MEnu ChANNEL AUto SEARCh
and press the key.
As soon as you press the OK key your, PVR10HD will automatically begin to search for all available HD and SD digital channels as well as available radio channels.
Once channel scan has completed the PVR10HD will exit from the AUTO SEARCH screen and display the first available channel in full screen.
8.3 Manual Search
If auto search is not finding a particular channel and you know the frequency and bandwidth details, then you may enter them in the Manual Search window.
Select MEnu ChANNEL MANUAL SEARCh
and press the key.
1. Use the key to move down to the
Frequency (KHz) field and input the numbers
using the numeric keypad on the remote.
2. When done, use the key again to move down to the Bandwidth (M) field. Press and choose the
appropriate bandwidth from the pop up menu.
3. Scroll down to the SEARCh tYPE field and choose either SINGLE or NEtwoRk .
4. Move up to BEGIN SEARCh at the top of the window and press to begin the search.
Once the search is complete you will be notified on-screen whether any channels were found.
8.4 channel InforMatIon
Select MEnu ChANNEL ChANNEL INFo
This window displays information about current channel, such as PID values, frequency, bandwidth, signal level and signal quality. This information could be helpful to identify and solve reception issues.

39
9. edIt channelThe channel editing functionality in your PVR10HD makes it easy to organise the vast number of available channels by allowing you to lock, move, delete and favourite channels.
To enter the channel edit menu,
Select MEnu ChANNEL ChANNEL EdIt and press the key.
Enter the local password if prompted (The default password is 0000)
9.1 lock channel
1. Use the and keys to select
the channel you wish to lock
2. Use key to bring up the edit menu
3. Select LoCk and press
This will mark the channel with a symbol
(Once you’ve chosen Lock from the edit
menu, you can now mark multiple channels
using the key.)
4. Press again if you want to cancel the lock operation
5. Press the EXIT key twice to exit out of the channel edit menu and press with the
ok option highlighted to confirm your changes.
note: The local password is required to view programs of the locked channels.
9.2 Move channel
1. Use the and keys to select
the channel you wish to move
2. Use key to bring up the edit menu
3. Select MoVE and press
This will mark the channel with a symbol
4. Use the and keys to move
the channel into a new position
5. Press to lock the channel in position
6. Press the EXIT key twice to exit out of the channel edit menu and press with the
ok option highlighted to confirm your changes.

40 WINTAL PVR10HD USER MANUAL
To continue moving channels, just press to mark the channel with the symbol and follow the instructions
from 4-5 above.
9.3 delete channel
1. Use the and keys to select
the channel you wish to delete
2. Use key to bring up the edit menu
3. Select dELEtE and press
This will mark the channel with a symbol
(Once you’ve chosen Delete from the edit
menu, you can now mark multiple channels
using the key.)
4. Press the EXIT key twice to exit out of the channel edit menu and press with the
ok option highlighted to confirm your changes.
note: You will have to re-scan for channels that have been deleted. Refer to 8.2 Auto Search on page 38 for more information on how to automatically scan channels. If you wish to delete all channels before you run a auto scan, you can do so by choosing dELEtE ALL at step 3 above.
9.4 edIt favourIteS
1. Use the and keys to select
the channel you wish to add to favourites
2. Use key to bring up the edit menu
3. Select FAVoURItE and press
This will mark the channel with a symbol
(Once you’ve chosen Favourites from the edit
menu, you can now mark multiple channels using the key.)
4. Press the EXIT key twice to exit out of the channel edit menu and press with the
ok option highlighted to confirm your changes.
note: Refer to section 3.4.1 Favourite Channel List on page 19 for more information about Channel Favourites

41
10. SettIngSTo enter the settings screen, select MEnu SEttINGS and press the key.
10.1 general SettIngS
Use the and keys to select
the setting you would like to change. Pressing
will bring up the options available for your
selection.
EXIT to save your changes.
note: Bold items are the default values.
ASPECt RAtIo : The aspect ratio depends how the picture fits on your TV. Options are: 1. Pan and Scan 4:32. Letterbox 4:3
3. Default 4:34. Pan & Scan 16:9
5. Letterbox 16:96. default 16:9
RESoLUtIoN :1. 576p2. 720p 50Hz
3. 720p 60Hz4. 1080i 50hz
5. 1080i 60Hz6. 1080p 50Hz
7. 1080p 60Hz
note: Ensure that you select the correct resolution for your TV. Refer to your TV’s manual if in doubt. Should you choose a wrong resolution and the screen goes black, wait for 10 seconds without pressing any buttons and your PVR10HD will revert to the previous working resolution.
tIME ZoNE SEt : 1. vIc2. NSW/ ACT
3. QLD4. SA
5.WA6. TAS
7. NT
CLoSEd CAPtIoN : Closed captions are available only if it is being streamed by the broadcaster.See section 3.7 “Closed Captions” on page 20 for more information.1. On 2. off
dAYLIGht SAVING tIME : Set it to on if you are observing DST.1. On 2. off
MENU tRANSPARENCY : Set the opacity for the on-screen menu,1. High 2. Middle 3. Low 4. default
AUdIo dECodE : Sets the audio output via the rear S/PDIF port. If your AV receiver can decode Dolby Digital signals set it to “Dolby Digital”. If not, set it to “PCM” to output the decoded signal.1. dolby digital 2. PCMnote: Dolby Digital surround sound is only available if it is streamed by the broadcaster.
PIP : Enable or disable Picture-in-Picture. For more information on PIP, please refer to section 3.8 Picture-in-Picture (PIP) on page 20.1. On 2. off

42 WINTAL PVR10HD USER MANUAL
10.2 change PaSSword
IMPortant: the default password is 0000. for security reasons, it is highly recommended that you change this.
MEnu SEttINGS ChANGE PASSwoRd and press the key.
The local password is required to change certain settings, view and edit locked channels etc.
Input your existing password using the numeric keypad on your remote under existing Password.Enter your new password in the Input new Password and enter the same password in new Password again.
10.3 Pg lock (PARENtAL GUIdANCE)
MEnu SEttINGS PG LoCk and press the key.
Parental controls allow you to restrict programming based on their classification.
The default setting has Parental Guidance turned off. Enter the local password and choose your restriction level if you wish to enable this feature.
Options are: ▪ P - Pre-school ▪ c - Children ▪ Pg - Parental Guidance ▪ r - Restricted 18+
Once activated, any show that has a classification higher than what is chosen will be blocked from viewing. For example, if you select Pg above, shows that have a rating above PG will be locked from viewing.
You will have to input the local password to be able to view content that has been locked.

43
10.4 network SettIngS
MEnu SEttINGS NEtwoRk and press the key.
The ethernet port located on your PVR10HD will allow it to receive MHEG-5 broadcasts once it becomes available in Australia. We have included this to make your PVR10HD as future proof as possible. MHEG-5 provides interactive/hybrid services beyond broadcast TV and also allows for EPG data to be transmitted via the internet.
The default DHCP IP mode setting will automatically configure your PVR10HD based on your existing network settings. However, if required, you may choose StAtIC and enter the necessary information.
10.5 factory reSet
warnIng: factory reset will revert all settings back to factory defaults and erase all channels. Beware when choosing this option!
MEnu SEttINGS FACtoRY RESEt
Press the key and input the local password
(The default password is 0000).
Use the key to highlight ok and press the
key.
Wait for the reset operation to complete. Your PVR10HD will prompt you to do a channel scan once it’s done. Confirm it to initiate an auto channel search.

44 WINTAL PVR10HD USER MANUAL
10.6 Software uPdate
warnIng: Make sure you do not abruptly switch off power to your Pvr10hd during the upgrade process as this may harm your unit.
MEnu SEttINGS SoFtwARE UPdAtE
Press the key and input the local password (The default password is 0000).You can upgrade your PVR10HD via the front or back USB ports or via the RS-232 port.For USB upgrades, make sure you have downloaded the firmware file to the root of your flash drive.Press OK to initiate the upgrade process.
You will receive an on-screen prompt once the upgrade process is complete and your PVR10HD will reboot itself.
10.7 SySteM InforMatIon
MEnu SEttINGS SYStEM INFo
This window displays information specific to your PVR10HD such as hardware version, software version and more.

45
11. aPPendIx11.1 trouBleShootIng
dISPlay on front Panel IS off1. Power adapter is disconnected. Make sure power adapter is plugged into a proper power socket.2. The receiver is turned off. Turn it on.
dISPlay on front Panel IS on, But no Sound and PIcture on tv ScreenThe receiver is in stand-by mode. Press PVR POWER key on your remote to turn it on.
no SIgnal1. Antenna cable is not conected. Make sure that there’s a connection between your aerial and the PVR10HD. 2. You haven’t performed a channel scan. See section 8. Channel Search on page 37. no Sound1. Audio cable is disconnected or incorrectly connected. See 2.1 “Connecting to your TV” on page 11.2. The receiver is in mute mode. Press MUTE key on remote to restore sound.3. Volume is set to minimum. Increase volume to a proper level using the remote.4. Audio settings are incorrect. See section 3.5 “Audio Setting” on page 19 or “Audio Decode” under General Settings in on page 41.
no PIcture1. Video cable is disconnected or incorrectly connected. See 2.1 “Connecting to your TV” on page 11.2. The receiver is in radio mode. Switch to TV mode if you need.3. Your TV is not set to AV mode.
vIdeo and audIo MISMatch, or Sound out of SyncAudio settings are incorrect. See section 3.5 “Audio Setting” on page 19 or “Audio Decode” under General Settings in on page 41.
Poor QualIty PIctureWeak signal. Ensure proper connection between your aerial and PVR10HD.
reMote control doeSn’t work1. Flat batteries. Replace the batteries.2. Remote is not aimed at the receiver. Aim remote at the receiver.
cannot record PrograM1. Not enough space on your internal and/ or external HDDs. Delete files and create space on the hard drives.2. There’s a conflict with the current recording. Stop current recording or wait until the recording is finished.
cannot oPerate tIMe ShIft1. “Time-shift Start Mode” is set to “Never”. See section 4.3.5 on page 23.2. The capacity of attached USB drive is less than 8GB.
note: If you cannot solve the problems after referring to this trouble shooting, please contact us on 1800 337 366.

46 WINTAL PVR10HD USER MANUAL
11.2 SPecIfIcatIon
tunerInput frequency 47 ~ 858MHz
loop out frequency 47 ~ 858MHz
Input level -25 ~ 20dBuV
Bandwidth 6M, 7M, 8M
Input Impedance 75Ω
channel decodIngStandard DMB-T EN300 744
demodulation QPSK, 16 and 64QAM
audIo decodIngStandard ISO/IEC 13818-3
decoding MPEG-1 & MPEG-2 layer I and II, AC3
audio Mode Left, Right and Stereo
vIdeo decodIng
StandardISO/IEC 13818-2, MPEG-2 MP@ML,MPEG-4 AVC/ H.264 HP@L4
aspect ratio 4:3, 16:9
resolution 1920 × 1080p max.
hIgh defInItIon outPutoutput format 1080p, 1080i, 720p
output connector HDMI, Y/Pb/Pr
Power SuPPlyInput voltage 12 V 3A DC
PhySIcal characterIStIcSSize 320mm (L) × 223mm (W) × 40mm (H)
weight 1.4kg
operation temperature 0° ~ 40° C
Storage temperature -40° ~ 60° C
Storage humidity ≤93%
THIS WARRANTY CARD AND THE PURCHASE DOCKET (OR SIMILAR PROOF OF PURCHASE)
SHOULD BE RETAINED BY THE CUSTOMER AT ALL TIMES
TROUBLE SHOOTING HELP LINE
1300 662 946
CUSTOMER
CARE CENTRE
CUSTOMER CARE CENTRE
Customer Care Centre562 Spencer Street, West MelbourneVICTORIA 3003
THIS PRODUCT IS WARRANTED FOR 12 MONTHS FROM THE DATE OF PURCHASE. Subject to the conditions of this warranty, the Customer Care Centre will perform necessary service on the product without charge for parts, or labour if, in the opinion of the manufacturer/ manufacturer’s agent, the product is found to be faulty within the warranty period.
The warranties hereby conferred do not extend to any costs associated with the delivery, handling, freighting or transportation of the product or any part thereof or replacement of and do not extend to any damage or loss occurring during, or associated with transit.
If warranty service is required you should: Telephone the Customer Care Centre on 1300 662 946 Provide a copy of your purchase receipt that shows retailers identity and date of purchase.
Send or bring the product to your Customer Care Centre. Please note that freight to and/or from your Customer Care Centre must be arranged by you.
This warranty only applies if the product has been installed and used in accordance with the manufacturer’s recommendations (as noted in the operating instructions) under normal use and reasonable care. The warranty covers normal domestic use only and does not cover damage, malfunction or failure resulting from use of incorrect voltage, accident, misuse, neglect, build-up of dirt or dust, abuse, mis-adjustment of customer controls, mains supply problems, thunderstorm activity, infestation by insects or vermin, tampering or repair by unauthorised persons (including unauthorised alterations), exposure to abnormally corrosive conditions or any foreign object or matter having entered the product.

WINTAL PVR10HD USER MANUAL