user's guide configuration server - avaya support · the configuration server, configuration...
TRANSCRIPT

User's Guide
Configuration Server
Release 4.0
Printed on 4 March, 2009

© 2009 Avaya Inc. All Rights Reserved.
Notice While reasonable efforts were made to ensure that the information in this document was complete and accurate at the time of printing, Avaya Inc. can assume no liability for any errors. Changes and corrections to the information in this document may be incorporated in future releases.
Documentation disclaimer Avaya Inc. is not responsible for any modifications, additions, or deletions to the original published version of this documentation unless such modifications, additions, or deletions were performed by Avaya.
Link disclaimer Avaya Inc. is not responsible for the contents or reliability of any linked Web sites referenced elsewhere within this Documentation, and Avaya does not necessarily endorse the products, services, or information described or offered within them. We cannot guarantee that these links will work all of the time and we have no control over the availability of the linked pages.
License USE OR INSTALLATION OF THE PRODUCT INDICATES THE END USER'S ACCEPTANCE OF THE TERMS SET FORTH HEREIN AND THE GENERAL LICENSE TERMS AVAILABLE ON THE AVAYA WEBSITE AT http://support.avaya.com/LicenseInfo/ ("GENERAL LICENSE TERMS"). IF YOU DO NOT WISH TO BE BOUND BY THESE TERMS, YOU MUST RETURN THE PRODUCT(S) TO THE POINT OF PURCHASE WITHIN TEN (10) DAYS OF DELIVERY FOR A REFUND OR CREDIT.
Avaya grants End User a license within the scope of the license types described below. The applicable number of licenses and units of capacity for which the license is granted will be one (1), unless a different number of licenses or units of capacity is specified in the Documentation or other materials available to End User. "Designated Processor" means a single stand-alone computing device. "Server" means a Designated Processor that hosts a software application to be accessed by multiple users. "Software" means the computer programs in object code, originally licensed by Avaya and ultimately utilized by End User, whether as stand-alone Products or pre-installed on Hardware. "Hardware" means the standard hardware Products, originally sold by Avaya and ultimately utilized by End User.
License type(s) Concurrent User License (CU). End User may install and use the Software on multiple Designated Processors or one or more Servers, so long as only the licensed number of Units are accessing and using the Software at any given time. A "Unit" means the unit on which Avaya, at its sole discretion, bases the pricing of its licenses and can be, without limitation, an agent, port or user, an e-mail or voice mail account in the name of a person or corporate function (eg., webmaster or helpdesk), or a directory entry in the administrative database utilized by the Product that permits one user to interface with the Software. Units may be linked to a specific, identified Server.
Copyright Except where expressly stated otherwise, the Product is protected by copyright and other laws respecting proprietary rights. Unauthorized reproduction, transfer, and or use can be a criminal, as well as a civil, offense under the applicable law.
Third-party components

Certain software programs or portions thereof included in the Product may contain software distributed under third party agreements (“Third Party Components”), which may contain terms that expand or limit rights to use certain portions of the Product (“Third Party Terms”). Information identifying Third Party Components and the Third Party Terms that apply to them is available on Avaya’s web site at: http://support.avaya.com/ThirdPartyLicense/.
Avaya fraud intervention If you suspect that you are being victimized by toll fraud and you need technical assistance or support, call Technical Service Center Toll Fraud Intervention Hotline at +1-800-643-2353 for the United States and Canada. Suspected security vulnerabilities with Avaya Products should be reported to Avaya by sending mail to: [email protected].
For additional support telephone numbers, see the Avaya Web site: http://www.avaya.com/support.
Trademarks Avaya is a trademark of Avaya Inc.
All non-Avaya trademarks are the property of their respective owners.
Avaya support Avaya provides a telephone number for you to use to report problems or to ask questions about your contact center. The support telephone number is 1-800-242-2121 in the United States. For additional support telephone numbers, see the Avaya Web site: http://www.avaya.com/support.
For the most current versions of documentation, go to the Avaya support Web site: http://www.avaya.com/support.

iv
Preface
Contents
This following few pages provides information that will help you use this document.

Contents v
Knowledge Base For information on any errors and updates relating to this document, visit the Avaya Contact Center Express Knowledge Base (http://support.avayacce.com).
Preface iv Knowledge Base ...........................................................................................................................................v
Chapter 1 Introduction 7 What is Configuration Server?......................................................................................................................8 How does Configuration Server Work?........................................................................................................9
Chapter 2 System Requirements 11 Installation Requirements ...........................................................................................................................11
Installation 13 Install Application ......................................................................................................................................13
Chapter 3 Operation 14 Create/Update Database..............................................................................................................................15 Start Configuration Server ..........................................................................................................................18 What is Configuration Manager?................................................................................................................19 Log into Database .......................................................................................................................................20 Edit Default Application Template.............................................................................................................22 Create New Application Template..............................................................................................................24 Add Configuration Filter Properties ...........................................................................................................27 Add User to Database .................................................................................................................................29 Assign Users to Application .......................................................................................................................30 Complete User Configuration.....................................................................................................................32 Real-Life Example......................................................................................................................................34
Chapter 4 Maintenance 36 Delete User Configuration ..........................................................................................................................37 Delete User from Database .........................................................................................................................38 Delete Application Template ......................................................................................................................39 Service Pack Templates ..............................................................................................................................40
Chapter 5 Appendix: Command Line Parameters 41 Command Line Parameters.........................................................................................................................42
Chapter 6 Appendix: Configuration Data Commands 46 Overview ....................................................................................................................................................47 Commands ..................................................................................................................................................48
Contents vi
LOOKUP.........................................................................................................................................49 WINENV.........................................................................................................................................50 ENCRYPT.......................................................................................................................................50 STRCAT..........................................................................................................................................51 SUBSTR..........................................................................................................................................51
Keywords....................................................................................................................................................52 COMPUTERNAME........................................................................................................................52 USERNAME ...................................................................................................................................52 IPADDRESS ...................................................................................................................................52 TIME ...............................................................................................................................................52 DATE ..............................................................................................................................................52 CWD................................................................................................................................................52 WINDIR ..........................................................................................................................................53 WINSYSDIR...................................................................................................................................53 WINTEMPDIR................................................................................................................................53
Literal Data Support ...................................................................................................................................54 Nested Commands ......................................................................................................................................55 Recursive Loop Protection..........................................................................................................................56 Resolution Precedence/Reentrancy.............................................................................................................57 Include Directive ........................................................................................................................................58
Index 60

7
C H A P T E R 1
Introduction
This chapter introduces the capabilities and benefits of Configuration Server and explains how the application works.
In This Chapter What is Configuration Server? ...........................................8How does Configuration Server Work? .............................9

Introduction 8
What is Configuration Server? The Configuration Server acts as a central repository for configuration information for Avaya Contact Center Express desktop applications. It allows a contact center or network administrator to change an application's configuration information without needing to go to individual desktops.
All the information processed by the server is stored in a backend database (SQL Server or SQL Server Express). Because the server operates as a service and has no user interface, adding configuration data to the database is done via a separate application called Configuration Manager.
Configuring the server itself it is done via the Configuration Server Manager. This application also has the ability to start and stop the server.
The Configuration Client control integrates a Contact Center Express application with its configuration information. It allows an application to transparently access information, regardless of its location. This control is stored on the client PC during the application install.
Configuration Manager
Configuration Server database(SQL Server or
SQL Server Express)
Client PC running Contact Center Express application
& Configuration Client
Configuration Server ManagerConfiguration Server

Introduction 9
How does Configuration Server Work? Configuration Server reads the appropriate configuration information from its manager's system registry and opens the database using that information. Once opened, it sets up a listening socket on the port specified and waits for incoming client connections.
When a Configuration Client connects to the Configuration Server, it passes it an application name and configuration filter (the filter is made up of properties like machine name and logged-in user name). The server executes an appropriate stored procedure against the database, using the application's name and filter to identify the required configuration.
The stored procedure returns configuration data that matches the configuration filter for that application. The server packets up the information and sends it to the Configuration Client. To make the processing easy, the format of the data is exactly the same as that in a local .ini file.
Later, when the user closes the application, the Configuration Client sends any new or changed data back to the server, which then updates the database.
Configuration Manager
Configuration Server database(SQL Server or
SQL Server Express)
System registry
Client PC running Contact Center Express application
& Configuration Client
Configuration Server ManagerConfiguration Server
Calls stored procedure
Application name & configuration filter
Record set
Configuration data in character format
Introduction 10
Language Support
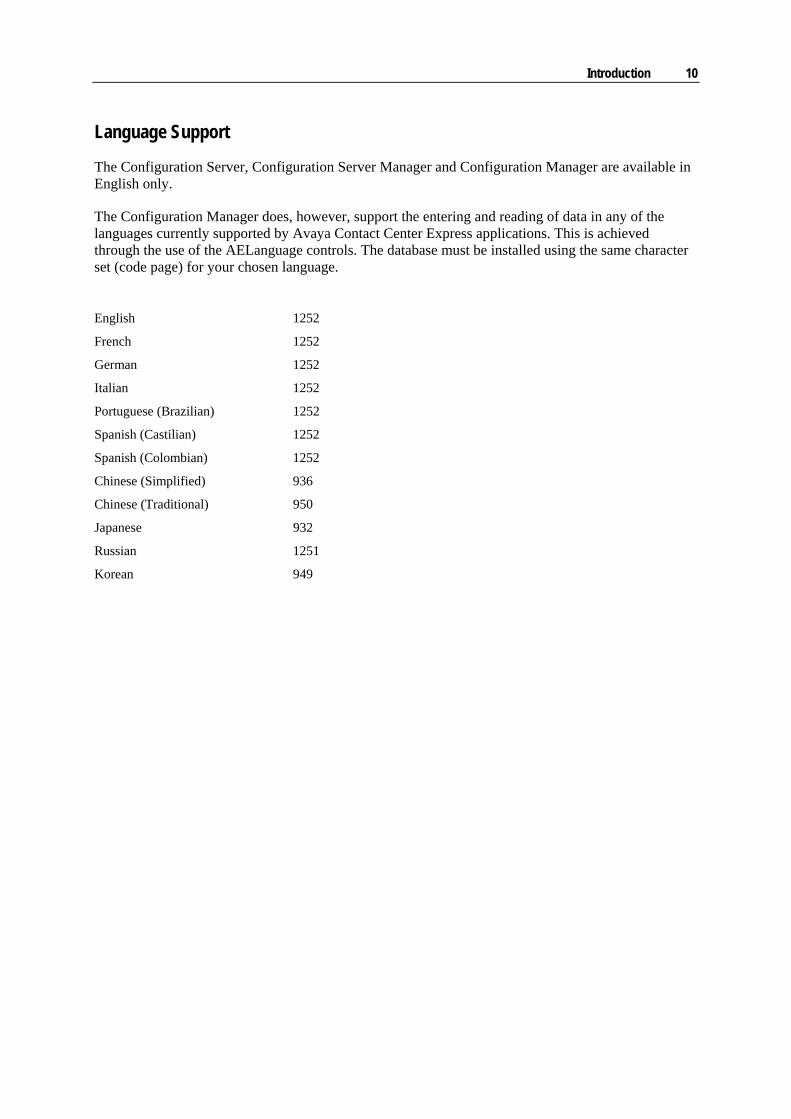
The Configuration Server, Configuration Server Manager and Configuration Manager are available in English only.
The Configuration Manager does, however, support the entering and reading of data in any of the languages currently supported by Avaya Contact Center Express applications. This is achieved through the use of the AELanguage controls. The database must be installed using the same character set (code page) for your chosen language.
Language Code page English 1252
French 1252
German 1252
Italian 1252
Portuguese (Brazilian) 1252
Spanish (Castilian) 1252
Spanish (Colombian) 1252
Chinese (Simplified) 936
Chinese (Traditional) 950
Japanese 932
Russian 1251
Korean 949
11
C H A P T E R 2
System Requirements
In This Chapter Installation Requirements...................................................11
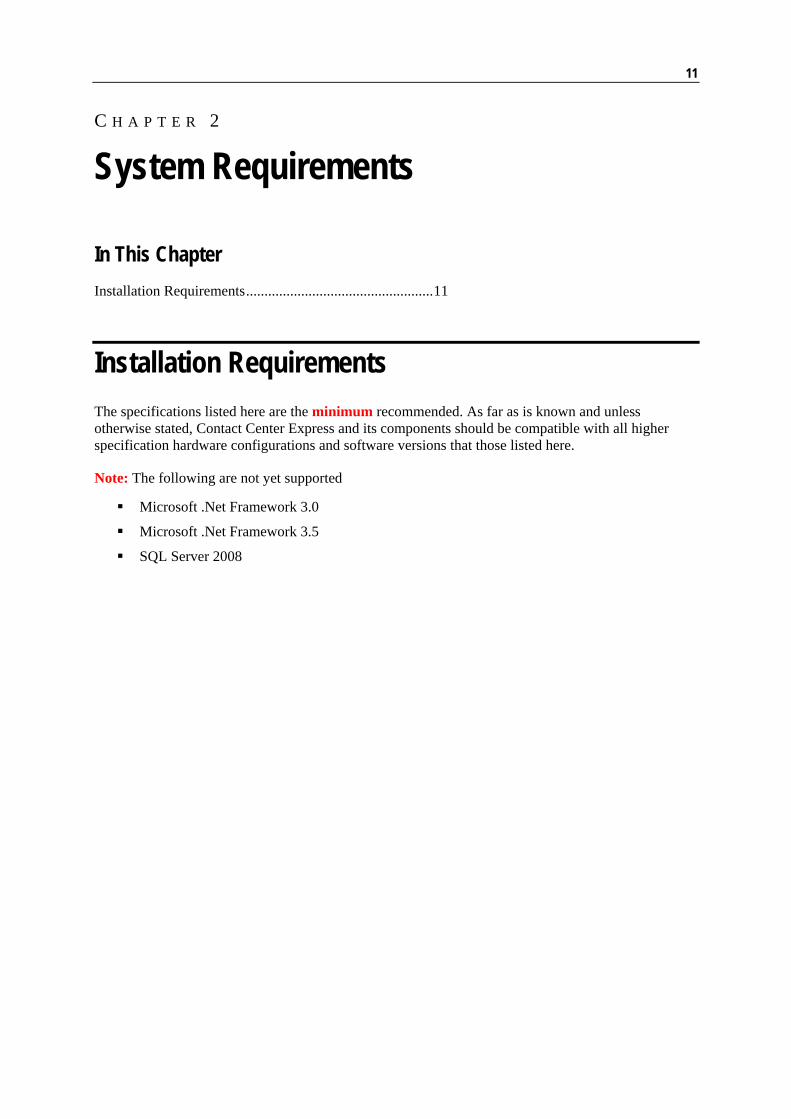
Installation Requirements The specifications listed here are the minimum recommended. As far as is known and unless otherwise stated, Contact Center Express and its components should be compatible with all higher specification hardware configurations and software versions that those listed here.
Note: The following are not yet supported
Microsoft .Net Framework 3.0
Microsoft .Net Framework 3.5
SQL Server 2008

System Requirements 12
Desktop
For Contact Center Express Desktop, Contact Center Express Reporting, Contact Center Express Control Panel and Supervisor.
Hardware: 1.6 GHz Pentium, 512MB of RAM, 50MB of free hard disk space, DVD drive, graphics card capable of supporting 1024x768 resolution monitor, mouse or other Windows-compatible pointing device, and TCP/IP LAN connection.
Software: Either Windows Vista (Enterprise), Windows XP Professional 32-bit SP2/SP3, Citrix Presentation Server 3.0.2 or Windows Terminal Services 32-bit with Application Enablement Services (AE Services) client software release 4.2.1, Microsoft Internet Explorer 6.0 SP1 and Microsoft .Net Framework 2.0 or 2.0 SP1.
Server
For License Director, XML Server, Configuration Server, Application Management Director, Media Director, all Media Stores and Gateways, Call Routing Server and Virtual Agent.
Hardware: A 2.4 GHz Pentium with 2GB of RAM.
Software: Either Windows 2003 Server (Enterprise & Standard) 32-bit, Windows 2008 Server (Enterprise & Standard) 32-bit with Application Enablement Services (AE Services) client software release 4.2.1, Microsoft Internet Explorer 6.0 SP1 and Microsoft .Net Framework 2.0 or 2.0 SP1. VMWare and Virtual Server are also supported.
Interaction Data Service
The Interaction Data Service requires its own dedicated server with the same minimum requirements as the server specifications listed above - excluding Microsoft Internet Explorer which is not required.
Database
Interaction Data Server (ActiveInteractionData) and Configuration Server (ACS) databases may be installed on either Microsoft SQL Server 2008 or Microsoft SQL Server 2005. ASMSControl, ASMSData and ASContact Databases must be installed on either Microsoft SQL Server 2005 or Microsoft SQL Server 2005 Express. For best performance host Microsoft SQL Server on a dedicated machine and ensure that both the Interaction Data Server and ASContact database are run on identical operating systems.
Email Server
Only POP3/SMTP supported: Microsoft Exchange Server 2003, Version 6.5 or Microsoft Exchange Server 2007.
Developers
Developing applications: Windows XP Professional 32-bit SP2/SP3 with Microsoft Visual Studio 2005, Application Enablement Services (AE Services) client software release 4.2.1, Microsoft Internet Explorer 6.0 SP1 and Microsoft .Net Framework 2.0 or 2.0 SP1.

Installation 13
Installation
The configuration and monitoring of this Contact Center Express service is accomplished by the Application Management Service installation of which is a necessary pre-requisite for the configuration and setup of Virtual Agent. For detailed information on how to install Application Management Service refer to the about the Contact Center Express Installation Guide.pdf.
One component of this service is the Contact Center Express Control Panel, a user interface that allows you to add and change configuration and operation information about currently monitored servers. For detailed information on how to configure this service, refer to the about the Contact Center Express Control Panel User Guide.pdf.
Install Application For instructions on how to install this application, refer to the Contact Center Express Installation Guide.pdf.
The Contact Center Express Installation Guide is on the Contact Center Express DVD (Overview and Miscellaneous folder) or can be downloaded from the Avaya Contact Center Express website (http://www.avayacontactcenterexpress.com/public_documentation.htm).

14
C H A P T E R 3
Operation
This chapter explains how to set up and manage the Configuration Server.
In This Chapter Create/Update Database .....................................................15Start Configuration Server..................................................18What is Configuration Manager? .......................................19Log into Database...............................................................20Edit Default Application Template ....................................22Create New Application Template .....................................24Add Configuration Filter Properties...................................27Add User to Database.........................................................29Assign Users to Application...............................................30Complete User Configuration ............................................32Real-Life Example .............................................................34

Operation 15
Create/Update Database
Installing SQL Server 2005 Express
If you are installing SQL Server 2005 Express as part of your Contact Center Express installation, you must go through a few steps before using Contact Center Express's database script files. For information, see the Install SQL Server 2005 Express procedure in the Contact Center Express Installation Guide.
Running Contact Center Express database scripts
Contact Center Express provides a set of database script files (.sql extension) and batch files (.bat extension) for the creation and maintenance of all databases used by its applications:
Configuration Server Interaction Data Service ASContact ASMediaStore
Please note that from release 3.0, these database scripts default Contact Center Express database collations to that of your SQL Server collation. Future database updates will rely on your Contact Center Express database collation remaining the same as the server collation; and that the server system databases also default to the server collation. Before proceeding, make sure your server collation is correct for your locale and likely usage.
You will find these scripts in a folder named SQL Script under the individual application folder structure. The folders reside on the distribution DVD and are also installed when you install these applications.
Run the scripts to either create or maintain the database by double clicking the Run AS Maintain Database.bat batch file in the relevant SQL Script folder.
If your SQL Server resides on:
a different machine to the Contact Center Express application, you must run the Run AS Maintain Database.bat batch file from the DVD folder structure.
the same machine as the Contact Center Express application, you can run the Run AS Maintain Database.bat batch file from either the DVD or the installed folder structure.
the same machine as the Contact Center Express application, but the SQL Server is not the default instance (as for SQL Server 2005 Express) you must first modify the Run AS Maintain Database.bat batch file. The second to last line in this file reads: SET ASServerName= which designates the default SQL instance. Change this line to equal the server name \ specific instance. For example to run SQL Server 2005 Express on the machine shown in the screen shot below, this line becomes: SET ASServerName=MWERENX7000\SQLEXPRESS If you are in any doubt as to the machine and SQL instance names, running SQL Server Management Studio Express will show you what SQL named instances are running on your machine.

Operation 16
This records information about your current folder and then runs a batch file which in turn runs a sql script (AS Maintain Database.sql) - both of which reside in the Utilities folder. This suite of batch and script files reads a control file (AS Script Master.txt) that directs, based on the current state of the database, the specific script files that will be run for the database.
With each release of Contact Center Express you must run Run AS Maintain Database.bat for the application databases you are already using to update the database to the current version. You must also run this batch file for databases you would like to install for the first time (this will create the database).
After you run Run AS Maintain Database.bat, you can view the message log (ASDatabaseLog_YYYYMMDD_HHMMSS.txt) which summarizes the processes that have taken place. Note that YYYYMMDD and HHMMSS will be replaced by the date and time you ran the job. This log file will appear in the folder from which you ran the batch file; or, if you ran it from the DVD, in the Temp folder of the Windows directory of your database server. The message shown by Run AS Maintain Database.bat shows the exact location of the log file.
Please note that the log file should end with the message “**Job SUCCEEDED to completely maintain ........ database ...”. If it ends with “**Job FAILED to completely maintain ...”, read the detail of the log file, make necessary adjustments and run Run AS Maintain Database.bat again. Running it additional times will not harm the database - it will do nothing if there is nothing to do.
Operation 17
The suite of scripts creates a table tblASSystem that holds the current database version and logs all attempts (successful or otherwise) to modify the database with the scripts.
Backup/Restore/Delete Databases
If you are using SQL Server 2005, SQL Server 2000 or either of the truncated versions (SQL Sever 2005 Express or MSDE 2000) the simplest way to backup, restore and delete Contact Center Express databases is via Microsoft’s GUI management tool, SQL Server Management Studio Express.
SQL Server Management Studio Express is automatically installed with the full version of SQL Server 2005, but if you are using SQL Server 2000, SQL Server 2005 Express or MSDE 2000, you need to download it from Microsoft's website (http://www.microsoft.com/downloads/details.aspx?familyid=C243A5AE-4BD1-4E3D-94B8-5A0F62BF7796&displaylang=en).
Operation 18
Start Configuration Server To start Configuration Server:
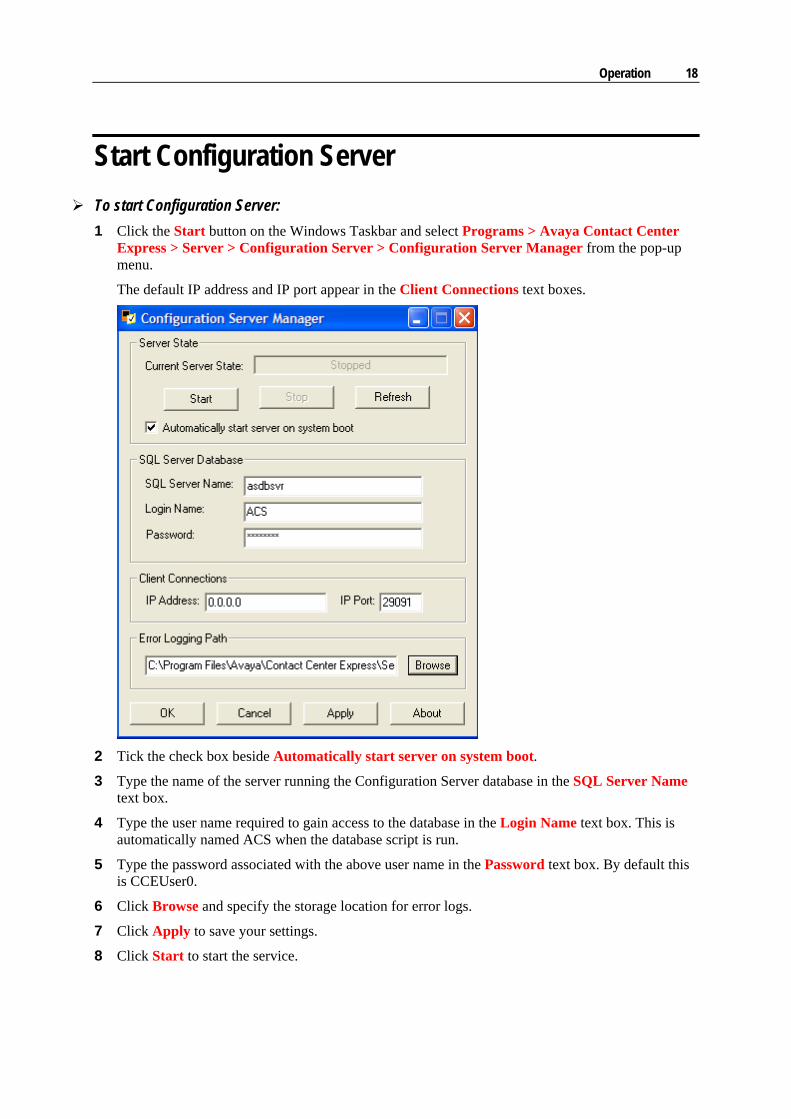
1 Click the Start button on the Windows Taskbar and select Programs > Avaya Contact Center Express > Server > Configuration Server > Configuration Server Manager from the pop-up menu.
The default IP address and IP port appear in the Client Connections text boxes.
2 Tick the check box beside Automatically start server on system boot.
3 Type the name of the server running the Configuration Server database in the SQL Server Name text box.
4 Type the user name required to gain access to the database in the Login Name text box. This is automatically named ACS when the database script is run.
5 Type the password associated with the above user name in the Password text box. By default this is CCEUser0.
6 Click Browse and specify the storage location for error logs.
7 Click Apply to save your settings.
8 Click Start to start the service.

Operation 19
What is Configuration Manager? Configuration Manager is the user interface that allows an administrator to add application configuration data to the Configuration Server database.
By default, Configuration Manager shows the configuration templates for all Contact Center Express desktop applications. These templates were automatically added to the Configuration Server database when the database is created.
Note: Configuration Manager runs with Microsoft Windows XP Professional 32-bit, SP2, and 2000 Professional, as well as Microsoft Management Console (MMC) 1.2 or higher and Microsoft Internet Explorer 6.0 SP1 or higher. MMC 1.2 is released with Windows 2000. If you do not have MMC, download it from the Microsoft website.

Operation 20
Log into Database To start Configuration Manager:
1 Click the Start button on the Windows Taskbar and select Programs > Avaya Contact Center Express > Server > Configuration Server > Configuration Manager from the pop-up menu.
The hierarchical tree structure features three nodes: Configuration Server, Applications and Users.
2 Right-click the Configuration Server node and select Database > Select Database from the pop-
up menu. The Select Database dialog box appears:
3 Type the name of the server running the Configuration Server database in the Database Server
Name text box.
4 Type the user name required to gain access to the database in the Login Name text box. This is automatically named ACS when the database script is run.

Operation 21
5 Type the password associated with the above user name in the Password text box. By default this is CCEUser0.
6 Click OK.
By default, Configuration Manager shows the application templates that were automatically added to the Configuration Server database when the database is created.

Operation 22
Edit Default Application Template To edit a default application template:
1 Right-click the application name and select Properties from the pop-up menu. The Application Properties dialog box appears:
The template contains four columns of pre-written application data:
Section. Sets of related configuration data. Read-only.
Key. Properties belonging to the application. Read-only.
Value. Values relating to the application keys. Some values appear automatically by default, which you can edit, while others are blank, ready for your selection.
Description. Descriptions of the application keys. Read-only.
2 Edit and add data in the Value column to ensure the template contains the configuration information that will be common to all users.
By default, Contact Center Express applications encrypt data for parameters containing the word Password. For more information, see the Contact Center Express Installation Guide (Configuration Commands).
For full property descriptions, refer to the user guide for that particular application.
Note: There are three types of editable cell: text boxes, drop-down list boxes and buttons that display dialog boxes for more complex data entry.
3 To add a new row of configuration data, click the Add button and enter the data as appropriate. Note: This method only creates text box cells in the Value column.

Operation 23
4 To save your application template changes, click OK.

Operation 24
Create New Application Template If you have developed your own CTI application using Developer and the Configuration Client, you may choose for the application to source its configuration data from the Configuration Server. In this case, you need to create a new template that contains configuration properties specific to your application. The template will act as a basis for user configurations.
To add a new application to the database directly from Configuration Manager: 1 Right-click the Applications node and select New Application from the pop-up menu. The New
Application dialog box appears:
2 Type the application name and description in the text boxes. Note: Application names are limited
to 50 characters.
3 Click OK. The application immediately appears in the tree menu.
Operation 25
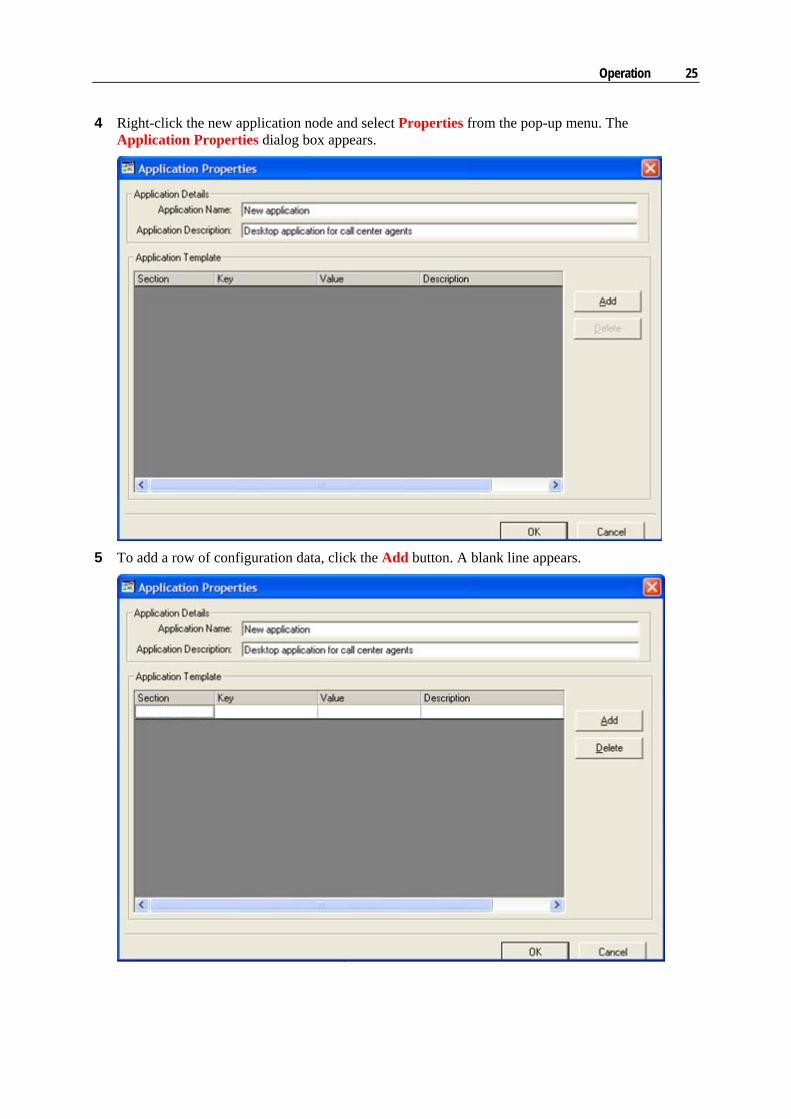
4 Right-click the new application node and select Properties from the pop-up menu. The Application Properties dialog box appears.
5 To add a row of configuration data, click the Add button. A blank line appears.

Operation 26
6 Click the first cell and type a Section name. Note: A section is a set of related configuration data. If, for example, you are planning to add several keys relating to the user's phone, you might create a section named 'MyPhone'.
7 Click the second cell and type a Key name. Note: A key is a property belonging to the application.
If, for example, you are planning to add the user's phone extension, you might create a key named 'MyDN'.
8 Click the third cell. If the Value that relates to the application key is common to all users, type it in the Value cell. If it is not common to all users, leave the Value cell blank.
9 Click the last cell and type a description for your key. Note: A description is an important reference for the administrator who will be adding/changing configuration data.
10 Once that row of data is complete, click the Add button to another row. Note: You must type a Section name, even if it is the same as the previous line item. As soon as you move to another cell, the text combines to form one overall section name for those keys.
11 To save and close your application template, click OK. Note: Once saved, any data in the Section
column becomes read-only.

Operation 27
Add Configuration Filter Properties When a Configuration Client connects to the Configuration Server, it passes it an application name and configuration filter. The server executes an appropriate stored procedure against the database, using that application name and filter to identify the required configuration.
A configuration filter is made up of one or more name/value pairs. Because Machine Name and User Network Login Name are likely to be the most commonly used name/value pairs, they are set up by default in Configuration Manager. You cannot delete these pairs but you can add others to the database.
To add a new name/value pair: 1 Right-click the Users node and select Filters from the pop-up menu. The Edit Filters dialog box
appears:
2 Click the Add button to display a blank line.
3 Double-click the first blank cell and type a a short name.
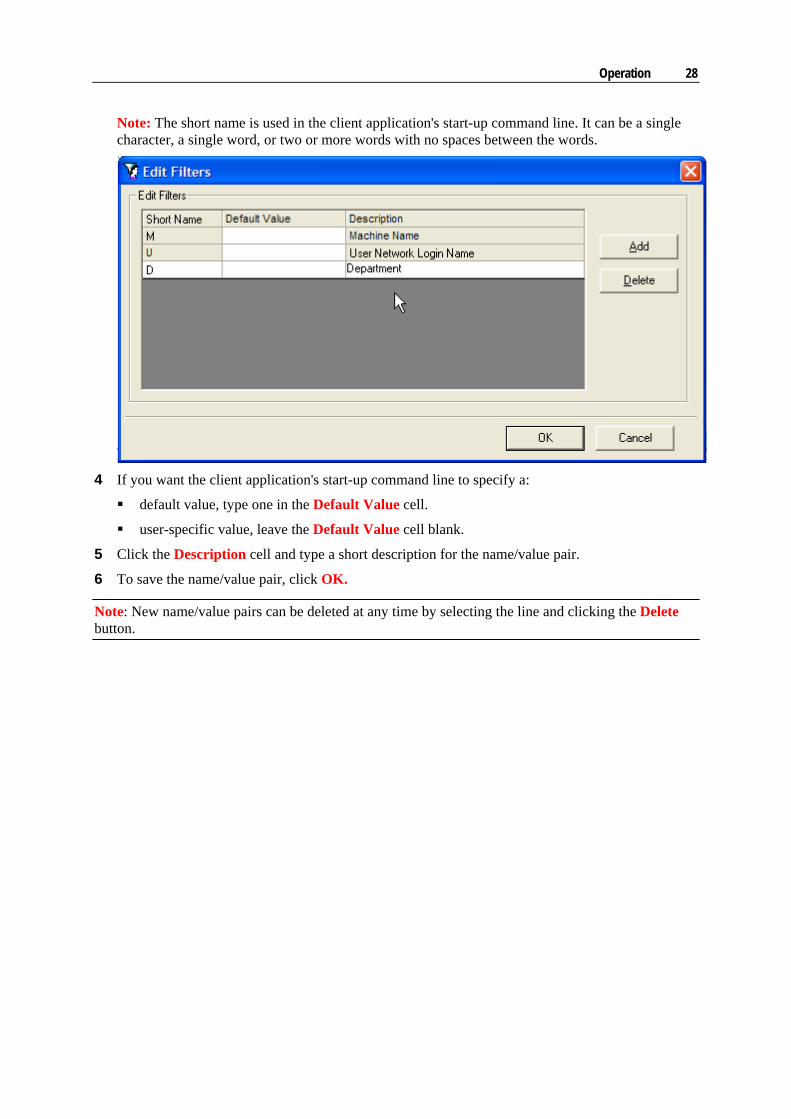
Operation 28
Note: The short name is used in the client application's start-up command line. It can be a single character, a single word, or two or more words with no spaces between the words.
4 If you want the client application's start-up command line to specify a:
default value, type one in the Default Value cell.
user-specific value, leave the Default Value cell blank.
5 Click the Description cell and type a short description for the name/value pair.
6 To save the name/value pair, click OK.
Note: New name/value pairs can be deleted at any time by selecting the line and clicking the Delete button.

Operation 29
Add User to Database To add a user to the database and assign filter values that relate to that user:
1 Right-click the Users node and select New User from the pop-up menu. The New User dialog box appears.
2 Type the user's name and user description in the text boxes.
3 Type unique, user-specific filter values in the text boxes.
Note: One or more of these values (along with their related Short name) must be specified in the client application's start-up command line. They allow the Configuration Server to identify the user's unique set of configuration data.
4 To add another user to the application database, click the Save and Add Next User button.
5 Click the OK button. The user(s) immediately appear in the tree menu.

Operation 30
Assign Users to Application To assign a single user to an application:
1 Click the Users node to display the users in the database.
2 Drag and drop a user's name over the name of the application.
The user's configuration immediately takes on the attributes of the application template. To view those attributes, right-click the user's name under the application node and select Properties from the pop-up menu. You can then complete or customize the user's configuration (see "Complete User Configuration" on page 32).

Operation 31
To assign multiple users to an application: 1 Right-click the application name and select New > New Configuration from the pop-up menu.
The Add Configuration dialog box appears:
2 Tick the check boxes beside the users you want to assign to the application and click OK. Note:
An application can have as many users as users exist in the database.
Operation 32
Complete User Configuration When you assign a user to an application, it automatically takes on the default attributes of the application's template.
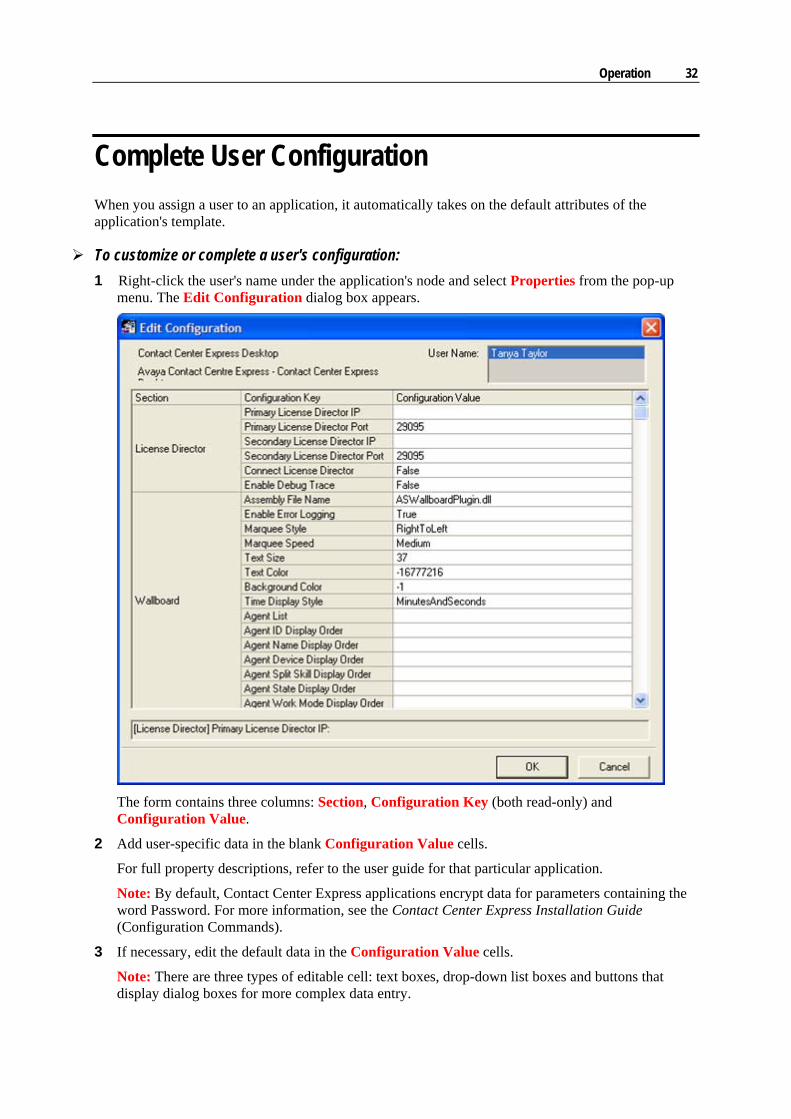
To customize or complete a user's configuration: 1 Right-click the user's name under the application's node and select Properties from the pop-up
menu. The Edit Configuration dialog box appears.
The form contains three columns: Section, Configuration Key (both read-only) and Configuration Value.
2 Add user-specific data in the blank Configuration Value cells.
For full property descriptions, refer to the user guide for that particular application.
Note: By default, Contact Center Express applications encrypt data for parameters containing the word Password. For more information, see the Contact Center Express Installation Guide (Configuration Commands).
3 If necessary, edit the default data in the Configuration Value cells.
Note: There are three types of editable cell: text boxes, drop-down list boxes and buttons that display dialog boxes for more complex data entry.

Operation 33
4 To add a new row of configuration data, click the Add button and enter the data as appropriate. Note: Value column cells can be text boxes only.
5 To save your user configuration, click OK.

Operation 34
Real-Life Example Scenario
An insurance company is running Contact Center Express Desktop to manage the flow of all its calls and multimedia work items. Its call center employs 140 agents, and those agents are divided into six groups based on their knowledge area. The company wants to use Configuration Server to quickly set up Contact Center Express Desktop configurations for all six groups of agents.
A Solution
One quick solution is to create six different templates, one for each group, and then assign agents to those groups.

Operation 35
Import the Contact Center Express Desktop template (AS Contact Center Express Desktop template add.sql) five more times and rename it appropriately for each group.
Import the template fromC:\Program Files\Avaya\Contact Center Express\Server\
Configuration Server\SQL Script
Edit each application template so it contains the default attributes to suit a particular group of agents
Open Configuration Manager and log into your Configuration Server database
Contact Center Express Desktop
loads as an application by
default
Add all 140 agents to the database
Drag and drop each agent into one of the six Contact Center Express Desktop groups
If required, customize each configuration by adding agent-specific configuration information

36
C H A P T E R 4
Maintenance
In This Chapter Delete User Configuration..................................................37Delete User from Database.................................................38Delete Application Template..............................................39Service Pack Templates......................................................40
Maintenance 37
Delete User Configuration To delete a user configuration:
1 Either:
Click the user name under the application node and press the Delete key.
Right-click the user name under the application node and select Delete from the pop-up menu. When the 'Delete this configuration' message appears, click OK.

Maintenance 38
Delete User from Database To delete a user from the database:
1 Either:
Click the user name under the User node and press the Delete key.
Right-click the user name under the User node and select Delete from the pop-up menu. When the 'Delete this user' message appears, click OK.
If the user has a user configuration assigned to an application, a message appears informing you the deletion is not successful. Delete the user from the application and repeat the above steps.
Maintenance 39
Delete Application Template To delete an application along with all the user configurations that belong to it:
1 Either:
Click the application name and press the Delete key.
Right-click the application name and select Delete from the pop-up menu. When the 'Do you want to delete this application' message appears, click OK.

Maintenance 40
Service Pack Templates If you have upgraded a Contact Center Express application using a recently released service pack and your old application sourced its configuration data from the Configuration Server, you need to:
import the service pack's new .sql file. To do this, right-click the Applications node and select Import Application from the pop-up menu. Note: You will temporarily have two application templates with the same name.
assign users to the application using the same procedure outlined in Assign Users to Application (on page 30).
transfer (copy and paste) user-specific information from the user's old configuration to the user's new configuration.
add user-specific information for configuration parameters that are new to the service pack template.
delete the old application template from the Application's node.

41
C H A P T E R 5
Appendix: Command Line Parameters
In This Chapter Command Line Parameters ................................................42

Appendix: Command Line Parameters 42
Command Line Parameters Configuration Client accepts command line parameters that dictate where it retrieves configuration information for the desktop applications of Agent, Wallboard and Contact Center Express Desktop. The three possible configuration data sources are the:
Configuration Server Local configuration file System registry
The application passes the information taken from the command line directly into the control. If a parameter exists in the command line, its value overrides information set within the container application. If a command line contains multiple entries for the same parameter, only the first instance is used.
The command line can contain the following command line parameters:
Application Name /z
Application Name is the name of the application (as configured in Configuration Server), which Configuration Client requests configuration information for.
Primary Server Name /s
Primary Server Name is the name of the primary Configuration Server that Configuration Client connects to for configuration information. This value can be the name of the server or the IP address of the server.
Alternatively, if you want to retrieve configuration information from the system registry, Server Name can be set to:
HKEY_LOCAL_MACHINE. Configuration Client retrieves information from the local machine system registry.
HKEY_CURRENT_USER. Configuration Client retrieves information from the local user system registry.

Appendix: Command Line Parameters 43
Primary Server Port /p
Primary Server Port is the primary TCP/IP port used for communication between the Configuration Server and the Configuration Client. When absent from the command line, the prescribed default, 29091, is used. The Server Port parameter enables you to override the default port.
Secondary Server Name /s2
Secondary Server Name is the name of the backup Configuration Server that Configuration Client connects to for configuration information. This value can be the name of the server or the IP address of the server.
Secondary Server Port /p2
Secondary Server Port is the backup TCP/IP port used for communication between the Configuration Server and the Configuration Client.
Configuration Filter /a
Configuration Filter is a compulsory parameter if you want to source configuration information from the Configuration Server.
A configuration filter is a name/value pair (or a combination of name/value pairs) that allows a user and their application's configuration profile to be identified and retrieved from the Configuration Server database.
A configuration filter is defined in the command line using a name=value format. Pairs are separated by semicolons:
Name1=Value1;Name2=Value2
Your command line can contain M=%%M or U=%%U, which are optional filters built into Configuration Server. When Configuration Client recognizes this text, it replaces %%M with the name of the machine running the application and %%U with the user's network login name. As long as the user is in the database, these base filters are sufficient to locate their data.
M (Machine Name) and U (User Network Login Name) are not compulsory filters, in fact any other filter may be designed and added to a database to locate the user. For example a filter named Pswd could be set up with the user's password as the value.
Configuration Filter is not required when dealing with the system registry or local configuration file.

Appendix: Command Line Parameters 44
File Name /f
File Name is the name of the local file that contains configuration information. If a full file path is specified, Configuration Client points directly to the file. If only the file name is specified, Configuration Client looks for the file in the default directory in which the application is running.
The File Name and Server Name command line parameters are not mutually exclusive. If both are found in the command line, the Server Name takes precedence. If the server cannot be contacted, Configuration Client attempts to extract information from the specified configuration file.
Logging State /t
Error logging for Configuration Client can be enabled by setting the Logging State parameter to true (/t True). Logged errors are sent to a file in the application's directory under the name 'ConfigErrorLog.txt'. When the Logging State parameter is absent from the command line, error logging is disabled.
Password Encryption /pwd
The automatic encryption on data associated with configuration parameter names that contain the (case insensitive) strings Password or Passwd can be turned off by setting the Password Encryption parameter to false (/pwd false). In this case, configuration data must be explicitly encrypted by the user inserting %%ENCRYPT commands. The /pwd parameter must be in lowercase.
Command Processing /d
This command line parameter allows you to disable command processing (on page 46). By default, command processing is enabled.
Include /i
This command line parameter allows an 'Include' file to be specified on the command line (see "Include Directive" on page 58). It allows a single file to be specified, however the parameter may be repeated multiple times.
Include file errors /j
This command line parameter allows you to disable error messages generated with the Include command (see "Include Directive" on page 58). By default, Configuration Client generates Include file errors to the containing application.
Token value /e NEWTOKEN
This command line parameter allows the configuration data commands token to be changed from the default “%%” value. The value following the NEWTOKEN parameter will be used to determine the beginning of the command sequence. The NEWTOKEN value must be present and can contain any character except a space.
Dump working set (/DWS)

Appendix: Command Line Parameters 45
The use of Configuration Data Commands (on page 46) mean the working configuration set presented to the application could look very different to the data stored in the ini file, registry or Configuration Server.
To help troubleshoot issues that are bound to arise from this functionality, this command line parameter dumps the contents of the working set to a file on the local machine at the point before the containing application is notified. This creates a file named with the current data and time and the fixed text "ConfigWS.ini" (eg 20051117132110ConfigWS.ini). This file contains the complete working set contents, including included files.
Command Line Format
Command lines must follow a set format, using spaces and quotation marks only where shown.
"C:\Program Files\Avaya\Contact Center Express\Desktop\Agent\ActiveAgent.exe" /z Agent /s 10.100.100.32 /p 29091 /a M=%%M;U=%%U
"C:\Program Files\Avaya\Contact Center Express\Desktop\Agent\ActiveAgent.exe" /z Agent /f C:\My Configuration\myFile.txt /t True /pwd false

46
C H A P T E R 6
Appendix: Configuration Data Commands
In This Chapter Overview ............................................................................47Commands..........................................................................48Keywords ...........................................................................52Literal Data Support ...........................................................54Nested Commands..............................................................55Recursive Loop Protection .................................................56Resolution Precedence/Reentrancy ....................................57Include Directive ................................................................58

Appendix: Configuration Data Commands 47
Overview Configuration data commands allow you to tell Configuration Client that further processing of the configuration data is required. When Configuration Client loads configuration data from the specified source, it will then perform a further processing step before making the data available to the controlling application.
Because these commands are processed at client level, they are available regardless of whether the data is located in a configuration file, the system registry or Configuration Server.
Token delimiter
Configuration data that must be processed further is identified by the default token “%%”. (If desired, you can, via the command line (see "Command Line Parameters" on page 42), change the token value from "%%" to something else.)
This token can appear at any point within the configuration data. Text that follows the token identifies the action (command) required by Configuration Client and the parameters for that action. Multiple commands can appear in a single configuration data item (see "Nested Commands" on page 55). Commands are resolved from right to left.
Configuration data commands are supported by a limited number of keywords that give access to machine-specific variables.
Text that appears before the token but after the item identifier is treated as a string literal.
Example
In the following example, DeviceName takes the configuration value “Minnie And Mickey”
[MainData]
DeviceName = Minnie %%STRCAT( “ And”, “ Mickey”)

Appendix: Configuration Data Commands 48
Commands Configuration Client supports the following configuration data commands. Command names are case sensitive.
When an unknown command is discovered, the result is an empty string, (“”). If this command is used to determine a piece of data used as the input for another calculation, an empty string is used.
All commands have parameters enclosed by an open/close pair of brackets.

Appendix: Configuration Data Commands 49
LOOKUP The LOOKUP command retrieves a matching value from another section within the current configuration set. This allows a section to be included within the configuration set that lists dynamic data to replace a static configuration value. A common example of this is to allow a single configuration set to serve an entire call center for an application such as Agent. Each user that logs on will have the MyDN data item modified based on the name of the computer the agent is using.
Syntax
%%LOOKUP(SECTION, ITEM)
Where SECTION is the section within the current configuration data that holds the match for the data specified by the ITEM variable. The SECTION and ITEM parameters can be either a string literal or a keyword.
Example 1
The following example results in the station parameter having the value 8572:
[MainData]
Station = %%LOOKUP(”Lookupdata”, “SomeStationData”)
[Lookupdata]
SomeStationData = 8572
Example 2
The following example results in the station parameter having the value 8572 when the configuration data is loaded on machine BAGLEYACER:
[MainData]
Station = %%LOOKUP(”Lookupdata”, COMPUTERNAME)
[Lookupdata]
BAGLEYACER = 8572
Example 3
The following example results in the station parameter having the value 8572 when the configuration data is loaded on a machine that has an environment variable named MyEnvironmentVariable equal to the value BAGLEYACER.
[MainData]
Station = %%LOOKUP(”Lookupdata”,WINENV(”MyEnvironmentVariable”))
[Lookupdata]

Appendix: Configuration Data Commands 50
BAGLEYACER = 8572
WINENV The WINENV command retrieves a matching value from the Windows system environment.
Syntax
%%WINENV( VARIABLENAME)
Where VARIABLENAME is the name of the system environment variable. The section parameter can be either a string literal or a keyword.
Example
The following example results in the station parameter having the value contained in the environment variable MyEnvironmentVariable.
[MainData]
Station = %%WINENV("MyEnviornment Variable")
ENCRYPT The ENCRYPT command allows Configuration Client to encrypt or decrypt a piece of configuration data.
If the data cannot be decrypted when the configuration file is loaded, it is presented to the user unchanged. It is assumed the data has not been encrypted and that it will be by Configuration Client at the next save.
Syntax
%%ENCRYPT( ENCRYPTEDDATA)
Example
The following example results in the user password being filled with the unencrypted data specified.
[MainData]
UserPassword = %%ENCRYPT(”9385d3fa18f4e2a1”)

Appendix: Configuration Data Commands 51
STRCAT The STRCAT command joins two pieces of data together to form a single piece of data.
Syntax
%%STRCAT( DATA1,DATA2)
The result is the string sum of DATA1 and DATA2.
Example
The following example results in the PersonalPhonebook configuration data being dynamically produced from some static text and the name of the logged in user.
[MainData]
PersonalPhoneBook = %%STRCAT(”c:\phonebooks\”,USERNAME)
SUBSTR The SUBSTR command extracts a piece of text from another, longer, piece of text.
Syntax
%%SUBSTR(DATA,START,COUNT)
The resultant data will be the portion of the string DATA starting from the character START and including COUNT characters. If START is a number greater than the length of DATA or is a negative value, the result will be an empty string. If the value of START + COUNT is greater than the length of DATA, the result will be the portion of the string DATA from the position START to the end of DATA.
Example
The following example results in the configuration data "The" being dynamically produced from the static text "The Rain In Spain". The first parameter is the string the text is extracted from. The second parameter is the start position, and the third parameter is the number of characters that are selected.
temp1 = %%SUBSTR("The Rain In Spain","0","3")
Appendix: Configuration Data Commands 52
Keywords Keywords are place holders to string literal values. Configuration Client replaces these keywords when the data is passed. Keywords are case sensitive.
Keywords may be used by themselves in the configuration data set or as parameters to valid commands. When used alone, they must be preceded by the token delimiter. Invalid keywords are treated as empty strings.
[MainData]
MyMachine = %%COMPUTERNAME
COMPUTERNAME Configuration Client replaces the COMPUTERNAME keyword with the value of the network machine name. If the machine is unnamed, this field is empty.
USERNAME Configuration Client replaces the USERNAME keyword with the value of the currently logged-in user name. If there is no logged-in user, this field is empty.
IPADDRESS Configuration Client replaces the IPADDRESS keyword with the value of the IP Address retrieved from the network configuration. If the machine is multi-homed, the first network setting is used.
TIME Configuration Client replaces the TIME keyword with the current machine time. This time is resolved to seconds and is formatted in accordance with the configured locale.
DATE Configuration Client replaces the DATE keyword with the current machine date. This date is formatted in accordance with the configured locale.
CWD The CWD keyword is replaced with the current working directory for the loading module.

Appendix: Configuration Data Commands 53
WINDIR The WINDIR keyword is replaced with the Windows directory.
WINSYSDIR The WINSYSDIR keyword is replaced with the Windows System directory.
WINTEMPDIR The WINTEMPDIR keyword is replaced with the Windows temporary directory. This value is defined as:
Windows 95/98/Me: The function gets the temporary file path as follows:
1 The path specified by the TMP environment variable.
2 The path specified by the TEMP environment variable, if TMP is not defined or if TMP specifies a directory that does not exist.
3 The current directory, if both TMP and TEMP are not defined or specify non-existent directories.
Windows NT/2000/XP: The function gets the temporary file path as follows:
1 The path specified by the TMP environment variable.
2 The path specified by the TEMP environment variable, if TMP is not defined.
3 The Windows d[irectory, if both TMP and TEMP are not defined.

Appendix: Configuration Data Commands 54
Literal Data Support Data within quotation marks (“”) is treated as literal data and is not processed further. Literal values can be accepted as parameters to all commands.

Appendix: Configuration Data Commands 55
Nested Commands Configuration Client allows multiple commands to be placed on a single configuration item. Configuration commands are separated at runtime and processed in a right to left manner.
A configuration item that includes invalid command data has resultant data set to an empty string.
Example
The following example builds a DeviceName configuration variable made from the environment variables: user name and computer name, joined by the “@” symbol.
[MainData]
DeviceName = %%STRCAT(WINENV("USERNAME"), STRCAT(“@”,COMPUTERNAME))
Appendix: Configuration Data Commands 56
Recursive Loop Protection The possibility exists for a configuration token to refer to itself when being passed. This could potentially cause a loop that does not end, at least not gracefully. A loop can exist in a simple direct relationship or may exist many layers deep. To prevent these loops occurring, no resolution sequence should make more than a fixed (eg 20) number of jumps to other configuration items. This constraint will be placed on the LOOKUP command.
Single level loops can be easily detected and avoided.
Example
[MainData]
UserPassword = %%LOOKUP(”MainData”, “UserPassword”)
Appendix: Configuration Data Commands 57
Resolution Precedence/Reentrancy It is possible for a configuration item that is being resolved to refer to another configuration item that also requires resolution; and for this item, in turn, to refer to a third item that also requires resolution. This pattern could result in many levels of indirection until a static node is reached. Configuration Client supports up to 20 levels.
Configuration set command resolution starts from the root node and works progressively through all sub nodes.

Appendix: Configuration Data Commands 58
Include Directive In some scenarios, it is desirable to import other files with configuration data into the main configuration set. For example, in a hot-seating environment, a local configuration set may include a list of machine names/phone number combinations that are used in a lookup command. This list may be stored in a common location like a network drive.
This functionality is enabled using a directive "include”.
Syntax
#include c:\temp\computerlist.dat
Rules for Use The directive may exist anywhere in the base configuration set. Multiple include directives are supported in the base configuration set. Nested "includes" are not supported (ie. an included file cannot include another file). Include files are processed after the base configuration is loaded, and are processed in the order
they are listed. Configuration data commands are processed after the included files have been added to the data
set. Configuration data loaded from included files is not saved to the original file or with the base
configuration set when the Save method is called. Changes to configuration data key/value pairs made by the application are lost when the application exits.
Included files must follow the same key/value pair format expected for configuration data.
INCLUDE_CONFIGURATION
To call a file from within Configuration Server, a key is required (it doesn't matter what it is) and the value needs to be the location of the file.

Appendix: Configuration Data Commands 59

60
A Add Configuration Filter Properties • 27 Add User to Database • 29 Appendix
Command Line Parameters • 41 Configuration Data Commands • 44, 45, 46
Assign Users to Application • 30, 40
C Command Line Parameters • 42, 47 Commands • 48 Complete User Configuration • 30, 32 COMPUTERNAME • 52 Create New Application Template • 24 Create/Update Database • 15 CWD • 52
D DATE • 52 Delete Application Template • 39 Delete User Configuration • 37 Delete User from Database • 38
E Edit Default Application Template • 22 ENCRYPT • 50
H How does Configuration Server Work? • 9
I Include Directive • 44, 58 Install Application • 13 Installation • 13 Installation Requirements • 11 Introduction • 7 IPADDRESS • 52
K Keywords • 52 Knowledge Base • v
L Literal Data Support • 54 Log into Database • 20
LOOKUP • 49
M Maintenance • 36
N Nested Commands • 47, 55
O Operation • 14 Overview • 47
P Preface • iv
R Real-Life Example • 34 Recursive Loop Protection • 56 Resolution Precedence/Reentrancy • 57
S Service Pack Templates • 40 Start Configuration Server • 18 STRCAT • 51 SUBSTR • 51 System Requirements • 11
T TIME • 52
U USERNAME • 52
W What is Configuration Manager? • 19 What is Configuration Server? • 8 WINDIR • 53 WINENV • 50 WINSYSDIR • 53 WINTEMPDIR • 53
Index