using ngc with aws - docs.nvidia.com · 6.3. deleting an ebs ... this document provides...
TRANSCRIPT

USING NGC WITH AWS
DU-08786-001 _v03 | February 2018
Setup Guide
www.nvidia.comUsing NGC with AWS DU-08786-001 _v03 | ii
TABLE OF CONTENTS
Chapter 1. Introduction to Using NGC with AWS.......................................................... 1Chapter 2. Preliminary Setup................................................................................. 3
2.1. Setting Up Your AWS Key Pair.......................................................................... 32.2. Setting Up Security Groups for the EC2 Instance................................................... 32.3. Setting Up Security Groups for EFS....................................................................5
Chapter 3. Launching a VM Instance from the AWS Console............................................63.1. Logging In and Selecting the AWS Zone...............................................................63.2. Selecting the NVIDIA Deep Learning AMI............................................................. 63.3. Selecting an Amazon EC2 P3 Instance Type and Configuring Instance Settings................. 73.4. Launching Your VM Instance............................................................................ 83.5. Connecting to Your VM Instance....................................................................... 83.6. Starting, Stopping, and Terminating Your VM Instance............................................. 9
Chapter 4. Launching a VM Instance Using AWS CLI.................................................... 104.1. Setting Up Environment Variables.................................................................... 104.2. Launching Your VM Instance........................................................................... 114.3. Connecting To Your VM Instance......................................................................114.4. Starting, Stopping, and Terminating Your VM Instance............................................12
Chapter 5. Using the Amazon Elastic File System (EFS) for Persistent Data Storage..............135.1. Creating an EFS..........................................................................................135.2. Mounting an EFS.........................................................................................145.3. Deleting an EFS..........................................................................................145.4. Managing an EFS Using AWS CLI...................................................................... 15
Chapter 6. Using the Amazon Elastic Block Storage (EBS) for Persistent Data Storage........... 166.1. Creating an EBS......................................................................................... 166.2. Attaching an EBS Volume to the EC2 Instance..................................................... 176.3. Deleting an EBS..........................................................................................186.4. Copying Datasets to the EBS Volume................................................................ 18
6.4.1. Uploading a Dataset to the EBS Volume....................................................... 186.4.2. Copying a Dataset from Existing EFS Storage to the EBS Volume.......................... 19
6.5. Managing an EBS Volume Using AWS CLI............................................................ 19Chapter 7. Examples of Running Containers..............................................................20
7.1. Logging Into the NGC Container Registry........................................................... 207.2. Example: MNIST Training Run Using PyTorch Container........................................... 207.3. Example: MNIST Training Run Using TensorFlow Container....................................... 21
Chapter 8. Power User Method for Launching a VM Instance: Terraform........................... 228.1. Setting Up a Security Group.......................................................................... 228.2. Launching Your VM Instance........................................................................... 228.3. Starting, Stopping, and Terminating Your VM Instance............................................23

www.nvidia.comUsing NGC with AWS DU-08786-001 _v03 | 1
Chapter 1.INTRODUCTION TO USING NGC WITH AWS
NVIDIA makes available on the Amazon Web Service (AWS) platform a customizedAmazon Machine Instance (AMI) optimized for the NVIDIA® Volta™ GPU, called theAmazon EC2 P3 Instance. Running NGC containers on this instance provides optimumperformance for deep learning jobs.
For those familiar with the AWS platform, the process of launching the instance is assimple as logging into AWS, selecting the NVIDIA Volta Deep Learning AMI and one ofthe Amazon EC2 P3 instance types, configuring settings as needed, then launching theinstance. After launching the instance, you can SSH into the instance and start runningdeep learning jobs using framework containers from the NGC Container Registry.
This document provides step-by-step instructions for accomplishing this, including howto use the AWS CLI.
Prerequisites
These instructions assume the following:
‣ You have an AWS account - https://aws.amazon.com‣ You have performed the following steps from the NGC website (see NGC Getting
Started Guide)
‣ Signed up for an NGC account at https://ngc.nvidia.com/signup.‣ Created an NGC API key for access to the NGC container registry.‣ Browsed the NGC website and identified an available NGC container and tag to
run on the AMI.‣ Windows Users: The CLI code snippets are for bash on Linux or Mac OS X. If you
are using Windows and want to use the snippets as-is, you can use the WindowsSubsystem for Linux and use the bash shell (you will be in Ubuntu Linux).
‣ If you plan to use AWS CLI, then the CLI must be installed, updated to the latestversion, and configured.
Introduction to Using NGC with AWS
www.nvidia.comUsing NGC with AWS DU-08786-001 _v03 | 2
Some of the AWS CLI snippets in these instructions make use of jq, which should beinstalled on the machine from which you'll run the AWS CLI. You may paste thesesnippets into your own bash scripts or type them at the command line.

www.nvidia.comUsing NGC with AWS DU-08786-001 _v03 | 3
Chapter 2.PRELIMINARY SETUP
Perform these preliminary setup tasks to simplify the process of launching the NVIDIAVolta Deep Learning AMI.
2.1. Setting Up Your AWS Key PairIf you do not already have Key Pairs defined, then you will need to setup your AWS KeyPair and have it on the machine on which you will use the AWS CLI, or from which youwill SSH to the instance. In the examples, the key pair is named "my-key-pair".
Once you have your key pair downloaded, make sure they are only readable by you,and (Linux or OSX) move them to your ~/.ssh/ directory.
chmod 400 my-key-pair*
mv my-key-pair* ~/.ssh/
On Windows, the location will depend on the SSH client you use, so modify theNVAWS_KEYPATH variable in the instance launch snippets.
2.2. Setting Up Security Groups for the EC2InstanceIn order to reach your running instances you will need a Security Group allowing (atminimum) SSH access.
1. Log into the AWS Console (https://aws.amazon.com), then under the Computesection, click EC2.
2. Enter the Security Groups screen, located on the left under "Network & Security","Security Groups".
Preliminary Setup
www.nvidia.comUsing NGC with AWS DU-08786-001 _v03 | 4
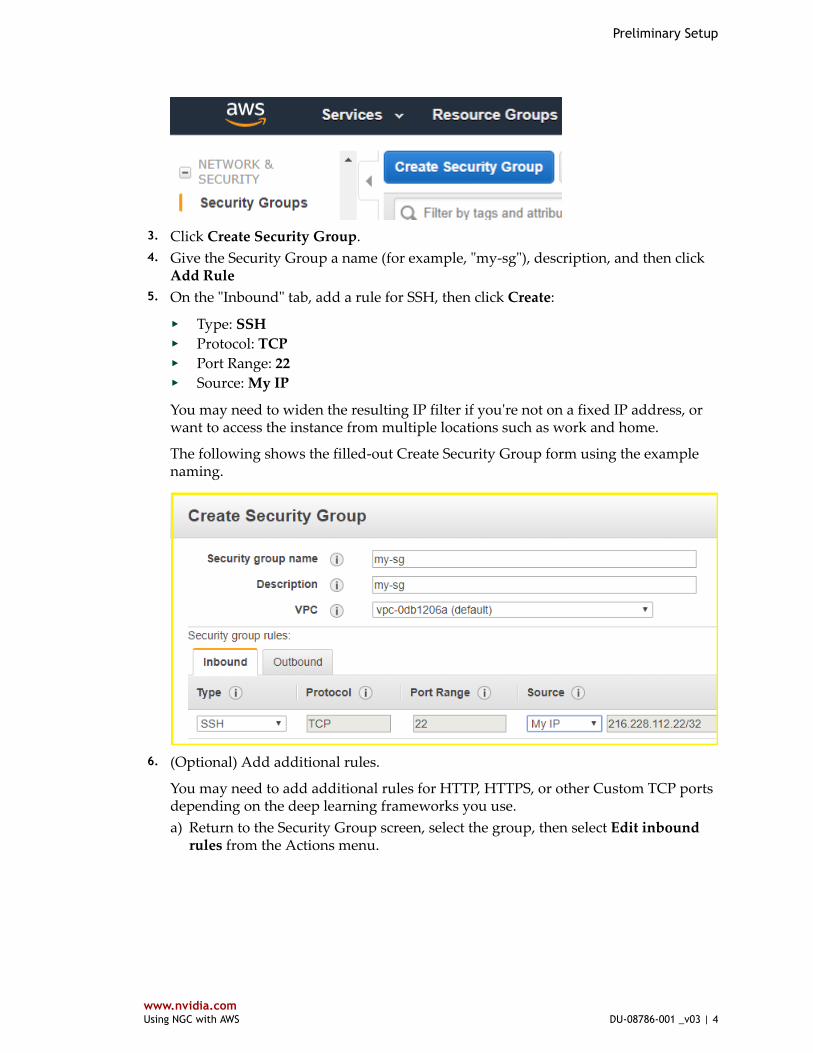
3. Click Create Security Group. 4. Give the Security Group a name (for example, "my-sg"), description, and then click
Add Rule 5. On the "Inbound" tab, add a rule for SSH, then click Create:
‣ Type: SSH‣ Protocol: TCP‣ Port Range: 22‣ Source: My IP
You may need to widen the resulting IP filter if you're not on a fixed IP address, orwant to access the instance from multiple locations such as work and home.
The following shows the filled-out Create Security Group form using the examplenaming.
6. (Optional) Add additional rules.
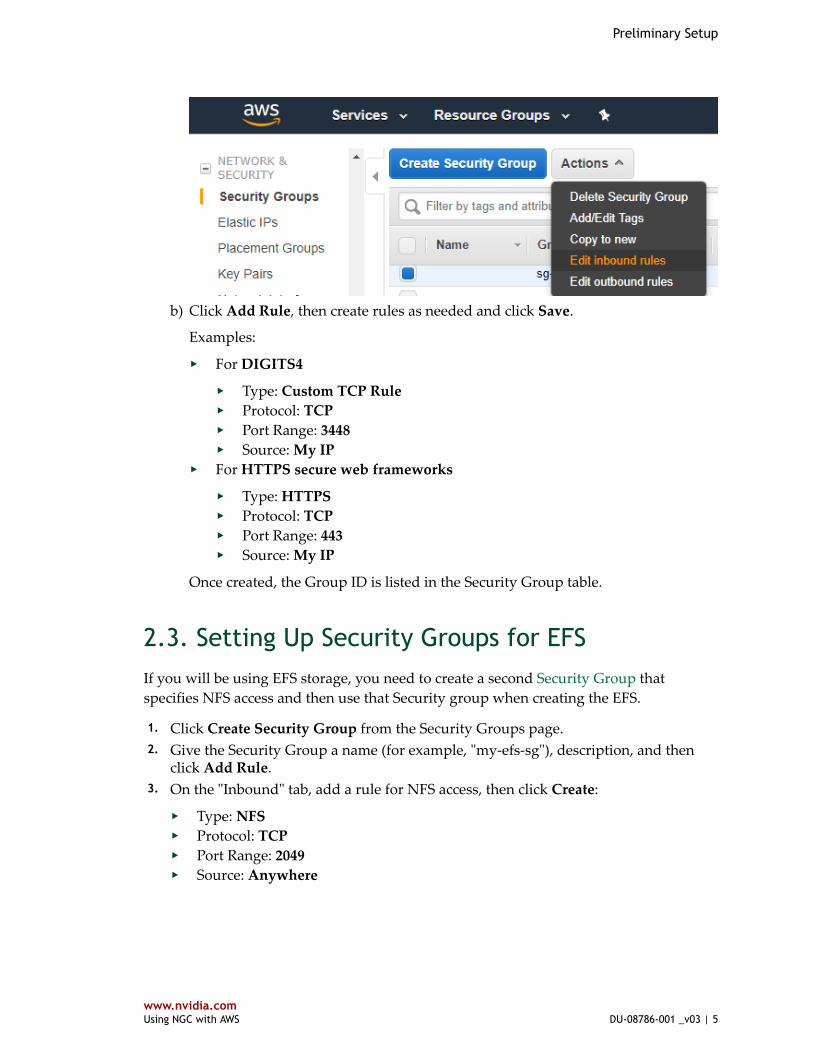
You may need to add additional rules for HTTP, HTTPS, or other Custom TCP portsdepending on the deep learning frameworks you use.a) Return to the Security Group screen, select the group, then select Edit inbound
rules from the Actions menu.
Preliminary Setup
www.nvidia.comUsing NGC with AWS DU-08786-001 _v03 | 5
b) Click Add Rule, then create rules as needed and click Save.
Examples:
‣ For DIGITS4
‣ Type: Custom TCP Rule‣ Protocol: TCP‣ Port Range: 3448‣ Source: My IP
‣ For HTTPS secure web frameworks
‣ Type: HTTPS‣ Protocol: TCP‣ Port Range: 443‣ Source: My IP
Once created, the Group ID is listed in the Security Group table.
2.3. Setting Up Security Groups for EFSIf you will be using EFS storage, you need to create a second Security Group thatspecifies NFS access and then use that Security group when creating the EFS.
1. Click Create Security Group from the Security Groups page. 2. Give the Security Group a name (for example, "my-efs-sg"), description, and then
click Add Rule. 3. On the "Inbound" tab, add a rule for NFS access, then click Create:
‣ Type: NFS‣ Protocol: TCP‣ Port Range: 2049‣ Source: Anywhere

www.nvidia.comUsing NGC with AWS DU-08786-001 _v03 | 6
Chapter 3.LAUNCHING A VM INSTANCE FROM THEAWS CONSOLE
3.1. Logging In and Selecting the AWS Zone 1. Log into the AWS Console (https://aws.amazon.com), then under the Compute
section, click EC2 . 2. Select the AWS Zone from the upper right of the top menu.
In order to use NVIDIA Volta GPUs in AWS, you must select a region that hasAmazon EC2 P3 instances available. The examples in this guide use instances inUS West (Oregon) - us-west-2. Check with AWS for Amazom EC2 P3 instanceavailability in other regions.
3.2. Selecting the NVIDIA Deep Learning AMI

Launching a VM Instance from the AWS Console
www.nvidia.comUsing NGC with AWS DU-08786-001 _v03 | 7
NVIDIA publishes and maintains an AMI with all the software needed to pull and runthe NGC deep learning containers. This AMI should be used as the basis for your Voltainstance types.
1. Click Launch Instance.
2. Select the NVIDIA Volta Deep Learning AMI.a) Select AWS Marketplace on the left, and search for "NVIDIA Volta Deep
Learning AMI", and select it.b) Click Continue on the details page.
3.3. Selecting an Amazon EC2 P3 Instance Typeand Configuring Instance Settings 1. Select one of the Amazon EC2 P3 instance types according to your GPU, CPU, and
memory requirements. 2. Click Review and Launch to review the default configuration settings, or continue
with the instructions in the next section to configure each setting step-by-step 3. After choosing an instance type, click Next: Configure Instance Details.
There are no instance details that need to be configured, so you can proceed to thenext step.
4. Add storage.
Click Next: Add Storage.
While the default 32 GiB for the root volume can be changed, users should notuse the root volume for storing datasets since the root volume is destroyed whenthe instance is terminated. NVIDIA provides directions in this guide for usingEFS volumes for datasets and deep learning job results. See the chapter Using theAmazon Elastic File System (EFS) for Persistent Data Storage.
5. Add tags.
Naming your instances helps to keep multiple instances organized.a) Click Next: Add Tag.b) Click Add Tag and then fill in the following information:
Key: "Name"
Value: <instance name, such as "My Volta 1GPU">
Launching a VM Instance from the AWS Console
www.nvidia.comUsing NGC with AWS DU-08786-001 _v03 | 8
6. Configure a Security Groupa) Click Next: Configure Security Group.b) Click Select an existing security group and select the Security Group you created
during Preliminary Setup.
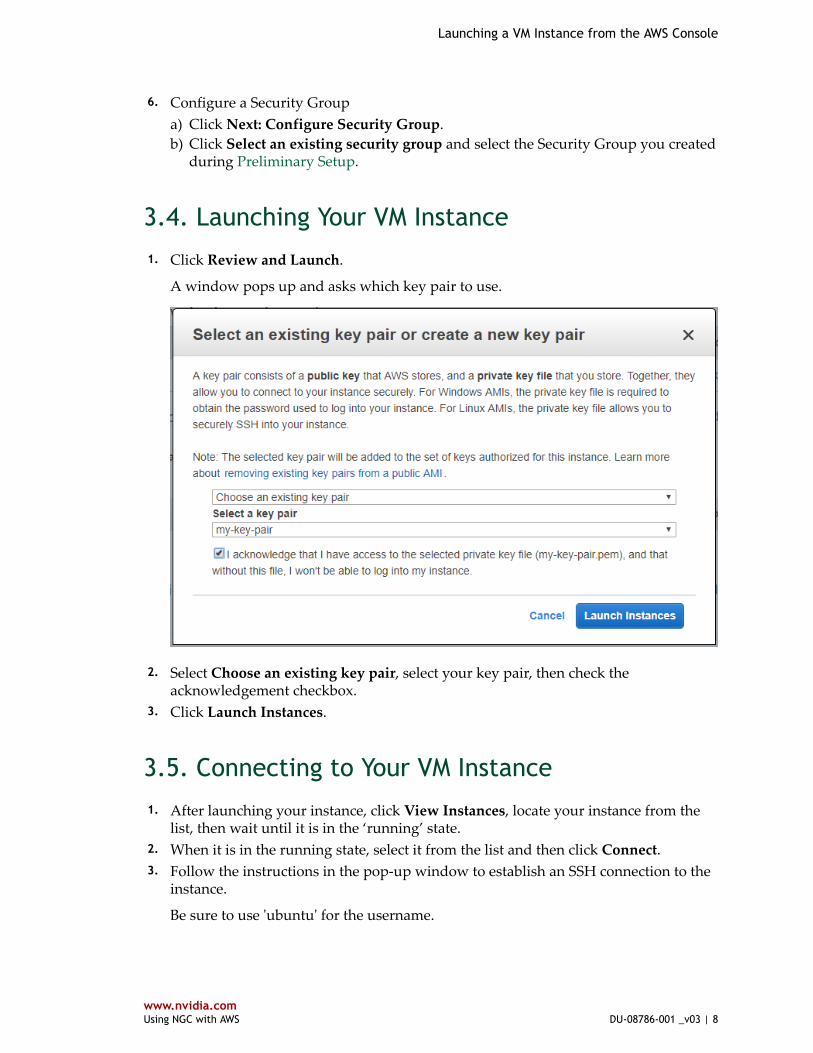
3.4. Launching Your VM Instance 1. Click Review and Launch.
A window pops up and asks which key pair to use.
2. Select Choose an existing key pair, select your key pair, then check theacknowledgement checkbox.
3. Click Launch Instances.
3.5. Connecting to Your VM Instance 1. After launching your instance, click View Instances, locate your instance from the
list, then wait until it is in the ‘running’ state. 2. When it is in the running state, select it from the list and then click Connect. 3. Follow the instructions in the pop-up window to establish an SSH connection to the
instance.
Be sure to use 'ubuntu' for the username.

Launching a VM Instance from the AWS Console
www.nvidia.comUsing NGC with AWS DU-08786-001 _v03 | 9
When logging into your virtual machine (VM) instance using SSH, you areprompted for your NGC API Key. If you supply the API Key at the prompt, theVM will automatically log you into the NGC container registry so that you canrun containers from the registry. You can choose not to supply the API Key atthe prompt and still log in to the instance. You can then log in later to the NGCcontainer registry (see Logging in to the NGC Container Registry).
If the instructions for SSH login do not work, see the AWS Connect to Your LinuxInstance documentation for additional information.
3.6. Starting, Stopping, and Terminating Your VMInstanceOnce you are done with your instance you can stop (to be started again later) orterminate (delete) it. Refer to the Instance Lifecycle in the AWS documentation for moreinformation.
Instances can be controlled from the Instances page, using the "Actions”->"InstanceState" menu to stop, start, or terminate Instances.

www.nvidia.comUsing NGC with AWS DU-08786-001 _v03 | 10
Chapter 4.LAUNCHING A VM INSTANCE USING AWSCLI
This flow and the code snippets in this section are for Linux or Mac OS X. If you areusing Windows, you can use the Windows Subsystem for Linux and use the bash shell(where you will be in Ubuntu Linux).
A comprehensive set of example bash scripts for automating the AWS CLI, and aTerraform configuration, are provided at https://github.com/nvidia/ngc-examples/ .You can download the scripts and modify them to meet your requirements. The codeexamples that follow use similar environment variables and structure as the scripts.
4.1. Setting Up Environment VariablesSet up the following environment variables which can be used in the commands forlaunching the VM instance:
Security Group ID (NVAWS_SG_ID)
The Security Group ID is used as part of the instance creation process. Once createdthe Group ID can be looked up in the AWS Console, or retrieved by name with thefollowing snippet, and stored in the $NVAWS_SG_ID environment variable.
NVAWS_SG_NAME='my-sg'
NVAWS_SG_ID=$(aws ec2 describe-security-groups --group-name "$NVAWS_SG_NAME" | jq .SecurityGroups[0].GroupId | sed 's/\"//g') && echo NVAWS_SG_ID=$NVAWS_SG_ID
Image ID (NVAWS_IMAGE_ID)
The following snippet will list the current "NVIDIA Volta Deep Learning AMI" ImageID, and stored in the $NVAWS_IMAGE_ID environment variable.
NVAWS_IMAGE_NAME='NVIDIA Volta Deep Learning AMI'
Launching a VM Instance Using AWS CLI
www.nvidia.comUsing NGC with AWS DU-08786-001 _v03 | 11
NVAWS_IMAGE_ID=$(aws ec2 describe-images --filters "Name=name,Values=$NVAWS_IMAGE_NAME" | jq .Images[0].ImageId | sed 's/\"//g') && echo NVAWS_IMAGE_ID=$NVAWS_IMAGE_ID
Other Environment Variables
Set up other env variables as follows, using your information:
NVAWS_KEYNAME=my-key-pair
NVAWS_KEYPATH=~/.ssh/
NVAWS_REGION=us-west-2
NVAWS_INSTANCE_TYPE=p3.2xlarge
NVAWS_EBS_GB=32
NVAWS_NAME_TAG='My Volta 1GPU'
Be sure to set a unique NVAWS_NAME_TAG for each instance you launch.
4.2. Launching Your VM InstanceLaunch the instance and capture the resulting JSON:NVAWS_LAUNCH_JSON=$(aws ec2 run-instances --image-id $NVAWS_IMAGE_ID \ --instance-type $NVAWS_INSTANCE_TYPE \ --region $NVAWS_REGION \ --key-name $NVAWS_KEYNAME \ --security-group-ids $NVAWS_SG_ID \ --block-device-mapping "[{\"DeviceName\":\"/dev/sda1\",\"Ebs\":{\"VolumeSize\":$NVAWS_EBS_GB}}]" \ --tag-specifications "ResourceType=instance,Tags=[{Key=Name,Value=$NVAWS_NAME_TAG}]")NVAWS_INSTANCE_ID=$(echo $NVAWS_LAUNCH_JSON | jq .Instances[0].InstanceId | sed 's/\"//g') && echo NVAWS_INSTANCE_ID=$NVAWS_INSTANCE_ID
The resulting Instance ID is stored in the NVAWS_INSTANCE_ID environment variable.
The launch process can take several minutes once a machine is available, and can bewatched in the AWS Console Instances page or with the CLI using:aws ec2 describe-instance-status --instance-id $NVAWS_INSTANCE_ID | jq '.InstanceStatuses[0].InstanceState.Name + " " + .InstanceStatuses[0].SystemStatus.Status'
Once the instance is "running initializing", you will be able to get the Public DNS namewith:NVAWS_DNS=$(aws ec2 describe-instances --instance-id $NVAWS_INSTANCE_ID | jq '.Reservations[0].Instances[0].PublicDnsName' | sed 's/\"//g') && \ echo NVAWS_DNS=$NVAWS_DNS
4.3. Connecting To Your VM InstanceSSH should work shortly after the instance reaches "running ok".

Launching a VM Instance Using AWS CLI
www.nvidia.comUsing NGC with AWS DU-08786-001 _v03 | 12
If started with CLI snippets and environment variables above, the command to SSH toyour instance is:ssh -i $NVAWS_KEYPATH/$NVAWS_KEYNAME.pem ubuntu@$NVAWS_DNS
Otherwise use your .pem key filename and the Public DNS name from the AWS Consoleto connect:ssh -i my-key-pair.pem ubuntu@public-dns-name
If these instructions for SSH login do not work, see the AWS Connect to Your LinuxInstance documentation for additional information.
When logging into your VM instance using SSH, you are prompted for your NGC APIKey. If you supply the API Key at the prompt, the VM will automatically log you intothe NGC container registry so that you can run containers from the registry. You canchoose not to supply the API Key at the prompt and still log in to the instance. You canthen log in later to the NGC container registry (see Logging in to the NGC ContainerRegistry) .
4.4. Starting, Stopping, and Terminating Your VMInstanceOnce you are done with your instance you can stop (to be started again later) orterminate (delete) it. Refer to the Instance Lifecycle in the AWS documentation for moreinformation.
Stop:aws ec2 stop-instances --instance-ids $NVAWS_INSTANCE_ID
Start:aws ec2 start-instances --instance-ids $NVAWS_INSTANCE_ID
Terminate:aws ec2 terminate-instances --instance-ids $NVAWS_INSTANCE_ID

www.nvidia.comUsing NGC with AWS DU-08786-001 _v03 | 13
Chapter 5.USING THE AMAZON ELASTIC FILE SYSTEM(EFS) FOR PERSISTENT DATA STORAGE
You can create an elastic file system (EFS) from the AWS Console. EFS is suggested sincea single EFS volume can be simultaneously accessed by multiple concurrent instances,and can be expanded beyond the initial size.
For working with a large number of small files, such as in a dataset, elastic blockstorage (EBS) offers better performance. For instructions on setting up and usingEBS, see the section Using the Amazon Elastic Block Storage (EBS) for Persistent DataStorage.
EFS is available in most regions with Amazon EC2 P3 instances.
5.1. Creating an EFS 1. Open the EFS Console.
Go to the main AWS console and select EFS under the "Storage" section. 2. Click Create file system. 3. At the Configure file system access page, make sure the Security group that you
created with NFS access is selected, then click Next Step. 4. Configure optional settings:
a) Enter a value for the Name key
This is the name of your EFS.b) Under Performance mode, select General purpose
The default setting will work for many workloads. You can experiment withother settings that are better suited to your workload.
c) Encryption is not needed if you are working with public datasets. For privatedatasets it's optional and involves additional setup steps. Read the AWSdocumentation if you need encryption.
d) Click Next step.
Using the Amazon Elastic File System (EFS) for Persistent Data Storage
www.nvidia.comUsing NGC with AWS DU-08786-001 _v03 | 14
5. Review the options and then click Create File System.
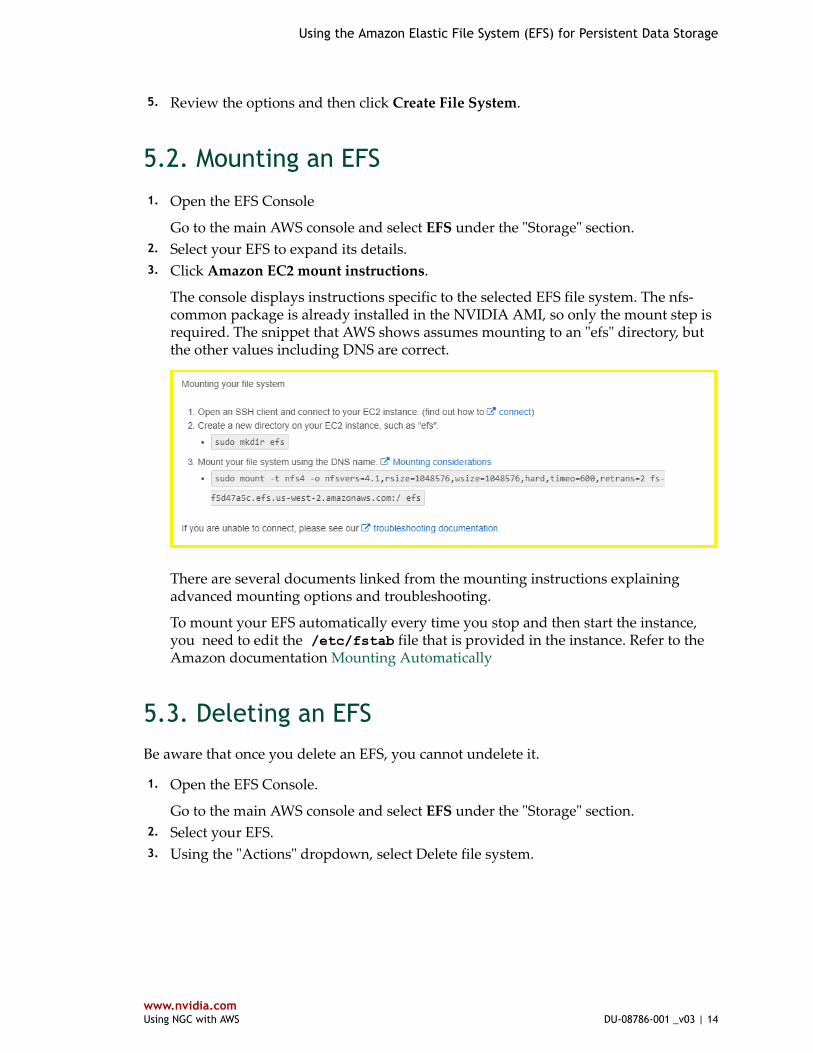
5.2. Mounting an EFS 1. Open the EFS Console
Go to the main AWS console and select EFS under the "Storage" section. 2. Select your EFS to expand its details. 3. Click Amazon EC2 mount instructions.
The console displays instructions specific to the selected EFS file system. The nfs-common package is already installed in the NVIDIA AMI, so only the mount step isrequired. The snippet that AWS shows assumes mounting to an "efs" directory, butthe other values including DNS are correct.
There are several documents linked from the mounting instructions explainingadvanced mounting options and troubleshooting.
To mount your EFS automatically every time you stop and then start the instance,you need to edit the /etc/fstab file that is provided in the instance. Refer to theAmazon documentation Mounting Automatically
5.3. Deleting an EFSBe aware that once you delete an EFS, you cannot undelete it.
1. Open the EFS Console.
Go to the main AWS console and select EFS under the "Storage" section. 2. Select your EFS. 3. Using the "Actions" dropdown, select Delete file system.

Using the Amazon Elastic File System (EFS) for Persistent Data Storage
www.nvidia.comUsing NGC with AWS DU-08786-001 _v03 | 15
4. In the confirmation dialog, enter the file system ID, and then click Delete FileSystem.
5.4. Managing an EFS Using AWS CLIIt is recommended that you use the AWS Console for EFS management. If you need tomanage EFS file systems with the CLI, NVIDIA has created scripts available on GitHubat https://github.com/nvidia/ngc-examples.
These scripts will let you perform basic EFS management and can serve as the basis forfurther automation.
www.nvidia.comUsing NGC with AWS DU-08786-001 _v03 | 16
Chapter 6.USING THE AMAZON ELASTIC BLOCKSTORAGE (EBS) FOR PERSISTENT DATASTORAGE
You can create elastic block storage (EBS) from the AWS Console. Like EFS, EBS is usedfor persistent data storage, but offers better performance when using a large number ofsmall files. Unlike EFS, EBS cannot be shared across multiple VMs. To share persistentdata storage, you need to use EFS.
EBS is available in most regions with Amazon EC2 P3 instances.
6.1. Creating an EBS 1. Open the EBS Volumes Console.
Go to the main AWS console, click EC2, then expand Elastic Block Store from theside menu, if necessary, and click Volumes.
2. Click Create Volume. 3. Make selections at the Create Volume page.
‣ Select General Purpose SSD (GP2) for the Volume Type.‣ Specify the volume size and Availability Zone.‣ (Optional) Add Tags.‣ Encryption is not needed if you are working with public datasets.‣ Snapshot ID is not needed.

Using the Amazon Elastic Block Storage (EBS) for Persistent Data Storage
www.nvidia.comUsing NGC with AWS DU-08786-001 _v03 | 17
4. Review the options and then click Create Volume.
6.2. Attaching an EBS Volume to the EC2 Instance 1. Once you have created the EBS volume, select the volume and then select Actions-
>Attach Volume. 2. Specify your EC2-instance ID as well as a drive letter for the device name (for
example, sdf), then click Attach.
This creates a /dev/xvdf (or the driver letter that you picked) virtual disk on yourEC2 instance.You can view the volume by running the lsblk command.~$ lsblk
NAME MAJ:MIN RM SIZE RO TYPE MOUNTPOINT xvda 202:0 0 128G 0 disk └─xvda1 202:1 0 128G 0 part /xvdf 202:16 0 250G 0 disk
3. Create a filesystem on the EBS volume.~# mkfs.ext4 /dev/xvdf
mke2fs 1.42.13 (17-May-2015) Creating filesystem with 65536000 4k blocks and 16384000 inodes Filesystem UUID: b0e3dee3-bf86-4e69-9488-cf4d4b57b367 Superblock backups stored on blocks: 32768, 98304, 163840, 229376, 294912, 819200, 884736, 1605632, 2654208, 4096000, 7962624, 11239424, 20480000, 23887872 Allocating group tables: done
Using the Amazon Elastic Block Storage (EBS) for Persistent Data Storage
www.nvidia.comUsing NGC with AWS DU-08786-001 _v03 | 18
Writing inode tables: done Creating journal (32768 blocks): done Writing superblocks and filesystem accounting information: done
4. Mount the volume to a mount directory.
~# mount /dev/xvdf /data
To mount the volume automatically every time the instance is stopped and restarted,add an entry to /etc/fstab. Refer to Amazon Documentation Making a VolumeAvailable for Use
6.3. Deleting an EBSBe aware that once you delete an EBS, you cannot undelete it.
1. Open the EBS Volumes Console.
Go to the main AWS console, click EC2, then expand Elastic Block Store from theside menu, if necessary, and click Volumes.
2. Select your EBS. 3. Detach the volume from the EC2 instance.
Select Actions->Detach Volume, then click Yes, Detach from the confirmationdialog.
4. Delect the storage volume.
Select Actions->Delete Volume and then click Yes, Delete from the confirmationdialog.
6.4. Copying Datasets to the EBS VolumeOnce you have created the EBS volume, you can upload datasets to the volume or copythe dataset from an existing EFS.
6.4.1. Uploading a Dataset to the EBS Volume
1. Mount the EBS volume to /data.
Issue the following to perform the one-time mount.
sudo mkdir /data sudo mount /dev/xvdf /data sudo chmod 777 /data
2. Copy the dataset onto the EBS volume in /data.
scp -i <.pem> -r local_dataset_dir/ ubuntu@<ec2-instance>:/data
Using the Amazon Elastic Block Storage (EBS) for Persistent Data Storage
www.nvidia.comUsing NGC with AWS DU-08786-001 _v03 | 19
6.4.2. Copying a Dataset from Existing EFS Storage tothe EBS Volume
1. Mount the EFS storage to /data, using the EFS storage DNS name.
Issue the following to perform the one-time mount.
sudo mkdir /efssudo mount -t nfs4 -o \ nfsvers=4.1,rsize=1048576,wsize=1048576,hard,timeo=600,retrans=2 \ EFS-DNS-NAME:/ /efssudo chmod 777 /efssudo cp -r /efs/<dataset> to /data
2. Copy the dataset from the EFS to the EBS volume..
sudo cp -r /efs/<dataset> to /data
6.5. Managing an EBS Volume Using AWS CLIIt is recommended that you use the AWS Console for EBS management. If you need tomanage EBS file systems with the CLI, NVIDIA has created scripts available on GitHubat https://github.com/nvidia/ngc-examples.
These scripts will let you perform basic EBS management and can serve as the basis forfurther automation.

www.nvidia.comUsing NGC with AWS DU-08786-001 _v03 | 20
Chapter 7.EXAMPLES OF RUNNING CONTAINERS
7.1. Logging Into the NGC Container RegistrySkip this section if you provided your API Key when logging into the VM via SSH.
If you did not provide your API Key when connecting to your instance, then you mustperform this step.
Log in to the NGC container registry using the following Docker command.
docker login nvcr.io
You will be prompted to enter a Username and Password. Type “$oauthtoken” exactlyas shown, and enter your NGC API key obtained during NGC account setup:
Username: $oauthtoken
Password: <Your NGC API Key>
From this point you can run Docker commands and access the NGC container registryfrom the VM instance.
7.2. Example: MNIST Training Run Using PyTorchContainerOnce logged in to the Amazon EC2 P3 instance, you can run the MNIST example underPyTorch.
Note that the PyTorch example will download the MNIST dataset from the web.
Pull and run the PyTorch container:
docker pull nvcr.io/nvidia/pytorch:17.10

Examples of Running Containers
www.nvidia.comUsing NGC with AWS DU-08786-001 _v03 | 21
nvidia-docker run --rm -it nvcr.io/nvidia/pytorch:17.10
Run the MNIST example:
cd /opt/pytorch/examples/mnist
python main.py
7.3. Example: MNIST Training Run UsingTensorFlow ContainerOnce logged in to the Amazon EC2 P3 instance, you can run the MNIST example underTensorFlow.
Note that the TensorFlow built-in example will pull the MNIST dataset from the web.
Pull and run the TensorFlow container:
docker pull nvcr.io/nvidia/tensorflow:17.10
nvidia-docker run --rm -it nvcr.io/nvidia/tensorflow:17.10
Following this tutorial: https://www.tensorflow.org/get_started/mnist/beginners
Run the MNIST_with_summaries example:
cd /opt/tensorflow/tensorflow/examples/tutorials/mnist
python mnist_with_summaries.py
www.nvidia.comUsing NGC with AWS DU-08786-001 _v03 | 22
Chapter 8.POWER USER METHOD FOR LAUNCHING AVM INSTANCE: TERRAFORM
Terraform enables you to safely and predictably create, change, and improve productioninfrastructure - and in this case easily get an AWS instance running. Instructions forinstalling Terraform on multiple platforms are in the Terraform Getting Started alongwith an overview of Terraform concepts.
8.1. Setting Up a Security GroupUse the AWS Console to set up a security group as explained in the Preliminary Setupsection.
8.2. Launching Your VM InstanceGet the Terraform configuration files (a Terraform config is a directory with several .tffiles) from https://github.com/nvidia/ngc-examples. Once you clone that git repo toan ngc-examples directory on your system, you will find the Terraform files in ngc-examples/aws/terraform.
You will also need your AWS credentials by either:
‣ Installing and configuring the AWS CLI (see Prerequisites). Terraform will use thoseAWS credentials.
Or
‣ Add your access and secret keys to the configuration file in the provider section ofvariables.tf.
Initialize Terraform in that directory:
terraform init
Power User Method for Launching a VM Instance: Terraform
www.nvidia.comUsing NGC with AWS DU-08786-001 _v03 | 23
Look at variables.tf and check that the variables agree with your desired setup and filelocations. It's best practice to run terraform plan before any change in order to testand check for errors:
terraform plan
Then apply the configuration:
terraform apply
Your Amazon EC2 P3 instance will now be initializing, and Terraform will outputthe SSH command to connect to the instance once it's running. This may take severalminutes.
At any time you can get the instance parameters and SSH line shown when you startedthe instance. Enter the configuration directory and type:
terraform output
8.3. Starting, Stopping, and Terminating Your VMInstanceStop: (Requires that AWS CLI is installed)aws ec2 stop-instances --instance-ids <instance_id>
Start:(Requires that AWS CLI is installed)aws ec2 start-instances --instance-ids <instance_id>
Terminate:terraform destroy

Notice
THE INFORMATION IN THIS GUIDE AND ALL OTHER INFORMATION CONTAINED IN NVIDIA DOCUMENTATION
REFERENCED IN THIS GUIDE IS PROVIDED “AS IS.” NVIDIA MAKES NO WARRANTIES, EXPRESSED, IMPLIED,
STATUTORY, OR OTHERWISE WITH RESPECT TO THE INFORMATION FOR THE PRODUCT, AND EXPRESSLY
DISCLAIMS ALL IMPLIED WARRANTIES OF NONINFRINGEMENT, MERCHANTABILITY, AND FITNESS FOR A
PARTICULAR PURPOSE. Notwithstanding any damages that customer might incur for any reason whatsoever,
NVIDIA’s aggregate and cumulative liability towards customer for the product described in this guide shall
be limited in accordance with the NVIDIA terms and conditions of sale for the product.
THE NVIDIA PRODUCT DESCRIBED IN THIS GUIDE IS NOT FAULT TOLERANT AND IS NOT DESIGNED,
MANUFACTURED OR INTENDED FOR USE IN CONNECTION WITH THE DESIGN, CONSTRUCTION, MAINTENANCE,
AND/OR OPERATION OF ANY SYSTEM WHERE THE USE OR A FAILURE OF SUCH SYSTEM COULD RESULT IN A
SITUATION THAT THREATENS THE SAFETY OF HUMAN LIFE OR SEVERE PHYSICAL HARM OR PROPERTY DAMAGE
(INCLUDING, FOR EXAMPLE, USE IN CONNECTION WITH ANY NUCLEAR, AVIONICS, LIFE SUPPORT OR OTHER
LIFE CRITICAL APPLICATION). NVIDIA EXPRESSLY DISCLAIMS ANY EXPRESS OR IMPLIED WARRANTY OF FITNESS
FOR SUCH HIGH RISK USES. NVIDIA SHALL NOT BE LIABLE TO CUSTOMER OR ANY THIRD PARTY, IN WHOLE OR
IN PART, FOR ANY CLAIMS OR DAMAGES ARISING FROM SUCH HIGH RISK USES.
NVIDIA makes no representation or warranty that the product described in this guide will be suitable for
any specified use without further testing or modification. Testing of all parameters of each product is not
necessarily performed by NVIDIA. It is customer’s sole responsibility to ensure the product is suitable and
fit for the application planned by customer and to do the necessary testing for the application in order
to avoid a default of the application or the product. Weaknesses in customer’s product designs may affect
the quality and reliability of the NVIDIA product and may result in additional or different conditions and/
or requirements beyond those contained in this guide. NVIDIA does not accept any liability related to any
default, damage, costs or problem which may be based on or attributable to: (i) the use of the NVIDIA
product in any manner that is contrary to this guide, or (ii) customer product designs.
Other than the right for customer to use the information in this guide with the product, no other license,
either expressed or implied, is hereby granted by NVIDIA under this guide. Reproduction of information
in this guide is permissible only if reproduction is approved by NVIDIA in writing, is reproduced without
alteration, and is accompanied by all associated conditions, limitations, and notices.
Trademarks
NVIDIA, the NVIDIA logo, and Volta are trademarks and/or registered trademarks of NVIDIA Corporation in
the Unites States and other countries.
Docker and the Docker logo are trademarks or registered trademarks of Docker, Inc. in the United States
and/or other countries.
Other company and product names may be trademarks of the respective companies with which they are
associated.
Copyright
© 2018 NVIDIA Corporation. All rights reserved.www.nvidia.com