using paypal with cloudtrax - cloudtrax-static.s3...
TRANSCRIPT
CLOUDTRAX USER GUIDE
Using PayPal in CloudTrax
CloudTrax is a free cloud-based network controller that helps you build, manage and monitor your wireless networks from anywhere in the world. This guide will help you accept payments from network users through PayPal.
© 2007-2013 CloudTraxRevised September 2013
CLOUDTRAX USER GUIDE:
Using PayPal in CloudTrax
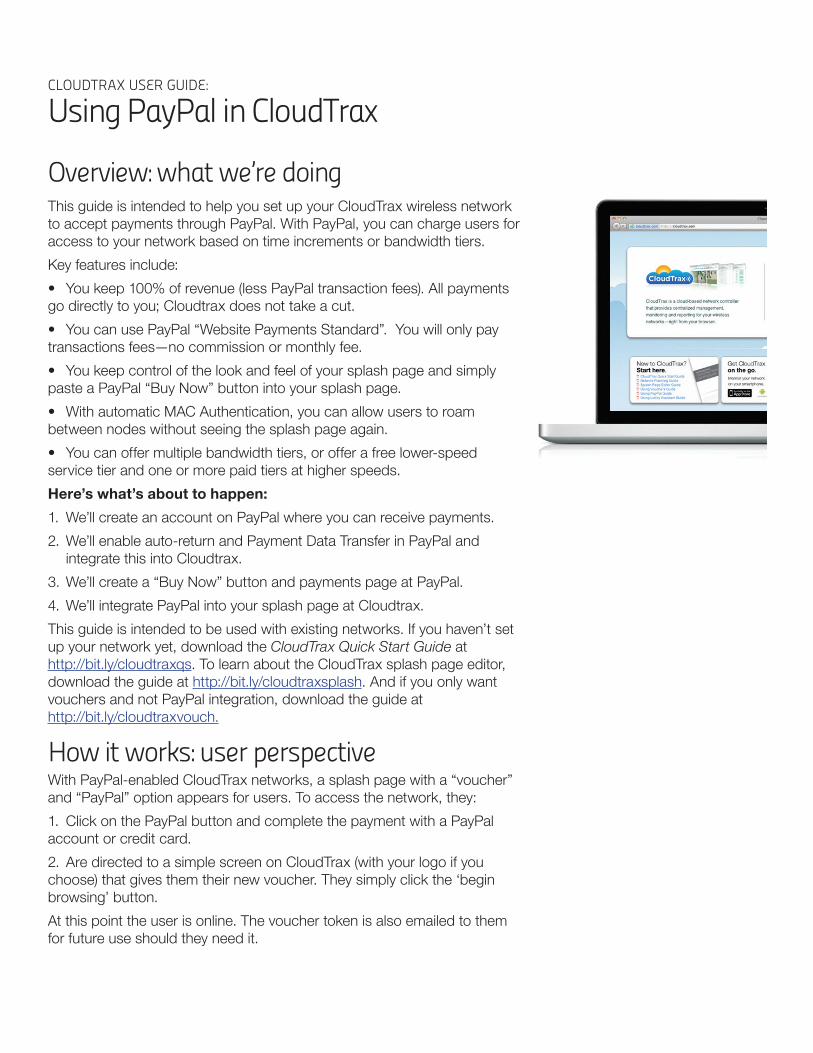
Overview: what we’re doingThis guide is intended to help you set up your CloudTrax wireless network to accept payments through PayPal. With PayPal, you can charge users for access to your network based on time increments or bandwidth tiers.Key features include:• You keep 100% of revenue (less PayPal transaction fees). All payments go directly to you; Cloudtrax does not take a cut.• You can use PayPal “Website Payments Standard”. You will only pay transactions fees—no commission or monthly fee.• You keep control of the look and feel of your splash page and simply paste a PayPal “Buy Now” button into your splash page. • With automatic MAC Authentication, you can allow users to roam between nodes without seeing the splash page again.• You can offer multiple bandwidth tiers, or offer a free lower-speed service tier and one or more paid tiers at higher speeds.Here’s what’s about to happen:1. We’ll create an account on PayPal where you can receive payments.2. We’ll enable auto-return and Payment Data Transfer in PayPal and integrate this into Cloudtrax.3. We’ll create a “Buy Now” button and payments page at PayPal.4. We’ll integrate PayPal into your splash page at Cloudtrax.This guide is intended to be used with existing networks. If you haven’t set up your network yet, download the CloudTrax Quick Start Guide at http://bit.ly/cloudtraxqs. To learn about the CloudTrax splash page editor, download the guide at http://bit.ly/cloudtraxsplash. And if you only want vouchers and not PayPal integration, download the guide at http://bit.ly/cloudtraxvouch.
How it works: user perspectiveWith PayPal-enabled CloudTrax networks, a splash page with a “voucher” and “PayPal” option appears for users. To access the network, they:1. Click on the PayPal button and complete the payment with a PayPal account or credit card. 2. Are directed to a simple screen on CloudTrax (with your logo if you choose) that gives them their new voucher. They simply click the ‘begin browsing’ button.At this point the user is online. The voucher token is also emailed to them for future use should they need it.
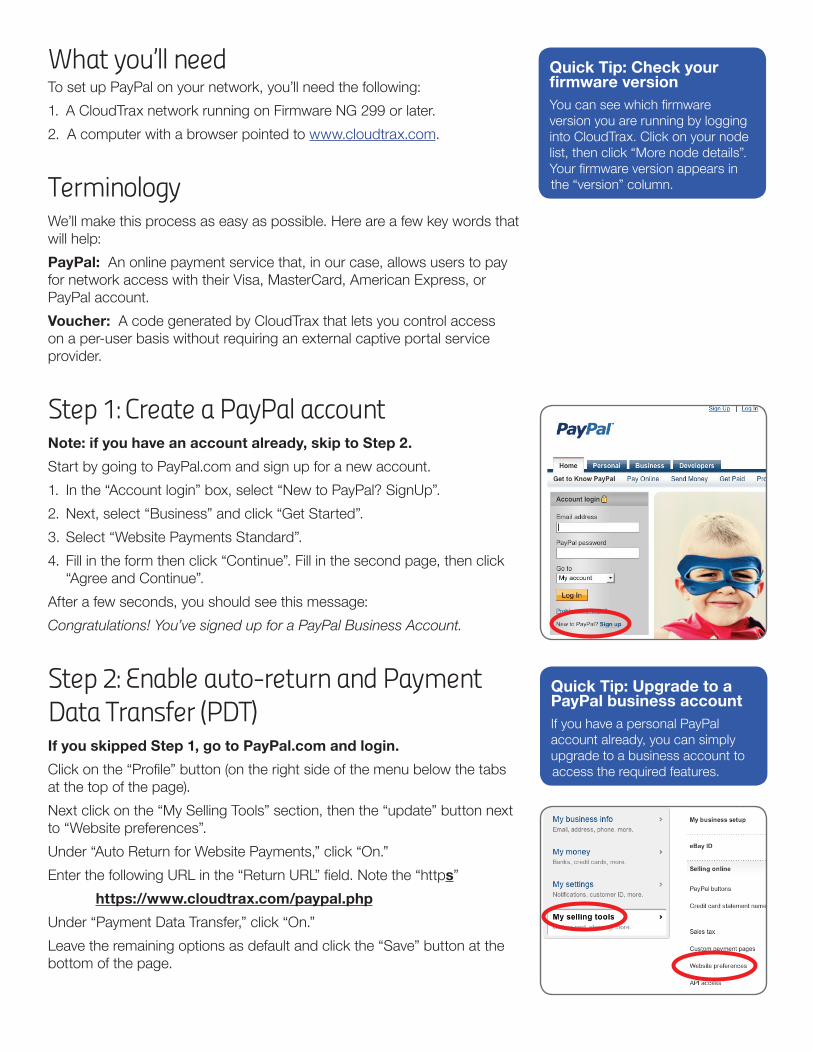
What you’ll needTo set up PayPal on your network, you’ll need the following:1. A CloudTrax network running on Firmware NG 299 or later. 2. A computer with a browser pointed to www.cloudtrax.com.
TerminologyWe’ll make this process as easy as possible. Here are a few key words that will help: PayPal: An online payment service that, in our case, allows users to pay for network access with their Visa, MasterCard, American Express, or PayPal account.Voucher: A code generated by CloudTrax that lets you control access on a per-user basis without requiring an external captive portal service provider.
Step 1: Create a PayPal accountNote: if you have an account already, skip to Step 2.Start by going to PayPal.com and sign up for a new account. 1. In the “Account login” box, select “New to PayPal? SignUp”.2. Next, select “Business” and click “Get Started”.3. Select “Website Payments Standard”.4. Fill in the form then click “Continue”. Fill in the second page, then click “Agree and Continue”.After a few seconds, you should see this message:Congratulations! You’ve signed up for a PayPal Business Account.
Step 2: Enable auto-return and Payment Data Transfer (PDT)If you skipped Step 1, go to PayPal.com and login.Clickonthe“Profile”button(ontherightsideofthemenubelowthetabsat the top of the page).Next click on the “My Selling Tools” section, then the “update” button next to “Website preferences”.Under “Auto Return for Website Payments,” click “On.”EnterthefollowingURLinthe“ReturnURL”field.Notethe“https” https://www.cloudtrax.com/paypal.phpUnder “Payment Data Transfer,” click “On.”Leave the remaining options as default and click the “Save” button at the bottom of the page.
Quick Tip: Check your firmware version Youcanseewhichfirmwareversion you are running by logging into CloudTrax. Click on your node list, then click “More node details”. Yourfirmwareversionappearsinthe “version” column.
Quick Tip: Upgrade to a PayPal business account If you have a personal PayPal account already, you can simply upgrade to a business account to access the required features.
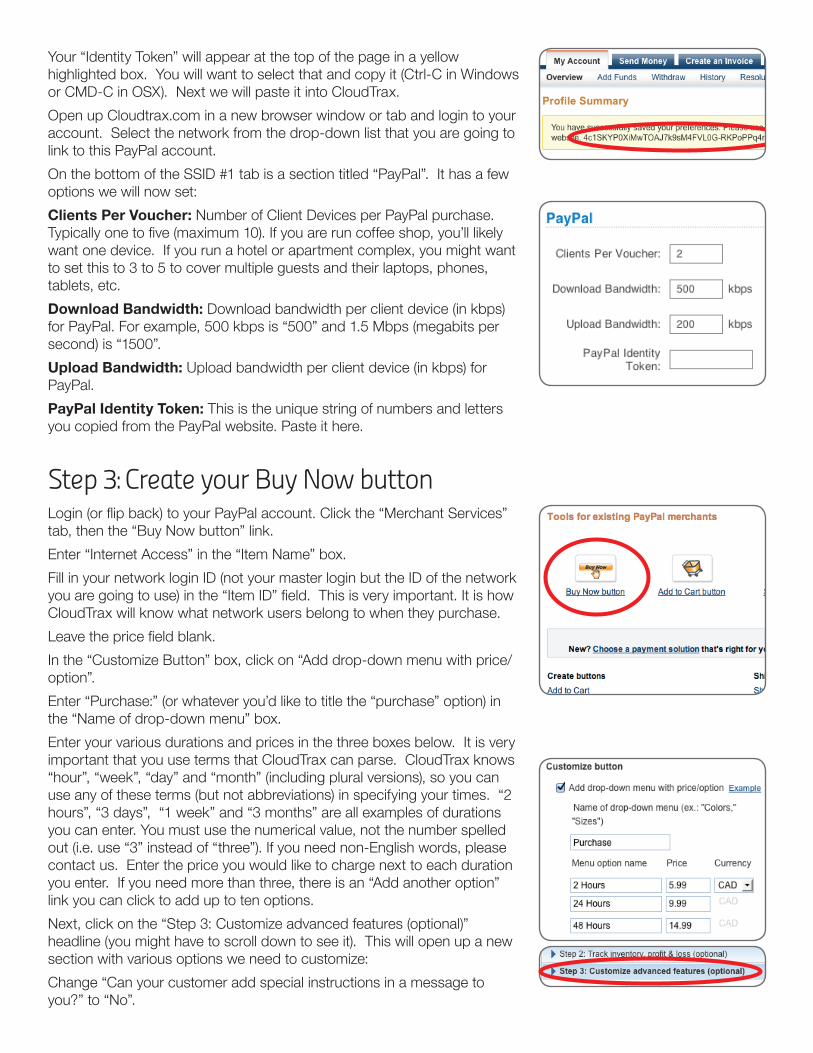
Your “Identity Token” will appear at the top of the page in a yellow highlighted box. You will want to select that and copy it (Ctrl-C in Windows or CMD-C in OSX). Next we will paste it into CloudTrax.Open up Cloudtrax.com in a new browser window or tab and login to your account. Select the network from the drop-down list that you are going to link to this PayPal account.On the bottom of the SSID #1 tab is a section titled “PayPal”. It has a few options we will now set:Clients Per Voucher: Number of Client Devices per PayPal purchase. Typicallyonetofive(maximum10).Ifyouareruncoffeeshop,you’lllikelywant one device. If you run a hotel or apartment complex, you might want to set this to 3 to 5 to cover multiple guests and their laptops, phones, tablets, etc.Download Bandwidth: Download bandwidth per client device (in kbps) for PayPal. For example, 500 kbps is “500” and 1.5 Mbps (megabits per second) is “1500”.Upload Bandwidth: Upload bandwidth per client device (in kbps) for PayPal.PayPal Identity Token: This is the unique string of numbers and letters you copied from the PayPal website. Paste it here.
Step 3: Create your Buy Now buttonLogin(orflipback)toyourPayPalaccount.Clickthe“MerchantServices”tab, then the “Buy Now button” link.Enter “Internet Access” in the “Item Name” box. Fill in your network login ID (not your master login but the ID of the network youaregoingtouse)inthe“ItemID”field.Thisisveryimportant.ItishowCloudTrax will know what network users belong to when they purchase.Leavethepricefieldblank.In the “Customize Button” box, click on “Add drop-down menu with price/option”.Enter “Purchase:” (or whatever you’d like to title the “purchase” option) in the “Name of drop-down menu” box.Enter your various durations and prices in the three boxes below. It is very important that you use terms that CloudTrax can parse. CloudTrax knows “hour”, “week”, “day” and “month” (including plural versions), so you can use any of these terms (but not abbreviations) in specifying your times. “2 hours”, “3 days”, “1 week” and “3 months” are all examples of durations you can enter. You must use the numerical value, not the number spelled out (i.e. use “3” instead of “three”). If you need non-English words, please contact us. Enter the price you would like to charge next to each duration you enter. If you need more than three, there is an “Add another option” link you can click to add up to ten options.Next, click on the “Step 3: Customize advanced features (optional)” headline (you might have to scroll down to see it). This will open up a new section with various options we need to customize:Change “Can your customer add special instructions in a message to you?” to “No”.
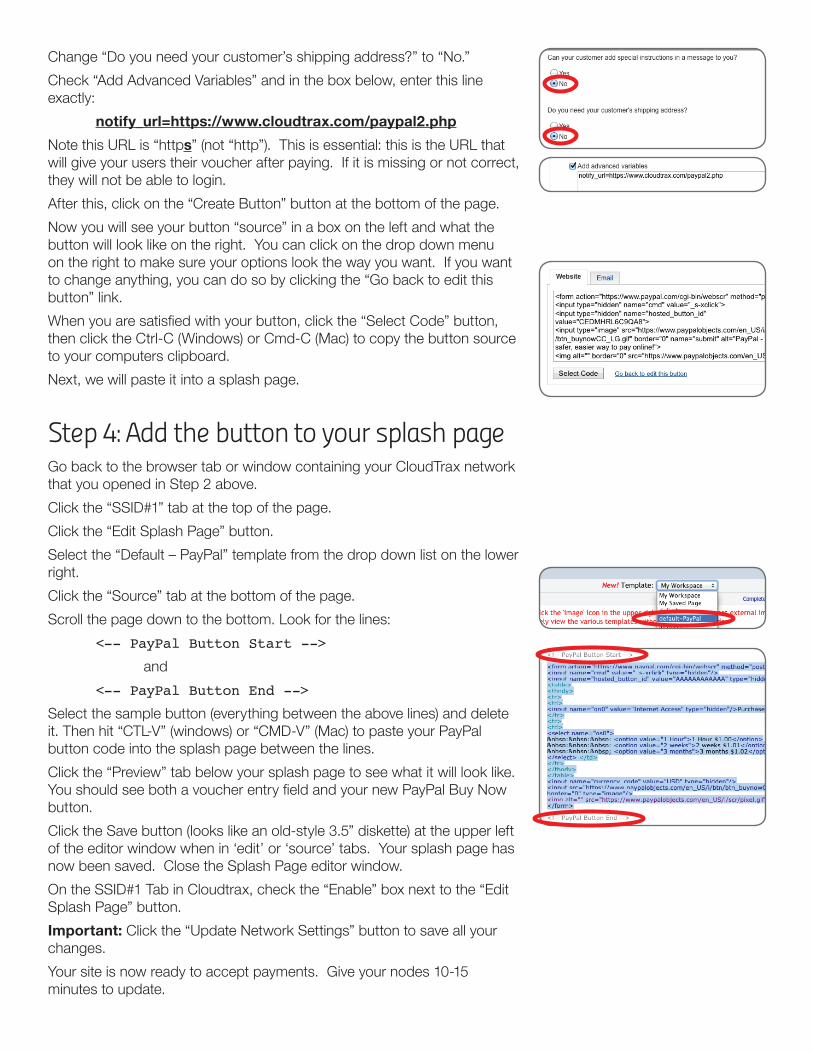
Change “Do you need your customer’s shipping address?” to “No.”Check “Add Advanced Variables” and in the box below, enter this line exactly: notify_url=https://www.cloudtrax.com/paypal2.phpNote this URL is “https” (not “http”). This is essential: this is the URL that will give your users their voucher after paying. If it is missing or not correct, they will not be able to login.After this, click on the “Create Button” button at the bottom of the page.Now you will see your button “source” in a box on the left and what the button will look like on the right. You can click on the drop down menu on the right to make sure your options look the way you want. If you want to change anything, you can do so by clicking the “Go back to edit this button” link.Whenyouaresatisfiedwithyourbutton,clickthe“SelectCode”button,then click the Ctrl-C (Windows) or Cmd-C (Mac) to copy the button source to your computers clipboard. Next, we will paste it into a splash page.
Step 4: Add the button to your splash pageGo back to the browser tab or window containing your CloudTrax network that you opened in Step 2 above.Click the “SSID#1” tab at the top of the page.Click the “Edit Splash Page” button. Select the “Default – PayPal” template from the drop down list on the lower right.Click the “Source” tab at the bottom of the page.Scroll the page down to the bottom. Look for the lines: <-- PayPal Button Start -->
and <-- PayPal Button End -->
Select the sample button (everything between the above lines) and delete it. Then hit “CTL-V” (windows) or “CMD-V” (Mac) to paste your PayPal button code into the splash page between the lines.Click the “Preview” tab below your splash page to see what it will look like. YoushouldseebothavoucherentryfieldandyournewPayPalBuyNowbutton.Click the Save button (looks like an old-style 3.5” diskette) at the upper left of the editor window when in ‘edit’ or ‘source’ tabs. Your splash page has now been saved. Close the Splash Page editor window.On the SSID#1 Tab in Cloudtrax, check the “Enable” box next to the “Edit Splash Page” button.Important: Click the “Update Network Settings” button to save all your changes.Your site is now ready to accept payments. Give your nodes 10-15 minutes to update.
Testing your new splash page with PayPalWhen you connect to the SSID you just enabled PayPal on, you should see your new splash page. To test the page, follow these steps:1. Click the PayPal “Buy Now” button you created.2. Purchase one of your options using a different PayPal account or use the “Credit card as a PayPal Guest” option.3. When you are done paying, you will be automatically (if paying with a PayPal account) redirected back to CloudTrax. If you paid via a credit card, there will be a “return to ” link. Click this link and you will be returned to CloudTrax.4. CloudTrax will display (with your logo if you uploaded one to the CloudTrax site) the voucher (and will also email it to you as the customer for future reference). Click the “Begin browsing” button.5. You should now be online (at Google.com). From here you can browse to any site you wish.Users will see the splash page whenever their duration (that they selected from the Buy Now button) expires. They can roam within your network without seeing the splash page again as their MAC address will be automaticallyverifiedastheymovebetweennodes.
Need additional help?To learn more about planning and optimizing your network, download the Cloudtrax Network Planning Guide at http://bit.ly/cloudtraxnpg.To learn more about the features within CloudTrax, download the CloudTrax Quick Start Guide at http://bit.ly/cloudtraxqs.To learn more about CloudTrax’s splash page feature, download the Using the Splash Page Editor Guide at http://bit.ly/cloudtraxsplash.To learn more about CloudTrax’s vouchers feature, download the Using Vouchers in CloudTrax Guide at http://bit.ly/cloudtraxvouch.To use Lobby Assistant or train others, download the Using Lobby Assistant Guide at http://bit.ly/lobbyassistant. This guide is written specificallyforhotelandapartmentfront-deskstaff.