using the hostess portalapi.ning.com/.../usingthehostessportal.pdf · using the hostess portal you...
TRANSCRIPT
Using the Hostess Portal You want your workshop to be a success—and we want to help! The Hostess Portal, available on your Stampin’ Up! demonstrator’s website is a fantastic tool to help you organize your workshop. You’ll find helpful tools, along with step‐by‐step instructions on how to make the most of your workshop. To enter the Hostess Portal, you’ll need two things:
1. Your Workshop ID 2. Your Hostess ID
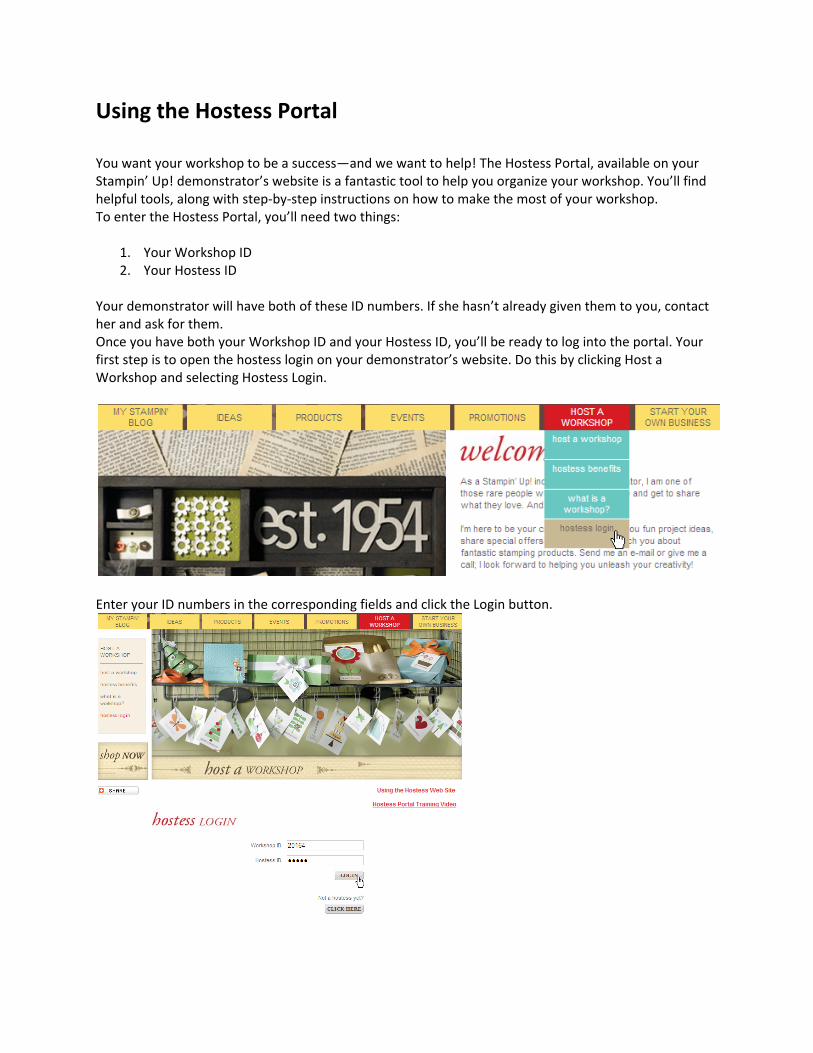
Your demonstrator will have both of these ID numbers. If she hasn’t already given them to you, contact her and ask for them. Once you have both your Workshop ID and your Hostess ID, you’ll be ready to log into the portal. Your first step is to open the hostess login on your demonstrator’s website. Do this by clicking Host a Workshop and selecting Hostess Login.
Enter your ID numbers in the corresponding fields and click the Login button.
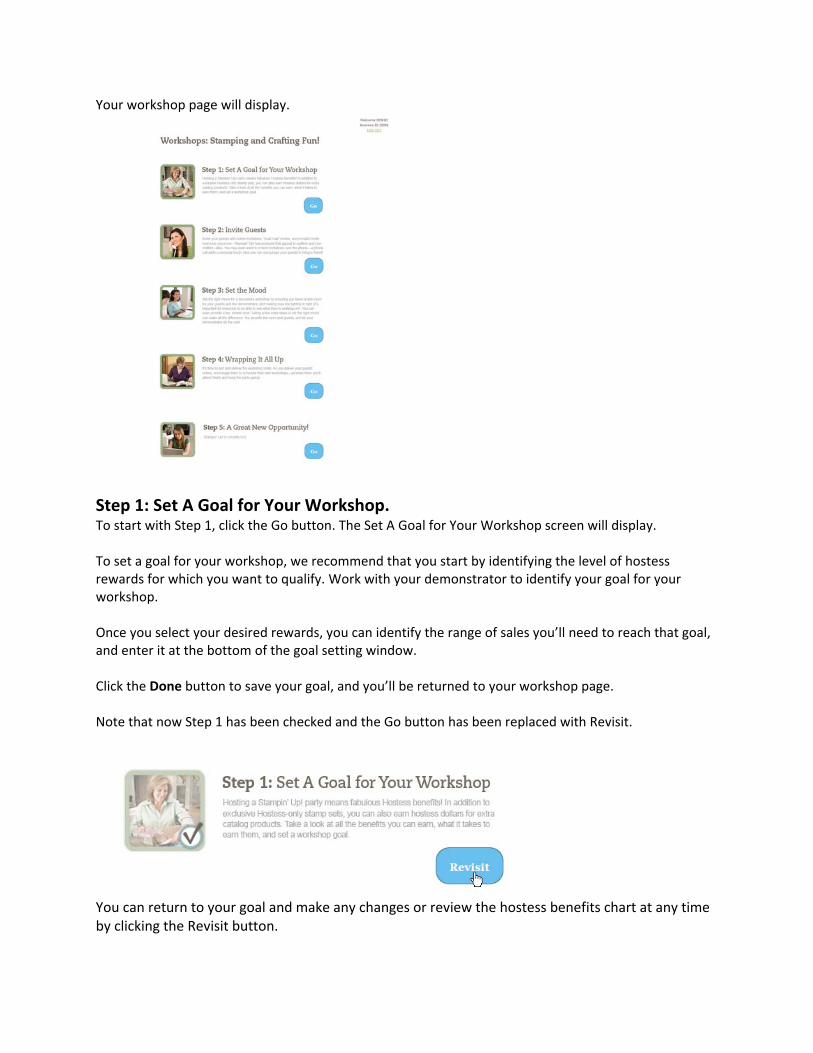
Your workshop page will display.
Step 1: Set A Goal for Your Workshop. To start with Step 1, click the Go button. The Set A Goal for Your Workshop screen will display. To set a goal for your workshop, we recommend that you start by identifying the level of hostess rewards for which you want to qualify. Work with your demonstrator to identify your goal for your workshop. Once you select your desired rewards, you can identify the range of sales you’ll need to reach that goal, and enter it at the bottom of the goal setting window. Click the Done button to save your goal, and you’ll be returned to your workshop page. Note that now Step 1 has been checked and the Go button has been replaced with Revisit.
You can return to your goal and make any changes or review the hostess benefits chart at any time by clicking the Revisit button.
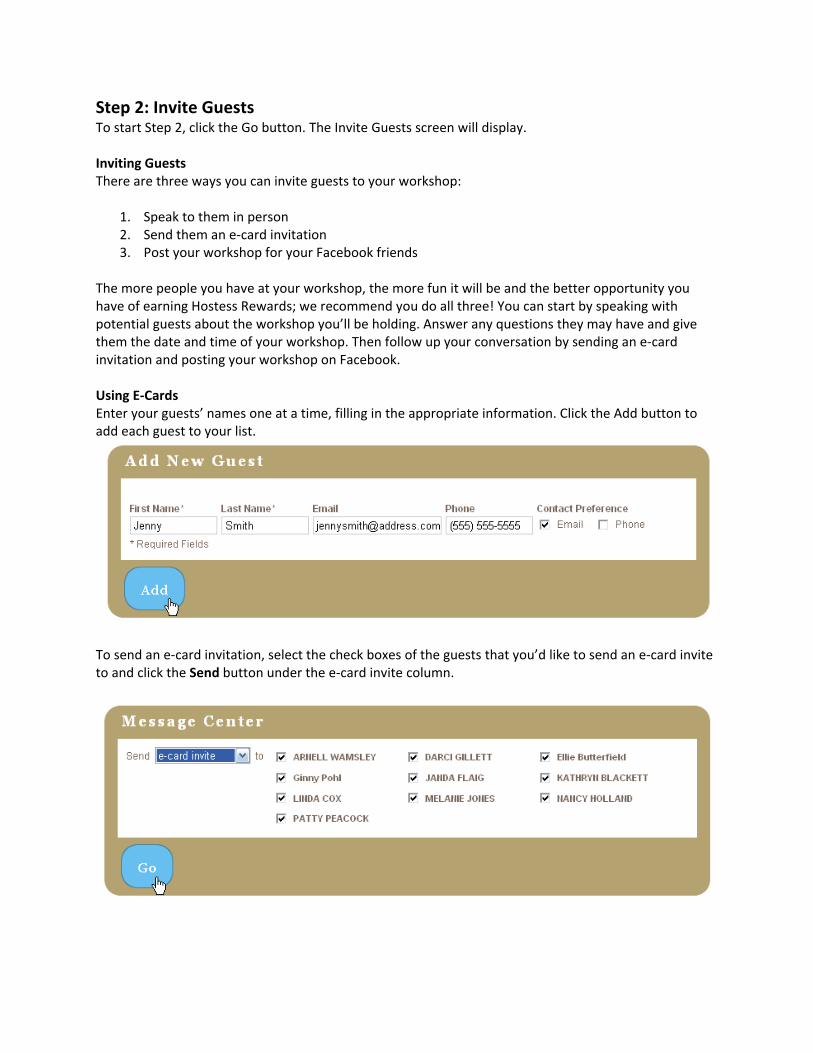
Step 2: Invite Guests To start Step 2, click the Go button. The Invite Guests screen will display. Inviting Guests There are three ways you can invite guests to your workshop:
1. Speak to them in person 2. Send them an e‐card invitation 3. Post your workshop for your Facebook friends
The more people you have at your workshop, the more fun it will be and the better opportunity you have of earning Hostess Rewards; we recommend you do all three! You can start by speaking with potential guests about the workshop you’ll be holding. Answer any questions they may have and give them the date and time of your workshop. Then follow up your conversation by sending an e‐card invitation and posting your workshop on Facebook. Using E‐Cards Enter your guests’ names one at a time, filling in the appropriate information. Click the Add button to add each guest to your list.
To send an e‐card invitation, select the check boxes of the guests that you’d like to send an e‐card invite to and click the Send button under the e‐card invite column.
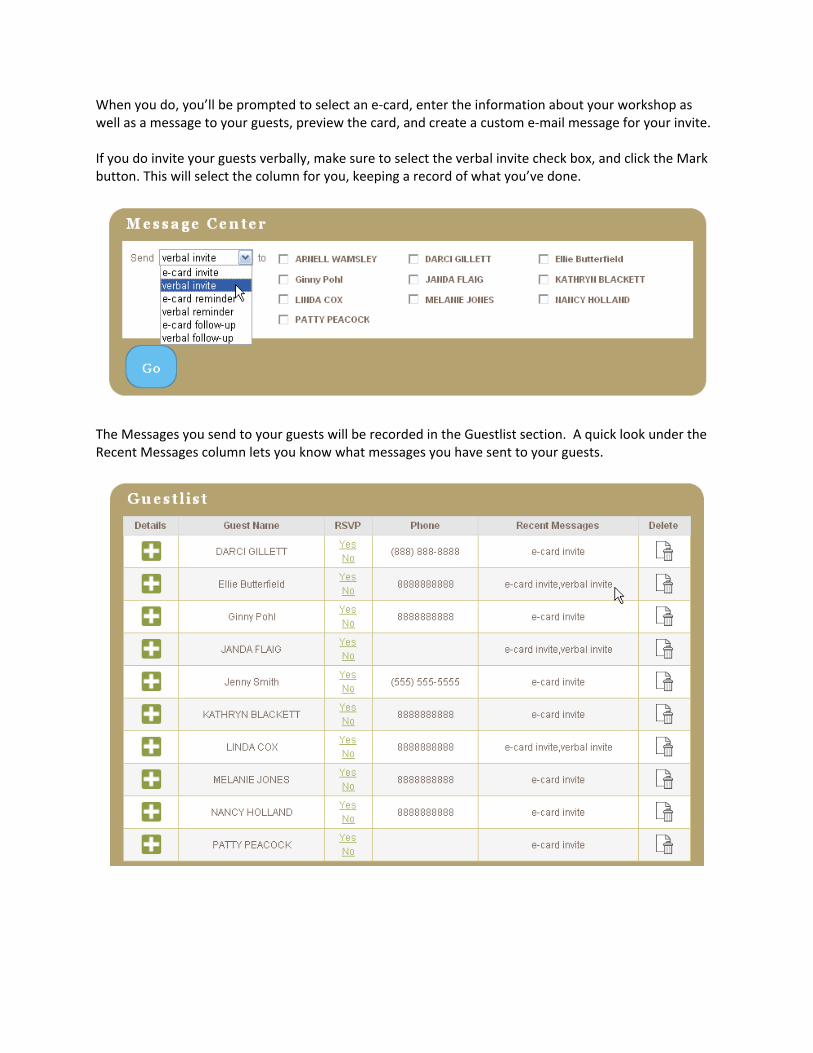
When you do, you’ll be prompted to select an e‐card, enter the information about your workshop as well as a message to your guests, preview the card, and create a custom e‐mail message for your invite. If you do invite your guests verbally, make sure to select the verbal invite check box, and click the Mark button. This will select the column for you, keeping a record of what you’ve done.
The Messages you send to your guests will be recorded in the Guestlist section. A quick look under the Recent Messages column lets you know what messages you have sent to your guests.
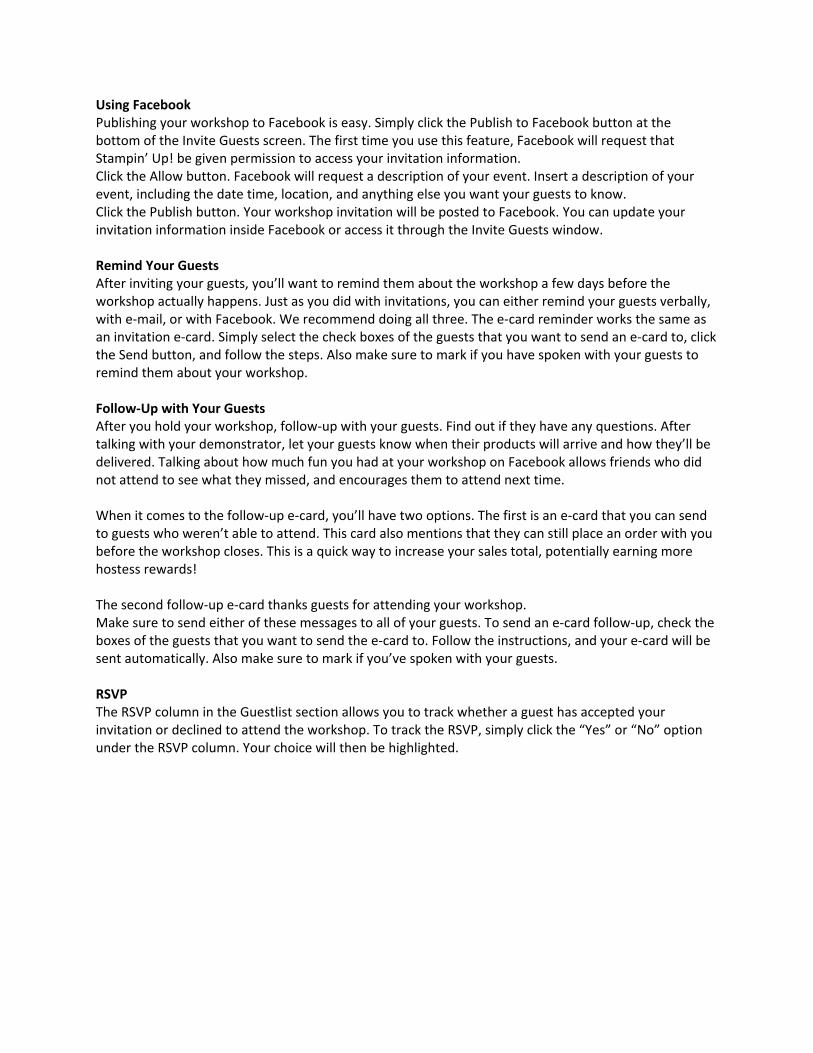
Using Facebook Publishing your workshop to Facebook is easy. Simply click the Publish to Facebook button at the bottom of the Invite Guests screen. The first time you use this feature, Facebook will request that Stampin’ Up! be given permission to access your invitation information. Click the Allow button. Facebook will request a description of your event. Insert a description of your event, including the date time, location, and anything else you want your guests to know. Click the Publish button. Your workshop invitation will be posted to Facebook. You can update your invitation information inside Facebook or access it through the Invite Guests window. Remind Your Guests After inviting your guests, you’ll want to remind them about the workshop a few days before the workshop actually happens. Just as you did with invitations, you can either remind your guests verbally, with e‐mail, or with Facebook. We recommend doing all three. The e‐card reminder works the same as an invitation e‐card. Simply select the check boxes of the guests that you want to send an e‐card to, click the Send button, and follow the steps. Also make sure to mark if you have spoken with your guests to remind them about your workshop. Follow‐Up with Your Guests After you hold your workshop, follow‐up with your guests. Find out if they have any questions. After talking with your demonstrator, let your guests know when their products will arrive and how they’ll be delivered. Talking about how much fun you had at your workshop on Facebook allows friends who did not attend to see what they missed, and encourages them to attend next time. When it comes to the follow‐up e‐card, you’ll have two options. The first is an e‐card that you can send to guests who weren’t able to attend. This card also mentions that they can still place an order with you before the workshop closes. This is a quick way to increase your sales total, potentially earning more hostess rewards! The second follow‐up e‐card thanks guests for attending your workshop. Make sure to send either of these messages to all of your guests. To send an e‐card follow‐up, check the boxes of the guests that you want to send the e‐card to. Follow the instructions, and your e‐card will be sent automatically. Also make sure to mark if you’ve spoken with your guests. RSVP The RSVP column in the Guestlist section allows you to track whether a guest has accepted your invitation or declined to attend the workshop. To track the RSVP, simply click the “Yes” or “No” option under the RSVP column. Your choice will then be highlighted.
Remove Guest If you need to remove a guest from your workshop, click the Delete icon in that guest’s row. That guest will then be removed from your Guestlist. Click the Update Guests button to save any changes or additions you’ve made. Remember, you can always come back to this invitation page by clicking Revisit from your workshop main page.
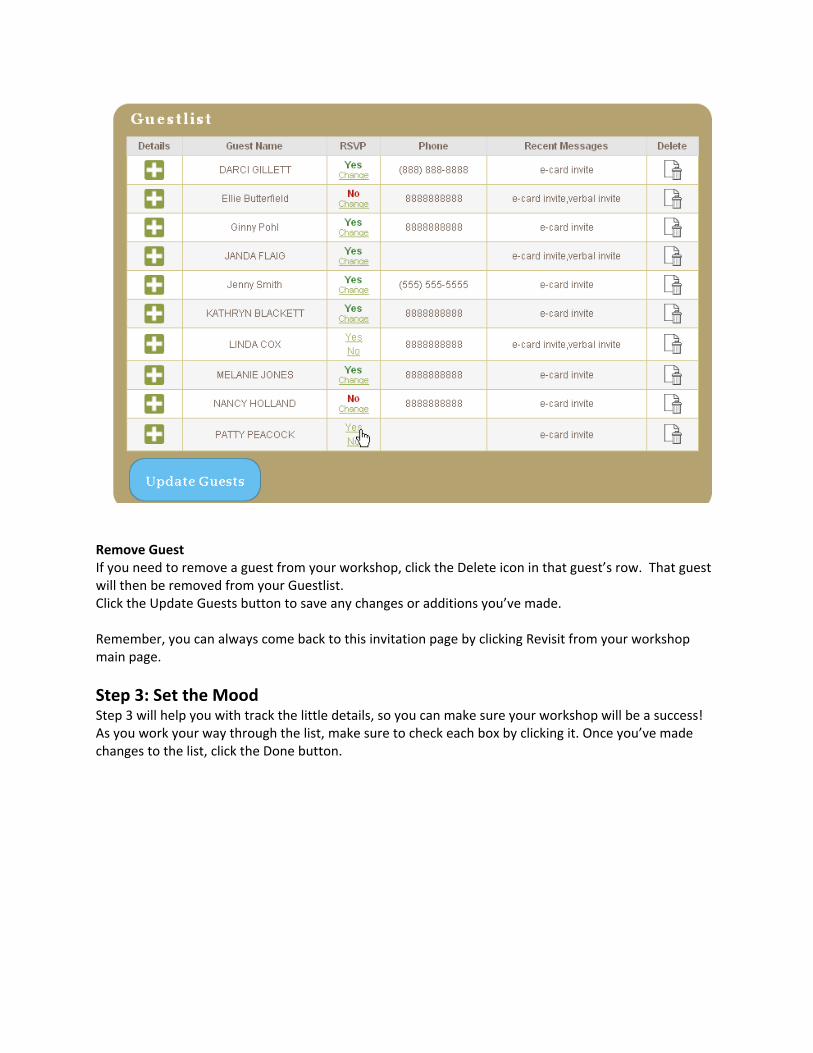
Step 3: Set the Mood Step 3 will help you with track the little details, so you can make sure your workshop will be a success! As you work your way through the list, make sure to check each box by clicking it. Once you’ve made changes to the list, click the Done button.
You will want to make multiple visits to this section of the hostess portal, as the items on the list will need to be completed at different times. You can come back to this list at any time by clicking Revisit on Step 3.
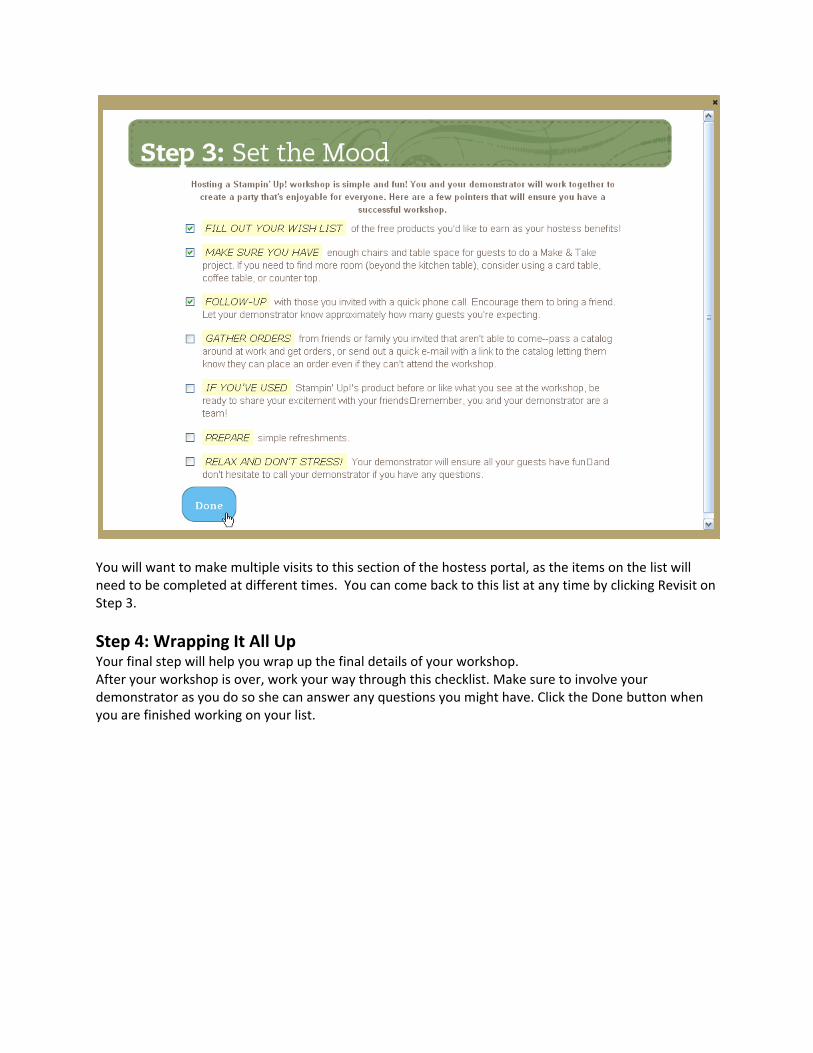
Step 4: Wrapping It All Up Your final step will help you wrap up the final details of your workshop. After your workshop is over, work your way through this checklist. Make sure to involve your demonstrator as you do so she can answer any questions you might have. Click the Done button when you are finished working on your list.
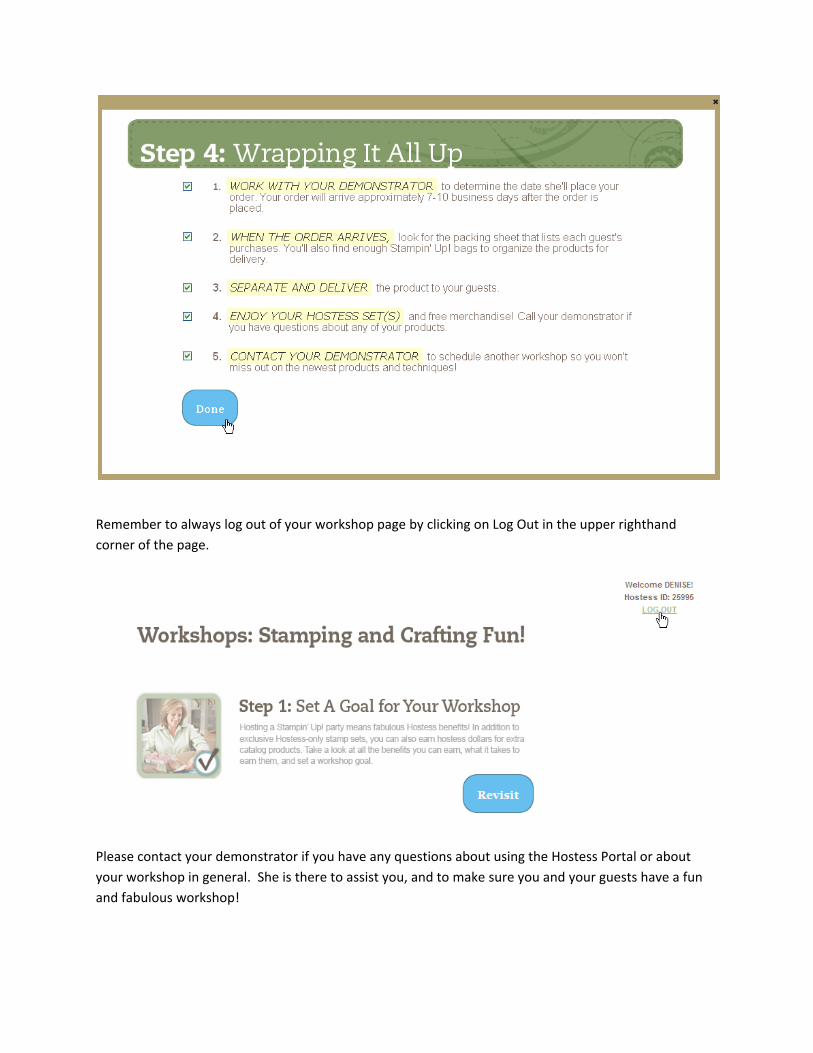
Remember to always log out of your workshop page by clicking on Log Out in the upper righthand
corner of the page.
Please contact your demonstrator if you have any questions about using the Hostess Portal or about
your workshop in general. She is there to assist you, and to make sure you and your guests have a fun
and fabulous workshop!