using the microsoft office connectors - community.pega.com the... · set the path property to the...
TRANSCRIPT

Pega Robotic Automation
USING THE MICROSOFT OFFICE CONNECTORS8.0
Start
Notice
© 2018 Pegasystems Inc., Cambridge, MAAll rights reserved.
Trademarks
For Pegasystems Inc. trademarks and registered trademarks, all rights reserved. All other trademarks or service marks are property of their respective holders. For information about the third-party software that is delivered with the product, refer to the third-party license file on your installation media that is specific to your release.
Notices
This publication describes and/or represents products and services of Pegasystems Inc. It may contain trade secrets and proprietary information that are protected by various federal, state, and international laws, and distributed under licenses restricting their use, copying, modification, distribution, or transmittal in any form without prior written authorization of Pegasystems Inc.This publication is current as of the date of publication only. Changes to the publication may be made from time to time at the discretion of Pegasystems Inc. This publication remains the property of Pegasystems Inc. and must be returned to it upon request. This publication does not imply any commitment to offer or deliver the products or services described herein.This publication may include references to Pegasystems Inc. product features that have not been licensed by you or your company. If you have questions about whether a particular capability is included in your installation, please consult your Pegasystems Inc. services consultant.Although Pegasystems Inc. strives for accuracy in its publications, any publication may contain inaccuracies or typographical errors, as well as technical inaccuracies. Pegasystems Inc. shall not be liable for technical or editorial errors or omissions contained herein. Pegasystems Inc. may make improvements and/or changes to the publication at any time without notice.Any references in this publication to non-Pegasystems websites are provided for convenience only and do not serve as an endorsement of these websites. The materials at these websites are not part of the material for Pegasystems products, and use of those websites is at your own risk.Information concerning non-Pegasystems products was obtained from the suppliers of those products, their publications, or other publicly available sources. Address questions about non-Pegasystems products to the suppliers of those products.This publication may contain examples used in daily business operations that include the names of people, companies, products, and other third-party publications. Such examples are fictitious and any similarity to the names or other data used by an actual business enterprise or individual is coincidental.This document is the property of:Pegasystems Inc.One Rogers StreetCambridge, MA 02142-1209USAPhone: (617) 374-9600Fax: (617) 374-9620www.pega.com
Updated: June 21, 2018
Feedback
If you have suggestions or comments for how we can improve our materials, send an email [email protected].

iii
CONTENTS
1 Using the Microsoft Office Connectors2 Overview
3 Installation configuration
4 Exercise 1 – Log in process
5 Exercise 2 – New Call window and export
12 Connector details
12 Microsoft Excel connector12 Exercise
16 Microsoft Outlook appointment connector
19 Microsoft Outlook contact
23 Microsoft Outlook notes

iv

Using the Microsoft Office Connectors 1
USING THE MICROSOFT OFFICE CONNECTORS
This document explains how to use Pega Robotic Automation Studio’s Microsoft Office Connectors. This includes Microsoft Word, Excel, and Outlook. In addition, this guide shows you how to use Pega Robotic Automation Studio functionality with these connectors.
Studio supports these versions of Microsoft Office:
• Office 2002• Office 2003• Office 2007• Office 2010• Office 2013• Office 2016
When you install Studio, the Setup wizard prompts you to choose which version of Microsoft Office you have.
This document includes the following topics.
• Exercise 1 – Log in process• Exercise 2 – New Call window and export• Connector details• Microsoft Outlook appointment connector• Microsoft Outlook contact• Microsoft Outlook notes
Prerequisites
You must have a working knowledge of Studio. The document also assumes you are familiar with general Microsoft Office concepts.
Using the Microsoft Office Connectors |
Using the Microsoft Office Connectors 2
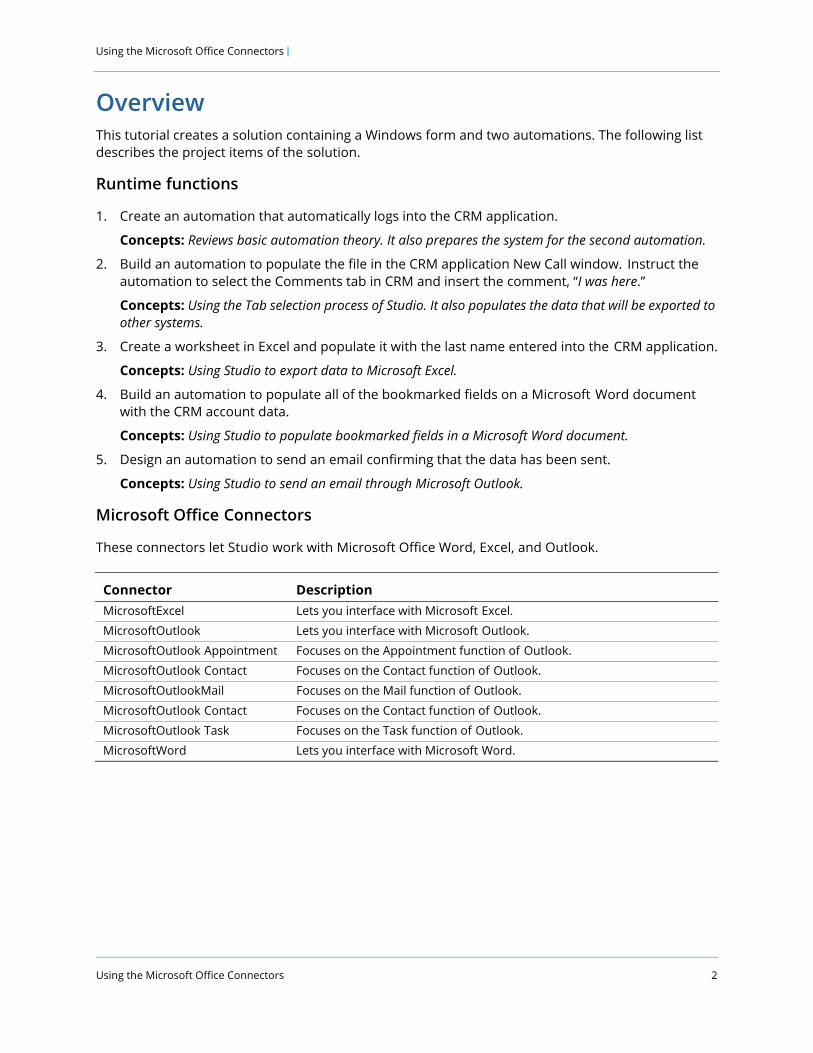
OverviewThis tutorial creates a solution containing a Windows form and two automations. The following list describes the project items of the solution.
Runtime functions
1. Create an automation that automatically logs into the CRM application.
Concepts: Reviews basic automation theory. It also prepares the system for the second automation.
2. Build an automation to populate the file in the CRM application New Call window. Instruct the automation to select the Comments tab in CRM and insert the comment, “I was here.”
Concepts: Using the Tab selection process of Studio. It also populates the data that will be exported to other systems.
3. Create a worksheet in Excel and populate it with the last name entered into the CRM application.
Concepts: Using Studio to export data to Microsoft Excel.
4. Build an automation to populate all of the bookmarked fields on a Microsoft Word document with the CRM account data.
Concepts: Using Studio to populate bookmarked fields in a Microsoft Word document.
5. Design an automation to send an email confirming that the data has been sent.
Concepts: Using Studio to send an email through Microsoft Outlook.
Microsoft Office Connectors
These connectors let Studio work with Microsoft Office Word, Excel, and Outlook.
Connector DescriptionMicrosoftExcel Lets you interface with Microsoft Excel.
MicrosoftOutlook Lets you interface with Microsoft Outlook.
MicrosoftOutlook Appointment Focuses on the Appointment function of Outlook.
MicrosoftOutlook Contact Focuses on the Contact function of Outlook.
MicrosoftOutlookMail Focuses on the Mail function of Outlook.
MicrosoftOutlook Contact Focuses on the Contact function of Outlook.
MicrosoftOutlook Task Focuses on the Task function of Outlook.
MicrosoftWord Lets you interface with Microsoft Word.

Using the Microsoft Office Connectors 3
Using the Microsoft Office Connectors |
Installation configurationWhen installing Studio, you can choose which version of Microsoft Office you want your installation of Studio to support:
• Office 2002• Office 2003• Office 2007• Office 2010• Office 2013• Office 2016
You can find additional information at these websites.
• Word — http://msdn2.microsoft.com/en-us/library/microsoft.office.interop.word._document_members(VS.80).aspx
• Excel workbook — http://msdn2.microsoft.com/en-us/library/microsoft.office.interop.excel._workbook_members(VS.80).aspx

Using the Microsoft Office Connectors | Exercise 1 – Log in process
Using the Microsoft Office Connectors 4
Exercise 1 – Log in processFollow these steps.
1. Create a blank solution and name it CRM Office.
2. Add a Windows adapter project item and name it CRM.
3. Set the Path property to the CRM application in the Studio folder.
4. Interrogate the Login button and the User Name and Password fields of the CRM Login screen. Then interrogate all of the fields in the New Call Window screen.
5. Create a new automation called Autx_LogIn automation with these events, properties, and methods.
Your automation should appear as shown in this example.
Note Delete the Window Text match rule for the account number label and change the Mode property for the New Call window to Starts With and the Text to New Call. This will remove any matching issues you may have.
Object ConnectLogin Created event This event to the txttxtCredentials Text property.
txttxtCredentials Text property This property to the Login Created event and the txttxtPassword Text property. Set the Text property to UserName.
txttxtPassword Text property This property to the txttxtCredentials Text property and the btnLogin PerformClick method. Set the Text property to Test.
btnLogin PerformClick method This method to the txttxtPassword Text property.

Using the Microsoft Office Connectors 5
Using the Microsoft Office Connectors | Exercise 2 – New Call window and export
Exercise 2 – New Call window and exportThe following automation uses Excel, Outlook, and Word to move data and showcase the Microsoft Office Connector capabilities. Follow these steps to create the solution.
1. Create an automation called Autx_Office Components.
2. Add a Created event for the Windows form named CRM_Subtraction_OpenSpan.
3. Insert the New Call button Perform Click event.
4. Add the tabMain SelectTab method for the Comments window.
5. Assign the I was here! property to interrogated txttxtComments window.
6. Assign the City, State, Street Addr, ZIP, and Name aspects with their correct values.
7. Add a message dialog. Use the Show method with the text parameter set to Confirm Send? and the Button property changed to YesNo.
8. Add the Microsoft Excel connector. It will appear in the Global tab of the component tray by default.
9. Create an Excel workbook.
10. Add the Workbook property for the selected workbook. Connect the Yes event from the ConfirmSend message dialog to the WorkBook properties for the Excel object. Make the link asynchronous.
11. Link to the SetCellValue method for the A2 cell. Take the data from the Name field assigned earlier.
12. Connect this to the Account number property from the interrogated CRM object.
13. Connect to the SetCellValue Excel method for cell B2.
Using the Microsoft Office Connectors | Exercise 2 – New Call window and export
Using the Microsoft Office Connectors 6
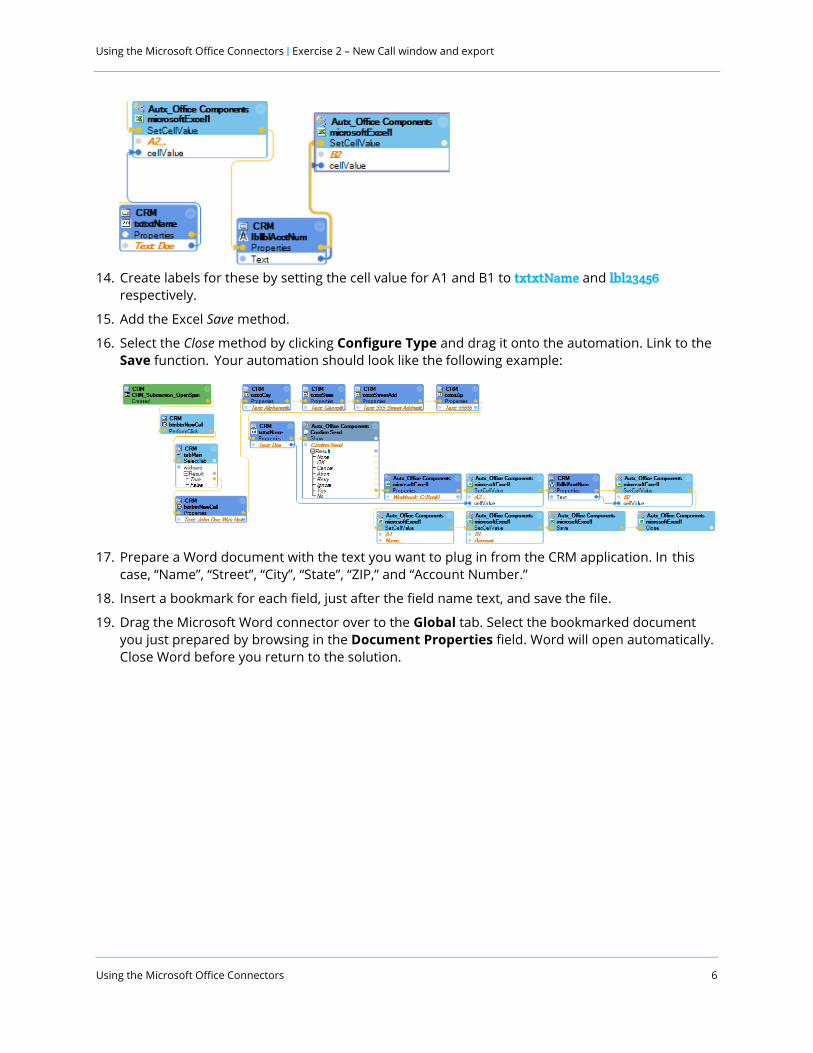
14. Create labels for these by setting the cell value for A1 and B1 to txtxtName and lbl23456 respectively.
15. Add the Excel Save method.
16. Select the Close method by clicking Configure Type and drag it onto the automation. Link to the Save function. Your automation should look like the following example:
17. Prepare a Word document with the text you want to plug in from the CRM application. In this case, “Name”, “Street”, “City”, “State”, “ZIP,” and “Account Number.”
18. Insert a bookmark for each field, just after the field name text, and save the file.
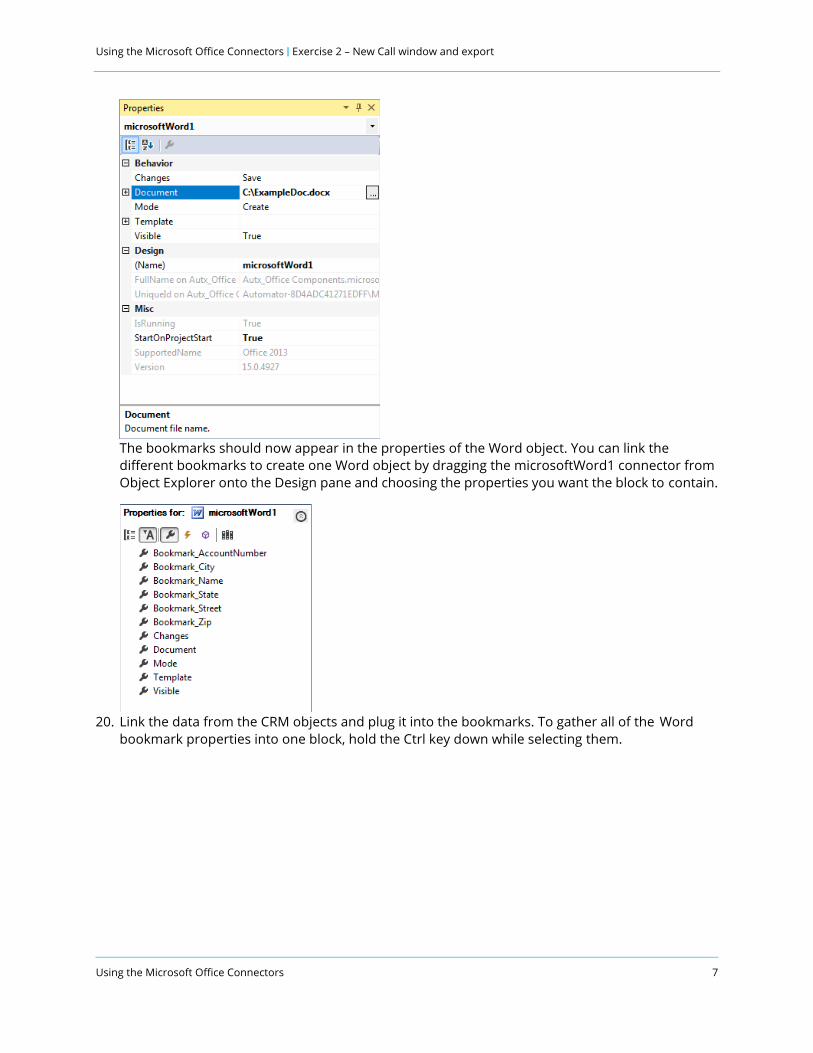
19. Drag the Microsoft Word connector over to the Global tab. Select the bookmarked document you just prepared by browsing in the Document Properties field. Word will open automatically. Close Word before you return to the solution.
Using the Microsoft Office Connectors 7
Using the Microsoft Office Connectors | Exercise 2 – New Call window and export
The bookmarks should now appear in the properties of the Word object. You can link the different bookmarks to create one Word object by dragging the microsoftWord1 connector from Object Explorer onto the Design pane and choosing the properties you want the block to contain.
20. Link the data from the CRM objects and plug it into the bookmarks. To gather all of the Word bookmark properties into one block, hold the Ctrl key down while selecting them.

Using the Microsoft Office Connectors | Exercise 2 – New Call window and export
Using the Microsoft Office Connectors 8
21. Connect the Yes result execution path from the Confirm Send Message Dialog to the Word bookmark Properties object. Make the link asynchronous.
22. Connect the Word bookmark Properties design block to the Word Save method.
23. Drag the Microsoft Outlook Mail connector over from the Connector Toolbar and drop it in the Global tab of the component tray.
24. Select the New method and connect it to the Yes event result from the Confirm Send message dialog. Make the link asynchronous.
25. Drag the Microsoft Outlook Mail property Body to the automation and connect it to the New Method. Set the text Body to This is the email that is sent when the confirmation button is clicked.
26. Drag the microsoftOutlookMail1 To property on to the automation. Link the Body object to the execution path. Change the To parameter to your email address. This parameter must be a properly formatted email address or you will get an error.
27. Drag the microsoftOutlookMail1 Send method to the automation and connect it to the microsoftOutLookMail1 To property.
28. Make sure Word and Excel are not open. Save and start the solution.
29. Stop the solution. You should have a document with name, account, and address details as well as a spreadsheet with two rows of information and a note in your email inbox from yourself. The completed automation looks like the following (group boxes have been added for clarity):

Using the Microsoft Office Connectors 9
Using the Microsoft Office Connectors | Exercise 2 – New Call window and export

Using the Microsoft Office Connectors | Exercise 2 – New Call window and export
Using the Microsoft Office Connectors 10
Object ConnectCRM_Subtraction_OpenSpan Created event
To the New_Call PerformClick method.
New_Call PerformClick method To the CRM_Subtraction_OpenSpan_Created event and the tabMain SelectTab method Comment parameter.
tabMain SelectTab method To the New_Call PerformClick method and the txttxtComments Text property.
txttxtComments Text property To the tabMain SelectTab method True event and the txttxtCity Text property. Set the property to John Doe Was Here.
txttxtCity Text property To the txttxtComment Text event link of the txttxtState Text property. Set the property to Alpharetta. Connect the data pathway to the Bookmark_City parameter of the microsoftWord1 connector.
txttxtState Text property To the txttxtCity Text event link of the txttxtStreetAdd Text property. Set the property to Georgia. Connect the data pathway to the Bookmark_State parameter of the microsoftWord1 connector.
txttxtStreetAdd Text property To the txttxtState Text event link of the txttxtZip Text property. Set the property to 555 Street Address. Connect the data pathway to the Bookmark_Street parameter of the microsoftWord1 connector.
txttxtZip Text property To the txtxtStreetAdd Text event link of the txttxtName Text property. Set the property to 55555. Connect the data pathway to the BookMark_Zip parameter of the microsoftWord1 connector.
txttxtName Text property To the txttxtZip Text event link of the Confirm Send Show method. Set the Text property to Doe. Connect the data pathway to the Bookmark_Name parameter of the microsoftWord1 connector and the cellvalue of the microsoftExcel1 SetCellValue method (A2).
Confirm Send Message dialog Show method Yes result event
This method to the txttxtName Text property, the microsoftWord1 Connector, the microsoftExcel1 connector, and the microsoftOutlookMail1 New method.
microsoftWord1 Connector (properties)
To the Confirm Send Show method and the microsoftWord1 Save method. Connect the Bookmark_Zip data parameter to the data connector of the txttxtZip Text property. Connect the Bookmark_Street data parameter to the data connector of the txttxtStreetAdd Text property.Connect the Bookmark_State parameter to the data connector of the txttxtState Text property. Connect the Bookmark_Name parameter to the data connector of the txttxtName Text property. Connect the Bookmark_City parameter to the txttxtCity Text property.Connect the Bookmark_Account parameter to the data connector of the lbl23456 Text property.
microsoftWord1 Save method To the microsoftWord1 connector.
microsoftExcel1 connector (properties)
To the Confirm Send Show method and the microsoftExcel1 SetCellValue method. Set the Workbook property to the path of the created workbook.

Using the Microsoft Office Connectors 11
Using the Microsoft Office Connectors | Exercise 2 – New Call window and export
microsoftExcel1 SetCellValue method (A2)
To the microsoftExcel1 connector and the lbl23456 Text property. Set the cell value to A2.Connect the cellValue parameter to the data connector of the txttxtName Text property.
Lbl23456 Text property To the microsoftExcel1 SetCellValue method (A2) and the microsoftExcel1 SetCellValue (B2) method. Connect the text data path to the cell value of the microsoftExcel1 Set Cell Value method (B2) and the BookMark_Account parameter of the microsoftWord1 connector.
microsoftExcel1 SetCellValue method (B2)
To the lbl23456 Text property and the microsoftExcel1 SetCellValue (A1) method. Set the Cell parameter to B2. Connect the cellValue parameter to the data connector of the lbl23456 Text property.
microsoftExcel1 SetCellValue method (A1)
To the microsoftExcel1 SetCellValue method (B2) and the microsoftExcel1 SetCellValue method (B1). Set the cell parameter to A1. Set the cellValue parameter to Last Name.
microsoftExcel1 SetCellValue method (B1)
To the microsoftExcel1 SetCellValue method (A1) and the microsoftExcel1 SaveAs method. Set the cell parameter to B1 and the Cell Value parameter to Account Number.
microsoftExcel1 SaveAs method To the microsoftExcel1 SetCellValue method (B1) and the microsoftExcel1.ExcelApplication Quit method. Set the file name to ExcelFun2.
microsoftExcel1.ExcelApplication Quit method
To the microsoftExcel1 SaveAs method.
microsoftOutlookMail1 New method To the Confirm Send Show method and the microsoftOutLokMail1 Body property.
microsoftOutLookMail1 Body property
To the microsoftOutLookMail1 New method and the microsoftOutLookMail1 To property. Set the Body parameter to This is the email that is being sent when the confirm button is pressed.
microsoftOutlookMail1 To property To the microsoftOutlookMail1 Body property and the microsoftOutlookMail1 Send method. Set the To property to the desired email address.
microsoftOutlookMail1 Send method
To the microsoftOutlookMail1 To property.
Object Connect
Using the Microsoft Office Connectors | Connector details
Using the Microsoft Office Connectors 12
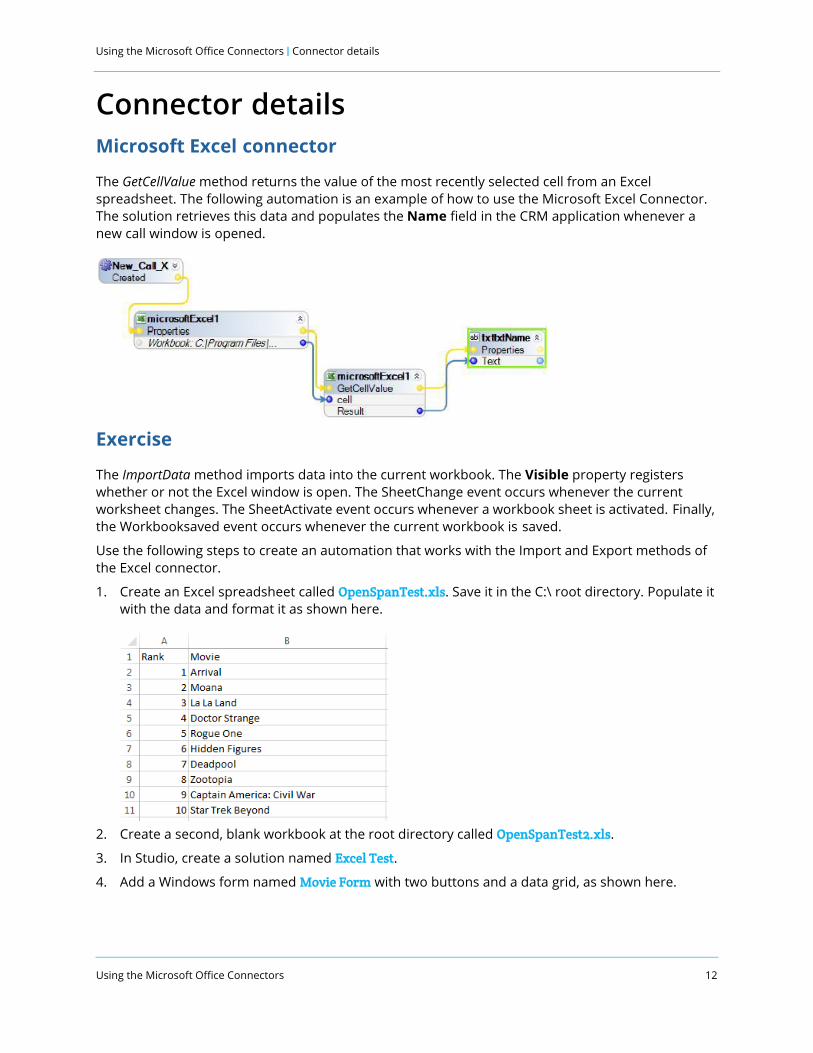
Connector detailsMicrosoft Excel connector
The GetCellValue method returns the value of the most recently selected cell from an Excel spreadsheet. The following automation is an example of how to use the Microsoft Excel Connector. The solution retrieves this data and populates the Name field in the CRM application whenever a new call window is opened.
Exercise
The ImportData method imports data into the current workbook. The Visible property registers whether or not the Excel window is open. The SheetChange event occurs whenever the current worksheet changes. The SheetActivate event occurs whenever a workbook sheet is activated. Finally, the Workbooksaved event occurs whenever the current workbook is saved.
Use the following steps to create an automation that works with the Import and Export methods of the Excel connector.
1. Create an Excel spreadsheet called OpenSpanTest.xls. Save it in the C:\ root directory. Populate it with the data and format it as shown here.
2. Create a second, blank workbook at the root directory called OpenSpanTest2.xls.
3. In Studio, create a solution named Excel Test.
4. Add a Windows form named Movie Form with two buttons and a data grid, as shown here.

Using the Microsoft Office Connectors 13
Using the Microsoft Office Connectors | Connector details
5. Name the design components as follows shown here.
6. Create an automation called Autx_Movies.
7. Insert the Click event for btn_GetData.
8. Add an Excel connector to the Global tab of the component tray of the automation. Name this OpenSpanTest.
9. Set the workbook property for the Excel connector to C:\Openspantest.xls.
10. Export the data using the ExportData method for the Excel connector. Set the range to be exported from A1 to B10. Set the Create Header parameter to True.
11. Connect the Click event from the btn_GetData to the Excel Connector ExportData method.
12. Connect the Result of the Excel ExportData method to the dataGrid_Movies Data Source incoming data port.

Using the Microsoft Office Connectors | Connector details
Using the Microsoft Office Connectors 14
13. Add a second Excel connector to the Global tab of the component tray.
14. Name this connector OpenSpanTest2.
15. Set the Workbook property to C:\OpenSpanTest2.xlsx.
16. Add the Click event for btn_SendData.
17. Add the ImportData method for OpenSpanTest2.
18. Connect the dataGrid_Movies object DataSource output to the DataTable parameter on the OpenSpanTest2 ImportData method.
19. Set the RowStart to 1 and the Column Start parameter to 1. Set the Create Header parameter to True.
20. Connect the Save method from the OpenSpan2 ImportData method to the OpenSpanTest2 ImportData method.
21. Save the solution.
22. Start the solution.
23. Click the Get Data button.
24. Click the Send Data button.
25. Stop the solution.
Your completed automation should look like the following example.
A summary of the connections in the automation follows:
Object ConnectBtn_GetData Click event To the OpenSpanTest ExportData method.
OpenSpanTest ExportData method
To the btn_GetData Click event and the dataGrid_Movies DataSource property.Connect the Result parameter to the data connector on the dataGrid_Movies DataSource property. Set the CellStart parameter to A1. Set the CellEnd parameter to B10. Set the createHeader parameter to True.
dataGrid_Movies DataSource property
To the OpenSpanTest ExportData method. Connect the incoming data connector to the result parameter from the OpenSpanTest ExportData method. Connect the outgoing data connector to the dataTable connector of the OpenSpanTest2 ImportData method.

Using the Microsoft Office Connectors 15
Using the Microsoft Office Connectors | Connector details
Btn_SendData Click event To the OpenSpanTest2 ImportData method.
OpenSpanTest2 ImportData method
To the btn_SendData Click method and the OpenSpanTest2 Save method. Connect the dataTable parameter to the outgoing data connector for the dataGrid_Movies DataSource property. Set the rowStart parameter to 1 and the ColumnStart parameter to 1.
OpenSpanTest2 Save method To the OpenSpanTest2 ImportData method.
Object Connect
Using the Microsoft Office Connectors | Microsoft Outlook appointment connector
Using the Microsoft Office Connectors 16
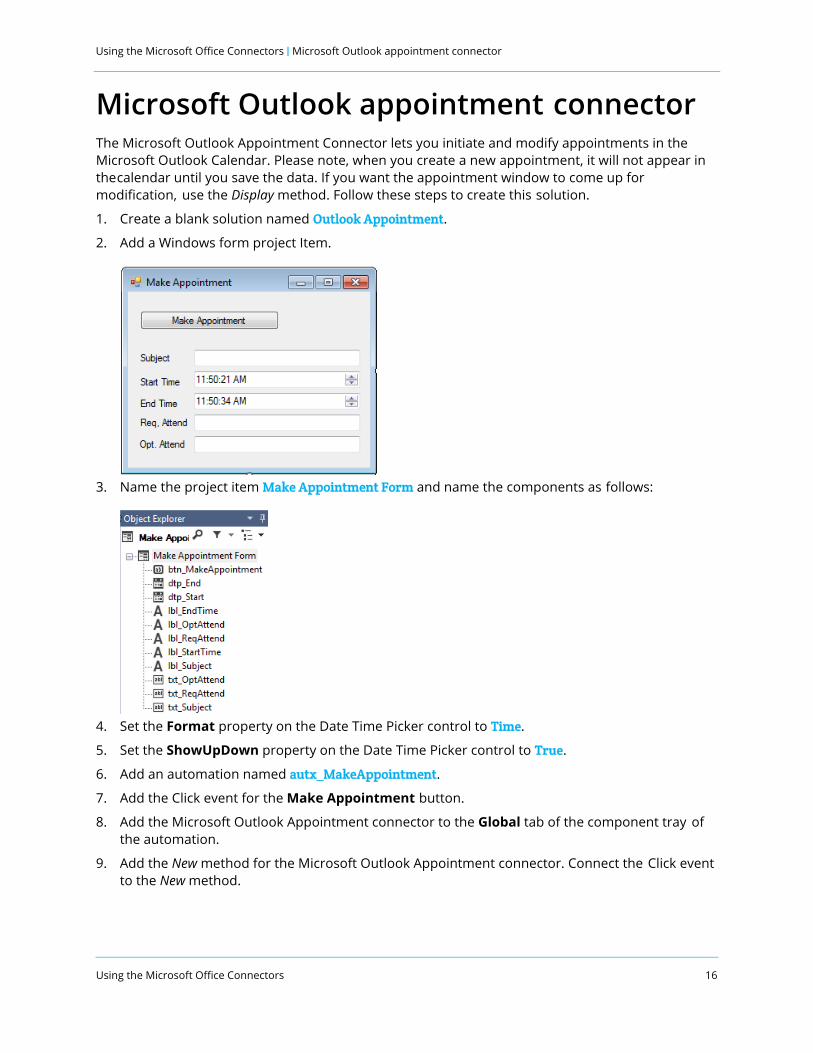
Microsoft Outlook appointment connectorThe Microsoft Outlook Appointment Connector lets you initiate and modify appointments in the Microsoft Outlook Calendar. Please note, when you create a new appointment, it will not appear in the calendar until you save the data. If you want the appointment window to come up for modification, use the Display method. Follow these steps to create this solution.
1. Create a blank solution named Outlook Appointment.
2. Add a Windows form project Item.
3. Name the project item Make Appointment Form and name the components as follows:
4. Set the Format property on the Date Time Picker control to Time.
5. Set the ShowUpDown property on the Date Time Picker control to True.
6. Add an automation named autx_MakeAppointment.
7. Add the Click event for the Make Appointment button.
8. Add the Microsoft Outlook Appointment connector to the Global tab of the component tray of the automation.
9. Add the New method for the Microsoft Outlook Appointment connector. Connect the Click event to the New method.

Using the Microsoft Office Connectors 17
Using the Microsoft Office Connectors | Microsoft Outlook appointment connector
10. Hold the Ctrl key down and select the following properties for the Microsoft Outlook Appointment: end, Optional Attendees, Required Attendees, Start, and Subject. Drag these properties as a group to the automation.
11. Connect the Text property for the subject, start, end, ReqAttend, and OptAttend fields to the Subject, Start, End, RequiredAttendees, and OptionalAttendees properties for the Microsoft Outlook Appointment connector.
12. Connect the New method output event node to the Microsoft Outlook Appointment input event node.
13. Connect the Microsoft Outlook Appointment connector Save method to the Microsoft Outlook Appointment block.
14. Save the automation.
15. Start the solution.
16. Enter a subject.
17. Enter a start time a half hour into the future and an end time that is two hours into the future.
18. Enter required and optional attendees (Consider putting your own name in both fields just to avoid sending others meeting requests.)
19. Click the Make Appointment button.
20. Check your Outlook Calendar. You should see an appointment with the appropriate data.
21. Stop the solution.
Your automation should look like the following automation.
A summary of the connections made in the automation follows:

Using the Microsoft Office Connectors | Microsoft Outlook appointment connector
Using the Microsoft Office Connectors 18
Object Connectbtn_MakeAppointment Click event To the microsoftOutlookAppointment1 New method.
microsoftOutlookAppointment1 New method
To the btn_MakeAppointment Click method and the microsoftOutlookAppointment1 Subject property.
microsoftOutlookAppointment1 Subject property
To the microsoftOutlookAppointment1 New method and the microsoftOutlookAppointment1 Start property. Connect the incoming data connector to the txt_Subject Text property.
txt_Subject Text property The outgoing data connector to the incoming data connector of the microsoftOutlookAppointment1 Subject property.
microsoftOutlookAppointment1 Start property
The microsoftOutlookAppointment1 Subject property and the microsoftOutlookAppointment1 End property. Connect the incoming data connector to the dtp_Start Text property.
dtp_Start Text property The outgoing data connector to the incoming data connector of the microsoftOutlookAppointment1 Start property.
microsoftOutlookAppointment1 End property
The microsoftOutlookAppointment1 Start property and the microsoftOutlookAppointment1 RequiredAttendees property. Connect the incoming data connector to the dtp_End Text property.
dtp_End Text property The outgoing data connector to the incoming data connector of the microsoftOutlookAppointment1 End property.
microsoftOutlookAppointment1 RequiredAttendees property
To the microsoftOutlookAppointment1 End property and the microsoftOutlookAppointment1 OptionalAttendees property. Connect the incoming data connector to the txt_ReqAttend Text property.
txt_ReqAttend Text property The outgoing data connector to the incoming data connector of the microsoftOutlookAppointment1 RequiredAttendees property.
microsoftOutlookAppointment1 OptionalAttendees property
To the microsoftOutlookAppointment1 RequiredAttendees property and the microsoftOutlookAppointment1 Save method. Connect the incoming data connector to the txt_OptAttend Text property.
txtOptAttend Text property The outgoing data connector to the incoming data connector of the microsoftOutlookAppointment1 OptionalAttendees property.
microsoftOutlookAppointment1 Save method
This to the microsoftOutlookAppointment1 OptionalAttendees property.

Using the Microsoft Office Connectors 19
Using the Microsoft Office Connectors | Microsoft Outlook contact
Microsoft Outlook contactThis exercise creates a windows form that extracts contact information from Microsoft Outlook.
1. Create a blank solution named Outlook Contact.
2. Either enter a new contact to use for testing purposes in Microsoft Outlook, or find an existing one that has all of the information needed (name, title, company, phone number, and email.)
3. Create a Windows form as follows shown below.
4. Name the Design form Contact and name the components as shown in the following example.
5. Add an automation called autx_GetContact.
6. Drag and drop the btn_GetContact Click event onto the autx_GetContact automation.
7. Insert the txtContactName Text property.
8. Add the Microsoft Outlook connector to the Global tab of the component tray of the automation.
9. Connect these to the microsoftOutlook FindContact method as shown in this example.

Using the Microsoft Office Connectors | Microsoft Outlook contact
Using the Microsoft Office Connectors 20
10. Right click on the data connector next to the contract parameter and select Extract Proxy. This lets you access extra properties, methods, and events of the selected object.
11. From the properties, methods, and events of the proxy, add the CompanyName, Email1Address, JobTitle, and BusinessTelephoneNumber properties.
Hold the Ctrl key down while selecting the properties and then drag them over as a block onto the automation. Connect the event links from the FindContact method to the Proxy and then to the Properties block as shown in this example.
12. Connect the txtEmail, txtCompany, txtPhoneNumber, and txtTitle fields to their corresponding Outlook Contact properties.
13. Your completed automation should look like the following example.

Using the Microsoft Office Connectors 21
Using the Microsoft Office Connectors | Microsoft Outlook contact
14. Save the solution.
15. Start the solution.
16. Type the name of someone that you have as an actual contact into the Contact Name field. If you do not have one, add a contact into Microsoft Outlook.
17. Click the Get Contact button. The fields will fill with the relevant contact data.
18. Stop the solution.
A summary of automation connections follows:
Object Connectbtn_GetContact Click event To the microsoftOutlook1 FindContact method.
txtContactName Text property The outgoing data connector to the name parameter of the microsoftOutlook1 FindContact method.

Using the Microsoft Office Connectors | Microsoft Outlook contact
Using the Microsoft Office Connectors 22
microsoftOutlook1 FindContact method To the btn_GetContact Click event and the microsoftOutlookContactProxy1. Connect the outgoing contact parameter data connector to the microsoftOutlookContactProxy1. Connect the outgoing data connector of the txtContactName Text property to the name parameter.
microsoftOutlookContactProxy1 To the microsoftOutlook1 FindContact method and the microsoftOutlookContactProxy1 CompanyName property. Connect the outgoing contact data connector to the incoming data connector.
microsoftOutlookContactProxy1 CompanyName property
To the microsoftOutlookContactProxy1 and the microsoftOutlookContactProxy1 Email1Address property. Connect the outgoing data port to the txtCompany Text property.
microsoftOutlookContactProxy1 Email1Address property
To the microsoftOutlookContactProxy1 CompanyName property and the microsoftOutlookContactProxy1 JobTitle property. Connect the outgoing data port to the txtEmail Text property.
microsoftOutlookContactProxy1 JobTitle property.
To the microsoftOutlookContactProxy1 Email1Address property and the microsoftOutlookContactProxy1 Business TelephoneNumber property. Connect the outgoing data port to the txtPhoneNumber Text property.
microsoftOutlookContactProxy BusinessTelephoneNumber property
To the microsoftOutlookContactProxy1 JobTitle property. Connect the outgoing data connector to the txtPhoneNumber Text property.
txtCompany Text property The incoming data connector to the outgoing data connector of the microsoftOutlookContactProxy1 CompanyName property.
txtEmail Text property The incoming data connector to the outgoing data connector of the microsoftOutlookContactProxy1 Email1Address property.
txtTitle Text property The incoming data connector to the outgoing data connector of the microsoftOutlookContactProxy1 JobTitle property.
txtPhoneNumber Text property The incoming data connector to the outgoing data connector of the microsoftOutlookContactProxy1 BusinessTelephoneNumber property.
Object Connect
Using the Microsoft Office Connectors 23
Using the Microsoft Office Connectors | Microsoft Outlook notes
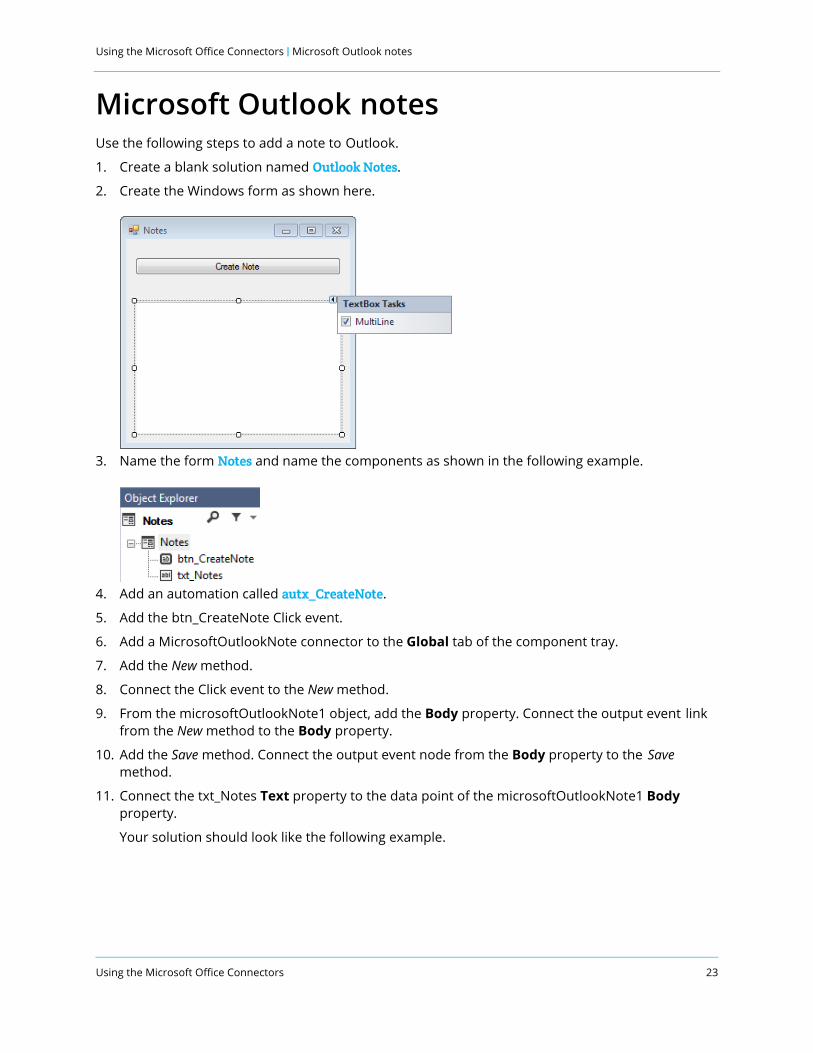
Microsoft Outlook notesUse the following steps to add a note to Outlook.
1. Create a blank solution named Outlook Notes.
2. Create the Windows form as shown here.
3. Name the form Notes and name the components as shown in the following example.
4. Add an automation called autx_CreateNote.
5. Add the btn_CreateNote Click event.
6. Add a MicrosoftOutlookNote connector to the Global tab of the component tray.
7. Add the New method.
8. Connect the Click event to the New method.
9. From the microsoftOutlookNote1 object, add the Body property. Connect the output event link from the New method to the Body property.
10. Add the Save method. Connect the output event node from the Body property to the Save method.
11. Connect the txt_Notes Text property to the data point of the microsoftOutlookNote1 Body property.
Your solution should look like the following example.

Using the Microsoft Office Connectors | Microsoft Outlook notes
Using the Microsoft Office Connectors 24
12. Save the solution.
13. Start the solution.
14. Enter a note into the text box.
15. Click the Create Note button.
16. Stop the solution.
17. Check your Outlook box for the new note. There should be a note visible with the information you that you entered into the Create Note form.
Here is a summary of the connections in the automation.
Object Connectbtn_CreateNote Click event To the microsoftOutlookNote1 New method.
microsoftOutlookNote1 New method To the btn_CreateNote Click event and the microsoftOutlookNote1 Body property.
txt_Notes Text property The outgoing data connector to the Body parameter of the microsoftOutlookNote1 Body property.
microsoftOutlookNote1 Body property To the microsoftOutlookNote1 New method and the microsoftOutlookNote1 Save method. Connect the incoming data connector to the txt_Notes Text property.
microsoftOutlookNote1 Save method To the microsoftOutlookNote1 Body property.