us.lge.com (u.s.a) ceramic-glass inductioncooktop …media.datatail.com/docs/manual/42890_en.pdf ·...
TRANSCRIPT
CERAMIC-GLASSINDUCTION COOKTOP
USER’S GUIDE &INSTALLATION INSTRUCTIONS
Please read this guide thoroughly before operating and keep it handy
for reference at all times.
GUÍA PARA EL USO &INSTRUCCIONES DE INSTALACIÓN
Lea detenidamente estas instruccionesantes utilizar y guárdelas como
referencia para el futuro.
To contact LG Electronics, 24 hours a day, 7 days a week:1-800-243-0000 (U.S.A.)1-888-542-2623 (Canada)Or visit us on the Web at: us.lge.com(U.S.A) or ca.lge.com (Canada)
Para comunicarse con LG Electronics,24 horas al día, 7 días a la semana:1-800-243-0000O visítenos en la Web en: us.lge.com
Pour communiquer avec LG Electronics, 24 heures par jour, 7 jours par semaine :1-888-542-2623Ou visitez-nous sur le Web au : ca.lge.com
Models/Modelos/Modèles
HN7413AGLCE30845
P/No. MFL41494801Printed in KoreaImpreso en KoreaImprimé en Corée
PLEASE READ THIS USER’S GUIDETHOROUGHLY BEFORE OPERATING.
LEA CUIDADOSAMENTE ESTA GUÍA PARA ELUSO ANTES DE UTILISAR.
VEUILLEZ LIRE ATTENTIVEMENT CE MANUELDE L’UTILISATEUR AVANT DE FAIRE
FONCTIONNER L’APPAREIL.
COCINA A INDUCCIÓNDE VIDRIO CERÁMICO
EN
GL
ISH
ES
PAÑ
OL
FR
AN
ÇA
IS
MANUEL DE L’UTILISATEUR ET DIRECTIVES D’INSTALLATION
Veuillez lire attentivement ce manuelavant de vous servir de l’appareil et
gardez-le en tout temps à portée de lamain pour référence.
TABLE DE CUISSON À INDUCTIONEN VERRE CÉRAMIQUE
2
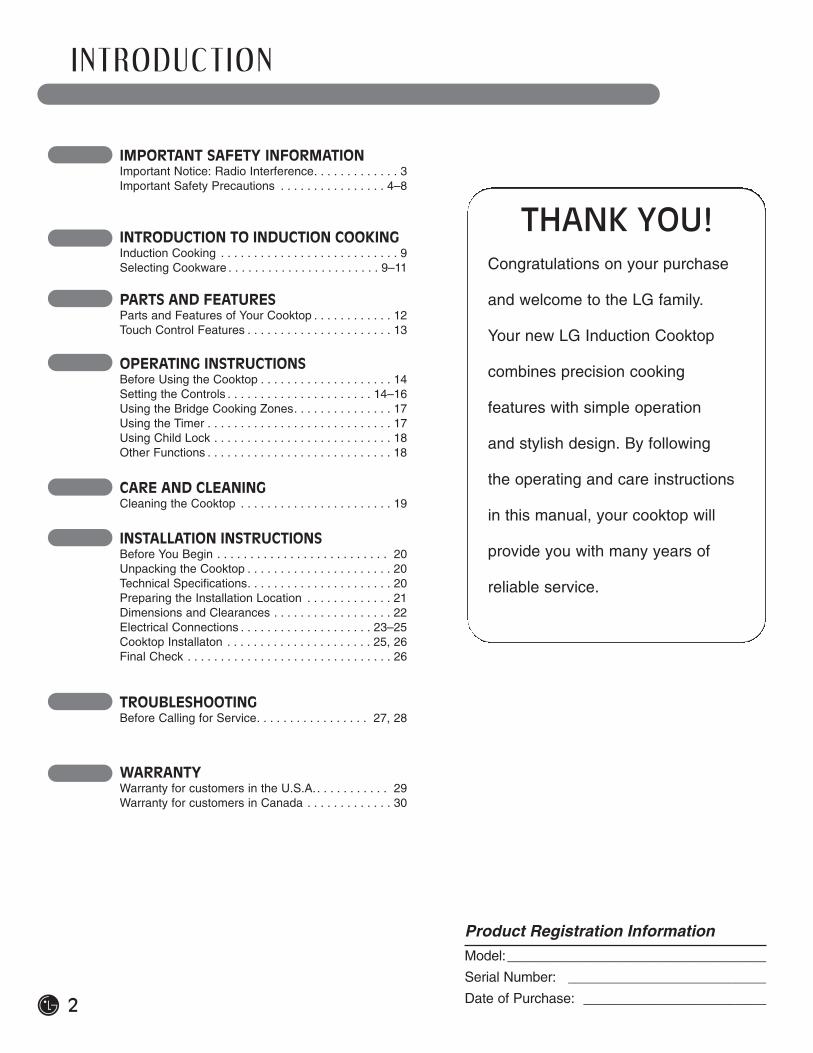
I N T RO D U C T I O N
IMPORTANT SAFETY INFORMATIONImportant Notice: Radio Interference. . . . . . . . . . . . . 3Important Safety Precautions . . . . . . . . . . . . . . . . 4–8
PARTS AND FEATURESParts and Features of Your Cooktop . . . . . . . . . . . . 12Touch Control Features . . . . . . . . . . . . . . . . . . . . . . 13
CARE AND CLEANINGCleaning the Cooktop . . . . . . . . . . . . . . . . . . . . . . . 19
TROUBLESHOOTINGBefore Calling for Service. . . . . . . . . . . . . . . . . 27, 28
Congratulations on your purchase
and welcome to the LG family.
Your new LG Induction Cooktop
combines precision cooking
features with simple operation
and stylish design. By following
the operating and care instructions
in this manual, your cooktop will
provide you with many years of
reliable service.
THANK YOU!INTRODUCTION TO INDUCTION COOKINGInduction Cooking . . . . . . . . . . . . . . . . . . . . . . . . . . . 9Selecting Cookware . . . . . . . . . . . . . . . . . . . . . . . 9–11
OPERATING INSTRUCTIONSBefore Using the Cooktop . . . . . . . . . . . . . . . . . . . . 14Setting the Controls . . . . . . . . . . . . . . . . . . . . . . 14–16Using the Bridge Cooking Zones. . . . . . . . . . . . . . . 17Using the Timer . . . . . . . . . . . . . . . . . . . . . . . . . . . . 17Using Child Lock . . . . . . . . . . . . . . . . . . . . . . . . . . . 18Other Functions . . . . . . . . . . . . . . . . . . . . . . . . . . . . 18
INSTALLATION INSTRUCTIONSBefore You Begin . . . . . . . . . . . . . . . . . . . . . . . . . . 20Unpacking the Cooktop . . . . . . . . . . . . . . . . . . . . . . 20Technical Specifications. . . . . . . . . . . . . . . . . . . . . . 20Preparing the Installation Location . . . . . . . . . . . . . 21Dimensions and Clearances . . . . . . . . . . . . . . . . . . 22Electrical Connections . . . . . . . . . . . . . . . . . . . . 23–25Cooktop Installaton . . . . . . . . . . . . . . . . . . . . . . 25, 26Final Check . . . . . . . . . . . . . . . . . . . . . . . . . . . . . . . 26
Product Registration Information
Model:__________________________________
Serial Number: __________________________
Date of Purchase: ________________________
WARRANTYWarranty for customers in the U.S.A.. . . . . . . . . . . 29Warranty for customers in Canada . . . . . . . . . . . . . 30
WARNING For your safety, the information in this manual must befollowed to minimize the risk of fire, electric shock, or to prevent property damage,personal injury, or death.
I M P O RTA N T S A F E T Y I N F O R M AT I O N
READ ALL INSTRUCTIONS BEFORE USE
This unit has been tested and found to comply withthe limits for a class B digital device, pursuant toPart 18 of the FCC rules. These limits aredesigned to provide reasonable protection againstharmful interference in a residential installation.This unit generates, uses and can radiate radiofrequency energy and, if not installed and used inaccordance with the instructions, may causeharmful interference to radio communications.However there is no guarantee that interferencewill not occur in a particular installation. If this unitdoes cause harmful interference to radio or
television reception, which can be determined byturning the unit off and on, the user is encouragedto try to correct the interference by one or more ofthe following measures:
• Reorient or relocate the radio and/or televisionreceiving antennae.
• Increase the distance between the cooktop unitand radio or television receiver.
• Connect the cooktop unit into an outlet or acircuit different from that to which the radio ortelevision receiver is connected.
IMPORTANT NOTICE: RADIO INTERFERENCE
3
EN
GL
ISH
The California Safe Drinking Water and ToxicEnforcement Act requires the Governor ofCalifornia to publish a list of substances known to the state to cause birth defects or other
reproductive harm and requires businesses towarn customers of potential exposure to suchsubstances.
IMPORTANT SAFETY NOTICE
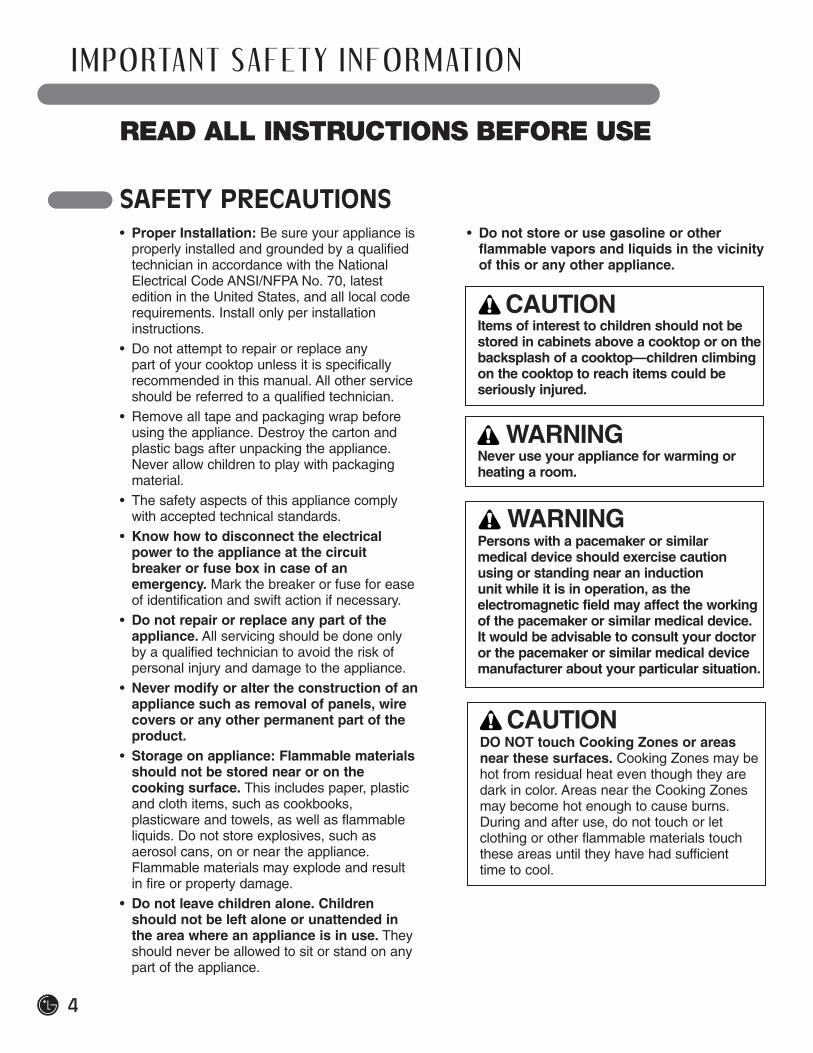
• Proper Installation: Be sure your appliance isproperly installed and grounded by a qualifiedtechnician in accordance with the NationalElectrical Code ANSI/NFPA No. 70, latestedition in the United States, and all local coderequirements. Install only per installationinstructions.
• Do not attempt to repair or replace any part of your cooktop unless it is specificallyrecommended in this manual. All other serviceshould be referred to a qualified technician.
• Remove all tape and packaging wrap beforeusing the appliance. Destroy the carton andplastic bags after unpacking the appliance.Never allow children to play with packagingmaterial.
• The safety aspects of this appliance complywith accepted technical standards.
• Know how to disconnect the electricalpower to the appliance at the circuitbreaker or fuse box in case of anemergency. Mark the breaker or fuse for easeof identification and swift action if necessary.
• Do not repair or replace any part of theappliance. All servicing should be done onlyby a qualified technician to avoid the risk ofpersonal injury and damage to the appliance.
• Never modify or alter the construction of anappliance such as removal of panels, wirecovers or any other permanent part of theproduct.
• Storage on appliance: Flammable materialsshould not be stored near or on thecooking surface. This includes paper, plasticand cloth items, such as cookbooks,plasticware and towels, as well as flammableliquids. Do not store explosives, such asaerosol cans, on or near the appliance.Flammable materials may explode and resultin fire or property damage.
• Do not leave children alone. Childrenshould not be left alone or unattended inthe area where an appliance is in use. Theyshould never be allowed to sit or stand on anypart of the appliance.
• Do not store or use gasoline or otherflammable vapors and liquids in the vicinityof this or any other appliance.
4
I M P O RTA N T S A F E T Y I N F O R M AT I O N
READ ALL INSTRUCTIONS BEFORE USE
Items of interest to children should not bestored in cabinets above a cooktop or on thebacksplash of a cooktop—children climbing on the cooktop to reach items could beseriously injured.
DO NOT touch Cooking Zones or areasnear these surfaces. Cooking Zones may behot from residual heat even though they aredark in color. Areas near the Cooking Zonesmay become hot enough to cause burns.During and after use, do not touch or letclothing or other flammable materials touchthese areas until they have had sufficient time to cool.
Never use your appliance for warming orheating a room.
Persons with a pacemaker or similar medical device should exercise cautionusing or standing near an induction unit while it is in operation, as theelectromagnetic field may affect the workingof the pacemaker or similar medical device.It would be advisable to consult your doctoror the pacemaker or similar medical devicemanufacturer about your particular situation.
SAFETY PRECAUTIONS
CAUTION
CAUTION
WARNING
WARNING
5
EN
GL
ISH
• The installation and connection of the newappliance must only be carried out by qualifiedpersonnel.
• Flush-mounted appliances may only beoperated following installation in suitablecabinets and workplaces which conform to therelevant standards. This ensures sufficientprotection against electric shock as required by certification agencies.
• If your appliance malfunctions or fractures, switch off all cooking zones, and contactService Center.
ELECTRICAL SAFETY
I M P O RTA N T S A F E T Y I N F O R M AT I O N
READ ALL INSTRUCTIONS BEFORE USE
• Wear proper apparel. Loose-fitting orhanging garments should never be wornwhile using the appliance. Do not let clothingor other flammable materials contact hotsurfaces.
• Do not use water or flour on grease fires.Smother the fire with a pan lid, or use bakingsoda, a dry chemical or foam-typeextinguisher.
• When heating fat or grease, watch itclosely. Fat or grease may catch fire ifallowed to become too hot.
• Use only dry pot holders. Moist or damp potholders on hot surfaces may result in burnsfrom steam. Do not let the pot holders touchhot surface units. Do not use a towel or otherbulky cloth instead of a pot holder.
• Do not heat unopened food containers.Buildup of pressure may cause the containerto burst and result in injury.
SAFETY PRECAUTIONS (cont.)
• If the surface is cracked, switch off theappliance to avoid the possibility ofelectric shock. Do not reuse yourCOOKTOP until the glass surface hasbeen changed.
• When using the COOKTOP, never usealuminum foil, products wrapped inaluminum foil, or deep-frozen food inaluminum cookware.
• If the supply cord is damaged, it must be replaced by the manufacturer, itsservice agent or similarly qualifiedpersons in order to avoid a hazard.
CHILD SAFETY
• This appliance is not intended for use byyoung children or infirm persons unlessthey have been adequately supervised bya responsible person to ensure that theycan use the appliance safely.
• Young children should be supervised toensure that they do not play with theappliance.
• Accessible parts may become hot during use. Young children should bekept away.
WARNING
WARNING
6
• This appliance may only be used for normalcooking and frying in the home. It is notdesigned for commercial or industrial purposes.
• Do not use the cooktop to heat the room. • Take care when plugging in electric
appliances near the cooktop. Cords must notcome into contact with the hot surface. Thiscould cause damage to the cooktop and cableinsulation.
• Overheated fats and oils catch fire quickly.You should supervise cooking when preparingfoods in fat or oil.
• After use, switch off the hob element by its control and do not rely on the pan detector.
• Always keep the control panels clean anddry. Do not let liquids or grease remain on thecooktop controls area. Spilled or burnt-on foodscan activate or deactivate the appliance. Cleanthe controls area thoroughly to resume normaloperation of the appliance.
• Never place combustible items on thecooktop.
• Never keep any combustible items oraerosol cans in a drawer located under the cooktop.
• Avoid placing metal cooking utensils on the cooking surface areas. Metal objects can become hot and cause burns.
• Know which touch keypad controls eachsurface of the cooking zones.
• Clean the appliance regularly to keep allparts free of grease that could catch fire.Exhaust fan ventilation hoods and grease filtersshould be kept clean. Do not allow grease toaccumulate on hood or filter. Greasy depositsin the fan could catch fire. Refer to hoodmanufacturer's instructions for cleaning.
• Use proper pan size. This appliance isequipped with one or more Cooking Zones of different sizes.
• Select utensils having flat bottoms largeenough to cover the Cooking Zones. Thepan detection sensors will not allow theaffected cooking zones to operate without a pan present.
• Do not place any object on or near thecontrol keypad area in order to preventaccidental activation of the cooktopcontrols.
• Utensil handles should be turned inwardand should not extend over adjacentcooking zones to reduce the risk of burns,ignition of flammable materials, and spillagedue to unintentional contact with the utensil.
• Never leave prepared food on the CookingZones. Boilovers cause smoking and greasyspillovers that may ignite, or a pan that hasboiled dry may melt or become damaged.
• Protective liners: Do not use aluminum foilto line any part of the cooktop. Only usealuminum foil as recommended after thecooking process, if used as a cover to beplaced over the food. Any other use ofaluminum foil may result in the risk of electricshock, fire or short circuit.
• Glazed cooking utensils: Only certain types of glass, glass/ceramic, ceramic,earthenware, or other glazed utensils aresuitable for rangetop service withoutbreaking due to the sudden change intemperature. Check the manufacturer’srecommendations for cooktop use.
• Ventilating hood: The ventilating hoodabove your cooking surface should becleaned frequently, so the grease fromcooking vapors does not accumulate on the hood or filter.
• Do not clean or operate a broken cooktop.If cooktop should break, cleaning solutions andspillovers may penetrate the broken cooktopand create a risk of electric shock. Contact aqualified technician immediately.
• Clean cooktop with caution. If a wet spongeor cloth is used to wipe spills on a hot cookingarea, be careful to avoid a steam burn. Somecleaners can produce harmful fumes if appliedto a hot surface.
SAFETY DURING USE
I M P O RTA N T S A F E T Y I N F O R M AT I O N
READ ALL INSTRUCTIONS BEFORE USE
7
EN
GL
ISH
COOK MEAT AND POULTRY THOROUGHLYCook meat and poultry thoroughly—meat to atleast an INTERNAL temperature of 160°F andpoultry to at least an INTERNAL temperature of180°F. Cooking to these temperatures usuallyprotects against foodborne illness.
I M P O RTA N T S A F E T Y I N F O R M AT I O N
READ ALL INSTRUCTIONS BEFORE USE
• Do not place hot cookware on cold cooktopglass. This could cause glass to break.
• Do not slide pans across the cooktopsurface. They may scratch the cooktopsurface.
• Do not let pans boil dry. This may causepermanent damage in the form of breakage,fusion, or marking that can affect the ceramic-glass cooktop. (This type of damage is notcovered by your warranty.)
• Never leave surface units unattended athigh heat settings. Boilover causes smokingand greasy spillovers that may ignite.
SAFETY DURING USE (cont.)
DO NOT pick up the supplied bridge panhandles after cooking. They might be hotand there is a risk of burning yourself.
• Always switch off the appliance beforecleaning.
• For safety reasons, do not clean theappliance with a steam jet or high-pressurecleaner.
• Clean the cooktop in accordance with themaintenance and cleaning instructions inthis manual.
• Steam cleaner is not to be used for cleaning of the cooktop.
• Do not use harsh abrasive cleaners orrough metal scrapers to clean the cooktopglass since they can scratch the surface,which may result in shattering of the glass.
SAFETY WHEN CLEANING
CAUTION
8
• Prior to using your cooktop for the first time,apply the recommended cooktop cleaningcreme to the ceramic surface. Buff with a non-abrasive cloth or pad. This will makecleaning easier when soiled from cooking. The special cooktop cleaning cream leaves a protective finish on the glass to help preventscratches and abrasions.
• Do not use the cooktop as a worksurface orstorage space.
• Please be careful at the edges when movingpots and pans around.
• Do not have the cooking zones on with emptypans, or with no pots or pans on them.
• Ceramic glass is very tough, and impervious to sharp temperature changes but is notunbreakable. It can be damaged if particularlyhard or sharp objects fall onto it.
• Be very cautious if using pots made of castiron, or other pots with rough edges or burrs.Moving these can cause scratches on glass.
• If sugar or a mixture containing sugar falls ontoa hot cooking zone and melts, removeimmediately, while still hot. If left to cool down,it may damage the surface when removed. NOTE: There is a risk of burning yourselfwhen the glass scraper is used on a hotcooking zone!
• Keep meltable objects or materials away fromthe ceramic glass surface, for example, plasticutensils, aluminum foil, or cooking wraps. If any materials or foodstuffs melt on theceramic-glass surface, these should becleaned up immediately.
HOW TO AVOID DAMAGE TO THE APPLIANCE
I M P O RTA N T S A F E T Y I N F O R M AT I O N
READ ALL INSTRUCTIONS BEFORE USE
READ AND FOLLOW THIS SAFETY INFORMATION CAREFULLY.
SAVE THESE INSTRUCTIONS
To protect the environment, it is important thatworn-out appliances are disposed of in thecorrect manner. • The appliance must not be disposed of with
household rubbish. • You can obtain information about collection
dates or public refuse disposal sites from your local health council or environmentalhealth office.
DISPOSAL OF OLD APPLIANCES
Before disposing of old appliances pleasemake them inoperable so they cannot be a source of danger. To do this, have aqualified person disconnect the appliancefrom the house circuitry.
CAUTION
I N T RO D U C T I O N TO I N D U C T I O N C O O K I N G
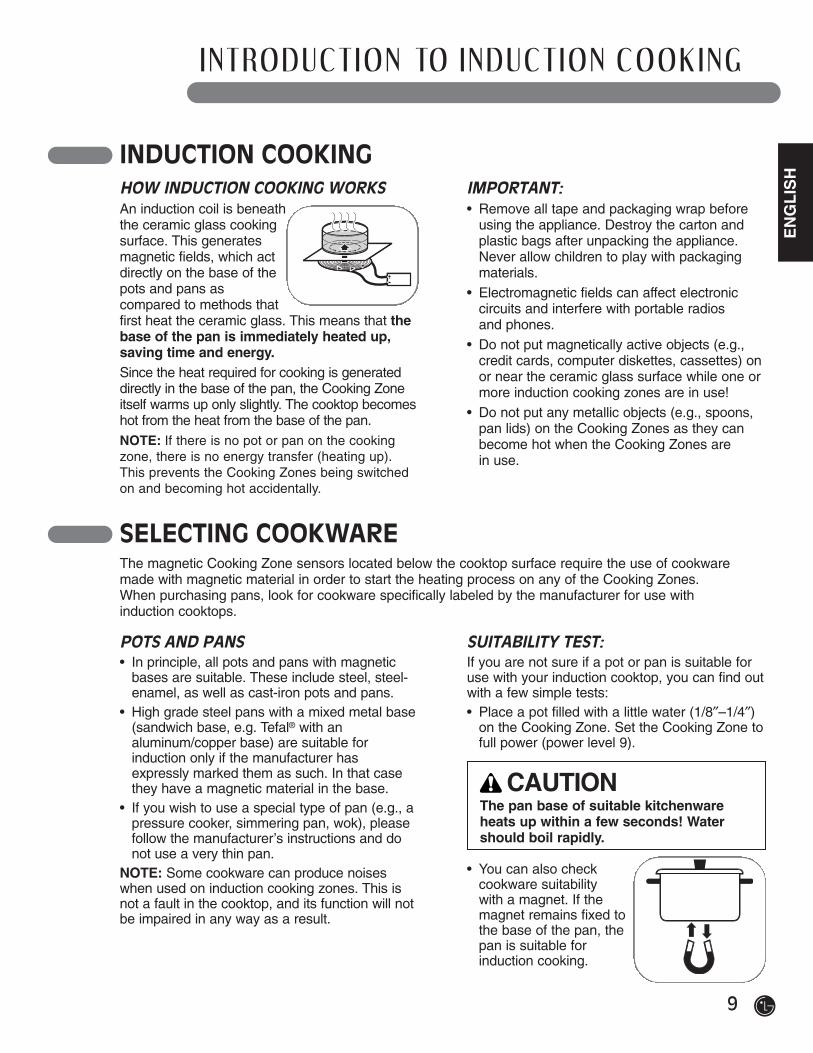
INDUCTION COOKINGHOW INDUCTION COOKING WORKSAn induction coil is beneaththe ceramic glass cookingsurface. This generatesmagnetic fields, which actdirectly on the base of thepots and pans ascompared to methods thatfirst heat the ceramic glass. This means that thebase of the pan is immediately heated up,saving time and energy.Since the heat required for cooking is generateddirectly in the base of the pan, the Cooking Zoneitself warms up only slightly. The cooktop becomeshot from the heat from the base of the pan. NOTE: If there is no pot or pan on the cookingzone, there is no energy transfer (heating up).This prevents the Cooking Zones being switchedon and becoming hot accidentally.
IMPORTANT:• Remove all tape and packaging wrap before
using the appliance. Destroy the carton andplastic bags after unpacking the appliance.Never allow children to play with packagingmaterials.
• Electromagnetic fields can affect electroniccircuits and interfere with portable radios and phones.
• Do not put magnetically active objects (e.g.,credit cards, computer diskettes, cassettes) onor near the ceramic glass surface while one ormore induction cooking zones are in use!
• Do not put any metallic objects (e.g., spoons,pan lids) on the Cooking Zones as they canbecome hot when the Cooking Zones are in use.
9
EN
GL
ISH
SELECTING COOKWARE
POTS AND PANS• In principle, all pots and pans with magnetic
bases are suitable. These include steel, steel-enamel, as well as cast-iron pots and pans.
• High grade steel pans with a mixed metal base(sandwich base, e.g. Tefal® with analuminum/copper base) are suitable forinduction only if the manufacturer hasexpressly marked them as such. In that casethey have a magnetic material in the base.
• If you wish to use a special type of pan (e.g., apressure cooker, simmering pan, wok), pleasefollow the manufacturer’s instructions and donot use a very thin pan.
NOTE: Some cookware can produce noiseswhen used on induction cooking zones. This isnot a fault in the cooktop, and its function will notbe impaired in any way as a result.
SUITABILITY TEST:If you are not sure if a pot or pan is suitable foruse with your induction cooktop, you can find outwith a few simple tests: • Place a pot filled with a little water (1/8″–1/4″)
on the Cooking Zone. Set the Cooking Zone tofull power (power level 9).
• You can also checkcookware suitability with a magnet. If themagnet remains fixed tothe base of the pan, thepan is suitable forinduction cooking.
The pan base of suitable kitchenware heats up within a few seconds! Watershould boil rapidly.
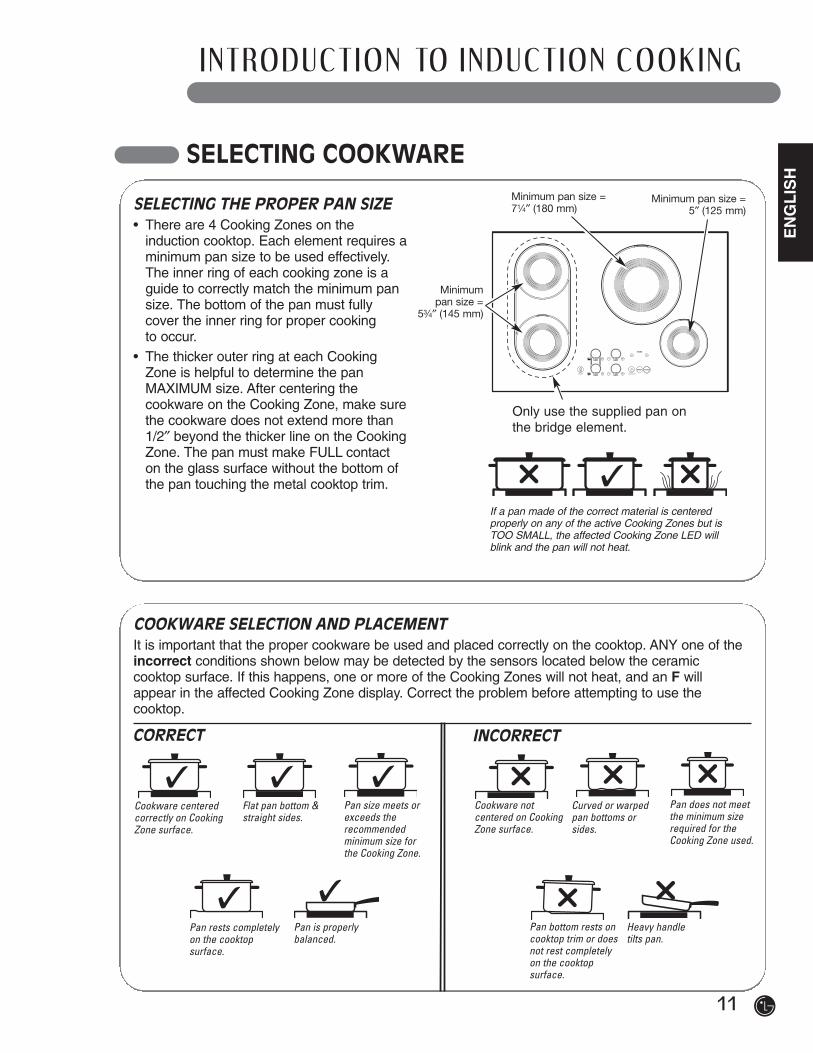
The magnetic Cooking Zone sensors located below the cooktop surface require the use of cookwaremade with magnetic material in order to start the heating process on any of the Cooking Zones. When purchasing pans, look for cookware specifically labeled by the manufacturer for use with induction cooktops.
CAUTION

10
I N T RO D U C T I O N TO I N D U C T I O N C O O K I N G
SELECTING COOKWARE (continued)
AVOIDING SCRATCHESIt is recommended to always use heavier gaugestainless steel cookware on your inductioncooktop surface. This will help reduce thepossibility of developing scratches on theceramic surface. Low-quality cookware canscratch the cooktop surface. Cookware should always be lifted over theceramic cooktop surface to prevent scratching.Sliding any type of cookware over the ceramiccooktop can affect the overall appearance of thecooktop. Over time, sliding ANY type of cookwareover the ceramic cooktop may alter the overallappearance of the cooktop. Eventually, thebuildup of scratches can make cleaning thesurface difficult and degrade the overallappearance of the cooktop. Scratches can also result from grains of sand(e.g., after washing vegetables) which aredragged with the pot across the cooking surface.
USE FLAT-BOTTOMED COOKWARECookware must fully contact the surface of thecooking element. Use flat-bottomed pans sized tofit the cooking element andamount of food beingprepared. Check forflatness by rotating a ruleracross the bottom of thecookware.
FOR BEST RESULTS:Always follow the recommendations for propercookware type and size. In addition:• Do not use dirty pans with grease buildup.
Always use pans that are easy to clean aftercooking, and make sure that the bottoms of thepans are clean and dry.
• When cooking with large amounts of liquid, uselarge pots so that nothing can boil over.
• Do not let pans boil dry. This may causepermanent damage in the form of breakage,fusion, or marring that can affect the ceramiccooktop. (This type of damage is not coveredby your warranty.)
• Match the pan size and Cooking Zone to theamount of food being prepared.
TIPS FOR SAVING ENERGY:• Always position pots and pans before you
switch on the Cooking Zone. • Dirty cooking zones and cookware use
more electricity. • Whenever possible, always have the lid firmly
placed on the pots and pans so that they arecompletely covered.
11
EN
GL
ISH
I N T RO D U C T I O N TO I N D U C T I O N C O O K I N G
COOKWARE SELECTION AND PLACEMENTIt is important that the proper cookware be used and placed correctly on the cooktop. ANY one of theincorrect conditions shown below may be detected by the sensors located below the ceramiccooktop surface. If this happens, one or more of the Cooking Zones will not heat, and an F willappear in the affected Cooking Zone display. Correct the problem before attempting to use thecooktop.
CORRECT INCORRECT
Cookware centeredcorrectly on CookingZone surface.
Flat pan bottom &straight sides.
Pan size meets orexceeds therecommendedminimum size forthe Cooking Zone.
Cookware notcentered on CookingZone surface.
Curved or warpedpan bottoms orsides.
Pan does not meetthe minimum sizerequired for theCooking Zone used.
Pan rests completelyon the cooktopsurface.
Pan is properlybalanced.
Pan bottom rests oncooktop trim or doesnot rest completelyon the cooktopsurface.
Heavy handle tilts pan.
SELECTING COOKWARE
If a pan made of the correct material is centeredproperly on any of the active Cooking Zones but isTOO SMALL, the affected Cooking Zone LED willblink and the pan will not heat.
Minimum pan size = 71⁄4″ (180 mm)
Minimum pan size = 5″ (125 mm)
Minimum pan size =
53⁄4″ (145 mm)
Only use the supplied pan onthe bridge element.
SELECTING THE PROPER PAN SIZE• There are 4 Cooking Zones on the
induction cooktop. Each element requires aminimum pan size to be used effectively.The inner ring of each cooking zone is aguide to correctly match the minimum pansize. The bottom of the pan must fullycover the inner ring for proper cooking to occur.
• The thicker outer ring at each CookingZone is helpful to determine the panMAXIMUM size. After centering thecookware on the Cooking Zone, make surethe cookware does not extend more than1/2″ beyond the thicker line on the CookingZone. The pan must make FULL contacton the glass surface without the bottom ofthe pan touching the metal cooktop trim.
12
PA RT S A N D F E AT U R E S
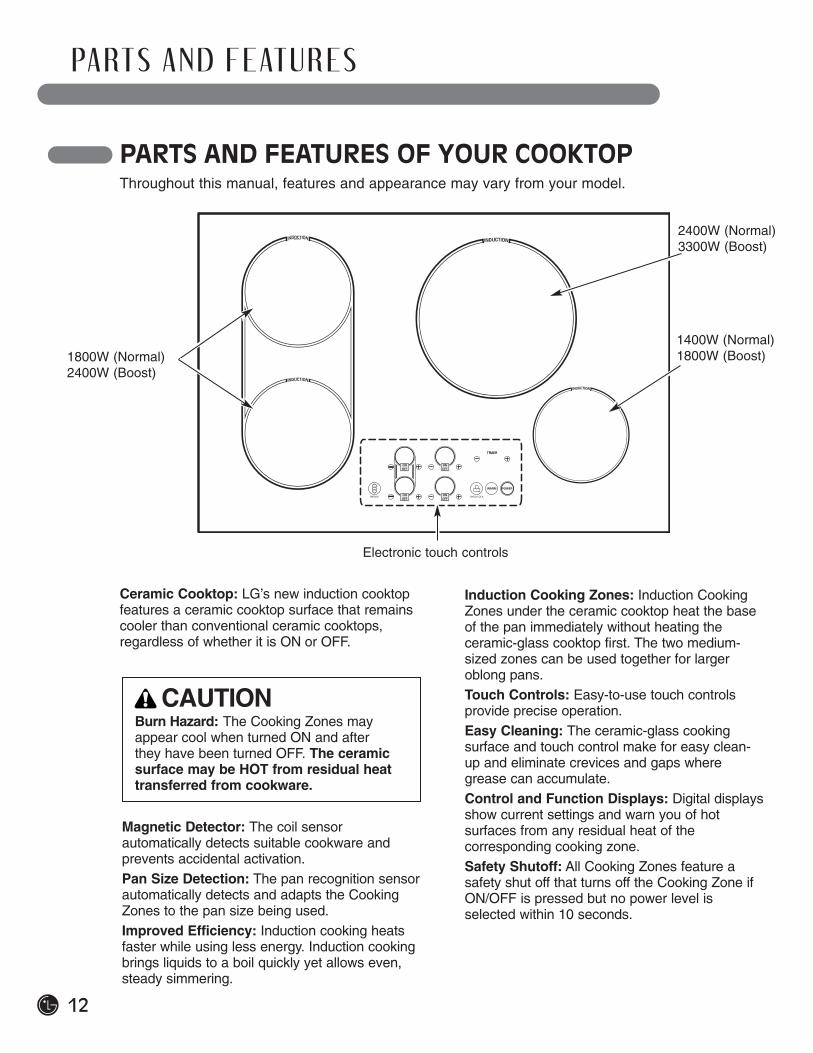
PARTS AND FEATURES OF YOUR COOKTOPThroughout this manual, features and appearance may vary from your model.
Ceramic Cooktop: LG’s new induction cooktopfeatures a ceramic cooktop surface that remainscooler than conventional ceramic cooktops,regardless of whether it is ON or OFF.
Burn Hazard: The Cooking Zones may appear cool when turned ON and after they have been turned OFF. The ceramicsurface may be HOT from residual heattransferred from cookware.
Magnetic Detector: The coil sensorautomatically detects suitable cookware andprevents accidental activation. Pan Size Detection: The pan recognition sensorautomatically detects and adapts the CookingZones to the pan size being used.Improved Efficiency: Induction cooking heatsfaster while using less energy. Induction cookingbrings liquids to a boil quickly yet allows even,steady simmering.
1800W (Normal)2400W (Boost)
2400W (Normal)3300W (Boost)
1400W (Normal)1800W (Boost)
Induction Cooking Zones: Induction CookingZones under the ceramic cooktop heat the baseof the pan immediately without heating theceramic-glass cooktop first. The two medium-sized zones can be used together for largeroblong pans.Touch Controls: Easy-to-use touch controlsprovide precise operation. Easy Cleaning: The ceramic-glass cookingsurface and touch control make for easy clean-up and eliminate crevices and gaps wheregrease can accumulate. Control and Function Displays: Digital displaysshow current settings and warn you of hotsurfaces from any residual heat of thecorresponding cooking zone. Safety Shutoff: All Cooking Zones feature asafety shut off that turns off the Cooking Zone ifON/OFF is pressed but no power level isselected within 10 seconds.
Electronic touch controls
CAUTION
13
EN
GL
ISH
TOUCH CONTROL FEATURES
PA RT S A N D F E AT U R E S
1
2
5
4
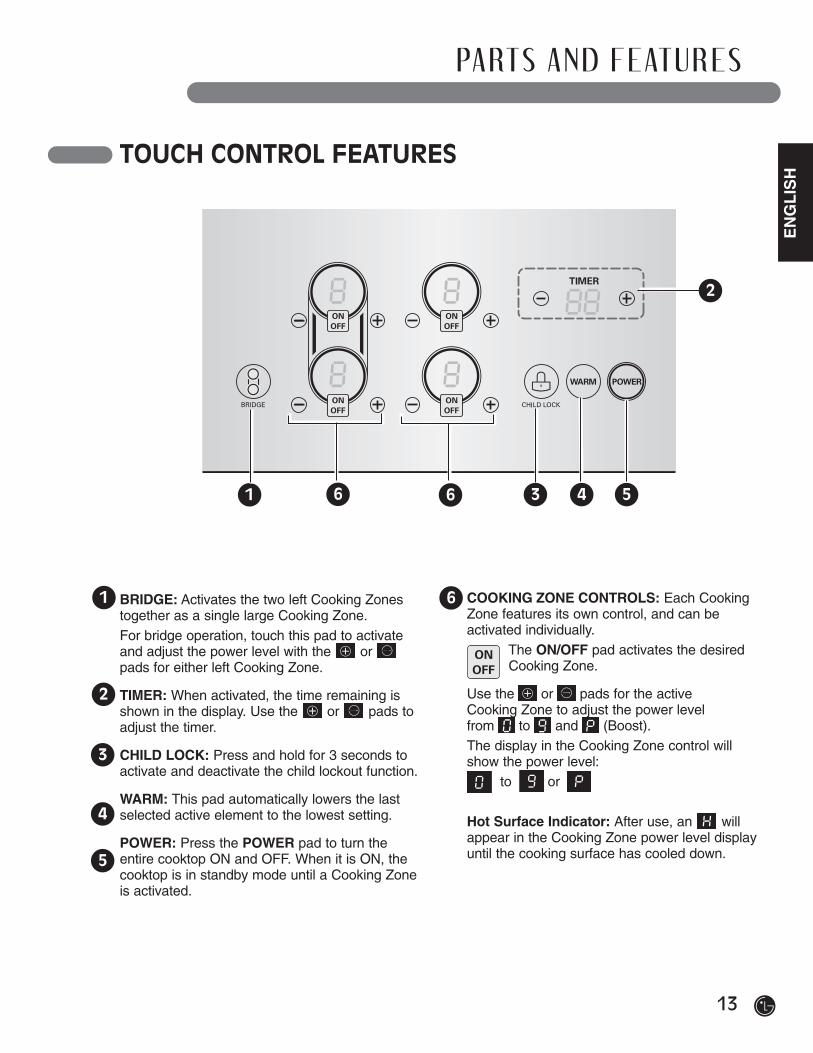
BRIDGE: Activates the two left Cooking Zonestogether as a single large Cooking Zone. For bridge operation, touch this pad to activateand adjust the power level with the or pads for either left Cooking Zone.
TIMER: When activated, the time remaining isshown in the display. Use the or pads toadjust the timer.
CHILD LOCK: Press and hold for 3 seconds toactivate and deactivate the child lockout function.
WARM: This pad automatically lowers the lastselected active element to the lowest setting.
POWER: Press the POWER pad to turn theentire cooktop ON and OFF. When it is ON, thecooktop is in standby mode until a Cooking Zoneis activated.
1
2
3 4 566
3
COOKING ZONE CONTROLS: Each CookingZone features its own control, and can beactivated individually.
The ON/OFF pad activates the desiredCooking Zone.
Use the or pads for the active Cooking Zone to adjust the power level from to and (Boost). The display in the Cooking Zone control willshow the power level:
to or
Hot Surface Indicator: After use, an willappear in the Cooking Zone power level displayuntil the cooking surface has cooled down.
to
6
to

14
O P E R AT I N G I N S T RU C T I O N S
To turn on the cooktop, touch thePOWER pad for approximately 2 seconds. The indicator above the pad will light.
NOTE: After turning on the cooktop with the POWER pad, you must select one of the Cooking Zones within 20 seconds using the Cooking Zone ON/OFF pad(s). If noselection is made, the cooktop will turn off for safety reasons.
Before using the cooktop for the first time, cleanit thoroughly with the included cleaner or ceramiccooktop cleaner according to the Care andCleaning instructions in this guide. This willremove any help protect the ceramic surface and make future cleanup easier.
BEFORE USING THE COOKTOP
Never use scrub pads or abrasive cleaners.They can cause permanent damage to thecooktop surface.
To operate the touch control pads, touch the padfirmly with the flat part of your fingertip.
SETTING THE CONTROLS
FIRST OPERATION
The first time that power is supplied to thecooktop, will flash in the display for eachcooking zone for 60 seconds or until thePOWER pad is touched for approximately 2 seconds.
NOTE: will also flash when power is restoredafter a power outage.
ACTIVATING THE COOKTOP
To select the desired Cooking Zone,press the ON/OFF pad. The display forthe selected Cooking Zone will show and and an indicator will light to indicatethat the Cooking Zone is on but nopower level is set.
NOTE: Once the Cooking Zone has beenselected with the ON/OFF pad, the power levelmust be selected within 5 seconds with the or pad. Otherwise, the Cooking Zonewill turn off for safety reasons.
SELECTING THE COOKING ZONE
CAUTION
15
EN
GL
ISH
O P E R AT I N G I N S T RU C T I O N S
The power level for the selected Cooking Zonecan be set from to and (Boost). To adjust the power level:
Touch the or pad for the selectedCooking Zone.
Touching will set the power level to .
Touching will set the power level to .
Touch the or pad of the selectedCooking Zone to increase or decrease thepower level.
If power level is selected, the CookingZone will turn off after 5 seconds.
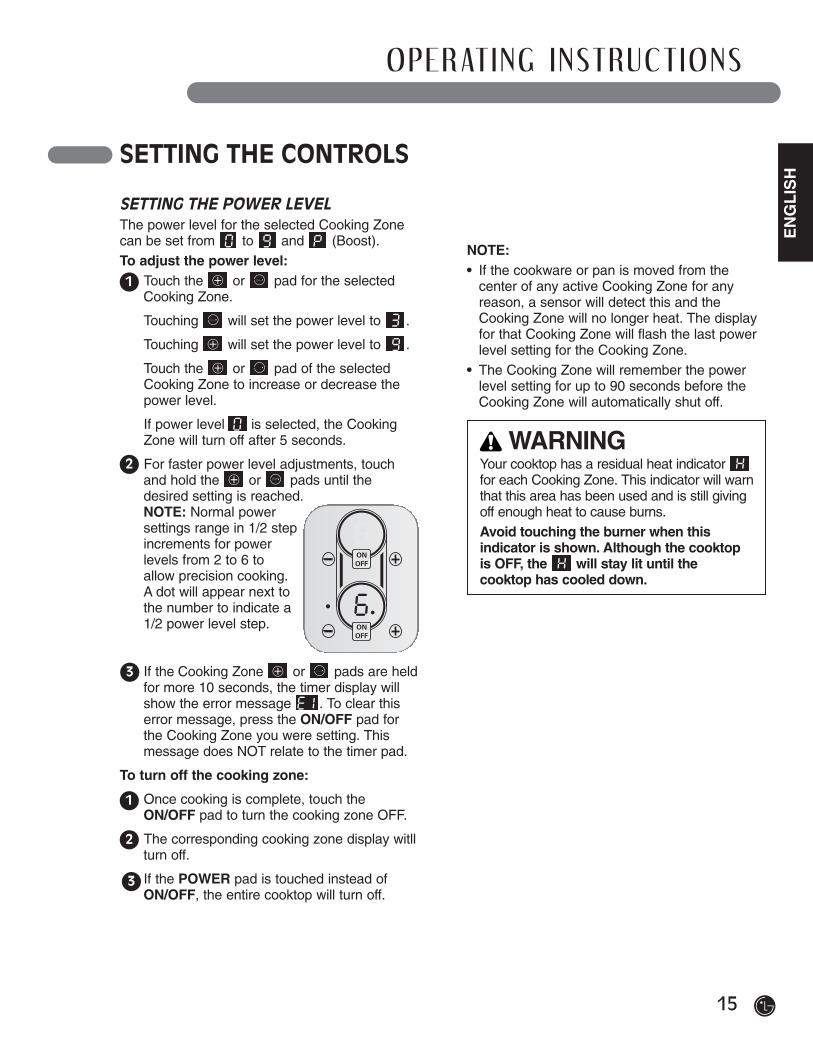
For faster power level adjustments, touchand hold the or pads until thedesired setting is reached.NOTE: Normal powersettings range in 1/2 stepincrements for powerlevels from 2 to 6 to allow precision cooking. A dot will appear next tothe number to indicate a1/2 power level step.
If the Cooking Zone or pads are heldfor more 10 seconds, the timer display willshow the error message . To clear thiserror message, press the ON/OFF pad forthe Cooking Zone you were setting. Thismessage does NOT relate to the timer pad.
To turn off the cooking zone:
Once cooking is complete, touch theON/OFF pad to turn the cooking zone OFF.
The corresponding cooking zone display witllturn off.
If the POWER pad is touched instead ofON/OFF, the entire cooktop will turn off.
to
1
2
3
SETTING THE POWER LEVEL
NOTE:• If the cookware or pan is moved from the
center of any active Cooking Zone for anyreason, a sensor will detect this and theCooking Zone will no longer heat. The displayfor that Cooking Zone will flash the last powerlevel setting for the Cooking Zone.
• The Cooking Zone will remember the powerlevel setting for up to 90 seconds before theCooking Zone will automatically shut off.
Your cooktop has a residual heat indicatorfor each Cooking Zone. This indicator will warnthat this area has been used and is still giving off enough heat to cause burns. Avoid touching the burner when thisindicator is shown. Although the cooktop is OFF, the will stay lit until the cooktop has cooled down.
SETTING THE CONTROLS
1
2
3
WARNING

The cooktop features a WARM setting thatoperates the last Cooking Zone used at theLOW power level.
To activate:Touch the WARM pad and the last Cooking Zoneused will be set to the LOW setting. willappear in the display.
To deactivate:To turn off the WARM function and return tonormal power levels, touch the pad and will be displayed.
to
16
O P E R AT I N G I N S T RU C T I O N S
SETTING THE CONTROLS (cont.)
Boost is the highest power level, designed forquickly heating or boiling larger quantities. Boostwill operate for a maximum of 12 minutes. After12 minutes, it will automatically revert to powerlevel 9.
POWER BOOST
ACTIVATING POWER BOOSTTurn on the desired Cooking Zone with theON/OFF pad for that Cooking Zone.
Touch the pad and will be displayed.
Touch the pad again and will bedisplayed.
NOTE: The power boost function will beactivated for a maximum of 12 minutes. Atthe end of the power boost cycle, theCooking Zone will automatically default tothe back to the power level . The powerboost function CANNOT be used with thefront and rear Cooking Zones on the sameside at the same time.
To deactivate the power boost function and revert to normal power levels, touch the pad.
NOTE: To protect the internal electroniccomponents of the cooktop, the cooktop may automatically deactivate the powerboost function and return to a normal power level before 12 minutes have passed.This is normal.
NOTE: The electronic processes involvedwith induction cooking create some unusualbackground noises. These noises are normaland part of the induction cooking process.Please note that these noises are morenoticeable while cooking with power boost.
1
2
3
4
WARM
Setting Function Used for
9 or Boost Fast heating Bringing liquids to a boil.
7–9 Heaving browning, Browning meats, heating deep fat frying oil for deep-fat frying,
sautéing, maintaining a fast boil for large amounts of liquids.
6–7 Roasting, frying Frying meats, chops,pancakes, sausages, eggs.
4–5 Boiling, general Cooking larger quantities,cooking soups and stews, steaming
potatoes, cooking meat stock or bouillon.
3–4 Steaming Steaming vegetables,braising meats.
2–3 Simmering Simmering rice or milk-based dishes, steaming smaller quantities of potatoes and vegetables,heating ready-to-serve meals.
1–2, L Melting Fluffy omelettes, keeping dishes warm, melting butter or chocolate.
0 OFF Off setting.
NOTE: These settings are recommended guidelines forcooking. You may need to adjust the power level for the type of food and pan.
POWER LEVEL GUIDE
17
EN
GL
ISH
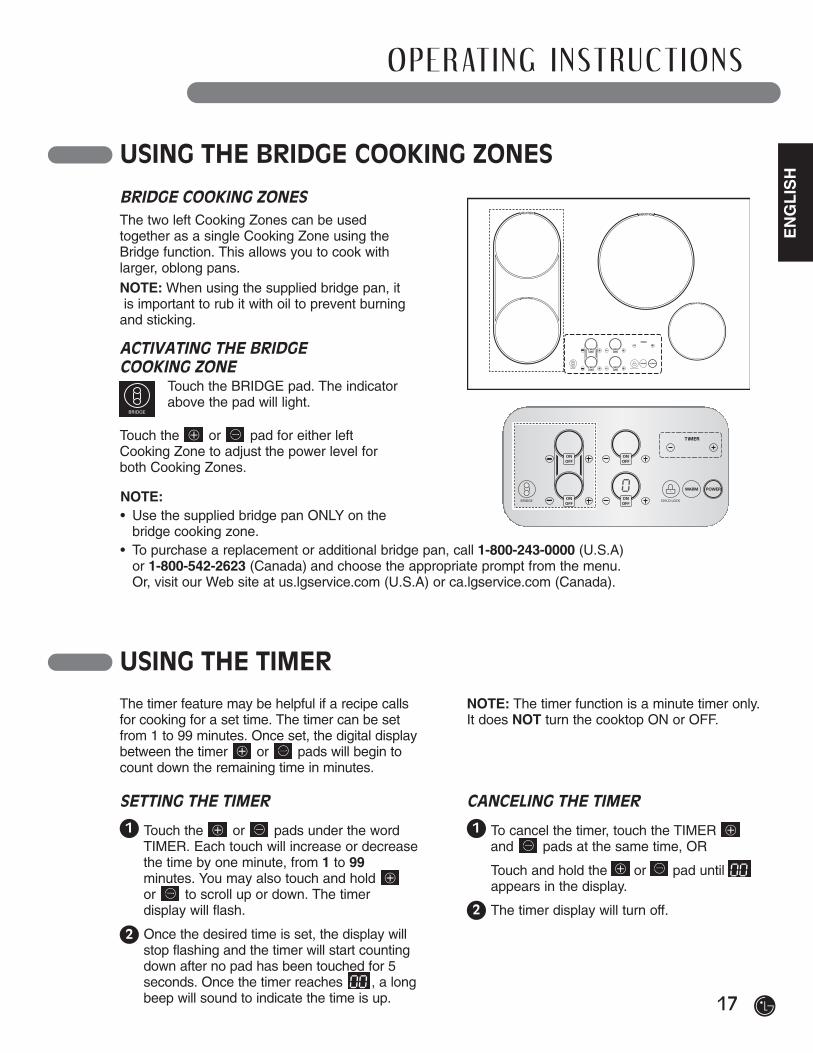
USING THE BRIDGE COOKING ZONES
The two left Cooking Zones can be usedtogether as a single Cooking Zone using theBridge function. This allows you to cook withlarger, oblong pans.NOTE: When using the supplied bridge pan, itis important to rub it with oil to prevent burning
and sticking.
BRIDGE COOKING ZONES
ACTIVATING THE BRIDGECOOKING ZONE
Touch the BRIDGE pad. The indicatorabove the pad will light.
Touch the or pad for either left Cooking Zone to adjust the power level for both Cooking Zones.
USING THE TIMERThe timer feature may be helpful if a recipe callsfor cooking for a set time. The timer can be setfrom 1 to 99 minutes. Once set, the digital displaybetween the timer or pads will begin tocount down the remaining time in minutes.
NOTE: The timer function is a minute timer only.It does NOT turn the cooktop ON or OFF.
SETTING THE TIMER
Touch the or pads under the wordTIMER. Each touch will increase or decreasethe time by one minute, from 1 to 99minutes. You may also touch and hold or to scroll up or down. The timerdisplay will flash.
Once the desired time is set, the display willstop flashing and the timer will start countingdown after no pad has been touched for 5seconds. Once the timer reaches , a longbeep will sound to indicate the time is up.
1
2
CANCELING THE TIMER
To cancel the timer, touch the TIMER and pads at the same time, OR
Touch and hold the or pad until appears in the display.
The timer display will turn off.
1
2
O P E R AT I N G I N S T RU C T I O N S
NOTE:• Use the supplied bridge pan ONLY on the
bridge cooking zone.• To purchase a replacement or additional bridge pan, call 1-800-243-0000 (U.S.A)
or 1-800-542-2623 (Canada) and choose the appropriate prompt from the menu. Or, visit our Web site at us.lgservice.com (U.S.A) or ca.lgservice.com (Canada).
18
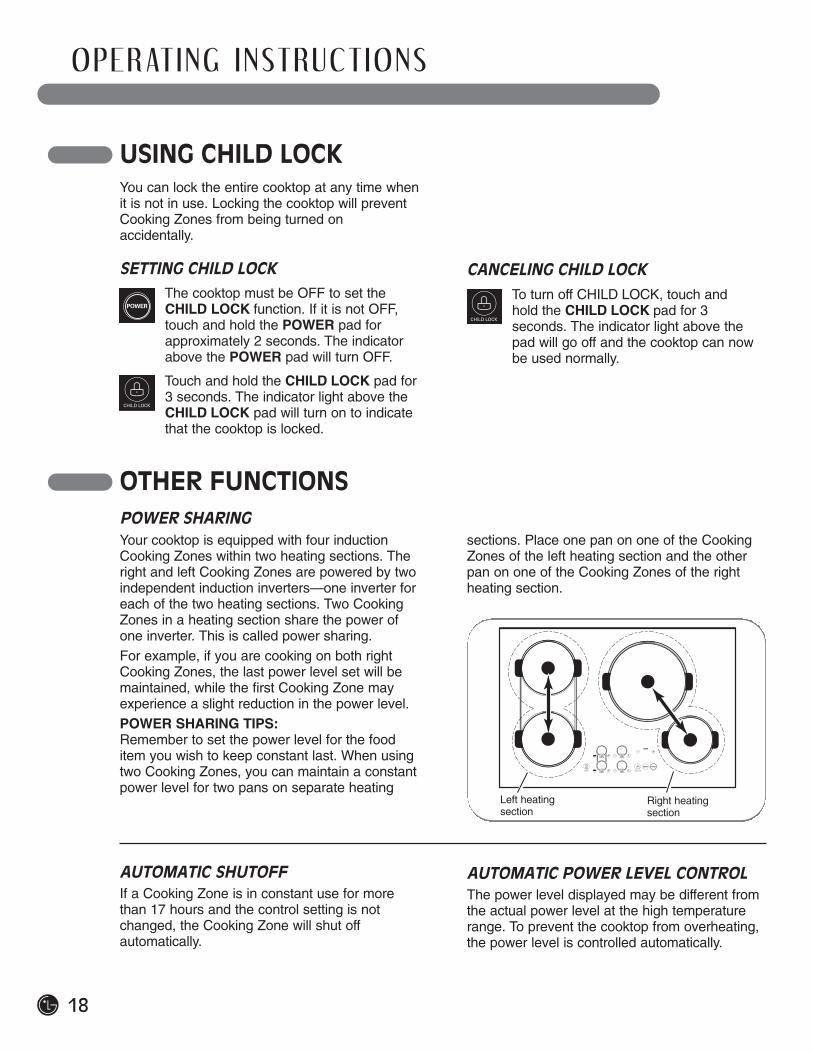
USING CHILD LOCKYou can lock the entire cooktop at any time whenit is not in use. Locking the cooktop will preventCooking Zones from being turned onaccidentally.
SETTING CHILD LOCKThe cooktop must be OFF to set theCHILD LOCK function. If it is not OFF,touch and hold the POWER pad forapproximately 2 seconds. The indicatorabove the POWER pad will turn OFF.
Touch and hold the CHILD LOCK pad for3 seconds. The indicator light above theCHILD LOCK pad will turn on to indicatethat the cooktop is locked.
To turn off CHILD LOCK, touch and hold the CHILD LOCK pad for 3seconds. The indicator light above thepad will go off and the cooktop can nowbe used normally.
CANCELING CHILD LOCK
OTHER FUNCTIONSPOWER SHARINGYour cooktop is equipped with four inductionCooking Zones within two heating sections. Theright and left Cooking Zones are powered by twoindependent induction inverters—one inverter foreach of the two heating sections. Two CookingZones in a heating section share the power ofone inverter. This is called power sharing. For example, if you are cooking on both rightCooking Zones, the last power level set will bemaintained, while the first Cooking Zone mayexperience a slight reduction in the power level. POWER SHARING TIPS: Remember to set the power level for the fooditem you wish to keep constant last. When usingtwo Cooking Zones, you can maintain a constantpower level for two pans on separate heating
sections. Place one pan on one of the CookingZones of the left heating section and the otherpan on one of the Cooking Zones of the rightheating section.
Left heatingsection
Right heatingsection
AUTOMATIC SHUTOFFIf a Cooking Zone is in constant use for morethan 17 hours and the control setting is notchanged, the Cooking Zone will shut offautomatically.
AUTOMATIC POWER LEVEL CONTROLThe power level displayed may be different fromthe actual power level at the high temperaturerange. To prevent the cooktop from overheating,the power level is controlled automatically.
O P E R AT I N G I N S T RU C T I O N S
19
EN
GL
ISH
General cleaning for induction ceramic glasscooking surfaces is considerably easier than for cooking surfaces with radiant heating.
NOTE:To prevent accidental activation of the controls, itis recommended that you set the CHILD LOCKfeature before cleaning.
CLEANING THE COOKTOP
CA R E A N D C L E A N I N G
IMPORTANT:• Cleaning agents must not come in contact with
the hot ceramic-glass surface. All cleaningagents must be rinsed off thoroughly with clean water.
• Do not use any aggressive cleaners such asgrill or oven sprays, coarse scouring cleansers,or abrasive pan cleaners.
• Clean the ceramic-glass surface after each use when it is warm to the touch or cold. This will prevent spills from becoming burnt on.Remove water marks, grease and discolorationwith a glass scraper and ceramic-glasscleaner.
When it is cool, wipe the ceramic-glasssurface with a damp cloth and a smallamount of ceramic glass cleaner.
Wipe dry with a clean cloth.
Once a week, thoroughly clean the entireceramic-glass cooking surface with acommercially available ceramic-glasscleaner.
Then, wipe the ceramic-glass surface using a clean, soft cloth dampened withclean water, and polish dry with a clean lint-free cloth.
1
2
GENERAL CLEANING
3
4
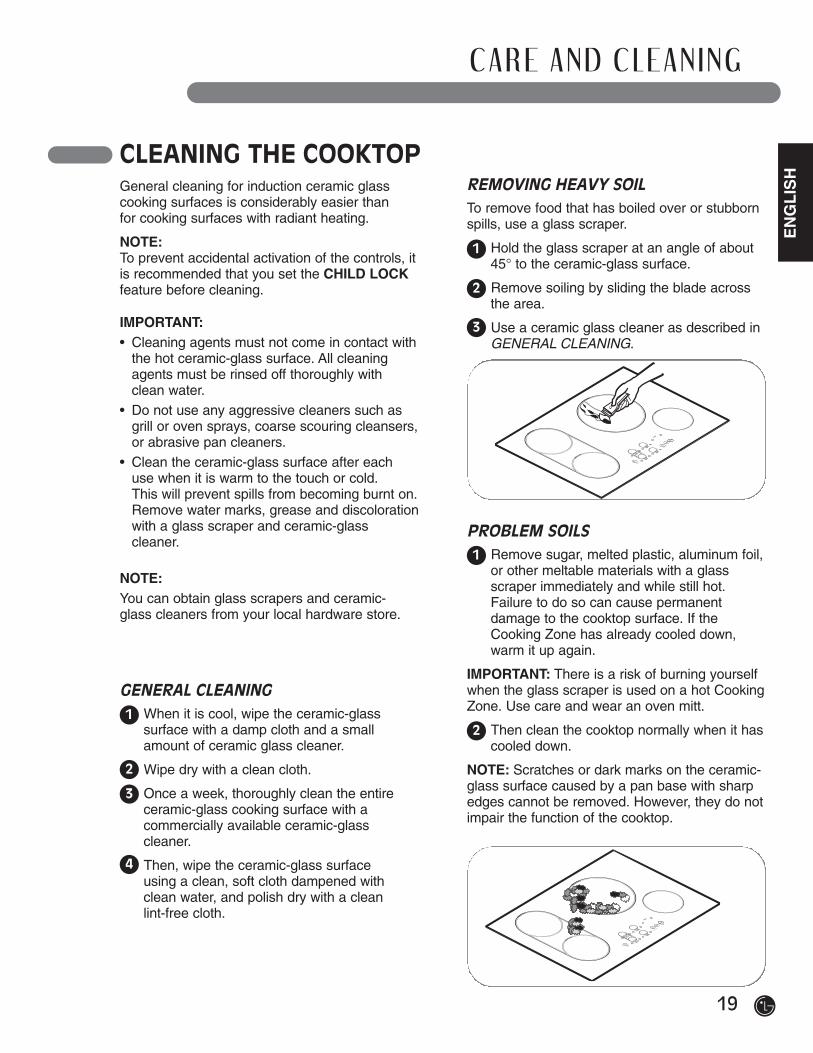
To remove food that has boiled over or stubbornspills, use a glass scraper.
Hold the glass scraper at an angle of about45° to the ceramic-glass surface.
Remove soiling by sliding the blade acrossthe area.
Use a ceramic glass cleaner as described inGENERAL CLEANING.
1
2
REMOVING HEAVY SOIL
3
Remove sugar, melted plastic, aluminum foil,or other meltable materials with a glassscraper immediately and while still hot.Failure to do so can cause permanentdamage to the cooktop surface. If theCooking Zone has already cooled down,warm it up again.
IMPORTANT: There is a risk of burning yourselfwhen the glass scraper is used on a hot CookingZone. Use care and wear an oven mitt.
Then clean the cooktop normally when it hascooled down.
NOTE: Scratches or dark marks on the ceramic-glass surface caused by a pan base with sharpedges cannot be removed. However, they do notimpair the function of the cooktop.
1
2
PROBLEM SOILS
NOTE:You can obtain glass scrapers and ceramic-glass cleaners from your local hardware store.
20
I N S TA L L AT I O N I N S T RU C T I O N S
INSTALLATION AND SERVICE MUST BE PERFORMED BY A QUALIFIED INSTALLER. IMPORTANT: SAVE THESE INSTRUCTIONS FOR LOCAL ELECTRICALINSPECTOR’S USE.READ AND SAVE THESE INSTRUCTIONS FOR FUTURE REFERENCE.
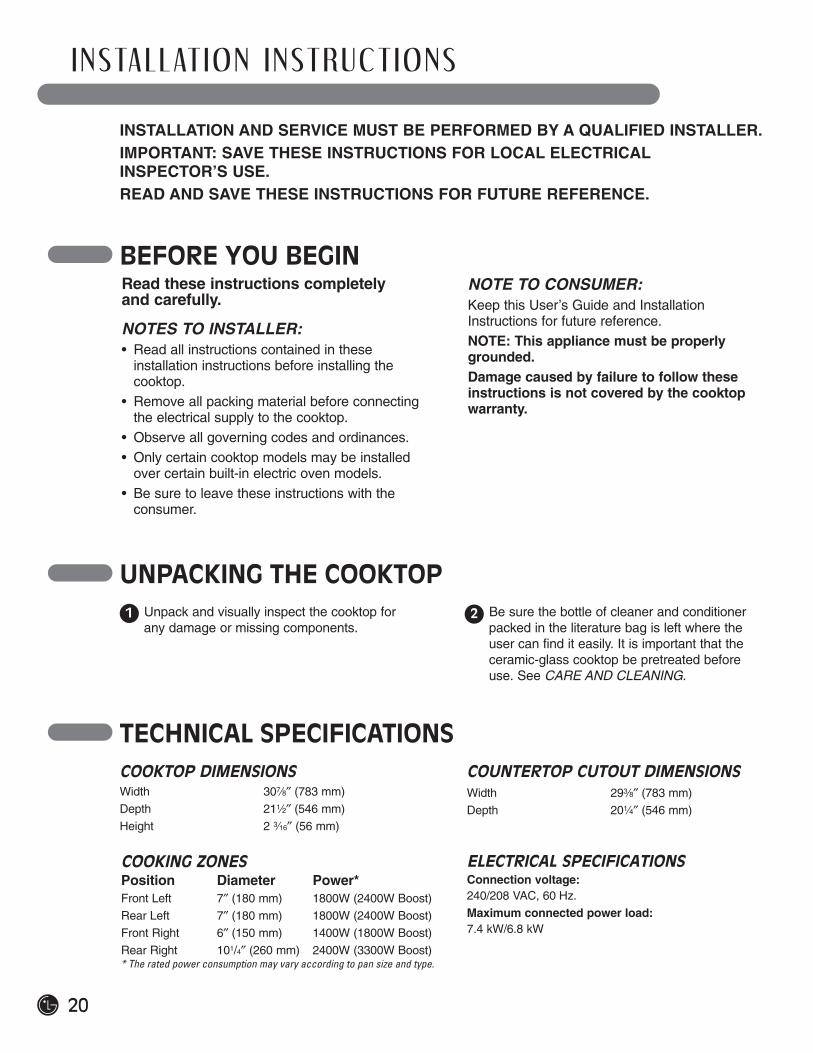
Read these instructions completely and carefully.
NOTES TO INSTALLER:• Read all instructions contained in these
installation instructions before installing thecooktop.
• Remove all packing material before connectingthe electrical supply to the cooktop.
• Observe all governing codes and ordinances. • Only certain cooktop models may be installed
over certain built-in electric oven models. • Be sure to leave these instructions with the
consumer.
NOTE TO CONSUMER:Keep this User’s Guide and InstallationInstructions for future reference.NOTE: This appliance must be properlygrounded. Damage caused by failure to follow theseinstructions is not covered by the cooktopwarranty.
BEFORE YOU BEGIN
TECHNICAL SPECIFICATIONS
Width 307⁄8″ (783 mm)
Depth 211⁄2″ (546 mm)
Height 2 3⁄16″ (56 mm)
COOKTOP DIMENSIONSWidth 293⁄8″ (783 mm)
Depth 201⁄4″ (546 mm)
COUNTERTOP CUTOUT DIMENSIONS
Position Diameter Power* Front Left 7″ (180 mm) 1800W (2400W Boost)
Rear Left 7″ (180 mm) 1800W (2400W Boost)
Front Right 6″ (150 mm) 1400W (1800W Boost)
Rear Right 101/4″ (260 mm) 2400W (3300W Boost)* The rated power consumption may vary according to pan size and type.
COOKING ZONESConnection voltage:240/208 VAC, 60 Hz.
Maximum connected power load:7.4 kW/6.8 kW
ELECTRICAL SPECIFICATIONS
UNPACKING THE COOKTOPUnpack and visually inspect the cooktop forany damage or missing components.
Be sure the bottle of cleaner and conditionerpacked in the literature bag is left where theuser can find it easily. It is important that theceramic-glass cooktop be pretreated beforeuse. See CARE AND CLEANING.
1 2
21
EN
GL
ISH
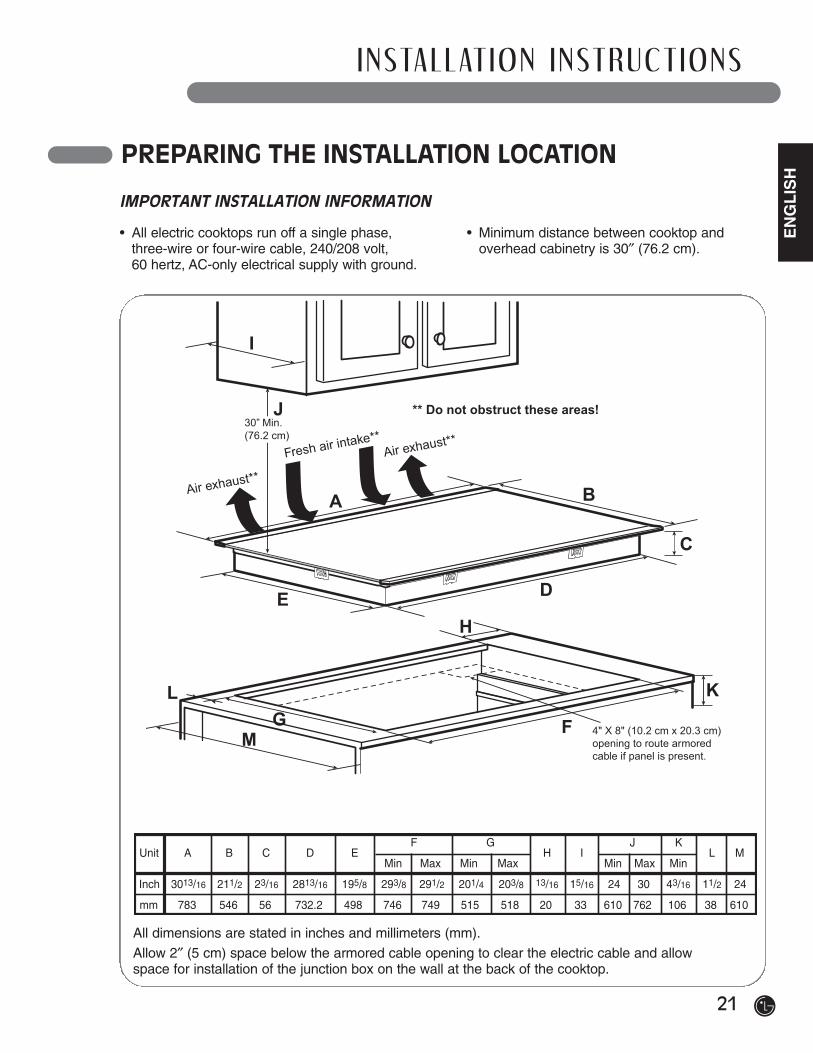
IMPORTANT INSTALLATION INFORMATION
• All electric cooktops run off a single phase,three-wire or four-wire cable, 240/208 volt, 60 hertz, AC-only electrical supply with ground.
• Minimum distance between cooktop andoverhead cabinetry is 30″ (76.2 cm).
I N S TA L L AT I O N I N S T RU C T I O N S
A B
I
J
C
D
H
E
FG
L
M
K
** Do not obstruct these areas!
Fresh air intake**Air exhaust**
Air exhaust**
30” Min. (76.2 cm)
4" X 8" (10.2 cm x 20.3 cm)opening to route armored cable if panel is present.
Unit A B C D EF G
H IJ K
L MMin Max Min Max Min Max Min
Inch 3013/16 211/2 23/16 2813/16 195/8 293/8 291/2 201/4 203/8 13/16 15/16 24 30 43/16 11/2 24
mm 783 546 56 732.2 498 746 749 515 518 20 33 610 762 106 38 610
All dimensions are stated in inches and millimeters (mm). Allow 2″ (5 cm) space below the armored cable opening to clear the electric cable and allowspace for installation of the junction box on the wall at the back of the cooktop.
PREPARING THE INSTALLATION LOCATION
22
I N S TA L L AT I O N I N S T RU C T I O N S
J F
G
I
10"( 25.4 cm)
18"( 45.7 cm)
12"(30.5 cm)
24"(61 cm)
L
MH
K
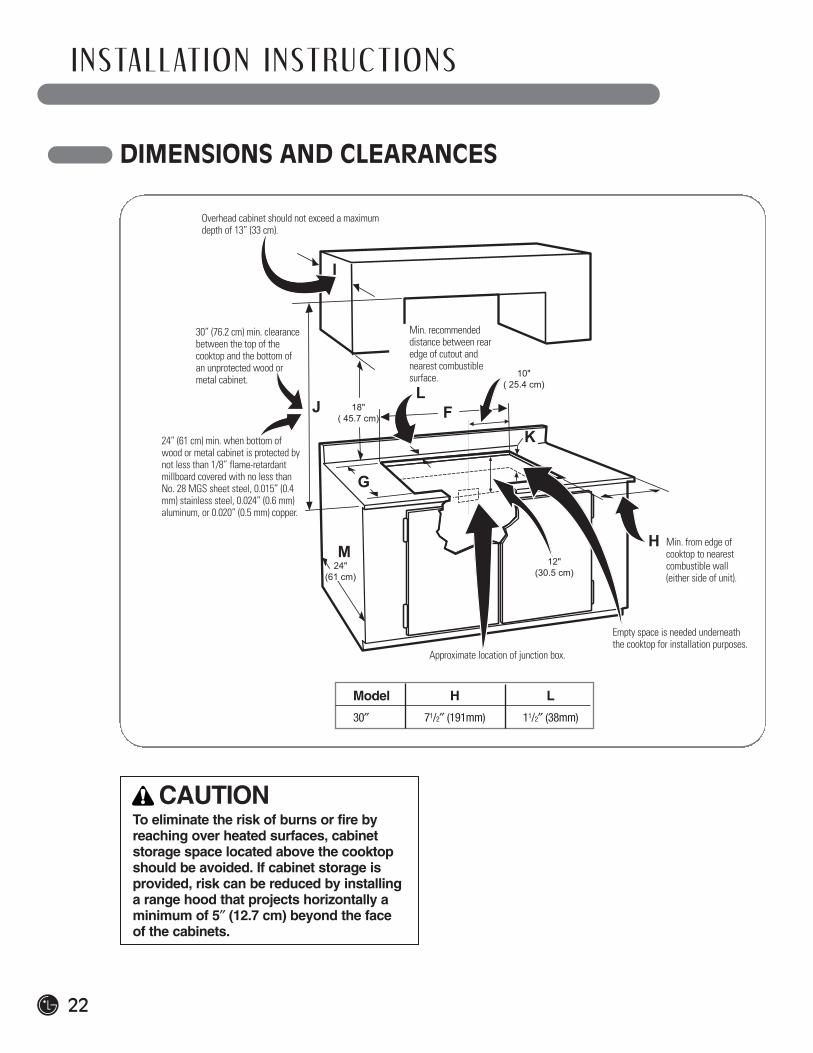
DIMENSIONS AND CLEARANCES
Model H L
30″ 71/2″ (191mm) 11/2″ (38mm)
To eliminate the risk of burns or fire byreaching over heated surfaces, cabinetstorage space located above the cooktopshould be avoided. If cabinet storage isprovided, risk can be reduced by installing a range hood that projects horizontally aminimum of 5″ (12.7 cm) beyond the face of the cabinets.
24” (61 cm) min. when bottom ofwood or metal cabinet is protected bynot less than 1/8” flame-retardantmillboard covered with no less thanNo. 28 MGS sheet steel, 0.015” (0.4mm) stainless steel, 0.024” (0.6 mm)aluminum, or 0.020” (0.5 mm) copper.
30” (76.2 cm) min. clearancebetween the top of thecooktop and the bottom ofan unprotected wood ormetal cabinet.
Overhead cabinet should not exceed a maximumdepth of 13” (33 cm).
Min. recommendeddistance between rearedge of cutout andnearest combustiblesurface.
Approximate location of junction box.
Empty space is needed underneaththe cooktop for installation purposes.
Min. from edge ofcooktop to nearestcombustible wall(either side of unit).
CAUTION
23
EN
GL
ISH
IMPORTANT SAFETY INSTRUCTIONS
• Be sure your cooktop is installed and groundedproperly by a qualified installer or servicetechnician.
• This cooktop must be electrically grounded inaccordance with local codes or, in theirabsence, with the National Electrical CodeANSI/NFPA No. 70, latest edition in the United States.
ELECTRICAL CONNECTIONS
I N S TA L L AT I O N I N S T RU C T I O N S
The electrical power to the cooktop must beshut off while line connections are beingmade. Failure to do so could result inserious injury or death.
PROVIDING THEELECTRICAL CONNECTIONInstall the junction box under the cabinet and run120/240 or 120/208 volt, AC wire from the maincircuit panel. NOTE: DO NOT connect the wire to the circuitpanel at this time.
ELECTRICAL REQUIREMENTS
Observe all governing codes and localordinances.
A 3-wire or 4-wire single-phase 120/240 or120/208 volt, 60 Hz AC-only electrical supplyis required on a separate circuit fused onboth sides of the line (time-delay fuse orcircuit breaker is recommended). DO NOTfuse neutral. The fuse size must not exceedthe circuit rating of the appliance specified onthe nameplate. This unit can consume up to 7,400W at 240 VAC. A 40 Amp circuit breaker with wiregauge #8 AWG must be used. NOTE: Wire sizes and connections mustconform with the fuse size and rating of theappliance in accordance with the NationalElectrical Code ANSI/NFPA No. 70, latestedition, and local codes and ordinances.
The appliance should be connected to thefused disconnect (or circuit breaker) boxthrough flexible armored or nonmetallicsheathed cable. The flexible armored cableextending from this appliance should beconnected directly to the grounded junctionbox. The junction box should be located asshown on page 22 with as much slack aspossible remaining in the cable between thebox and the appliance, so it can be moved ifservicing is ever necessary. A suitable strain relief must be provided toattach the flexible armored cable to thejunction box.
1
2
3
4
An extension cord must not be used withthis appliance. Such use may result in a fire,electrical shock, or other personal injury.
WARNING
WARNING
24
I N S TA L L AT I O N I N S T RU C T I O N S
ELECTRICAL CONNECTION
Connect the flexible armored cable that extendsfrom the surface unit to the junction box using asuitable strain relief at the point the armoredcable enters the junction box. Then make theelectrical connection as follows. Electrical ground is required on thisappliance. This appliance is manufactured with a supplywire and a frame connected green or barecopper grounding wire. NOTE TO ELECTRICIAN:The armored cable leads supplied with theappliance are UL-listed for connection to largergauge household wiring. The insulation of theleads is rated at temperatures much higher thanthe temperature rating of household wiring. Thecurrent-carrying capacity of the conductor wire is governed by the temperature rating of theinsulation around the wire, rather than the wire gauge alone.
ELECTRICAL CONNECTIONS (cont.)
This appliance is equipped with a copperconductor flexible cable. If connection ismade to aluminum house wiring, use onlyspecial connectors which are approved forjoining copper and aluminum wires inaccordance with the National Electrical Codeand local codes and ordinances. Improperconnection of aluminum house wiring tocopper leads can result in a short circuit orfire. Follow the connector manufacturer’srecommended procedure closely.
DO NOT ground to a gas supply pipe. DONOT connect to electrical power supply until appliance is permanently grounded.Connect the ground wire before turning on the power.
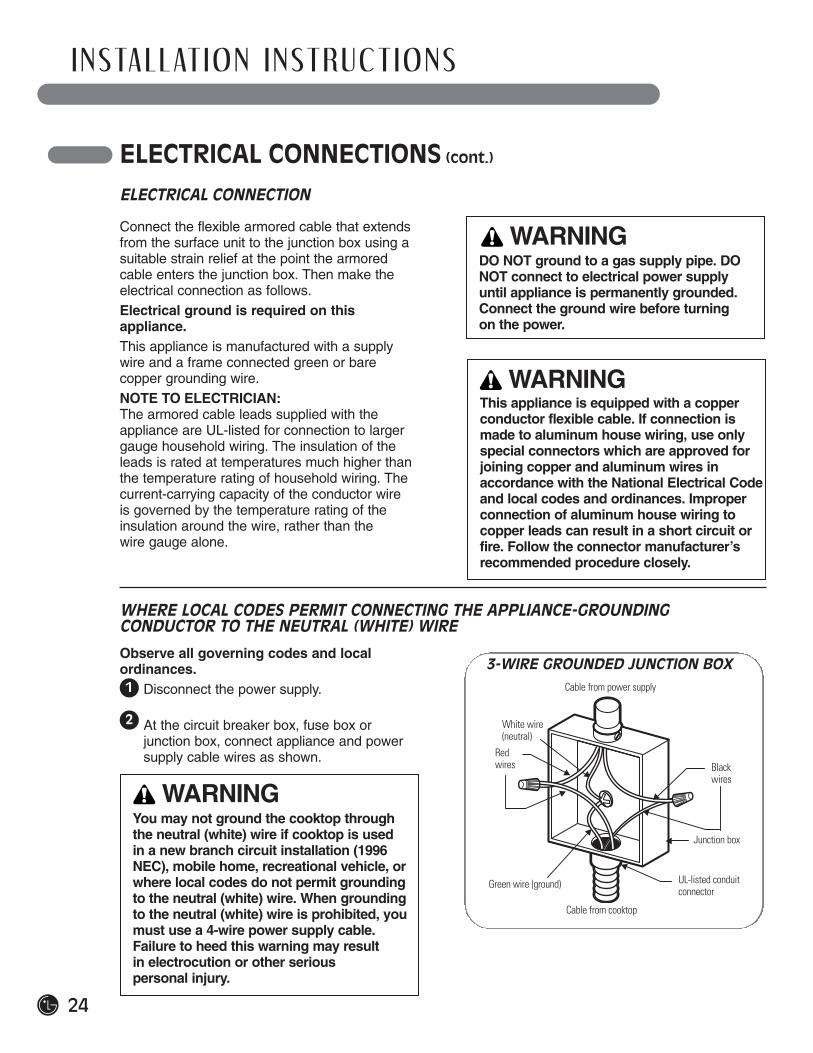
WHERE LOCAL CODES PERMIT CONNECTING THE APPLIANCE-GROUNDINGCONDUCTOR TO THE NEUTRAL (WHITE) WIRE
Observe all governing codes and localordinances.
Disconnect the power supply.
At the circuit breaker box, fuse box orjunction box, connect appliance and powersupply cable wires as shown.
1
2
You may not ground the cooktop throughthe neutral (white) wire if cooktop is used in a new branch circuit installation (1996NEC), mobile home, recreational vehicle, orwhere local codes do not permit groundingto the neutral (white) wire. When groundingto the neutral (white) wire is prohibited, youmust use a 4-wire power supply cable.Failure to heed this warning may result in electrocution or other serious personal injury.
3-WIRE GROUNDED JUNCTION BOXCable from power supply
White wire (neutral)
Red wires Black
wires
Green wire (ground)
Cable from cooktop
UL-listed conduitconnector
Junction box
WARNING
WARNING
WARNING
25
EN
GL
ISH
ELECTRICAL CONNECTIONS (cont.)
IF COOKTOP IS USED IN A NEW BRANCH CIRCUIT INSTALLATION (1996 NEC), MOBILEHOME, RECREATIONAL VEHICLE, OR WHERE LOCAL CODES DO NOT PERMITGROUNDING TO THE NEUTRAL (WHITE) WIRE
Observe all governing codes and localordinances.
Disconnect the power supply.
At the circuit breaker box, fuse box orjunction box, connect appliance and powersupply cable wires as shown.
1
2
If connecting to a 4-wire power supply cableelectrical system, the appliance frameconnected ground wire MUST NOT beconnected to the neutral wire of the 4-wireelectrical system.
4-WIRE GROUNDED JUNCTION BOX
I N S TA L L AT I O N I N S T RU C T I O N S
COOKTOP INSTALLATIONVisually inspect the cooktop for damage.Make sure all cooktop screws are tight (see below for locations).
1
Screws
Carefully lower the cooktop into the counter-top cutout, making sure not to trap any wires.NOTE: Do not use caulking compound. Thecooktop must be removable, should servicebe required.
2
Do not remove the nylon spacers on theedges of the cooktop. These spacers centerthe cooktop in the space provided. Thecooktop must be centered to allow properventing and to prevent excess heat buildupthat may result in heat damage or fire.
Nylon spacers
Cable from power supply
Groundwire
Black wires
Green wire (ground)
Cable from cooktop
UL-listed conduitconnector
Junction box
Red wires
White wire (no connection)
WARNING
WARNING

26
Install the retainer brackets to the bottom ofthe cooktop; then snug the bolts against thebottom of the countertop as shown.
NOTE: The retainer brackets MUST beinstalled to meet local codes or, in theirabsence, with the National Electrical CodeANSI/NFPA No. 70, latest edition.
3
I N S TA L L AT I O N I N S T RU C T I O N S
COOKTOP INSTALLATION (cont.)
Perform a final operational check of the cooktop,making sure the cooktop powers on properly andthat each Cooking Zone operates correctly. Referto the Operating Instructions in this guide fordetails.
FINAL CHECK
Do not touch cooktop glass or CookingZones. They may be hot enough to cause burns.
MODEL AND SERIAL NUMBER LOCATION
The model and serial numbers are located on aplate on the bottom of the cooktop. Pleaserecord them in this guide; you will need them for warranty registration.
Retainerbrackets
Retainerbrackets
Preferredinstallation
Alternativeinstallation
CountertopCooktop
Bolt
Retainerbrackets
CAUTION
27
EN
GL
ISH
Problem Possible Causes SolutionsCooktop does not work • Cooktop controls are locked. • See USING CHILD LOCK to turn off the
CHILD LOCK feature.
• Circuit breaker has tripped or • Reset the circuit breaker or replace the fuse.fuse is blown.
• Power outage. • Check house lights to confirm power outage.
• Installation wiring not complete. • Contact the installer or dealer.
Cooktop does not heat • No cookware or improper • Make sure that cookware is centered on the cooking cookware on Cooking Zone. zone, and that cookware is of the proper type for
induction cooking. See SELECTING COOKWARE.
• Cookware incorrect size for • Cookware bottom must be large enough to cover selected Cooking Zone. Cooking Zone completely. See SELECTING COOKWARE.
• Cookware not resting completely • Cookware bottoms must be flat and centered on theon Cooking Zone. Cooking Zone, and must not rest on the cooktop triim.
See SELECTING COOKWARE.
• Incorrect Cooking Zone selected. • Make sure the correct control is ON for the Cooking Zone being used.
• No power to cooktop. • See “Cooktop does not work” above.
Cooktop turns off • Cooktop internal heat sensor • Make sure the cooktop vents are not blocked. Seewhile cooking has detected high temperature page 21 for Air Exhaust and Fresh Air Intake locations.
inside the cooktop.
• Automatic shutoff has activated. • The cooktop features an automatic shutoff feature that turns the entire cooktop off if any Cooking Zone has been on continuously for 17 hours.
• Liquid or object on controls area. • The cooktop control may read liquids or objects in the controls area as a touch, which could cause the cooktop to shut off. Clean up spills or remove objects and restart cooktop.
The power level for a • Cookware has been removed from • Place the cookware back on the Cooking Zone within Cooking Zone is flashing the Cooking Zone. 90 seconds to maintain the power level settings.
• Cookware not centered on • Make sure cookware is centered and resting flat on the Cooking Zone. Cooking Zone. See SELECTING COOKWARE.
Power Boost does • Power Boost being used with two • Each side of the cooktop shares an inverter for both not work Cooking Zones on the same side of Cooking Zone. Power Boost cannot be used with two
the cooktop. Cooking Zones on the same inverter at the same time.See POWER BOOST and POWER SHARING.
T RO U B L E S H O OT I N G
BEFORE CALLING FOR SERVICEBefore you call for service, review this list. It may save you time and expense. This list includes commonoccurrences that are not the result of a defect in workmanship or materials.
28
BEFORE CALLING FOR SERVICE
T RO U B L E S H O OT I N G
Problem Possible Causes Solutions
appears in the • Control pad was touched too long. • This message will appear if any pad except the Timer timer display or pads is touched for more than 10 seconds.
It will also appear if liquids or objects are spilled or left on the controls area. To clear the error code, remove any liquid or objects from the controls area and press the POWER pad to reset the cooktop.
appears in the • Supplied voltage to cooktop is • If the voltage of the power supplied to the cooktop is too timer display too low. low, it cannot operate properly and will show this error
code. This may be caused by reduced voltage being supplied to the house circuit. If connections are correct and the supplied voltage returns to normal,the code will disappear.
appears in the • Electronics fault error message. • Turn the cooktop OFF; then shut off power at the fuse or display and a number circuit breaker for about 30 seconds. Turn power back appears in the timer on to the cooktop and turn the cooktop on using thedisplay POWER pad. If the error message is still displayed, call
for service.
flashes in the • Power outage or initial startup. • When the cooktop is first turned on or after a power display outage, will blink in the display for 90 minutes or
until the POWER pad is touched for 2 seconds.
29
EN
GL
ISH
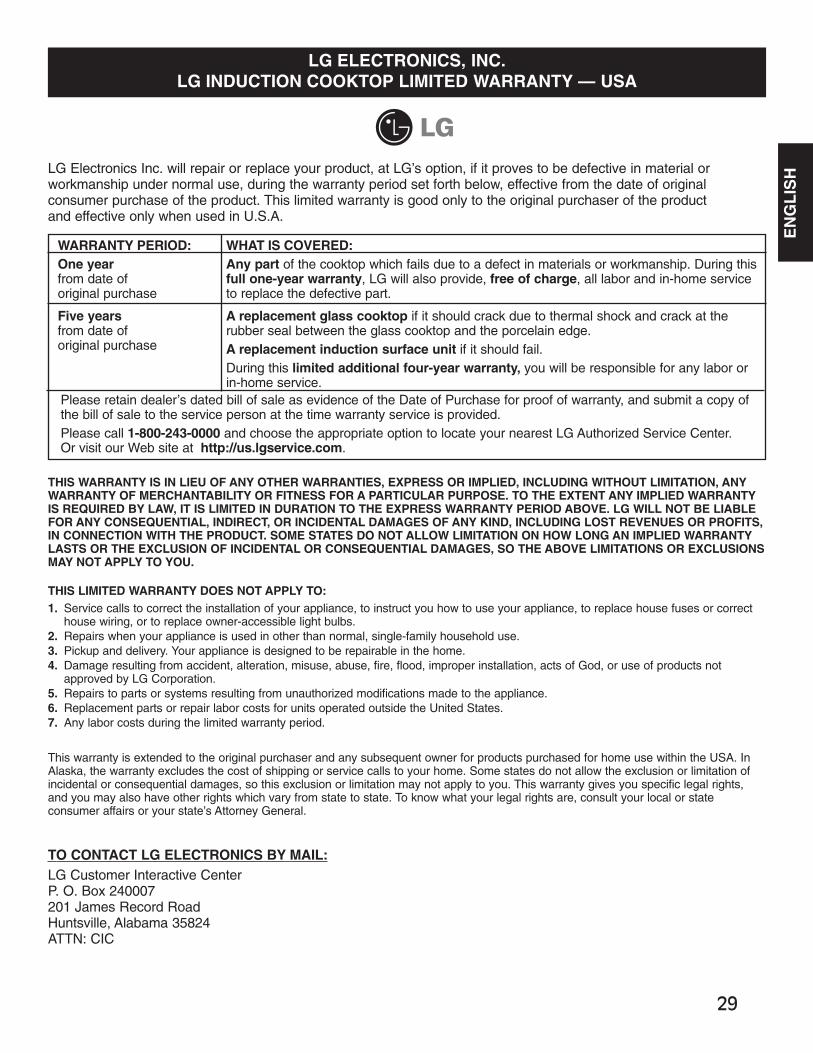
LG ELECTRONICS, INC.LG INDUCTION COOKTOP LIMITED WARRANTY — USA
LG Electronics Inc. will repair or replace your product, at LG’s option, if it proves to be defective in material orworkmanship under normal use, during the warranty period set forth below, effective from the date of originalconsumer purchase of the product. This limited warranty is good only to the original purchaser of the product and effective only when used in U.S.A.
THIS WARRANTY IS IN LIEU OF ANY OTHER WARRANTIES, EXPRESS OR IMPLIED, INCLUDING WITHOUT LIMITATION, ANYWARRANTY OF MERCHANTABILITY OR FITNESS FOR A PARTICULAR PURPOSE. TO THE EXTENT ANY IMPLIED WARRANTYIS REQUIRED BY LAW, IT IS LIMITED IN DURATION TO THE EXPRESS WARRANTY PERIOD ABOVE. LG WILL NOT BE LIABLEFOR ANY CONSEQUENTIAL, INDIRECT, OR INCIDENTAL DAMAGES OF ANY KIND, INCLUDING LOST REVENUES OR PROFITS,IN CONNECTION WITH THE PRODUCT. SOME STATES DO NOT ALLOW LIMITATION ON HOW LONG AN IMPLIED WARRANTYLASTS OR THE EXCLUSION OF INCIDENTAL OR CONSEQUENTIAL DAMAGES, SO THE ABOVE LIMITATIONS OR EXCLUSIONSMAY NOT APPLY TO YOU.
WARRANTY PERIOD:One yearfrom date of original purchase
Five yearsfrom date of original purchase
Please retain dealer’s dated bill of sale as evidence of the Date of Purchase for proof of warranty, and submit a copy ofthe bill of sale to the service person at the time warranty service is provided.Please call 1-800-243-0000 and choose the appropriate option to locate your nearest LG Authorized Service Center.Or visit our Web site at http://us.lgservice.com.
THIS LIMITED WARRANTY DOES NOT APPLY TO:1. Service calls to correct the installation of your appliance, to instruct you how to use your appliance, to replace house fuses or correct
house wiring, or to replace owner-accessible light bulbs.2. Repairs when your appliance is used in other than normal, single-family household use.3. Pickup and delivery. Your appliance is designed to be repairable in the home.4. Damage resulting from accident, alteration, misuse, abuse, fire, flood, improper installation, acts of God, or use of products not
approved by LG Corporation.5. Repairs to parts or systems resulting from unauthorized modifications made to the appliance.6. Replacement parts or repair labor costs for units operated outside the United States.7. Any labor costs during the limited warranty period.
This warranty is extended to the original purchaser and any subsequent owner for products purchased for home use within the USA. InAlaska, the warranty excludes the cost of shipping or service calls to your home. Some states do not allow the exclusion or limitation ofincidental or consequential damages, so this exclusion or limitation may not apply to you. This warranty gives you specific legal rights,and you may also have other rights which vary from state to state. To know what your legal rights are, consult your local or stateconsumer affairs or your state’s Attorney General.
TO CONTACT LG ELECTRONICS BY MAIL:LG Customer Interactive CenterP. O. Box 240007201 James Record RoadHuntsville, Alabama 35824ATTN: CIC
WHAT IS COVERED:Any part of the cooktop which fails due to a defect in materials or workmanship. During thisfull one-year warranty, LG will also provide, free of charge, all labor and in-home serviceto replace the defective part.
A replacement glass cooktop if it should crack due to thermal shock and crack at therubber seal between the glass cooktop and the porcelain edge.A replacement induction surface unit if it should fail. During this limited additional four-year warranty, you will be responsible for any labor orin-home service.
30
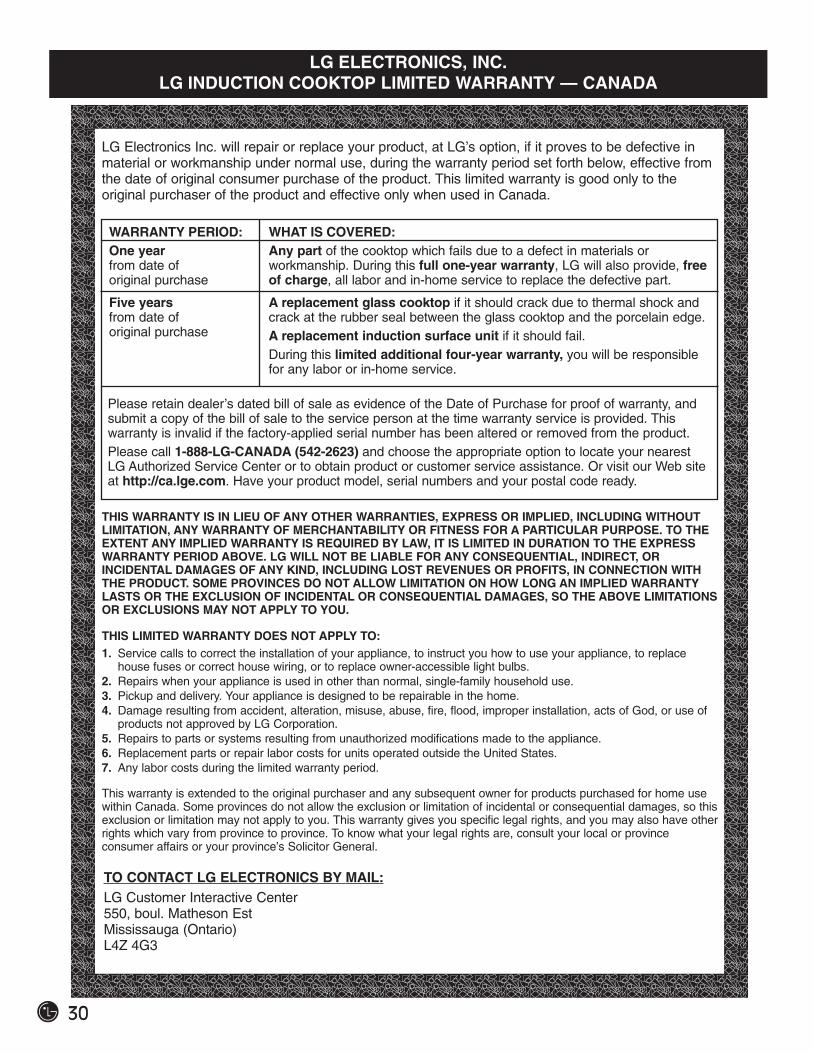
LG ELECTRONICS, INC.LG INDUCTION COOKTOP LIMITED WARRANTY — CANADA
LG Electronics Inc. will repair or replace your product, at LG’s option, if it proves to be defective inmaterial or workmanship under normal use, during the warranty period set forth below, effective fromthe date of original consumer purchase of the product. This limited warranty is good only to theoriginal purchaser of the product and effective only when used in Canada.
THIS WARRANTY IS IN LIEU OF ANY OTHER WARRANTIES, EXPRESS OR IMPLIED, INCLUDING WITHOUTLIMITATION, ANY WARRANTY OF MERCHANTABILITY OR FITNESS FOR A PARTICULAR PURPOSE. TO THEEXTENT ANY IMPLIED WARRANTY IS REQUIRED BY LAW, IT IS LIMITED IN DURATION TO THE EXPRESSWARRANTY PERIOD ABOVE. LG WILL NOT BE LIABLE FOR ANY CONSEQUENTIAL, INDIRECT, ORINCIDENTAL DAMAGES OF ANY KIND, INCLUDING LOST REVENUES OR PROFITS, IN CONNECTION WITHTHE PRODUCT. SOME PROVINCES DO NOT ALLOW LIMITATION ON HOW LONG AN IMPLIED WARRANTYLASTS OR THE EXCLUSION OF INCIDENTAL OR CONSEQUENTIAL DAMAGES, SO THE ABOVE LIMITATIONSOR EXCLUSIONS MAY NOT APPLY TO YOU.
WARRANTY PERIOD:One yearfrom date of original purchase
Five yearsfrom date of original purchase
Please retain dealer’s dated bill of sale as evidence of the Date of Purchase for proof of warranty, andsubmit a copy of the bill of sale to the service person at the time warranty service is provided. Thiswarranty is invalid if the factory-applied serial number has been altered or removed from the product.Please call 1-888-LG-CANADA (542-2623) and choose the appropriate option to locate your nearestLG Authorized Service Center or to obtain product or customer service assistance. Or visit our Web siteat http://ca.lge.com. Have your product model, serial numbers and your postal code ready.
THIS LIMITED WARRANTY DOES NOT APPLY TO:1. Service calls to correct the installation of your appliance, to instruct you how to use your appliance, to replace
house fuses or correct house wiring, or to replace owner-accessible light bulbs.2. Repairs when your appliance is used in other than normal, single-family household use.3. Pickup and delivery. Your appliance is designed to be repairable in the home.4. Damage resulting from accident, alteration, misuse, abuse, fire, flood, improper installation, acts of God, or use of
products not approved by LG Corporation.5. Repairs to parts or systems resulting from unauthorized modifications made to the appliance.6. Replacement parts or repair labor costs for units operated outside the United States.7. Any labor costs during the limited warranty period.
This warranty is extended to the original purchaser and any subsequent owner for products purchased for home usewithin Canada. Some provinces do not allow the exclusion or limitation of incidental or consequential damages, so thisexclusion or limitation may not apply to you. This warranty gives you specific legal rights, and you may also have otherrights which vary from province to province. To know what your legal rights are, consult your local or provinceconsumer affairs or your province’s Solicitor General.
TO CONTACT LG ELECTRONICS BY MAIL:LG Customer Interactive Center550, boul. Matheson EstMississauga (Ontario)L4Z 4G3
WHAT IS COVERED:Any part of the cooktop which fails due to a defect in materials orworkmanship. During this full one-year warranty, LG will also provide, freeof charge, all labor and in-home service to replace the defective part.
A replacement glass cooktop if it should crack due to thermal shock andcrack at the rubber seal between the glass cooktop and the porcelain edge.A replacement induction surface unit if it should fail. During this limited additional four-year warranty, you will be responsiblefor any labor or in-home service.

31
EN
GL
ISH
N OT E S