vapor-logic 4 - dristeem-media.com · vapor-logic®4 humidifier control system installation and...
TRANSCRIPT

Vapor-logic®4Humidi f ie r Contro l System
Instal lat ion and Operation Manual
Important: Read and save these instructions.

Warnings and Cautions . . . . . . . . . . . . . . . . . . . . . . . . . . . . . . . . ivOverview
Vapor-logic4 capabilities . . . . . . . . . . . . . . . . . . . . . . . . . . . . . . . . . . 1Humidification system overview . . . . . . . . . . . . . . . . . . . . . . . . . . . 3Vapor-logic4 board: . . . . . . . . . . . . . . . . . . . . . . . . . . . . . . . . . . . . . . 4Keypad/display . . . . . . . . . . . . . . . . . . . . . . . . . . . . . . . . . . . . . . . . . . . 6Web interface . . . . . . . . . . . . . . . . . . . . . . . . . . . . . . . . . . . . . . . . . . . . 7
InstallationPre-installation Checklist . . . . . . . . . . . . . . . . . . . . . . . . . . . . . . . . . . 8Installation process . . . . . . . . . . . . . . . . . . . . . . . . . . . . . . . . . . . . . . 10Step 1 – Field wiring:
Control input . . . . . . . . . . . . . . . . . . . . . . . . . . . . . . . . . . . . . . . . . 12Control input signals . . . . . . . . . . . . . . . . . . . . . . . . . . . . . . . . . . 14Limit controls . . . . . . . . . . . . . . . . . . . . . . . . . . . . . . . . . . . . . . . . 16Communication connections
Vapor-logic4 keypad/display . . . . . . . . . . . . . . . . . . . . . . . . . 19Web interface communication . . . . . . . . . . . . . . . . . . . . . . . . 21Other communication connections . . . . . . . . . . . . . . . . . . . . 23
Sensor placement . . . . . . . . . . . . . . . . . . . . . . . . . . . . . . . . . . . . . 26Step 2 – Setup
Using the keypad/display . . . . . . . . . . . . . . . . . . . . . . . . . . . . 28Using the Web interface . . . . . . . . . . . . . . . . . . . . . . . . . . . . . 29Setup screen . . . . . . . . . . . . . . . . . . . . . . . . . . . . . . . . . . . . . . . . 29
Step 3 – Startup . . . . . . . . . . . . . . . . . . . . . . . . . . . . . . . . . . . . . . . . . 37Staging multiple XT humidifiers
Control input examples . . . . . . . . . . . . . . . . . . . . . . . . . . . . . . 37Setting control input ranges . . . . . . . . . . . . . . . . . . . . . . . . . . 37
OperationUsing menus and screens
Changing mode and set point . . . . . . . . . . . . . . . . . . . . . . . . 39Tank activities defined . . . . . . . . . . . . . . . . . . . . . . . . . . . . . . . 39
Home screen (keypad/display) . . . . . . . . . . . . . . . . . . . . . . . . . . . . 39Status screen . . . . . . . . . . . . . . . . . . . . . . . . . . . . . . . . . . . . . . . . . . . . 40Diagnostics screen . . . . . . . . . . . . . . . . . . . . . . . . . . . . . . . . . . . . . . . 43Alarms screen . . . . . . . . . . . . . . . . . . . . . . . . . . . . . . . . . . . . . . . . . . . 48Setup menu . . . . . . . . . . . . . . . . . . . . . . . . . . . . . . . . . . . . . . . . . . . . . 50PID tuning
Improves humidifier response time . . . . . . . . . . . . . . . . . . . 51The proportional term . . . . . . . . . . . . . . . . . . . . . . . . . . . . . . . 51The integral term . . . . . . . . . . . . . . . . . . . . . . . . . . . . . . . . . . . 52The derivative term . . . . . . . . . . . . . . . . . . . . . . . . . . . . . . . . . 53PID band . . . . . . . . . . . . . . . . . . . . . . . . . . . . . . . . . . . . . . . . . . 53PID setup tips . . . . . . . . . . . . . . . . . . . . . . . . . . . . . . . . . . . . . . 54
Water level controlProbe system . . . . . . . . . . . . . . . . . . . . . . . . . . . . . . . . . . . . . . . 55Float valve system . . . . . . . . . . . . . . . . . . . . . . . . . . . . . . . . . . . 56Electrode steam humidifiers . . . . . . . . . . . . . . . . . . . . . . . . . . 57
DRI-STEEM® Technical Support:
800-328-4447

Options and featuresDuct high limit switch option . . . . . . . . . . . . . . . . . . . . . . . . 58Modulating high limit transmitter option . . . . . . . . . . . . . . 58Temperature compensation control option . . . . . . . . . . . . . 58Auxiliary temperature sensor option . . . . . . . . . . . . . . . . . . 59Tank preheat feature . . . . . . . . . . . . . . . . . . . . . . . . . . . . . . . . 59Aquastat set point feature . . . . . . . . . . . . . . . . . . . . . . . . . . . . 60Fan-based dispersion operation . . . . . . . . . . . . . . . . . . . . . . . 60Sensor offsets . . . . . . . . . . . . . . . . . . . . . . . . . . . . . . . . . . . . . . . 61Automatic drain sequence, tap/softened water . . . . . . . . . . 61Draining when using softened water . . . . . . . . . . . . . . . . . . . 62Skim timer . . . . . . . . . . . . . . . . . . . . . . . . . . . . . . . . . . . . . . . . . 62End-of-season drain . . . . . . . . . . . . . . . . . . . . . . . . . . . . . . . . . 62Service interval . . . . . . . . . . . . . . . . . . . . . . . . . . . . . . . . . . . . . 62Setting date and time . . . . . . . . . . . . . . . . . . . . . . . . . . . . . . . . 63Battery backup, nonvolatile memory . . . . . . . . . . . . . . . . . . 63Security/password . . . . . . . . . . . . . . . . . . . . . . . . . . . . . . . . . . . 63Downloading historical data . . . . . . . . . . . . . . . . . . . . . . . . . . 64Backing up and restoring data . . . . . . . . . . . . . . . . . . . . . . . . 64
Firmware updatesDownloading firmware updates . . . . . . . . . . . . . . . . . . . . . . . 65Installing firmware updates . . . . . . . . . . . . . . . . . . . . . . . . . . 68
Test outputs and test run . . . . . . . . . . . . . . . . . . . . . . . . . . . . . . . . . 69Modbus, BACnet, LonTalk interoperability
Connections . . . . . . . . . . . . . . . . . . . . . . . . . . . . . . . . . . . . . . . 70Installing LonTalk as a retrofit . . . . . . . . . . . . . . . . . . . . . . . . 70Installing BACnet as a retrofit . . . . . . . . . . . . . . . . . . . . . . . . 70
Multiple-tank operation:Introduction
Multi-tank mode defined . . . . . . . . . . . . . . . . . . . . . . . . . . . . 77Multi-tank control interface . . . . . . . . . . . . . . . . . . . . . . . . . . 77
Priority groupsStart-up order and trim tanks . . . . . . . . . . . . . . . . . . . . . . . . 77Tank grouping to maximize efficiency . . . . . . . . . . . . . . . . . 78Redundant tank for mission-critical applications . . . . . . . . 78Tank wear leveling . . . . . . . . . . . . . . . . . . . . . . . . . . . . . . . . . . 78Fault tolerance . . . . . . . . . . . . . . . . . . . . . . . . . . . . . . . . . . . . . . 78
Wiring and setupWiring a multi-tank group of humidifiers . . . . . . . . . . . . . . 80Multi-tank system setup . . . . . . . . . . . . . . . . . . . . . . . . . . . . . 80
Modbus, BACnet, LonTalkMulti-tank fieldbus profiles . . . . . . . . . . . . . . . . . . . . . . . . . . 81Other system parameters and interoperability . . . . . . . . . . 81Multi-tank operation with Web interface. . . . . . . . . . . . . . . 81
Using the keypad/display . . . . . . . . . . . . . . . . . . . . . . . . . . . . . . . 82Using the Web interface . . . . . . . . . . . . . . . . . . . . . . . . . . . . . . . 83
Troubleshooting guide . . . . . . . . . . . . . . . . . . . . . . . . . . . . . . . . . . . 84Replacement parts . . . . . . . . . . . . . . . . . . . . . . . . . . . . . . . . . . . . . . . 96
Warranty . . . . . . . . . . . . . . . . . . . . . . . . . . . . . . . . . . . Back cover

WARNING CAUTIONIndicates a hazardous situation that could result in death or serious injury if instructions are not followed.
Indicates a hazardous situation that could result in damage to or destruction of property if instructions are not followed.
mc_051508_1145
CAUTIONHot discharge water
Discharge water can be as hot as 212 °F (100 °C) and can damage the drain plumbing.
Humidifiers equipped with a water tempering device need fresh make-up water in order to function properly. Make sure the water supply to the water tempering device remains open during draining.
Excessive supply water pressure
Supply water pressure greater than 80 psi (550 kPa) can cause the humidifier to overflow.mc_011909_1140
WARNINGRead all warnings and instructions
This page provides important safety instructions; it is intended to supplement — not replace — the humidifier's Installation, Operation, and Maintenance Manual (IOM). Read the IOM that was provided with the humidifier before performing service or maintenance procedures on any part of the system. Failure to follow all warnings and instructions could produce the hazardous situations described here and in the IOM, resulting in property damage, personal injury, or death.
If the IOM is missing, go to www.dristeem.com to download a replacement.mc_071608_0910
Hot surfaces and hot water
Steam humidification systems have extremely hot surfaces, and water in tanks, electrode cylinders, steam pipes, and dispersion assemblies can be as hot as 212 °F (100 °C). To avoid severe burns, allow the entire humidification system to cool.
Follow the cool-down procedure in the humidifier's IOM before performing service or maintenance procedures on any part of the system.
mc_071608_0911
Shut down the energy source
Before performing service or maintenance procedures on any part of the humidification system, verify that all energy sources are off. Energy sources can be electricity, gas, steam, or hot liquid. Failure to shut down the energy source could result in carbon monoxide poisoning, fire, explosion, electrical shock, and other hazardous conditions. These hazardous conditions could cause property damage, personal injury, or death.
Contact with energized circuits can cause property damage, severe personal injury or death as a result of electrical shock or fire. Do not remove the shroud/cover, electrical panel cover/door, access panels, or heater terminal cover until electrical power is disconnected.
Follow the shutdown procedure in the humidifier's IOM before performing service or maintenance procedures on any part of the system.
mc_050808_1551
Warnings and Cautions
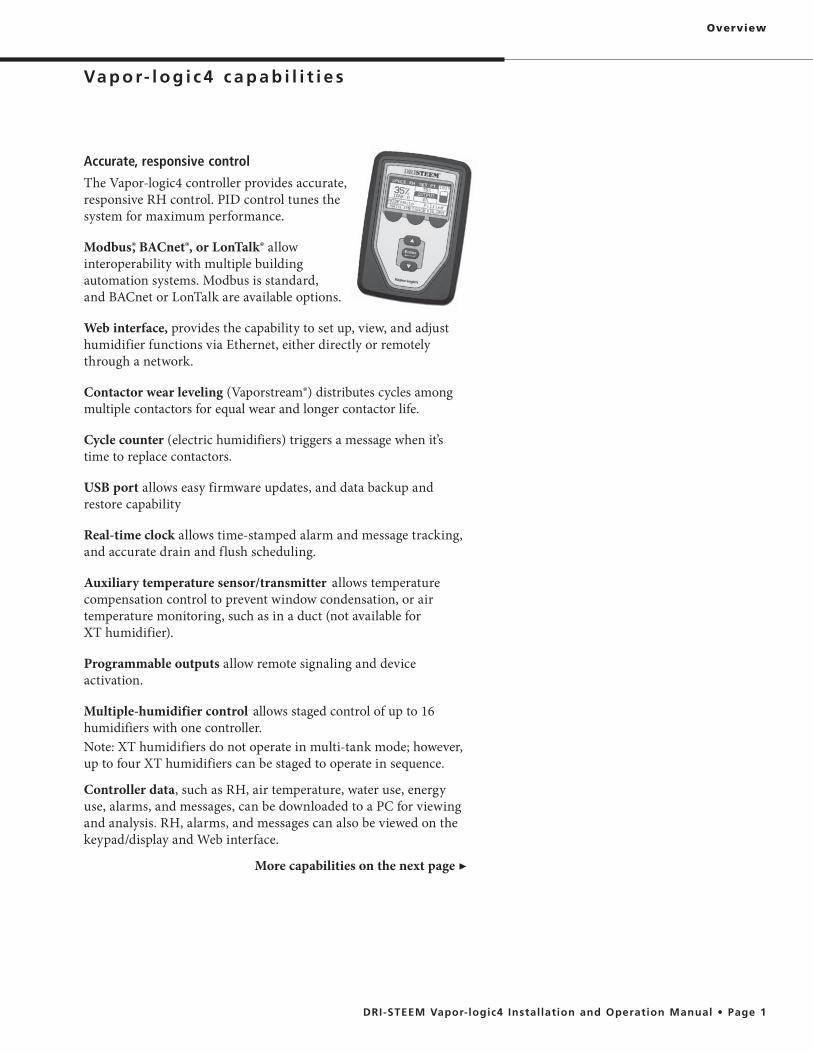
Accurate, responsive control
The Vapor-logic4 controller provides accurate, responsive RH control. PID control tunes the system for maximum performance.
Modbus®, BACnet® , or LonTalk® allow interoperability with multiple building automation systems. Modbus is standard, and BACnet or LonTalk are available options.
Web interface, provides the capability to set up, view, and adjust humidifier functions via Ethernet, either directly or remotely through a network.
Contactor wear leveling (Vaporstream®) distributes cycles among multiple contactors for equal wear and longer contactor life.
Cycle counter (electric humidifiers) triggers a message when it’s time to replace contactors.
USB port allows easy firmware updates, and data backup and restore capability
Real-time clock allows time-stamped alarm and message tracking, and accurate drain and flush scheduling.
Auxiliary temperature sensor/transmitter allows temperature compensation control to prevent window condensation, or air temperature monitoring, such as in a duct (not available for XT humidifier).
Programmable outputs allow remote signaling and device activation.
Multiple-humidifier control allows staged control of up to 16 humidifiers with one controller.Note: XT humidifiers do not operate in multi-tank mode; however, up to four XT humidifiers can be staged to operate in sequence.
Controller data, such as RH, air temperature, water use, energy use, alarms, and messages, can be downloaded to a PC for viewing and analysis. RH, alarms, and messages can also be viewed on the keypad/display and Web interface.
More capabilities on the next page ▶
Overview
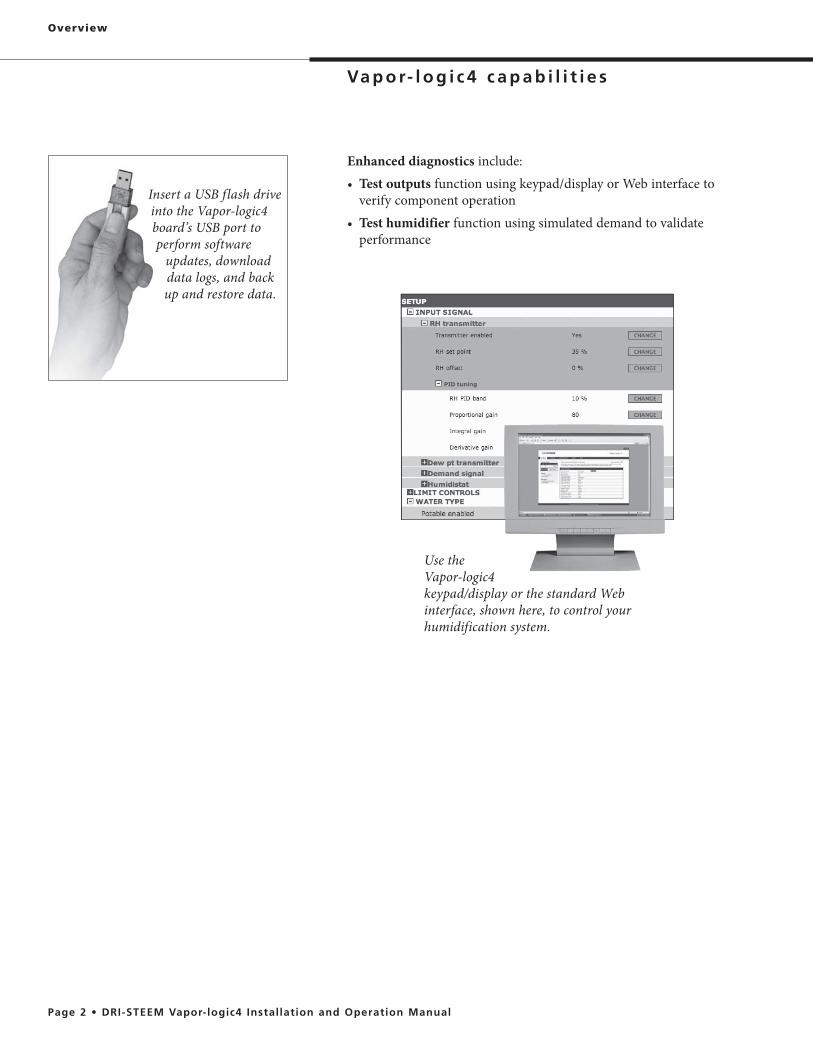
Use the Vapor-logic4 keypad/display or the standard Web interface, shown here, to control your humidification system.
Insert a USB flash drive into the Vapor-logic4 board’s USB port to perform software
updates, download data logs, and back up and restore data.
Enhanced diagnostics include:Test outputs function using keypad/display or Web interface to verify component operationTest humidifier function using simulated demand to validate performance
Overview
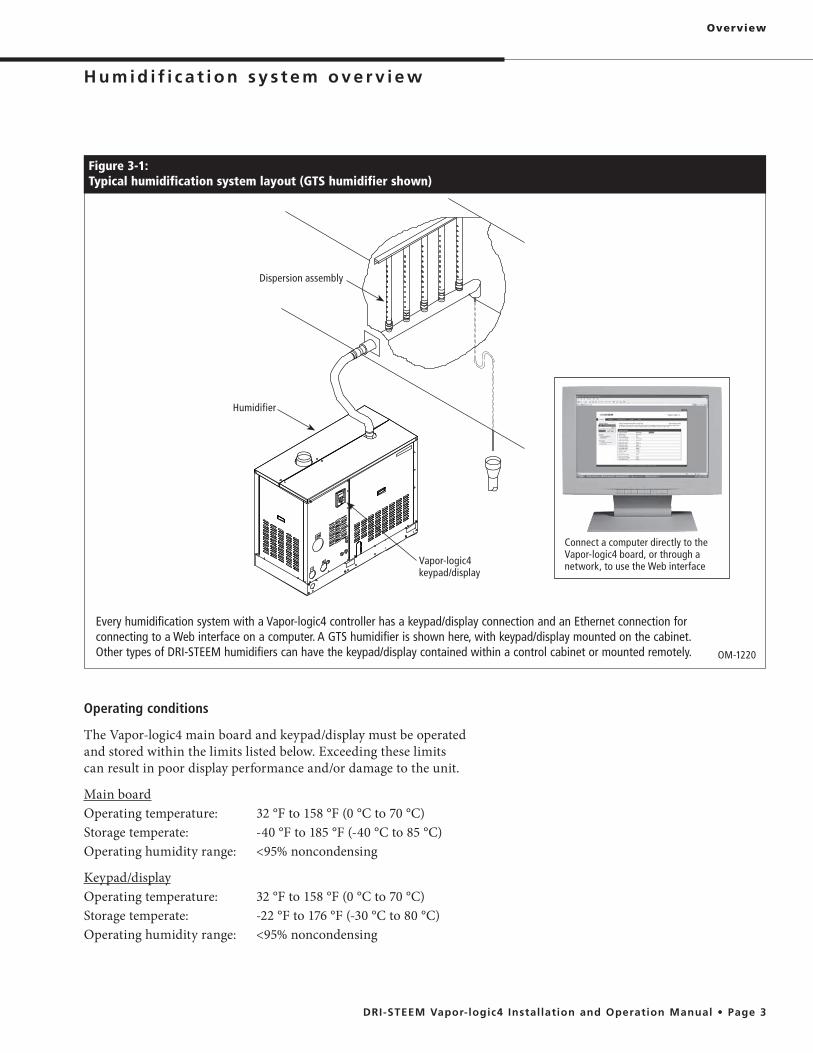
Figure 3-1: Typical humidification system layout (GTS humidifier shown)
Vapor-logic4keypad/display
Humidifier
OM-1220
Dispersion assembly
Every humidification system with a Vapor-logic4 controller has a keypad/display connection and an Ethernet connection for connecting to a Web interface on a computer. A GTS humidifier is shown here, with keypad/display mounted on the cabinet. Other types of DRI-STEEM humidifiers can have the keypad/display contained within a control cabinet or mounted remotely.
Connect a computer directly to the Vapor-logic4 board, or through a network, to use the Web interface
Operating conditions
The Vapor-logic4 main board and keypad/display must be operated and stored within the limits listed below. Exceeding these limits can result in poor display performance and/or damage to the unit.
Main boardOperating temperature: 32 °F to 158 °F (0 °C to 70 °C)Storage temperate: -40 °F to 185 °F (-40 °C to 85 °C)Operating humidity range: <95% noncondensing
Keypad/displayOperating temperature: 32 °F to 158 °F (0 °C to 70 °C)Storage temperate: -22 °F to 176 °F (-30 °C to 80 °C)Operating humidity range: <95% noncondensing
Overview

Vapor-logic4 control board
The Vapor-logic4 control board is mounted inside the humidifier control compartment or cabinet.
Notes:
on a GTS humidifier subpanel. Location varies with humidifier type.
is in the control cabinet or on the humidifier’s subpanel.
The photo above shows key components of the Vapor-logic4 control board. See the illustration on the next page for more detail.
Figure 4-1:Vapor-logic4 control board
Power to board connection
Factory connection points for drain, steam valve, etc.
USB connection
Field connection points for transmitters, power vent, etc. Field connection terminal labels have a white border.
Optional LonTalk module location
Ethernet connection for computer network
and/or BACnet/IPKeypad/display
connection
BACnet or Modbus connection
Factory connection points for water level control,
gas valves, etc.
DRI-STEEM RS485 connection
Figure 4-2:Control board mounted on GTS subpanel
Overview

P9:Ethernet connection to
laptop computer, network, or BACnet IP
P10:Vapor-logic4 keypad/display connection
Figure 5-1:Vapor-logic4 control board connections
P4:Isw = Interlock switch (24VAC input)TT = Tank temp sensor (RTD input)
= Ground for tank temp sensorAI2 = Analog input (0-10VDC typical)
XT current sense
P3:GV1 = Gas valve 1 (24VAC input)BT1 = Blower tach 1 (pulse tach input)LW = Low water (24VAC input)/XT high water probeFPsw = Flue pressure switch
(24VAC input)/XT2 high water probe (right cylinder)
Notes:
during the Setup process.
surrounded with a white border (P11-P16).
humidifiers as well as electric humidifiers). Your application will not have connections at all terminals.
P2:Low = Low water probeMid = Mid water probe Top = Top water probe
= Ground for water probe
P1:24VAC = Power to board
= Ground for power return
P5:GV2 = Gas valve 2 (24VAC input)BT2 = Blower tach 2 (pulse tach input)GV3 = Gas valve 3 (24VAC input)BT3 = Blower tach 3 (pulse tach input)
P6:GV4 = Gas valve 4 (24VAC input)BT4 = Blower tach 4 (pulse tach input)
= Ground for AIAI1 = Analog input (RTD input)
P7:Fieldbus = Modbus or BACnet MS/TP (RS485)
P8:DSTEEM = Multi-tank (RS485)
SW1:RS485 termination for multi-tank
P19:Steam = Steam or hot water valve
=Ground for blower and P16 triac SSR/BL = SSR (electric systems)/or Blower (gas systems)
P18: (all are triacs)CT/I4 = Contactor 4 (electric systems)/or Ignition module 4 (gas systems)CT/I3 = Contactor 3/Ignition module 3CT/I2 = Contactor 2/Ignition module 2
P17: (all are triacs)CT/I1 = Contactor 1/Ignition module 1Drain = Drain valve (24 VAC output)Fill = Fill valve (24 VAC output)
P16: (all are triacs)PV/CA = Power vent/combustion air control signal (24 VAC output)SDU = Space Distribution Unit (24 VAC output) Triac = Programmable output, 4 AMP* max.
Connect ground at P19. * See Caution below.
P15:PVsw = Power vent switch (24VAC input) 24VAC = Power to power-vent switchCAsw = Combust. air sw. (24VAC input)24VAC = Power to combustion air switch
P14:TS = Aux. temp. sensor or temp. comp.
sensor (4-20 mA input)/XT current sense input dual cylinder
24VDC = Power to aux. temp. sensor or temp. comp. sensorP13:AFsw = Airflow proving switch (24VAC input) 24VAC = Power to airflow proving switchDHL = Duct high limit switch/transm. (4-20 mA input) 24VDC = Power to duct high limit switch or transmitterP12:Programmable dry contact, 10 AMP* max. * See Caution below.N.C. = Normally closed C = CommonN.O. = Normally openP11:
= Ground for demand signal by othersRH = Space RH input (RH transmitter,
dew point transmitter, humidistat, or demand signal by others [4-20 mA or 0-10VDC typical])
24VDC = Power to space RH sensor
LED-1 (power indicator)LED-2
Overview
CAUTIONTriac and dry contact maximum currentsProgrammable triac (P16) is rated for 4 Amp maximum, and programmable dry contact (P12) is rated for 10 Amp maximum. Exceeding these maximum ratings can cause the triac or relay components on the Vapor-logic4 board to fail.

Figure 6-1:Using the Vapor-logic4 keypad/display
Press Main softkey for Main menu; other softkey functions
vary by screen
Press Up or Down
arrow to move through menus
and screens Press Enter to select or confirm
Alarm label flashes when there is a system alarm
Fill icon shows water level in tank (see Page 39)
Note: XT humidifier display does not include fill icon (see Figure 57-1).
Typical Home screen
Tank temperature
Tank status
Change set point from the Home screen by pressing the Up or Down arrow keys until set point is highlighted (as shown here), press Enter, press Up or Down arrow keys to change value, press Enter to confirm
Message label becomes highlighted when there is a system message
Change Mode from the Home screen by pressing the Up or
Down arrow keys until Mode is highlighted, press Enter, press Up
or Down arrow keys to change, press Enter to confirm
Overview

Figure 7-1:Using the Vapor-logic4 Web interface (Setup screen shown)
Click on a tab label to move to another screen
Click here to view alarms
Click here to view messages
To change value: Highlight value; type in new value; click on APPLY
Click on CHANGE to change value
Click on label to contract (–) or expand (+) menu item
Overview

☐ See Figure 8-1 for field terminal block locations. Note that field wiring connection locations on the Vapor-logic4 board are surrounded with a white border.
☐ See the figure on the next page for instructions on how to make wiring connections.
☐ See the wiring drawings and manuals that shipped with your humidifier.
☐ When making field connections, do not route low voltage wires near line voltage wires. Do not route low voltage wires in the same conduit as line voltage wires.
☐ Humidistat, room/duct transmitter, temperature sensor, and airflow proving switch wiring must be minimum 18-gauge (1 mm2) plenum rated, shielded (screened), twisted pair wire with a bare drain wire for grounding.
☐ Connect the shield (screen) wire [with a length less than 2" (50 mm)] to the shield (screen) ground terminal on the electric subpanel. Do not ground the shield (screen) wire on the humidistat or transmitter end.
☐ If you have a remote-mounted control cabinet, the water level control device, thermal trip, safety interlock, fill valve, and drain valve wiring must be minimum 18-gauge (1 mm2) stranded wire run in a conduit separate from power wires.
Do not use shielded (screened) cable for water level control devices.
When the control cabinet is mounted remotely from the humidifier, connect a ground wire from the machine ground lug on the humidifier to the machine ground lug in the control cabinet. The bonding machine ground wire should be the same AWG (mm2) as the largest heater wire (electric humidifiers) or sized per local code, National Electrical Code (NEC), or in Europe, IEC 60364 requirements.
Figure 8-1:Vapor-logic4 control board detail
Board detail showing white border
Terminals P-11 through P-16 have a white border on the Vapor-logic4 board. This is where you will make most of your field wiring connections.
Full board
Field connection terminals have labels printed on a white border.
Installation

[ Figure 9-1:Vapor-logic4 terminal block detail and connection instructions
Terminal block plug. Make connections when the plug is attached to the board, or remove for easier access. Pull plug straight up to remove.
Tighten screw after wire is inserted. Maximum torque is 3 in-lb (0.34 N-m)
Remove insulation from end of wire and insert wire here.
P11
P12 P13 P14 P15 P16
SDUTriac PV/CA24VAC CAsw 24VAC PVswTS24VDCDHL24VDC 24VAC AFswN.O. C N.C.24VDC RH
Vapor-logic4 board detail (see also Figure 5-1)
Installation

The Vapor-logic4 board is designed to make installation very easy:
white.
inserting wires and tightening screws.
board fully configured, with drain, fill, and other humidifier components factory-wired to the board, and the keypad/display attached to the humidifier and connected to the Vapor-logic4 board.
Installing Vapor-logic4 is a three-step process:
1. Connect field wiring from device to Vapor-logic4 board.
See instructions beginning on Page 12. Note that some connections listed here may not apply to your system.
(one required) – RH or dew point transmitter – Demand signal by others (4-20 mA or 0-10 VDC typical) – Room or duct humidistat – Demand signal by BACnet, Modbus, or LonTalk – Airflow switch (duct or SDU) – Duct high limit on-off switch or transmitter – Temperature compensation transmitter (or auxiliary
temperature sensor connected to same terminal)
Installation

– Vapor-logic4 keypad – Ethernet – Modbus – BACnet – LonTalk – Multiple-tank communication
2. Complete the Setup process.
See instructions beginning on Page 28.
3. Start up humidifier(s).
See instructions on Page 37.
Refer to the Pre-installation Checklist and drawings on the previous pages, and then make the field wiring connections as described on the following pages.
Installation

Connect control input signal wiring by inserting wires into Terminal P11 (labeled 24vdc, RH, and ground) per the wiring diagram on the next page. Tighten screws; maximum torque is 3 in-lb (0.34 N-m).
Allowed inputs at Terminal P11 include:
Transmitters provide a signal proportional to the RH or dew point being measured. All transmitters provided by DRI-STEEM are two-wire devices using a 4 to 20 mA signal.
Demand signals are sent to the Vapor-logic4 board from another control system such as a building automation system. These systems have their own RH or dew point transmitters, calculate required humidifier output, and send a demand signal to the humidifier to create steam at a percentage of that humidifier’s capacity. Demand signals are typically 0-10 VDC or 4-20 mA, but may also come from a DDC signal via Modbus, BACnet, or LonTalk.
A humidistat also delivers a demand signal to the humidifier, but it is not typically used with Vapor-logic4.
Humidistats provide either on-off control or modulating control. DRI-STEEM humidistats are powered by a 24 VDC supply provided by the Vapor-logic4 control board.
When using modulating control, the signal from a humidistat directly controls the amount of output from the humidifier.
Notes:
operation, see “Control input signals” on Page 14.
for more information about input signals.
Figure 12-1:Terminal P11
Terminal P11:24VDC = Power to space RH sensor RH = Space RH input (RH transmitter, dew point transmitter, humidistat, or demand signal by others) (4-20 mA or 0-16 (typ. 0-10) VDC input
= Ground for demand signal by others
Terminal P11
Note:
If you do not know which control components were ordered with your system, contact DRI-STEEM or connect your keypad/display to the Vapor-logic4 board per the instructions on Page 19. Go to the Setup menu per the instructions on Page 28 to view system parameters that were factory configured as ordered.
Installation

Figure 13-1: Vapor-logic4 control input wiring connections
Signal by others
Transmitter
On-off RH humidistat
Key
Installation

DRI-STEEM offers three control options for all its humidification systems controlled by Vapor-logic4: On-off control, demand signal control, and transmitter control.
On-off control
On-off control—the simplest control scheme—does exactly what its name implies: the output device turns fully on, then fully off.
The humidistat that controls the humidifier has a differential between the on and off switch points. The differential is established at a range sufficient to prevent output short cycling. In other words, the humidity level has to fall below set point before the humidistat closes and energizes the humidifier. Once the humidifier is energized, the humidistat stays closed until the humidity is above set point. This creates an operating range that prevents the humidifier from running for very short periods of time.
In applications where there are multiple contactor outputs, such as an electric element humidifier, contactors for each heat stage are pulled in one at a time with a one-second delay between them. In applications with a variable output stage, such as a GTS humidifier, the outputs are ramped up until they reach 100%.
Installation

Calculation of transmitter % RH
% RH = (mA reading) – 4 mA 16 mA
Example: 12 mA – 4 mA 0.16 mA
Modulating demand signal control
With modulating demand signal control, a modulating humidistat or a building automation system sends a signal to the Vapor-logic4 controller, which then sends a signal to the humidifier to produce a directly proportional steam output. For example, if a humidistat operating between 4 mA and 20 mA sends a 4 mA signal, the humidifier produces no output; a 12 mA signal causes the humidifier to run at 50% of capacity; and a 20 mA signal causes the humidifier to run at 100% capacity.
With a humidistat provided by DRI-STEEM producing this signal, the humidity set point is set at the humidistat. The keypad/display then is used for maintaining and troubleshooting the humidification system, with humidifier control stemming from the humidistat itself. With a building automation system (BAS) providing the signal, the humidity set point is established by the BAS, and the humidifier responds to the BAS commands.
Transmitter control
With transmitter control, the Vapor-logic4 board receives a signal that corresponds to the actual humidity level measured in the space being controlled. (With a transmitter provided by DRI-STEEM, the signal is 4 to 20 mA, which corresponds to 0 to 100% RH). The Vapor-logic4 controller employs an internal PID loop that uses this humidity measurement along with a user-defined humidity set point to calculate a demand level. This demand level is the level at which the humidifier will run. See “PID tuning” on Page 51.
Installation
x 100%
x 100% = 50% RH
Airflow proving switch
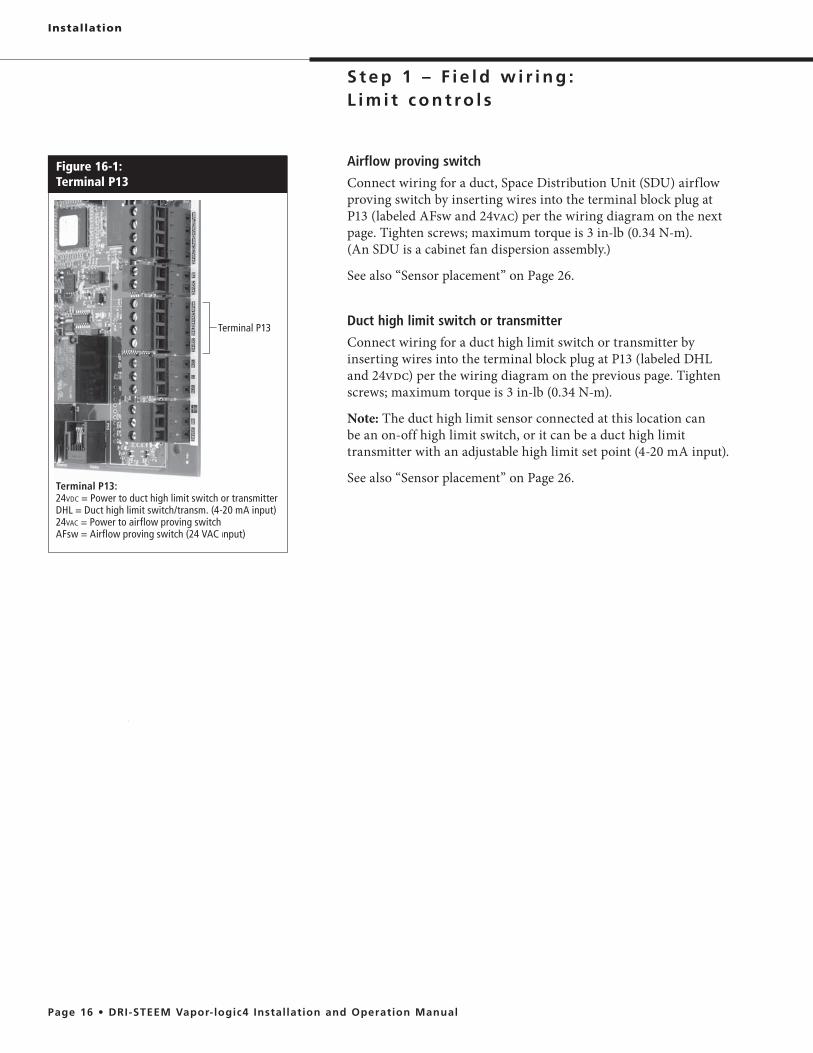
Connect wiring for a duct, Space Distribution Unit (SDU) airflow proving switch by inserting wires into the terminal block plug at P13 (labeled AFsw and 24vac) per the wiring diagram on the next page. Tighten screws; maximum torque is 3 in-lb (0.34 N-m). (An SDU is a cabinet fan dispersion assembly.)
See also “Sensor placement” on Page 26.
Duct high limit switch or transmitter
Connect wiring for a duct high limit switch or transmitter by inserting wires into the terminal block plug at P13 (labeled DHL and 24vdc) per the wiring diagram on the previous page. Tighten screws; maximum torque is 3 in-lb (0.34 N-m).
Note: The duct high limit sensor connected at this location can be an on-off high limit switch, or it can be a duct high limit transmitter with an adjustable high limit set point (4-20 mA input).
See also “Sensor placement” on Page 26.
Terminal P13
Figure 16-1:Terminal P13
Terminal P13:24VDC = Power to duct high limit switch or transmitterDHL = Duct high limit switch/transm. (4-20 mA input) 24VAC = Power to airflow proving switchAFsw = Airflow proving switch (24 VAC Input)
Installation

Figure 17-1: Vapor-logic4 limit controls wiring connections
Airflow switch
Duct high limit (not used on SDU or Area-type)
Temperature compensation transmitter or auxiliary temperature sensor
Key
In a duct When using an SDU
Installation
Note: This control is not available for XT humidifiers.

Terminal P14
Figure 18-1:Terminal P14
Terminal P14:24VDC = Power to auxiliary temperature sensor or temperature compensation sensor (transmitter)TS = Auxiliary temperature sensor or temperature compensation sensor (transmitter) (4-20 mA input)
Figure 18-2:Temp. comp. transmitter installation
OM-337
Thermostatcontrol wires
Surface-mounted thermostat temperature control box on wall
Typical sensor cord routing
Secure temperature sensor tip to inside surface of window glass using clear RTV silicone adhesive
Double- pane window glass
Window frame
Installation
Connect wiring for a temperature compensation transmitter or an auxiliary temperature sensor by inserting wires into the terminal block plug at P14 (labeled 24vdc and TS) per the wiring diagram on the previous page. Tighten screws; maximum torque is 3 in-lb (0.34 N-m).
Note: Only one device can be connected at P14. You will identify the connected device in “Step 2 – Setup,” beginning on Page 28.
Auxiliary temperature sensor
An auxiliary temperature sensor typically monitors duct or space air temperature. Mount the auxiliary temperature sensor wherever you want to monitor temperature. Auxiliary temperature readings are logged to the data log.
Temperature compensation transmitter
A temperature compensation transmitter allows Vapor-logic4 to reduce humidifier output on cold days, reducing window condensation. Mount the temperature compensation transmitter on the inside of an outside-wall window.
To mount the temperature compensation sensor:
1. See Figure 18-2. Position the temperature compensation sensor control box on a wall adjacent to a window frame facing north or northeast.
2. Place the flat surface of the temperature sensor tip on the lower corner of glass surface.
3. Temporarily hold the sensor tip in place with strips of masking tape.
4. Apply a small amount of clear RTV silicone adhesive over and around the sensor tip (making sure the sensor tip is in contact with the window glass).
5. After adhesive cures, remove masking tape.
6. See the operation section of this manual for more information about the temperature compensation sensor.

Vapor-logic4 keypad/display
If your keypad/display is factory-mounted and connected to the Vapor-logic4 board, proceed to installing the next device required by your system.
If your keypad/display was shipped loose, mount the keypad/display in a location so that the provided cable is long enough to connect the keypad/display to the Vapor-logic4 board.
To connect a Vapor-logic4 keypad/display to the Vapor-logic4 board, insert the male end of the provided cable into the Vapor-logic4 board at Terminal P10 (labeled Display) until you hear a click sound (see also the wiring diagram on the next page). Plug the other end of the cable into the keypad/display. This connection provides DC power and communication to the keypad/display.
See Caution at right before routing cable.
If a longer keypad/display cable is needed, order a replacement cable from DRI-STEEM (see the replacement parts section of this manual), or use a four-conductor straight-through cable or a six-conductor, crossover, twisted pair cable connected to an RJ11 jack.
Note required operating conditions listed on Page 3.
Other than factory-mounted, there are three ways to mount the keypad/display. See Figure 19-2.
Terminal P10:Display
Figure 19-1:Terminal P10
Mount keypad/display back directly to wall Mount keypad/display back to junction box Mount keypad/display back to phone plate
Figure 19-2:Mounting the keypad/display
Installation
CAUTIONKeypad/display cable
Maximum cable length is 500’ (152 m).
When routing keypad/display cable, route cable away from all power wiring.
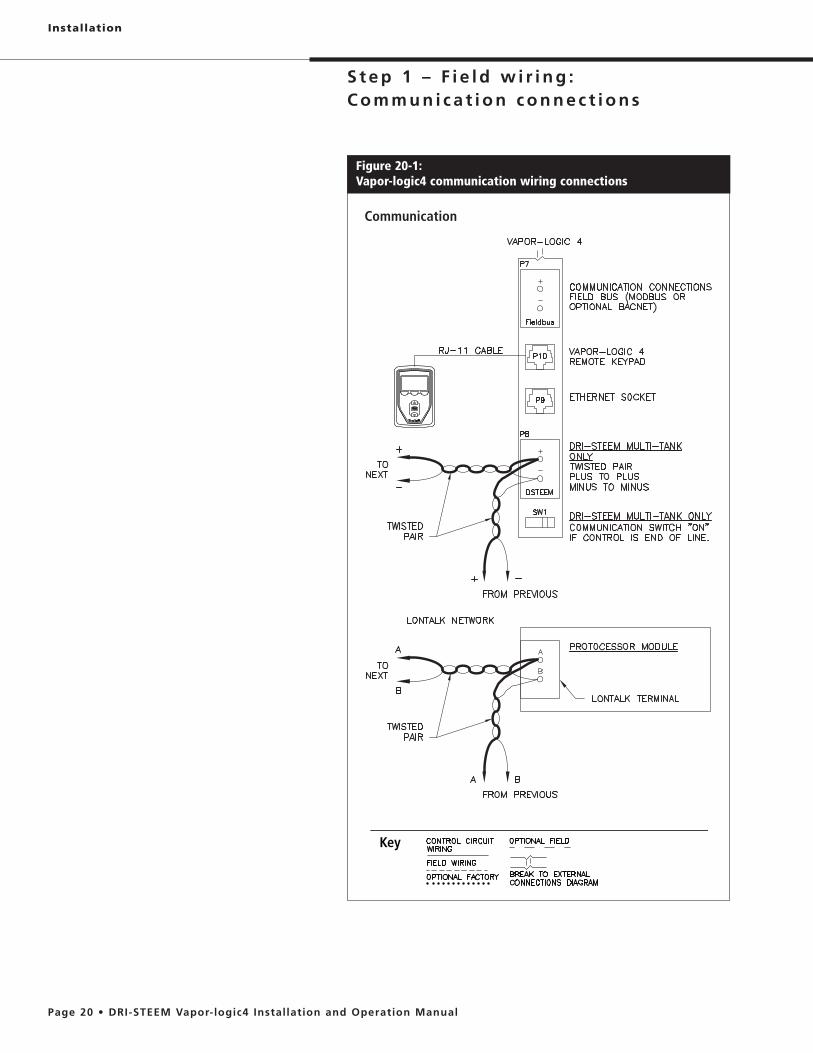
Figure 20-1: Vapor-logic4 communication wiring connections
Key
Communication
Installation

Web interface communication
Utilizing the Vapor-logic4 Web interface is optional. The humidifier can be operated using the keypad/display and/or the Web interface. When using the Web interface, the humidifier can be accessed by a computer either directly or through a network. Each Vapor-logic4 controller ships with the static IP address of 192.168.1.195. This allows users to locate the Web interface upon start-up. After initial start-up, the IP address can remain as is, be re-assigned as another static address, or configured to automatically go out and find an IP address on the network using DHCP. See the steps below for information about connecting to the humidifier using the Web interface.
Connecting Web interface directly to a computer not on a network
1. Connect the Ethernet cable. Insert the male end of an RJ45 Ethernet cable into the
Vapor-logic4 board at P9 (labeled Ethernet; see Figure 21-1) until you hear a click sound. Insert the other end of the cable into a computer. Since the Ethernet port on the Vapor-logic4 board is auto-sensing, either a straight-through or crossover cable will work.
2. Check the current IP address of your computer. Connecting a computer to the humidifier requires that the
computer being used has the same network address range as Vapor-logic4. In order to validate this, check the IP address of the computer being used by going to the computer’s Start menu and selecting Run. When the box shown below appears, type in cmd on the Open line and hit OK.
Terminal P9:Ethernet
Figure 21-1:Terminal P9
Vapor-logic4 default IP address
192.168.1.195.
Figure 21-2:Checking your IP address
Installation

After a system prompt appears, type in ipconfig and then hit Enter. The current IP address of the computer should appear. If the first three segments of that IP address are different than the first three segments of the humidifier’s default IP (192.168.1.xxx), you must change either your computer or Vapor-logic4’s IP address such that they match each other.
3. Change the IP address of your humidifier or computer if necessary.
a. Change the IP address of the humidifier to work with your computer.
The most straightforward way to change the IP address of the humidifier using Vapor-logic4 is to use the keypad/display. Go to Setup/Communications/Network IP address on the keypad/display and change the IP address such that the first three segments of the computer’s settings match the network address. Make sure the last digit of the IP address is different between the humidifier and the computer. Cycle power of Vapor-logic4 board for address change to take effect.
b. Change the IP address of your computer to match the humidifier.
Changing the IP address of the computer being used will likely require administrative privileges for your company’s network. Please consult your IT department for this task.
Figure 22-1:Checking your IP address
Installation

Enter the IP address in your browser’s address bar
Figure 23-1:Entering the IP address
Installation
CAUTIONVapor-logic4 IP address
Before you connect a Vapor-logic4 device to a network, please contact your IT department. Given that the Vapor-logic4 controller ships with a static IP address, it is important to ensure that there is not another device with that same IP address already on the network. Working with your IT department before network connection will help ensure the integrity of the network and the devices on that network
DHCP and IP address
When DHCP is enabled, the server can dynamically change the IP address of Vapor-logic4, making existing bookmarks unusable.
4. Connect to the humidifier.a. Using a computer connected to the Vapor-logic4 board,
open a Web browser such as Mozilla® Firefox® or Internet Explorer®.
b. Find the browser address bar (see Figure 23-1), delete all existing text in the browser address bar, type the Vapor-logic4 IP address into the browser’s address bar, and press Enter.
Note: The Vapor-logic4 default IP address is 192.168.1.195
Connecting Web interface to an Ethernet network
See Caution at right before proceeding.
If your network uses DHCP (Dynamic Host Configuration Protocol), use the keypad/display to navigate to: Setup/Communications/Network IP Address. Enable DHCP and restart the Vapor-logic4 board.
The most current IP address can always be found by using the keypad/display to navigate to: Set-Up/Communications/Network IP Address.
Important: DHCP cannot be enabled from the Web interface; it must be enabled using the keypad/display.
Other communication connections
For BACnet or LonTalk installation instructions, see Page 70.For multiple-tank installation instructions, see Page 77.

Programmable triac
See “Programmable triac maximum current” in Caution below. Connect wiring to the output by inserting wires into the terminal block plug at P16 (labeled Triac) and into the terminal block plug at P19 (labeled ground), per the wiring diagram in Figure 25-1. This connection allows remote activation of a device such as a fan or signal light. Output parameters are defined during Step 2 of the installation process.
Programmable relay (dry contact)
See “Programmable relay maximum current” in Caution below.See Figure 25-1. Connect wiring for remote signaling using a programmable relay (dry contact) by inserting wires into the terminal block plug at P12 (labeled N.O., C, and N.C.), per the wiring diagram in Figure 25-1. Tighten screws; maximum torque is 3 in-lb (0.34 N-m).This connection allows remote activation of a device such as a fan or signal light. Output parameters are defined during Step 2 of the installation process.
Terminal P12
Figure 24-2:Terminal P12
Terminal P12:Programmable relay (dry contact) (10 AMP max. rated)N.O. = Normally openC = CommonN.C. = Normally closed
Terminal P16
Figure 24-1:Terminal P16
Terminal P16: (all are triacs)Triac = Programmable output (4 AMP max.) (Note: Connect ground at P19) PV/CA = Power vent/combustion air control signal (24 VAC output) SDU = Space Distribution Unit (24 VAC output)
Installation
CAUTIONProgrammable triac maximum current
Programmable triac (P16) is rated for 100 mA from the factory, and up to 4 Amps when a 24 VAC, 4 Amp (100 VA) transformer is wired in parallel to the factory transformer. Exceeding this maximum rating can cause the triac component or the Vapor-logic4 board to fail.
Programmable relay maximum current
Programmable relay (dry contact) (P12) is rated for 24 VAC, 10 Amp maximum. Exceeding this maximum rating can cause the relay component or the Vapor-logic4 board to fail.

Figure 25-1:Vapor-logic4 programmable triac and relay wiring connections
Programmable triac and relay
Key
Terminal P15
Figure 25-3:Terminal P15
Terminal P15:24VAC = Power to combustion air switchCAsw = Combust. air sw. (24VAC input)24VAC = Power to power vent switchPVsw = Power vent switch (24VAC input)
Terminal P16
Figure 25-2:Terminal P16
Terminal P16: (all are triacs)Triac = Programmable output (Note: Connect ground at P19) PV/CA = Power vent/combustion air control signal (24 VAC output) SDU = Space Distribution Unit (24 VAC output)
Area-type and SDU dispersion fans
Connect wiring for Area-type and Space Distribution Unit (SDU) dispersion fans by inserting the wire into the terminal block plug at P16 (labeled SDU). Tighten screws; maximum torque is 3 in-lb (0.34 N-m).
Optional combustion air switch and power vent (GTS systems)
Connect wiring for GTS combustion air switch and/or GTS power vent by inserting wires into the terminal block plugs at P15 and P16. Tighten screws; maximum torque is 3 in-lb (0.34 N-m).
The combustion air switch is on the combustion air damper. The power vent switch indicates airflow at the power venter.
Installation

mc_060508_0750
Installation
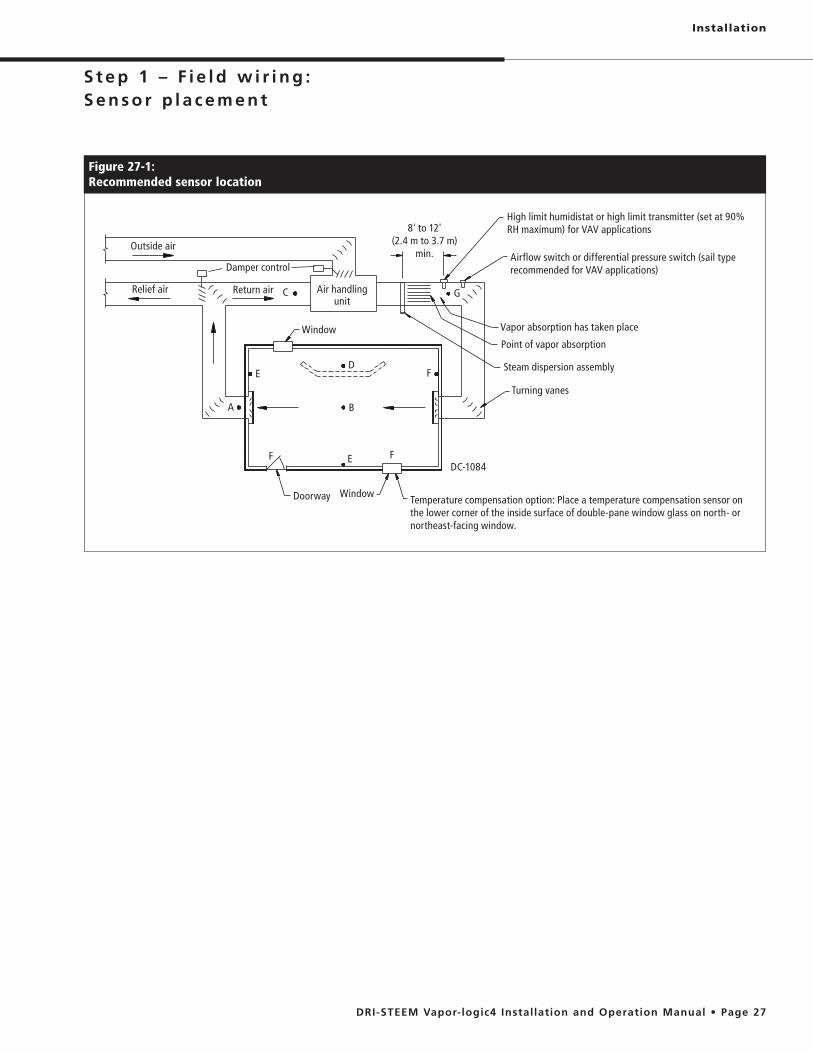
Humidistat and sensor locations are critical
Humidistat and sensor location have a significant impact on humidifier performance. In most cases, do not interchange duct and room humidity devices. Room humidity devices are calibrated with zero or little airflow; whereas duct humidity devices require air passing across them.Recommended sensor locations (see figure below):A Ideal. Ensures the best uniform mix of dry and moist air with
stable temperature control.B Acceptable, but room environment may affect controllability,
such as when sensor is too close to air grilles, registers, or heat radiation from room lighting.
C Acceptable. Provides uniform mixture of dry and moist air. If extended time lag exists between moisture generation and sensing, extend sampling time.
D Acceptable (behind wall or partition) for sampling entire room if sensor is near an air exhaust return outlet. Typical placement for sampling a critical area.
E Not acceptable. These locations may not represent actual overall conditions in the space.
F Not acceptable. Do not place sensors near windows, door passageways, or areas of stagnant airflow.
Best sensing location for a high-limit humidistat or humidity transmitter and airflow proving switch.
Other factors affecting humidity controlHumidity control involves more than the controller’s ability to control the system. Other factors that play an important role in overall system control are:
moisture migration time lags
transmitters and their location
duct
space environments
Installation
Figure 27-1:Recommended sensor location
Outside air
Relief air Return air Air handling unit
8' to 12'(2.4 m to 3.7 m)
min.
Steam dispersion assembly
Turning vanes
Temperature compensation option: Place a temperature compensation sensor on the lower corner of the inside surface of double-pane window glass on north- or northeast-facing window.
WindowDoorway
WindowPoint of vapor absorption
Vapor absorption has taken place
Airflow switch or differential pressure switch (sail type recommended for VAV applications)
High limit humidistat or high limit transmitter (set at 90% RH maximum) for VAV applications
Damper control
C
A
E
F
D
B
E F
G
F
DC-1084

To simplify the field-installation process, humidifiers are sent from the factory configured as ordered. However, some settings are unknown at the factory and need to be defined during the setup process using the Setup menu. The Setup menu is also where you make future system setting changes.
To begin the field setup process, go to the Setup menu on either the keypad/display or the Web interface. Setup menu parameters are listed in Table 30-1. Options and defaults are the same whether viewed from the keypad/display or Web interface. However, labels may be abbreviated on the keypad/display.
Using the keypad/display
To access the Setup menu on the keypad/display, press the Main softkey on the Vapor-logic4 keypad (see figure below). Press the Down arrow on the keypad until Setup is highlighted. Press Enter.
After entering the Setup menu, press the Up and Down arrows to scroll through all setup parameters or to change values. Use the Enter key to select parameters.
Figure 28-1: Keypad/display screens
“A” indicates that these settings apply to Tank A. All humidifier tanks are labeled as “A” except in applications where multiple humidifiers are controlled by one controller.
“1/15” indicates the highlighted item is the first of fifteen items
Push Up or Down arrow to scroll through menu items; press Enter to select highlighted item
MAIN BACK
1/15 ASETUP
HOME
Limit controlsWater typeWater management
Input signal
Fan-based dispersion
MAIN BACK
1/4 AINPUT SIGNAL
HOME
Dew pt transmitterDemand signalHumidistat
RH transmitter
MAIN BACK
2/4 ARH X-MITTER
HOME
On
RH set pt 35%
Transmitter enabled
Figure 28-2:Using the Vapor-logic4 keypad
Press Main softkey to go to Main menu; press Up or Down arrow to move through menus and screens
Press Up or Down
arrow to move through menus
and screens Press Enter to select or confirm
Typical Home screen
Installation

Using the Web interface
Although not required for humidifier operation, the Web interface allows convenient and remote access to Vapor-logic4.See Page 21 for Web interface connection and IP address instructions. Follow the instructions below to complete the setup process.
Setup screen
Installation
Click on a tab label to move to another screen
Click here to view alarms
Click here to view messages
To change value: Highlight value; type in new value; click on APPLY
Click on CHANGE to change value
Click on label to contract (–) or expand (+) menu item
Figure 29-1:Using the Vapor-logic4 Web interface (Setup screen shown)

Table 30-1:Setup menu
Menu item Default value Minimum value
Maximum value Units Notes
Note: Your system might not have all of the items listed in this table (Pages 30 through 36).
Input signal
RH transmitter -- -- -- --
Transmitter enabled -- No Yes --
RH set point 35 0 100 %
RH offset 0 -20 20 %
DRI-STEEM recommends using default values for offsets and PID settings when first setting up your humidifier.
PID tuning -- -- -- --
RH PID band 10 0 50 %
Proportional gain 80 0 1000 ---
Integral gain 40 0 1000 ---
Derivative gain 0 0 1000 ---
Dew pt transmitter -- -- -- --
Transmitter enabled -- No Yes --
Dew point set point50 20 80 °F
10 -6 26 °C
Dew point offset0 -20 20 °F
DRI-STEEM recommends using default values for offsets and PID settings when first setting up your humidifier.
0 -11 11 °C
Dew point minimum 0 -100 Maximum °F /°C
Dew point maximum 100 Minimum 100 °F /°C
PID tuning -- -- -- --
Dew point PID band10 1 20 °F
5 1 20 °C
Proportional gain 80 0 1000 --
Integral gain 40 0 1000 --
Derivative gain 0 0 1000 --
Demand signal -- -- -- --
VDC signal -- -- -- --
VDC signal enabled -- No Yes --
0% output at 1.0 0.0 Maximum VDC
100% output at 9.0 Minimum 10.0 VDC
mA signal -- -- -- --
mA signal enabled -- No Yes --
0% output at 4.0 0.0 Maximum mA
100% output at 20.0 Minimum 20.0 mA
Control via Modbus -- -- -- --
Choose Modbus, BACnet, or LonTalk in this section only if your demand input signal is via Modbus, BACnet, or LonTalk. If you are interoperating (sharing operating parameters with a building automation system) using Modbus, BACnet, or LonTalk protocols, see also the Communications Setup options.
Modbus controlled No No Yes --
Control via BACnet -- -- -- --
BACnet controlled No No Yes --
Control via LonTalk -- -- -- --
LonTalk controlled No No Yes --
Continued
Installation

Table 30-1:Setup menu (continued)
Menu item Default value
Minimum value
Maximum value Units Notes
Humidistat -- -- -- --
Humidistat enabled No No Yes --
Limit control
HL switch -- -- -- --
Switch in system Yes No Yes --
HL transmitter -- -- -- --
Transmitter enabled No No Yes --
Duct HL set point 80 5 95 % RH
Duct HL span 5 0 20 % RHSpan (throttle span) is an offset below the high limit set point where the humidifier reduces output but does not turn off until the device high limit set point is reached.
Duct HL offset 0 -20 20 % RH
Water type (not an XT menu item)
Potable enabled -- No Yes --
Changing the water type setting from potable/softened to DI/RO, or from DI/RO to potable/softened requires humidifier hardware changes.Changing the water type setting without the required hardware changes can cause component failure, severe property damage, severe personal injury, or death.
Softened enabled -- No Yes --
DI/RO enabled -- No Yes --
Continued
Installation
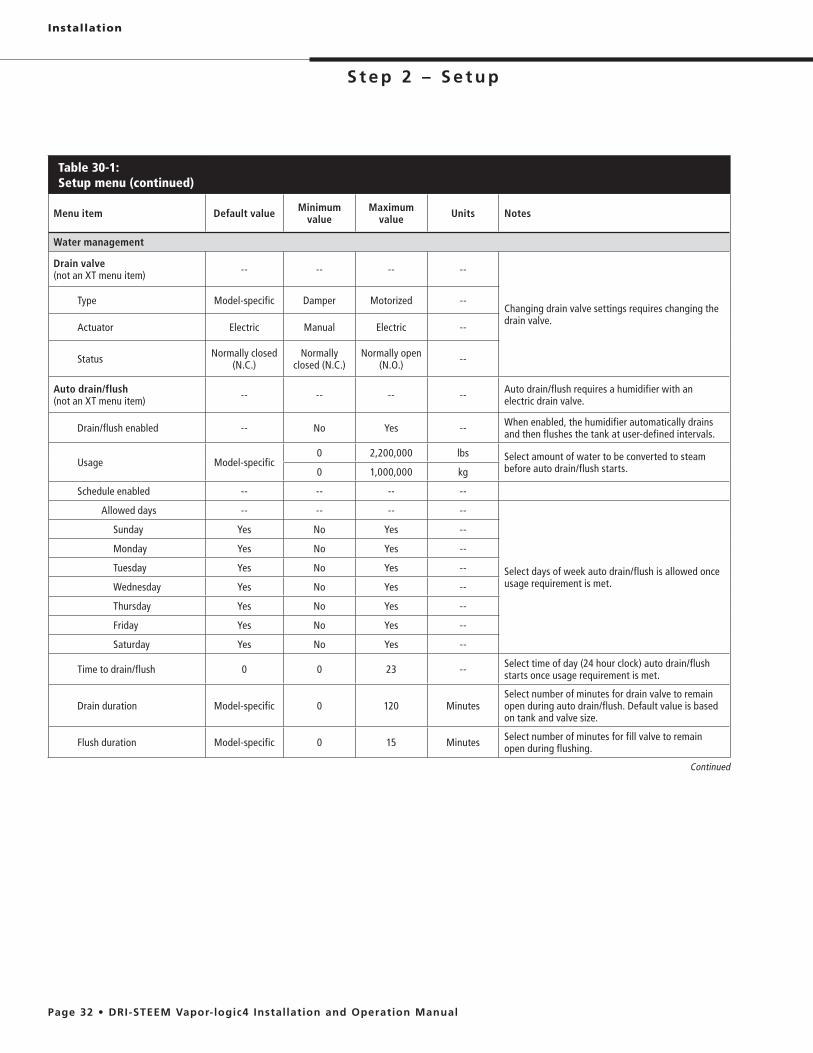
Table 30-1:Setup menu (continued)
Menu item Default value Minimum value
Maximum value Units Notes
Water management
Drain valve (not an XT menu item) -- -- -- --
Changing drain valve settings requires changing the drain valve.
Type Model-specific Damper Motorized --
Actuator Electric Manual Electric --
Status Normally closed (N.C.)
Normally closed (N.C.)
Normally open (N.O.) --
Auto drain/flush (not an XT menu item) -- -- -- -- Auto drain/flush requires a humidifier with an
electric drain valve.
Drain/flush enabled -- No Yes -- When enabled, the humidifier automatically drains and then flushes the tank at user-defined intervals.
Usage Model-specific0 2,200,000 lbs Select amount of water to be converted to steam
before auto drain/flush starts.0 1,000,000 kg
Schedule enabled -- -- -- --
Allowed days -- -- -- --
Select days of week auto drain/flush is allowed once usage requirement is met.
Sunday Yes No Yes --
Monday Yes No Yes --
Tuesday Yes No Yes --
Wednesday Yes No Yes --
Thursday Yes No Yes --
Friday Yes No Yes --
Saturday Yes No Yes --
Time to drain/flush 0 0 23 -- Select time of day (24 hour clock) auto drain/flush starts once usage requirement is met.
Drain duration Model-specific 0 120 MinutesSelect number of minutes for drain valve to remain open during auto drain/flush. Default value is based on tank and valve size.
Flush duration Model-specific 0 15 Minutes Select number of minutes for fill valve to remain open during flushing.
Continued
Installation

Table 30-1:Setup menu (continued)
Menu item Default value Minimum value
Maximum value Units Notes
Water management (continued)
Skim (not an XT menu item) -- -- -- --
Skim enabled Yes No Yes -- Enabled as default except on DI water systems.
Skim duration Model-specific 0 120 Seconds
End-of-season drain -- -- -- --
EOS enabled Yes No Yes --Enabled as default except on DI water systems. If enabled, the humidifier tank drains after the humidifier has been idle for a user-defined time.
Idle time for EOS 72 1 168 Hours Select number of hours humidifier is idle before end-of-season draining starts.
Aquastat (not an XT menu item) -- -- -- --
The minimum aquastat setting prevents tank water freezing. Higher settings keep tank water warm, reducing time required to bring water to boiling after a call for humidity.
Aquastat enabled -- No Yes --
Aquastat set point50 40 180 °F
10 4 82 °C
Service interval -- -- -- --
Service interval
Model-specific 0 2,200,000 lbsSelect amount of water to be converted to steam or hours that humidifier runs before service interval is reached.
Model-specific 0 1,000,000 kg
Model-specific 0 10,000 Hours
Probe threshold -- -- -- --
Probe threshold 800 300 2000 --
Probe debounce time 2 1 10 Seconds Amount of time the water probe must be in or out of water to change the water/no water state.
Fill fault time 40 40 250 Minutes Amount of fill time before an alarm will occur.
XT management (XT only)
Tempering enabled Model-specific No Yes --
Enables drain tempering for XT. Tempering turns on the fill valve whenever the drain is energized and may not be required if the drain line can accommodate boiling water.
TP Mode enabled Model-specific No Yes --TP Mode allows the humidifier to more closely track demand by cycling the contactor when current is greater than the demand signal requirement.
Turn on percent 20 10 20 % Minimum run level when TP mode is disabled.
Fan-based dispersion Changing fan-based dispersion settings can require component changes for system to operate correctly.
SDU -- -- -- -- An SDU is a space distribution unit, which disperses steam using a fan housed in a cabinet. SDU on system -- No Yes --
Area-type -- -- -- -- An Area-type dispersion unit is a caged fan mounted on top of the humidifier tank. Area-type on system -- No Yes --
Time delay -- -- -- -- Select number of minutes fan-based dispersion unit operates after water in tank stops boiling. A delay keeps the fan running until all steam is dispersed. Output time delay 5 1 30 Minutes
Continued
Installation

Table 30-1:Setup menu (continued)
Menu item Default value
Minimum value
Maximum value Units Notes
Remote temp sensor (not an XT menu item)
Changing temperature sensor settings can require component changes for system to operate correctly.
Temp compensation -- -- -- --
Temp comp enabled -- No Yes --
Temp monitor -- -- -- --
Temp monitor enabled -- No Yes --
Temp sensor offset -- -- -- --Used to calibrate temperature monitoring sensor and temperature compensation sensor Temp sensor offset
0 -20 20 °F
0 -11 11 °C
Communications Changing communications settings can require component changes for system to operate correctly.
BACnet -- -- -- --
Unlock code 0 0 999999 --
BACnet enabled -- No Yes --
BACnet comm channel 19200MS/TP BACnet IP 76800 MS/TP --
Device instance 255 0 4194303 --
MS/TP station 1 0 127 -- MS/TP only
Max masters 127 0 127 -- MS/TP only
UDP port (47808) 47808 1024 65535 -- BACnet/IP only
Modbus -- -- -- --
Modbus enabled -- No Yes --
Modbus baud rate 9600 4800 38400 --
Modbus address 99 0 255 --
LonTalk -- -- -- --
LonTalk enabled -- No Yes --
Network IP address -- -- -- --
Network IP address 192.168.1.195 0.0.0.0 255.255. 255.255 --
Network IP mask 255.255.255.0 0.0.0.0 255.255 255.255
Enable DHCP No No Yes -- Use keypad/display to access this menu item. This item is not available when using the Web interface.
Continued
Installation

Table 30-1:Setup menu (continued)
Menu item Default value
Minimum value
Maximum value Units Notes
Programmable outputs
Dry contact -- -- -- -- Programmable dry contact (P12) is rated for 24 VAC, 10 Amp maximum. Exceeding this maximum rating can cause the dry contact (relay) component or the Vapor-logic4 board to fail.
All alarms Yes No Yes -- A dry contact activates whenever there is an alarm.
Selected alarms/messages No No Yes -- A dry contact activates whenever there are alarms or messages selected from the setup list.
Heat on-off enabled No No Yes -- A dry contact activates when the humidifier is heating.
Steam yes-no enabled (not an XT menu item) No No Yes -- A dry contact activates when the tank temperature
reaches boiling.
24 VAC triac -- -- -- --Programmable triac (P16) is rated for 100 mA from the factory, and up to 4 Amps when a 24 VAC, 4 Amp (100 VA) transformer is wired in parallel to the factory transformer. Exceeding this maximum rating can cause the triac component or the Vapor-logic4 board to fail.
All alarms No No Yes -- A triac activates whenever there is an alarm.
Selected alarms/messages No No Yes -- A triac activates whenever there are alarms or messages selected from the setup list.
Heat on-off enabled No No Yes -- A triac activates when the humidifier is heating.
Steam yes-no enabled (not an XT menu item) No No Yes -- A triac activates when the tank temperature reaches
boiling.
Set date and time
Date -- 1/1/2007 1/1/2099 mm/dd/yy
Time -- 0:00 23:59 Hours:Minutes 24 hour clock
Language
Display in English -- No Yes --
Select one language for both keypad/display and Web interface communications.
Display in French -- No Yes --
Display in German -- No Yes --
Display in Spanish -- No Yes --
Continued
Installation

Table 30-1:Setup menu (continued)
Menu item Default value
Minimum value
Maximum value Units Notes
Units
Display inch-pound -- No Yes --
Display SI -- No Yes --
Security
Require password No No Yes --
Set password None 0 9999 -- Enter a four-digit password using numbers only.
Time-out 5 1 120 Minutes The number of inactivity minutes Vapor-logic4 remains in read-write mode before returning to read-only mode
Capacity adjust
Capacity calibration (GTS systems) 100.0 0.0 245.0 % Changing the capacity calibration setting changes reported, not actual, humidifier output.
Capacity calibration (XT systems) 100.0 10.0 100.0 % Changing the capacity setting changes the actual humidifier output.
Idle time
Idle time 5 1 120 Minutes Select number of minutes keypad/display remains idle before returning to the Home screen.
Reset to defaults
Reset to defaults -- -- -- --Select this if you want to reset all humidifier settings to factory defaults
Valve span
Span Min 2.00 Max 10.00 0.00 10.00 VDC
Installation

To start up your humidifier, go to the Start-up Checklist in your humidifier’s Installation, Operation, and Maintenance manual.
Staging multiple XT humidifiers
Up to four XT electrode steam humidifiers can be staged to operate in sequence. In a sequenced application, one control input signal is divided by user-selectable settings among the humidifiers connected in sequence. See the Vapor-logic4 board connection points in Figure 37-1.
Control input examples
Table 37-1:Control input example for four XT humidifiers in sequence
XT humidifier
Control input Result
H-1 (primary)Any valid
Vapor-logic4 control input
0 to 100% steam output corresponding to 4–20 mA or 0–10 VDC control signal
H-2 (staged) 4–6 VDC* 0 to 100% steam output scaled across 4–6 VDC range
H-3 (staged) 6–8 VDC* 0 to 100% steam output scaled across 6–8 VDC range
H-4 (staged) 8–10 VDC* 0 to 100% steam output scaled across 8–10 VDC range
* User-selectable, 0–10 VDC in 0.1 V increments.
Table 37-2:Control input example for two XT humidifiers in sequence
XT humidifier
Control input Result
H-1 (primary)Any valid
Vapor-logic4 control input
0 to 100% steam output corresponding to 4–20 mA or 0 to 10 VDC control signal
H-2 (staged) 5–10 VDC* 0 to 100% steam output scaled across 5–10 VDC range
* User-selectable, 0–10 VDC in 0.1 V increments.
Setting control input ranges
1. Using the keypad/display or Web interface, go to the Tank setup menu, then select Input signal, then Demand signal.
2. Select Yes to enable user input.
3. Scroll down to select the range for each staged input.
4. Press the Enter key to confirm selections.
Installation
Figure 37-1:Vapor-logic4 board connections for staging multiple XT humidifiers
Connect Steam to RH connection points of staged humidifiers.
Primary XT humidifier (H-1) boardCorner of Vapor-logic4 board opposite from Ethernet connection shown
Connect Ground ( )to Ground connection points of staged humidifiers.
Multi-tank mode
XT humidifiers do not operate in multi-tank mode. See “Multiple-tank operation” on Page 77.
Contact DRI-STEEM if you need assistance staging XT humidifiers. See “Calling DRI-STEEM Technical Support” on Page 84.

. Vapor-logic4 keypad/display has the following menus and screens:
– Status– Diagnostics– Alarms– Setup
Press the Main softkey to go to the Main menu selection screen. Press the Up and Down arrow keys to choose a submenu and press Enter to select.
Vapor-logic4 Web interface has the following screens:
Click on tab labels to go to other screens. The highlighted tab indicates the current screen.
Press the Main softkey to go to Status, Diagnostics, Alarms, or Setup screens
Figure 38-1:Using the keypad/display
Press the Up or Down arrow keys to choose a submenu or change a value. Press the Enter key to select a submenu or value.
Click on a tab label to move to another screen
Click here to view alarms
Click here to view messages
Click on CHANGE to change value. Note that most system parameters are changed in the Setup menu.
Operation
Drag scroll bar to view more of the window
Figure 38-2:Using the Vapor-logic4 Web interface (Status screen shown)

Vapor-logic4 returns to the Home screen on the keypad/display after a user-defined period of idleness. The Home screen displays the items most frequently viewed: Actual space RH or dew point, RH or dew point set point, tank/system output or steam demand, humidifier mode, and tank activities such as filling skimming, heating, boiling, and draining.
There is a tank level indicator on the right side of the screen. See the table below for a description of tank level indicators.
Above the tank level indicator is a tank temperature display showing actual tank temperature.
Changing mode and set point
Mode and Set point can be changed from the Home screen. Press the Up or Down arrow key until the Set point or Mode is highlighted, press Enter, press Up or Down arrow key to change value, press Enter to confirm. All other parameters shown on the Home screen are for viewing only and cannot be changed. Go to the Setup menu to change these items.
Tank activities defined
Fill valve remains open until water reaches operating level. Fill valve is open to allow water to flow through
the overflow port, skimming off precipitated minerals (tap and softened water systems only).
Tank is draining. Fill and drain valve are open to flush tank (tap and
softened water systems only). Water in tank is heating.
Water in tank is boiling and there is a demand for humidity.
Water is at boiling temperature and there is no demand for humidity.
Water temperature is equal to or greater than 100 °F (38 °C) and not boiling.
Water temperature is less than 100 °F (38 °C). Humidifier is in end-of-season drain.
There is no water in the humidifier and there is no demand for humidity.
No demand or an active alarm preventing operation (XT only).ain: Humidifier is doing a drain to reduce conductivity
or eliminate foam. Process can take several minutes for large-capacity humidifiers. (XT only).
Water level has reached top of cylinder (XT only).
Table 39-1:Fill icon
Indicates in:
Tap/softened water systems
(see Figure 39-2)
DI/RO water systems
Water level is above top probe.
Water is above low water level.
Water level is between mid and top probes. N/A
Water level is between low and mid probes. N/A
Water level is below low probe (heat is disabled).
Water is below low water level (heat is disabled).
Note: XT humidifier display does not include fill icon (see Figure 57-1).
Figure 39-1: Keypad/display Home screen
Tank-level icons indicate water level at the water level control probe. See “Water level control” on Page 55.
Top probe
Mid probe
Low probe
Figure 39-2:Water level control for tap/softened water systems
VLC-OM-030
Operation
MAIN MESSAGE ALARM
212 F̊SET PTSPACE RH
OUTPUT59%
FillingMODE: Auto
35%34%TANK A

Using either the keypad/display or the Web interface, the Status screen is where all humidifier parameters can be viewed.
See the tables on the following pages for Status screen item descriptions for both the keypad/display and Web interface.
1/4 AMAIN MENU
Tank setup
HOME
DiagnosticsAlarms
Tank status
Figure 40-1: Keypad/display screens
MAIN BACK
2/24 ATANK STATUS
HOME
Auto
Space RH 34% RH
Mode
MAIN BACK
3/24 ATANK STATUS
HOME
34% RH
RH set point 35% RH
Space RH
“A” indicates these settings apply to Tank A. All humidifier tanks are labeled as “A” except in applications where multiple humidifiers are controlled by one controller.
“1/4” indicates the highlighted item is the first of four items
Push Up or Down arrow to scroll through menu items; press Enter to select highlighted item
Operation
Drag scroll bar to view more of the window
Figure 40-2:Web interface Status screen

Table 41-1:Status screen
Note: Your system might not have all of the items listed in this table (Pages 41 and 42).
Menu item Default value Minimum value
Maximum value Units Notes
Tank run mode Standby -- -- --
Operating mode of humidifier. Choose from Auto, Standby, or Drain.Auto mode, the humidifier operates normally. All humidifier
components are monitored and controlled. If there is a call for humidification, the system reacts.
Standby mode, the humidifier is offline. All humidity control inputs appear but are not acted upon; however, if the tank temperature falls below the freeze protect set point, the drain valve opens.
Drain mode, the automatic drain valve (if so equipped) opens and the tank drains. All humidifier operation is suspended, and the drain valve remains open until the unit is taken out of Drain tank mode.
Test outputs and Test run modes.
Space RH -- 0 100 %
RH set point 35 0 100 %
Input signal-- 0 10 VDC
-- 0 20 mA
Dew point-- 0 100 °F
-- -17 37 °C
Dew point set point
50 20 80 °F
10 -6 26 °C
Steam demand -- 0 100 % Displays steam demand as a percent of capacity
Steam output-- 0 100,000 lbs/hr
-- 0 100,000 kg/h
Duct RH -- 0 100 %
Duct HL switch -- Open Closed --
Duct HL set point 80 0 100 %
Duct HL signal -- 0 20 mA
Tank temperature
-- 15 265 °F
-- -9 129 °C
Tank temp signal -- 0 2200 Ohms
Aux temperature
-- -20 160 °F
-- -29 71 °C
Aux temp signal -- 4 20 mA
Continued
Operation
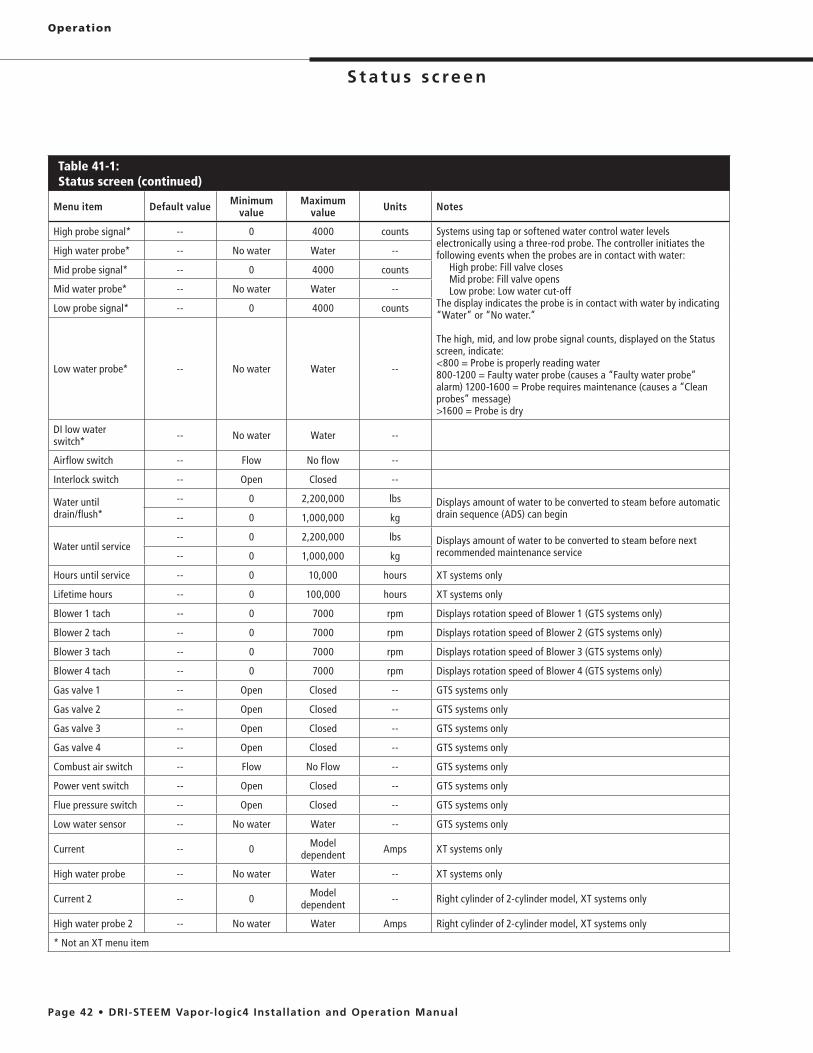
Table 41-1:Status screen (continued)
Menu item Default value Minimum value
Maximum value Units Notes
High probe signal* -- 0 4000 counts Systems using tap or softened water control water levels electronically using a three-rod probe. The controller initiates the following events when the probes are in contact with water: High probe: Fill valve closes Mid probe: Fill valve opens Low probe: Low water cut-off The display indicates the probe is in contact with water by indicating “Water” or “No water.”
The high, mid, and low probe signal counts, displayed on the Status screen, indicate:<800 = Probe is properly reading water 800-1200 = Faulty water probe (causes a “Faulty water probe” alarm) 1200-1600 = Probe requires maintenance (causes a “Clean probes” message)>1600 = Probe is dry
High water probe* -- No water Water --
Mid probe signal* -- 0 4000 counts
Mid water probe* -- No water Water --
Low probe signal* -- 0 4000 counts
Low water probe* -- No water Water --
DI low water switch* -- No water Water --
Airflow switch -- Flow No flow --
Interlock switch -- Open Closed --
Water until drain/flush*
-- 0 2,200,000 lbs Displays amount of water to be converted to steam before automatic drain sequence (ADS) can begin-- 0 1,000,000 kg
Water until service-- 0 2,200,000 lbs Displays amount of water to be converted to steam before next
recommended maintenance service-- 0 1,000,000 kg
Hours until service -- 0 10,000 hours XT systems only
Lifetime hours -- 0 100,000 hours XT systems only
Blower 1 tach -- 0 7000 rpm Displays rotation speed of Blower 1 (GTS systems only)
Blower 2 tach -- 0 7000 rpm Displays rotation speed of Blower 2 (GTS systems only)
Blower 3 tach -- 0 7000 rpm Displays rotation speed of Blower 3 (GTS systems only)
Blower 4 tach -- 0 7000 rpm Displays rotation speed of Blower 4 (GTS systems only)
Gas valve 1 -- Open Closed -- GTS systems only
Gas valve 2 -- Open Closed -- GTS systems only
Gas valve 3 -- Open Closed -- GTS systems only
Gas valve 4 -- Open Closed -- GTS systems only
Combust air switch -- Flow No Flow -- GTS systems only
Power vent switch -- Open Closed -- GTS systems only
Flue pressure switch -- Open Closed -- GTS systems only
Low water sensor -- No water Water -- GTS systems only
Current -- 0 Model dependent Amps XT systems only
High water probe -- No water Water -- XT systems only
Current 2 -- 0 Model dependent -- Right cylinder of 2-cylinder model, XT systems only
High water probe 2 -- No water Water Amps Right cylinder of 2-cylinder model, XT systems only
* Not an XT menu item
Operation

The Diagnostics screen provides access to system messages, system data, humidifier information, and test functions.
See the following pages for more information about the Diagnostics screen.
System messages and the Messages Log When a system event occurs (e.g., when regularly scheduled unit servicing becomes due), a system message is added to the Messages Log (“Service unit”). The Messages Log displays the message name, date and time of occurrence, plus whether the message is active, has been cleared by an operator, or auto-cleared by Vapor-logic4. Active messages display first in the Messages Log, followed by cleared messages, listed in order of occurrence. The Messages Log displays up to ten messages. As new messages enter the log, the oldest, cleared messages leave the log first.
Messages auto-cleared by Vapor-logic4 describe events that have resolved on their own. For example, a “No airflow” message appears when there is no airflow in the duct. If airflow returns, the “No airflow” message auto-clears, but stays in the Messages Log (per the rules described above) to let the operator know there was an airflow interruption.
The keypad/display highlights the Message softkey label when there is a system message. When this occurs, press the Message softkey to view the Messages Log.
The Web interface displays a link to system messages in the upper left corner of the screen. Click on the link to view system messages (see the next page).
See Pages 64 through 69 for more information about downloading data, USB backup and restore, and test modes.
Figure 43-1: Keypad/display screens
2/6 ADIAGNOSTICS
Humidifier info
HOME
Messages
USB backup/restoreDownload data
Test outputsMAIN BACK
2/7 ADOWNLOAD DATA
RH and temp history
HOME
Alarm history
Temperature historyRH history
Water convertedMAIN BACK
Press the MESSAGE softkey, or select Messages from the Diagnostics menu to view the Messages Log.
Operation
MAIN MESSAGE ALARM
212 F̊SET PTSPACE RH
OUTPUT59%
FillingMODE: Auto
35%34%TANK A

Figure 44-1:Vapor-logic4 Web interface Diagnostics screen
View messages by clicking on “View Messages” on any screen or by opening the Diagnostics screen.
Clear messages by clicking here.
Click on buttons to activate functions.
Operation

Table 45-1:Diagnostics menu
Menu item Minimum value
Maximum value Notes
Note: Your system might not have all of the items listed in this table (Pages 45 through 47).
Download data
Download to USB -- -- Download all data sets to the USB flash drive.
Download via Ethernet -- -- Only available from web page
Data point interval 30 seconds 900 seconds Interval that data will be stored
USB backup/restore
Back up settings No YesHumidifier settings can be backed up to or restored from a USB flash drive.
Restore settings No Yes
Humidifier info
Factory string -- -- Displays as-shipped configuration string
Current string -- -- Displays current configuration string
Serial number -- -- Displays humidifier serial number
Firmware version -- -- Displays current firmware version of Vapor-logic4 control board
Firmware date -- -- Displays current firmware date of Vapor-logic4 control board
Model -- -- XT systems only
Voltage -- -- XT systems only
Phase -- -- XT systems only
Test outputs
Fill valve -- --
Cycles output to verify operation.
Drain valve -- --
Fan control -- --
Programmable triac -- --
Dry contact relay -- --
Continued
Operation

Table 45-1:Diagnostics menu (continued)
Menu item Default value Minimum value
Maximum value Units Description
Test outputs (continued)
Contactor 1, 2, 3, or 4 -- -- -- --
Cycles output to verify operation.
SSR control -- -- -- --
Ignition module 1, 2, 3, or 4 -- -- -- --
Blower speed control -- -- -- --
Power vent control -- -- -- --
Steam valve -- -- -- --
Test run*
Test run percent 0 0 100 % Set demand percent value between 0 and 100 to test.
Test run time 0 0 30 minutes Set test run time duration between 0 and 30 minutes.
Start
Stop
* Humidifier test run will not occur if safety circuits (for example, duct high limit switch, airflow proving switch, or safety interlock switch ) are not operating correctly.
Continued
Operation

Table 45-1:Diagnostics menu (continued)
Message Description Does message auto-clear?
Messages
Replace contactors Contactors have reached normal life span. Replace contactors. No
Service unit Regularly scheduled unit servicing is due. No
Drain pending Auto drain/flush will occur at next scheduled time. Yes
No airflow No duct airflow Yes
I-lock open Interlock safety switch is open. Yes
Freeze drain Tank has drained to prevent freezing. Yes
EOS active The humidifier is draining or has drained and remains inactive until receiving another call for humidity. Yes
Temp comp on Humidifier output has been reduced because temperature compensation sensor reads a temperature on the inside-pane of an outside-wall window that could cause condensation. Yes
Clean probes Water level control probes need cleaning. Check tank for cleaning. No
Duct HL trip Duct relative humidity has risen above the high limit set point, or high limit switch has opened. Yes
Duct HL span Duct high limit humidistat has entered the throttle span range and is approaching duct high limit set point. Yes
Insufficient water The low water probe is not in contact with water when there is a demand for humidity. Yes
Boiling temp calibrated
Indicates actual humidifier boiling temperature at time of reading. This reading is taken after power-up by the tank sensor at the time of first steam creation. Yes
Check cylinder / high water
(XT systems only)
Clean water, or end of cylinder life.After 10 hours of normalized 100% run time, target current has not been reached, water is at the high water probe, and current has not increased from the previous reading.Humidifier continues to operate. Yes, if target current is
reachedClean supply water (cleaner than cylinder water). Filling has stopped due to reaching the high water probe, and the current has decreased three times in a row.Humidifier continues to operate.
Notes:
Operation

The Alarms menu displays system alarms. Using the keypad/display, go to the Alarms menu by pressing the Alarms softkey (which will be flashing if there is an Alarm), or by pressing the Home softkey and then the Alarms softkey. Using the Web interface, click on the View Alarms link in the upper left corner of any screen.
System alarms are listed in the Alarms Log. The Alarms Log displays the alarm name, date and time of occurrence, plus whether the alarm is active, has been cleared by an operator, or auto-cleared by Vapor-logic4. The Alarms Log lists active alarms at the top of the list, followed by cleared alarms. The Alarms Log holds 30 alarms. As alarms are cleared, they move down the list below active alarms. When the Alarms list reaches 30 alarms, new alarms add to the top of the list and the oldest, cleared alarms leave the list. Alarm information is retained in nonvolatile memory if the Vapor-logic4 board loses power.
See Table 49-1 for alarms and their descriptions
Alarm causes and recommended actions are listed in the troubleshooting section in this manual.
Figure 48-1: Keypad/display screens
MAIN CLEAR
1/2 AALARMS
INFO
miswiredWater probes
Manually cleared 02-02-2008 12:23
Figure 48-2:Vapor-logic4 Web interface Alarms screen
Press the ALARM softkey when flashing, or select Alarms from the Main menu to view the Alarms Log.
Operation
MAIN MESSAGE ALARM
212 F̊SET PTSPACE RH
OUTPUT59%
FillingMODE: Auto
35%34%TANK A

Table 49-1:Alarms menu
Alarm label Description Does alarm auto-clear?
Tank temp sensor failed Tank temp sensor has failed. No
RH signal out of range RH signal is out of range. Yes
Dew point sig. out of range Dew point signal is out of range. Yes
Demand signal Demand signal is out of range. Yes
Duct RH signal out of range Duct RH signal is out of range. Sensor my be faulty. Yes
Aux temp sens out of range Auxiliary temp sensor signal is out of range. Yes
Water probe miswired Water probe head is miswired or faulty. Yes
Faulty water probe Water probe readings are suspect, likely caused by scale on probe. No
Excess fill time Fill valve has been on too long during initial tank fill. Bottom probe is not in contact with water. Yes
Excess refill time Re-filling is taking too long. Top probe is not in contact with water. Yes
Tank not draining Drain valve has been open for the prescribed amount of time based on the humidifier model, and water is still touching the low water probe. Yes
Tank overtemp
Fault occurs at boiling temperature plus 25 °F (13 °C). All units are put into a keep-cool state where fill and drain cycles operate to keep tank cool.First resolve any safety issues, then resolve whatever is causing the problem. Restart the controller, and clear the alarm.
No
Excessive boil time
Humidifier continues to add water when there is no demand, signifying humidifier is continuing to make steam. Humidifier is put into a keep-cool state where fill and drain cycles operate to keep tank water from boiling.First resolve any safety issues, then resolve whatever is causing the problem. Restart the controller, and clear the alarm.Note: This alarm applies only to non-DI/RO-water humidifiers and DI/RO-water humidifiers with EOS drain.
No
No SDU airflow Airflow proving switch in the SDU (space distribution unit, a fan-based dispersion assembly) indicates no airflow. No steam is produced while alarm is active. Yes
No power vent airflow Pressure switch indicates there is no airflow at the power venter. Yes
No combustion airflow Switch indicates the combustion air damper is closed. Yes
Blocked flue (GTS systems only) Flue pressure switch indicates positive pressure in flue. Burner will not ignite when this fault is active. Yes
Burner 1, 2, 3, or 4 fault Burner tried one or more times to light and did not succeed. Once this fault is active, Vapor-logic4 locks out the burner and does not try to light it again until fault is cleared. Other burners can run. No
Ignition mod. 1, 2, 3, or 4 fault Ignition module has not opened the gas valve. Once this fault is active, Vapor-logic4 locks out the ignition module and does not try to start it again until fault is cleared. Other ignition modules can run. No
Blower 1, 2, 3, or 4 fault Blower is turning at less than the specified minimum RPM. Unit not allowed to run. Yes
Gas valve 1, 2, 3, or 4 fault Gas valve is on when it should be off. Unit not allowed to run. Yes
Low water Low water probe is in contact with water and low water sensor is not in contact with water. Yes
XV header flooded (STS systems only) Float switch in Ultra-sorb Model XV header has detected a flooded header condition Yes
Continued
Operation

Setup menu
The Setup menu is where system parameters can be changed. This menu is used primarily during initial installation, but can also be used for making changes or adjustments as needed during operation. Note that while all parameters can be changed, many changes also require a corresponding hardware change. Vapor-logic4 firmware will warn you of this during the setup process.
See the Pages 28 through 36 for more information about the Setup menu.
Operation
Table 49-1:Alarms menu (continued)
Alarm label Description Does alarm auto-clear?
Supply water failure (XT systems only)
No water. Supply water failure, or drain malfunctioning/leaking.Fill has been on for 30 minutes without reaching high water probe or target current. Cycles the fill and drain valves 20 times and retries filling for 10 additional minutes before an alarm is generated. If not corrected, humidifier shuts down.
No
Supply water failure 2 (XT systems only) No water in right cylinder. See above. No
Excessive foaming (XT systems only)
Continuous foaming causing a problem.Target current has been reached but is now below the –10% of nominal current, and high water probe has been wet for an extended period of time.– or –Fill was halted because top probe became wet, and current is reduced to 50% of when fill was halted.
Humidifier will do a normal drain event. Alarm is generated if this condition occurs 10 times, indicating that foaming is a persistent problem. If not corrected, humidifier shuts down.
Cylinder may need to be completely drained twice to prevent foaming. See “Start-up procedure” in XT Electrode Steam Humidifier Installation, Operation, and Maintenance Manual shipped with the humidifier.
No
Excessive foaming 2 (XT systems only)
Continuous foaming causing a problem in right cylinder.See Excessive foaming below.
No
Overcurrent (XT systems only)
Overcurrent; 120% over nominal. Conductivity build-up; drain malfunctioning/plugged; or too much condensate return.Drains up to 12 times to attempt to reduce current:
5-second intervals. If not corrected, humidifier shuts down.
No
Overcurrent 2 (XT systems only) Overcurrent; 120% over nominal in right cylinder. See above. No
Current sensor out of range (XT systems only)
XT current sensor is out of range Yes
Current sensor 2 out of range (XT systems only)
XT current sensor 2 is out of range Yes
Notes:

When your system has a humidity or dew point transmitter, you can adjust and control the set point through the keypad/display or Web interface using a proportional, integral, and derivative (PID) control loop.
Improves humidifier response time
With a PID loop, you can tune your system for maximum performance using the proportional (Kp), integral (Ki), and derivative (Kd) gain terms. These gain factors work in the following way: The overall demand in a PID system is made up of three distinct parts—the proportional, the integral, and the derivative. Each of these parts is calculated and then multiplied by its corresponding gain factor. These gain factors are the setup variables you have access to from the Setup menu. By making a gain factor larger, you increase its overall influence on system demand. Once each PID component is multiplied by its gain factor, all three terms are added together to determine the overall demand percentage.
The proportional term
The proportional term is the difference between the RH set point and the actual humidity multiplied by the proportional gain. For example, with a Kp of 80 and the actual humidity 5% below the RH set point, the proportional contribution to the demand is: 5 × 80 × 0.085 = 33% (the 0.085 is an internal scalar used to increase the usable span of Kp).
There is a problem with using only proportional gain to control the RH. In almost all applications there is some constant load on the humidifier just as there is a constant load on heating equipment. If the proportional term is all that is used, the actual humidity must be less than the set point for the humidifier to be on.
What happens is the humidifier finds a happy medium where the actual humidity is something less than the set point, which allows the humidifier to continue to run. This difference between the set point and the actual running humidity level is called the droop. This droop can be corrected using the next term, the integral.
Kp = Proportional gain factor
Ki = Integral gain factor
Kd = Derivative gain factor
Operation

The integral term
The integral term is an accumulation of RH error over time multiplied by the integral gain. Every 1/10 second when the demand is updated, the instantaneous RH error (RH set point – actual RH) is added to a temporary variable that accumulates the error. This accumulated error is multiplied by the integral gain to create the integral term. The integral gain affects how fast the humidifier corrects a droop condition. The higher the integral gain (Ki), the faster the reaction. (An integral gain of zero disables this variable and allows the unit to run on the proportional term only.)
With an integral gain term greater than zero and an actual humidity below set point, the demand increases slightly with each update. If the actual humidity is above set point, the demand decreases slightly. The amount it increases or decreases depends on the magnitude of the RH error and the integral gain value. The closer you are to the set point, the smaller the addition or subtraction.
When looking at this control scheme, an interesting pattern occurs. The total demand signal for the humidifier is the sum of the proportional part, the integral part, and the derivative part. As the actual humidity approaches the set point, the integral portion makes up the majority of the demand, and the proportional part makes up very little. Once the set point is reached and the unit stabilizes, the entire demand is made up of the integral part because the proportional part is zero.
If the actual humidity goes over the set point, the integral term starts to decrease. In addition, the proportional term becomes negative and actually starts to subtract from the total system demand. These two terms work in conjunction with each other to bring the humidifier back to set point.
Operation

The derivative term
The derivative term is the measured change in error over time multiplied by the derivative gain (differentiating error with respect to time).
If the actual measured RH is below set point and is rising, the derivative term subtracts from the demand in anticipation of the approaching set point.
If the actual measured RH is below set point and is falling, the derivative term adds to the demand in anticipation of the need to get the demand up faster and start climbing toward set point.
If the actual measured RH is above set point and falling, the derivative term adds to the overall demand in anticipation of the approaching set point. It generally is used to increase damping and, in some cases, improves the stability of the system.
However, in the majority of control situations, the derivative term is not needed and is simply set to zero. The proportional term and integral term provide tight, accurate control without the addition of the derivative term.
PID band
The last user-controlled term in the PID equation is the PID band. The PID band defines the range of measured RH values (°F/°C for dew point control) where the PID loop is in operation. The PID loop is in operation when the measured RH is in the range of (RH set point – PID band) to (RH set point + PID band). If the measured RH is below the PID band, the PID calculations are suspended and the demand is set to 100%. Conversely, if the measured RH is above the PID band, the demand is set to 0%.
For example, if starting with an RH set point of 35% and a PID band of 10%, the PID loop operates when the actual humidity is in the range of 25% to 45%. If the actual humidity is lower than 25%, the humidifier is full on. If the actual humidity is above 45%, the humidifier demand is 0%. The PID band aids in speeding the response time of the system. It allows the RH to get somewhat close to the set point and then lets the PID loop precisely control the RH when it is within the PID band. The default value for the PID band is 10%.
Large spaces where the humidification system influences the RH very slowly typically benefit from a smaller PID band. Small spaces where the humidification system can quickly influence the RH typically benefit from a larger PID band. Rarely should it be set to less than 10%.
Operation

PID setup tips
A large PID band (10% to 20%) yields tighter and more stable control with longer response times. A small PID band produces quicker response times, but control may become unstable if the RH regularly goes outside the band.
As a rule, start with a PID band of 10%. When the humidifier is operating at steady state, make sure the RH does not go outside the PID band. The intent of the PID band is to quickly get the RH into a controllable range. To increase or decrease the effect of the proportional term on system performance, adjust the proportional gain (Kp).
However, for the majority of systems, the factory default setting of 80 is sufficient. Generally speaking, a large integral gain (Ki) quickens the system response but may cause it to oscillate and become unstable. A small integral gain yields tighter, more stable control at the expense of a long response time.
These principles can be applied in the following examples: If a system eventually reaches the desired RH level but takes a long time to do so without overshooting the set point, faster response can be achieved by increasing the integral gain. If the measured RH oscillates above and below the set point numerous times before finally reaching set point, decrease the integral gain.
Typically, if a large adjustment is made to the integral gain, better response is achieved by decreasing the magnitude of the change. Then, modify the proportional gain slightly in the same direction the integral gain was changed. RH history data, available for download from the Diagnostics menu, can aid when doing PID loop tuning.
Operation

Probe system
Humidifiers with tap/softened fill water use conductivity probes to measure and control the water level for optimum operating efficiency. Water conductivity must be at least 30 μS/cm for the probe system to operate. The three-probe system is monitored by the Vapor-logic4 board, which performs all the necessary logic and timing functions to provide total water level control and safety shutdown.
Vapor-logic4 automatically maintains the water level between the top and middle probes (see Figure 55-1). When the water level falls below the middle probe, the fill valve opens until the water level rises to the top probe. Water must remain in contact with the probe surface for three seconds for Vapor-logic4 to determine that the water is at the probe’s level.
Conversely, water must stay out of contact with the probe surface for three seconds for Vapor-logic4 to determine that the water is below the probe’s level. This three-second delay ensures that turbulence does not cause an incorrect level reading.
Each time the fill valve energizes, the Vapor-logic4 system tests the probe system. If the signal from the probe assembly begins to deteriorate, the “Clean probes” message appears in the Messages Log. Once the probe system reaches its maximum usable life, the humidifier shuts down and the “Faulty water probe” alarm appears.
An adjustable skim time allows for an extended skim period (0 to 120 seconds) to reduce mineral accumulation. When skimming, the fill valve remains energized after the water level reaches the top probe for the amount of time specified by the skim duration. The skim duration is adjustable in one-second intervals through the Setup menu.
If the water level falls below the low-water cutoff probe, heating outputs are disabled; this provides low-water protection for the heating outputs.
See “Chloride corrosion” Caution at right.
Figure 55-1:Water level control for tap/softened water humidifier
Operation
Humidifiers using tap or softened water control water levels electronically using a three-rod probe. The controller responds with the above actions when the water level reaches each rod.
VLC-OM-030
Fill valve opens when water level is below this probe.
Low-water cutoff. Power to heaters is cut if water level drops below this probe.
Fill valve closes when water level rises to this probe.
mc_030910_1335
XT humidifiers do not use conductivity probes for water level control. See “Electrode steam humidifiers” on Page 57.
CAUTIONChloride corrosionDamage caused by chloride corrosion is not covered by your DRI-STEEM warranty.Chloride corrosion can result from a variety of causes, including, but not limited to

Float valve system
DI/RO water systems (except for steam injection) use a float valve system to control water levels for optimum operating efficiency. DI/RO systems are used where water/steam purity is important, where demineralized water is needed to improve performance or lessen maintenance requirements, or where a water source has minimal or no conductivity, thus requiring a float rather than a probe to sense water levels.The float valve system consists of a fill float and a low water cutoff float.The fill float regulates how much water is added to the tank via a float ball, float arm, and mechanical valve. The valve is adjusted to fill the evaporating chamber within ¼" (6 mm) of the overflow port allowing heated, and therefore expanded, water at startup to fill the external P-trap.The low water cutoff float has an electrical switch that closes when a ready water condition is reached. This float switch provides low water protection for the heating outputs. If the water falls below the float, the heating outputs are disabled. See “Chloride corrosion” Caution at left.
Figure 56-1:Water level control for DI/RO water systems
Figure 56-2:Low water cutoff switch for DI/RO water systems
Operation
Supply water connection
Float rod
Float ball
OM-7396
Humidifiers using DI/RO water control water levels using a float valve and low-water cutoff switch.
mc_052710_1644
A zero mark on top of the float indicates proper float placement on stem. Switch is normally open when float ball is at its lowest point on the stem.
OM-3009
XT humidifiers do not use the float valve system for water level control. See “Electrode steam humidifiers” on Page 57.
CAUTIONChloride corrosionDamage caused by chloride corrosion is not covered by your DRI-STEEM warranty.Chloride corrosion can result from a variety of causes, including, but not limited to

Operation
Figure 57-1: Water level control for electrode steam humidifier
OM-7580
Fill cup
Overflow
Overflow to drain
Cylinder drain
Water
Electrodes
High water sensor
Water fill line connection (under cabinet)
Electrode steam humidifiersIn electrode steam humidifiers (see Figure 57-1), steam output is directly related to the resistance of the water in the steam cylinder and, therefore, the conductivity of the water between the electrodes. Recommended supply water conductivity for XT humidifiers is 125 to 1250 μS/cm.Higher water levels cover more electrode surface and result in more steam; lower water levels cover less electrode surface and result in less steam. Since water conductivity and water level both correlate to steam output, DRI-STEEM electrode humidifiers employ an algorithm that monitors conductivity and manages drain and fill events to optimize humidifier performance and provide proper steam output. As the water in the cylinder boils into steam, the concentration of conductive ions increases until it reaches a threshold that triggers a drain and fill event. This rids the cylinder of highly conductive water and replaces it with less conductive fill water. The more conductive the fill water and the higher the demand, the more quickly the threshold is reached, and the more frequently the cylinder automatically drains and fills to stay within the parameters for proper steam output. To prevent overfilling of the cylinder, filling stops if the water level reaches the high water sensor.
Supply water
Electrode steam humidifiers use tap or softened supply water. Demineralized, deionized, and reverse-osmosis water are not conductive enough for electrode steam humidifiers.

When a duct high limit option is ordered, DRI-STEEM provides either a duct high limit switch or a duct high limit humidity transmitter (4 to 20 mA output, 0 to 100% RH range) for duct mounting.
Duct high limit switch optionThe duct high limit switch prevents duct saturation by turning off the humidifier when reaching the device set point. When this occurs, a “Duct HL trip” message appears in the Messages Log and autoclears when duct RH drops below the duct high limit set point.
Modulating high limit transmitter optionThe modulating high limit transmitter operates in conjunction with the room/duct controlling transmitter or demand signal through the Vapor-logic4 control system to prevent excess humidification in the duct. Vapor-logic4 starts lowering the humidifier output when the duct relative humidity is within a user-defined percentage (default is 5%) of the duct high limit set point. This value is called the duct high limit span and is defined during Setup.When duct relative humidity enters this range, a “Duct HL span” message appears in the Messages Log and the Message label lights on the keypad/display. If necessary, the reduction of the humidifier output continues until maximum high limit set point is reached, shutting off the humidifier completely. If this occurs, a “Duct HL trip” message appears in the Messages Log.When the high relative humidity starts to decrease in the duct, Vapor-logic4 slowly starts to increase steam production. When the duct relative humidity decreases to greater than the defined percentage below the duct high limit set point, the control transmitter or signal by others demand signal is restored as the primary controller, returning the control system to normal operation, and the messages in the Messages Log automatically clear.
Temperature compensation control optionNote: This option is not applicable for XT humidifiers.When selected as an option, DRI-STEEM provides a temperature compensation transmitter. The temperature compensation transmitter continually monitors interior window glass temperature and transmits this temperature to Vapor-logic4. Vapor-logic4 assumes a 70 °F (21 °C) room temperature and uses the glass temperature and the RH in the space being controlled to calculate the dew point (°F or °C) for the space.
Operation

Operation
If the window temperature falls below the dew point, Vapor-logic4 automatically decreases the RH set point so moisture does not form on windows. The Home screen displays the modified RH set point, and an asterisk (*) appears next to the modified RH set point, denoting that temperature compensation has taken control of the RH set point. The “Temp comp on” message appears in the Messages Log and the Message softkey label becomes highlighted. When the interior window glass temperature rises above the dew point, Vapor-logic4 restores system control to the normal RH set point for the space, and the “Temp comp on” message automatically clears.The temperature compensation control option is available only when the system is equipped with an RH transmitter. It is not available when a remote humidistat, dew point transmitter, or building automation system is used to control the humidifier.The transmitter provided with Vapor-logic4 is calibrated for –20 °F to 160 °F (–29 °C to 71 °C) with output from 4 to 20 mA. For example, a temperature reading of 70 °F (21 °C) should produce a measurement of 12 mA. You can calibrate the sensor by adjusting the offset in the auxiliary temp sensor section of the Setup menu.
Auxiliary temperature sensor optionNote: This option is not applicable for XT humidifiers.When selected as an option, DRI-STEEM provides a temperature sensor for monitoring temperature in a duct or space. Temperature from this sensor can be viewed from the Status menu (“Aux temperature”). Temperature history data is logged to the data log and can be downloaded from the download data section of the Diagnostics menu.
Tank preheat feature
The tank preheat feature heats the water in the tank to near boiling to allow a rapid response to a demand signal. If the tank is cold when a small demand signal is present, the Vapor-logic4 controller overrides the demand signal and heats until the tank temperature increases to the boiling point. At this point, control is returned to the original demand signal. Preheating allows the system to respond quickly to small demand requests. When preheating, the word “Heating” appears on the Home screen.

Aquastat set point featureNote: This feature is not applicable for XT humidifiers.The aquastat set point is the minimum tank temperature the Vapor-logic4 controller maintains when there is no call for humidity or when safety circuits are not satisfied (e.g., high limit or airflow proving switch). The aquastat set point is adjusted through the water management section of the Setup menu. This feature shortens the tank preheat time, providing a rapid response to a call for humidity. For example, if the aquastat is set at 180 °F (82 °C) when a call for humidity occurs, the tank only needs to warm up 32 °F (18 °C) to reach the boiling point. However, if the aquastat is at its minimum default setting of 40 °F (4 °C) and the tank is in an average-temperature occupied room, when a call for humidity occurs, the tank needs to warm up from room temperature to the boiling point before producing steam. When an aquastat call is heating the tank, the word “Heating” appears on the Home screen. Aquastat heating will occur with high-limit and airflow alarm conditions.
Freeze protection
Freeze protection is similar to aquastat operation with some exceptions. The freeze protect set point is fixed at 40 °F (4 °C). Its purpose is to prevent the tank from freezing in cold environments. Unlike aquastat, if a condition exists that prevents the heaters, burners, and valves from firing (such as an alarm, an external interlock switch is open, or the humidifier is in Standby mode), instead of remaining idle, the controller switches to manual drain run mode and the tank drains to prevent freezing. Change mode to Auto to resume operation.When the tank is heating to prevent freezing, the word “Heating” appears on the Home screen. When the tank is draining or has drained to prevent freezing, the “Freeze drain” message appears in the Messages Log and the Message softkey label becomes highlighted.
Fan-based dispersion operationIf your humidifier is equipped with a Space Distribution Unit (SDU) or an Area-type fan, it is enabled after the Vapor-logic4 controller receives a call for humidity and the tank water is approaching boiling temperature. When the humidifier no longer receives a call for humidity, it stops heating and the SDU or Area-type fan continues to run for the time delay period (as defined in the fan-based dispersion section Setup menu).
Operation

Operation
Sensor offsetsAll external transmitters shipped with Vapor-logic4 can be field calibrated from the Setup menu. For example, if the system is equipped with an RH transmitter, there is an RH offset setting. The factory default for all transmitter offset settings is zero. The sensors that have this adjustment capability are the humidity, duct high limit, temperature compensation, and dew point transmitters.
Automatic drain sequence, tap/softened water(See note at right for XT humidifiers.)
When configured to run a tap/softened water humidifier with an automatic drain valve, Vapor-logic4 uses an automatic drain sequence (ADS) to reduce mineral accumulation in the tank and drain line, which decreases tank maintenance. The automatic drain sequence starts by opening the drain valve to empty the tank. When the drain duration ends, the fill and drain valves remain open to flush the tank. When the flush duration ends, the automatic drain sequence is complete and the humidifier resumes normal operation. The default drain and flush durations are model-specific and can be adjusted in the water management section of the Setup menu. Automatic draining and flushing parameters are defined in the water management section of the Setup menu:
automatic drain sequence begins must be defined (Usage). Defaults for this value are model-specific and are calculated based on operating 200 hours at 100% capacity. Go to the Setup menu to view or change this setting for your humidifier.
can occur must be defined. This means that once the Usage requirement is met, the automatic drain sequence can occur on the first allowed day (allowed days default is all days).
be defined (default value is midnight).For example, if you use factory default settings for the automatic drain sequence, the first automatic drain sequence will occur at midnight on any day of the week once the model-specific usage requirement has been met. If you want to change these settings, go to the water management section of the Setup menu.Note that the automatic drain sequence is designed for a tap/softened water humidifier with electric drain and fill valves. Humidifiers using DI/RO water do not require automatic draining and flushing, but this feature can be enabled if the humidifier has electric drain and fill valves.
Drain algorithm for XT humidifiers
XT humidifiers employ a drain algorithm that is written specifically for how electrode steam humidifiers function. See “Electrode steam humidifiers” on Page 57.

Draining when using softened waterWhen using softened water, draining occurs for a one-minute duration after a period of time based on 1000 hours of 100% operation to remove residue from the drain valve mechanism. End-of-season draining occurs as described below.
Skim timer
With a tap/softened water configuration, the Vapor-logic4 controller has a skim timer. This timer is activated at the end of each fill cycle. The timer keeps the fill valve open (for a user-determined amount of time after the tank has filled) to skim minerals off the water surface. The skim time is adjusted through the Setup menu.
End-of-season drainIf there is no call for humidity for a user-defined time period, the humidifier performs an end-of-season (EOS) drain where the drain valve remains open for ten hours to allow the tank to drain and then closes. If the humidifier receives a call for humidity after the ten-hour end-of-season drain-down period has begun, the controller stops the end-of-season draining, the tank refills, and the humidifier resumes normal operation. The user-defined inactivity time period (idle time) is defined in the end-of-season drain section of the Setup menu. This option is available only on units equipped with electric drain and fill valves.
Service intervalThe Vapor-logic4 controller tracks the amount of water converted to steam by the humidifier and the number of hours the humidifier runs. When the amount of steam or hours of run time exceeds the user-defined service interval (pounds, kilograms, or hours, adjusted in the Setup menu), “Service unit” appears in the Messages Log.
The humidifier continues to operate after the message appears. The message notifies the user that the service interval was reached and the humidifier should be cleaned. The message remains in the Messages Log until it is cleared or until the Messages Log adds 10 new messages (the maximum number of messages the log holds).
Operation

Operation
Setting date and timeThe Vapor-logic4 controller contains a real-time clock that is used for several features including the drain and flush sequence and alarm logging. If you need to reset the date or time, go to the Setup menu. The date and time will need to be reset whenever the Vapor-logic4 controller has been powered off for more than 72 hours, such as when starting up at the beginning of the humidification season.Note: Verify the date and time settings after every firmware
upgrade.
Battery backup, nonvolatile memoryIf there is a power outage, date and time settings will be saved for 72 hours. Alarms, unit configuration, and usage timers will remain in nonvolatile memory indefinitely.
Security/passwordTo control who can change Vapor-logic4 settings, enable the security function and define a password in the Setup menu. Enter four digits, numbers only, and define the time-out period (minutes of inactivity before Vapor-logic4 reverts to read-only mode). The Web interface and the keypad/display can have separate passwords.Important: Write down the password and keep in a secure location.

Downloading historical data
Vapor-logic4 acquires data at one-minute intervals and retains it for seven rolling days. These data, available for download and sorting, contain the details shown in Table 64-1. Go to the Download data section of the Diagnostic screen for download options.
Table 64-1:Sample of data log downloaded and sorted
TimeSpaceRH or Demand
Aux Temp (degF)
Tank Temp (degF) BTU’s used
Lbs steam
Output (pcnt) Alarm/Msg Alarm/Msg Status
Current Config: XX##XX#X###XX
Factory Config: XX##XX#X###XX
1/26/10 9:36 AM 23 0 212 567019018 421066 23
— —
1/26/10 9:37 AM 23 0 212 567021350 421068 23
1/26/10 9:38 AM 23 0 211 567023681 421070 23
1/26/10 9:39 AM LOW WATER CUTOUT
Auto cleared message
1/26/10 9:40 AM 23 0 210 567028344 421073 23
1/26/10 9:41 AM 23 0 211 567030677 421075 23
1/26/10 9:42 AM 23 0 212 567033008 421077 23
1/26/10 9:43 AM 23 0 212 567035339 421079 23
1/26/10 9:44 AM Unit Start Auto cleared message
To sort data (as shown above) with alarms and messages listed in the order they occurred:
1. Import the data into a spreadsheet program, such as Microsoft Excel.
2. Set the Time column to be displayed in the date-time format.3. Sort all rows by “Time” in ascending order.
Backing up and restoring dataVapor-logic4 data can be backed up to and restored from a USB flash drive. The backup file contains all information relative to the humidifier, including firmware, user settings, model number, serial number, and the configuration string.
Backup files use the serial number in the backup file name so that the file is easily matched to a particular humidifier.
Operation
Note: Data is saved to nonvolatile memory every 60 minutes. If unit power is lost, up to 60 minutes of data could be lost.

Operation
To create a backup file:1. Insert a FAT32-formatted USB flash drive into the USB port on
the Vapor-logic4 board.2. Go to Diagnostics/USB backup-restore/Back up settings3. Select Yes. The display will prompt you when backup is
complete.To restore from a backup file:1. Insert a FAT32-formatted USB flash drive with that humidifier’s
backup file into the USB port on the Vapor-logic4 board.2. Go to Diagnostics/USB backup-restore/Restore settings.3. Select Yes. Note that the serial number of the humidifier and
backup file must match to complete the restore process.
Downloading firmware updates
The Vapor-logic4 controller can be field upgraded to the latest firmware version via the USB port on the Vapor-logic4 board. Firmware updates are available for free on the DRI-STEEM website. To update your Vapor-logic4 controller to the latest firmware version, perform the following procedure:1. Navigate to the Vapor-logic4 page at www.dristeem.com,
or type the following into your browser’s address bar: www.dristeem.com/products_ControllersAcess_VL4.jsp
2. Click the Firmware updates link on the Vapor-logic4 page.3. Plug a reliable USB flash drive into a USB port on your
computer, and prepare the flash drive as follows:a) Move or delete all files from the drive.b) Make sure it has at least 16 MB of free space.c) Make sure it is not partitioned into multiple drives.
4. Perform the procedure in Table 66-1.

Operation
Table 66-1:Downloading Vapor-logic4 firmware updates
1. Click the link shown to the right on the Vapor-logic4 firmware updates page of www.dristeem.com.
If a security window appears, click the Save button.
Note: The screenshots in this table depict typical Internet Explorer screens in Windows XP. While your browser and operating system might be set up differently, the screenshots are provided as a general road map.
2. When prompted for a save location, choose your desktop.
3. Click the Save button.
4. On your desktop, double-click the new vl4_update.exe file.
5. If a Security Warning appears, click the Run button.
A WinZip Self-Extractor window appears.
Continued

Operation
Table 66-1:Downloading Vapor-logic4 firmware updates (continued)
6. Click the Browse button in the WinZip Self-Extractor window, and select your USB flash drive as the target location.
7. Click the Unzip button in the WinZip Self-Extractor window.
A WinZip window opens to confirm that the firmware update has been unzipped.
8. Click the OK button.
9. Click the Close button to close the WinZip Self-Extractor window.
10. Open your USB flash drive. Confirm that it contains a folder named vl4_update, and that it is has today’s timestamp.
11. Remove the USB flash drive from your computer.
12. Proceed to “Installing firmware updates” on Page 68.
mc_121610_0530

WARNING
Electric shock hazard
All circuits must be energized for this firmware update procedure. Contact with energized circuits can cause severe personal injury or death as a result of electric shock.
To prevent shock when grounding to the electrical subpanel, touch the subpanel along its edge, away from wires and components.
mc_072209_1320
Cycling power with USB flash drive inserted
Every time power is cycled while the USB flash drive is inserted, the update process repeats and must be allowed to complete before the USB flash drive is removed or power is cycled again. Doing either one prematurely could corrupt the update and render the board inoperable. If in doubt, wait five minutes after power is turned on before cycling power or removing the USB flash drive.
Operation
Installing firmware updates
Note: For mission-critical applications, DRI-STEEM recommends that you have a spare Vapor-logic4 board on hand before updating.1. Place the humidifier system in Standby mode.
2. To prevent static damage to the USB flash drive and controller, ground yourself by briefly touching the humidifier’s electrical subpanel before touching any part of the controller board or doing Step 3. See the Warning at left.
3. Insert the USB flash drive loaded with the unzipped firmware update folder into the Vapor-logic4 board USB port.
CAUTIONDo not remove USB flash drive or cycle power earlyDuring Steps 4 through 6, do not remove the USB flash drive or cycle the power until the signal occurs as explained in Step 6. Doing either one prematurely could corrupt the update and render the board inoperable.
4. Disconnect power to the Vapor-logic4 board, wait five seconds, and reconnect power.
5. Wait for a relay on the Vapor-logic4 board to begin clicking continuously. It could take anywhere from several seconds to over two minutes.
: If the keypad/display begins to blink continuously while waiting, disconnect power to the Vapor-logic4 board, wait five seconds, and reconnect power. Then go to Step 6.
6. When the relay on the Vapor-logic4 board begins to click continuously, remove the USB flash drive from the Vapor-logic4 board USB port.
When the USB flash drive is removed, the Vapor-logic4 controller and display reboot with the updated firmware.
7. Verify the update by checking the Vapor-logic4 firmware version as follows:
a) Select Diagnostics in the keypad/display Main menu b) Select Humidifier info. c) Scroll down to Firmware version.
The firmware version displayed should match the version number of the vl4vx.x.x file in the vl4_update folder on the USB flash drive.
8. Update the clock/calendar to today’s date.
9. Verify humidifier operation, and return it to service.

Test outputs
When completing an installation or repair, cycle all outputs, such as fill valve, drain valve, etc., to verify operation. Go to the test outputs section of the Diagnostics menu and scroll through each connected output to verify operation. During testing, the humidifier mode changes to Standby and the tank status changes to Test.
Test run
Vapor-logic4 has a test run capability to confirm system functionality. This capability allows a technician to simulate a demand for steam production when there isn’t one (such as when performing routine maintenance). To confirm functionality, go to the test run section of the Diagnostics menu. Set system demand percent and set test run time duration. During testing, the humidifier mode changes to Standby and the tank status changes to Test.mc_102108_1350
Operation
Not all USB drives perform equally. If a USB flash drive fails to update the Vapor-logic4 firmware, perform the following procedure with a different USB flash drive:
1. Prepare a new flash drive as described in Step 3 of “Downloading firmware updates” on Page 65.
2. Repeat Steps 4 through 11 in Table 66-1.
3. Repeat Steps 1 through 7 on Page 68.
mc_120210_1235

Vapor-logic4 comes standard with Modbus, or with BACnet or LonTalk if ordered. Vapor-logic4 can connect to building automation systems using these protocols. Variables are defined in the tables on the following pages.Note: For retrofit BACnet or LonTalk installations, contact
your local DRI-STEEM representative or DRI-STEEM to purchase a BACnet or LonTalk upgrade.
Connections1. If connecting to a Modbus or BACnet MS/TP system, connect
Modbus or BACnet system wiring to terminal P7 on the Vapor-logic4 board (positive to positive, negative to negative).If connecting to a BACnet/IP system, connect BACnet system wiring to the Ethernet connection.
2. If connecting to a LonTalk system, connect the LON ProtoCessor module per Step 3 in Figure 70-1.
3. Disconnect power to the Vapor-logic4 board, wait 5 seconds, and reconnect power.
4. Set up communication with Vapor-logic4 using your Modbus, BACnet, or LonTalk network manager, referencing Table 71-1.
Installing LonTalk as a retrofit1. Turn off power to the unit.2. Touch the unit’s bare metal frame before handling the LON
ProtoCessor module, and hold onto frame while handling the module.
3. While handling the module, hold it by the edge. Avoid touching the components or circuit board.
4. Plug LON ProtoCessor module into mounting pins (as shown in Figure 70-1) with LonTalk connector at the edge of the board. Make sure all pins are seated in the connector.
5. Connect LonTalk system wires to LON ProtoCessor module as shown is Step 3 at right.
6. Turn on power to the unit.7. Use either the keypad/display or Web interface go to the
Communications section of the Setup menu to enable LonTalk communication.
8. Set up communication with Vapor-logic4 using your LonTalk network manager, referencing Table 71-1.
Installing BACnet as a retrofit1. Using the keypad/display or Web interface, go to the Setup
menu, and select Tank Setup, then Communication, then BACnet, and press Enter.
2. Enter the code provided when you purchased the BACnet upgrade. The activation code is matched to the unit’s serial number.
3. Select the BACnet communication channel in the BACnet Setup menu.
4. Cycle the power to activate BACnet.
Figure 70-1:LON ProtoCessor module installation
3. Connect wiring from LonTalk system to LON ProtoCessor module on Vapor-logic4 board.
1. Remove LON ProtoCessor module from box.
Vapor-logic4 board
Bottom of LON ProtoCessor module
2. Insert LON ProtoCessor module into pins on Vapor-logic4 board.
NOTE: Orient the LON ProtoCessor module as shown, with wire connectors end at the side of the Vapor-logic 4 board.
Connect LonTalksystem wires to LON ProtoCessor module here.
Operation

Table 71-1:Interoperability variable and object names
Variable name andBACnet object name
Read Only (RO) or
Read Write (RW)
Modbus register number*
BACnet Object
Type and Instance
LonTalk variable names**
Description Units Range
I-P units
SI units I-P units SI units
Read-only analog variables
Space_RH ROIR-1
30001AI-01 nvoSpaceRH
Relative humidity content of the air in the space being humidified.
% % 0 to 100 0 to 100
Space_dew_point ROIR-2
30002AI-02 nvoSpaceDewPoint
Dew point of the air in the space being humidified.
ºF ºC 20 to 80 -6 to 26
Duct_RH ROIR-3
30003AI-03 nvoDuctRH
Relative humidity content of the air in the duct.
% % 0 to 100 0 to 100
Steam_demand_mass ROIR-4
30004AI-04 nvoSteamDmndMass
Steam demand in pounds or kilograms per hour.
lbs/hr kg/h0 to
100,0000 to
100,000
Steam_demand_percent ROIR-5
30005AI-05 nvoSteamDemand%
Steam demand as a percentage of the humidifier’s total capacity.
% % 0 to 100 0 to 100
Aux_temp ROIR-6
30006AI-06 nvoAuxTemp
Temperature of the auxiliary temperature sensor.
ºF ºC -20 to 160 -29 to 170
Tank_temp ROIR-7
30007AI-07 nvoTankTemp
Temperature of the water in the humidifier’s evaporating chamber.
ºF ºC-240 to
265-151 to
129
Steam_output_mass ROIR-8
30008AV-1 nvoSteamOutMass
Estimated amount of steam the humidifier is producing in pounds or kilograms per hour.
lbs/hr kg/h0 to
100,0000 to
100,000
Steam_output_percent ROIR-9
30009AV-2 nvoSteamOutput%
Estimated amount of steam the humidifier is producing as a percentage of the humidifier’s total capacity.
% & 0 to 100 0 to 100
Water_until_ADS ROIR-1030010
AV-3 nvoWaterUntilADS
Pounds or kilograms of water remaining to be converted to steam before the next automatic drain sequence (ADS) cycle.
100 lbs
100 kg
0 to 2,200,000
0 to 1,000,000
Water_until_service ROIR-1130011
AV-4 nvoWaterTilSrvc
Pounds or kilograms of water remaining to be converted to steam before the next service cycle.
100 lbs
100 kg
0 to 2,200,000
0 to 1,000,000
Current_1(XT systems only)
ROIR-2630026
AI-10 nvoXT_current1 XT operating current Amps Amps 0 to 100 0 to 100
Current_2(XT systems only)
ROIR-2730027
AI-11 nvoXT_current2XT operating current, right cylinder
Amps Amps 0 to 100 0 to 100
* See Note 1 on Page 76.** See Note 2 on Page 76.
Continued
Operation

Table 71-1:Interoperability variable and object names (continued)
Variable name andBACnet object name
Read Only (RO) or
Read Write (RW)
Modbus register number*
BACnet Object
Type and Instance
LonTalk variable names**
Description Units Range
I-P units
SI units I-P units SI units
Setup variables
Run_mode
WriteHR-1
40001MSV-01 nviRunMode
Mode of the unit or system. The defined options are: 1 Auto 2 Local standby 3 System standby 4 Manual drain
-- -- 1 to 4 1 to 4
ReadHR-1
40001MSV-01 nvoRunMode
Mode of the unit or system. The defined options are: 1 Auto 2 Local standby 3 System standby 4 Manual drain 5 Test outputs 6 Test run
-- -- 1 to 6 1 to 6
Space_RH_set_point
WriteHR-2
40002AV-05 nviSpaceRHsetPt Humidity set point
for the space being humidified.
% % 0 to 100 0 to 100
ReadHR-2
40002AV-05 nvoSpaceRHsetPt % % 0 to 100 0 to 100
Space_dew_point_set_point
WriteHR-3
40003AV-06 nviSpaceDewPtSP Dew point set point
for the space being humidified.
ºF ºC 20 to 80 -6 to 26
ReadHR-3
40003AV-06 nvoSpaceDewPtSP ºF ºC 20 to 80 -6 to 26
Duct_high_limit_set_point
WriteHR-4
40004AV-07 nviDuctHLsetPt
Duct high limit set point.
% % 0 to 100 0 to 100
ReadHR-4
40004AV-07 nvoDuctHLsetPt % % 0 to 100 0 to 100
Fieldbus_demand_mass Write OnlyHR-5
40005AV-08 nviFbusDemndMass
Steam output (as demanded via the fieldbus) as a percentage of the humidifier’s total capacity.
lbs/hr kg/h0 to
100,0000 to
100,000
Fieldbus_demand_% Write OnlyHR-6
40006AV-09 nviFldBusDemand%
Steam output (as demanded via fieldbus) in pounds or kilograms per hour. If the request exceeds the unit’s capacity, the unit will run at 100% capacity.
% % 0 to 100 0 to 100
PID_band RWHR-7
40007AV-10 nciPIDband PID band. % % 0 to 50 0 to 50
PID-Kp RWHR-8
40008AV-11 nciPIDkp
PID-Kp (proportional gain) factor.
-- -- 0 to 1000 0 to 1000
PID-Ki RWHR-9
40009AV-12 nciPIDki
PID-Ki (integral gain) factor.
-- -- 0 to 1000 0 to 1000
PID-Kd RWHR-1040010
AV-13 nciPIDkdPID-Kp (derivative gain) factor.
-- -- 0 to 1000 0 to 1000
* See Note 1 on Page 76.** See Note 2 on Page 76.
Continued
Operation

Table 71-1:Interoperability variable and object names (continued)
Variable name andBACnet object name
Read Only (RO) or
Read Write (RW)
Modbus register number*
BACnet Object
Type and Instance
LonTalk variable names**
Description Units Range
I-P units
SI unitsI-P
unitsSI units
Read-only digital I/O
Airflow_proving_switch RODI-1
10001BI-01 nvoAirflowSwitch 0=Open; 1=Closed
-- -- -- --
Duct_HL_switch RODI-2
10002BI-02 nvoDuctHLswitch 0=Open; 1=Closed
Safety_interlock RODI-3
10003BI-03 nvoSafetyI-lock 0=Open; 1=Closed
Combustion_air_damper_(GTS) RODI-4
10004BI-04 nvoCombustAirDmp
0=Damper Closed; 1=Damper Open
Flue_pressure_switch_(GTS) RODI-5
10005BI-05 nvoFluePressurSw 0=Open; 1=Closed
Power_vent_switch_(GTS) RODI-6
10006BI-06 nvoPowerVentSwch 0=Vent Off; 1=Vent On
XV_header_status_(STS) RODI-6
10006BI-06 nvoPowerVentSwch 0=Ready; 1=Not ready
Low_water_sensor_ (GTS) RODI-7
10007BI-07 nvoLowWaterSensr 0=No Water; 1=Water
Fill_valve RODI-8
10008BO-01 nvoFillValve 0=Closed; 1=Open
Drain_valve RODI-9
10009BO-02 nvoDrainValve
0=Not Draining; 1=Draining
Active_fault_exists RODI-1010010
BI-08nvoMT_AlarmSomewhere
0=No; 1=Yes
Active_message_exists RODI-1110011
BI-09nvoMT_MsgSomewhere
0=No; 1=Yes
High_water_sensor RODI-1210012
BI-10 nvoXT_highwater1 0=No Water; 1=Water XT systems only
High_water_sensor_2 RODI-1310013
BI-11 nvoXT_Highwater2 0=No Water; 1=Water Right cylinder, 2-cylinder XT systems only
Faults and alarms
Active_messages_exist RODV-1
1BV-01 nvoMessages
Obsolete with firmware version 2.3.5
-- -- -- --
Active_auto_cleared_alarms_exist RODV-2
2BV-02 nvoAlarms1
Active_manually_cleared_alarms_exist
RODV-3
3BV-03 nvoAlarms2
Flags all manually cleared alarms
Clear_all_faults RWDV-4
4BV-04 nviClearAllFaults
When set will clear all active faults
Alarm_tank_temp_sensor_failed RWDV-5
5BV-05 nvoAlrmTnkTmpSen See Alarms menu.
Alarm_tank_overtemp RWDV-6
6BV-06 nvoAlrmOvertemp See Alarms menu.
Alarm_RH_signal_out_of_rangeRW
DV-77
BV-07nvoAlrmRHsignal See Alarms menu.
Alarm_dew_pt_sig_out_of_range nvoAlrmDewPtSgnl See Alarms menu.
* See Note 1 on Page 76.** See Note 2 on Page 76.
Continued
Operation

Table 71-1:Interoperability variable and object names (continued)
Variable name andBACnet object name
Read Only (RO) or
Read Write (RW)
Modbus register number*
BACnet Object
Type and Instance
LonTalk variable names**
Description Units Range
I-P units
SI unitsI-P
unitsSI units
Faults and alarms (cont.)
Alarm_demand_sig_out_of_range RWDV-7
7BV-07 nvoAlrmDemndSgnl
See Table 49-1, Alarms menu
-- -- -- --
Alarm_duct_RH_sig_out_of_range RWDV-8
8BV-08 nvoAlrmDuctRHsig
Alarm_aux_temp_sens_out_of_rnge RWDV-9
9BV-09 nvoAlrmAuxTemp
Alarm_water_probe_miswired RWDV-10
10BV-10 nvoAlrmProbeWire
Alarm_water_probe_failed RWDV-11
11BV-11 nvoAlrmProbeFail
Alarm_excess_fill_time RWDV-12
12BV-12 nvoAlrmFillTime
Alarm_excess_refill_time RWDV-13
13BV-13 nvoAlrmRefilTime
Alarm_tank_not_draining RWDV-14
14BV-14 nvoAlrmNoDrain
Alarm_excess_water_no_demand RWDV-15
15BV-15 nvoAlrmXessWater
Alarm_no_SDU_airflow RWDV-16
16BV-16 nvoAlrmNoSDUair
Alarm_no_power_vent_airflow RWDV-17
17BV-17 nvoAlrmPrVentAir
Alarm_no_combustion_airflow RWDV-18
18BV-18 nvoAlrmNoCombAir
Alarm_blocked_flue RWDV-19
19BV-19 nvoAlrmBlockdFlu
Alarm_burner_1_failed RWDV-20
20BV-20 nvoAlrmBurner1
Alarm_burner_2_failed RWDV-21
21BV-21 nvoAlrmBurner2
Alarm_burner_3_failed RWDV-22
22BV-22 nvoAlrmBurner3
Alarm_burner_4_failed RWDV-23
23BV-23 nvoAlrmBurner4
Alarm_ignition_module_1_failed RWDV-24
24BV-24 nvoAlrmIgnitMod1
Alarm_ignition_module_2_failed RWDV-25
25BV-25 nvoAlrmIgnitMod2
Alarm_ignition_module_3_failed RWDV-26
26BV-26 nvoAlrmIgnitMod3
Alarm_ignition_module_4_failed RWDV-27
27BV-27 nvoAlrmIgnitMod4
Alarm_blower_1_failed RWDV-28
28BV-28 nvoAlrmBlower1
* See Note 1 on Page 76.** See Note 2 on Page 76.
Continued
Operation

Operation
Table 71-1:Interoperability variable and object names (continued)
Variable name andBACnet object name
Read Only (RO) or
Read Write (RW)
Modbus register number*
BACnet Object
Type and Instance
LonTalk variable names**
Description Units Range
I-P units
SI unitsI-P
unitsSI units
Faults and alarms (cont.)
Alarm_blower_2_failed RWDV-29
29BV-29 nvoAlrmBlower2
See Table 49-1, Alarms menu
-- -- -- --
Alarm_blower_3_failed RWDV-30
30BV-30 nvoAlrmBlower3
Alarm_blower_4_failed RWDV-31
31BV-31 nvoAlrmBlower4
Alarm_gas_valve_1_failed RWDV-32
32BV-32 nvoAlrmGasValve1
Alarm_gas_valve_2_failed RWDV-33
33BV-33 nvoAlrmGasValve2
Alarm_gas_valve_3_failed RWDV-34
34BV-34 nvoAlrmGasValve3
Alarm_gas_valve_4_failed RWDV-35
35BV-35 nvoAlrmGasValve4
Alarm_low_water RWDV-36
36BV-36 nvoAlrmLowWater
Alarm_foaming_fault_2 RWDV-37
37BV-37 nvoAlrmFoaming2
Alarm_Current_Sense1_ Out_Of_Range RWDV-51
51BV-51 nvoAlrmCurSense1
Alarm_Current_Sense2_ Out_Of_Range RWDV-52
52BV-52 nvoAlrmCurSense2
Alarm_Overcurrent RWDV-53
53BV-53 nvoAlrmOverCur1
Alarm_Supply_Water RWDV-54
54BV-54 nvoAlrmSupplyH201
Alarm_Foaming_Fault RWDV-55
55BV-55 nvoAlrmFoaming1
Alarm_Overcurrent_2 RWDV-57
57BV-57 nvoAlrmSupplyH202
Alarm_Supply_Water_2 RWDV-58
58BV-58 nnvoAlrmSupplyH202
* See Note 1 on Page 76.** See Note 2 on Page 76.
Continued

Operation
Table 71-1:Interoperability variable and object names (continued)
Variable name andBACnet object name
Read Only (RO) or
Read Write (RW)
Modbus register number*
BACnet Object
Type and Instance
LonTalk variable names**
Description Units Range
I-P units
SI unitsI-P
unitsSI units
Messages
Message_Check_Cylinder RWDV-56
56BV-56 nvoMsgChkCyl1
See Table 45-1, Diagnostics menu
-- -- -- --
Message_Check_Cylinder_2 RWDV-59
59BV-59 nvoMsgChkCyl2
Message_replace_contactors RWDV-38
38BV-38 nvoMsgReplCntctr
Message_service_unit RWDV-39
39BV-39 nvoMsgSrviceUnit
Message_drain_pending RWDV-40
40BV-40 nvoMsgDrainPend
Message_no_duct_airflow RWDV-41
41BV-41 nvoMsgNoDuctAir
Message_interlock_open RWDV-42
42BV-42 nvoMsgIlockOpen
Message_freeze_prevent_draining RWDV-43
43BV-43 nvoMsgFreezDrain
Message_end-of-season_active RWDV-44
44BV-44 nvoMsgEOSactive
Message_temp_comp_on RWDV-45
45BV-45 nvoMsgTempCompOn
Message_clean_probes RWDV-46
46BV-46 nvoMsgCleanProbe
Message_duct_HL_trip RWDV-47
47BV-47 nvoMsgDuctHLtrip
Message_duct_HL_span RWDV-48
48BV-48 nvoMsgDuctHLspan
Message_insufficient_water RWDV-49
49BV-49 nvoMsgH2Ocutout
Message_boiling_temp_calibrated RWDV-50
50BV-50 nvoMsgBoilTempCl
Notes: 1. Modbus Input Registers (IR1-IR11) 16 bit read only Modbus Holding Registers (HR1-HR10) 16 bit read/write Modbus Discrete Input Registers (DI1-DI9) single bit read only Modbus Coil Registers (DV1-DV50) single bit read/write 2. nvi LonTalk SNVTs are write-only; nvo are read-only
Multi-tank mode definedIn multi-tank mode, one Vapor-logic4 controller can control multiple humidifier tanks, and tanks in a multi-tank system can vary by energy source and capacity.
A multi-tank system has one master controller controlling up to 16 slave tanks. The master controller receives the demand signal and controls slave tank steam production based on
The master controller also gives permission to slave humidifier tanks to perform functions, such as draining and flushing.
The master controller must be
Multi-tank control interfaceMost systems have one Vapor-logic4 keypad per multi-tank group. This keypad ships with the tank that has the master control board. The keypad (or the Web interface; see note below) can be connected to any humidifier in the multi-tank group. Maximum cable length from the keypad to any control board in the multi-tank group is 500' (152 m). Note: Multi-tank groups can also be operated using the Web interface.
See “Multi-tank operation with Web interface” on Page 81.
Operation
Start-up order and trim tanksAll humidifier tanks in a multi-tank group are factory-assigned to a priority group. There are four priority groups: 0, 1, 2, and 3.
Priority groups identify tank function as follows:0 = Trim tanks 2 = Priority 2 tanks (peak)1 = Priority 1 tanks (load) 3 = Redundant tank
Tanks in priority group 0 are brought online first, followed by tanks in priority group 1, then 2. Priority group 3 designates an optional redundant tank, which comes online only if a tank in the system is unavailable and the remaining tanks cannot meet capacity.
A trim tank is assigned to priority group 0 and is brought online first — always before tanks in priority groups 1, 2, or 3. The trim tank modulates continuously, responding to system demand changes.Multi-tank groups requiring a rapid response to changes in system demand typically have an electric element humidifier with SSR control as the trim tank.
Staging multiple XT humidifiers
XT humidifiers do not operate in multi-tank mode; however, up to four XT humidifiers can be staged to operate in sequence.
See “Staging multiple XT humidifiers” on Page 37.

Operation
Tank grouping to maximize efficiency Priority 1 and priority 2 tanks can be grouped to improve efficiency. Tanks not identified as trim or redundant tanks are factory-assigned to priority groups 1 and 2. Priority 1 tanks come online before priority 2 tanks. Because tanks in a multi-tank system can vary by capacity, this allows tank grouping to maximize efficiency, bringing tanks online in the order that best matches humidification load to individual tank capacity.
Example 1: A large-capacity tank that meets humidification demand most days is assigned to priority group 1. Smaller-capacity tanks, needed only when additional capacity is needed, are assigned to priority group 2.
Example 2: A gas-fired tank that meets humidification demand most days is assigned to priority group 1. Electric tanks, needed only when additional capacity is needed, are assigned to priority group 2
Note: Wear leveling occurs only within a priority group. Redundant tank for mission-critical applications A redundant tank can be assigned for mission-critical applications. The system capacity of a multi-tank group is the combined capacity of tanks in groups 0, 1, and 2. Placing a tank in priority group 3 ensures that it only runs as a redundant tank. The redundant tank can be assigned to priority group 3 and will operate only if one or more of the tanks in groups 0, 1, and 2 are not available, and the remaining tanks in the multi-tank group cannot meet demand for steam production.
Note: For best performance, multiple electric humidifiers in a given priority group must all have the same heater controls. That is, they should all be 100% SSR control, or all be sequenced SSR control, or all be contactor control.
Tank wear leveling
The master controller monitors tank wear and assigns steam production to tanks to equalize wear as much as possible within each priority group.
Fault tolerance
The master controller monitors tank status of all tanks in a multi-tank group periodically. If a tank goes offline or is not communicating (“No comm”) for a defined time period, the controller identifies that tank as unavailable and the system responds using other available tanks. If the master controller stops operating, the remaining slave tanks continue to run for a short time at the level they were last run, and then quit.
Configuration tips
Use priority groups 1 and 2 to group tanks for maximum energy efficiency. For example, put gas-fired tanks in group 1 and electric tanks in group 2.
Multiple small-capacity tanks usually operate more efficiently than one large-capacity tank meeting the same load requirement.
Use priority groups 1 and 2 to group tanks by capacity, bringing tanks online in the order that best matches humidification load to individual tank capacities.
If your multi-tank system has a redundant tank, configure that tank as the master controller. This will reduce system down time while the master controller tank receives servicing. Since the redundant tank operates the least in a multi-tank system, it is the tank most likely to remain online.
Match the capacity of the redundant tank to the largest tank in the system to ensure the system’s ability to meet maximum humidification load when a tank goes offline.
See Note 1 in Table 79-1.
Table 79-1:Multitank priority groups application example
Priority group Assignment Description Application considerations
0 Trimchanges. An SSR-controlled electric
resistive unit will provide the best control.
1 LoadGTS and STS are the most cost effective, but any unit can be used.
2 Peakassignment for a lower-up-front-cost humidifier.
Electric resistive are the most cost effective (any unit can be used).
3 Redundant
conditions and the remaining trim, load, and peak tanks cannot meet demand.
See Note 1 below.
will not need to bring down the master controller to service it.
most cost-effective up front.
factor.
Notes:1. If protection is required against multiple tanks being offline at the same time, the redundant tank should be at least as large as the sum of the X largest tanks
where X is the number of tanks for which protection is desired.2. From a fuel cost standpoint, electric should have the lowest priority. It should run last and the least.3. From an energy standpoint, GTS generally has the lowest operating cost.4. When calculating energy, consider heat loss from distribution and piping of steam.5. Humidifiers within a priority group are load leveled.6. Humidifiers within a group should have the same energy source.
Operation

Important:
All multi-tank communication must go through the master controller to reach slave tanks. Therefore, keypad/display communication requires that power is supplied to:
keypad/display
Wiring a multi-tank group of humidifiers
To wire a multi-tank group of humidifiers:1. Determine which control board is the master controller. The
master controller ships with the keypad/display. The master controller is labeled as Tank A on the keypad/display and on the tank’s product label.
2. Connect all required control inputs to the master controller board by following the instructions in “Control input” on Page 12.
3. Wire all control boards of the multi-tank group together using twisted pair wire.
Important: DRI-STEEM recommends using Cat-5 cable. Do not use non-twisted two-conductor wire.
Connect controller boards together at terminal block P8. Connect positive to positive terminals, and negative to negative terminals. On the last board in the series of connected boards, change the switch labeled “SW1” (located on the Vapor-logic4 board next to P8) to the On position. On all other boards SW1 should be in the Off position.
4. If you plan to use the Web interface, follow the wiring instructions in “Web interface communication” on Page 21.Note: Each tank must be connected via Ethernet to a network
system for the Web interface to access all tanks in the multi-tank group.
5. Connect the keypad/display cable to any control board in the multi-tank system. The master tank must be powered for the display to communicate.
Multi-tank system setup
Factory configurationHumidifier tanks ordered as a multi-tank group are configured at the factory. The factory configuration process includes:
Note: The master tank is always configured as Tank A.
Changing factory configurationChange tank designation using the Web interface only. Go to the Web screen Setup menu to access Multi-tank setup/Tank designator.
Important: Any change made to or from the tank controller designated as “A” will cause an approximate five-second delay while the board reboots. During this time the Web interface display will not change.
Operation

Table 81-1:Multi-tank fieldbus profiles
Item Description Modbus register
BACnet BACnet description LonTalk
MT_ACTIVE_FAULT_EXISTS_SOMEWHERE TRUE when there is an active fault on 1 or more units in the MT group
DI:10 10010
BI-08 MT_active_fault_in_system
nvoMT_AlarmSomewhere
MT_ACTIVE_MESSAGE_EXISTS_SOMEWHERE TRUE when there is an active message on 1 or more units in the MT group
DI:1110011
BI-09 MT_active_message_in_system
nvoMT_MsgSomewhere
MT_SYS_OUTPUT_MASS_HR Actual steam production of the system (mass/hr)
IR:2330023
AI-08 MT_steam_demand_mass
nvoMT_SteamOutMass
MT_SYS_OUTPUT_LBS_HR Actual steam production of the system (lbs/hr)
IR:2430024
MT_SYS_OUTPUT_PCNT Actual steam production of the system (% of system capacity)
IR:2530025
AI-09 MT_steam_demand_percent
nvoMT_SteamOutput%
MT_RUNMODE MT runmode 1=run, 0=standby HR:14 40014
MSV-02 MT_Runmode values: 1)System Standby 2)System Auto
nviMTRunMode nvoMTRunMode
MT_STEAM_REQ_MASS_HR The fieldbus request for steam (lbs/hr)
HR:15 40015
AV-14 MT_steam_output_req_mass
nviMT_FbusDemndMass
MT_STEAM_REQ_LBS_HR Fixed units. The fieldbus request for steam (lbs/hr)
HR:16 40016
MT_STEAM_REQ_SYS_PCNT The fieldbus request for steam (% of system)
HR:1740017
AV-15 MT_steam_output_req_pcnt
nviMT_FldBusDemand%
Other system parameters and interoperabilityGeneral system parameters are set the same as for stand-alone tank/controller. See the Setup section of this manual for instructions.
Multi-tank operation with Web interfaceIf you plan to use the Web interface for multi-tank operation, the web interface must first be configured, see Web interface communication on Page 21.
To change a priority group, go to the Setup menu to access Multi-tank setup/Tank priority group.
To add a tank to a multi-tank system:
1. Verify that the new tank has the correct tank designator. Change, if necessary, before wiring in Step 2.
2. Connect wiring of new tank.
3. The master controller automatically adds the new tank’s capacity into the total system capacity.
To permanently remove a tank from a multi-tank system:
1. Disconnect control board wiring (location P8) of the tank being removed.
2. Reset system capacity from the Multi-tank setup menu. The controller will automatically calculate the new system capacity.
Important:
designator (A, B, C ... P). Duplicate tank designations will cause multi-tank mode to operate incorrectly.
192.168.1.195. When installing on an Ethernet network, assign each board a unique IP address to avoid conflict with other devices on the network.
Operation
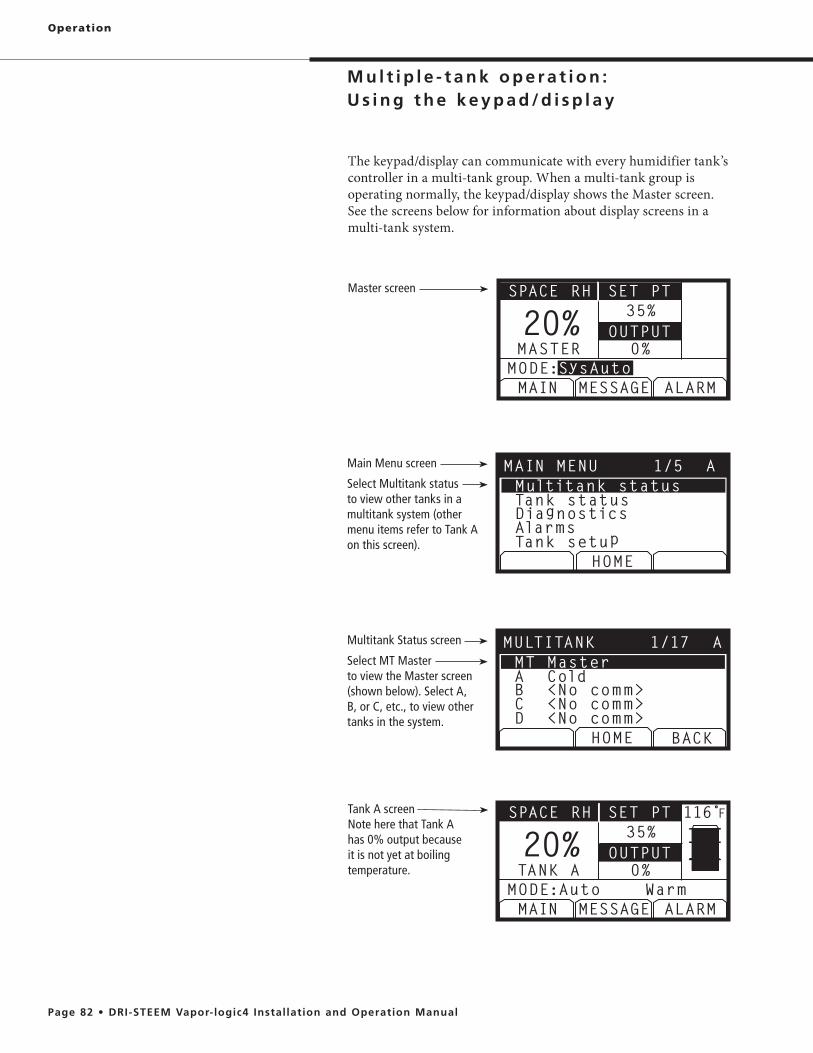
Main Menu screen
Select Multitank status to view other tanks in a multitank system (other menu items refer to Tank A on this screen).
HOME
Multitank status
DiagnosticsTank status
Tank setupAlarms
MAIN MENU 1/5 A
SET PTSPACE RH
OUTPUT0%
35%20%MODE:Auto WarmTANK A
MESSAGEMAIN ALARM
116 F̊Tank A screenNote here that Tank A has 0% output because it is not yet at boiling temperature.
MODE:SysAuto
SET PTSPACE RH
OUTPUT0%
35%20%MASTER
MESSAGEMAIN ALARM
Master screen
Multitank Status screen
HOME BACK
MT Master
B <No comm>A Cold
D <No comm>C <No comm>
MULTITANK 1/17 ASelect MT Master to view the Master screen (shown below). Select A, B, or C, etc., to view other tanks in the system.
The keypad/display can communicate with every humidifier tank’s controller in a multi-tank group. When a multi-tank group is operating normally, the keypad/display shows the Master screen. See the screens below for information about display screens in a multi-tank system.
Operation

Additional Web interface screens, described below, appear when operating in multi-tank mode.
Each connected tank automatically shows up as a link. Click on a tank link to view its status.
Important: All system tanks must be network-connected via Ethernet for these links to function.
Click on the Setup tab to view Multi-tank setup parameters.
This letter identifies which tank (A ... P) you are viewing.
Operation

Solving issues
1. Review issues, possible causes and recommended actions.
The troubleshooting guide on the following pages presents issues, possible causes and recommended actions for typical issues.
2. Review tank or dispersion manuals.
If you have a tank-related or dispersion-related issue, you may also need to refer to those specific product manuals.
3. If you’re still having issues, call DRI-STEEM.
If the troubleshooting guide does not help you solve your issue, call DRI-STEEM with the following information available:
You’ll find this information on the humidifier or control cabinet.
Example: water leaking, low humidity, high humidity, etc.
Example: Tank temp, probe wiring, etc.
Example: Always, after remodel, after a change in weather, etc.
Example: Pressure, new boiler, new service, new controller, relocation, change in maintenance, etc.
Calling DRI-STEEM Technical Support
Have the following information ready before calling:
Vapor-logic4 firmware version ____________________________
Humidifier model number _______________________________
Humidifier serial number ________________________________
Issue definition ________________________________________
Alarms Log items _______________________________________
Messages Log items _____________________________________
Time issue began _______________________________________
Recent system changes ___________________________________
Operation
DRI-STEEM Technical Support:
800-328-4447

Table 85-1:Troubleshooting guide
Pow
er is
sues
Issue Possible causes Actions
Green power indicator light is off. transformer.
No remote indication of alarm lightNo remote activation of fan
from Setup menu Setup menu to program dry contact and/or 24 VAC triac.
from the dry contact connection point on terminal block P12 or from the triac connection point on terminal block P16.
burned out replace if needed.
switching terminal P12) for contact closure.
No readable information on keypad/display boardtripped.
enclosure only).
Keypad/display does not energize. characteristics.
voltage is not present, check transformer circuit breaker. Reset if needed.
below terminal cover.
Display is completely black.
Continued
Operation

Table 85-1:Troubleshooting guide (continued)
Tran
smit
ter
or h
umid
ista
t is
sues
Issue Possible causes Actions
Alarm: RH signal out of range
When transmitter or humidistat alarms appear, possible causes are:
signals are: 4-20 mA, or 0-10 VDC
At terminal P11 -- RH signal: 2-10 VDC. -- Dew point signal: 2-10 VDC. -- Demand signal: 0-10 VDC. At terminal P13 -- Duct high limit signal: 0-24 VDC, 2-10 VDC. At terminal P14 -- Auxiliary temp sensor or temperature compensation sensor: 2-10 VDC.
-- If there is no output, replace transmitter. -- Verify output is 4-20 mA. -- Calibrate transmitter or humidistat
if necessary.
DRI-STEEM.
Alarm: Dew point signal out of range
Alarm: Demand signal out of range
Alarm: Duct RH signal out of range
Alarm: Aux temp sens out of range
Alarm: No SDU airflow
incorrectly wired
not start)
Continued
Operation

Table 85-1:Troubleshooting guide (continued)
Wat
er le
vel c
ontr
ol p
robe
issu
es
Issue Possible causes Actions
Alarm: Water probe miswired
Alarm:Faulty water probe
Do not use shielded (screened) wiring.
exceed the recommended 50' (15 m) limit.
the humidifier's manual.
installed correctly, that there are no elbows or restrictions in the piping, and that the length of the piping is not too long. See instructions in the humidifier's manual.
is not plugged.
and humidifier tank.
needed.
bicarbonate (i.e., Alka Seltzer) to increase conductivity. Consult DRI-STEEM for further advice.
temperature thermostat
assembly.
Continued
Operation

Table 85-1:Troubleshooting guide (continued)
Filli
ng is
sues
Issue Possible causes Actions
Alarm: Excessive fill time
Alarm:Excessive refill time
Tank is not full.
wired
menu.
valve.
”In” should be visible on fill valve body.
valve and make it difficult to open
rod assembly.
Tank is full.
Low water conductivity:
humidifiers with heating elements require fill
conductivity is 125 to 1250 μS/cm.
increase water conductivity. Consult DRI-STEEM for further advice.
”In” should be visible on fill valve body.
converted to steam before receiving a fault.
Fill valve cycles on and off frequently (several times per minute)
For XT humidifiers, see Check cylinder / high water on Page 47 of Table 45-1.
valve.
the valve.
Vapor-logic4 control board terminal P17 (drain).
Continued
Operation

Table 85-1:Troubleshooting guide (continued)
Filli
ng is
sues
Issue Possible causes Actions
Unit does not fill with water.open, verify proper 24 VAC to fill valve. If voltage is present and valve does not open, replace valve or valve coil.
pressure exists.
mode
Fill valve does not closereset to automatic.
not allow complete closure.
drain coil.
bicarbonate (i.e., Alka Seltzer) to tank or cylinder water. If this solves the issue, you have low-conductivity water; consult DRI-STEEM for further advice.– Tap/softened water GTS humidifiers and electric humidifiers
with heating elements require fill water conductivity to be
– XT humidifier recommended fill water conductivity is 125 to 1250 μS/cm.
replace valve.
properly. Clean or replace valve as needed.
controls.)
Continued
Operation

Table 85-1:Troubleshooting guide (continued)
Dra
inin
g is
sues
Issue Possible causes Actions
Alarm: Tank not draining
control board.
valve.
and pitch requirements.
Unit does not perform automatic drain sequence
system, or automatic drain is disabled
drain pipe
drain valve.
valve.
Unit does not perform end-of-season drain
setup
Continued
Operation

Table 85-1:Troubleshooting guide (continued)
Hea
ting
issu
es
Issue Possible causes Actions
Alarm: Tank temperature sensor failed
1000 Ohms = 68 °F (20 °C); 1702 Ohms = 212 °F (100 °C).
temperature thermostat
Alarm: Tank overtemp
(14 ºC) over boiling temperature
Reduced or no output (even though water level is correct)
Electric humidifiers:
Electric humidifiers:
operate, e.g., duct humidistats, airflow proving switch, etc. Reset, replace or calibrate as needed. (Airflow switch, terminal P13 (24VAC and AFsw) measures 24 VAC if open. On-off high limit, terminals P13 (24VDC and DHL), measures 24 VDC if open.
Reset if necessary.
GTS, STS or LTS systems only:
GTS systems only:
Continued
Operation

Table 85-1:Troubleshooting guide (continued)
Hea
ting
issu
es
Issue Possible causes Actions
Heater burnout
replace with larger humidifier. Consult DRI-STEEM.
Increase skim duration, frequency of drain cycle, and/or frequency of cleaning. Use softened makeup water.
burned-out heater verify chloride content in supply water is very low.
Tank does not heat up.under heater wiring cover tripped
models only)
(GTS systems only)connected.
is not present, troubleshoot boards and wiring system for potential short circuit.
unit
signal.
Humidifier tank has proper water level and is always warm.
temperature within range of 40 ºF to 180 ºF (4 ºC to 82 ºC).
Continued
Operation

Table 85-1:Troubleshooting guide (continued)
Hum
idit
y se
t po
int
issu
es
Issue Possible causes Actions
Humidity is below desired level. humidity level humidifier.
repair, or replace as needed.
fill P-trap with water or repair as needed.
recommended height (see humidifier tank manual for water seal height).
of the high pressure (e.g., high duct static pressure, undersized orifices in dispersion tubes, water, or crushed vapor hose) and correct as required.
control and high limit humidity transmitters long and/or uninsulated (do not insulate steam hose).
wiring.
zone valves, etc.) are not allowing unit to operate.
necessary.
Vapor-logic4 firmware control board connections P11 and P13.
Consult DRI-STEEM.
not in Auto mode
Continued
Operation

Table 85-1:Troubleshooting guide (continued)
Hum
idit
y se
t po
int
issu
es
Issue Possible causes Actions
Humidity above set point.
transmitters
malfunctioning, repair or recalibrate.
Hunting (humidity swings above and below desired set point)
repair or replace. control settings: RH set point, high
limit set point, cycle rate, PID tuning, etc.
placement” on Page 26.
separated from each other. If they are not, an induced control voltage can occur, causing erratic operation.
wiring.
gain (Ki) is too large menu.
changing to controlling with a modulating signal.
Continued
Operation

Table 85-1:Troubleshooting guide (continued)
Gas
-to-
stea
m (G
TS) h
umid
ifier
issu
es
Issue Possible causes Actions
Alarm: Blocked flue
high wind vent cap or isolate as recommended by local codes.
Alarm: Gas valve [number] fault
Alarm: Burner [number] faultpressure to manifold per rating plate.
to gently push down fibers near flame sensor.
Alarm: Ignition module [number] fault gas valve
sequence
Alarm: Blower [number] fault failed to meet demand speed
Alarm: No power vent airflow
Alarm: No combustion airflow
Operation
Stea
m-t
o-st
eam
(STS
) hum
idifi
er is
sues Humidifier will not heat
Low outputon unit.

Operation
Table 96-1:Vapor-logic4 replacement parts
Description Quantity Part number
Main board 1 408495-001
Keypad/display (includes printed circuit board, LCD display screen, membrane switch, front and back of plastic cover) 1 408495-010
Keypad/display communication cable (contact DRI-STEEM for lengths other than 27" (686 mm) and 60" (1524 mm)27" (686 mm) 408490-014
60" (1524 mm) 408490-009
Molex connector plug, 2-position 1 406246-002
Molex connector plug, 3-position 1 406246-003
Molex connector plug, 4-position 1 406246-004
LonTalk card 1 408642
BACnet 1 191515

Operation
Figure 97-1:Vapor-logic4 replacement parts
Main board Keypad display
Molex connector plug (2-position shown) LonTalk card


Firmware Version 2.X.X Form No. VL4-IOM-0312 Part No. 890000-713 Rev G
Expect quality from the industry leader
For more than 45 years, DRI-STEEM has been leading the industry with creative and reliable humidification solutions. Our focus on quality is evident in the construction of the Vapor-logic4 controller. DRI-STEEM also leads the industry with a Two-year Limited Warranty and optional extended warranty.
For more information www.dristeem.com [email protected]
For the most recent product information visit our website: www.dristeem.com
Two-year Limited Warranty
DRI-STEEM Corporation (“DRI-STEEM”) warrants to the original user that its products will be free from defects in materials and workmanship for a period of two (2) years after installation or twenty-seven (27) months from the date DRI-STEEM ships such product, whichever date is the earlier.
If any DRI-STEEM product is found to be defective in material or workmanship during the applicable warranty period, DRI-STEEM’s entire liability, and the purchaser’s sole and exclusive remedy, shall be the repair or replacement of the defective product, or the refund of the purchase price, at DRI-STEEM’s election. DRI-STEEM shall not be liable for any costs or expenses, whether direct or indirect, associated with the installation, removal or reinstallation of any defective product. The Limited Warranty does not include cylinder replacement for electrode steam humidifiers.
DRI-STEEM’s Limited Warranty shall not be effective or actionable unless there is compliance with all installation and operating instructions furnished by DRI-STEEM, or if the products have been modified or altered without the written consent of DRI-STEEM, or if such products have been subject to accident, misuse, mishandling, tampering, negligence or improper maintenance. Any warranty claim must be submitted to DRI-STEEM in writing within the stated warranty period. Defective parts may be required to be returned to DRI-STEEM.
DRI-STEEM’s Limited Warranty is made in lieu of, and DRI-STEEM disclaims all other warranties, whether express or implied, including but not limited to any IMPLIED WARRANTY OF MERCHANTABILITY, ANY IMPLIED WARRANTY OF FITNESS FOR A PARTICULAR PURPOSE, any implied warranty arising out of a course of dealing or of performance, custom or usage of trade.
DRI-STEEM SHALL NOT, UNDER ANY CIRCUMSTANCES BE LIABLE FOR ANY DIRECT, INDIRECT, INCIDENTAL, SPECIAL OR CONSEQUENTIAL DAMAGES (INCLUDING, BUT NOT LIMITED TO, LOSS OF PROFITS, REVENUE OR BUSINESS) OR DAMAGE OR INJURY TO PERSONS OR PROPERTY IN ANY WAY RELATED TO THE MANUFACTURE OR THE USE OF ITS PRODUCTS. The exclusion applies regardless of whether such damages are sought based on breach of warranty, breach of contract, negligence, strict liability in tort, or any other legal theory, even if DRI-STEEM has notice of the possibility of such damages.
By purchasing DRI-STEEM’s products, the purchaser agrees to the terms and conditions of this Limited Warranty.
Extended warranty
The original user may extend the term of the DRI-STEEM Limited Warranty for a limited number of months past the initial applicable warranty period and term provided in the first paragraph of this Limited Warranty. All the terms and conditions of the Limited Warranty during the initial applicable warranty period and term shall apply during any extended term. An extended warranty term of an additional twelve (12) months or twenty four (24) months of coverage may be purchased. The extended warranty term may be purchased until eighteen (18) months after the product is shipped, after which time no extended warranties are available.
Any extension of the Limited Warranty under this program must be in writing, signed by DRI-STEEM, and paid for in full by the purchaser.mc_051308_0630
Printed on 30% recycled paper
DRI-STEEM CorporationAn ISO 9001:2000 certified company
U.S. Headquarters:14949 Technology DriveEden Prairie, MN 55344800-328-4447 or 952-949-2415952-229-3200 (fax)
European office:Marc Briers Grote Hellekensstraat 54 bB-3520 Zonhoven Belgium+3211823595 (voice) +3211817948 (fax)E-mail: [email protected]
Continuous product improvement is a policy of DRI-STEEM Corporation; therefore, product features and specifications are subject to change without notice.
DRI-STEEM, Vaporstream, Vapormist, and Vapor-logic are registered trademarks of DRI-STEEM Corporation and are filed for trademark registration in Canada and the European community.
Product and corporate names used in this document may be trademarks or registered trademarks. They are used for explanation only without intent to infringe.
© 2012 DRI-STEEM Corporation
Warranty