variable speed homogenizer
TRANSCRIPT

OWNER’S MANUAL
Cole-Parmer Instrument Company 625 East Bunker Court Vernon Hills, IL 60061 USA Toll Free: 1-800-323-4340 Phone: 1-847-549-7600 Fax: 1-847-247-2929 Hearing Impaired: 1-800-833-7400
VARIABLE SPEED HOMOGENIZER

2
This manual is a guide for the use of the Cole-Parmer LabGen 7 and accessories. Data herein has been verified and validated. It is believed adequate for the intended use of the instrument. If the instrument or procedures are used for purposes over and above the capabilities specified herein, confirmation of the validity and suitability should be obtained, otherwise Cole-Parmer does not guarantee results and assumes no obligation or liability. This publication is not a license to operate under, or a recommendation to infringe upon, any process patents. Notes, cautions, and warnings within the text of this manual are used to emphasize important and critical instructions. This Cole-Parmer product is warranted to be free from defects in material and workmanship for a period of ONE YEAR from the date of delivery. Cole-Parmer will repair or replace and return free of charge any part which is returned to its factory within said period, transportation prepaid by user, and which is found upon inspection to have been defective in materials or workmanship. For the first 90 days, both parts and service are without charge. For the balance of the period, parts will be provided but service will be charged at established labor rates. This warranty does not include normal wear from use; it does not apply to any instrument or parts which have been altered by anyone other than an employee of Cole-Parmer nor to any instrument which has been damaged through accident, negligence, failure to follow operating instructions, the use of electric currents or circuits other than those specified on the plate affixed to the instrument, misuse, or abuse. Cole-Parmer reserves the right to change, alter, modify, or improve any of its instruments without any obligation whatever to make corresponding changes to any instrument previously sold or shipped. THE FORGOING OBLIGATION IS IN LIEU OF ALL OBLIGATIONS AND LIABILITIES INCLUDING NEGLIGENCE AND ALL WARRANTIES OF MERCHANTABILITY OR OTHERWISE, EXPRESSED OR IMPLIED IN FACT OR BY LAW, AND STATE OUR ENTIRE AND EXCLUSIVE LIABILITY AND BUYERS EXCLUSIVE REMEDY FOR ANY CLAIM OF DAMAGES IN CONNECTION WITH THE SALE OR FURNISHING OF GOODS OR PARTS, THEIR DESIGN, SUITABILITY FOR USE, INSTALLATION, OR OPERATION. COLE-PARMER WILL IN NO EVENT BE LIABLE FOR ANY SPECIAL OR CONSEQUENTIAL DAMAGES WHATSOEVER, AND THEIR LIABILITY UNDER NO CIRCUMSTANCES WILL EXCEED THE CON-TRACT PRICE FOR THE GOODS FOR WHICH LIABILITY IS CLAIMED.
WARRANTY INFORMATION

3
-READ ALL INSTRUCTIONS BEFORE USING. -SAVE THIS OWNER’S MANUAL. The LabGEN 7 has been engineered for economical functionality as well as safety; however, basic safety precautions and common sense must always be demonstrated when using any electrical product. Do not attempt to modify any part of the LabGEN 7. If you experience problems with or have questions about your LabGEN 7, contact your authorized dealer or call Cole-Parmer at 1-800-323-4340 or 847-549-7600.
-DO NOT allow the machine to be submerged in any liquid.
-DO NOT use in any setting other than an indoor laboratory.
-DO NOT plug power cord into an incorrect outlet.
To reduce the risk of burns, electrocution, fire, or injury:
-Use this product only for its intended purpose as described in this booklet. Do not use attachments not recommended by the manufacturer.
-DO NOT operate the product if it is damaged in any way.
-Keep this product away from heated surfaces.
IMPORTANT SAFEGUARDS
DANGER
WARNING

4
TABLE OF CONTENTS
Warranty Information…………………………………. Section 1. Preparation for Use 1.1 Specifications………………………………... 1.2 Parts and Accessories……………………….. 1.3 Stand-Mounting the Tissue Master…………..
2
5 5 6
Section 2. Operation……………………………………
6
Section 3. Generator Probe Maintenance 3.1 Disassembly………………………………….. 3.2 Bearing Removal…………………………….. 3.3 Reassembly…………………………………... 3.4 Replacement Bearing Run-in………………...
7 7 8 9
Section 5. Motor Unit Maintenance 4.1 Motor Cleaning……………………………… 4.2 Brush Replacement…………………………..
10 10
Section 6. Troubleshooting……………………………
11
Section 4. Reorder Information……………………… 9

5
The Cole-Parmer LabGEN 7 is a variable speed, handheld homogenizer. It combines a high-speed, high-torque motor with an included autoclavable 7mmx85mm rotor-stator generator probe.
1.1 SPECIFICATIONS
Motor Drive Unit
LabGEN 7 Motor Speed: 5,000-35,000rpm
Capacity: 0.25-30ml Height (motor only): 15.3cm (6in.) Weight (motor only): 446g (15.7oz) Electrical Requirements: Motor: 115V@60Hz or 220V@50Hz Standards Approval/Compliance: 115V: CSA Certified 220V: CSA & CE Certified Stainless Steel Generator Probe Probe Diameter: 7mm Probe Length: 82mm Processing Capacity: 0.25-30mL Probe Applications: liquid/liquid or most tissue Minimum Vessel Inside Diameter: 8mm
SECTION 1. PREPARATION FOR USE
1.2 PARTS AND ACCESSORIES
Remove the LabGEN 7 and any accessories from their packaging. If any parts are missing or damaged, call your authorized dealer or call Cole-Parmer at
1-800-323-4340 or 847-549-7600.
Your LabGEN 7 includes the following parts and accessories:
1) Assembled LabGEN 7 Unit
2) Two Spare Bearings (White)
3) Two Spare Flexible Collets (Black)
4) One Collet Wrench

6
1) Check that the power switch is in the OFF position. 2) Plug the power cord into an appropriate outlet.
3) The bottom of the GENERATOR must be submersed in a liquid before operation to prevent bearing damage.
4) Turn ON the power switch. The speed progressively increases as the switch slides away from the “O” mark. Run the motor for the appropriate amount of time required to homogenize the sample. Moving the
homogenizer up and down within the sample during processing will increase processing efficiency.
5) A simple cleaning of the GENERATOR in between samples may be
accomplished by running the probe in a chlorine bleach solution and then in distilled water to rinse. The probe must still be cleaned periodically in accordance with section 3.
SECTION 2. OPERATION
WARNING: DO NOT attempt to plug a cord into an incompatible outlet.
WARNING: DO NOT process pathogenic material in an open container. For assistance, contact your authorized dealer or Cole-Parmer at 1-800-323-4340 or 847-549-7600.
1.3 STAND-MOUNTING THE LabGEN 7 (Optional) An optional stand kit (Part # F22000) may be purchased to mount the LabGEN 7. Contact your authorized dealer or Cole-Parmer at 1-800-323-4340 or 847-549-7600 to order. Assemble the stand:
1) Thread the larger rod onto the base plate. 2) Thread the cross-rod into the motor cradle. 3) Assemble the clamp to the vertical rod. 4) Assemble the cross-rod to the clamp. 5) Insert the motor unit into the motor cradle and tighten the thumb screws
SECTION 1. PREPARATION FOR USE

7
In order to thoroughly clean the components of the LabGEN 7, it must be
disassembled.
3.1 DISASSEMBLY
1) Disconnect the MOTOR from the power source.
2) Unthread the GENERATOR TUBE from the motor unit.
3) Hold down the SHAFT LOCK BUTTON. Use the collet wrench to loosen (counterclockwise) and remove the COLLET NUT.
4) Remove the steel ROTOR SHAFT from the COLLET NUT and FLEXIBLE COLLET.
5) If the BEARING is worn, it needs to be replaced (see Section 3.2). If the BEARING does not need replacing, wipe the rotor shaft with a cloth or paper towel. Use the included brush to clean inside the generator tube.
3.2 BEARING REMOVAL
1) Hold the BEARING/ROTOR SHAFT with a pair of pliers.
2) Use a sharp knife to cut the BEARING lengthwise.
3) Peel the BEARING off of the shaft and discard.
SECTION 3. GENRATOR PROBE & ACCESSORY MAINTENANCE
MOTOR
SHAFT LOCK BUTTON
FLEXIBLE COLLET (BLACK)
COLLET NUT BEARING (WHITE)
ROTOR SHAFT
GENERATOR TUBE
WARNING: DO NOT hold the bearing/rotor shaft with bare hands while cutting.

8
3.3 REASSEMBLY
1) Stand the new BEARING flat on a table surface and press the smaller end of the ROTOR SHAFT through the BEARING.
2) Holding the ROTOR SHAFT off the table, push the ROTOR SHAFT through the hole in the center of the collet wrench and use the wrench to press the BEARING down the shaft until it snaps into place (the bearing should feel
loose in the bearing seat). (see figures)
4) Slide the COLLET NUT onto the ROTOR SHAFT.
5) Slide the FLEXIBLE COLLET about one centimeter onto the ROTOR SHAFT.
6) Check that the unit is disconnected from the power source.
7) Insert the ROTOR SHAFT into the MOTOR unit until it stops. Ensure that the
shaft is all the way in the motor unit.
8) Slide the COLLET NUT down the ROTOR SHAFT and thread it onto the
MOTOR unit.
9) Hold down the SHAFT LOCK BUTTON and hand tighten the collet nut as
much as possible. DO NOT use the collet wrench.
10) Slide the GENERATOR TUBE over the ROTOR SHAFT and thread it
onto the MOTOR unit. Firmly hand tighten the tube.
11) See section 3.4 for instructions to run-in the new BEARING.
(if the bearing was not replaced, the LabGEN 7 is ready
WARNING: To reduce the risk of personal injury, DO NOT attempt to run the motor with the shaft exposed.
SECTION 3. GENRATOR PROBE & ACCESSORY MAINTENANCE
9
3.4 BEARING RUN-IN
If the BEARING was replaced, it must be run-in before use.
1) Immerse 1/3 of the GENERATOR in water and run the MOTOR at a low speed for one minute.
2) Increase speed at one minute intervals for three minutes
3) Run at full speed for one minute.
4) Disconnect the unit from the power source
5) Remove the GENERATOR TUBE and clean the BEARING with the brush. (DO NOT remove the bearing)
6) Re-install the GENERATOR TUBE. The LabGEN 7 is now ready for use.
NOTE: If the probe is excessively noisy, turn the motor off and return to step 1.
SECTION 3. GENRATOR PROBE & ACCESSORY MAINTENANCE
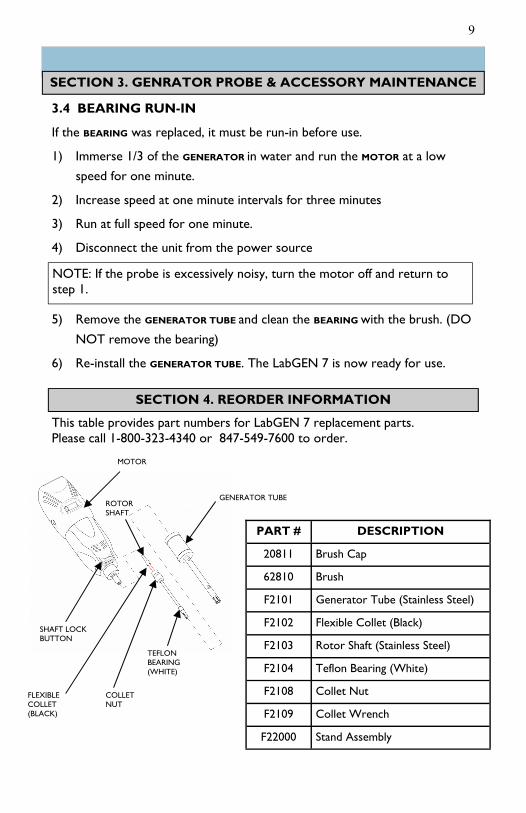
PART # DESCRIPTION
20811 Brush Cap
62810 Brush
F2101 Generator Tube (Stainless Steel)
F2102 Flexible Collet (Black)
F2103 Rotor Shaft (Stainless Steel)
F2104 Teflon Bearing (White)
F2108 Collet Nut
F2109 Collet Wrench
F22000 Stand Assembly
SHAFT LOCK BUTTON
FLEXIBLE COLLET (BLACK)
COLLET NUT
TEFLON BEARING (WHITE)
ROTOR SHAFT
GENERATOR TUBE
MOTOR
This table provides part numbers for LabGEN 7 replacement parts. Please call 1-800-323-4340 or 847-549-7600 to order.
SECTION 4. REORDER INFORMATION

10
5.1 MOTOR CLEANING
The MOTOR housing may be wiped down with a clean cloth when disconnected from the power source and not in use. DO NOT use solvents to clean the unit.
5.2 BRUSH REPLACEMENT
1) Remove Power.
2) Using the driver end of the collet wrench, unscrew and remove one BRUSH CAP.
3) Pull on the brush spring. The BRUSH and spring will come out as one assembly. If the spring breaks, turn the MOTOR on its side and tap it until the BRUSH falls out.
4) Repeat steps 2 and 3 for the other BRUSH.
5) Install the new BRUSHES (with springs) into the MOTOR unit.
6) Re-install the BRUSH CAPS to both sides of the MOTOR unit and tighten with the collet wrench. The LabGEN 7 is now ready for use.
WARNING: DO NOT attempt to disassemble the motor unit.
SECTION 5. MOTOR UNIT MAINTENANCE
BRUSH (2)
BRUSH CAP (2)
WARNING: DO NOT connect the power cord to a power source if it is worn or damaged. For assistance, call your authorized dealer or Cole-Parmer at 1-800-323-4340 or 847-549-7600.

11
SECTION 6. TROUBLESHOOTING
Do not attempt to service the LabGEN 7 in a manner other than those discussed in this manual. For any issue that is unsuccessfully corrected using this guide, please contact your authorized dealer or call technical assistance at Cole-Parmer at 1-800-323-4340 or 847-549-7600.
PROBLEM CORRECTIVE ACTION
The LabGEN 7 is plugged in and turned on but is not functioning.
-Check power cord connectors -Check wall socket for power to the outlet
Motor is turned ON and makes a makes a “buzzing” sound, but is not working.
-Check that the brushes are not worn and are correctly installed. Replace if necessary. (see Section 4.2)
Motor unit operating speed declines, stalls intermittently, or stops completely
-Check that the brushes are not worn and are correctly installed. Replace if necessary. (see Section 4.2) -Check the condition of the flexible collet and replace if needed (see Section 3)
Excessive noise during normal operation -Check the condition of the Teflon bearing (white) and replace if needed (see Section 3). -Check the condition of the flexible collet and replace if needed (see Section 3)
Rotor shaft slides out of the bottom of the tube.
-Check the condition of the flexible collet and replace if needed (see Section 3)
Excessive noise during run-in of a new bearing
-Turn the LabGEN 7 OFF and return to step 1 of Section 3.4
Teflon bearing wears quickly -Fluid level may be too low in the tube. -Immerse the probe deeper into the fluid.
Excessive splashing in sample tube -Fluid level too low for tube size

12
625 East Bunker Court Toll Free: 1-800-323-4340 Vernon Hills. IL 60061 Phone: 1-847-549-7600 FAX: 1-847-247-2929 www.coleparmer.com Email: [email protected] Patents Pending Rev. 07/10/08 rb P/N: 03-203C