vehiclesim dynamics plugin for unreal engine tutorial...the vehiclesim dynamics plugin page in the...
TRANSCRIPT

Mechanical Simulation Technical Memo 755 Phoenix Drive, Ann Arbor MI, 48108, USA Phone: 734 668-2930 • Fax: 734 668-2877 • Email: [email protected] carsim.com
1 / 25 December 2019
VehicleSim Dynamics Plugin for Unreal Engine Tutorial
Before You Start ..................................................................................................... 1 How to Setup the VehicleSim Dynamics Plugin .................................................... 2
Manual Plug-in Setup ...................................................................................... 2 How to Attach Objects to the Simulation ............................................................... 4 Loading an Example Project .................................................................................. 7 Creating a Vehicle Model in CarSim ................................................................... 10 Changing CarSim Vehicle Parameters ................................................................. 14 Selecting a Vehicle with a different type of Suspension ...................................... 15 Input and Configuration Settings of the Plugin .................................................... 16 Changing the Coefficient of Road Friction .......................................................... 18 Using TruckSim in the plugin .............................................................................. 20
Removing the Trailer ..................................................................................... 21 Path Utility ........................................................................................................... 22
Unreal Engine is a powerful gaming engine that provides high-quality graphics. The Mechanical Simulation VehicleSim Dynamics Plugin for Unreal Engine (“the plugin”) allows users to create these high-quality graphics and include CarSim and TruckSim math models. The plugin will feed terrain data, including surface friction, from Unreal Engine to the CarSim or TruckSim math model. It will also provide the math model data to the Unreal simulation using C++ code or Blueprints (Unreal Engine’s block-based visual scripting system). Standard CarSim output files are generated so that you can view the selected variable outputs in the VS Visualizer plotter (included with CarSim and TruckSim) after a run.
This tutorial assumes you have little or no experience with Unreal Engine and that you would like to use the plugin for your vehicle simulations.
This tutorial has separate sections demonstrating the use of CarSim and TruckSim with the plugin and Unreal Engine.
Before You Start Before starting, there are a few requirements.
1. To use the CarSim math model, you must have a valid CarSim Solver license and ensure that either the CarSim program or the CSLM license utility is running with the CarSim Solver license feature enabled.

2 / 25
2. To use the TruckSim math model, you must have a valid TruckSim Solver license and ensure that either the main TruckSim program or the TSLM license utility is running with the TruckSim Solver license feature enabled.
3. The appropriate Unreal Engine version must be installed from www.unrealengine.com. To find which engine version is supported by your CarSim or TruckSim version, please visit the VehicleSim Dynamics Plugin page in the user section of www.carsim.com.
How to Setup the VehicleSim Dynamics Plugin Once you’ve downloaded and installed Unreal Engine, open the Epic Games Launcher to access the application. Go to Marketplace, and search for “VehicleSim” to find the plugin (Figure 1). Click Install to Engine , then click the Launch button to access the project browser.
Figure 1. VehicleSim Dynamics plugin installation.
Manual Plug-in Setup If you require a version of the plug-in that is not available on the Unreal Marketplace, such as the Linux version, the plugin can be added to your project manually. Start by downloading the appropriate version of the plug-in from the user section of www.carsim.com. The plug-in zip file contains the source and binaries. Extract the files from the zip into the Plugins/ folder for your current project, creating the folder if it does not exist. You may be prompted to rebuild the plug-in if you are using a different version of the Unreal Editor that does not match the compiled plug-in binaries.
In the Unreal Project Browser (Figure 2), locate the Vehicle project template inside of the Games category and create a project using the default options.
1
2

3 / 25
Figure 2. Unreal project browser.
This creates a new Unreal Blueprint project based on the Vehicle project template and opens the new project in the Unreal Editor.
Note You may need to enable the VehicleSim Dynamics plugin on the Plugins Settings dialog (Figure 3) before you have access to it. In the Unreal Editor, navigate on the main drop-down menu to Edit > Plugins and ensure that the Enable checkbox is checked. You may be required to restart Unreal after changing this setting.
Figure 3. Plugin Browser Screen.
Once you’ve created the project, navigate to the left side of the screen under Modes (Figure 4) and search for CarSim . An item named Carsim Vehicle Pawn will show up under the search bar. You have now located the proper plugin feature that we will use.
1
1
1

4 / 25
Figure 4. Finding the CarSim Pawn.
How to Attach Objects to the Simulation In the following steps, we will add an Actor (an object within the Unreal simulation) to the scene, attach a body mesh to it, and finally adjust the offset coordinates of the 3D shape such that the visual representation of the car aligns properly with origin of the CarSim coordinate system.
1. Drag the CarSim Vehicle Pawn to the Unreal Viewport (Figure 5). We have now located the correct class object to use with the plugin and have dragged it into the window from the menu.
Figure 5. Navigating the Unreal GUI.
Note The vehicle will not have any body geometry attached initially. It will appear as an xyz origin with cameras, as shown above.
6
1
2
3
4
5

5 / 25
2. Toward the top right side of the Unreal Editor screen is a menu box called the World Outliner . Locate the CarSimPawn (the object name may have a number appended, such as “CarSimPawn1”) and highlight it by left-clicking once.
3. Expand the Component list of our CarSimPawn instance in the Details panel so that you can see the BodyShapeOffset Component.
4. Locate the Content Browser on the lower part of the Unreal Editor window. Navigate to the example vehicle body shape in the Content Browser: Content > Vehicle > Sedan and drag Sedan_SkelMesh to the Details menu, dropping the mesh onto BodyShapeOffset Component . It will prompt you for a name; press Enter to accept the defaut name. This will attach the body mesh to the CarSimPawn object.
5. Ensure that the Sedan_SkelMesh Component instance is attached to the BodyShapeOffset Component instance within the Details panel. Unreal Editor’s behavior when dropping components on this panel can sometimes be unpredictable, and the hierarchical display (with its mix of triangle shapes, icons, and text) can be confusing, which can make it difficult to determine the attachment hierarchy.
If the steps below to offset the body shape do not produce the expected results, it is likely that the mesh is not attached to BodyShapeOffset Component, but rather one of the other Components in the hierarchy.
Drag the mesh Component within the hierarchy to modify its attachment. Pay close attention to the pop-up tooltips while dragging as there may be times where you expect to execute an “attach” operation, but Unreal Editor actually executes a “detach” operation.
Figure 6. SedanSkelMesh must be attached to BodyShapeOffset.
6. Select Sedan_SkelMesh in the Component hierarchy (Figure 7) to display its properties below the Component list. Here, you will find physics and collision elements to manage. Scroll down until you find the Collision Presets , and use the drop-down menu to change collision preset to “Vehicle” for the body mesh.
2
1

6 / 25
Figure 7. Set the collision presets to vehicle.
Note Both the vehicle from the Unreal example project (the Sedan Actor) and the CarSim vehicle (the CarSimPawn Actor) have their “Auto Possess Player” option set to “Player 0”, which may cause a controller input conflict. To avoid this, set “Auto Possess Player” to “Disable” for the Sedan. See in Figure 5.
7. Select the BodyShapeOffset Component and enter -140.0 in the Location X Offset. This will align the visible 3D shape properly with the CarSim vehicle coordinate system (which has its longitudinal origin at the center of the front axle).
6
2

7 / 25
Figure 8. Offsetting visual body object to align with CarSim coordinate system.
Hit the Play button on the top of the Unreal Editor to drive the CarSim vehicle using the existing control mapping from the Unreal example project (Figure 7) and click the Viewport. If a keyboard is used, the vehicle can be maneuvered with the WADS or arrow keys. Alternatively, you could also operate a gamepad or a gaming steering wheel kit to drive the vehicle.
After stopping the simulation (if a mouse cursor is not visible, hit “Escape”), the CarSim output files can be found in:
User home folder > AppData > Local > UnrealEngine > Common > CarSim_plugin
Note that the AppData folder is often treated as a Hidden Item in Windows Explorer. To see it, click the checkbox to show Hidden Items under the VIEW tab of the explorer window.
Loading an Example Project This example has been tested using CarSim 2020.0 and Unreal Engine version 4.24.
1. Download the example project from the Mechanical Simulation website www.carsim.com, by navigating to User Section > Tools > Unreal Plug-in. Links to the version specific files will be listed along the sidebar on the right. Download the Example plug-in project and unzip into the Unreal Projects folder.
2. Open the project by either double-clicking on the Unreal project file (Example_UE4_Project.uproject) in the unzipped folder or launch Unreal Engine and browse to the project file.

8 / 25
Note If a message appears saying modules are missing or requesting to build with a different engine, click Yes. This occurs when a newer version of Unreal Engine is used.
3. The Unreal Editor will open the project with two vehicles in a driving environment (Figure 9).
Note The first time you open the project, the objects in the scene may be gray and/or have a checkerboard pattern on them. This is normal, it is the way Unreal Editor displays objects while it is compiling the rendering shaders in the background. The colored texture maps should appear after a few moments (depending on hardware performance).
Figure 9. Example project.
4. The VehicleSim Dynamics plugin requires a CarSim license to run. To enable the CarSim license, ensure that either:
a. The main CarSim Browser program (carsim.exe) is running, or
b. The CSLM license utility is running with the CarSim Solver license feature enabled.
5. Hit the Play button on the Unreal Editor toolbar (or press the assigned hotkey, Alt+P) to drive the CarSim vehicle using the existing control mapping form the example project. The

9 / 25
vehicle can be moved using a keyboard with WASD or arrow keys. A gamepad may also be used.
Note This example project contains two vehicles in order to support the VS Connect example. When testing a single vehicle as outlined in this document, you will receive multiple warnings indicating “Unable to locate VS Solver Variable.” These can be safely ignored. The second vehicle, named A_MovingObjectVehicle in the World Outliner, will set itself to invisible when Play is hit if it is not being updated via VS Connect. For more details about using VS Connect with The CarSim Unreal Plugin, see:
http://www.unrealengine.com/marketplace/carsim-vehicle-dynamics
If a CarSim dataset (vehicle configuration) is not provided by the user, the plugin uses a default dataset that is included with the plugin. This data can be found in the plugin’s installation folder (within the Unreal Engine installation folder):
Plugins > Marketplace > CarSim > ThirdParty > VehicleSim > Data
Note If you hit the Play button, and the animation looks like it in 3D stereo mode, you need to turn off Stereoscopic 3D Mode in NVIDIA control panel (Figure 10).
Figure 10. Disabling Stereoscopic 3D Mode in NVIDIA control panel.

10 / 25
Creating a Vehicle Model in CarSim As mentioned in the previous section, the CarSim math model in the plugin uses a default vehicle dataset if one is not specified. This section describes how to specify your own CarSim dataset and run your vehicle within Unreal Engine.
Open CarSim and use the menu command File > New Dataset (Empty) to create a new dataset in the Run Control library. Set the Category for the new dataset to Unreal Engine Plug-in
, and in Title for the new dataset, enter UE Vehicle (Figure 11).
Figure 11. Creating a new CarSim dataset.
Figure 12. Selecting a vehicle in a new dataset.
In this new dataset (Figure 12), uncheck Set driver controls here , Set time step here , and Advanced settings . Use the pull-down menu next to Math Model and select Vehicles >
1
2
3
4
5
6

11 / 25
Vehicle Assembly. Then, select D-Class, Sedan . Select 0 from the More plots drop down menu . Select Vehicle Reference > 13 Azm, 9 El, 18 m Dist, 45 FoV, No Yaw for Animator: Camera Setup dataset .
Next, select Models: Transfer to Local Windows Directory from the Models drop-down menu. Select the UE4 Simfile generator dataset (Figure 13).
Figure 13. Select Models: Transfer to Local Windows Directory and then UE4 simfile generator
Next, click the Generate Files for This Run button on the Run Control screen. Then, navigate to the working directory of the CarSim database (select “Help -> About CarSim…” to see the working directory). Locate the file ue4simfile.sim that you just created, and press Shift + Right-Click on it. Select Copy as Path from the resulting dropdown-menu to copy the full path name of the file to the Windows clipboard.

12 / 25
Figure 14. CarSim movement using Unreal.
Go back to the Unreal Editor. Find DemoVehicle in World Outliner and right-click to highlight it. Then, in the Component list within the Details tab, find and click on the CarSimMovement (Inherited) Component (Figure 14). You may need to scroll down do locate it.
In the properties listed below the Component hierarchy list, find CarSim > Solver Config File and Paste the path you copied in the previous step (Figure 15).
1

13 / 25
Figure 15. Vs Config File Setup.
Note The path created using Copy Path in Windows Explorer includes quotation marks ( “ ” ) at the beginning and at the end of the path. Delete these two quotation marks in the pathname.

14 / 25
Press the Play button in the Unreal Editor and then click the ViewPort. CarSim will now run with the given parameters. The vehicle can be moved using a keyboard with WASD or arrow keys. A gamepad is also used. Press H key to display a speedometer and a tachometer. Press the Tab key o toggle the camera view between the driver view and the outside view. After stopping the simulation (if a mouse cursor is not visible, hit “Escape”), the CarSim output files can be found from the CarSim GUI. Go to View > Open Results Folder for this Run in Windows.
Changing CarSim Vehicle Parameters You can now modify the vehicle inside CarSim and test it using the Unreal Editor.
1. From the Run Control screen in CarSim, click the arrow next to the vehicle dataset and select [Copy and Link Dataset] to duplicate it. Leave the category name and the title name as the default (Figure 16).
Figure 16. Duplicate Dataset in CarSim.
2. Click the D-Class, Sedan #1 blue link to navigate to the newly-created Vehicle: Assembly dataset.
3. Select [Copy and Link Dataset] to duplicate the Rigid sprung mass dataset. Again, accept the default name, “D-Class, Sedan #1”.
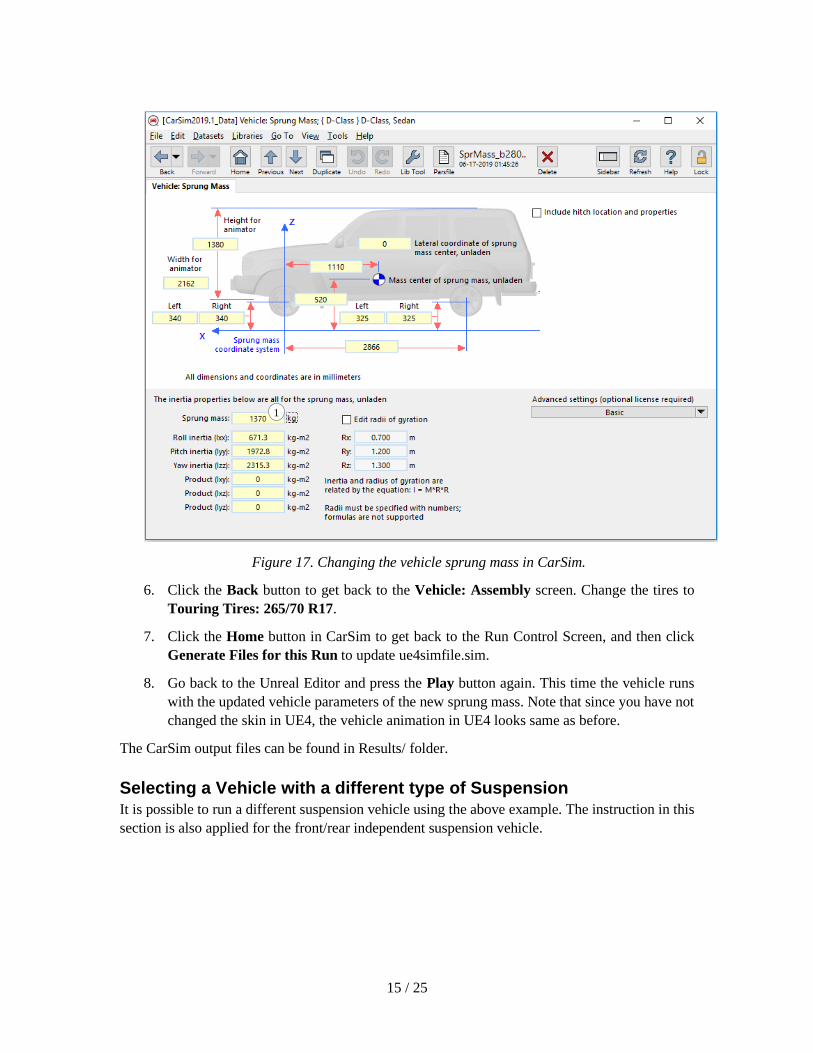
4. Click the D-Class, Sedan #1 blue link to navigate to the newly-created Vehicle: Sprung Mass dataset.
5. Change the sprung mass value from 1370 Kg ( Figure 17) to 1600 Kg.
15 / 25
Figure 17. Changing the vehicle sprung mass in CarSim.
6. Click the Back button to get back to the Vehicle: Assembly screen. Change the tires to Touring Tires: 265/70 R17.
7. Click the Home button in CarSim to get back to the Run Control Screen, and then click Generate Files for this Run to update ue4simfile.sim.
8. Go back to the Unreal Editor and press the Play button again. This time the vehicle runs with the updated vehicle parameters of the new sprung mass. Note that since you have not changed the skin in UE4, the vehicle animation in UE4 looks same as before.
The CarSim output files can be found in Results/ folder.
Selecting a Vehicle with a different type of Suspension It is possible to run a different suspension vehicle using the above example. The instruction in this section is also applied for the front/rear independent suspension vehicle.
1
16 / 25
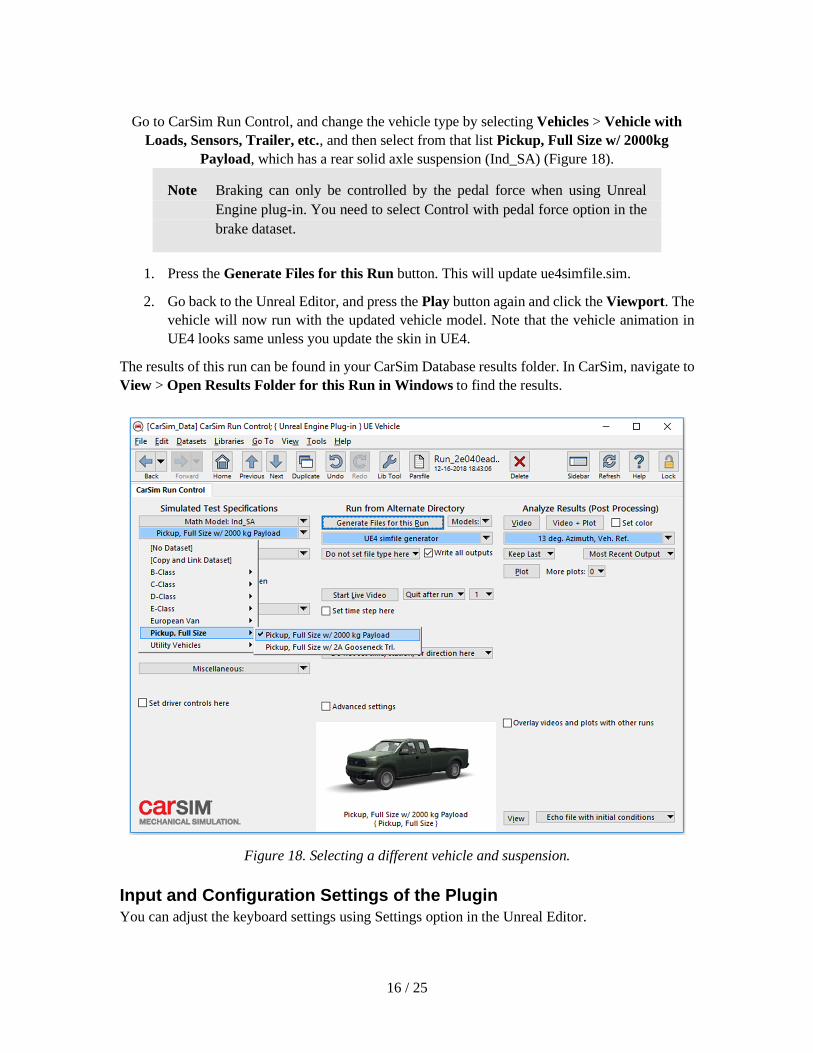
Go to CarSim Run Control, and change the vehicle type by selecting Vehicles > Vehicle with Loads, Sensors, Trailer, etc., and then select from that list Pickup, Full Size w/ 2000kg
Payload, which has a rear solid axle suspension (Ind_SA) (Figure 18).
Note Braking can only be controlled by the pedal force when using Unreal Engine plug-in. You need to select Control with pedal force option in the brake dataset.
1. Press the Generate Files for this Run button. This will update ue4simfile.sim.
2. Go back to the Unreal Editor, and press the Play button again and click the Viewport. The vehicle will now run with the updated vehicle model. Note that the vehicle animation in UE4 looks same unless you update the skin in UE4.
The results of this run can be found in your CarSim Database results folder. In CarSim, navigate to View > Open Results Folder for this Run in Windows to find the results.
Figure 18. Selecting a different vehicle and suspension.
Input and Configuration Settings of the Plugin You can adjust the keyboard settings using Settings option in the Unreal Editor.

17 / 25
Go to Edit > Projects Settings. Select Input under Engine category (Figure 19). Here, you can set the different keyboard control and the scale of the throttle and the brake. In Figure 19, it is showing that the Brake is 1.0 when using “S” and 0.5 but when using “Down” key. That means, the brake force is applied 50% of the force when using “Down” key.
You can select different CarSim settings in the Details tab as follows (Figure 20).
The Solver Config File is where you can enter the name of CarSim *.sim (Simfile). To use the example models packaged with the plugin, you can simply enter carsim_all.par or trucksim_all.par depending on which product you’re using. If you’d like to inspect these files, they are in your plugin installation location from the Unreal Marketplace. The default location would be Engine\Plugins\Marketplace\CarSim\ThirdParty\VehicleSim inside of your engine installation, e.g. c:\Program Files\Epic Games\UE_4.24.
Instead of the road in the Unreal scene, you can use the CarSim Road. To do so, select Use Carsim Road . If this box is checked, the CarSim solver uses the road defined in CarSim. If this box is not checked, the solver will query the Unreal terrain below the vehicle tires. If Use VehicleSim start position is checked, the vehicle will be positioned based on the parameters in the Parsfile.
Figure 19. Unreal Engine Input Settings.

18 / 25
Figure 20. CarSim Component settings.
For the driver control, Use VehicleSim Driver box can be checked/unchecked. If the box is checked, CarSim driver model is used and the control is ignored. If unchecked, the vehicle inputs will be passed to the solver but the CarSim driver model will be suppressed. Note that it is important to match the CarSim coordinates and the UE4 coordinates when use CarSim driver model in UE4. For example, if your vehicle’s starting position is at (500, 500, 0) in UE4 but the CarSim starts at (0, 0, 0), you are not able to observe a desired maneuver.
If you’d like to keep a vehicle in your scene but not have it activated you can select Disable VehicleSim vehicle . This will prevent the vehicle from doing a license check and loading when the simulation begins. This can be useful for having many vehicles in your scene that you can activate as needed. The example scene will check this flag during Begin Play in the blueprints and hide the vehicle from the scene if it is disabled.
If Use VehicleSim driver is unchecked, Max Hand Wheel Angle Degrees, Max Throttle, and either Max Brake Pedal Force Newtons (for datasets using pedal force) or Max MC Pressure (MPa) (for datasets using Master Cylinder pressure) can be adjusted.
Changing the Coefficient of Road Friction If you are not using CarSim Road ( in Figure 20), and if you want to change the road friction coefficient, you can do so inside Unreal Editor.
To change the road friction for the Example_UE4_Project.uprogject, in Content Browser, go to Content > Environment > Materials folder (Figure 21).
5
6
7
1
2
3
4
5
6
7

19 / 25
Figure 21. Access to the Materials from Content Browser.
In the right bottom corner of the Content Browser tab, click View Options, check Column for the View Type, and sort with Type so it is easy to find Physical Materials (Figure 22).
In this example, the gray part of the road uses Road PhysMat physical material. Click road_PhysMat. When the window opens, the Friction entry is found under Physical Material (Figure 23). Change this value to experiment.
The white part of the road uses Concrete_PhysMat material. If necessary, change this friction coefficient as well.
Figure 22. Select Column for the View Options.

20 / 25
Figure 23. Changing the friction coefficient.
Using TruckSim in the plugin TruckSim solvers can also be used with the plugin. The setup and configuration are the same as outlined above for CarSim, although the blueprints are different to accommodate trailer spawning and uses appropriate shapes for the default truck model. As with the car, you can customize these to your needs or create your own blueprints.
The example project is by default setup to run CarSim. The Disable VehicleSim vehicle checkbox (see Figure 15) is selected for the truck model, which will not allow the vehicle to initialize. The truck blueprint is configured to hide it from the scene when disabled.
If you want to use the truck you will need to turn off the Disable VehicleSim vehicle option and set the pawn to Auto Possess Player with your active player (Figure 24), usually Player 0. You may also want to disable and hide the car if you’re using the truck.
1

21 / 25
Figure 24. Setting the TruckSim pawn to be possessed by Player 0.
Removing the Trailer TruckSim includes an example titled {External Control of Runs} * Unreal Engine 4 Plug-in, Lead Vehicle. Using this example and by following previous sections, it is easy to run TruckSim inside Unreal Engine environment. To remove the trailer, go to this example and:
1. click UE4 Default blue link under Math Model: S_S + S and go inside “Vehicle: Loaded Combination; UE4 Default” dataset. Uncheck Trailer (Figure 25).
1

22 / 25
Figure 25. Uncheck Trailer Option in TruckSim.
2. Hit the Home button to go back to Run Control screen. Verify that it is updated to Math Model: S_S.
3. Hit the Generate Files for this Run button to create a new simfile.
4. Make sure Use VehicleSim start position and Use VehicleSim driver are enabled inside of the CarSimMovement component of the truck pawn in the Unreal Engine scene. This dataset is meant to be controlled by the internal driver model.
Now, while the truck is running, there is no trailer attached. This is because the trailer shape is included in the project and it is added and removed dynamically inside VehicleSim Dynamic plugin.
Path Utility The Example Project includes Path Utility blueprint. Using this utility, the coordinates of the path can be easily obtained from Unreal Engine and imported to CarSim. To use this utility, follow the steps below:
1. In Content Browser, go to Content/VS_Core and find PathUtility (Figure 27). Grab this PathUtility icon and drag it to the ViewPort. Use a mouse and move it to the location of the desired path starting point.

23 / 25
Figure 26. PathUtility in Content Browser.
2. Once PathUtility is added in ViewPort, it can be found in World Outliner (Figure 27).
Figure 27. PathUtility in World outliner.

24 / 25
Figure 28. Setting Spline Points.
3. Select PathUtility in World Outliner and select PathUtility (self) in Details (Figure 28). To add points, scroll down and go to Default and click Add Spline Point . Each time a spline point is added, move the point to the desired location by using a mouse. Make sure z-height of the path is above ground. A point can be deleted by clicking and highlighting the point and press the delete button. Add the desired numbers of points for the path in Points Along Path . The default is set to 100.
4. To write x, y, z coordinates of the path, set the name of a csv file in Path File , and press the Print Path Spline to File button.
5. Open the csv file. Copy and paste the x, y, z coordinates of the path into CarSim (Figure 29).

25 / 25
Figure 29. Copy X, Y, Z Coordinates of the Path to CarSim.
6. After entering the new path in VehicleSim, generate a new simfile.sim and use this simfile as solver config file. Make sure Use VehicleSim start position and Use VehicleSim driver are selected.
Note that the users do not need to worry about the z-height of the path as long as Use VehicleSim road is unchecked. When this option is unchecked, the solver will query the Unreal Engine terrain below the tires.
IMPORTANT The z-height of the path does not have to be accurate if Use VehicleSim road option is unchecked. However, when defining a path (in Step 3 above), make sure that z-height is above ground. Otherwise, the solver cannot find the terrain information under the tires.