vendor master data usingdirect input method
TRANSCRIPT

Uploading Vendor Master data using Direct Input Method By Kameswara Rao G, IBM India
Go to transaction LSMW.
Click on “Create Entry”.
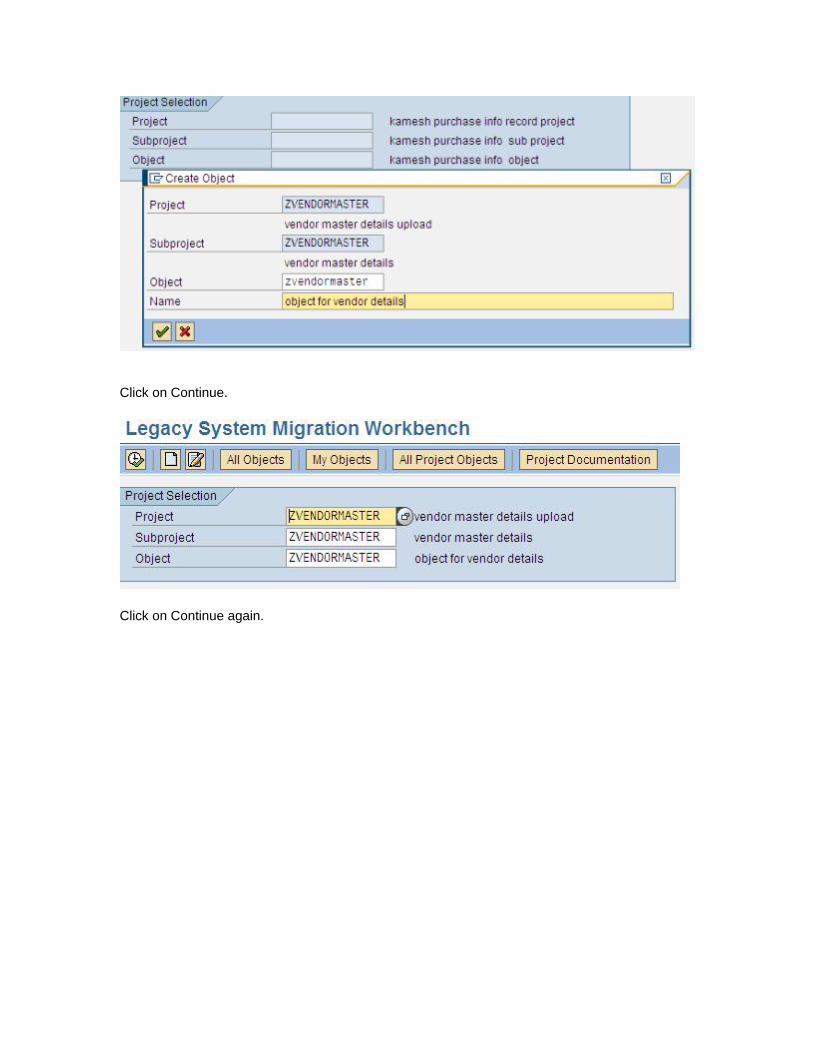
Create Project:
Click on “Continue”.
Create ‘Subproject’:

Click on “Continue” and create Object.
Click on Continue.
Click on Continue again.

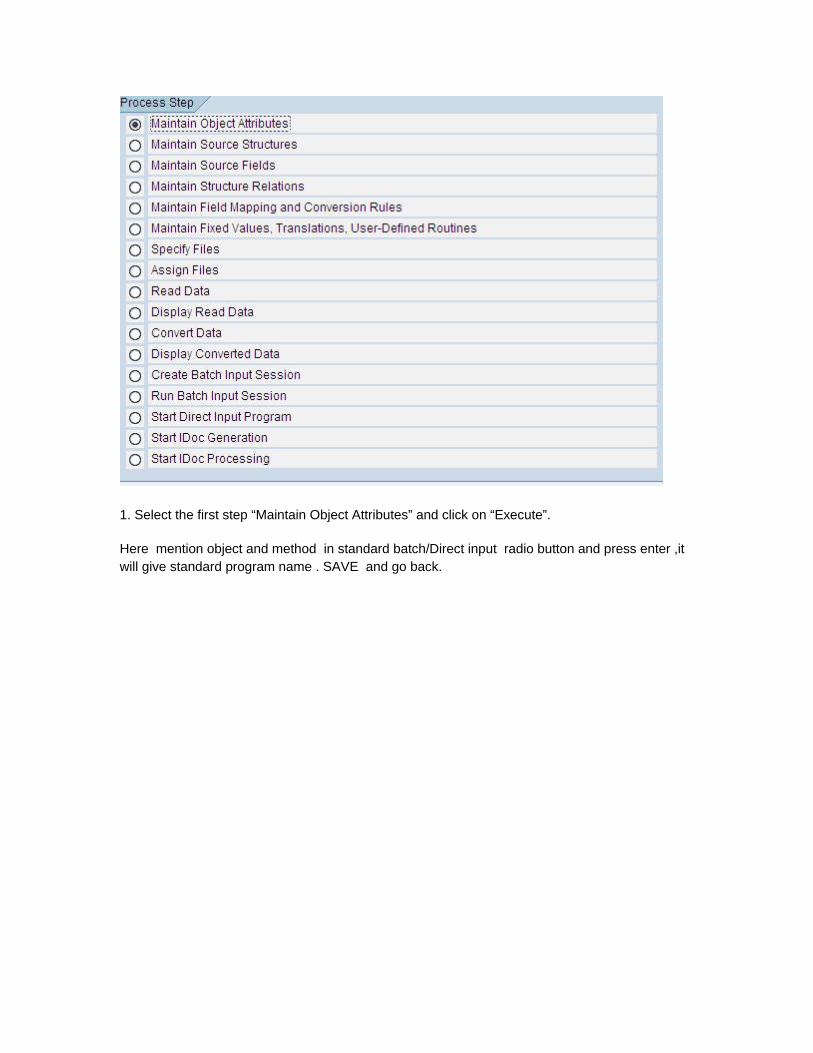
1. Select the first step “Maintain Object Attributes” and click on “Execute”.
Here mention object and method in standard batch/Direct input radio button and press enter ,it will give standard program name . SAVE and go back.

Save and go back .
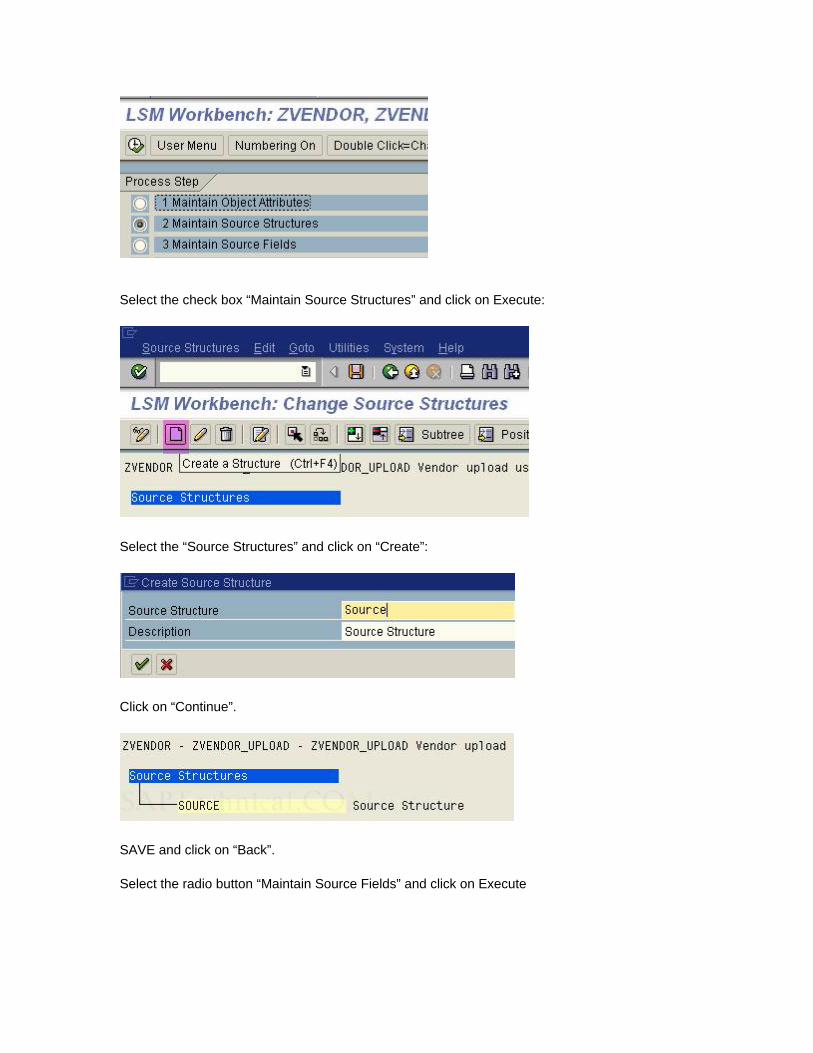
2. Select the step “Maintain Source Structures ” and click on “Execute”.
Save and Go back.

Uploading Vendor Master data using Direct Input Method By Kameswara Rao G, IBM India
Go to transaction LSMW.
Click on “Create Entry”.
Create Project:
Click on “Continue”.
Create ‘Subproject’:

Click on “Continue” and create Object.
Click on Continue.
Click on Continue again.

1. Select the first step “Maintain Object Attributes” and click on “Execute”.
Here mention object and method in standard batch/Direct input radio button and press enter ,it will give standard program name . SAVE and go back.

Save and go back .
2. Select the step “Maintain Source Structures ” and click on “Execute”.
Save and Go back. Uploading Vendor Master data using Direct Input Method

By Kameswara Rao G, IBM India
Go to transaction LSMW.
Click on “Create Entry”.
Create Project:
Click on “Continue”.
Create ‘Subproject’:
Click on “Continue” and create Object.
Click on Continue.
Click on Continue again.
1. Select the first step “Maintain Object Attributes” and click on “Execute”.
Here mention object and method in standard batch/Direct input radio button and press enter ,it will give standard program name . SAVE and go back.

Save and go back .
2. Select the step “Maintain Source Structures ” and click on “Execute”.
Save and Go back.
3. Select “Maintain Source Fields” and Execute

Place cursor on structure name and click on
Here mention the what ever fields we require and flat file should be in the same structure .
Save and come back.
Save and come back.
4 . Select “Maintain Structure Relations” and Execute :
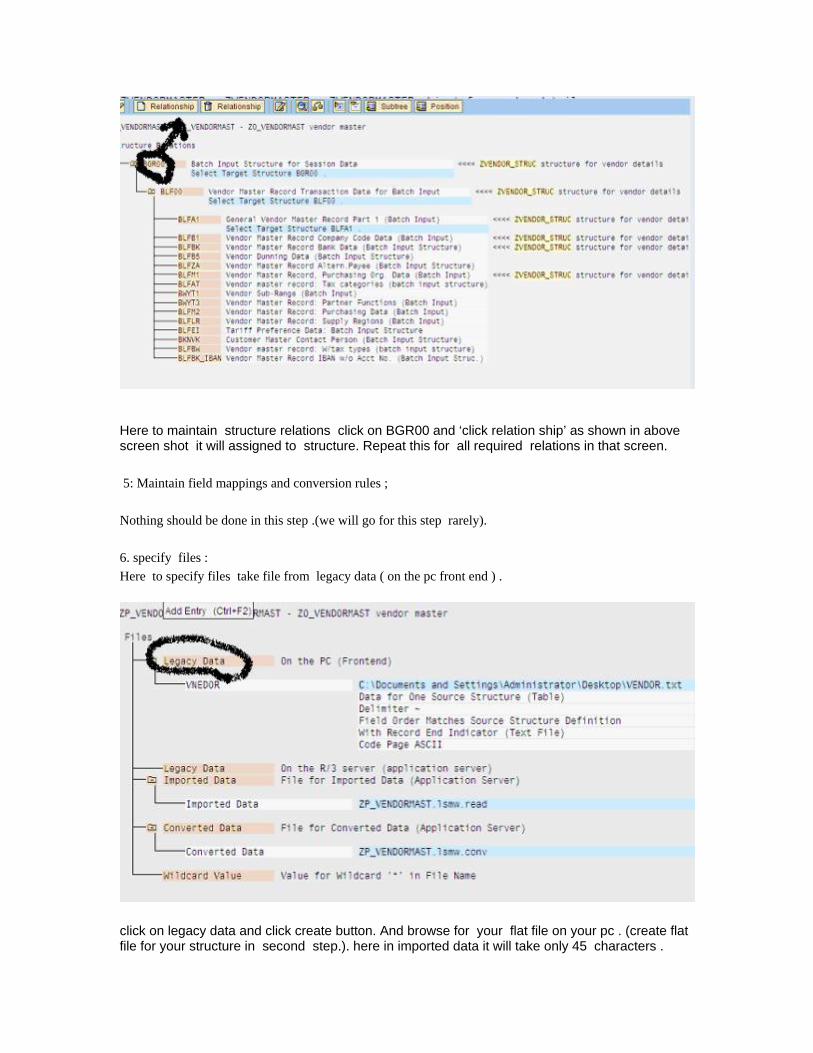
Here to maintain structure relations click on BGR00 and ‘click relation ship’ as shown in above screen shot it will assigned to structure. Repeat this for all required relations in that screen.
5: Maintain field mappings and conversion rules ; Nothing should be done in this step .(we will go for this step rarely). 6. specify files : Here to specify files take file from legacy data ( on the pc front end ) .
click on legacy data and click create button. And browse for your flat file on your pc . (create flat file for your structure in second step.). here in imported data it will take only 45 characters .

7 : Assign Files
To assign files click cursor on structure and click assignment .it will assign to file .
8: Read Data
9: Display read data
10: Convert Data

11. Display converted data.
12. create the batch input session to create session. 13. Run the batch input session to create session.
Uploading Vendor Master data using Recording Method By Tejaswini
This tutorials details about uploading vendor master data using recording method.
Go to transaction LSMW.

Click on “Create Entry”.
Create Project:
Click on “Continue”.
Create ‘Subproject’:
Click on “Continue” and create Object.

Click on Continue.
Click on Continue again.
Select the first step “Maintain Object Attributes” and click on “Execute”.

Select the check box “Batch input Recording” and click on :
Create a recording for the transaction XK01 with the required fields. In this example, only mandatory fields are used.
Save the recording.
<Once the recording is done, please remember to mention the field name for each field by double-clicking on it and removing the default value that appears in the recording (the default values shown are the values you entered during your recording). See the screenshot below>

Come back to the earlier screen and mention the name of the recording.
SAVE and click on “Back”.
Select the check box “Maintain Source Structures” and click on Execute:
Select the “Source Structures” and click on “Create”:
Click on “Continue”.
SAVE and click on “Back”.
Select the radio button “Maintain Source Fields” and click on Execute

Select the Source structure and click on “Create Field”
In our scenario for creating vendor master records, we would define only the mandatory fields.


Save and click on Back.
Select “Maintain Structure Relations” and click on “Execute”.
Save and go back to the previous screen.
Now click on Read data and select Execute button

Click on Execute
The file is successfully read.
To see the data that is read, use “Display read data” on the main screen.

Double-click on the record.

Now come back to the main screen and select “Convert data”

To check, if the data has successfully converted from source structure to target structure, select “Display Converted data”

Double-click on the record.
Now create batch input session and the run the same.

Now run the session to upload the data.