· web viewthe fixture includes a pvc lamp stand to suspend a purchased fluorescent shop...
TRANSCRIPT

For Teachers Engineering Design in Oregon Science Classrooms Page 1 of 7
Light Fixture Construction Instructions for Biofuel from Algae
INTRODUCTION These instructions are for an inexpensive light fixture (Figure 1 on page 2) for growing
algae where you don’t have a well-lit window or greenhouse available. The fixture includes a PVC lamp stand to suspend a purchased fluorescent shop light. Assembly is quick, but allow two days’ drying time after using the PVC cement.
Instructions for two versions of the fixture are given:
Threaded fittings : lamp stand comes apart for storage or transport. If you are planning on creating kits for several high schools at a central location, consider that by using the threaded fittings you can more easily leave the final assembly to teachers in their classrooms. You can complete gluing of the unthreaded slip fittings described in step 1 below in the central location, let the PVC cement dry for a couple days, box up the kits, distribute them to the schools, and provide instructions for assembling the threaded pieces and hanging the shop light to the teachers who will receive these kits.
Low-cost : all joins are cemented; once assembled this stand is not intended to come apart. You can save money by leaving out the threaded fitting and using only cemented joints. This may be a good alternative if you have room to store the assembled fixtures and don’t need to transport them or box them up when they are not being used in a classroom.
Safety Note: The steps involving PVC cement should be done outdoors or in a very well vented indoor area. Wear gloves. Once the cemented joints have dried the rest of the assembly can be completed in a classroom or other indoor area. This means you should begin the assembly steps at least two days in advance of using the light fixtures in a classroom.

For Teachers Engineering Design in Oregon Science Classrooms Page 2 of 7
MATERIALS
Details are given below, with a summary here.
1 10’ PVC tubing, ¾ inch 1 small can of PVC Cement 2 U-bolts 2 large paper clips or small S-hooks, to attach shop light chain to U-bolts 1 48” shop lamp that takes T12 fluorescent tubes 2 48” T12 fluorescent tubes ¾” inch (nominal) PVC fittings as follows
Threaded fittings lamp stand Low-cost lamp stand
4 caps, unthreaded 2 Tees, threaded in the middle only 2 elbows, unthreaded 5 male threaded adapters 3 female threaded adapters
4 caps, unthreaded 2 Tees with 3 unthreaded joints 2 elbows, unthreaded
Teflon plumbers tape (Threaded fittings lamp stand only)
Figure 1—Low-cost version of the lamp stand with the shop light installed:
PVC Tubing. Tubing can be Schedule 40 for maximum strength but less expensive and lighter PVC 1120 tubing will work as well. Buy one 10-foot length of ¾ inch tubing for each lamp to be constructed and cut it as noted. Some

For Teachers Engineering Design in Oregon Science Classrooms Page 3 of 7
stores will cut purchased PVC tubing for you; if not, PVC can be cut with a hack saw so you may need to purchase one.
Threaded fittings lamp stand: cut PVC as follows: 4 each at 7 inches – to be used as feet of the light fixture 2 each at 22 inches – to be used as uprights 2 each at 20 inches – to be used as cross pieces 2 each at 3 inches – to attach threaded fittings to elbows at the top of uprights
Low cost lamp stand: cut PVC as follows: 4 each at 6 1/2 inches – to be used as feet of the light fixture 2 each at 22 inches – to be used as uprights 1 each at 490 inches – to be used as a cross piece
PVC Fittings. For each light fixture, buy the following ¾ inch (nominal) PVC fittings.Note: The threaded ends of PVC fittings are referred to as MHT. The unthreaded ends are referred to as slip. The slip ends are glued to the next piece. The threaded ends are rotated into the next piece after Teflon tape has been applied to the male threads.
For the Threaded-fittings lamp stand, you need these ¾ inch (nominal) PVC fittings: 4 caps, unthreaded, to be cemented at the ends of the 7-inch feet. 2 Tees, threaded in the middle but not at the ends, to be used to make pairs of feet 2 elbows, unthreaded, to be used as the top of the uprights 5 male threaded adapters
o 2 to be used at the bottom of the 22 inch upright tubes to thread into tees that for the pairs of feeto 2 to go at one end of the 2 cross pieceso 1 to go on the 3-inch horizontal tube that is glued to one of the elbows at the top of one of the
uprights 3 female threaded adapters
o 2 to go at one end of the 2 cross pieceo 1 to go on the 3-inch horizontal tube that is glued to one of the elbows at the top of the other
upright
For the Low-cost lamp stand, you need these ¾ inch (nominal) PVC fittings: 4 caps, unthreaded, to be cemented at the ends of the 6 ½ -inch feet 2 Tees with 3 unthread slip joints 2 elbows, unthreaded, to be used as the top of the uprights
Additional Materials: Description and use
PVC cement. Buy the smallest can available unless you plan to build more than one light fixture. Buy the least expensive cement available as the joints don’t need to hold water pressure. PVC primer is not required for the same reason.Safety Note: Wear gloves and work outdoors or in a very well vented indoor area when using PVC cement. Allow about 48 hours for cemented joins to dry; the rest of the assembly can be completed in a classroom or other indoor area.
Threaded fittings lamp stand only: Teflon tape to wrap around the threads before assembling the threaded pieces. You can assemble the pieces without the tape but you may not be able to get them apart again! The product you’re looking for may be labeled as plumbing tape or PTFE tape. Buy the smallest size unless

For Teachers Engineering Design in Oregon Science Classrooms Page 4 of 7
you’re planning on assembling a large number of fixtures. For instance, ½ inch by 260 inches for about $1.00.
2 U-bolts per fixture to be used to hang the shop light from the PVC structure. U-bolts described as for ¾ inch pipe are a good match. The actual dimensions of the U-bolt should be larger than ¾ inch because ¾ describes the inside dimension of the pipe to be hung from them. The actual dimensions will be approximately 1/4 in. x 1-1/8 in. x 2-1/16 in. The item may be described as Crown Bolt, Coarse Zinc-Plated #308 U-Bolt.
Shop light that will hold two 48-inch T12 florescent bulbs for each light fixture. One inexpensive brand and model is “Lithonia Lighting 2-Light White T12 Fluorescent Shoplight.”
2 48-inch T12 bulbs. Buy the least expensive bulbs available as the exact color of white light produced will usually not have a significant impact on the growth rate of the algae. Cool white bulbs – 34 watt or 40 watt – work well. Be consistent in the color and wattage of the bulbs you buy for any one class so the students’ results will not vary based on the type of bulb unless you allow the students to choose the type and wattage of bulb. If your budget allows you to buy more expensive bulbs you might want to buy a few T12 plant-aquarium bulbs in case the students’ proposed designs call for them.

For Teachers Engineering Design in Oregon Science Classrooms Page 5 of 7
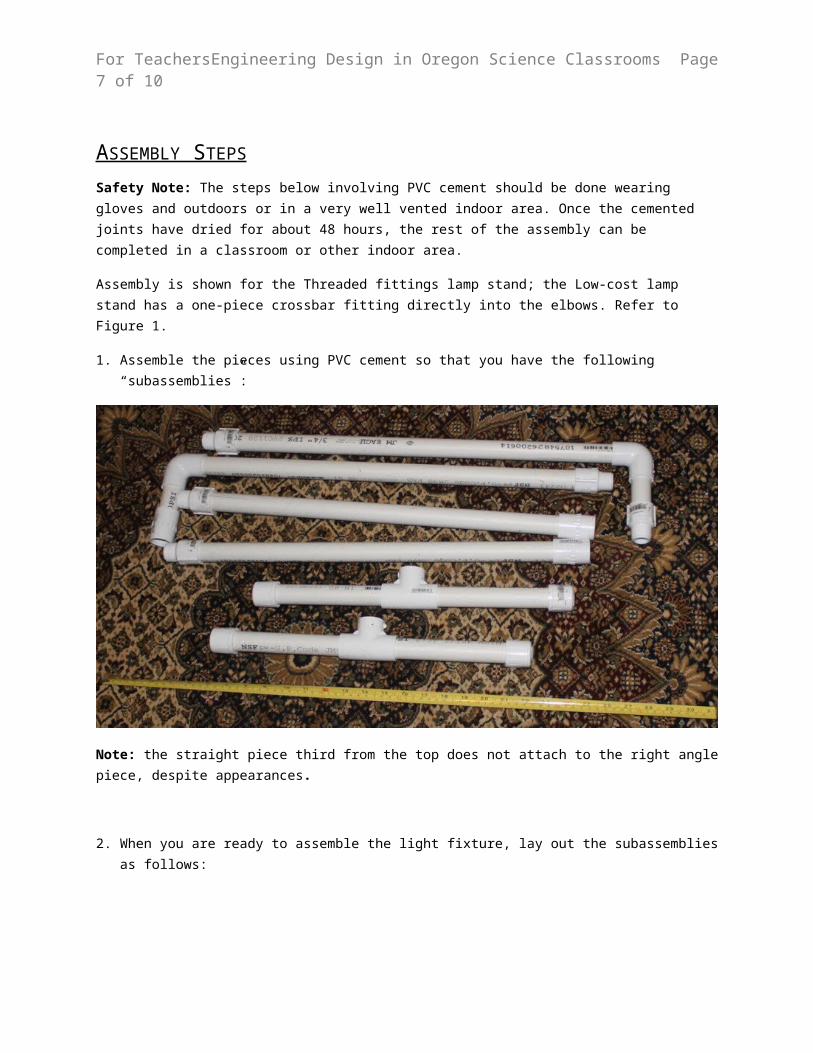
ASSEMBLY STEPS Safety Note: The steps below involving PVC cement should be done wearing gloves and outdoors or in a very well vented indoor area. Once the cemented joints have dried for about 48 hours, the rest of the assembly can be completed in a classroom or other indoor area.
Assembly is shown for the Threaded fittings lamp stand; the Low-cost lamp stand has a one-piece crossbar fitting directly into the elbows. Refer to Figure 1.
1. Assemble the pieces using PVC cement so that you have the following “subassemblies”:
Note: the straight piece third from the top does not attach to the right angle piece, despite appearances.
2. When you are ready to assemble the light fixture, lay out the subassemblies as follows:

For Teachers Engineering Design in Oregon Science Classrooms Page 6 of 7
3. Apply the plumbing tape to the threaded fittings as shown:
4. Then assemble the pieces as shown:
5. Next attach the U-Bolts in each corner as shown:
For Teachers Engineering Design in Oregon Science Classrooms Page 7 of 7
6. Then attach the shop light using a large paper clip or a purchased S hook:
7. Then insert the T12 bulbs into the shop light. Align the prongs of the bulb to the sockets at each end, slide the bulb in, and then twist the bulb to secure it.
Optional: To monitor ambient temperature, attach a thermometer to one upright using duct tape.