vintage bluetit & pansies instructions2 - insight into my ... · 3021 3051 3078 3371 3726 3746...
TRANSCRIPT

Vintage�Bluetit�&�Pansies
MINIATURE EMBROIDERYTrishBurr

�I jout!Gps!N jojbuvsf!Fncspjefsz
Miniature needle painting embroidery is the reproduction of a painting or illustration in minute form and
includes as much detail as a larger piece of artwork. It is no more difficult to execute than normal
needle painting but it is essential to work under a magnifying glass in order to see the stitches clearly.
Here are a few hints when stitching in miniature:
1) Shorten your stitches slightly to about 0.5cm (0.196inches) - I have given you the exact lengths
of the stitches in the diagram (A1) below which is actual size. Some will be slightly longer.
2) To fit all the colours into a shape work more than one shade across each row, i.e. horizontally
as well as vertically and blend each colour in with the next. Diagram (B2)
3) Because we are using less shades you need to blend each shade in well with the next by
staggering the stitches in each row to avoid hard bands of colour. (Diagram C3)
4) When filling a very small shape with more than one shade - fill the shape completely with the first
shade (a) and go back and add in a few stitches on top of this (b) with the second shade. This avoids
banded rows in a small space. Diagram (D4)
A1 B2 C3 D4
(a) (b)
Hints�For�Miniature�Embroidery
Approx 25 shades of DMC stranded cotton shades are used in this design, each one carefully chosen to most closely represent the colour in the original picture. Anchor substitutes can be found online.
Use one strand throughout.
Preparation* Iron the fabrics to remove creases.
* Line up fabric and mount into the hoop ensuring it is drum tight.
* Separate one strand of thread and thread into the needle.
* Follow the step by step directions.
DMC Project Threads
DMC Project Threads
154
315
316
370
646
647
727
746
756
834
930
931
932
3012
3021
3051
3078
3371
3726
3746
3753
3756
3787
3802
3865
Thread�Diagram
Wing6479329319303021lines3021
Top Of Wing647932931930
Tail9319303021
All leaves + Sepals 30123051
Bud316315
Petal3865746647
Petal7463078834
Petal3802154
Petal31637263802
Petal31637263802
Petal7463078727 Petals
7463078727834
Petal7463078727834Centre316315154
Petal7463078727Centre932930154
Bud37463078
Claws 3787
Beak3756Outline3371
Breast8347273078834370
Eye3371Outline33713756Highlight647
Head9319323753
Cheek 37563865Neck6463021
Under wing64764637873021lines3021line under wing3371
Triangle centres30123051
3078Outline
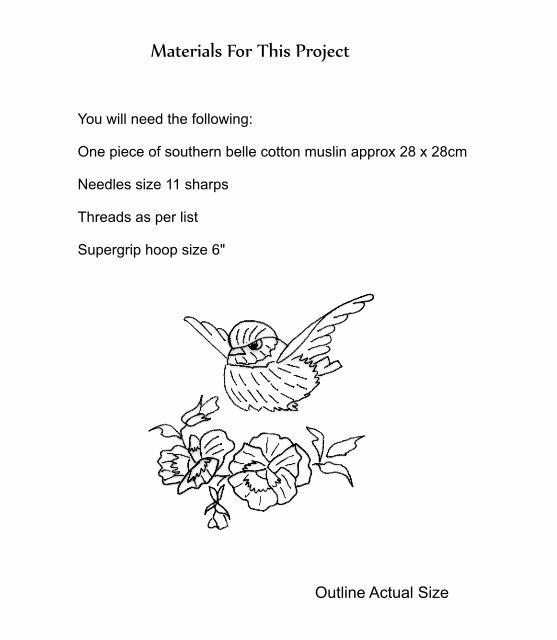
Outline Actual Size
Materials�For�This�Project
You will need the following:
One piece of southern belle cotton muslin approx 28 x 28cm
Needles size 11 sharps
Threads as per list
Supergrip hoop size 6"

Thread�Diagram
Wing6479329319303021lines3021
Top Of Wing647932931930
Tail9319303021
All leaves + Sepals 30123051
Bud316315
Petal3865746647
Petal7463078834
Petal3802154
Petal31637263802
Petal31637263802
Petal7463078727 Petals
7463078727834
Petal7463078727834Centre316315154
Petal7463078727Centre932930154
Bud37463078
Claws 3787
Beak3756Outline3371
Breast8347273078834370
Eye3371Outline33713756Highlight647
Head9319323753
Cheek 37563865Neck6463021
Under wing64764637873021lines3021line under wing3371
Triangle centres30123051
3078Outline
Outline Actual Size
Materials�For�This�Project
You will need the following:
One piece of southern belle cotton muslin approx 28 x 28cm
Needles size 11 sharps
Threads as per list
Supergrip hoop size 6"

Directions
Start with the back wing left. Fill with long & short stitch from the tip
down towards the body. When all the stitching is complete go
back and add straight lines at the tips as shown.
Directions
Fill the right wing next. Start with the underneath of the wing and
fill with long & short stitch from the outside edge in towards the
body in line with the direction lines. Add lines along the feathers
as shown. Next fill the top of the wing with long & short stitch from
the tip down towards the base. When all the stitching is complete go
back and add a line under the wing tip.
1 2
Wing6579329319303021lines3021
Top Of Wing647932931930
Under wing64764637873021lines3021line under wing3371
Wings Wings

Directions
Start with the back wing left. Fill with long & short stitch from the tip
down towards the body. When all the stitching is complete go
back and add straight lines at the tips as shown.
Directions
Fill the right wing next. Start with the underneath of the wing and
fill with long & short stitch from the outside edge in towards the
body in line with the direction lines. Add lines along the feathers
as shown. Next fill the top of the wing with long & short stitch from
the tip down towards the base. When all the stitching is complete go
back and add a line under the wing tip.
1 2
Wing6579329319303021lines3021
Top Of Wing647932931930
Under wing64764637873021lines3021line under wing3371
Wings Wings

3 4
Directions
Outline the eye and beak with split stitch. Fill the pupil with satin
stitch in 3371. Add a few straight stitches in 3756 around this. Add
a highlight on top of the pupil (one tiny stitch) in 647. Fill the beak
with satin stitch in 3756. Fill the neck in long & short stitches from
the outside in towards the cheek in 646 & 3021. Continue up into
the cheek in 3756 & 3865.
Directions
Fill the head with long & short stitch from the outside edge in towards the beak
and eye.
Fill the tail with long & short stitch from the outside in towards the breast.Beak3756Outline3371
Eye3371Outline33713756Highlight647
Head9319323753
Cheek 37563865
Neck6463021
Tail9319303021
Eye,�Beak,�Cheek�&�Neck Head

5 6
Directions
Fill the breast with long & short stitch from
the chest down towards the claws.
Make two small bullion knots next to each
other for the claws.
Breast 834 727 3078 834 370
Claws 3787
Breast Pansies
All leaves + Sepals 30123051
Bud316315
Petal3865746647
Petal7463078834
Petal3802154
Petal31637263802
Petal31637263802
Petal7463078727 Petals
7463078727834
Petal7463078727834Centre316315154
Petal7463078727Centre932930154
Use the thread diagram below for placement of colours.

7 8Pansy�One Pansy�Two
Directions
Outline each petal/bud with split stitch in
one strand of thread before filling. Fill each
petal/bud with long & short stitch from the
outer edge in towards the centre. When all
stitching is complete add the centre shades on
top. Fill the small triangle centre in satin stitch.
Use the enlarged photos for placement of colours.

Leaves
Outline leaves with split stitch. Fill the leaves with long & short stitch in 3012 and 3051.
1 2
Completion
If necessary wash your work in tepid water using a mild soap powder. Rinse
thoroughly in cold water and wrap in a fluffy towel to remove excess moisture. Place face
down on a fluffy towel and iron on back of work till 95% dry. Leave to dry.
Stitch�Glossary
French Knots
Bullion Knots
Turkish stitch
Long & Short Stitch
Securing stitch
(to start & end off)
Split stitch
Satin stitch
Completion9